

Page 1
Start Here
Commencez ici
Comience aquí
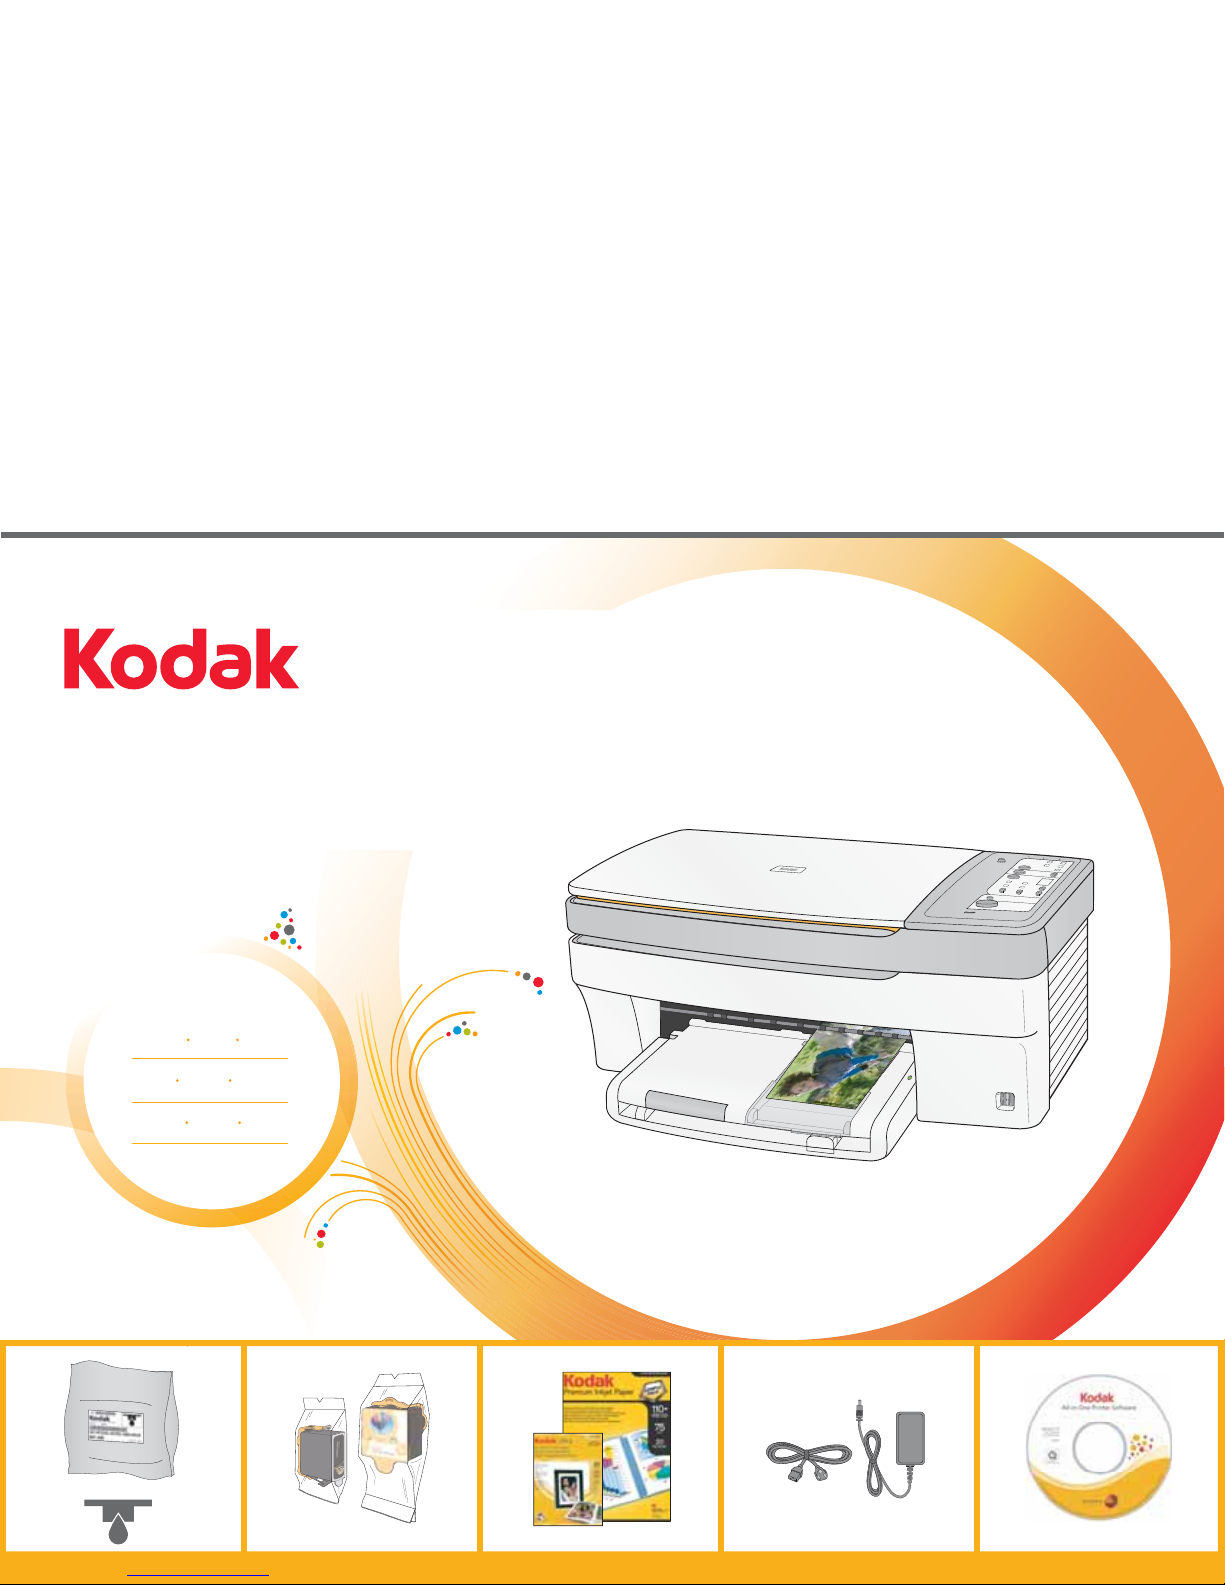
EasyShare 5100
All-in-One Printer
Imprimante tout-en-un
Impresora todo en uno AiO
Print Copy Scan
Impression Copie Numérisation
Imprime Copia Escanea
Photo
Cop
y
Scan
Start
E
a
s
y
S
h
a
r
e
5
1
0
0
A
ll
in
O
n
e
P
r
in
t
e
r
Page 2
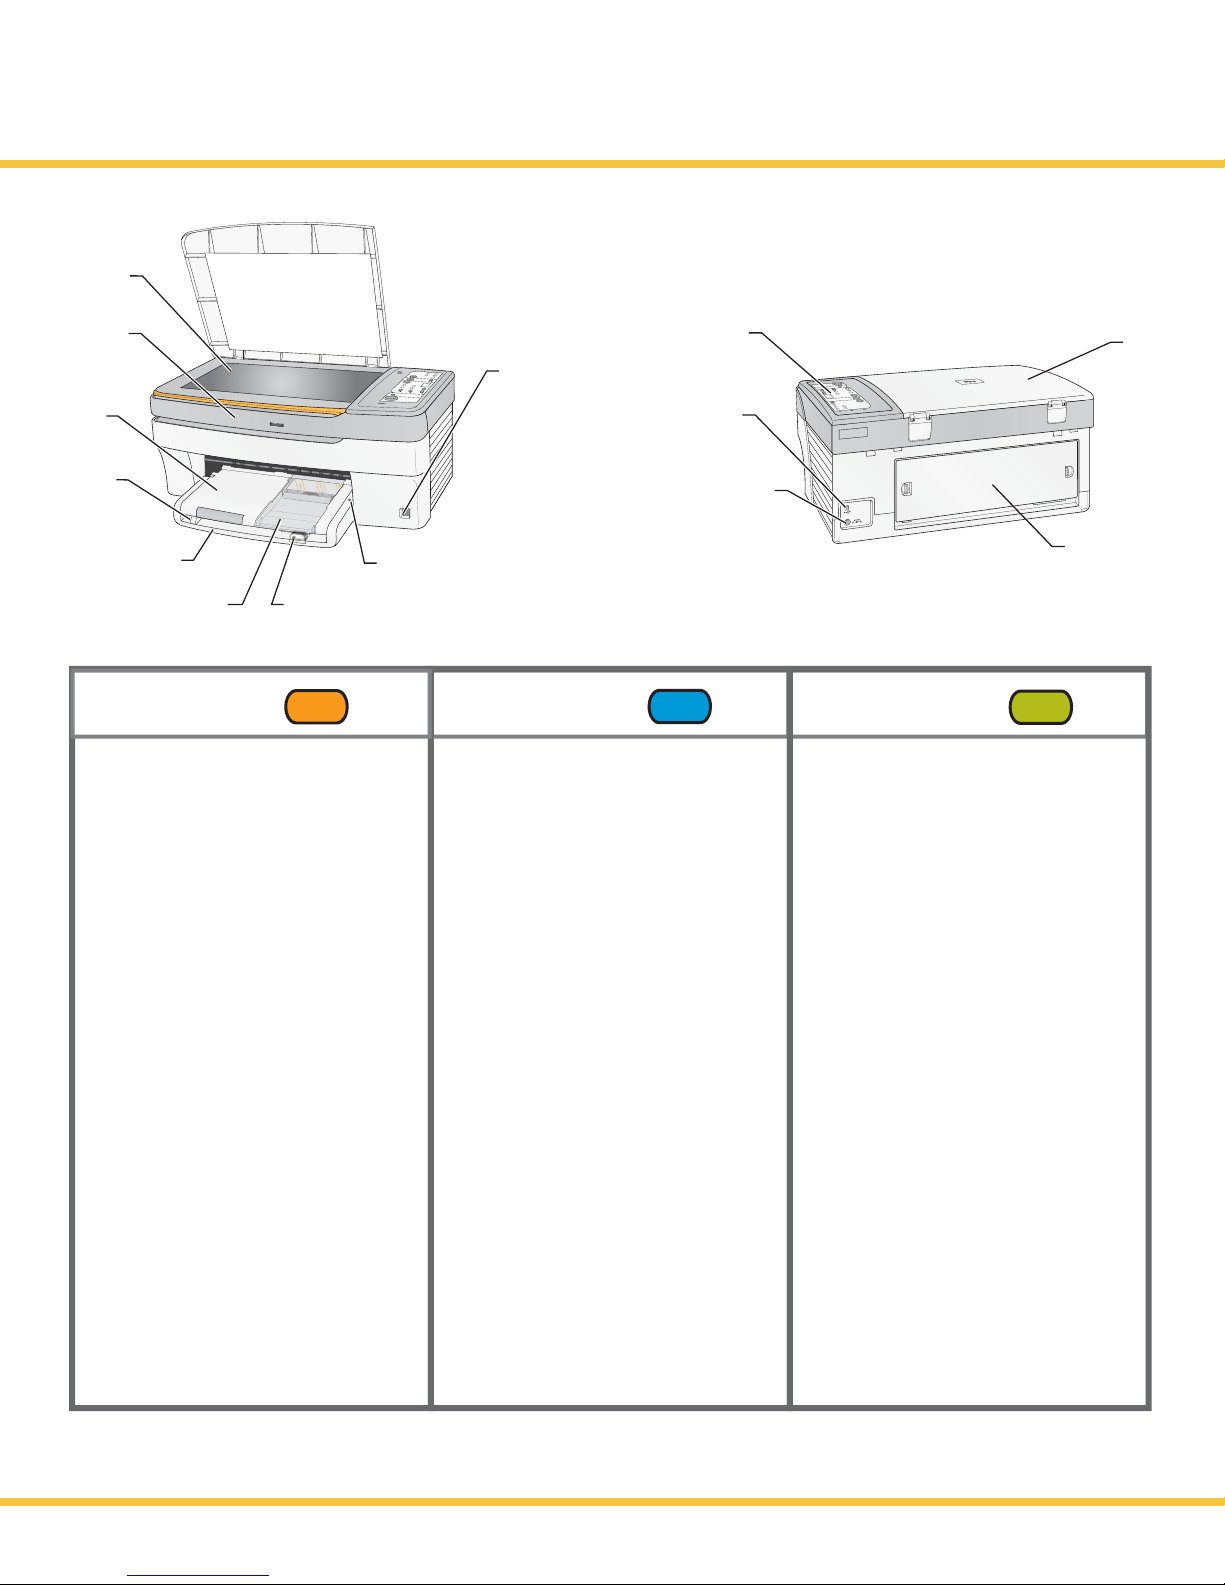
Identify Main Components
Identification des principaux composants
Componentes principales
1.
2.
3.
Kodak
4.
5.
6.
ENGLISH
1. Scanner glass
2. Printer access door
3. Output tray
4. Paper-width guide
5. Main tray
6. Photo tray
7. Paper-length guide
8. Photo tray light
9. USB drive/PictBridge port
7.
EN
P
h
o
t
o
C
o
p
y
S
c
a
n
S
ta
r
t
E
a
s
y
S
h
a
r
e
5
1
0
0
A
ll-
i
n
O
n
e
P
r
i
n
t
e
r
9.
8.
FRENCH SPANISH
1. Vitre du numériseur
2. Porte d'accès de l'imprimante
3. Plateau de sortie
4. Guide de largeur du papier
5. Plateau principal
6. Plateau à papier photo
7. Guide de longueur du papier
8. Voyant de plateau à papier photo
9. Port USB/PictBridge
FR
12.
13.
5
1
0
0
a
l
l
i
n
o
n
e
p
r
in
t
e
r
K
o
d
a
k
E
a
s
y
S
h
a
r
e
Start
Can
cel
C
o
py
Scan
Ph
o
to
Bla
ck
In
k
C
h
e
c
k
C
o
l
or
In
k
C
h
e
c
P
k
ap
e
r
C
he
ck
14.
ES
1. Vidrio del escáner
2. Cubierta de la impresora
3. Bandeja de salida
4. Guía de ancho del papel
5. Bandeja principal
6. Bandeja para fotografías
7. Guía de longitud del papel
8. Luz de bandeja para fotografías
9. Puerto para unidad USB/PictBridge
16.
15.
12. Control panel
13. USB port
14. Power connector
15. Rear access door
16. Scanner lid
12. Panneau de commande
13. Port USB
14. Connecteur d'alimentation
15. Porte d'accès arrière
16. Couvercle du numériseur
www.kodak.com/go/support
12. Panel del control
13. Puerto USB
14. Conector de alimentación
15. Tapa posterior
16. Cubierta del escáner
Page 3
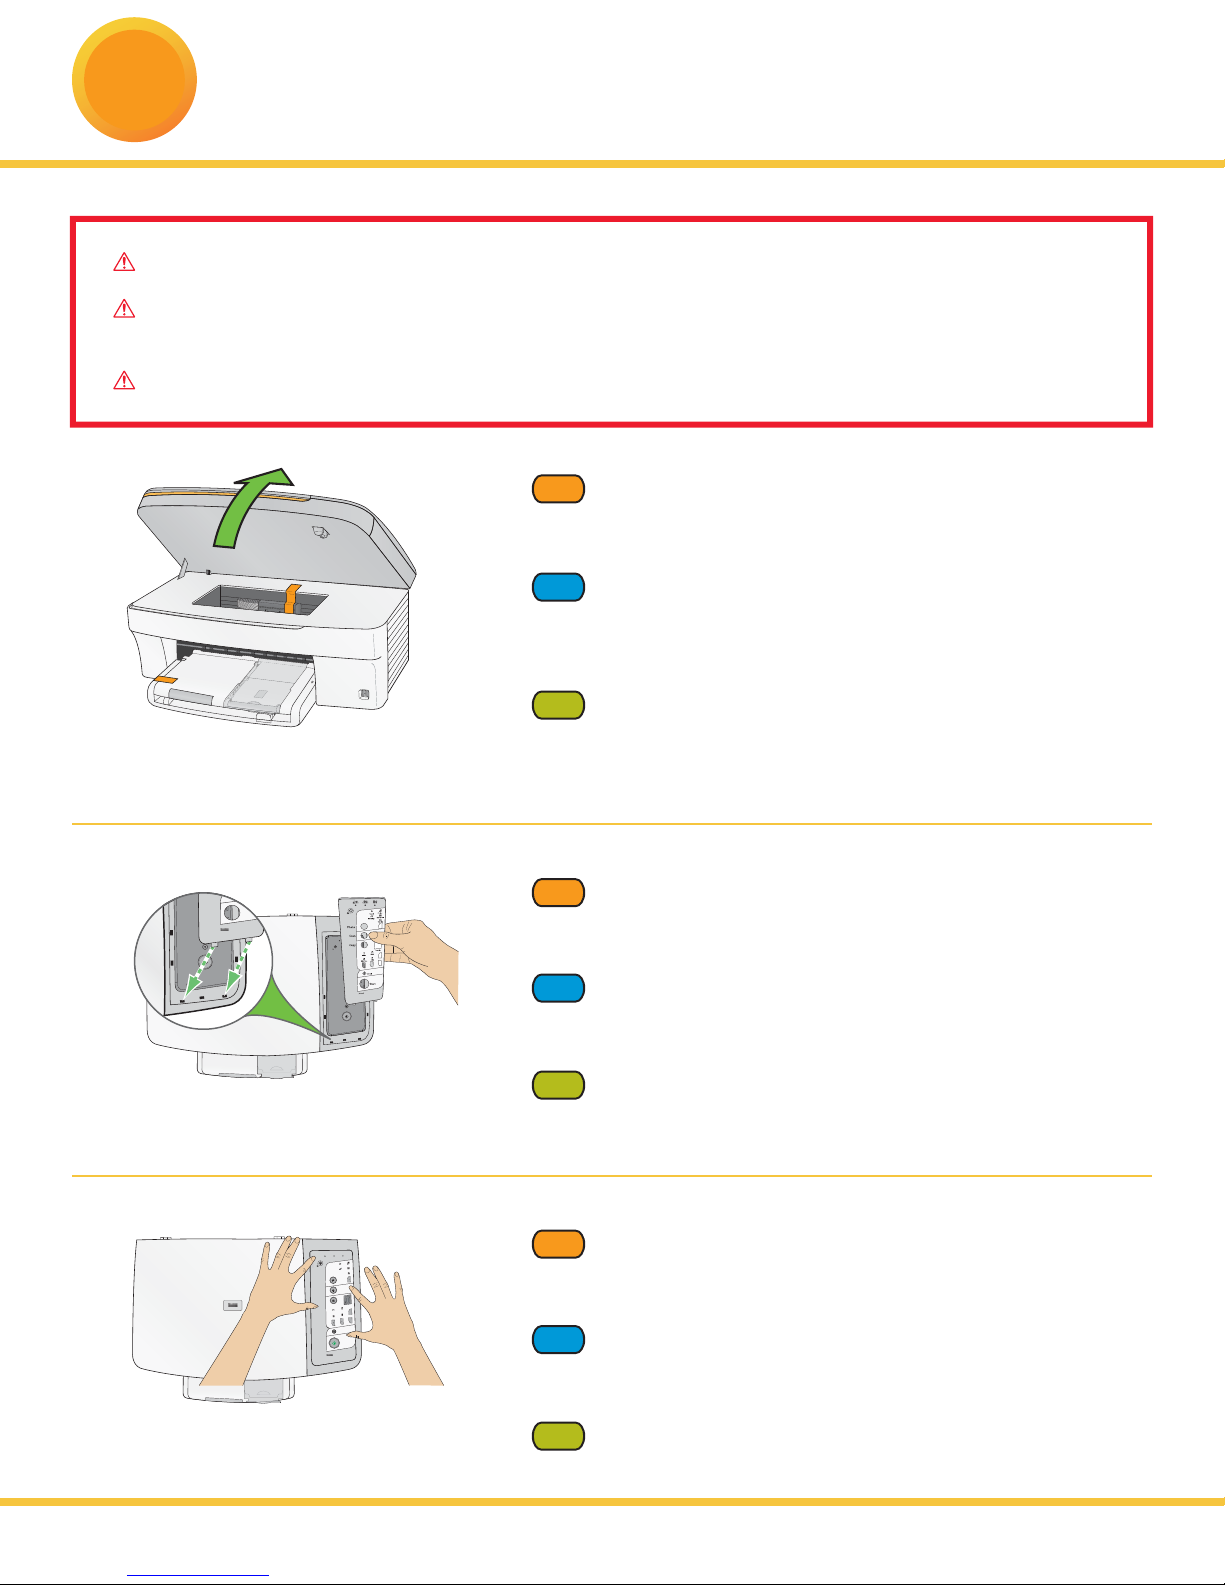
Unpack Printer and Install Control Panel
1
Déballage de l'imprimante et Installation du panneau de command
Desempaque la impresora y Instale el panel de control
IMPORTANT: Do not connect the USB cable to the printer until instructed during software installation.
IMPORTANT:
au cours de l'installation du logiciel.
IMPORTANT: no conecte el cable USB a la impresora hasta que así se le indique durante la instalación del software.
ne branchez pas le câble USB dans l'imprimante avant que cela ne vous soit indiqué
a) See box flaps for unpacking instructions.
EN
Remove all orange shipping tape from the printer.
Consultez les directives de déballage sur les rabats de la boîte.
a)
FR
Retirez de l'imprimante tous les rubans orange utilisés pour
l' expédition.
All-in-One Printer
a) En las solapas de la caja se incluyen instrucciones para
ES
desempacar la unidad.
Retire todas las cintas de color naranja de la impresora.
b) If not preinstalled, insert the control panel overlay,
rt
Sta
+
EasyShare 5100
-
DPOF
+
5100
Share
Easy
er
EasyShare 5100
All-in-One Print
-
All-in-One Printer
EN
bottom end first.
b) Si elle n'est pas préinstallée, insérez la façade amovible du
FR
panneau de commande, en commençant par le bas.
b) De no venir instalado, coloque el overlay del panel de control,
ES
comenzando por la parte inferior.
c) Press down on all edges of the overlay until
k
c
e
h
C
k
c
e
h
C
k
c
e
h
C
r
e
p
a
P
k
n
I
r
o
l
o
C
k
n
I
k
c
a
l
B
DPOF
s
o
t
o
h
P
d
e
g
g
a
T
t
e
e
h
s
f
o
o
r
P
e
g
id
r
B
t
ic
P
r
e
f
s
an
r
T
to
Pho
Scan
y
Cop
y
t
i
t
n
a
u
Q
k
ac
l
B
%
0
0
1
+
r
o
l
o
C
e
g
a
P
o
t
t
i
F
-
cel
Can
rt
Sta
EasyShare 5100
All-in-One Printer
EN
it snaps into position.
FR
c) Appuyez sur chaque bord de la façade, jusqu'à ce qu elle
s'enclenche en position.
c) Presione sobre los bordes del overlay hasta que encaje.
ES
www.kodak.com/go/support
1
Page 4
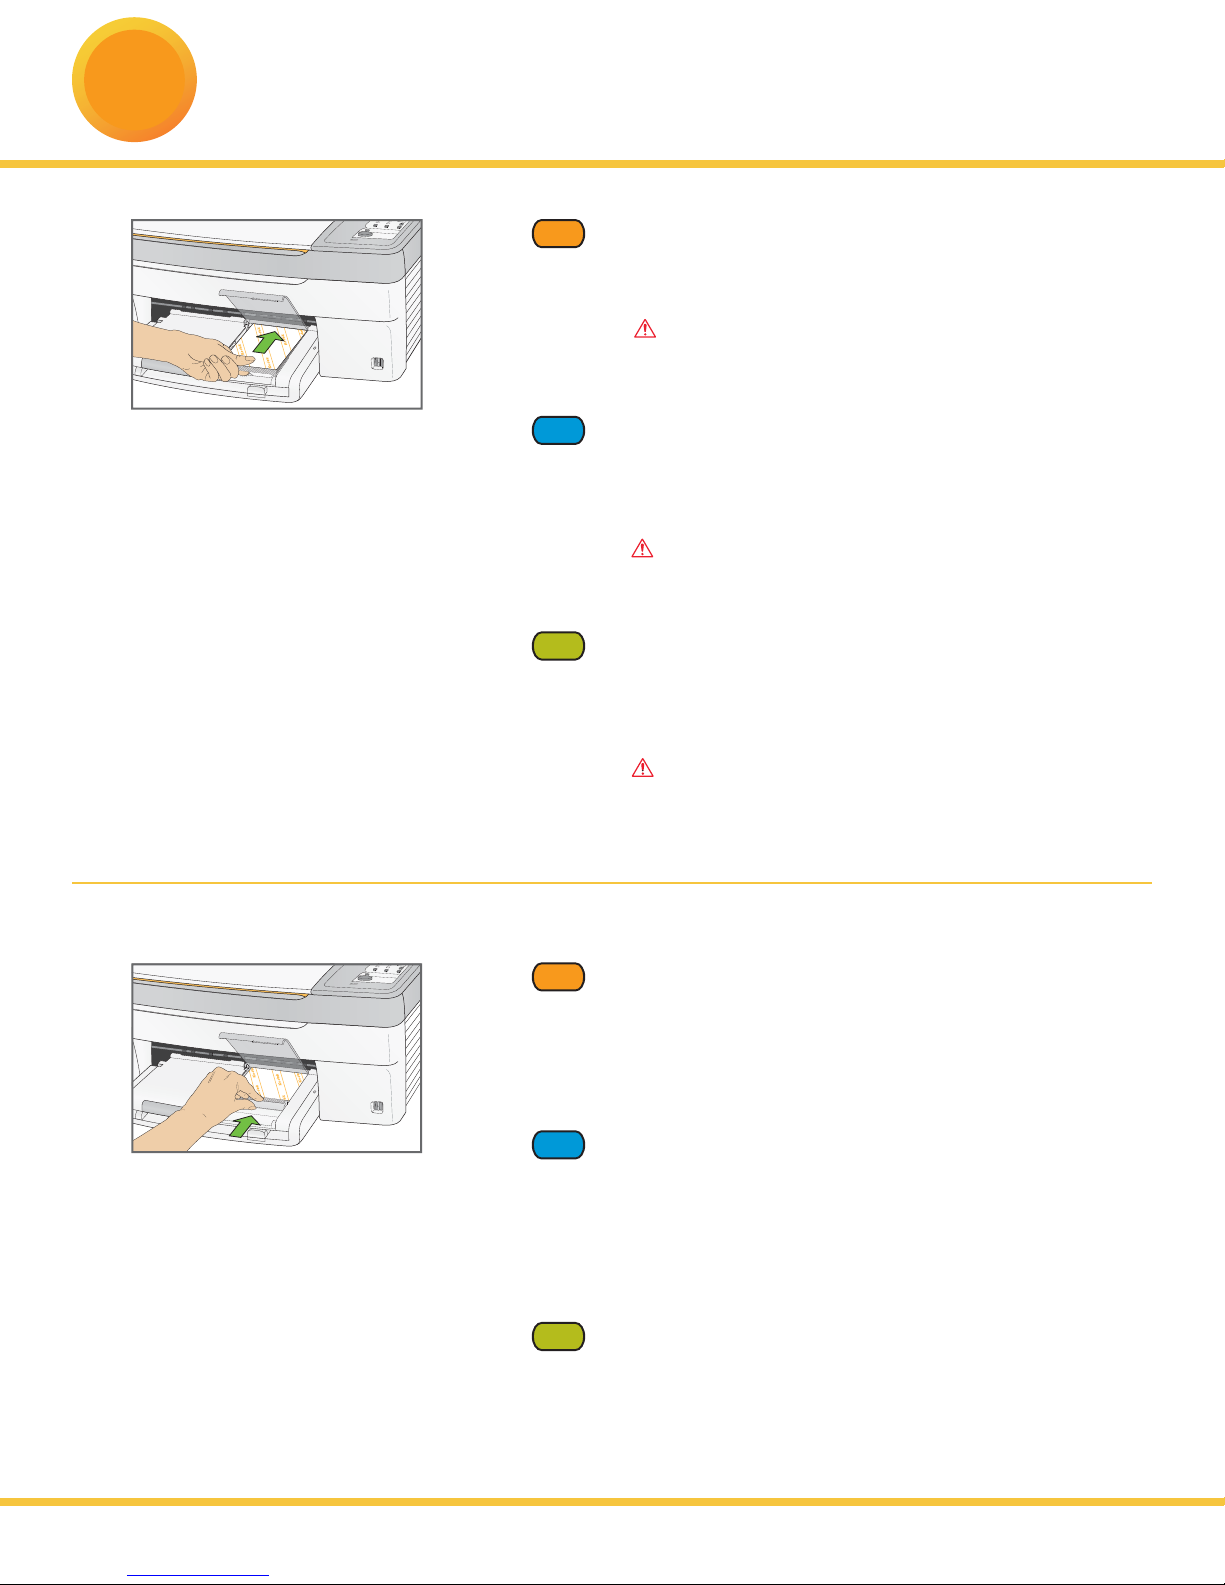
Load Paper
2
Chargez le papier
Cargue el papel
S
tart
Ea
syShar
e
51
00
A
ll-
in
-On
e P
rinter
a) Load photo paper into the photo tray.
EN
Lift the photo tray lid until it remains standing without support.
Insert the photo paper glossy side down.
IMPORTANT: Do not overload the photo tray.
Max 20 sheets.
a) Chargez le papier photo dans le plateau à papier photo.
FR
Soulevez complètement le couvercle du plateau à papier
photo jusqu'à ce qu'il reste en position.
Insérez le papier photo, côté brillant vers le bas
IMPORTANT: ne remplissez pas trop le plateau:
20feuilles maximum.
ES
a) Coloque papel fotográfico en la bandeja para fotografías.
Levante la tapa de la bandeja hasta que quede de pie sin
necesidad de apoyarla.
Coloque el papel con la cara brillante hacia abajo.
IMPORTANTE: no recargue la bandeja. Como máximo,
puede colocar 20 hojas.
S
ta
rt
E
a
s
y
S
ha
r
e
5
10
0
A
ll-
in
-O
n
e
P
rin
t
e
r
b) Push the photo tray in until it clicks into place.
EN
NOTE: You can only print to the photo tray when the photo
tray is pushed in.
Lower the photo tray lid.
b) Poussez le plateau jusqu'à ce qu'il s'enclenche en position.
FR
REMARQUE: vous ne pouvez imprimer à partir du plateau
à papier photo que lorsque le plateau est bien poussé et
enclenché en position.
Rabaissez le couvercle du plateau.
b) Empuje la bandeja hasta que calce.
ES
NOTA: sólo se puede usar la bandeja si está bien encajada.
Baje la tapa de la bandeja.
2
www.kodak.com/go/support
Page 5
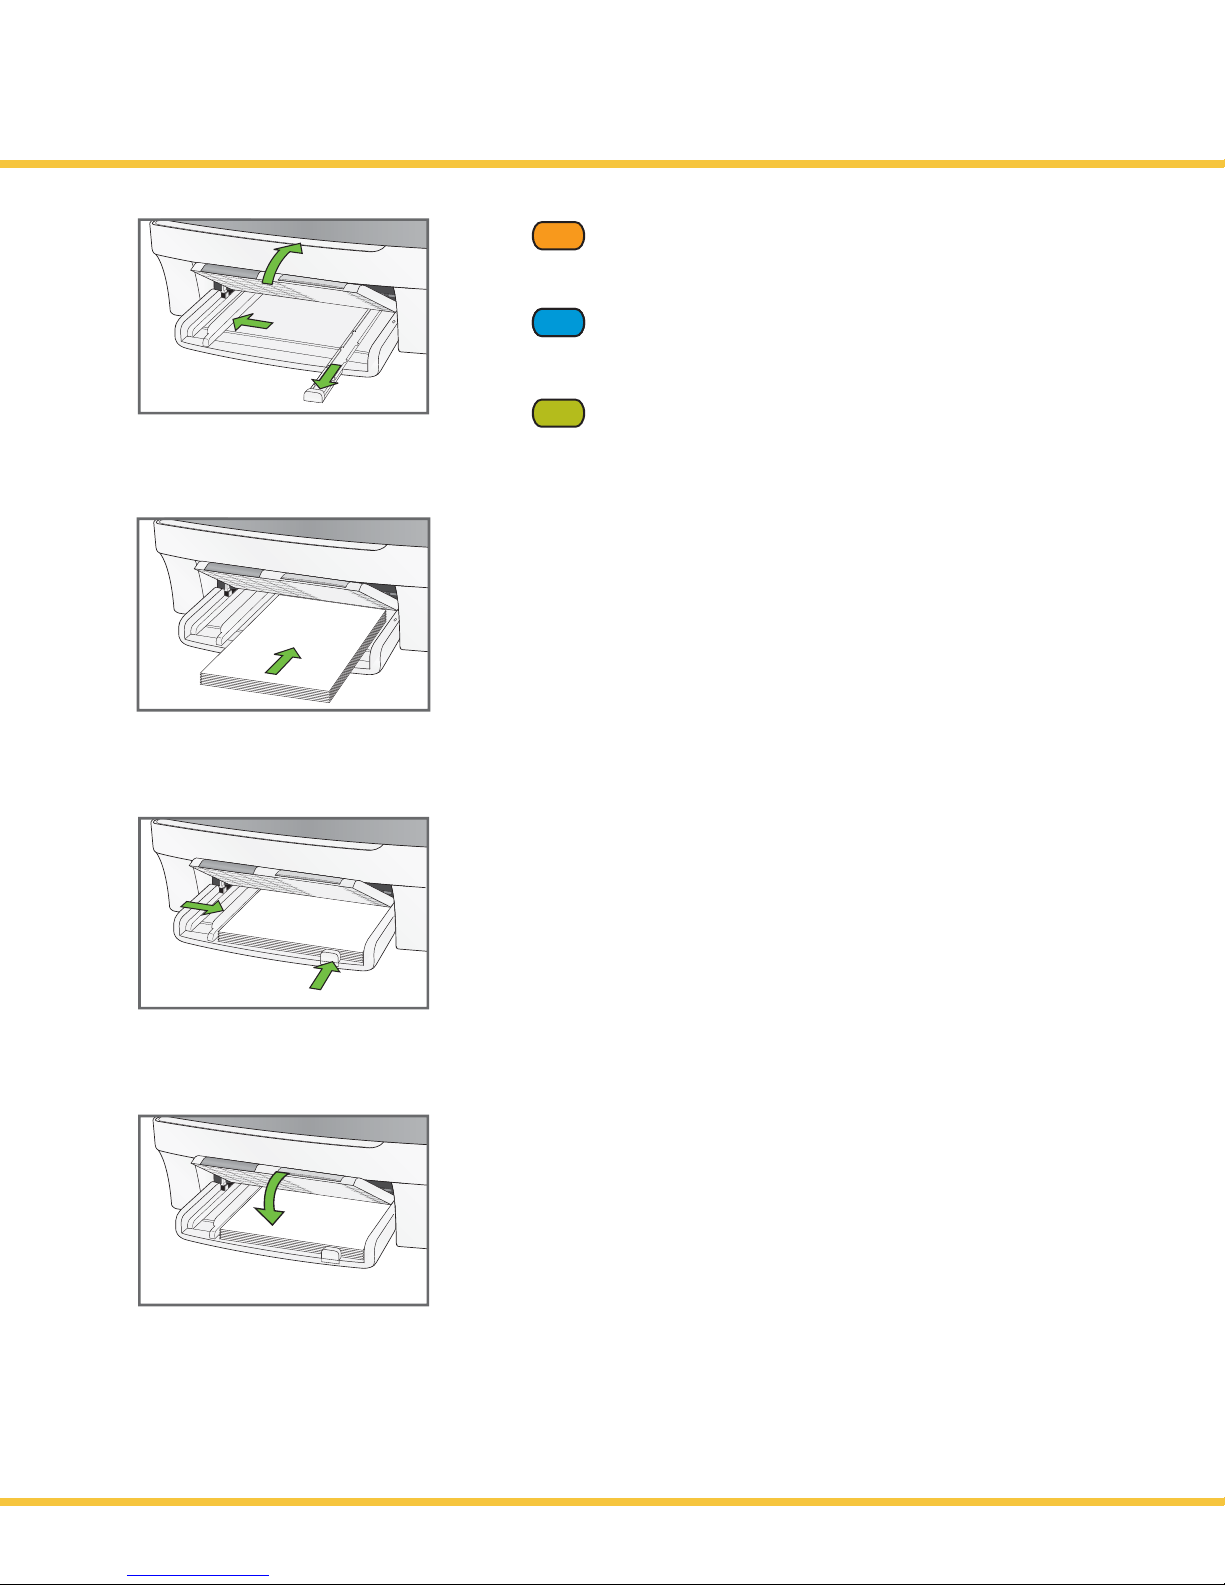
c) Load plain white paper into the main tray.
EN
FR
FR
c) Chargez du papier blanc ordinaire dans le plateau principal.
ES
c) Coloque papel blanco en la bandeja principal.
www.kodak.com/go/support
3
Page 6
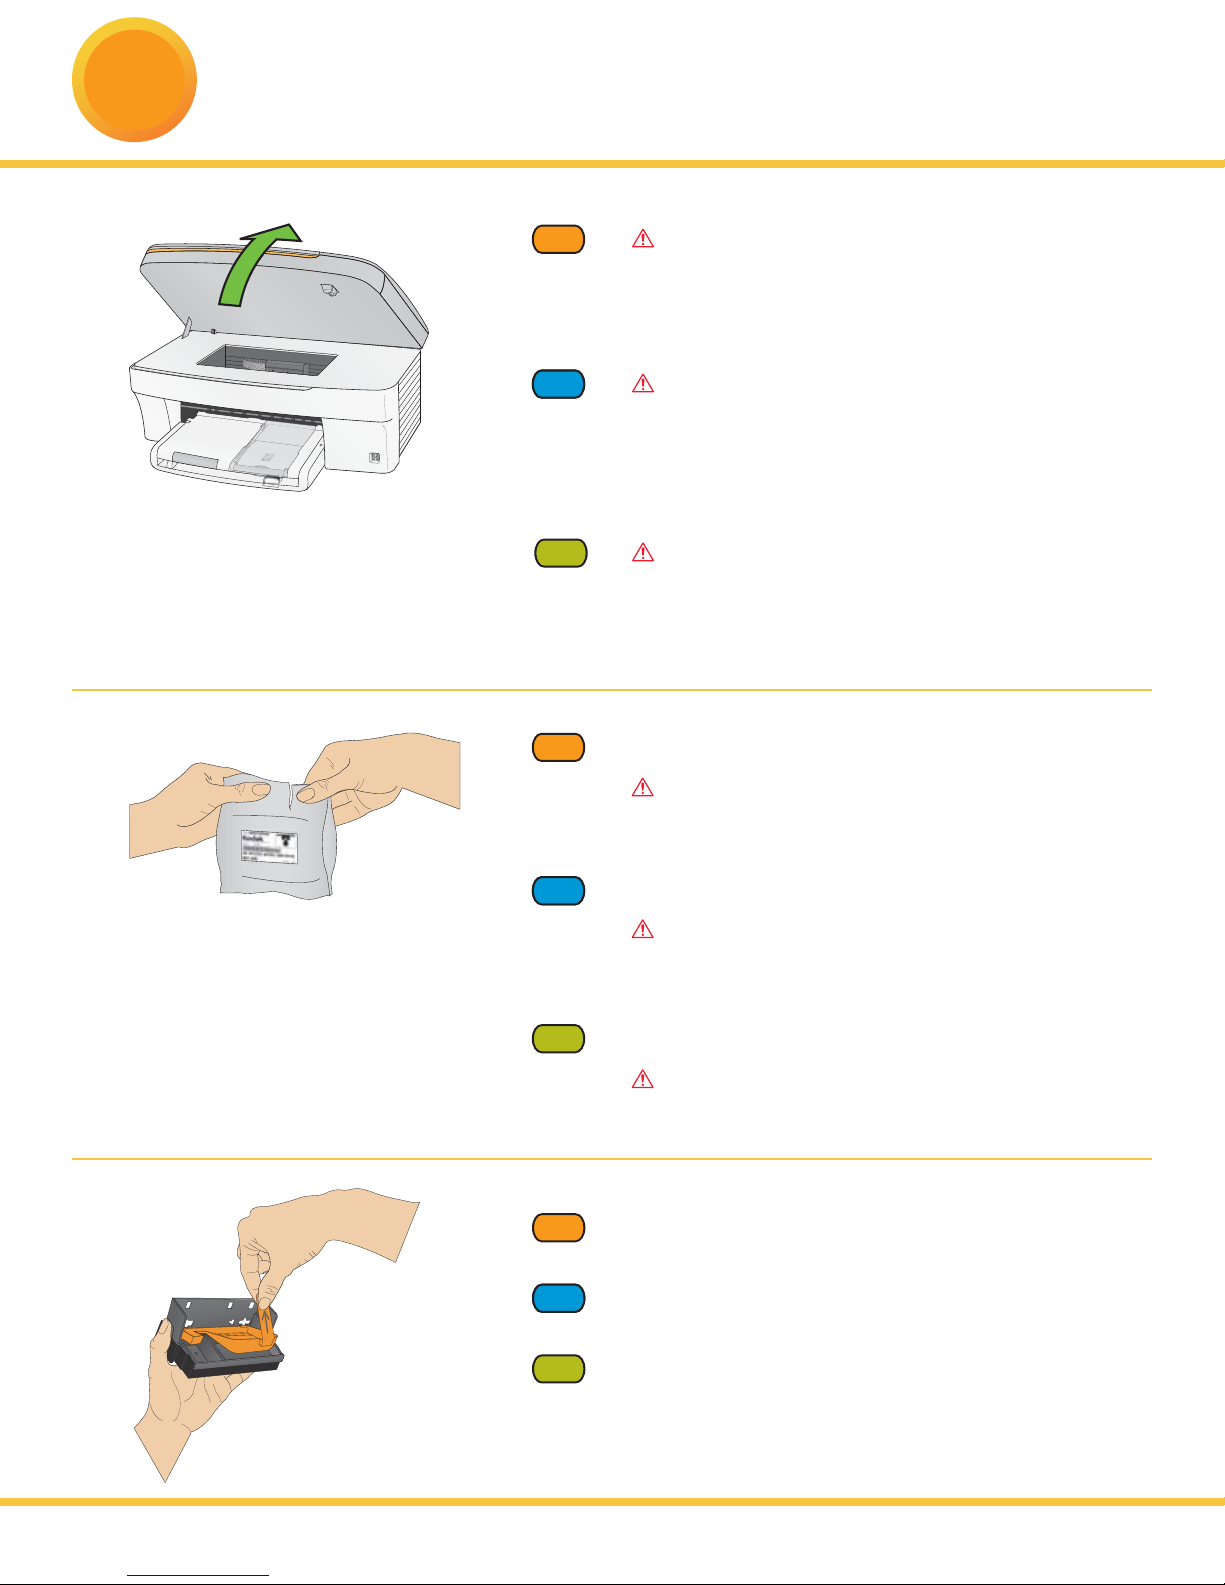
Install Printhead
3
Installation de la tête d'impression
Instale el cabezal de impresión
IMPORTANT: The printhead is fragile. Handle carefully.
EN
a) Lift the printer access door.
Make sure the orange tape is removed from the carriage.
FR
FR
IMPORTANT: la tête d'impression est fragile.
Manipulez-la avec précaution.
a) Soulevez la porte d'accès de l'imprimante. Assurez-vous que
le ruban orange a bien été retiré du chariot.
IMPORTANTE: el cabezal es una pieza frágil. Tómelo con
ES
cuidado.
a) Levante la cubierta de la impresora. Asegúrese de retirar la
cinta anaranjada del soporte móvil.
b) Remove the printhead from it's bag.
EN
IMPORTANT: Insert the printhead immediately upon
opening sealed bag.
b) Retirez la tête d'impression de son emballage.
FR
FR
IMPORTANT: installez la tête d'impression aussitôt après
avoir ouvert l'emballage scellé.
b) Saque el cabezal de la bolsa.
ES
IMPORTANTE: inserte en cabezal de impresión
inmediatamente después de abrir la bolsa sellada.
c) Pull on the orange tab to remove the protective retainer.
EN
c) Tirez sur le taquet orange pour retirer la pièce de protection.
FR
FR
4
c) Jale de la lengüeta naranja para retirar el sujetador.
ES
www.kodak.com/go/support
Page 7
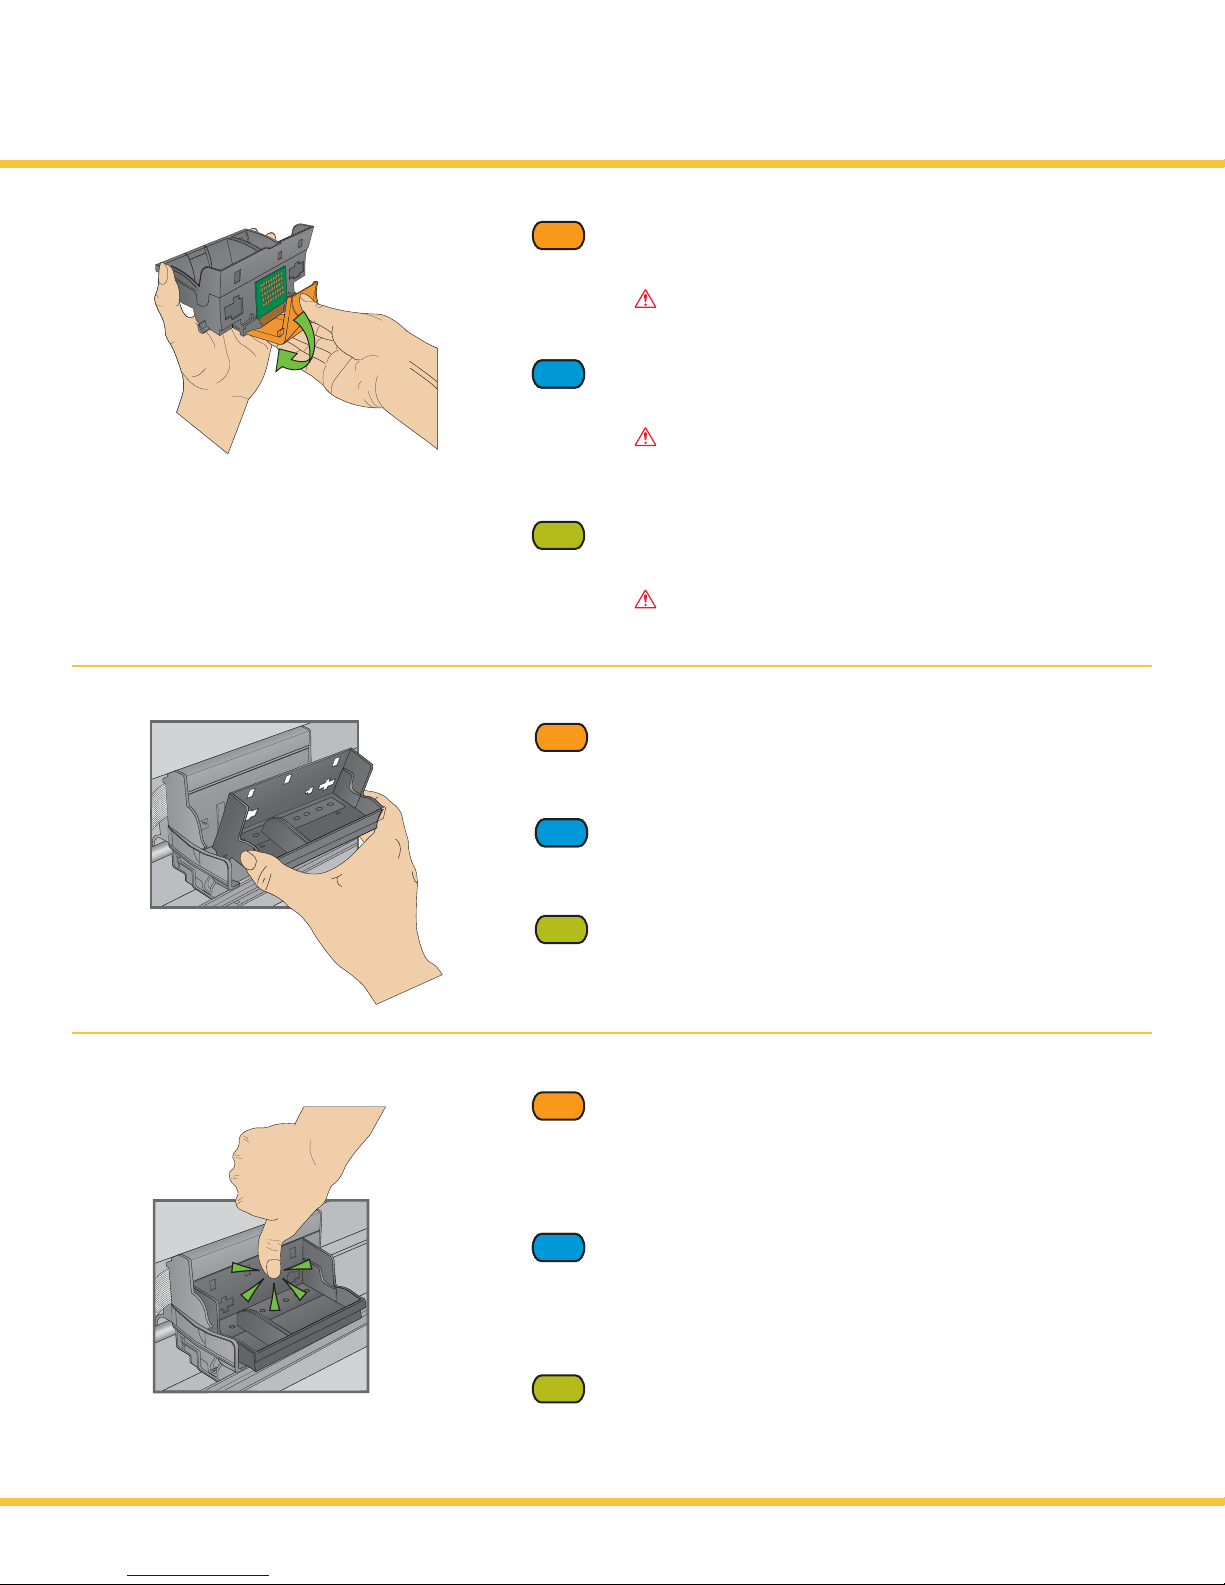
d) Carefully remove and discard the black plastic shield
EN
and the orange protective cap.
IMPORTANT: Do not touch the copper-colored contacts.
d) Retirez avec précaution la pellicule en plastique noir et le
FR
FR
capuchon protecteur orange, puis jetez-les.
IMPORTANT: ne touchez pas aux contacts de couleur
cuivre.
d) Cuidadosamente retire el protector plástico y la tapa naranja
ES
de protección y bótelos.
IMPORTANTE: no toque los contactos de color cobre.
e) Place the printhead into the carriage. Insert at the angle
EN
shown.
e) Installez la tête d'impression dans le chariot. Insérez-la en
FR
FR
angle de la manière illustrée.
e) Coloque el cabezal en el soporte móvil. Insértelo en el
ES
ángulo que se indica.
f) Push firmly against the back wall of the printhead
EN
until it clicks into place
Tip: The printhead requires a firm push and makes an
audible click when locked into place.
f) Poussez fermement contre la paroi arrière de la tête
FR
FR
d'impression jusqu'à ce qu'elle s'enclenche en position.
Conseil: vous devez pousser fermement sur la tête d'impression
pour la mettre en place, jusqu'à ce que vous entendiez un clic.
ES
f) Empuje firmemente contra la placa posterior del cabezal
hasta que calce.
Sugerencia: empuje con firmeza. Sabrá que el cabezal está
bien instalado cuando oiga un "clic".
www.kodak.com/go/support
5
Page 8
Install Ink Cartridges
10
4
Installation des cartouches d'encre
Instale los cartuchos de tinta
EN
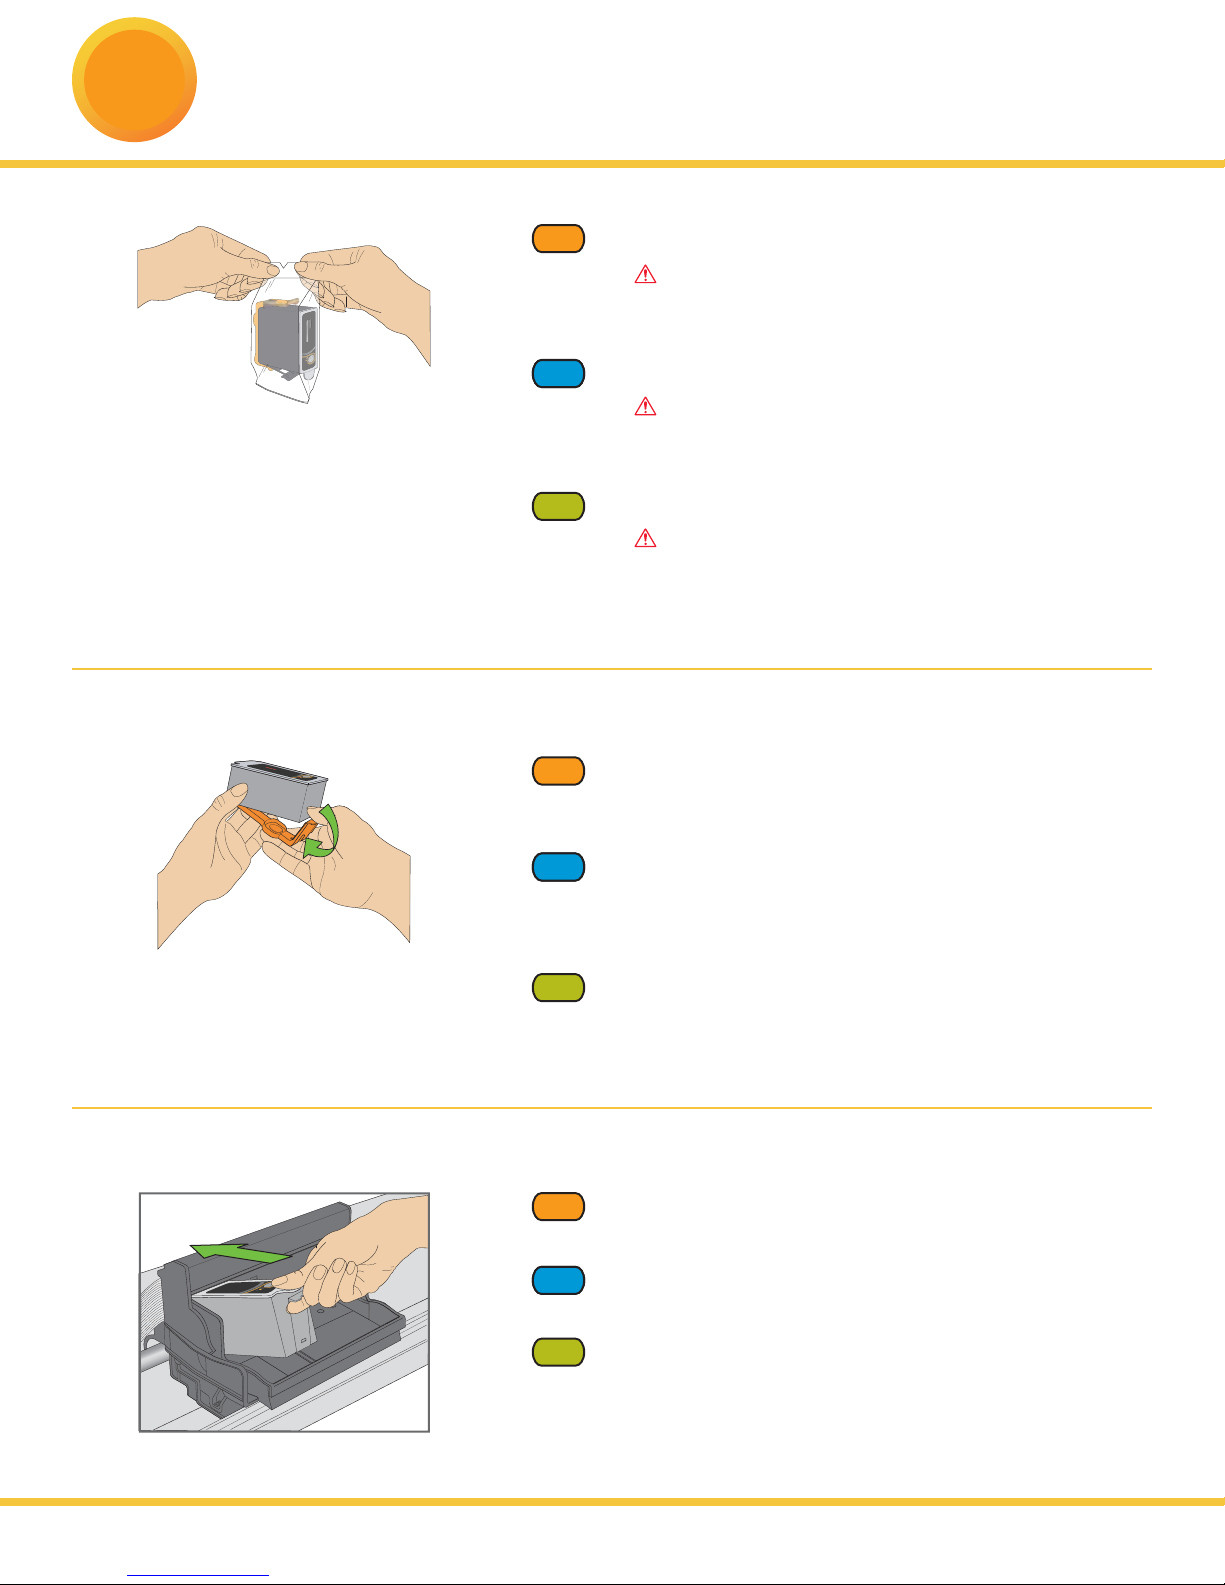
a) Remove the black ink cartridge from it's bag.
IMPORTANT: Insert ink cartridges immediately upon
opening sealed bag.
10
a) Retirez la cartouche d'encre noire de son emballage.
FR
FR
IMPORTANT: installez les cartouches d'encre aussitôt
après avoir ouvert l'emballage scellé.
a) Retire el cartucho de tinta negra de la bolsa.
ES
IMPORTANTE: Iinserte los cartuchos tan pronto los
saque de la bolsa.
Bla
c
k
Ink
C
ar
trid
g
e
10
EN
b) Carefully remove remove and discard the orange cap.
Handle ink cartridges carefully to avoid ink transfer.
FR
FR
b) Retirez délicatement le capuchon orange et jetez-le.
Manipulez les cartouches avec soin afin d'éviter tout
transfert d'encre.
b) Cuidadosamente retire la tapa naranja y bótela.
ES
Tome el cartucho con cuidado para evitar transferir tinta.
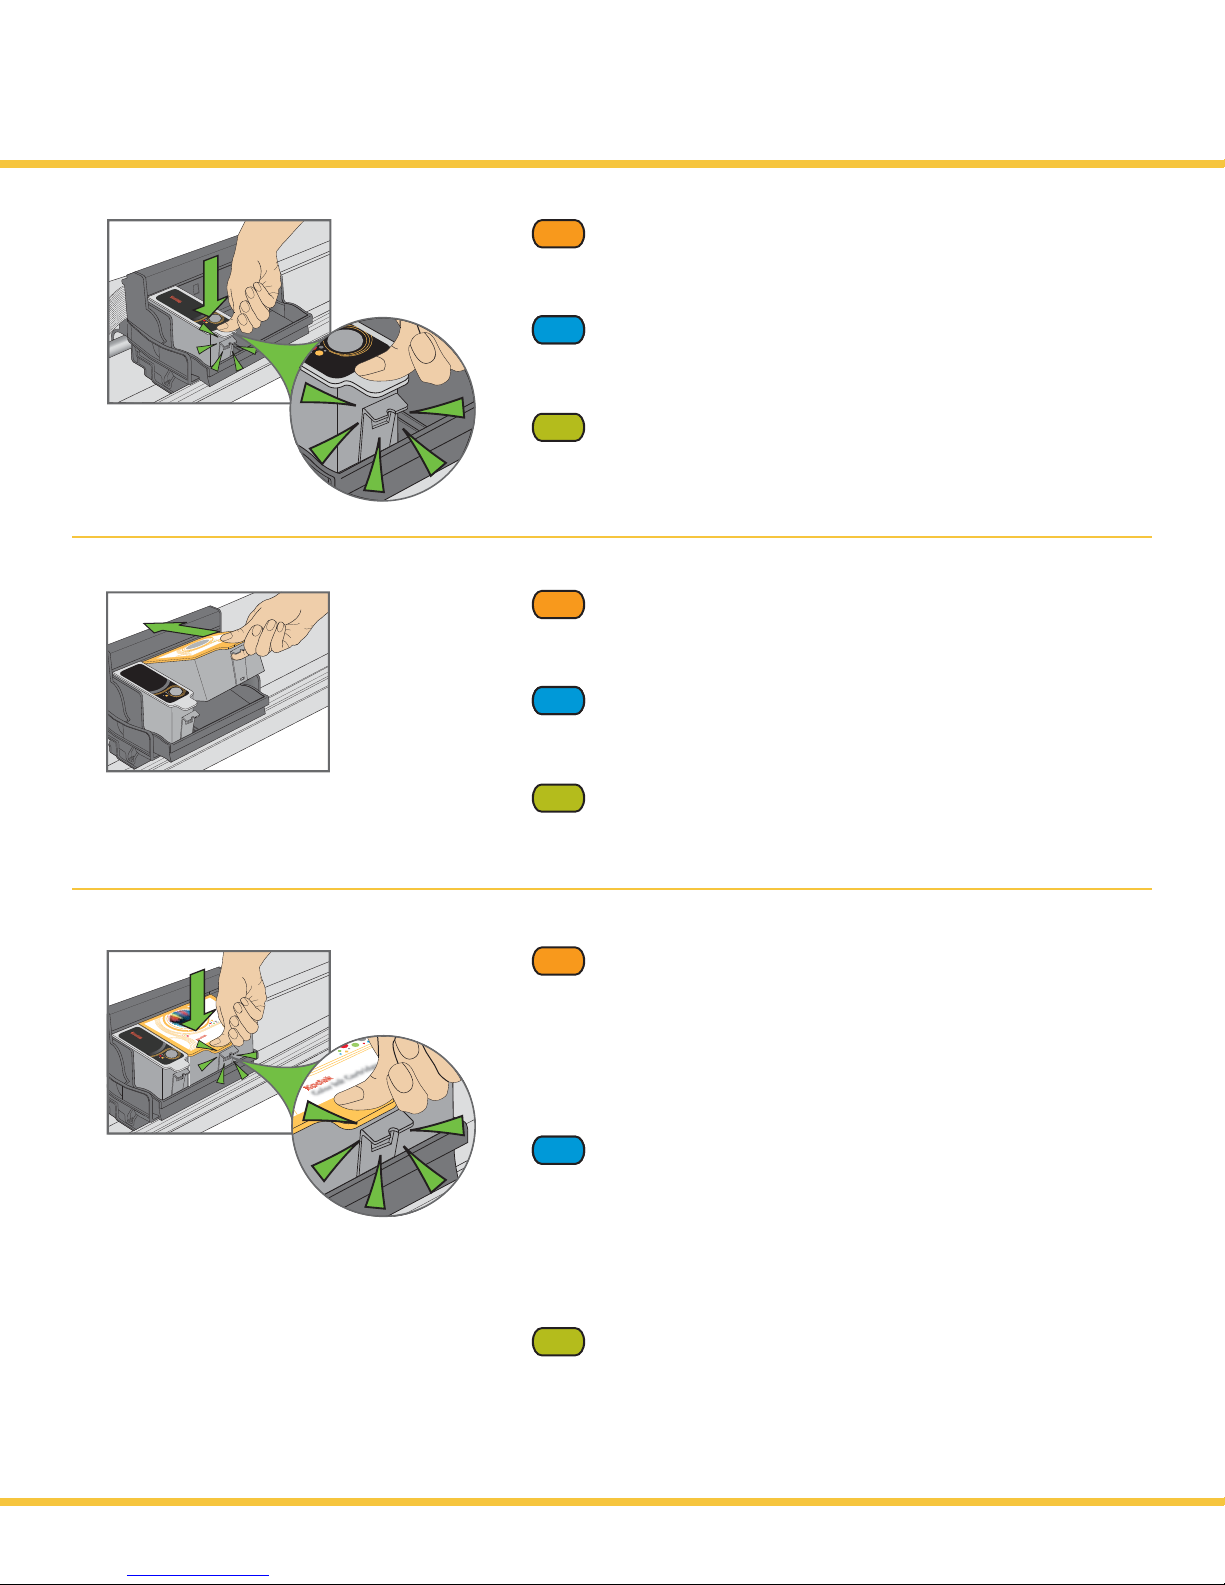
c) Insert the black ink cartridge into the printhead.
EN
10
r
ge
trid
k C
a
B
k In
lac
c) Insérez la cartouche d'encre noire dans la tête d'impression.
FR
FR
6
c) Inserte el cartucho de tinta negra en el cabezal.
ES
www.kodak.com/go/support
Page 9
Black Ink Cart
d) Press down on the ink cartridge until you hear
EN
it click into position.
Black Ink Ca
rtridg
e
10
10
0
1
e
g
d
i
r
t
r
a
C
k
n
I
r
o
l
o
C
ridge
10
d) Poussez la cartouche d'encre vers le bas pour la mettre en
FR
FR
place, jusqu'à ce que vous entendiez un clic.
d) Presiónelo hacia abajo hasta que calce.
ES
e) Open and uncap the color ink cartridge.
EN
Insert it into the printhead.
e) Déballez la cartouche d'encre couleur et retirez le capuchon.
FR
FR
Insérez la cartouche dans la tête d'impression.
e) Abra y destape el cartucho de tinta de color.
ES
Insértelo en el cabezal.
10
e
idg
B
la
ck
Ink Ca
rt
r
id
g
e
tr
Car
or Ink
Col
10
f) Press down firmly on the ink cartridge until you hear
EN
it click into position. It is normal for the printhead to flex
when inserting the cartridge. You will not damage the
printer.
g) Close the printer access door.
f) Poussez fermement la cartouche d'encre vers le bas pour la
FR
FR
mettre en place, jusqu'à ce que vous entendiez un clic. Il est
normal que la tête d'impression fléchisse pendant l'insertion
de la cartouche. Cela n'endommage pas l'imprimante.
g) Fermez la porte d'accès de l'imprimante.
f) Presione firmemente sobre el cartucho hasta que calce bien.
ES
Es normal que el cabezal se mueva (flexione) al colocar
el cartucho. No dañará la impresora.
g) Cierre la cubierta de la impresora.
www.kodak.com/go/support
7
Page 10

Connect Power
5
Branchement de l'alimentation
Conecte la alimentación
EN
5
1
0
0
a
l
l
i
n
-
o
n
e
p
r
i
n
t
e
r
K
o
d
a
k
E
a
s
y
S
h
a
re
Start
C
a
n
c
e
l
C
op
y
Sc
an
P
h
oto
B
la
c
k
I
n
k
C
h
e
c
k
C
o
l
o
r
I
n
k
C
h
e
P
c
a
k
pe
r
C
h
e
c
k
FR
FR
ES
a) Connect the power supply and adapter.
a) Branchez le cordon d’alimentation et l'adaptateur.
a) Conecte el adaptador y el cable de conexión.
-ON
EN
b) Press ON.
P
hoto
C
opy
S
ca
n
Start
E
a
sy
S
h
a
r
e
5
1
0
0
A
ll-
in
O
n
e
P
rinte
r
b) Appuyez sur ON (Marche).
FR
FR
b) Pulse ENCENDIDO.
ES
8
www.kodak.com/go/support
Page 11

Calibrate Printer
6
Étalonnage de l'imprimante
Calibre la impresora
Sta
rt
E
a
sySh
are
51
00
All-
in-
One
Pri
nte
r
EN
FR
FR
IMPORTANT: Make sure that the photo tray is pushed in.
The photo tray light should be lit.
a) Press Start.
Wait two minutes for the calibration sheet to print.
Tip: If the calibration sheet does not print properly, see the
Troubleshooting section in this setup guide.
IMPORTANT: assurez-vous que le plateau à papier photo
est en place. Le voyant du plateau doit être allumé.
a) Appuyez sur Start (Démarrer). L'impression de la page
d'étalonnage prend environ deux minutes. Veuillez patienter.
Conseil: si la page d'étalonnage ne s'imprime pas correctement,
consultez la section Dépannage de la présente fiche de mise
en route.
IMPORTANTE: asegúrese de que la bandeja para fotografías
esté bien instalada. Se debería encender la luz de la bandeja
para fotografías.
a) Pulse INICIAR. Espere dos minutos para que se imprima la
ES
hoja de calibración
Sugerencia: si la hoja de calibración no se imprime
correctamente, consulte la sección de solución de problemas
de este folleto.
EN
b) Remove the calibration sheet from the output tray.
Place it face down and align to the front, right corner
of the scanner glass, as shown.
IMPORTANT: The blue arrow in the corner of the
calibration sheet must point to the registration marks
as shown.
4x6
b) Retirez la page d'étalonnage du plateau de sortie.
FR
FR
Placez-la face contre la vitre et alignez-la avec le coin avant
droit de la vitre du numériseur, comme illustré.
IMPORTANT: la flèche bleue située dans le coin de la page
d'étalonnage doit pointer vers les marques d'enregistrement,
comme illustré.
b) Retire la hoja de calibración de la bandeja de salida. Colóquela
ES
boca abajo y alinéela en el vidrio del escáner partiendo por la
esquina frontal derecha (como se indica).
IMPORTANTE: la flecha azul que aparece en la esquina de
la hoja de calibración debe apuntar a las marcas de registro
(como se indica).
www.kodak.com/go/support
9
Page 12

Calibrate Printer
Étalonnage de l'imprimante
Calibre la impresora
4x6
EN
c) Lower the scanner lid and press Start. Remove the sheet from
the scanner glass when the calibration is complete.
4x6
FR
FR
c) Abaissez le couvercle du numériseur et appuyez sur Start
(Démarrer). Une fois l'étalonnage terminé, retirez la page
6
x
4
de la vitre du numériseur.
c) Baje la cubierta del escáner y pulse INICIAR.
ES
Retire la hoja del escáner finalizada la calibración.
Start
Ea
sySh
are
51
00
All
-in-O
n
e P
rin
ter
d) Lift the photo tray lid, then slide the photo tray toward you to
EN
return to main tray operation. The photo tray light will turn o.
d) Relevez le couvercle du plateau à papier photo, puis tirez le
FR
FR
plateau vers vous pour retourner au fonctionnement du plateau
principal. Le voyant du plateau à papier photo s'éteint.
d) Levante la tapa de la bandeja para fotografías, jale la bandeja
ES
hacia usted para usar la bandeja principal. La luz de la bandeja
para fotografías se apagará.
10
www.kodak.com/go/support
Page 13

Install Windows Software
7
7
IMPORTANT: Do not connect the USB cable to the printer until instructed during software installation.
IMPORTANT:
au cours de l'installation du logiciel.
IMPORTANT: no conecte el cable USB a la impresora hasta que así se le indique durante la instalación del software.
WINDOWSWINDOWS
WINDOWSWINDOWS
WINDOWSWINDOWS
WINDOWSWINDOWS
Windows
ne branchez pas le câble USB dans l'imprimante avant que cela ne vous soit indiqué
Installation du logiciel pour Windows
Instale el software en Windows
a) Load the Kodak EasyShare CD into the CD-ROM drive.
EN
If insructions do not appear, click Start, then Run.
Select CD-ROM drive and type setup.exe, then
press ENTER.
For the latest updates, visit:
www.kodak.com/go/downloads
WINDOWSWINDOWS
WINDOWSWINDOWS
WINDOWSWINDOWS
WINDOWSWINDOWS
WINDOWSWINDOWS
WINDOWSWINDOWS
WINDOWSWINDOWS
WINDOWSWINDOWS
WINDOWSWINDOWS
WINDOWSWINDOWS
WINDOWSWINDOWS
WINDOWSWINDOWS
WINDOWSWINDOWS
b) If connected to the internet, select Web Install to get
the latest upgrades for your printer.
a) Insérez le CD Kodak EasyShare dans le lecteur de CD-ROM.
FR
Si aucune instruction n'apparaît, cliquez sur le menu
Démarreuis sur Exécuter. Sélectionne z le lecteur de
CD-ROM NTRÉE.
Pour obtenir les dernières mises à jour, visitez
www.kodak.com/go/downloads
b) Si vous êtes connecté à Internet, sélctionez Web Install
(Installation Web) pour btenir les dernières mises à niveau
pour votre imprimante.
a) Coloque el CD de Kodak EasyShare en la unidad CD-ROM.
ES
Si no aparecieran las instrucciones, elija Incio>Ejecutar.
Seleccione la unidad CD-ROM, escriba setup.exe y
pulse Enter.
En www.kodak.com/go/downloads encontrará las últimas
actualizaciones.
WINDOWSWINDOWS
WINDOWSWINDOWS
b) Si está conectado a Internet, elija Web Install (Instalación Web)
para bajar las últimas actualizaciones para su impresora.
www.kodak.com/go/support
11
Page 14

Install Windows Software
Installation du logiciel pour Windows
Windows
WINDOWSWINDOW S
c) Follow the on screen prompts to install the AiO Software.
EN
WINDOW SWINDOWS
FR
FR
WINDOWSWINDOW S
WINDOW SWINDOWS
WINDOWSWINDOW S
WINDOW SWINDOWS
WINDOWSWINDOW S
WINDOW SWINDOWS
WINDOWSWINDOW S
WINDOW SWINDOWS
c) Suivez les instructions à l'écran pour installer le logiciel
d'imprimante tout-en-un.
ES
c) Siga las instrucciones en pantalla para instalar el software
de AiO.
EN
d) Connect the printer to the USB port. Click Next and
follow the on screen prompts.
d) Branchez l'imprimante dans le portUSB. Cliquez sur Next
FR
FR
(Suivant) et suivez les instructions achées à l'écran.
Instale el software en Windows
If prompted, re-boot your computer.
Si le programme vous y invite, redémarrez votre ordinateur.
WINDOWSWINDOW S
WINDOW SWINDOWS
WINDOWSWINDOW S
Vista
WINDOW SWINDOWS
WINDOWSWINDOW S
WINDOW SWINDOWS
WINDOWSWINDOW S
WINDOW SWINDOWS
XP
WINDOWSWINDOW S
WINDOW SWINDOWS
d) Conecte la impresora al puerto USB. Haga clic en
ES
Siguiente y siga las instrucciones en pantalla.
Cuando e indique, reinicie la computadora.
e) When the EasyShare AiO dialog box appears,
EN
close the window.
e) Lorsque la boîte de dialogue EasyShare AiO apparaît,
FR
FR
fermez la fenêtre.
ES
e) Cuando aparezca el cuadro de diálogo EasyShare AiO,
cierr la ventana.
WINDOWSWINDOW S
WINDOW SWINDOWS
WINDOWSWINDOW S
12
www.kodak.com/go/support
Page 15

Install Macintosh Software
Installation du logiciel pour Macintosh
Macintosh
MACINTOSHMACINTOSH
MACINT OSHMACINTOSH
MACINTOSHMACINTOSH
MACINT OSHMACINTOSH
MACINTOSHMACINTOSH
MACINT OSHMACINTOSH
MACINTOSHMACINTOSH
MACINT OSHMACINTOSH
MACINTOSHMACINTOSH
MACINT OSHMACINTOSH
EN
FR
FR
ES
EN
Instale el software en Macintosh
a) Connect the USB cable to the printer and your computer.
a) Branchez le câbleUSB dans l'imprimante et dans votre ordinateur.
a) Conecte el cable USB a la impresora y a la computadora.
b) Load the Kodak EasyShare CD into the CD-ROM drive. The
Kodak 5000 AiO Printer Software installer window should be
displayed. If not, double click the Kodak 5000 AiO Printer
Software CD icon on the desktop.
Follow the on screen prompts.
For the latest updates, visit www.kodak.com/go/downloads
MACINTOSHMACINTOSH
MACINT OSHMACINTOSH
MACINTOSHMACINTOSH
MACINT OSHMACINTOSH
MACINTOSHMACINTOSH
MACINT OSHMACINTOSH
MACINTOSHMACINTOSH
MACINT OSHMACINTOSH
MACINTOSHMACINTOSH
MACINT OSHMACINTOSH
MACINTOSHMACINTOSH
MACINT OSHMACINTOSH
MACINTOSHMACINTOSH
b) Insérez le CD Kodak EasyShare dans le lecteur de CD-ROM.
FR
FR
La fenêtre du programme d'installation du logiciel d'imprimante
tout-en-un Kodak5000 devrait apparaître. Si ce n'est pas le cas,
double-cliquez sur l'icône du CD Kodak5000 AiO Printer
Software sur le bureau. Suivez les instructions achées à l'écran.
Pour obtenir les dernières mises à jour, visitez
www.kodak.com/go/downloads
b) Coloque el CD de Kodak EasyShare en la unidad CD-ROM.
ES
Debería aparecer la ventana del instalador del software de la
impresora Kodak 5000 AiO. De no ser así, haga doble clic en
el icono del CD de la impresora que aparece en el escritorio de
la computadora. Siga las indicaciones en pantalla.
En www.kodak.com/go/downloads encontrará las últimas
actualizaciones.
EN
c) Double click the Install Software.mpkg icon and follow the
on screen prompts.
FR
FR
c) Double-cliquez sur l'icône «Install Software.mpkg» et suivez
les instructions à l'écran.
MACINT OSHMACINTOSH
MACINTOSHMACINTOSH
ES
c) Haga doble clic en el ícono Install Software.mpkg y siga las
indicaciones en pantalla.
www.kodak.com/go/support
13
Page 16

Install Macintosh Software
Installation du logiciel pour Macintosh
Macintosh
MACINTOSHMACINTOSH
EN
MACINT OSHMACINTOSH
MACINTOSHMACINTOSH
MACINT OSHMACINTOSH
MACINTOSHMACINTOSH
MACINT OSHMACINTOSH
MACINTOSHMACINTOSH
MACINT OSHMACINTOSH
MACINTOSHMACINTOSH
MACINT OSHMACINTOSH
MACINTOSHMACINTOSH
EN
FR
FR
FR
FR
ES
ES
EN
Instale el software en Macintosh
d) Choose a destination for the installed software. Click Continue
and follow the on screen prompts.
d) Choisissez la destination d'installation du logiciel. Cliquez sur
Continue (Continuer) et suivez les instructions à l'écran.
d) Elija dónde instalará el software. Haga clic en Continuar y siga
las indicaciones en pantalla.
e) Click Install to perform a basic installation of the software.
Click Continue and follow the on screen prompts.
MACINT OSHMACINTOSH
MACINTOSHMACINTOSH
MACINT OSHMACINTOSH
MACINTOSHMACINTOSH
MACINT OSHMACINTOSH
MACINTOSHMACINTOSH
MACINT OSHMACINTOSH
MACINTOSHMACINTOSH
MACINT OSHMACINTOSH
MACINTOSHMACINTOSH
MACINT OSHMACINTOSH
MACINTOSHMACINTOSH
e) Cliquez sur Install (Installer) pour eectuer l'installation de
FR
FR
base du logiciel. Cliquez sur Continue (Continuer) et suivez
les instructions à l'écra
e) La opción Instalar permite seguir una instalación básica del
ES
software. Haga clic en Continuar y siga las indicaciones en
pantalla.
f) Click Restart to complete the installation.
EN
f) Cliquez sur Restart (Redémarrer) pour finaliser l'installation.
FR
FR
ES
f) Haga clic en Reiniciar para finalizar la instalación.
MACINT OSHMACINTOSH
MACINTOSHMACINTOSH
14
www.kodak.com/go/support
Page 17

Helpful Tips
8
Conseils utiles
Sugerencias útiles
Pull out the output tray extender to help collect your 8.5"x11"
EN
prints.
Déployez l'extension du plateau de sortie pour récupérer plus
FR
FR
facilement .vos impressions 8,5pox11po.
ES
Saque el alargador de la bandeja de salida para que quepn
copias de 22x28cm.
EN
FR
FR
ES
The photo tray light illuminates when the photo tray is pushed in.
To use the main paper tray, disengage the photo tray by pulling
it towards you.
Le voyant du plateau à papier photo s'allume lorsque le plateau
est en place. Pour utiliser le plateau principal, dégagez le plateau
à papier photo en le tirant vers vous.
La luz de la bandeja para fotografías se enciende cuando la
bandeja está instalada. Para usar la bandeja principal, desconecte
la bandeja para fotografías jalándola hacia usted.
www.kodak.com/go/support
15
Page 18

Control Panel Features
Fonctions du panneau de commande
Funciones del panel de control
Photo
Scan
Check
Black Ink
Check
Color Ink
Tagged
PictBridge
1.
Check
Paper
DPOF
Photos
Proofsheet
Transfe r
2.
3.
ENGLISH
EN
1. Indicates that a source with a DPOF
print file is detected
2. Indicates PictBridge connectivity
3. If photo tray is engaged, toggles
between Transfer and Proofsheet.
If photo tray is not engaged, toggles
between Transfer and Photos
4. Quantity display
5. Increases the number of copies from
1-9
6. Decreases the number of copies from
9-1
7. Toggles between Black and Color
copies
8. Toggles between 100% and Fit-to-Page
Copy
100%
Fit to Page
Cancel
Black
Color
Start
Quantity
4.
+
5.
-
6.
7.
EasyShare 5100
All-in-One Printer
8.
FRENCH
1. Indique qu'une source contenant un
fichier d'impression DPOF a été
détectée
2. Indique une connectivité PictBridge
3. Si le plateau à papier photo est en
place, permet d'alterner entre les
fonctions Transfer (Transfert) et
Proofsheet (Épreuve); si le plateau à
papier photo n'est pas en place, permet
d'alterner entre Transfer et Photos
4. Ache la quantité
5. Augmente le nombre de copies de 1à9
6. Diminue le nombre de copies de 9à1
7. Permet d'alterner entres les copies noir
et blanc et les copies couleur
8. Permet d'alterner entre les options
100% et Fit to Page (Ajuster à la page)
FR
SPANISH
ES
1. Indica que se detectó una fuente con un
archivo de impresión a DPOF.
2. Indica conectividad con PictBridge
3. Si la bandeja para fotografías está
conectada, puede cambiar entre las
funciones Transferir y Hoja de contacto.
Si la bandeja no está conectada, puede
cambiar entre las funciones Transferir
y Foto.
4. Pantalla de cantidad de copias
5. Aumenta la cantidad de copias de 1 a 9.
6. Disminuye la cantidad de copias de
9 a 1.
7. Cambia entre copias en blanco y negro
y color.
8. Cambia entre 100% y Ajustar
16
www.kodak.com/go/support
Page 19

Getting Started
Démarrage
Procedimientos iniciales
EN
FR
FR
ES
EN
FR
FR
You can access and use the AiO Home Center by double-clicking on the icon on your desktop.
Vous pouvez accéder au Centre tout-en-un en double-cliquant sur l'icône achée sur votre bureau.
Para usar el centro AiO Home Center, haga doble clic en el icono correspondiente que aparece en el escritorio de la
computadora.
Windows
The AiO Home Center will enable you to copy, scan, and configure your AiO Printer from the computer. You can also
launch Kodak EasyShare software for transferring, viewing, and working with your digtal pictures and videos.
Ce Centre vous permet de copier ou de numériser des documents et de configurer votre imprimante tout-en-un
depuis l'ordinateur. Vous pouvez également lancer le logiciel Kodak EasyShare pour transférer, visualiser et gérer vos
photos et vidéos numériques.
ES
EN
FR
FR
ES
El centro AiO Home Center le permitirá copiar, escanear y configurar su impresora AiO desde la computadora.
También puede abrir el software Kodak EasyShare para transferir, ver y trabajar con fotografías y videos digitales.
Macintosh
The AiO Home Center will enable you to configure your AiO Printer from the computer. You can also order supplies
and launch Kodak EasyShare software for transferring, viewing, and working with your digital pictures and videos.
Use the Kodak EasyShare AiO drivers to print and scan to your AiO Printer.
Le Centre tout-en-un vous permet de configurer votre imprimante tout-en-un à partir de l'ordinateur. Vous pouvez
également commander des fournitures et utiliser le logiciel Kodak EasyShare pour transférer, visualiser et gérer vos
photos et vidéos numériques. Utilisez les pilotes de l'imprimante tout-en-un Kodak EasyShare pour imprimer et
numériser des documents à partir de votre imprimante tout-en-un.
El centro AiO Home Center le permitirá configurar su impresora AiO desde la computadora. También puede solicitar
repuestos y abrir el software Kodak EasyShare para transferir, ver y trabajar con fotografías y videos digitales. Use
los controladores de Kodak EasyShare AiO para imprimir y escanear imágenes en su impresora AiO.
www.kodak.com/go/support
17
Page 20

Troubleshooting
Dépannage
Solución de problemas
EN
If you have additional questions about troubleshooting this device, please visit www.kodak.com/go/5100aiosupport
PROBLEM:
I cannot print anything, the printer is locked-out after printing the calibration sheet.
SOLUTION:
1. Are both the Black and Color lights solid red? YES
2. Did you already scan the Calibration Sheet?
NO - proceed to step 3.
YES - proceed to step 5.
3. Place calibration sheet on the scanner glass.
4. Press START.
Did this correct your problem?
YES - no further troubleshooting is necessary
NO - proceed to steps 5 through 8.
5. Reset power to printer by turning it OFF. Wait ten seconds and turn it back ON.
6. After the printer finishes re-booting, check the position of the calibration sheet on the scanner glass.
7. Press START.
Did this correct your problem?
YES - no further troubleshooting is necessary.
NO - contact Kodak service support.
PROBLEM:
I've put the calibration sheet on the scanner glass and nothing happened.
SOLUTION:
One of two scenarios may have occurred. Either the calibration sheet is not positioned correctly (arrow not positioned
in right corner) on the scanner glass or the calibration sheet is skewed (not aligned squarely) on the scanner.
1. Verify that the calibration sheet is positioned correctly on the scanner glass.
2. Press START.
Did this correct your problem?
YES - no further troubleshooting is necessary.
NO - please contact Kodak service support.
PROBLEM:
I cannot get a calibration sheet to print.
SOLUTION:
When necessary, you can force a calibration sheet to print by following these steps:
1. Make sure the photo paper tray is loaded and pushed in.
2. Press CANCEL and PHOTO simultaneously. Then press START.
3. When the print comes out, place it at the front-right corner of the scanner glass, and press START.
PROBLEM:
My calibration page printed on plain white text paper.
SOLUTION:
Follow the directions as listed in step 6. Calibration will work successfully on both plain white paper and photo
paper.
18
www.kodak.com/go/support
Page 21

Troubleshooting
Dépannage
Solución de problemas
PROBLEM:
I cannot print to my desired paper type.
SOLUTION:
Check to see if the photo tray is pushed in. You can do this by checking if the green photo tray light is illuminated. If it is,
all prints will be produced from this tray. If you want to print from the main tray, pull out the photo tray by lifting the lid
and sliding the paper tray toward you (See step 6d).
PROBLEM:
I have a paper jam.
SOLUTION:
1. Press in the tabs on the rear access door to remove the door.
2. Gently pull the paper out of the rollers. IMPORTANT: If the paper tears while removing it, check inside the printer for
torn pieces of paper and remove them. Additional jams are likely to occur if all of the torn pieces are not removed.
3. Replace the rear access door. Gently push the door forward until it snaps into place.
FR
FR
Is Further Troubleshooting Required?
If you need further information to help answer your
questions, please contact Technical Support and have your
KODAK SERVICE NUMBER
F330065
*F330065*
*F330065*
KSN number ready. Your KSN number can be found on the
printer by lifting the printer access door as shown.
Pour toute question supplémentaire sur le dépannage de cet appareil, veuillez visiter le site
www.kodak.com/go/5100aiosupport
PROBLÈME:
Je ne peux rien imprimer; l'imprimante s'est verrouillée après l'impression de la page d'étalonnage.
SOLUTION:
1. Les voyants d'encre noire et d'encre couleur sont-ils allumés en rouge? OUI
2. Avez-vous déjà numérisé la page d'étalonnage?
NON– passez à l'étape3.
OUI– passez à l'étape5.
3. Placez la page d'étalonnage sur la vitre du numériseur.
4. Appuyez sur START (Démarrer).
Cette solution a-t-elle permis de résoudre le problème?
OUI– la procédure de dépannage est terminée.
NON– exécutez les étapes5 à8.
5. Réinitialisez l'alimentation en mettant l'imprimante hors tension. Patientez 10secondes, puis remettez-la sous
tension.
6. Une fois le redémarrage de l'imprimante terminé, vérifiez la position de la page d'étalonnage sur la vitre du
numériseur.
7. Appuyez sur START (Démarrer).
Cette solution a-t-elle permis de résoudre le problème?
OUI– la procédure de dépannage est terminée.
NON– contactez le service d'assistance de Kodak.
www.kodak.com/go/support
19
Page 22

Troubleshooting
Dépannage
Solución de problemas
PROBLÈME:
J'ai placé la page d'étalonnage sur la vitre du numériseur, mais il ne s'est rien passé.
SOLUTION:
L'une ou l'autre des situations suivantes peut s'être produite. La page d'étalonnage n'est pas correctement placée sur la
vitre du numériseur (la flèche ne pointe pas vers le coin avant droit) ou bien elle est placée de travers (mal alignée) sur la
vitre.
1. Vérifiez si la page d'étalonnage est correctement placée sur la vitre du numériseur.
2. Appuyez sur START (Démarrer).
Cette solution a-t-elle permis de résoudre le problème?
OUI– la procédure de dépannage est terminée.
NON– veuillez contacter le service d'assistance de Kodak.
PROBLÈME:
La page d'étalonnage ne s'imprime pas.
SOLUTION:
Lorsque cela est nécessaire, vous pouvez forcer l'impression d'une page d'étalonnage en eectuant les étapes suivantes:
1. Assurez-vous que le plateau à papier photo est correctement installé et chargé.
2. Appuyez simultanément sur CANCEL (Annuler) et PHOTO. Appuyez ensuite sur START (Démarrer).
3. Une fois la page d'étalonnage imprimée, placez-la dans le coin avant droit de la vitre du numériseur, puis appuyez sur
START (Démarrer).
PROBLÈME:
La page d'étalonnage s'est imprimée sur du papier blanc ordinaire.
SOLUTION:
Suivez les instructions fournies à l'étape6. L'étalonnage peut s'eectuer correctement sur du papier blanc ordinaire ou
sur du papier photo.
PROBLÈME:
Je ne parviens à imprimer sur le type de papier que j'ai choisi.
SOLUTION:
Vérifiez que le plateau à papier photo est bien en place. Il vous sut de vérifier si le voyant vert du plateau est allumé.
S'il l'est, toutes les impressions se feront à partir de ce plateau. Si vous désirez imprimer à partir du plateau principal,
dégagez le plateau à papier photo en soulevant son couvercle puis en tirant le plateau vers vous (voir l'étape6d).
PROBLÈME:
Un bourrage papier s'est produit.
SOLUTION:
1. Appuyez sur les taquets de la porte d'accès arrière et retirez-la.
2. Tirez délicatement sur le papier coincé pour le dégager des rouleaux.
IMPORTANT: si le papier se déchire, vérifiez s'il reste des morceaux de papier déchiré dans l'imprimante et
retirez-les. D'autres bourrages papier risquent de se produire si vous n'enlevez pas tous les morceaux de papier.
3. Réinstallez la porte d'accès arrière. Repoussez délicatement la porte jusqu'à ce qu'elle s'enclenche en position.
20
www.kodak.com/go/support
Page 23

Troubleshooting
Dépannage
Solución de problemas
Votre problème persiste?
Si vous n'avez pas trouvé la réponse à vos questions,
veuillez contacter le service d'assistance technique
(conservez votre numéro de service Kodak à portée de
main). Ce numéro figure sur l'appareil; vous le trouverez
en soulevant la porte d'accès de l'imprimante, comme illustré.
KODAK SERVICE NUMBER
F330065
*F330065*
*F330065*
ES
Si tiene más preguntas sobre cómo solucionar problemas, vaya a www.kodak.com/go/5100aiosupport.
PROBLEMA:
No puedo imprimir nada. La impresora se bloqueó después de imprimir la página de calibración.
SOLUCIÓN:
1. ¿Las luces para copia en color y en blanco y negro están encendidas de color rojo? SÍ
2. ¿Ya escaneó la hoja de calibración?
NO. Vaya al paso 3.
Sí. Vaya al paso 5.
3. Coloque la hoja de calibración sobre el vidrio del escáner.
4. Pulse INICIAR.
¿Se solucionó el problema?
SÍ. No tiene que hacer nada más.
NO. Vaya a los pasos del 5 al 8.
5. Apague la impresora. Espera unos diez segundos y vuelva a encenderla.
6. Cuando la impresora se haya reiniciado, compruebe la posición de la hoja de calibración sobre el escáner.
7. Pulse INICIAR.
¿Se solucionó el problema?
Sí. No tiene que hacer nada más.
NO. Comuníquese con un representante del departamento de asistencia técnica de Kodak.
PROBLEMA:
Coloqué la hoja de calibración sobre el vidrio del escáner pero no pasó nada.
SOLUCIÓN:
Es posible que haya ocurrido una de estas dos posibilidades. La hoja de calibración no se colocó correctamente (la flecha
no está en la esquina derecha) sobre el vidrio de escáner, o bien la hoja de calibración no está alineada (se colocó en
forma oblicua) correctamente sobre el vidrio.
1. Compruebe que la hoja de calibración se haya colocado correctamente sobre el vidrio del escáner.
2. Pulse INICIAR.
¿Se solucionó el problema?
Sí. No tiene que hacer nada más.
NO. Comuníquese con un representante del departamento de asistencia técnica de Kodak.
www.kodak.com/go/support
21
Page 24

Troubleshooting
Dépannage
Solución de problemas
PROBLEMA:
No puedo imprimir la hoja de calibración.
SOLUCIÓN:
Cuando sea necesario, puede forzar la impresión de la hoja de calibración de la siguiente manera:
1. Asegúrese de que la bandeja para papel fotográfico esté bien instalada.
2. Pulse CANCELAR y FOTO al mismo tiempo. Pulse INICIAR.
3. Cuando salga la copia impresa, colóquela sobre el vidrio del escáner, alineándola partiendo por la esquina frontal
derecha, y pulse INICIAR.
PROBLEMA:
La página de calibración se imprimió en papel blanco normal.
SOLUCIÓN:
Siga lo indicado en el paso 6. La calibración será correcta en papel fotográfico o en papel blanco normal.
PROBLEMA:
No puedo imprimir usando un tipo de papel determinado.
SOLUCIÓN:
Vea si la bandeja para fotografías está instalada. Para ello, compruebe que la luz verde de la bandeja esté encendida. De
ser así, las copias saldrán de esta bandeja. Si desea imprimir desde la bandeja principal, retire la bandeja para
fotografías: levante la tapa y jale la bandeja hacia usted, como se indica en el paso 6d.
PROBLEMA:
El papel se atascó.
SOLUCIÓN:
1. Pulse las lengüetas de la tapa posterior sacarla.
2. Cuidadosamente saque el papel de los rodillos.
IMPORTANTE: si el papel se rompe al sacarlo, revise en el interior de la impresora para ver que no haya trocitos y, de
haberlos, retírelos. Es posible que el papel se siga atascando si no se retiran todos los trozos de papel que hayan
quedado dentro de la impresora.
3. Vuelva a colocar la tapa posterior. Empuje cuidadosamente la tapa hasta que calce y quede bien instalada.
¿Necesita más ayuda con otros problemas?
Si necesita más información sobre otros problemas,
comuníquese con el departamento de asistencia técnica
y tenga a mano el número KSN. Verá este número al
KODAK SERVICE NUMBER
F330065
*F330065*
*F330065*
levantar la cubierta de la impresora como se indica.
22
www.kodak.com/go/support
Page 25

More Accessories
Plus d'accessoires
Más accesorios
More Options
More Convenience
Plus d'options
Plus pratique
Más opciones
Mayor conveniencia
W
ir
e
le
s
s
2
.0
U
S
B
B
l
u
e
t
o
o
t
h
A
d
a
p
t
e
r
The KODAK EasyShare All-in-One Printer gives you more. Be sure to visit our online store to select from our full line of supplies
and accessories at www.kodak.com/go/AiO
Kodak's Inkjet Photo Paper
Get prints that look great the first time with Kodak's unique backprint technology that automatically enables optimized prints.
Value Packs
Save up to 50% on everything you print and pay as low as 10 cents a print with our ink and paper Value Packs.
Two-sided Printing Accessory
It's easy to print both sides of your document with the Kodak EasyShare 5000 Series Two-Sided Printing Accessory.
Wireless Adaptor
Go wireless with the Kodak Wireless 2.0 USB Bluetooth Adaptor.
Note: A USB 2.0 cable is required to connect your Kodak All-in-One printer to your Windows or Macintosh OS computer.
Available in the Kodak online store or see your local retailer.
L'imprimante tout-en-un KODAK EasyShare vous ore encore plus. Consultez notre boutique en ligne pour choisir parmi notre
gamme complète de fournitures et d'accessoires, à l'adresse www.kodak.com/go/AiO
Papier photo jet d'encre Kodak
Obtenez des impressions réussies du premier coup grâce à la technologie unique d'impression au verso Kodak, qui permet des
impressions automatiquement optimisées.
Emballages économiques
Économisez jusqu'à 50% sur toutes vos impressions et payez aussi peu que 10cents par tirage grâce à nos ensembles
économiques encre et papier.
Accessoire d'impression recto verso
Il est très facile d'imprimer sur les deux côtés de votre document grâce à l'accessoire d'impression recto verso des imprimantes
Kodak EasyShare, série5000.
Adaptateur sans fil
Soyez mobile grâce à l'adaptateurUSB2.0 sans fil Kodak compatible Bluetooth.
Remarque: un câbleUSB2.0 est nécessaire pour raccorder votre imprimante tout-en-un Kodak à votre ordinateur Windows ou
MacintoshOS. Ce câble est disponible sur la boutique en ligne Kodak ou auprès de votre détaillant.
La impresora todo en uno Kodak EasyShare AiO le da más. Visite nuestra tienda en línea para ver nuestra línea completa de
accesorios y artículos: www.kodak.com/go/AiO
Papel fotográfico Kodak Inkjet
Permite conseguir copias llamativas gracias a la exclusiva tecnología Backprint de Kodak que imprime automáticamente copias
optimizadas.
Ofertas
Ahorre hasta un 50% en todo lo que imprima y pague tan sólo 10 centavos por copia con el paquete valor de tinta y papel.
Accesorio para imprimir a doble cara
Ahora es fácil imprimir documentos a doble cara con el accesorio de impresión Kodak EasyShare serie 5000.
Adaptador inalámbrico
Yo no tendrá que depender de cables con el adaptador USB Bluetooth Kodak Wireless 2.0.
Nota: necesitará un cable USB 2.0 para conectar la impresora Kodak AiO a la computadora. Disponible en la tienda en línea de
Kodak y en distribuidores locales.
www.kodak.com/go/support
23
Page 26

Limited Warranty
Garantie limitée
Limited Warranty
Kodak warrants Kodak consumer electronic products and accessories ("Products"), excluding batteries, to be free from
malfunctions and defects in both materials and workmanship for one year from the date of purchase. Coverage - Kodak will repair
or replace Products if they fail to function properly during the warranty period, as stated herein. Warranty service will include all
labour as well as any necessary adjustments and/or replacement parts. If Kodak is unable to repair or replace a Product, Kodak
will, at its option, refund the purchase price paid for the Product provided the Product has been returned to Kodak together with
proof of the purchase price paid. If replacement parts are used in making repairs, those parts may be remanufactured. or may
contain remanufactured materials. If it is necessary to replace the entire Product, it may be replaced with a remanufactured
Product. Remanufactured Products, parts and materials are warranted for the remaining warranty term of the original Product, or
90 days after the date of repair or replacement, whichever is longer. Claiming - You may be requested to send Products, at your
expense, to the authorized service facility for the country where the Products were purchased. Retain the original dated sales
receipt. Proof of the date of purchase will be required with any request for warranty repair. YOUR STATUTORY RIGHTS AS A
CONSUMER REMAIN UNAFFECTED.
Garantie limitée
Kodak garantit que les appareils et accessoires électroniques grand public Kodak (les « produits »), exception faite des piles,
seront exempts de toute défaillance ou défaut matériel et de fabrication pendant un an à compter de la date d'achat.
Conservez l'original daté de la preuve d'achat. Une preuve de la date d'achat sera requise lors de toute demande de réparation
sous garantie. Couverture de la garantie limitée - La présente garantie ne sera honorée que dans la zone géographique où les
produits ont été achetés. Il se peut que l'on vous demande d'expédier les produits, à vos frais, au centre d'assistance autorisé du
pays où vous les avez achetés. Kodak réparera ou remplacera les produits s'ils ne fonctionnent pas correctement pendant la
période de garantie, sous réserve des conditions ou des restrictions énoncées dans les présentes. La garantie comprend la
main-d'œuvre ainsi que les réglages ou les pièces de remplacement nécessaires. Si Kodak n'est pas en mesure de réparer ni de
remplacer un produit, elle pourra opter pour un remboursement du prix d'achat déboursé pour le produit, à condition que ce
dernier lui soit retourné accompagné d'un justificatif du prix payé à l'achat. La réparation, le remplacement ou le remboursement
du prix d'achat constituent le seul recours dans le cadre de la présente garantie. Les pièces de remplacement utilisées pour des
réparations éventuelles peuvent avoir été réusinées. Il se peut également qu'elles soient composées de matériaux réusinés. Si le
produit complet doit être remplacé, il peut l'être par un produit réusiné. Les produits, les pièces et les matériaux réusinés sont
garantis pendant le reste de la garantie du produit d'origine ou pendant quatre-vingt-dix (90) jours à compter de la date de la
réparation ou de remplacement, selon la période la plus longue. Limitations - La présente garantie ne couvre pas les
circonstances indépendantes de la volonté de Kodak. La présente garantie ne s'applique pas lorsque la panne est due à des
dommages subis pendant l'expédition ou à la suite d'une modification, d'une réparation non autorisée, d'une utilisation
inadaptée, d'un usage abusif, d'une utilisation avec des accessoires ou des appareils et dispositifs non compatibles (encres ou
cartouches d'encre d'autres marques que Kodak, par exemple), du non-respect des consignes d'utilisation, d'entretien ou
d'emballage, de la non-utilisation des articles fournis par Kodak (tels que les adaptateurs et les câbles) ou aux demandes
eectuées après la date d'expiration de la présente garantie. KODAK N'ÉMET AUCUNE AUTRE GARANTIE EXPRESSE NI
IMPLICITE À L'ÉGARD DU PRODUIT, Y COMPRIS LES GARANTIES IMPLICITES DE QUALITÉ MARCHANDE ET D'ADAPTATION
À UN USAGE PARTICULIER. Dans l'éventualité où l'exclusion de toute garantie implicite n'est pas applicable en vertu de la loi, la
durée de la garantie implicite sera d'un an à compter de la date d'achat ou toute durée supérieure prévue par la loi. La réparation,
le remplacement ou le remboursement constituent la seule obligation contractée par Kodak. Kodak ne saurait être tenue
responsable de tout dommage particulier, consécutif ou indirects résultant de la vente, de l'achat ou de l'utilisation du produit,
quelle qu'en soit la cause. Par les présentes, Kodak décline expressément toute responsabilité relative à tout dommage
particulier, consécutif ou indirect (y compris aux pertes de revenus ou de profits, aux coûts liés aux temps d'indisponibilité, à la
perte d'utilisation de l'équipement, aux coûts d'équipements, d'installation ou de services de remplacement ou aux demandes de
vos clients relativement à de tels dommages découlant de l'achat, de l'utilisation ou de la défaillance du produit), quelle qu'en soit
la cause ou en raison de la violation de toute garantie écrite ou implicite. Vos droits - Certains États ou certaines juridictions ne
reconnaissent pas les exclusions ou les limitations à l'égard des dommages consécutifs ou fortuits. Il se peut donc que vous ne
soyez pas assujetti aux limitations ou exclusions susmentionnées. Certains États ou certaines juridictions ne reconnaissent pas
les limitations sur la durée des garanties implicites. Il se peut donc également que cette limitation ne puisse s'appliquer à votre
situation. La présente garantie vous donne des droits précis et il se peut que vous possédiez d'autres droits, qui peuvent varier
selon l'État ou la juridiction. Vos droits prévus par la loi ne sont nullement touchés. À l'extérieur des États-Unis et du Canada Les
conditions générales de la présente garantie peuvent être diérentes à l'extérieur des États-Unis et du Canada. À moins qu'une
garantie précise de Kodak ne soit communiquée à l'acquéreur par écrit par une entreprise Kodak, aucune autre garantie ou
responsabilité n'existe au-delà des exigences minimales imposées par la loi, même si la perte, le défaut ou le préjudice a été
provoqué par une négligence ou tout autre acte.
24
www.kodak.com/go/support
Page 27

Safety
Sûreté
Seguridad
-
Read and follow these instructions before using KODAK products.
- Always follow basic safety procedures.
- Follow all warnings and instructions marked on the equipment.
WARNING STATEMENTS
- Do not expose this product to liquid, moisture, or extreme temperatures. KODAK AC adapters are intended for indoor use only. The use of
controls, adjustments, or procedures other than those specified herein may result in exposure to shock and/or electrical or mechanical hazards.
- Keep ink cartridges out of reach of children. Ink may be harmful if swallowed.
- Do not place your AiO Printer on an unstable cart, stand, bracket, or table. Injury to persons and damage to the equipment may occur.
- The use of an accessory attachment that is not recommended by Kodak, such as an AC adapter, may cause fire, electric shock, or injury.
- Pushing objects through the equipment openings can result in an electric shock or risk of fire.
CAUTIONARY STATEMENTS
- Adjust only those controls covered in the operating instructions.
- Do not disassemble this product; there are no user-serviceable parts inside. Refer servicing to qualified service personnel.
- The AC adapter power supply is equipped with 3-wire grounding type plugs. If you cannot insert the plug into the power outlet, contact an
electrician to check or replace the power outlet.
- Do not plug the AC adapter into a household extension cord.
- If the power cord or plug is frayed or damaged, the equipment gets wet, or the equipment does not operate normally when the operating
instructions are followed, unplug your AiO Printer from the power outlet and contact Kodak qualified service personnel for further instructions.
- For added protection from damage during a lightning storm, or any time when your AiO Printer and it's associated AC adapter will be left unused
for long periods of time, unplug the AC adapter from the power outlet and any attached fax line from the printer.
- To reduce the risk of fire, use only 26 AWG or larger telecommunication line cord.
- To prevent your AiO printer from overheating do not place it near a heat register, or install it in a cabinet without proper ventilation.
- Do not use your AiO Printer near water or spill liquid on it.
- Unplug the equipment from the wall outlet before cleaning.
- Dropping your AiO Printer may damage the housing and result in extensive damage that will require repair by a qualified technician to restore
normal operation.
- Excessive dust levels may damage internal parts.
For more information, go to
-
Veuillez lire les conseils et les avertissements suivants avant d'utiliser des produits KODAK.
www.kodak.com/go/MSDS
- Veillez à toujours respecter les mesures élémentaires de sécurité.
- Prêtez attention à tous les avertissements et à toutes les instructions qui figurent sur le matériel.
AVERTISSEMENT
- N'exposez pas le présent produit à des liquides, à de la moisissure ni à des températures extrêmes. Les adaptateurs c.a. KODAK sont réservés à
un usage à l'intérieur. Le recours à des contrôles, des réglages ou des procédures autres que mentionnés dans les présentes peut entraîner des
risques de choc électrique ou des blessures d'origine mécanique.
- Garder hors de portée des enfants. L'encre est nocive si elle est avalée.
- Ne placez pas votre imprimante tout-en-un EasyShare sur un chariot, un support, un étrier de fixation ou une table instables. Des personnes
pourraient être blessées et l'équipement, endommagé.
- L'utilisation d'un accessoire qui n'est pas recommandé par Kodak (adaptateur c.a., par exemple) peut provoquer un incendie, un choc électrique
ou une blessure.
- N'introduisez aucun objet dans les orifices du matériel sous peine de provoquer un choc électrique ou un incendie.
PRUDENCE
- Ne réglez que les contrôles décrits dans les instructions de fonctionnement.
- Ne démontez pas le présent produit. Il ne contient aucune pièce qui puisse être réparée par l'utilisateur. Confiez les réparations à un technicien
agréé Kodak.
www.kodak.com/go/support
25
Page 28

Safety
Sûreté
Seguridad
- La source d'alimentation de l'adaptateur c.a. est munie de fiches à mise à la terre à trois fils. Si vous ne parvenez pas à brancher la fiche sur la
prise de courant, communiquez avec un électricien afin qu'il vérifie ou remplace cette prise.
- Ne branchez pas l'adaptateur c.a. à une rallonge domestique.
- Débranchez votre imprimante tout-en-un EasyShare de la prise d'alimentation et adressez-vous à un technicien qualifié si le cordon ou la fiche
sont endommagés, si le matériel est mouillé ou s'il ne fonctionne pas correctement lorsque les directives d'utilisation sont respectées.
- Pour mieux protéger votre imprimante tout-en-un EasyShare et son adaptateur c.a. en cas d’orage ou pendant de longues périodes d’inactivité,
débranchez l'adaptateur de la prise d'alimentation.
- Pour éviter la surchaue de votre imprimante tout-en-un EasyShare, n'obstruez pas les fentes ou les orifices du matériel, éloignez ce dernier des
sources de chaleur et ne le placez pas dans une armoire sans ventilation adéquate.
- N'utilisez pas votre imprimante tout-en-un EasyShare près de l'eau et ne renversez pas de liquide sur celle-ci.
- Avant tout nettoyage, débranchez le matériel de la prise murale.
- Le fait de laisser tomber votre imprimante tout-en-un EasyShare peut en endommager le boîtier. Cela est également susceptible de causer de
graves dégâts au matériel et nécessiter l’intervention d’un technicien qualifié pour rétablir le bon fonctionnement de l'imprimante.
- Une quantité excessive de poussière peut endommager des composants internes.
For more information, go to
- Lea y siga las precauciones y advertencias a continuación antes de usar cualquier producto Kodak.
- Siempre siga procedimientos de seguridad básicos.
- Siga todas las advertencias e instrucciones indicadas en el equipo.
www.kodak.com/go/MSDS
ADVERTENCIA
- No exponga este producto a líquidos, humedad o temperaturas extremas. Los adaptadores de CA Kodak se han elaborado sólo para usarse en
interiores. El uso de controles, ajustes o procedimientos no incluidos en este documento, podrían dar como resultado la exposición a un shock
eléctrico o peligros mecánicos o eléctricos.
- Mantener fuera del alcance de los niños. La tinta es peligrosa si se ingiere.
- No coloque la impresora EasyShare AiO sobre un carro, soporte, repisa, mesa o superficie que no sea estable. De lo contrario, podría sufrir
lesiones o dañar el equipo.
- El uso de accesorios no recomendados por Kodak, como en el caso de un adaptador de CA, podría causar daños, lesiones, un shock eléctrico o
incluso originar un incendio.
- Insertar objetos por los orificios del equipo puede causar un shock eléctrico o incluso un incendio.
PRECAUCIÓN
- Ajuste sólo los controles que se incluyen en las instrucciones.
- No desmonte este producto. En el interior no hay ninguna pieza que pueda reparar el usuario. Si necesita reparar el equipo, hágalo revisar por
personal de servicio calificado de Kodak.
- El adaptador de CA cuenta con enchufes de 3 hilos de conexión a tierra. Si por algún motivo no puede insertar el enchufe en un tomacorriente,
comuníquese con un electricista para que revise o cambie el tomacorriente.
- No enchufe el adaptador de CA en un cable de extensión.
- Desenchufe la impresora EasyShare AiO. Comuníquese con personal de servicio calificado si detecta que los cables están dañados o pelados, o
si el equipo no opera correctamente aún habiendo seguido las instrucciones pertinentes.
- Para aumentar la protección en la eventualidad de tormentas eléctricas, o cuando no use la impresora EasyShare AiO y el adaptador de CA por
un largo período, desenchufe el adaptador del tomacorriente.
- Para evitar que la impresora EasyShare AiO se recaliente, no bloquee ni cubra las ranuras y orificios del equipo, no coloque la impresora cerca
de fuentes de calor, y no la instale en un gabinete que no cuente con ventilación adecuada.
- No use la impresora EasyShare AiO cerca del agua, ni permita que le salpique cualquier tipo de líquido.
- Desenchufe la impresora del tomacorriente antes de limpiarla.
- Si la impresora EasyShare AiO se cayera, se podría dañar la cubierta externa o las piezas internas de manera tal que un técnico calificado
debería repararla para que vuelva a funcionar normalmente.
- Las piezas internas del equipo se pueden ver dañadas por niveles excesivos de polvo.
Si necesita más información, vaya a
www.kodak.com/go/MSDS
26
www.kodak.com/go/support
Page 29

Registration has its rewards— including a terrific oer.
Register your KODAK All-in-One Printer and get great support, expert tips, free software downloads—plus
a phenomenal deal on inkjet supplies to get you started. Simply register right away when prompted during
software installation or on the web at www.kodak.com/go/register. Registration takes a minute—but the
rewards are lasting.
Inkjet supplies oer valid for U.S. residents only.
L’enregistrement, c’est avantageux!
En enregistrant votre imprimante tout-en-un KODAK, vous aurez accès à un service exceptionnel, à des
conseils de spécialistes ainsi qu’au téléchargement et à la mise à jour de logiciels. Il vous sut
d'enregistrer votre appareil directement lorsque le système vous le demande pendant l'installation du
logiciel ou sur Internet à l'adresse suivante : www.kodak.com/go/register. Prenez donc une minute pour le
faire et profitez longuement des avantages qui en découlent!
El registro tiene sus recompensas.
Registre su impresora multifunción KODAK y obtenga una excelente asistencia, consejos de expertos,
además de descargas y actualizaciones de software. Simplemente registre el producto cuando se le
indique durante la instalación del software, o en Internet en la dirección www.kodak.com/go/register. El
registro tarda un minuto, pero las recompensas son permanentes.
Page 30

Any Questions?
N'importe quelles Questions ?
¿Alguna Pregunta?
ENEN
Need More Help? Look here for answers: www.kodak.com/go/5100aiosupport
The User Guide is installed with your Kodak AiOSoftware and is located:
Windows: Start All Programs Kodak
Macintosh: Library Documentation Kodak AiO Printers
For printer support, please call 1-800-235-6325
Besoin d'une aide supplémentaire? Nous avons les réponses: www.kodak.com/go/5100aiosupport
FRFRFR
FR
Le Guide d’utilisation est installé avec votre logiciel Centre tout-en-un Kodak sous:
Windows: Démarrer Tous les programmes Kodak
Macintosh: Bibliothèque Documentation Kodak AiO Printers
Pour obtenir de l’assistance, téléphonez au 1-800-465-6325
ES
¿Más ayuda? Aquí encontrará respuestas: www.kodak.com/go/5100aiosupport
La guía del usuario se instala junto con el software de la impresora Kodak AiO en:
Windows: Inicio Programas Kodak
Macintosh: Biblioteca Documentación Kodak AiO Printers
Para obtener asistencia para su impresora, llame al 1-305-507-5600
Printed in the U.S.A.
The Bluetooth® trademarks are owned by the Bluetooth SIG, Inc.
Windows® is a registered trademark of Microsoft Corporation
Macintosh® is a registered trademark of Apple Computer, Inc.
Eastman Kodak Company
Rochester, NY 14650 U.S.A.
© Eastman Kodak Company, 2007
MC/MR/TM: Kodak, EasyShare.
*1K2504*
*1K2504*
1K2504
*A*
*A*
A
Imprimé aux États-Unis
Les marques de commerce Bluetooth® sont la propriété de
Bluetooth SIG, Inc.
Windows® est une marque déposée de Microsoft Corporation.
Macintosh® est une marque déposée de Apple Computer, Inc.
Impreso en Estados Unidos.
Las marcas registradas Bluetooth® son de propiedad de
Bluetooth SIG, Inc.
Windows® es marca registrada de Microsoft Corporation.
Macintosh® es marca registrada de Apple Computer, Inc.
 Loading...