

Page 1
KODAK HD LED TV
User Manual
24HDX100S | 32HDX900S | 32HDX1000S | 32HDX1100S | 40FHDX900S | 50FHDX900S
Please read this manual carefully before installing and operating the TV.
Keep this manual with you for reference.
Page 2

Page 3

Introduction 1
Warnings & Safety Precautions 1
Features 2
Safety Information 2
Important Safety Precautions 3
Prepration Stand Installation 4
Functional Overview Fornt & Side Panel 5
Rear Panel 6
Connections 7
Remote Control 8
Basic Operation 11
Menu Operation 12
Media Play 19
PC Setting 20
Instructions for Platform Operation 21
Specification 24
Troubleshooting 25
CONTENTS
Page 4

INTRODUCTION
Thank you for choosing our product. To be able to make use of all application options, we
recommend that you should read this operation manual carefully and preserve it for quick
access, if required.
Do not touch any parts in the set and do not make changes to any settings not described
in this operating manual.
The LED Screen is a high-tech product which consists of more than 9,00,000 control
elements. Any Non-active red, blue or green spots / lines that might appear on the screen
occasionally, have no efect on the performance of the screen or television and may
disappear over a short period of time.
WARNINGS AND SAFETY PRECAUTIONS
Warning:
– To prevent damage to the TV which may result in a fire or electrical shock hazard, do not
expose the TV set to rain or excessive moisture.
– Do not rub or strike the Active matrix LED with any thing hard as this may scratch, mark or
damage the active matrix LED permanently.
– For safety, do not place vessels or any container which contain fluid including water, on or
near the TV.
– Do not insert any objects in the ventilation slots.
Service:
– Do not remove the back cover of the set as this can expose you to very high voltage and
other hazards. If the set does not operate properly, unplug it and call KODAK HD LED
TV customer care.
Antenna:
– Connect the antenna cable to the socket marked ANT IN on the back cover. For best
reception an outdoor antenna should be used.
Location:
– Position the set so that no bright light or sunlight falls directly on the screen. Reflections on
the screen may affects the picture quality & viewing of television.
– Soft and indirect lighting is recommended for comfortable viewing.
– Care should be taken not to expose the set to any unnecessary vibration, moisture, dust or
heat.
– Adequate ventilation is essential to prevent set failure.Ensure that the set is placed in a
position to allow a free flow of air. Do not cover ventilation opening on the back cover. Do
not place the set in an enclosure or very close to walls.
– Avoid excessively warm locations to prevent possible damages to the set.
– Place the television on a solid and flat surface, if not wall mounted.
1
Page 5
FEATURES
SAFETY INFORMATION
2
HD/FHD Resolution–
Extra Slim Design–
200,000:1 Dynamic Contrast Ratio–
HDMI Connectivity–
Full Multimedia Interface–
Seven Picture Modes–
Five Sound Modes–
o o
178 x178 Viewing Angle–
PC Connectivity–
Dynamic Noise Reduction–
CAUTION
RISK OF ELECTRIC SHOCK
DO NOT OPEN
High voltages are used in the operation of
this product. To reduce the risk of electric
shock, do not remove cover of the cabinet,
refer for servicing to qualified service personal.
If the LED TV requries any changes or coarse adjustment, electric shocks
are imminent. Do not attempt to open contact customer support for needed
overhual.
The exclamation point within an equilateral triangle is
intended to alert the user to the presence of important
operating & maintenance (servicing) instruction in the
literature accompanying the appliance.
The lightning flash with arrowhead symbol within an
equilateral triangle is intended to alert the user to the
presence of uninsulated dangerous voltage within the
products enclosure that may be of sufficient magnitude
to constitute a risk of electric shock to persons.
Warning
Page 6

IMPORTANT SAFETY PRECAUTIONS
3
— Read & keep this instruction manual.
— Read all warnings.
— Clean only with dry cloth.
— Do not block any ventilation openings. Install in accordance with the manufacturer’s
instrutions.
— Do not install near any heat source such as radiators, heat registers, stoves or other apparatus
(including amplifiers) that produce heat.
— Do not defeat the safety purpose of the polarized or grounding-type plug. A polarized plug
has two blades with one wider than the other. A grounding type plug has two blades and a
third grounding prong.
— The wide blade or third prong are provided for your safety. If the provided plug does not
fit into your outlet, protect the power cord from being walked on or pinched particularly
at plugs, socket outlets and the point where they exit from the apparatus.
— Only use attachments / accessories specified by the manufacturer.
— Use only with the bracket or table stand specified by the manufacturer or sold with the
apparatus.
— Unplug this apparatus during lightning storms or when unused for long period of time.
— To reduce the risk of fire or electric shock, do not expose this apparatus to rain or moisture.
— The apparatus should be disconnected from the mains by placing the power / standby
switch in the standby position and unplugging the power cord of the appataus from the AC
main outlet.
— The socket outlet should be installed near the equipment & should be easily accessible.
— This product should never be placed in a built-in installation such as a bookcase or rack
unless proper ventilation is provided or the manufacture’s instructions have been adhered to.
— The apparatus should not be exposed to dripping or splashing & objects filled with liquid,
such as vases, should be placed on the apparatus.
— Do not place any sources of danger on the apparatus (e.g. liquid filled objects, lighted
candles).
— Wall or ceiling mounting - The appliance should be mounted to a wall or ceiling only as
recommended by the manufacturer.
Servicing should be carried out by qualified service personnel only. To reduce the risk of
electric shock do not perform any servicing other than that contained in the operating
instructions.
Page 7
PREPARATION
4
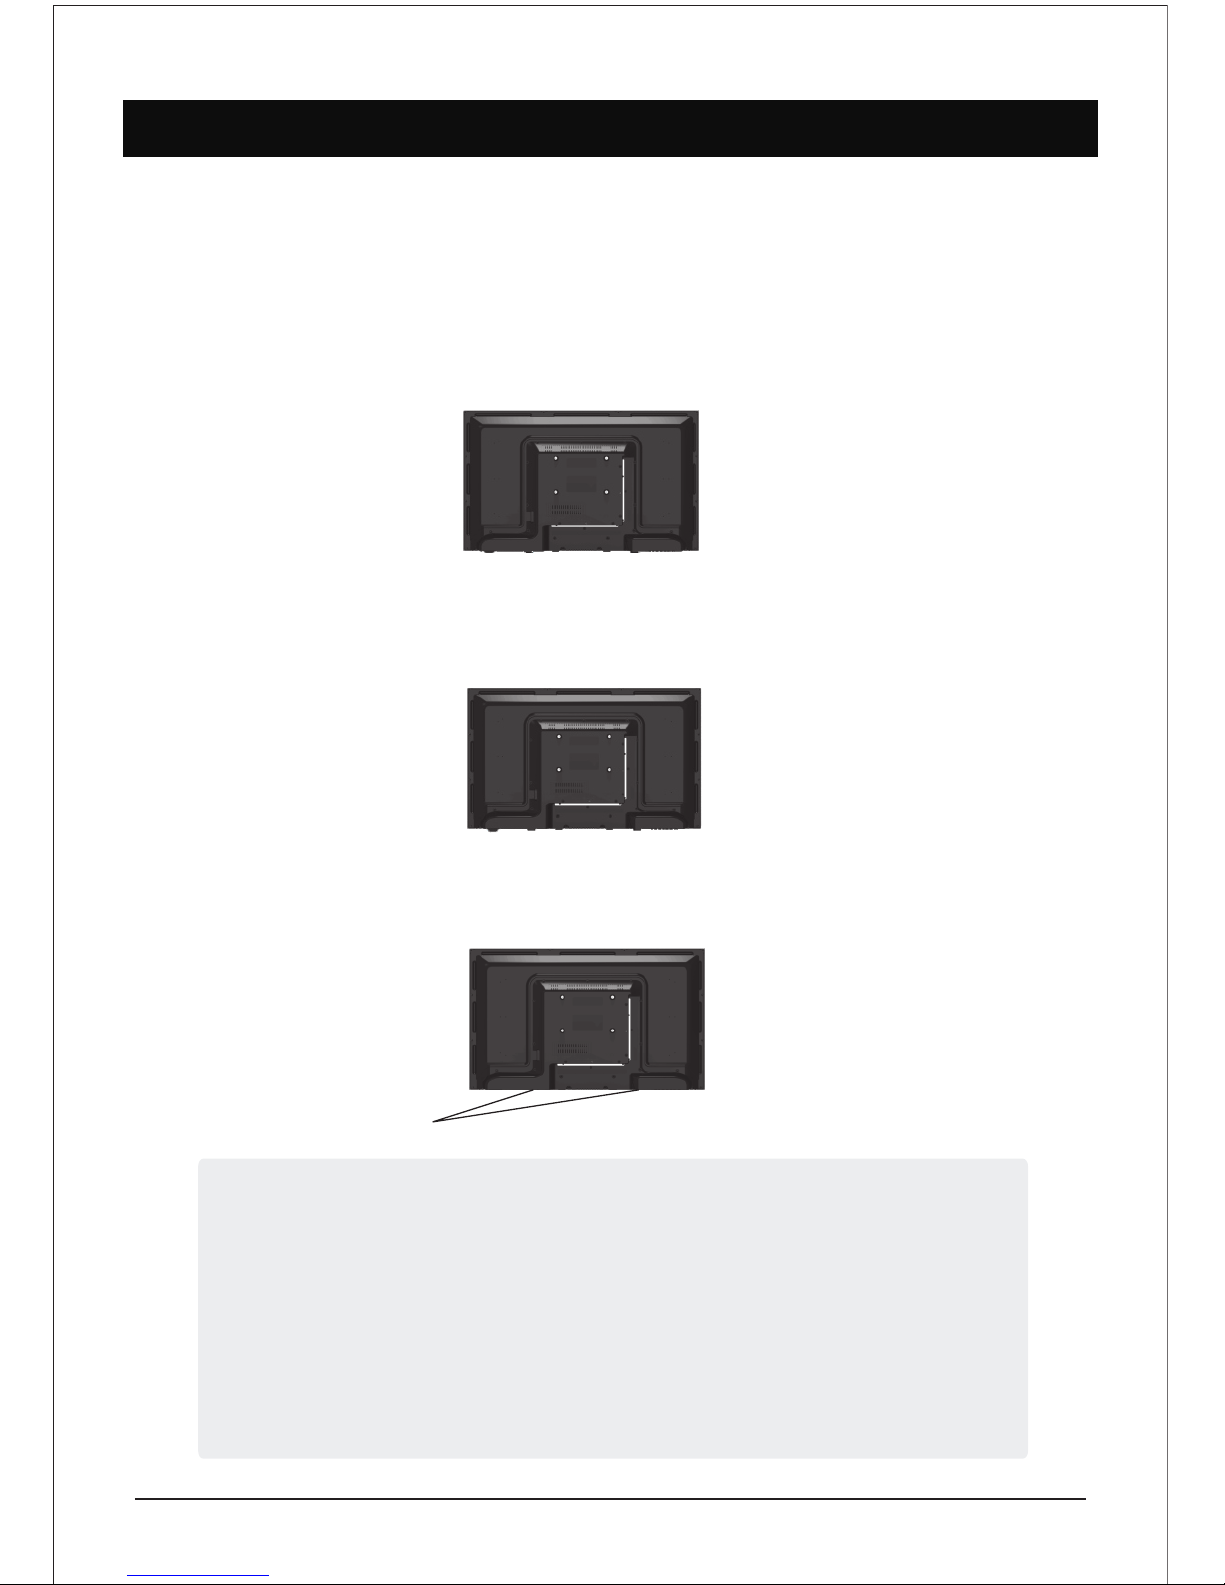
Stand Installation
The TV base will be separated with the TV unit. You should install the base before
you use the TV unit.
- Place the TV with its font side facing down on a cushioned flat surface.
- Place the base on the hinge of TV unit, with the base direction shown under
the base. (See the picture)
- Tighten the supplied screws to fix the TV stand securely in place.
(Screws - Provided with TV unit)
WARNING
- The TV stand may not be securely fixed in place after repeated tightening
and loosening of screws.
- During assembling and disassembling the TV stand, please use your hand
to support it. Failing to do so may cause the TV stand to fall and result in
personal injury / damage to the product.
- After installing the TV stand, please ensure that the screws are tightened
firmly. Failure to do so may cause the TV set to tip over or damage it.
(Screw fixes here)
Page 8
FUNCTIONAL OVERVIEW
5
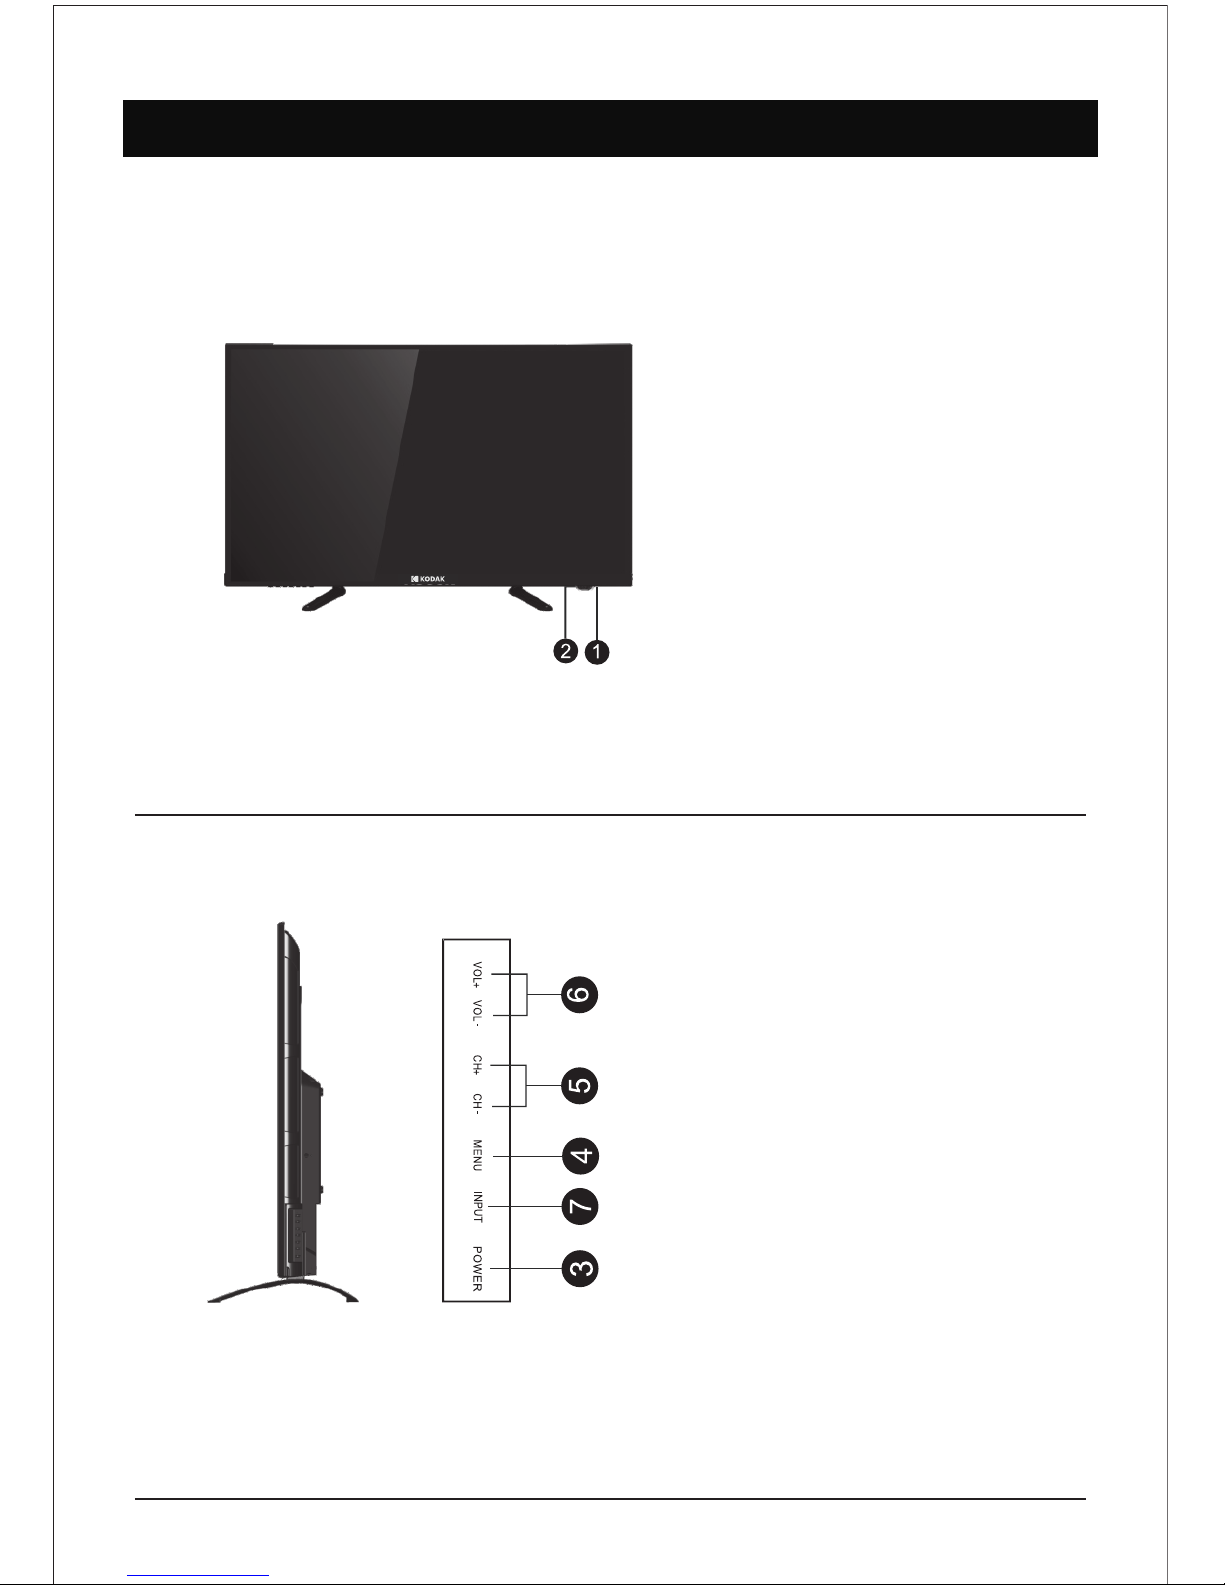
Front & Side Panel
1 Power Light
On Standby Mode, the light
turns red.
2 Infrared Remote Sensor
Receives the signals from the
remote control.
3 Power
Press to turn TV on or turn to
standby mode.
4 Menu
Press to display the setup menu on
the TV screen.
5 CH-, CH+
Press to select desired channels. or
press to select or adjust a menu item.
6 Vol-, Vol+
Press to select TV or all video input
modes : TV, AV, HDMI, VGA, USB.
7 Input
Press to select source of viewing.
Page 9
FUNCTIONAL OVERVIEW (AS PER MODEL)
6
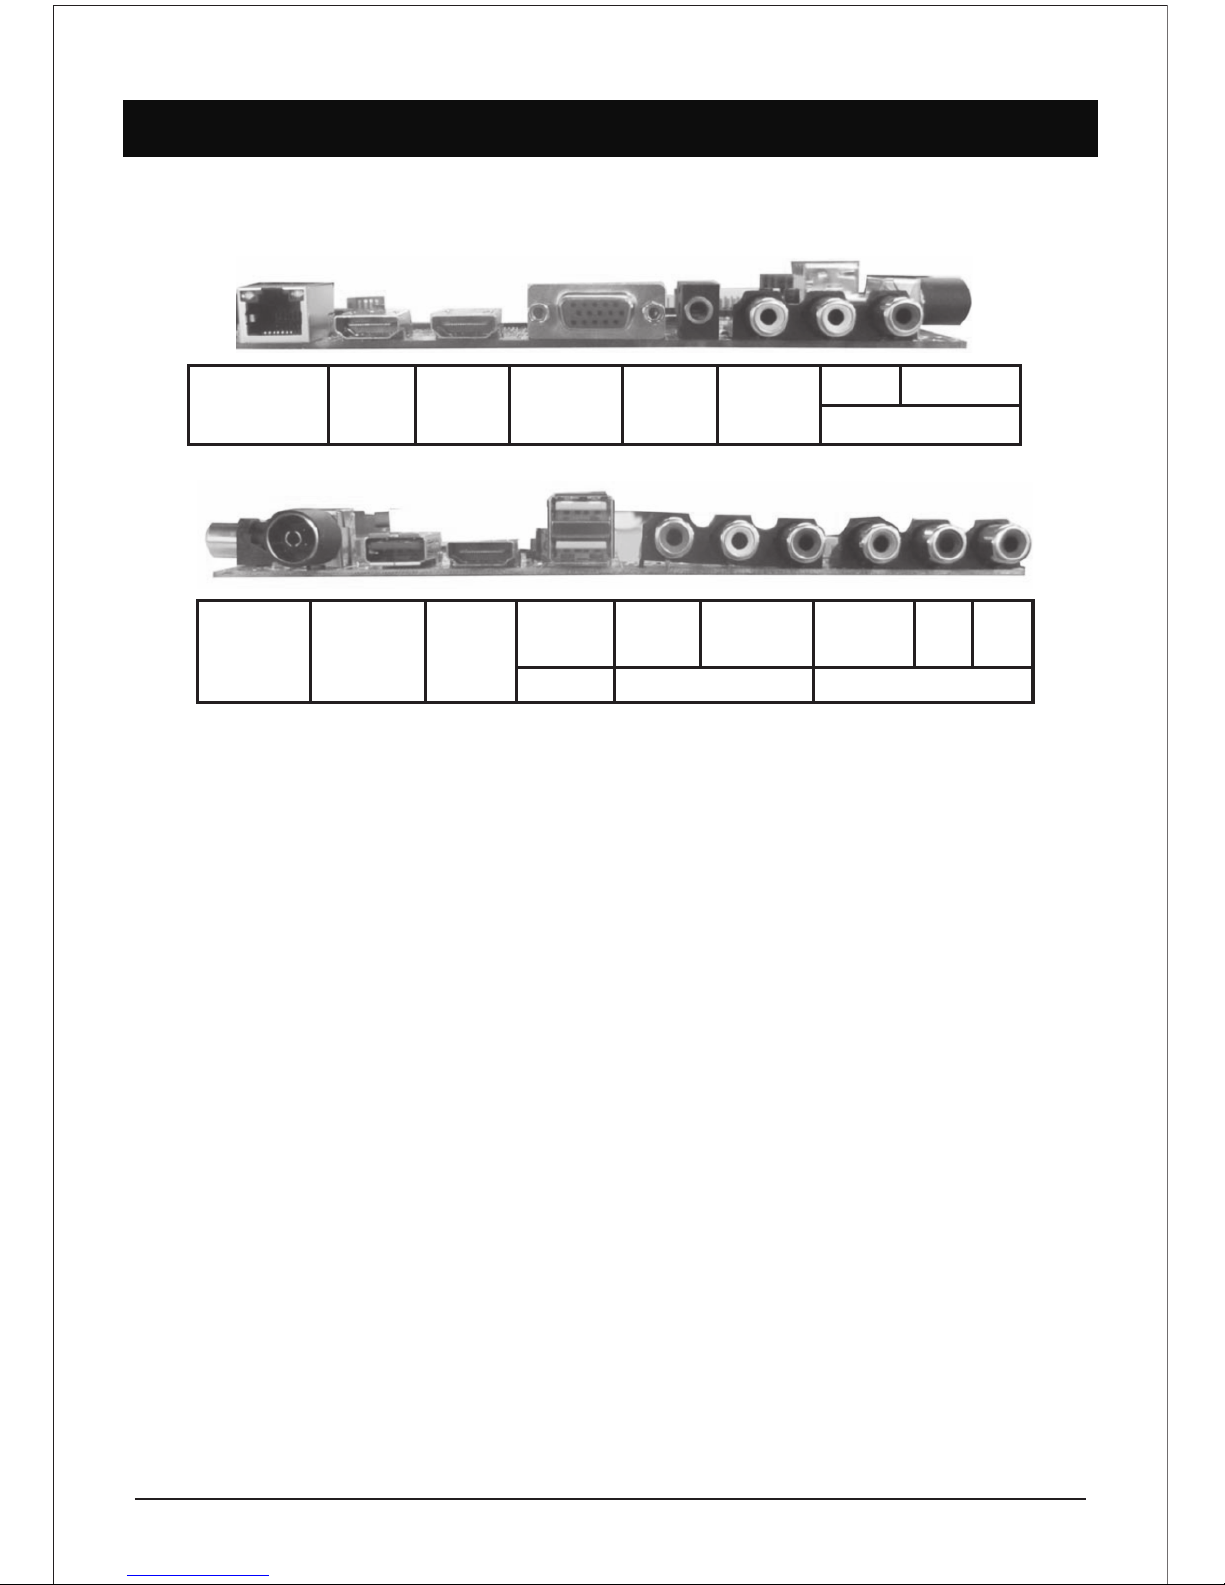
Rear Panel
VIDEO
AV1 IN
L - AUDIO - R
Y / VIDEO
Pb Pr
AV2 IN
*EARPHONE
HDMI x 3
USB3
RJ 45 HDMI 1 HDMI 2 VGA
PC
AUDIO
TV USB 1
USB 2
COAX
L-AUDIO-R
IN
- LAN (Local Area Network)
For Internet connection
- USB
Insert USB
- HDMI input Terminal
Connect to equipment with HDMI output
- VGA(PC IN) Input Terminal
Connect to PC.
- PC / HDMI Analog Audio Input Terminal
Connect to equipment using HDMI-DVI
connection or PC with audio output.
- AV 1 & AV 2 In / YPBPR
Connect the video output jack of DVD or VCR
- Antenna Input Terminal
Connect to equipment with antenna output or
wall antenna socket.
*This image is for reference only to explain uses of various connections. Actual product specifications may differ
from the above.
Page 10

CONNECTIONS
7
You can connect VCR, DVD player, set-top box, computer, game console or other
equipment to the TV. To view external source images, press to select the input
source.
Source
Connecting an AV Equipment with HDMI Connector
Connecting an AV Equipment with Composite Connector
Connecting an AV Equipment with VGA Connector
- If the external equipment has DVI output, you can connect it to the HDMI terminal using a HDMI-DVI cable.
In case of using the HDMI-DVI cable, connect analog audio signal to RGB/HDMI analog audio input terminal.
- Please refer to the user manual of the external equipment for more information on connection to the TV.
- Please disconnect all power supplies to the equipment & TV before connection.
- Compatibility of the TV set & external equipment is dependent on hardware compatibility of both.
Page 11

S. Mode
P. Mode
REMOTE CONTROL
8
Installing the remote control batteries
- Open the battery cover.
- Insert batteries (2x AAA size batteries)
Place batteries with their terminals observing
the (+) & (-) indications.
- Replace the cover & press down until the lock
snaps closed. If the remote control is not used
for an extended period of time, remove the
batteries from the remote control as damage
may result due to electrolyte leakage from the
batteries.
- The batteries shall not be exposed to excessive heat such as sunshine, fire or the like.
- Danger of explosion if battery is incorrectly replaced. Replace only with the same or
equivalent type.
- Risk of explosion if battery is replaced by an incorrect type. Dispose of batteries
according to the instructions.
- Do not dispose of batteries in a fire, danger of explosion
- Batteries not covered under warranty.
Note:
POWER
FREEZE
INFO
S.MODE
P.MODE
FAV
FAV./Setting
FAV+/Capture
Turns TV into STANDBY ON/OFF.
Select to freeze the scene still on the screen.
Displays present source information with details of input signal connected.
Recalls / changes presetted sound settings.
Recalls / changes presetted picture settings.
Press to add or remove your favorite channels under TV menu.
Press to switch your favorite channels under TV menu. / Press to open set-up.
Press to switch your favorite channels under TV menu.
- Navigates vertically Up/Down through the Menu/Sub Menus.
- To enter character/numbers in program name parameter.
- To navigate channel Up/Down through valid channels.
- Navigates horizontally Right/Left through the Menu/Sub menus.
- To enter in Menu/Sub menus & to adjust Vol +/-.
- To navigate the letter in program name parameter.
- To select the time.
- To select Source by right arrow key.
- Increase / Decrease the value of selected items & set the
parameter On/Off.
- To enter in sub menu.
- Enter to edit program name parameter.
P
P
OK
EXIT
Press to exit the OSD menu
FUNCTIONS
Page 12

REMOTE CONTROL
9
MENU
INPUT
VOL +/PA+/-
ECO
MUTE
- / -- / CH. LIST
Q.VIEW
Sleep
Sub Title
Aspect
GOTO
/
ROOT
/
Speaker
Media
To select menu OSD window and return to upper menu.
Input source selection.
Select to increase or decrease volume.
Select to increase or decrease volume for power audio.
This key provides the different power saving modes. The current mode is
displayed with ecovision symbol on the screen. In audio only mode display is off
& only audio is on. Press any key to exit audio only mode. Note: VOL+/-, PA+/- &
Mute can fuction even as panel is off. Note: Audio only mode is not available in
models 32” and above.
Turns sound OFF or ON
Figures 0-9 are used to directly input channel number.
- Press this key to enter the program number for different digit eg. -/--/---
- Press for the list of program.
Press this key to toggle between the current & the previous program you were watching.
- Press this key to save channels when manual tuning or to delete channel when editing
TVprogram in program edit function.
- To set sleep timer except when in program Edit Menu or USB mode
- To delete item selected in USB mode.
- Press this key to display sub title list.
- Press this key to rename channels in program edit function.
- Press this key to switch On/Off internal speaker used in TV set.
- Press this key to swap channel in program edit function.
- Press this key to open media center.
- Press this key to switch aspect ratio.
- Press this key to skip channel in program edit function.
- Press this key to STOP in USB mode
- Press this key to PLAY/PAUSE in USB mode
- Press this key to FAST REVERSE in USB MODE
- Press this key to FAST FORWARD in USB MODE
- Press this key to select play time position
When playing the Photo or Video or Mp3 or Text, if you select ROOT key it will stop
playing & return to the current list in USB mode.
Press to open home page.
- Press this key to play the previous track.
- Press this key to play the next track.
Page 13

REMOTE CONTROL
10
Power On/Off
Turning on the TV
- Plug the TV’s power cord into a wall outlet (after this step, the main unit will turn on
and enter stanby mode automatically).
- Press the (Power) button on the TV, or press the (Power) button on the remote
control. The TV will turn on.
Placing In Standby Mode
Your TV can be placed in Standby mode in order to reduce the power consumption.
The standby mode can be usefull when you wish to interrupt viewing temporarily
(during a meal, for example).
- Press the Power Button.
- To switch back on, simply press power button.
Remark: Do not leave your TV in standby mode for long periods of time. (When you
are away on holiday, for example). It is the best to unplug the set from the mains and
aerial.
Changing Programmes
Using the programme selection buttons on the remote control to change
programmes
To select a programme, press the corresponding programme selection button
remote control. For example, to select programme 8, press the “8” programme
selection button on the remote control.
Using the P+/- buttons to sequentially change programmes
Press P+/- buttons on the remote control or on the TV to sequentially seletct
the TV programmes available in you area.
Using the button to return to sequentially change programmes
To return to the previous viewed programme, press the button on the remote
control.
Page 14

BASIC OPERATION
11
Power On/Off
To turn on the TV
- Connect the power play into the wall outlet.
The power indicator lights in red, indicating
that the TV is in Standby Mode.
-Press
The Power indicator lights turns off & the
TV turns on.
To turn off the TV
-Press
The power indicator lights in red & the
TV turns off to standby mode.
- It takes approximately 10 sec. for the
picture to appear after the TV is turned on.
- The TV will switch to standby mode auto matically if there is no signal input for 10
minutes.
- If the TV will not be used for a long periods
of time, unplug the TV from the wall outlet.
Channel Selection
To select channel
Press P+/- or Program Select buttons to select
the channel number directly.
Input Source Selection
To select input “SOURCE”.
- Press to select the desired input source,
then press “enter” to enter. The selected
input source image displays.
INPUT Source : TV, AV-1, PC, HDMI - 1, HDMI - 2
HDMI - 3, USB
Volume Adjustment
To change the volume
- Press V+ to increase the sound volume.
- Press V- to decrease the sound volume.
To Mute the sound
- Press to temporarily turn off the sound.
- Press or V+ to restore the sound to
previous level.
- You can decrease the sound volume by pressing
V- while the sound is muted.
On-Screen Displays (OSD) Selection
& Adjustment
- Press “MENU” to display the main menu.
- Press to select a menu. The selected
menu page displays.
- Press to set your selection.
- Press to choose an item on the menu
page & press to set your selection.
- Press to adjust an item value or choose
options.
- Press “MENU” to return to the menu, press
”MENU” again to exit.
The OSD menu screen will be closed automatically when no operation has been made
for the set OSD menu display time.
Page 15

CHANNEL :
Auto Tunning : You can tuto tune all RF channels in ATV input source only.
ATV Manual Tunning : Channel
: Color System
: Sound System
: Search
: Frequency
CH1
Auto/PAL/NTSC/SECAM
BG/DK/I/M
< >
62.25 MHz
MENU
Program Edit
:
1 S-00 ATV
Delete Edit Move Skip
O
G
Y B
Picture
: Standard / Soft / User / Vivid/Natural/Sports/Lightness
ATV Manual Tunning Contrast
Brightness
Hue
Sharpness
Saturation
ECO
back Light
Color Temperature
Aspect Ratio
Image Noise
Reduction
: 0 - 100
: 0 - 100
: 0 - 100
: 0 - 100
: 0 - 100
: Off/Low/Middle/High
: 0 - 100
: Standard / Warm / Coll
: 16:9
: Off/Weak/Middle/Strong
SOUND :
: 2016 / 7 / 1
: 09:02:40
: Setting off Time Off / On
Date
Current Time
Off Time
Standard / Music / Movie / News / User
Brass
Treble
Balance
AVC
Surround
SPDIF Output
Screen Off
: 0 - 100
: 0 - 100
: 0 - 100
: Off / On
: Off / On
: PCM/RAQ/OFF
: >>>
(Press Ok, Only Sound, No Picture
To exit, press any key.
TIME :
: Setting Boot Time OFF/ON
On Time
Hour 9 (0-23)
Minute 05 (0-59)
(Off Time must be more, than 1 minutes after the current time)
Hour
Minute
Source
(Schedule time must behind the current time)
9
43
ATV
: Off / 10 min / 20 min/ 30 min/ 60 min / 90 mibn /
120 min / 180 min / 240 min.
Sleep Time
: Always / 5 Sec / 10 Sec / 15 Sec / 20 Sec / 30 Sec.
: Off / On
: Off / On
Stand by On : OFF / ON
ARC : OFF / On
Menu Time
Blue Screen HDMI ECE
SETTING :
: 0 - 100
: >>>>
Menu Opcity
Restore To Default
MENU OPERATION
12
Page 16

MENU OPERATION
Auto Tuning
ATV Manual Tuning
Program Edit
Channel
Picture
Sound
Time
Setting
Select
Confirm
Exit
13
Channel Setting (Use for TV)
- Press the “MENU” button on the remote
control to enter the OSD menu. Then
press buttons the “CHANNEL”.
- Press buttons to select the desired item,
then press or ENTER to enter.
- Press buttons on the remote control to
adjust desired item.
- Press the “MENU” button on the remote
control to return to upper menu.
At ATV input source, the first page showed is CHANNEL. At non ATV input source, the first page
is PICTURE as default. Currently press ENTER to get in sub menu, submenu highlight fixed on
press button key, the subtopic turns up with full screen.
Note : CHANNEL can be only selected under ATV condition, others can’t be used.
- Auto Scan : Enter Auto, it shows the process of frequency & the number of channels.
Press to select country & Tune Type at first,
press to select start or cancel, then press OK
button to start or exit Auto Scan.
- TV Manual Tuning:
Storage To : Current storage space shows, the following
option are available : 1-200.
System : Default option depends on country selection.
The following option are available : BG, I, DK
Current CH : Current channel shows.
Search : Can be searched at full channel condition.
Frequency : Show the current frequency & follow
search or Fine-Tune to adjust.
NOTE : After tuning by hand, make sure to press red button for storage, otherwise all channels searched
would not be stored after switching condition.
Page 17

MENU OPERATION
14
- Program edit :
There are 3 items in the Preference page : Skip, Type
Select : Select your channel name by moving the cursor.
Delete : Delete current channel, as follows :
Press UP/DOWN buttons to choose the channel which you want to delete, then
press RED button to delete the current channel.
GREEN Button :
Modify current channel name, only used in ATV mode.
- At normal condition, press GREEN button to enter RENAME mode.
- At RENAME Mode :
MENU : Press to exit RENAME mode, back to normal.
EXIT : Press to exit menu.
UP/DOWN : Press to switch letters, numbers or signs.
LEFT/RIGHT : Press to switch left & right, can select by circle.
GREEN : Press to exit RENAME mode, return normal condition.
Yellow Button :
Channel switching function, ATV available as default.
- At normal condition, enter SWAP mode, & current selected channel is mobile channel X.
- At SWAP mode :
MENU : Press to exit SWAP mode, turn to normal condition.
EXIT : Press to exit menu.
UP/DOWN : Choose switch channels.
YELLOW : If current selected channel is what selected before X, no any other action,
Otherwise, the current channel is channel Y, need to exchange X& Y condition. But the
channel number stays 1,2,3,...... order as before.
BLUE Button :
Choose if skip the channel when CH+/- channel tuning.
At Non Skip channel, press BLUE button, & Skip the current channel
At skip channel, press blue button to cancel skip.
Page 18

MENU OPERATION
15
Picture Setting
You can adjust picture effect here, such as contrast,
brightness & etc.
- Press the “MENU” button on the remote
control to enter the OSD menu.
Then press buttons to select the “PICTURE”.
- Press button to select the desired item to enter.
- Press buttons on the remote control to adjust
desired item.
- Press the “MENU” button on the remote control
to return upper menu.
Picture Mode : Press buttons to select. The following option are available.
“Standard, Mild, User, Dynamic”
Contrast : Adjust image contrast.
Brightness : Adjust image brightness.
Color : Adjust the color saturation.
Sharpness : Adjust the sharpness level of image.
Tint : Determines the tint of the screen (This is only available with NTSC).
Color Temperature : Adjust the color temperature level of image. The following option are
available, “Normal, Warm, User, Cool”.
RED/GREEN/BLUE : Press buttons to adjust numeric size, Press MENU button to turn back
picture main menu.
Aspect Ratio : Press buttons to select, 16:9, Zoom 1, Zoom 2, Panorama, 4:3
Noise Reduction : Press buttons to select On/Off.
Color Temperature
You can select your favorite color temperature.
- Press the “MENU” button on the remote
control to enter the OSD menu. Then press
buttons to select the “PICTURE”
- Press button to select the “Color Temperature”
- Press buttons on the remote control to choose
color temp’s value.
- Press the “MENU” button on the remote
control to return to upper menu.
User : Adjust the color value.
Normal : Keep the original white color
Warm : Adjust the white color to a little bit red.
Cool : Adjust the white color to a little bit blue.
Remark : The changes you made will be stored automatically.
Page 19

MENU OPERATION
16
PC Setting (Only for PC Mode)
The function only used in PC port to adjust PC position. Enter
the screen page with buttons or ENTER button.
- When input PC source, you can go to PC to set up menu.
- Press the “MENU” button on the remote control to enter
the OSD menu. Then press buttons to select the
“PICTURE SETUP” in main menu.
- You can press ENTER buttons to enter PC setup mode
after selecting PC setting , & the press buttons to
select your desired item press buttons to adjust.
- Press the “MENU” button on the remote control to
return to upper menu.
- In PC function operation will instruct more clear.
Sound Setting
You can customize different sound mode to get best effect.
- Press the “MENU” button on the remote
control to enter the OSD menu. Then press
buttons to select the “SOUND”
- Press button to select the desired item
to enter.
- Press buttons on the remote control to
increase or decrease the value of desired
item.
- Press the “MENU’ button on the remote
control to return to upper menu.
Auto Adjust : Press buttons, TV system adjust by itself, it can adjust, H position, V position, Phase & so
on that can make the image in center & display best.
H. Position : Adjust Horizontal Position of the PC Screen.
V. Position : Adjust the Vertical Position of the PC Screen.
Size : Adjust the size of the PC Screen.
Phase : When necessary, adjust the pixel phase of the picture to avoid picture interference.
Sound Mode : Press buttons to select one of the following options are available “Standard, Music, Movie,
Sports User”.
Treble : Adjust bass effect.
Bass : Adjust bass effect.
Balance : Adjust balance effect.
Auto Volume : (Auto volume control, when you turn on the TV, this feature allows the TV to
automatically adjust the sound output from level to the previous level of
last time when you turned off the TV) : On/Off.
Surround Sound : Select it to enter, then you can select Off or On.
Page 20

MENU OPERATION
Time
Clock
Off Time
On Time
Sleep Timer
Auto Sleep
09/NOV 04:19
13:57
13:58
Off
On
17
Time Setting
You can set the TV’s time & you should set time if you use the automatic On/Off times.
- Press the “MENU” button on the remote control to enter
the OSD menu.
Then press buttons to select the “TIME”.
- Press button to select the desired item to enter.
- Press buttons on the remote control to adjust desired item.
- Press the “MENU” button on the remote control to upper menu.
Sleep Timer : Press buttons to select your desired item (Off,
240 min., 180 min., 120 min., 90 min., 60 min., 30 min., & 10 min.)
Auto Sleep : Within 10 min. there is no signal, the TV will auto sleep
Clock
- Press the “MENU” button on the remote control to enter
the OSD menu.
Then press buttons to select the “TIME”.
- Press button to select CLOCK, then press ENTER button
to enter.
- Press buttons to select the desired item.
- Press the “MENU” button on the remote control to return upper
menu.
- Press the “MENU” button on the remote control to enter
the OSD menu.
Then press buttons to select the “TIME”.
- Press button to select Off Time, then press ENTER button to
enter.
- Press buttons to select the desired item, then press
buttons on the remote control to set the time.
- Press the “MENU” button on the remote control to return upper
menu.
Off Time
Page 21

Option
OSD Language
OSD Duration
Blue
Restore Default
English
Off
Off
18
MENU OPERATION
On Time
- Press the “MENU” button on the remote control to enter
the OSD menu.
Then press buttons to select the “TIME”.
- Press button to select On Time, then press ENTER to enter.
- Press buttons on the remote control to adjust desired item,
then press buttons on the remote control to set the time.
- Press the “MENU” button on the remote control to return to
upper menu.
Option Setting
You can adjust the OSD language, OSD Duration
- Press the “MENU” button on the remote control to enter the
OSD menu, then press buttons to select the “OPTION’.
- Press button to select the desired item to enter.
- Press button on the remote on the remote control to return
to upper menu.
OSD Lanugage : Press buttons to select the OSD language.
OSD Duration : Press buttons to select your desired item
(Off, 5S, 10S, 15S, 30S, 45S, 60S).
Blue Screen : If no signal is being received or the signal is very
weak, a blue screen automatically replaces the noisy picture
background. Press buttons to select On/Off.
Restore Factory Default : Restore the default setting.
Note : Restore factory default will clear all the programs &
passwords
Page 22

MEDIA PLAY
Photo
Menu
Exit
Select
Move
19
Remote Contoller Media
Media Play
When selecting the USB input mode & input your USB, you can play the USB.
There are 4 items in the preference page : PHOTO, MUSIC, MOVIE, TEXT.
Button
ENTER
Description
Stop / Playback
Play / Pause
Skip a scene or music
Go back to the previous or skip to the next
Press to select item
Press to confirm an action (For example:
copy, paste, etc.)
Note : Select the picture & press PLAY button to play after exiting music play mode.
When playing a movie you can press the “ENTER” button, then the function menu will
appear on the screen. You can select you desired item.
The supported file format of media playing:
File Type
PHOTO
MUSIC
MOVIE
TEXT
Supported File Format
BMP / JPEG / PNG
WMA / Mp3 / Mp4 / AAC
MPEG1 / MPEG2 / MPEG4 / RM / RMVB
TXT
File Name
.jpeg / .bmp
.mp3 / .wma
.mpg / .dat / .vob
.txt
Note : In case the screen reads not compatible with HDD. The file you played needs license
from external source (customer should check this point) or it will not be played.
Page 23

PC SETTING
20
Setting up your PC Software (Based on Windows)
The Windows display-setting for a typical computer are shown below. But the
actual screen on your PC will probably be different, depending upon your
paticular version of windows and your particular video card. But even if you're
actual screen looks different, the same, basic set-up information will apply in
almost all cases.
- First, click on “Control panel” on the Windows start menu.
- When the control panel window appears, click on “Appearance & Themes”
& a display dialog box will appear.
- When the control panel window appears, click on “Display” & a display dialog
-box will appear.
- Navigate to the “Setting” tab on the display dialog-box. The correct size
setting (resolution) Optimum: 1366 x 768
If a vertical-frequency option exists on your display settings dialog box, the correct value is “60” or “70 Hz”.
Otherwise, just click “Enter” & exit the dialog box.
Display Mode
If the signal from the system equals the standard signal mode, the screen is adjusted automatically. if the
signal from the system does not equal the standard signal mode, adjust the mode by referring to your
videocard user guide, otherwise there may be no video. For the display modes listed below, the screen image
has been optimized by manufacturer.
Resolution
640x480
800x600
1024x768
1366x768
Vertical Frequency (Hz)
60Hz
60Hz
60Hz
60Hz
Mode
VGA
SVGA
XGA
WXGA
1920x1080
60Hz WXGA
Note : This is only a reference recommendation. Actual user connectivity features may differ & require
additional settings.
Page 24

INSTRUCTIONS FOR PLATFORM OPERATION
21
Quick Start
Before using this device, please get familiar with the operations below for better experience.
Language input setting (IME)
Language : Select the system language, select Settings > IME > Language Setting, & press “OK” key.
press “ ” key to select the desired language, & then press “OK” key.
Selecting Input Method : In the smart mode, select Settings > IME > Update Input Method, &
integarted “Android Keyboard” & “Google play in Input Method”, you can also download & install third party
input method.
Setting System Time : In the smart mode, select Settings > Date & Time > Set Date & Time
Automatically from the internet, press “OK” key & the system update the clock from the network
automatically, if the TV set isn’t connected to the network, you can set the system time manually.
Screenshot : Before screen shooting, please insert the USB mass storage device into the USB interface,
& press “ ” key. After screen shooting, the picture are saved in the “ ”SNAPSHOT ;\Pictures\Screenshots
folder in the USB mass storage device.
Play the previous video.
Select the speed of fast rewind
Pause / Play the video
Select the speed of fast forward
Play the next video
Select the starting time point of watching
View the playing list
Show details of the video
Playing setup, show/hide subtitle &
adjust the audio progress in this option.
Set A-B repeat playing, set point A & point
B, & the video will repeat between A & B.
A dual-screen display, start or off dual
display function.
Select playing screen.
Select dual display window display mode.
While playing press “OK” key to show the menu options as in the picture above, select an icon & press
“OK” key to perform the operation, you can press “Return” key to exit playing, or “ ” keys
on the remote control to perform shortcut operation.
Page 25

22
INSTRUCTIONS FOR PLATFORM OPERATION
Multimedia Player
Select Multimedia in the main interface, & press
“OK” key to run. Select the file type from all, picture, song &
video in the left.
Playing files in local disk device :
Before playing files in the local disk, insert the USB mass storage
device into the USB interface. Select local disk device in the file
directory in the center, & press “OK” key to enter. Select Back in
the directory, press “OK” key to return to previous folder. Select
the target folder, press “Return” key to return to the desktop.
Attention :
- Non-standard USB devices be recognized. In this case, please replace with a standard USB device.
- The stream media system has certain restrictions on the format of files. The viewing may be abnormal if it is
out of the system restriction.
- Do not remove the USB device while playing, or the system or device may incur a problem. Before replacing
USB device, please turn off power supply.
- The system supports standard USB 1.1, USB 2.0, USB 3.0 devices, such as USB mass storage devices & remo able hard drives.
- The maximum output current of the USB port of this device is 500 mA, & self-protection will be enabled
if it is beyond this limit. Please use external power supply if an external device of higher current will be conn ected.
- The system is complicated, when it is reading or playing files, the screen may be still or certain functions may
be invalid due to the compatibility & stability of the USB device, in this case please turn off the device & re initialize the system.
Media Player UI icon introduction
Picture Player Menu Options
Play the previous picture
Pause / Play lantern slide
Play the next picture
Zoom in the picture
Zoom out the picture
o
Rotate 90 left
o
Rotate 90 right
Show detail of the picture
Play the previous track
Pause / resume music playing
Play the next track
Set the repeat playing mode : All, Single, Random
View the playing list.
Show details of the music
Video Player Menu Options
Page 26

SPECIFICATION
24
Screen Size
Resolution
Audio Output
Power Consumption
Connectivity
TV System
AV System
Working Voltage
80cm
HD Resolution
10W + 10W
57W
PAL, SECAM, AUTO
DK, BG, I, M
100V-250V, 50/60 Hz
RF, AV, IN/OUT, HDMI,
VGA, USB, EARPHONE,
YPBPR, LAN, PC, AUDIO
Screen Size
Resolution
Audio Output
Power Consumption
Connectivity
TV System
AV System
Working Voltage
102cm
Full HD Resolution
10W + 10W
85W
PAL, SECAM, AUTO
DK, BG, I, M
100V-250V, 50/60 Hz
RF, AV, IN/OUT, HDMI,
VGA, USB, EARPHONE,
YPBPR, LAN, PC, AUDIO
Note : This user manual is for reference only. Specifications are subject to change without notice.
If at any time in the future you should need to dispose of this product please note that, Waste
electrical products should not be disposed of with household waste. Please recycle where
facilities exist. Check with your Local Authority or retailer for recycling advice. (Waste Electrical
& Electronic Equipment)
Screen Size
Resolution
Audio Output
Power Consumption
Connectivity
TV System
AV System
Working Voltage
61cm
HD Resolution
10W + 10W
45W
PAL, SECAM, AUTO
DK, BG, I, M
100V-250V, 50/60 Hz
RF, AV, IN/OUT, HDMI,
VGA, USB, EARPHONE,
YPBPR, LAN, PC, AUDIO
Screen Size
Resolution
Audio Output
Power Consumption
Connectivity
TV System
AV System
Working Voltage
124cm
1920 X 1080
10W + 10W
105W
PAL, SECAM, AUTO
DK, BG, I, M
105W AC, 50/60 Hz
RF, AV, IN/OUT, HDMI,
VGA, USB, EARPHONE,
YPBPR, LAN, PC, AUDIO
Page 27

TROUBLESHOOTING
25
Snowflake spots occur in
the TV images & there is
noise in accompanying
sound.
There is neither display nor
sound on the screen. The
indication light is not on.
Dotted line or strip disturb a nce occurs in TV
images.
Double images occur on
the TV screen.
The images are colorless.
The TV has no accompanying sound.
There is no display on the
PC, with the prompt of “No
Signal Input”. The red indicator light is blinking.
Images displayed on the
PC deviate. The screen is
not full or is exceeded.
The display is fuzzy.
The remote control distance is short or out of
control.
- The antenna connector is loose, or the
cable damaged.
- The antenna type is improper.
- The antenna direction or position is
inaccurate.
- The signal is weak.
- The power plug is loose or the power
supply is not connected.
- The power switch is not turned on.
- The signal is disturbed by car, neon
light, electric hair dryer, etc.
- TV singals are reflected by surrounding
high mountains or mansions.
- The direction of the antenna is
inaccurate.
- The color saturation is adjusted too low.
- The volume is set too low.
- The sound is on mute.
- The signal connecting cable is loose
or falls off.
- The adjustment is improper.
- The display mode in inaccurate.
- The remote control receiving window of
the machine is blocked by some object.
- The battery of the remote control is low.
- Check if the antenna plug is loose or the
cable is in good condition.
- Check the antenna type (VHF/UHF).
- Adjust the direction & position of the
antenna.
- Try to use signal enhancer.
- Check if the power line is connected.
- Press the “ ” button on the panel.
- Do not use electric hair dryer aside the
TV set & adjust the antenna direction to
reduce disturbance.
- Use high oriented antenna & use the
Fine Tune function of “TV”.
- Adjust the direction of the antenna.
- Enter “PICTURE” setting to increase
color saturation.
- Adjust the volume to a proper degree.
- Press “MUTE” key on the remote control
to cancel mute mode.
- Check if the signal connecting cable is
loose or falls off. Reconnect it.
- Use automatic adjustment function.
- Enter “PC Image Mode” adjustment level
or vertical position.
- Use the recommended mode.
- Remove the object to avoid blocking the
remote control receiving window.
- Replace the battery.
Machine is slow, system
crash, can’t operate the
machine.
- Too much to run the program.
- The external environment (such as
lighting, static electricity, etc.) Interfere
with the normal work of the machine.
- Disconnect the power supply first, &
connect the power supply after about
1-2 minutes, then turn on the TV again.
Problem Possible Causes Solutions
Page 28

26
TROUBLESHOOTING
- Check if the fuse or circuit breaker is working.
- Plug another electrical device into the outlet
to make sure it is working or turned on.
- Power plug is having a bad contact with the
outlet.
- Check the signal source.
NO PICTURE, NO SOUND
- Change the color system.
- Adjust the saturation.
- Try another channel. Black-white program
may be received.
NO COLOR
- Change the batteries.
- Batteries are not installed correctly.
REMOTE CONTROL DOES NOT WORK
- Adjust the brightness & contrast.
- Broadcasting failure.
NO PICTURE, NORMAL SOUND
- Press the volume up button to increase
volume.
- Volume is set to mute, press MUTE to restore
Audio.
- Change the sound system.
- Broadcasting failure.
NORMAL PICTURE, NO SOUND
- It is usually caused by local interference,such
as cars, daylight lamps & hair driers. Adjust the
antenna to minimize the interference.
UNORDERLY RIPPLES ON THE PICTURE
- Perhaps the TV can not recognize the resolution set by he PC. Suggest to change the best
resolution of Windows system. Set refresh rate.
BLANK SCREEN IN PC MODE
- If the antenna is located in a fringe area of a
television signal where the signal is weak, the
picture may be marred by dots. When the
signal is extremely weak, it may be necessary
to install a special antenna to improve the
reception.
- Adjust the position & orientation of the indoor/
outdoor antenna.
- Check the connection of antenna.
- Fine tune the channel.
- Try another channel. Broadcasting failure.
SNOWY DOTS & INTERFERENCE
- Black spots or horizontal streaks appear or
the picture flutters or drifts. This is usually
caused by interference from car ignition
system, neon lamps, electric drills, or other
electrical appliance.
IGNITION
- Ghosts are caused by the television signal
following two paths. One is the direct path,
the other is reflected from tall buildings, hills
or other objects. Changing the direction or
position of the antenna. This will improve
reception.
GHOST
- This interference produces moving ripples or
diagonal streaks, & in some case, loss of cont rast in the picture. Find out & remove the radio
interference source.
RADIO FREQUENCY INTERFERENCE
Page 29

Page 30

www.kodaktv.in
c
SPPL 2018.
Super Plastronics Private Limited
B-29, 30 & 31 Sector - 81 Phase 2 Noida, 201305
Toll Free - 1800-3000-2288
customercare@kodaktv.in
The Kodak trademark, logo and trade dress
are used under license from Kodak
 Loading...