

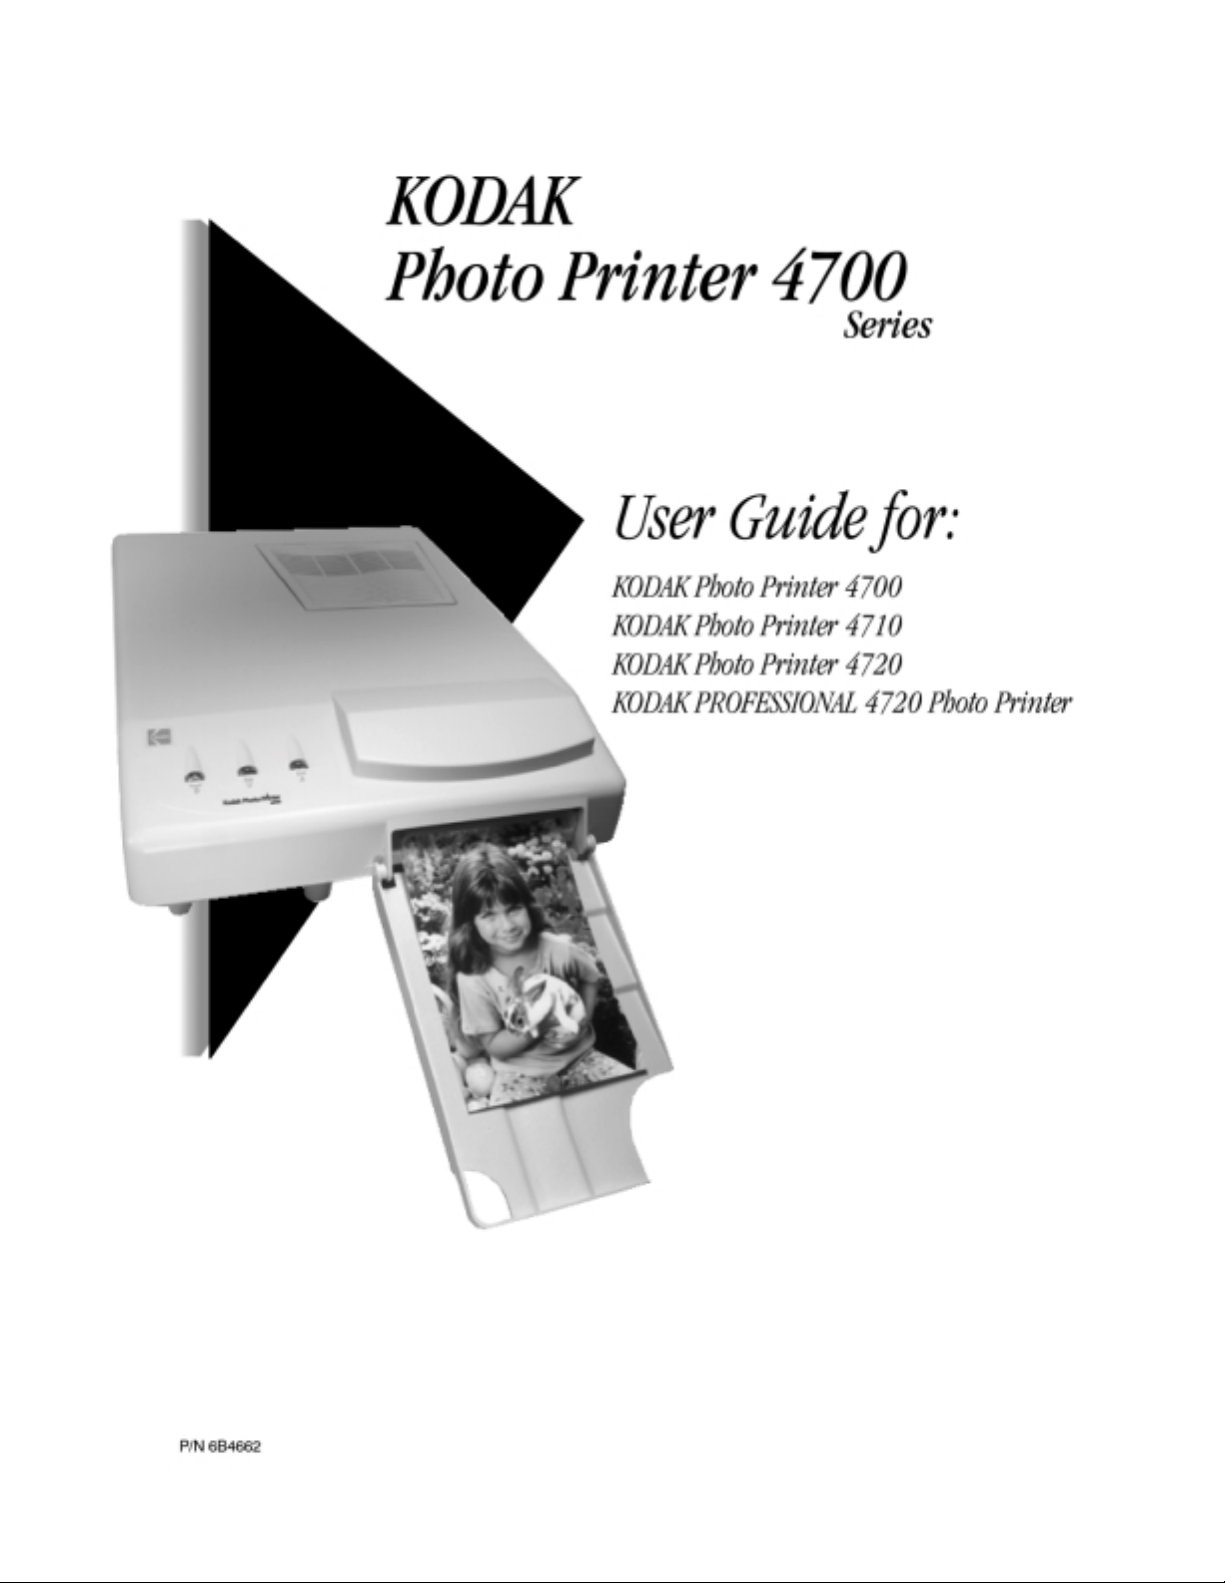
Page 1
Page 2

Contents
About This Guide........................................................................................................................... iii
Regulatory and Safety Information..................................................................................................v
Radio Frequency Interference ...................................................................................................v
Important Safety Information ................................................................................................. vi
Noise Emission Information ................................................................................................... vi
1 Getting Started .....................................................................................................7
Finding a Location for the Printer .............................................................................................7
Unpacking the Printer ...............................................................................................................9
Locating the Printer Parts .......................................................................................................10
Connecting the Cable and the Power Cords ...........................................................................11
Loading the Ribbon Cartridge ................................................................................................12
Removing the Ribbon Cartridge .............................................................................................13
Loading the Paper ...................................................................................................................14
Installing the Printer Drivers ...................................................................................................17
Installing the WINDOWS 95/98 Printer Driver ............................................................... 17
Installing the WINDOWS NT 4.0 Printer Driver............................................................. 19
2 Operating the Printer..........................................................................................21
Looking at the Display Panel ..................................................................................................21
Removing Paper Trimmings (Photo Printer 4720 only) .........................................................22
Keeping the Printer in Good Working Order ..........................................................................22
Working with the Printer ........................................................................................................23
Choosing the Printer Features on WINDOWS 95 and WINDOWS 98 Systems ...................24
What You Can Do on the Paper Tabbed Page.................................................................. 25
What You Can Do on the Device Options Tabbed Page.................................................. 27
Choosing the Printer Features on a WINDOWS NT 4.0 System ...........................................28
What You Can Do on the Page Setup Tabbed Page......................................................... 28
What You Can Do on the Advanced Tabbed Page........................................................... 30
Photo Printer 4700 Series i
Page 3

3 Troubleshooting and Maintaining the Printer ....................................................33
Handling Paper Jams ..............................................................................................................33
Cleaning the Print Head and the Platen Roller .......................................................................35
Cleaning the Pick Roller .........................................................................................................38
Cleaning the Printer ................................................................................................................39
Resolving Error Messages ......................................................................................................40
Appendix A Printer Specifications and Site Requirements.....................................43
Printer Specifications ..............................................................................................................43
Space Requirements ................................................................................................................43
Operating Environment ...........................................................................................................43
Power Requirements ...............................................................................................................43
Agency Approval ....................................................................................................................43
Appendix B Accessories and Supplies....................................................................45
Accessories .............................................................................................................................45
Supplies ...................................................................................................................................45
Appendix C Image Sizes.........................................................................................47
Index ..............................................................................................................................................49
ii Photo Printer 4700 Series
Page 4

About This Guide
This guide provides the information that owners and operators of the KODAK
Photo Printer 4700 Series need to set up, operate, maintain, and troubleshoot the
printer.
This guide is organized as follows.
Chapter 1 Getting Started—explains how to unpack and set up
Chapter 2 Operating the Printer—describes the functions of the
Chapter 3 Troubleshooting and Maintaining the Printer—
Appendix A Printer Specifications and Site Requirements—lists
Appendix B Accessories and Supplies—lists accessories and
Appendix C Image Sizes—includes a table that lists recommended
Regulatory and Safety Information—provides
important information you should read before using
the printer.
the printer and how to get it ready to use. Also tells
how to load ribbon, paper, and the printer drivers.
indicator l i ghts on the display panel and how to work
with the printer driver settings.
describes how to clear paper jams, clean the thermal
print head, and handle error messages. Provides
solutions to common printer problems.
printer specifications and site specifications.
supplies for the printer and tells how to order them.
image sizes for optimum printing.
Photo Printer 4700 Series iii
Page 5

Regulatory and Safety Information
This section lists important regulatory and safety information for the
KODAK Photo Printer 4700 Series.
Radio Frequenc y In terference
NOTE: This equipment has been tested and found to comply with the limits fo r a Class B
digital device, pursuant to part 15 of the FCC rules. These limits are designed to
provide reasonable protection against harmful interference in a residential
installation. This equipment generates, uses and can radiate radio frequency
energy and, if not installed and used in accordance with the instructions, may
cause harmful interference to radio communications. However, there is no
guarantee that interference will not occur in a particular installation. If this
equipment does cause harmful interference to radio or television reception,
which can be determined by turning the equipment off and on, the user is
encouraged to try to correct the interference by one or more of the following
measures:
• reposition or relocate the receiving antenna.
• increase the separation between the equipment and the receiver.
• connect the equipment to an outlet on a circuit that is different from the one to
which the receiver is connected.
• consult the dealer or an experienced radio/TV technician for help.
Requirements of the EMC directive 89/336/EEC were met through compliance
with the following:
• EN 55022: 94 (class B) with Amendments A1:95 and A2:97
• EN 50082 - 1 (European - EU) consists of:
EN 61000-4-2:95ESD
EN 61000-4-3:95rf immunity
EN 61000-4-4:95EFT
EN 61000-3-2 Harmonics
EN 61000-3-3 Flicker
“Changes or modifications not expressly approved by the party responsible for
compliance could void the user’s authority to operate the equipment.”
This is a Class B pr odu ct bas ed on the standard of the Voluntary Control Cou nci l
for interference from Information Technology Equipment (VCCI). If this is used
near a radio or television receiver in a domestic environment, it may cause radio
interference. Install and use the equipment according to the instruction manual.
Photo Printer 4700 Series v
Page 6
Important Safety Information
CAUTION: Use of controls, or adjustments or performance of procedures
• Read and understand all instructions before using the printer.
• The power outlet should be easily accessible and installed near the printer .
• There are no user serviceable parts. To reduce the risk of electric shock, do not
disassemble the printer; contact your local Kodak representative if service or
repair work is required. Incorrect reassembly can cause electric shock.
• Do not expose the printer to moisture or water.
• Do not operate the printer with a damaged power cord. If the printer has been
dropped or damaged, be sure a qualified service person examines the printer
before you use it.
• Position the cord so that it will not be tripped over, pulled, or contact hot
surfaces.
• Always unplug the printer from the electrical outlet before cleaning and
servicing and when not in use. Never yank the cord to pull the plug from the
outlet. Grasp the plug and pull it to disconnect.
• The use of an accessory attachment not recommended by Kodak may cause a
risk of fire, electric shock, or injury to persons.
• Connect the printer to a grounded outlet.
other than those specified may result in injury and/or damage
to the printer.
Hot Surface Label
Noise Emission Information
Operator Position Sound Pressure Levels (L
Sound Power Levels (L
) Standby
WA
NOTE: All data measured in accordance with DIN 45 635, ANSI S12 10-1985,
CAUTION: Hot surface. Avoid contact.
) Standby
A
Full System
Instantaneous Peak
Values ≥ 130 dB(C)
Full System
and ISO 7779 in a hemi-anechoic chamber.
43.5 dB(A)
51.0 dB(A)
None
51.4 dB(A)
65.5 dB(A)
vi Photo Printer 4700 Series
Page 7
1 Getting Started
The KODAK Photo Printer 4700 Series (referred to as the printer in this guide) is
a thermal dye transfer device with superior printing speed and image quality. The
printer uses KODAK photo paper and sticker paper to produce long-lasting
printed images of photographic quality on a 102 x 178 mm (4 x 7 inch) print with
protective coating in about one minute for the 4710 and the 4720 models and
about 90 seconds for the 4700 model.
Finding a Locat ion for the Printer
Model Print Speed Cutter
4700 90 seconds No
4710 1 minute No
4720 1 minute Yes
As you look for an appropriate location for the printer, keep the following
guidelines in mind.
• Allow enough room around the printer to do the following.
— Front Side - load paper and retrieve prints
— Back Side - insert cables and power on/off the printer
— Right Side - l oad ribbon cartr idge
You also need enough room to turn the printer on its side to clean the pick
roller and open the paper jam access area on the bottom.
• Place the printer on a flat, smooth surface. Make sure airflow around the top
and back is not blocked.
• A v oid areas where ventilation ducts, open doors, or frequent passers-by might
expose the printer and paper to high levels of debris. Airborne dirt particles
can cause image quality problems.
NOTE: If you are using the printer in an enclosed kiosk, filtered ventilation is
required.
Photo Printer 4700 Series 7
Page 8
Space requirements for the printer
51 mm (2 inches)
229 mm (9 inches)
76 mm (3 inches)
254 mm (10 inches)
For information on printer specifications, space requirements, operating
environment, and power requirements, see Appendix A on page 43.
8 Photo Printer 4700 Series
Page 9

Unpacking the Pr inter
The following items are included with the printer and packed in an accessory
box. If any items are missing, contact your place of purchase.
• Universal photo/sticker paper tray
NOTE: Depending on your printer mod el you may have both a photo paper tray
and a sticker paper tray.
• Output tray
• Power cords (United States, Europe, and Australia)
• Print head cleaning kit
• User’s guide (in English)
• CD (labeled “KODAK Photo Printer 4700 Series Software and
Documentation”) containing:
—ADOBE Acrobat Reader
—electronic version of the User’s guide (in Chinese, English, French,
German, Japanese, Korean, Portuguese and Spanish)
—printer drivers for WINDOWS 95 (OEM Service Release 2) and
WINDOWS 98 systems, and WINDOWS NT 4.0 with a minimum of Service
Pack 4 systems
• Quick setup card in multiple languages.
NOTE: The printer also requi res a sta ndard IEE E 1284 p arallel cable which you
may need to purchase. Select a high quality, well-shielded cable. Since
cable length can affect the quality of communication between a
computer and the printer, select the shortest cable length possible.
To unpack the printer:
1. Remove the accessory box from the shipping carton. Open the box and remove
its contents.
2. Remove the printer from the shipping carton.
3. Remove the printer from the plastic bag.
IMPORTANT: Save the packaging in case you need to ship the printer.
Photo Printer 4700 Series 9
Page 10
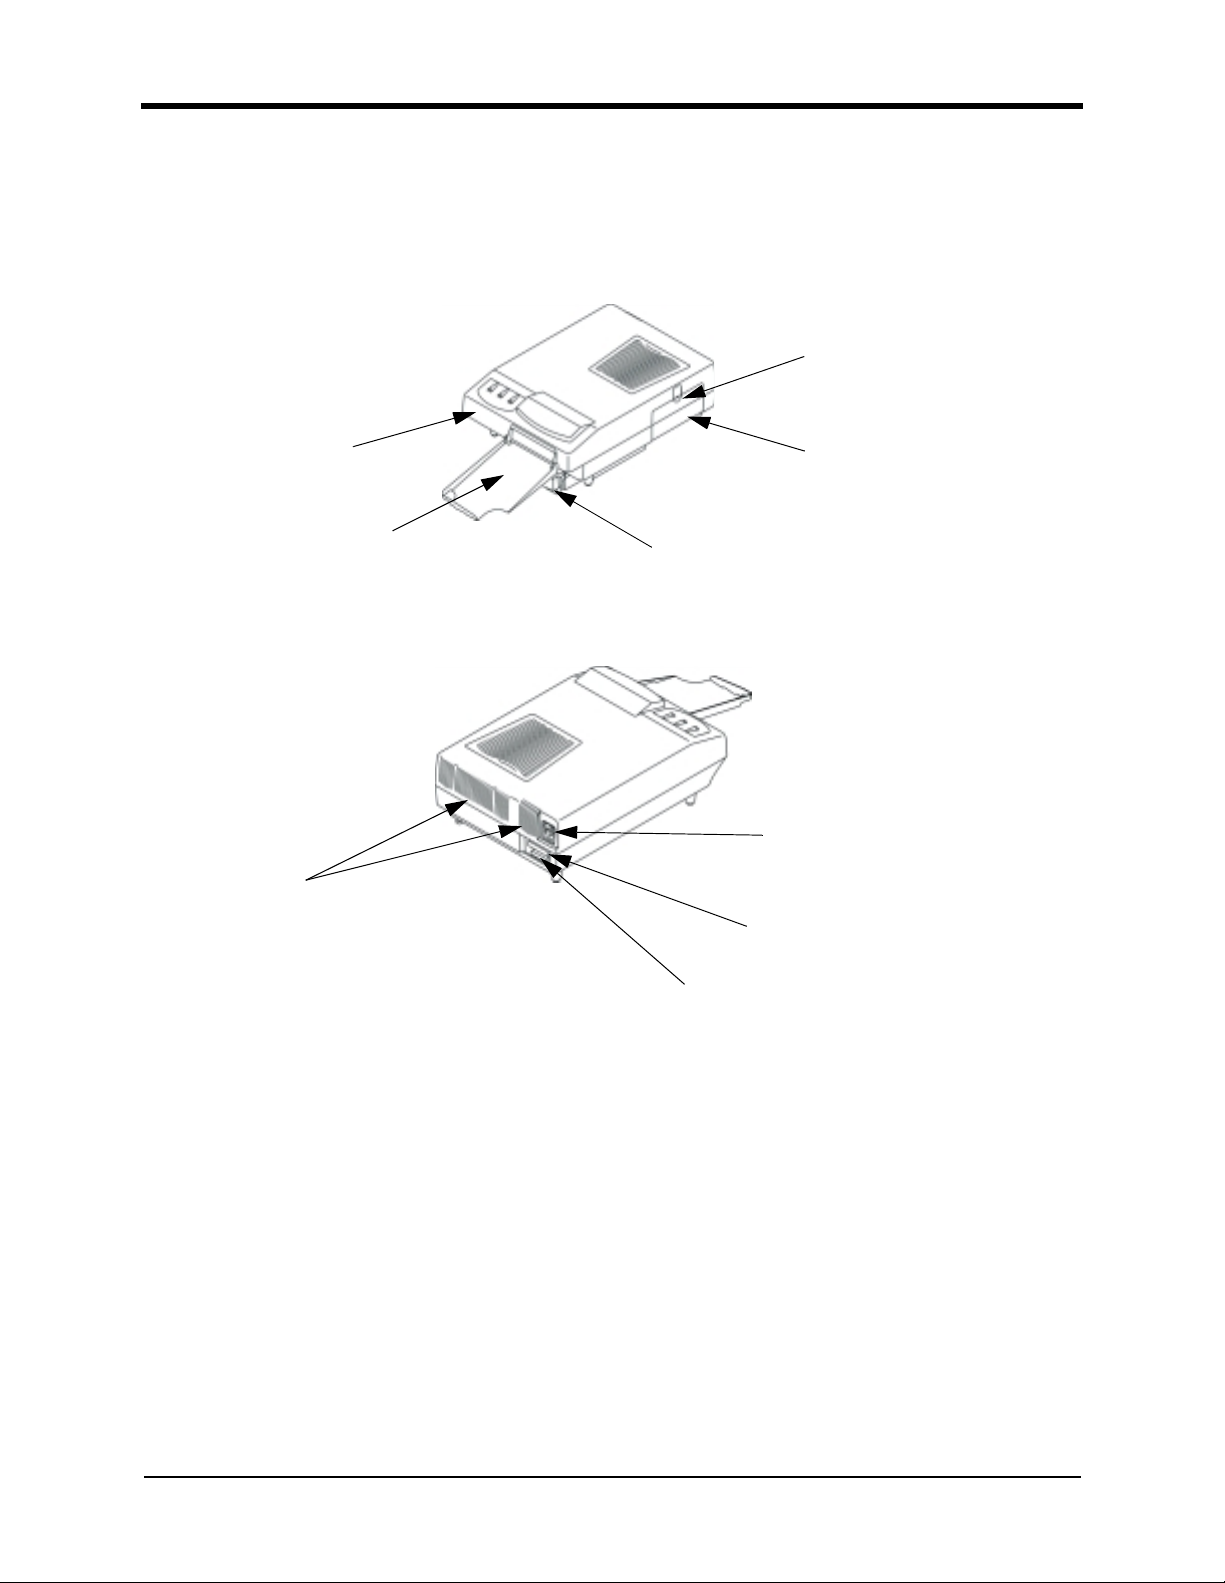
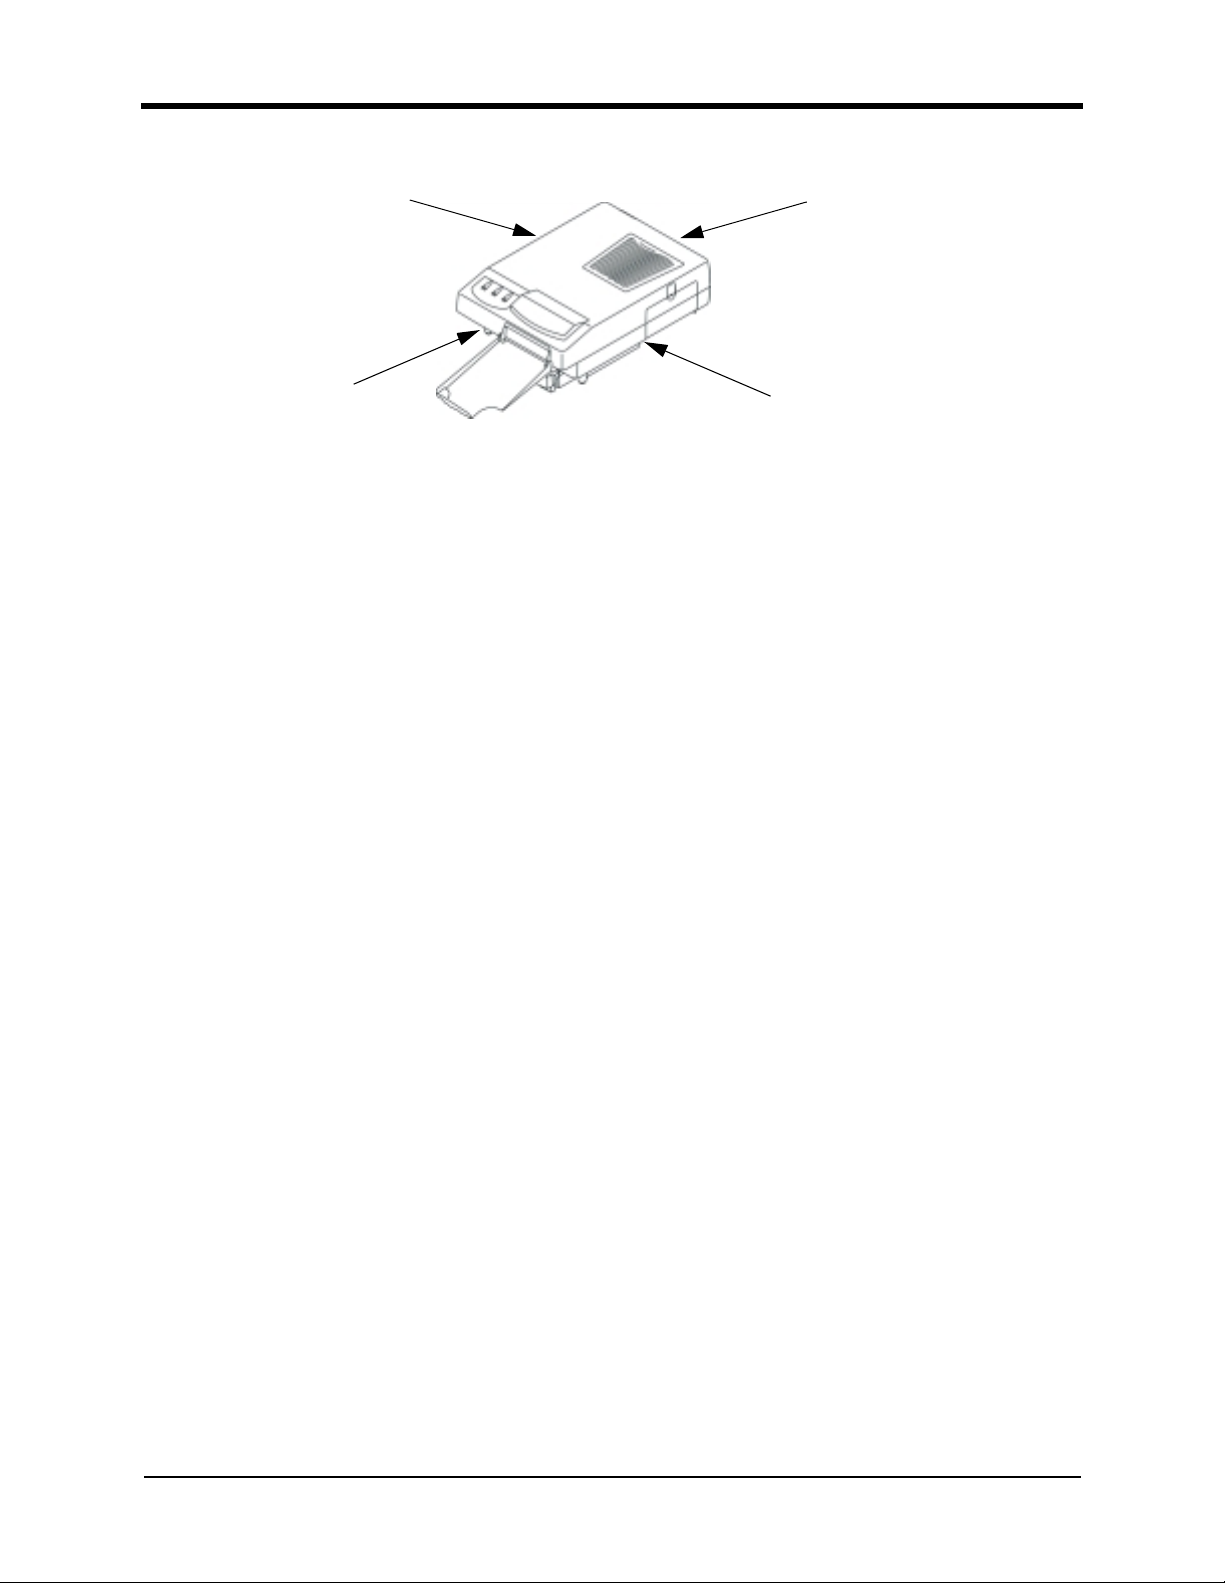
Locating the Printer Parts
Refer to the following illustrations to locate the main par ts of your printer.
Front and Right Side of Printer
Door Pull
LED Display Panel
Output Tray
Ventilation
Ribbon Cartridge Door
Paper Tray
Back and Left Side of Printer
Power Receptacle
and On/Off Switch
Centronics-36 Connector
DB-25 Connec tor
10 Photo Printer 4700 Series
Page 11
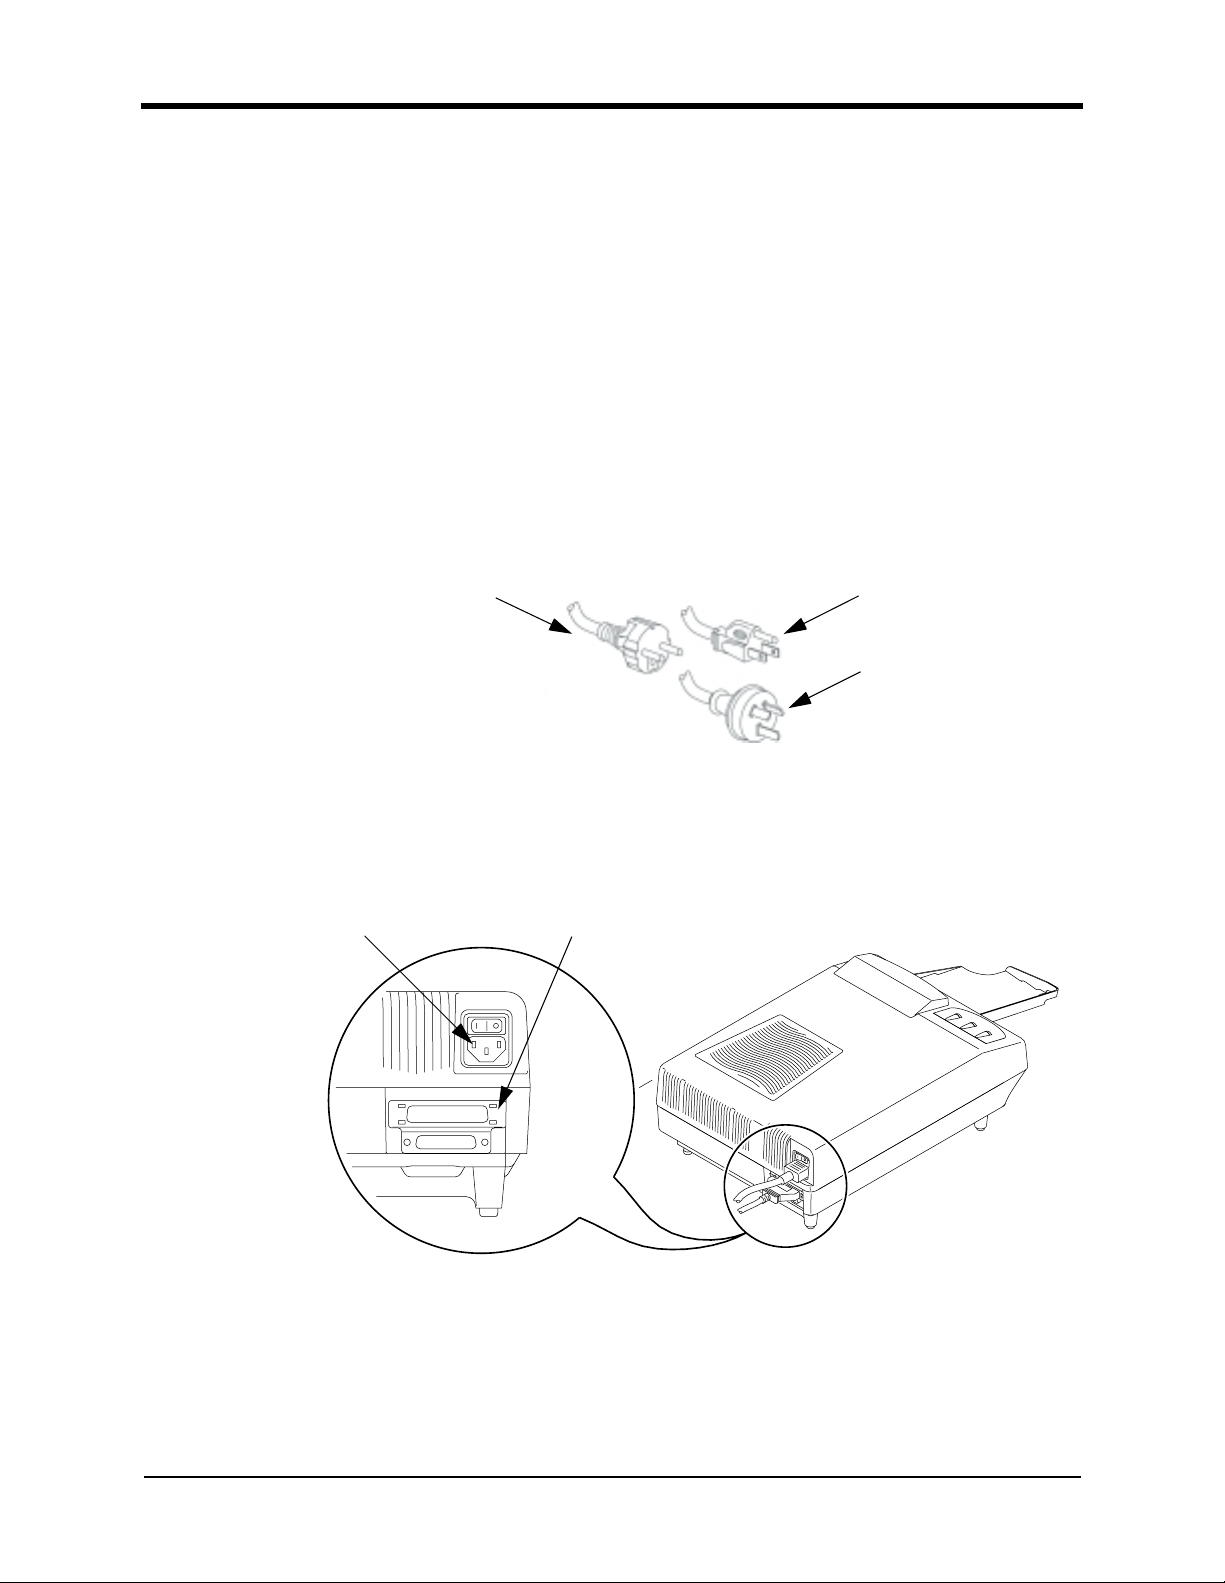
Connecting the Cable and the Pow er Cords
Standard power cords are provided. The printer also requires a 1284 parallel
cable which you may need to provide.
To connect the 1284 parallel cable:
1. With the printer power and the computer power off, plug the cable’s D B-2 5
pin connector into the DB-25 (parallel port) connector on the back of the host
computer. Tighten the screws on the connector to lock it into place.
2. Plug the cable’s Centronics-36 pin connector into the Centronics -36 con nector
(top connector) on the back of the printer. Adjust the cable clips on the pin
connector to lock it into place.
To connect the power cord:
1. Turn the printer power off.
2. Locate the power cord for your geographic region . The fol lowing po wer cords
are included with your printer.
Power Cord
Connector
Europe
3. Plug the appropriate end of the power cord into the port on the printer.
4. Plug the power cord into the power outlet.
1284 Parallel
Connector
United States
Australia
5. Set the power switch to On.
Photo Printer 4700 Series 11
Page 12
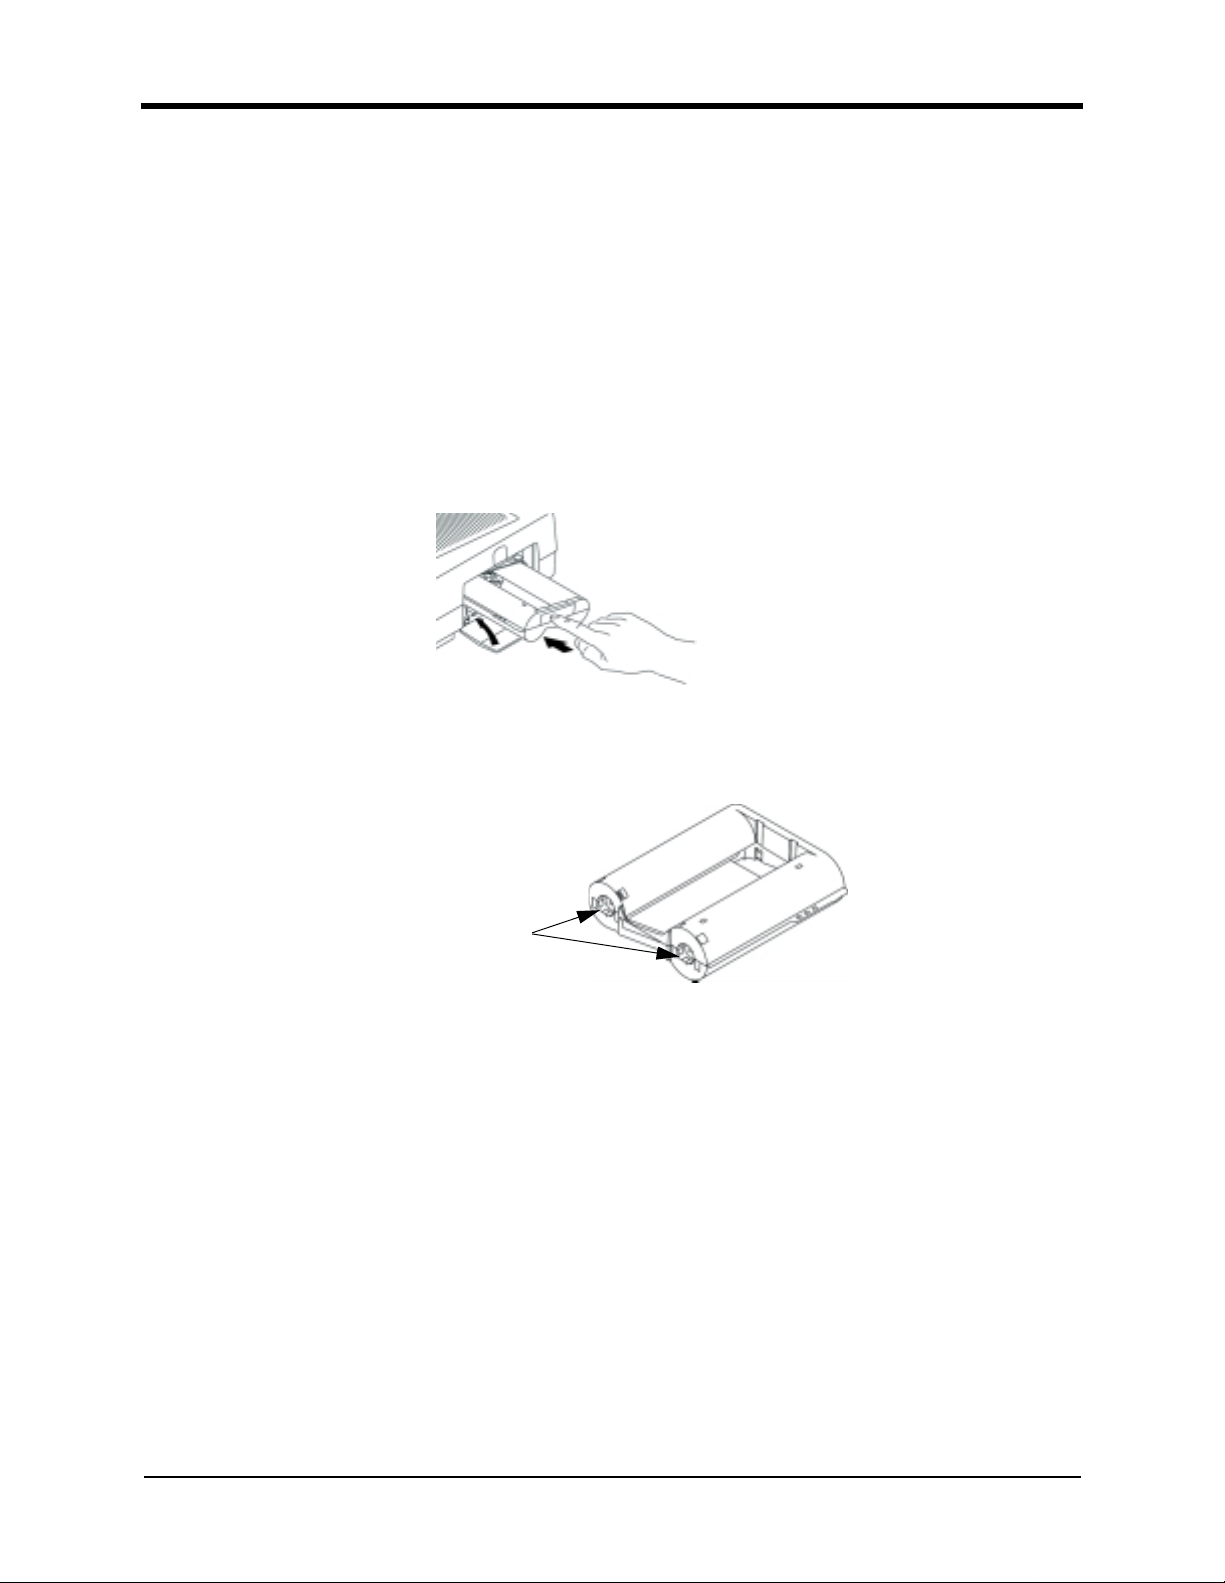
Loading the Ribb on Car tr i dg e
The ribbon provides the dye s for printing images. The f our -patch ribbo n cont ains
three dye patches (yellow, magenta, and cyan) and the protective coating patch.
The three-color, XTRALIFE ribbon contains enough dye to make 100 prints.
To load a ribbon cartridge:
1. Remove the ribbon cartridge from its packaging.
2. Place your finger in the top opening of the printer’s ribbon cartridge door. Pull
the door toward you to open it.
3. Slide the new ribbon cartridge, with the smooth , fini shed side faci n g you , int o
the open slot. (The ribbon cartridge only fits one way in the open slot.) Push
the cartridge until it locks in place.
NOTE: If the ribbon cartridge does not insert fully, rotate the cartridge spools
slightly and try again.
Rotate here
4. Close the door.
12 Photo Printer 4700 Series
Page 13
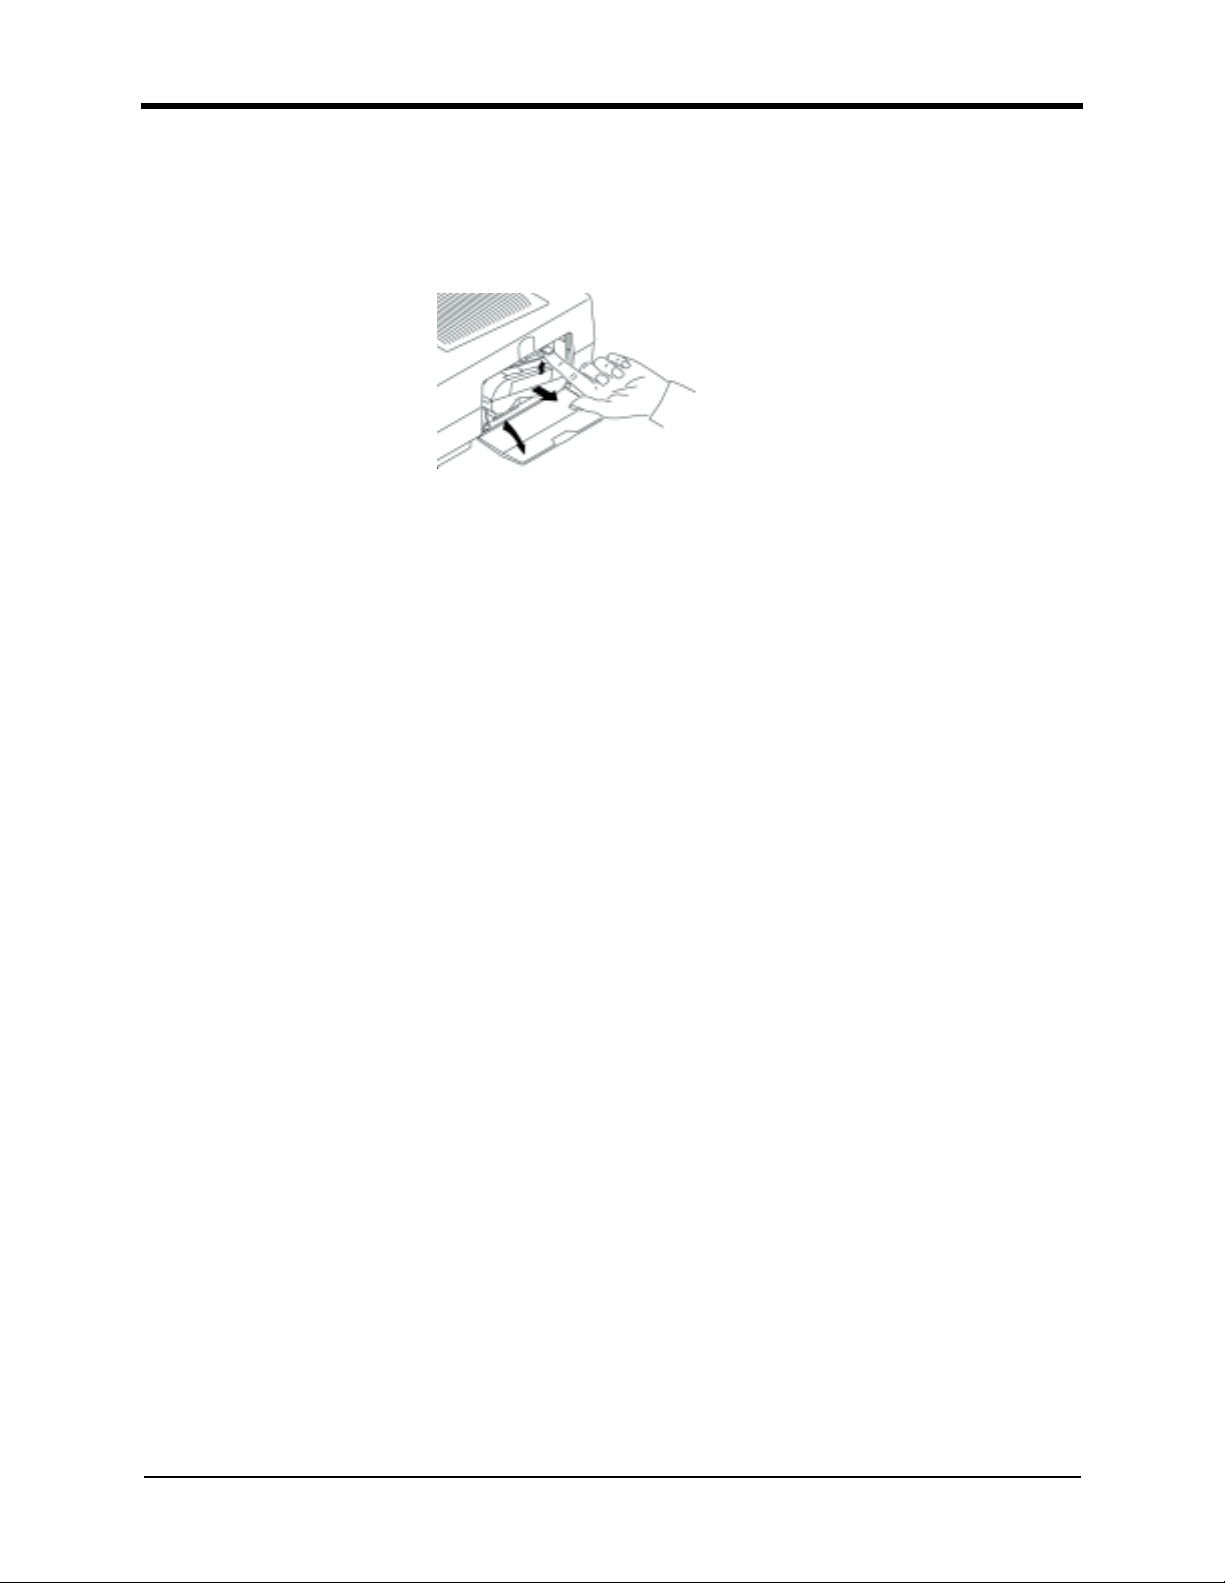
Removing the Ribbon Cartridge
1. Place your finger in the opening at the top of the ribbo n cartridge doo r . Pull the
door toward you to open it.
2. Push up on the green lever to release the ribbon cartridge.
3. Remove the cartridge. Slide the new ribbon cartridge, with the smooth,
finished side facing you, into the open slot. (Th e ribbon cartridge only fi ts one
way in the open slot.) Push the cartridge into the printer until it locks in place.
NOTE: Images remain on the ribbon after printing. If you need to maintain
confidentiality, dispose of the ribbon cartridge appropriately.
4. Close the door.
Photo Printer 4700 Series 13
Page 14

Loading the Pape r
Your printer will come with either:
• One universal photo/sticker paper tray
Or
• Two separate trays: a photo paper tray and a sticker paper tray
When using a universal photo/s t icke r paper tra y you must move the slider on the
tray cover to reveal the correct paper type you are using as shown in the
illustrations below:
Slider position for photo paper
When you are using separate photo paper and sticker paper trays, the paper type
must match the paper type as shown on the top of the tray. The photo paper tray
has a blue label on the top and the sticker paper tray has a green label on the top.
Slider position for sticker paper
Each paper tray holds 100 sheets of either photo paper or sticker paper.
14 Photo Printer 4700 Series
Page 15

CAUTION: Make sure that you check the label on your paper tray top
before you load paper. If the tray top does not match the
paper you load, you may have poor image quality and
damage the printer.
IMPORTANT: Do not remove the paper tray while the printer is printing. If
you do, paper might jam inside the printer.
To load photo paper or sticker paper:
1. Pull the paper tray straight out of the prin ter.
2. Lift the left side of the paper tray cover.
Corner Nails
Internal Side
Bias Spring
IMPORTANT: Photo and sticker paper may be packed with a piece of
cardboard on top. To avoid getting fingerprints on the paper,
keep this cardboard in place while you load the paper.
If your paper is not packed with a piece of cardboard on top,
cover the top sheet with a clean piece of protective material to
avoid getting fingerprints on the paper. Fingerprints on the
image area will affect image quality.
Photo Printer 4700 Series 15
Page 16

Right Corner Nail
3. Place a stack of no more than 100 sheets of paper, shiny side up for photo
paper and sticker side up for sticker paper, (Kodak logo facedown for both) at
a slight angle in the tray.
Side Bias Springs
4. Push the paper against the inter nal side bias springs and un der th e righ t corn er
nail.
5. Lower the paper into the paper tray. Fit the left edge of the paper under the left
corner nail.
6. Hold the paper down below the paper tray sides and close the paper t ray cover .
Discard the cardboard if you are loading photo paper. Discard the top sheet of
protective material if you are loading sticker paper.
7. Line up the paper tray grooves with the printer grooves. Slide the tray straight
back until it locks in place. The tray slides best on a flat, smooth surface.
16 Photo Printer 4700 Series
Page 17

Installing the Printer Drivers
The KODAK Photo Printer 4700 Printer Driver for WINDOWS 95 and
WINDOWS 98 (referred to in this guide as WINDOWS 95/98 printer driver) and
the KODAK Photo Printer 4700 Printer Driver for WINDOWS NT 4.0 (referred
to in this guide as WINDOWS NT 4.0 printer driver) are included with the
printer.
NOTE: To use these printer drivers you must have one of the following
operating systems: WINDOWS 95 (OEM Service Release 2),
WINDOWS 98, or WINDOWS NT 4.0 with a minimum of Service
Pack 4.
Installing the WINDOWS 95/98 Printer Driver
IMPORTANT: The WINDOWS 95/98 printer driver requires the parallel port
mode of your host computer to be ECP-co mpatibl e. Before you
install this driver, you may need to configure the parallel port
mode of your host computer to ECP mode.
To configure the parallel port mode of your host computer to be
ECP-compatible:
NOTE: Different computers have different BIOS configuration s. Therefor e, the
following steps only give you a general guideline for configuring the
BIOS. You may need the assistance of your system administrator to
perform this task.
1. Run your computer’s Setup progr am. (T yp ically , to do this yo u click a function
key or the Delete key during the boot-up of your system.) Open the Main
Page.
2. Follow the instructions on the Main Page to navigate to the page that lists your
Parallel Port Type.
3. If necessary, change your Parallel Port Type to ECP mode.
4. Save and exit the Setup Program per your computer manufacturer’s
instructions.
The BIOS automatically updates your Parallel Port Mode and restarts the
system.
You are now ready to install the printer driver.
To install the printer driver:
1. To start the Add Printer Wizard do one of the following:
• Click Start, point to Settings, click Printers, and then double-click the Add
Printer icon.
Or
• Ins ert the CD that came with your printer into your CD-ROM drive, select
your language from the choices that appear on the screen, and then click
Printer Drivers.
If the screen does not appear, double-click My Computer, then double-click
your CD-ROM drive.
Photo Printer 4700 Series 17
Page 18

2. Follow the on-screen instructions. When you are prompted to select a
manufacturer and printer, insert the CD that came with your printer into your
CD-ROM drive and click Have Disk.
3. Click Browse and locate the drive and folder that contains the
OEMSETUP.INF file for your printer. When the correct file name appears in
the “Copy manufacturer’s files from” text box, click OK.
4. Be sure the drive listed in the “Copy manufacturer’s files from” list box is
your CD-ROM drive and click OK.
5. Select your printer from the list and click Next.
6. When prompted, insert the WINDOWS Installation CD associated with your
operating system, click Browse, select either the WIN95 folder or WIN98
folder, and then click OK.
7. Continue to follow the on-screen instructions . Wh en you are prompted to
select a port, select EKLPT1.
If the EKLPT1 port does not appear in your list, you must add it before you
finish installing the printer driver.
If the EKLPT1 port does appear in your list, select it and proceed to the steps
to finish installing the printer driver.
To add the EKLPT1 port:
1. Click A dd Port.
2. Accept the default values for Port and Device and click OK.
3. Clic k OK in the next dialog box.
The EKLPT1 port is now selected.
4. Click N ext.
To finish installing the printer driver:
1. The printer’s name appears. If you choose to change that name, enter a short
(up to 31 characters) name.
2. Follow the online instructions to comp lete the installation.
The printer icon is labeled “Kodak photo printer 4700” or a customized name
if you entered one.
3. Restart your computer to be sure all new files are added.
18 Photo Printer 4700 Series
Page 19

Installing the WINDOWS NT 4.0 Printer Driver
IMPORTANT: The WINDOWS NT 4.0 printer driver requir es the parallel port
mode of your host computer to be ECP-co mpatibl e. Before you
install this driver, you may need to configure the parallel port
mode of your host computer to ECP mode.
To configure the parallel port mode of your host computer to be
ECP-compatible:
NOTE: Different computers have different BIOS configuration s. Therefor e, the
following steps only give you a general guideline for configuring the
BIOS. You may need the assistance of your system administrator to
perform this task.
1. Run your computer’s Setup progr am. (T yp ically , to do this yo u click a function
key or the Delete key during the boot-up of your system.) Open the Main
Page.
2. Follow the instructions on the Main Page to navigate to the page that lists your
Parallel Port Type.
3. Change your Parallel Port Type to ECP mode.
4. Save and exit the Setup Program per your computer manufacturer’s
instructions.
The BIOS automatically updates your Parallel Port Type and restarts the
system.
You are now ready to install the printer driver.
To install the printer driver:
NOTE: It is recommended that you always install the WINDOWS NT 4.0
printer driver from the CD that came with your printer.
You must have administrator privileges to install a printer on a
WINDOWS NT system. You may need the assistance of your system
administrator to perform this task.
1. To start the Add Printer Wizard do one of the following:
• Click Start, point to Settings, click Printers, and then double-click the Add
Printer icon.
Or
• Ins ert the CD that came with your printer into your CD-ROM drive, select
your language from the choices that appear on the screen, and then click
Printer Drivers.
If the screen does not appear, double-click My Computer, then double-click
your CD-ROM drive.
2. Follow the on-screen instructions. When you are prompted to select a port,
select EKLPT1.
If the EKLPT1 port does not appear in your list, you must add it before you
finish installing the printer driver.
If the EKLPT1 port does appear in your list, select it and proceed to the steps
to finish installing the printer driver.
Photo Printer 4700 Series 19
Page 20

To add the EKLPT1 port:
1. Click Add Port and New M onitor.
2. In the Installing Print Monitor dialog box that opens, if necessary, change the
drive in the “Copy files from:” text box to your CD-ROM drive. Place the CD
that came with your printer in your CD-ROM drive. Browse to the
MONITOR.INF file and click OK.
The Printer Po rts dialog box opens with Kodak ECP Port highlighted.
3. Click N ew Port.
A progress bar appears while the files are download ing. A Setu p Message also
appears stating that you must restart your PC before the new EC P por t will
take effect. Complete the installation before restarting your PC.
NOTE: If you get an error message instead of the progress bar, see “Resolving
Error Messages” on page 40.
4. In the next two dialog boxes that open, click OK. In the next dialog box, click
Close.
The EKLPT1 port is now installed.
To finish installing the printer driver:
1. Click N ext.
2. When prompted to select a manufacturer and printer, insert the CD that came
with your printer into your CD-ROM drive and click Have Disk.
3. Click Browse and locate the drive and folder that contains the
OEMSETUP.INF file for your printer. When the correct name appears in the
“Copy manufacturer’s files from” text box, click OK.
4. Be sure the drive listed in the “Copy manufacturer’s files from” list box is
your CD-ROM drive and click OK.
5. Select your printer from the list and click Next.
6. If you choose to customize the printer’s name, enter a short (up to 31
characters) name.
7. Continue with the installation. When asked “Would you like to print a test
page?”, select No, and then click Finish.
8. When prompted, insert the WINDOWS NT Workstation CD.
After the driver is installed, an icon labeled “Kodak photo printer 4700” or a
custom name if you entered one, appears in the list of printers.
9. Restart your computer to be sure all new files are added.
20 Photo Printer 4700 Series
Page 21

2 Operating the Printer
This chapter describes the printer’s display panel and the printing options
available.
Looking at the Display Panel
The printer display panel on the front of the printer has three indicator lights.
Table 1 describes the different statuses of these indicator lights.
Table 1: Indicator Light Statuses and What They Mean
Indicator Light Indicator Light Status Means This
Power On
Off
Busy On
Flashing
Off
The printer is on and ready to print.
The printer is off.
A print job is printing.
A print job is setting up.
The printer is available to start printing a job.
Photo Printer 4700 Series 21
Page 22

Table 1: Indicator Light Statuses and Wh at They Mean (Cont’d)
Indicator Light Indicator Light Status Means This
Error
NOTE: Check
your host
computer for the
error message.
For a listing of
error messages,
possible causes,
and possible
solutions, see
“Resolving Error
Messages” on
page 40.
On A printing error occurred. Turn the printer off
and back on to reset.
Flashing • The printer is initializing.
• The paper tray may be empty or the ribbon
cartridge missing.
• A paper jam may exist.
Off No errors exist.
Removing Paper Trim mings (Photo Prin ter 4720 only)
The trimmings bin sits on top of the paper tray. When your paper is cut, the
trimmings drop into this bin. Be sure to remove the trimmings before you lift the
paper tray cover to load paper.
CAUTION: Empty the bin every fifty cut prints to prevent the
trimmings from interfering with the operation of the cutter.
Trimming s Bi n
Keeping the Prin t er in Goo d Working Order
Follow these guidelines:
• Keep the printer clean.
• Keep the surrounding area vacuumed and litter-free.
• Protect the printer from tobacco smoke, dust, sand, and liquid spills.
• Keep objects off the top of the printer.
22 Photo Printer 4700 Series
Page 23

Working with the Printer
Follow these guidelines:
• Do NOT overload the paper tray. We suggest loadin g no mor e than 1 00 sh eets
of paper.
• Do NOT remove prints from the output tray until the printer ejects them.
• Do NOT put a print back into the output tray or you may cause a paper jam.
• Do NOT exceed the 10 print capacity of the output tray.
• Do NOT cut more than 50 sheets without emptying the trimmings bin.
Photo Printer 4700 Series 23
Page 24

Choosing the Printer Features on WINDOWS 95 and WINDOWS 98 Systems
On WINDOWS 95 and WINDOWS 98 systems, the Paper and the Device
Options tabbed pages are the only ones in which the printer driver and the printer
interact. The other tabbed pages ar e provid ed by the operating s ystem an d are no t
supported by the printer driver or the printer. These pages are not discussed in
this manual. For additional information go to the web site for downloading
driver updates:
http://www.kodak.com/global/en/service/software/thermalDrivers.shtml
You can access the Page Setup and Advanced tabbed pages from the Control
Panel or from an application. To open one of these pages from the Control Panel,
double-click the Printers icon. Right-click “Kodak photo printer 4700” or a
customized name, if you entered one, and click Properties. Click either the Page
Setup tab or the Advanced tab to open that tabbed page.
To open one of these tabbed pages from an application, select Print on the File
menu and follow your application’s procedure for selecting a printer driver and
its features.
24 Photo Printer 4700 Series
Page 25

What You Can Do on the Paper Tabbed Page
Paper size—allows you to specify the size of your output.
4x7 in—produces a 4 x 7 inch (102 x 178 mm) image.
4x6 in—produces a 4 x 6 inch (102 x 152 mm) image.
Border—produces a bordered, 4 x 6 inch (102 x 152 mm) print. The printed
image size is 3.5 x 5 inches (89 x 127 mm).
4x8.2 in—produces up to a 4 x 7 inch (102 x 178 mm) image. This selection is
appropriate for stickers and any uncut prints.
See Appendix C on page 47 for recommended image sizing.
Photo Printer 4700 Series 25
Page 26

Orientation—allows you to specify a Portrait or a Landscape layout.
Paper source—standard WINDOWS 95/98 required feature. Defa ult Tray is the
only option.
Media choice—allows you to make one of the following choices.
Xtralife Auto—the printer applies protective coating to the print if an
XTRALIFE ribbon cartridge is loaded. If an XTRALIFE ribbon cartridge is
not loaded, the job prints without the protective coating and no error message
appears.
Xtralife On—the printer applies protective coating to the print if an
XTRALIFE ribbon cartridge is loaded. If an XTRALIFE ribbon cartridge is
not loaded, an error message appears telling you to check the ribbon cartridge.
To resolve the error message:
• Load an XTRALIFE ribbon cartridge in the printer and click Retry.
Or
• Click Cancel on the error message and resend the job with Xtralife
Auto or Xtralife Off sel ected.
Xtralife Off—the printer does not apply protective coating to the print.
Copies—the range is 1 - 150.
About—opens a window that lists the printer driver’s name and version number.
Restore Defaults—returns all settings on the Paper tabbed page to their defaults.
• Paper Size—4x6 in
• Orientation—Portrait
• Paper Source—Default Tray
• Media choice—Xtralife Auto
• Copies—1
• Print quality—No Sharpening (see “What You Can Do on the Device Options
Tabbed Page” on page 27.)
26 Photo Printer 4700 Series
Page 27

What You Can Do on the Device Options Tabbed Page
Print Quality—allows you to sharpen an image to make edges crisper and
details more noticeable. The following choices are available.
No Sharpening—no enhancement of details is added.
Normal Sharpening—adds one-half the amount of detail enhancement
possible.
Maximum Sharpening—adds the maximum amount of detail enhancement
possible.
Photo Printer 4700 Series 27
Page 28

Choosing the Printer Features on a WINDOWS NT 4.0 System
On a WINDOWS NT 4.0 system the Page Setup and Advanced tabbed pages are
the only ones in which the printer driver and the printer interact. The other tabbed
pages are provided by the operating system and are not discussed in this manual.
You can access the Page Setup and Advanced tabbed pages from the Control
Panel or from an application. To open one of these pages from the Control Panel,
double-click the Printers icon. Right-click “Kodak photo printer 4700” or a
customized name, if you entered one, and click Document Defaults. Click either
the Page Setup tab or the Advanced tab to open that tabbed page.
What You Can Do on the Page Setup Tabbed Page
Paper Size—allows you to specify the size of your output.
4x7 in—produces a 4 x 7 inch (102 x 178 mm) image.
4x6 in—produces a 4 x 6 inch (102 x 152 mm) image.
Border—produces a bordered, 4 x 6 inch print. The printed image size is
3.5 x 5 inches (89 x 127 mm).
4x8.2 in—produces up to a 4 x 7 inch (102 x 178 mm) image. This selection is
appropriate for stickers and any uncut prints.
See Appendix C on page 47 for recommended image sizing.
28 Photo Printer 4700 Series
Page 29

Copy Count—the range is 1 - 150.
Orientation—allows you to specify a Portrait or a Landscape layout.
Color Appearance—a standard control provided by the printer driver. Allows
you to request either grayscale or color output.
Photo Printer 4700 Series 29
Page 30

What You Can Do on the Advanced Tabbed Page
Paper size—allows you to specify the size of your output.
4x6 in—produces a 4 x 6 inch (102 x 152 mm) image.
4x7 in—produces a 4 x 7 inch (102 x 178 mm) image.
4x8.2 in—produces up to a 4 x 7 inch (102 x 178 mm) image. This selection is
appropriate for stickers and any uncut prints.
Border 4x6 in—produces an image size that is 3.5 x 5 inches (89 x 127 mm).
See Appendix C on page 47 for recommended image sizing.
30 Photo Printer 4700 Series
Page 31

Orientation—allows you to specify a Portrait or a Landscape layout.
Copy Count—the range is 1 - 150.
Media—allows you to make one of the following choices.
Xtralife Auto—the printer applies protective coating to the print if an
XTRALIFE ribbon cartridge is loaded. If an XTRALIFE ribbon cartridge is
not loaded, no error message appears and the job prints without protective
coating.
Xtralife On—the printer applies protective coating to the print if an
XTRALIFE ribbon cartridge is loaded. If an XTRALIFE ribbon cartridge is
not loaded, an error message appears telling you to check the ribbon cartridge.
To resolve the error message:
• Load an XTRALIFE ribbon cartridge in the printer and click Retry on
the error message.
Or
• Click Cancel on the error message and resend the job with Xtralife
Auto or Xtralife Off sel ected.
Xtralife Off—the printer does not apply protective coating to the print.
Print Quality—allows you to sharpen an image to make edges crisper and
details more noticeable. The following choices are available.
No Sharpening—no enhancement of details is added.
Normal Sharpening—adds one-half the amount of detail enhancement
possible.
Maximum Sharpening—adds the maximum amount of detail enhancement
possible.
NOTE: The following two buttons are visible only if you select “Kodak photo
printer 4700 Document Settings” at the top of the Advanced tabbed
page.
Undo Changed Option—returns all settings on the Advanced tabbed page to the
previous settings.
About Raster Printer Driver—opens a window that lists the printer driver’s
name and version number.
Photo Printer 4700 Series 31
Page 32

3 Troubleshooting and Maintaining the Printer
This chapter describes the problems you may occasionally have with the printer.
Information on how to solve these problems as well as printer maintenance
procedures are also included.
Handling Paper Jams
If a paper jam occurs, the printer attempts to eject the jammed paper
automatically. If the paper jam clears, resend the print job.
If the printer is unable to clear the jam automatically, turn the printer power off
and then on. This action may cause the printer to eject the partially processed
paper. If the paper jam clears, resend the print job.
Sometimes a paper jam occurs as the paper is picked. For this type of jam,
remove the paper tray and any paper caught in the printer.
If the paper jam still does not clear, remove the paper through the paper jam
access area.
To clear a paper jam through the paper jam access area:
1. Turn the printer power off and unplug the printer.
2. Turn the printer on its left side. The paper/media jam label is now visible.
Open panel, remove jammed media,
replac e pan e l be fore operat i on .
Paper/Media Jam Label
Photo Printer 4700 Series 33
Page 33

3. Press down on the locking tab on the paper jam acces s area. Remo ve the pap er
jam access area door.
4. Remove the paper from the paper jam access area.
5. Replace the paper jam access area door. Make sure both locking tabs are
secure.
6. Turn the printer right side up.
7. Plug in the power cord and turn the printer power on. Resend the job.
34 Photo Printer 4700 Series
Page 34

Cleaning the Print Head and the Platen Roller
Lines or streaks on your prints indicate that the thermal print head and/or the
platen roller need cleaning.
Ten alcohol pads for cleaning the thermal print head are included with your
printer. For information about ordering extra pads, See “Supplies” on page 45.
CAUTION: Always use the type of alcohol pad provided with your
printer.
Never rub or wipe anything, except the recommended
alcohol pad, across the thermal print head.
To clean the thermal print head and the platen roller:
1. Turn the printer power off and unplug the power cord.
2. Place your finger in the opening at the top of the ribbo n cartridge doo r . Pull the
door toward you to open it.
3. Push up on the green lever to release the ribbon cartridge.
IMPORTANT: Do not touch the ribbon. Fingerprints on the ribbon can
severely reduce your image quality.
If you do touch a part of the ribbon, advance the ribbon to the
middle of the next magenta section.
4. Remove the ribbon cartridge and place it in a clean area. Close the ribbon
cartridge door.
5. Turn the printer on its left side.
6. Press down on the locking tab on the paper jam acces s area. Remo ve the pap er
jam access area door.
Photo Printer 4700 Series 35
Page 35

7. Locate the thermal print head and the platen roller.
Thermal
Print Head
Platen Roller
8. Remove an alcohol pad from its packaging. Move the pad along the complete
length of the thermal print head, in one direction only, as follows.
—Apply firm, even pressure.
—Make three passes along the thermal print head.
—Use a clean part of the pad for each pass.
9. Use a damp, lint-free cloth to clean the platen roller. Move the cloth, in one
direction only, as follows.
—Apply firm, even pressure.
—Rotate the platen roller to an uncleaned area after each pass.
—Use a clean part of the cloth for each pass.
10.Wait at least 2 minutes for the print head to dry. Replace the paper jam access
area door .
11.Turn the printer right side up.
36 Photo Printer 4700 Series
Page 36

12. Open the ribbon cartridge door. Slide the ribbon cartridge, with the smooth,
finished side facing you, into the ribbon cartridge slot. Lock the cartridge in
place.
13. Plug in the power cord and turn the printer power on. Print a copy. If you still
see lines or streaks on this copy, clean the print head and the platen roller
again. If a second cleaning does not correct the problem, contact your Kodak
representative for service.
Photo Printer 4700 Series 37
Page 37

Cleaning the Pick Roller
Occasionally, dust and paper particles collect on the printer’s pick roller which
pulls paper from the paper tray. These accumulations can prevent the pick roller
from pulling the paper. A “Pr inter is out of paper” message, when there is still
paper in the tray, may indicate that the pick roller needs cleaning.
To clean the pick roller:
1. Turn the printer power off and unplug the power cord.
2. Remove the output tray and the paper tray.
3. Turn the printer on its left side.
4. Locate the pick roller.
Pick Roller
5. Wrap a pressure-sensitive tape, such as masking or cellophane tape, sticky side
out, around three fingers.
6. Place the three taped fingers on the pick roller. Use these fingers to turn the
roller several times, making sure that the tape touches all of the roller surface.
7. Turn the printer right side up.
8. Plug in the power cord and turn the printer power on. Make sure paper is
loaded correctly in the paper tray. Print a copy. If the pick roller still does not
pick the paper, contact your Kodak representative for service.
38 Photo Printer 4700 Series
Page 38

Cleaning the Printer
To help ensure good printer performance and high-quality output, be sure the
printer’s operating environment is clean and dust-free.
Clean the printer regular ly as des cri bed bel ow. Before you begin, turn the printer
power off and unplug the power cord.
• Wipe the printer cabinet, the paper tray area, and the output tray with a damp,
lint-free cloth. These steps eliminate dust buildup and prevent dirt from getting
into the printer.
CAUTION: Never use abrasives or harsh chemicals to clean any part of
the printer.
• Vacuum the exterior of the printer and the surrounding area to keep them
dust-free.
Photo Printer 4700 Series 39
Page 39

Resolving Error Messages
Error messages appear on the host comp uter and indicate that a pr inter or syst em
problem has occurred.
When an error message appears you ca n:
• Click Retry to resend the job.
• Click Cancel to cancel the job.
• Click neither button. Every 5 seconds the printer driver will retry the job.
Table 2 will assist you in identifying and correcting printer problems. If you
cannot solve a problem, contact your Kodak representative for service.
Table 2: Common Printer Driver Error Messages
Error # Message Possible Causes Possible Solutions
1 The printer is out of ribbon. The ribbon cartridge is
empty.
2 The printer is out of paper. The paper tray is empty. Load paper.
3 Check ribbon cartridge. The ribbon cartridge is
not loaded correctly.
A protective coating is
requested for your print
and an XTRALIFE
ribbon cartridge is not
loaded.
4 Check paper tray. The paper tray is not
inserted correctly.
5 Check paper path. P aper is stuck in the
printer.
6 Check cutter. Paper trimmings stuck in
the cutter.
Remove the ribbon cartridge
and load a new one.
See “Loading the Ribbon
Cartridge” on page 12.
Load an XTRALIFE ribbon
cartridge.
Remove and re-insert the
paper tray, making sure it is
seated correctly.
Clear the paper jam. See
“Handling Paper Jams” on
page 33.
1. Turn off the printer.
2. Remove tray and loose
paper trimmings.
3. Replace tray in the printer.
4. Turn on the printer.
(These steps should cycle the
cutter and clear the paper.)
7 The printer is not connected
or the printer power is not
turned on.
40 Photo Printer 4700 Series
The printer is not
connected to the PC.
The printer power is not
turned on.
Check the 1284 parallel cable
connections.
Check the power cord
connections.
Page 40

Table 2: Common Printer Driver Error Messages (Cont’d)
Error # Message Possible Causes Possible Solutions
8 There is a problem with the
printer.
9 A system error has
occurred.
There is a problem with
the printer or the printer
is not responding.
The PC has a system
error.
The PC does not have
enough memory to print
the job.
• Wait a few seconds and
select Retry in the error
dialog box.
• Select Cancel in the error
dialog box. Resend the job.
• Restart the printer and
resend the job.
• Wait a few seconds and
select Retry in the error
dialog box.
• Select Cancel in the error
dialog box. Resend the job.
• Save your work. Close all
applications. Restart the PC
and resend the job.
• Close all unnecessary
applications.
• Resize the image to make it
smaller.
NA Usage dialog box appears
during the installation of the
EKLPT port on a
WINDOWS NT system.
You are trying to install
the EKLPT port from a
source other than the CD.
The new source has
blank spaces embedded
in the full path name of
the installation software’s
source directory.
• Save your work. Close all
applications. Restart the PC
and resend the job.
Remove the blank spaces. For
example, replace C:\4700
Windows NT Driver with
C:\4700_Windows_
NT_Driver.
Use the CD for the
installation.
Photo Printer 4700 Series 41
Page 41

Appendix A Printer Specifications and Site
Requirements
Printer Specifications
Printer Dimensions
Width: 295 mm (11.6 inches)
Depth: 413 mm (16.25 inches)
Height: 14 1 mm (5.55 inches)
Printer Weight
6.4 kg (14 lbs.)
Printer Resolution
10.5 pixels per mm (267 pixels per inch)
Space Requirem ents
Operating Environment
Power Requirements
Front: 229 mm (9 inches)
Back: 76 mm (3 inches)
Left Side: 51 mm (2 inches)
Right Side: 254 mm (10 inches)
5ºC (40ºF) at 20% relative humidity (Minimum)
35ºC (96ºF) at 85% relative humidity (M aximu m)
Voltage/Frequency
90V to 250V/47Hz to 60Hz
Power consumption
250 watts maximum
Agency Approval
Federal agency approval information appears on a label on the bottom of the
printer.
Appendix A 43
Page 42

Appendix B Accessories and Supplies
This appendix lists the accessories and supplies available for the
printer. Ordering information is also included.
Accessories
Purchase printer accessories through your Kodak representative.
Table 3: Accessories and Order Numbers
Accessory Order Number Printer Type
Universal Photo/Sticker Paper Tray 178-3323 4710 and 4720
Sticker Paper Tray 121-6712 4700
Photo Paper Tray 831-7554 4700
Output Tray 7C5284 All
Supplies
Purchase printer supplies through your Kodak representative.
• Photo Kit (200 sheets)
• Sticker Kit (200 sheets)
• Print Head Cleaning Kit (Order Number 172-1117)
Appendix B 45
Page 43

Appendix C Image Sizes
The following table lists recommended image sizes for optimum printing.
This includes a 3 - 4% overfill required for borderless prints.
Image Size Table
Pixels Inches mm Pixels Inches mm
Border 4 x 6 in. (10 2 x 15 2 mm) 936 3.506 89 1332 4.989 126.7
4 x 6 in. (102 x 152 mm) 1104 4.135 105 1656 6.202 157.5
4 x 7 in. (102 x 178 mm) 1104 4.135 105 1932 7.236 183.8
4 x 8 in. (102 x 208 mm) 1104 4.135 105 1932 7.236 183.8
Width Length
Appendix C 47
Page 44

Index
error messages
printer driver 40
resolving 40
H
handling paper jams 33
Numerics
1284 cable, connecting 11
A
accessories 45
adding, EKLPT1 port 18, 20
Advanced tabbed page options 30
agency approval 43
C
cartridge
loading 12
removing 13
characteristics of the printer 7
choosing printer features
on a WINDOWS 95 system 24
on a WINDOWS 98 system 24
on a WINDOWS NT 4.0 system 28
cleaning
pick roller 38
print head 35
printer 39
clearing
error messages 40
paper jams 33
components of the printer 9
configuring, parallel port 17, 19
connecting 11
1284 cable 11
power cord 11
I
image sizes 47
indicator light statuses 21
installing
1284 cable 11
power cord 11
printer drivers 17
WINDOWS 95/98 printer driver 17
WINDOWS NT 4.0 printer driver 19
L
loading
paper 14
ribbon cartridge 12
locating printer parts 10
location for the printer 7
looking at the display panel 21
M
maintenance of the printer 22, 33
O
operating environment 43
operating the printer 21
options
Advanced tabbed page 30
Device Options tabbed page 27
Page Setup tabbed page 28
Paper tabbed page 25
order numbers for accessories 45
P
D
Device Options tabbed page options 27
display panel, viewing 21
E
EKLPT1 port, adding 18, 20
environment for printer operation 43
environmental requirements 7
Photo Printer 4700 Series 49
Page Setup tabbed page options 28
paper jams
clearing 33
handling 33
Paper tabbed page options 25
paper tray description 14
paper trimmings, removing 22
paper, loading 14
parallel port, configuring 17, 19
Page 45

parts of the printer 9
pick roller, cleaning 38
platen roller, cleaning 35
power cord, connecting 11
power requirements 43
print head, cleaning 35
printer
accessories 45
characteristic s 7
cleaning 39
components 9
keeping in good working order 22
location 7
maintenance 22, 33
operating 21
parts 10
specifications 43
supplies 45
unpacking 9
working with 23
printer driver error messages 40
printer drivers, installing 17
printer errors, troubleshooting 33
printer features
choosing on a WINDOWS 95 system 24
choosing on a WINDOWS 98 system 24
choosing on a WINDOWS NT 4.0 system
28
printer parts, locating 10
R
removing
paper trimmings 22
ribbon cartridge 13
requirements
for power 43
for space around the printer 7, 43
of the site 43
resolving error messages 40
ribbon cartridge
loading 12
removing 13
S
selecting printer features
on a WINDOWS 95 system 24
on a WINDOWS 98 system 24
on a WINDOWS NT 4.0 system 28
site requirements 43
space requirements 7, 43
specifications of the printer 43
statuses of indicator lights 21
T
thermal print head, cleaning 35
trimmings bin 22
troubleshooting 33
U
unpacking the printer 9
V
viewing the display panel 21
W
WINDOWS 95 system
choosing printer features 24
installing the printer driver 17
WINDOWS 98 system
choosing printer features 24
installing the printer driver 17
WINDOWS NT 4.0 system
choosing printer features 28
installing the printer driver 19
working with the printer 23
50 Photo Printer 4700 Series
 Loading...