

Page 1
IMPORTANT
SAFETY
INSTRUCTIONS
When using your photographic equip
ment, basic safety precautions shouid
aiways be foliowed, inciuding the foiiowing:
1. Read and understand all instructions be
fore using.
2. Close supervision is necessary when any
appiiance is used by or near children. Do
not leave appliance unattended while in
use.
3. Care must be taken as burns can occur
from touching hot parts.
4. Do not operate appliance with a dam
aged cord or if the appliance has been
dropped or damaged—until it has been
examined by a qualified serviceman.
5. Position the cord so that it will not be
tripped over, pulled, or contact hot sur
faces.
6. If an extension cord is necessary, a cord
with a current rating at least equal to that
of the appliance should be used. Cords
rated for less amperage than the appli
ance may overheat.
7. Always unplug appliance from electrical
outlet before cleaning and servicing and
when not in use. Never yank cord to pull
plug from outlet. Grasp plug and pull to
disconnect.
8. Let appliance cool completely before put
ting away. Loop cord loosely around
appliance when storing.
9. To reduce the risk of electric shock, do
not immerse this appliance in water or
other liquids.
10. To reduce the risk of electric shock, do
not disassemble this appliance, but take
it to a qualified serviceman when service
or repair work is required. Incorrect reas
sembly can cause electric shock when
the appliance is used subsequently.
11. The use of an accessory attachment not
recommended by the manufacturer may
cause a risk of fire, electric shock, or
injury to persons.
12. Connect this appliance to a grounded out
let.
13. Disconnect this unit from its source of
supply before replacing the projection
lamp.
SAVE THESE
INTRODUCTION
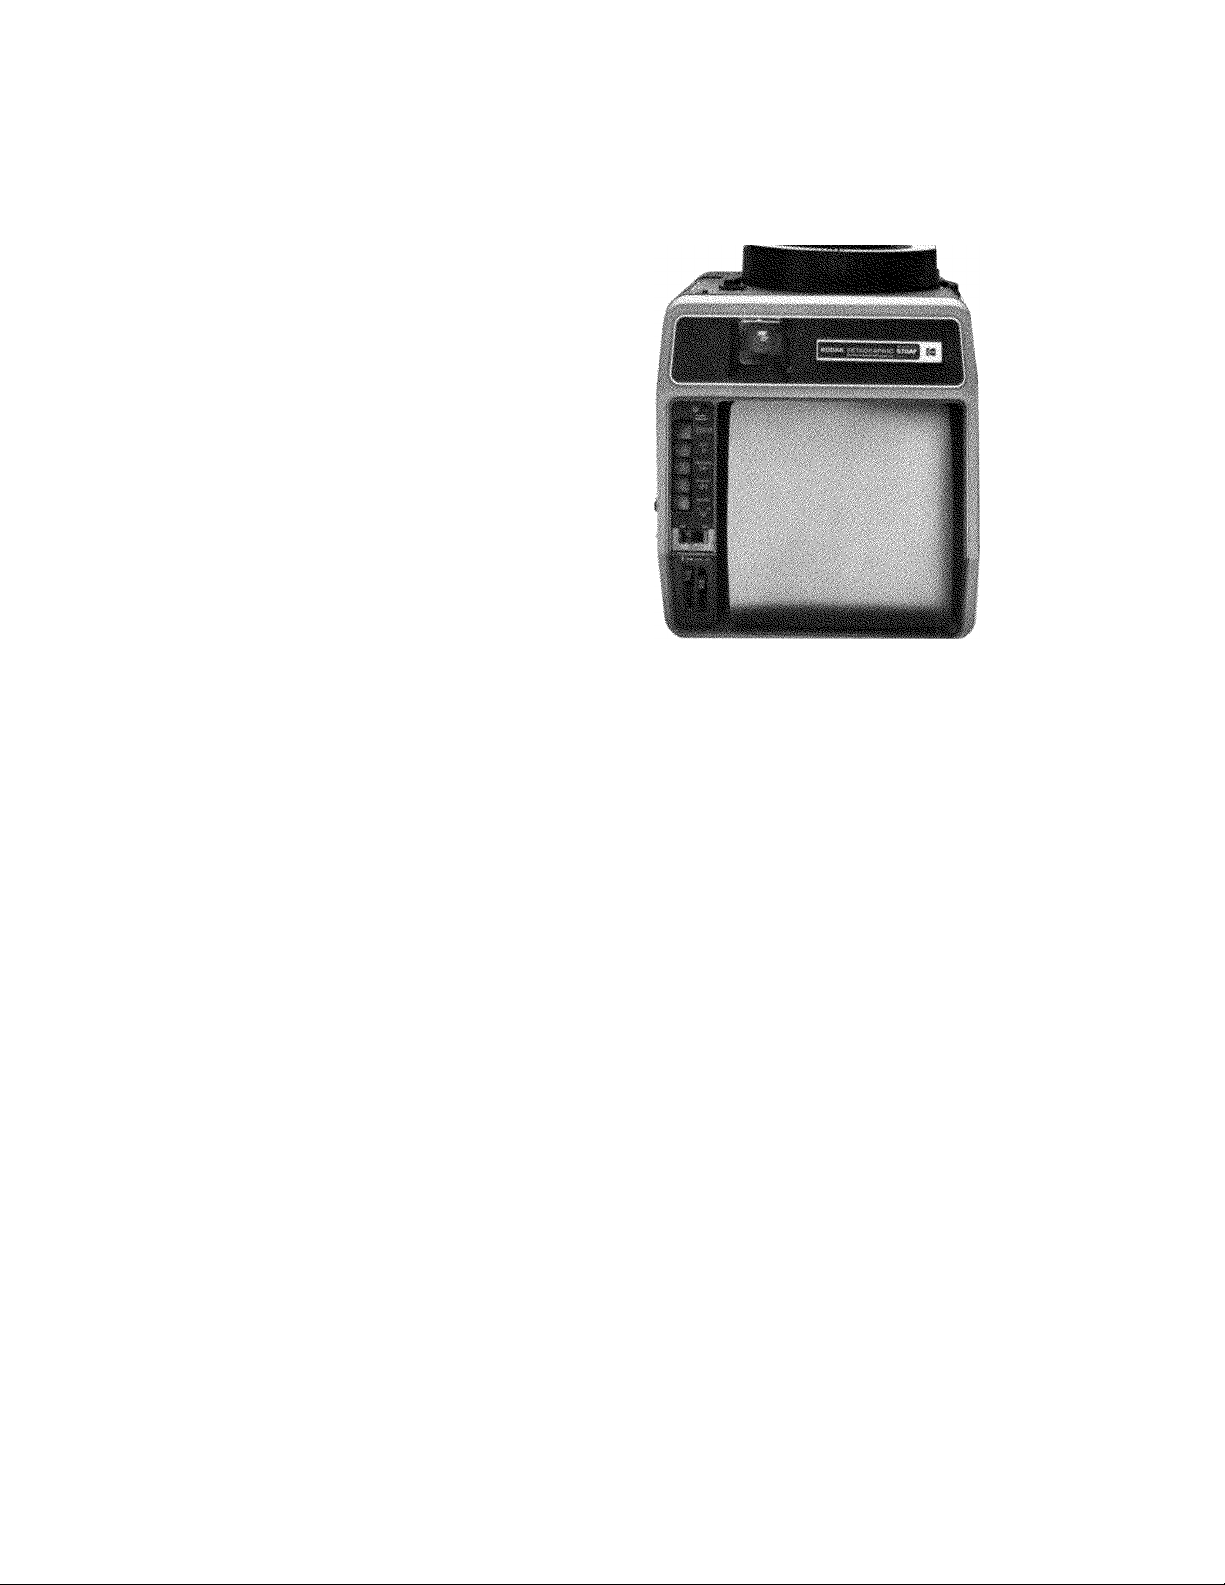
Congratulations on the purchase of your new KODAK
EKTAGRAPHIC AudioViewer/Projector.
Please study this instruction manual. Knowing how your Audio
Viewer/Projector works will help you to communicate your message
to your audience more effectively.
The current family of KODAK EKTAGRAPHIC AudioViewer/
Projectors has four models: the Models 220, 270, 470, and 570AF.
The Model 220 is a minimiim-investment machine for playback of
synchronized sound-slide programs for almost any application in
which automatic slide projection with soimd for an individual or a
small group is required.
The Model 570AF provides additional features for maximum equip
ment versatility, such as autofocus capability and a variable
electronic timer for silent automatic slide advance.
The Models 270 and 470 offer a range of features in between these
two models to satisfy your particular needs.
IMPORTANT: This instruction manual explains all of the
operational features of our top-of-the-line AudioViewer/
Projector—the Model 570AF. It therefore describes in detail
features that your AudioViewer/Projector may not have.
To become familiar with the features provided by your AudioViewer/ Projector, and to make this instruction manual as useful to
you as possible, scan the list of features under “Standard Features of
the Current Line of KODAK EKTAGRAPHIC AudioViewer I
Projectors;” then study the “Feature Comparison Chart—KODAK
EKTAGRAPHIC AudioViewer/Projectors” so that you will be able to
identify the instructions that apply to your machine. (For your
convenience, specific AudioViewer/Projector models are identified in
the instructions, where appropriate.)
For Help
If you ever need technical assistance with your AudioViewer/
Projector, please contact your local dealer in Kodak audiovisual
products or call Kodak at 1-800-242-2424 from 9 a.m. to 8 p.m.,
(eastern time zone) Monday through Friday.
INSTRUCTIONS
©Eastman Kodak Company, 1985
Page 2
This page is designed to be left
open so that you can simulta
neously refer to controls and fea
tures of the AudioViewer/Projector identified on this page and
discussed on following pages.
SLIDE-FORWARD
BUTTON
(Also used for
recording slide-
advance signals.)
SLIDE-REVERSE
BUTTON
SLIDE-SELECT
BUTTON
IMAGE-
MAGNIFYING
LEVER
FRONT
PROJECTiON
DOOR
I
__
CASSETTE-
WELL COVER
SLIDE-FOCUS
KNOB
CABINET-MOUNTED HANDLE
(Usable with tray installed)
TRAY-REMOVAL
SCREW
1
TRAY LOCK RING
(Be sure this ring is firmiy
iocked to prevent spiiiing
siides if the tray is
removed and inverted.)
TAPE PAUSE/RESTART
LIGHT
----------------
TAPE STOP/EJECT
BUTTON
-----------
TAPE-PLAY
BUTTON -
TAPE-FORWARD
BUTTON ---------
TAPE-REWIND
BUTTON —
TAPE-RECORDING
BUTTON
(To record, press with
tape PLAY button.
SIGNAL-RECORDING ■
LIGHT
POWER SWITCH
(ON/OFF)
TAPE PAUSE/RESTART
BUTTON
(Also used for
recording program-
pause signals.)
1
QUiCK LOCKING
ELEVATION LATCH
OMNIDIRECTIONAL,
(Models 270, 470, and
HAND-HELD
MICROPHONE
570AF)
m
fCii
BUILT-IN, BOTTOM-MOUNTED,
ELEVATION LEG
(LEFT)
EXTERNAL-PROJECTOR
INTERCONNECT
OUTLET
OMNIDIRECTIONAL
LOUDSPEAKER
HEADPHONE
EXTERNAL-
LOUDSPEAKER
OUTLET (SPK)
BUILT-IN
VIEWING SCREEN
THREE-POSITION
PROJECTION-LAMP
SWITCH (HI/LO/EXTERNAL
PROJECTOR)
OUTLET
REMOTE- VARIABLE ELECTRONIC
CONTROL \ TIMER (automatic
OUTLET \ slide advance: 2-24
ELEVATION LEG
I RIGHT)
seconds)
AUDIO-TREBLE ----------------
CONTROL
(TONE)
LUME CONTROL
(VOLUME)
AUDIO-RECORDING
Serial Number
The serial number of your AudioViewer/Projector is located on
the data plate on the bottom of
your machine. Record it for
future reference.
MICROPHONE JACK
REMOTE
TAPE-CONTROL
JACK
• >■ VTwTMfríM ^
LIGHT
Page 3

TABLE OF CONTENTS
FEATURE COMPARISON CHART—THE
KODAK EKTAGRAPHIC AUDIOVIEWER/
PROJECTOR, MODELS 220, 270, 470,
AND 570AF....................................................................... 1
STANDARD FEATURES OF THE CURRENT
LINE OF KODAK EKTAGRAPHIC
AUDIOVIEWER/PROJECTORS
....................................
OPERATING INSTRUCTIONS ...................................... 1
Preparing the AudioViewer/Projector for
Program Playback
Using the Built-In Viewing Screen
Focusing the Image
Using the Image-Magnifying System
Using an External Front-Projection Screen
..................................................
................................
.......................................................
............................
..................
Raising and Leveling the Image..................................... 3
Using the Built-In Cassette Machine
............................
OPERATING CONTROLS .............................................. 4
Slide Controls................................................................. 4
Slide-focus knob
Autofocus on/off switch
Slide-forward button
Slide-reverse button
Slide-select button
Projection-lamp switch
........................................................
.............................................
..................................................
....................................................
......................................................
..............................................
Image-magnifying lever.............................................. 4
Variable electronic timer
Slide Control Outlets and Jacks
External-projector interconnect outlet
............................................
.....................................
........................
Using a Single External Slide Projector with the
External-Projector Interconnect Outlet
......................
Using a KODAK EKTAGRAPHIC Programmable
Dissolve Control (and two slide projectors)
with the External-Projector Interconnect
Outlet ...................................................................... 5
Cassette Tape Controls and Visual Indicators
..............
5
Tape-recording button................................................. 5
Tape-forward button
..................................................
Tape-rewind button..................................................... 5
Tape-play button......................................................... 5
Tape stop/eject button................................................. 5
Tape pause/restart button ........................................... 5
Tape pause/restart light .............................................. 5
Signal-recording light
Audio-recording light
................................................
................................................
Cassette Tape Outlets, Jacks, and Microphone .... 5
Remote-control outlet
................................................
Headphone outlet ....................................................... 6
Microphone jack
.........................................................
External-loudspeaker outlet........................................ 6
Omnidirectional handheld microphone
......................
OTHER WAYS TO SHOW SLIDES ............................... 6
SHUTDOWN..................................................................... 6
PREPARING NEW SOUND-SLIDE PROGRAMS
(Models 270, 470, and 570AF) ......................................... 7
Writing the Outline, Writing the Script, and
Planning the Visuals ............................................... 7
Indicating slide-advance pulses in the script
.................
8
Placement of program-pause signals
in the script.............................................................. 8
Editing, arranging the slides, and loading
the tray
How to avoid image cropping
...................................................................
........................................
8
9
Practicing the program (before recording it)................. 9
1
Recording the program on the tape
Recording the audio........................................................10
...............................
9
Evaluating the soundtrack and correcting
any errors ................................................................10
1
2
2
2
3
3
How to record the slide-advance pulses ........................10
How to record the program-pause signals
.....................
11
Evaluating the slide-advance pulses (and
program-pause signals); correcting
any errors ................................................................11
Evaluating the finished program
....................................
11
Recording narration and background music
simultaneously.........................................................11
4
4
4
4
4
4
4
4
4
PREVENTING ACCIDENTAL ERASURES OF
YOUR PROGRAM TAPES............................................ 12
IN CASE OF DIFFICULTY
............................................
Slide tray jammed?.........................................................12
Projection lamp burned out?
(How to change the projection lamp)......................12
Tray advance unreliably?
OWNER’S MAINTENANCE
Cleaning the built-in tape deck
Cleaning the built-in viewing screen
...............................................
.........................................
......................................
.............................
12
13
13
13
13
Adjusting the position of the image
4
on the built-in viewing screen
Vertical image alignment
.........................................
Horizontal image alignment
..............................
.....................................
13
13
13
Adjustment of lifter height............................................14
Aligning the image-magnifying system .......................14
MAGNETIC CASSETTE TAPES
5
Cassette tape track configuration of the
EKTAGRAPHIC AudioViewer/Projector
..............
14
Playing continuously repeating sound-
slide programs .......................................................15
Some sources of endless-loop compact cassettes
designed to be played in the vertical plane ... 15
5
5
5
6
USING A KODAK EC REMOTE CONTROL
WITH AN EKTAGRAPHIC AUDIOVIEWER/
PROJECTOR................................................................... 16
SPECIFICATIONS.......................................................... 16
DIMENSIONAL LINE DRAWINGS FOR
THE KODAK EKTAGRAPHIC
6
AUDIOVIEWER/PROJECTOR
....................................
17
WARRANTY................................... Outside Back Cover
EASTMAN KODAK COMPANY EQUIPMENT
SERVICE CENTERS .................... Outside Back Cover
Page 4
FEATURE COMPARISON CHART—THE KODAK EKTAGRAPHIC
AUDIOVIEWER/PROJECTOR, MODELS 220, 270, 470, AND 570AF
Features
Plays programs that conform to ANSI
Standard PH7.4-1975
Erases, records, and plays back au
dio and slide-advance pulses (visual
recording light, omnidirectional mi
crophone, microphone jack, and re
mote tape-control jack included).
Erases, records, and plays back
automatic program-pause signals
(tape restart button and tape-stop
visual indicator included).
Autofocus capability with ON/OFF
switch
Variable electronic timer provides
silent automatic slide advance.
(Rates: 2-24 seconds)
STANDARD FEATURES OF THE CURRENT LINE OF
KODAK EKTAGRAPHIC AUDIOVIEWER/PROJECTORS
Will play programs conforming to ANSI Standard PH7.4-1975.*
• Image viewing on built-in viewing screen or external front-projection screen.
(External screen not provided.)
Image-magnifying lever to enlarge images by about 50 percent.
• External-projector interconnect outlet allows control of external slide projec
tor (or dissolve control and two slide projectors) for use with a variety of
projection lenses.
• Choice of manual forward-and-reverse projection with push buttons on the
machine or with optional remote control.
• Manual focus knob for convenient focus adjustment.
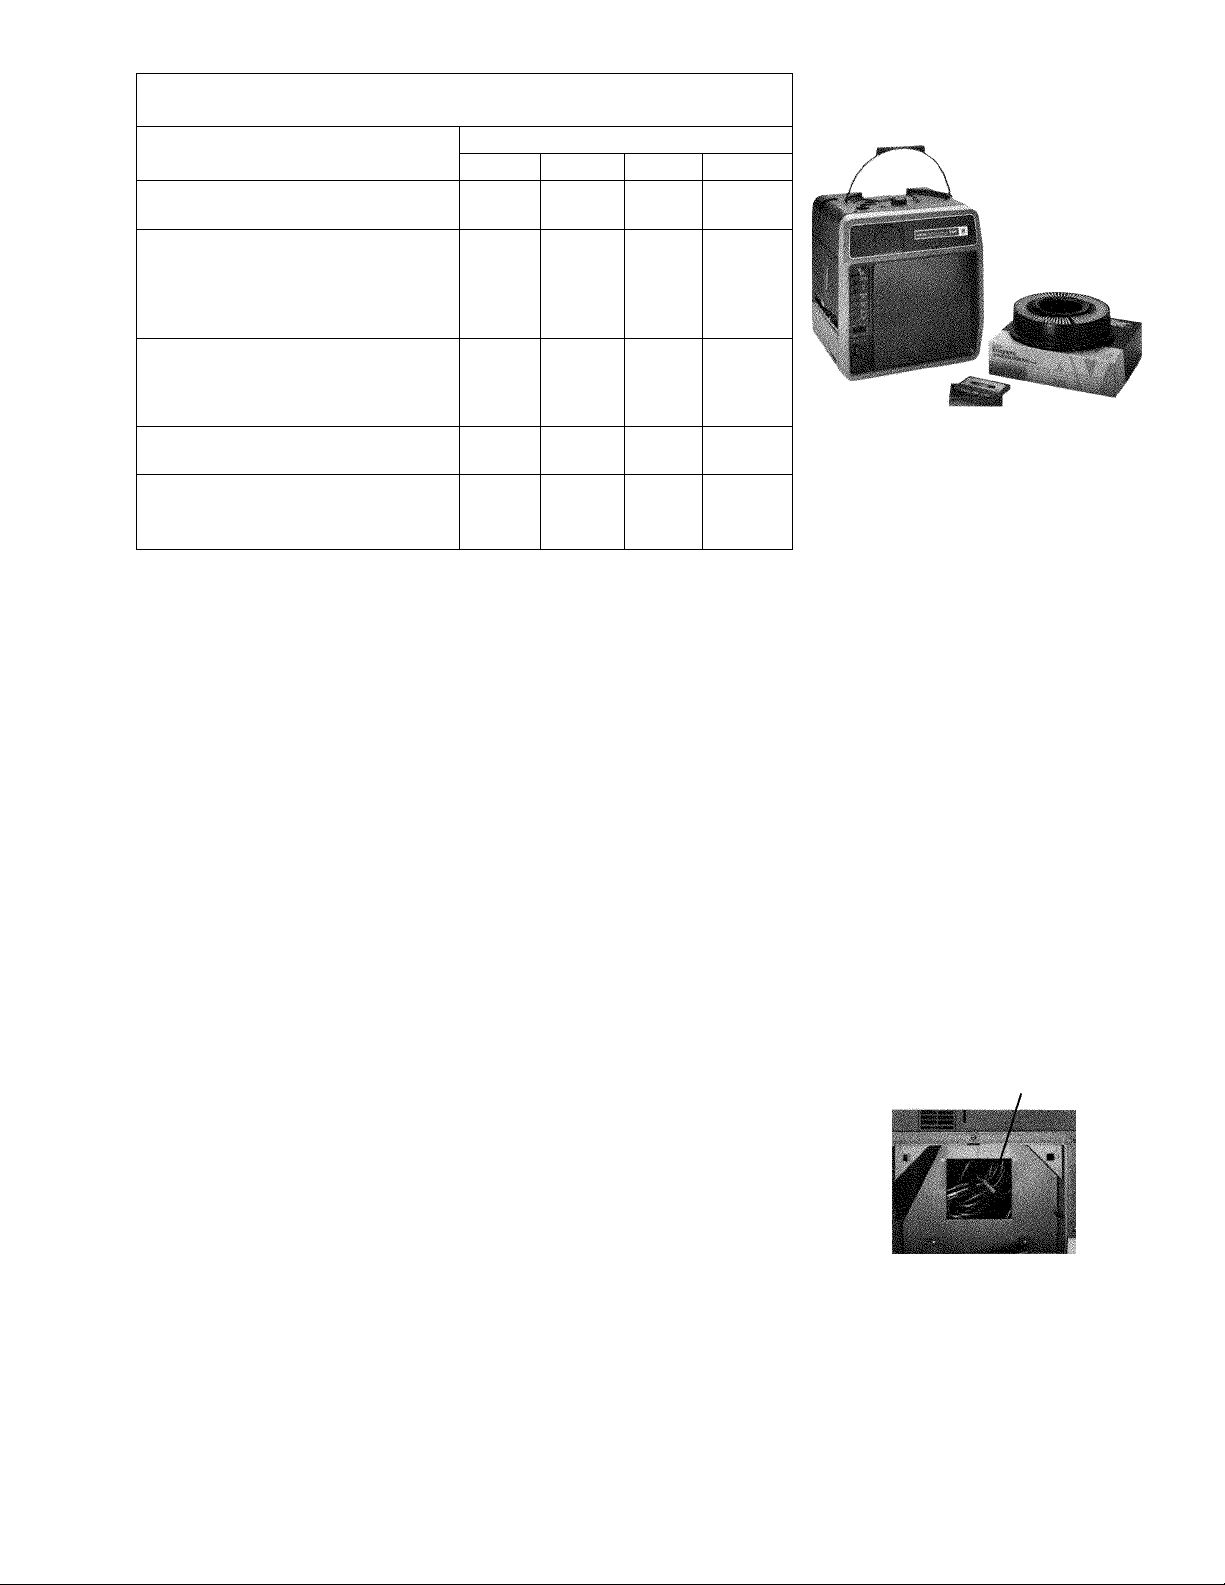
Will accept any KODAK SMe Tray (except Pocket CAROUSEL Slide Trays).
NOTE: Tray not included with AudioViewer/Projector.
Will accept KODAK EC Stack Loader (for forward operation only).
Dark-screen shutter blocks projection light beam when gate is empty.
• Automatic end-of-tape stop helps prevent damage to tape. (Tape-control
buttons return to their released position when tape ends.)
HI/LO/EXT (High, Low, External-Projector) projection-lamp switch provides
high brightness, extended-life brightness, or turns the lamp off when an
external slide projector (or dissolve control and two slide projectors) is being
advanced by the built-in tape deck, slide-forward button, or variableelectronic timer (Model 570AF only) of the AudioViewer/Projector.
Adjustable legs provide quick image elevation.
• Built-in omnidirectional loudspeaker.
Separate outlets for an external loudspeaker and headphones.
• Convenient slide tray storage.
Foldaway handle (usable with tray installed).
Coin-slotted tray-removal screw for removing tray when slide is jammed in
gate.
Thermal fuses to prevent overheating.
Permanently attached three-wire grounded power cord.
• Slide-change time of 1 second (about the same as a KODAK EKTAGRAPHIC
m Projector).
UL listed.
• CSA Certified.
*A copy of this Standard can be purchased from the American Nationai Standards Institute, Inc.,
1430 Broadway, New York, NY 10018.
220
• •
Models
270 470
• •
•
• •
•
570AF
•
•
•
OPERATING
INSTRUCTIONS
To play back a sound-slide pro
gram with your KODAK
EKTAGRAPHIC AudioViewer/
Projector, follow the steps listed
below:
You will need a program recorded in
conformance with ANSI Standard
PH7.4—1975. (Any program
recorded with an EKTAGRAPHIC
AudioViewer/Projector or
EKTAGRAPHIC AudioViewer can
be used.)
Preparing the AudioViewer/
Projector for Program Piayback
1. Place the AudioViewer/
Projector on a sturdy support.
(The rubber feet are nonmarring.)
2. Turn the storage-door latches
on the back of the Audio
Viewer/Projector counter
clockwise and open the storage
door from the top.
a. Uncoil the permanently at
tached power cord and run it
through the slot of the storage
door.
b. Close the storage door and re
lock both latches.
POWER CORD
STORAGE DOOR
1 1"
STORAGE-DOOR LATCHES
3. Plug the AudioViewer/Prqjec-
tor into a grounded 120 V,
60 Hz power outlet.
Page 5
SLIDE-NUMBER “0”
I
GATE INDEX
a. Place the tray of slides on the
AudioViewer/Projector with
slide number "0” at the gate
index. (If the tray does not seat
properly on the Audio Viewer/
Projector, remove the tray and
rotate the bottom metal plate
of the tray until the metal
plate locks into the "0”
position.)
b. Replace the tray on the Audio
Viewer/Projector.
Using the Built-In Viewing Screen
5. Set the projection-lamp switch
(HI/ LO/EXT) to the low (LO)
position.
a. Low (LO) is normally used for
projecting images onto the
built-in viewing screen.
b. High (HI) is normally used for
a brighter image when project
ing onto an external front
screen (using the built-in frontprojection lens). Using high
with the built-in viewing
screen will not damage the
AudioViewer/Projector, the
built-in screen, nor the slides.
c. The function of the external
position of the lamp switch
(EXT) is discussed on page 4,
under the heading, "Projec
tion-lamp switch (HI/LO/
EXT),” and also under "Exter
nal- projector interconnect
outlet.”
6. Press the slide-forward button
to advance the tray to a slide.
An image will appear on the
screen.
Using the Image-Magnifying System
8. To magnify the image for
close-up study, press in and
lower the image-magnifying
lever.
a. The center portion of a 24 x
36 mm transparency is magni
fied about 50 percent to fill the
built-in viewing screen.
h. Refocus the image. (The image
magnifier also works when pro
jecting onto an external frontprojection screen.)
.--ililiii'î:;-' .:
1
IMAGE-MAGNIFYING
LEVER
4. Turn on the AudioViewer/
Projector by moving the power
button to the ON position.
a. The projection lamp will
turn on.
b. The motor and fan will also
start but the built-in viewing
screen (or built-in front-projec
tion lens) will remain dark be
cause the dark-screen shutter
opens to allow the light beam
to project only when a slide is
in the gate.
Focusing the Image
7. Focus the image.
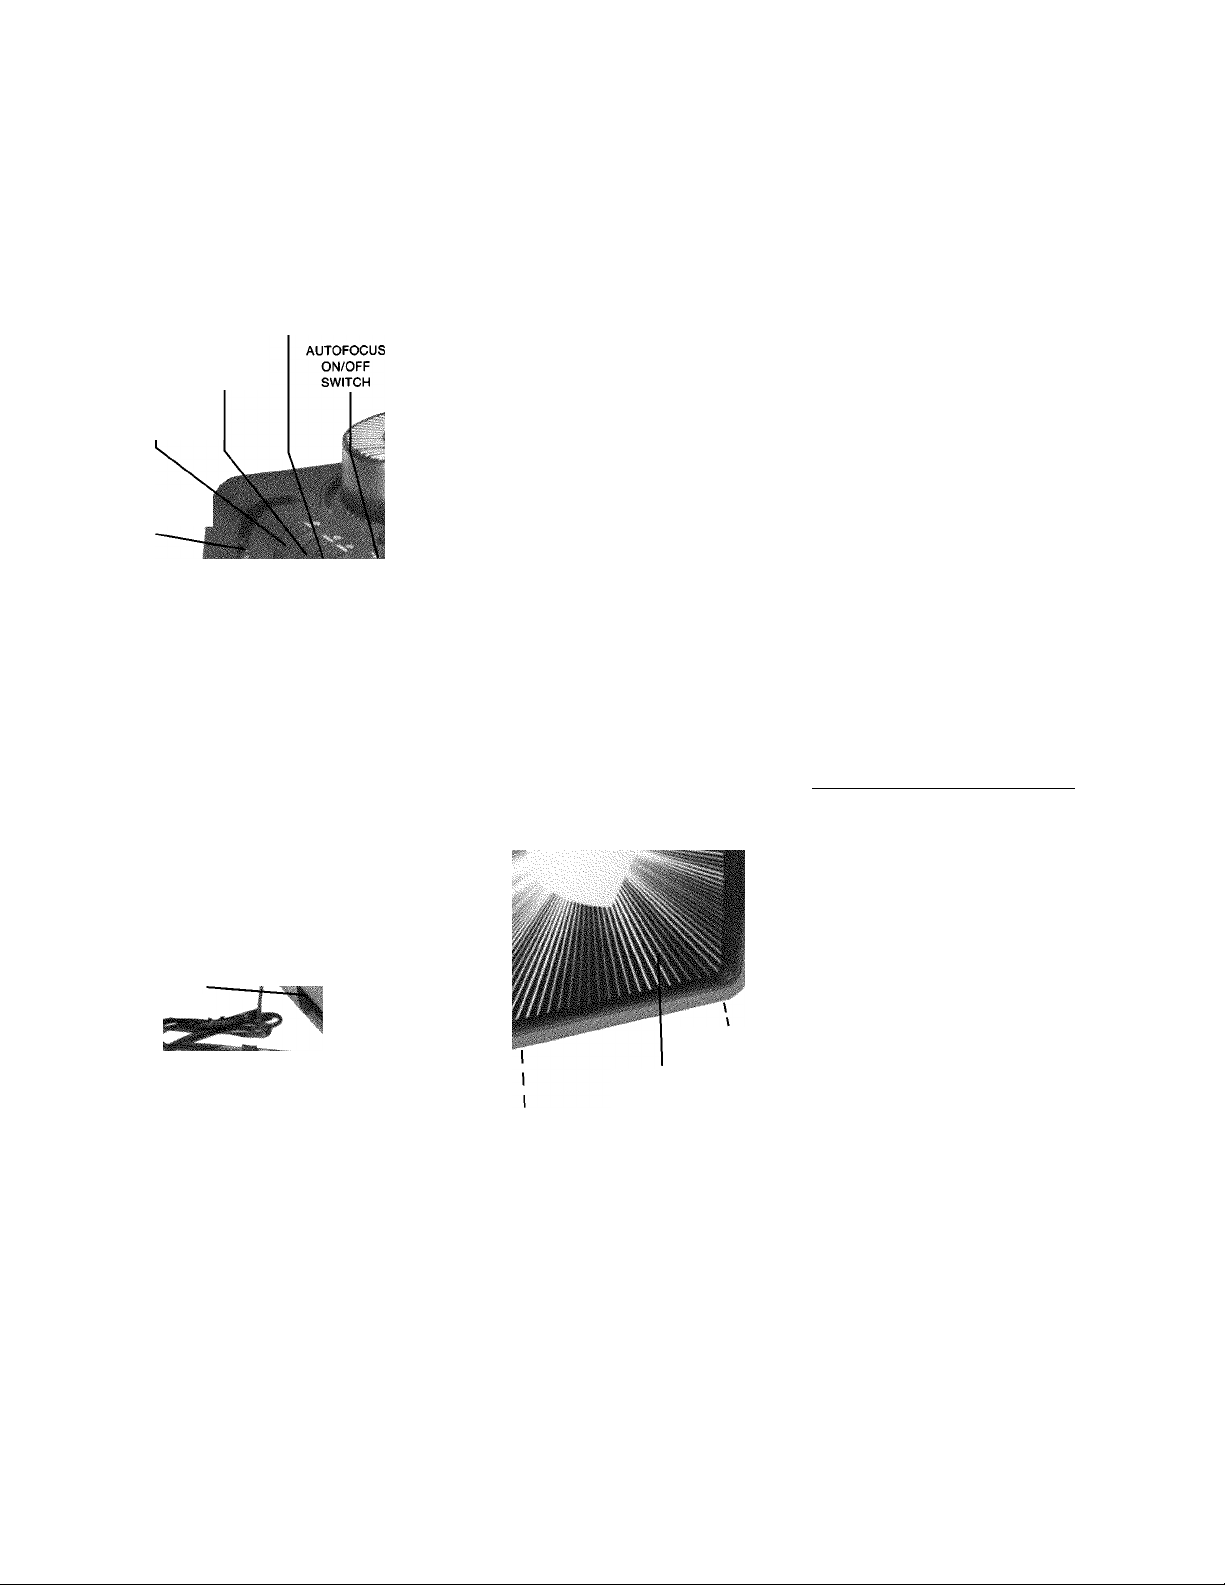
a. Model 570AF: Move the
AUTOFOCUS ON/OFF
SWITCH to the ON position. If
possible, focus on an openframe cardboard-mounted
slide, rather than on a glassmounted slide; the autofocus
mechanism will then focus
automatically on each slide
type, even when intermixing
cardboard, plastic, and metal
mounts (with the exception of
glass-mounted black-and white
slides).
h. Models 220, 270, and 470:
Manual focusing is normally
needed only once at the begin
ning of the slide program if all
slide mounts are the same type.
If cardboard and glass-mounted
slides are intermixed, however,
refocusing for each mount type
may be necessary.
IMAGE IN MAGNIFIED MODE
Page 6
Using an External Front-Projection
Screen
NOTE: For optimum image
brightness and quality, the sug
gested distance between the exter
nal front-projection screen and
AudioViewer/Projector is 3 to
12 feet (0.91 metre to 3.7 metres).
9. To project onto an external
screen:
a. Place the projection-lamp
switch at high (HI) and move
the front-projection door to the
right. This will expose the per
manently installed 77 mm //3.5
front-projection lens.
b. Refocus the image on the exter
nal screen.
Raising and Leveling the Image
10. To raise and level the image
a. Press and hold down both inde
pendently adjustable elevation
latches.
b. Raise and adjust the front of
the AudioViewer/Projector to
the desired angle.
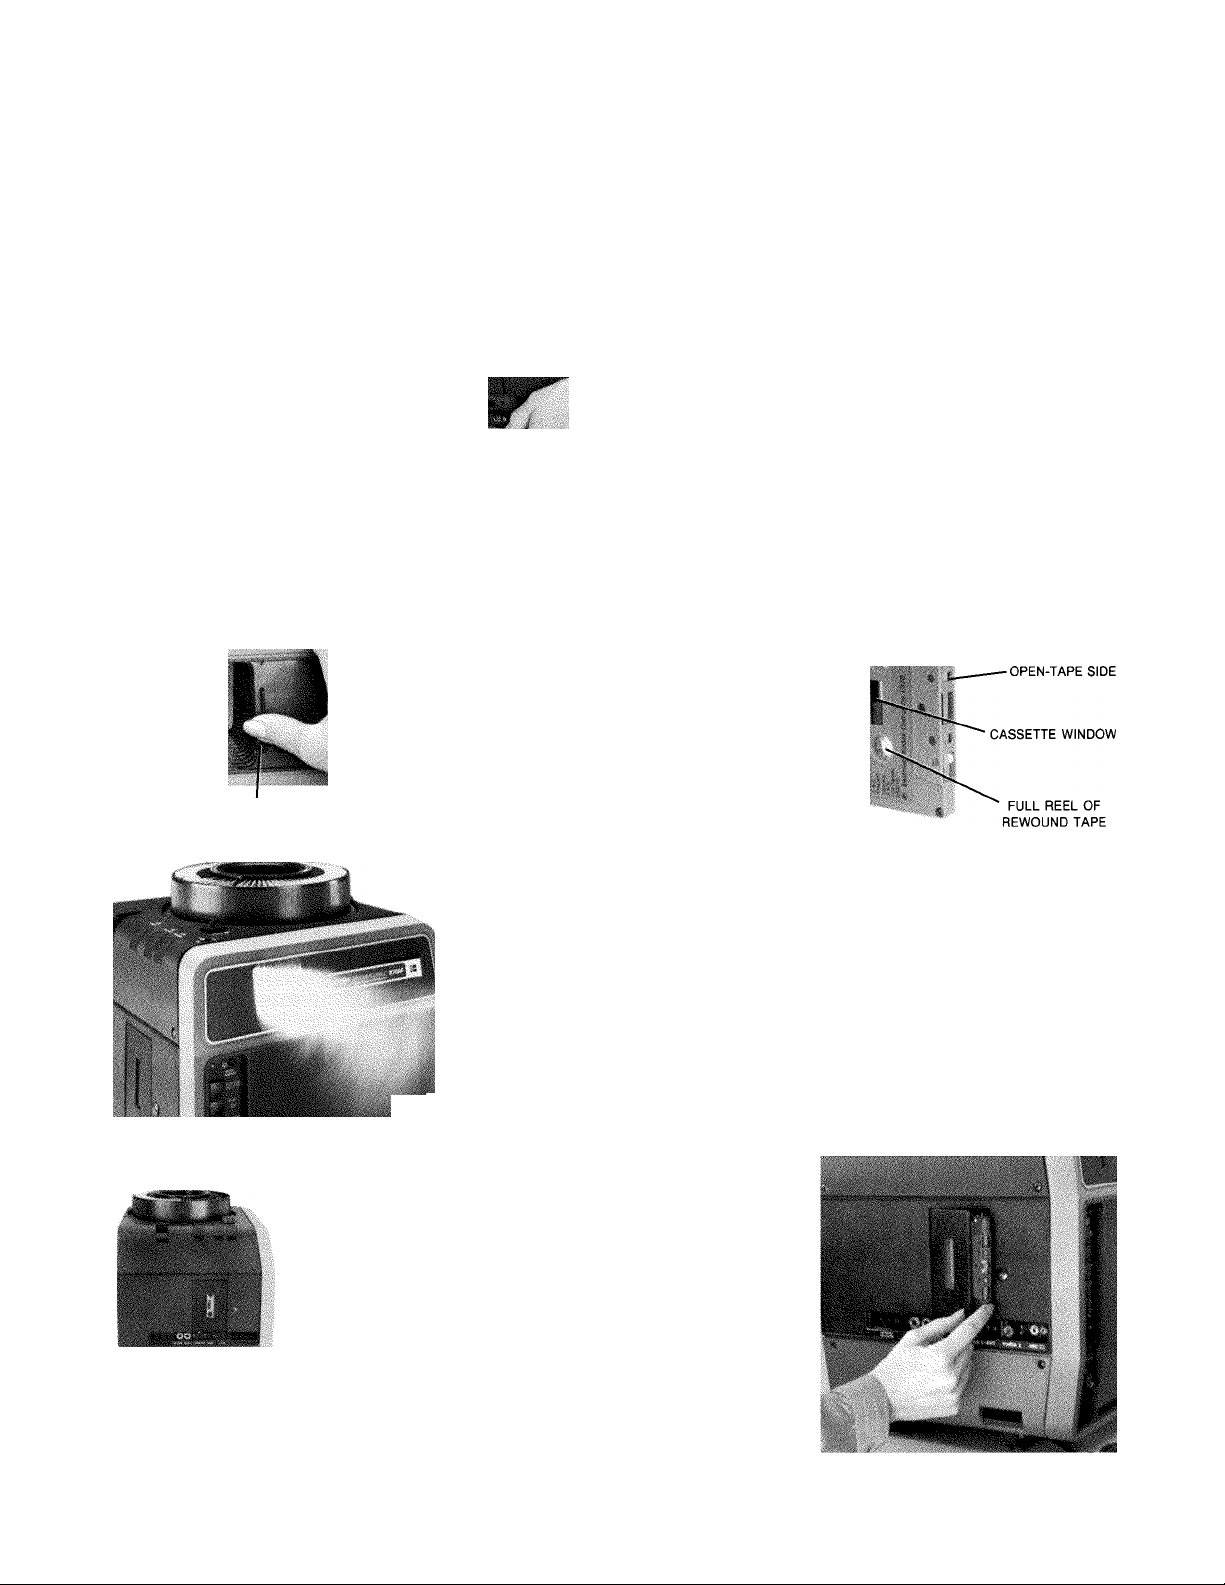
Using the Built-In Cassette Machine
12. Press the tape stop/eject
button (STOP/EJECT) to open
the cassette well.
IMPORTANT: Unlike most cas
sette machines, the AudioViewer/
Projector requires the cassette to
he oriented so that
a. The full reel of rewound tape
on the supply reel is located on
the bottom—not at the top.
(The empty takeup reel is
located on top.)
b. The open-tape side of the cas
sette faces forward (toward
you).
c. Side A of the tape faces away
from the machine.
FRONT-PROJECTION DOOR
c. Release the latches.
11. Reverse the tray to the
beginning of the program.
Press the slide-reverse button un
til slide-number "0” is at the gate
index.
■ SIDE A
s
13. Insert the Cassette into the
Cassette Well.
a. Orient the cassette as de
scribed above and gently press
the cassette into the cassette
well; then close the cassettewell cover.
b. Press the tape-play button. The
tape will start playing.
c. Adjust volume and tone.
d. Refocus if necessary.
\(
iS
Suggested front-projection distance is 3-12 feet.
Page 7
OPERATING CONTROLS
Slide Controls
Slide-focus knob: Turn this knob in
either direction to focus images.
With the Model 570AF, place the
autofocus on/off switch at the ON
position and focus the first image
only. Subsequent images will remain
in focus, even when using mixed types
of mounts, providing the autofocus
ON/ OFF switch is kept on.
Autofocus on/off switch: This
switch (Model 570AF only) must be
set at ON for the autofocus mecha
nism to operate.
Slide-forward button: Press and re
lease this button once to advance the
tray to the next slide. Hold it down to
advance the tray rapidly.
Pressing this button while the
AudioViewer/Projector is in the re
cording mode (Models 270, 470, and
570AF) advances the tray and records
a 1000 Hz slide-advance pulse on the
projector-control track of the tape.
(See page 15 for information on the
tape-track configuration of the AudioViewer/Projector, under the heading
"Magnetic Cassette Tapes.”
Slide-reverse button: Press and re
lease this button once to reverse the
tray to the preceding slide. Hold it
down to reverse the tray rapidly.
NOTE: The slide-forward and
slide-reverse buttons can be
used during program playback
to resynchronize the images
with the audio track, if
necessary.
Power switch: Moving this switch to
the ON position provides power to the
entire Audio Viewer/Projector.
Slide-select button: When this but
ton is held down (with power on), the
tray can be rotated by hand in either
direction to any slide for projection or
for editing, or to slide-number "0” for
tray removal.
Projection-lamp switch (HI/
LO/EXT): As noted previously. High
(HI) produces a brighter image and is
normally used when projecting slides
onto an external screen with the
built-in front-projection lens.
The low position of this switch (LO)
is normally used when viewing im
ages on the built-in viewing screen
(front-projection door closed).
The external position (EXT) turns
off the projection lamp in the AudioViewer/Projector and routes manual,
recorded, or timer-generated (Model
570AF only) slide-advance pulses to
an external slide projector (or dis
4
solve control and two slide projectors)
linked to the external-projector inter
connect outlet with an accessory
KODAK
AudioViewer EC Intercon
nect Cord.
Image-magnifying lever: When this
lever is lowered to its bottom position,
the center portion of a 24 x 36 mm
transparency is magnified by about 50
percent so the center portion of the
image fills the screen and small de
tails in the center of the slide can be
seen more easily.
The normal (unmagnifying) posi
tion of the image-magnifying lever
is up.
Images can be magnified while us
ing the built-in viewing screen or
while projecting images onto an ex
ternal screen using the built-in frontprojection lens. (Refer to page 9, un
der the heading "How to Avoid Image
Cropping” for important information
on transparency formats and the
usable picture area.)
Variable electronic timer: The vari
able electronic timer (Model 570AF
only) provides continuously variable
automatic slide advance pulses from
approximately 2 seconds at the fast
end (1) to 24 seconds at the slow end
(9). The slide tray on the AudioViewer/ Projector (or on an external
slide projector or dissolve control con
nected to the external-projector inter
connect outlet) will cycle automati
cally at any chosen interval from 2 to
24 seconds.
When using the variable electronic
timer to advance an external slide
projector or dissolve control (con
nected to the external-projector inter
connect outlet with an AudioViewer
EC Interconnect Cord), set the AudioViewer/Projector projection lamp
switch at the external (EXT) position.
Move the variable electronic timer
control to off to resume manual or
taped slide advance.
Quick-locking elevation legs: As
noted previously, you can adjust the
Audio Viewer/Projector for proper im
age height and leveling by pressing
down on both independently-adjustable latches while raising or lowering
the Audio Viewer/Projector to the de
sired angle. When the image is in the
required position, release both latch
es. The elevation legs will lock in
position.
Slide Control Outlets and Jacks
External-projector interconnect
outlet: This outlet accepts the plug of
a KODAK AudioViewer EC Intercon
nect Cord (an accessory item de
scribed on page 18). When the 3-posi-
tion lamp-control switch is set at the
external position (EXT), the AudioViewer EC Interconnect Cord pro
vides a path for manual, recorded, or
timer-generated (Model 570AF only)
slide-advance pulses from the AudioViewer/Projector to an external slide
projector (or dissolve control and two
slide projectors).
To use the external-projector
interconnect outlet, the following
equipment is needed: a KODAK
EKTAGRAPHIC AudioViewer/
Projector, Model 220, 270, 470, or
570AF; a KODAK AudioViewer EC
Interconnect Cord; a slide projector
(such as a KODAK EKTAGRAPHIC
III E Projector) or a dissolve control
and two slide projectors (such as a
KODAK EKTAGRAPHIC Program
mable Dissolve Control, Model 2, and
two KODAK EKTAGRAPHIC III E
Projectors.) You will also need a suit
able sound-slide program (an AV cas
sette tape recorded with narration
and 1000 Hz slide-advance signals)
and a tray of slides.
Using a Single External Slide Pro
jector with the External-Projector
Interconnect Outlet
NOTE: Refer to the "User’s Op
erating Instructions” packed
with your slide projector for de
tails on projector operation.
1. Connect the 2-pin plug of the
KODAK AudioViewer EC Inter
connect Cord (accessory item) into
the external projector (EXTER
NAL PROJECTOR) jack on the
side panel of the AudioViewer/
Projector.
2. Then insert the 5-pin plug of the
AudioViewer EC Interconnect
Cord into the remote-control recep
tacle of the external slide projector.
3. Set the projection-lamp switch of
the Audio Viewer/Projector at the
external position (EXT). If the pro
jection-lamp switch is set at HI or
LO, the slide-advance mechanism
of the Audio Viewer/Projector will
advance instead of the external
slide projector.
4. Turn on the lamp of the external
slide projector and install the tray
Page 8

on the external slide projector.
Align and focus the image. Then
reset the tray at the beginning of
the program.
5. Play the program-cassette tape in
the AudioViewer/Projector. As the
cassette tape plays, the external
slide projector will advance in syn
chronization with the 1000 Hz
slide-advance pulses recorded on
the control track of the program
cassette tape.
Using a KODAK EKTAGRAPHIC
Programmable Dissolve Control
(and two Slide Projectors) with the
External-Projector Interconnect
Outlet
NOTE: Refer to the "User’s
Operating Instructions” packed
with your Programmable Dis
solve Control for details on dis
solve control operation.
lì
To advance two slide projectors in
the dissolve mode, connect the acces
sory AudioViewer EC Interconnect
Cord to the REMOTE receptacle
located on the back panel of the
KODAK EKTAGRAPHIC Program
mable Dissolve Control, Model 2. The
Programmable Dissolve Control will
advance at a 1-second rate each time
it receives a slide-advance pulse from
the AudioViewer/Projector.
Be sure to connect and operate the
equipment before a scheduled show
ing. A thorough rehearsal is good
audiovisual practice.
Remote tape-control jack: This
jack (provided on Models 270, 470,
and 570AF), accepts the smaller of the
two microphone plugs supplied on the
AudioViewer/Projector. This jack
also accepts the plug of a
KODAK
AudioViewer Tape Deck Remote Con
trol (an accessory item described on
page 18).
Cassette-Tape Controls and
Visual Indicators
Tape-recording button: To put the
AudioViewer/Projector into the re
cording mode (using Model 270, 470,
or 570AF), simultaneously press this
button (RECORD) and the tape play
button (PLAY).
For details on recording a soundslide program, refer to page 9, "Re
cording the Program on the Tape.”
Tape-forward button: This button
(FORWARD) advances the tape rapid
ly onto the top take-up reel of the
cassette.
Tape-rewind button: Press this but
ton (REWIND) to rewind the tape
rapidly onto the bottom supply reel of
the cassette.
Tape-play button: Press PLAY to
play the tape. The normal playing
speed is the same as for most cassette
machines intended for home use—
1 7/8 inches per second. When this
button is pressed simultaneously with
the record button, recording models
of the AudioViewer/Projector (Mod
els 270, 470, and 570AF) are put into
the recording mode.
Tape stop/eject button: With any
tape-control button depressed, press
ing this button once stops the built-in
tape machine. Pressing it twice un
latches the cassette-well cover so the
cassette can be inserted or removed.
(With no tape-control buttons de
pressed, the first actuation of the tape
stop/eject button unlatches the cas
sette-well cover.)
Tape pause/restart button: Press
ing this button (PAUSE/RESTART)
in the recording mode (Models 470
and 570AF only) records a 150 Hz
program-pause (tape-stop) signal on
the tape. (The tape does not stop as
the signal is being recorded, howev
er.)
Tapes stopped in the playback mode
by recorded program-pause signals
(using Models 470 and 570AF) can
also be restarted with this button.
This button can also be used during
tape playback to stop and restart the
tape at any point in the program.
Models 220 and 270 will ignore (run
by) recorded 150 Hz tape-stop signals
because these AudioViewer/Projectors are not provided with pause/res
tart circuitry. However, you can stop
the tape manually. To stop and restart
the tape at the points in the program
indicated in the script, simply press
the tape stop/eject button to stop the
tape; press the tape play button
(PLAY) to restart the tape when de
sired.
The cassette tape deck in the Model
270 can also be stopped and restarted
with a KODAK AudioViewer Tape
Deck Remote Control. See page 18 for
a description of this accessory item.)
Tape pause/restart light (Models
470 and 570AF): This light brightens
when:
• The tape is stopped by a recorded
150 Hz program-pause signal, dur
ing program playback.
• The tape pause/restart button is
pressed to stop the tape in the play
back mode.
• The tape deck motor switch (located
on the handle of the microphone
supplied with Models 270, 470, and
570AF) is moved to the OFF posi
tion, or the tape deck motor switch
on the accessory AudioViewer Tape
Deck Remote Control is placed at
the OFF position. The tape pause/
restart light goes off when the tape
is restarted.
Tone: This control decreases highfrequency (treble) response as it is
moved down from the top position.
Adjust it for best sound. It is inopera
tive during recording.
Volume control: Moving this con
trol up increases sound level during
program playback. Moving the con
trol down decreases volume.
This control does not affect record
ing level.
Signal-recording light: This green
light (on Models 270, 470, and 570AF)
stays on (brightens) when the Audio
Viewer/Projector is being used to re
cord 1000 Hz slide-advance pulses and
150 Hz program-pause signals. (Re
cording of slide-advance pulses and
program-pause signals is normally ac
complished when the AudioViewer/
Projector is in the recording mode
with the microphone disconnected.
Re
fer to page 10, "How to Record the
Slide-Advance Pulses,” and "How to
Record the Program-Pause Signals.”
Any previous slide-advance pulses
or program-pause signals recorded on
the control tracks of the program
cassette tape will be erased if the tape
is running while the signal-recording
light is on.
Audio-recording light: This red
light (on Models 270, 470, and 570AF)
"flickers” when sound is being record
ed with the microphone.
Sound already recorded on the tape
will be erased if the tape is running
while the audio-recording light is on.
(For details on recording audio, refer
to "Recording the Program on the
Tape” on page 9.)
Cassette Tape Outlets, Jacks,
and Microphone
Remote-control outlet: This outlet
on Models 220 and 270 accepts t'he
Page 9

plug of a KODAK AudioViewer/Pro-
jector Remote Control 210/260.
The remote-control outlet on Model
470 and Model 570AF accepts the plug
of the KODAK AudioViewer/Projector Remote Control 410/460. (The
functions of these accessory items are
described on page 18.)
Headphone outlet (EAR): Head
phones with a 1/4-inch plug (or adapt
er) can be used. (Audio is reproduced
monaurally.) Medium- to high-imped
ance headphones (150-2000 ohms) are
recommended. The internal loud
speaker and the external loudspeaker
jack are bypassed when the head
phone outlet is used. When using
headphones, adjust tone and volume
level as desired.
Microphone jack: This jack (on
Models 270, 470, and 570AF) accepts
the plug of the handheld microphone
supplied with the AudioViewer/
Projector.
The small remote tape-control jack
(located next to the microphone jack
on Models 270, 470, and 570AF) also
accepts the plug of a KODAK AudioViewer Tape Deck Remote Control
(an accessory item described on page
18) for manual remote control of tape
stop/ start during recording and
playback.
External-loudspeaker outlet
(SPK): An external loudspeaker hav
ing a nominal impedance of 8 to 16
ohms can be connected to this outlet
with a 1/4-inch phone plug.
An external loudspeaker should be
considered when the audience is large
enough to require the connection of
an external slide projector (or dis
solve control and two slide projectors)
to the external-projector interconnect
outlet for projection on an external
screen.
The internal omnidirectional loud
speaker is automatically disconnected
when an external loudspeaker is con
nected to the external-loudspeaker
outlet.
CAUTION: Do not connect
headphones to the externalloudspeaker outlet!
OTHER WAYS
TO SHOW SLIDES
1. Editing Without a Lock Ring on
the Tray: Remove the lock ring
from the tray. Place the tray on the
AudioViewer/Projector and press
the slide-forward button or slidereverse button to raise the slide for
easy removal. Replace the lock
ring before removing the tray.
2. Projecting Without a Tray: Sim
ply insert a slide into the gate
(with the image correctly-reading
from left to right and then turned
upside down). To remove the slide,
press the slide-select button
(SELECT).
3. Random Display: Holding the
slide-select button down (with
power on) allows the tray to be
manually rotated to any slide for
viewing.
4. With a KODAK EC Stack
Loader: Up to 40 2 x 2-inch (50 x
50 mm) cardboard or thin-plastic
mounted slides can be shown with
out a tray.
SHUTDOWN
1. At the end of the program, press
the stop/eject button to stop the
tape; press the rewind button to
rewind it. When the rewind button
snaps back out after rewinding,
press the stop/eject button to open
the cassette well.
2. Remove the cassette, close the cas
sette well door, and place the cas
sette in its protective plastic case.
3. Close the front-projection door;
move the image-magnifying lever
to the normal (up) position and set
the projection-lamp switch to low.
4. With power on, hold down the
slide-select button and manually
rotate the tray so that slide num
ber "0” is at the gate index. Re
lease the slide-select button and
remove the tray.
5. Turn the AudioViewer/Projector
off. If it is to be moved, press the
elevation latches and lower the
machine to retract the elevation
legs. Then unplug the power cord.
6. Open the rear-storage door and
coil the power cord into it.
7. To store the tray in the Audio
Viewer/Projector, orient the bot
tom metal plate of the tray away
from the machine and insert the
tray into the storage compartment.
(It will not go in backwards.)
8. Close the storage door and relock
both latches.
9. Finally, protect the built-in screen
from damage with a suitable cover.
Omnidirectional handheld micro
phone: This microphone (provided
with Models 270, 470, and 570AF) is
used for recording narration and
sound effects. (For more details about
recording audio, refer to "Recording
the Program on the Tape,” on page 9.)
The tape deck motor switch located
on the handle of the microphone al
lows stopping and restarting the tape
during recording and playback.
TAPE DECK
MOTOR SWITCH
Page 10

PREPARING NEW
SOUND-SLIDE
PROGRAMS
(Models 270, 470, and 570AF)
Writing the Outline, Writing the
Script, and Planning the Visuals
The following information applies
only to recording models of the
AudioViewerI Projector: Models
270, 470, and 570AF.
Preparing a new sound-slide pro
gram with the KODAK
EKTAGRAPHIC AudioViewer/
Projector is challenging—and fun! If
you’ve never done much writing be
fore, the prospect of turning out an
entire script may make you nervous.
If so, relax. Writing is easier if you
tackle he job in stages and allow
enough time.
We suggest novice producers write
the narration first, before they consid
er the visuals to illustrate it.
Gathering and Organizing
Your Ideas
Hold a brainstorming session and
write down as many ideas for your
script as you can think of. Use a
3 X 5-inch card for each idea. Review
all of the cards and determine five or
six major subject headings that cover
all your ideas.
Writing the Outline
Next, organize the cards under the
major headings and discard redun
dant cards. Add new ones as you
think of new ideas. Now put the cards
in order. This will give you a good
start on the first draft of the outline.
Number the cards so they can be
easily rearranged in correct order if
they are dropped. Writing the outline
should be easy if you follow the order
of the cards. Leave five or six blank
lines between each major heading (to
be filled in later with more detailed
information).
When you’re satisfied with the out
line, you may want to give your super
visor, co-workers, or sponsors a copy
to make sure that they agree with the
creative approach and the content
that you plan to cover.
On-the-Job-Safety
Visual
1. Watch It!
CHARCOAL FIRE
2. Person with charcoal grill.
3. Two people talking.
4. CU—Hands/electric
fire starter.
5. CU—Charcoal/starter.
6. Two people dressed
in shorts.
7. CU—Son at door.
8. LS—Father at charcoal.
9. CU—Father picking up.
10. CU—Pouring gas on.
11. MS—Gas explosion in grill.
12. LS—Burning gas can
and bushes.
13. LS—Man extinguishing fire.
14. LS—Foot kicking gas can.
Writing the Script
Now add as much relevant detail as
you can in the space under each head
ing and then turn the points you’ve
listed into sentences. If you have trou
ble finding the right words, ask your
self, what am I really trying to say?
When you can answer that question
in a simple sentence, write it down.
When you’ve finished the first
draft, put it away for a few days.
When you pick it up again, you may
be surprised by how little effort is
needed to complete it.
Remember that the audience watch
ing your slide show will not be able to
Narration
MUSIC FADES UNDER AS NARRATION
BEGINS
It was a hot Sunday afternoon and we
decided to barbecue some steaks.
My son was in a rush to go out on a date
and asked me to start the fire.
1 plugged in the electric fire starter and
slipped it under the charcoal.
Usually we wait 15 to 20 minutes for the
fire to start.
My neighbor came over and we started
talking—it was a hot day; perfect for
bermuda shorts and no shoes or socks.
Then my son came to the door, asked
how the fire was coming, and said that
he was in a hurry and had to get going. 1
told him to shower and the fire would be
ready.
But when 1 looked, the charcoal didn’t
seem to be lit.
... so 1 decided to hurry things up a bit. 1
got the gasoline can out and ... 1 have
to admit this was a real dumb thing to
do.
I’ve preached to my kids . . . never put
gasoline on a fire—but of course, 1
wasn’t thinking, just hurrying, and holy
mackerel . . .
Phoom! The whole thing exploded.
There was fire under the charcoal after
all. It shook me up so badly that 1 just
threw the gas can and . . .
... hit a nearby evergreen, setting it on
fire. Then the flames headed toward my
garage.
My neighbor came over and beat the
flames with some burlap while 1 ran for
the hose.
The can was kicked into the driveway
where it started.
see your paragraphs and punctuation.
You have to write for their ears. Use
short, easily-understood sentences.
Avoid unusual words, technical
terms, and jargon. Remember; clarity
comes from little words.
When you’re satisfied with your
script, record a "test tape” of the
script with the AudioViewer/Projector and play it back to hear how it
sounds. This serves as a double check.
If you can read the narration aloud
with no difficulty, you or the narrator
you choose should be able to read it
easily too. If the people you ask to
listen to the tape understand it,
chances are your audience will
understand the final production tape
as well.
Page 11

Planning the Visuals
Now develop the visual side of the
script the same way you developed
the narration. Read through the
script (and listen to the "test tape”
you made). Make a list of all the
images that might work with the
script. Then go back over the list and
eliminate images that aren’t techni
cally feasible or that would be too
troublesome to shoot (because of dis
tant or difficult locations).
V
Type up the script with the com
mentary on the right side of the page
and the descriptions of the visuals on
the left (as shown on page 7, in "On
the Job Safety.”) It’s easier to type
this way. If you double or triple-space,
you’ll have room for the revisions you
may want to make later as you edit
the slides. When planning your slides,
be sure that no image remains on the
screen for too long.
Also remember that you have the
option of recording a program-pause
signal at any point in the program
(with Model 470 and Model 570AF)
for automatic tape stop. When the
tape automatically stops in response
to the recorded 150 Hz program-pause
signal, you can ask questions of the
audience, use the image-magnifying
feature to spotlight details in the
center portion of the slide, and
then resume the program when
appropriate.
If your script does not contain de
scriptions of the visuals, you can still
indicate where each slide change is
located in the program by inserting a
round dot (with a felt-tip pen) above
the words in the script that are spo
ken as the image changes. Then num
ber the dots consecutively.
Placement of Program-Pause
Signals in the Script
To show where program-pause signals
are needed in the script (using Models
470 and 570AF only), simply print
TAPE STOP (preferably in red ink).
Be sure to allow two seconds of
silence (unrecorded tape) before and
after each program-pause signal to
prevent tape slowdown and start-up
distortion of the recorded audio.
Editing, Arranging the Slides,
and Loading the Tray
1. Place your slides so that all im
ages and words are right-side up,
reading correctly from left to
right, and in correct projection
sequence (in the order that you
want them to appear in the show).
2. Review your slides. Is each slide
properly exposed, composed, and
focused? Are all important ele
ments in each slide legible? Is the
meaning of each slide readily ap
parent? Do the images fit together
visually and make logical sense?
Now is the best time to delete or
replace ineffective slides.
3. Rotate the remaining slides upside
down (so that all images are up
side down). Number each slide
mount consecutively in the upper
right-hand corner. (Do not use
sticky labels on the mounts. Pro
jector heat will loosen them, caus
ing the slides to jam in the gate.
Use a permanent ink felt-tip mark
er instead.)
4. Remove the lock ring or cover of
the tray by turning it counter
clockwise.
5. Be sure the bottom metal slide
retainer plate of the tray is locked
in the zero position. (Turn the
bottom metal plate of the tray
until it locks tightly.)
6. Insert the first slide into slot num
ber 1, the second slide into slot
number 2, etc. Remember: the cor
rect slide orientation for the AudioViewer/Projector is with the
image upside down and the cor
rect-reading side of the transpar
ency facing toward the next-higher
number in the tray.
7. Insert the slides into the tray in
exactly the same order and orien
tation as you arranged them (with
the images upside down).
8. Hold the full tray right-side up in
front of you. The mount numbers
on the slide mounts should be
positioned next to the outside cir
cumference of the tray and visible
as the tray is rotated.
9. Replace the lock ring or cover of
the tray.
10. Place the tray on the AudioViewer/Projector and advance
through the slides while checking
them for correct order and image
orientation on the screen.
11. Reset the tray to the beginning of
the program (so that slide-number
"0” is at the gate index).
^
___
î.-.''’'!---
Indicating Slide-Advance Pulses
In the Script
Note that the slide changes are indi
cated by the start of each new para
graph and that the images are num
bered consecutively.
8
$
Page 12

How to Avoid Image Cropping
As you plan your slides, keep in mind that the more familiar you are with the
imaging requirements of the EKTAGRAPHIC AudioViewer/Projector (as with any
slide-display device having a built-in screen), the better you can prepare 2 x 2-inch
(135-format) slides that effectively communicate your message. Image legibility and
cropping are of prime importance with these communication devices.
Generally, you can use all of the transparency area of a 126-size slide. Horizontal
and vertical 135-size slides and 127-size super slides are cropped somewhat by these
display devices. About 3/64-incb (1.2 mm) of the long dimension (width) of a 135-size
slide is trimmed off each edge by the built-in screen. However, the narrow dimension
(height) of the slide will be visible.
Super slides lose about 1/4 inch (6.4 mm) of image height and width (3.2 mm at
each edge) when projected on the built-in screen of these machines. (It’s necessary
to crop some area from the larger formats so that images from the smaller formats
will not be too small for viewing.)
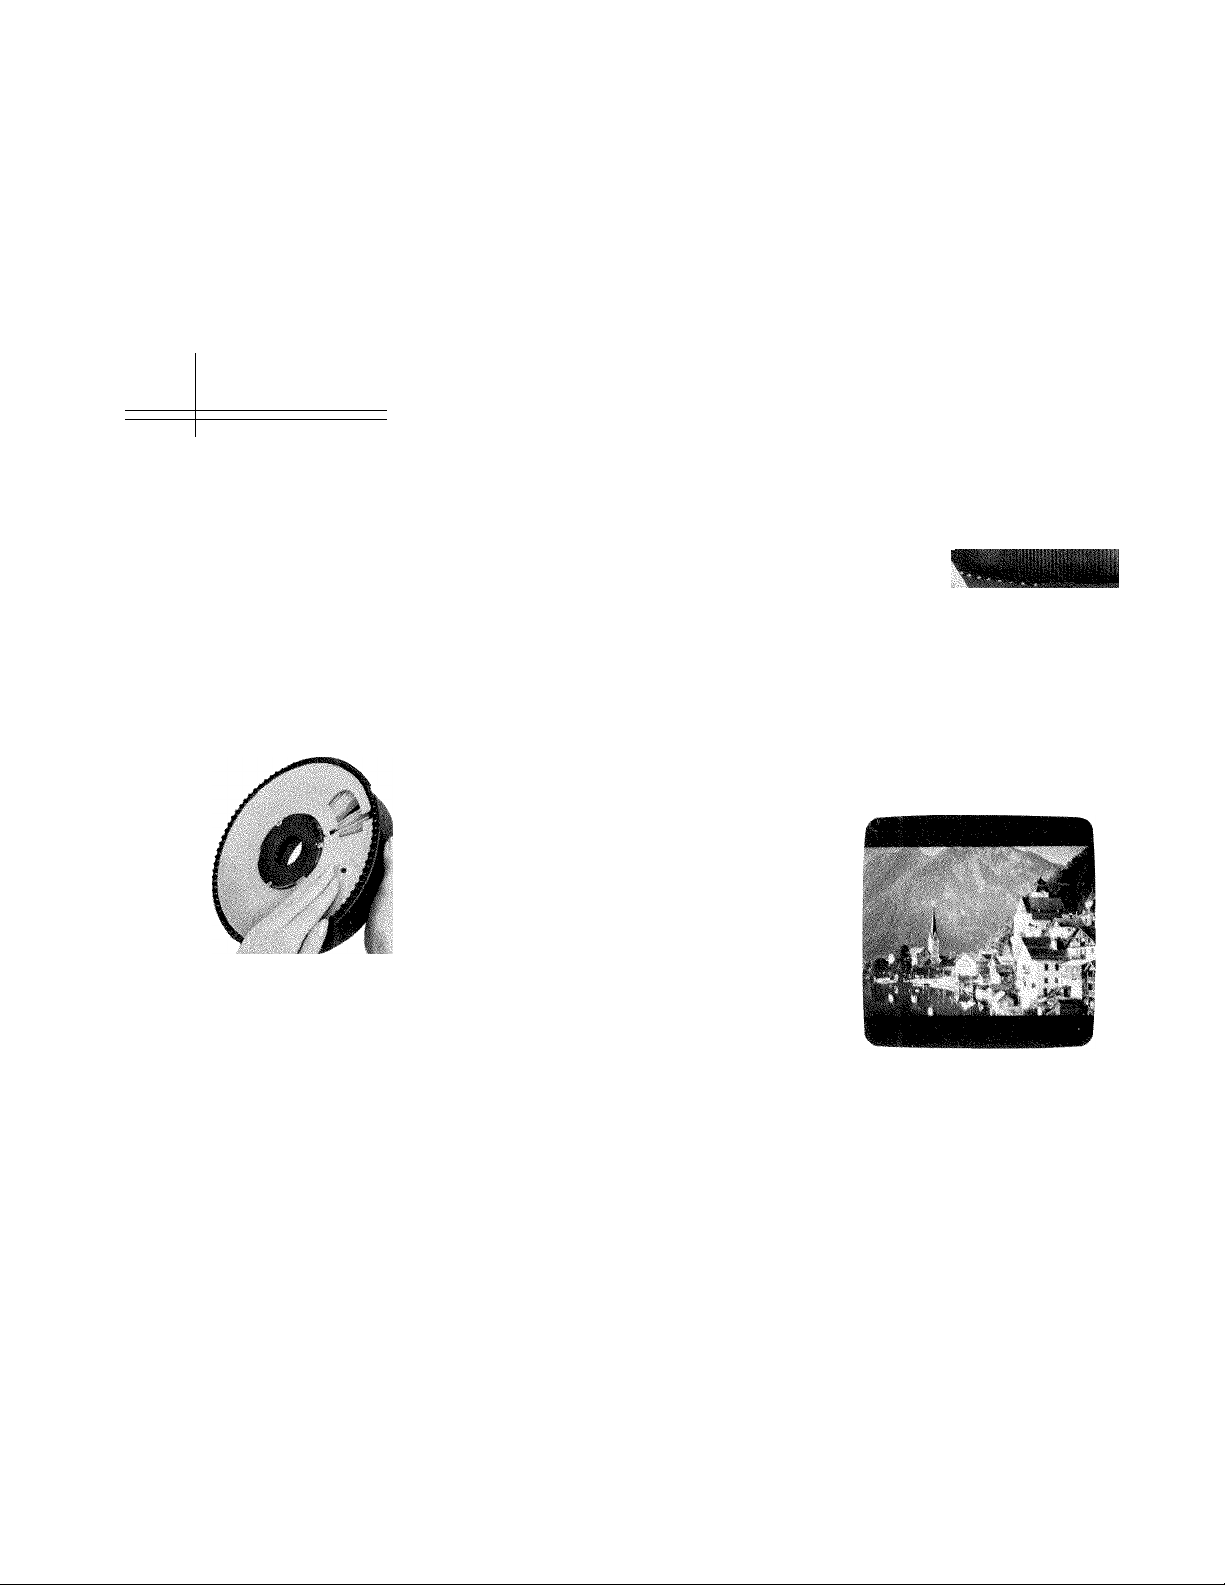
If you wish to fill the built-in screen of the AudioViewer/Projector completely,
one method is to use slides with a 30.8 mm square aperture. Slides with apertures of
this size are made by Kodak processing laboratories when
duplicates are ordered from superslides or from square transparencies made on
120- or 620-size film.
When projecting onto an external front screen (using the built-in front-projection
lens), the full picture area of all transparency formats (with the exception of 38 x 38
mm super slides that are vignetted when used with the short focal-length lens) will
be projected without image cropping.
We recommend that you shoot or select slides that have the same-size aperture
and same image orientation (all horizontal or all vertical formats).
All slides used with the AudioViewer/Projector are automatically registered
horizontally and vertically in both front- qnd rear-screen modes of projection.
Slide Formats as Displayed on the Built-In Screen of the AudioViewer/
Projector
AudioViewer/Projector in the Normal Mode of Projection (UnmagniHed
Images)
Standard 2 x 2-inch (50 x 50 mm) Slide Formats as Viewed on the Screen of
the AudioViewer/Projector in the Normal (Unmagnifled) Mode and with
Nominal Magnification (7.15)
127-Size Super Slide (38 x 38 mm)
(271.7 X 271.7 mm)
135-Size Horizontal Format (23 x 34 mm)
(164.4 X 243.1 mm)-------------------------
126-Size Slide (26.5 x 26.5 mm)
(189.5 x 189.5 mm)
135-Size Vertical Format (23 x 34 mm)
(164.4 X 243.1 mm)
AudioViewer/Projector
Built-In
Rear-Viewing Screen
---------------
-----------
---------------------
------------------------
r:
r
KODACHROME
n
_i
Practicing the Program
(Before Recording It)
While reading the script, practice
pressing the slide-forward button (on
the AudioViewer/Projector or on the
optional KODAK AudioViewer/
Projector Remote Control 210/260 or
AudioViewer/ Projector Remote Con
trol 410/460) to record the slideadvance pulses (and to advance the
tray simultaneously). You may need
to press the slide-advance button a
second or so "ahead of schedule” so
that the images appear on the screen
exactly when they are supposed to.
(Slide-cycling time for the Audio
Viewer/Projector is about the same as
for most KODAK EKTAGRAPHIC
III and EKTAGRAPHIC Slide Pro
jectors—about 1 second.)
Recording the Program on the Tape
Although recording the audio track
and signal track of the program cas
sette tape at one time (in the same
recording "pass” of the tape) is possi
ble, it is not recommended. We recom
mend that you record the program
cassette tape in the following order:
1. Record the audio with the micro
phone.
2. Rewind the program tape to the
beginning. Disconnect the micro
phone. Place the tray of slides on
the AudioViewer/Projector.
3. Record the slide-advance pulses
(and program-pause signals with
models 470 and 570AF) while lis
tening to the audio, reading the
script, and pressing the slideadvance button (and pause/restart
button) as required.
AudioViewer/Projector in the Magnified Mode
Standard 2 x 2-Inch (50 x 50 mm) Slide Formats as Viewed on the Screen of
the AudioViewer/Projector in the Magnified Mode with Nominal Magnifica
tion (10.5)
127-Size Super Slide (38 x 38 mm)
(399 x 399 mm)
135-Size Horizontal Format (23 x 34 mm)
(241.5 X 357 mm)
126-Size Slide (26.5 x 26.5 mm)
(278.2 X 278.2 mm)
135-Size Vertical Format (23 x 34 mm)
(241.5 X 357 mm)
AudioViewer/Projector
Built-In
----------------------------------------
Rear-Viewing Screen
-------------------
---------------------------
----------
----------------------
r
n
_l
Page 13

Recording the Audio
1. Turn power on and insert a
blank cassette.
a. Play the program tape for about
8 to 10 seconds to get past the
unrecordable tape leader. Then
stop the tape with the tape stop/
eject button.
2. Record the script.
NOTE: Record in a room
in which you will not be
disturbed!
Put a sign on the door to make
sure you won’t be interrupted
during the recording session.
Disconnect the telephone and
close the windows. (The AudioViewer/Projector microphone
will pick up most noises in the
environment.) Also try to record
the entire script in one session
so the recording sounds consis
tent.
a. To put the Audio’Viewer/Projec-
tor in the recording mode, press
the tape play and tape record
buttons simultaneously. (The
tape will start recording when
you move the switch on the
microphone handle back to the
ON position.)
3. Press the tape pause/restart button
for about 1/2 second to record the
program-pause signal.
4. Allow the tape to play for two
more seconds and then stop it by
moving the switch on the handle of
the microphone to the OFF posi
tion. You can then start recording
the script.
b. Insert the plugs of the micro
phone into the microphone jack
and the remote tape-control
jack. The plugs will go in only
one way.
c. Move the tape-deck-motor
switch located on the handle of
the microphone to the OFF posi
tion so the tape doesn’t start
prematurely when you are
ready to begin recording.
The tape-deck motor switch prevents the tape
from running when the switch is at the OFF posi
tion.
10
b. When you are ready to record,
move the switch on the micro
phone back to ON, pause briefly
to let the tape reach proper
speed, and then narrate the
script into the microphone in a
normal speaking voice.
c. The red audio recording light
will flicker, indicating that your
voice is being recorded. The
built-in AGO (automatic gain
control) will keep the recording
level at an acceptable level.
For Models 470 and 570AF:
Recording a 150 Hz program-pause
signal immediately before the begin
ning of the program so the tape al
ways conveniently stops at the begin
ning of the program in the playback
mode will be helpful to you and other
program presenters. To do this:
1. Put the machine into the recording
mode by pressing the tape play and
tape record buttons simultaneously.
2. Let the tape run for several
seconds from the beginning.
Evaluating the Soundtrack and
Correcting Any Errors
Rewind and listen to the tape. Is the
sound level adequate—and consis
tent? Are there distracting back
ground noises? Is each word clearly
enunciated and correctly pro
nounced? Does the narration sound
like it was patched together from sev
eral recording sessions or does it flow
smoothly at the same playback level
from beginning to end? If you discov
er errors in your recording or if you
wish to make changes to it, change the
script first. Then:
1. Play the tape to any pause in
sound before the required record
ing change.
2. Record the new section, making
sure to avoid erasing good audio.
3. Stop, rewind, and listen to the cor
rected section.
How to Record the Slide-Advance
Pulses
IMPORTANT: To prevent
erasing the audio from the
tape while the AudioViewer/
Projector is being used to
record slide-advance pulses
(and program-pause signals
with Model 470 and Model
570AF), disconnect the
microphone.
When the microphone is discon
nected, slide-advance pulses and pro
gram-pause signals can be erased and
Page 14

recorded without erasing your valu
able soundtrack. When the micro
phone is connected, both tape tracks
(audio on tracks 1 and 2, and slideadvance pulses and program-pause
signals on tracks 3 and 4) can be
erased and recorded.
1. Install the tray at "0.”
2. Play the tape past the initial pro
gram-pause signal (Models 470 and
570AF only).
3. Then stop the tape.
4. Put the machine into the recording
mode with the microphone discon
nected.
5. As the tape plays, read the script
and press the slide-forward button
(FORWARD) for about 1/2 second
at the points indicated in the
script. The tray will advance one
slide as each signal is recorded.
Reassuring "beeps” will be made
audible when recording slide-ad
vance pulses if the volume control
is raised slightly during recording.
(You won’t hear the "beeps” dur
ing tape playback.)
How to Record the Program-Pause
Signals (Models 470 and 570AF)
IMPORTANT: Do not record
the program-pause signals sepa
rately from the slide-advance
pulses. Record both types of sig
nals during the same "pass” of
the tape.
1. Press the tape pause/restart button
(PAUSE/RESTART) where the
words TAPE STOP appear in the
typed script. (The tape pause/res
tart light will not turn on when the
pause/restart button is pressed.)
2. The program tape actually stops in
response to recorded programpause signals only during tape
playback.
Evaluating the Slide-Advance
Pulses (and Program-Pause
Signals); Correcting Any Errors
Are all slides on the screen long
enough for viewers to see them and
read any text? Are some on the screen
longer than they need to be? Do some
images appear on the screen too late
(lag behind the narration)? Does the
tape stop when it is supposed to? If
the tape contains signal-recording er
rors, you can fix them without erasing
the audio.
1. Correct the script first.
2. Make sure the microphone is still
unplugged.
3. Play the tape to the pulses (and
signals) that need correction.
4. Stop the tape.
5. Put the AudioViewer/Projector
into the recording mode. (The au
dio will not be erased because the
microphone is still disconnected.)
6. As the tape plays, read the script,
listen to the recorded audio, watch
the images on the screen, and re
cord the new slide-advance pulses
(and program-pause signals). (The
tray will not advance, nor will the
tape stop, in response to old pulses
or signals because they are auto
matically erased as the tape is be
ing recorded.)
7. Be sure to stop the tape, with the
tape stop/eject button, before eras
ing good slide-advance pulses (or
program-pause signals).
8. Rewind the tape and check the
corrected section.
NOTE; If the program is short,
recording all of the slideadvance pulses (and programpause signals) from the begin
ning may be easier and more
effective.
Evaluating the Finished Program
You may need an outsider’s viewpoint
because after you’ve worked on an
audiovisual production, you may not
be able to judge it realistically.
Choose someone who is willing and
able to give you an honest opinion.
Chances are you’ll be dissatisfied
with some of the sequences in the
show, but remember that you may be
overly critical of your own efforts.
Perhaps all you need is one or two
new slides to replace marginal ones.
Recording Narration and
Background Music Simultaneously
Recording models of the AudioViewer/ Projector (Models 270, 470,
and 570AF) can be used with the
supplied microphone to record sound
from the built-in loudspeaker of a
radio, television, music playback
system, or other electronic source.
In this way, narration, background
music, and sound effects can be
recorded simultaneously with the
narration.
If your show is intended for sympa
thetic audiences within your organi
zation, you may not require a sound
track with anything more than narra
tion. However, you can often improve
the quality, appeal, and effectiveness
of your show by adding appropriate
music as background.
The easiest way to do this is to play
a tape containing the music over a
second cassette recorder located near
the microphone connected to the Au
dioViewer/Projector. By carefully
changing the volume of the external
tape recorder (i.e., the cassette ma
chine playing the background music),
an assistant can "fade up” or "fade
down” the background music as need
ed as you record the script. Thorough
rehearsal can produce an effective
sound track on your program tape.
Audio also can be recorded elec
tronically from an amplifier through
the AudioViewer/Projector micro
phone input with a special attenuat
ing connecting cord (available at ra
dio supply stores) that reduces signal
level to approximately microphone
level.
A separate cassette recorder can
also be used to record the audio for
your show on your program tape; the
slide-advance pulses (and programpause signals, with models 470 and
570AF) can be added to the program
tape later with the AudioViewer/
Projector.
IMPORTANT: Remember that
music and other copyrighted
materials cannot be recorded
without clearance from the
owner of the copyright.
11
Page 15

Preventing Accidental
Erasures of Your
Program Tapes
With a suitable tool, break out the
plastic tabs from the edge of your
valuable recorded cassettes so the
tape cannot be accidentally erased
and recorded. With the tabs removed
from the edge of the cassette, the tape
record button (RECORD) cannot be
pressed in to put the AudioViewer/
Projector into the recording mode.
To erase and record the tape again,
cover the tab holes with pressuresensitive (cellophane) tape; then you
can record the cassette again.
Be sure to remove the cellophane
tape after recording the new program.
TABS
IN CASE OF DIFFICULTY
Slide Tray Jammed?
The AudioViewer/Projector is de
signed to stop to reduce the possibili
ty of damage if a bent slide is caught
(jammed) in the gate.
To reset the slide mechanism of the
AudioViewer/Projector after a jam,
follow these steps:
1. Stop the program cassette tape by
pressing the stop/eject button.
2. Make a note of the number of the
slide in the gate.
3. Turn the large coin-slotted trayremoval screw (located in the hub
of the projector housing in the
center of the tray) in either direc
tion as far as it will go and then
remove the tray. (The tray-removal screw does not come out.)
Projection Lamp Burned Out?
(How to Change the Projection
Lamp)
CAUTION: Unplug power
cord from power outlet
before changing the lamp!
The lamp may still be hot!
Wear protective gloves!
Replace the projection lamp if the
screen remains dark (no image) when
power is on, the projection-lamp
switch is in the LO or HI position,
and a slide is in the gate. To replace
the projection lamp
1. Keep power on until the fan cools
the lamp area; then switch the
AudioViewer/Projector off.
2. Turn the screw on the lamp-access
door counterclockwise and swing
open the lamp door.
3. Pull back on the lamp lever to
move the lamp up for removal.
4. Before inserting a new lamp, latch
the lamp lever first.
5. Insert the new lamp and press it
down against the socket to be sure
it is tightly seated.
12
CELLOPHANE TAPE
4. Be sure the lock ring on the tray
is tight before inverting the tray.
5. Turn the slide tray upside down
and rotate the bottom metal plate
of the tray until it locks in the "0”
position.
6. Press the slide-select button
(SELECT) to lift the jammed slide
out of the gate, and then remove
the slide.
7. Press the slide-select button a
second time to reset the slide
mechanism.
NOTE: In some cases it may
be necessary to turn the
AudioViewer/Projector power
off and on before pressing the
slide-select button to reset the
slide mechanism.
8. Turn the tray upright and loosen
and remove the lock ring of the
tray.
9. Check the slide for damage, and
replace it if necessary.
10. Replace the lock ring on the tray,
replace the tray on the Audio
Viewer/Projector at the correct
slide number, and resume the
program.
6. Wipe off any fingerprints from the
lamp with a cloth moistened with
rubbing alcohol. (Avoid touching
the mirror on the lamp-access
door.)
7. Close the door, retighten the
screw, and plug the AudioViewer/
Projector in.
8. Turn the AudioViewer/Projector
on and advance the tray to a slide
to see if the image is projected on
the screen.
Page 16

Tray Advance Unreliably?
Compact cassette slide-advance sig
nals and program-pause signals con
forming with spacing, frequency, du
ration, and level characteristics listed
under "Specifications” on page 17 will
operate the AudioViewer/Projector
dependably. Signals not conforming
to these specifications may result in
undependable operation. For example,
slide-advance signals of the correct
frequency (1000 Hz) but of the wrong
duration (other than 0.07 sec.) may
result in erratic slide-tray advance.
(Tapes made in conformance with
ANSI Standard PH7.4-1975 will oper
ate this machine dependably.)
Tapes recorded with earlier models
of the EKTAGRAPHIC AudioViewer
or EKTAGRAPHIC AudioViewer/
Projector will operate an
EKTAGRAPHIC AudioViewer/
Projector, Models 220, 270, 470, or
570AF dependably, and vice versa.
OWNER’S
MAINTENANCE
Cleaning the Built-In Tape Deck
If possible, clean the built-in tape
deck after every program. Cleaning
the tape deck takes only a few min
utes and helps prevent buildup of
oxide from tapes and loss of sound
fidelity.
1. Unplug the power cord!
2. Press the tape stop/eject button to
open the cassette well. Then par
tially close the cassette well door
to position the heads of the tape
deck for more convenient access
for cleaning.
3. Press and hold in the tape play
button to keep the tape heads
forward.
Rub the capstan, tape-guide path,
4.
and metallic heads with a cotton
swab moistened with head-clean
ing solution or isopropyl alcohol.
Do not touch the heads with any
metallic object. A head-cleaning
cassette (available at radio-supply
stores) can be used occasionally,
but a swab dipped in isopropyl
alcohol is preferred.
Cleaning the Built-In Viewing
Screen
Use a soft, damp cloth to clean the
built-in viewing screen. Do not use
lens-cleaning solutions or tissues con
taining silicone.
The optics and mirrors inside the
AudioViewer/Projector should be
cleaned only by a qualified techni
cian, such as those at a Kodak Ser
vice Center (addresses on back cover).
Partial disassembly of the Audio
Viewer/Projector is required for this
Adjusting the Position of the Image
on the Built-In Viewing Screen
All KODAK EKTAGRAPHIC AudioViewer/Projectors have been designed
to let the owner maintain, and make
minor adjustments to, the machine as
necessary.
The front mirrors have to be read
justed when the image on the built-in
screen is not in perfect alignment.
Adjustments are made with the
screws located on the front-projection
door. Be sure the image-magnifying
lever is located in its "up” position,
for normal (unmagnified) viewing
of images; then close the frontprojection door.
i
1% J
Clean the tape deck often to prevent buildup of
oxide on the heads and loss of sound fidelity.
I
i ' 7
-WMi
^,
Head-Cleaning Cassette
Vertical Image Alignment
1. Insert a slide into the gate of the
Audio Viewer/Proj ector.
2. Turn the lower left screw to center
the image vertically. (The frontprojection door may need to be
opened slightly to reveal the
screw.)
Horizontal Image Alignment
1. Insert a slide into the gate of the
AudioViewer/Projector.
2. Turn the upper right screw on the
front-projection door to center the
image from side-to-side.
13
Page 17

Adjustment of Lifter Height
The lifter returns the slide to the slide
tray. If adjustment is necessary
1. Remove the slide tray.
2. Pry off the black plastic cap cover
ing the screw.
3. A 0.050-inch Allen wrench is re
quired to turn the screw. Turning
it clockwise will cause the slide to
be lifted higher. Adjust the lifter
height so that the top of the slide
comes close to, but does not touch,
the bottom of the tray lock ring
when pressing the slide-select but
ton. (If the lifter is adjusted too
high, you will hear a noise as the
slides touch the ring. Readjust the
lifter as necessary.)
4. Replace the plastic cap on the
screw.
Aligning the Image-Magnifying
System
1. Make a slide for image positioning
as shown below.
+
2. Tape a 2 X 2-inch slide transparen
cy of poor quality (such as an
overexposed one) squarely over the
illustration.
3. Use a straight edge and pin to
scratch the surface.
4. Place this slide in the gate of the
AudioViewer/Projector.
5. Move the image-magnifying lever
down to the image-magnifying po
sition.
6. Remove the cap covering the
screw.
7. A 3/32-inch Allen wrench is need
ed. Slowly turn the screw to align
the central portion of the slide
with the screen. (The tray cannot
be on the AudioViewer/Projector
for this adjustment.)
MAGNETIC CASSETTE
TAPES
Cassette Tape Track Configuration
of the EKTAGRAPHIC
AudioViewer/Projector
The monaural cassette tape machine
built into the AudioViewer/Projector
is used essentially like any other—
with the exception that it uses tracks
1 and 2 for the audio portion of the
program and tracks 3 and 4 for 1000
(Models 470 and 570AF)
TAPE TRACKS
SIGNALS AUDIO
4 3 2 1
PROGRAM-PAUSE
SIGNAL
NUMBER 1 ■
SLIDE-ADVANCE
PULSE
NUMBER 1
SLIDE-ADVANCE
PULSE
NUMBER 2
PAUSE AT
LEAST
1 1/2 SECONDS
PROGRAM-PAUSE
SIGNAL
NUMBER 2
14
SLIDE-ADVANCE
PULSE
NUMBER 22
SLIDE-ADVANCE
PULSE
NUMBER 23
PROGRAM-PAUSE
SIGNAL
NUMBER 6
SLIDE-ADVANCE
PULSE
NUMBER 24
FINAL ■
PROGRAM-PAUSE
SIGNAL
Page 18

Hz slide-advance pulses and 150 Hz
program-pause signals. Like most cas
sette machines designed for audiovi
sual use, the tape is intended for
recording and playing in one direc
tion only and must be rewound before
being replayed.
If the cassette is accidentally
turned over and played in the wrong
direction, you will hear the 1000 Hz
slide-advance pulses (the "beeps”) re
produced over the loudspeaker—not
the soundtrack.
(Models 220 and 270)
TAPE TRACKS
SIGNALS AUDIO
4 3 2 1
Playing Continuously Repeating
Sound-Slide Programs
A silent or recorded endless-loop cas
sette having properly spaced slideadvance pulses can be used as a tim
ing device to advance a sound-slide
program designed to repeat continu
ously. Record slide-advance pulses (at
least 1 1/2 seconds apart) on the end
less-loop cassette at the intervals de
sired. Short endless-loop cassettes are
preferred. Be sure to use only the type
that have sprocket teeth on the hub of
the take-up reel. Clean the metal heads
and tape-guide path in the built-in
cassette machine often because these
tapes are heavily lubricated.
Model 570AF: We suggest using
the built-in variable-electronic timer
as the timing device to advance the
continuously repeating program in
stead of an endless-loop cassette.
Some Sources of Endless-Loop
Compact Cassettes Designed
to be Played in the Vertical
Plane
Compact-cassette format continuousloop tapes are usually designed to be
played in the horizontal plane, label
up. However, owners and users of the
EKTAGRAPHIC AudioViewer/
Projector interested in producing
and presenting continuously repeat
ing sound-slide programs may want
to purchase continuous-loop cas
settes designed to be played vertical
ly. Two firms marketing such cas
settes are:
• Visual Horizons, Inc.
180 Metro Park
Rochester, NY 14623
• Mann Endless Cassette Industries
P.O. Box 1347
3700 Sacramento St.
San Francisco, CA 94101
These companies are mentioned
for the convenience of our custom
ers. This does not constitute a recom
mendation or endorsement by
Eastman Kodak Company.
Mi
1
An endless-loop cassette.
©
Stereo Music Tapes
Cassette tapes that have audio record
ed on all four tracks (such as those
sold for playback on home cassette
players) will trigger sporadic and un
wanted slide advances (and program
pauses, with Models 470 and 570AF).
Tapes having no audio recorded
on tracks 3 and 4 (such as those
recorded with an EKTAGRAPHIC
AudioViewer/Projector or with most
audiovisual cassette recorders) can be
played satisfactorily.
15
Page 19

Using a KODAK EC
Remote Control with
an EKTAGRAPHIC
AudioViewer/Projector
A KODAK EC-1, EC-2, or EC-3 Re
mote Control (normally intended for
use with KODAK EKTAGRAPHIC
III and EKTAGRAPHIC Slide Pro
jectors) can be connected to the re
mote-control outlet of an Audio
Viewer/Projector and used to
remotely advance and reverse the
tray. (The EC Remote Control can
also be used to record slide-advance
pulses when using the Models 270,
470, or 570AF).
If the KODAK EC Remote Control
has a focus switch, it can be used to
pause and restart the program tape
during recording and playback and to
record program-pause signals (with
Models 470 and 570AF). (The focus
switch on the EC Remote Control will
not provide remote-focus capability.)
Accidentally pressing the focus
switch on the EC Remote Control in
both directions while recording a pro
gram-pause signal on the tape may
record an improper signal.
16
SPECIFICATIONS
Weight (approximate)—22 pounds
(10 kilograms)
Built-In Viewing Screen—9 x 9 in.
(229 X 229 mm); 12.1 in. (305 mm)
corner to corner; recessed to resist
impact; acrylic coated to minimize
glare.
Magnification Ratio of Built-In
Viewing Screen—7.15 with the
77 mm lens; 10.5 with the 56 mm lens.
Power Requirements—120 V
± 10%, 60 Hz, 300 VA maximum,
2.2 A.
Power Cord—three-wire grounded,
8-ft., permanently attached.
Projection Lamp—ANSI Code
DDM (19 V, 80 W) tungsten halogen.
At HI (17.5 V nominal) average lamp
life is 125 hours. At LO (14.5 V nomi
nal) average lamp life is 1200 hours.
Rated lamp life is approximate.
Optional Projection Lamp—ANSI
Code DDS (21 V, 80 W) tungsten
halogen. At HI, life expectancy is 5000
hours.
OPTICAL SYSTEM
Projection of Transparency
Formats
The EKTAGRAPHIC AudioViewer/
Projector can project any transparen
cy format in the rear-screen or frontprojection mode in a 2 X 2-inch (50 x
50 mm) mount, including 127-size,
126-size, 135-size, and 110-size trans
parencies in 2 X 2-inch mounts or
KODAK 2x2 Adapters for 110 Slides.
The usable picture area for most
slide transparency formats will over
fill the built-in viewing screen. In
front-screen projection, the full pic
ture area of all transparency formats
(with the exception of 38 x 38 mm
super slides that are vignetted when
used with the short focal-length lens)
will be projected without image
cropping.
EKTAGRAPHIC AudioViewer/
Projector and EKTAGRAPHIC (or
CAROUSEL) Slide Projector
Image Sizes
When using the 77 mm //3.5 normal
lens in the AudioViewer/Projector,
the front-projected image will be
almost exactly the same size as
with the same slide type in
an EKTAGRAPHIC or CAROUSEL
Slide Projector, when the
EKTANAR, 3-inch (76 mm) //3.5 Pro
jection Lens is being used.
With the 56 mm //3.0 image-magni
fying lens, the image from the Audio
Viewer/Projector will be about one
third larger (i.e., if the image is three
feet wide with the 77 mm //3.5 lens, it
will be about 49 inches wide with the
56 mm //3.0 lens). As a result, the
image area is increased by about
50 percent.
Normal Lens (Front-Projection
and Rear-Viewing Flat-Field
Lens)—77 mm //3.5.
Image-Magnifying Lens (FrontProjection and Rear-Screen
Viewing)—56 mm //3.0 lens for short
projection distances and close-ups.
Mirrors—Mirrors to fold the light
beam and to give correct image orien
tation are first-surface aluminized
with a silicon-monoxide, hard-surface
coating.
Focus Knob—Both the front and
rear lens and the image-magnifying
lens are focused by the manual focus
knob.
ELECTRONICS
Signal-to-Noise Ratio—35 dB mini
mum at rated output.
Earphone (EAR) Outlet—1 W RMS
continuous sine wave into 8 ohms;
requires 1/4-inch (6.35 mm) plug.
Amplifier Power Output (External
Loudspeaker Outlet)—5 W RMS
continuous sine wave into 8 ohms
with maximum harmonic distortion of
5 percent.
Internal Loudspeaker—3 x 5-inch
(76 X 127 mm), 8-ohm, oval, base-
mounted, omnidirectional.
Audio Recording Indicator—Red
flickering light indicates that tape
tracks 1 and 2 for audio are in the
recording mode.
Signal-Recording Indicator—Illu
minated green signal light indicates
that signal tracks 3 and 4 for 1000 Hz
slide-advance pulses (and 150 Hz program-pause signals for Model 470 and
Model 570AF) are in the recording
mode.
Page 20

Output Impedance—8 ohms.
Microphone Impedance—200 ohms
at 1000 Hz.
Microphone Jack Configuration—
2 prong.
Large Jack Size—Accepts 9/64-in.
dia. (3.6 mm) plug.
Small Jack Size—Remote tape
control jack is 1/10 in. dia. (2.5 mm)
plug.
Recommended Headphone Imped
ance—150 to 2000 ohms (8 to 150
acceptable).
External Loudspeaker Jack Size—
Accepts 1/4 in. dia. (6.35 mm) plug.
Rewind/Fast Forward Timing—
Approximately 95 seconds for a C-60
compact cassette.
Wow and Flutter—0.45 percent
maximum.
Tape Speed—In play and recording
modes, 1.875 ips (4.76 cm/sec) ± 3
percent.
Slide-Adyance Pulses
Spacing—At least 1 1/2 seconds be
tween the start of two successive
pulses are required.
Frequency—1000 Hz ± 5 percent.
Duration—0.45 ± 0.07 seconds.
Level— — 4 dB, ± 4 dB (ref to 250
nWb/m at 315 Hz.
Lubrication—All bearings are selflubricating; no oiling is needed. After
1000 hours of operation, the AudioViewer/Projectorshould be serviced at
a KODAK Equipment Service Center
(addresses on back cover).
Thermal Fuses—Your
EKTAGRAPHIC AudioViewer/
Projector is equipped with two ther
mal fuses to prevent overheating. If
the AudioViewer/Projector gets too
hot, the fuse on the motor will open
and power to the AudioViewer/Pro
jector will be shut off. When the
AudioViewer/Projector cools, the fuse
will reset automatically and power
will be restored. If the second fuse
(located near the lamp-mounting
bracket) opens, it will not reset. Call a
KODAK Equipment Service Center
to have it replaced and the Audio
Viewer/Projector repaired (if neces
sary). Be sure to correct the cause of
overheating before using the Audio
Viewer/Projector again.
NOTE; The KODAK EC Auto
matic Timer and the KODAK
EC Sound-Slide Synchronizer
cannot be used with an
EKTAGRAPHIC AudioViewer/
Projector.
DIMENSIONAL LINE DRAWINGS
FOR THE KODAK EKTAGRAPHIC
AUDIOVIEWER/PROJECTOR
Height—14.4 inches (366 mm) with
out a tray.
Width—13 inches (330 mm)
Length—12.8 inches (325 mm)
Shown below are dimensional line
drawings for anyone wishing to build
projection accessories for the Audio
Viewer/Projector.
NOTE: If you modify your Audio
Viewer/Projector, obliterate UL
and CSA labels. Modified equip
ment must conform to electrical
and other appropriate codes and
to safety requirements. This
AudioViewer/Projector is subject
to minor appearance changes.
ñü ü
16.3 In.
(414 mm)
o
D
14.4 In.
(366 mm)
1
___
Q_Q
___
^ nj
\
Program-Pause Signals
Spacing—At least 2 seconds between
the start of two signals or between
the end of a signal and the start of
recorded audio (any tape track) are
required.
Frequency—150 Hz ± 5%.
Duration—Same as slide-advance
pulses.
Level—Same as slide-advance pulses.
Ventilation—A dual blower system
cools the lamp and the motor.
Internal Storage—Power cord, slide
tray, microphone, remote-control, ac
cessory
KODAK AudioViewer EC In
terconnect Cord, and spare lamp. For
safety, the storage compartment is
isolated from the electrical compo
nents. The AudioViewer/Projector op
erates without danger of overheating
even if the storage compartment is
filled.
Elevation-Adjustment Range—Up
to 8 degrees.
u
12.8 in.
(325 mm)
13.0 In.
(330 mm)
CE3
U
17
Page 21

WARRANTY
KODAK EKTAGRAPHIC
AudioViewer/Projector
Models 220
270
470
570AF
Kodak warrants this KODAK
EKTAGRAPHIC AudioViewer/Pro
jector to function properly for one
year from date of purchase. Kodak
makes no other warranties,
express, implied or of merchant
ability, for this equipment.
Carefully follow all instructions in
this pamphlet to get the best results
and to prevent damage to your Audio
Viewer/Projector. If this Audio
Viewer/Projector does not function
properly within the warranty period,
Kodak will repair or replace the Au
dioViewer/Projector, at its option and
at no charge, unless damaged by mis
use or other circumstances beyond
Kodak’s control.
For assistance in using this Audio
Viewer/Projector, contact a dealer in
Kodak audiovisual products. Such
dealers are listed in the Yellow Pages
of your local telephone directory un
der Audiovisual Equipment and Sup
plies. For service on this Audio
Viewer/Projector, return it through a
dealer in Kodak audiovisual products
or one of the Kodak Equipment Ser
vice Centers listed on the right. To
help us get your AudioViewer/Projec
tor back to you promptly, please
enclose a note giving details of the
problem, date of purchase, and your
complete name and address.
Repair or replacement is Kodak’s
only obligation. Kodak will not be
responsible for any consequential
or incidental damages resulting
from the sale or use of this Audio-
Viewer ¡Projector, even if loss or
damage is caused by the negligence
or other fault of Kodak.
EASTMAN KODAK COMPANY
EQUIPMENT SERVICE CENTERS
U.S.:
Call 1-800-242-2424
for service information.
Toronto, ON M6M 1V3:
Kodak Canada, Inc.
3500 Eglinton Ave. West
Pub. Pt. No. 634696
Presentation Technologies
EASTMAN KODAK COMPANY • ROCHESTER, NEW YORK 14650
Kodak, Ektagraphic, Estar, Carousel, Ektachrome,
Kodalith, Kodacolor, Kodachrome,
Minor Revision 12/97
and Transvue are trademarks.
Printed in U.S.A.
 Loading...