

Page 1

NIC front cover Page 1 Wednesday, July 15, 1998 2:30 PM
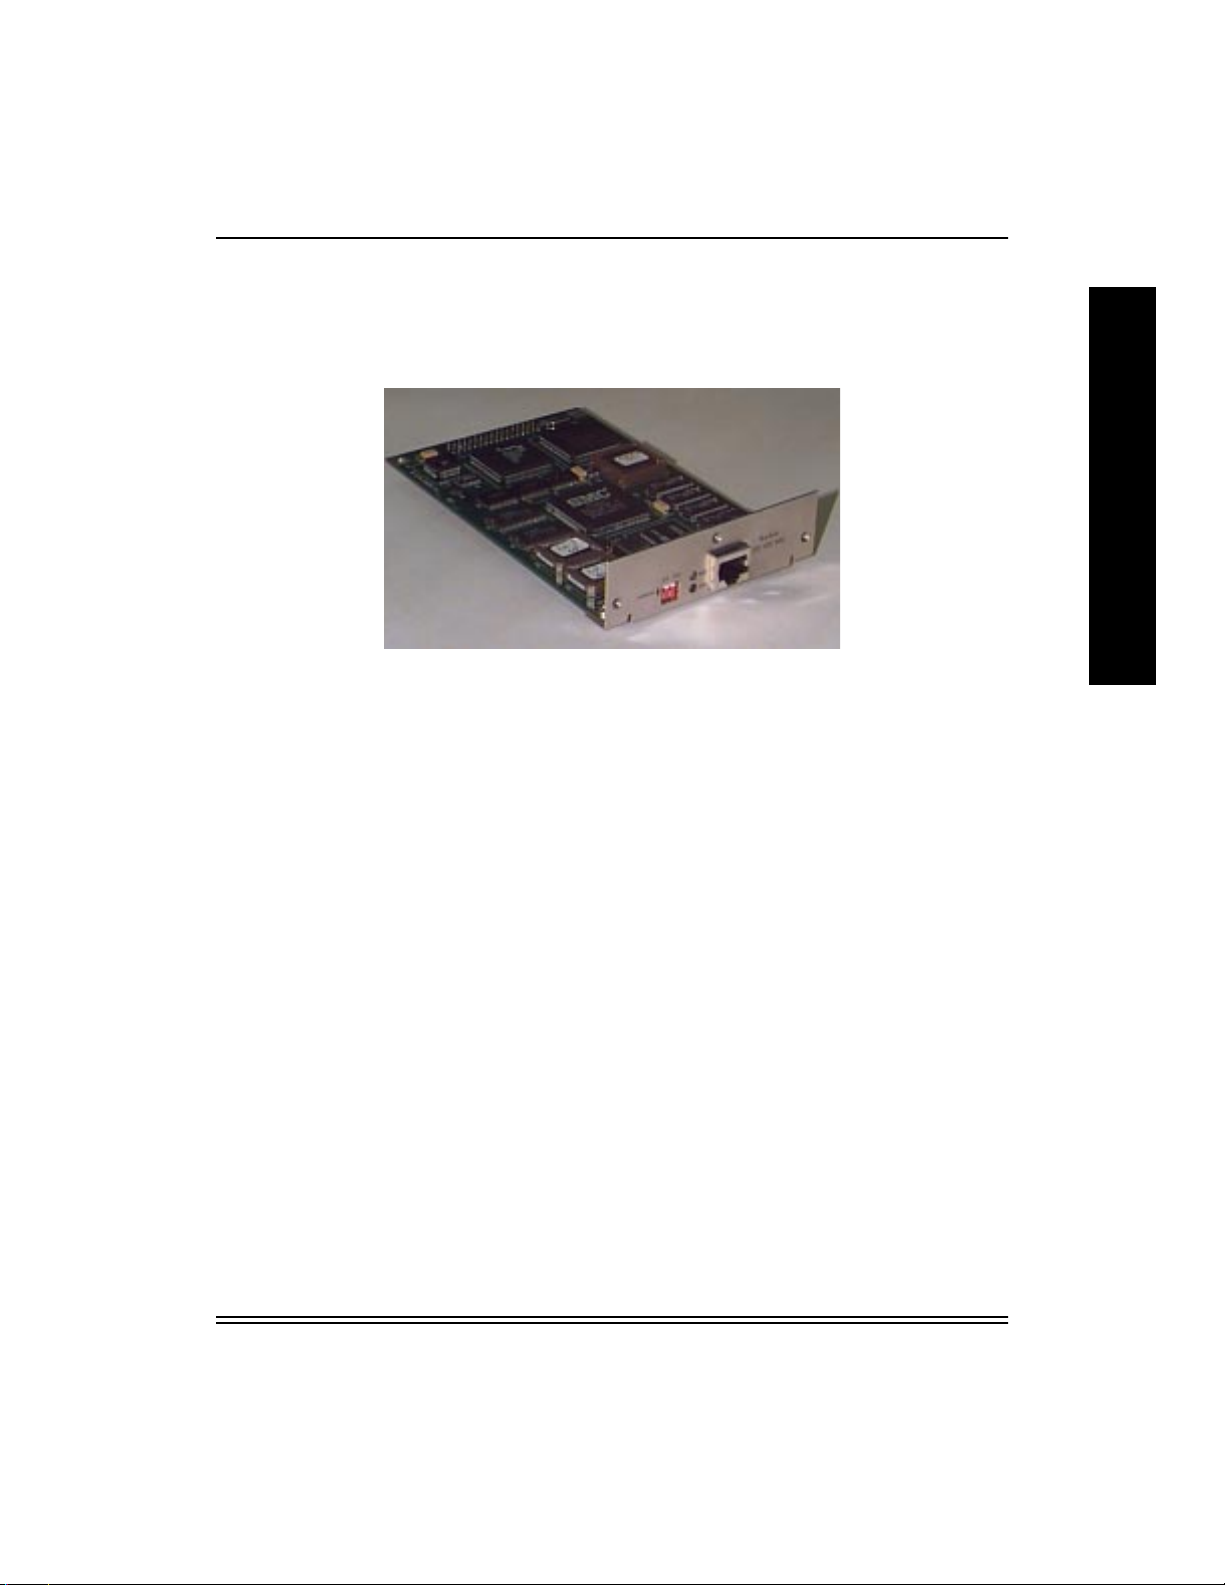
KODAK 10/100
Network Interface Card
KODAK XLS 8400 PS Color Printer
KODAK XLS 8600/8600 PS Color Printer
KODAK DIGITAL SCIENCE
KODAK PROFESSIONAL
KODAK DIGITAL SCIENCE
KODAK DIGITAL SCIENCE
TM
8650/8650 PS Color Printer
8657 Color Printer
TM
Desktop Color Proofer 9000
TM
DCP 9300 Proofer
Part No. 3H0610
Page 2

Contents
CONTENTS
I
1 Kodak 10/100 NIC Introduction and ConÞguration ..................... 1-1
N
T
1.1 About this Guide.......................................................................................................... 1-1
1.2 Using this Guide .......................................................................................................... 1-1
1.3 Contents of this Guide ................................................................................................. 1-2
1.4 NIC Package Contents................................................................................................. 1-3
1.5 Upgrading from a Kodak 10Mbit NIC ........................................................................ 1-4
1.6 Kodak 10/100 NIC Features ........................................................................................ 1-4
1.6.1 Hardware Features ............................................................................................ 1-4
1.7 Protocols ...................................................................................................................... 1-5
R
O
D
U
C
T
I
O
N
1.8 Network Performance.................................................................................................. 1-5
1.9 NIC and Printer Installation/Configuration Overview................................................. 1-5
2 NIC Installation and VeriÞcation ................................................... 2-1
2.1 Equipment Requirements............................................................................................. 2-1
2.2 Preparing the Kodak 8400/86xx series Printers........................................................... 2-1
2.3 Preparing the Kodak DCP 9000 and 9300 Proofers ................................................... 2-3
2.4 Installing or Removing the NIC................................................................................... 2-4
2.5 Printing a NIC Configuration Test Page...................................................................... 2-5
2.6 NIC Faceplate .............................................................................................................. 2-7
2.7 Operation Mode Switches............................................................................................ 2-7
2.8 Configuring the Network Parameters .......................................................................... 2-8
3 Windows - FastManage ConÞguration Utilities ........................... 3-1
3.1 FastManage Features ................................................................................................... 3-1
3.1.1 FastManage Hardware Requirements .............................................................. 3-2
3.1.2 Software Requirements .................................................................................... 3-2
July 1998 iii
Page 3

Contents
3.2 Extracting Files from the Windows Utilities Diskette................................................. 3-3
I
N
T
R
O
D
U
C
T
I
O
N
3.2.1 Setting up the FastManage Utilities ................................................................. 3-3
3.3 Installing FastManage.................................................................................................. 3-4
3.4 FastManage - Discovery Application .......................................................................... 3-7
3.4.1 Opening the Discovery Application ................................................................. 3-8
3.4.2 Kodak Printer/Proofer NIC Icon Names ........................................................ 3-10
3.4.3 Discovery Application Tools ......................................................................... 3-11
3.4.4 Discovery Application Preferences ................................................................ 3-14
3.4.5 Application Launch Parameters ..................................................................... 3-17
3.4.6 Mib2 System Parameters ................................................................................ 3-18
3.5 Fastmanage - Kodak NIC Manager Application ....................................................... 3-20
3.6 NIC Manager Configuration Menus.......................................................................... 3-21
3.6.1 TCP/IP Configuration .................................................................................... 3-22
3.6.2 Novell Configuration ...................................................................................... 3-23
3.7 General Configuration ............................................................................................... 3-24
3.7.1 Ethertalk Configuration .................................................................................. 3-25
3.7.2 SMB Configuration ........................................................................................ 3-26
3.7.3 NetBIOS Configuration .................................................................................. 3-26
3.7.4 Status Menu .................................................................................................... 3-27
3.7.5 Help Menu ...................................................................................................... 3-27
3.8 FastManage - Ping Application ................................................................................. 3-27
3.9 FastManage - BOOTP Application........................................................................... 3-29
3.10 NetBeui Browsing and Sharing Abilities................................................................... 3-31
3.10.1 DOS Tools for NetBIOS ................................................................................ 3-32
3.11 Troubleshooting FastManage .................................................................................... 3-33
3.11.1 Error Messages ............................................................................................... 3-33
3.11.2 IP Address Validation Messages .................................................................... 3-34
3.11.3 Discovery Application Messages ................................................................... 3-35
3.11.4 Ping Application Message .............................................................................. 3-35
3.11.5 BOOTP Server Application Messages ........................................................... 3-36
iv July 1998
Page 4

Contents
4 Novell NetWare ............................................................................... 4-1
4.1 NetWare Client Installation Overview ........................................................................ 4-1
I
N
4.2 Configuring in a Bindery Environment ....................................................................... 4-1
4.2.1 Configuring using PCONSOLE ....................................................................... 4-1
4.3 Configuring in an NDS Environment .......................................................................... 4-2
4.3.1 Configuring Your NDS Server using PCONSOLE ......................................... 4-2
4.3.2 Configuring the NIC for NDS .......................................................................... 4-3
4.3.3 Additional Queues ............................................................................................ 4-3
4.3.4 Creating an NDS Print Server Using NWadmin .............................................. 4-4
4.4 Configuring in a Mixed Bindery and NDS Environment............................................ 4-7
4.5 Novell NetWare - AppleTalk....................................................................................... 4-9
4.5.1 Configuring Novell NetWare 3.x for AppleTalk ............................................. 4-9
4.5.2 Configuring Novell NetWare 4.x for AppleTalk ........................................... 4-10
T
R
O
D
U
C
T
I
O
N
4.6 Troubleshooting Netware .......................................................................................... 4-11
4.6.1 NIC Console Messages .................................................................................. 4-12
5 Windows for WorkGroups (3.x) ..................................................... 5-1
5.1 Configure the NIC ....................................................................................................... 5-1
5.2 Configure the Workstation for Printing....................................................................... 5-1
6 Windows 95 ..................................................................................... 6-1
6.1 Configure the NIC ....................................................................................................... 6-1
6.2 Configure the Workstation for Printing....................................................................... 6-1
6.2.1 Printer/NIC selection and printer setup using Win 95/NT Network
Neighborhood: .................................................................................................. 6-2
6.2.2 Using the ÒAdd PrinterÓ Method ...................................................................... 6-3
6.2.3 Setting Printer Properties ................................................................................. 6-8
July 1998 v
Page 5

N
T
R
O
D
U
C
T
O
N
Contents
7 Windows NT 3.51Workstation/Servers ......................................... 7-1
I
I
7.1 Configure the NIC, if necessary .................................................................................. 7-1
7.2 Configure the print servers, if necessary ..................................................................... 7-1
7.2.1 Network Service and Protocol Installation ....................................................... 7-2
7.2.2 Windows NT Server Queues ............................................................................ 7-2
7.3 Configuring your Workstation for Printing ................................................................. 7-3
7.4 Adding a Printer........................................................................................................... 7-3
7.4.1 Adding a Printer ............................................................................................... 7-4
7.4.2 Printing via TCP/IP (LPR Port) ....................................................................... 7-5
7.4.3 Printing via AppleTalk ..................................................................................... 7-6
7.4.4 Printing via a Server/Print Queue ..................................................................... 7-8
7.4.5 Creating a Print Queue ..................................................................................... 7-8
8 Windows NT 4.0 Workstation/Servers .......................................... 8-1
8.1 Configure the NIC ....................................................................................................... 8-1
8.2 Configure Print Servers ............................................................................................... 8-1
8.2.1 Network Service and Protocol Installation ....................................................... 8-2
8.2.2 Windows NT Server Queues ............................................................................ 8-2
8.3 Configuring your Workstation for Printing ................................................................. 8-2
8.4 Printer/NIC selection and printer setup using Win 95/NT Network Neighborhood: .. 8-3
8.5 Adding a Printer to Your System using ÒAdd PrinterÓ................................................ 8-3
8.5.1 Printing Via TCP/IP (LPR Port) ....................................................................... 8-3
8.5.2 Printing via AppleTalk ..................................................................................... 8-6
8.5.3 Printing via a Print Queue ................................................................................ 8-8
8.6 Installing the Kodak Printer Driver ............................................................................ 8-9
8.7 Printer Properties ....................................................................................................... 8-13
8.7.1 Setting Up Output Properties ......................................................................... 8-13
9 Apple/Macintosh Environments .................................................... 9-1
9.1 Configuring the NIC .................................................................................................... 9-1
9.2 "NIC Configuration Test Page" vs "Printer Test Page" :............................................ 9-2
vi July 1998
Page 6

Contents
9.3 Contents of NIC/Macintosh Utilities Diskette............................................................. 9-3
9.3.1 Using the Laserwriter Utility for Downloading Configuration Files ............... 9-4
9.4 Configuring Macintosh Systems for Printing .............................................................. 9-5
10 Unix Environment ......................................................................... 10-1
10.1 Configuring the NIC from Unix (TCP/IP) Platforms ................................................ 10-1
10.1.1 Setting the IP Address Using Arp and Telnet ................................................ 10-2
10.1.2 Verifying IP Address is Set Properly ............................................................. 10-3
10.2 Introduction to LPD/LPR........................................................................................... 10-3
10.2.1 Setting up LPD/LPR ....................................................................................... 10-4
10.2.2 Remote or Direct Network Spooling .............................................................. 10-4
10.3 Printer/NIC Setup using the Installation Script ......................................................... 10-4
I
N
T
R
O
D
U
C
T
I
O
N
10.4 Manual NIC Installation for BSD Machines ............................................................. 10-5
10.4.1 Manual NIC Installation for System V Machines .......................................... 10-5
10.5 Printcap File Parameters ........................................................................................... 10-7
10.5.1 TFTP Support for the printer/NIC .................................................................. 10-8
11 Printing .......................................................................................... 11-1
11.1 PostScript and Raster Modes ..................................................................................... 11-1
11.1.1 PostScript Drivers .......................................................................................... 11-1
11.1.2 Raster Drivers ................................................................................................. 11-1
11.1.3 Language Efficiency vs Network and Printer Performance ........................... 11-1
11.1.4 Non-Kodak Printer Software .......................................................................... 11-1
11.2 Changing between PostScript and Raster Printing
Modes - Kodak 8xxx series Printers 11-2
11.3 Changing From PostScript to Raster Printing Modes - Kodak DCP9000 Proofers .. 11-3
11.4 Printing in PostScript Mode from Windows/DOS Systems ...................................... 11-4
11.4.1 Printing from Windows .................................................................................. 11-4
11.4.2 Printing from DOS ......................................................................................... 11-4
11.4.3 Eliminating ÒCtrlDÓs from Print jobs ............................................................. 11-5
11.5 Printing in PostScript Mode from Macintosh Systems.............................................. 11-5
11.6 Printing from BSD UNIX Systems............................................................................ 11-6
July 1998 vii
Page 7

N
T
R
O
D
U
C
T
O
N
Contents
11.7 Printing from UNIX System V Systems.................................................................... 11-6
I
11.8 Printing from VMS Systems...................................................................................... 11-7
11.8.1 Printing in Raster Mode from Windows and Macintosh Platforms ............... 11-7
12 Troubleshooting ........................................................................... 12-1
12.1 Verifying Standalone Printer Functions .................................................................... 12-5
12.2 Verify Network Connectivity .................................................................................... 12-6
12.3 Verify Network Parameters ....................................................................................... 12-6
12.4 Verify Application and Printer Parameters................................................................ 12-7
I
12.5 Novell NetWare Installations..................................................................................... 12-7
12.5.1 Netware debug via Telnet session .................................................................. 12-8
12.6 NT Installations........................................................................................................ 12-10
12.7 AppleTalk Installations............................................................................................ 12-11
12.7.1 PostScript mode ............................................................................................ 12-11
12.8 TCP/IP Installations................................................................................................. 12-12
Appendix A NIC Telnet ........................................................................ A-1
A.1 NIC Telnet Mode........................................................................................................ A-1
A.2 NIC Telnet Session ..................................................................................................... A-1
A.3 Telnet Diagnostic and Configuration Commands ...................................................... A-2
A.4 Sample Telnet Session depicting Monitor options ..................................................... A-2
A.4.1 CÑConfigure Console (for status monitoring)............................................... A-2
A.4.2 DÑDisplay summary configuration parameters............................................. A-2
A.4.3 FÑFlash firmware load enable/disable........................................................... A-3
A.4.4 IÑDisplay/set IP address................................................................................ A-3
A.4.5 LÑLimit monitor network access by password ............................................. A-4
A.4.6 NÑNetwork protocols menu .......................................................................... A-4
A.4.7 TÑTCP/IP (sockets, lpd, rarp, bootp, tftp) options........................................ A-5
A.4.8 ZÑReset nvram to factory defaults ................................................................ A-6
A.4.9 +ÑPrint PostScript test page .......................................................................... A-6
A.5 Finishing Up a Telnet Session .................................................................................... A-6
viii July 1998
Page 8

Contents
Appendix B Third Party Network Applications and Utilities ........... B-1
B.1 Windows 95 LPR Utilities ........................................................................................... B-1
B.2 PC-NFS for Windows .................................................................................................. B-1
Appendix C Upgrading NIC Firmware and Resetting NIC to
Factory Defaults
C.1 Upgrading the Flash EPROMs .................................................................................... C-1
C.2 Using the Network Download Procedure .................................................................... C-1
C.2.1 Downloading the Flash Image.......................................................................... C-1
C.2.2 Recovering from a Failed Download ...............................................................C-2
C.2.3 Restoring the Alternate Bank Image ................................................................C-2
C.2.4 Completing the Download ...............................................................................C-3
C.2.5 Flash Download Commands ............................................................................C-3
............................................................. C-1
I
N
T
R
O
D
U
C
T
I
O
N
C.3 Resetting the NIC to Factory Defaults......................................................................... C-4
Appendix D NIC SpeciÞcations .......................................................... D-1
D.1 RJ-45 Connector ......................................................................................................... D-1
D.2 Climate: Storage Temperature .................................................................................... D-2
D.3 Electrical UTP Interface ............................................................................................. D-2
D.4 Regulatory Approvals................................................................................................. D-2
D.5 Test Print Settings When Using Defaults ................................................................... D-2
Appendix E Technical Assistance ..................................................... E-1
Index ......................................................................................... Index-1
July 1998 ix
Page 9
Kodak 10/100 NIC Introduction and Configuration
1 Kodak 10/100 NIC Introduction and ConÞguration
I
N
T
R
O
D
U
C
T
I
O
N
1.1 About this Guide
This guide provides information about the Kodak 10/100 Network
Interface Card (NIC) features, installation and conÞguration.
This NIC can be used with the following printers and proofers:
¥ Kodak XLS
¥ Kodak XLS 8600/8600 PS color printer
¥ Kodak Professional
Kodak Digital Science
¥
Kodak Digital Science
¥
Kodak Digital Science
¥
This NIC cannot be used with the Kodak Professional 8670 PS printer.
1.2 Using this Guide
This guide is intended for system administrators responsible for
conÞguring, maintaining, and troubleshooting computers and peripherals
in networked environments.
8400 PS color printer
8657 color printer
TM
8650/8650 PS color printer
TM
desktop color proofer 9000
TM
DCP 9000 proofer
July 1998 1-1
Page 10

N
T
R
O
D
U
C
T
O
N
Kodak 10/100 NIC Introduction and Configuration
It is also intended for administrators and experienced users responsible
I
I
for conÞguring individual workstation platforms.
This guide assumes an understanding of Novell IPX, EtherTalk, TCP/IP,
and/or NetBeui networking protocols, and administrative experience with
Novell, Macintosh, Windows and/or Unix platforms.
This guide provides procedures for installing the NIC hardware,
conÞguring the NIC, conÞguring print queues, and conÞguring user
workstations.
This guide does not describe how to operate a printer or proofer. For that
information, refer to the appropriate printer or proofer user guides.
1.3 Contents of this Guide
Chapter 1 - Introduction and ConÞguration Overview: Provides
overviews of the Kodak 10/100 NIC used with Kodak Printers and
Proofers. Also provides an overview of NIC and printer installation and
conÞguration procedures.
Chapter 2 - NIC Hardware Installation: Has instructions for installing the
Kodak 10/100 NIC hardware in Kodak printers and proofers. Also
provides initial powerup details for verifying proper installation.
Chapter 3 - Windows - FastManage Utilities: Has instructions for
installing FastManage utilities for conÞguring the NIC from Windows
platforms. Also describes the use of the FastManage utilitiesÑ Discovery,
Kodak NIC Manager, BootP and Ping.
Chapter 4 - Novell Netware Server: Has procedures for setting up
Novell Netware Bindery or NDS server print queues to accommodate
Kodak printers.
Chapter 5 - Windows for Workgroups (3.x)
Chapter 6 - Windows 95
Chapter 7 - Windows NT 3.51
Chapter 8 - Windows NT 4.0
Chapter 9 - Apple Macintosh
1-2 July 1998
Page 11

Kodak 10/100 NIC Introduction and Configuration
Chapter 10 - Unix
Chapter 11 - Network Printing: Summarizes techniques for printing from
Windows, Macintosh and Unix platforms.
Chapter 12 - TroubleShooting: Provides ßow charts and speciÞcs on
various steps.
Appendix A - Telnet ConÞguration Utilities
Appendix B - 3rd Party Networking Utilities
Appendix C - Upgrading NIC ÒFlashÓ Firmware
Appendix D - NIC SpeciÞcations
Appendix E - Technical Assistance
I
N
T
R
O
D
U
C
T
I
O
N
1.4 NIC Package Contents
The Kodak 10/100 NIC may come already installed in your printer; it may
also be separately purchased as an option to support network printing.
If the NIC was pre-installed , the following items should be included with
the printer, software and documentation packages:
¥ 10/100 Network Interface Card
¥ UserÕs Guide (this manual)
¥ 1 diskette - ConÞguration Utilities for DOS/Windows
¥ 1 diskette - ConÞguration Utilities for Macintosh
¥ 1 diskette - ConÞguration Utilities for Unix
¥ Ethernet Hardware Address labels
¥ Anti-static strap
¥ Kodak Printer Drivers and Export Modules for Windows and/or
Macintosh.
If you purchased the NIC as an option , you should have all the items
listed above except the Windows and Macintosh drivers and export
modules software and documentation. These items were included with
your printer.
July 1998 1-3
Page 12

N
T
R
O
D
U
C
T
O
N
Kodak 10/100 NIC Introduction and Configuration
1.5 Upgrading from a Kodak 10Mbit NIC
I
The Kodak 10/100 Mbit NIC may be used to upgrade any Kodak printers
that are currently using a Kodak 10Mbit NIC with a ÒMIL-3007EKÒsticker
on the bottom of the NIC.
Note: This manual is applicable only to Kodak printers using this Kodak
10/100 NIC upgrade relative to NIC conÞguration methods.
1.6 Kodak 10/100 NIC Features
I
The NIC is an autodetecting 10 or 100 Mbps, network interface card that
allows users to connect directly to a Kodak printer or proofer on Ethernet
networks using 10BaseT or 100BaseT network media.
The NIC connects printers directly to Ethernet networks utilizing IPX,
EtherTalk, TCP/IP and/or NetBios/Netbeui protocols in support of Novell
NetWare 3.x, Netware 4.x, Netware NDS, IBM OS/2, MS-DOS, Windows
3.x, Windows 95, Windows NT 3.51, Windows NT 4.0, Macintosh and
Unix environments. In general, any system that supports the NIC
protocols should be able to use this NIC to print to Kodak printers.
1.6.1 Hardware Features
¥ NIC motherboard, with Ethernet controller and custom shared DMA
interface to Kodak printer. The NIC connects directly to Ethernet
networks via an RJ-45 connector.
¥ CPU: An Intel 80186 processor, with a 16 MHz clock.
¥ 1 MByte of memory via Flash EPROMs: 2 Flash EPROMs are 29F040
devices. Each EPROM is 4 Mbits and arranged in 2 ´ 256k ´ 8 format.
Firmware upgrades of the ßash EPROMs can be done via network
connections.
¥ MAC chipset: Ethernet controller is 10/100 Mbps, with SRAM for data
buffering, and its own memory management.10 Mbit vs. 100 Mbit
autosensing accommodates network speed capabilities.
¥ 2 switches on the NIC faceplate provide Normal, Normal + Telnet, and
NIC conÞguration test page modes of NIC operation.
¥ Green and Yellow LEDs indicate network connectivity and trafÞc.
1-4 July 1998
Page 13

1.7 Protocols
¥ The NIC supports TCP/IP, Novell IPX, EtherTalk and NetBeui/NetBios
protocols.
¥ Users can print in either PostScript or raster mode.
IMPORTANT: Printing in raster mode using EtherTalk is possible only
from a Macintosh. For non-Macintosh systems using
EtherTalk, you can print only in PostScript mode.
1.8 Network Performance
Network performance depends heavily on the topology of a network
(networked elements, that is, the # of users/nodes, inter-connectivity and
conÞguration of hubs, switches, subnets, routers, etc.) and will vary for
speciÞc environments.
Kodak 10/100 NIC Introduction and Configuration
I
N
T
R
O
D
U
C
T
I
O
N
A color-capable printer accepting large print jobs (1 to 100 Mbytes) may
be a critical factor in environments where network utilization optimization
is critical. A Kodak printer with a Kodak 10/100 NIC operating in a 100
Mbit environment may drastically improve your networkÕs performance
because it will only require a fraction (1/10) of the subnet network
bandwidth that would be necessary if it was operating at 10 Mbits.
1.9 NIC and Printer Installation/ConÞguration Overview
The diagram on the next page and the text that follows provide an
overview of
NIC and printer installation and conÞguration procedures.
July 1998 1-5
Page 14
Kodak 10/100 NIC Introduction and Configuration
N
T
R
O
D
U
C
T
O
N
I
I
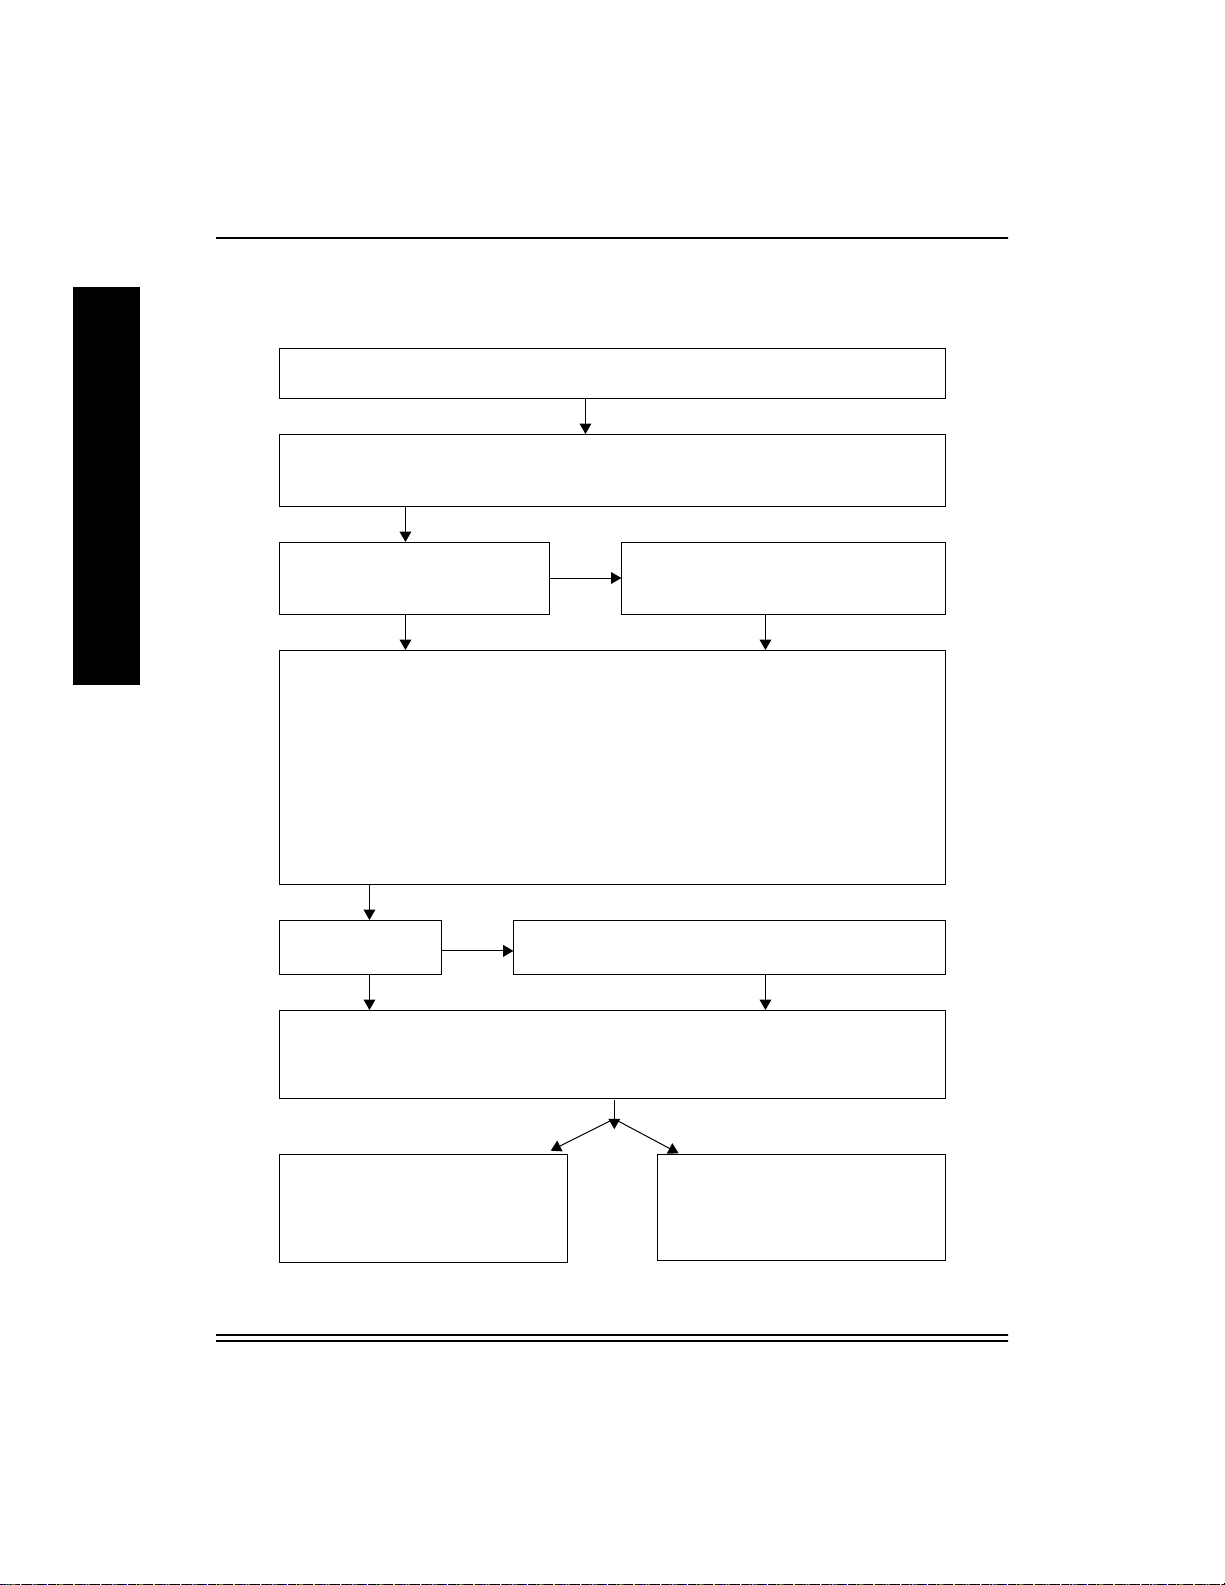
Printer/NIC Installation and ConÞguration Overview
Step 1:Determine your Network and Printing Environment. (Ch1:Intro/Overview)
NIC supports TCP/IP, Novell Netware, AppleTalk & Native Windows (NetBeui) Protocols.
Step 2: Gather Necessary Hardware & Software Components. (Ch1:Intro/Overview)
NIC, NIC ConÞg S/W, Printer, Printer ConÞg S/W, i.e.PostScript Drivers and Raster Export
Modules
Step 3: Install the NIC in the Printer.
NIC Pre-installed in Printer?
Yes
Step 4: ConÞgure the NIC. (Ch3:FastManage, Ch9:Apple/Macintosh, Appendix: A Telnet)
Recommendation: Use defaults until successful network printing is demonstrated.
Complete the following if using TCP/IP. (TCP/IP minimally requires an IP Address).
The quickest method (when IP = 0.0.0.0) is to use ÒarpÓ and ÒtelnetÓ commands.
1) Set NIC mode switches in Telnet mode (D1 up, D2 down) and power cycle printer.
2) Use arp -s <IP Address> <NIC Ethernet Address>
3) Use telnet <IP Address> 2002.
5) Follow Telnet Ethernet>TCP/IP>Set IP menus to set IP address and then Reset the NIC.
6) Power cycle the printer.
No
(Ch2:NIC Install) Requires NIC, Phillips or
T10 Torque Screwdriver, and Static Strap.
Use Server
Print Queues?
No
Step 6: ConÞgure Workstations for PostScript and/or Raster Mode Printing. (Ch5-8
Windows, Ch9 Macintosh)
Install proper PostScript Driver (for printer in PostScript mode) and/or Kodak Export Module
plug-in (for printer in raster mode).
Step7:Printer in PostScript Mode
(Ch11:Printing)
Use File > Print
from Applications and
Select the Kodak Printer.
Yes
Step 5:ConÞgure Server (Ch4:Novell, Ch7/8 Windows
NT, Ch10:Unix)
Step7:Printer in Raster Mode
(Ch11:Printing)
Use File > Export
from Adobe PhotoShop and Select
the Kodak Printer.
1-6 July 1998
Page 15

Kodak 10/100 NIC Introduction and Configuration
Step 1: Assess your network/printing environment
Consult with your system/network administrator regarding
¥ Protocols: Determine the network protocol(s) (TCP/IP, Novell IPX,
AppleTalk and/or NetBIOS) to use for communicating to the printer/
NIC.
¥ NIC ConÞguration Platform: Determine the platform that is appropriate
for conÞguring NIC network parameters.
¥ Servers: Determine any servers that will be used to spool and manage
jobs sent to corresponding printer queues.
¥ Printing Platforms: Determine the workstation platforms that will be
used for creating and sending print jobs.
Step 2: Gather the necessary components
¥ Hardware: Kodak printer, Kodak 10/100 NIC, and network cabling
certiÞed for 10 or 100 Mbit operation depending on the speed of your
network.
¥ Networking components: Networking components (cables, converters,
hubs, etc.) are not included with the NIC. You must purchase
interconnecting networking components needed to support a speciÞc
environment separately.
I
N
T
R
O
D
U
C
T
I
O
N
If a BNC (10Base2) connection is required, purchase a BNC/RJ45
transceiver or hub from your local dealer or distributor.
If a direct RJ45 (10/100BaseT) connection from a single computer to
a printer is required, a mini-hub and two network cables should be
used, minimally. We do not recommend using an Rx/Tx crossover
cable to defeat the need for a hub because it is a custom cable that
may not be available from a local dealer/distributor. Refer to the RJ54
connector description in Appendix D.
¥ NIC ConÞguration Software: Determine the NIC conÞguration utility
software appropriate for the platform. Use FastManage Utilities
(provided) or NBMon for Windows platforms, Laserwriter Utilities
(provided) for Macintosh platforms. Telnet (not provided) can be used
for any platform that supports TCP/IP.
July 1998 1-7
Page 16

N
T
R
O
D
U
C
T
O
N
Kodak 10/100 NIC Introduction and Configuration
¥ Windows & Macintosh Printer ConÞguration Software: PostScript
I
I
drivers for Kodak printers for printing when the printer is in PostScript
mode and Export modules for printing when the printer is in raster
mode. For Unix platforms, refer to Appendix E, Technical Assistance.
¥ Printer/NIC documentation and software: If you cannot locate the
software that came with your printer and NIC, the latest printer and
NIC documentation and software are available on the Kodak Web site
(www.kodak.com). You may wish to copy components that are
pertinent to your printer and NIC to a local server for quick access by
those who are responsible for setting up their individual workstations.
Note: If you have problems related to printer or NIC software, check
the Kodak Web site (www.kodak.com) to verify that you have
the latest version. Download the latest version, if necessary.
Step 3: Install the NIC hardware, if necessary
¥ Install the NIC in the Kodak printer, if necessary. Refer to the NIC
Hardware Installation chapter for installation details and to verify
proper NIC operation on powerup.
Step 4: ConÞgure the NIC from the desired platform
¥ NIC Defaults: We recommend that you use the default parameters
initially until the printer functions on your network.
¥ NIC ConÞguration SW: If you decide not to use the defaults, install the
remote conÞguration software utilities appropriate for the platform.
Refer to the appropriate chapter for details.
1-8 July 1998
Page 17

Kodak 10/100 NIC Introduction and Configuration
NIC ConÞguration Software
¥
Windows: The NIC may be conÞgured from Windows-based platforms
using NIC FastManage, NBMon or Telnet utilities. Refer to the
Windows FastManage Utility chapter.
¥ Macintosh: The NIC may be conÞgured from Macintosh-based
platforms using NIC LaserWriter utilities. Refer to the Apple Macintosh
- Laserwriter Utilities section. Telnet may also be used.
¥ Unix: Use Telnet utilities.
¥ Telnet: The NIC may be conÞgured from any platform supporting TCP/
IP via TELNET utilities after an IP address has been established.
Refer to Appendix A, Telnet.
IMPORTANT: This 10/100 NIC is configurable ONLY by using remote
configuration utilities listed above. Use of the front control
panel and corresponding test page is not pertinent to this
NIC.
Step 5: ConÞgure the print servers, if necessary
I
N
T
R
O
D
U
C
T
I
O
N
Determine whether server print queues will be used and conÞgure the
appropriate servers.
Chapter 4 describes how to conÞgure Novell servers.
Procedures for conÞguring Windows NT servers are identical to
procedures for conÞguring Windows NT workstations with the exception
of ÒsharingÓ the printer. Refer to Windows NT chapters.
Step 6: ConÞgure the printer on workstations
Determine the printer modes (PostScript and raster) that will be used.
Install the PostScript and raster printer software.
PostScript mode: PostScript printer drivers or PPDs must be installed on
each platform that prints to the printer.
July 1998 1-9
Page 18

N
T
R
O
D
U
C
T
O
N
Kodak 10/100 NIC Introduction and Configuration
Raster mode: Printer drivers (referred to as Export Modules) must be
I
I
installed on each platform that prints (exports) Þles to the printer. Export
modules are used with Adobe PhotoShop and with the Kodak Printer
Calibration Utilities. Applications that are Adobe Photoshop Plug-in
module-compliant could also use a Kodak printer export module.
Platform Print Drivers: Kodak develops printer-speciÞc drivers and
export modules for Macintosh and most PC platforms. Drivers for other
platforms (that is, Unix) may be available through alternate vendors who
support Kodak printers. Refer to Appendix E if necessary.
If a Kodak driver is not available for a particular platform, you can use a
generic PostScript driver; however, it may not support all printer features.
Step 7: Printing
Refer to Chapter 11, Printing, for information about mode selection and
printing to Kodak printers in PostScript or raster mode.
Troubleshooting
Refer to chapter 12, Troubleshooting, before contacting your retailer
(1st)or Kodak (2nd) for technical assistance.
1-10 July 1998
Page 19

2 NIC Installation and Verification
This chapter describes how to install the NIC in the Kodak XLS 8400 and
8600 printers, the Kodak Digital Science 8650 printer, the Kodak
Professional 8657 printer, the Kodak Digital Science Desktop Color
Proofer 9000, and the Kodak Digital Science DCP 9300 Proofer. It also
describes how to run the verification test using the default configurations
after the NIC is installed. See the last part of this chapter for information
about NIC LEDs and operating mode switches for power-up hardware
verification.
For a fee, you may have a Kodak service representative install the NIC in
the printer. This fee covers hardware installation only. Network setup
tasks are still your responsibility. If you install the NIC yourself, you are
responsible for any damage that occurs during installation.
2.1 Equipment Requirements
When installing a new NIC or replacing a NIC, you need
• a Phillips-head or Torque-head (T15) screwdriver. Check the rear of
the printer to determine the screwdriver you need.
NIC Installation and Verification
I
N
S
T
A
L
L
A
T
I
O
N
• network cabling certified for 10 and/or 100 Mbit operation depending
on the speed of your network. The Kodak Printer and NIC support
10BaseT or 100BaseT cabling directly. For 100 Mbit operation, use
category 5 (CAT 5), unshielded twisted pair (UTP) cabling.
2.2 Preparing the Kodak 8400/86xx series Printers
1. Turn off and unplug the printer.
July 1998 2-1
Page 20
I
N
S
T
A
L
L
A
T
I
O
N
NIC Installation and Verification
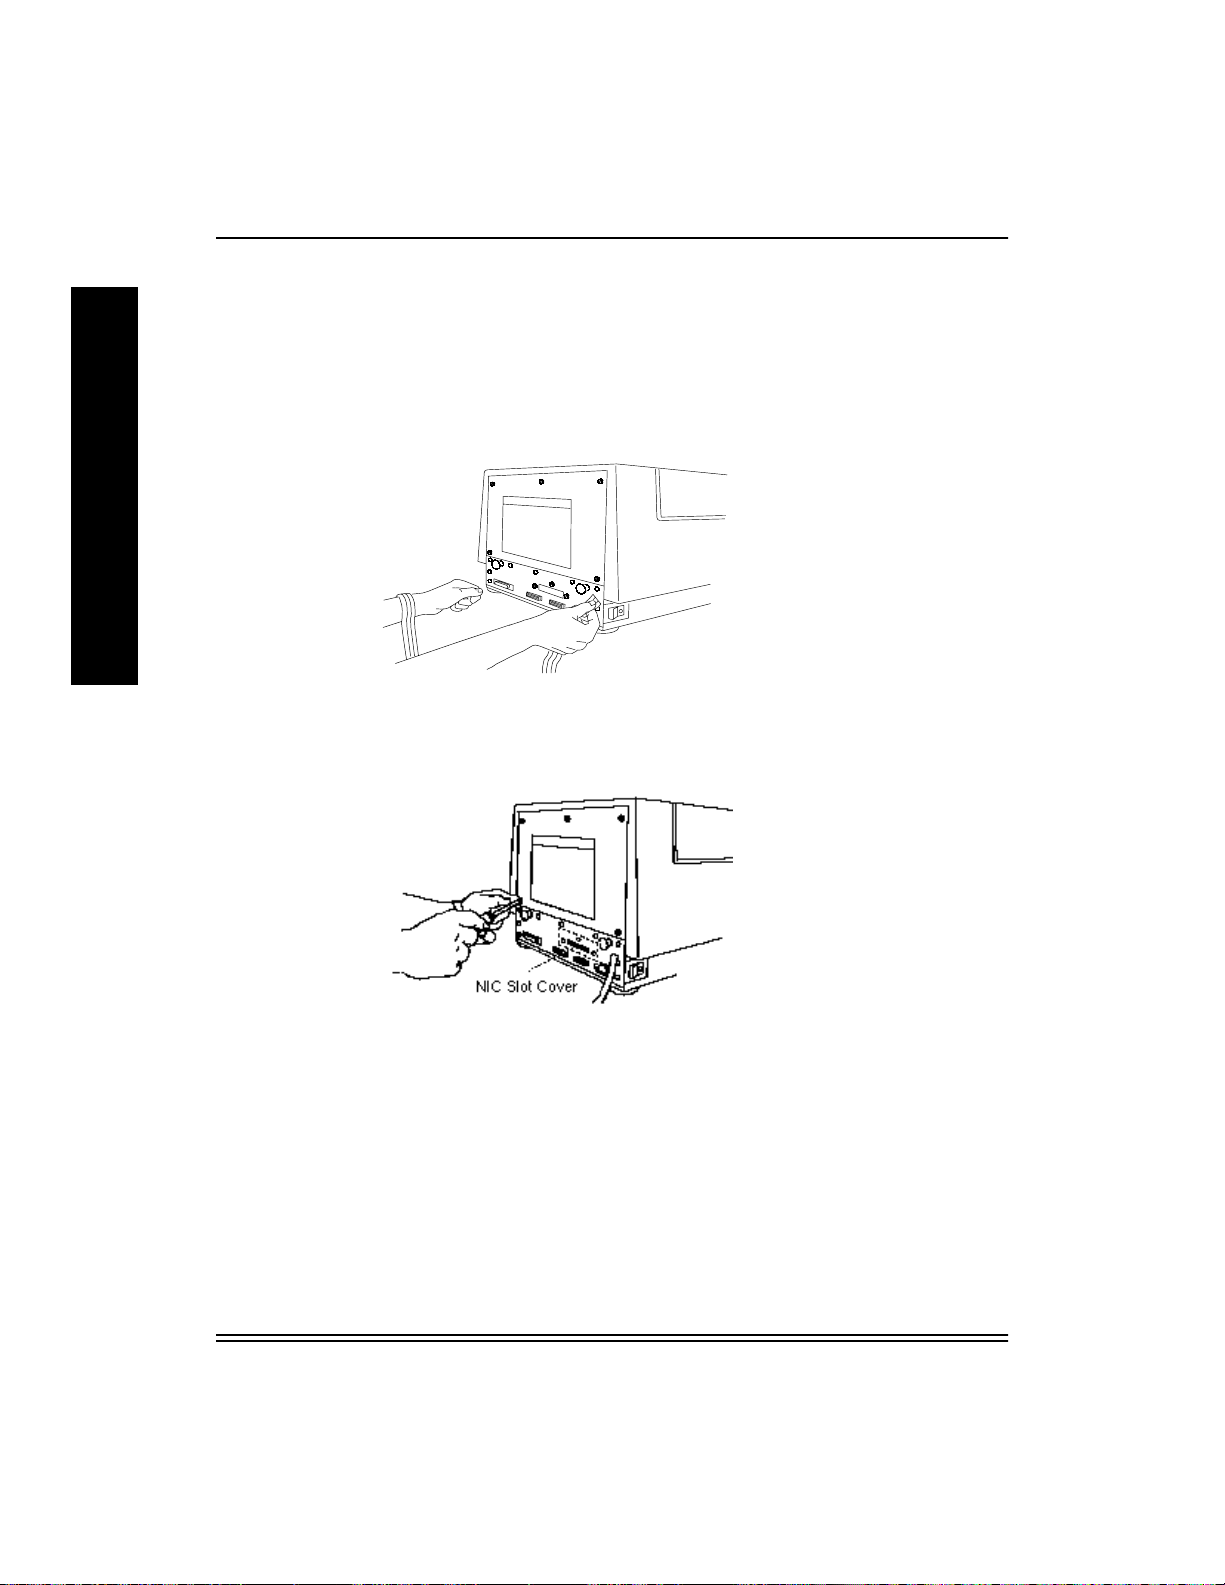
2. Attach the wrist portion of the antistatic strap to your wrist. Attach the
other end of the strap to the metal plate on the back of the printer.
CAUTION: Wear the antistatic strap when you open the back of the
printer, remove the NIC from the antistatic bag, and
install the NIC. This helps prevent static discharge
damage to the printer and the NIC.
3. Remove the three screws that hold the NIC slot cov er (or e xisting NIC)
in place and set the slot cover aside. Also, remove the five screws on
the back of the printer.
2-2 July 1998
Page 21
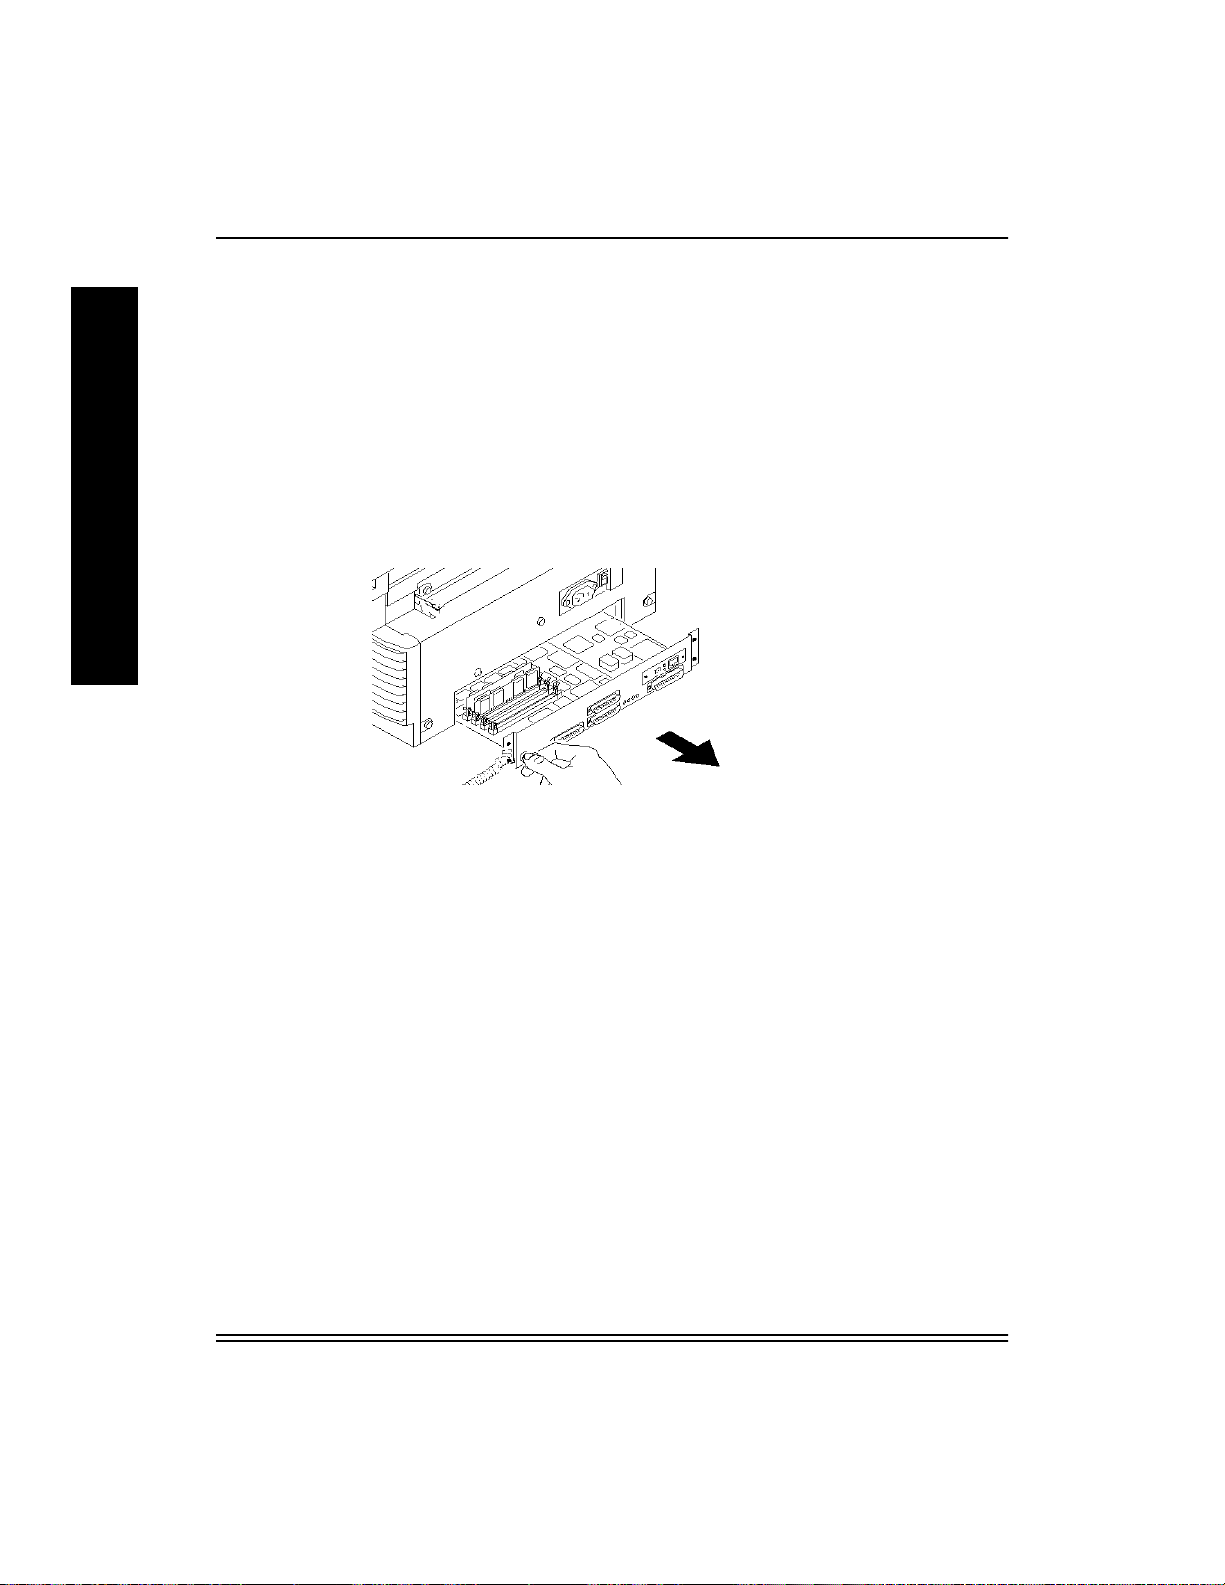
NIC Installation and Verification
A
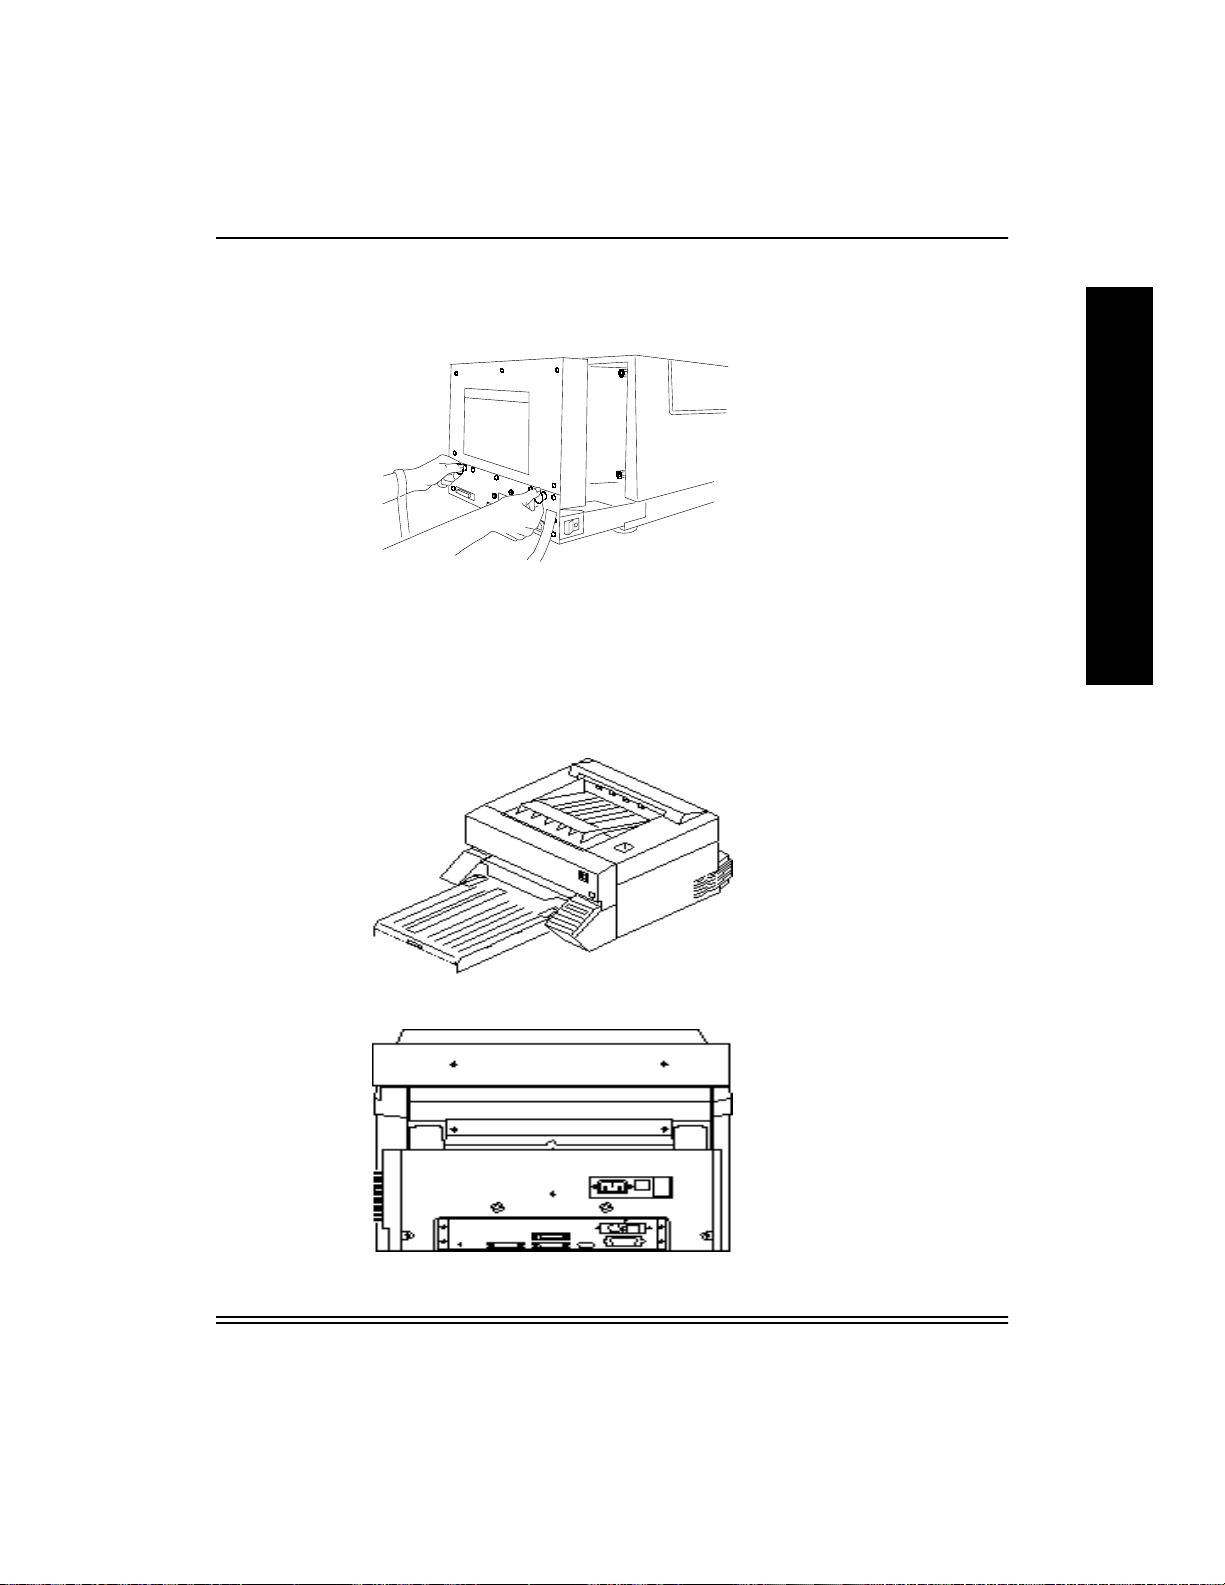
4. Grasp the two black handles on the metal plate. Slowly pull the dra wer
out about six inches.
The printer is ready. Continue to Section 2.4,
Interface Card
.
Installing the Network
2.3 Preparing the Kodak DCP 9000 and 9300 Proofers
1. Turn off and unplug the proofer.
I
N
S
T
A
L
L
A
T
I
O
N
July 1998 2-3
Page 22
I
N
S
T
A
L
L
A
T
I
O
N
NIC Installation and Verification
2. Attach the wrist portion of the antistatic strap to your wrist. Attach the
other end of the strap to the metal plate on the electronics drawer on
the proofer.
CAUTION: Wear the antistatic strap when you remove the
electronics drawer, remove the NIC from the antistatic
bag, and remove or install the NIC. This helps prevent
static discharge damage to the proofer and the NIC.
3. Remove the three screws that hold the NIC in place. Also, remove the
four screws (two on each side) on the back of the proofer holding the
electronics drawer with cable connectors in place.
4. Grasp the black handle on the metal plate. Slowly pull the drawer out
about six inches.
The proofer is ready. Continue to Section 2.4.
2.4 Installing or Removing the NIC
Do as follows to install and seat the NIC.
Note: To remove a NIC, complete these steps in reverse order. On some
printers/proofers, you may need to squeeze the standoffs with
pliers to remove the NIC.
1. Remove the NIC from its antistatic bag.
2-4 July 1998
Page 23

NIC Installation and Verification
2. Hold the card so that the printer connector is facing down and the
network cable receptacle is toward you.
3. Tilt the card at about a 30-degree angle, and slide the front into the
NIC slot. Seat the card by positioning the connector on the bottom of
the card against the receptacle on the mother board. Press the card
gently into place.
The network cable receptacle should be accessible through the front
of the slot.
4. Secure the NIC faceplate to the printer / proofer back plate by
replacing the three screws you removed.
I
N
S
T
A
L
L
A
T
I
O
N
5. Grasp the handles on the back of the printer and slide the back of the
printer in.
6. Replace any back panel screws that you removed.
7. Attach the Ethernet cable to the network cable receptacle on the NIC.
8. Plug in the power cord.
2.5 Printing a NIC Configuration Test Page
Note: Make sure that the Ethernet cable is connected.
1. Set the Operational Mode Switches in T est Page Mode (D1 Down, D2
Up). A NIC Configur ation Test Page will be generated when the printer
reaches its READY state.
2. Power up the printer. The NIC will do a self-test at startup.
3. Check the LEDs during the Power Up/ Initialization phase. The
following should occur:
July 1998 2-5
Page 24

I
N
S
T
A
L
L
A
T
I
O
N
NIC Installation and Verification
The green Link LED should come ON and remain ON until the printer
reaches READY.
The yellow Net Traffic should blink 3 to 4 times a second until the
printer reaches READY.
This process may occur twice; the NIC will start a power up sequence
and then the printer will issue an additional NIC reset during the printer
initialization sequence.
4. Check the LEDs again after the printer reaches READY. Ready
indicates the NIC is connected to the network.
The green Link LED should come ON and remain ON (this indicates
that there is connectivity to a network hub/switch).
The yellow Net Traffic LED should blink intermittently as it detects
traffic on the network.
If the LEDs do not behave as described above, refer to page 12-3.
There is also the possibility that the NIC may be defective.
5. Check the NIC Configuration test print. Keep it to refer to when
configuring NIC network-related parameters.
If you have taken the default settings and will not be using TCP/IP
6.
installation is complete. Proceed to the chapter that describes
installing the printer on your system.
If you will be using TCP/IP
Note: Do not confuse this “NIC configuration” test page with the “Printer”
test page that is produced from the printer front control panel. This
10/100 NIC is completely configured using remote configuration
utilities. If you are not using NIC f actory defaults and are concerned
with discrepancies between test pages, you should also enter
pertinent parameters, i.e.,TCP/IP address, via the front control
panel.
2-6 July 1998
, continue to section 2.8.
, the
Page 25
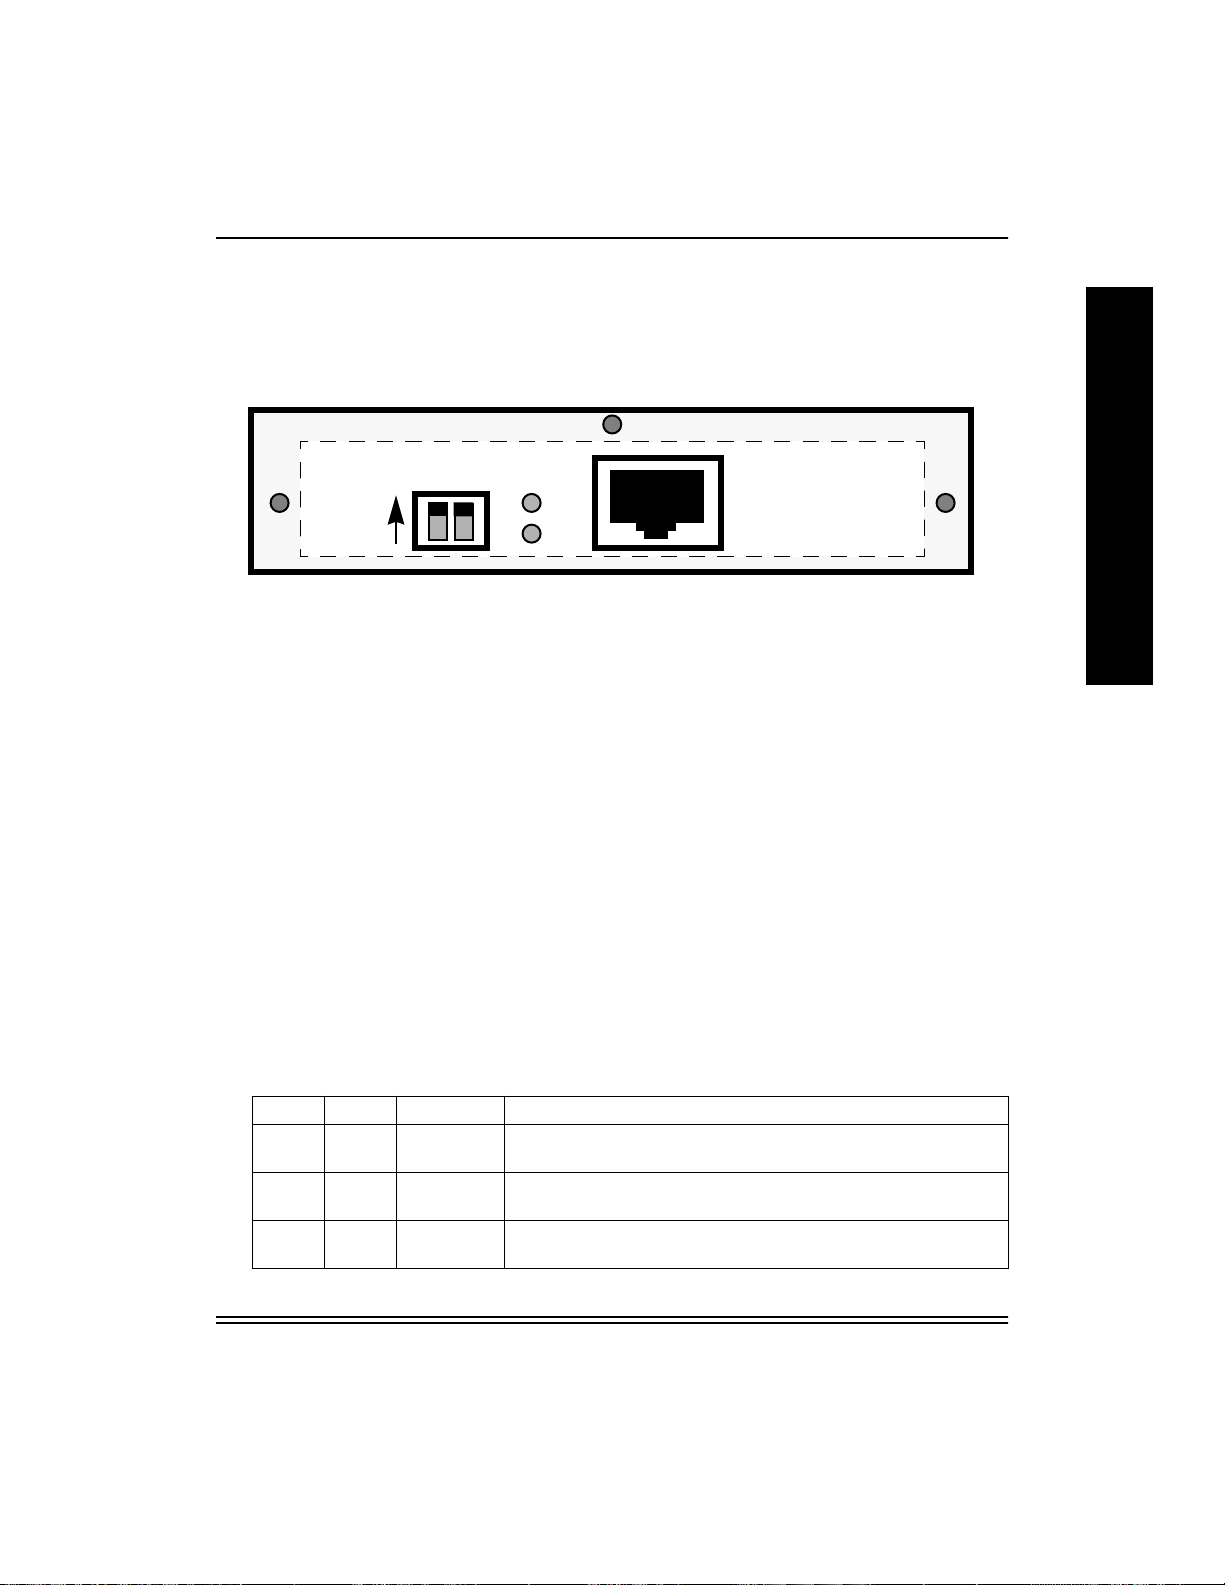
2.6 NIC Faceplate
The illustration below shows the NIC faceplate (as seen from the rear of
the printer after installation).
Normal
Switches: D1 and D2 are operation mode switches; they are shown in
Normal Operation Mode for printing (D1 & D2 Up).
LEDs: NET (Yellow) and LNK (Green) LEDs show network traffic and
connectivity.
Ethernet Address: A unique NIC Ethernet address is assigned to each
NIC (i.e. 0040C8 1234AB). The first six digits are always 00:40:C8. The
last six digits are unique to each NIC.
D1 D2
NET
LNK
NIC Installation and Verification
Kodak
10/100 NIC
I
N
S
T
A
L
L
A
T
I
O
N
Network Broadcasts: The NIC uses its Ethernet address to advertise
itself on Macintosh via Appletalk and on Windows via NetBeui as
“KDxxxxxx” where “xxxxxx” are the last six digits of the address. For
example, a NIC with the address 0040C81234AB would advertise itself
as KD1234AB throughout.
2.7 Operation Mode Switches
Refer to the following table to select a NIC operating mode.
Selecting a NIC Operating Mode
D1 D2 Mode Description
Up Up Normal Default. Does not allow a telnet connection. Users can print to
the unit.
Up Down Telnet
Diagnostic
Down Down Reset to
Defaults
July 1998 2-7
Allows a telnet connection to change its parameters. Users
can also print.
This setting is used to reset the NIC to use factory default
configuration parameters.
Page 26

I
N
S
T
A
L
L
A
T
I
O
N
NIC Installation and Verification
Selecting a NIC Operating Mode
Down Up Test Page A parameter test page is generated when you pow er cycle the
printer. Print jobs are not accepted. NOTE: The printer must
be in PostScript mode. For raster-only printers, obtain the
parameters via a Telnet session.
Pow er cycle the device whene v er you reset the s witches. When finished in
any mode, return the switches to Normal or Telnet mode, then power
cycle the device again for printing.
2.8 Configuring the Network Parameters
If you will be using TCP/IP, configure the NIC networking parameters.
TCP/IP requires an IP address. You can set this up using Arp, then use a
NIC configuration utility to save the IP address.
Note: Default configuration parameters should suffice for getting started
with IPX, EtherTalk or NetBeui protocols.
To use TCP/IP:
1. Set the operating mode switches to Telnet (D1 Up, D2 Down).
2. Power cycle the printer/NIC.
3. Map an IP address to the NIC Ethernet address using Arp.
Note: You can use Arp only if the computer supports TCP/IP and the
existing IP address is 0.0.0.0. If an IP address already exists,
change it using a NIC configuration utility.
Use the syntax your system requires for mapping an IP address to the
hardware address. If needed, obtain the syntax using your system
help.
EXAMPLE: for MS-DOS, when the hardware address =
0040C8:1234AB and the IP address = 2.4.6.8, type:
arp -s 2.4.6.8 00-40-C8-12-34-AB
Note: If an error occurs, type arp or arp /help for the proper syntax f or
your system.
4. To use Telnet (with MS-DOS), type telnet 2.4.6.8 2002
Note: 2002 is the NIC’s diagnostic port.
2-8 July 1998
Page 27

NIC Installation and Verification
Follow the telnet menu to set the TCP/IP address; save it using the
NIC Reset command and then power cycle the printer.
If needed, see the platform-specific chapters for details on configuring
NIC network-related parameters from that platform.
Next, you need to configure the computers for printing. Refer to the
platform-specific chapters for details.
I
N
S
T
A
L
L
A
T
I
O
N
July 1998 2-9
Page 28

Windows - FastManage Configuration Utilities
3 Windows - FastManage ConÞguration Utilities
Windows FastManage Utilities: FastManage Utilities allow you to
conÞgure the NIC remotely from Windows platforms. They provide
complete control over all network protocols and related parameters via a
graphical user interface.
Alternate Method: You can also use Telnet to conÞgure and troubleshoot
the NIC from any platform that supports TCP/IP communications. Refer to
Appendix A for information on using Telnet.
Initial NIC check and printer setup using Win 95/NT Network
Neighborhood: If you have network browsing capabilities and you select
Workgroup, you should be able to see the printer/NIC initially advertising
itself as KDxxxxxx, where ÒxxxxxxÓ is consistent with the last six digits of
the Ethernet address for the NIC. This is just an initial check that the NIC
is functioning on your network. You must still use conÞguration utilities to
conÞgure non-default network parameters. If you are comfortable with
NIC conÞguration defaults, then you could select the ÒKDxxxxxxÓ printer/
NIC. Windows will prompt you to install a print driver, if necessary. After
installing an appropriate printer driver, you will be able to select the printer
within an application ÒPrintÓ window and and print to that printer.
F
A
S
T
M
A
N
A
G
E
3.1 FastManage Features
FastManage consists of the following applications:
¥ Discovery Application: Used to Þnd devices that have an SNMP
agent on the network. An icon is displayed for each discovered device.
¥ Kodak NIC Manager: Used to Þnd and conÞgure Kodak10/100 NICs
used in Kodak printers.
¥ BOOTP Server: Allows you to assign IP addresses dynamically to
devices on the network.
¥ Ping: A stand-alone program for debugging. You can ping the NIC IP
address to verify that is functional via the network.
¥ On-line help: A list of available help options.
¥ Uninstall FastManage: Removes FastManage from a system.
July 1998 3-1
Page 29

Windows - FastManage Configuration Utilities
3.1.1 FastManage Hardware Requirements
FastManage requires:
¥ A 486 Pentium PC, 66 Mhz computer or higher
¥ 16 MB of RAM or higher
¥ At least 4 MB of free disk space
F
A
S
T
M
A
N
A
G
E
¥ Microsoft Windows 3.1 or higher
¥ Ethernet card installed
FastManage runs as a stand-alone tool (that is, users need not have any
TCP/IP packages on their systems). However, if a system has any
Winsock compatible TCP/IP stacks (that is, PC/TCP, Chameleon, or LAN
Workplace), FastManage will co-exist with these packages. FastManage
runs on top of public domain packet drivers as well as ODI drivers.
3.1.2 Software Requirements
IP ConÞguration
¥ Packet or ODI Driver must be loaded for the PC network interface.
¥ For ODI Drivers, add the following line to the net.cfg Þle:
Frame Ethernet_II
IPX ConÞgurations
¥ Novell 4.1 Drivers for Windows and DOS. Refer to the Novell Netware
Documentation for information.
¥ ODI Driver must be loaded for the PCÕs network interface.
NetBIOS ConÞguration
¥ NetBIOS over NetBEUI network conÞguration for Windows 3.11 or
Windows 95.
3-2 July 1998
Page 30

Windows - FastManage Configuration Utilities
3.2 Extracting Files from the Windows Utilities Diskette
The NIC.exe Þle on the diskette is a compressed archive of DOS/
Windows for conÞguring the NIC networking parameters. To effectively
manage these Þles, do as follows:
1. Create a KODAK directory/folder on your hard drive, then copy the
NIC.exe Þle to that folder
2. From a RUN or MS-DOS window, type NIC -d to extract and
decompress the directories and Þles.
DOS and FASTMAN directories and Þles appear in the KODAK
directory. The FASTMAN directory contains the Kodak FastManage
Utility Setup Þles that are used when running setup.exe.The DOS
directory contains the PrintMon and NBMon utilities that are used to
detect and conÞgure the NIC in a DOS environment.
3.2.1 Setting up the FastManage Utilities
To set up the FastManage utilities, run setup.exe (in the FASTMAN
directory), then follow the on-screen prompts. We recommend using the
FM default installation directory.
The default installation directory, FM, will contain the Kodak Fast Manage
Utilities for Windows, including Discovery, NIC Manager, and BOOTP. You
access the utilities, which are graphical user interfaces for detecting and
conÞguring NICs in your network environment, from the Start/Program
menu.
F
A
S
T
M
A
N
A
G
E
July 1998 3-3
Page 31

F
A
S
T
M
A
N
A
G
E
Windows - FastManage Configuration Utilities
3.3 Installing FastManage
To install FastManage on MS windows:
1. Select Run from the File menu.
2. Type c:\Kodak\Fast\setup.exe on the command line and click
OK. The FastManage Welcome screen appears.
3. Register FastManage and click Next.
4. ConÞrm that the registration is correct and click Next. The screen
below appears.
5. Choose one or more protocolsÑIP, IPX, and/or NetBIOSÑto search
for the Kodak NIC. Then click Next.
If multiple protocols are selected simultaneously, the same NIC will
appear multiple times displaying a name or address that is pertinent to
each protocol that discovers the NIC. In an environment with many
Kodak printers with this 10/100 NIC, multiple displays of the same NIC
could lead to confusion.
Recommendation : Select only 1 protocol that is prevalent on your
network to discover the NIC. If the Kodak NIC does not appear in
ÒDiscoveryÓ, then use the ÒParameters > DiscoveryÓ pulldown menu to
de-select that protocol and select a different protocol.
3-4 July 1998
Page 32

Windows - FastManage Configuration Utilities
Note: IPX support requires that DOS and Windows drivers for Novell
already be installed.
If you selected IP, continue to the next step. Otherwise, jump to step 7.
F
A
S
T
M
A
N
A
G
E
6. (If you selected IP) Specify the local workstationÕs IP address and
subnet mask. Then click Next.
Note: The Gateway parameter is optional. The NIC IP address can be
established after these utilities are installed.
July 1998 3-5
Page 33

F
A
S
T
M
A
N
A
G
E
Windows - FastManage Configuration Utilities
¥ If the IPX protocol is loaded and running on a system running
Windows 95, the check box for Send NetBIOS over IPX should
not be checked.
Send NetBIOS over IPX is located in the Control Panel-->
Network--> IPX Compatible Protocol screen.
¥ Open up the Control Panel, Networks screen. Choose NetBEUI
protocol. Check the checkbox marked Set this Protocol to be
the Default Protocol. In Windows 95, it is located in the
Advanced Options window.
7. Choose the location in which to install the FastManage application
(the default location is FM) then click Next.
A progress bar shows the progress of the installation process.
8. When prompted for a menu item for FastManage in NWADMIN utility,
answer Yes or No.
If you say Yes, a snap-fp.dll Þle is copied to the Windows directory
and the nwadmin.ini Þle is updated.
IMPORTANT: The NWADMIN utility must be loaded if you want to have a
menu item. If it is not loaded, an error message appears.
9. Click Finish when installation is complete to have FastManage restart
the system.
Note: If you choose not to restart at this time, you will be asked if you
want to view the ReadMe Þle. Enter Yes or No.
3-6 July 1998
Page 34

Windows - FastManage Configuration Utilities
Once the system is operational, the FastManage screen appears.
3.4 FastManage - Discovery Application
The Discovery application detects network SNMP manageable devices
on IP, IPX, and NetBEUI (NetBIOS) networks.
On IP networks, Discovery supports and performs the following:
F
A
S
T
M
A
N
A
G
E
¥ Reads entries from a local host table and sends an SNMP query to
each.
¥ Pings a local broadcast address to detect all devices.
¥ Detects the current subnet devices using the subnet mask and the IP
address of the device.
¥ Through SNMP traps, FastManage sends a power-on trap at powerup
if they are conÞgured with a manager address.
Discovery options are conÞgurable and are stored in the issnmp.ini Þle.
Discovery uses the thumbnail (icon) to identify an SNMP device and then
displays it to represent the product. Click the thumbnail once to display
information for that device. Double-click the thumbnail to launch the
device.
July 1998 3-7
Page 35

F
A
S
T
M
A
N
A
G
E
Windows - FastManage Configuration Utilities
Discovery supports a limited amount of placement so that you can
position the device on the ÒmapÓ most suited to your needs. You can also
make devices that you do not want to manage invisible, store a map, or
restore an old map. Discovery also contains a TFTP client. You can select
a device and download ßash image to upgrade the device to a different
Þrmware level.
Note: Kodak printers with a Kodak10 MBit NIC do not appear in
Discovery. ConÞguration utilities provided for this Kodak10/100
NIC are not applicable to the Kodak10 MBit NIC.
3.4.1 Opening the Discovery Application
After FastManage installation is complete, the Kodak FastManage
window should appear.
If the window does not appear, from the Program Manager, double-click
on the FastManage for Kodak NIC icon.
3-8 July 1998
Page 36

Windows - FastManage Configuration Utilities
To open the Discovery Application,double-click on the icon. A
Discovery Map appears with all detected devices.
F
A
S
T
M
A
N
A
G
E
If, during installation, you chose more than one protocol to Þnd SNMP
devices, an icon will be displayed for each protocol you chose.
Recommendation : Select only one protocol that is prevalent on your
network to discover the NIC. If the Kodak NIC does not appear in
ÒDiscovery,Ó use the ÒParameters > DiscoveryÓ pulldown menu to deselect that protocol and select a different protocol.
Note: You may need to use Discovery ÒOptions > Discover HostsÓ from
the pulldown menu if your Kodak printers do not appear in the
Discovery window at Þrst.
Click once on a ÒKodak Printer/ProoferÓ icon to highlight it. The device
type appears at the bottom of the discovery map. Click on the icon again
to view its system information.
July 1998 3-9
Page 37

F
A
S
T
M
A
N
A
G
E
Windows - FastManage Configuration Utilities
Click twice on a Kodak Printer/Proofer icon to start up the NIC Manager
for conÞguring a Kodak Printer/Proofer 10/100 Network Interface Card.
3.4.2 Kodak Printer/Proofer NIC Icon Names
In the Discovery map, the following icon represents Kodak printers or
proofers with the 10/100 NIC.
The name or address of a discovered device is displayed below the
device. These names are based on certain criteria. For example:
¥ KdxxxxxxÑThis device was discovered by the IPX protocol (where
xxxxxx are the last six digits of the Ethernet address. For example, a
device with an Ethernet address of Ò0040C00702CA,Ó will have an IPX
SAP name of Kd0702CA). You cannot change this name.
3-10 July 1998
Page 38

Windows - FastManage Configuration Utilities
¥ SNMPAxxxxxxÑThis device was discovered by the SNMP over
NetBIOS (where xxxxxx are the last six digits of the Ethernet address.
For example, a device with an Ethernet address of Ò0040C00702CA,Ó
will have a NetBIOS name of Kd0702CA). You cannot change this
name.
¥ UNKNOWNÑThis device was discovered by the IP protocol; however,
there was no entry in the host table relating to this device. You can add
a name to the device by creating an input entry into a local hosts Þle
on your workstation, i.e. \fm\hosts. Use a standard text editor to do
this. You can change this name.
To toggle between node name and node address, use the Node/Address
icon. See section 3.5.2.
If the Kodak Printer/NIC shows up as a device on the network, you can
double click on the device and the Kodak NIC Manager utility will start up
automatically. Proceed to Section 3.6, Kodak NIC Manager, for
additional instructions for conÞguring the NIC.
If the Kodak Printer/NIC does not show up as a device on the network,
try using a different protocol. If, after trying all three protocols, the NIC still
does not show up, proceed to Chapter 12, Troubleshooting.
F
A
S
T
M
A
N
A
G
E
3.4.3 Discovery Application Tools
Below is a close-up view of the Discovery application tool bar.
New
Map
Open
Map
Save
Map
Rename
Map
host name or
IP address
Rediscover
View as
Refresh
screen
New
host
Ping
TFTP
Close all
Windows
Node
properties
FastManage_025
Help
3.4.3.1 Renaming a Discovery Map
1. Click the Rename Map icon (fourth from the left).
A Map Title Editor window appears.
July 1998 3-11
Page 39

F
A
S
T
M
A
N
A
G
E
Windows - FastManage Configuration Utilities
2. Delete the old name and enter a new Map name.
3. Click OK.
3.4.3.2 Changing from the Node Name to an Address
You can display either the name or address of a device. To change from a
name to the address, click the Node/Address icon (Þfth from left). To
change back to the name, click the Node/Address icon again.
3.4.3.3 Using the Ping Manager
1. Click the Ping icon (Þfth from the right).
A Ping Manager window appears.
2. Click once on an IP address.
3. Click the Ping button.
The host that was contacted responds in the Report box.
3.4.3.4 Downloading Firmware Upgrade Files (TCP/IP Only)
1. Click the TFTP icon (fourth from right) OR use ÒAction > TFTPÓ from
the pulldown menu.
A Flash Download (TFTP) window appears.
3-12 July 1998
Page 40

Windows - FastManage Configuration Utilities
2. Type the Þle name in the Download File Name Þeld, or click Browse to
search for the Þles.
3. Enter the IP address of the device to which you are downloading, then
click Download to download the Þle.
Note: The download process may take minutes (2-3000 packets). To
verify a proper download, you could telnet (See Appendices A & B)
into the NIC and monitor the progress of the download, resetting of
the NIC, etc.
Note: We recommend that only one NIC be upgraded at a time since mis-
synchronization of multiple downloads might result in corruption of
NIC Þrmware and the necessity to recover. Refer to Appendix C for
Þrmware upgrading and recover procedures.
3.4.3.5 Changing the Host Name for the Devices
1. Click the Node Properties icon (second from right).
A Node Properties window appears.
2. Click on the desired node to change its name.
The current node name appears at the top of the box, on the righthand side, the current name of the node appears (unless given a
name, it will say unknown).
F
A
S
T
M
A
N
A
G
E
3. Erase the current name.
4. Deselect the Visible box to make a device invisible.
5. Enter a name and click OK.
July 1998 3-13
Page 41

F
A
S
T
M
A
N
A
G
E
Windows - FastManage Configuration Utilities
3.4.4 Discovery Application Preferences
To conÞgure general application preferences, select General Parameters
from the Parameters menu. A ÒGeneral ParametersÓ menu appears.
3.4.4.1 Display Fields
¥ Show Node Name: Displays hostnames for the devices discovered.
¥ Show Node Address: Displays IP and IPX addresses for the devices
discovered.
3.4.4.2 Automatic Operations Fields
¥ Load Saved Maps: Loads the saved map when starting Discovery
Application.
¥ Save Maps On Exit: Saves the map when Discovery Application is
exited.
¥ Save Options On Exit: Save the options when you exit the Discovery
Application.
3-14 July 1998
Page 42

Windows - FastManage Configuration Utilities
3.4.4.3 Broadcast Fields
¥ Refresh Every: Broadcasts every <n> seconds to discover new
devices.
¥ Discover: This parameter signiÞes how often ÒDiscoveryÓ will attempt
to re-discover nodes on the network.Default is 90 sec.
¥ Dead: This parameter signiÞes the number of ÒDiscoveryÓ attempts to
try before marking a node as ÒdeadÓ (off-line). Default is 2 attempts.
¥ Wait: This parameter signiÞes the amount of time ÒDiscoveryÓ waits for
a reply from a node. Default is 1 sec.
3.4.4.4 Files Fields
¥ Default Map File: Enter the name of the default map Þle.
¥ Map File Path: Enter the path for map Þles.
¥ Hosts File Path: Enter the path for hosts Þle (default is \fm).
¥ Bootptab File Path: Enter the path for bootptab Þle (default is \fm).
¥ Allow To Edit Hosts File: If selected, Discovery will update the hosts
Þle if a new host is discovered.
F
A
S
T
M
A
N
A
G
E
To conÞgure Discovery application preferences, select Discovery
Parameters from the Parameters menu. A ÒDiscovery ParametersÓ
menu appears.
July 1998 3-15
Page 43

F
A
S
T
M
A
N
A
G
E
Windows - FastManage Configuration Utilities
3.4.4.5 Protocols
¥ Enable IP, Enable IPX, Enable NetBIOS - after installation, Discovery
protocols may be selected and de-selected using this menu.
Note: If you disable all protocols and then close Discovery, Discovery will
not be able to start up again, so you will not be able to select a
protocol using this menu. To recover from this situation, edit the
issnmp.ini Þle and replace ÒNOÓ with ÒYESÓ in one of the protocol
statements, i.e. ÒIP=NOÓ, ÒIPX=NOÓ, and ÒNETBIOS=NOÓ.
3.4.4.6 IP Parameters
¥ Use DNS: Use ÒDomain Naming SevicesÓ to reference nodes.
¥ Poll IP Range: Traverses through the IP address range for that
subnet, discovers each host through SNMP, and displays those that
respond.
¥ Do IP Broadcast: If this checkbox is selected, perform IP Discovery.
¥ Every: Re-discovers hosts every <n> seconds.
3-16 July 1998
Page 44

Windows - FastManage Configuration Utilities
¥ # Times: Number of communication attempts before marking the node
dead.
3.4.4.7 IPX Parameters
¥ Do IPX Routing: Search for devices across routers.
¥ Do IPX Discovery: Use SNMP over IPX and Þnd all devices that
respond.
3.4.4.8 NetBIOS Parameters
¥ Strict Name Resolution: If this option is enabled, all device names
starting with SNMPA will be treated as NetBIOS names. The ÒEnable
NetBIOSÓ parameters must be selected to enable this option. Cecked
by default.
¥ Do NetBIOS Discovery: Use SNMP over NetBIOS and Þnd all
devices that respond.
3.4.4.9 General Discovery Options
¥ Poll ÒHostsÓ List: Poll a local hosts list address/names of devices.
¥ Poll Map List: Discovers each host in Map 1 through SNMP.
¥ Find Only Kodak Devices: If this checkbox is selected, Discovery
Þnds and displays only Kodak devices.
3.4.5 Application Launch Parameters
When a device is discovered, you can launch a thumbnail to view a fullscreen image of that device. The Edit Launch Parameter option allows
you to name and then launch another SNMP device besides the Kodak
Printer/NIC. For example, you can view a full-screen image of hubs and
servers.
F
A
S
T
M
A
N
A
G
E
To conÞgure application launch preferences, select Application
Launching Parameters from the Parameters menu. A Ò Launch
ParametersÓ conÞguration menu appears.
July 1998 3-17
Page 45

F
A
S
T
M
A
N
A
G
E
Windows - FastManage Configuration Utilities
To conÞgure the Launch Parameter option:
1. In the Object IdentiÞer of the Device line, enter the SNMP deviceÕs
unique SNMP identiÞer.
2. In the Launch App and Cmd Line Paras line, enter the name of the
application to launch.
3. Click Add when Þnished.
You can now launch the SNMP device.
3.4.6 Mib2 System Parameters
The Mib2 system parameter allows you identify a workstation. If the NIC
has a Telnet password enabled, you cannot manage the device with the
FastManage software.
To conÞgure Mib2 system preferences, select Mib2 System Parameters
from the Parameters menu. A ÒMIB2 System ParametersÓ menu
appears.
3-18 July 1998
Page 46

Windows - FastManage Configuration Utilities
1. Fill in the required parameters:
ÒGet CommunityÓ and ÒSet CommunityÓ are the only required
parameters. By default, Get Community is set to public; and Set
Community is set to private.
The parameters ÒDescription,Ó ÒName,Ó ÒLocation,Ó and ÒContactÓ are
information that will be returned by the FastManage software in
response to an SNMP query.
F
A
S
T
M
A
N
A
G
E
ÒEnable AgentÓ: When checked, the agent software is enabled. The
agent software is the portion of the software that responds to an
SNMP query, thus Þlling in the ÒDescription,Ó ÒName,Ó ÒLocation,Ó and
ÒContactÓ parameters.
July 1998 3-19
Page 47

F
A
S
T
M
A
N
A
G
E
Windows - FastManage Configuration Utilities
3.5 Fastmanage - Kodak NIC Manager Application
Use the Kodak NIC Manager to conÞgure the NIC relative to the various
network protocols.
After FastManage installation is complete, a Kodak FastManage window
should appear (shown below). If the window does not appear, locate the
NIC Manager from the Windows NT Program Manager.
1. Double-click on the Kodak NIC Manager icon.
2. When prompted for an ÒIP Address/Alias,Ó ÒIPX Address/Name,Ó or a
ÒNetBIOS Name,Ó enter the device name or address as it appears on
the network.
Note: If needed, Þnd the name on the Discovery Map.
3-20 July 1998
Page 48

Windows - FastManage Configuration Utilities
A graphic displaying the NIC faceplate appears. This graphic is the
same as displayed during the Discovery Application when you double
click the Kodak Printer/Proofer NIC icon.
Hot Spots on the graphic lets you obtain information. To Þnd a hot spot,
move the mouse around the screen. A box outlining the hot spot appears.
Hot spots are as follows:
F
A
S
T
M
A
N
A
G
E
¥ Traps:lists hardware or software problems affecting the device. If there
are no problems, a message to that effect appears.
¥ Uptime: shows how long the device has been running.
¥ Reset: asks you if you want to reset the NIC. Select Yes to continue,
No to stop.
¥ Kodak 10/100 NIC: displays NIC information. You can change the
Name, Location, and Contact. Press Set after making changes.
3.6 NIC Manager ConÞguration Menus
Several options are available from the ConÞguration menu. This section
discusses those options.
July 1998 3-21
Page 49

F
A
S
T
M
A
N
A
G
E
Windows - FastManage Configuration Utilities
3.6.1 TCP/IP Configuration
You make a series of choices to conÞgure the NIC on TCP/IP networks.
Below is a hierarchy of these choices.
From TCP/IP ConÞde., selections include:
IP ConÞguration -->
¥ IP A
¥ Subnet Mask: Sets the subnet mask address for the device.
¥ Gateway Address: Sets up the address of the router that routes IP
¥ Enable RARP: When enabled, the device will try to obtain its IP
¥ Enable BOOTP: When enabled, the device tries to obtain its IP
¥ IP Traps -->
¥ Enable DHCP: Enables/disables the DHCP feature.
LPD ConÞguration: Enables BSD-type LPD print services and its
options.
3-22 July 1998
ddress: Allows you to change the IP address of the device.
Changes take effect at system reset. Exit and relaunch the utility.
packets across subnets.
address using RARP at power-up.
address using BOOTP at power-up.
¥ Enable IP Traps: When enabled, sends ÒtrapsÓ (problems) to a
designated system.
¥ IP Traps Hosts: Designates where the traps will be sent.
Page 50

Restricted Hosts -->
¥ Subnets: Limits access to FastManage. Only hosts in the selected
subnet can access FastManage.
¥ Allowed IP Addresses: Limits access to FastManage. Only hosts
with IP addresses can access FastManage.
3.6.2 Novell Configuration
Windows - FastManage Configuration Utilities
You make a series of choices to conÞgure the Kodak NIC for a Novell
network.
From Novell ConÞg., selections include:
X ConÞguration -->
IP
¥ IPX SAP Name: Changes the name used by the device in service
messages on the IPX network. This name appears in Map 1 of the
Discovery Application node.
¥ IPX SAP Interval: ConÞguring the SAP internal of the device (valid
numbers are from 1 to 6)
F
A
S
T
M
A
N
A
G
E
¥ IPX Traps -->
¥ Enable IPX Traps: Same as enable IP traps.
¥ IPX Trap Hosts: Designates where traps will be sent.
¥ IPX Enabled: Enables/disables IPX protocol.
July 1998 3-23
Page 51

Windows - FastManage Configuration Utilities
NDS ConÞguration -->
¥ Enable NDS: Enables/disables NetWare directory services.
¥ Preferred DS Tree: Sets the ÒtreeÓ where the print server and print
queues are deÞned.
¥ Preferred DS Context: Sets the ÒcontextÓ where the print server and
print queues are deÞned.
F
A
S
T
M
A
N
A
G
E
Print Server ConÞguration -->
¥ Queue Scan Rate: Sets the rate (times per second) that the printer/
NIC scans the Novell queue for print jobs.
¥ Frame Type: Selects NetWareÕs frame type.
¥ ConÞguration Server: Server where the bindery conÞguration Þle
for the printer resides.
¥ NotiÞcation: When enabled, lets the printer send status to users on
the notify list.
3.7 General ConÞguration
Choices you can make to conÞgure FastManage for a general network
are shown below.
General ConÞg selections include:
ommunity Strings: Sets SNMP community strings.
¥ C
3-24 July 1998
Page 52

¥ Flash ConÞg. -->Allow Download: Enables/disables the upgrade of
the Þrmware.
3.7.1 Ethertalk Configuration
Choices you can make to conÞgure the printer/NIC for an Ethertalk
network are shown below.
Ethertalk ConÞg selections include:
Windows - FastManage Configuration Utilities
F
A
S
T
M
A
N
A
G
E
¥ General ConÞg.-->
¥ Zone Name: Logical group where FastManage exists.
¥ Enable Ethertalk: Enables/disables the Ethertalk protocol.
¥ Ethertalk Phase: Sets the compatibility level of the Appletalk
network system (Phase II by default).
¥ Printer Setup -->ÓPrinter1Ó is the default printer port and cannot be
modiÞed.
July 1998 3-25
Page 53

F
A
S
T
M
A
N
A
G
E
Windows - FastManage Configuration Utilities
3.7.2 SMB Configuration
The choices you can make to conÞgure the printer/NIC for a SMB network
are shown and described below.
SMB ConÞg options include:
¥ SMB ConÞg.-->
¥ HP DLC: Enables/disables HP DLC protocol
¥ SMB Enabled: Enables/disables SMB protocol
¥ SMB Names: Sets the SMB workgroup and unique identiÞcation
¥ SMB Share Name: Sets the aliases of the printer port
Parameters for the SMB share name window include:
¥ SMB share name
¥ SMB description
¥ Type index
¥ Number
3.7.3 NetBIOS Configuration
¥ NetBIOS ConÞg.-->
¥ NetBIOS Names: Select the NetBIOS Names option to display
the NetBIOS Group and NetBIOS Unique Name for the Printer/
NIC. These names cannot be modiÞed.
3-26 July 1998
Page 54

3.7.4 Status Menu
These parameters currently have no function.
3.7.5 Help Menu
The Help menu has two options, ÒUsing HelpÓ and ÒAbout Kodak NIC
Manager.Ó
Windows - FastManage Configuration Utilities
F
A
S
T
M
A
N
A
G
E
¥ Using Help: A standard Windows help Þle appears.
¥ About Kodak NIC Manager: Displays information on the current
FastManage being used, including:
¥ Firmware version
¥ Type of Printer/NIC being managed
¥ Address/Name of Printer/NIC
¥ Set community string
3.8 FastManage - Ping Application
Use the Ping utility to verify that a printer/NIC with an established IP
address is functional on the network.
July 1998 3-27
Page 55

F
A
S
T
M
A
N
A
G
E
Windows - FastManage Configuration Utilities
After FastManage installation is complete, a Kodak FastManage window
appears (shown below). If the window does not appear, double-click on
the Kodak FastManage icon from the Program Manager.
1. From the Kodak FastManage window, double-click on the Ping
Application icon.
2. To Ping a known IP address, select the Ping pull-down window.
A Perform Ping Operation window appears.
3. Enter the IP address and click on the Ping button.
The response appears below the Ping button.
4. From the Settings menu, select View.
The Update Settings window appears.
3-28 July 1998
Page 56

Windows - FastManage Configuration Utilities
3.9 FastManage - BOOTP Application
TheBOOTP application implements a BOOTP server and allows you to
assign IP addresses dynamically to network devices. FastManage
network print servers implement BOOTP and can obtain their IP
addresses from the BOOTP server. The BOOTP server looks for the
appropriate entry containing the IP and device addresses.
The BOOTP application is pertinent only if TCP/IP is the only protocol
selected and your NIC does not yet have an IP address conÞgured and
stored in its memory.
After FastManage installation is complete, the Kodak FastManage
window appears. If the window does not appear, double-click on the
Kodak FastManage icon from the Program Manager.
1. From the Kodak FastManage window, double-click on the BOOTP
Server icon
F
A
S
T
M
A
N
A
G
E
July 1998 3-29
Page 57

F
A
S
T
M
A
N
A
G
E
Windows - FastManage Configuration Utilities
The following screen appears.
BOOTP needs a Bootptab Þle to operate. An empty Bootptab Þle is
provided with FastManage.
2. Make sure that the Bootptab Þle is displayed. If it does not, click
Browse to Þnd it.
Note: The Bootptab Þle is usually located in the \fm directory.
3. Click Ok.
The BootP Server window appears.
4. Click Add Entry to Bootptab File from the File menu to add an entry
to the Bootptab Þle.
5. To add a node with an Ethernet address of Ò0040C8 1234ABÓ and an
IP address of Ò199.86.12.1,Ó enter 00.40.C8.12.34.AB in the
Hardware Address box, and 199.86.12.1 in the IP Address box.
Note: The host name is user deÞnable.
6. Click Ok.
3-30 July 1998
Page 58

Windows - FastManage Configuration Utilities
3.10 NetBeui Browsing and Sharing Abilities
When a client machine comes up on the network, it usually comes up in a
pre-conÞgured workgroup. The default workgroup for all NetBIOS
machines (including the Kodak NIC) is named Workgroup. When users
look for devices on the network, they normally see only those devices in
their workgroup. Windows 95 allows a user to browse multiple
workgroups, to choose a speciÞc workgroup, and then to view the devices
inside that workgroup. There must be at least one PC workstation in each
workgroup to store a list of all the other devices in that workgroup. That
PC is the BrowseMaster. The BrowseMaster is checked by the NetBIOS
clients without any user intervention.
The NIC cannot act as a BrowseMaster. For example, a NetBIOS
workstation is on a workgroup (for example, ÒMyCompanyÓ) and the
printer/NIC is installed on the network. The NIC will come up and
advertise itself in the default workgroup called workgroup. A user who
browses the network (using Net View or Network Neighborhood
applications) will not see the printer/NIC or even see a workgroup called
workgroup, because there is not at least one workstation in the
workgroup with the printer/NIC.
F
A
S
T
M
A
N
A
G
E
To solve this problem:
1. Connect to the printer/NIC.
2. Store a new NetBIOS workgroup name using either FastManage
package, nbmon.exe, or any other conÞguration tool.
3. Once connected to the printer/NIC, go to the Network Protocol
section, then to Microsoft SMB.
4. Change the property called NetBIOS Workgroup.
5. Change the workgroup name to the same as in the workgroup (that is,
MyCompany).
Users should now be able to browse the printer/NIC just as they would
any normal NetBIOS client.
As an alternative:
1. Use the net use or net view command without having the printer/NIC
in the same workgroup as the workstation.
2. Fill in the proper NetBIOS name of the printer/NIC.
July 1998 3-31
Page 59

F
A
S
T
M
A
N
A
G
E
Windows - FastManage Configuration Utilities
3. Enter net? at a DOS prompt for more information about the utilities.
3.10.1 DOS Tools for NetBIOS
If you have problems installing and using the NetBIOS management
tools, the following suggestions might help:
¥ When using the showprn.exe tool, and the printer/NIC does not
appear, issue the command with a -d0, -d1 or -d2 switch:
showprn.exe -d1
This causes showprn to use an alternate stack to send the packet.
This problem shows up sometimes in systems that have multiple NICs
or multiple protocols loaded. If a -d1 switch was used with the
showprn.exe tool, use it on the NBMON command line.
¥ If the IPX protocol is loaded and running on a system running
Windows 95, the check box for Send NetBIOS over IPX should not be
checked.
Send NetBIOS over IPX is located in the Control Panel--> Network-
-> IPX Compatible Protocol screen.
¥ Open up the Control Panel, Networks screen. Choose NetBEUI
protocol. Check the checkbox marked Set this Protocol to be the
Default Protocol. In Windows 95, it is located in the Advanced
Options window.
3-32 July 1998
Page 60

3.11 Troubleshooting FastManage
The following table lists problems that may occur with FastManage; it also
lists possible solutions.
Problem Solution
SNMP community strings are
defaulted to public and private
Unable to start the FastManage
application. A message such as
ÒUnable to start protocol stackÓ
displays
Applications start, but do not display
connected ports or SNMP statistics
Can not start applications and the
message ÒIP_STACK section
issnmp.ini Þle needs IPADDR= setÓ
appears
The message ÒUnable to Þnd and
start net driverÓ appears
The message ÒNo Netware
connections foundÓ when running
Discovery or ÒHost not in IPX binderyÓ
appears
Windows - FastManage Configuration Utilities
Change the community strings in the
issnmp.ini Þle
Restart Windows.
Restart Windows. Verify Þrmware agent
is compatible with FastManage
Reinstall FastManage with IP and IPX
protocols.
Load IPX drivers before starting
Windows.
Load VLM.EXE before starting
Windows.
F
A
S
T
M
A
N
A
G
E
3.11.1 Error Messages
The following table contains error messages that you may see while using
the FastManage Network Manager.
July 1998 3-33
Page 61

General Messages
Message Cause Solution
Bad status from target
device: <n>. Press
CANCEL to exit
program
Unable to open SNMP
Session
Bitmap Init Error Application is not able to
Unable to load
NPAPI.DLL
Unable to load
NPSNMP.DLL
WINSNMP Error (%ld)
sending%s packet
Appears when the
SNMP agent on device
returns a
NO_SUCH_NAME for a
particular OID
Usually appears if the IP
stack on the manager
has died
Þnd the bitmap
File NPAPI.DLL could
not be found
File NPSNMP.DLL could
not be found
Appears when the
manager is not able to
send a WINSNMP
packet. Sometimes
occurs due to an SNMP
agent in the device that
crashed.
The Þrmware on the agent
does not match with the
version of the Manager
software. Upgrade the agent
Þrmware and the
FastManage Software
Package.
Restart Windows.
The FastManage installation
may be bad. Reinstall.
Put the Þle NPAPI.DLL in the
path.
¥ Put the Þle NPSNMP.DLL in
the path.
¥ Set NetBeui as a default
using the Network Control
Panel.
Use the PING application to
Þnd out if the agent device is
reachable. If yes, restart
Windows. If not, power cycle
the device and try again.
3.11.2 IP Address Validation Messages
The following table displays messages that you may see when entering
an IP address:
IP Address Validation Messages
Message Solution
More than 3 dots exist in the address or No
characters present between dots or Invalid
character in IP Address or The address
contains one Þeld with value more than 255.
Not all Þelds are deÞned.
A valid IP address is of the form
a.b.c.d, where a.b.c.d can vary
from 0 to 255. For example,
193.25.86.214
Page 62

3.11.3 Discovery Application Messages
The following table lists errors messages that you may see while using
the Discovery Application.
Discovery Application Messages
Message Solution
IP, IPX, and NetBIOS Discovery are
disabled. For Discovery to work, at least
one of them should be enabled. Please
update SNMP section, IP/IPX entries of
issnmp.ini Þle. Discovery will exit now
Unable to open Þle (bitmap Þle) or
Unable to copy palette for the bitmap or
Unable to create bitmap from Þle DIB
No such pathway or drive is not ready Restart Windows.
For reliable Discovery operation using IPX, it is recommended that the
following systems all be on the same subnet :
¥ Novell server servicing the printer
¥ Novell server you log into as a user from the workstation running
Discovery. (It is also recommended that this server be the same as
the server servicing the printer).
Windows - FastManage Configuration Utilities
Valid Values are: IP=YES or IP=NO,
IPX=YES or IPX=NO, and
NetBIOS=Yes or NetBIOS=No
The FastManage installation may be
bad. Reinstall.
F
A
S
T
M
A
N
A
G
E
¥ Workstation running Discovery
¥ Kodak printer
3.11.4 Ping Application Message
The following message may appear while you are using the Ping
Application:
Ping Application Message
Message Solution
IP is disabled in the Þle issnmp.ini. IP
needs to be enabled for this application
to run. This application will exit now
July 1998 3-35
Enable IP discovery in the Discovery
Application to enabled IP.
Page 63

F
A
S
T
M
A
N
A
G
E
Windows - FastManage Configuration Utilities
3.11.5 BOOTP Server Application Messages
The following messages may appear while you are using the BOOTP
Server Application.
BOOTP Server Application Messages
Problem Cause Solution
Please retry when there is a
bootptab Þle
IP is disabled in the Þle
issnmp.ini. For this
application to run, enabled IP
Error to read packet A bad BOOTP packet
The address should contain
only HEX digits. i.e., 0-9, and
A-F/(a-f)
Hardware address is not
speciÞed. So this entry cannot
be saved
IP address is not speciÞed. So
this entry cannot be save
This is not a valid hardware
address
No Bottleful found Enter bootptab Þle and
IP discovery disabled
in the Discovery
Application
is received
Validation for
Macintosh address
Appears during the
operation ÒAdd entry
to Bootptab ÞleÓ
Appears during the
operation ÒAdd entry
to Bootptab ÞleÓ
User input invalid
Macintosh address
retry.
Enable IP Discovery in
the Discovery
Application to enabled
IP.
Retry. If the problem
persists, reset the
device.
Enter a valid Macintosh
address.
Enter the Host name
address in the user entry
form.
Enter the IP address in
the user entry form.
A valid hardware
address is a 12-digit
HEX number. For
example:
01.23.45.67.89.AB
3-36 July 1998
Page 64

4 Novell NetWare
Refer to Kodak Printer/NIC Installation and ConÞguration Overview in
Chapter 1 for overall conÞguration process steps and details. This chapter
describes the conÞguration of Novell Netware print servers and queues.
4.1 NetWare Client Installation Overview
In general, to install on a NetWare workstation, determine whether the
Kodak printer/NIC will be installed in:
¥ NetWare 2.x, 3.x, 4.x bindery emulation environment
¥ NetWare 4.x NDS environment
¥ Netware AppleTalk (ATPS) environment.
Note: For complete information on using NetWareÕs client utilities, refer to
the NetWare documentation.
Novell NetWare
N
O
V
E
L
L
4.2 ConÞguring in a Bindery Environment
The Kodak printer/NIC can be conÞgured to service up to 16 print queues
on 16 different bindery style NetWare servers (NetWare 2.x, 3.x, 4.x). If
you are not using NetWare Directory Services (NDS), disable it.
4.2.1 Configuring using PCONSOLE
Refer to the NetWare documentation for information on using the
PCONSOLE command.
To conÞgure the KODAK NIC using the PCONSOLE command:
1. Create a print server called KDxxxxxx through PCONSOLE.
where xxxxxx are the last six digits of the unitÕs Ethernet address.
2. Create a queue for the printer using PCONSOLE.
3. Assign the queue created above to the print server KDxxxxxx.
4. Power cycle the printer.
The queue will send data to the printer.
N
E
T
W
A
R
E
July 1998 4-1
Page 65

Novell NetWare
5. Set up the preferred server name on the NIC, using NIC conÞguration
utilities for Windows.
Note: For more information on setting the preferred server name, see
Chapter 3, Windows - FastManage ConÞguration Utilities.
4.3 ConÞguring in an NDS Environment
4.3.1 Configuring Your NDS Server using PCONSOLE
N
O
V
E
L
L
N
E
T
W
A
R
E
To conÞgure the NIC using PCONSOLE:
1. Run PCONSOLE using the following command (from the /public
directory on the server):
pconsole
2. Using the arrow keys, select Quick Setup and press [Enter].
3. In the Print Services Quick Setup window, select Print Server and
press [Enter].
4. Press [Insert] to create the Print Server Object for the NIC.
The name must have eight characters. Begin with ÒKDÓ and end with
the last six digits of the hardware address (found on the NIC
faceplate or NIC conÞguration test page). For example, if the
hardware address of a printer is Ò0040C81234AB,Ó create a print
server named KD1234AB.
Note: The print server name is not case sensitive.
5. After creating the print server object, select New Printer and press
[Enter].
6. Enter a name for the new printer object used by the printer. The name
should be less than 256 characters, including the context. The print
server will service only one printer per NDS Server.
7. After adding the new printer object, select New Print Queue and
press [Enter].
8. Type the name of a Queue (that the printer will service).
The queue name must be less than 256 characters, including the
context. By default, all queues are serviced by the printer.
4-2 July 1998
Page 66

9. After typing in the names of the three objects, select Printer Type and
press [Enter].
10.Select Other/Unknown.
11. When Þnished, press [ESC] to Save changes.
The volume Þeld is Þlled in by PCONSOLE with the name of the nearest
volume. This is the name of the server volume that will hold the
queued jobs for the print server.
12.Turn off the Banners to eliminate user ID pages.
Note: If a user ID page is desired, the type of banner should be
ÒPostScriptÓ (not ÒtextÓ) for PostScript mode print jobs. The banner
must be OFF for Raster mode print jobs since ÒPostScriptÓ or ÒTextÓ
banners will cause the print job to fail (Printer will process job and
return to ÒREADYÓ without generating a print).
4.3.2 Configuring the NIC for NDS
Novell NetWare
N
O
V
E
L
L
ConÞgure a DS Tree Name and DS Context Name on the NIC. (You can
also use FastManage to conÞgure these two parameters.)
4.3.3 Additional Queues
The print server contains the name of a printer to service. The printer
contains a list of print queues belonging to it.
To add queues to the print server service:
1. Choose Printers under the Available Options window.
2. Select the printer created and press [Enter].
3. Select Print Queues Assigned. Pressing [Insert] allows a user to
choose from a list of created queues.
4. Create new print queues by pressing [Insert] again.
Once an object is created, it must remain in that context until deleted.
By default, quick setup creates these objects in the same context;
however, users have full control of the object context. Note the context
name at the top of the screen.
5. Press [ESC] to Exit.
N
E
T
W
A
R
E
July 1998 4-3
Page 67

N
O
V
E
L
L
Novell NetWare
6. Once Þnished with the server conÞguration, run a NIC conÞguration
utility, i.e., FastManage, to set up a DS Context Name and DS Tree
Name.
4.3.4 Creating an NDS Print Server Using NWadmin
1. Open NetWare Tools and double-click on NWadmin.
2. Highlight the Organizational Unit where the print server, printer, and
print queue will be created.
3. Under the Object pull-down window, click Create.
N
E
T
W
A
R
E
The New Object window appears.
4. Select print server and click OK.
The Create Print Server window appears.
5. Type the printer name.
The name must have eight characters, must start with KD and end
with the last six digits of the hardware address. This number can be
found on the NIC faceplate.
6. Click Create.
4.3.4.1 Creating a New Printer
1. Under the Object pull-down window, click Create.
The New Object window appears.
2. Select Printer and click OK.
The create printer window appears.
3. Type the Printer Name and click Create.
4-4 July 1998
Page 68

Novell NetWare
4.3.4.2 Creating a Print Queue
1. From the Object menu, click Create.
The New Object window appears.
2. Select Print Queue and click OK.
The Create Print Queue window appears.
3. To the right of the Print Queue Volume box, click the Select Object
icon.
4. In the Select Object window, highlight the Directory Context where
the print queue will be held and click OK.
The Create Print Queue window appears with the selected object
Þlled in the Print Queue Volume box.
5. Type the Print Queue Name and click Create.
¥ The queue name should have fewer than 256 characters, including
the context.
¥ By default, all queues are serviced by the printer attached to the
NIC.
A new print server, printer, and print queue have been created. Continue
to Section 4.3.4.3 to connect these objects.
N
O
V
E
L
L
N
E
T
W
A
R
E
July 1998 4-5
Page 69

N
O
V
E
L
L
Novell NetWare
4.3.4.3 Connecting the Print Server to a Printer
1. In the Context Tree window, double-click the print server created.
2. Click Assignments in the following window.
N
E
T
W
A
R
E
3. In the next window, click Add.
4. Highlight the printer created and click OK.
The server queue is now connected to the Kodak printer. Continue to
Section 4.3.4.4 to assign a print queue to the print server.
4-6 July 1998
Page 70

4.3.4.4 Assigning a Print Queue to a Print Server
1. Double-click the recently assigned printer.
2. In the window that appears, click Assignments.
Novell NetWare
N
O
V
E
L
L
3. In the Assignments window, click Add.
4. In the Select Object window, select the print queue created and click
OK.
In the next window that appears, the print queue is assigned.
5. Click OK if this is correct.
The print queue is assigned. Now you can use FastManage to set up a
DS Tree Name and DS Context Name.
4.4 ConÞguring in a Mixed Bindery and NDS Environment
The Kodak printer/NIC can operate in a mixed Bindery/NDS environment.
Adhere to the following restrictions:
¥ The Kodak printer/NIC can service up to 16 queues (NDS and/or
Bindery) on a total of 16 servers.
¥ The Kodak printer/NIC cannot service bindery queues and NDS
queues on the same server (i.e., two simultaneous connectionsÑone
bindery, one NDSÑon the same server).
¥ The Kodak printer/NIC can service NDS queues in only one tree.
N
E
T
W
A
R
E
July 1998 4-7
Page 71

N
O
V
E
L
L
N
E
T
W
A
R
E
Novell NetWare
¥ When logged in to an NDS environment as an NDS Print Server, you
should conÞgure the print server with only one NDS Printer object. You
specify parameters, such as which port to send data (LPT or COM) by
creating special queue name sufÞxes.
The major differences between conÞguring a Kodak printer/NIC to
service bindery or NDS queues areÑ
¥ When using Bindery queues, users may modify the setting in the
printer/NIC called Preferred Server. This refers to the Bindery File
Server that holds the conÞguration Þle.
¥ When servicing NDS queues, the printer must be conÞgured with a
context name, and may be conÞgured (optionally) with a tree name.
This can be done with FastManage.
¥ When conÞgured for NDS, the printer does not use a conÞguration Þle.
It logs into the context where it was conÞgured, locates the printer and
queues that it should service.
¥ Regarding manual conÞguration of print server, queues, and printers
(within PCONSOLE or NWadmin): Bindery print servers are directly
attached to bindery print queues. NDS print servers are attached to a
single printer, which in turn is potentially attached to many print
queues.
When conÞgured to service both Bindery and NDS queues, the NIC does
the following:
1. At startup, the NIC tries to locate an NDS server.
2. Once it locates the server, the NIC looks at the context it has been
conÞgured with, and tries to log in as print server KDxxxxxx (the xxxs
are the six-digit hardware address).
3. Once successful, the NIC gets the printer attribute of that print server,
and then gets the list of print queues that the printer should service.
4. The NIC attaches to those print queues and moves on to the next
phase.
Note: If a context was not speciÞed in the NIC NVRAM, the NIC will not
log into the NDS tree.
5. The NIC then tries to locate normal Bindery Þle servers.
4-8 July 1998
Page 72

Novell NetWare
6. Once it locates a Bindery Þle server, the NIC looks in its preferred
server for an NVRAM value, and if a value exists, routes itself to that
server.
7. The NIC then looks on the preferred server for a print server queue in
the form of KDxxxxxx.
8. The NIC then reads the print server queueÕs conÞguration Þle and logs
in and attaches to the queues and servers listed in that conÞguration
Þle.
9. If a preferred server was not speciÞed in its NVRAM, the NIC searches
up to 24 Þle servers on the network for a print queue.
10.If a print queue is not found, the NIC goes back periodically through
the list of servers and try to blindly log in as print server KDxxxxxx. If
successful, it gets the list of queues that the NIC should service and
attaches to those queues.
4.5 Novell NetWare - AppleTalk
If AppleTalk Print Services (ATPS) for Novell is not already in use, consult
the Novell CD-ROM on-line documentation to set up and use ATPS. To
use ATPS for the Kodak printer, an ATPS.CFG Þle must be edited
appropriately to deÞne an AppleTalk printer name and corresponding
zone.
Note: AppleTalk for Novell recognizes the printer only when it is in
PostScript mode. Raster mode cannot be accommodated. You
must set up an IPX queue to support both PostScript and raster
modes. Only Macintosh systems can print in raster mode using
AppleTalk.
4.5.1 Configuring Novell NetWare 3.x for AppleTalk
To use ATPS for Novell, an atps.cfg Þle must be edited appropriately to
deÞne an AppleTalk printer name and corresponding zone.
N
O
V
E
L
L
N
E
T
W
A
R
E
Note: You cannot print in raster mode using ATPS.
The following procedure describes how to conÞgure Novell ATPS to
service the printer and the queue. In this example, the printer is a Kodak
printer with a default name of Kodak Digital Scienceª 8650 PS.
1. Make a test print to obtain or verify the printerÕs name.
July 1998 4-9
Page 73

N
O
V
E
L
L
Novell NetWare
2. On the server, back up the sys:\system\atps.cfg Þle.
Note: Make sure you include the beginning and end quotes in the
following commands.
Edit the atps.cfg Þle, and add a line with the Kodak printer AppleTalk
name and its associated AppleTalk zone to the list of printers in the
following format:
<Appletalk printer name>:<Appletalk zone>
For example, enter the following command:
ÒKodak Printer:Kprinter_ZoneÓ
Note: Make sure you include the quotation marks in the command.
If no queue is stated, a NetWare queue associated with the AppleTalk
printer name, NW_Kodak_Printer, is created. You can verify this using
PCONSOLE.
N
E
T
W
A
R
E
To create a different queue name, enter the following command:
<Appletalk name>:<Appletalk zone> -o <queuename>
For example, enter:
ÒKodak Printer:KPrinter_ZoneÓ -o KPrinter_q
3. Save the atps.cfg Þle.
4. Load atps -s -v
Use the -v [verbose] option to view the atps activity and to verify that
the contents are executed properly.
Your server can now use the same print services that Macintosh
computers use to access a Kodak printer.
4.5.2 Configuring Novell NetWare 4.x for AppleTalk
Use the NetWare 4.x utilities provided to set up AppleTalk. This setup is
menu driven, so you do no need to edit any Þles.
4-10 July 1998
Page 74

4.6 Troubleshooting Netware
The printer/NIC does not log in to bindery Novell 3.x server
The server may not have the bindery emulation mode enabled. To verify
that the bindery emulation is enabled, Þnd the following line in the
autoexec.ncf Þle in the system directory:
Set Bindery Context=<context>
Novell NetWare
where <context> is the name of the company to be used by bindery
emulation. If it is not there, bindery emulation is not running. Refer to the
NetWare userÕs manual for instructions on bindery emulation.
The printer/NIC does not login to the Þle server
¥ Use FastManage to see the messages sent by the printer/NIC.
¥ Use the userlist command (in NetWare 4.x, this is nlist user) to see
whether an assigned user to the printer/NIC has logged in.
¥ Use PCONSOLE to force a conÞguration Þle server to direct the
printer/NIC to search for a speciÞc server.
¥ Use a speciÞc frame type (refer to FastManage).
File server displays an Incomplete Packet error message
By default, the printer/NIC Þnds NetWare servers using repeated
broadcasts of different frame types. If a server is bound to a speciÞc
frame type, the server issues error messages for frames it does not
understand. Use FastManage to set a speciÞc frame type.
NotiÞcation not working when created with PCONSOLE
Verify that the printer type is DeÞned Elsewhere and not any other type.
Select the Print Servers menu and change the settings in the Printers
submenu.
N
O
V
E
L
L
N
E
T
W
A
R
E
July 1998 4-11
Page 75

Novell NetWare
4.6.1 NIC Console Messages
This section lists and describes the printer/NIC console messages.
Could not attach QUEUE1
Verify that the queue name is spelled correctly and whether another print
server is servicing QUEUE1.
Attaching queue QUEUE1 on server SERVER1
N
O
V
E
L
L
N
E
T
W
A
R
E
The printer/NIC has read the conÞguration Þle and has attached to the
queue that asked to be serviced.
No such object FAKEQ
There is no queue named FAKEQ. Verify it and the spelling of its queue
name.
Failed to login to Þle server SERVER1 for server FAKEPS
The printer/NIC could not log in to a nonexistent Þle server.
The print server has not been created in PCONSOLE. This error may also
occur if the user has modiÞed the printer conÞguration in PCONSOLE.
Remove any recent conÞguration changes.
4-12 July 1998
Page 76

5 Windows for WorkGroups (3.x)
Refer to Kodak Printer/NIC Installation and ConÞguration Overview in
Chapter 1 for overall conÞguration process steps and details. In the list
below, the steps described in this chapter are highlighted.
Step 1: Assess your network/printing environment
Step 2: Gather the necessary components
Step 3: Install the NIC hardware, if needed
Step 4: ConÞgure the NIC, if necessary
Windows for WorkGroups (3.x)
Step 5: ConÞgure print servers, if needed
Step 6: ConÞgure the printer on user workstations
Step 7: Printing
5.1 ConÞgure the NIC
If possible, start with the default parameters. TCP/IP protocol is the only
protocol that minimally requires conÞguration of an IP address. if you
need to conÞgure NIC network parameters in Windows environments,
refer to Chapter 3, FastManage or Appendix A, Telnet.
5.2 ConÞgure the Workstation for Printing
You should verify that this platform is supported for printing to your printer
or proofer. Refer to the user guides and software provided with your
printer or proofer for information about installing software to support
PostScript and raster printing, calibration, etc. If needed, refer to
Appendix E, Technical Assistance.
W
I
N
D
O
W
S
3
X
July 1998 5-1
Page 77

Windows for WorkGroups (3.x)
Adding a Printer to Your System
Use the following procedure to add a printer, install a PostScript driver
and select a server print queue. If needed, refer to the documentation and
software provided with your system.
For general information regarding potential third-party solutions and tools,
refer to Appendix B. Kodak is not responsible for troubleshooting
solutions done by vendors.
1. From the Main menu, double-click on the Control Panel icon.
2. From the Control Panel, double-click on the Printer icon.
3. Click on the Connect button.
W
I
N
D
O
W
S
3
X
4. From the Connect window, select an appropriate LPT port to use for
the printer from the Ports menu.
The Kodak printer should appear in the Installed Printers menu
within the Printer Control Panel if the PostScript driver was installed.
5. Click on the Network icon.
6. In the Network Printer Connections window, click on Servers and
select an appropriate server from the list. Log in to the server, if
necessary. Select the Printers icon and then an appropriate print
queue from the list.
7. Select LPT Settings. To eliminate extraneous banner (USER ID)
pages, make sure that the Enable Banner feature is not selected.
8. When Þnished, click on OK and close windows where appropriate.
5-2 July 1998
Page 78

6 Windows 95
Refer to Kodak Printer/NIC Installation and ConÞguration Overview in
Chapter 1 for overall conÞguration process steps and details. The steps
described in this chapter are highlighted in the list below.
Step 1: Assess your network/printing environment
Step 2: Gather the necessary components
Step 3: Install the NIC Hardware, if needed
Step 4: ConÞgure the NIC, if necessary
Step 5: ConÞgure the print servers, if needed
Step 6: ConÞgure the printer on user workstations
Step 7: Printing
6.1 ConÞgure the NIC
If possible, start with the default parameters. TCP/IP protocol is the only
protocol that minimally requires conÞguration of an IP address. Refer to
FastManage, Chapter 3, or Telnet, Appendix A. If you need to conÞgure
NIC network parameters in Windows environments.
6.2 ConÞgure the Workstation for Printing
Windows 95
W
I
N
D
O
W
S
9
5
You should verify that this platform is supported for printing to your printer
or proofer. Refer to the user guides and README Þles provided with your
printer or proofer for information about installing software to support
PostScript and raster printing, calibration, etc. If needed, refer to
Appendix E, Technical Assistance.
July 1998 6-1
Page 79

W
I
N
D
O
W
S
Windows 95
Adding a Printer to Your System
Use the following procedure to add a printer, install a PostScript driver,
and select a server print queue to use for printing. If problems occur,
refer to the Windows 95 documentation, README FIles, and software
provided with your system. You may also need to consult the user guides
and README Þles provided with your printer and your applications.
There is general information about potential third- party solutions and
tools, i.e.,Windows 95 LPR, in Appendix B. Kodak is not responsible for
troubleshooting solutions provided by alternate vendors.
If NetBeui is enabled on the NIC, you can add a printer using Network
Neighborhood. You can also add a printer using the Win 95 ÒAdd PrinterÓ
utility.
6.2.1 Printer/NIC selection and printer setup using Win 95/NT Network Neighborhood:
If you have network browsing capabilities and you select Workgroup, you
should be able to see the printer/NIC advertising itself as KDxxxxxx,
where ÒxxxxxxÓ is consistent with the last six digits of the Ethernet
address for the NIC.
1. Open Network Neighborhood
2. Locate and then double-click the printer icon named KDxxxxxx.
9
5
6-2 July 1998
You must still use conÞguration utilities to conÞgure non-default network
parameters. If you are comfortable with NIC conÞguration defaults, then
you could select the ÒKDxxxxxxÓ printer/NIC. Windows will prompt you to
install a print driver, if necessary. After installing an appropriate printer
driver, you will be able to select the printer within an application ÒPrintÓ
window and and print to that printer.
Page 80

6.2.2 Using the ÒAdd PrinterÓ Method
1. From the Start icon, select Settings and then Printers.
2. Click on the Add Printer icon.
3. Click on Next.
Windows 95
W
I
N
D
O
W
S
July 1998 6-3
9
5
Page 81

W
I
N
D
O
W
S
9
5
Windows 95
4. Select Network Printer to select a server/printQ. Then click on Next.
5. Browse the network for an appropriate server/queue name. Click on
Next.
6. To install a PostScript driver for the Kodak printer, click on Have Disk,
then Next.
Note: Drivers provided by Microsoft may appear in the Add Printer
Wizard window as Kodak drivers. These drivers have not been
tested or certiÞed by Kodak. If you are not sure if the PostScript
driver for the Kodak printer has been installed, install the PostScript
driver supplied with the Kodak printer.
6-4 July 1998
Page 82

Windows 95
7. If you are installing the printer driver from a diskette or a CD-ROM,
insert the proper media, then click on OK.
If installation software has been copied to your system, click on
Browse to locate the directory where it resides. When the correct
directory opens in the Copy manufacturerÕs Þles from box, click on
OK.
8. Locate the drive and directory where the printer driver installation
diskette or CD-ROM is located. Click on OK.
W
I
N
D
O
W
S
9
5
July 1998 6-5
Page 83

W
I
N
D
O
W
S
Windows 95
9. Select the printer relative to the ribbon media in the printer, then
Next.
10.If the current driver has been loaded previously and operates correctly,
select Keep existing driver, then Next.
If you are not sure that the current driver is the PostScript driver for the
Kodak printer, select Replace existing driver, then Next.
9
5
6-6 July 1998
11. Either use the default printer name or enter a preferred name. Click on
Yes or No to use the printer as the default printer. Click on Next.
Page 84

Windows 95
12.Click on Yes to print a test page to verify that the setup is correct. Click
on Finish.
Note: If errors occur when you print a test page, check the Printer
Properties menus for the correct printer parameter settings. Refer
to Section 6.2.3, Setting Printer Properties.
13.If the installation proceeds successfully, a progress bar shows that the
driver is being installed. When the installation is complete, the Kodak
printer icon appears in the Printers window. Proceed to Section 6.2.3,
Setting Printer Properties.
If you had problems locating Þles, the installation may stop, and you
may be prompted to insert your Windows 95 CD-ROM. Proceed to
step 14.
W
I
N
D
O
W
S
14.Install the CD-ROM if this is the Þrst time you are installing a
PostScript printer driver. Click on OK.
July 1998 6-7
9
5
Page 85

Windows 95
15. Click on Browse if you need to locate the C:\WINDOWS\SYSTEM
directory. Click on OK.
IMPORTANT: We recommend that you install all files. If you select the
option to skip a file, do so only if you are sure the file is a
generic PostScript file and is already installed on your
system. Check the C:\WINDOWS\SYSTEM directory for
previously installed files.
16.Click on OK in the Open window to load the Þles.
When the installation is complete, the Kodak printer icon appears in
the Printers window.
6.2.3 Setting Printer Properties
1. Select the newly created Kodak printer in the Printers window. Select
File > Properties from the pulldown menus.
W
I
N
D
O
W
S
9
5
The Printer Properties window appears.
2. From the Properties window:
6-8 July 1998
Page 86

Windows 95
ÑSelect PostScript > Advanced, then make sure that all Ctrl Ds
before and after jobs are disabled. This prevents you from receiving
extra pages or a blank PostScript error page.
ÑCheck Capture Settings; to eliminate extraneous banner (USER
ID) pages, make sure that the Enable Banner feature is not selected.
ÑCheck all other tabs and set up all corresponding options to match
the type and size of media and ribbon materials in the printer as well
as printing features, i.e., Ultracolor, to avoid printing errors.
W
I
N
D
O
W
S
9
5
July 1998 6-9
Page 87

Windows NT 3.51Workstation/Servers
7 Windows NT 3.51Workstation/Servers
Refer to Kodak Printer/NIC Installation and ConÞguration Overview in
Chapter 1 for overall conÞguration process steps and details. Steps
covered in this chapter are highlighted in the list below.
Step 1: Assess your network/printing environment
Step 2: Gather the necessary components
Step 3: Install the NIC hardware, if necessary
Step 4: ConÞgure the NIC, if necessary
Step 5: ConÞgure print servers, if necessary
Step 6: ConÞgure the printer on user workstations
Step 7: Printing
7.1 ConÞgure the NIC, if necessary
If possible, start with default parameters. TCP/IP protocol is the only
protocol that minimally requires the conÞguration of an IP address. if it is
necessary to conÞgure NIC network parameters in Windows
environments, refer to Chapter 3, FastManage, or Appendix A, Telnet.
7.2 ConÞgure the print servers, if necessary
Servers are conÞgured as are workstations except that the printer is
shared for use by multiple users.
W
I
N
D
O
W
S
N
T
3
5
1
July 1998 7-1
Page 88

W
I
N
D
O
W
S
Windows NT 3.51Workstation/Servers
7.2.1 Network Service and Protocol Installation
Windows NT supports network printing utilizing TCP/IP, Novel Netware
IPX, NetBeui and/or AppleTalk protocols. Appropriate protocols and
services must be installed prior to conÞguring printers using the network
control panel.
Protocols vs Printing Modes
Service/Protocol System Support
Module
TCP//IP Microsoft TCP/IP Printing
Support
IPX (Novell) Netware Services/
Support
NetBeui Native Windows Support PostScript or Raster
AppleTalk AppleTalk Protocol PostScript only
7.2.2 Windows NT Server Queues
Problem Downloading non-NT drivers from NT Servers
NT systems are supposed to support automatic downloading of other OS
drivers when users conÞgure their OS for printing to an NT queue. For
non-NT OSs, i.e., Windows 95, the proper Kodak OS driver is not
downloaded. When a printer is shared on a server, do not select other
OSs that will use the queue. Drivers should be installed locally on all nonNT systems serviced by a server.
Printer Modes
Supported
PostScript or Raster
PostScript or Raster
N
T
3
5
1
Corrupted Image Data
On NT servers, you may encounter corrupt image data when you print
Þles larger than 5 Mbytes (exhibited by color bands across the print). To
prevent this from happening, set up your server to accept the entire print
job before passing the Þle on to the printer. To do this, do NOT select Job
Prints While Spooling in Server Properties.
7-2 July 1998
Page 89

Windows NT 3.51Workstation/Servers
7.3 ConÞguring your Workstation for Printing
You should verify that this platform is supported for printing to your printer
or proofer. Refer to User Guides and software README Þles provided
with your printer or proofer for information on installing software to
support PostScript and raster printing, calibration, and so on. If
necessary, refer to Appendix E, Technical Assistance.
7.4 Adding a Printer
You may use the following generic procedures to add a printer and install
a PostScript driver. These include:
¥ Create a printer that will communicate via TCP/IP (LPR Port)
¥ Create a printer that will communicate via AppleTalk
¥ Create a printer that will communicate via a server/queue
¥ Create a Windows NT printer/queue that remote users can select
Note: Server conÞguration is identical to workstation conÞguration except
that the resulting printer must then be shared and a queue name
assigned.
For solving problems you might have, refer to the Windows NT
documentation provided with your system.
W
I
N
D
O
W
S
July 1998 7-3
N
T
3
5
1
Page 90

W
I
N
D
O
W
S
Windows NT 3.51Workstation/Servers
7.4.1 Adding a Printer
Note: If needed, refer to your printer User Guide and application
README Þles.
3. From the Program Manager window, select Main, then Print
Manager.The Print Manager window appears.
4. Select Create Printer from the Printer menu. The following windows
appear.
N
T
3
5
1
5. In the Create Printer window, enter the following:
Printer name: Enter a name that you wish to appear on the resulting
printer icon in the Print Manager window.
Driver: The Kodak driver is a PostScript driver that uses Windows NT
PostScript (PSCRIPT.*) components that reside on the CD-ROM
provided with Windows NT. These components may already reside in
C:\windows\system if a PostScript driver was previously installed.
7-4 July 1998
Page 91

Select Other, and install the appropriate Kodak driver (PPD) provided
by Kodak. If a Windows NT driver is not available for the Kodak printer,
you could use another Kodak or generic PostScript driver. However,
this driver might not provide full access/control of a different Kodak
printerÕs features. You may have problems if you use the Kodak 8600
v2014 driver that Microsoft provides with Windows NT systems.
The example below shows the installation of printer software that was
downloaded from the Kodak web site to the directory
C:ekptrs\8650\nt351v105.
Description: Enter a description of the printer, if desired.
Note: If a message such as CanÕt find File: PSCRIPT.* or
Unable to Open File PSCRIPT.* appears, insert the
Windows NT CD-ROM, then click on Retry.
7.4.2 Printing via TCP/IP (LPR Port)
Windows NT 3.51Workstation/Servers
W
I
N
D
O
W
S
Do as follows to set up a system to print using TCP/IP.
1. From the Create Printer window, select Other from the Print to list box.
The Print Destinations window appears.
2. Select LPR Port.
July 1998 7-5
N
T
3
5
1
Page 92

Windows NT 3.51Workstation/Servers
3. Select LPR PORT.
Note: If LPR Port is not in the menu, select Other again, the install
Microsoft TCP/IP Printing Services.
The Add LPR compatible printer dialog box appears.
4. Enter the following information:
Name or address of host providing LPDÑEnter the IP Address that
has been assigned to the Kodak printer.
Name of printer on that machine.
W
I
N
D
O
W
S
N
T
3
5
1
5. Click on OK in the remaining open screens.
The newly conÞgured printer appears in the Print Manager window.
7.4.3 Printing via AppleTalk
Note: AppleTalk for Windows NT supports printing only in PostScript
mode. Use TCP/IP queues to print in both PostScript and raster
modes.
To set up a system to print using AppleTalk:
1. From the Create Printer window, select Other from the Print to list box.
2. Select AppleTalk Printing Devices, then click on OK.
7-6 July 1998
Page 93

Windows NT 3.51Workstation/Servers
Note: If AppleTalk Printing Devices Port is not in the menu, select Other
again and install AppleTalk Protocol.
3. Double-click on the pertinent AppleTalk Zone to view the available
devices and to select the Kodak
printer..
IMPORTANT: If you CAPTURE a printer as an AppleTalk device, users
who previously could select the printer via AppleTalk will no
longer be able to do so. Use CAPTURE on a server only
when the goal is that users see only a queue and not the
actual printer on the network.
4. Click on OK in the open screens.
The newly conÞgured printer appears in the Print Manager window.
W
I
N
D
O
W
S
N
T
3
5
1
July 1998 7-7
Page 94

W
I
N
D
O
W
S
Windows NT 3.51Workstation/Servers
7.4.4 Printing via a Server/Print Queue
To select a print queue for indirect printing:
Note: Use the Create Printer dialog box to select an appropriate print
queue.
1. From the Print Þeld, select an appropriate print queue.
Note: You may have to select Other and Browse the network to Þnd and
select an appropriate queue.
2. Click on OK in the Create Printer dialog box.
The newly conÞgured printer appears in the Print Manager window.
7.4.5 Creating a Print Queue
Use the Create Printer dialog box to set up a shared printer on a network.
N
T
3
5
1
1. Click on the Share this Printer on the Network check box.
2. Enter the printer queue name as you want it to appear to users.
7-8 July 1998
Page 95

Windows NT 3.51Workstation/Servers
3. Enter the name of the Windows NT server for which the printer is
conÞgured.
Note: In the example above, Location = NALA and Share name =
DS8650 results in a \\ NALA \ DS8650 server/queue that is
available for users to select from the ADD PRINTER mechanism or
by using PRINTER>CONNECT TO PRINTER from the PRINT
MANAGER menu.
4. Click on OK in the open Create Printer window.
The printer appears in the Print Manager window.
W
I
N
D
O
W
S
July 1998 7-9
N
T
3
5
1
Page 96

Windows NT 4.0 Workstation/Servers
8 Windows NT 4.0 Workstation/Servers
Refer to Kodak Printer/NIC Installation and ConÞguration Overview in
Chapter 1 for overall conÞguration process steps and details. In the list
below, the steps described in this chapter are highlighted.
Step 1: Assess your network/printing environment
Step 2: Gather the necessary components
Step 3: Install the NIC hardware, if needed
Step 4: ConÞgure the NIC, if necessary
Step 5: ConÞgure the print servers, if needed
Step 6: ConÞgure the printer on user workstations
Step 7: Printing
8.1 ConÞgure the NIC
If possible, start with the default parameters. TCP/IP protocol is the only
protocol that minimally requires conÞguration of an IP address. if it is
necessary to conÞgure NIC network parameters in Windows
environments, refer to Chapter 3, FastManage, or Appendix A, Telnet.
8.2 ConÞgure Print Servers
Servers are conÞgured the same as workstations; however, the printer is
shared for use by multiple users.
W
I
N
D
O
W
S
N
T
July 1998 8-1
4
0
Page 97

W
I
N
D
O
W
S
N
T
Windows NT 4.0 Workstation/Servers
8.2.1 Network Service and Protocol Installation
Windows NT supports network printing utilizing TCP/IP, Novel Netware
IPX, NetBeui and AppleTalk protocols. Appropriate protocols and services
must be installed prior to conÞguring printers.
Protocols vs Printing Modes
Service/Protocol System Support
Module
TCP//IP Microsoft TCP/IP printing
support
IPX (Novell) Netware services/support PostScript or raster
NetBeui native Windows support PostScript or raster
AppleTalk AppleTalk Protocol PostScript only
8.2.2 Windows NT Server Queues
Problem Downloading non-Windows NT drivers From Windows NT
Servers
Windows NT systems are supposed to support automatic downloading of
other OS drivers when users conÞgure their OS for printing to a Windows
NT queue. For non-Windows NT OSs, i.e.,Windows 95, the proper Kodak
OS driver is not downloaded. When a printer is shared on a server, do
not select other OSs that will use the queue. Drivers should be installed
locally on all non-Windows NT systems serviced by a server.
Preventing Corrupt Image Data
On Windows NT servers, you may encounter corrupt data when printing
Þles over 5 Mbytes (exhibited by occurrences of color bands across the
printed image). You can correct this condition by setting up your server to
accept the entire print job before passing the Þle on to the printer. To do
this, do NOT select Job Prints While Spooling in Server Properties.
Printer Modes
Supported
PostScript or raster
4
8.3 ConÞguring your Workstation for Printing
0
You should verify that this platform is supported for printing to your printer
or proofer. Refer to the user guides and software Þles provided with your
printer or proofer for information about installing software to support
PostScript and raster printing, calibration, etc. If needed, refer to
Appendix E, Technical Assistance.
8-2 July 1998
Page 98

Windows NT 4.0 Workstation/Servers
8.4 Printer/NIC selection and printer setup using Win 95/NT Network
Neighborhood:
If you have network browsing capabilities and you select Workgroup, you
should be able to see the printer/NIC advertising itself as KDxxxxxx,
where ÒxxxxxxÓ is consistent with the last six digits of the Ethernet
address for the NIC.
1. Open Network Neighborhood
2. Locate and then double-click the printer icon named KDxxxxxx.
You must still use conÞguration utilities to conÞgure non-default network
parameters. If you are comfortable with NIC conÞguration defaults, then
you could select the ÒKDxxxxxxÓ printer/NIC. Windows will prompt you to
install a print driver, if necessary. After installing an appropriate printer
driver, you will be able to select the printer within an application ÒPrintÓ
window and and print to that printer.
8.5 Adding a Printer to Your System
Complete the following generic procedures to add a printer and install a
PostScript driver. These procedures include:
¥ Creating a printer that will communicate via TCP/IP (LPR Port) -
Section 8.5.1
¥ Creating a printer that will communicate via AppleTalk - Section 8.5.2
¥ Creating a printer that will communicate via a server/queue - Section
8.5.3
¥ Creating a Windows NT printer/queue that remote users may select
W
I
N
D
O
W
S
Note: Server conÞguration is the same as workstation conÞguration;
however, the resulting printer must then be shared and a queue
name assigned.
If needed, refer to the Windows NT documentation and software provided
with your system.
8.5.1 Printing Via TCP/IP (LPR Port)
1. From Start, select Settings and then Printers.
July 1998 8-3
N
T
4
0
Page 99

Windows NT 4.0 Workstation/Servers
The Printers window appears.
2. Click on Add Printer. The Add Printer Wizard window appears.
W
I
N
D
O
W
S
N
T
4
0
3. Select My Computer, then click on Next.
4. From the Add Printer Wizard screen, do one of the following:
If you are conÞguring your server or workstation to print directly to the
printer from an LPR port, click on Add Port.
If you are conÞguring your workstation to print indirectly to the printer
from a predeÞned server print queue, click on LPT1 and then Next.
8-4 July 1998
Page 100

Windows NT 4.0 Workstation/Servers
The Printer Ports window appears.
5. Double-click on LPR Port.
Note: If LPR Port is not in the menu, install Microsoft TCP/IP Printing
Services.
The Add LPR compatible printer window appears.
6. In the Name or address of server providing lpd textbox, enter the IP
address that has been assigned to the Kodak printer.
7. In the Name of printer or print queue textbox, enter the name of the
printer or print queue. (Any name is Ok.)
8. Click on OK.
9. Click on Close in the Printer Ports window.
10.From the Add Printer Wizard (Add Port) window, click on Next.
The procedure is complete. Proceed to Section 8.6, Installing the Kodak
Printer Driver.
July 1998 8-5
W
I
N
D
O
W
S
N
T
4
0
 Loading...