

Page 1

Page 2

Safety
User Precautions
• Place the scanner on a sturdy, level work surface capable of supporting at least 31.75 kg (70 lbs) and leave adequate
clearance on all sides of the scanner.
• When relocating the scanner, it is recommended that two people lift the scanner and use safe lifting techniques.
• Do not install the scanner in a location subject to dust, humidity or steam. This may cause electrical shock or a fire. Only use
the scanner indoors in a dry location.
• Make sure the electrical power outlet is located within 1.52 meters (5 feet) of the scanner and is easily accessible.
• When disconnecting equipment from the electric socket, be sure to grasp the plug, not the cord.
• Be sure the power cord is securely plugged into the wall outlet. Failure to do so may cause electrical shock or fire.
• Do not damage, knot, cut or modify the power cord or use a damaged power cord. This may cause electrical shock or fire.
• The scanner requires a dedicated and properly grounded power outlet. Do not use an extension cord or power strip with the
scanner.
• Do not leave the power cord plugged into the AC outlet if the scanner is not used for an extended period of time.
• Leave sufficient space around the power outlet so it can be easily unplugged in case of an emergency.
• Do not use the scanner if it becomes inordinately hot, has a strange odor, emits smoke, or makes unfamiliar noises.
Immediately stop the scanner and disconnect the power cord from the power outlet. Contact Kodak Service.
• Do not disassemble, service or modify the scanner except as explained in the User’s Guide.
• When using the flatbed for unbound or single pages, keep the top lid closed while scanning.
• Do not move the scanner with the power cord and interface cable attached. This may cause damage to the cord/cable.
Remove the power cord from the wall outlet before moving or relocating the scanner.
• Follow the Kodak recommended cleaning procedures. Do not use air, liquid or gas spray cleaners. These cleaners displace
dust, dirt and debris to other locations within the scanner, which may cause the scanner to malfunction.
• Material Safety Data Sheets (MSDS) for chemical products are available on the Kodak website at: www .kodak.com/go/msds.
When accessing the MSDSs from the website, you will be required to provide the catalog number or keyword of the
consumable you want the Material Safety Data Sheet for. See the section entitled, “Supplies and consumables” later in this
guide for supplies and catalog numbers.
Users and their employers need to observe the common sense precautions applicable to the operation of any machinery. These
include, but are not limited to, the following:
• Do not wear loose clothing, unbuttoned sleeves, etc.
• Do not wear loose jewelry, bracelets, bulky rings, long necklaces, etc.
• Hair length should be kept short, using a hair net if needed, or tying long hair up in a bundle.
• Remove all other loose objects from the area that could be drawn into the machine.
• Take sufficient breaks to maintain mental alertness.
• Use only the recommended cleaning supplies.
• Do not use canned/compressed air.
Supervisors should review their employee practices and make compliance with these precautions a part of the job description
for operation of the scanner or any mechanical device.
Page 3
Environmental information
•The Kodak Truper Scanners are designed to meet worldwide environmental requirements.
• In the USA, go to www.kodak.com/go/recycle for information on how to return this product for recycling or resuse.
• Guidelines are available for the disposal of consumable items that are replaced during maintenance or service; follow local
regulations or contact Kodak locally for more information.
• The product packaging is recyclable.
• Kodak Truper Scanners are Energy Star compliant and shipped from the factory with the default time set to 15 minutes.
European Union
This symbol indicates that when the last user wishes to discard this product, it must be sent to appropriate
facilities for recovery and recycling. Please contact your local Kodak representative or refer to
www.kodak.com/go/recycle for additional information on the collection and recovery programs available for this
product.
Please consult www.kodak.com/go/REACH for information about the presence of substances included on the candidate list
according to article 59(1) of Regulation (EC) No. 1907/2006 (REACH).
Acoustic emission
Maschinenlärminformationsverordnung – 3, GSGV
Der arbeitsplatzbezogene Emissionswert beträgt <70 dB(A).
[Machine Noise Information Ordinance — 3, GSGV
The operator-position noise emission value is <70 dB(A).]
EMC statements
United States
This equipment has been tested and found to comply with the limits for a Class A digital device pursuant to Part 15 of the FCC
rules. These limits are designed to provide reasonable protection against harmful interference when the equipment is operated
in a commercial environment. This equipment generates, uses, and can radiate radio frequently energy and, if not installed and
used in accordance with the instruction manual, may cause harmful interference to radio communications. Operation of this
equipment in a residential area is likely to cause harmful interference in which case the user will be required to correct the
interference at their own expense.
Japan
This is a Class A product based on the standard of the Voluntary Control Council for interference by information Technology
Equipment (VCCI). If this equipment is used in a domestic environment, radio disturbance may arise. When such trouble
occurs, the user may be required to take corrective action.
Taiwan
WARNING: This is a Class A product. In a domestic environment this product may cause radio interference in which case the
user may be required to take adequate measures.
Page 4

Peoples Republic of China
WARNING: This is a Class A product. In a domestic environment this product may cause radio interference in which case the
user may be required to take adequate measures.
Korea
Please note that this equipment has obtained EMC registration for commercial use. In the event that it has been mistakenly sold
or purchased, please exchange it for equipment certified for home use.
European Union
WARNING: This is a Class A product. In a domestic environment this product may cause radio interference in which case the
user may be required to take adequate measures.
Page 5

OVERVIEW 1-1
INSTALLATION 2-1
USING THE SCANNER 3-1
ADVANCED FEATURES 4-1
USER UTILITY 5-1
MAINTENANCE 6-1
TROUBLESHOOTING 7-1
APPENDICIES A-E
Page 6

1 Overview
Kodak Trūper 3610 Scanner
Kodak Trūper 3210 Scanner
Contents Optional accessories.......................................................................1-2
What’s in the box ...........................................................................1-2
Scanner components......................................................................1-3
Front view: Trūper 3610 Scanner...............................................1-3
Front view: Trūper 3210 Scanner...............................................1-4
Rear view: Trūper 3610 Scanner................................................1-5
Rear view: Trūper 3210 Scanner................................................1-6
Inside view..................................................................................1-7
With Kodak Trūper
production scanner segment just got a little faster. The
3210 and 3610 Scanners, the low-volume
Trūper
Scanners’ unique combination of image quality, duty cycle and
speed make them an attractive option for service bureau overflow,
busy office environments and businesses with exception document
scanning needs. You can meet all of your diverse scanning needs
whether you are using the Kodak Tr
rotary) or the Kodak Tr
ūper 3610 Scanner (rotary only).
ūper 3210 Scanner (flatbed with
A-61660 July 2013 1-1
• Kodak Trūper 3210 Scanner — duplex scanner that scans 95 pages
per minute in color , grayscale and black and white; including a built-in
flatbed for scanning exception documents.
• Kodak Trūper 3610 Scanner — a rotary-only duplex scanner that
scans 95 pages per minute in color, grayscale and black and white.
NOTE:The procedures in this manual are the same for both
scanners unless otherwise noted. The illustrations shown
in this manual are for the Kodak Trūper 3610 Scanner . If the
location of any part s, buttons, etc. are in a different position
for the Kodak Trūper 3210 Scanner, both models will be
shown.
Page 7

Optional accessories Long Document Paper Weight — designed to aid in scanning
extremely long documents. The paper weight improves long document
handling by applying a small and uniform amount of pressure, for long
documents to run smoothly through the scanner t ransport. For use with
both the Kodak Trūper 3210 or 3610 Scanner. CAT No. 109 2436
Imprinter — front page (pre-scan) imprinter prints the user-specified
alphanumeric string on the front side of documents before they are
scanned. CAT No. 896 1955
Memory Upgrade Kit — some scanning work may require additional
memory depending on variables such as the size of the documents you
are scanning and the desired image resolution. For example, two-sided
scanning of larger document sizes such as A3, or color scanning at a
resolution of 600 dpi may require additional memory. If you need
additional memory, the Memory Upgrade Kit is available. CAT No. 132
6313
What’s in the box • Kodak Trūper 3210 or 3610 Scanner
• Power cord
• USB cable
• Wire Frame (3610 Scanner only)
• Shading Sheet
• Starter Cleaning Kit
• Kodak Trūper Quick Installation Guide
• Installation Resource CD which includes the following:
- User Utility
- ISIS/TWAIN Driver
-VRS Software
- Kodak Trūper User’s Guide (multiple languages)
- VRS User Manual and Release Notes
1-2 A-61660 July 2013
Page 8

Scanner components
Power indicator
Stop/Start
Transport
cover
Auto/Manual
Feed selector
ADF door
release
ADF door
Document guide
Separation roller Feeder tray
Feeder tray
extension
Power
button
Exit tray
Exit stopper
Front view — Kodak Trūper 3610 Scanner
Power indicator — lights when the power to the scanner is on.
Stop/Start button — starts or stops scanning.
Transport cover — provides access to internal components.
Auto/Manual feed selector — set this selector to AUTO if you are
feeding a stack of documents. If you are feeding documents one at a
time, set the selector to MANUAL.
ADF door release — push this button to open the ADF door.
ADF door — provides access to the Automatic Document Feeder.
Document guides — slide the document guides in or out to
accommodate the size of the documents you are scanning.
Separation roller — allows the paper feed roller to feed a single
document into the scanner.
Feeder tray — holds documents in place for automatic or manual
scanning. The documents should be placed face-up to ensure they are
scanned in the correct order.
Feeder tray extension — pull this extension out to accommodate
document sizes longer than 11 inches (279.4 mm).
Power button — press this button to turn the scanner on or off.
Exit stopper — located on the exit tray, the exit stopper can be
positioned to accommodate the length of the documents being fed
through the scanner.
Exit tray — collects the documents after scanning. The scanned
documents will be deposited face-down in the exit tray.
A-61660 July 2013 1-3
Page 9

Front view — Kodak Trūper 3210 Scanner
Power indicator
Stop/Start
Power switch
Transport cover
Exit stopper
Back stopper
Feeder tray extension
Feeder tray
Document
guide
ADF door
ADF door
release
Auto/Manual
feed select
Exit tray
Separation roller
Flatbed
Exit tray — collects the documents after scanning. The scanned
documents will be deposited face-down in the exit tray.
Transport cover — provides access to internal components.
Auto/Manual feed selector — set this selector to AUTO if you are
feeding a stack of documents. If you are feeding documents one at a
time, set the selector to MANUAL.
ADF door release — push this button to open the ADF door.
ADF door — provides access to the internal components of the
scanner.
Separation roller — allows the paper feed roller to feed a single
document into the scanner.
Document guides — slide the document guides in or out to
accommodate the size of the documents you are scanning.
Feeder tray — holds documents in place for automatic or manual
scanning. The documents should be placed face-up to ensure they are
scanned in the correct order.
Feeder tray extension — pull this extension out to accommodate
document sizes longer than 11 inches (279.4 mm).
Back stopper — prevents documents from falling off of the exit tray if
you lift the flatbed cover after the documents have exited from the
scanner.
1-4 A-61660 July 2013
Exit stopper — located on the exit tray, the exit stopper can be folded
down or positioned to accommodate the length of the documents being
fed through the scanner (not shown in this illustration).
Page 10

Flatbed — for scanning bound books, document s that are badly torn or
USB port
AC power input
Imprinter door
Vent
Vent
Exhaust fan
other exception documents.
Power switch — press this button to turn the scanner on or off.
Stop/Start button — starts or stops scanning.
Power indicator — indicates scanner status. See the section entitled,
“Scanner LED status” in Chapter 7 for a description of the scanner
states.
Rear view — Kodak Trūper 3610 Scanner
USB port — connects the USB 2.0 cable to the scanner.
Exhaust fan and vents — clean these areas once a month for best
scanner performance.
AC power input — connects the power cord to the scanner.
Imprinter door — allows access to the optional imprinter.
A-61660 July 2013 1-5
Page 11

Rear view — Kodak Trūper 3210 Scanner
USB portExhaust fan and vents
AC power
input
Imprinter
door
USB port — connects the USB 2.0 cable to the scanner.
Exhaust fan and vents — clean these areas once a month for best
scanner performance.
AC power input — connects the power cord to the scanner.
Imprinter door — allows access to the optional imprinter.
1-6 A-61660 July 2013
Page 12

Inside view — the internal components are the same for both scanner models.
Background bar
Release latch
Background
bar
Imaging guide
Imaging guide
Imaging guides — the glass through which the scanner camera sees
the document. Light from the lamps passes through this glass to
illuminate the document.
Background bar — the upper and lower bar can be easily rotated to
change the background color of the scanned document. Black or white
backgrounds may be selected.
Release latch — press this release lever up to release and open the
transport cover.
A-61660 July 2013 1-7
Page 13

2 Installation
Contents Installation checklist........................................................................2-1
Attaching the feeder tray.................................................................2-2
Making connections........................................................................2-2
Installing the Windows scanner driver ............................................2-3
Installing the software.....................................................................2-4
Step 1: User utility.......................................................................2-4
Step 2: ISIS/TWAIN Driver .........................................................2-5
Step 3: VirtualReScan ................................................................2-5
Step 4: Applications....................................................................2-5
User Utilities ...............................................................................2-6
Viewing manuals.............................................................................2-6
Installation checklist • After the scanner has been unpacked, it is recommended that you
keep the original carton and all packing materials in case you need
them later. See Appendix E, Repacking the Scanner for more
information.
• Verify the computer system requirements. Refer to Appendix A,
Specifications.
• Attach the feeder tray to the scanner. See the section entitled,
“Attaching the feeder tray” later in this chapter.
• Connect the scanner. See the section entitled, “Making connections”
later in this chapter.
• Install the software. See the section entitled, “Installing the software”
later in this chapter.
You are now ready to scan. Refer to the instructions for your scanning
or document management software application.
A-61660 July 2013 2-1
Page 14

Attaching the feeder
AC power input
USB port
tray
1. Install the left side of the feeder tray by inserting the pin located at
the left side of the feeder into the hole.
2. Install the right side of the feeder tray by inserting the pin located at
the right side of the feeder into the hole. A small amount of pressure
will be required to align the pin with the hole.
Making connections 1. Turn the host PC off.
2. Plug the power cord into the AC power input on the back of the
scanner and connect the other end to a power outlet.
3. Connect the USB cable to an available USB 2.0 port on the host PC
and connect the other end to the USB port on the scanner.
NOTE: Do not connect the scanner to a USB hub.
2-2 A-61660 July 2013
Page 15

Installing the
Windows scanner
driver
1. Press the Power button to turn the scanner on.
The power indicator will flash orange then display a steady green
when the scanner is ready.
2. Turn on the host PC.
For Windows 2000, Windows XP or Windows Vista: You must be
logged in with Administrator privileges. Windows will detect the scanner
and start the Found New Hardware Wizard.
3. At the Found New Hardware Wizard screen, click Next.
4. Select Search for a suitable driver for my device, then click Next.
5. Select CD-ROM drives, then click Next.
6. Insert the Installation Resource CD into the appropriate drive on the
host PC.
7. When Windows finds the device driver, click Next.
NOTE: If Windows cannot find the driver files, click the Browse
button in the Files Needed dialog box. Browse to the folder
D:\minidriver, where “D” is the letter for the drive that
contains the Installation Resource CD. If there is no request
for files, continue with the next step.
If the Windows XP compatibility message is displayed, click
Continue Anyway.
8. The Found New Hardware Wizard will complete the driver
installation. Click Finish.
9. Restart the host PC.
A-61660 July 2013 2-3
Page 16
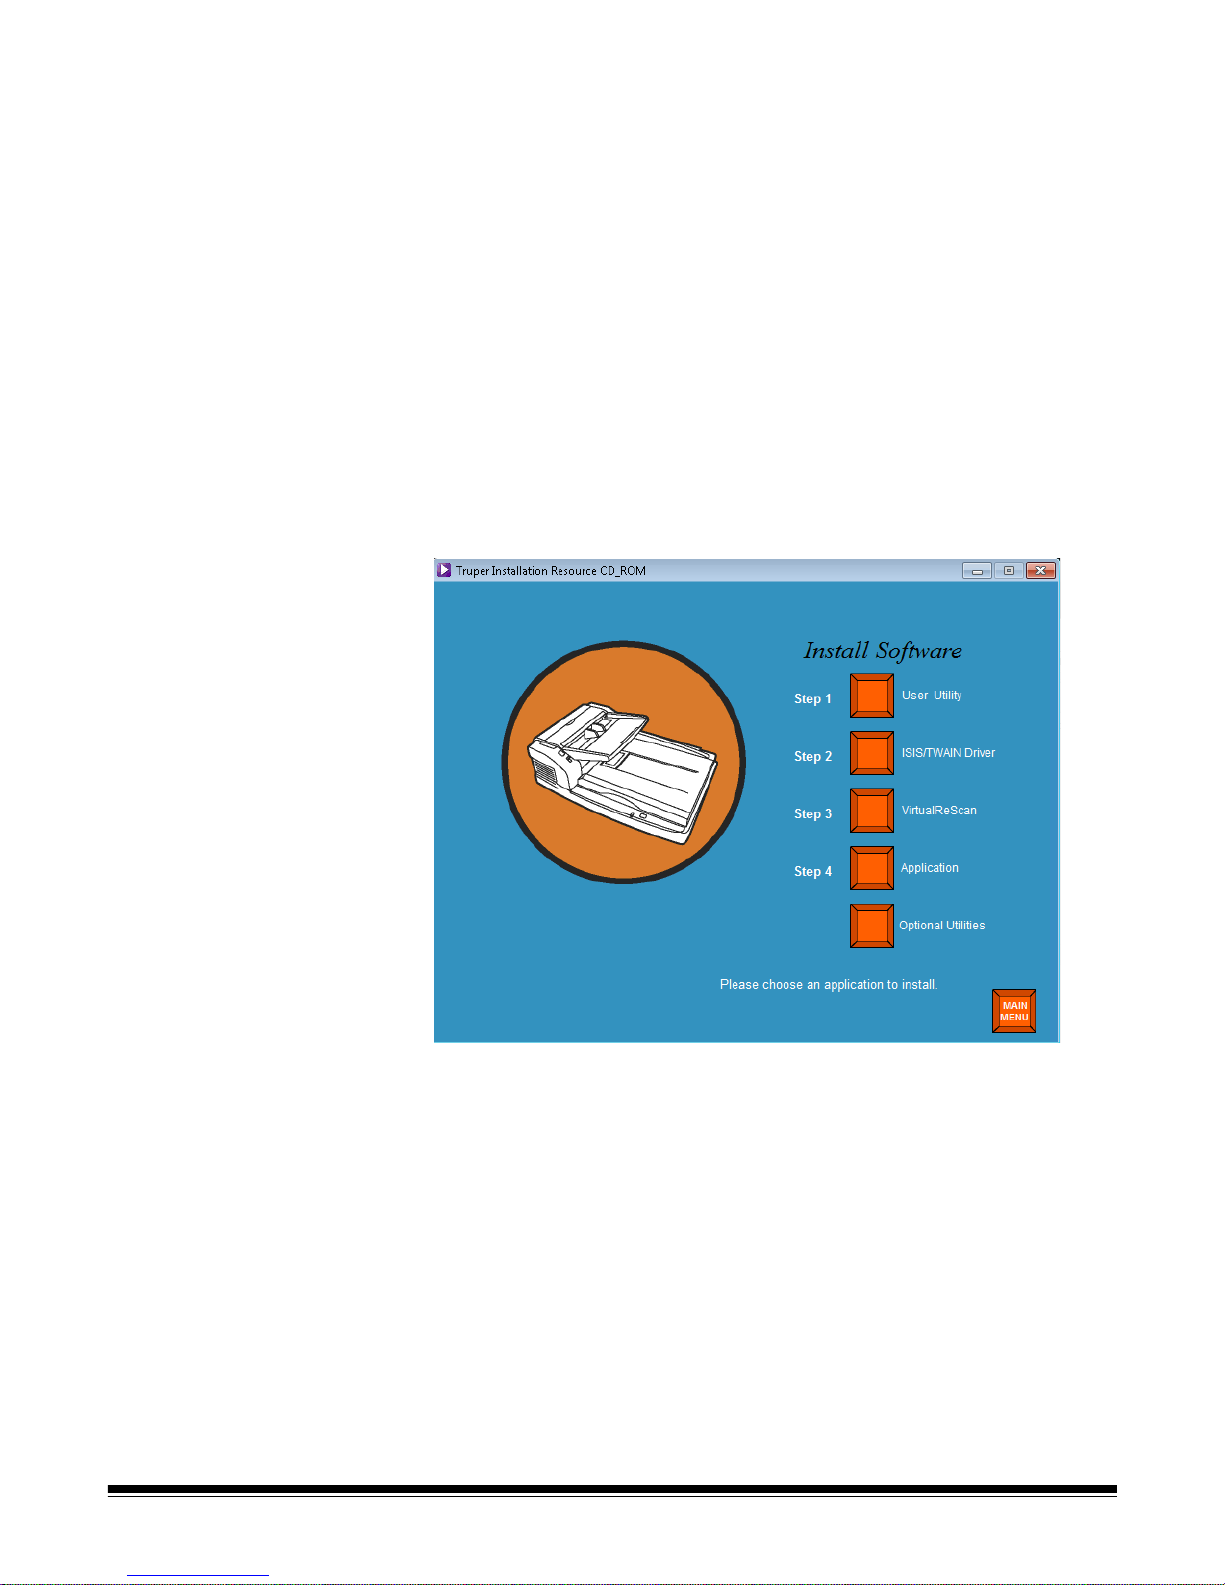
Installing the
software
1. Insert the Installation Resource CD in the CD-ROM drive of the host
PC. The installation will start automatically.
NOTE: If the installation does not start automatically, select
Start>Run and type D:\ in the Run dialog box where “D” is
the letter of drive that contains the Installation Resource
CD. Locate the setup.exe file and double-click on it to open
the Installation menu.
2. Select the desired language from the Language dialog box and click
OK.
3. Click the Trūper Scanner image that you are installing software for
from the Main menu.
4. Click Install Software.
After these steps have been completed, continue with the inst allation of
the following: User Utility, ISIS/TWAIN Driver, VirtualReScan,
Application and Optional Utilities.
Step 1: User Utility 1. Click Step 1 User Utility.
2-4 A-61660 July 2013
2. Read the license agreement and click Yes to accept the agreement.
3. Click Next to select the default destination folder for the program
files (recommended). To install the files in a different folder, click
Browse and select a different destination, then click OK in the
Choose Folder window .
4. Click Next to select the default folder for program icons. The User
Utility will be installed.
5. When complete, click Finish. The User Utility on-line help files will
be installed.
6. Click Next to continue.
7. When the on-line help files have been installed, click Finish.
Page 17

Step 2: ISIS/TWAIN Driver 1. Click Step 2 ISIS/TWAIN Driver.
2. Read the license agreement and click Yes to accept the agreement.
3. Close all other Windows programs and click Next.
4. When the installation is complete, select Yes, I want to restart my
computer now and click Finish.
Step 3: VirtualReScan 1. Click Step 3 VirtualReScan.
NOTE: It will take a few moments for the installation to begin. As
installation is progressing, messages will be displayed
(i.e., VRS is installing....Please wait! This message will
disappear when VRS has finished).
2. When the installation is complete, you will be prompted to restart the
PC. Click Yes on the dialog box.
Step 4: Application 1. Click Step 4 Application to install your scanning application.
Driver Selection: Scanning Applications with VRS connectivity
VirtualReScan is compatible with most scanning applications. When
starting your scanning application, you may be requested to select
a scanner or a scanner source. Depending on your application,
select one of the following:
• For ImageControls applications, set Scanner Source to: Trūper
3210/3610 with SVRS.
• For ISIS applications, set Scanner Selection to: Kofax VRS
Scanner. This is the certified ISIS driver for this configuration.
DO NOT select Trūper 3210/3610.
• For TWAIN applications, set Scanner Selection to: Kofax
Software VRS - TWAIN.
NOTE: Contact your application reseller for more information.
Scanning applications with Direct ISIS connectivity
Occasionally, an ISIS application based on PixTools may not
support the recommended VRS-based ISIS driver . Check with your
application reseller to determine if your scanning application is
compatible with VRS or requires the use of a Direct ISIS driver. For
Direct ISIS connectivity, select the following driver:
• ISIS Application Scanner Selection: 3210/3610. This is the
certified ISIS driver for direct connectivity.
A-61660 July 2013 2-5
Page 18

Scanning applications with TWAIN connectivity
Occasionally, the TWAIN application may not support the
recommended VRS-based TWAIN driver. Check with your
application reseller to determine if your scanning application is
compatible with VRS or requires the use of a Direct TWAIN driver.
For Direct TWAIN connectivity, select the following driver:
• TWAIN Application Scanner Selection: 3210/3610. This is the
certified TWAIN driver for direct connectivity.
Optional Utilities 1. Click Optional Utilities from the Install Software screen.
2. From the Optional Utilities screen, click ScanDemo to install this
application.
Viewing ma nua ls The Kodak Trūper 3210/3610 User’s Guide and VRS manuals are
available on the Installation Resource CD.
NOTE: To view the manuals you will need Adobe Acrobat Reader.
1. Insert the Installation Resource CD in the PC.
2. Select the desired language.
3. Click View Manuals from the Main menu.
4. Select the manual you want to view.
2-6 A-61660 July 2013
Page 19

3 Using the Scanner
Contents Getting your scanner ready to scan................................................3-1
Determining your feeding mode................................................3-2
Making scanner adjustments....................................................3-3
Attaching the wire frame...........................................................3-4
Changing the background bars.................................................3-5
Changing the background flatbed sheet...................................3-6
Stop/Stop button functionality ...................................................3-6
Getting your documents ready to scan...........................................3-8
Scanning documents ......................................................................3-9
Scanning with the flatbed (3210 Scanner).................................... 3-11
Getting your scanner
ready to scan
1. Press the power button to On (I). The power indicator on the front of
the scanner will flash orange and then display a steady green. See
the section entitled, “Scanner LED status” in Chapter 7 for more
information regarding the power indicator.
2. After the power indicator on the scanner is a steady green, turn on
your PC.
3. Determine your feeding mode: Auto for batch scanning; Manual for
feeding one document at a time. See the next section, “Determining
your feeding mode” for more information.
4. Adjust your side guides, end stop, change the background plates,
etc. to accommodate your document scanning needs. See the
section entitled, “Making scanner adjustments” later in this chapter
for more information.
A-61660 July 2013 3-1
Page 20

Determining your feeding
mode
The scanner has an Auto/Manual feed selector switch. This switch must
be placed in the correct position depending on your scanning needs.
You can scan in Auto mode or Manual mode.
Auto mode — use Auto mode when you are scanning a batch of
documents. The feed selector switch must be in the Up position. Use
Auto to lower the feeder tray between each batch and restar t scanning
immediately. To feed documents in Auto mode:
1. Set the feed selector switch to Auto. The feeder will adjust
automatically to the automatic feed position.
2. Verify that the document guides are adjusted to fit the size of the
documents you are scanning (slightly wider than the size of the
documents in the batch).
3. On the PC, click the Start/Batch button in the scanning application.
Place your documents into the feeder tray. The feeder tray will rise
and automatically feed the batch of documents in the feeder tray.
Manual mode — use Manual mode when you want to feed one
document at a time or thicker documents. The feed selector switch
must be in the Down position. Manual mode is not recommended for
multiple or batch feeding.
1. Set the feed selector switch to Manual. The feeder will adjust
automatically to the manual feed position.
2. Verify that the document guides are adjusted to fit the size of the
documents you are scanning (slightly wider than the size of the
document you are scanning).
3. Insert one document into the feeder tray with the top side facing up.
3-2 A-61660 July 2013
Page 21

Making scanner
Feeder
tray
extension
Exit stopper
adjustments
Before scanning documents, you may need to adjust your document
guides, feeder tray extension and exit stopper to accommodate the size
of the documents you are scanning. If necessary, the wire frame is
available if you are scanning documents of varying sizes.
• The document guides on the feeder tray can be moved in and out to
accommodate the size of the documents you are scanning.
• If you are scanning documents longer than 11 inches (279.4 mm),
pull the feeder tray extension out. The feeder tray extension will
support documents up to 15 inches (381 mm) long.
• To handle longer paper in the exit tray , extend the exit stopper. Adjust
the position of the exit stopper so that it will accommodate the length
of the documents. The exit stopper is adjustable to 17 inches (432
mm). When scanning a document longer than 17 inches (432 mm) or
A3 size (420 mm), fold down the exit stopper so that the longer paper
will fit in the exit tray.
• If you are feeding documents of varying sizes, attach the wire frame
to aid in document stacking. See the next section, “Attaching the wire
frame” for more information.
A-61660 July 2013 3-3
Page 22

Attaching the wire frame 1. Pull the exit door release lever and open the exit door.
Exit door release lever
2. Attach the wire frame to both of the exit door release sides.
3. Hang the wire frame on the shaft of the exit door release.
4. Slowly pull the wire frame forward until it clicks into place.
5. Gently close the exit door.
3-4 A-61660 July 2013
Page 23

Changing the background
bars
There are two background bars located inside of the scanner; an upper
background bar and a lower background bar . Each bar has a white side
and a black side. These bars can be easily changed. The background
color is important because is may affect the cropping quality of the
scanned image.
Most of the time, you will scan your documents using the black
background. The black background can
improve imaging of documents
with very light contrast data and increase color uniformity.
You should use the white background if you are scanning translucent
documents. The white background will reduce black background bleedthrough, which produces whiter images.
The background color set up in your scanning application, must match
the color of the background bars.
To change the background bars:
1. Turn the scanner off and open the exit door.
2. Locate the lower background bar, place your finger on the right end
of the bar and push it to the left. Rotate the b ackground bar until the
desired color is showing. Release the pressure on the background
bar and verify it is locked in place.
3. Locate the upper background bar, place your finger on the left end
and push it to the right. Rotate the background bar until the desired
color is showing. Release the pressure on the background bar and
verify it is locked in place.
Both background bars should be the same color.
4. Gently close the exit door and turn the scanner on.
A-61660 July 2013 3-5
Page 24

Changing the background
Flatbed sheet
flatbed sheet — for the
3210 Scanner only
To provide a background color, the flatbed sheet is black on one side
and white on the other side. The flatbed sheet color is initially set to
black. To change the color of the flatbed sheet, do the following:
1. Turn the scanner off.
2. Raise the feeder tray to the upright position.
3. Open the flatbed cover.
4. Gently pull the magnetized flatbed sheet away from the document
cover.
5. Turn the flatbed sheet over so the color you want for the background
faces the flatbed glass.
Stop/Start button
functionality
6. Reattach the flatbed sheet to the document cover by positioning the
corners of the sheet in the brackets.
The Stop/ Start button has different functions depending on the mode of
operation.
Emergency Stop mode (default) — if the scanner is running and
feeding paper, press the blue Stop/Start button to immediately stop the
paper in the scanner. This is the default mode of operation.
If a multifeed condition is present, pressing and holding this button until
the Ready/Error light flashes alternately between green and orange, the
multifeed detection will be disabled for the next sheet fed.
3-6 A-61660 July 2013
Page 25
Getting your
Feeding
direction
2.75 (70 mm) - unlimited
1.57 - 11.70 inches (40 - 297 mm)
documents ready to
scan
For best results, follow these guidelines for documents that will be
scanned using the ADF (Automatic Document Feeder):
• Standard paper size documents feed easily through the scanner.
When organizing your documents for scanning, stack the document s
so the lead edges are aligned and centered in the feeder tray. This
allows the feeder to introduce documents into the scanner one at a
time.
Maximum thickness: 2.0 to 5.9 mils (0.05 to 0.15 mm)
Maximum weight: 10.6 to 34 lbs. (40 to 127 g/m
2
)
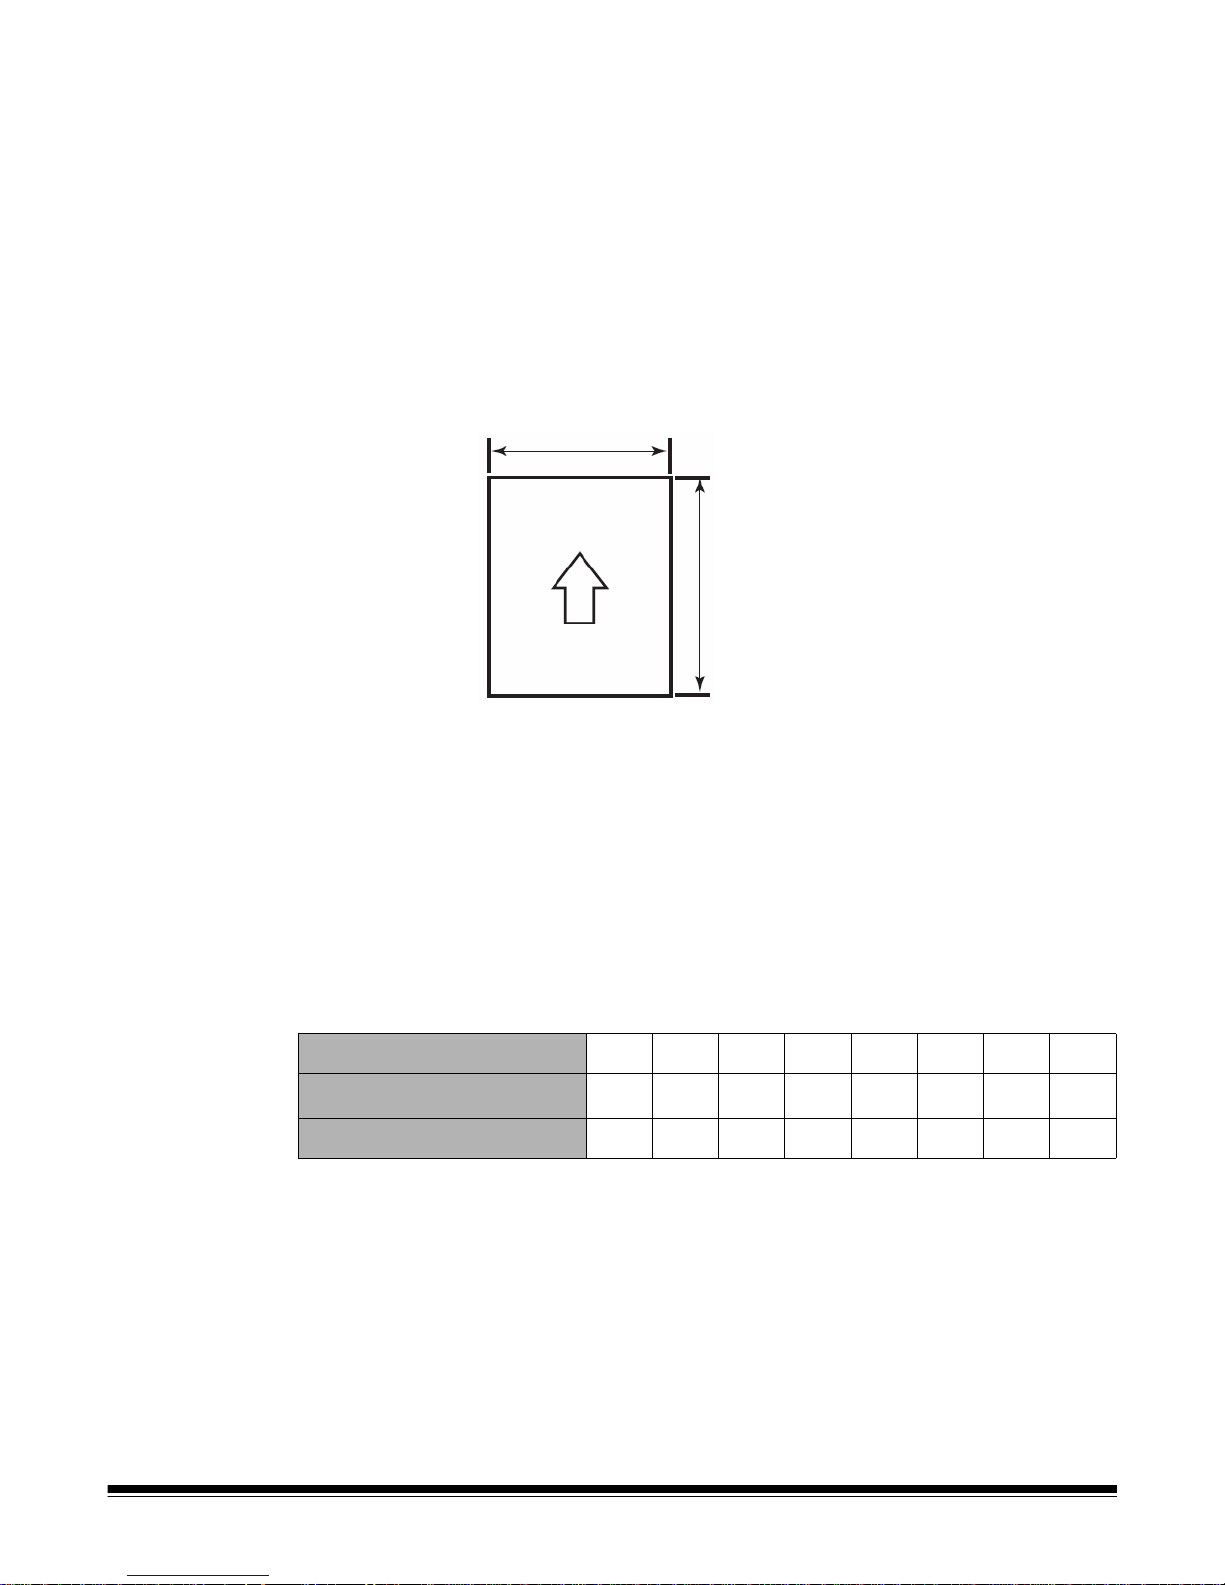
• Acceptable document size for the ADF:
Paper weight (lbs) 11 14 17 20 21 24 28 34
Paper weight (g/m2)
Maximum number of sheets 320 260 200 170 160 140 120 100
• Remove all staples and paper clips before scanning. St aples and
paper clips on documents may damage the scanner and documents.
• Glued or curled documents may cause a p aper jam or damage in the
ADF.
• All inks and correction fluids on the paper must be dry before
scanning is started.
• The height of the documents placed in the feeder tray must not
exceed the paper limit mark that appears on the right side of the
document guide. The following chart indicates the maximum number
of sheets that can be loaded on the feeder tray:
40 52 64 75 80 90 104 127
• Sheets that are exceptionally thick or thin should be placed in the
ADF manually, one sheet at a time, if you have a 3210 Scanner, you
can use the flatbed.
A-61660 July 2013 3-7
Page 26

• Curled, wrinkled, or folded documents may not scan properly. Check
Feeding direction
Feeding direction
the allowances for curl and fold in the following diagram:
Curl must be less
than 0.20 inches
(5 mm)
Fold must be less
than 0.20 inches
(5 mm)
The following types of documents may cause jams in the ADF or may
cause the ADF to feed more than one sheet at a time.
- Overhead projector sheets, plastic films, cloth or metallic sheets
- Paper with irregularities such as tabs, staples, paste and similar
items
- Thick or irregular documents such as envelopes or documents that
are glued together
- Thermal or heat sensitive paper
- Tracing paper
- Damaged or wrinkled documents
- Photographs
- Coated paper
- Thick plastic cards such as credit cards or identification cards
- Torn sheets and documents with notches, holes, punched or
perforated sheets
- Extremely smooth or shiny paper
- Paper that is highly textured
- Paper with carbon sheets
- Carbonless (NCR) paper
3-8 A-61660 July 2013
Page 27

Scanning documents 1. Prepare the batch of documents you want to scan by following the
guidelines provided in the previous section, “Getting your
documents ready to scan”.
2. Place the documents you want to scan in the feeder tray with the
side to be scanned facing up. Slowly push the sheets into the
scanner transport.
NOTES:
• Do not overfill the feeder tray. The document stack should not
exceed the Paper Limit mark on the feeder tray.
• The guide on the ADF d oor provides a graphical document sizing
scale and a directional “Face Up” icon to aid in document
scanning.
• Use the Wire Frame attachment when scanning several
documents of varying sizes.
3. You are now ready to scan. Refer to the instructions for your
scanning application or document management software for more
information. Scanner settings are available through the Properties
window after the scanner has been selected. See Chapter 4,
Advanced Features for more information.
A-61660 July 2013 3-9
Page 28

Scanning with the
Feeder tray
Document cover
Standard mark
flatbed (3210
Scanner)
You can use the flatbed on the 3210 Scanner to scan a single sheet,
exception documents or documents that you do not want to take apart
before scanning (e.g., books, magazines).
NOTE: Do not place floppy disks or any items containing magnetic
media on the flatbed.
1. Raise the feeder tray up until the tray clicks into place.
2. Open the document cover.
3. Select Flatbed Mode in the scanning application.
4. Place the document face down in the upper left corner of the flatbed
5. Place the shorter edge of the document along the left edge of the
6. Place the longer edge of the document along the top edge of the
7. Gently close the document cover.
NOTES:
• When scanning thick documents such as a bound book, only the
• Do not open or press down on the document cover during the
• When using the flatbed for a series of documents, keep the feeder
glass.
flatbed glass. Match the shorter edge with the standard mark.
flatbed glass. Match the longer edge with the standard mark.
NOTE: If the document is not properly aligned, the document will
not scan correctly.
areas that are touching the flatbed glass will be scanned.
scanning process.
tray raised. You only need to raise and lower the document cover
when you scan each document.
3-10 A-61660 July 2013
Page 29

4 Advanced Features
Contents Accessing Advanced features.........................................................4-1
Preset tab...................................................................................4-4
Layout tab...................................................................................4-5
Paper Handling tab.....................................................................4-7
Image Processing tab...............................................................4-10
About tab..................................................................................4-14
This chapter provides information about advanced features that can be
used with the Kodak Truper 3210 and 3610 Scanners. The controls for
operating the Advanced Features are accessible within the
®
VirtualReScan
NOTES:
• When VRS is not installed, similar settings can be found in the Direct
ISIS and TWAIN settings.
• Some functions shown in Advanced Features are disabled when
using VRS.
(VRS) Interactive Viewer.
A-61660 July 2013 4-1
Page 30

Accessing Advanced
features
To access the VRS Interactive Viewer , VRS Professional sof tware must
be loaded on the host PC that the scanner is connected to. VRS
Professional will be active when the scanning application being used is
launched and a VRS scan source is selected. There are three types of
scan sources, depending on the VRS driver used.
• VRS ImageControls®-based Applications
• VRS ISIS-based Applications
• VRS TWAIN-based Applications
NOTE: This User’s Guide only documents the VRS-based scanning
setup.
To open the VRS Test Application:
1. Select Start>VRS Test Application.
The VRS Test Application (VCDemo) screen will be displayed.
2. Select Scanner>Source to connect to the scanner.
3. When the scanner is connected, select Source>Advanced
Properties to setup your scanner properties.
4-2 A-61660 July 2013
Page 31

4. The VirtualReScan Interactive Viewer window will be displayed.
5. Within the Interactive Viewer, access the Advanced features by
clicking the Scanner Driver Settings icon to display the
Properties window.
NOTE: Descriptions of the features on the tabs on the right side of
the VirtualRescan Interactive Viewer window can be found
in the VRS Manual on the Installation CD. Some useful
features to note are:
• Auto orient ation — located on the Skew button: allows
you to do content-based orientation, in 90-degree
increments
.
• Fill Holes — located on the Noise button: allows you to
fill in the holes that are around the edges of your
document. The types of holes that are filled include:
round, rectangular, and irregularly shaped (e.g., doublepunched or those having a slight tear that could have
occurred when the document was removed from a
binder).
• Blank Page Detection — located on the Blank Page
button: allows you to configure the scanner to not give
blank images to the scanning application.
A-61660 July 2013 4-3
Page 32

Preset tab The Preset tab allows you to customize scanner settings and save
them with a new preset name.
1. Click Save As to enter the name of your profile.
2. Proceed with clicking the other tabs to set up the properties for this
profile.
4-4 A-61660 July 2013
Page 33

Layout tab The Layout tab provides the following options.
Select Setting Side — select the side of the image that you want to
configure your page settings for. Options are: Both, Front or Back.
Page Size — the default page size is set when a scanner is first
selected. You can choose a different page size using the drop-down list.
• Custom Page Width/Custom Page Length: if you select Custom
from the Page Size drop-down list, Custom Page Width and
Custom Page Length will become available. You can enter the width
and length of the documents you want to scan in these fields. The
maximum width is 11.9 inches; the maximum length is 100 inches.
A-61660 July 2013 4-5
Page 34

Area — allows you to define the amount of image data which is
returned to your PC.
• X: the distance from the left end of the scanner to the lef t-edge of the
scanning area.
• Y: the position from the top end of the document to the top end of the
scanning area.
• Width: the width of the scanning area.
• Height: the height of the scanning area.
Select whether you want the area to be defined in Pixels, Inches or
Centimeters.
• Snap ⎯ enable this option to control the dimensions of the preview
area to fixed 1/8-inch increments.
Page Layout
• Portrait: displays the image orientation in the shape of a
conventional portrait, where height is greater than width.
• Landscape: displays the image orientation in the shape of a
conventional landscape painting, where width is greater than height.
Feed — allows you to select the way you place your documents in the
scanner, Top edge first, Bottom edge first, Left edge first or Right
edge first.
• Sub Area(W): this option is only available when Length Control in the
Paper Handling tab is disabled.
4-6 A-61660 July 2013
Page 35

Paper Handling tab The Paper Handling tab provides the following options.
Feeding Features — check this option to set multi-feed detection.
Detect Double Feed: select this checkbox to turn Detect Double Feed
on. This function detects the feeding of more than one document at a
time. If a double feed is detected, you can stop scanning or be notified
that a double feed is detected and continue scanning.
This function can detect double feeds even when sheets are
superimposed exactly on top of each other, but it may not be detected
properly with some paper thicknesses and when creasing and other
factors are present.
If a double feed occurs, remove the document from the scanner and
separate the double-fed pages, reinsert the document(s) into the feeder
tray and press Stop/Start to resume scanning.
NOTE: For instructions on removing document jams, see the section
entitled, “Clearing a document jam” in Chapter 7.
• Sensitivity: if the Detect Double Feed function operates incorrectly,
adjust the sensitivity level by selecting one of the following levels:
- High — select this when feeding thin documents.
- Normal — this is the standard sensitivity.
- Low — select this when feeding thick documents.
A-61660 July 2013 4-7
Page 36

• Action: select one of the following:
- Beep — if selected, will signal an alert when a double-fed
document is detected.
- Stop Scanning — stops the scanning process when a double-
fed document is detected. This is the default.
Feeding Speed — when scanning thin paper, badly creased paper,
fragile paper, etc. you can change the speed of the scanner.
• Slow: this speed slows the documents that are fed through the ADF
to about one-half the speed of Normal mode. The image quality in
the Slow mode is the same as in the Normal mode.
• Normal: this is the normal speed of the scanner and is used fo r most
document scanning.
NOTE: At resolutions above 300 dpi, the paper is fed at the same
speed as in the Normal mode even if Slow has been specified.
Length Control — limits the length of the image to the actual page
length. For example, if you turn off Length Control and select Page
Size: Legal but scan a letter size document, the image size will be 14
inches long (11 inches for lettersize plus 3 inches of black on the
bottom).
If this option is turned on, with the same Page Size: Legal selection and
you feed a letter size document, the length will be limited to 11 inches
(the length of the actual document).
It has no effect if the document is longer than the selected page size;
the bottom is still cut off. For example, if you select Page Size: Letter
and feed a legal-size document, the image will be limited to 11 inches
whether this option is enabled or not.
Detect Paper Width (Z) — not available.
Margin — places a black border around the outside of the selected
page size. This option is always on so the scanner can perform deskew
and crop operations as needed.
Skew Stop — when enabled, the scanner will stop feeding if it detects
that the document being fed is at a highly skewed angle.
Long Paper (X) — allows the scanner to scan a document virtually
infinitely long. It will scan paper of any length, and generate images of
whatever size is selected in the Layout tab.
For example, if this option is enabled and you select a page size of
Letter (8.5 x 11 inches) and feed paper that is 220 inches long, the
result will be 20 separate images that are 8.5 x 11 inches in size.
Fit to Page — reduces or enlarges the image to fit the size of the
selected paper.
4-8 A-61660 July 2013
Page 37

Manual Feed mode — select one of the following options for your
scanning needs.
• Off — if you select this option, you will nee d to load the documents in
the scanner and click Start Batch (or a button with similar name) in
the scanning application to start scanning.
•On — select On when manually feeding documents. This should be
selected when feeding mixed document types that are difficult to
separate and may cause multifeeds. In this mode, the ADF is raised
and the feeder rollers are not engaged until the document’s leading
edge approaches the feeder roller.
• Start Button — if selected, the scanner will not start feeding until the
Stop/Start button is pressed.
• Automatic — this is the standard mode of operation. In Automatic
mode, the “out of paper” indication is displayed immediately after a
batch has been scanned. This is the default.
• Timeout — allows you to set the amount of time the scanner will wait
after the last document enters the transport before the transport
timeout action is taken. You can specify a time delay setting from 1 to
300 seconds.
NOTE:The Timeout option is active in all Manual Feed Mode options
except for Off.
• Unlimited — this is unlimited timeout. It is only available in the Start
Button and Automatic modes.
• Detect Control Sheet — if this option is checked, the scanner will
detect when a control sheet is placed in a batch and change the
scanner's settings (i.e., color mode) accordingly.
• Skip Control Sheet — if this option is checked, the scanner will not
generate an image of the scanned control sheet.
A-61660 July 2013 4-9
Page 38

Image Processing tab The Image Processing tab provides the following options.
Extra Features
• White Level from Paper — check this option to reduce background
noise.
• Automatic Separation — check this option if you want the scanner
to attempt to separate text and images, and apply dithering to only
images.
• Binary Dynamic Threshold — for documents with colored
backgrounds, scanned in black and white.
• Color Matching — applies different color matching methods for
standardized color reproduction.
Image Features
• Mirror — flips the output image horizontally.
• Invert — allows you to select how the black pixels will be stored in
the image. By default the black pixels are stored as black and the
white pixels are stored as white. Check this option if you want the
black pixels stored as white and the white pixels stored as black.
• Image Emphasis — alters the sharpness of an image. Smooth is
blurry, and Low, Medium and High are all levels of sharpness.
• Chroma — color saturation, a lower value removes color and the
image will turn into grayscale. A higher value increases the color
brightness.
4-10 A-61660 July 2013
Page 39

JPEG Quality — select a compression value from 1 to 100. The lower
the value will provide the maximum compression which produces the
smallest image size. The higher the value will provide the least amount
of compression which produces the largest image size.
Image Processing — not available.
Noise Reduction — reduces random noise by converting a single
black pixel to white when it is completely surrounded by white pixels or
by converting a single white pixel to black when it is completely
surrounded by black pixels. Select to remove Black Noise or White
Noise.
Drop Out — color dropout allows you to remove a one or more colors
from a color document when scanning in Black and White mode. Up to
6 colors can be dropped out.
• Single Color: allows you to delete colored (red, green or blue) text or
lines printed on documents. Single color dropout can only be used
with binary images in black and white or binary modes and can be set
independently for the front and back of a document. This functionality
is primarily used in OCR (Optical Character Reading) to dropout form
lines.
NOTE: Depending on the scanning conditions and colors, it may
not be possible to delete the specified colors completely.
To drop out a single color, select Red, Green or Blue from the Single
Color drop-down list.
A-61660 July 2013 4-11
Page 40

• Multiple Colors: allows you to remove up to 6 colors. To drop out
multiple colors:
1. Click the Dropout button. The Multicolor Dropout dialog box will be
displayed.
2. Click Selection 1.
3. Adjust the Hue Range, Saturation Range, and Value Range bars.
Hue Range determines how many colors to dropout, while the
Saturation Range controls the amount of intensity to dropout and
the Value Range is the level of brightness to dropout.
4-12 A-61660 July 2013
Page 41

NOTES:
• The default values for Hue, Saturation and Value are typically
accurate. However, if the dropout color requires adjusting, the
Hue, Saturation and Value numbers can be modified manually.
• Hue determines the color. Saturation defines the intensity of the
color. Value controls the brightness of the color.
4. To add additional dropout colors, click the next Selection radio
button and repeat steps 4 - 7.
5. In the Maximum Replacement Value section, do one of the
following:
•Select Automatic and adjust the bar accordingly.
•Select Auto to completely dropout the color.
To disable dropout colors:
• Select the Selection radio button for the color you want to disable
and then uncheck Enable.
NOTE: Any and all of the selections can be active at the same time.
Gamma — this is a shading adjustment.
• Normal: uses a predefined curve that works best under most
conditions in all color modes.
• For CRT: select if you intend to view the images on a display.
• User Downloaded: to download your own curve formula.
• Linear: no curve, straight line formula.
A-61660 July 2013 4-13
Page 42

About screen The About screen displays the scanner version and copyright
information.
4-14 A-61660 July 2013
Page 43

5 User Utility
Contents Starting the User Utility ...................................................................5-1
The User Utility dialog box..............................................................5-1
The User Utility is a software program used to maintain and
troubleshoot the Kodak Trūper 3210 and 3610 Scanners. The User
Utility is installed as part of the scanner’s software installation.
If the Trūper User Utility icon is not on your desktop, see the section
entitled, “Installing the software” in Chapter 2.
Starting the User
Utility
The User Utility
dialog box
• Click the User Utility icon or click the Start>Programs>Kodak>
Scanner Tools.
NOTE: When starting the User Utility, the Select Scanner dialog box
may be displayed. If this dialog box is displayed, select the
desired scanner from the drop-down list.
This dialog box displays the Scanner Status, Scanner Information,
Scanner Counter and the User Utility functions and settings options.
A-61660 July 2013 5-1
Page 44

Scanner Status and Error Code — displays the status of the
connected scanner along with error codes. For information about the
messages and error codes, see the section entitled, “User Utility error
codes” in Chapter 7.
Scanner Information — provides information about the connected
scanner (i.e., Model, Firmware Version, Memory installed, etc.).
Scanner Condition — provides information about scanner settings.
• Sleep Mode — the scanner is configured with the power saver
feature enabled with a 15-minute wait time. This conserves energy
and reduces operating costs. Sleep Mode will go into effect after 15
minutes after the last scanner operation. If you want to change these
values, click Sleep Mode and make your selection.
The wait time can be set from 1 to 60 minutes in 1-minute
increments.
• Clean Imprinter — if you have the imprinter installed, this option is
available. If the imprinter ink cartridge is clogged, verify that the
imprinter door is closed and click the Clean Imprinter button to clean
the cartridge. An automatic cleaning will be performed to improve the
print quality.
• Buzzer Setting — click ON if you want the scanner can alert you
with a buzzer when it detects a designated paper size.
5-2 A-61660 July 2013
Page 45

• User Shading — provides adjustments to improve image quality.
Shading adjustment should be performed when the density of the
scanned images is uneven and the image displays perpendicular
lines, when colors in some parts of the scanned image are extremely
different from what is expected, or when the image quality fails to be
improved after cleaning the scanner.
Before performing shading adjustment, thoroughly clean the drive
rollers, background bars and ADF glass areas. Only use shading
paper that is supplied with the scanner and is in good condition.
1. Click User Shading on the User Utility.
2. Click Start Shading. The User Shading utility will guide you
through the necessary steps.
3. Clean the inside of the scanner. See the section entitled,
“Cleaning inside the scanner” in Chapter 6. When finished, click
OK.
4. Turn over the upper and lower background bars to white. See the
section entitled, “Changing the background bars” in Chapter 3.
When finished, click OK.
5. Place the shading paper in the feeder tray in the Landscape
position, then click OK. The scanner reads the shading paper an d
the shading adjustment sets the background bars for the white
shading. Wait until the message Now Adjusting is cleared from
the screen.
6. Turn the upper and lower background bars over to the bla ck side.
When finished, click OK.
NOTE: The shading paper is NOT used for the black
background bars.
The shading adjustment data with the black background bar is
created. Wait until the message Now Adjusting is cleared from
the screen.
7. Click OK to complete shading adjustment.
NOTE: If the scanned images are still lined after the shading
adjustment and these lines are not eliminated even after
the ADF glass areas have been cleaned, the shading has
not been compensated properly. Clean the parts again and
perform the shading adjustment procedure again.
A-61660 July 2013 5-3
Page 46

• Restoring shading to the default: you can restore shading
adjustment data to the default setting by clicking Restore Default on
the User Shading dialog box. Restore the default if the image quality
deteriorates or has not improved as a result of the shading
adjustment process.
Caution Setting — click this option to set the number of pages
scanned after the rollers were last replaced that you want to be
reminded that it is time to clean the rollers.
Scanner Counter — the scanner counter can be used to keep track of
the number of documents scanned. The counters also provide a
reminder for roller cleaning and parts replacement.
5-4 A-61660 July 2013
• System — displays the number of pages scanned in ADF mode af ter
the last counter update.
• Flatbed — displays the number of pages scanned in Flatbed mode
after the last counter update.
Page 47

• After Clean Roller — displays the number of pages scanned after
the rollers were last cleaned. When the After Clean Roller number is
greater than the Warning number, the rollers need to be cleaned.
(The Warning number indicates how many pages can be scanned
after roller cleaning before the rollers need to be cleaned again.)
• After Replace Roller — displays the number of pages scan ned after
the rollers were last replaced. When the After Replace Roller number
is greater than the Warning number, the rollers need to be replaced.
(The Warning number indicates how many pages can be scanned
with a new set of rollers before the rollers need to be replaced.)
• Update All Counters — updates the counter display to the most
current numbers. Document scanning operations do not
automatically update the counter displays.
• Clear Counter buttons — there are two Clear Counter buttons, one
to clear the After Clean Roller display and one to clear the After
Replace Roller display.
- After you clean the rollers, click Clear Counter for After Clean
Roller and reset the number to zero.
- After you replace the rollers, click Clear Counter for After
Replace Roller and reset the counter to zero.
Help — opens the Kodak Trūper 3210 and 3610 Scanners User’s
Guide in PDF file format.
Select Scanner(X) — opens the Select Scanner dialog box. If more
than one scanner is connected to the computer, you can use the Select
Scanner dialog box to select a different scanner. The User Utility
functions and settings will then apply to the selected scanner. To select
a different scanner:
1. Click Select Scanner(X).
2. Click the drop-down list and select a different scanner, then click
OK.
Save Info — allows you to save current scanner and computer system
information to a log file.
1. Click Save info.
2. In the Save in drop-down list, browse to find a location to save the
log file.
3. In the File name box, type a file name for the log file (the default file
name is Scanner.log).
A-61660 July 2013 5-5
Page 48

4. Click Save.
Close — closes the User Utility.
Check Version Information — right-click the title bar at the top of the
display window and click About to view the version information.
5-6 A-61660 July 2013
Page 49

6 Maintenance
Contents Cleaning procedures.......................................................................6-1
Roller cleaning............................................................................6-2
Cleaning the outside of the scanner...........................................6-2
Cleaning inside the scanner.......................................................6-2
Cleaning the rollers in the ADF area..........................................6-3
Cleaning the rollers in the Exit area ...........................................6-5
Cleaning the background bars and imaging guides...................6-6
Cleaning the sensors..................................................................6-6
Cleaning the flatbed ...................................................................6-9
Replacing consumables................................................................6-10
Supplies and consumables ..........................................................6-13
Cleaning procedures The following cleaning guidelines and procedures will help ensure best
scanner performance.
NOTE: Use only the recommended cleaning supplies when cleaning
the scanner.
• If paper jamming, marking or multiple-sheet feeding occurs
frequently, clean the rollers, sensors and double feed detector as
described in this section. If paper jamming, marking or double
feeding occurs frequently even after cleaning, you may need to
change the rollers.
• To maintain scanning quality, clean the scanner at least once a week
or after 20,000 sheets have been scanned, whichever comes first. To
determine the number of sheets scanned, use t he Trūper User Utility.
• Be sure the documents you scan are clean. If the documents you
scan are dirty, the scanner components will also become dirty.
• When scanning with the flatbed, if black dots or white patches appear
in the scanned results, open the document cover and clean the
flatbed glass and flatbed sheet using S taticide wipes. If bla ck or white
lines appear on the scanned images, clean the imaging guides and
the background bars.
• It is recommended that you clean all of the rollers at the same time.
A-61660 July 2013 6-1
Page 50

Roller cleaning pads Review the following information before using the roller cleaning pads
• If you need more information about the roller cleaning pads, refer to
the Material Safety Data Sheet (MSDS). See the Kodak website at:
www.kodak.com/go/msds.
• Additional roller cleaning pads can be purchased. See “Supplies and
consumables” later in this chapter for ordering information.
NOTE: Use the roller cleaning pads immediately af ter opening the bag.
If the bag remains open for a long period of time, the alcohol
cleaning solution will evaporate and the cleaning pad will not be
effective.
Cleaning the outside of the
scanner
Cleaning inside the
scanner
Clean the outside of the scanner at least once a month.
1. Turn the scanner off.
2. Clean the exit tray, the feeder and feeder tray, ADF cover and other
surfaces with a soft cloth.
3. Clean the feeder tray and exit tray of the ADF at least once a month
or more often if there is an accumulation of dirt, dust and grime.
4. Use a brush to remove dirt and dust from the exhaust fan vent and
the two vents on the left and right side on the back of the scanner.
If paper jamming, marking, or multiple-sheet feeding occurs frequently,
clean the rollers, sensors and double feed detector as described in this
section. To maintain scanning quality, clean the scanner components
frequently: Clean inside the scanner at least once per week or after
20,000 sheets have been scanned, whichever comes first.
NOTE: To determine the number of sheets scanned, use the
Trūper User Utility. See the Chapter 5, Trūper User Utility for
more information.
The following guidelines are for cleaning inside the scanner:
Cleaning the rollers in the
ADF area
6-2 A-61660 July 2013
• Be sure the documents you are scanning are as clean as possib le to
minimize frequent scanner dirt and dust buildup.
• When cleaning the rollers, hold the roller to prevent it from rotating,
then horizontally wipe the roller from side to side. Turn the roller as
you continue to wipe until the entire roller has been cleaned.
• If black or white lines appear on the scanned images, clean the
imaging guides and the background bars as described in the section
entitled, “Cleaning the background bars and imaging guides” later in
this chapter.
• If paper jamming, marking, or multi-sheet feeding occurs frequently
even after cleaning, you may need to change the rollers as described
in the section entitled, “Replacing consumables” later in this chapter.
Cleaning the paper feeder roller and separation roller
1. Turn the scanner off.
Page 51

2. Push the ADF door release button to open the ADF.
ADF door
release
Feeder
roller
3. Use the roller cleaning pad to remove any dirt or grime from the
surfaces of the paper feed roller and separation roller.
4. Open the separation roller cover by pulling up from the indent on the
right side.
A-61660 July 2013 6-3
Page 52

5. Use the roller cleaning pad to remove the dirt from the surface of the
Drive
rollers
Free
rollers
separation roller.
6. Close the separation roller cover.
Cleaning the drive rollers and free rollers in the ADF
7. Use the roller cleaning pad to remove the dirt from the surfaces of
the four drive rollers.
8. Use the roller cleaning pad to remove the dirt from the surfaces of
the four free rollers.
9. Close the ADF door.
6-4 A-61660 July 2013
Page 53

Cleaning the rollers in the
Drive
rollers
Exit
rollers
Exit area
Cleaning the drive rollers, free rollers and exit rollers in the exit
door
1. Pull the exit door release lever to open the exit door.
2. Use the roller cleaning pad to remove the dirt from the surfaces of
the four drive rollers and the two exit rollers.
3. Use the roller cleaning pad to remove the dirt from the surfaces of
the six free rollers.
4. Gently close the exit door.
5. When finished, turn the scanner on.
6. After cleaning the rollers, open the User Utility and click Clear
Counter to clear the roller counter. For more information, see the
section entitled, “Scanner counter” in Chapter 5, Trūper User Utility.
A-61660 July 2013 6-5
Page 54

Cleaning the background
Upper and
lower
imaging
Upper and
lower
background
bars
guides
Blower
Sensor or detector
bars and imaging guides
1. Turn the scanner off.
2. Pull the exit door release lever to open the exit door.
3. In the scanner base assembly, clean the upper and lower imaging
guides and background bars with a Staticide wipe.
4. Gently close the exit door.
Cleaning the sensors Use the blower accessory to clean all sensors.
6-6 A-61660 July 2013
Cleaning the paper sensor, waiting sensors and double feed
detector
1. Press the ADF door release button to open the ADF door.
Page 55

2. Use the blower accessory to blow off any dirt from the surface of the
Waiting sensor
Reflector sheet for
waiting sensor
Paper sensor
Double feed detector
Double feed detector
paper sensor and waiting sensor. Also, blow off any dirt from the
surface of the metal reflector sheet used by the waiting sensor.
3. Blow off any dirt from the double feed detectors.
A-61660 July 2013 6-7
4. Gently close the ADF door.
Page 56

Cleaning the starting, skew and ending sensors
Ending sensor
Skew sensor
Starting sensor
Skew sensor
Reflector sheet for
skew sensor (left)
Reflector sheet for
starting sensor
Reflector sheet
for skew sensor
(right)
Ending sensor
1. Pull the exit door release lever to open the exit door.
2. Blow off any dirt from the surface of the starting sensor , right and left
skew sensors and ending sensor.
3. Blow off any dirt from the reflector sheets for the starting sensor,
skew sensor (left), skew sensor (right) and the ending sensor.
6-8 A-61660 July 2013
4. Gently close the exit door.
Page 57

Cleaning the flatbed
Document cover
Feeder tray
Document cover
detector
Flatbed glass
1. Raise the feeder tray until the tray clicks into place.
(3210 Scanner)
2. Open the document cover.
3. Clean the surface of the flatbed glass with a Staticide wipe. If
required, clean the surface of the flatbed sheet.
4. Use the blower accessory to blow off any dirt that may have
accumulated in the area of the document cover detector.
5. Gently close the flatbed cover and lower the feeder tray.
A-61660 July 2013 6-9
Page 58

Replacing
Consumables
Replace the feed roller module and the separation roller module after
300,000 scans. Replace the roller modules more often if feeding
problems continue after cleaning (i.e., paper jamming, slipping, multifeeding, marking, etc.)
Replacing the paper feed roller module
1. Turn the scanner off.
2. Push the ADF door release button to open the ADF door.
3. Open the Roller Exchange Kit. See “Supplies and consumables”
later in this chapter for more information regarding additional Roller
Exchange Kits.
4. Remove the paper feed roller module from the ADF door.
• Place your fingers on the tabs on the sides of the roller module
and pull down the roller module.
• Disengage the shaf t on the roller module from the brackets in the
ADF door assembly. Carefully disengage the gears on the roller
module from the gears in the ADF door assembly.
5. Install the new paper feed roller module by inserting the shaft on the
roller module into the brackets in the ADF door assembly.
6-10 A-61660 July 2013
Page 59

Take care to match the gears on the roller module with the gears in
the ADF door assembly.
6. Push up the roller module until it is locked in place.
A-61660 July 2013 6-11
Page 60

Replacing the separation roller module
Separation roller
Separation roller
cover
Indent
7. Grasp the indent section of the separation roller cover and remove
the cover to expose the separation roller.
8. Remove the separation roller from the metal brackets by holding the
ends of the roller shaft and pulling the roller up and out of the
scanner.
6-12 A-61660 July 2013
9. Open the Roller Exchange Kit and take out the new separation
roller.
Page 61

10.Install the new separation roller by lowering the roller into the metal
Groove
brackets. Take care to match the groove on one side of the roller
shaft with the metal bracket that fit s the groove . When the groove is
matched with the bracket, the roller shaft slides into the bracket.
11. Close the separation roller cover.
12.After replacing the paper feed and separation roller modules, click
the icon to open the Trūper User Utility. Select the User Utility
option and click Clear Counter to clear the roller counter. For more
information, see the section entitled, “Scanner counter” in Chapter
5, Trūper User Utility.
Supplies and
consumables
13.Gently close the ADF door and turn on the scanner.
Contact your scanner supplier to order supplies or go to:
www.scannerstore.kodak.com.
Description CAT No.
Staticide Wipes for Kodak Scanners (qty 144) 896 5519
Kodak Digital Science Roller Cleaning Pads (qty 24) 853 5981
Roller Exchange Kit 846 0321
Shading Paper 153 5376
NCR Residue Cleaning Pad 103 3893
Blower Brush 179 7158
Printer: Black Cartridge 818 3386
Printer: Red Cartridge 159 6832
Accessories CAT No.
Memory Upgrade Kit 124 4847
Imprinter Accessory 896 1955
Long Document Paper Weight Ki
t
109 2436
A-61660 July 2013 6-13
NOTE: Items and catalog numbers are subject to change. For the most
up to date list of supplies and consumables go to:
www.kodak.com/go/scannersupplies.
Page 62

7 Troubleshooting
Contents Clearing a document jam................................................................7-1
Removing documents from the ADF area ..................................7-1
Removing documents from the exit area....................................7-2
Problem solving ..............................................................................7-2
User Utility error codes ...................................................................7-4
Scanner LED status........................................................................7-5
Contacting Service..........................................................................7-5
Clearing a document
jam
Removing documents from
the ADF area
Following are procedures for clearing an occasional document jam.
To minimize document jams, review the “Getting your documents ready
to scan” in Chapter 3 for best feeder performance.
IMPORTANT:Only remove jammed documents from the ADF when the
ADF door is open. Removing documents when the door
is closed may damage the document.
1. Press the ADF door release button to open the ADF door.
2. Remove any jammed document(s) from the document feeder.
A-61660 July 2013 7-1
NOTE: When only the bottom end of a jammed document is visible
with the ADF door open, keep the ADF door open and also
open the exit door. Carefully remove the jammed paper
through either the document feeder or the exit path. To
remove paper from the exit path, see the next section,
“Removing documents from the exit area”.
3. Gently close the ADF door and resume scanning.
Page 63

Removing documents from
Exit door
release lever
the exit area
1. Raise the feeder tray and pull the exit door release lever to open the
exit door.
2. Remove the jammed document.
3. Close the exit door and lower the feeder tray back into position.
Problem solving Occasionally you may encounter a situation with your scanner where it
may not function properly. Use the chart below as a guide to check
possible solutions to help you resolve the situation before calling
Technical Support.
If a problem persists after you have checked the User Utility status
messages and error codes as described in the “User Utility error codes”
section later in this chapter, review the proble ms and possible solutions
below. I f the scanner still is not working, turn the scanner off, un plug the
power cord and call Technical Support.
Problem Possible Solution
The LED does not light when the power
button is turned on.
The computer does not recognize the
scanner.
Scanning speed is too slow using the
USB connection.
The ADF door does not open when the
ADF door release button is pressed.
• Be sure that the power cord is securely pl ug ge d into th e po we r ou tle t
and into the scanner power input.
• There could be a problem with the power supply. Disconnect the
scanner from the power outlet and call Service.
• Be sure the scanner is properly connected to the computer. See
“Making connections” in Chapter 2.
• The scanner has not been properly configured using the Windows
“Found new hardware” procedure. Uninsta ll the scanner from the
computer and reinstall the scanner in order to recognize the sca nner
hardware. See “Installing the Windows scanner driver” in Chapter 2.
• Check the computer to determine that the USB interface is installed
properly. Check the USB properties using the Windows Device
Manager.
• Verify that the scanner is not connected to a USB hub.
• Be sure the USB cable does not have a High Speed log. Only use the
cable that was provided with the scanner.
• Verify that the scanner is connected with a USB 2.0 interface.
The ADF door is not closed properly. Push the ADF door release button
and lift up the ADF door, then close the ADF door securely until it is
locked. DO NOT slam the ADF door.
7-2 A-61660 July 2013
Page 64

Problem Possible Solution
(ADF) The document has been loaded
on the feeder tray , but the scann er does
not start scanning.
• The document is not loaded properly. See the section entitled,
“Scanning documents” in Chapter 3.
• The sensor cannot detect the document because the edge of the
document is curled. Flatten the document and load it again. See the
section entitled, “Getting your documents ready to scan” in Chapter 3.
(ADF) Double feeding or skewing
problems occur frequently or the
scanner stops feeding while scanning.
• The rollers may be dirty or have reached their life expectancy. Clean
the rollers and examine them for wear . See Chapter 6, Maintenance for
cleaning and replacement procedures.
• The document is curled for folded. Flatten the document, reduce the
number of sheets in the feeder tray and load the document again.
(ADF) Scanned image is skewed.
• Be sure the document guides are adjusted to the size of the documents
being scanned.
• Verify that the document to be scanned is straight in the feeder tray.
• The right and left sides of the document to be scanned are not the
same height because of curls and folds. Remove the curls or folds,
reduce the number of sheets in the feeder tray and load the document
again.
For 3210 Scanner only:
• An irregular type of document needs to be scanned. Use the flatbed to
scan the document.
• The document length is less than 2.75 in (70 mm). Use the flatbed to
scan the document.
(ADF) The scanned document is blank. Verify that the document to be scanned is positioned correctly in the
feeder tray. Documents should be placed in the feeder tray face-up.
Vertical lines appear on the scanned
document.
Clean the imaging guides (or flatbed glass) and background bars. See
Chapter 6, Maintenance for cleaning procedures.
The scanning density is uneven. • Clean the imaging guides (or flatbed glass) and background bars. See
Chapter 6, Maintenance for cleaning procedures.
• Perform a shading adjustment. See Chapter 5, User Utility (User
Shading) for more information.
The color of the scanned document is
Adjust the computer display and monitor settings.
very different from the original
document.
Dark spots or noise appear on the
scanned documents.
Scanned image has moire fringes or
patterns, such as stripes or wavy
pattern noise.
Clean the imaging guides (or flatbed glass) and background bars. See
Chapter 6, Maintenance for cleaning procedures.
This is caused by the original printing pattern on the document and the
selected scanning resolution. Change the scanning resolution, then scan
the document(s) again.
Image crop failures with VRS scanning. Paper or dust may be on the background bars. Examine and clean the
background bars. See Chapter 6, Maintenance for cleaning procedures.
A-61660 July 2013 7-3
Page 65

User Utility error
codes
Error code and message Possible Cause/Solution
U11, U12, U13, U14, U15,
U16, U17
Jam occurred. Please open the
door and remove the paper.
U18
Document remains in the
scanner. Please open the door
and remove the paper.
U20
Skew error occurred.
U23
Double feed occurred. Please
open the door and remove the
paper.
U30, U32, U34
Scanner door is open. Please
close the door.
Fxx
System error occurred. Please
contact Technical Support.
***Warning***
The rollers need to be cleaned.
Please clean the rollers.
Please select the Clear Counter
button after cleaning the rollers.
***Warning***
The rollers need to be replaced.
Please replace the rollers.
Please select Clear Counter
button after replacing the rollers
*** Warning ***
Insufficient front light error
occurred.
The lamp and/or scanning
sensor need to be replaced.
*** Warning ***
Insufficient back light error
occurred.
The lamp and/or scanning
sensor need to be replaced
If an issue occurs during scanning, click the icon to open the Trūper User
Utility. Check the Scanner Status message and Error Code information. The
following table explains the error codes and messag es and describes possib le
causes/solutions.
A document is jammed or the document sensors are dirty.
• Open the ADF and exit doors and remove the jammed paper. See “Clearing a
document jam” earlier in this chapter.
• Clean the sensors. See Chapter 6, Maintenance for cleaning procedures.
A document is jammed or the document sensors are dirty.
• Open the ADF and exit doors and remove the jammed paper. See “Clearing a
document jam” earlier in this chapter.
• Clean the sensors. See Chapter 6, Maintenance for cleaning procedures.
• Open the ADF and exit doors and remove the jammed paper. See “Clearing a
document jam” earlier in this chapter.
A double feed has occurred or the rollers are dirty.
• Open the ADF and exit doors and remove the jammed paper. See “Clearing a
document jam” earlier in this chapter.
• Clean the rollers. See Chapter 6, Maintenance for cleaning procedures.
• Securely close the ADF door.
• Contact Technical Support.
Warning counter has expired
The rollers need to be cleaned.
• Clean the rollers. See Chapter 6, Maintenance for cleaning procedures. After
cleaning the rollers, return to the User Utility and click the Clear Counter
button. See the section entitled, “The User Utility dialog box“ (Scanner Counter)
in Chapter 5.
Warning counter has expired
The rollers need to be replaced.
• Replace the rollers. See Chapter 6, Maintenance for replacement procedures.
After replacing the rollers, return to the User Utility and click the Clear Counter
button. See the section entitled, “The User Utility dialog box“ (Scanner Counter)
in Chapter 5.
It is time to replace the lamp and scanning sensor (fro nt ).
• Contact Technical Support.
It is time to replace the lamp and scanning sensor (ba ck) .
• Contact Technical Support.
7-4 A-61660 July 2013
Page 66

Error code and message Possible Cause/Remedy
*** Warning ***
The front reference plate may
need to be cleaned.
Please clean the front
reference plate
*** Warning ***
The back reference plate may
need to be cleaned.
Please clean the back
reference plate.
Scanner is not connected. • If the scanner is not connected, connect the scanner to the computer, turn on
The upper background bar is dirty.
• Clean the upper backgroun d ba r. See Chapter 6, Maintenance for cleaning
procedures.
The lower background bar is dirty.
Clean the lower background bar. See Chapter 6, Maintenance for cleaning
procedures.
the scanner and restart the computer.
• If the scanner is not turned on, turn the scanner on and then restart the
computer.
• If the computer was turned on before the scanner was ready, restart the
computer.
Scanner LED status The color of the LED indicates the scanner status.
LED Status
Steady green Ready to scan or scanning is in process.
Flashing green Sleep mode.
Flashing green/orange Multifeed Ignore function is set.
Steady orange The rollers need to be cleaned or replaced.
Scanning can continue.
Flashing orange Initializing or Sleep mode with warning. Check
the status of the scanner using the User Utility.
Red An error occurred. Check the status of the
scanner using the User Utility.
Contacting Service 1. Visit www.Kodak.com/go/dicontacts to obtain the most current
A-61660 July 2013 7-5
phone number for your country.
2. When calling, please have the following information ready:
• A description of your problem.
• The scanner model and serial number.
• Computer configuration.
• Software application you are using.
Page 67

Appendix A Specifications
Contents Specifications..................................................................................A-1
System requirements......................................................................A-2
Space requirements........................................................................A-3
Feature Specification
Scanning mode Simplex and Duplex
Scanning method CIS. LED lamps.
Scanning speed
200 dpi, lettersize,
landscape
Resolution
(flatbed or ADF)
Output options Black and White, Grayscale (8-bit) and Color (24-bit)
Image enhancement Auto cropping, deskew, auto brightness, contrast control, auto color detect, auto
Document size Flatbed: 11.7 x 17 in. (297 x 432 mm)
Paper thickness 2.0 to 5.9 mils (0.05 to 0.15 mm)
Paper weight (ADF)
Feeder capacity
Black and white and color:
Simplex: 95 ppm (pages per minute)
Duplex; 190 ipm (images per minute)
NOTE: The scanning speeds indicated were developed in a test environment.
Actual speeds will vary depending on the computer memory, operating
system and the scanning or document management software application .
Black and white/Grayscale (with VRS): 100, 150, 200, 240, 300, 400, 600 dpi
Color (with VRS): 100, 150, 200, 240, 300, 400 dpi
Optical: 600 dpi
rotation, blank page deletion and bar code recognition and advanced clarity.
ADF: approximately 1.9 x 2.8 in. (48 x 70 mm) to 11.9 x 100 in. (302 x 2540 mm)
NOTE: For scanning paper longer than 14 inches (356 mm) legal size, a resolution of
less than 300 dpi and single-sheet feeding is recommended.
NOTE: 1 mil = 1/1000 in
.
10.6 to 34 lbs. (40 g/m2 to 127 g/m2)
200 sheets (17-lb./64 g/m
2
) paper
Scanner dimensions
(unpacked)
Scanner weight
(unpacked)
Interface USB 2.0 enhanced (cable included)
Power requirements AC 100-120 V, 50/60 Hz, 1.2 A AC 220-240 V, 50-60 Hz, 0.6A
Power consumption
Maximum (scanning)
Minimum (standby) < 27 W < 27 W
Sleep mode <1.4 W < 1.4 W
30 x 20 x 11.4 in (76 x 51 x 29 cm)
When the document cover is open, height is 22 in. (56 cm)
64 lbs (29 kg)
A-61660 June 2013 A-1
< 90 W < 80 W
Page 68

Feature Specification
Environment
Operating Temperature
and Humidity
59° to 95°F (15°C to 35°C), 20 to 80% RH non-condensing
Storage Temperature
and Humidity
Daily Duty Cycle 15,000 pages
Additional features
Additional contents
Bundled software
Imprinter options
Number of characters
32° to 104°F (0°C to 40°C), 30 to 80% RH
End User Replaceable Feeder Rollers, Electronic Color Dropout (Red, Green, Blue),
Switchable Background, Ultrasonic Multifeed, Scan Time Bar Code Recognition
Power Cord, USB Cable 2.0, Roller Cleaning Kit, CD-ROM (USer’s Guide, VRS
Professional, User Utility Software),
Printed Documents (Quick Installation Checklist)
Kofax VCDemo, Kofax Scan Demo Software
Pre-scan, front page
VCDemo, 62 characters, ISIS characters
NOTE: The number of characters will vary according to the scanning application.
System requirements Following is the minimum recommended system configuration to run
Kodak Trūper 3210 and 3610 Scanners:
Minimum Requirements
• Pentium 4, 1.4 GHz processor
• 256 MB RAM
• Hard drive with 300 MB free disk space for installation
• Monitor resolution: 800 x 600
• CD ROM drive
• Microsoft Internet Explorer 5.01 (or later)
Recommended Requirements
• Intel Core 2 Duo/AMD Athlon 64 X2
• Memory: 2 GB
• Hard Disk: 250 GB (7200 rpm)
• Monitor resolution: 1024 x 768
• CD ROM drive
• Microsoft Internet Explorer 6 (or later)
Operating system
• Microsoft Windows 7
• Microsoft Windows 2000
• Microsoft Windows XP Professional (32-bit)
• Microsoft Windows Vista
A-2 A-61660 June 2013
Page 69

Display: Resolution 1024 x 768 or more; 65,536 colors or more
Interface: USB 2.0 (enhanced)
NOTES:
• Do not connect the scanner to a USB hub.
• There must be 1 GB or more of free space on the hard drive.
• Depending on the computer system and the scanning application or
document management software used, you may not be able to scan
a large color image in high resolution.
Space requirements Following are the minimum space requirements that are recommended
to open and maintain the scanner. The recommended clearance of the
top and sides of the scanner will ensure that there is proper ventilation
and provide the necessary area for scanner maintenance.
• Top clearance necessary to open the document cover:
27.6 in. (700 mm)
• Sides: 7.9 in. (200 mm)
• Front clearance necessary to pull the exit stopped forward:
11.8i in. (300 mm)
• Rear clearance necessary to remove or install the computer interface
board: 13.8 in. (350 mm)
A-61660 June 2013 A-3
Page 70

Appendix B Installing and Using the Imprinter
Connectors
Ink cartridge adjusting lever
Scale
Carriage
Contents Imprinter components.....................................................................B-1
Installing the imprinter.....................................................................B-1
Ink cartridge installation and print position......................................B-3
Installing the ink cartridge............................................................B-3
Adjusting the print position ..........................................................B-4
Print position chart.......................................................................B-5
Cleaning the ink cartridge...............................................................B-6
Cleaning the print head automatically .........................................B-6
Cleaning the print head manually................................................B-6
Removing the ink cartridge.............................................................B-6
Ink cartridge specifications..............................................................B-7
Setting up the print string................................................................B-7
This appendix provides procedures for installing and using the optional
pre-scan imprinter and how to install and replace ink cartridges. For
information on ordering supplies and accessories, see the section
entitled, “Supplies and consumables” in Chapter 6, Maintenance.
Imprinter
components
Installing the
imprinter
Following are the components of the imprinter.
1. Turn the scanner off.
2. Open the imprinter door.
A-61660 July 2013 B-1
Page 71

3. Connect the imprinter cable to the connector on the scanner.
NOTE: Before you insert the connector, be sure to match the rib on
the imprinter cable connector with the slot on the scanner
connector.
4. Insert the upper pins on the imprinter unit into the guides located on
the bracket. Match the channels in the pins with the guides.
5. Insert the lower pins into the guides located on the bracket. Match
the channels in the pins with the guides. Gently insert the pins until
they are locked in place by the springs.
6. Gently close the imprinter door.
B-2 A-61660 July 2013
Page 72

Ink cartridge
Review the precautions below before installing the ink cartridge:
installation and
printing position
Installing the ink cartridge 1. Remove the protective tape from the ink cartridge.
• Do not touch the print head with your hands or with a dirty object.
• If the date marked on the ink cartridge box has expired, or if the ink
cartridge is used six months after unpacking the unit, the print quality
may be affected.
• Be sure that the storage temperature is between 32°F and 104°F
(0°C and 40°C).
• Store the ink cartridge away from direct sunlight.
• Do not clean the ink cartridge with alcohol.
• Do not let the ink come in contact with your skin.
• If the ink comes into contact with eyes, rinse the area completely with
fresh water. If irritation or pain remains after rinsing, consult a doctor
immediately.
• Do not dispose of the ink cartridge in fire.
2. Move the carriage on the imprinter unit to the Ink Cartridge
Exchange Position.
A-61660 July 2013 B-3
Page 73

3. Insert the ink cartridge into the carriage and lock the cartridge
adjusting lever.
Adjusting the printing
position
To add an imprint to the page that will appear on the scanned image,
adjust the position of the carriage according to the size of the
documents you want to scan. Move the carriage to align the tab on
carriage with one of the marks that appears on the scale.
• For the imprint to appear on the right side of the page, move the
carriage to the right side of the scale.
• For the imprint to appear on the left side of the page, move the
carriage to the left side of the scale.
NOTE: The tab on the printer carriage must be aligned with one of
the marks on the scale. If the carriage is not properly aligned,
the imprinter will not print.
B-4 A-61660 July 2013
Page 74

Printing position chart This chart shows the position of the imprint according to the document
size selected when adjusting the printer position.
To set other printing parameters, see the instructions for your scanning
application or document management software.
NOTE: With certain types of paper, the ink from the imprinter may stain
the inside of the scanner. For example, ink may stain the
scanner rollers. If this occurs, clean the areas by using the roller
cleaning paper.
A-61660 July 2013 B-5
Page 75

Cleaning the ink
Print Head
cartridge
If the head of the ink cartridge is dirty or if the ink cartridge has not been
used for a long period of time, it may not print properly.
Cleaning the print head
automatically
Cleaning the print head
manually
Removing the ink
cartridge
1. Click the User Utility icon to open the User Utility.
2. Click Clean Imprinter. This option only improves the print quality.
This option is only available if the imprinter is installed.
1. Remove the ink cartridge as described in the next section.
2. Use a moistened tissue paper to gently wipe and clean the print
head.
CAUTION: Do not use any material that contains alcohol or the
roller cleaning paper to clean the print head.
1. Move the carriage on the imprinter unit to the Ink Cartridge
Exchange Position.
B-6 A-61660 July 2013
2. Pinch the cartridge adjusting lever and lift the cartridge out of
position.
Ink cartridge disposal: Consult the Hewlett-Packard website for
recycling printing supplies or disposing of the ink cartridges
according to local regulations.
Page 76

Ink cartridge
specifications
The optional pre-scan imprinter unit and replacement ink cartridges are
available from resellers, web merchants and from the Kodak on-line
store (http:/scannerstore.kodak.com). See the section entitled,
“Supplies and consumables” in Chapter 6, Maintenance.
Ink cartridge life Approximately 4,000,000 characters (standard font)
Approximately 2,000,000 characters (bold font)
Number of characters VCDemo 62 characters. The numbers of characters
will vary according to the application.
Nozzles 12
Unusable documents Plastic film or coated paper should not be used with
the imprinter
Storage environment Temperature: 32°F to 104°F (0°C to 40°C)
Humidity: 10% to 80% RH
Operating environment Temperature: 59°F to 86°F (15°C to 30°C)
Humidity: 30% to 80% RH
Setting up the print
string
The pre-scan imprinter prints on the front sides of documents before
they are scanned.The printed results are reflected on the scanned
images.
1. To set the imprinter settings, click Imprinter.
A-61660 July 2013 B-7
Page 77

The Imprinter Settings dialog box will be displayed.
2. Click Enable.
3. If you want bold type, click Bold Font.
4. In the Imprinter String field, type in the character string to be printed.
NOTE: The symbols and alphanumeric characters in the following
table can be printed. In addition, other information such as
the date and time can be specified. Up to 72 characters can
be printed.
5. Type in the printing offset in the Printing Offset field. A 10 mm offset
is always added to this value.
Unit: 2.38 mm per increment (printing orientation: 90, 270°)
1: 12.38 mm
2: 14.76 mm
Unit: 3.44 mm per increment (printing orientation: 00, 180°)
1: 13.44 mm
2: 16.88 mm
6. In the Start Number field, type in the default value of the counter
specified by the imprinter string.
7. In the Step Number field, type in the step number of the counter
specified by the imprinter string.
8. Select the printing orientation from the Orientation drop-down list.
9. If desired, check the Starting Number Automatic Increment
checkbox to automatically increment the number at the start of
scanning plus the number of pages scanned x the step number,
upon completion of scanning.
10.Click OK when finished.
B-8 A-61660 July 2013
Page 78

Appendix C Adding Memory
Retaining screw
Retaining screw
Handle
The scanner includes 64 MB of base memory. Some scanning work
may require additional memory depending on variables such as the
size of the documents to be scanned and the de sired image resolut ion.
For example, two-sided scanning of larger document sizes such as A3,
or color scanning at a resolution of 600 dpi may require additional
memory.
If you need additional memory, you will need to purchase the Memory
Upgrade Kit. See the section entitled, “Supplies and consumables” in
Chapter 6, Maintenance for more information.
NOTE: Only people who are familiar with installing memory modules,
i.e., memory on a PC, should install this upgrade kit. If you are
uncomfortable installing memory modules, contact your service
provider or system administrator.
CAUTION: This kit contains parts and assemblies susceptible to
damage by electrostatic discharge (ESD).
Installing the DIMM
module
1. Turn the scanner off.
2. Disconnect the power cord from the electrical outlet and disconnect
the computer interface cable.
3. Remove the two retaining screws from the interface board and put
them aside.
4. Pull the handle to remove the interface board.
CAUTION: Do not place your hand inside the unit.
A-61660 July 2013 C-1
Page 79

5. Insert the DIMM module into the module connector on the interface
board at an angle.
6. Push the module in until it clicks into place and the white tabs on the
module connector close around the DIMM module.
7. Be sure the indent on the DIMM module is to the left side when you
insert the DIMM module. If the indent is not in this position, the
DIMM module will not be inserted properly.
NOTE: If you need to remove the DIMM module, pull the white tabs
at both sides of the module connector to release the DIMM
module, then carefully pull it out.
8. Slide the interface board back into the unit by guiding the board into
place along the rails located inside the scanner.
9. Push the board in firmly until it locks into place.
C-2 A-61660 July 2013
10.Confirm that the interface board is fully inserted and firmly locked in
place, then secure the interface board with the two retaining screws.
Page 80

Appendix D Glossary
Automatic Document Feed (ADF) mode — the scanner mode in
which the documents are automatically fed, rather than manually fed,
into the document feeder.
Crop (auto crop) — this software option automatically crops every
page to its original size by looking for page or document borders.
Deskew — the process of electronically straightening an image after it
has been scanned. This can be done through software or through
firmware on the scanner.
Double Feed — occurs when more than one document is fed through
the feeder at one time.
Duplex scanner — a scanner capable of scanning both sides of a
document in a single pass through the scanner.
Error message — a message displayed in the User Utility dialog box,
or an indicator light on the LED status indicator. Error messages or
indicators appear whenever the scanner determines that a problem
exists.
Flatbed sheet — adjustable component used in conjunction with the
reference plates to change the background color of the scanned
documents.
Imprinter — optional accessory that allows for front page pre-scan
imprinting of a string of alphanumeric characters on document s that are
fed into the scanner transport.
Manual mode — the scanner mode in which documents are manually
fed by the operator, rather than automatically fed into the feeder.
Multi color dropout — allows you to dropout up to 6 colors from a
color document when scanning in black and white mode.
Paper path — the curved path taken by a document as it passes
through the scanner.
Paper transport — the mechanical system for moving a document
through the scanner.
Resolution — a measurement of the ability of a scanner to reproduce
small objects. The higher the resolution, the smaller the object the
scanner can reproduce. Resolution is measured in dots per inch (dpi).
RGB — three components of color: Red, Green, Blue.
Simplex scanner — a scanner designed to scan one side of a
document as it passes through the scanner.
A-61660 July 2013 D-1
Single color dropout — allows you to dropout one color (red, green or
blue) from a color document when scanning in black and white mode.
Page 81

Skew — the result of feeding a document at an angle. It appears
crooked or misaligned on the display and also looks this way when
printed. To minimize skew, guide the document against the left
document feed guide.
Transport system. See Paper transport.
USB (Universal Serial Bus) — a data transmission system that
operates between the scanner and the host computer system.
VRS (VirtualReScan) — VRS is an electronic check-point for scanned
images. As images pass through the scanner, VRS performs a multipoint inspection of each document. VRS automatically checks and
adjusts for alignment (skew), brightness, contrast and image clarity.
D-2 A-61660 July 2013
Page 82

Appendix E Repacking the Scanner
Remove feeder
tray
Exit stopper
If you need to transport or ship the scanner, follow these repacking
instructions.
• Use the original scanner carton and packing materials. You will also
need shipping tape and scissors.
• Improper repacking of the scanner may cause damage during
handling and shipment.
• The scanner should always be handled in the horizontal position.
1. Turn the scanner off. Disconnect the scanner from the electrical
outlet and disconnect the interface cable.
2. Remove the feeder tray and fold down the exit stopper. Wrap the
tray with protective sheets of plastic. Seal the plastic with tape.
3. Pack the scanner in the original carton and packing materials.
A-61660 July 2013 E-1
Page 83

Appendix F Warranty - US and Canada only
Congratulations on the purchase of a Kodak Scanner. Kodak Scanners are designed to provide end users with the highest
performance and reliability. All Kodak Scanners are covered by the following Limited Warranty.
Limited Warranty for Kodak Scanners
Eastman Kodak Company provides the following Limited Warranty on Kodak Scanners (excluding spare parts and
consumables) distributed by Kodak or through Kodak’s authorized distribution channels:
Kodak warrants that a Kodak Scanner, from the time of sale through the Limited Warranty period applicable to the Product, will
be free of defects in materials or workmanship and will conform to the performance specifications applicable for the particular
Kodak Scanner.
All Kodak Scanners are subject to the Warranty Exclusions described below. A Kodak Scanner found to be defective or which
does not conform to the product specifications will be repaired or replaced with new or refurbished product at Kodak’s option.
Purchasers may determine the applicable Limited Warranty period for the Kodak Scanners purchased by calling (800) 8221414, or by visiting www.Kodak.com/go/disupport or by reviewing the Limited Warranty Summary Card enclosed with the Kodak
Scanner.
Proof of purchase is required to demonstrate eligibility for warranty service.
Warranty exclusions
Kodak’s Limited Warranty does not apply to a Kodak Scanner that has been subjected to physical damage after purchase,
caused, for example, by casualty, accident, acts of God or transportation, including (a) by a failure to properly package and ship
the Scanner back to Kodak for warranty service in accordance with Kodak’s then current Packaging and Shipping Guidelines,
including failure to replace the shipping restraint prior to shipping, or by a failure to remove the shipping restraint prior to use; (b)
resulting from the user’s installation, system integration, programming, re-installation of user operating systems or applications
software, systems engineering, relocation, reconstruction of data, or removal of the product or any component (including
breakage of a connector, cover , glass, pins, or seal); (c) from service, modification or repair not performed by Kodak or a service
provider authorized by Kodak or by tampering, use of counterfeit or other non-Kodak components, assemblies, accessories, or
modules; (d) by misuse, unreasonable handling or maintenance, mistreatment, operator error, failure to provide proper
supervision or maintenance, including use of cleaning products or other accessories not approved by Kodak or use in
contravention of recommended procedures or specifications; (e) by environmental conditions (such as excessive heat or other
unsuitable physical operating environment), corrosion, staining, electrical work external to the product or failure to provide
electro-static discharge (ESD) protection; (f) by failure to install firmware updates or releases available for the product and (g) by
such other supplemental exclusions published from time to time online at www.Kodak.com/go/disupport or by calling (800) 822-
1414.
Kodak provides no Limited Warranty for products purchased from countries other than the United States. Purchasers of
products from foreign distribution channels must seek warranty coverage, if any, through the original source of purchase.
Kodak provides no Limited Warranty for products that are purchased as part of a third party manufacturer’s product, computer
system or other electronic device.
Any warranty for these products is provided by the OEM (Original Equipment Manufacturer) as part of that manufacturer’s
product or system.
The replacement product assumes the remainder of the Limited Warranty period applicable to the defective product or thirty
(30) days, whichever is longer.
Installation Warning and Disclaimer
KODAK WILL NOT BE RESPONSIBLE FOR ANY CONSEQUENTIAL OR INCIDENTAL DAMAGES RESULTING FROM THE
SALE, INSTALLATION, USE, SERVICING OR IMPROPER FUNCTIONING OF THIS PRODUCT, REGARDLESS OF THE
CAUSE. SUCH DAMAGES FOR WHICH KODAK WILL NOT BE RESPONSIBLE, INCLUDE, BUT ARE NOT LIMITED TO,
LOSS OF REVENUE OR PROFIT, LOSS OF DATA, DOWNTIME COSTS, LOSS OF USE OF THE PRODUCT, COST OF ANY
SUBSTITUTE PRODUCT, FACILITIES OR SERVICES OR CLAIMS OF CUSTOMERS FOR SUCH DAMAGES.
If there is any conflict between other sections of this appendix and the Limited Warranty, the terms of the Limited Warranty
prevail.
A-61660 July 2013 F-1
Page 84

How to obtain Limited Warranty service
Kodak Scanners are supplied with information on unpacking, setup, installation and operation. Careful reading of the User’s
Guide will answer most of the technical questions the end user might have regarding proper installation, operation and
maintenance of the product. However, should additional technical support be required, you may visit our website at:
www.Kodak.com/go/disupport or contact:
Kodak’s Response Center: (800) 822-1414
The Response Center is available Monday – Friday (excluding Kodak holidays) 8 a.m. to 5 p.m. EST.
Before placing the call, the eligible purchaser should have the Kodak Scanner model number, part number, serial number and
proof of purchase available. The eligible purchaser should also be prepared to provide a description of the problem.
Response Center personnel will assist the end user in resolving the problem over the phone. The end user may be asked to run
some simple, self-diagnostic tests and report the resulting status and error code messages. This will assist the Response
Center in determining if the problem is the Kodak Scanner or another component and if the problem can be resolved over the
phone. If the Response Center determines a hardware problem exists that is covered either under th e Limited Warranty or a
purchased Maintenance Agreement, a Return Material Authorization Number (RMA) will be assigned as needed, a service
request will be initiated and repair or replacement procedures will follow.
Packaging and shipping guidelines
Purchaser must ship all warranty returns in a method that guarantees full protection of the product from shipping damage.
Failure to do so will void the Kodak Scanner warranty. Kodak advises the purchaser to keep the original box and packing
materials for storing or shipping. Kodak is not responsible for issues related to shipping damage. The purchaser must return
only the Kodak Scanner. Prior to shipment, purchaser must remove and retain all “add-on” items, (i.e. adapters, cables,
software, manuals, etc.). Kodak accepts no responsibility for these items and they will not be returned with the repaired or
replacement Kodak Scanner. All products should be returned to Kodak in the original shipping container, or an authorized
packaging box for the units being returned. Purchaser must install the shipping restraint before the Kodak Scanner is shipped.
When the original packaging is not available, contact Kodak’s Response Center at (800) 822-1414 for part numbers and
replacement packaging ordering information.
Return procedure
Eligible purchasers seeking services for Kodak Scanners covered under this Limited Warranty must obtain a Return Material
Authorization number (“RMA”) by calling (800) 822-1414 and within ten (10) business days from the date of issuance of the
RMA must return the Kodak Scanner to the address designated in the RMA at the end user’s own expense and risk, in
compliance with Kodak’s current Packaging and Shipping Guidelines.
Any defective products or parts replaced by Kodak become the property of Kodak.
Customer responsibility
BY REQUESTING SERVICE, THE ELIGIBLE PURCHASER ACKNOWLEDGES THE TERMS OF THE LIMITED WARRANTY,
INCLUDING THE DISCLAIMER AND LIMITATION OF LIABILITY PROVISIONS. PRIOR TO SEEKING SERVICE, THE END
USER MUST BACK-UP ANY DATA OR FILES THAT MAY BECOME DAMAGED OR LOST. KODAK IS, WITHOUT
LIMIT ATION, NOT RESPONSIBLE FOR LOST OR DAMAGED DATA OR FILES.
Warranty Service descriptions
Eastman Kodak Company (Kodak) offers a range of service programs to support its Limited Warranty and to assist with the use
and care of the Kodak Scanner (“Service Methods”). A Kodak Scanner represents an important investment. Kodak Scanners
provide the productivity needed to stay competitive. The sudden loss of this productivity, even temporarily, could seriously affect
the ability to meet commitments. Downtime can be very expensive, not just in the cost of the repair but also in time lost. To help
alleviate these problems, Kodak may use one of the service methods listed below, depending upon product type, in providing
service under its Limited Warranty.
Included with selected Kodak Scanners is a Limited Warranty Registration card and a Limited Warranty Summary card. The
Limited Warranty Summary card is specific by model. The Limited Warranty Summary card contains important warranty
information, including the model number and the Limited Warranty. Refer to the Limited Warranty Summary card to determine
the available Service Methods applicable to the particular Kodak Scanner.
If the Limited Warranty Registration card or Limited Warranty Summary card cannot be located, additional information may be
obtained about the product, including updated warranty and service program information and restrictions, online at
www.Kodak.com/go/disupport or by phone at (800) 822-1414.
To avoid service delays, Kodak urges end users to complete and return the enclosed Limited Warranty Registration Card at the
first opportunity. If you cannot locate the Limited Warranty Registration card, you may register online at www.Kodak.com/go/
disupport or by phone at (800) 822-1414.
Kodak also provides a variety of service programs that may be purchased to assist with the use and care of the Kodak Scanner.
Kodak is committed to providing its customers with quality, performance, reliability and service under the Limited Warranty.
F-2 A-61660 July 2013
Page 85

On-site service
For the selected Kodak Scanner, and after the Response Center verifies a hardware problem, a service call will be opened and
logged. An Kodak Field Engineer will be dispatched to the product location to perform repair service if the product is located
within the contiguous forty-eight (48) United States, in certain areas of Alaska and Hawaii, and if there are no security, safe ty or
physical requirements that would restrict the Field Engineer’s access to the scanner. For additional information on service
areas, visit our website at: www.Kodak.com/go/docimaging. On-Site Service will be provided between the hours of 8 a.m. and 5
p.m. local time, Monday through Friday (excluding Kodak holidays).
AUR
AUR may be one of the easiest and most comprehensive service offerings in the industry. In the unlikely event of a product
defect, for eligible purchasers of certain Kodak Scanners, Kodak will replace that product within two business days.
The AUR provides advance replacement on specific failed or broken Kodak Scanner. To be eligible to take advantage of the
AUR, the eligible purchaser must obtain an RMA number, sign an Advance Replacement Agreement and provide a credit card
deposit to secure the replacement product. The RMA number should be kept in the event that the status of the replacement
product needs to be checked. The eligible purchaser will be asked for the address where the replacement product is to be
shipped. The eligible purchaser will also be faxed packing and shipping instructions for the malfunctioning product. The eligible
purchaser will then receive a replacement product within 2 business days after the service call initiation and Kodak’s receipt of
the signed agreement. The malfunctioning product must be received by Kodak within ten (10) days of the end user’s receipt of
the replacement product or the end user’s credit card will be charged the list price of the replacement product. Shipment of
replacement Imaging Product will be made at Kodak’s expense and choice of freight carrier. Shipments not made under
Kodak’s directions and choice of freight carrier may void the Limited Warranty.
Before the product is returned to Kodak, be sure to remove all options and accessories (which include power cord,
documentation, etc.) that are not covered by the Limited Warranty. The box and packaging in which the replacement product
was shipped must be used to return the malfunctioning product. If the malfunctioning product is not returned in the box and
packaging in which the replacement product was shipped the Limited Warranty may be voided. The Return Material
Authorization Number (“RMA”) must be clearly marked on the outside of the box to ensure proper receipt and credit of the
defective product.
Depot service
If the Kodak Scanner is not eligible for Advance Exchange or On-Site Service, an eligible purchaser may utilize our Depot
Repair Service. The eligible purchaser will be instructed to ship the product to the nearest authorized Depot Repair Center.
Product must be shipped at the eligible purchaser’s risk and expense to the repair center. Before the product is returned to the
repair center, be sure to remove all options and accessories (which include power cord, documentation, etc.) not covered by the
Limited Warranty . All products should be returned to Kodak in the original shipping container, or in a recommended packing box.
The Kodak Scanner must have the shipping restraint installed before it is shipped. When the original packaging is not available,
contact Kodak’s Response Center at (800) 822-1414, for ordering information. Eligible purchasers seeking services for Kodak
Scanners must obtain a Return Material Authorization number (“RMA”) by calling (800) 822-1414, and within ten (10) business
days from the date of issuance of the RMA must return the Kodak Scanner to the address designated in the RMA at the end
user’s own expense and risk. The Return Material Authorizati on Number (“RMA”) must be clearly marked on the outside of the
box to ensure proper receipt and credit of the defective product.
Upon receipt of the product, the repair center will repair product within ten (10) business days. The repaired product will be
shipped back two-day express mail at no expense to the eligible purchaser.
Important restrictions
Eligibility: The Advance Exchange Program and the Depot Service are available to eligible purchasers in the fifty (50) United
States, and On-Site Service is available in the contiguous forty-eight (48) states and in certain areas of Alaska and Hawaii for
products purchased from authorized distributors of Kodak. The Kodak Scanner will be ineligible for any service under warran ty
if the product falls under any of Kodak’s then-current Warranty Exclusions, including a purchaser’s failure to return defective
products to Kodak in compliance with Kodak’s then current Packaging and Shipping Guidelines. Persons are only considered
“eligible purchasers” or “end users” if they originally purchased the Kodak Scanner for their own personal or business use, and
not for resale.
Consumables: Consumables are items that wear out under normal use and must be replaced by the end user as needed.
Consumables, supplies, other expendable items and those items identified as being the user’s responsibility in the User’s Guide
are not covered under the Limited Warranty.
If any of the above excluded parts or services are required, they may be available through an authorized service provider at
their hourly rates and at terms then in effect.
Any defective products or parts replaced by Kodak become the property of Kodak.
A-61660 July 2013 F-3
Page 86

Contacting Kodak
For Information on Kodak Scanners:
Website: www.Kodak.com/go/docimaging
For U.S. Service, Repair and Technical Assistance by Telephone:
Telephone technical support is available Monday-Friday between the hours of 5 a.m. to 5 p.m. excluding Kodak holidays.
Phone: (800) 822-1414
For Technical Docu mentation and FAQ’s available 24 hours a day:
Website: www.Kodak.com/go/docimaging
For Service Program Information
Website: www.Kodak.com
Phone: (800) 822-1414
F-4 A-61660 July 2013
Page 87

 Loading...