

Page 1

KODAK PROFESSIONAL Easy Print Software
for
Large Format 3000 Series Inkjet Printers
USER’S GUIDE
Page 2

Page 3

Contents
About This Guide .................................................................................... iii
1 Introduction
2 Installing Easy Print Software
3 Using Easy Config
Package Contents .............................................................................................1-1
Easy Print Features ...........................................................................................1-2
3000 Series Printer Compatibility .........................................................1-2
Input Sources ........................................................................................1-2
Getting Help with Easy Print ..............................................................................1-3
Getting Help from Outside the United States ........................................1-3
Getting Information from the KODAK Home Page ...............................1-4
Minimum System Requirements ........................................................................2-1
WINDOWS Systems .............................................................................2-1
MACINTOSH Systems .........................................................................2-1
Installing the Software .......................................................................................2-1
Setting the Defaults on the Easy Print Defaults Tab .............................3-1
Setting the Defaults on the Directories Tab ..........................................3-4
Setting the Defaults on the Image Source Tab .....................................3-5
Setting the Defaults on the Printer Tab .................................................3-6
Updating Media Files .........................................................................................3-7
Adding New Media on the Media Tab ...................................................3-7
4 Using Easy Print
Printing an Image File ........................................................................................4-1
Printing an Image from the Hot Folder ...............................................................4-2
Adjusting Your Images Before Printing ..............................................................4-3
Adjusting the Output Size .....................................................................4-3
Setting the Print Quality ........................................................................4-3
Selecting the Image Source ..................................................................4-3
Selecting a Printer ................................................................................4-4
Selecting the Media ..............................................................................4-4
Selecting the Orientation of Your Image ...............................................4-4
Selecting the Photograph Check Box ...................................................4-5
Adjusting How Your Image Appears .....................................................4-5
Creating a Print Ready File (PRF) .....................................................................4-5
Printing a PRF File .............................................................................................4-6
Index............................................................................................... Index-1
May 2000 i
Page 4

Page 5

About This Guide
This guide provides information that key operators and users of KODAK
PROFESSIONAL Easy Print need to know to install and configure the
software.
This guide is organized as follows:
Introduction - describes what is included with Easy Print, Easy Print
features, and how to get help.
Installing Easy Print - lists the system requirements for installing Easy
Print, and explains how to install Easy Print and configure your printer to
work with Easy Print.
Using Easy Config - explains how to set user defaults for Easy Print, how
to configure your input and output devices, how to add new media and
update current media.
Using Easy Print - explains how to make prints with Easy Print.
May 2000 iii
Page 6

Page 7

1 Introduction
Welcome to KODAK PROFESSIONAL Easy Print (Easy Print). With Easy
Print you can easily print images on any of the KODAK PROFESSIONAL
Large Format 3000 Series Inkjet Printers (3000 Series Printers) using
KODAK PROFESSIONAL EI Inks and Media to achieve the best image
quality possible. With a few simple controls, select an image for printing,
adjust the size and quality of your finished print, and select the media for
the print job. Each media selection contains a complete set of printing
parameters. Easy Print then combines the selections you made with the
parameters that are included with the media to give you the best possible
print.
Package Contents
•CD
• User’s Guide
• Registration Card
May 2000 1-1
Page 8

Introduction
Easy Print Features
The software is easy to install on either your WINDOWS-based or
MACINTOSH computer. Easy Print includes a user-friendly interface that
can be configured for default settings and has the capability to update
current media or add new media parameters.
Easy Print is compatible with most popular image editing software
applications such as ADOBE PHOTOSHOP, ADOBE ILLUSTRATOR or
any application capable of printing images in the following formats:
• TIFF
• JPEG
• KODAK Photo CD
• KODAK Picture CD
• PRF (Easy Print Ready Format)
3000 Series Printer Compatibility
Easy Print may be used to send print jobs to any of the 3000 Series
Printers using KODAK PROFESSIONAL inks and media. Contact your
dealer of KODAK products for a listing of the media currently available for
your 3000 Series Printer.
Input Sources
You can use Easy Print to send jobs to your 3000 Series Printer from a
variety of input sources such as digital cameras and scanners.
1-2 May 2000
Page 9
Getting Help with Easy Print
Your dealer of KODAK products is the best source for information about
installing, configuring, and using Easy Print. Contact your dealer with any
questions you have.
For technical support in the US, call 1-800-23KODAK (1-800-235-6325)
between 9:00 a.m.and 8:00 p.m. Eastern Standard Time on regular
business days. Call this number for:
• help setting up or operating the printer
• service
• warranty information
• information about other KODAK products
The FAX back number for product literature is 1-800-508-1531. You may
call this number 7 days a week, 24 hours a day.
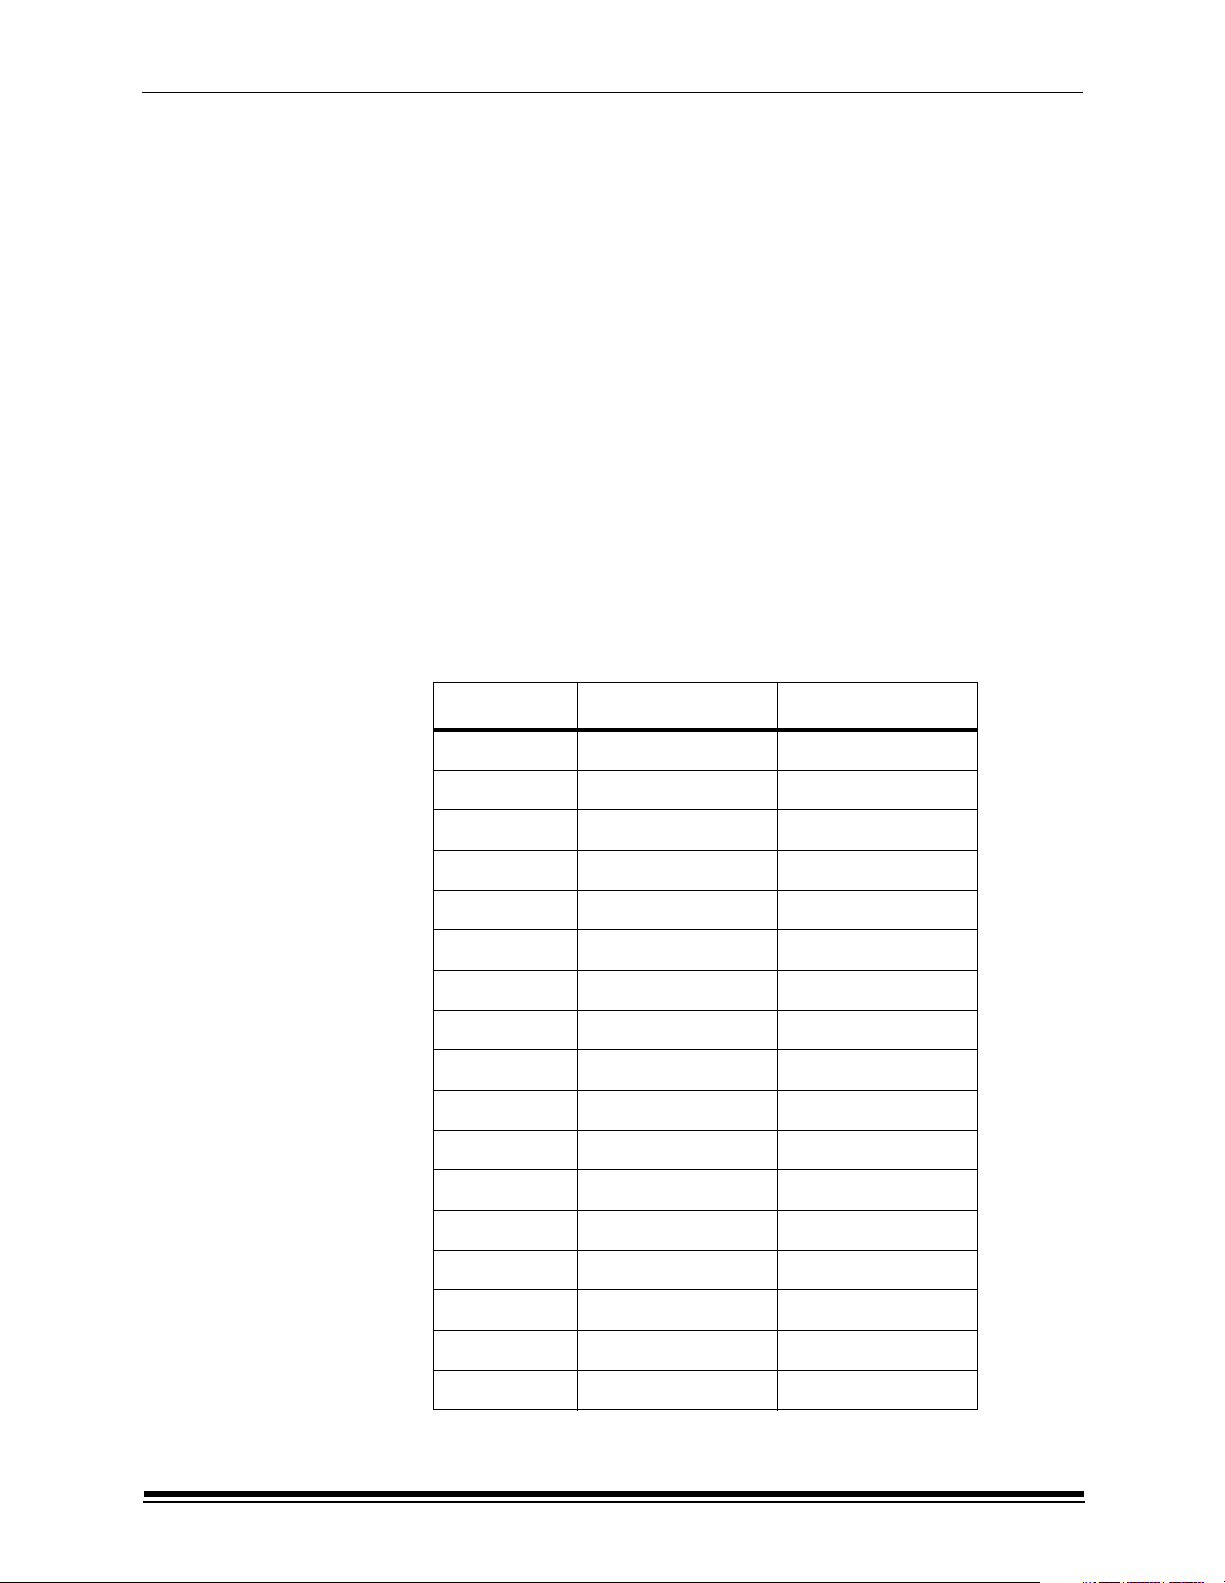
Getting Help from Outside the United States
Help numbers for Canada, the Asia/Pacific, and European regions are
listed below.
Introduction
Country Country code Helpline number
Australia 1-300-130-674
Belgium 32 02-713-14-45
Canada 1-800-465-6325
Denmark 45 3-848-71-30
Finland 35 0800-1-17056
France 33 01-55-1740-77
Germany 49 069-5007-0035
Hong Kong 54 852-2564-9777
Indonesia 65 65-470-9875
Ireland 353 01-407-3054
Italy 39 02-696-334-52
Korea 82 82-2-708-5400
Malaysia 60 3-757-2722
Netherlands 31 020-3469372
Norway 47 23-16-21-33
Philippines 63 63-2-810-0331
Portugal 44 44-0-131-458-6714
May 2000 1-3
Page 10
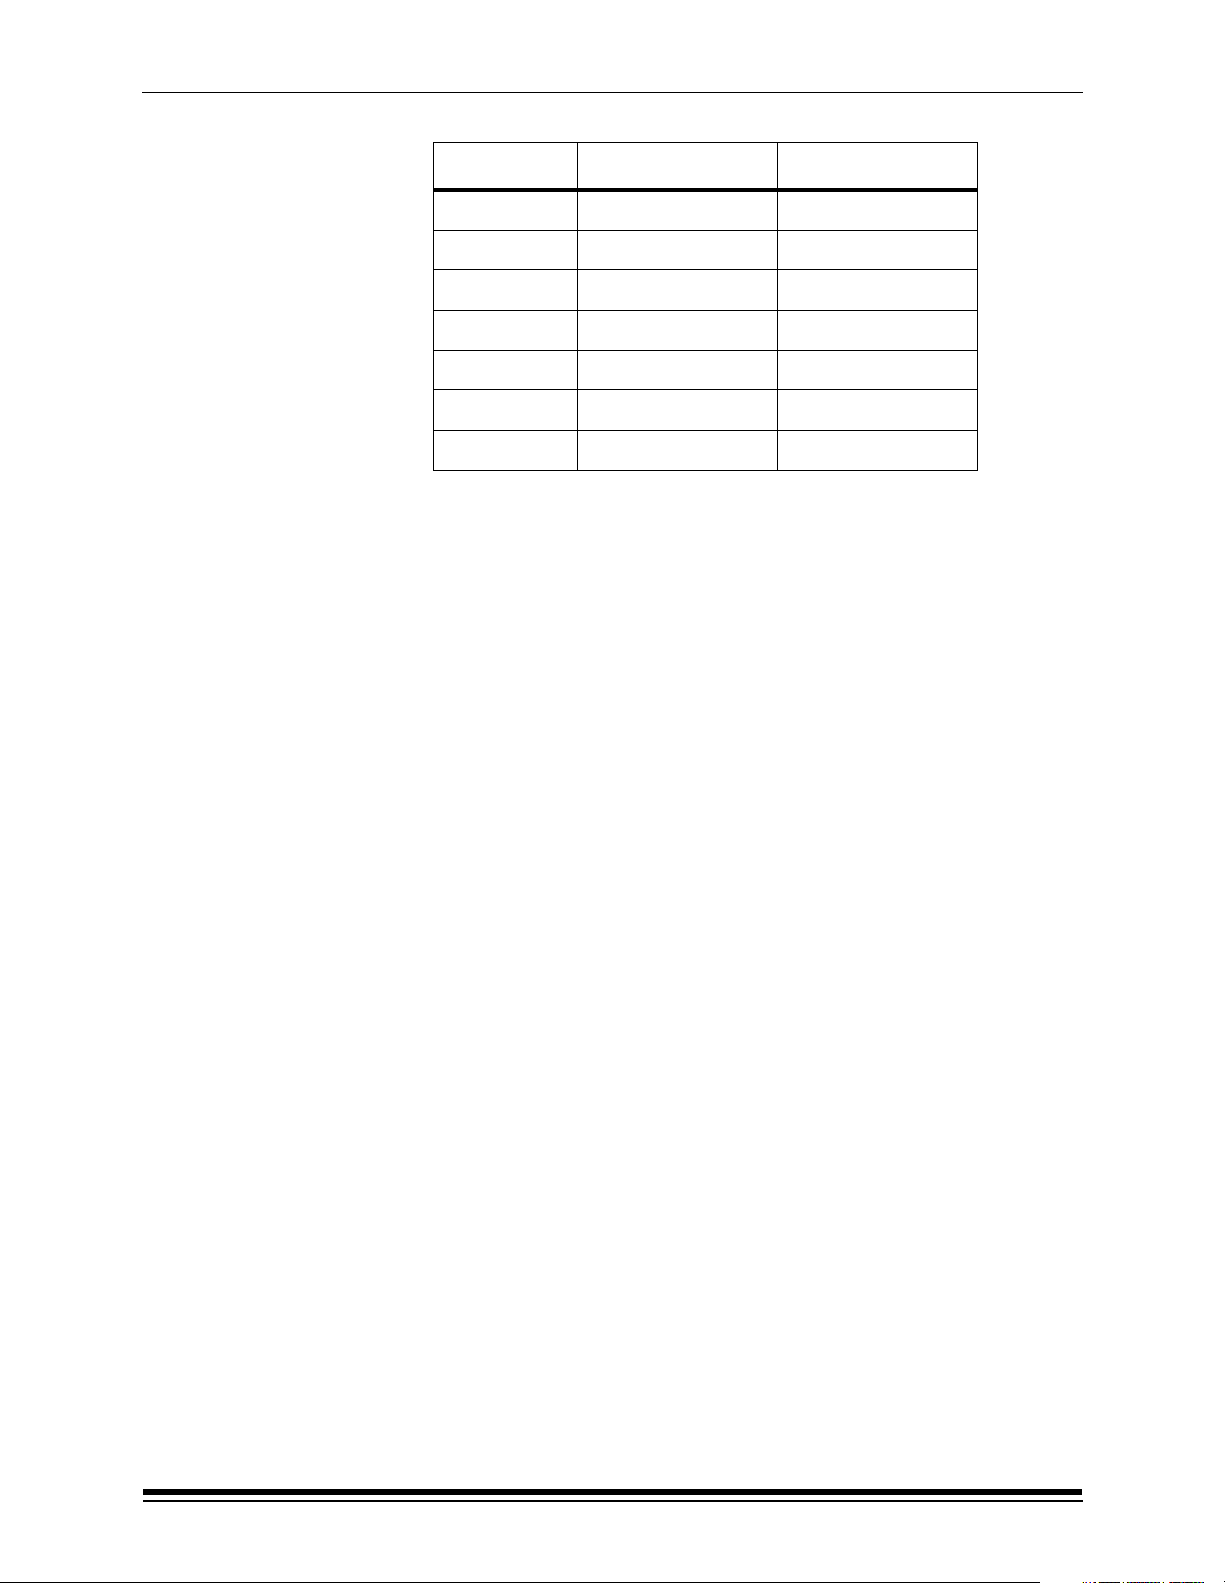
Introduction
Country Country code Helpline number
Singapore 65 65-470-9875
Spain 34 91-749-76-53
Sweden 46 08-587-704-21
Switzerland 41 01-838-53-51
Taiwan 886-2-893-8210
Thailand 66 66-2-271-3040
UK 44 0870-2430270
Getting Information from the KODAK Home Page
You may refer to Kodak’s Web site for information on available media,
troubleshooting, and product support topics. Type the following address:
http://www.kodak.com/go/support
Support for Easy Print can be found by selecting “Easy Print” from the
alphabetical list, or by typing Easy Print in the search field on this page.
1-4 May 2000
Page 11

2 Installing Easy Print Software
This chapter explains how to install the software and configure KODAK
PROFESSIONAL Easy Print to work with your KODAK PROFESSIONAL
Large Format 3000 Series Inkjet Printer.
Minimum System Requirements
You can install Easy Print on a WINDOWS-based or a MACINTOSH
computer that has the following hardware and software installed:
WINDOWS Systems
• 233 Mhz Pentium II processor or higher
• WINDOWS 98, or WINDOWS NT 4.0 with Service Pack 3 or higher
• 15 in. monitor with a resolution of 800 x 600 dpi or higher
• minimum 64 MB of RAM
• 1284 ECP compatible parallel port or a 10/100 Mbit network card
installed
• 6 GB hard drive or greater with a minimum 50 MB of free hard drive
space
Note: For large image rotation at least 200 MB of free hard drive
space is required.
MACINTOSH Systems
• Power Mac G3 or G4 Processor with OS Version 8.6 and 9.0.4 only
• 15 in. monitor with a resolution of 800 x 600 dpi or higher
• minimum 64 MB of RAM
• 1284 ECP compatible parallel port or a 10/100 Mbit network card
installed
• 6 GB hard drive or greater with a minimum 50 MB of free hard drive
space
Note: For large image rotation at least 200 MB of free hard drive
space is required.
Installing the Software
Your system should be up and running before you install Easy Print.
1. Close all open applications.
IMPORTANT: Make sure that all applications are closed and
not just minimized. If you leave any
applications open and try to install the
software, the open applications may interfere
with the installation.
May 2000 2-1
Page 12

Installing Easy Print Software
2. Place the Easy Print CD in the CD-ROM drive and navigate to the
CD drive.
IMPORTANT: Do not use the Browse button to change the
destination folder for the JavaRuntime
Environment.
3. Double-click Easy Setup.BAT.
Note: For WINDOWS 98, you may need to exit the DOS
screen.
The KODAK Easy Setup screen appears.
4. Click Next.
The KODAK Easy Setup screen appears.
5. Easy Print creates an Easy Print directory on the C: drive. If you wish
to install Easy Print in a different location, click the open folder icon;
and select the directory. Click Next when the correct directory
appears in the box.
6. In the license agreement screen that appears, click Accept to agree
with the terms and conditions of the agreement.
2-2 May 2000
Page 13

Installing Easy Print Software
The release notes appear. Read them now or later. They will be
installed in the Easy Print Directory.
7. Click Install.
8. After Easy Print extracts the files, click Next.
May 2000 2-3
Page 14

Installing Easy Print Software
9. Make your selections for:
• Image Source
• Language
• Units
10. Click Next.
11. Select the printer you wish to configure.
12. Type in a descriptive name for the printer in the box.
13. Click Next.
2-4 May 2000
Page 15

Installing Easy Print Software
A screen appears that allows you to set the parameters for your printer.
14. Select the printer you wish to configure from the Printer list.
15. Select the media to be used in the printer and its width from the
Media lists.
16. Select the type of ink loaded in the printer from the InkType list.
17. Move the slider to set a value for Ink Depletion. The value you set
determines the amount of ink that is applied to the media.
Note: The normal value is 100 percent. Decreasing the
value can cause image quality problems. Setting the
Ink Depletion for 100% is adequate for most
conditions.
18. Click the Cut Media check box if you want the printer to cut the media
after printing.
Note: Certain types of media, such as EI canvas, can not be
cut due to the thickness of the media.
19. Enter the number of seconds that the printer waits before cutting in
the Dry Time box.
20. Select the type of connection the printer has to your host computer in
the Connection Type list.
May 2000 2-5
Page 16

Installing Easy Print Software
21. If your printer is on a network, enter the IP address for the printer in
the IP Address box.
22. Click Finish, or click Add Printer to add another printer to your
system configuration and repeat Steps 11 - 21.
2-6 May 2000
Page 17

3 Using Easy Config
Easy Config is a program that allows you to set defaults for commonlyused options for print jobs. Setting defaults eliminates the need for you to
set them for each print job. You can also use the options in Easy Config
to establish workflows, configure KODAK PROFESSIONAL Easy Print,
add printers, add new media, and update current media.
Note: Once you make a change it is set unless you change it back to the
original setting.
To launch the Easy Config application:
• From the WINDOWS desktop, click the Start menu, and select
Programs> Easy Print>Easy Config.
• From a MACINTOSH computer, navigate to the Easy Print folder
and double-click the Easy Config icon.
Note: Depending upon system performance, you may have to wait for
Easy Config to initialize the Graphic User Interface (GUI).
Setting the Defaults on the Easy Print Defaults Tab
You can set defaults for the following options on the Easy Print Defaults
tab of the Easy Config dialog box. Your saved settings are effective when
you exit Easy Config.
Language - Select the language in which Easy Print appears.
May 2000 3-1
Page 18

Using Easy Config
Units - Select either Inches or Centimeters as the measurement unit.
Number of Copies - Enter the number of copies you wish to appear as
the default.
Note: You can override the copies default setting for an individual job.
Easy Print will revert to the default setting when you load a new job
or restart Easy Print.
Nest Copies - Select the Nest Copies check box to place copies of the
image across the width of the media. This allows Easy Print to make the
most efficient use of the media when you print multiple copies of the same
image.
Note: The number of images placed across the width of the media
depends upon the width of the media and the width of the image.
Output Width - Enter a default value for the width of the printed image.
Tiff images will default to the value in the header of the file if it exists.
Fit to Media - Select this check box to change the default width of the
image to fit the width of the media loaded.
Printing Quality - Move the slider to the right for the best image quality at
a slower speed. Move the slider to the left for good quality at a higher
speed. Move the slider to the center for a balance of speed and print
quality.
Justification - Select Left to align the image on the left edge of the media,
or select Right to align the edge of the image along the right edge of the
media. Select Center to place the image in the center of the media.
Cut Marks - Select this check box to print marks so that you can easily
trim your output.
Leading Edge - Enter a value to determine the amount of white space at
the top of the print.
Left Margin - Enter a value to determine the amount of white space on the
left side of the print.
Right Margin - Enter a value to determine the amount of white space on
the right side of the print.
3-2 May 2000
Page 19

Using Easy Config
Trailing Edge - Enter a value to determine the amount of white space at
the bottom of the print.
Orientation - Click the button to select the degree of rotation for your
prints.
Note: The 0 setting prints the image in the orientation in which the image
was created. The Auto setting allows Easy Print to select the
orientation that best places the image to conserve media.
Mirror - Select either a horizontal or vertical mirror image, if desired.
Enable Text Annotation - Select the check box and enter identifying text
in the Additional Text box that you wish to appear on the trailing edge of
your print, along with the print job data.
Note: This feature is not available for MACINTOSH systems.
May 2000 3-3
Page 20

Using Easy Config
Setting the Defaults on the Directories Tab
Use the options on the Directories tab to designate folders in which Easy
Print looks for images to print. The typical workflow for Easy Print is as
follows:
Hot
Folder
Hot Folder (optional) - Click the open folder icon, and locate the folder you
wish to designate as the hot folder. The folder can be located on a network
or on a local drive. This folder then becomes the location where Easy Print
looks for the next image to print. Press Enter to validate the change.
Staging Folder (optional) - Click the open folder icon, and locate the folder
you wish to designate as the staging folder. The folder should be located
on a local drive. This folder then becomes the location to which Easy Print
moves the images that are ready for printing. Press Enter to validate the
change.
Save Image After Processing - Select this check box if you want your
images saved after you print them.
Save Folder - Click the open folder icon, and locate the folder you wish to
designate as the Save Folder. If you selected the Save Image After
Processing check box, Easy Print moves image files to this folder after
printing. Press Enter to validate the change.
Staging
Folder
Save
Folder
3-4 May 2000
Page 21

Using Easy Config
The following are additional folders you may wish to use depending upon
your workflow and the types of images you print:
Start Up Folder - Click the open folder icon, and select the folder Easy
Print searches for first when browsing for an image file in Easy Print. Press
Enter to validate the change.
File Output Folder - Click the open file icon, and select the folder to save
files that are processed using the Print to File option in Easy Print. The
Print to File option processes images but does not print them. Press Enter
to validate the change.
Temporary Folder - Click the open folder icon, and select a folder as a
work space for large files during processing. Press Enter to validate the
change.
Note: The temporary folder should not be set to the root directory, for
example, C:\.
Setting the Defaults on the Image Source Tab
You can print images created on different input devices such as digital
cameras and scanners. Use the following options on the Image Source tab
to configure Easy Print to work with your input devices for the best possible
prints:
Image Source - Select the device you wish to configure. The default that
appears is the device you set when you installed the software.
RGB ICC Input Profile - Select an RGB ICC input profile if you created or
obtained one for your image source. Otherwise, the default should be
used.
May 2000 3-5
Page 22

Using Easy Config
CMYK ICC Input Profile - Select a CMYK ICC input profile if you created
or obtained one for your image source. Otherwise, the default should be
used.
Note: The RGB and CMYK ICC Input Profile options are available when
the input device supports RGB or CMYK input.
Use Embedded ICC Input Profile - Select this check box if you wish to
use the ICC profiles that are embedded in the image.
Setting the Defaults on the Printer Tab
The Printer tab allows you to change the defaults for a variety of output
devices. The options that appear in the configuration box are specific to
the output device you select. The following options are specific to a 3000
Series Printer:
Printer - Select your output device from the list.
Print to File - Select this check box to process images to print at a later
time.
Media - Select the media loaded in the 3000 Series Printer and the width
of the media.
Ink Type - Select the type of ink that is installed in the 3000 Series Printer,
either dye or pigment.
3-6 May 2000
Page 23

Using Easy Config
Ink Depletion - The value you set determines the amount of ink that is
applied to the media. The normal value is 100 percent. Decreasing the
value can cause image quality problems.
Note: The normal value is 100 percent. Decreasing the value can cause
image quality problems. Setting the Ink Depeletion for 100% is
adequate for most conditions.
Cut Media - Select this check box if you want the printer to cut the media
after printing.
Note: Certain types of media, such as EI canvas, can not be cut due to the
thickness of the media.
Dry Time - Enter a value for how long the printer waits before cutting in
the Dry Time field.
Connection Type - Select the type of connection the printer has to your
host computer in the Connection Type list.
Parallel Port - Select the local port to be used if the printer is connected
using a parallel port.
IP Address - Enter the IP address for the printer if it has a network
connection.
Updating Media Files
Adding New Media on the Media Tab
1. Click Add Media.
May 2000 3-7
Page 24

Using Easy Config
The Update Installed Media window appears.
2. Update media using Web access or CD.
To update using the Web:
• Connect to the Internet service provider and do one
– If you have a WINDOWS-based computer, type the address
exactly as follows (the address is case sensitive):
ftp://ftp.kodak.com/EasyPrint/EasyPrintPC. Press Enter to
validate the change.
– If you have a MACINTOSH computer, type the address
exactly as follows (the address is case sensitive):
ftp://ftp.kodak.com/EasyPrint/EasyPrintMac. Press Enter to
validate the change.
To update using a CD:
• Type in the letter for the CD-ROM drive on the desktop. Press Enter
to validate the change.
3. Choose a printer from the drop-down menu.
All available media appears.
4. Select one or more media from the Available Media box.
of the following.
5. Click Install.
3-8 May 2000
Page 25

4 Using Easy Print
This chapter contains information you need to send print jobs to the
KODAK PROFESSIONAL 3000 Series Inkjet Printers using KODAK
PROFESSIONAL Easy Print. These instructions assume that you have
installed Easy Print and configured it for the workflow in your printing
environment.
Printing an Image File
1. Launch the Easy Print application:
• From the WINDOWS desktop, click the Start menu, and select
Programs>Easy Print>Easy Print.
• From a MACINTOSH computer, navigate to the Easy Print folder,
and double-click the Easy Print icon.
Note: Depending upon system performance you may have to wait for Easy Print
to initialize the Graphic User Interface (GUI).
The Kodak Easy Print window appears.
2. If you are not using the hot folder, click the open folder icon.
May 2000 4-1
Page 26

Using Easy Print
3. Locate the image you wish to print.
Note: The Easy Print open file utility can not open images:
• from the network neighborhood
• off the desktop
• through shortcut folders
4. Click Open.
5. The file name for the image appears in the Input Filename box, and
the image appears in the preview area of the Easy Print dialog box.
6. Accept the default settings, or make any changes you wish.
7. Click Print to send the image to the printer.
Printing an Image from the Hot Folder
If the hot folder contains ready-to-print images, the name of the first image
in the folder appears in the Filename box. The icon for the hot folder
indicates that it contains ready-to-print images.
1. Launch the Easy Print application:
• From the Windows desktop, click the Start menu, and select
Programs>Easy Print>Easy Print.
• From a MACINTOSH computer, navigate to the Easy Print folder
and double-click the Easy Print icon.
The image appears in the preview window.
hot folder icon
2. Accept the default settings, or make any changes you wish.
3. Click Print to send the image to the printer.
4. The icon for the hot folder indicates if it contains
additional images.
4-2 May 2000
Page 27

Adjusting Your Images Before Printing
Many of the options on the Easy Print dialog box may already be set for
you on the Easy Config dialog box. You can change the settings for any of
the following defaults for the current file you loaded. However, the default
settings return when you load the next image.
Adjusting the Output Size
Note:
• If you select the Aspect Lock check box, the correct proportions of
the image will be maintained.
• If the Aspect Lock check box is selected, you need to set only
either the height or the width.
1. Enter a value for the width of the image you wish to print in the
Output Width box.
2. Tab to the Output Height box, and enter a value for the height of the
image you wish to print. The maximum height is 100 ft.
Note: If you select the Aspect Lock check box, the output height is automatically
calculated to maintain the correct image proportions.
Using Easy Print
Setting the Print Quality
You can change the output quality of your prints by moving the slider
between High Productivity and Best Image Quality. However, when you
move the slider to the right for Best Image Quality, the print time increases.
The center position provides the best balance of speed and quality.
Selecting the Image Source
From the Image Source list, select the input device that created the input
for the image.
IMPORTANT: Select the correct input device because it is
configured for the best possible color
correction.
May 2000 4-3
Page 28

Using Easy Print
Selecting a Printer
Select your printer from the Printer list. Select the Print to File check box
to process the file and save it in a folder to print at a later time. See "Printing
a PRF File" on page 4-6.
Selecting the Media
From the Media list, select the media currently loaded in the printer.
IMPORTANT: Select the correct media and media width
because each contains a set of parameters
that are applied to your image to give you the
best quality print.
Selecting the Orientation of Your Image
Use the 270, 180, and 90 buttons in the Output Orientation box to rotate
your image.
• Select a 0 rotation to print the image in the orientation in which it
was created.
• Select Auto for Easy Print to set the best rotation for the image to
conserve media.
Note: Rotating images requires more memory which may cause your system to
process data more slowly. You should have a minimum 400 MB of free disk
space for rotating the largest input image size (8000 x 8000 pixels).
Mirror - Click the appropriate Mirror icon to create a vertical or horizontal
mirror image only if printing on backlit film or other transparent media.
4-4 May 2000
Page 29

Using Easy Print
Selecting the Photograph Check Box
Select the Photograph check box if the image you
are printing is a photograph. Selecting the
Photograph check box allows for a smooth and
more pleasing color rendering for photographs.
Note: Clear the Photographic check box if you are printing business graphics or
line art. Colors are more saturated and have a greater contrast if
Photograph is not selected.
Adjusting How Your Image Appears
Move the Blur/Sharpen, Contrast, and Darker/Lighter sliders to change
the appearance of your image.
Move the slider of the Blur/Sharpen slider to soften or highlight the edges
in your image or hide (blur) small defects in the image.
Move the Contrast slider to change the contrast in your image.
Move the Darker/Lighter slider to brighten or darken an image.
Creating a Print Ready File (PRF)
When you create a PRF file, no data is sent to the printer. You can process
a file and print it at a later time, for example:
• if your printer is down for maintenance
• if you want to print all the files with one media type before changing
to different media
• if your host computer is not connected to the printer
1. Click the Open File or Hot Folder icon, and load the file you wish to
process to PRF format.
2. Select the Print to File check box.
3. Set print options as previously indicated.
4. If Print to File is selected, the copies field is shaded and set to 1.
5. Click the Print button.
Easy Print prompts for a PRF file name and then prints to a PRF file.
May 2000 4-5
Page 30

Using Easy Print
Printing a PRF File
1. Click the Open File icon and load the PRF file.
Note: The image will not be displayed in the preview.
IMPORTANT: You cannot use the options on the Easy Print
dialog box. Your print will use the settings you
applied when you created the PRF file.
2. Click Print.
4-6 May 2000
Page 31

Index
Numerics
3000 Series Printers
compatibility with Easy Print
A
1-2
Aspect lock
B
Blur/sharpen slider
C
Connection types list
Contrast slider
Cut marks
Cut media
D
Dry time
E
Easy Config
4-3
4-5
3-7
4-5
3-2
2-5, 3-7
3-7
defaults on the Easy Print Defaults tab
defaults on the Image Source tab
options on the Directories tab
iii
using
3-1
3-5
3-4
Easy Print
file format compatibility with
installation requirements
for a MACINTOSH computer
for a WINDOWS-based computer
installing
release notes
technical support
using
Enable text annotation
F
FAX back number
File output folder
Fit to media
May 2000 Index-1
iii, 2-1
2-3
1-3
iii
3-3
1-3
3-5
3-2
1-2
2-1
2-1
Page 32

Index
H
Hot folder
I
Image output size
Image source
information about KODAK products
Ink depletion
Ink type
Input sources
IP address
J
JPEG images
Justification
K
KODAK Home Page
3-4
opening an image from
4-2
4-3
2-4, 4-3
2-5, 3-7
2-5, 3-6
compatiblity with Easy Print
2-6, 3-7
1-2
3-2
1-4
1-2
1-3
KODAK Photo CD
KODAK Picture CD
L
Language
Leading edge
Left margin
M
Media
Media files
Mirror
N
Nesting copies
2-4, 3-1
3-2
3-2
2-5, 3-6, 4-4
3-7
adding
updating using a CD
updating using the Web
updating
3-7
3-3, 4-4
3-2
1-2
1-2
3-8
3-8
Network connection
Number of copies
Index-2 May 2000
2-5
3-2
Page 33

Index
O
Orientation
Output height
Output width
P
Parallel connection
Parallel port
Photographic
Print quality
Print ready file
Print Ready Format
Print to file
Printer
Printing a PRF file
Printing an image file
Printing quality
3-3, 4-4
4-3
3-2, 4-3
selecting
2-5
3-7
4-5
4-3
4-5
3-6
selecting
selecting parameters for
setting parameters for
2-4, 2-5, 3-6, 4-4
4-6
3-2
1-2
2-5
2-4
4-1
Product literature
R
Right margin
S
Save folder
Save image after processing
Selecting the image source
Service
Staging folder
Start up folder
T
Technical support
Temporary folder
TIFF images
Trailing edge
1-3
in the US
outside the US
1-3
3-2
3-4
3-4
3-5
1-3
1-3
3-5
1-2
3-3
3-4
4-3
May 2000 Index-3
Page 34

Index
U
Units of measurement
W
Warranty information
2-4, 3-2
1-3
Index-4 May 2000
Page 35

Page 36

 Loading...