

Page 1

User's Guide
for
ENCAD 1500 TX
Digital Textile System
TM
P/N 210433-1
Copyright ENCAD, Inc. 1998
®
ENCAD
Macintosh is a trademark of Apple Computer Corp.
Other trademarks are the property of their respective owners.
Except as provided below, no part of this manual may be copied or distributed, transmitted,
transcribed, stored in a retrieval system, or translated in any human or computing language, in
any form or by any means, electronic, mechanical, magnetic or otherwise, or disclosed to a
third party without the express written permission of ENCAD, Inc., 6059 Cornerstone Court
West, San Diego, CA 92121, U.S.A.
Certain manuals are distributed by ENCAD in an electronic format on CD-ROM or over the
internet. The registered user of an ENCAD product whose manuals is distributed in this
fashion may print one copy for their personal use only.
REVISION HISTORY
Rev. A February 1998
, Quality Imaging Supplies and Digital Textile System are trademarks of ENCAD, Inc.
Page 2

1500 TX User's Guide
W ARRANTY CLAIMS
United States
ENCAD®, Inc., warrants the 1500 TX printer (“PRODUCT”) to be free from defects in workmanship
and materials for a period of 180 days from the date of purchase. In order to submit a Warranty
claim, please contact the ENCAD Help Desk at (619) 452-4350.
ENCAD reserves the right to make changes or improvements to Products, without incurring any
obligation to similarly alter Products previously purchased.
Buyer’s sole and exclusive rights pursuant to this Warranty shall be for the repair or replacement of
defective Product. ENCAD specifically disclaims any and all other warranties, expressed or
implied, including but not limited to, implied warranties of merchantability and fitness for a
particular purpose. In no event shall ENCAD be liable for any loss of profit or other commercial
damages, special, incidental or consequential damages, or any other damages or claims, whatsoever.
This Warranty gives Buyer specific legal rights, and Buyer may also have other rights that vary
from state to state.
This Warranty applies only to printers purchased from ENCAD, or authorized ENCAD distributors
or dealers. The intent of this Warranty is to repair or replace defective Products subjected to
normal wear and tear, when operated according to ENCAD instructions.
This warranty does not cover damage to the Product resulting from the following:
· Accident or negligence.
· Unauthorized modification of the Product.
· Adverse environmental conditions.
· Service of the Product by other than an ENCAD authorized service provider.
· Unauthorized or improper use, including but not limited to:
- Use in applications for which the Product was not designed.
- Using cartridges, ink, or media other than ENCAD TX products.
- Lubricating any part of the printer.
Internationally: Contact your dealer or distributor for warranty information.
ii
Page 3

iii
1500 TX User's Guide
FCC Statement (U.S.A.)
The United States Federal Communications Commission has specified that the following notice be brought to the
attention of users of the ENCAD printers.
FEDERAL COMMUNICATIONS COMMISSION RADIO AND TELEVISION INTERFERENCE FOR
CLASS B DEVICE
Statement
This equipment has been tested and found to comply with the limits for a Class B digital device, pursuant to
Part 15 of the FCC Rules. These limits are designed to provide reasonable protection against harmful
interference in a residential installation. This equipment generates, uses, and can radiate radio frequency
energy , and if not installed and used in accordance with the instructions, may cause harmful interference to
radio communications.
User Instructions:
If the equipment does cause harmful interference to radio or television reception, which can be determined by
turning the equipment on and off, the user is encouraged to try to correct the interference by one of the
following measures:
• Reorient or relocate the receiving antenna.
• Increase the separation between the equipment and receiver.
• Connect the equipment into an outlet on a circuit different from that to which the receiver is connected.
• Consult the dealer or an experienced radio/TV technician for help.
Changes or modifications not expressly approved by ENCAD, Inc. could void the user’s authority to operate
the equipment.
Note: This product was FCC certified under test conditions that included the use of shielded I/O cables and
connectors between system components. To be in compliance with FCC regulations, the user must use
shielded cables and connectors and install them properly.
VDE Statement
Hiermit wird bescheinigt, daß der Drucker in Übereinstimmung mit den Bestimmungen der BMPTAmstbIVfg 234/1991 funkentstört ist. Der vorschriftsmäßige Betrieb mancher Geräte (z.B. Meßsender) kann
allerdings gewissen Einschränkungen unterliegen. Beachten Sie deshalb die Hinweise in der
Bedienungsanleitung.
Dem Zentralamt für Zulassungen im Fernmeldewesen würde den Inverkehrbringen dieses Gerätes angezeigt
und die Berechtigung zur Überprüfung der Serie auf die Einhaltung der Bestimmungen eingeräumt.
Industry Canada
This Class B digital apparatus meets all requirements of the Canadian Interference-Causing Equipment
Regulations.
Cet apparell numérique de la classe B respecte toutes les exigences du Réglement sur le matériel brouilleur
du Canada.
Page 4

1500 TX User's Guide
iv
Material safety data sheet
To obtain information on the proper use, handling, and disposal of any
ENCAD TX ink, consult the material safety data sheet included in the ink
kit or obtain a copy from ENCAD, Inc. at:
6059 Cornerstone Court West
San Diego, California 92121-3734
(619) 452-4350
International users should contact their local dealer or distributors.
General Operating Safety
The use of a <HAR> cord set (rated 10A, 250VAC) with the proper plug
configuration for the country where the device will be used is required for
continued safety compliance.
Ein harmonisiertes (<HAR>) Netzkabel (min. 10A, 250V~) mit dem
vorgeschriebenen Netzstecker für das entsprechende Land in dem das
Gerät installiert wird, ist unbedingt notwendig für die elektrische
Sicherheit.
El uso de cable poder <marcado HAR> (capacidad de 10A, 250V~), con
el enchufe apropiado para el país donde se use el producto, es requerido
para acatamiento de seguridad eléctrica.
L' emploi d' un cordon surmoulé <HAR> (estimé 10A, 250V CA) avec
la configuration de la fiche convenable pour le pays où l' appareil sera
utilisé, est exigé pour la conformité à la sécurité continuée.
Other reference materials
In addition to this User Guide, the following additional guides are
included with your printer:
Quick Start - Tells you how to assemble and install the printer's hardware.
Software Drivers - Readme files on the 1500 TX CD-ROM contain
information for installing and using the various drivers and utilities.
Page 5

v
1500 TX User's Guide
Manual conventions
➪ Indicates a procedure for you to follow in order to perform a specific
function. Read the accompanying explanatory text before following the
step-by-step procedure.
! Indicates a warning. Ignoring the warning can damage the printer or
result in an unsatisfactorily printed image.
✓ Indicates a tip or suggestion that can make using the printer easier or
improve your printed images.
Manual organization
It is not necessary to read this manual from cover to cover. Reading
Chapters 1 through 3 will give you an understanding of printer's basic
operation. Your particular needs will determine how you use the rest of
the guide.
Chapter 1 Introduction - Introduces the printer and provides basic
guidelines for getting the best print quality.
Chapter 2 Getting started - Describes the printer's components and
explains the basic steps needed for using the printer after it has been
assembled and connected to your computer. Includes procedures for
installing and priming ink cartridges and loading media.
Chapter 3 Setting printer options - Explains how to use some of the
printer's features.
Chapter 4 Maintenance - Includes instructions for periodic maintenance functions such as refilling ink reservoirs, replacing ink cartridges,
and periodic cleaning of the ink cartridges and service station.
Appendix A Calibration - Explains what to look for in the calibration
plots and how to make the adjustments.
Appendix B Installing additional memory - Explains how to install
additional memory for printing large files.
Appendix C Menu tree - Explains the menu structure.
Page 6

1500 TX User's Guide
vi
Appendix D Error messages - Explains the error messages and provides suggestions of what to do when you see them.
Appendix E Glossary - Explains terms used in the manual.
Appendix F T echnical information - Lists the technical specifications for
1500 TX printer.
Appendix G Supplies - Includes a complete list of ENCAD media, ink,
cartridges, and spare parts and information for ordering supplies for your
printer.
Appendix H Communication and cabling - Provides the printer's serial
cable requirements and details on setting serial communication parameters.
Appendix I Troubleshooting - Provides answers to commonly asked
questions and solutions to typical problems.
Page 7

vii
1500 TX User's Guide
Contents
Chapter 1 Introduction......................................................1 -1
Printing with 1500 TX printers ...............................................................1-2
Obtaining quality results ........................................................................1-2
Chapter 2 Getting started............................................. 2-1
Using the control panel..........................................................................2-2
Setting the language..............................................................................2-3
Loading media ......................................................................................2-3
Using the power media feed and take-up system ..................................2-4
Using the take-up roll ............................................................................2-5
Moving the carriage ..............................................................................2-6
Installing the cutter ................................................................................2-7
Filling the ink reservoirs ........................................................................2-8
Filling the ink cartridges ........................................................................2-9
Priming the ink delivery lines...............................................................2-12
Priming the ink cartridges ...................................................................2-14
Aligning the ink cartridges (color calibration) ......................................2-17
Cartridge recognition ..........................................................................2-18
Pausing the printer..............................................................................2-18
Canceling a print.................................................................................2-19
Chapter 3 Printer options .................................................3-1
Returning to the default settings ............................................................3-1
Printing the settings...............................................................................3-1
Choosing print mode options.................................................................3-3
Choosing paper options ........................................................................3-5
Defining user setup...............................................................................3-9
Choosing ink options...........................................................................3-10
Page 8

1500 TX User's Guide
viii
Chapter 4 Printer maintenance and storage...................4-1
Periodic maintenance...........................................................................4-1
Removing and storing ink cartridges.....................................................4-3
Replacing the reservoirs........................................................................4-4
Installing new cartridges........................................................................4-4
Purging ink delivery lines......................................................................4-5
Periodic cleaning..................................................................................4-6
Cleaning the service station..................................................................4-8
Maintaining the NovaPrime..................................................................4-10
Preparing your printer for transport or storage...................................4-10
Returning the printer for service..........................................................4-11
Accessing printer information.............................................................4-11
Appendices
A Calibration.......................................................................................A-1
B Installing additional memory............................................................B-1
C User interface..................................................................................C-1
D Error messages...............................................................................D-1
E Glossary..........................................................................................E-1
F Technical information.......................................................................F-1
G Ordering supplies............................................................................G-1
H Serial cable.....................................................................................H-1
I Troubleshooting.................................................................................I-1
Page 9
Introduction 1
This user guide covers the 1500 TX Digital T extile System.
1500 TX printers are wide-format color inkjet printers that give you
professional-quality output with all the brilliance liquid ink. For artists,
designers, and business professionals, ENCAD printers let you experience the creative freedom of exceptional graphics quality . The printer
cuts hours of production time, while giving you the dramatic impact of
high fidelity images.
1500 TX printers are being used for many types of printing needs:
• T extile design • Strike-offs
• Sample yardage • Posters/storyboards
• Banners • DTP
• Signs • Packaging prototypes
• Displays • Fine art
• Proofing • Exhibits
INTRODUCTI ON
Page 10

1500 TX User's Guide
1-2 Introduction
Printing with 1500 TX printers
The 1500 TX wide format inkjet printers let you create huge designs. The
length of your printed piece can be the length of a roll of media. Only
Extreme Color Printing combines the technical sophistication of the
ENCAD printers with the unique qualities of ENCAD TX proprietary inks
and media, which includes a variety of popular fabrics, photogloss, coated
canvas, and matte paper .
These printers feature a continuous-feeding ink system which uses 500ml
reservoirs for each color, so you never have to worry about running out of
ink halfway through a big print job. Before starting a print job, just look at
the transparent plastic reservoirs to check the ink supply . When the ink
supply is low , just open the cap and refill.
The printers accept raster-oriented data in the form of HP RTL format.
In this mode, printing begins immediately after the first complete line of
HP RTL data is received. Depending on the software used, millions of
colors are possible, yielding superb results for continuous-tone images.
Y our printer comes with TX Print, a software RIP designed specifically
for textile printing applications. It includes a visual interface, and features
which include tiling, rotating, and repeating of images.
Obtaining quality results
Y ou have probably seen a demonstration of your printer's capabilities or
sample output. If so, you are aware of the superb color graphics which
can be obtained, and the variety of fabrics and papers you can use. Note,
however, that to obtain high-quality results, you must consider several
factors. Follow the simple guidelines in the sections that follow to obtain
excellent results.
Page 11
Introduction 1-3
1500 TX User's Guide
INTRODUCTION
Use the right inks and media
ENCAD’ s commitment to Extreme Color encompasses media, ink, and
cartridges. A team of color scientists and media specialists work with
world class ink and media manufacturers to develop supplies that are
scientifically matched to the 1500 TX series. Used together, the
ENCAD inks and media provide the widest color gamut available,
making our fabrics and media ideal for applications from proofs to
presentations.
When you choose ENCAD's T extile Inks (TX) and special coated
fabrics, you can be confident you're producing the most saturated and
vibrant colors possible. ENCAD's complete line of T extile Inks and pretreated fabrics blend to deliver the color depth necessary to print strikeoffs and samples. T extile Inks can also be used with ENCAD's Quality
Imaging Supplies media to print stunning presentation boards. Get
consistent results yard after yard by using ENCAD TX inks, fabrics and
media with your 1500 TX printer .
ENCAD inks and media give you optimal image quality through:
• Scientifically matched ink and media
• Ultra-wide color gamut or process standard
• Wide range of media: a variety of fabrics and popular media such as
matte paper, photo paper, and canvas.
Page 12
1500 TX User's Guide
1-4 Introduction
Caring for your ink and cartridges
! Handle cartridges only on the plastic areas. Touching the copper
electrical interconnect or the inkjets can damage the cartridge.
• Be sure the ink in the cartridges matches the ink in the reservoirs.
• Do not shake ink refill containers.
• Store ink and cartridges in the same environment as the printer
whenever possible.
• If you remove a cartridge from the printer, do not leave it exposed to
the air for an extended period because the jets may clog. Replace the
original tape on the jet plate. Place the cartridge in a sealed plastic bag
and store it in a closed area at room temperature. Keep it out of direct
sunlight.
• Open new cartridges only when you are ready to install them.
• Use only ENCAD-brand ink refills and cartridges.
• Drawings containing both black and color elements require alignment
of the cartridges to each other . See Appendix A for details.
Choose the right media
Job Media
Sample yardage
Strike-offs
Textile designs
Cotton knit
Cotton plain weave
Rib knit
Cotton heavy twill
Polyester knit
Art specialty Canvas
Banners
Client, marketing
presentations
Photo-realistic images
Posters
Trade shows
Photo Gloss
Premium Matte
Page 13

Introduction 1-5
1500 TX User's Guide
INTRODUCTION
Caring for your media
Store media in its original packaging in a cool, dry area until you are ready
to use it. The environment should be stable; i.e., no extremes of heat and
cold, and non-condensing humidity . If conditions are outside the operating
ranges recommended for the printer, allow the media to acclimate in the
operating environment for at least 48 hours before using it.
If you remove a roll of media from the printer, be sure to store it in a
manner which keeps it clean and dust-free. Ideally , you should return it to
its original packaging for storage.
Print on the correct side! Roll media is wound with the preferred side
out.
Handle with care! Handle your media carefully to avoid creases, scrapes,
and tears. A void crushing or damaging roll media edges.
W ear gloves! Photographic paper-based media is very susceptible to
scratching and creasing and may absorb skin oils. Fingerprints on
the media prior to printing may result in visible fingerprints after ink
is applied.
Choose the correct printing mode
There are four modes of printing, giving you freedom to tradeoff printing
quality and speed. Normal and draft modes can be used for most fabric
designs. If banding occurs, use Quality or Enhanced mode. Be sure to use
Enhanced mode when printing on Photogloss media.
Page 14

1500 TX User's Guide
1-6 Introduction
This page intentionally blank.
Page 15
GETTING STARTED
Getting started 2
This chapter gives you details on setting up your printer and using the functions
available on its panels.
Before you start, be sure that:
• the power cord is plugged in
• you have connected your printer to your computer using either
a parallel or serial cable
• the printer is turned on before attempting to print
• driver software is installed. Refer to the Readme files on the
driver disks provided with your printer . Details on using the drivers
are contained in the PC Connectivity Guide on the CD-ROM.
Page 16
1500 TX User's Guide
2-2 Getting Started
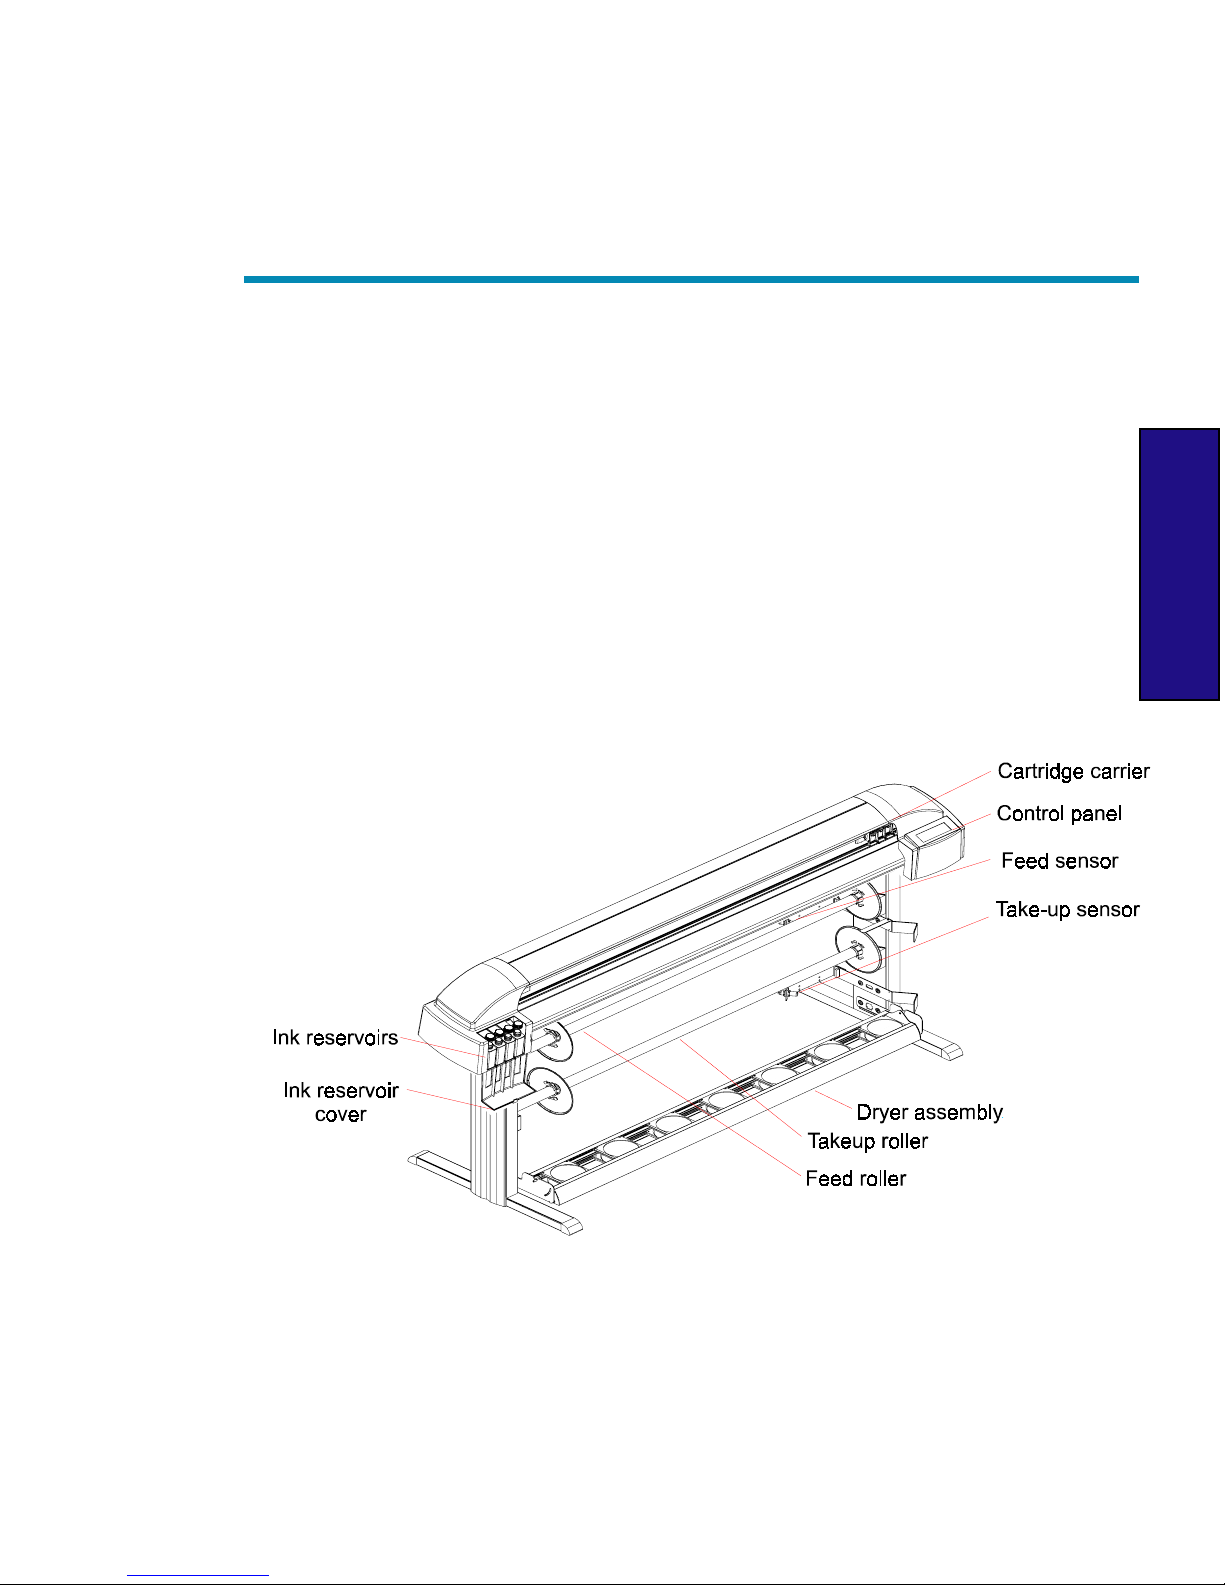
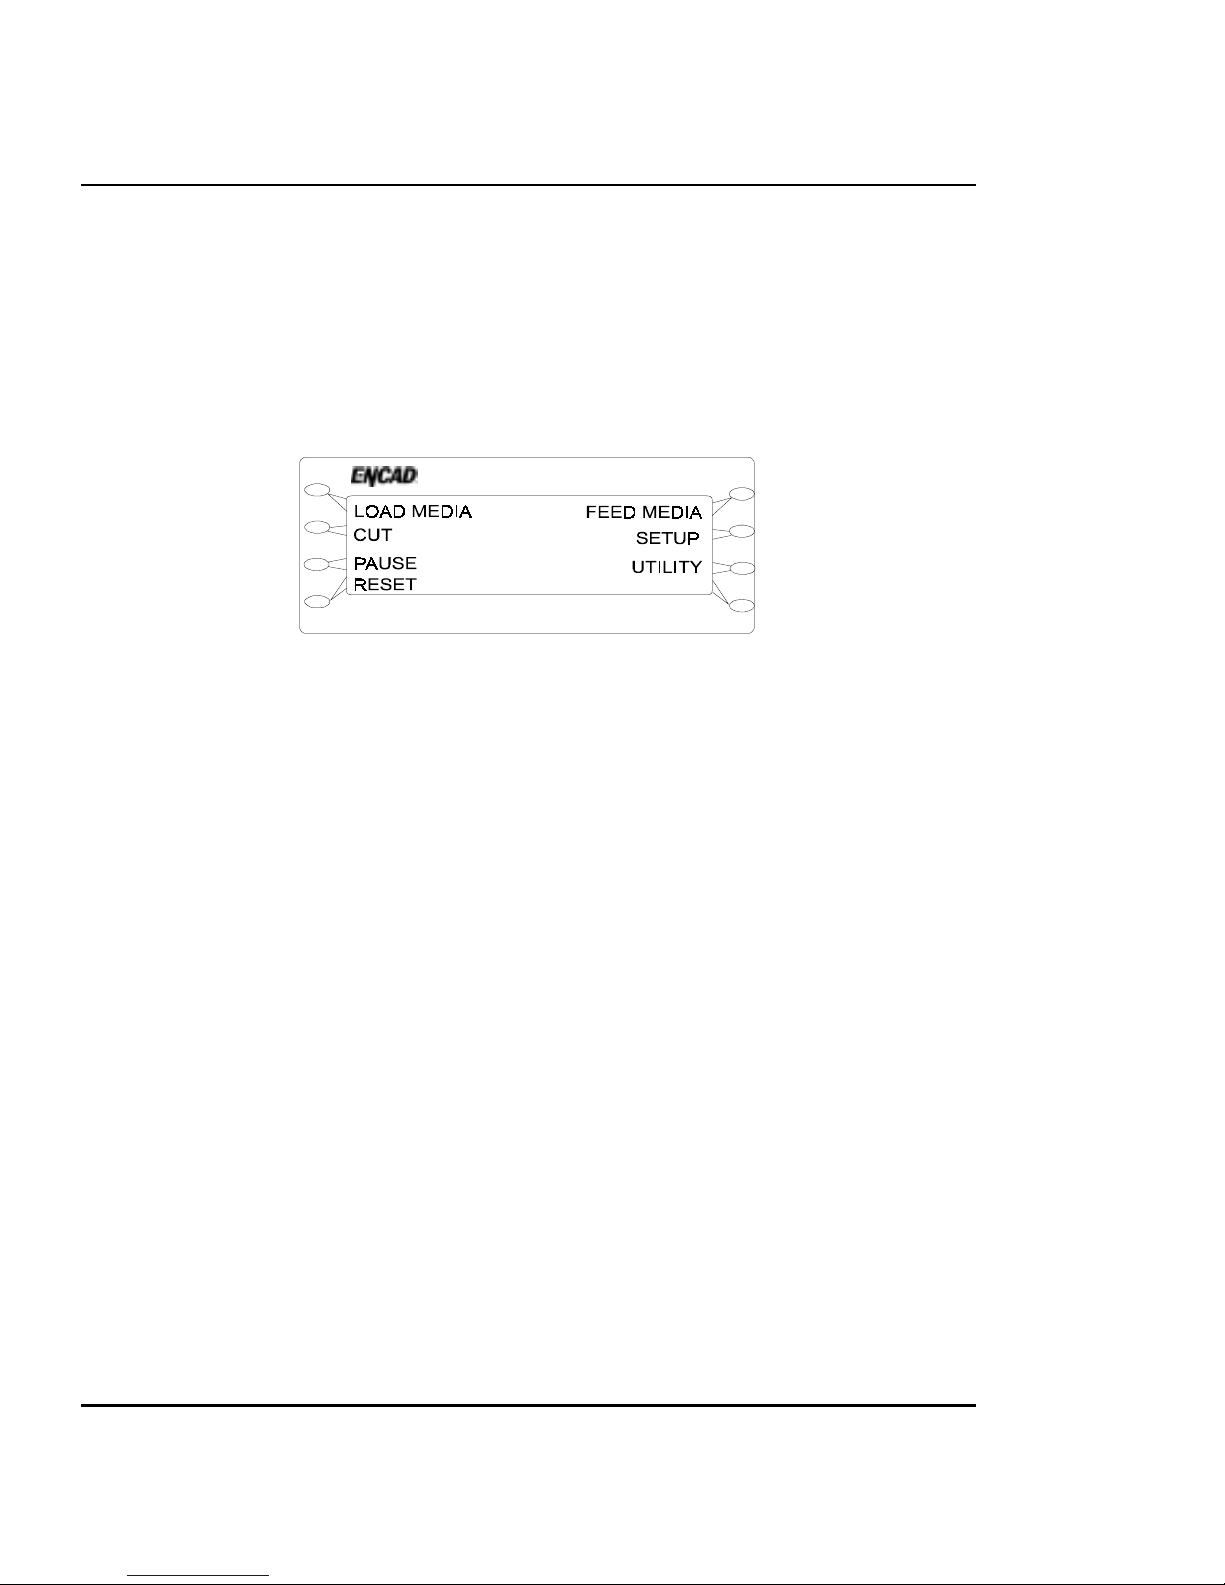
Using the control panel
The control panel at the right side of the printer includes eight buttons and a
display which indicates modes and settings. An overview is provided here so that
you can load media and cartridges. Details on menu options are included in
Chapters 3 and 4. The menu tree in Appendix C summarizes all the printer modes
and their functions.
Printer control panel
T wo types of menus are displayed: action menus provide a list of additional menus
or immediate tasks to perform. Selection menus let you view and modify values.
Choosing menu functions
T o select a function, press the button adjacent the function displayed.
The display will list options available for the selected function. Press the Next
Option or Prev . Option buttons to view the selections. When the selection you
want displays, press the button for the option and press OK.
Depending on the type of menu, you can return to the previous menu level by
pressing the OK or Exit button. Press Exit consecutively to return to the main
menu.
Press the Cancel button to restore the previous setting and exit the menu.
Page 17

Getting Started 2-3
1500 TX User's Guide
GETTING STARTED
Setting the language
Y our printer can display menu items and messages in English, German, French,
Italian, Portuguese, Spanish, Korean, Japanese and Chinese.
➪➪
➪➪
➪ To choose a language
1 Press Setup, User Settings, Language, and the button for the language
you want.
2 Press OK.
Loading media
You can use either roll media or cut sheets; the default is roll media. To ensure
straight paper loading and avoid skewing, be sure to hold the media parallel to
the platen line. Use the load lines on the platen as a guide to correctly load
media. The printer includes sensors which detect the presence of media and
activate the feed and take-up mechanisms.
Roll media must have an inside diameter of 2 or 3” and a maximum outside
diameter of 6". If your media has an inside diameter of 3”, use a core adapter
supplied with your printer . If you plan to store prints on the take-up roll, you
may want to have extra cores available.
! IMPORT ANT! The printer can use media up to 60" wide. The rolls
can be heavy, so you may want to have someone help you to load
them. Before starting, be sure that you have a take-up roll core
available which is the same width as the media you are loading.
! If your roll media has wrinkled or damaged edges, cut off the
damaged part of the roll prior to loading to prevent the media from
jamming in the printer.
Page 18
1500 TX User's Guide
2-4 Getting Started
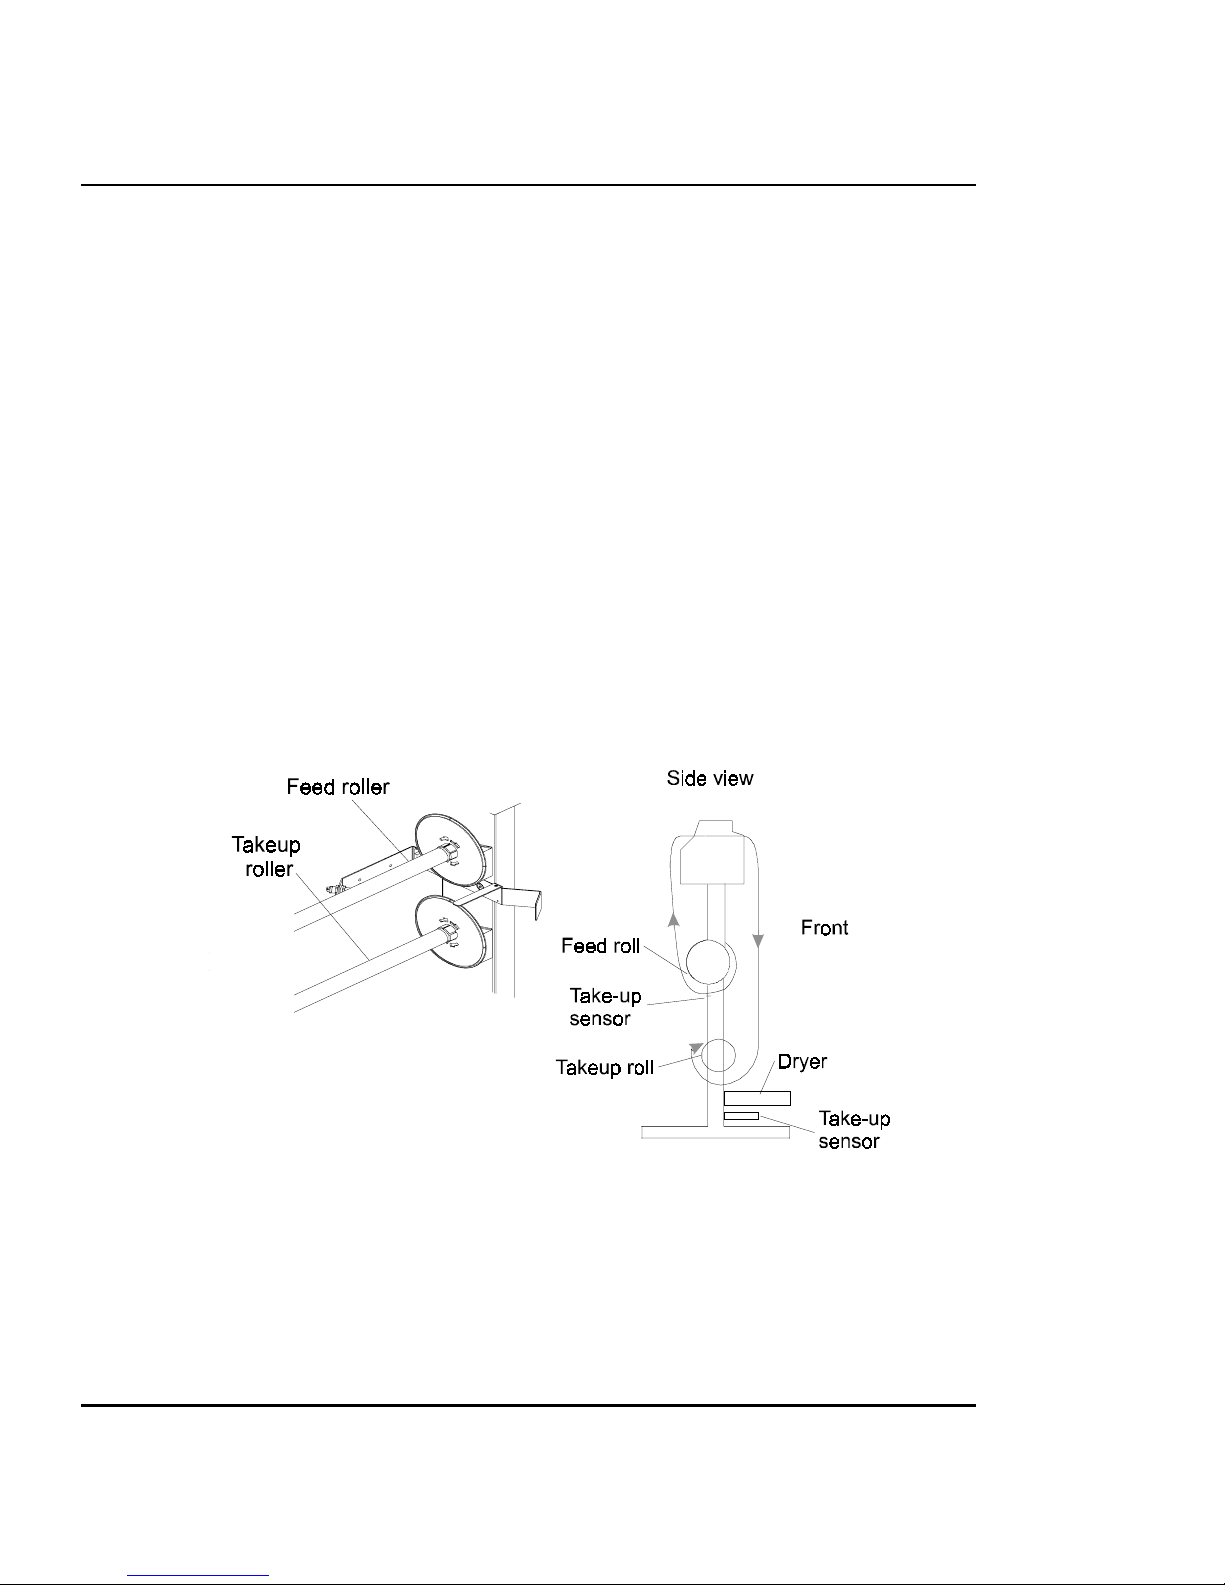
Using the power media feed and take-up system
The power media feed and take-up system facilitates long, unattended printing
runs by automatically unwinding and rewinding media as prints are generated. It
includes a feed roll, a take-up roll, and sensors which prevents media from coming
into contact with the floor .
When the unit is first turned on, the feeder may turn for a few seconds. If the
take-up turns, the sensor is blocked. Clear anything blocking the sensor before
proceeding.
➪➪
➪➪
➪ To load roll media
1 Slide the rolled media onto the media (upper) roller , orienting it as shown
below. Slide the media guide into the roll core, and tighten the guide to
secure the roll by turning the blue knob clockwise. Standing behind the
printer, insert the media's leading edge into the back of the printer ,
aligning the paper edge with the alignment mark on the platen. The
printer will sense the presence of the media and automatically feed it.
2 As printing progresses, media is looped down in front of the take-up core
until it is detected by the sensor on the printer stand leg. The take-up rolls
then activate to roll the media.
Be sure not to block the sensor!
3 Press Load Media to move the media into printing position.
Page 19

Getting Started 2-5
1500 TX User's Guide
GETTING STARTED
Using the take-up roll
The take-up roll allows unattended printing by automatically winding printed media
onto a core. In this mode, the automatic cutter is disabled. When using this
option, be sure that the media sensor on the printer's right leg is not blocked.
Depending on the ambient humidity , temperature, and amount of ink coverage,
you may want to turn on the dryer and/or set a dry time as described in Chapter
3. If you are using the dryer, position it so that the fans blow on the media.
➪➪
➪➪
➪ To use the take-up roll
1 Set the printer to Take-up mode by pressing Setup/Paper Options Menu,
Supply Type/Take-up, then press OK. This enables the take-up roll and
disables the cutter.
2 Install an empty core onto the take-up guides. Be sure that the core width
matches the width of the media you are using.
3 Slide the roll guide into the media core, and secure it by tightening the
locking mechanism. If you moved the sensor mounting bracket before
loading the roll media, be sure to return it to its normal position.
Since media cores can be narrower than the media, position the media
guide 1/8” from the end of the core and lock it into place.
4 Press Feed Media/Forward to advance enough media to allow its
leading edge to come to the center of the take-up roll.
Page 20

1500 TX User's Guide
2-6 Getting Started
Using at least three pieces of tape, attach the leading edge of the media
to the take-up roll at the left, right, and center of the core.
As printing progresses, the media is looped down in front of the take-up
core until it is detected by the sensor on the printer leg. The take-up roll is
then activated to roll the media.
Be sure not to block the sensor!
Note: If you are running narrow media, and depending on ambient
temperature and humidity , you may want to set a dry time and/or turn on
the dryer as described in Chapter 3 if you are running a long plot.
Because of the print speed and the narrow media, the ink may otherwise
not have sufficient time to dry before the media is rolled onto the take-up
core.
➪➪
➪➪
➪ To unload the take-up roll
1 Press the Cut button to cut the media.
2 Remove the roll from the printer and release the adjustable roll guide.
Moving the carriage
When not in use, the cartridges rest in the service station at the right side of the
printer . This device seals the inkjets to prevent them from drying out. If power is
turned on, always use the Utility/Access Cartridges button to move the
carriage away from the service station so that you can install, change, adjust
or clean the ink cartridges or the service station.
Page 21

Getting Started 2-7
1500 TX User's Guide
GETTING STARTED
Installing the cutter
You need to install the cutter if you want the printer to automatically cut the
media after printing.
! Be careful when handling the cutter to avoid injury.
! Do not use an external knife to cut media as this can damage the
platen and prevent the media sensors from operating properly.
The exception to this is ribbed media which cannot be cut with the
cutter. It is OK to use scissors to cut ribbed media.
➪➪
➪➪
➪ T o install the cutter
1 Press the Access Cartridges button to move the carriage to the
left, out of the service station.
The cutter fits in the printer on the left side of the carriage. Install
the cutter by inserting it into the carriage.
2 Push the cutter into the slot until it clicks into place.
3 Press the Access Cartridges button to move the carriage back into
the service station. This ensures that the cutter blade is in the home
position.
Page 22

1500 TX User's Guide
2-8 Getting Started
➪➪
➪➪
➪ To remove the cutter
1 Press the Utility/Access Cartridges button to move the carriage to the
center of the platen.
2 Press the knife latch down.
3 Pull the cutter out of the carriage.
When the cutter becomes worn, it can cause the carriage to jam or can cause a
ragged media cut. In extreme cases, you might see an error message stating
"Carriage Axis Failure".
You can order replacement cutters from ENCAD by calling
800-45-ENCAD, (619-677-5071) or fax ENCAD at 619-549-7894. Users outside
the U.S. can call their local ENCAD sales center .
Filling the ink reservoirs
! Use of inks other than ENCAD TX series ink may cause damage to
the printer.
The printer can support long, uninterrupted printing runs because each of its four
reservoirs holds 500ml of ink. The ink reservoirs are located at the printer's left
side.
Note: When running at carriage speeds faster than the default, it is recommended that ink levels in the reservoirs be no more than 300ml maximum.
Page 23

Getting Started 2-9
1500 TX User's Guide
GETTING STARTED
➪➪
➪➪
➪ To fill the ink reservoirs
1 Open the cover on the left side of the printer to access the ink reser-
voirs. Unscrew the cap of one reservoir. Open only one reservoir at a
time to prevent contamination with other ink colors.
2 Remove cap from the bottle.
3 Make sure the ink color and type matches the reservoir and pour in the
ink. Be sure to use only TX ink in all the reservoirs and TX series ink
cartridges. Replace the cap on the reservoir.
4 A complete second set of plumbing is provided, so there are two color-
coded quick connect fittings for changing to another type of ink.
Be
sure that each reservoir is connected to the same color fitting.
5 Repeat for the remaining reservoirs, then close the cover .
Page 24
1500 TX User's Guide
2-10 Getting Started
Filling the ink cartridges
The printer is designed to use only ENCAD 104 jet cartridges. Using other
cartridges will cause the printer to beep and prevent it from printing.
Installation of new ink cartridges involves filling the ink cartridges, connecting the
cartridge to the quick connect fitting and priming the jet plate with the NovaPrime.
Each refill kit contains a 20 ml container of ink (squeeze bottle) which is enough
to fill the cartridge approximately half full and is the proper amount for correct
function of the ink system.
Note: Y ou should fill, connect, and prime one color at a time. Fill all
cartridges and reservoirs only with TX ink.
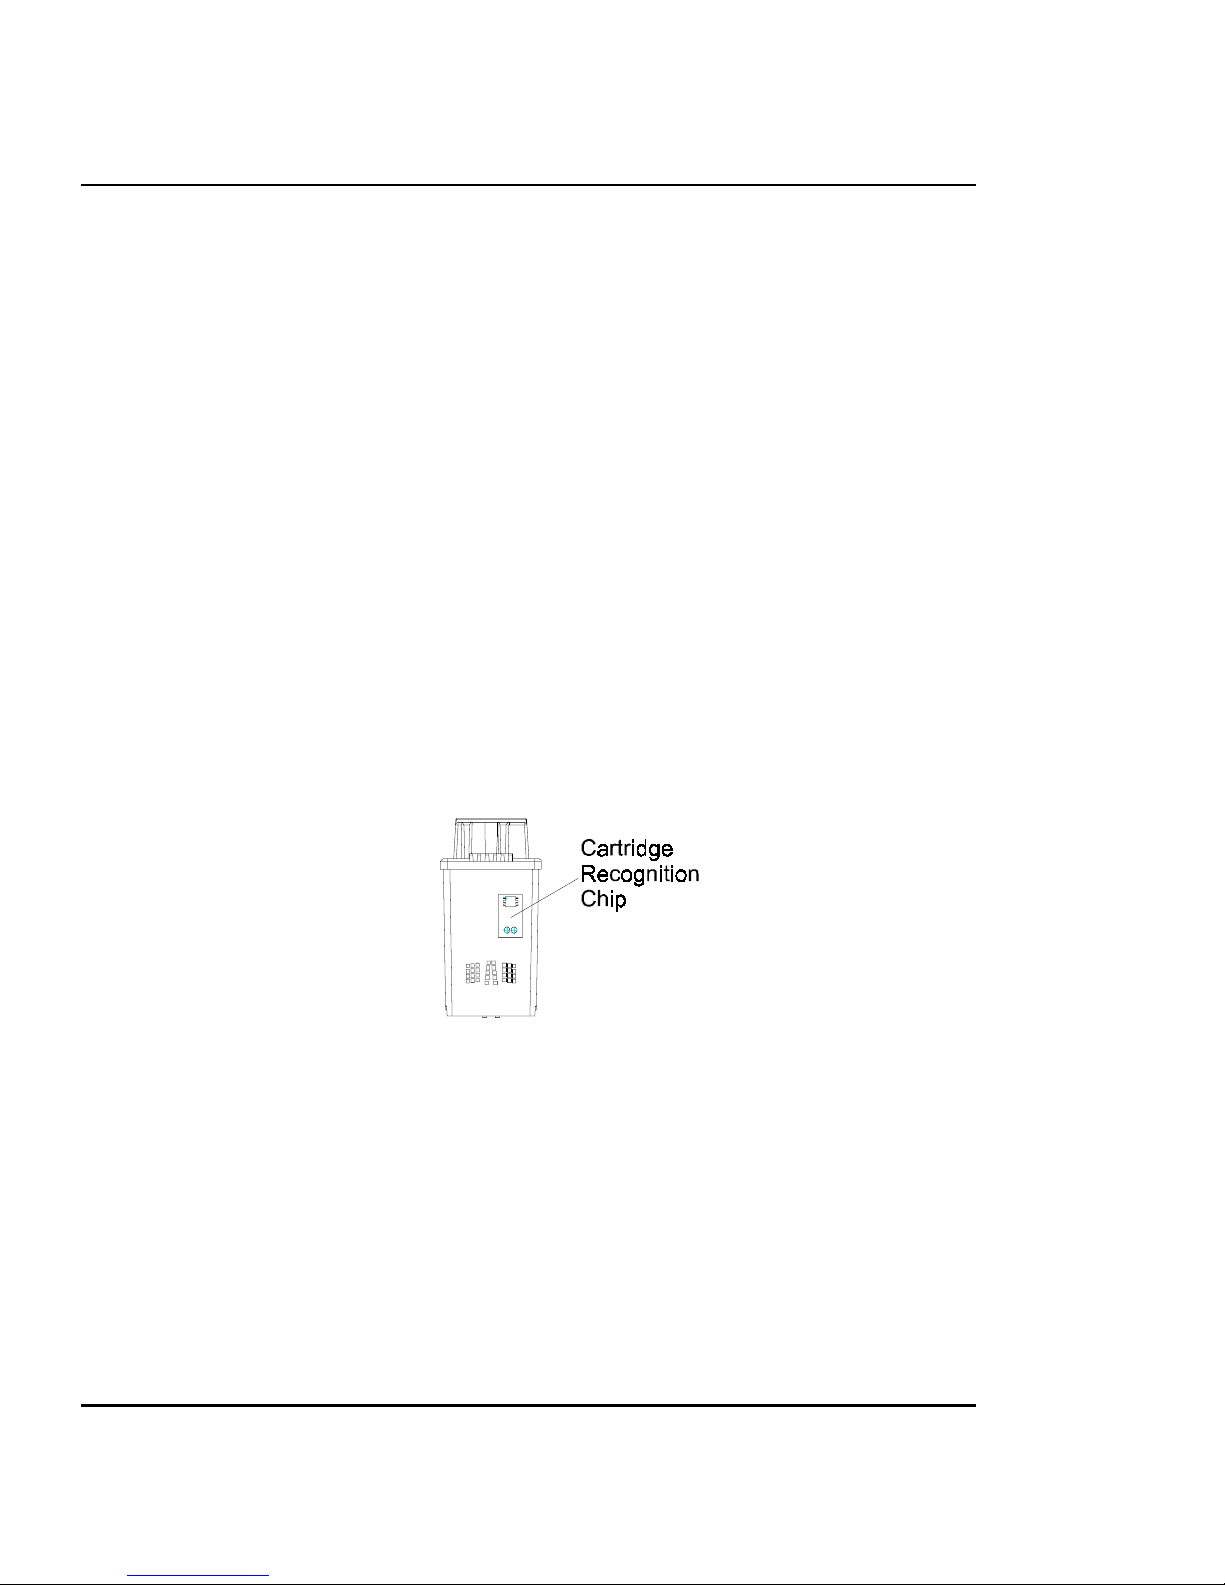
Note: V isually inspect each cartridge before filling it. Make sure the blue
tape is intact on the jet area of the cartridge. Do not remove tape at this
time! Inspect the IC chip on the cartridge. Make sure it is secure and in
approximately the location shown on the following figure. If any cartridge
is damaged, use one of your spare cartridges in its place and contact your
authorized ENCAD distributor/dealer for return/replacement of the
defective cartridge.
➪➪
➪➪
➪ To fill the ink cartridges
Note: Before starting, you may want to have paper towels handy and
wear disposable gloves.
! Leave the blue tape over the jet area until you are ready to prime the
jet plate.
! Do not touch the jet area or the flex contact area of the cartridge.
Page 25
Getting Started 2-11
1500 TX User's Guide
GETTING STARTED
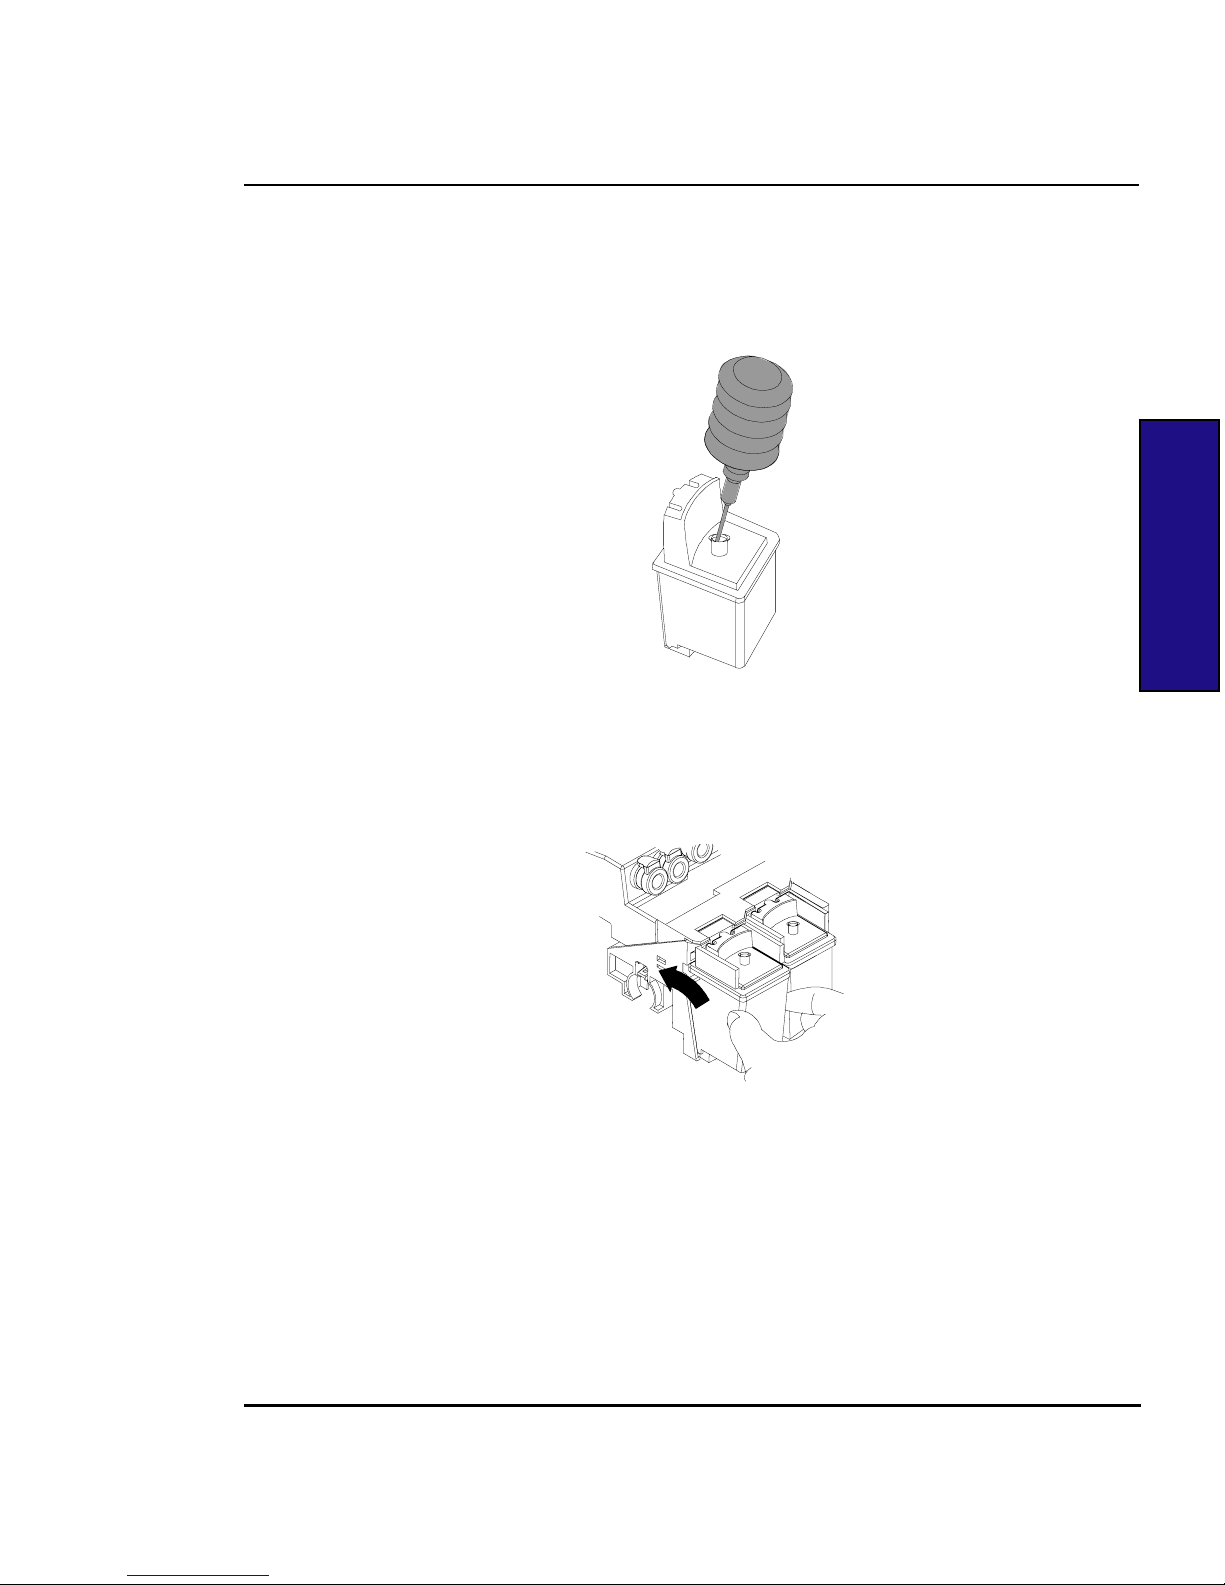
1 Remove the cap on the squeeze bottle.
2 Insert the needle of the squeeze bottle into the hole on the top of the
empty cartridge. Slowly push it down until it bottoms out, then retract it by
approximately 1/8".
3 Slowly press the plunger , dispensing all of the ink into the cartridge.
4 Recap the bottle.
5 Install the cartridge in the carriage.
! Caution: do not remove the blue tape yet.
Page 26

1500 TX User's Guide
2-12 Getting Started
6 Attach the cartridge tube assembly to the carriage only .
7 Repeat for each cartridge.
Priming the ink delivery lines
After filling the ink reservoirs and ink cartridges, you will need to prime each of
the four ink delivery lines to establish ink flow through the lines and ink cartridges.
The NovaPrime is provided for this purpose.
This procedure only needs to be done the first time you set up the printer . It is not
necessary when refilling the reservoirs or replacing ink cartridges.
When filling more than one color of ink, be sure to thoroughly wipe any excess ink
from the NovaPrime before working with the next color to avoid the possibility of
color cross contamination.
➪➪
➪➪
➪ To prime the delivery lines
! W ork with one ink color at a time to prevent contaminating another
color.
1 Press Utility/Access Cartridges to move the carriage to the position
which allows replacement of the ink cartridges.
Note: It is very important that the ink delivery line is not twisted.
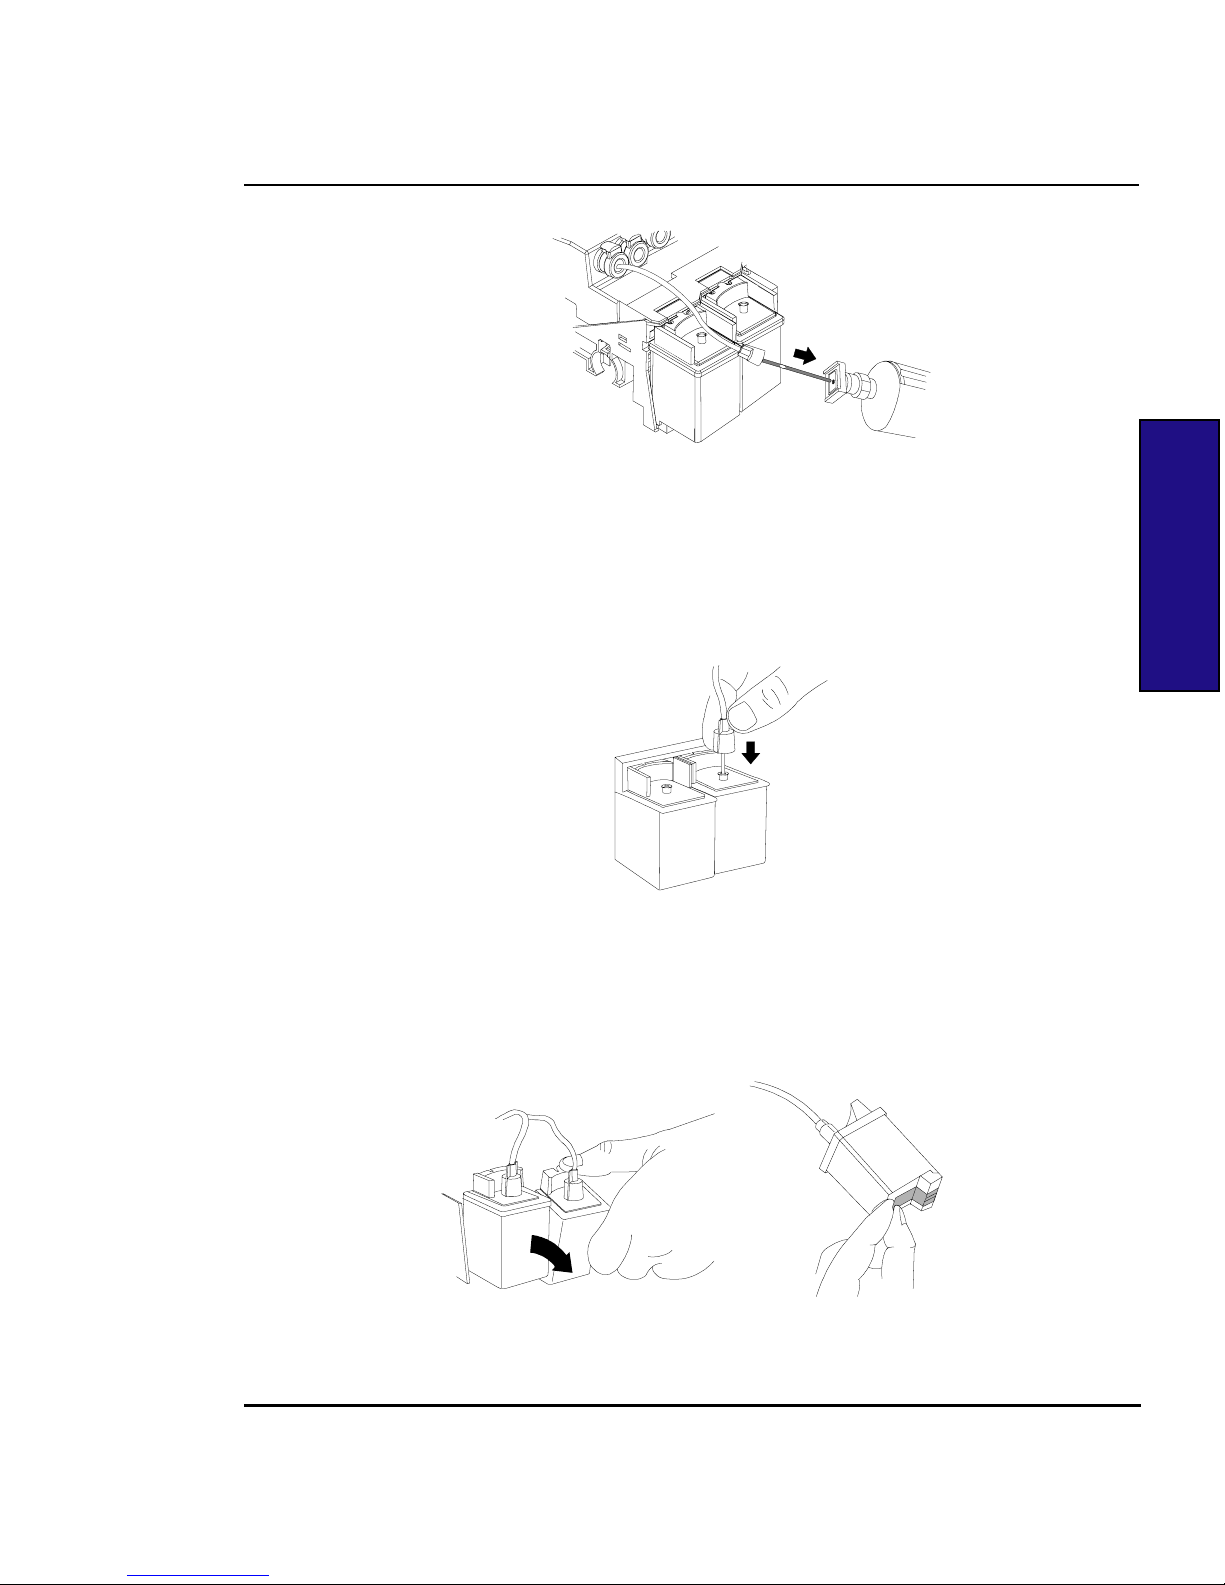
2 Insert the needle into the small hole on the NovaPrime.
Page 27
Getting Started 2-13
1500 TX User's Guide
GETTING STARTED
3 Press the button on the NovaPrime to activate the vacuum and draw ink
through the line.
4 When ink is visible in the NovaPrime sight tube, remove the cartridge
needle from the NovaPrime and insert it into the hole in the top of the ink
cartridge. Be sure the needle is tightly connected.
5 Gently tighten the fitting (~1/4 turn) to prevent air leaks. Do not over-
tighten.
6 Remove the cartridge from the carriage and remove the blue tape from
the jet area of the cartridge.
Page 28
1500 TX User's Guide
2-14 Getting Started
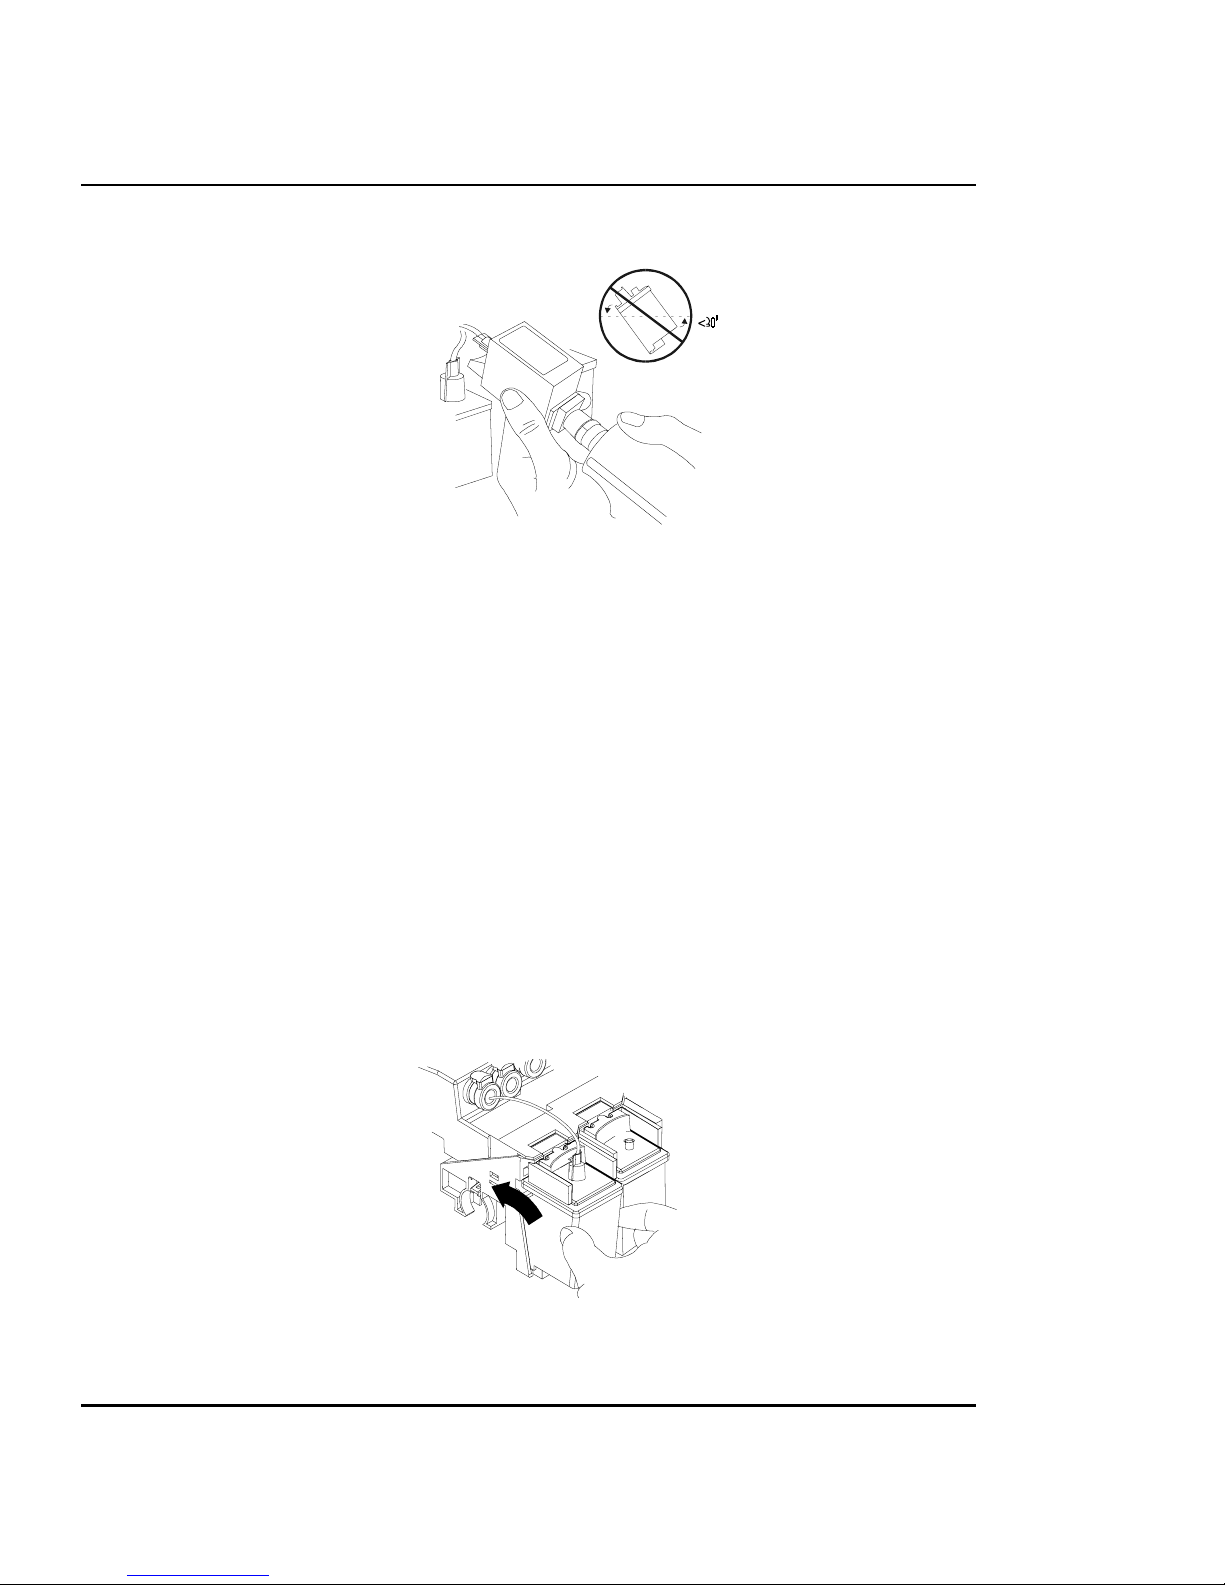
7 Place the suction end of the NovaPrime over the jet area of the cartridge.
8 Make sure the NovaPrime is making good contact with the jet area.
Pulse the pump 3 - 5 times, until the ink is visible in the NovaPrime sight
tube, maintain good contact between the inkjet plate and the pump for an
additional 5 seconds.
When removing the NovaPrime, use the silicone tip to wipe and clean the
jet plate. Remember to clean the silicone tip of ink before moving to the
next cartridge.
9 Check that there are no twists in the ink delivery line.
Check for ink on the jet plate. Continuous bleeding of the jet plate
indicates a loss of vacuum in the cartridge or an air leak in the lines.
Correct this before proceeding.
10 Insert the cartridge into the carriage.
11 Print the Prime pattern as described in the next section, then align the
cartridges as described later in this guide.
Page 29

Getting Started 2-15
1500 TX User's Guide
GETTING STARTED
Priming the ink cartridges
Before printing and at regular intervals during printing, the printer wipes the ink
cartridge jets at the service station. This function is user selectable during
printing or between prints. Still, ink cartridge jets can become clogged, especially with prolonged exposure to the air or with disuse. Printing the Prime
pattern helps to clear the jets and to check that the ink cartridges fire properly .
ENCAD recommends that you prime the cartridges daily to ensure the best
possible print quality .
The 1500 TX includes a feature called Open Jet Detection and Compensation.
This feature helps maintain optimal print quality and gives you the confidence to
print long, unattended jobs. During multi-pass printing, the 1500 TX will automatically compensate for jets found to be electrically damaged. The only
intervention needed is to verify that there are no clogged jets and then choose
which print mode is most appropriate for your needs. This is by printing the
Prime test pattern and then setting the print mode accordingly .
➪➪
➪➪
➪ To prime the ink cartridges
1 With media loaded, press Utility/Prime.
A test pattern prints.
2 If the printed results are unsatisfactory , run the test several more times
to unclog the inkjet nozzles.
➪➪
➪➪
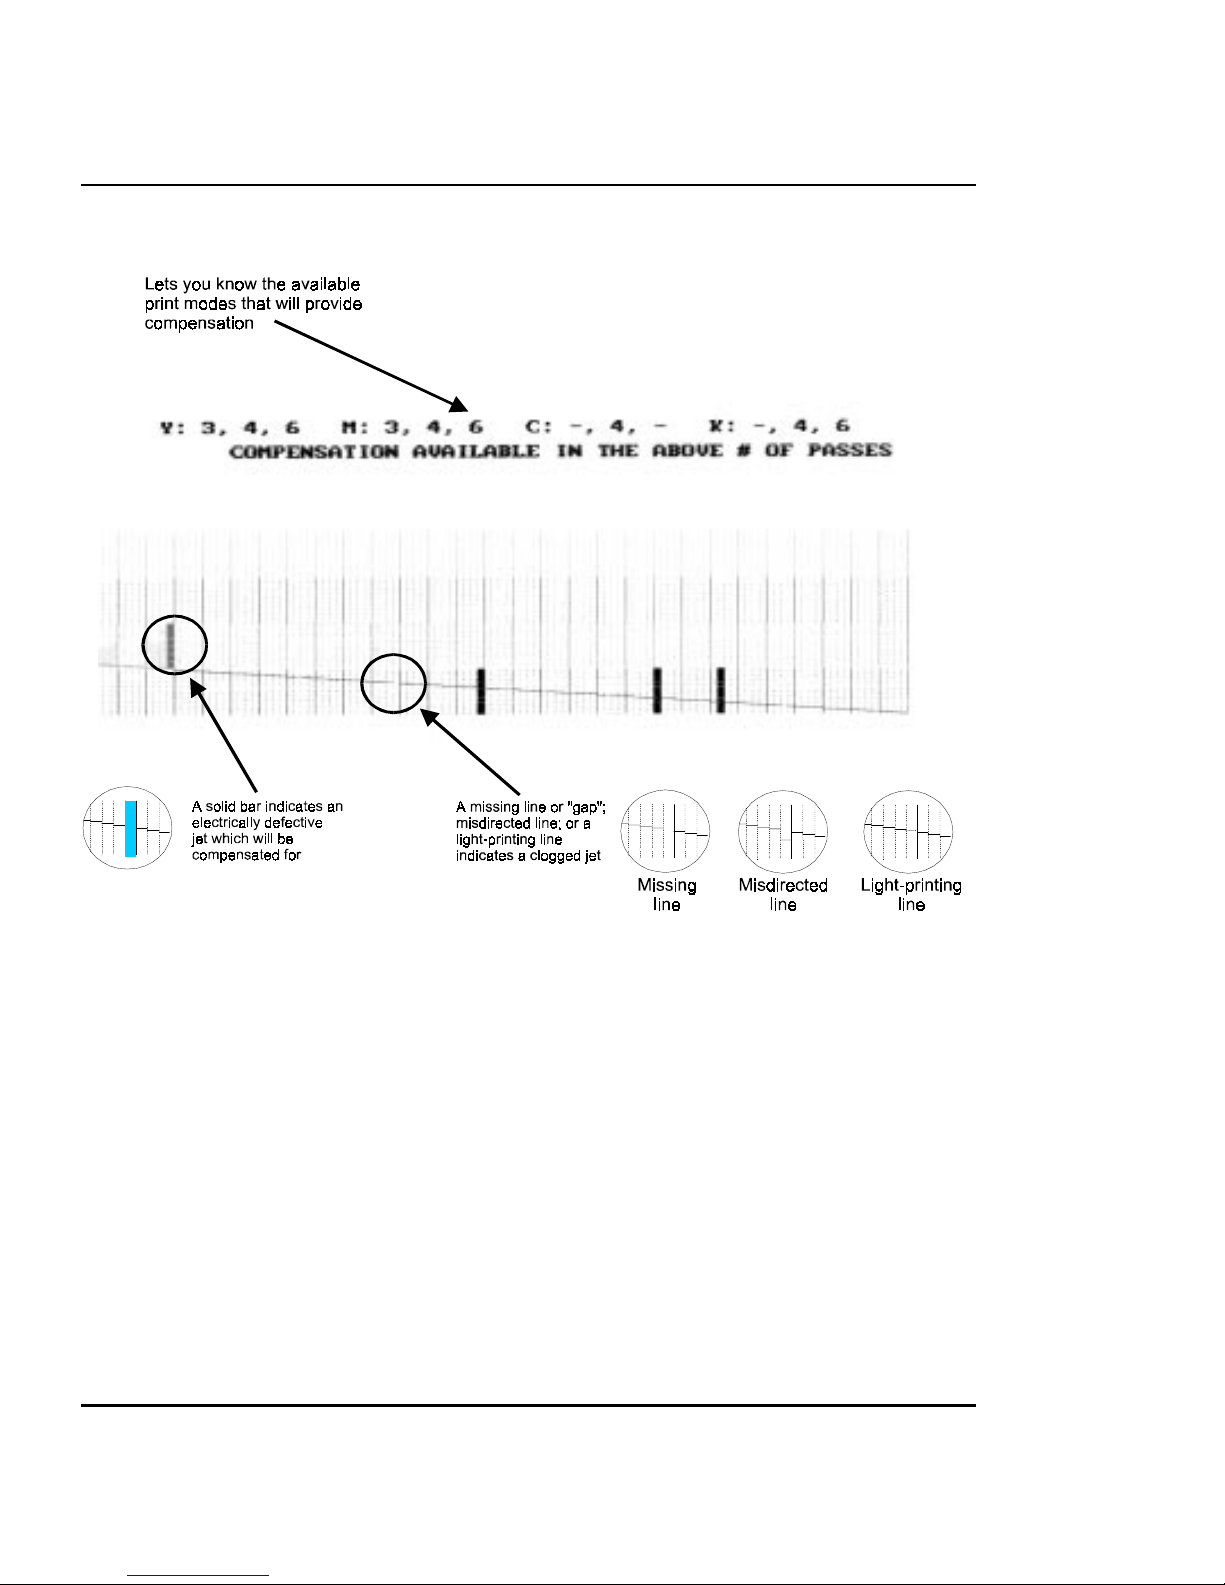
➪ To interpret the Prime test pattern
The test pattern consists of bands of color for each cartridge and a
sloping line. Within the Prime test pattern, each jet is represented with
a short horizontal line. T ogether , these short horizontal lines form a
“stair step” pattern. Electrically defective jets appear as solid bars.
Clogged jets appear as gaps or misdirected lines in the “stair step”
pattern. The print modes for which compensation is available are
shown clearly above the Prime.
Page 30
1500 TX User's Guide
2-16 Getting Started
Clogged jets
Clogged jets cannot be automatically detected and therefore must be cleared
manually . T o clear a clogged jet, clean and prime the affected cartridge according
to the instructions on page 4-8 of the Users Guide. Y our goal is to eliminate all
gaps in the “stair step” pattern before starting your job.
Electrically defective jets
Y our 1500 TX automatically discontinues use of electrically defective jets and
instead uses other jets to compensate for them.
Page 31

Getting Started 2-17
1500 TX User's Guide
GETTING STARTED
Choosing a Print Mode
The Prime test pattern will show which Print Modes can fully compensate for the
defective jets in each cartridge. The same print mode must be available for all
four print cartridges in order to provide full compensation. In the preceding
example, 4-pass printing is the only mode in which full compensation can be
achieved. If 6-pass printing is desired, the cyan cartridge would need to be
replaced. If 3-pass printing is desired, both the black and cyan cartridges would
need to be replaced.
Aligning the ink cartridges (color calibration)
Color calibration aligns the inkjets of the cartridges to each other . Misalignment
can result from minute variations in cartridges during manufacturing and from
cartridge alignment in the printer . Color test patterns let you check the horizontal
and vertical alignment values and adjust them for the best printing results. Check
the calibration each time you replace one of the ink cartridges. Further calibrations
are available for XY (paper axis). The procedures are included in Appendix A.
➪➪
➪➪
➪ To perform color calibration
1 With media loaded, press Utility/Color Calibration Menu/Calib Print Test.
The test patterns print as shown below.
Yellow
Magenta
Cyan
Black
Current heads test pattern
... -3 -2 -1 0 1 2 3 ...
Horizontal head-to-head test pattern
Page 32

1500 TX User's Guide
2-18 Getting Started
Black
Color
Vertical head-to-head test pattern
2 Press Cyan Adjust - V ertical.
3 Examine the printout and enter the number that represents the best color
alignment for cyan-vertical. See Appendix A for details.
4 Repeat for each color and for horizontal alignment as well.
Cartridge recognition
The printer is designed to use only ENCAD TX cartridges. T o eliminate potential
damage to the printer, a Cartridge Recognition feature checks to ensure that
ENCAD TX cartridges are installed, and that they are installed properly . Cartridge
recognition is performed when a print request is received (i.e., image data, prime,
etc.).
If the system detects a problem, the following error message is displayed on the
control panel: “Unrecognized Cartridge(s)” and the printer will beep three (3)
times.
➪➪
➪➪
➪ T o clear cartridge recognition error
1 Press Access Cartridges to move the carriage to the position which
allows replacement of the ink cartridges.
2 V erify that four ENCAD TX cartridges are installed. Replace any invalid
cartridges.
3 Press OK. If the problem has been corrected, the printer will proceed
with the print request.
Pausing the printer
T o pause the printer while printing, press the Pause button. Press it again to
resume printing.
Page 33

Getting Started 2-19
1500 TX User's Guide
GETTING STARTED
Canceling a print
T o cancel a print, first send a cancel order from the computer using the appropriate command for your software application. For example, you can delete the file in
the Print Manager/Print Options.
T o clear the buffer after cancelling a print, press Reset.
Page 34

1500 TX User's Guide
2-20 Getting Started
This page intentionally blank.
Page 35

Printer options 3
Y ou can define printer options through your application software or by
choosing settings from the printer's control panel. The following printer
options described in this chapter:
• Initialize (return to default settings)
• Print mode
• Paper Options
• User Setup
Returning to the default settings
Pressing the Setup/User Setup/Init Settings buttons returns all printer
options to the factory defaults. All saved user settings are lost. The table
that follows shows the printer defaults.
Printing the settings
Pressing the Setup/User Setup/Print Settings buttons causes the printer to
print a listing of its current settings. Be sure to have paper loaded before
you start.
PRINTER OPTIONS
Page 36

1500 TX User's Guide
3-2 Printer Options
USER SETTINGS DEFAULT OTHER OPTIONS
COLOR MODE COLOR MONO
QUALITY MODE NORMAL DRAFT, QUALITY , ENHANCED, USER
PRINT PASSES 4 1, 3, 6
CARRIAGE SPEED 5 1-10
PRINT DIRECTIO N BI UNI
AUTO-LOAD DELAY 6 1-12 SEC.
MEDIA STANDARD ALL US ENGR, US ARCH, ISO A, M_DIN,
GRAPHICS, MET OVER A, ISO B, SPECIAL
MARGINS NORMAL EXPANDED
AUTO CUT OFF ON
SAVE MEDIA ON OFF
AUTO WIPE ON OFF
CALIB XY OFF ON
SELECT USER 1 1 TO 8
SAVE USER 1 1 TO 8
UNITS SELECT ENGLISH METRIC
LANGUAGE ENGLISH GERMAN, FRENCH, ITALIAN, SPANISH,
PORTUGUESE, JAPANESE. CHINESE,
KOREAN
INK PREHEAT Y-2, B-2, C-2, M-2 OFF, 1-7
DRYER OFF ON
DRY TIME 0 0:10, 0:20, … 60:00
BAUD RATE 9600 19200, 38400
PARITY BIT EVEN NONE, EVEN, ODD
DATA BIT 7 8
SYSTEM SETTINGS DEFAULT OTHER OPTIONS
SUPPLY TYPE TAKEUP ROLL
LCD CONTRAST 9 1-16
CALIBRATION SETTINGS DEFAULT OTHER OPTIONS
DEADBAND 40 0…120
SLOW DEADBAND 0 -2…+2
CYAN VERTICAL 0 -9…+9
MAGENTA VERTICAL 0 -9…+9
YELLOW VERTICAL 0 -9…+9
CYAN HORIZONTAL 0 -9…+9
MAGENTA HORIZONTAL 0 -9…+9
YELLOW HORI Z O NT A L 0 -9…+9
PAPER AXIS 33.00 32-34
Page 37

Printer Options 3-3
1500 TX User's Guide
PRINTER OPTIONS
Choosing print mode options
Your printer offers several print modes which let you make tradeoffs between
speed and quality.
The print mode you use depends on various factors, such as your software
application, whether you’re printing in color or monochrome, and the type of
media you’re using. Each print mode directly affects the printing speed and
quality of the image you print, so you should understand the differences.
Each of the print modes attempts to strike a balance between speed and quality,
with the quality mode providing quality images at a reasonable printing speed
for most users. Whenever you choose a print mode other than Normal, you will
choose to emphasize either speed or quality.
Print mode options include the following:
• Color mode
• Print quality
• Print passes
• Carriage speed
• Print direction
Default print mode settings are summarized in the table which follows. It is not
necessary to set all the parameters, unless you want to create a user-defined
print mode.
MODE DPI UNI- OR
BI-DIRECTIONAL
# OF PASSES CARRIA GE
SPEED
DRAFT 300X300 BI 3 5
NORMAL
(DEFAULT)
300X300 BI 4 5
QUALITY 300x300 BI 6 5
ENHANCED 300X300 UNI 6 5
USER 300X300 User-defined through control panel.
Note: when running at carriage speeds faster than the default, it is recommended
that ink levels in the reservoirs be no more than 300 ml maximum.
Page 38

1500 TX User's Guide
3-4 Printer Options
Color mode
Color mode refers to whether you are printing in color or monochrome.
➪➪
➪➪
➪ To choose the color mode
1 Press Setup/Print Mode/Color Mode.
2 Choose Color or Mono.
3 Press OK.
Print modes
There are five print modes. Draft and Normal modes are suited for high speed
priting on most fabrics. Normal mode is the default. Quality and Enhanced modes
are usesd for printing on papers such as matte and photogloss. Use Enhanced
mode if banding occurs. In User mode, the printer paramters are defined by the
user at the control panel.
➪➪
➪➪
➪ To choose print quality
1 Press Setup/Print Mode/Quality Mode.
2 Choose the desired quality .
3 Press OK.
Print passes
The number of passes indicates how many times the cartridges must fire to lay
down the ink for a complete scan line. You may select single, three, four, or six
passes, so that on a single pass, the jets fire a third (or a quarter) of the dots. If
you're printing an image with heavy fill or shading, setting the print mode to an
option that lays down less ink (e.g., four pass) can help prevent running and
bleeding.
➪➪
➪➪
➪ To change the number of passes
1 Choose Setup/Print Mode/Print Passes.
2 Choose Single Pass, Three Pass, Four Pass or Six Pass.
3 Press OK.
Page 39

Printer Options 3-5
1500 TX User's Guide
PRINTER OPTIONS
Print direction
Print direction specifies whether the inkjets fire on both passes of the carriage over
the print area (bidirectional), or just on the return pass (unidirectional). If you’re
printing an image with heavy fill or shading, unidirectional can reduce running and
ink bleeding. If you’re more concerned with printer speed, bidirectional firing can
decrease your printing time.
➪➪
➪➪
➪ To change the print direction
1 Press Setup/Print Mode/Print Direction.
2 Choose Unidirectional or Bidirectional.
3 Press OK.
Choosing paper options
Paper options let you define the following:
• Supply T ype*
• Media Standard
• Margins
• Auto-Load Delay
• Auto-Cut
• Save Media
• Auto-Wipe
*Media feeding and loading is covered in Chapter 2.
Page 40

1500 TX User's Guide
3-6 Printer Options
Media standard
When you create an image, you determine its size at the computer. It's
important that you know the size of the image and load the appropriate
size media because the printer automatically defines the print area based
on the loaded media's width. Be sure that the media you load is wide
enough to accommodate the image. If the media is smaller than the image,
the image may be truncated. Minimum media width is 11".
If you choose "All" as the media standard, all medias can be used. This
option offers the most flexibility when printing on fabrics. If you are
printing on media such as paper or photogloss, choose graphic arts as the
media standard.
➪➪
➪➪
➪ To choose the media standard
1 Press Setup/Paper Option/Media Standard
2 Choose the size of media you are loading.
3 Press OK.
Margins
Margins can be set to Normal or Expanded. The Expanded setting expands the print area and decreases the margins.
Any part of the image that extends into the margin will be clipped. When
the Margins option is set to Expanded, make sure that you align the media
accurately using the guide on the right of the platen so that the ink doesn’t
exceed the edge of the media.
Rollfeed maximum printing area
Normal: 0.59" (15 mm) margin on three sides.
Expanded: 0.197" (5 mm) margin on three sides.
When a new roll is loaded, or after a cut edge, the printer will force a 3"
top margin to assure a clean start to the print. This is not used with
successive prints, so the margin between prints in this case is 0.4" with
expanded margins and 0.625" with normal margins.
Page 41

Printer Options 3-7
1500 TX User's Guide
PRINTER OPTIONS
➪➪
➪➪
➪ To set margins
1 Press Setup/Paper Option/Margins.
2 Choose Normal or Expanded.
3 Press OK.
Auto-Load Delay
Auto-Load delay lets you set the time between when the printer senses the media
and when printing starts. This lets you manually reposition the media if necessary .
The default is 6 seconds, selectable from a range of 1-12 seconds.
➪➪
➪➪
➪ To set auto-load delay
1 Press Setup/Paper Option/Auto-Load Delay .
2 Choose the delay time.
3 Press OK.
Auto-Cut
When the Auto-Cut option is set to on (off is the default), the printer automatically
cuts the media when the image is complete. Be sure the image is dry before
cutting, turn on the dryer and/or specify a Dry Time. See “Setting a Dry T ime” in
this chapter for the procedure. You can select Cut from the control panel at any
time to cut the media.
Note: Automatic cutting is disabled when the paper feed option is
set to TAKEUP.
➪➪
➪➪
➪ To set auto-cut
1 Press Setup/Paper Option/Auto-Cut.
2 Choose On or Off.
3 Press OK.
Page 42

1500 TX User's Guide
3-8 Printer Options
Save Media
When the Save Media is On (the default), the media advances only as far as
needed to print the image. With the Save Media option turned of f, the printer
advances the full print area of the loaded media. For example, if a 36 inch roll is
loaded, the printer advances the length of the print area for a standard 36 x 48"
sheet even if the printed image is only 30 inches long.
➪➪
➪➪
➪ To turn off Save Media
1 Press Setup/Paper Option/Save Media.
2 Choose Off.
3 Press OK.
Auto-Wipe
The cartridge jet plates are periodically wiped during printing. The default for this
function is ON. If you are having problems with banding, you can sometimes
solve the problem by setting the wiper to OFF; however, this can cause clogging of
the inkjets.
➪➪
➪➪
➪ To turn off the wiper
1 Press Setup/Paper Option/Auto-Wipe.
2 Choose Off.
3 Press OK.
Page 43

Printer Options 3-9
1500 TX User's Guide
PRINTER OPTIONS
Defining user setup
You can save the options you use most frequently so you don’t have to
reconfigure the printer each time you print an image. You can define up to eight
different combinations of options and save them with a user number ranging
from 1-8. Select the user number you want to use before sending an image to the
printer.
You can save settings for the following options:
• Cut On or Off • Auto-Wipe On or Off
• Print Mode • Media Standard
• Monochrome or Color • Normal or Expanded Margins
• Drying Time • Parity
• Save Media On or Off • Baud Rate
• Quality Mode • Dryer On/Off
➪➪
➪➪
➪ To save user setup
1 Press Setup/User Setup/Save User.
2 Scroll to the number for the user settings.
3 Press OK.
➪➪
➪➪
➪ To use a previously saved user setting
1 Press Setup/User Setup/Select User.
2 Scroll to the number for the user settings to use.
3 Press OK.
Page 44

1500 TX User's Guide
3-10 Printer Options
Choosing a language
Printer menus and options can be displayed in the following languages: English,
German, French, Italian, Portuguese, Spanish, Chinese, Japanese, and Korean.
➪➪
➪➪
➪ To choose a language
1 Press Setup/User Setup/Language.
2 Choose the language to display .
3 Press OK.
Choosing ink options
Ink Preheat
If you are experiencing banding, you may want to experiment with the ink preheat
settings. These will vary depending on the ambient temperature where the printer
is located and on the media and ink used. Note: setting the preheat level too high
can cause the ink to sputter . Values are Off, 1-7. Defaults are: black = 2, yellow =
2, magenta = 2, cyan = 2.
➪➪
➪➪
➪ To set the ink preheat time
1 Press Setup/Ink Option/Ink Preheat.
2 Choose a preheat value.
3 Press OK.
Page 45

Printer Options 3-11
1500 TX User's Guide
PRINTER OPTIONS
Dry time
Unattended prints might require drying time to prevent the ink from smearing
when the image touches the takeup roll or previously printed images. In addition,
you may want to change drying time depending on the media you are using, the
ambient temperature and the humidity . Dry T ime values range from 10 seconds
to 60 minutes. When the Dry Time has expired, the printer rolls or cuts the
image and begins printing the next image in the buffer .
➪➪
➪➪
➪ To set the dry time
1 Press Setup/Ink Option/Dry T ime.
2 Choose a time from 10 seconds to 60 minutes.
3 Press OK.
Dryer On/Off
The dryer installed at the base of the printer stand helps to dry ink.
➪➪
➪➪
➪ To enable the dryer
1 Press Setup/Ink Option/Dryer .
2 Choose On.
3 Press OK.
LCD Contrast
The LCD Contrast function lets you adjust the brightness of the control panel.
The range is 1-16, where 16 is less contrast. The default is 9.
➪➪
➪➪
➪ To set LCD contrast
1 Press Setup/User Setup/LCD Contrast.
2 Choose the contrast value.
3 Press OK.
Page 46

1500 TX User's Guide
3-12 Printer Options
This page intentionally blank.
Page 47

MAINTENANCE
AND STORAGE
Printer maintenance and storage 4
This chapter provides information on the following:
• Periodic maintenance
• Preparing your printer for storage or transport
• Using the information function.
T o Assist you in printer maintenance, an optional kit is available, P/N
210468-00.
Periodic maintenance
Periodic maintenance functions which you will want to perform to
assure continued quality printing include:
• Refilling the ink reservoirs
• Changing ink type
• Replacing ink cartridges
• Cleaning the ink cartridges
• Cleaning the service station
Refilling ink reservoirs
! Use of inks other than ENCAD TX may cause damage to
your printer.
The ink reservoirs are located at the left side of the printer. You can
refill any time, even while printing. Be sure the reservoirs always have
ink in them - it is a good idea to keep them full. Allowing a reservoir
to run out of ink causes the ink delivery lines to deprime and may
cause ink leakage and damage to the ink cartridges and carriage
electronics.
Page 48

1500 TX User's Guide
4-2 Printer maintenance and storage
➪➪
➪➪
➪ T o fill the ink reservoir
Note: Before starting, you may want to do the following:
•
Have paper towels handy .
•
Wear disposable gloves.
! Open only one reservoir at a time to prevent ink fromacciden-
tally contaminating another color.
1 Assemble the pouring spout by attaching the tube to the lid.
2 Replace the lid of the 500 ml ink bottle with the pouring
spout.
3 Be sure that the opening in the pouring spout tube is below the pouring
spout lid or ink will spill.
4 Open the front left cover to gain access to the reservoirs.
5 Remove the cap from the pouring spout.
6 Remove the cap from the reservoir you want to fill.
7 Verify that the ink color and type in the bottle and in the reservoir ink
match.
8 Pour the ink into the reservoir to ~1 inch from the top. Do not overfill.
9 Replace the cap on the reservoir and close the panel.
Page 49

Printer maintenance and storage 4-3
1500 TX User's Guide
MAINTENANCE
AND STORAGE
Removing and storing ink cartridges
➪➪
➪➪
➪ To remove cartridges
Note: If you lay down a cartridge with ink in it, lay it on its
front side so that the flex contacts face up. This prevents
ink from leaking out either the top opening or out the jet
area on the bottom.
! Do not touch the flex contact area of the cartridge.
1 Press Utility/Access Cartridge to move the cartridges out of the service
station.
2 Disconnect the quick connect fitting, noting the color fitting to which it
was connected.
3 Remove the cartridge from the carriage by gently pulling the top edge
toward you, then lifting it out of the carriage. Leave the tube fitting
attached to the cartridge to avoid leaking.
4 Wipe any ink from the fitting using a lint-free cloth.
5 Store the cartridge in the cartridge garage to keep it ready for use and
repeat the previous steps for the remaining cartridges.
Page 50

1500 TX User's Guide
4-4 Printer maintenance and storage
Replacing the reservoirs
1 Remove all the cartridges before replacing the ink reservoirs.
2 Open the left front cover to access the reservoirs. Leave the caps on the
reservoirs. Disconnect the quick connect fitting for each reservoir, noting
the color of the fitting to which it was connected.
3 Slide each reservoir forward to remove it from the printer .
Store the reservoirs away from direct sunlight in an environment similar to
that of the printer.
4 Replace the reservoirs with new reservoirs.
5 Fill the reservoirs with ink and attach to the quick connect fittings not used
for the previous type of ink.
Installing new cartridges
Be sure the cartridges you are installing contain the same type of ink as
the reservoirs. Fill them, if necessary , snap them into place and attach the
quick connect fittings as described in Chapter 2.
! The printer will only operate when TX cartridges are in-
stalled. Installing non-TX series cartridges may damage the
printer and will prevent it from operating correctly .
! Don’t attempt to install or remove an ink cartridge from the
carriage at any time without first selecting Utility/Access
Cartridges to move the carriage away from the service
station. Don’t attempt to manually pull the carriage out of
the service station while the printer is turned on. This can
damage the printer.
! Touching the copper area that houses the electrical intercon-
nect and the inkjets can damage the cartridge.
Page 51

Printer maintenance and storage 4-5
1500 TX User's Guide
MAINTENANCE
AND STORAGE
Each time you place new ink cartridges in the printer, prime and calibrate
them to ensure the highest quality printed images. Priming is covered in
Chapter 2 and calibration procedures are discussed in Appendix A.
Ink cartridges generally last as long as the ink in a reservoir . When a
cartridge misfires or the quality deteriorates, you will want to replace it.
Purging ink delivery lines
Y ou should pur ge the ink lines and rinse them with distilled water very
well before storing or transporting the printer . Y ou will then have to
reprime the lines as described in Chapter 2.
➪➪
➪➪
➪ To purge ink delivery lines
1 Remove all four cartridges before purging the ink lines.
2 Disconnect the ink delivery lines from the ink reservoirs. Carefully wipe
any excess ink from each connector using a paper towel before proceed-
ing.
3 Insert the tube that was in the cartridge into a container of distilled water .
4 Connect the NovaPrime to a connector at the ink reservoir and turn it on
until ink stops flowing into the collection bottle.
5 Repeat the same procedure for the rest of the lines.
Page 52

1500 TX User's Guide
4-6 Printer maintenance and storage
Periodic cleaning
T o assure the best quality printing, you should clean the cartridges and
service station once a week. In addition, you should wipe any areas of
the printer exposed to ink and the print shaft using a lint-free cloth
moistened with water.
Note: Do not lubricate the print shaft! Keep it clean using a
clean cloth and rubbing alcohol.
The table that follows identifies periodic cleaning which you can perform
to keep your printer in top operating condition.
Interval Component Cleaning Agent
Immediately
Any - c lea n u p ink spills Distilled wa te r
Weekly
Service sta tio n se a ls an d wipers Distilled water
Monthly
Slide shaft Isopropyl alcohol
Encod e r str ip to p a n d bottom Distilled wa te r
Cartridg e je t a re a Distilled water
Semiannually
Extern al a r ea s Distilled wa te r
Pinch rollers and lower drive
rollers
Distilled wa te r
Annually
Encoder sensor Canned air or alcohol-
moistened cloth.
Inner p la ten Distilled wa ter
Carriage Distilled wa te r
As Required
Keypad Industrial film cleaner
Other
When a cartridge is changed
or there is a p ro b le m with the
prime
Cartridge dimples/flex driver
cables
Isopropyl alcohol
Page 53

Printer maintenance and storage 4-7
1500 TX User's Guide
MAINTENANCE
AND STORAGE
Materials to use for cleaning
• Isopropyl alcohol (industrial grade)
• Lint-free soft cloth/paper wipe
• Dry lint-free cloth
• Cotton swabs
• Ultrasonic cleaner (if available)
• Distilled/Reverse osmosis water (purified water)
• Canned/compressed air .
Components to annually inspect
The following components should be cleaned and inspected for damage
on an annual basis and replaced if necessary .
• Carriage belt
• Trailing cable
• Service station seals and wipers
• Cutter
Cleaning the ink cartridge jet plate
The ink cartridges may require occasional maintenance when used in
low humidity . If repeated priming doesn’t unclog the head, follow the
cleaning procedure below . In addition, cartridges will wear out after
prolonged use. If cleaning the cartridge does not restore print quality ,
replace it.
Page 54

1500 TX User's Guide
4-8 Printer maintenance and storage
➪➪
➪➪
➪ To clean the ink cartridge jet plate
1 Press the Utility/Access Cartridges buttons to move the carriage away
from the service station.
2 Disconnect the quick connect fittings, noting the color of the fitting to
which the cartridge was connected.
3 Remove the ink cartridge from the printer by gently pulling the top of
the cartridge toward you, then lifting it up out of the carriage.
4 Press lightly against the jets with a water-moistened, lint-free, non-paper
cloth (do not use alcohol). Gently blot any excess ink. Blot - do not wipe.
Wiping may damage the jets. (Ink will appear on the cloth; this is normal.)
Reinstall the cartridge in the carriage and reconnect the ink supply line.
! Never use alcohol to clean the jet area of the cartridge.
5 Press the Utility/Access Cartridges buttons to return the carriage to the
service station.
6 Press the Utility/Prime buttons to check the cartridges. Repeat two more
times, if necessary . If the cartridges fire correctly , perform the appropriate
calibration procedures from Appendix A.
7 If the cartridge continues to misfire, remove the cartridge. Rinse the ink
from the bottom of the cartridge using warm distilled water.
8 Dry all surfaces of the cartridge, except for the bottom, or jet area and the
circuit plate. Reinstall the cartridge and reprime. Check the Prime test
pattern and set the print mode as indicated on the test pattern print. (See
Chapter 2 for instructions on interpreting the Prime test pattern.)
Cleaning the service station
Ink and dust can accumulate in the service station causing poor print
quality . Depending on how frequently you print, you may want to clean
the service station every week using the following procedure.
Page 55

Printer maintenance and storage 4-9
1500 TX User's Guide
MAINTENANCE
AND STORAGE
➪➪
➪➪
➪ To clean the service station
1 Select Utility/Access Cartridges to move the carriage away from the
service station.
2 Raise the printer cover.
3 Locate the service station release tab at the right end of the service
station base. Move it gently to the left and lift to remove the entire
service station assembly .
4 Rinse the service station and wipers with warm water . Use cotton swabs
to clean small spaces.
5 Inspect the seals and wipers. Any damage to these parts can cause the
cartridge jetplate to clog, resulting in misfires. Compare the wipers to
the figure which follows and replace the service station if necessary .
6 Dry the service station and replace it, putting the left side in first. Make
sure the release tab re-latches.
7 Press Utility/Access Cartridge to return the carriage to the service
station.
Page 56

1500 TX User's Guide
4-10 Printer maintenance and storage
Maintaining the NovaPrime
The NovaPrime is an accessory used to establish ink flow when new
cartridges and reservoirs are installed. It is battery operated and uses 4 AA
batteries.
➪➪
➪➪
➪ To replace the battery
1 Remove the screw at the end of the unit and open the NovaPrime.
2 Note the orientation of the battery pack. Pull it out and replace the AA
batteries.
➪➪
➪➪
➪ To clean the NovaPrime
Clean the NovaPrime (part that touches the cartridge) with distilled water
and a lint-free cloth to remove ink. Thoroughly wash the ink bottle and
allow to air dry .
Preparing your printer for transport or storage
If you need to take your printer out of service, for example, to ship it to another
location or to send it to a repair depot do the following:
• Remove the ink cartridges and store them in a sealed plastic bag, away
from direct light and heat.
• Remove the ink reservoirs.
• W ash out the service station.
Page 57

Printer maintenance and storage 4-11
1500 TX User's Guide
MAINTENANCE
AND STORAGE
Returning the printer for service
If for any reason, you need to return your printer to ENCAD for service,
you must remove the cartridges, ink reservoirs, and purge the
ink supply lines. Before returning the printer , contact ENCAD T echni-
cal Support for an RMA number and for complete instructions on
preparing your printer for shipment.
Accessing printer information
The printer can provide you with information on the following:
• Plot area
• Memory
• Calibration settings
• On time
• Plot time
• Firmware version
➪➪
➪➪
➪ To access printer information
1 Select Utility/Print Settings or Utility/Display Settings.
2 Press the button for the item for which you want information.
3 Press OK.
Page 58

1500 TX User's Guide
4-12 Printer maintenance and storage
This page intentionally blank.
Page 59

APPENDICES
Calibration A
Cartridge calibration
For best results, the cartridge calibration must be performed each time
you install a new cartridge. The printer draws a series of three patterns.
The first pattern, labeled “Current Heads (Y, M, C),” shows yellow,
magenta, and cyan + which represent the horizontal and vertical alignment between the cartridges.
Yellow
Magenta
Cyan
Black
Current Heads (Y, M, C)
When the colored + lines up horizontally and vertically with the black
alignment marks, no adjustment is required.
The second pattern, labeled “Color Horizontal Head-To-Head Calibration,” horizontally aligns the cartridges. Three lines similar to the
example below are printed with the following color combinations:
yellow/magenta, magenta/cyan, and cyan/black.
... -3 -2 -1 0 1 2 3 ...
Color Horizontal Head-to-Head Calibration
The third pattern, labeled “Color Vertical Head-To-Head Calibration,”
vertically aligns the cartridges.
Black
Color
Color Vertical Head-to-Head Calibration
The numbers below each set of lines represent the different horizontal
and vertical alignment values.
Page 60

1500 TX User's Guide
A-2 Calibration
Examine the patterns to determine which value shows the best horizontal
and vertical alignment between cartridges. These are the values you will
set in the printer menu.
Defining Calibration Units
Y ou can set the calibration units to English or Metric.
➪➪
➪➪
➪ T o set calibration units
1 Select Setup/User Setup/Units Select.
2 Choose English or Metric.
➪➪
➪➪
➪ To adjust the alignment values
1 Install ink cartridges in the printer . (See Chapter 2 "Getting started" for
cartridge installation instructions.)
2 Load media in the printer that is at least 11 inches (28 cm) wide. (See
Chapter 2 "Getting started" for media loading instructions.)
3 Prime the heads to ensure that all cartridges fire correctly. Make sure
Color is the selected print mode.
4 Select Utilities/Color Calibration/Calib Print Test.
The test patterns print.
5 Examine the Current Heads pattern; the colored +’s should align with the
black lines. If any of the +’s don’t align, perform the procedure for
adjusting the color values.
6 Press Cyan - Vertical.
7 Examine the printout and enter the number that represents the best
color alignment for cyan-vertical.
8 Repeat for each color and for horizontal alignment as well.
Page 61

Calibration A-3
1500 TX User's Guide
APPENDICES
XY calibration
Choosing Utility/Paper Axis Test lets the printer draw a set of
vertical marks to calibrate the paper axis and a set of horizontal
marks to measure the carriage axis. To measure the marks laid down
by the printer, you will need a ruler or scale at least 33 inches (838.2
mm) long. The vertical marks should be exactly 33.00 inches (838.2
mm) apart. The horizontal marks should be exactly 21.00 inches
(533.4 mm) apart. If the distance between the marks is different from
that shown on the display, you adjust the printer by setting its
values to match the length or width you measured.
When you set the XY calibration values, all subsequent images are
printed using the new values until you manually reset the calibration.
The XY calibration values are only used when the Use XY Calibration option is set to On (see Chapter 2). XY calibration should not be
used for merged vector/raster images.
➪➪
➪➪
➪ To print the XY calibration test pattern
1 Load the printer with media that is at least 36 (91 cm) inches long (or
the media that you are going to run; you cannot load a 36" sheet and
then run the calibration from a roll feed because the line lengths will
not match).
2 Press Utility/Calibration/Paper Axis T est.
The printer prints two marks.
3 Remove the media from the printer and measure the distance
between the witness marks. The distance between the marks should
be exactly 33.00 inches (838.2 mm).
Page 62

1500 TX User's Guide
A-4 Calibration
Paper axis calibration
➪➪
➪➪
➪ To calibrate the horizontal axis
1 Select Utility/Calibration/Paper Axis T est.
2 Measure the test pattern printed when you pressed Utility/Calibration/Use
Calib XY. The distance between the marks should be exactly 33 inches
(838.2 mm).
3 Press the Next Selection button until the dimension you measure dis-
plays.
4 Press OK.
Page 63

APPENDICES
Installing additional memory B
Your printer is shipped with 8 MB of RAM and is upgradable to a
maximum of 128 MB, 64 MB per socket. Additional memory helps to
free the host computer more quickly.
Acceptable SIMM sizes
Printer memory may be upgraded by installing 72-pin SIMMs that are
either 32 or 36 bits wide. (The printer does not use parity bits.) The
SIMMs must not exceed a height of 2 inches (5 cm) and must conform
to JEDEC Std. 21-C, release 4.
The printer will accept 4 MB, 8 MB, 16 MB, 32 or 64 MB SIMMs.
The SIMMs in the following table have been tested and found to func-
tion properly in ENCAD printers. Other manufacturer's SIMMs may be
used if they are within the height limitation and conform to JEDEC
specifications; however, ENCAD does not guarantee compatibility.
ENCAD's bulletin board and Web page provide further information on
SIMM compatibility. You may want to check there for the latest information.
Note: ENCAD printers do not use parity. Either 32-bit or 36-bit
wide SIMMs may be used.
Vendor 4 Megabyte 8 Megabyte
Micron MT8D132M-6,-7 MT16D232M-6,-7
Samsung KMM5321200AW-6,-7 Siemens - HYM322140S60,70
Toshiba THM3210B0ASG-60,-70 THM3220C0ASG-60,-70
16 Megabyte 32 Megabyte
Micron MT8D432M-6,-7 MT16D832M-6,-7
Samsung KMM5324100AK-6,-7 KMM5328100AK-6
Page 64

1500 TX User's Guide
B-2 Installing additional memory
SIMM installation
The SIMMs are located on the PCB inside the right cover. The PCB
comes with one SIMM slot empty and 8 MB RAM SIMM installed on
the board. The following procedures describe how to remove the right
cover, remove any currently installed SIMM(s), install new SIMM(s)
and replace the cover. You will need a #2 Phillips screwdriver to complete the procedures.
! A LWAYS UNPLUG THE POWER CORD BEFORE
BEGINNING.
! To avoid static damage to the printer, never touch the circuit
board or its components without first touching the bright
metal portions of the printer. Static damage is more likely
when the relative humidity is low .
➪➪
➪➪
➪ To remove the right cover
1 Disconnect the power and the interface cables.
2 Remove the printer's top cover.
3 Remove the three screws under the right side of the printer which
attach the right side cover and the two screws which attach the cover to
the right plate.
4 Slide back the pin that holds the right cover to the rear cover.
5 Move the right cover, being careful to clear the parallel port on the back
of the unit.
6 Carefully disconnect the ribbon cable from the connector on the PC
board and the other two cables that go to the cover.
Page 65

Installing additional memory B-3
1500 TX User's Guide
APPENDICES
➪➪
➪➪
➪ T o remove the SIMMs
1 Facing the top of the SIMMs, push the side clips gently to the outside
(away from the SIMM).
2 Push over and pull out, being careful not to damage the fingers on the
top.
Page 66

1500 TX User's Guide
B-4 Installing additional memory
➪➪
➪➪
➪ T o install the new SIMM
1 Slowly push the SIMM to a 90o angle until the two side clips snap into
place. Make sure the SIMM is fully seated.
2 Carefully reconnect the ribbon cable harness to the connector on the
PC board. Reattach the other connectors removed earlier.
3 Reinstall the right cover and top cover.
Page 67

APPENDICES
Menu tree C
This section contains an overview of the printer's menu tree. The use of
the options is explained in Chapters 2 and 3 of this guide. In the figures
that follow , items in italics indicate that selecting the option gives access
to further options. Items in bold are the default option.
Main menu at a glance
Main Menu Load Media
Cut
Pause
Reset
Feed Media Menu
Setup Menu Print Mode Menu
Paper Options Menu
User Setup Menu
Ink Option Menu
Serial Comm Menu
Exit
Utility Menu Prime
Access Cartridge
Color Calib Menu
Display Settings
Print Settings
Service Menu
Exit
Page 68

1500 TX User's Guide
C-2 Menu Tree
Feed media menu
l
Forward Backward
l
l l
l l
l
Exit
l
Forward advances media toward the front of the printer.
Backward moves media to toward the back of the printer.
Exit returns to main menu.
Page 69

Menu Tree C-3
1500 TX User's Guide
APPENDICES
Setup menu at a glance
Setup Print Mode Menu
Color Mode Color , mono
Quality Mode User, Draft, Normal, Quality, Enhanced
Print Passes 1, 3, 4, 6
Carriage Speed 1-10, 5
Print Direction Uni, bi
Exit
Paper Option Menu
Supply Type Roll, take-up
Media Standard All, US_Engr, US_Arch, ISO_A, M_DIN, ISO_B,
Special_MAP, Graphic_Arts, US_All, Metric_All
Margins Normal, Expanded
Auto-Load Delay 1-12, 6
Auto-Cut On/Off
Save Media On/Off
Auto-Wipe On/Off
Exit
User Setup Menu
Select User 1-8, 1
Save User 1-8, 1
Units Select English, Metric
Language English, German, French, Italian, Spanish,
Portuguese, Japanese, Chinese, Korean
Init Settings
Print Settings
LCD Contrast 1-16, 9 (16 is less contrast)
Exit
Ink Option Menu
Ink Preheat Menu Off, 1-7. Default is 2.
Dryer On/Off
Dry Time 0, 0:10, 0:20, 0:30…60:00
Exit
Serial Comm Menu
Baud Rate 9600, 19200, 38400
Parity Bit Even, Odd, None
Data Bit 7, 8
Page 70

1500 TX User's Guide
C-4 Menu Tree
Setup menu
l
Print Mode Menu User Setup Menu
l
l
Paper Option Menu Ink Option Menu
l
l
Serial Comm Menu
l
l
Exit
l
Print Mode Menu provides access to options for color, quality , print passes, carriage speed,
and print direction.
Paper Option Menu provides access to options for loading paper.
User Setup Menu provides access to options for defining and saving user settings.
Serial Comm Menu provides access to options for setting communications parameters.
Exit returns to the main menu.
Print Mode
l
Color Mode Print Passes
l
l
Quality Mode Carriage Speed
l
l
Print Direction
l
l
Exit
l
Color mode provides access to a further menu to select color (default) or mono-
chrome printing.
Quality mode provides access to a further menu to select User, Draft, Normal (default),
Quality , or Enhanced print mode.
Print passes provides access to a further menu to select 1, 3, 4 (default), or 6 print
passes. More passes = better quality .
Carriage speed provides access to a further menu to select the carriage speed in a range
1-10. Default is 5.
Print direction provides access to a further menu to select whether the printer will print
in bi (default) or uni-directional printing (one direction).
Exit return to the Setup menu.
Page 71

Menu Tree C-5
1500 TX User's Guide
APPENDICES
Paper Option Menu
l
Supply Type Auto-Cut
l
l
Media Standard Save Media
l
l
Margins Auto-Wipe
l
l
Auto-Load Delay Exit
l
Supply type provides access to a further menu to select the paper feed mode: roll, or
takeup(default).
Media standard provides access to a further menu to select the media standard: All
(default), US_Engr, US_Arch, ISO_A, M_DIN, ISO_B, Special_MAP,
Graphic_Arts, US_All, Metric_All.
Margins provides access to a further menu to change the available plot area
based on the margin type elected. Select Normal (default) or Expanded
margins.
Auto-Load Delay provides access to a further menu to change the delay between when
the media is loaded and when printing starts. This allows users to
adjust the media if necessary . Select 1-12 seconds. Default = 6.
Auto-cut provides access to a further menu to turn Auto-cut Off (default) or On.
When On, the printer cuts the media after printing is complete.
Save Media provides access to a further menu to turn Save media On (default) or
Off. When set to On, printing will stop at the end of the plot rather than at
the end of the frame size.
Auto-Wipe provides access to a further menu to turn the Auto-wipe function On
(default) or Off. When on, the cartridges are wiped during printing.
Exit returns to the Setup menu.
Page 72

1500 TX User's Guide
C-6 Menu Tree
User Setup Menu
l
Select User Init Settings
l
l
Save User Print Settings
l
l
Units Select LCD Con trast
l
l
Language Exit
l
Select user provides access to a further menu to select a previously saved user
configuration.
Save user provides access to a further menu to save the current printer configura-
tion to the selected user number.
Units select provides access to a further menu to choose the calibration units:
English or Metric.
Language provides access to a further menu to select the language used for the
display . Choose from English (default), German, French, Italian,
Spanish, Portuguese, Japanese, Chinese, Korean.
Init settings returns the printer to its default settings.
Print settings prints the current settings.
LCD Contrast provides access to a further menu to set the LCD contrast.
Exit returns to the Setup menu.
Page 73

Menu Tree C-7
1500 TX User's Guide
APPENDICES
Ink Option Menu
l
Ink Reduction Dryer
l
l
Ink Pr eheat Dry Time
l
l l
l
Exit
l
Ink reduction not used.
Ink preheat provides access to a further menu to set the ink preheat value. Options
are Off, 1-7. Default is 2.
Dryer provides access to a further menu to turn the dryer Off (default) or On.
Dry time provides access to a further menu to select the dry time in the range of
0 seconds (default) to 60 minutes. When enabled, the printer waits
the selected amount of time after printing before cutting the media or
advancing to the next print.
Exit returns to the Setup menu.
Page 74

1500 TX User's Guide
C-8 Menu Tree
Serial Comm Menu
l
Baud Rate
l
l
Data Bits
l
l
Parity Bit
l
l
Exit
l
Baud rate provides access to a further menu to select the baud rate: 9600 (default),
19200, 38400.
Data bits provides access to a further menu to select 7 (default) or 8 as the data
bit.
Parity bits provides access to a further menu to select parity: None, Even (default),
Odd.
Exit returns to the Setup menu.
Page 75

Menu Tree C-9
1500 TX User's Guide
APPENDICES
Utility menu at a glance
Utility Prime
Access Cartridge
Color Calibration Menu
Color Calib Cyan, magenta, yellow vertical
Cyan, magenta, yellow horizontal
Calib print test
Calibration Menu
Use Calib XY ON/off
Paper Axis T est
Paper Axis 32.00 - 34.00
Diagnostics (tech support only)
Display settings
Print settings
Service menu
Deadband test (tech support only)
Slow db test
Single line test
All lines test
Deadband
Slow deadband
Clock reset
Page 76

1500 TX User's Guide
C-10 Menu Tree
Utility menu
l
Prime Display Settings
l
l
Access Cartridge Print Settings
l
l
Color Calib Menu Service Menu
l
l
Calibration Menu Exit
l
Prime prints the prime pattern.
Access Cartridge moves the ink carriage away from the service station for installing and
replacing cartridges and the media cutter .
Color Calib Menu provides access to further menus for printing the color calibration test
pattern and for entering values determined by examining the test patterns.
Calibration Menu provides access to a further menu for calibration options and diagnos-
tics.
Display Settings displays information such as media size, firmware revision, RAM size,
and plot hours.
Print Settings prints information such as media size, firmware revision, RAM size, and
plot hours.
Service Menu for use by ENCAD technical support only .
Exit returns to the main menu.
Page 77

Menu Tree C-11
1500 TX User's Guide
APPENDICES
Calibration Menu
Use Calib XY Paper Axis
l
Paper Axis Test Diagnostics
l
l
Exit
l
Use Calib XY provides access to a further menu in which you can set this function on or
off.
Paper Axis Test prints the paper axis test pattern.
Paper Axis provides access to a further menu in which to enter values determined
by examining the paper axis test pattern.
Diagnostics for tech support only.
Page 78

1500 TX User's Guide
C-12 Menu Tree
This page intentionally blank.
Page 79

APPENDICES
Error messages D
These display messages are helpful in determining the status of the
printer and possible corrective action when operation does not appear to
be normal.
Error Messages
Error messages consist of the message “Internal ERROR: Shutdown” on
line 2 of the display. On line 4, a specific message will appear. If you
cannot clear the error, record the message and the sequence of events
leading to the message so that you can describe the problem to ENCAD
technical support personnel.
If the “Servo shutdown” message displayed, cycle the printer's power to
clear the error.
If the “Unrecognized Cartridge(s)” message is displayed, one of three
problems is present:
1) One or more non-ENCAD TX cartridges are installed;
2) One or more cartridges are improperly installed; and
3) One or more cartridges not installed.
T o clear the error , press Access Cartridges to move the carriage to the
position which allows replacement of the ink cartridges. Check to make
sure your ENCAD TX cartridges are installed in each position and all
cartridges are installed properly .
Page 80

1500 TX User's Guide
D-2 Error messages
This page intentionally blank.
Page 81

APPENDICES
Glossary E
baud rate The rate of data transfer (bits per second between the computer
and printer.
bit The smallest unit of digital information used by a computer or
printer.
buffer The part of the printer's memory that is used for receiving and
processing plot files.
calibration The procedures to adjust the ink cartridge alignment and line
length accuracy.
carriage axis The plot area measured parallel to the platen.
Centronics A standard parallel interface.
configuration The way that the computer and printer are connected.
dpi Dots per inch (dpi), the number of dots the printer lays down
in an inch.
handshake A method the computer and printer use to communicate.
inkjet The nozzle part of the ink cartridge.
interface
cable The cable used to connect the printer to the computer. NovaJet printers
use a serial or parallel interface cable.
media The surface on which the printer prints the image. Media
comes in a variety of types, including fabrics, paper, and
canvas.
monochrome An image that is printed in only one color (usually black).
orientation The direction of the plotted image on the page.
palette The available colors for the printer.
paper axis The long side of the plot area measured at right angles
to the platen.
parallel
interface An interface type in which all bytes are transferred
simultaneously, making it faster than a serial interface.
Page 82

1500 TX User's Guide
E-2 Glossary
parity A method for checking the transfer of information
between the computer and printer.
platen The surface on which media is placed to print.
plot area The area in which the printer prints the image, determined
by the width of the media.
prime To clear the ink cartridges by forcing them to fire rapidly. Also, to fill
the ink lines with ink.
raster image A graphic created by dots called bitmaps.
resolution The sharpness of a printed image as measured by dots per
inch.
roll feed Media that is packaged on a roll and is loaded and fed through
the back of the printer.
vector A graphic created by geometric lines. HP-GL and HP-GL/2 files are
vector files.
Page 83

APPENDICES
Technical information F
MEDIA SIZES: up to 60" wide; see Appendix G.
MEDIA TYPES:
Encad Cotton Plain Weave
Encad Cotton Jersey Knit
Encad Cotton Heavy Twill
Encad Cotton Rib Knit
Encad Rayon
Encad Polyester Stretch Crepe
Encad Chiffon
Encad Swimwear Knit
Encad Premium Matte
Encad Photo Semi-gloss
Encad Canvas
See Appendix G for details.
MEDIA ROLL PARAMETERS
Inner roll core: 2" and 3"
Max. outside roll diameter: 6"
Max. roll width: 60"
RESOLUTION:
300 x 300 dpi addressable
STANDARD FEATURES:
Rollfeed with cutter
Power feed and takeup
8 user-savable settings
Power PC 33 MHZ processor
104 jet ink cartridges
500 ml ink reservoirs
Two sets of ink lines
Ink priming system
BUFFER:
Two 72-pin, 32-bit wide DRAM sockets.
8 MB, user upgradeable to 16, 32 or 64
MB, 70 ns or faster, ENCAD approved.
INTERFACES:
Bidirectional Parallel (IEEE 1284)
RS-422/232
422 to 9 pin 232 for self-service
Optional 10 Base T, 10 Base 2
BAUD RATES:
9600; 19200; 38400
POWER:
90-246 VAC 47-63 Hz
Consumption:
20 W Idle
140 W Typical
215 W Maximum
OPERATING ENVIRONMENT:
59° - 95°F (15°- 35°C)
10-70% RH, Non-condensing
STORAGE ENVIRONMENT:
-5° - 140°F (-21°- 60°C)
5-80% RH, Non-condensing
CERTIFICATIONS:
Safety
CSA, CSE/NRTL,
(equivalent to UL1950)
TUV GS
EN 50 082-1
EN 60 950
UL1950
NOM-019-SCFI-1993
IEC 950
AS/NZS 3260
EMI
FCC Class A, B
CSA C108.8
EN 55 022 Class A , B
CE Mark
CISPR 22- Class A, B
AS/NZS 3548
Page 84

1500 TX User's Guide
F-2 Specifications
Made in the U.S.A.
DIMENSIONS
Height
(platen above floor) 44" (1.12m)
Width 95" (2.41m)
Depth 28" (0.71m)
Weight 150
Print width up to 59.6" printable
Page 85

APPENDICES
Ordering supplies G
ENCAD media for 1500 TX printers
ENCAD offers a full line of inkjet media which gives you brighter ,
crisper color from your printer . ENCAD TX ink and media are optimized to work together and were designed for optimal results on your
printer . You can count on:
● Brilliant, saturated colors
● Sharp lines and edges
● No visible bleeding between colors
Note: Ink and cartridges are specific to the 1500 TX printers.
ENCAD supplies ordering information
Y ou can order ENCAD supplies from your Authorized ENCAD Distributor, ENCAD Supplies Dealer or order directly from ENCAD:
For the names of authorized distributors in Europe, Asia, and Latin America, call:
Europe: Paris, France Phone: 1-3051-0041 Fax: 1-3051-7080
Latin America: Austin, TX Phone: 512-219-8022 Fax: 512-219-7863
Asia: Hong Kong Phone: 2-2881-8969 Fax: 2-2881-0912
TX Ink and cartridges
1500 TX printers use the proprietary TX ink system.
Page 86

1500 TX User's Guide
G-2 Ordering supplies
TX Ink System
TX Ink is an extended ink system which reduces the interval between
cartridge changes. This system is ideal for unattended printing and large
batch runs. Each ENCAD TX proprietary cartridge includes the nozzle
mechanics, and electrical connections. It draws ink from a reservoir in the
printer . The ink reservoirs can be filled at any time, for uninterrupted
printing. After extensive use, the cartridges do experience some wear and
should be replaced.
The TX Ink System includes:
● ENCAD proprietary TX cartridges
● 500 ml bottles of ink. Available in cyan, magenta, yellow, and black.
Note: Always refill cartridges and reservoirs with the same
color of ink.
Inkjet media for 1500 TX printers
ENCAD TX ink and media expand the range of projects you can produce
with your printer. Put your ENCAD inkjet printer to work creating
dazzling presentations, quality fine art, photo-realistic images, impressive
signs, eye-catching trade show displays, and more.
ENCAD TX media features proprietary coatings which provide the highest
image quality when used with ENCAD TX inks. Our stringent quality
assurance program guarantees consistent coatings, repeatable colors, and
outstanding compatibility with ENCAD TX inks.
Fabrics
All fabrics are backed with paper and coated with special formulas.
Current offerings include:
• Encad Cotton Plain W eave
• Encad Cotton Jersey Knit
• Encad Cotton Heavy T will
• Encad Rib Knit
• Encad Rayon
• Encad Polyester Stretch Crepe
• Encad Chiffon
• Encad Swimwear Knit
Page 87

Ordering supplies G-3
1500 TX User's Guide
APPENDICES
Photo Paper
This photographic-based media is excellent for posters, photo-realistic
images, and framed art. Renderings benefit from quality output with this
paper. It is also ideal for client or marketing presentations
Photo Semi-Gloss - 7 mil
Use with Enhanced Printing mode only .
Matte Paper
Premium matte offers brilliant colors, minimal color bleeding, sharp lines
and edges. Ideal for images with medium to light color fill.
Premium Matte 100 gram
This paper produces high resolution, no bleed output with no
strikethrough for medium color fill and minimal cockle.
Use with Enhanced Printing mode only .
Specialty
Canvas
Inkjet coated artist canvas for photo-realistic images, art work, portraits,
any image which requires an artist canvas look. Quality comparable to
photographic glossy media.
Use with Enhanced Printing mode only .
Media Sizes
Most roll medias are available 58"/60" wide on 2 or 3" diameter cores.
Call your authorized ENCAD media dealer for availability .
Media Cores
Media cores are used with the takeup roll. They are available 60" wide
with a diameter of 2". Core adapters are included with the printer .
Page 88

1500 TX User's Guide
G-4 Ordering supplies
Media Samples
Media samples are available so that you may experiment with a variety of
media for your application. Because we are always adding new media, call
your authorized ENCAD media dealer for a list of current offerings.
Media Cutter (pkg. of 5)
Page 89

This appendix defines the serial cable requirements for connecting the
printer to your DOS based systems. It also includes instructions for
setting serial communication parameters.
Parallel cable
You can use any parallel cable which meets IEEE 1284 standards.
RS-232 cable requirements
You may build this cable or purchase it from ENCAD, Inc.
HSKO 1
HSKI 2
TXD- 3
GND 4
RXD- 5
TXD+ 6
GPI 7
RXD+ 8
Mini-Din-8
Plug
2TXD
3RXD
4RTS
5CTS
6DSR
7GND
8 DCD
20 DTR
22 RI
DB-25S
Female
3TXD
2RXD
7RTS
8CTS
6DSR
5GND
1 DCD
4DTR
9RI
DB-9S
Female
Communications and cabling H
APPENDICES
Page 90

1500 TX User's Guide
H-2 Serial communications and cabling
HSKO 1
HSKI 2
TXD- 3
GND 4
RXD- 5
TXD+ 6
GPI 7
RXD+ 8
2TXD2
3RXD3
4RTS4
5CTS5
6DSR6
7GND7
8 DCD 8
20 DTR 20
22 RI 22
2 (3) TXD
3 (2) RXD
4 (7) RTS
5 (8) CTS
6 (6) DSR
7 (5) GND
8 (1) DCD
20 (4) DTR
22 (9) RI
Mini-Din-8
DB-25S (DB-9S)
Female
Mac to Hayes Modem Cable
Belkin F2V088 or equivalent.
Do not use cable from
PC Ac ce ssories !
Laplink
®
Serial Cable.
DB-25S
Female
DB-25P
Male
Page 91

APPENDICES
Serial communications and cabling H-3
1500 TX User's Guide
Setting serial communications parameters
If your software or hardware platform only has serial communication capability, check the manuals provided with your system for the required communication parameters prior to setting the RS-422/232 options on the printer.
Setting the baud rate
Baud rate is the data transmission rate (in bits per second) between your
computer and the printer. The Serial Communicaitons menu lets you select
from the following baud rates:
9600 19200 38400
➪➪
➪➪
➪ To set the baud rate
1 Select Setup/Serial Communications Menu/Baud Rate.
2 Choose the desired rate.
3 Press OK.
Setting the parity bit
The Serial Communications menu lets you select from the following parity
options:
Even, Odd, None
➪➪
➪➪
➪ To set the parity bit
1 Select Setup/Serial Communications Menu/Parity Bit.
2 Choose the desired option.
3 Press OK.
Setting the data bit
The Serial Communications menu lets you set the data bit to 7 or 8.
➪➪
➪➪
➪ To set the data bit
1 Select Setup/Serial Communications Menu/Data Bit.
2 Choose the desired option.
3 Press OK.
Page 92

1500 TX User's Guide
H-4 Serial communications and cabling
This page intentionally blank.
Page 93

APPENDICES
T roubleshooting I
This appendix contains valuable information to help you solve the most
common printer problems for 1500 TX printers.
The problems addressed are divided into these types:
• Printer health
• Print quality
• Data transfer
• Application software
A separate index is provided at the end of this appendix to help you
quickly locate discussions of symptoms and their solutions.
T roubleshooting quick list
Many common problems can be solved by checking for just three items:
• Is the printer connected to a good power source?
• If using a serial cable, do serial I/O settings match on the printer and
computer?
Isolating problems
Y ou can quickly isolate problems to either the printer , computer/printer
interface, or application software using the following procedure:
1. Turn the printer OFF, then ON.
2. Load media, then run a prime to assure that all jets fire. (See "Priming for Cartridge Print Check" in Chapter 2.)
3. Perform a color calibration. (See Appendix A.)
If your printer fails during any of the above steps, call your ENCAD
distributor/dealer or call ENCAD Technical Support. Otherwise,
continue with the steps that follow.
Page 94

1500 TX User's Guide
I-2 Troubleshooting
4. Send the demo print directly to the printer through the parallel port.
For example, on a PC, type:
copy /b <filename>.rtl lpt1. The demo print and other sample prints
are provided on your utility disk.
5. If your computer is running on a network, login and copy the sample
file to the printer over the network.
6. If steps 4 or 5 fail, repeat them using another computer.
If any of these steps fail, your printer may not be correctly connected
to your computer and/or network. Contact your network administrator or your ENCAD dealer. Otherwise, continue with the steps that
follow.
7. Print directly to the printer from several software applications.
8. If you are networked, login and try printing from several software
applications.
9. If steps 7 or 8 fail, repeat them using another computer or remove
from the network and test standalone.
If one application fails, but others print successfully, that can indicate a problem with a specific software package. Call technical
support of the failed product. If all the applications fail, determine
what they have in common; for example, a RIP box or Windows
driver. Call technical support of the particular vendor.
Printer Health
Printer will not turn on
Make sure the power cord is securely attached to the printer and plugged
into an operating outlet.
Make sure the power switch is turned on.
Printer intermittently reboots
Clean and reseat memory SIMMs.
Test and replace memory SIMMs. (See Appendix B.)
Check that power is coming to the printer .
Page 95

Troubleshooting I-3
1500 TX User's Guide
APPENDICES
Display does not come on
Check that the power cord is plugged in and the printer switch is turned
on.
Push any control panel button. The display should come on.
Printing doesn’t start immediately when a file is sent
A short delay between sending the file and starting to print is normal,
particularly if you are using a serial port. If you are using the serial port,
make sure you’re using the correct interface cable and that it is securely
connected to the proper ports on both the printer and the computer.
(ENCAD serial cable PN 203977)
If you are using a serial interface, make sure that the RS-232/422 settings
match the requirements of your hardware and software. (See Appendix
H.)
If you are using a Windows application, be sure the Print Manager is
OFF. Turn off the Print Manager with the ENCAD Windows driver.
File will not print
If you are using a serial cable, check that it is ENCAD PN 203977 for
PC systems. Be sure that RS232/422 settings in your software match
those on your printer .
Check your electrical connections.
From your software application, print to a file and send the file to the
printer in DOS using the DOS Copy command. At the DOS prompt, type
COPY /b filename portname (LPT or COM port). Alternately, use the
GO.EXE program. To print the file, type GO filename. This program is
supplied on your Utilities disk and can also be downloaded from the
ENCAD BBS.
Slow printing under Windows
Windows applications naturally print slower than DOS applications. Be
sure the Windows Print Manager is turned OFF.
Page 96

1500 TX User's Guide
I-4 Troubleshooting
T akeup roll doesn't turn
Be sure the paper feed option is set to Takeup.
T akeup roll doesn't stop turning
Check that the take-up sensor is not blocked. There should be nothing
between the take-up sensor and media.
Automatic cutter doesn’t work or tears the paper
Make sure the Auto-Cut option is set to ON.
Make sure Media Supply T ype is set to Roll.
Make sure the cutter is properly installed. (See "Installing the Cutter" in
Chapter 2.)
TURN POWER OFF and clean the inside of the black belt using
alcohol and a lint-free cloth. Push the carriage back and forth to access
all areas of the belt. Manually push the carriage all the way to the left to
force the cutter to drop. Turn power on.
If the cutter is worn, replace it. You should replace the cutter after every
200 plots (more or less, depending on the type of media used). (See
Appendix G for ordering information.)
Carriage jams
Check for paper jams or blockage.
Be sure the service station is lowering. If it does not lower, push it left
and down, or the cutter will not disengage.
Carriage axis failure
This may be caused by using matte paper which may curl and cause
carriage axis failure. Be sure to use inkjet quality media. (See Appendix
G.)
An obstruction in the path of the carriage assembly is hindering carriage
movement. The obstruction may or may not be visible. Other common
causes include dirty encoder strip, media interference, worn carriage
bushings, cutter malfunction, and loose trailing cable connections.
After checking the following items, reboot the printer to ensure proper
operation.
Page 97

Troubleshooting I-5
1500 TX User's Guide
APPENDICES
Note: If the error re-occurs, observe whether the carriage is in the same
or different location.
If the carriage is in the same spot, check the encoder strip for visible
damage (clear plastic strip under the trailing cable tray and above the
belt) Refer to the figure which follows.
Encoder strip under second trailing cable cover level,
(clear plastic strip directly behind the shaft)
Printer front view
Verify that carriage movement is free and smooth by turning the power
off and moving the carriage from one end of the shaft to the other (make
sure there is no binding and that nothing is blocking the carriage movement ). (MAKE SURE POWER IS OFF BEFORE PERFORMING
THIS STEP.)
Clean the top and bottom of the encoder strip using a q-tip and distilled
water (let it dry completely ~ approximately 30 minutes) before trying to
operate the printer).
Remove the cutter from the left side of the carriage and check it for
visible damage. Make sure cutter version 3 (or newer) is installed (see the
figure below).
3
Check the shaft for visible damage (carriage moves back and forth on it
during operation).
Clean the shaft with a lint free cloth and isopropyl alcohol (let it dry
completely before trying to operate the printer).
Page 98

1500 TX User's Guide
I-6 Troubleshooting
Check the belt for visible damage such as fraying and pieces coming off it.
Check the trailing cable (cable that moves during printer operation) for
visible damage.
Check whether the idler assembly (located at the left end of the belt)
moves freely . Check whether it is cracked or broken.
Cannot draw ink during initial siphon
Check that the quick release fitting connection to the ink reservoir is
secure.
Check whether contaminants have blocked the ink delivery lines. If
necessary, flush the lines with distilled water, then reprime.
Initial siphon cannot be established
Check that ink reservoirs are full.
Check ink delivery system for leaks in the lines, at the tubing connection,
and at the quick connect coupling to the reservoir. If leaks cannot be
stopped, call Technical Support.
Ink cartridges do not fire properly
Be sure that cartridges and the service station are cleaned periodically to
maintain good print quality. (See "Cleaning Cartridges" in Chapter 4.)
Cartridges may wear out after extended use. Try replacing the cartridge.
Store cartridges in a sealed container at room temperature when not in
use for extended periods of time.
Make sure the protective tape is removed from the cartridges.
Remove the cartridge and reinstall it, or clean the electrical contact on
the cartridge and carrier. Be sure it is clean and dry. Be sure the cartridge
is seated properly. (See "Installing Ink Cartridges" and "Cleaning Cartridges" in Chapter 4.)
Check that ink is being fed through the delivery lines. If necessary, use
the NovaPrime to pull ink out of the nozzle plate to remove trapped air
bubbles.
Be sure the ink reservoirs are not empty.
Page 99

Troubleshooting I-7
1500 TX User's Guide
APPENDICES
Cartridges leaking
Check that reservoirs are not overfilled.
V arious nozzles are clogged or stop firing
Repeat prime several times.
Remove, clean, and reinstall cartridge; repeat prime. Do not use alcohol on
the jet area.
Clean service station; clean cartridge again; repeat prime.
Clean cartridge electrical contacts using a cotton swab moistened with
water. Dry contact. Repeat prime. Do not use acetone or any other harsh
cleaner as this may cause damage to the flex cable.
Nozzle may have failed. Replace cartridge. Check for nozzle clogs by
using the suction bulb on the cartridge nozzle plate.
Check to see whether spray from printing has contaminated the flex
contact. Remove the cartridge and wipe the carrier flex and cartridge flex
with a cotton swab dipped in alcohol.
Run prime. If sections of the print are missing, replace the cartridge.
Ink spills on the flex cable
Clean the flex cable gently with a cotton swab moistened with water. Do
not use acetone or any other harsh cleaner as this may cause damage to
the flex cable.
Printer settings are lost when printer is turned off or rebooted
Be sure to save your printer settings to a User number. (See "Saving
User Settings" in Chapter 3.) When you are ready to print, select the
User number that you saved.
What if I need a firmware upgrade?
You can download firmware upgrades from ENCAD’s BBS or from the
Internet WEB page.
Page 100

1500 TX User's Guide
I-8 Troubleshooting
Print Quality
Many of the print quality concerns can be resolved by priming, cleaning,
and calibrating the cartridges. When this is the case, “Prime, clean,
calibrate, or replace” is indicated with other solutions. Refer to the
following chapters for details:
Prime - see Chapter 2
Clean - see Chapter 4
Calibrate - see Appendix A.
Replace - see Chapter 4.
No print appears
Check that tape has been removed from the printhead before using the
cartridge.
White lines or large gaps on print or portions of characters
missing
Prime, clean, calibrate, or replace cartridges.
Check if the ink reservoir is empty . Refill if necessary.
Make sure the media feeds freely.
Overall print quality is poor
Prime, clean, calibrate, or replace cartridges.
Make sure the printer is positioned on level ground.
Cartridge spits small amounts of ink on paper
Nozzle plate may be flooded. Try using a lower firing rate or replacing the
cartridge.
Streak marks
Clean the service station at least once a week, or more often, depending on the number of prints you are running. (See Chapter 4.)
Prime, clean, calibrate, or replace cartridges.
 Loading...