

Page 1

Part No. 1H9659
KODAK Digital Science
t
Calibration Utility
for MICROSOFT WINDOWS
and MACINTOSH
User’s Guide
Page 2

Page 3

Contents
Introduction
What’s in this Guide v. . . . . . . . . . . . . . . . . . . . . . . . . . . . . . . . . . . . . . . . . . .
1 Calibration Utility for MICROSOFT WINDOWS
Installation 1–1. . . . . . . . . . . . . . . . . . . . . . . . . . . . . . . . . . . . . . . . . . . . . . . . . .
System Requirements 1–1. . . . . . . . . . . . . . . . . . . . . . . . . . . . . . . . . . . . . . . . .
Operating the Calibration Utility 1–3. . . . . . . . . . . . . . . . . . . . . . . . . . . . . .
Starting in Windows 3.1x 1–3. . . . . . . . . . . . . . . . . . . . . . . . . . . . . . . . . . . . . . .
Starting in Windows 95 1–4. . . . . . . . . . . . . . . . . . . . . . . . . . . . . . . . . . . . . . . .
Using Easy Cal to Calibrate Your Printer 1–6. . . . . . . . . . . . . . . . . . . . . . . . .
Using Normal Utility to Calibrate Your Printer 1–16. . . . . . . . . . . . . . . . . . . . .
Recommended System Configuration 1–1. . . . . . . . . . . . . . . . . . . . . . . .
Minimum System Configuration 1–1. . . . . . . . . . . . . . . . . . . . . . . . . . . . . .
Easy Cal Step 1 1–7. . . . . . . . . . . . . . . . . . . . . . . . . . . . . . . . . . . . . . . . . . .
Easy Cal Step 2 1–8. . . . . . . . . . . . . . . . . . . . . . . . . . . . . . . . . . . . . . . . . . .
Easy Cal Step 3 1–10. . . . . . . . . . . . . . . . . . . . . . . . . . . . . . . . . . . . . . . . . . .
Easy Cal Step 4 1–12. . . . . . . . . . . . . . . . . . . . . . . . . . . . . . . . . . . . . . . . . . .
Easy Cal Step 5 1–14. . . . . . . . . . . . . . . . . . . . . . . . . . . . . . . . . . . . . . . . . . .
Setting Preferences 1–17. . . . . . . . . . . . . . . . . . . . . . . . . . . . . . . . . . . . . . . .
Selecting and Setting Up a Printer 1–18. . . . . . . . . . . . . . . . . . . . . . . . . . .
Creating a New Calibration Document 1–19. . . . . . . . . . . . . . . . . . . . . . . .
Selecting a Starting Point for the Calibration Document 1–20. . . . . . . . .
Opening an Existing Calibration Table 1–26. . . . . . . . . . . . . . . . . . . . . . . .
Using the Calibration Document Window 1–28. . . . . . . . . . . . . . . . . . . . .
Calibrating the Printer 1–29. . . . . . . . . . . . . . . . . . . . . . . . . . . . . . . . . . . . . .
Visual Gray Balance 1–29. . . . . . . . . . . . . . . . . . . . . . . . . . . . . . . . . . . . . . .
Visual Linearity 1–35. . . . . . . . . . . . . . . . . . . . . . . . . . . . . . . . . . . . . . . . . . . .
Densitometer 1–39. . . . . . . . . . . . . . . . . . . . . . . . . . . . . . . . . . . . . . . . . . . . .
Part No. 1H9659 September 1997
i
Page 4

Contents
Option Descriptions 1–45. . . . . . . . . . . . . . . . . . . . . . . . . . . . . . . . . . . . . . . . .
File Menu 1–45. . . . . . . . . . . . . . . . . . . . . . . . . . . . . . . . . . . . . . . . . . . . . . . . . . . .
Edit Menu 1–46. . . . . . . . . . . . . . . . . . . . . . . . . . . . . . . . . . . . . . . . . . . . . . . . . . . .
Calibration Menu 1–46. . . . . . . . . . . . . . . . . . . . . . . . . . . . . . . . . . . . . . . . . . . . . .
Printer Menu 1–49. . . . . . . . . . . . . . . . . . . . . . . . . . . . . . . . . . . . . . . . . . . . . . . . .
Easy-Cal Menu 1–49. . . . . . . . . . . . . . . . . . . . . . . . . . . . . . . . . . . . . . . . . . . . . . .
Calibration Table Dialog Box 1–50. . . . . . . . . . . . . . . . . . . . . . . . . . . . . . . . . . . .
Calibration Document Window 1–52. . . . . . . . . . . . . . . . . . . . . . . . . . . . . . . . . .
2 Calibration Utility for MACINTOSH
Installation 2–1. . . . . . . . . . . . . . . . . . . . . . . . . . . . . . . . . . . . . . . . . . . . . . . . . .
System Requirements 2–1. . . . . . . . . . . . . . . . . . . . . . . . . . . . . . . . . . . . . . . . .
Recommended System Configuration 2–1. . . . . . . . . . . . . . . . . . . . . . . .
Minimum System Configuration 2–1. . . . . . . . . . . . . . . . . . . . . . . . . . . . . .
Operating the Calibration Utility 2–3. . . . . . . . . . . . . . . . . . . . . . . . . . . . . .
Using Easy Cal to Calibrate Your Printer 2–4. . . . . . . . . . . . . . . . . . . . . . . . .
Easy Cal Step 1 2–5. . . . . . . . . . . . . . . . . . . . . . . . . . . . . . . . . . . . . . . . . . .
Easy Cal Step 2 2–7. . . . . . . . . . . . . . . . . . . . . . . . . . . . . . . . . . . . . . . . . . .
Easy Cal Step 3 2–9. . . . . . . . . . . . . . . . . . . . . . . . . . . . . . . . . . . . . . . . . . .
Easy Cal Step 4 2–11. . . . . . . . . . . . . . . . . . . . . . . . . . . . . . . . . . . . . . . . . . .
Easy Cal Step 5 2–12. . . . . . . . . . . . . . . . . . . . . . . . . . . . . . . . . . . . . . . . . . .
Using Normal Utility to Calibrate Your Printer 2–14. . . . . . . . . . . . . . . . . . . . .
Setting Preferences 2–15. . . . . . . . . . . . . . . . . . . . . . . . . . . . . . . . . . . . . . . .
Selecting and Setting Up a Printer 2–16. . . . . . . . . . . . . . . . . . . . . . . . . . .
Creating a New Calibration Document 2–17. . . . . . . . . . . . . . . . . . . . . . . .
Selecting a Starting Point for the Calibration Document 2–18. . . . . . . . .
Opening an Existing Calibration Table 2–23. . . . . . . . . . . . . . . . . . . . . . . .
Using the Calibration Document Window 2–24. . . . . . . . . . . . . . . . . . . . .
Calibrating the Printer 2–25. . . . . . . . . . . . . . . . . . . . . . . . . . . . . . . . . . . . . .
Visual Gray Balance 2–25. . . . . . . . . . . . . . . . . . . . . . . . . . . . . . . . . . . . . . .
Visual Linearity 2–31. . . . . . . . . . . . . . . . . . . . . . . . . . . . . . . . . . . . . . . . . . . .
Densitometer 2–35. . . . . . . . . . . . . . . . . . . . . . . . . . . . . . . . . . . . . . . . . . . . .
ii
September 1997 Part No. 1H9659
Page 5

Option Descriptions 2–41. . . . . . . . . . . . . . . . . . . . . . . . . . . . . . . . . . . . . . . . .
File Menu 2–41. . . . . . . . . . . . . . . . . . . . . . . . . . . . . . . . . . . . . . . . . . . . . . . . . . . .
Edit Menu 2–42. . . . . . . . . . . . . . . . . . . . . . . . . . . . . . . . . . . . . . . . . . . . . . . . . . . .
Calibration Menu 2–42. . . . . . . . . . . . . . . . . . . . . . . . . . . . . . . . . . . . . . . . . . . . . .
Printer Menu 2–45. . . . . . . . . . . . . . . . . . . . . . . . . . . . . . . . . . . . . . . . . . . . . . . . .
Easy-Cal Menu 2–45. . . . . . . . . . . . . . . . . . . . . . . . . . . . . . . . . . . . . . . . . . . . . . .
Calibration Table Dialog Box 2–46. . . . . . . . . . . . . . . . . . . . . . . . . . . . . . . . . . . .
Calibration Document Window 2–48. . . . . . . . . . . . . . . . . . . . . . . . . . . . . . . . . .
Appendix A Kodak XLS 8600 and Kodak DS 8650 Printers
Ribbon Media Choices A–1. . . . . . . . . . . . . . . . . . . . . . . . . . . . . . . . . . . . . . . . .
Printer Ribbons (V1.0) A–2. . . . . . . . . . . . . . . . . . . . . . . . . . . . . . . . . . . . . .
Printer Ribbons (V1.5) A–3. . . . . . . . . . . . . . . . . . . . . . . . . . . . . . . . . . . . . .
Using the Calibration Utility to Download
Default Calibration Tables A–4. . . . . . . . . . . . . . . . . . . . . . . . . . . . . . . . . . . .
Putting Your Printer in Raster Mode A–4. . . . . . . . . . . . . . . . . . . . . . . . . .
Calibrating Your Printer for V1.5 Ribbon A–5. . . . . . . . . . . . . . . . . . . . . .
Calibrating Your Printer for V1.0 Ribbon A–7. . . . . . . . . . . . . . . . . . . . . .
Do I Need to Calibrate My Printer? A–8. . . . . . . . . . . . . . . . . . . . . . . . . . . . . .
Contents
Index
Part No. 1H9659 September 1997
iii
Page 6

Page 7

Introduction
The
Kodak Digital Science
WINDOWS and MACINTOSH (Calibration Utility) allows you to bring
your printing system to the best possible color response.
Kodak thermal dye diffusion printing systems are composed of printers
and printer media (thermal ribbon and paper or transparency material).
Normal variability in the manufacturing processes of printers and media
may cause slight variations in light gray (low density) areas of prints.
The human visual system is sensitive to color changes in low density
areas on prints and you may occasionally want to adjust your printer
output to match viewing conditions.
The Calibration Utility allows you to select export and import modules,
open and save calibration tables, enter measurement information from
a test print, and calculate a new calibration table. The calibration test
prints are key to the Calibration Utility. The new calibration table allows
you to adjust the levels of cyan, magenta, and yellow dye to create a
neutral gray with the correct density.
What’s in this Guide
This guide consists of the following chapters:
Introduction—describes the calibration prints and the recommended
process for using the Calibration Utility.
t
Calibration Utility for MICROSOFT
Chapter 1: Calibration Utility for MICROSOFT WINDOWS—describes
how to use the Calibration Utility on WINDOWS systems.
Chapter 2: Calibration Utility for MACINTOSH—describes how to
use the Calibration Utility on a MACINTOSH system.
Appendix A: Kodak XLS 8600 and Kodak DS 8650 Printers—describes
the printer ribbon media choices for these printers and gives instructions
for downloading new calibration tables for your printer.
Index—a comprehensive index is included.
Part No. 1H9659 September 1997
v
Page 8

Page 9
1Calibration Utility for
MICROSOFT WINDOWS
This chapter describes how to install and use the Calibration Utility on a
system that uses Microsoft Windows 3.1, Windows for Workgroups 3.11,
or Windows 95. You should be familiar with the Windows environment.
Installation
See the "Read Me" for instructions for installing the calibration utility.
System Requirements
Recommended System Configuration
D
486 or Pentium processor
D
MS-DOS, version 6.22 or later
D
Microsoft Windows for Workgroups 3.11 or Windows 95
D
16 MB of RAM
D
4 MB of hard disk space
D
CD-ROM drive
D
color monitor
Minimum System Configuration
D
386 processor
D
MS-DOS, version 5.0 or later
D
Microsoft Windows 3.1, Windows for Workgroups 3.11, or Windows 95
D
8 MB of RAM
D
4 MB of hard disk space
D
standard color or black and white monitor
(standard VGA; minimum resolution 640 x 480 pixels)
Part No. 1H9659 September 1997
1–1
Page 10

Calibration Utility for MICROSOFT WINDOWS
Installing the Software
This section describes how to install the Calibration Utility. Follow the
steps for your particular Windows system.
Windows 3.1x
1. Place the Calibration Utility CD or diskette in the appropriate drive.
2. Open and read the
changes and information).
3. Open the Program Manager window.
4. Pull down the File menu and select
5. Type d:\setup <enter>.
NOTE:Replace “d” in the above command with the appropriate drive
letter, if necessary.
readme.wri
file (which contains last-minute
Run
.
IMPORTANT:
Other executable files are on the disk (_mssetup.exe
and _mstest.exe). If you run either of these programs,
you will not be able to install the Calibration Utility.
This page has been intentionally left blank.
The installation begins. Follow the instructions that appear on the
screen. When the installation is complete, a confirmation box appears.
6. Click on the
Windows restarts. A new group named Kodak Calibration Utility
appears in the Program Manager window.
7. Remove the CD or diskette from the drive.
Continue
button.
Windows 95
1. Place the Calibration Utility CD or diskette in the appropriate drive.
2. Open and read the
changes and information).
3. Double-click on the
4. Double-click on the appropriate drive.
5. Double-click on the
IMPORTANT:
Other executable files are on the disk (_mssetup.exe
and _mstest.exe). If you run either of these programs,
you will not be able to install the Calibration Utility.
readme.wri
file (which contains last-minute
My Computer
setup.exe
icon.
icon.
1–2
The installation begins. Follow the instructions that appear on the
screen. When the installation is complete, a confirmation box appears.
6. Click on the
7. Remove the CD or diskette from the drive.
Continue
button.
September 1997 Part No. 1H9659
Page 11
Calibration Utility for MICROSOFT WINDOWS
Operating the Calibration Utility
The following steps describe how to start the Calibration Utility.
NOTE:The export module for the printer you want to calibrate must be
installed before you start the Calibration Utility. The Calibration
Utility prompts you for the location of the folder containing the
export module.
If you use another version of Windows, your dialog boxes will look
slightly different than those shown in this chapter.
Starting in Windows 3.1x
1. Double-click on the
Program Manager window.
The Kodak Calibration Utility window opens.
2. Double-click on the
A splash screen appears, then the Calibration Utility selection
dialog appears.
NOTE:If this is the first time that the Calibration Utility has been
run, or if there are no printers on the
list, or if the Preferences files have been deleted, you must
select and open the export module for the printer that you
want to calibrate.
3. Do one of the following:
D
Click on the
Information about the Easy Cal calibration procedure is in “Using
Easy Cal to Calibrate Your Printer” on page 1–6.
Kodak DS Calibration Utility
Kodak DS Calibration Utility
Begin Easy Cal
button to start up Easy Cal.
group icon in the
icon.
Select Printer
drop-down
D
Click on the
Information about the Normal Utility calibration procedure is in
“Using Normal Utility to Calibrate Your Printer” on page 1–16.
Part No. 1H9659 September 1997
or
Launch Normal Utility
button to start up Normal Utility.
1–3
Page 12

Calibration Utility for MICROSOFT WINDOWS
NOTE:If you want to go directly to Normal Utility without the Calibration
Utility selection dialog appearing each time you start the Calibration
Utility, select the check box labeled
utility and don’t show this screen
(
Show Easy Cal selection screen at start-up
dialog box (accessed from the File menu) is deselected.
To use Easy Cal from within Normal Utility , pull down the Easy-Cal
menu and select
If you want the Calibration Utility selection box to appear when
you start up the Calibration Utility, select the
selection screen at start-up
For more information about the options in the Preferences dialog
box, refer to “Option Descriptions” on page 1–45.
Starting in Windows 95
Begin...
At start-up, launch normal
. The corresponding check box
) in the Preferences
or
Begin with Previous Settings...
.
Show Easy Cal
check box in the Preferences dialog box.
1. Click on the
2. Select
3. Select
4. Select
Utility menu.
A splash screen appears, then the Calibration Utility selection
dialog appears.
NOTE:If this is the first time that the Calibration Utility has been
run, or if there are no printers on the
list, or if the Preferences files have been deleted, you must
select and open the export module for the printer that you
want to calibrate.
Start
button.
Programs
on the Start menu.
Kodak DS Calibration Utility
Kodak DS Calibration Utility
on the Programs menu.
on the Kodak DS Calibration
Select Printer
drop-down
1–4
September 1997 Part No. 1H9659
Page 13

Calibration Utility for MICROSOFT WINDOWS
5. Do one of the following:
D
Click on the
Begin Easy Cal
button to start up Easy Cal.
Information about the Easy Cal calibration procedure is in “Using
Easy Cal to Calibrate Your Printer” on page 1–6.
or
D
Click on the
Launch Normal Utility
button to start up Normal Utility.
Information about the Normal Utility calibration procedure is in
“Using Normal Utility to Calibrate Your Printer” on page 1–16.
NOTE:If you want to go directly to Normal Utility without the Calibration
Utility selection dialog appearing each time you start the Calibration
Utility, select the check box labeled
utility and don’t show this screen
(
Show Easy Cal selection screen at start-up
At start-up, launch normal
. The corresponding check box
) in the Preferences
dialog box (accessed from the File menu) is deselected.
To use Easy Cal from within Normal Utility , pull down the Easy-Cal
menu and select
Begin...
or
Begin with Previous Settings...
.
If you want the Calibration Utility selection box to appear when
you start up the Calibration Utility, select the
selection screen at start-up
check box in the Preferences dialog box.
Show Easy Cal
Part No. 1H9659 September 1997
For more information about the options in the Preferences dialog
box, refer to “Option Descriptions” on page 1–45.
1–5
Page 14
Calibration Utility for MICROSOFT WINDOWS
Using Easy Cal to Calibrate Your Printer
The Easy Cal calibration procedure provides you with steps that guide
you through the process of calibrating your printer using a Visual Gray
Balance calibration.
NOTE:The Easy Cal calibration procedure cannot be used to calibrate a
printer that is using black-only ribbon.
When you click on the
selection dialog, the Easy Cal calibration procedure starts up and the
following dialog box appears.
D
Click on the
The Easy Cal Step 1 of 5 dialog box appears.
NOTE:Clicking on the
Proceed
Begin Easy Cal
button.
Cancel
button accesses Normal Utility.
button in the Calibration Utility
1–6
September 1997 Part No. 1H9659
Page 15
Calibration Utility for MICROSOFT WINDOWS
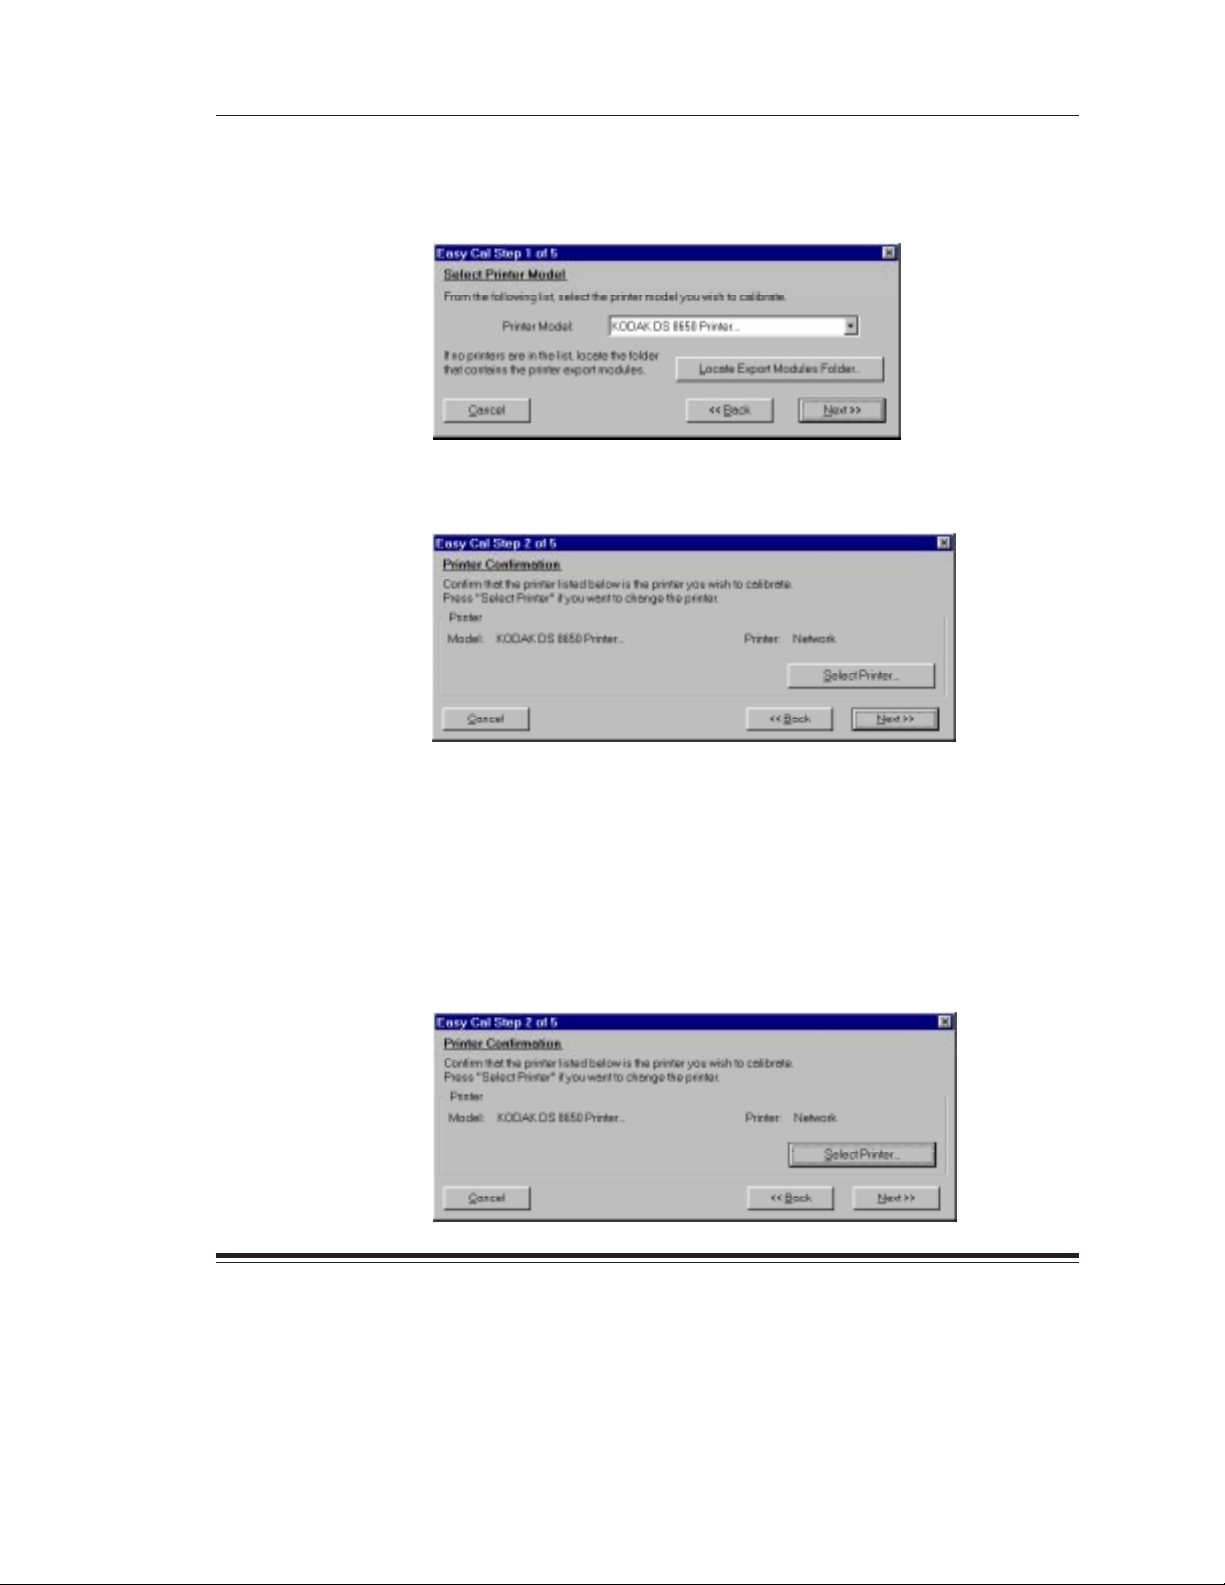
Easy Cal Step 1
The Easy Cal Step 1 dialog box allows you to select a printer model to
calibrate and find the corresponding export module.
NOTE:If you do not need to specify a different printer, click on the
Next>>
“Easy Cal Step 2.”
button in the Easy Cal Step 1 dialog box and go to
1. Select a printer on the
NOTE:If there are no printers on the
the printer you want to calibrate does not appear on the list,
you must find and select the export module for the printer that
you want to calibrate.
2. Click on the
A selection box appears. This box shows the directory in which the
Calibration Utility was installed. The name of the export module
appears in the
Locate Export Modules Folder...
Files
Printer Model
list.
drop-down list.
Printer Model
button.
drop-down list or
3. Find and open the directory that contains the export module.
Part No. 1H9659 September 1997
1–7
Page 16
Calibration Utility for MICROSOFT WINDOWS
4. Click on the OK button.
Y ou return to the Easy Cal Step 1 dialog box. The Calibration Utility now
can find and use the export module so it can transfer data to the printer.
5. Click on the
The Easy Cal Step 2 dialog box appears.
Next >>
button.
Easy Cal Step 2
The Easy Cal Step 2 dialog box allows you to specify a different printer to
calibrate than the one that appears in the
NOTE:If you do not need to specify a different printer, you can ignore the
following steps and click on the
Step 2 dialog box and go to “Easy Cal Step 3.”
1. Click on the
Select Printer...
button.
Printer
Next>>
box.
button in the Easy Cal
1–8
September 1997 Part No. 1H9659
Page 17
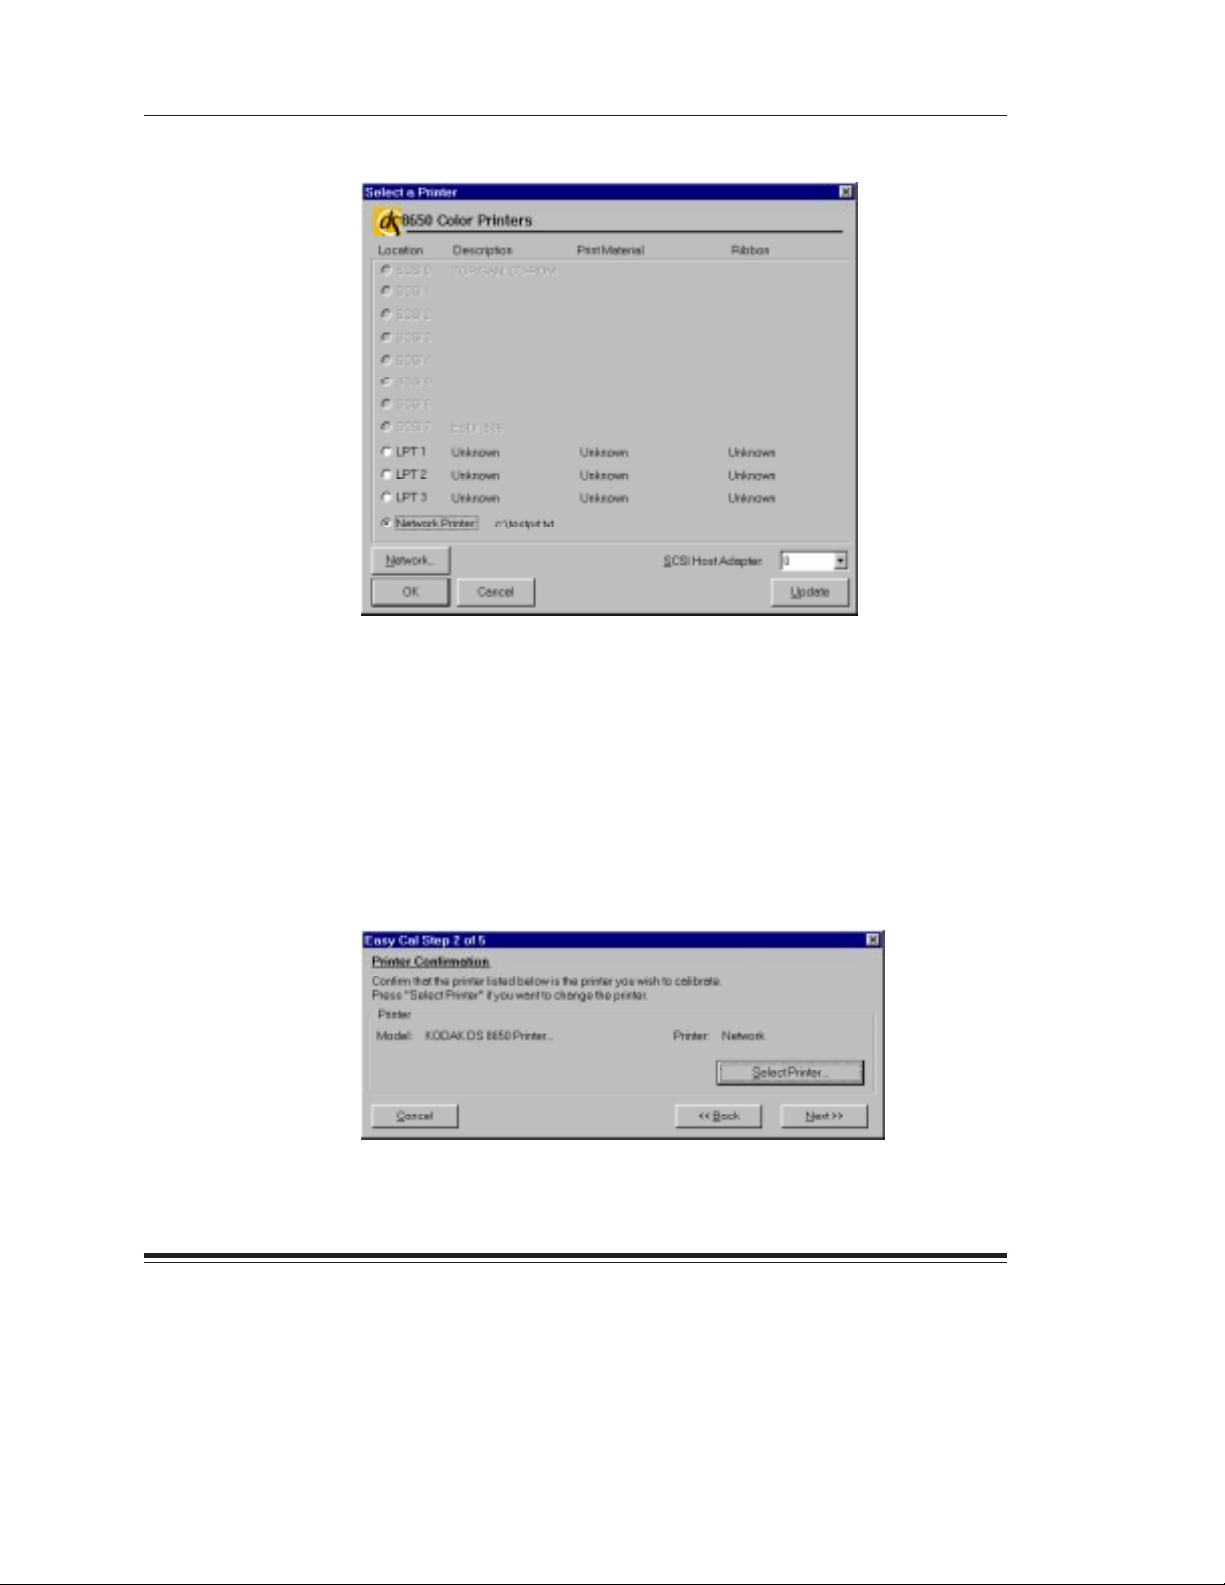
Calibration Utility for MICROSOFT WINDOWS
The Select a Printer dialog box appears.
NOTE:Your Select Printer dialog box may appear different, depending on
your printer export module.
2. Click on the button for the port to which the printer is connected.
3. Click on the
You return to the Easy Cal Step 2 dialog box.
Part No. 1H9659 September 1997
If this is the first time that the Calibration Utility has been run
or if the Preferences files have been deleted, you must locate an
export module folder. At this time some export modules may
require that you locate the necessary files.
OK
button.
1–9
Page 18

Calibration Utility for MICROSOFT WINDOWS
4. Click on the
The Easy Cal Step 3 dialog box appears.
Next >>
button.
Easy Cal Step 3
The Easy Cal Step 3 dialog box allows you to specify a different printer
media to calibrate than the one that appears in the
1. Make sure that the paper and media types for which you want to
calibrate are loaded in the printer.
Printer Setup
box.
1–10
NOTE:If you do not need to specify a different printer media, you can
ignore the following steps and click on the
the Easy Cal Step 3 dialog box and go to “Easy Cal Step 4.”
2. Click on the
Change Setup...
Next>>
button.
September 1997 Part No. 1H9659
button in
Page 19
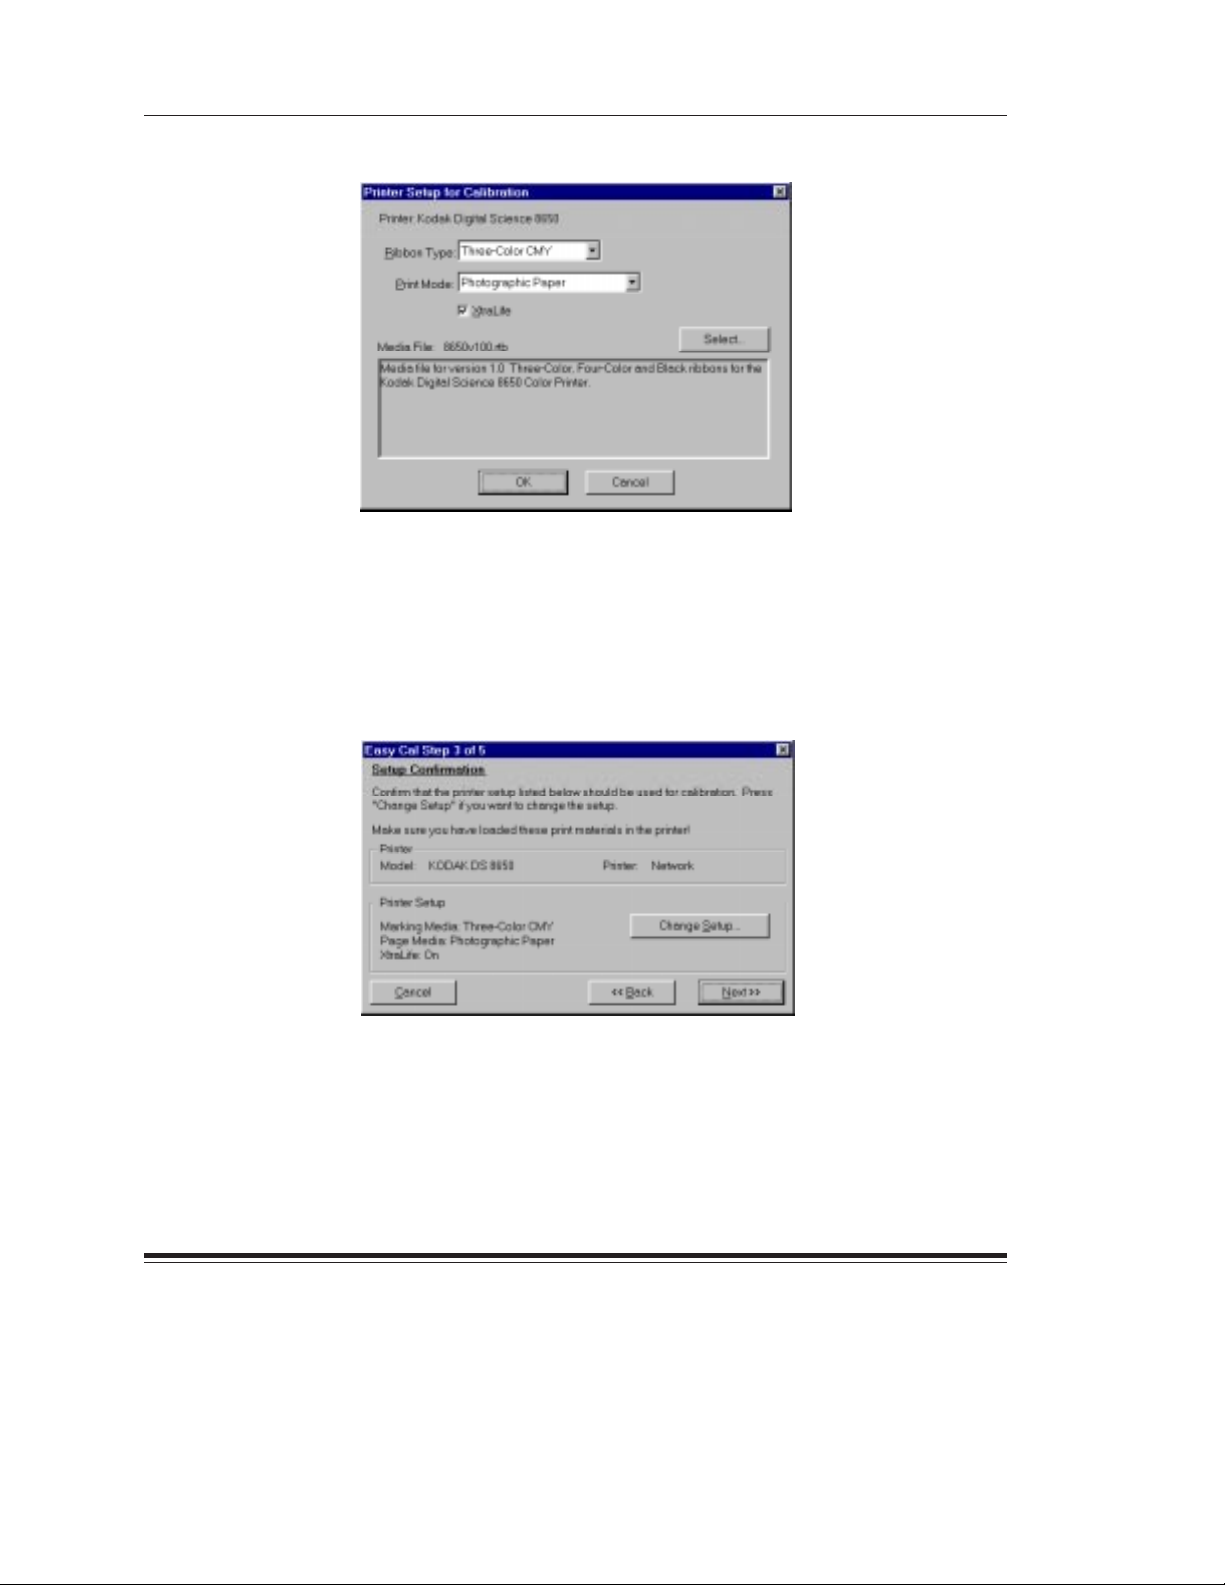
Calibration Utility for MICROSOFT WINDOWS
The Printer Setup for Calibration dialog box appears.
NOTE:Your Printer Setup for Calibration dialog box may appear different,
depending on your printer export module.
3. Make any necessary changes in the Printer Setup for Calibration
dialog box.
4. Click on the
OK
button.
You return to the Easy Cal Step 3 dialog box.
5. Click on the
Next >>
button.
Part No. 1H9659 September 1997
1–11
Page 20
Calibration Utility for MICROSOFT WINDOWS
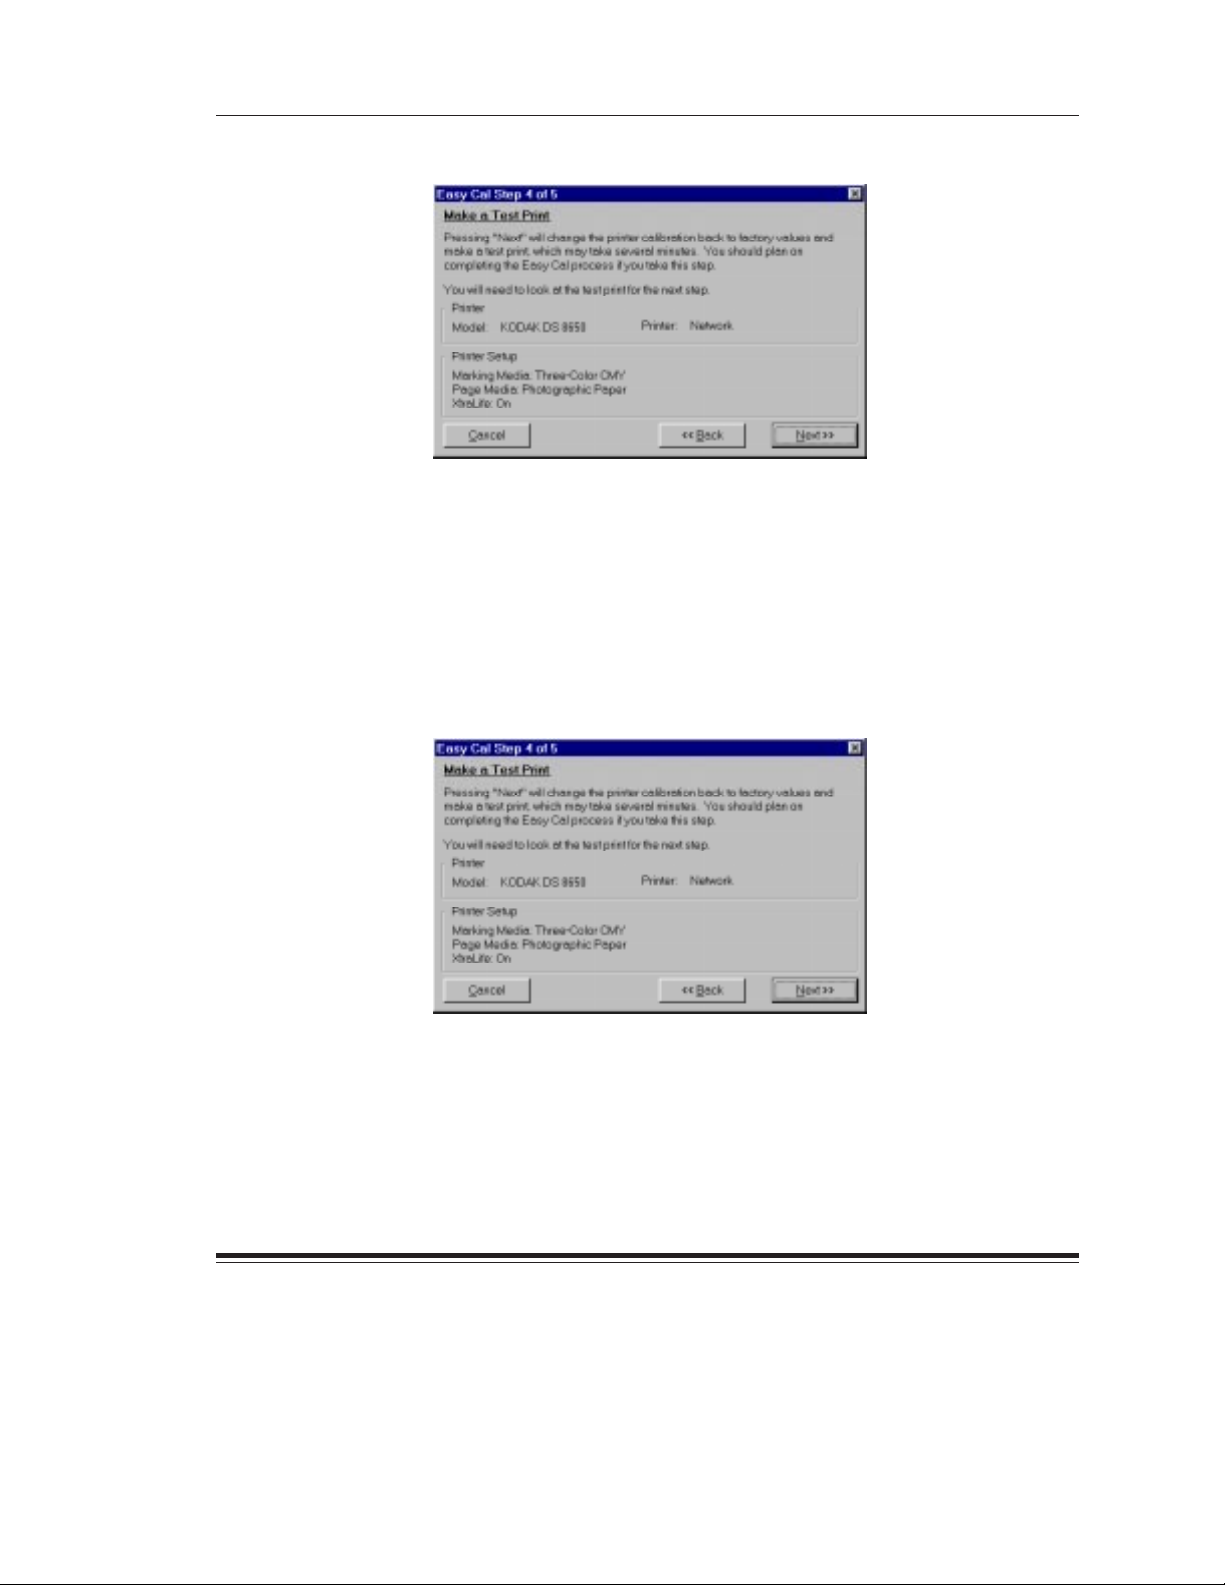
The Easy Cal Step 4 dialog box appears.
Easy Cal Step 4
The Easy Cal Step 4 dialog box contains printer and printer setup
information that will be used for the test print that is created in this step.
NOTE:If the Easy Cal Step 4 dialog box does not contain printer and
printer setup information, click on the
on the
Change Setup...
button.
<<Back
button and click
1–12
1. Make sure that the
NOTE:Clicking on the
printer. The previous table is overwritten.
Printer
Next>>
and
Printer Setup
button sends the default table to the
information is correct.
September 1997 Part No. 1H9659
Page 21
Calibration Utility for MICROSOFT WINDOWS
2. Click on the
Next >>
button.
The default table is sent to the printer and the previous table is
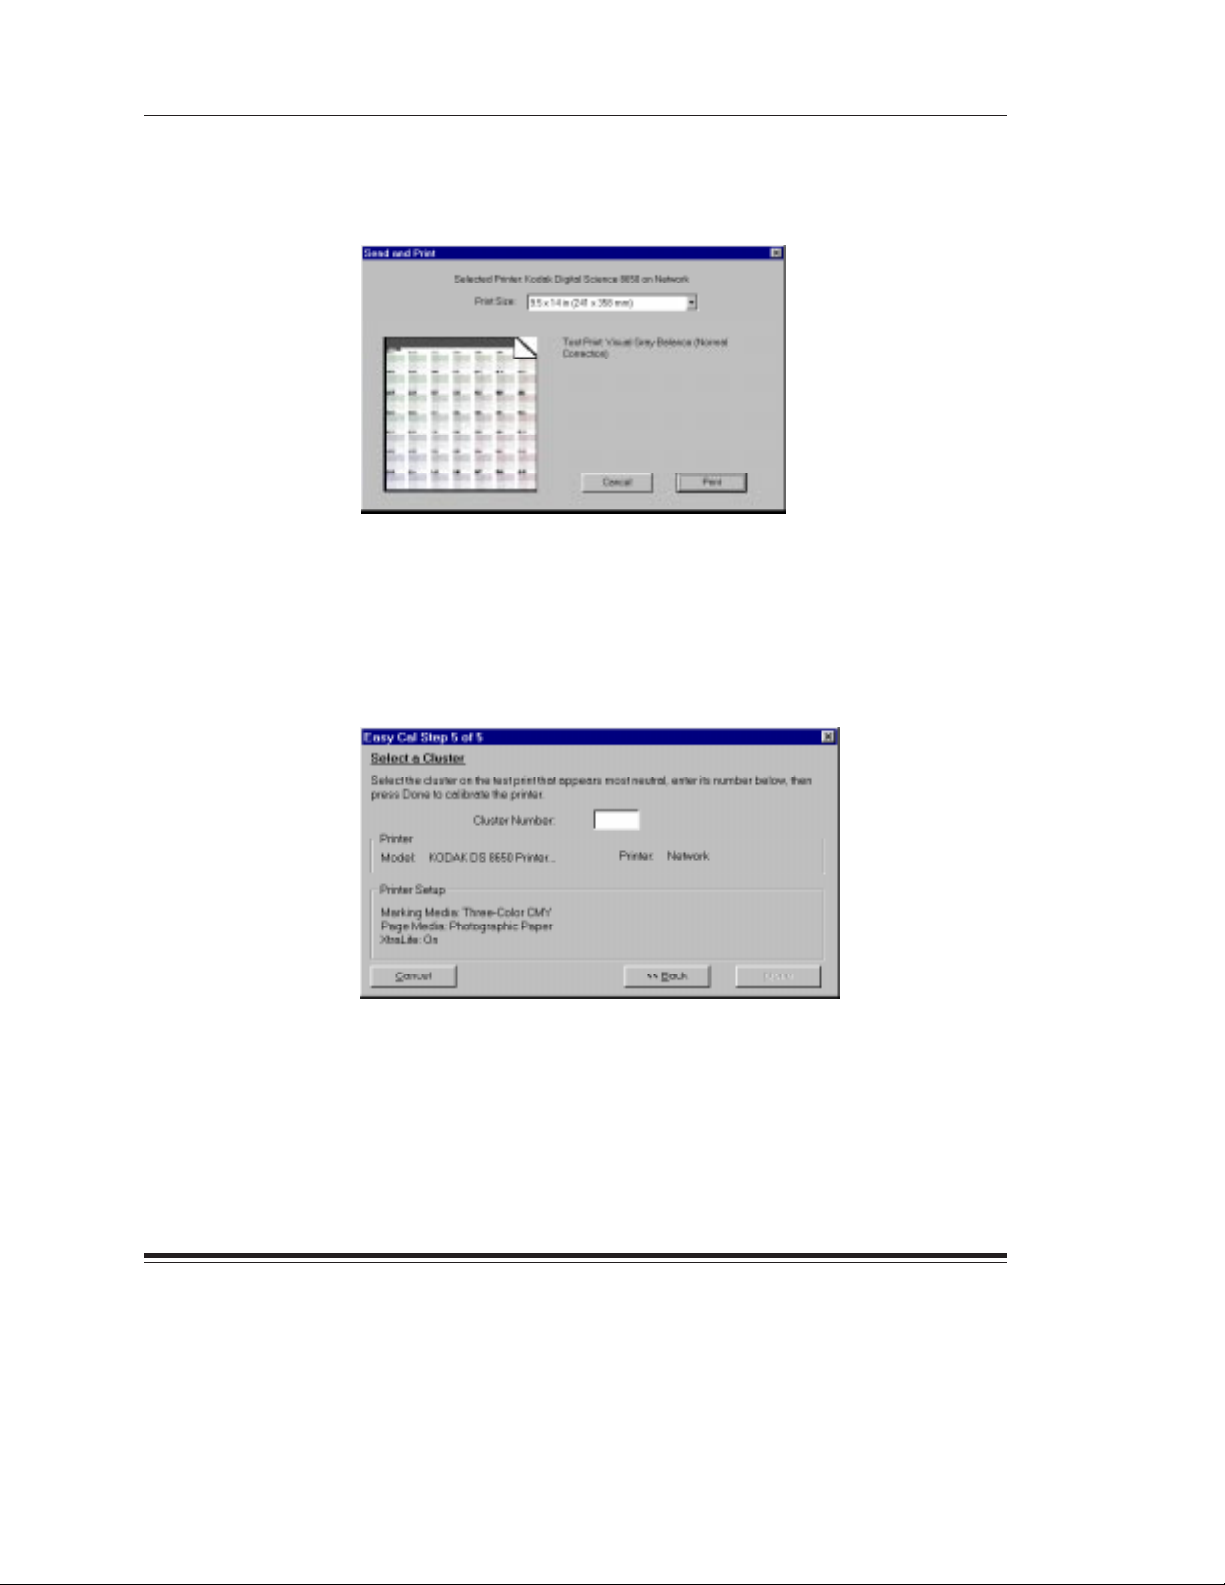
overwritten. The Send and Print dialog box appears.
NOTE:Your Send and Print dialog box may appear different, depending
on your printer export module.
3. Click on the
Print
button.
Your computer begins processing information. This may take a few
minutes. The calibration test print is printed on the specified printer.
The Easy Cal Step 5 dialog box appears.
Part No. 1H9659 September 1997
1–13
Page 22
Calibration Utility for MICROSOFT WINDOWS
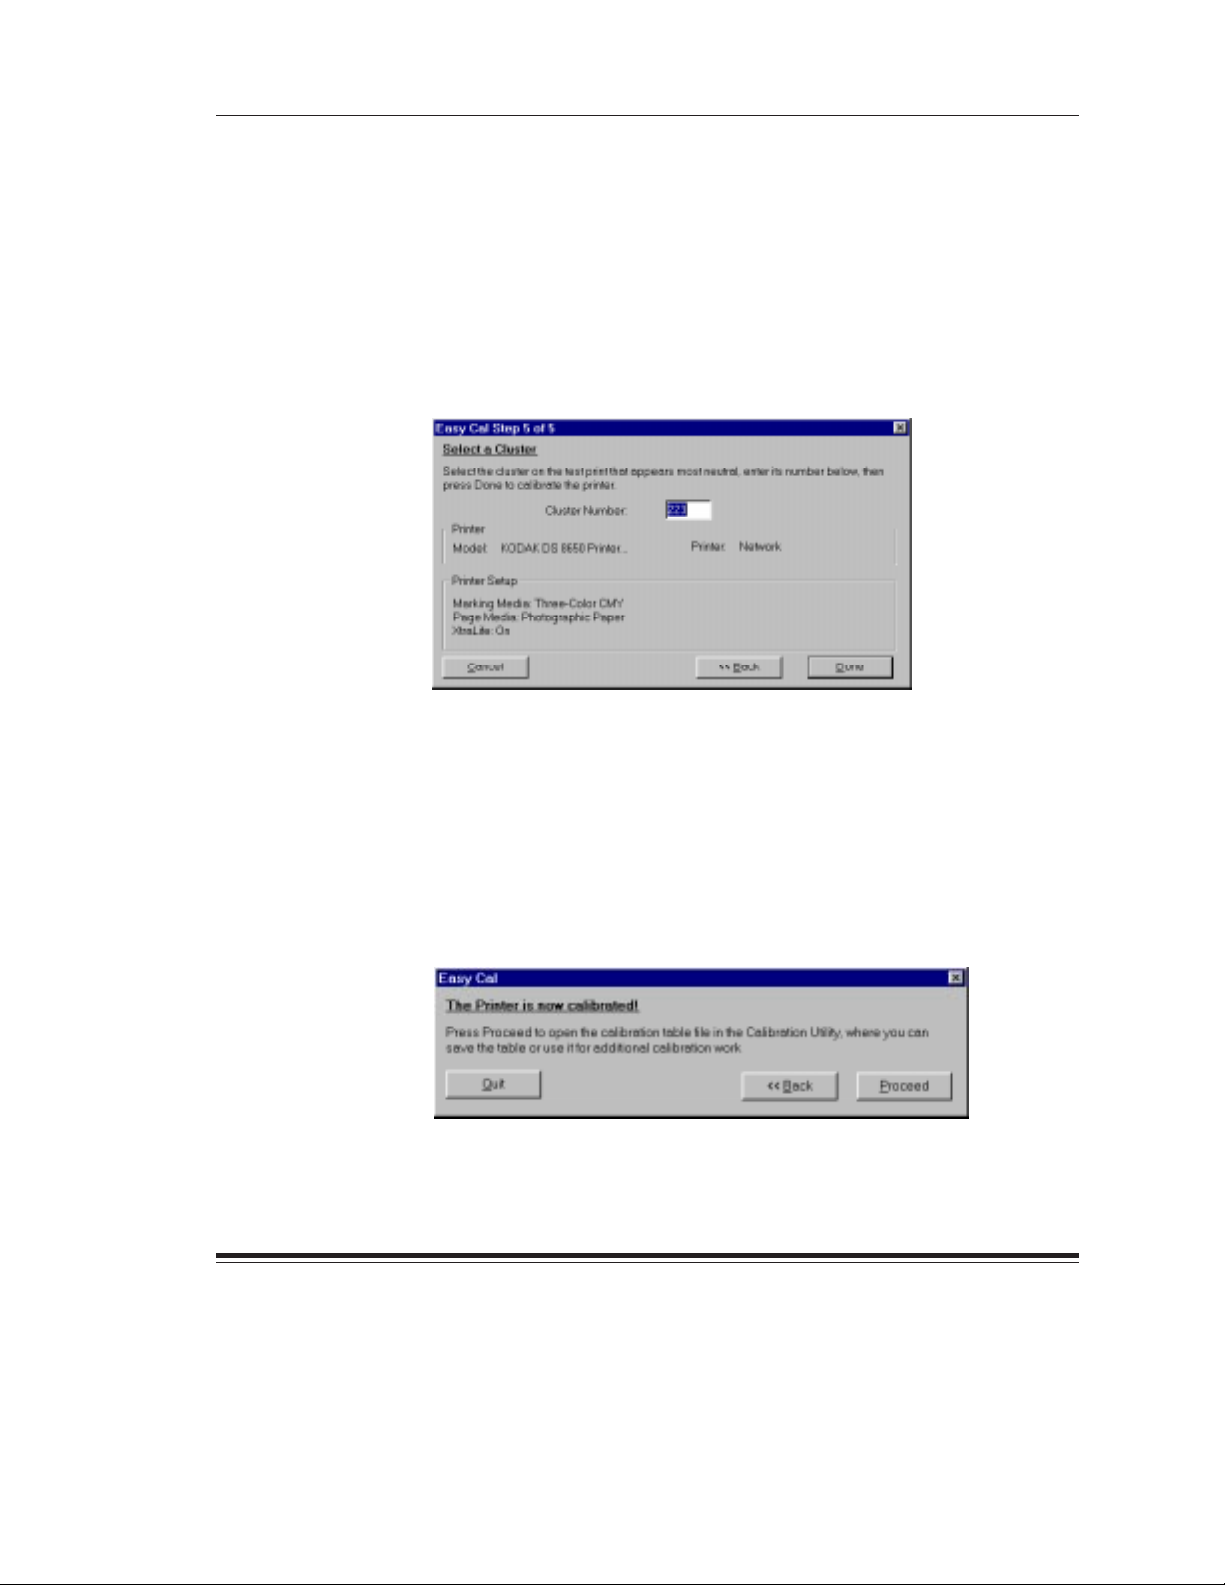
Easy Cal Step 5
Use the test print to calibrate your printer in the Easy Cal Step 5 dialog box.
1. Look at the test print and decide which grayscale cluster appears
the most neutral gray.
NOTE:If you want to print another test print, click on the
to return to the Easy Cal Step 4 dialog box.
2. Type the number of the most neutral grayscale cluster in the
Number
NOTE:If you want to print an updated test print, you can click on the
3. Click on the
text box.
<<Back
If cluster number 225 on the updated test print is the most neutral
gray, then the calibration is successful. Type 225 in the
Number
button to return to the Easy Cal Step 4 dialog box.
text box and go to step 3.
Done
button.
<<Back
button
Cluster
Cluster
1–14
The printer calibration begins. When the calibration is complete, the
following dialog box appears.
September 1997 Part No. 1H9659
Page 23

Calibration Utility for MICROSOFT WINDOWS
4. Do one of the following:
D
If you do not want to make another test print and you do not want
to save the calibration table, click on the
Exit
button to quit the
Calibration Utility .
or
D
If you want to save the calibration table, click on the
Proceed
button to access a document window. Refer to “Using the
Calibration Document Window” on page 1–28.
Saving Your Calibration Table
You may want to save the calibration table you just created to use as a
starting point for later calibrations.
D
Pull down the File menu and select
Save
to save changes to the
current calibration table.
D
Pull down the File menu and select
Save As
to access a selection box
in which you can specify a new name and location for the current
calibration table.
Part No. 1H9659 September 1997
1–15
Page 24

Calibration Utility for MICROSOFT WINDOWS
Using Normal Utility to Calibrate Your Printer
The Normal Utility calibration procedure allows you to create a new
calibration document or start from a calibration document that was
previously created and saved.
When you click on the
Launch Normal Utility
button in the Calibration
Utility selection box, the Normal Utility calibration procedure starts up
and the Calibration Utility window opens.
NOTE:If this is the first time that the Calibration Utility has been
run, or if there are no printers on the
Select Printer
drop-down
list, or if the Preferences files have been deleted, you must
select and open the export module for the printer that you
want to calibrate.
You can either create a new calibration table or open an existing one to
calibrate your printer.
D
Information about creating a new calibration table is in “Creating a
New Calibration Document” on page 1–19.
D
Information about using an existing calibration table is in “Opening an
Existing Calibration Table” on page 1–26.
1–16
September 1997 Part No. 1H9659
Page 25
Calibration Utility for MICROSOFT WINDOWS
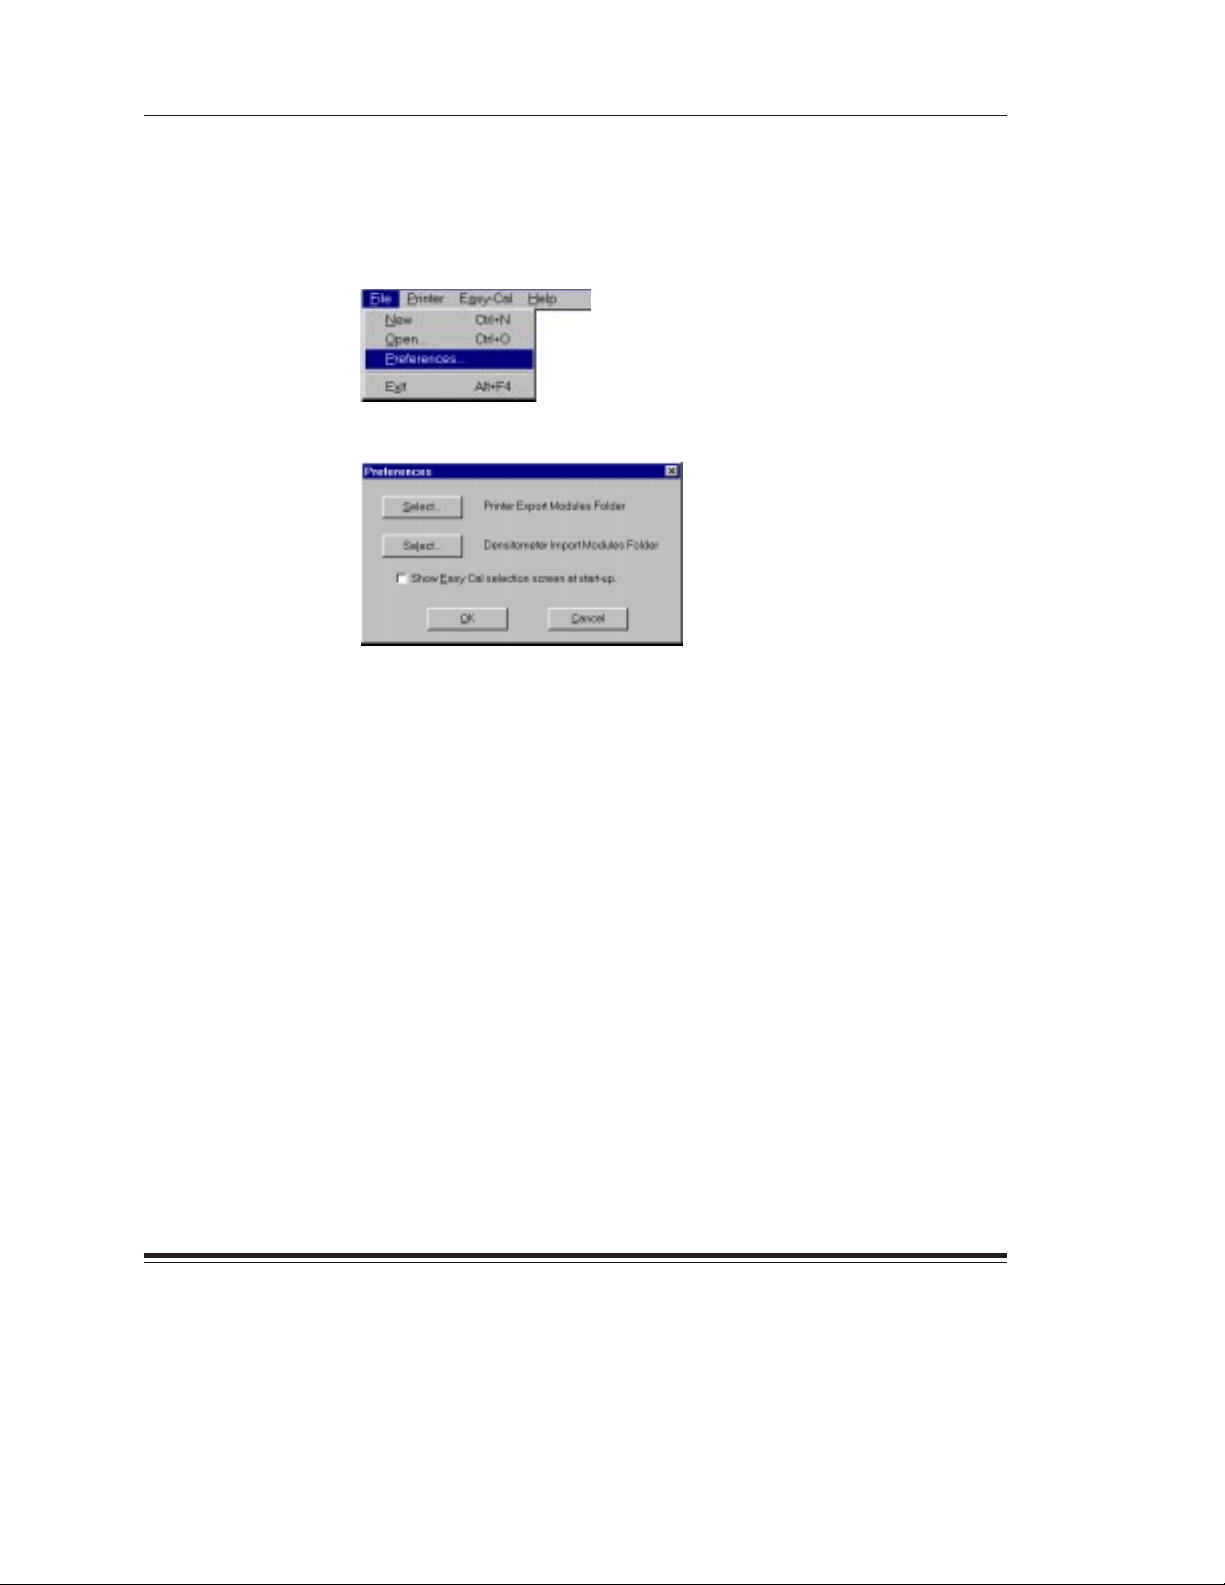
Setting Preferences
Y ou can specify the folders that contains the export module and the import
module (used for densitometer settings) in the Preferences dialog box.
1. Pull down the File menu and select
The Preferences dialog box appears.
2. Click on the
A selection box appears.
3. Find and open the folder in which the export module is located.
4. Click on the
You return to the Preferences dialog box.
Select
button next to “Printer Export Modules Folder.”
OK
button.
Preferences
.
5. Click on the
A selection box appears.
6. Find and open the folder in which the import module is located.
7. Click on the
You return to the Preferences dialog box.
8. Click on the
Your selections are saved.
Part No. 1H9659 September 1997
Select
button next to “Densitometer Import Modules Folder.”
OK
button.
OK
button.
1–17
Page 26

Calibration Utility for MICROSOFT WINDOWS
Selecting and Setting Up a Printer
Select a printer and specify the printer media before you start a calibration.
1. Pull down the Printer menu.
2. Choose
3. Pull down the Printer menu and choose
The Printer Setup for Calibration dialog box appears.
NOTE:The Printer Setup for Calibration dialog box may appear different,
4. Select the media combination(s) for which you are calibrating.
5. Click on the
The Printer Setup for Calibration dialog box closes.
Select Printer
depending on the selected printer.
OK
and highlight the printer you want to calibrate.
button.
Printer Setup
.
1–18
September 1997 Part No. 1H9659
Page 27
Calibration Utility for MICROSOFT WINDOWS
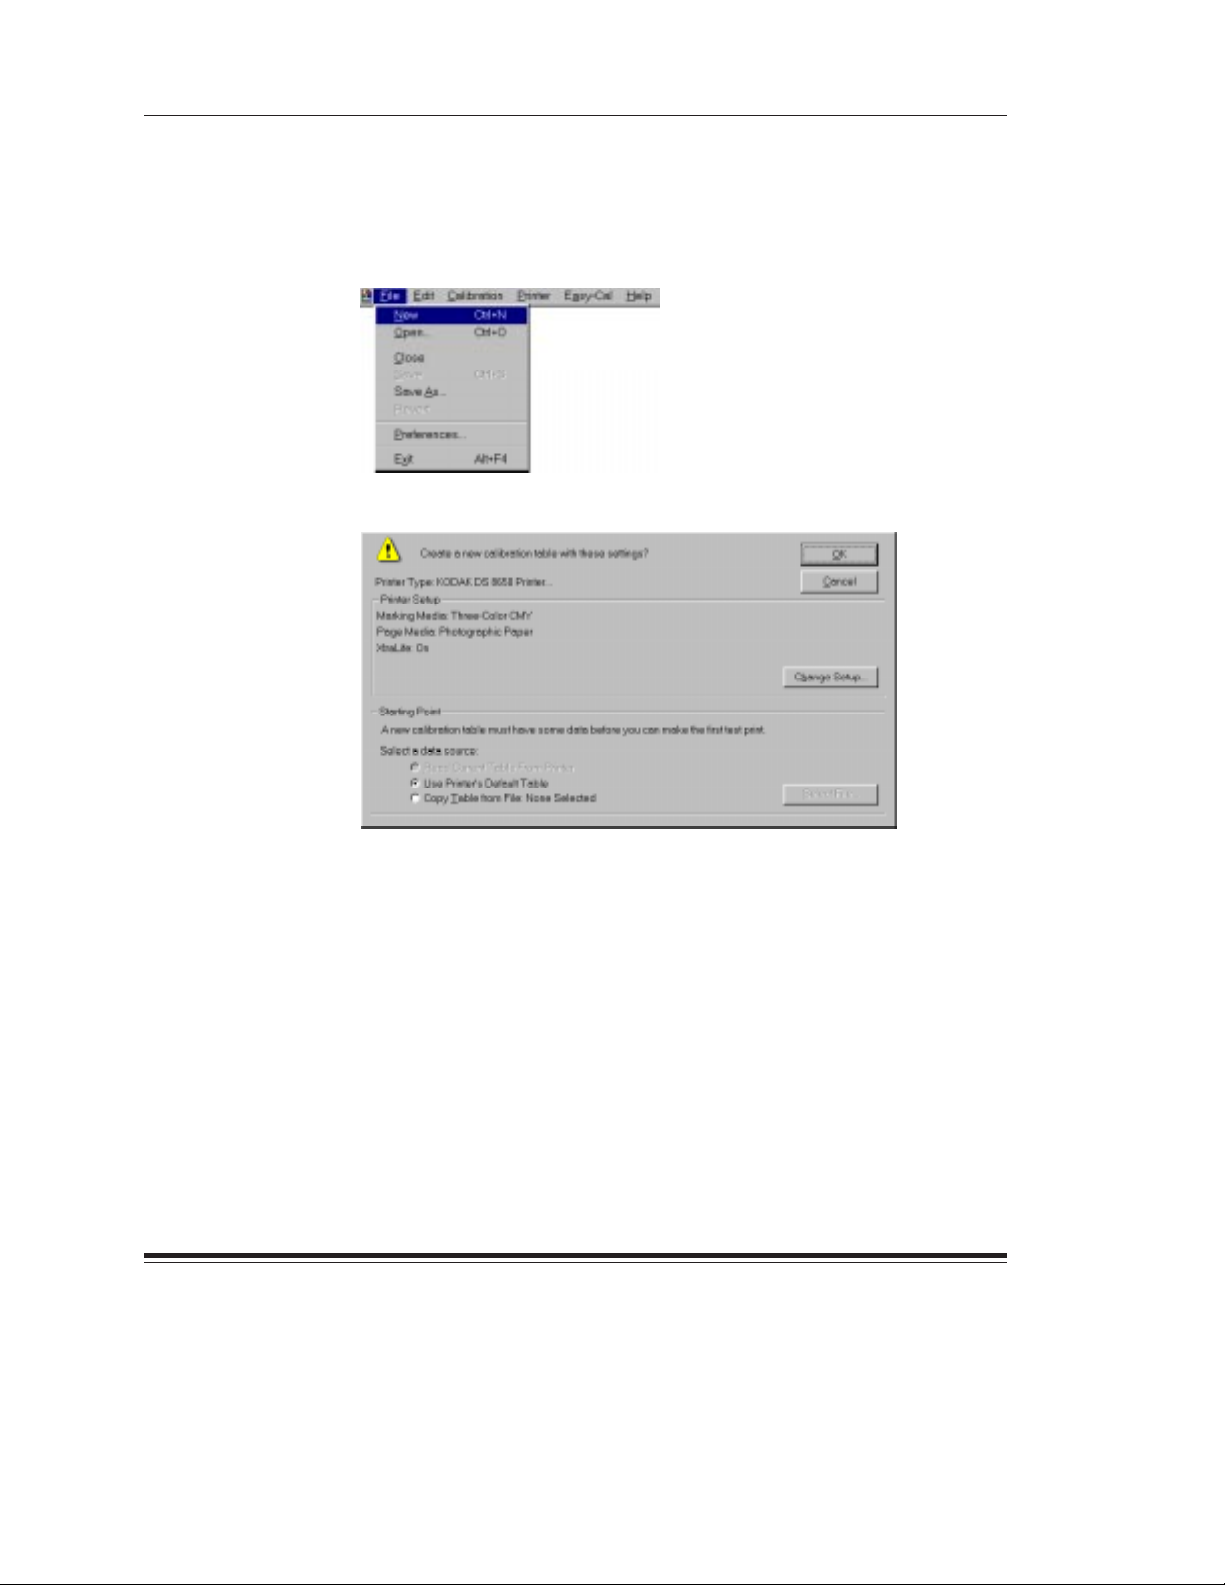
Creating a New Calibration Document
You can either create a new calibration document or open an existing
one to calibrate your printer.
1. Pull down the File menu and select
The Calibration Table dialog box appears.
New
.
Ribbon and paper type information may not appear in the
Printer Setup
Printer Setup...
If the correct paper and media types do not appear, refer to the
previous section, “Selecting and Setting Up a Printer.” If the
correct paper and media types appear, refer to “Selecting a
Starting Point for the Calibration Document” on page 1–20.
NOTE:The
Part No. 1H9659 September 1997
box if you have not first used the Printer menu’s
option.
Read Current Table From Printer
be available if the printer cannot return this information
(for example, many printers connected via parallel will have
this option deselected).
radio button will not
1–19
Page 28
Calibration Utility for MICROSOFT WINDOWS
Selecting a Starting Point for the Calibration Document
This section describes how to select a starting point (base file) for the
calibration document. There are three ways to access a base file:
D
Read Current Table From Printer
(refer to “Using the Printer’s Current Calibration Table as the
Starting Point” on this page).
D
Use Printer’s Default Table
“Using the Printer’s Default Calibration Table as the Starting Point”
on page 1–22).
D
Copy Table from File
table (refer to “Using an Existing Calibration Table as the Starting Point”
on page 1–23).
Using the Printer’s Current Calibration Table as the Starting Point
—uses the printer’s current table
—uses the printer’s default table (refer to
—uses a previously created and saved calibration
1. Select the
Starting Point
Read Current Table From Printer
box.
2. Click on the OK button.
radio button in the
1–20
September 1997 Part No. 1H9659
Page 29
Calibration Utility for MICROSOFT WINDOWS
A Calibration Document window appears.
3. Go to “Using the Calibration Document Window” on page 1–28.
Part No. 1H9659 September 1997
1–21
Page 30
Calibration Utility for MICROSOFT WINDOWS
Using the Printer’s Default Calibration Table as the Starting Point
1. Select the
Point
Use Printer’s Default Table
box.
2. Click on the OK button.
A Calibration Document window appears.
radio button in the
Starting
1–22
3. Go to “Using the Calibration Document Window” on page 1–28.
September 1997 Part No. 1H9659
Page 31

Calibration Utility for MICROSOFT WINDOWS
Using an Existing Calibration Table as the Starting Point
You can follow the steps below only if you have previously created and
saved a calibration table. If you are using the Calibration Utility for the
first time, no calibration tables exist yet for use as a starting point.
The table you select to use as a starting point does not contain printer setup
information. Follow the instructions in “Selecting and Setting Up a Printer”
on page 1–18 to specify information about the printer paper and media.
1. Select the
2. Click on the
Copy Table from File:
Select File...
button.
A file selection dialog box appears.
radio button in the
Starting Point
box.
Part No. 1H9659 September 1997
1–23
Page 32

Calibration Utility for MICROSOFT WINDOWS
3. Find and open the directory that contains the calibration table you
want to use as the starting point for your new table.
4. Select the calibration table you want to copy.
NOTE:The data in the table selected as a starting point is specific to the
paper and media types specified when the table was created. You
cannot select documents for the incorrect paper and ribbon type.
The files you can select are files created by the Calibration
Utility or any file that has a
only choose tables that are configured for that particular printer
and media.
.kcu
extension. However, you can
5. Click on the
Open
button.
The file selection dialog box closes. The name of the selected
calibration table appears after the
Copy Table from File:
6. Click on the OK button.
radio button.
1–24
September 1997 Part No. 1H9659
Page 33

Calibration Utility for MICROSOFT WINDOWS
A Calibration Document window appears.
7. Go to “Using the Calibration Document Window” on page 1–28.
Part No. 1H9659 September 1997
1–25
Page 34

Calibration Utility for MICROSOFT WINDOWS
Opening an Existing Calibration Table
1. Pull down the File menu and select
A file selection dialog box appears.
2. Find and open the directory that contains the calibration table you
want to use.
Open
.
1–26
3. Select the calibration table you want to use.
4. Click on the
Open
button.
September 1997 Part No. 1H9659
Page 35

Calibration Utility for MICROSOFT WINDOWS
A Calibration Document window appears.
5. Go to “Using the Calibration Document Window” on page 1–28.
Part No. 1H9659 September 1997
1–27
Page 36

Calibration Utility for MICROSOFT WINDOWS
Using the Calibration Document Window
Use the Calibration Document window to set up and run Visual Gray
Balance, Visual Linearity, and Densitometer calibrations.
1. Make sure that the information in the
box is correct and make sure that you are creating a calibration
table for the media you want to use.
2. Type information about the printer you are calibrating in the
Description
3. Type information about the media combination for which you are
calibrating in the
text box.
Media Description
Printer Setup Information
Printer
text box.
1–28
NOTE:Entries in the
boxes are optional and do not appear on the test print.
You can calibrate your printer. Refer to “Calibrating the Printer”
on page 1–29.
NOTE:If you are using black-only media, you cannot use the Visual Gray
Balance calibration method to calibrate your printer. You must go
directly to the Visual Linearity calibration procedure.
Printer Description
and
Media Description
September 1997 Part No. 1H9659
text
Page 37

Calibration Utility for MICROSOFT WINDOWS
Calibrating the Printer
You can now calibrate your printer by running the Visual Gray Balance
and Visual Linearity calibration procedures.
If you have a densitometer, you can run just the Densitometer calibration
procedure. You do not have to do Visual Gray Balance and Visual
Linearity calibrations. Refer to “Running a Densitometer Calibration”
on page 1–40.
Visual Gray Balance
Visual Gray Balance calibrates your printer so it produces a neutral
gray. The Calibration Utility allows you to select from three Visual Gray
Balance calibration prints. Each of these prints presents 49 numbered
grayscale clusters. Each cluster is made up of four boxes of varying
densities. A Visual Gray Balance calibration print looks similar to the
following example.
249
The clusters on the three prints include a range of colors. Clusters in the
upper left corner will have a green hue. Clusters in the lower right corner
will have a magenta hue. Three different calibration prints allow you to
choose the degree of color shift.
Slightly Green
Part No. 1H9659 September 1997
Part No. 8B9045 July 1996
Somewhat Green
Slightly Magenta
NormalFine Coarse
Very Green
Somewhat Magenta
Very Magenta
1–29
Page 38

Calibration Utility for MICROSOFT WINDOWS
Fine—offers the least degree of difference between clusters. This print
is useful when it is difficult to choose between clusters on the Normal
calibration print.
For example, you printed a Normal print and you find that the most
neutral-looking clusters are next to each other, but one still looks
slightly green while the other still looks slightly magenta. You can
print a Fine calibration print to get more choices within a smaller
range of colors.
Normal—offers a moderate degree of difference between clusters.
The amount of correction in this print is appropriate for most
calibration jobs.
Coarse—offers the greatest degree of difference in clusters. This
print is useful when neutral areas in your prints appear very green
or very magenta.
Running a Visual Gray Balance Calibration
1. Pull down the Calibration menu and select
2. Pull down the Calibration menu and select
Visual Gray Balance
Setup Visual Gray Balance...
The Calibration Setup – Visual Gray Balance dialog box opens.
3. Select a radio button in the
Amount of Correction
box.
.
.
1–30
September 1997 Part No. 1H9659
Page 39

Calibration Utility for MICROSOFT WINDOWS
4. Click on the OK button.
You return to the Calibration Document window.
5. Click on the
Send & Print
button.
The Send and Print dialog box appears.
NOTE:Your Send and Print dialog box may appear different, depending
on your printer export module.
Part No. 1H9659 September 1997
1–31
Page 40

Calibration Utility for MICROSOFT WINDOWS
6. Click on the
Print
button.
You return to the Calibration Document window. The calibration test
print is printed on the specified printer.
7. View the calibration test print and determine which cluster appears
the most neutral.
1–32
If the Visual Gray Balance most-neutral cluster number on the
test print ends in 25, the printer is already calibrated. You should
now perform a Visual Linearity calibration.
If the Visual Gray Balance number on the test print does not
end in 25, you must recalibrate the printer to the most neutral
cluster number.
NOTE:If you enter a value that ends in 25, the calibration table does
not change.
8. Click on the
Input
button.
September 1997 Part No. 1H9659
Page 41

Calibration Utility for MICROSOFT WINDOWS
The Input Test Print Values dialog box appears.
9. Type the number of the most-neutral cluster in the
10. Click on the
Recompute the Table
button.
Cluster Number
The calibration table data is updated and the Calibration Document
window appears.
box.
Part No. 1H9659 September 1997
1–33
Page 42

Calibration Utility for MICROSOFT WINDOWS
1 1. Click on the
Send
button if you are satisfied with the neutral in the cluster
you selected and you do not want to look at another calibration print.
A confirmation box appears.
12. Click on the
Send
button.
The recomputed table is sent to the printer and the following
message appears.
13. Click on the OK button.
The calibration table is computed using the specified values and
you return to the Calibration Document window. You should now
perform a Visual Linearity calibration.
1–34
NOTE:You should make another test print to verify your input
value adjustments.
September 1997 Part No. 1H9659
Page 43

Calibration Utility for MICROSOFT WINDOWS
Visual Linearity
Visual Linearity calibrates your printer so it produces the correct shading
(lightness/darkness).
Use the Linearity Reference Card to select a cluster for each of the six
density ranges. Visual Linearity calibration prints look similar to the
following examples.
CMYKCMY K
Using the Linearity Reference Card
The Linearity Reference Card is included with the Calibration Utility.
Use this Reference Card for performing Visual Linearity calibrations.
Following are instructions for using the Reference Card.
1. Lay the Linearity Reference Card with the name at the top on the first
row of the calibration print.
NOTE:It may not be possible to find a cluster in which all six gray levels
2. Slide the Linearity Reference Card across each patch in the row
and determine which of the nine patches in the row most closely
matches the darkness on the Reference Card.
NOTE:Match the darkness on the Reference Card, not the color.
3. Repeat step 2 for each row on the calibration print.
Part No. 1H9659 September 1997
exactly match the Linearity Reference Card. Select the cluster
that appears to be the closest match.
1–35
Page 44

Calibration Utility for MICROSOFT WINDOWS
Running a Visual Linearity Calibration
After you have run a calibration using the
use the
table using values from the test print.
1. Pull down the Calibration menu and select
Visual Linearity
You return to the Calibration Document window.
option to recompute the current calibration
Visual Gray Balance
Visual Linearity
option,
.
1–36
2. Click on the
Send & Print
button.
September 1997 Part No. 1H9659
Page 45

Calibration Utility for MICROSOFT WINDOWS
The Send and Print dialog box opens.
NOTE:Your Send and Print dialog box may appear different, depending
on your printer export module.
3. Click on the
Print
button.
You return to the Calibration Document window. The calibration test
print is printed on the specified printer.
Part No. 1H9659 September 1997
1–37
Page 46

Calibration Utility for MICROSOFT WINDOWS
4. Use the Linearity Reference Card to select a box number for each of
the six density ranges.
If all of the Visual Linearity numbers on the test print are box number 5,
the printer is already calibrated. You can close the Calibration Utility.
If the Visual Linearity numbers on the test print are not all box number 5,
you must recalibrate the printer. Go to step 5.
5. Click on the
Input
button.
The Input Test Print Values dialog box opens.
6. Type in the values you select from the test print in the text boxes.
1–38
7. Click on the
Recompute the Table
button.
The calibration table is computed using the specified values and the
Calibration Document window appears.
8. Click on the
Send
button to send the table to the printer.
September 1997 Part No. 1H9659
Page 47

Calibration Utility for MICROSOFT WINDOWS
Densitometer
A Densitometer calibration corrects the printer’s response based on the
densitometer reading for selected patches. If you have a densitometer, you
do not need to run Visual Gray Balance and Visual Linearity calibrations.
You only have to run the Densitometer calibration.
Print a test print and read it with a densitometer. There are two kinds of
densitometer prints: process and separation. The kind of print you get
depends on your printer. Densitometer calibration prints look similar to
the following examples.
Process Densitometer Prints
CMY K
CMYK
example: from a Kodak XLS 8600 Printer or
Kodak Digital Science
t
8650 Printer
Separations Densitometer Prints
CMYKCMY K
example: from a
Kodak Digital Science
t
DCP 9000 Printer
NOTE:Separation prints have separate individual colors for each of the
cyan, magenta, and yellow planes. Process prints combine the
cyan, magenta, and yellow into a single gray column. Black is
always a separate column.
Using a densitometer, you enter the density results for each of the
patches in the Densitometer Input Test Print Values dialog box. In
each case, you always input the visual component for the patch.
For separations prints, enter the “C” component for the cyan
patches, the “M” component for the magenta patches, and the
“Y” component for the yellow patches.
For process prints, enter the “C,” “M,” and “Y” components for
each of the CMY patches.
Part No. 1H9659 September 1997
1–39
Page 48

Calibration Utility for MICROSOFT WINDOWS
Running a Densitometer Calibration
If you have a densitometer, you can run the Densitometer calibration
instead of the Visual Gray Balance and Visual Linearity calibrations.
1. Set up your densitometer.
2. Pull down the Calibration menu and select
3. Pull down the Calibration menu and select
The Calibration Setup – Densitometer dialog box appears.
4. Select a densitometer status in the
5. Pull down the
select the number of squares in your test print.
6. Click on the
Number of Squares
OK
button.
Densitometer
menu in the
Densitometer
Setup Densitometer...
box.
Test Print
.
.
box and
1–40
September 1997 Part No. 1H9659
Page 49

Calibration Utility for MICROSOFT WINDOWS
You return to the Calibration Document window.
7. Click on the
Send & Print
button.
The Send and Print dialog box appears.
NOTE:Your Send and Print dialog box may appear different, depending
on your printer export module.
Part No. 1H9659 September 1997
1–41
Page 50

Calibration Utility for MICROSOFT WINDOWS
8. Click on the
Print
button.
You return to the Calibration Document window. The calibration test
print is printed on the specified printer.
9. Click on the
Input
button.
The Input Test Print Values dialog box appears.
1–42
September 1997 Part No. 1H9659
Page 51

Calibration Utility for MICROSOFT WINDOWS
One, three, or four Density Value columns appear in the Input Test
Print Values dialog box, depending on the calibration your printer
requires (for black ribbon, three-color ribbon, or four-color ribbon).
The number of Density Value rows is determined by the selection
in the
Number of Squares
menu (15 or 38).
Valid characters in this dialog box include numbers from 0 to 9,
periods (.), and commas (,). The valid range is 0 to 3.999
(0 to 3,999). Move from cell to cell using your keyboard’s
arrow keys. You can copy and paste any group of contiguous
fields in a rectangular pattern.
10. Type the test print values in the text boxes.
NOTE:You can import densitometer data automatically with an
11. Click on the
The calibration table is computed using the specified values and the
Calibration Document window appears.
Part No. 1H9659 September 1997
import module. If your densitometer has an associated import
module, the densitometer readings will be imported directly into
the dialog box. Using the Kodak File Reader, you can read in
a file of data and specify the end of Field and End of Record
characters. For more information, refer to “Import” on
page 1–44.
Recompute the Table
button.
1–43
Page 52

Calibration Utility for MICROSOFT WINDOWS
Import
The selected import module opens a dialog box when you click on the
Import
button in the Densitometer — Input Test Print Values dialog box.
For the Kodak File Reader, the following dialog box appears when you
click on the
Import
button.
End of Field Character—specify the end-of-field character used in
your densitometer file: “space,” “comma,” “tab,” “CR” (carriage return),
“CR-LF” (carriage return/line feed), “LF” (line feed), and “Semi-colon.”
End of Record Character—specify the end-of-record character used
in your densitometer file: “space,” “comma,” “tab,” “CR” (carriage return),
“CR-LF” (carriage return/line feed), “LF” (line feed), and “Semi-colon.”
Open—the
Open
button allows you to find and import the densitometer
file with the values you want to use in the Input Test Print Values
dialog box.
1–44
September 1997 Part No. 1H9659
Page 53

Option Descriptions
This section describes the Calibration Utility menu and dialog box options.
File Menu
This section describes the features on the File pulldown menu.
New—accesses the Calibration Document window so you can select
options for the current printer setup.
Open—accesses a file selection box so you can select an existing
calibration table from which to start.
Close—closes the current calibration document.
Save—saves changes to the current calibration document. When you
name a calibration document, you may want to include characters that
indicate the selected media types. Saving a document this way allows you
to select it later to use as a starting point for a new calibration document.
Save As...—accesses a dialog box in which you can specify a new
name and location for the current calibration settings. When you name
a calibration document, you may want to include characters that indicate
the selected media types. Naming a document this way allows you to
select it later to use as a starting point for a calibration document.
Revert—returns a calibration document to its original state. All
recomputations are discarded.
Preferences...—accesses a dialog box that allows you to specify the
folder containing the export module and the folder containing the import
module (used for densitometer settings).
Calibration Utility for MICROSOFT WINDOWS
Exit—exits the Calibration Utility.
Part No. 1H9659 September 1997
1–45
Page 54

Calibration Utility for MICROSOFT WINDOWS
Edit Menu
The Edit menu is enabled only when a Calibration Document window
is open.
The options in the Edit menu are enabled only when you enter text in the
Printer Description
and
Calibration Menu
The Calibration menu is enabled when a Calibration Document window is
open. You can choose to calibrate based on your input to the Visual Gray
Balance, Visual Linearity, and Densitometer dialog boxes.
Media Description
boxes.
1–46
Calibration Setup — Visual Gray Balance
This dialog box allows you to specify the degree of correction to apply
with the current calibration table.
NOTE:If you are using black-only media, you cannot use the Visual Gray
Balance calibration method to calibrate your printer.
September 1997 Part No. 1H9659
Page 55

Calibration Utility for MICROSOFT WINDOWS
Amount of Correction
The
Amount of Correction
of difference between neutrals the calibration print will present.
Fine—the calibration print offers the least degree of difference in neutrals
between the cluster in the upper left corner and the cluster in the lower
right corner. The cluster in the upper left corner is only slightly green and
the cluster in the lower right corner is only slightly magenta.
Select “Fine” to get the smallest hue range. This means that the hue
differences between clusters is small so you can fine-tune by choosing
between very similar neutrals.
Normal—the calibration print offers a moderate degree of difference in
neutrals between the cluster in the upper left corner and the cluster in the
lower right corner. The cluster in the upper left corner is somewhat green
and the cluster in the lower right corner is somewhat magenta.
Select “Normal” to get a larger hue range than “Fine.” This means that
the hue differences between clusters is slightly larger and adjacent
clusters are less similar.
Coarse—the calibration print offers the greatest degree of difference in
neutrals between the cluster in the upper left corner and the cluster in the
lower right corner. The cluster in the upper left corner is distinctly green
and the cluster in the lower right corner is distinctly magenta.
radio buttons allow you to specify the degree
Select “Coarse” to get the largest hue range. This means that the hue
differences between clusters is easily discernible and adjacent clusters
are distinctly different.
Calibration Setup — Visual Linearity
There is no functionality for this option at this time.
Part No. 1H9659 September 1997
1–47
Page 56

Calibration Utility for MICROSOFT WINDOWS
Calibration Setup — Densitometer
This dialog box allows you to use values from a densitometer text table
to recompute the calibration table.
NOTE:Make sure that your densitometer is calibrated before you try to
calibrate your printer with the densitometer values.
Densitometer
Densitometer
The
data (
Status A
Utility calculates the table data using the density type that the export
module needs for the current calibration slot.
NOTE:Depending on the export module and settings, one of these
options may not be available. For example,
available for the
Test Print — Number of Squares
Number of Squares
The
the number of squares (15 or 38) in your test print.
radio buttons allow you to specify what type of density
or
Status T
) your densitometer provides. The Calibration
Kodak Digital Science
menu in the
Test Print
Status A
t
DCP 9000 Printer.
box allows you to specify
is not
1–48
September 1997 Part No. 1H9659
Page 57

Calibration Utility for MICROSOFT WINDOWS
Printer Menu
The Printer menu allows you to select a printer or set up the printer
from the menu bar.
Select Printer—a menu with the printer selections for your
system appears.
Printer Setup...—the Printer Setup for Calibration dialog box appears
so you can make changes for the selected printer.
Easy-Cal Menu
The Easy-Cal menu allows you to start the Easy Cal calibration
procedure from the menu bar.
Begin...—the Easy Cal calibration procedure starts up.
Begin with Previous Settings...—the Easy Cal Step 4 dialog
box appears.
NOTE:The Easy Cal calibration procedure cannot be used to calibrate
Part No. 1H9659 September 1997
a printer that is using black-only ribbon.
1–49
Page 58

Calibration Utility for MICROSOFT WINDOWS
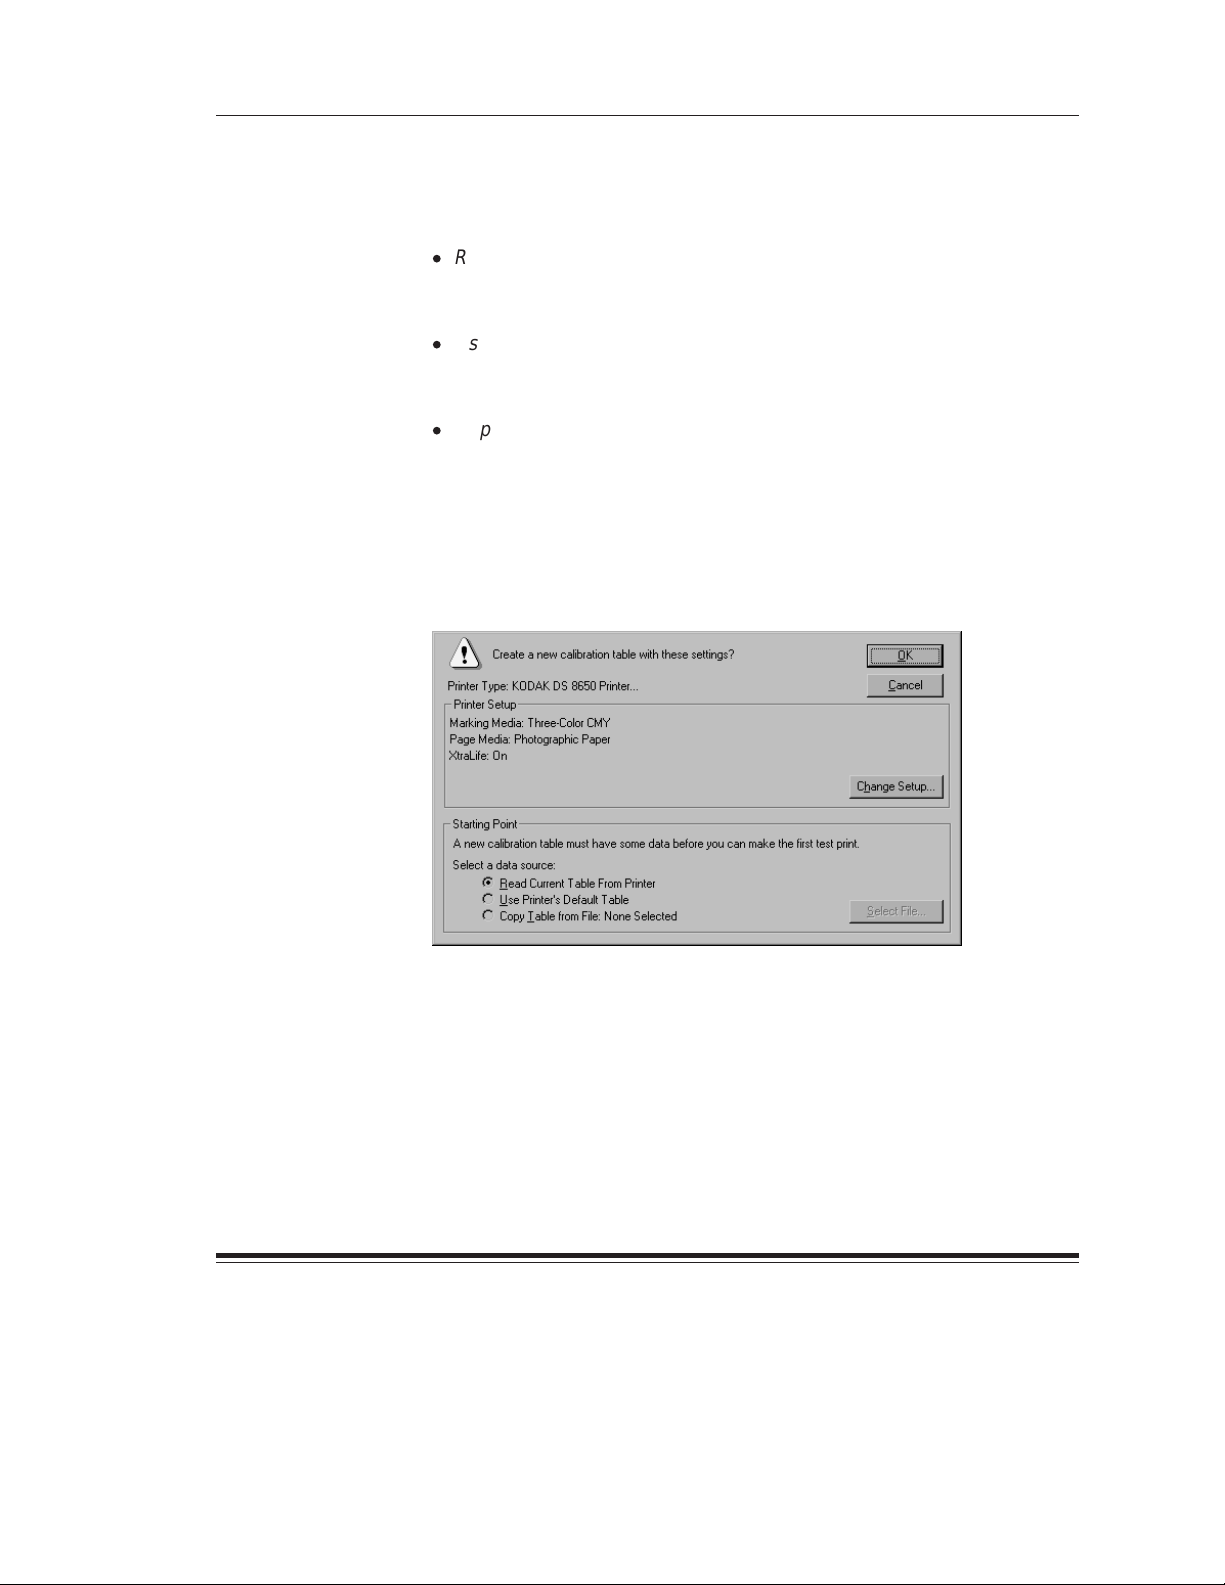
Calibration Table Dialog Box
Pull down the File menu and select
allows you to create a new calibration table.
Printer Setup
Printer Setup
The
for which the printer will be calibrated. Click on the
to change the information that appears.
box lists information about the ribbon and paper type
New
to access a dialog box that
Change Setup
button
1–50
Change Setup—accesses the Printer Setup for Calibration dialog
box so you can select options that match the media in the printer
you are calibrating.
September 1997 Part No. 1H9659
Page 59

Starting Point
Calibration Utility for MICROSOFT WINDOWS
Starting Point
The
base for the new calibration table.
Read Current Table From Printer—allows you to retrieve and begin
with the printer’s current table. Once the table is loaded, you can edit
it and recalibrate the printer. This option is not always available as a
starting point.
Use Printer’s Default Table—default printer data acts as the starting
point for the new calibration document.
Copy Table from File—the calibration table you select with the
File
button acts as the starting point for the new calibration document.
Select File—opens a selection box so you can choose an existing
calibration document from which to start.
box allows you to select the data that will act as a
Select
OK
OK
The
window. Refer to “Calibration Document Window” on page 1–52 for
more information.
Cancel
The
Cancel
calibration document.
Part No. 1H9659 September 1997
button closes the dialog box and opens a Calibration Document
button closes the dialog box without creating a new
1–51
Page 60

Calibration Utility for MICROSOFT WINDOWS
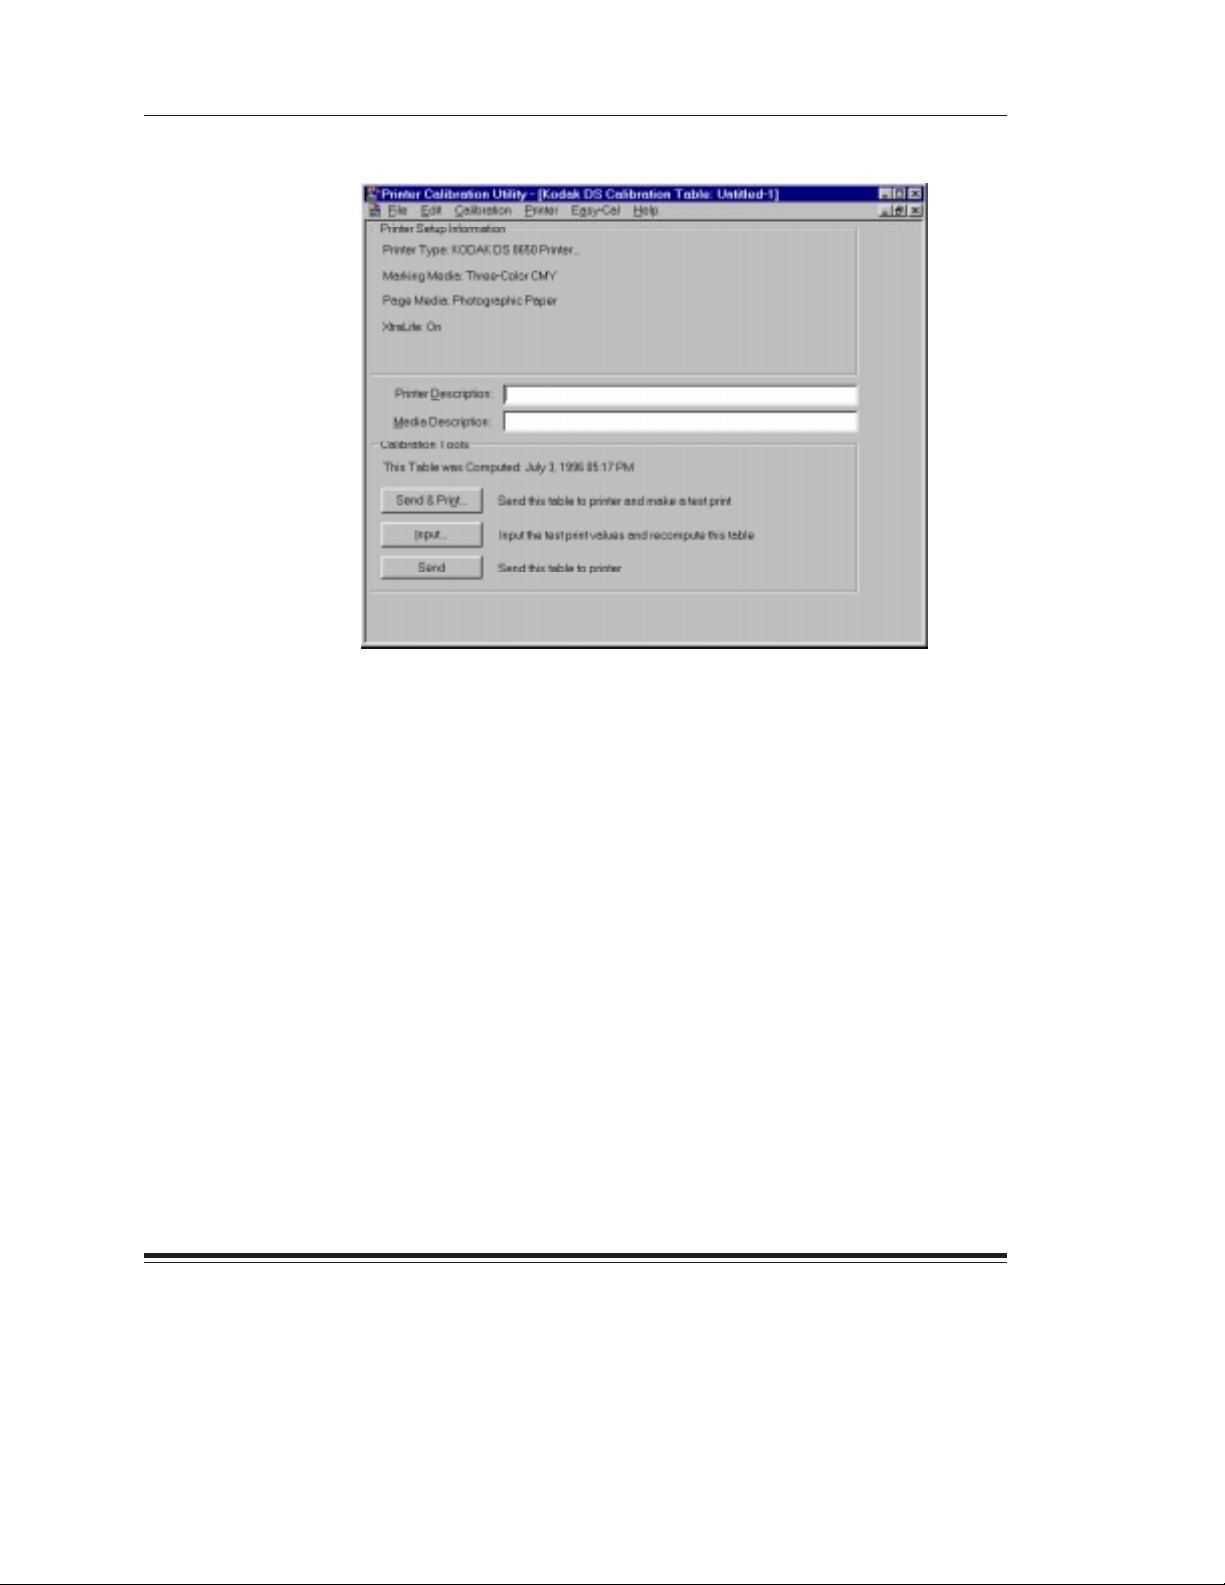
Calibration Document Window
The Calibration Document window allows you to specify information
about the calibration table.
1–52
Printer Setup Information
The
Printer Setup Information
ribbon, and paper type for which the printer will be calibrated.
box lists information about the printer type,
September 1997 Part No. 1H9659
Page 61

Calibration Utility for MICROSOFT WINDOWS
Printer Description
The
Printer Description
describes the printer for which the calibration table will be used. The text
you enter is used to help describe the specifics of a particular calibration
table. This text is not printed on the test print. An entry is optional. Use
the Edit menu when you enter text.
Media Description
The
Media Description
describes the media for which the calibration table will be used. The text
you enter is used to help describe the specifics of a particular calibration
table. This text is not printed on the test print. An entry is optional. Use
the Edit menu when you enter text.
Calibration Tools
text box allows you to enter information that
text box allows you to enter information that
Calibration Tools
Send & Print—sends the current calibration table to the printer.
A calibration print is generated so you can evaluate the results.
Input—accesses the Input Test Print Values dialog boxes so you can
enter
Visual Gray Balance, Visual Linearity
Send—sends the current calibration table to the printer without
generating a calibration print. This button is usually used after you
have created a test print and have recomputed the calibration table.
offers handling options for the calibration table.
, and
Densitometer
data.
Part No. 1H9659 September 1997
1–53
Page 62

Page 63

2Calibration Utility for MACINTOSH
This chapter describes how to install and use the Calibration Utility on a
Macintosh system. You should be familiar with the Macintosh environment.
Installation
See the "Read Me" for instructions for installing the calibration utility.
System Requirements
Recommended System Configuration
D
68040 or PowerPC processor
D
APPLE System 7.5
D
16 MB of RAM
D
color monitor
D
CD-ROM drive
Minimum System Configuration
D
68030 processor
D
APPLE System 7.1
D
8 MB of RAM
D
standard color or black and white monitor
(minimum resolution 640 x 400 pixels)
Part No. 1H9659 September 1997
2–1
Page 64

Calibration Utility for MACINTOSH
Installing the Software
1. Place the CD or diskette containing the Calibration Utility in the
appropriate drive.
An icon appears on the desktop.
2. Open and read the
changes and information).
3. Open a folder on your hard drive in which you want to place the
Calibration Utility .
4. Double-click on the icon to open it.
5. Select the
folder you created on your hard drive.
The entire contents of the folder on the CD or diskette are copied
into the folder you created.
6. Remove the CD or diskette from the drive.
This page has been intentionally left blank.
The Calibration Utility is ready to run.
Kodak DS Calibration Utility
README
file (which contains last-minute
folder and drag it into the
2–2
September 1997 Part No. 1H9659
Page 65

Operating the Calibration Utility
The following steps describe how to start the Calibration Utility.
Calibration Utility for MACINTOSH
1. Double-click on the
A splash screen appears, then the Calibration Utility selection
box appears.
2. Do one of the following:
D
Click on the
Information about the Easy Cal calibration procedure is in “Using
Easy Cal to Calibrate Your Printer” on page 2–4.
D
Click on the
Information about the Normal Utility calibration procedure is in
“Using Normal Utility to Calibrate Your Printer” on page 2–14.
Kodak DS Calibration Utility
Begin Easy Cal
or
button to start up Easy Cal.
Launch Normal Utility
button to start up Normal Utility.
icon on your hard drive.
NOTE:If you want to go directly to Normal Utility without the Calibration
Part No. 1H9659 September 1997
Utility selection dialog appearing each time you start the Calibration
Utility, select the check box labeled
utility and don’t show this screen
(
Show Easy Cal selection screen at start-up
dialog box (accessed from the File menu) is deselected.
To use Easy Cal from within Normal Utility , pull down the Easy-Cal
menu and select
If you want the Calibration Utility selection box to appear when
you start up the Calibration Utility, select the
selection screen at start-up
For more information about the options in the Preferences dialog
box, refer to “Option Descriptions” on page 2–41.
Begin...
or
Begin with Previous Settings...
check box in the Preferences dialog box.
At start-up, launch normal
. The corresponding check box
) in the Preferences
.
Show Easy Cal
2–3
Page 66

Calibration Utility for MACINTOSH
Using Easy Cal to Calibrate Your Printer
The Easy Cal calibration procedure provides you with steps that guide
you through the process of calibrating your printer using a Visual Gray
Balance calibration.
NOTE:The Easy Cal calibration procedure cannot be used to calibrate a
printer that is using black-only ribbon.
When you click on the
selection dialog, the Easy Cal calibration procedure starts up and the
following dialog box appears.
D
Click on the
The Easy Cal Step 1 of 5 dialog box appears.
NOTE:Clicking on the
Proceed
Begin Easy Cal
button.
Cancel
button accesses Normal Utility.
button in the Calibration Utility
2–4
September 1997 Part No. 1H9659
Page 67

Calibration Utility for MACINTOSH
Easy Cal Step 1
The Easy Cal Step 1 dialog box allows you to select a printer model to
calibrate and find the corresponding export module.
If you do not need to specify a different printer, click on the
in the Easy Cal Step 1 dialog box and go to “Easy Cal Step 2.”
1. Select a printer on the
NOTE:If there are no printers on the
you want to calibrate does not appear on the menu, you must
find and select the export module for the printer that you want
to calibrate.
2. Click on the
A selection box appears. The selection box shows the folder in which
the Calibration Utility was installed. The name of the export module
appears in the
Locate Export Modules Folder...
Files
Printer Model
list.
menu.
Printer Model
button.
menu or the printer
Next>>
button
Part No. 1H9659 September 1997
2–5
Page 68

Calibration Utility for MACINTOSH
3. Find and open the folder that contains the export module.
4. Select the export module you want to use.
5. Click on
Open
button.
You return to the Easy Cal Step 1 dialog box. The Calibration Utility
now can find and use the export module so it can transfer data to
the printer.
6. Click on the
Next >>
button.
The Easy Cal Step 2 dialog box appears.
2–6
September 1997 Part No. 1H9659
Page 69

Calibration Utility for MACINTOSH
Easy Cal Step 2
The Easy Cal Step 2 dialog box allows you to specify a different printer to
calibrate than the one that appears in the
NOTE:If you do not need to specify a different printer, you can ignore the
following steps and click on the
Step 2 dialog box and go to “Easy Cal Step 3.”
Printer
Next>>
box.
button in the Easy Cal
1. Click on the
The Select Printer dialog box appears.
Select Printer...
button.
NOTE:Your Select Printer dialog box may appear different, depending on
2. Click on the button for the port to which the printer is connected.
3. Click on the
Part No. 1H9659 September 1997
your printer export module.
If this is the first time that the Calibration Utility has been
run or if the Preferences files have been deleted, you may be
prompted to locate the necessary files for the export module.
OK
button.
2–7
Page 70

Calibration Utility for MACINTOSH
You return to the Easy Cal Step 2 dialog box.
4. Click on the
Next >>
button.
The Easy Cal Step 3 dialog box appears.
2–8
September 1997 Part No. 1H9659
Page 71

Calibration Utility for MACINTOSH
Easy Cal Step 3
The Easy Cal Step 3 dialog box allows you to specify a different printer
media to calibrate than the one that appears in the
1. Make sure that the paper and media types for which you want to
calibrate are loaded in the printer.
NOTE:If you do not need to specify a different printer media, you can
ignore the following steps and click on the
the Easy Cal Step 3 dialog box and go to “Easy Cal Step 4.”
Printer Setup
Next>>
button in
box.
2. Click on the
The Printer Setup for Calibration dialog box appears.
NOTE:Your Printer Setup for Calibration dialog box may appear different,
Part No. 1H9659 September 1997
Change Setup...
depending on your printer export module.
button.
2–9
Page 72

Calibration Utility for MACINTOSH
3. Make any necessary changes in the Printer Setup for Calibration
dialog box.
4. Click on the
OK
button.
You return to the Easy Cal Step 3 dialog box.
5. Click on the
Next >>
button.
The Easy Cal Step 4 dialog box appears.
2–10
September 1997 Part No. 1H9659
Page 73

Calibration Utility for MACINTOSH
Easy Cal Step 4
The Easy Cal Step 4 dialog box contains printer and printer setup
information that will be used in the test print that is created in this step.
NOTE:If the Easy Cal Step 4 dialog box does not contain printer and
printer setup information, click on the
on the
Change Setup...
button.
<<Back
button and click
1. Make sure that the
NOTE:Clicking on the
printer. The previous table is overwritten.
2. Click on the
The default table is sent to the printer and the previous table is
overwritten. The Send and Print dialog box appears.
Next >>
Printer
Next>>
button.
and
Printer Setup
button sends the default table to the
information is correct.
NOTE:Your Send and Print dialog box may appear different, depending
Part No. 1H9659 September 1997
on your printer export module.
2–11
Page 74

Calibration Utility for MACINTOSH
3. Click on the
Your computer begins processing information. This may take a few
minutes. The calibration test print is printed on the specified printer.
The Easy Cal Step 5 dialog box appears.
Print
button.
Easy Cal Step 5
Use the test print to calibrate your printer in the Easy Cal Step 5 dialog box.
1. Look at the test print and decide which grayscale cluster appears
the most neutral gray.
2–12
NOTE:If you want to print another test print, click on the
to return to the Easy Cal Step 4 dialog box.
2. Type the number of the most neutral grayscale cluster in the
Number
text box.
September 1997 Part No. 1H9659
<<Back
button
Cluster
Page 75

Calibration Utility for MACINTOSH
NOTE:If you want to print an updated test print, you can click on the
<<Back
button to return to the Easy Cal Step 4 dialog box.
If cluster number 225 on the updated test print is the most neutral
gray, then the calibration is successful. Type 225 in the
Number
text box and go to step 3.
Cluster
3. Click on the
Done
button.
The printer calibration begins. When the calibration is complete, the
following dialog box appears.
4. Do one of the following:
D
If you do not want to make another test print and you do not want
to save the calibration table, click on the
Quit
button to quit the
Calibration Utility .
or
D
If you want to save the calibration table, click on the
Proceed
button to access a document window. Refer to “Using the
Calibration Document Window” on page 2–24.
Saving Your Calibration Table
You may want to save the calibration table you just created to use as a
starting point for later calibrations.
D
Pull down the File menu and select
current calibration table.
D
Pull down the File menu and select
in which you can specify a new name and location for the current
calibration table.
Part No. 1H9659 September 1997
Save
to save changes to the
Save As
to access a selection box
2–13
Page 76

Calibration Utility for MACINTOSH
Using Normal Utility to Calibrate Your Printer
The Normal Utility calibration procedure allows you to create a new
calibration document or start from a calibration document that was
previously created and saved.
When you click on the
Launch Normal Utility
button in the Calibration
Utility selection box, the Normal Utility calibration procedure starts up
and the Printer Calibration Utility window opens.
NOTE:If this is the first time that the Calibration Utility has been
run, or if there are no printers on the
Select Printer
menu, or
if the Preferences files have been deleted, you must select
and open the export module for the printer that you want
to calibrate.
You can either create a new calibration table or open an existing one to
calibrate your printer.
D
Information about creating a new calibration table is in “Creating a
New Calibration Document” on page 2–17.
D
Information about using an existing calibration table is in “Opening an
Existing Calibration Table” on page 2–23.
2–14
September 1997 Part No. 1H9659
Page 77

Calibration Utility for MACINTOSH
Setting Preferences
Y ou can specify the folders that contains the export module and the import
module (used for densitometer settings) in the Preferences dialog box.
1. Pull down the File menu and select
The Preferences dialog box appears.
2. Click on the
A file selection dialog box appears.
3. Find and open the folder in which the export module is located.
4. Click on the
Select
button next to “Printer Export Modules Folder.”
OK
button.
Preferences
.
You return to the Preferences dialog box.
5. Click on the
A file selection dialog box appears.
6. Find and open the folder in which the import module is located.
7. Click on the
You return to the Preferences dialog box.
8. Click on the
Your selections are saved.
Part No. 1H9659 September 1997
Select
button next to “Densitometer Import Modules Folder.”
OK
button.
OK
button.
2–15
Page 78

Calibration Utility for MACINTOSH
Selecting and Setting Up a Printer
Select a printer and specify the printer media before you start a calibration.
1. Pull down the Printer menu.
2. Choose
3. Pull down the Printer menu and choose
The Printer Setup for Calibration dialog box appears.
NOTE:The Printer Setup for Calibration dialog box may appear different,
4. Select the media combination(s) for which you are calibrating.
5. Click on the
Select Printer
depending on the selected printer.
OK
and highlight the printer you want to calibrate.
button.
Printer Setup
.
2–16
The Printer Setup for Calibration dialog box closes.
September 1997 Part No. 1H9659
Page 79

Calibration Utility for MACINTOSH
Creating a New Calibration Document
You can either create a new calibration document or open an existing
one to calibrate your printer.
New
1. Pull down the File menu and select
The Calibration Table dialog box appears.
.
Ribbon and paper type information may not appear in the
Printer Setup
Printer Setup...
If the correct paper and media types do not appear, refer to the
previous section, “Selecting and Setting Up a Printer.” If the
correct paper and media types appear, refer to “Selecting a
Starting Point for the Calibration Document” on page 2–18.
NOTE:The
Part No. 1H9659 September 1997
box if you have not first used the Printer menu’s
option.
Read Current Table From Printer
be available if the printer cannot return this information
(for example, many printers connected via parallel will
have this option deselected).
radio button will not
2–17
Page 80

Calibration Utility for MACINTOSH
Selecting a Starting Point for the Calibration Document
This section describes how to select a starting point (base file) for the
calibration document. There are three ways to access a base file:
D
Read Current Table from Printer
to “Using the Printer’s Current Calibration Table as the Starting Point”
on this page).
D
Use Printer’s Default Table
“Using the Printer’s Default Calibration Table as the Starting Point”
on page 2–20).
D
Copy Table from File
table (refer to “Using an Existing Calibration Table as the Starting Point”
on page 2–21).
Using the Printer’s Current Calibration Table as the Starting Point
—uses the printer’s current table (refer
—uses the printer’s default table (refer to
—uses a previously created and saved calibration
1. Select the
Point
Read Current Table from Printer
box.
2. Click on the OK button.
radio button in the
Starting
2–18
September 1997 Part No. 1H9659
Page 81

Calibration Utility for MACINTOSH
A Calibration Document window appears.
3. Go to “Using the Calibration Document Window” on page 2–24.
Part No. 1H9659 September 1997
2–19
Page 82

Calibration Utility for MACINTOSH
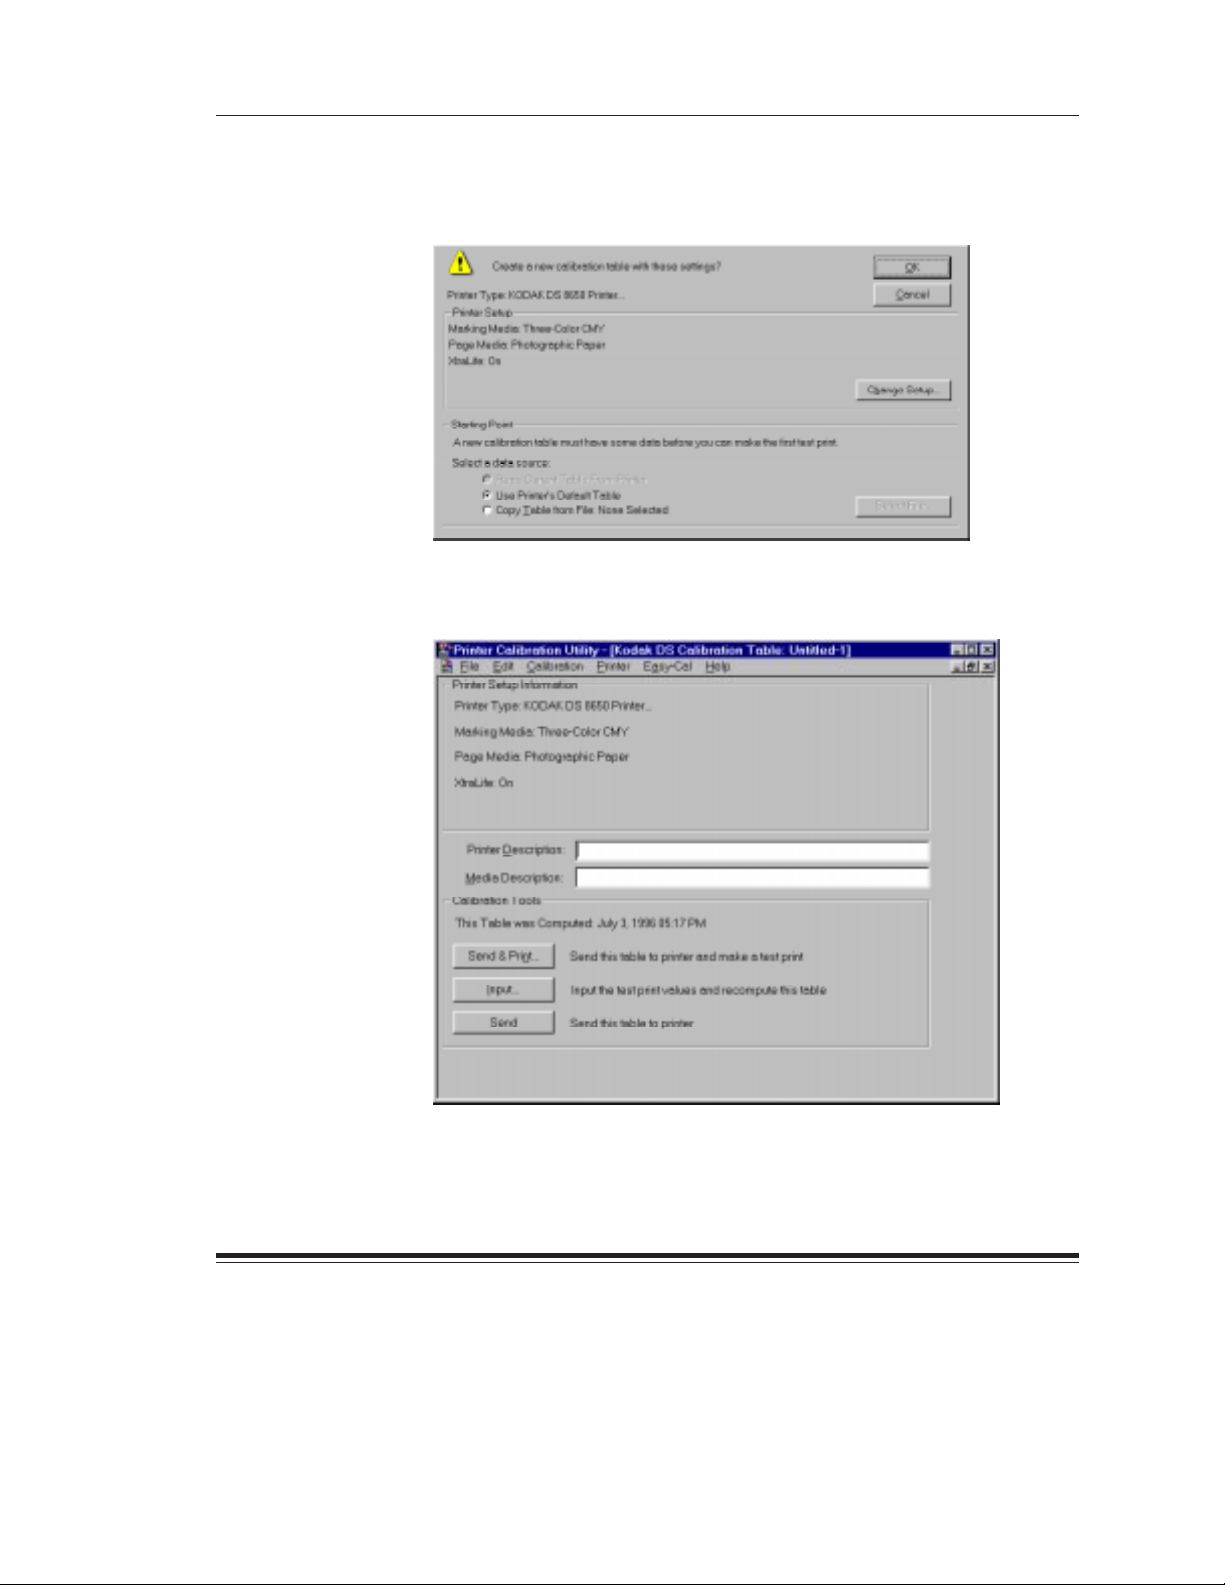
Using the Printer’s Default Calibration Table as the Starting Point
1. Select the
Point
Use Printer’s Default Table
box.
2. Click on the OK button.
A Calibration Document window appears.
radio button in the
Starting
2–20
3. Go to “Using the Calibration Document Window” on page 2–24.
September 1997 Part No. 1H9659
Page 83

Calibration Utility for MACINTOSH
Using an Existing Calibration Table as the Starting Point
You can follow the steps below only if you have previously created and
saved a calibration table. If you are using the Calibration Utility for the
first time, no calibration tables exist yet for use as a starting point.
The table you select to use as a starting point does not contain printer
setup information. Follow the instructions in “Selecting and Setting Up
a Printer” on page 2–16 to specify information about the printer paper
and media.
1. Select the
2. Click on the
Copy Table from File:
Select File...
button.
radio button in the
Starting Point
box.
A file selection dialog box appears.
3. Find and open the folder that contains the calibration table you want
to use as the starting point for your new table.
4. Select the calibration table you want to copy.
Part No. 1H9659 September 1997
2–21
Page 84

Calibration Utility for MACINTOSH
NOTE:The data in the table selected as a starting point is specific to the
paper and media types specified when the table was created. You
cannot select documents for the incorrect paper and ribbon type.
The files you can select are files created by the Calibration Utility or
any file that has a
tables that are configured for that particular printer and media.
.kcu
extension. However, you can only choose
5. Click on the
Open
button.
The file selection dialog box closes. The name of the selected
calibration table appears after the
Copy Table from File:
6. Click on the OK button.
A Calibration Document window appears.
radio button.
2–22
7. Go to “Using the Calibration Document Window” on page 2–24.
September 1997 Part No. 1H9659
Page 85

Calibration Utility for MACINTOSH
Opening an Existing Calibration Table
1. Pull down the File menu and select
A file selection dialog box appears.
2. Find and open the folder that contains the calibration table you
want to use.
3. Select the calibration table you want to use.
Open
.
4. Click on the
A Calibration Document window appears.
5. Go to “Using the Calibration Document Window” on page 2–24.
Part No. 1H9659 September 1997
Open
button.
2–23
Page 86

Calibration Utility for MACINTOSH
Using the Calibration Document Window
Use the Calibration Document window to set up and run Visual Gray
Balance, Visual Linearity, and Densitometer calibrations.
1. Make sure that the information in the
is correct and make sure that you are creating a calibration table for
the media you want to use.
2. Type information about the printer you are calibrating in the
Description
3. Type information about the media combination for which you are
calibrating in the
NOTE:Entries in the
boxes are optional and do not appear on the test print.
text box.
Media Description
Printer Description
Printer Setup Information
text box.
and
Media Description
Printer
text
box
2–24
You can calibrate your printer. Refer to “Calibrating the Printer”
on page 2–25.
NOTE:If you are using black-only media, you cannot use the Visual Gray
Balance calibration method to calibrate your printer. You must go
directly to the Visual Linearity calibration procedure.
September 1997 Part No. 1H9659
Page 87

Calibration Utility for MACINTOSH
Calibrating the Printer
You can now calibrate your printer by running the Visual Gray Balance
and Visual Linearity calibration procedures.
If you have a densitometer, you can run just the Densitometer calibration
procedure. You do not have to do Visual Gray Balance and Visual
Linearity calibrations. Refer to “Running a Densitometer Calibration”
on page 2–36.
Visual Gray Balance
Visual Gray Balance calibrates your printer so it produces a neutral gray.
The Calibration Utility allows you to select from three Visual Gray Balance
calibration prints. Each of these prints presents 49 numbered grayscale
clusters. Each cluster is made up of four boxes of varying densities. A Visual
Gray Balance calibration print looks similar to the following example.
249
The clusters on the three prints include a range of colors. Clusters in the
upper left corner will have a green hue. Clusters in the lower right corner
will have a magenta hue. Three different calibration prints allow you to
choose the degree of color shift.
Slightly Green
Part No. 1H9659 September 1997
Part No. 8B9045 July 1996
Somewhat Green
Slightly Magenta
NormalFine Coarse
Very Green
Somewhat Magenta
Very Magenta
2–25
Page 88

Calibration Utility for MACINTOSH
Fine—offers the least degree of difference between clusters. This print
is useful when it is difficult to choose between clusters on the Normal
calibration print.
For example, you printed a Normal print and you find that the most
neutral-looking clusters are next to each other, but one still looks slightly
green while the other still looks slightly magenta. You can print a Fine
calibration print to get more choices within a smaller range of colors.
Normal—offers a moderate degree of difference between clusters.
The amount of correction in this print will be appropriate for most
calibration jobs.
Coarse—offers the greatest degree of difference in clusters. This
print is useful when neutral areas in your prints appear very green
or very magenta.
Running a Visual Gray Balance Calibration
1. Pull down the Calibration menu and select
2. Pull down the Calibration menu and select
Visual Gray Balance
Setup Visual Gray Balance...
The Calibration Setup – Visual Gray Balance dialog box opens.
3. Select a radio button in the
Amount of Correction
box.
.
.
2–26
September 1997 Part No. 1H9659
Page 89

Calibration Utility for MACINTOSH
4. Click on the OK button.
You return to the Calibration Document window.
5. Click on the
Send & Print
button.
The Send and Print dialog box appears.
NOTE:Your Send and Print dialog box may appear different, depending
on your printer export module.
Part No. 1H9659 September 1997
2–27
Page 90

Calibration Utility for MACINTOSH
6. Click on the
Print
button.
You return to the Calibration Document window. The calibration test
print is printed on the specified printer.
7. View the calibration test print and determine which cluster appears
the most neutral.
If the Visual Gray Balance most-neutral cluster number on the
test print ends in 25, the printer is already calibrated. You should
now perform a Visual Linearity calibration.
2–28
If the Visual Gray Balance number on the test print does not
end in 25, you must recalibrate the printer to the most neutral
cluster number.
NOTE:If you enter a value that ends in 25, the calibration table does
not change.
8. Click on the
Input
button.
September 1997 Part No. 1H9659
Page 91

Calibration Utility for MACINTOSH
The Input Test Print Values dialog box appears.
9. Type the number of the most-neutral cluster in the
10. Click on the
Recompute the Table
button.
Cluster Number
The calibration table data is updated and the Calibration Document
window appears.
box.
Part No. 1H9659 September 1997
2–29
Page 92

Calibration Utility for MACINTOSH
1 1. Click on the
Send
button if you are satisfied with the neutral in the cluster
you selected and you do not want to look at another calibration print.
A confirmation box appears.
12. Click on the
Send
button.
The recomputed table is sent to the printer and the following
message appears.
13. Click on the OK button.
2–30
The calibration table is computed using the specified values and you
return to the Calibration Document window. You should now perform a
Visual Linearity calibration.
NOTE:You should make another test print to verify your input
value adjustments.
September 1997 Part No. 1H9659
Page 93

Calibration Utility for MACINTOSH
Visual Linearity
Visual Linearity calibrates your printer so it produces the correct shading
(lightness/darkness).
Use the Linearity Reference Card to select a cluster for each of the six
density ranges. Visual Linearity calibration prints look similar to the
following examples.
CMYKCMY K
Using the Linearity Reference Card
The Linearity Reference Card is included with the Calibration Utility.
Use this Reference Card for performing Visual Linearity calibrations.
Following are instructions for using the Reference Card.
1. Lay the Linearity Reference Card with the name at the top on the first
row of the calibration print.
NOTE:It may not be possible to find a cluster in which all six gray levels
2. Slide the Linearity Reference Card across each patch in the row
and determine which of the nine patches in the row most closely
matches the darkness on the Reference Card.
NOTE:Match the darkness on the Reference Card, not the color.
3. Repeat step 2 for each row on the calibration print.
Part No. 1H9659 September 1997
exactly match the Linearity Reference Card. Select the cluster
that appears to be the closest match.
2–31
Page 94

Calibration Utility for MACINTOSH
Running a Visual Linearity Calibration
After you have run a calibration using the
use the
table using values from the test print.
1. Pull down the Calibration menu and select
Visual Linearity
You return to the Calibration Document window.
option to recompute the current calibration
Visual Gray Balance
Visual Linearity
option,
.
2–32
2. Click on the
The Send and Print dialog box opens.
NOTE:Your Send and Print dialog box may appear different, depending
on your printer export module.
Send & Print
button.
September 1997 Part No. 1H9659
Page 95

Calibration Utility for MACINTOSH
3. Click on the
Print
button.
You return to the Calibration Document window. The calibration test
print is printed on the specified printer.
4. Use the Linearity Reference Card to select a box number for each of
the six density ranges.
If all of the Visual Linearity numbers on the test print are box number 5,
the printer is already calibrated. You can close the Calibration Utility.
If the Visual Linearity numbers on the test print are not all box number 5,
you must recalibrate the printer. Go to step 5.
5. Click on the
The Input Test Print Values dialog box opens.
Part No. 1H9659 September 1997
Input
button.
2–33
Page 96

Calibration Utility for MACINTOSH
6. Type in the values you select from the test print in the text boxes.
7. Click on the
Recompute the Table
button.
The calibration table is computed using the specified values and the
Calibration Document window appears.
8. Click on the
Send
button to send the table to the printer.
2–34
September 1997 Part No. 1H9659
Page 97

Calibration Utility for MACINTOSH
Densitometer
A Densitometer calibration corrects the printer’s response based on the
densitometer reading for selected patches. If you have a densitometer, you
do not need to run Visual Gray Balance and Visual Linearity calibrations.
You only have to run the Densitometer calibration.
Print a test print and read it with a densitometer. There are two kinds of
densitometer prints: process and separation. The kind of print you get
depends on your printer. Densitometer calibration prints look similar to
the following examples.
Process Densitometer Prints
CMY K
CMYK
example: from a Kodak XLS 8600 Printer or
Kodak Digital Science
t
8650 Printer
Separations Densitometer Prints
CMYKCMY K
example: from a
Kodak Digital Science
t
DCP 9000 Printer
NOTE:Separation prints have separate individual colors for each of the
cyan, magenta, and yellow planes. Process prints combine the
cyan, magenta, and yellow into a single gray column. Black is
always a separate column.
Using a densitometer, you enter the density results for each of the
patches in the Densitometer Input Test Print Values dialog box. In
each case, you always input the visual component for the patch.
For separations prints, enter the “C” component for the cyan
patches, the “M” component for the magenta patches, and the
“Y” component for the yellow patches.
For process prints, enter the “C,” “M,” and “Y” components for
each of the CMY patches.
Part No. 1H9659 September 1997
2–35
Page 98

Calibration Utility for MACINTOSH
Running a Densitometer Calibration
If you have a densitometer, you can run the Densitometer calibration
instead of the Visual Gray Balance and Visual Linearity calibrations.
1. Set up your densitometer.
2. Pull down the Calibration menu and select
3. Pull down the Calibration menu and select
The Calibration Setup – Densitometer dialog box appears.
4. Select a densitometer status in the
5. Pull down the
select the number of squares in your test print.
6. Click on the
Number of Squares
OK
button.
Densitometer
menu in the
Densitometer
Setup Densitometer...
box.
Test Print
.
.
box and
2–36
September 1997 Part No. 1H9659
Page 99

Calibration Utility for MACINTOSH
You return to the Calibration Document window.
7. Click on the
Send & Print
button.
The Send and Print dialog box appears.
NOTE:Your Send and Print dialog box may appear different, depending
on your export module.
Part No. 1H9659 September 1997
2–37
Page 100

Calibration Utility for MACINTOSH
8. Click on the
Print
button.
You return to the Calibration Document window. The calibration test
print is printed on the specified printer.
9. Click on the
Input
button.
The Input Test Print Values dialog box appears.
2–38
September 1997 Part No. 1H9659
 Loading...