


Wireless 9 Function Cycle Computer Wireless 12 Function Cycle Computer *
ENGLISH 2-13
DEUTSCH 14-25 ESPAÑOL 26-37 ITALIANO 38-49
50-61

CONTENTS |
2 |
Anatomy ................................................................................................................... |
3 |
Main Unit Setup ....................................................................................................... |
4 |
Functions .................................................................................................................. |
7 |
Button and Normal Operations ................................................................................ |
8 |
Bike Installation ..................................................................................................... |
10 |
Battery Change ....................................................................................................... |
12 |
Care and Maintenance Instructions ....................................................................... |
12 |
The Full Specs ........................................................................................................ |
13 |
ENGLISH
* = N.E.R.D Wireless 12 Function Cycle Computer only
ANATOMY OF A WIRELESS N.E.R.D. |
|
3 |
Wireless Cycle Computer |
Transmitter |
Magnet |
MODE |
SET |
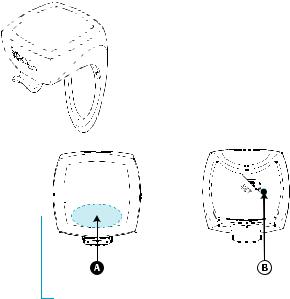
ACTIVATION AREA
The Wireless N.E.R.D. has a MODE button that is activated by pressing the computer screen face in the area shown above. The MODE button is used for most normal operations of the computer. Throughout this manual, the MODE button is designated by A .
The SET button is located on the underside of the computer as indicated above. It is accessed by using a pen or other small object to depress it. The SET button is used for setup operations only. Throughout this manual, the SET button is designated by B .
* = N.E.R.D Wireless 12 Function Cycle Computer only
MAIN UNIT SETUP
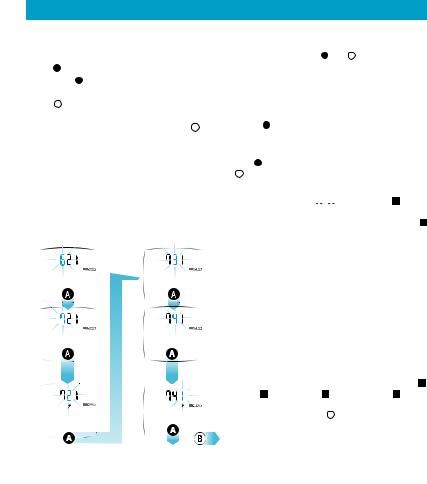
DATA SETTING PROCESS (Fig 1.1)
1.All user-input data is adjusted for each digit separately. The current digit to be set will flash.
2.Press A to increase the digit value by 1.
3.Hold down A for 2 seconds to advance to the next digit.
4.Press B to store the on-screen data and advance to the next data setting.
5.Once all data setting is complete, hold down B for 2 seconds to exit the data setting mode. This can also be done at any point whilst in data setting mode, leaving the remaining un-set data with a  reading.
Fig 1.1
DATA SETTING PROCESS
2 seconds |
2 seconds |
|
|
* = N.E.R.D Wireless 12 Function Cycle Computer only
4
INITIATING THE COMPUTER (ALL CLEAR) (Fig 1.2)
1.A battery is already loaded in the main unit when purchased. Hold down A and B simultaneously for 3 seconds to initiate the computer and clear all data.
 It is important to initiate the computer before first usage to prevent the computer producing errors.
2.The LCD segments will be tested automatically after the unit is initiated.
3.Press A to stop LCD test. You will then see a flashing
KM/H.
UNIT SELECTION (Fig 1.3)
Press A to toggle between KM/H or M/H (Mile/hour). Press B to confirm the current selection.
CIRCUMFERENCE DATA SETTING (Fig 1.4a)
1.The display shows 


 for the Bike 1 default circumference value of 2155mm. Measure the value for your wheel by following the steps below. (The Bike 2 default circumference value is 2050mm.)*
MEASURING WHEEL CIRCUMFERENCE (Fig 1.4b)
Roll the wheel until the valve stem is at its lowest point (closest to the ground) then mark this first point on the ground. Roll the bicycle forward until the wheel has completed one full revolution and the valve stem returns to its lowest point. Mark the second point on the ground. Measure the distance between the marks. Enter this value to set the wheel circumference. It is important that this measurement is accurate to ensure correct data input when riding.
ODOMETER AND TOTAL TRIP TIME DATA SETTING (Fig 1.5)
1.Designed for entering in previous data of ODO 1 ,
ODO 2 *, T.TIMED TRIP 1 and T.TIMED TRIP 2 * after a battery replacement. A new user does not need to set this data. Each press of B advances to the next data setting screen.
2.Adjust the digits as described in the Data Setting Process. (Fig 1.1)
 Loading...