

PWR BANK
CHARGING YOUR PWR BANK
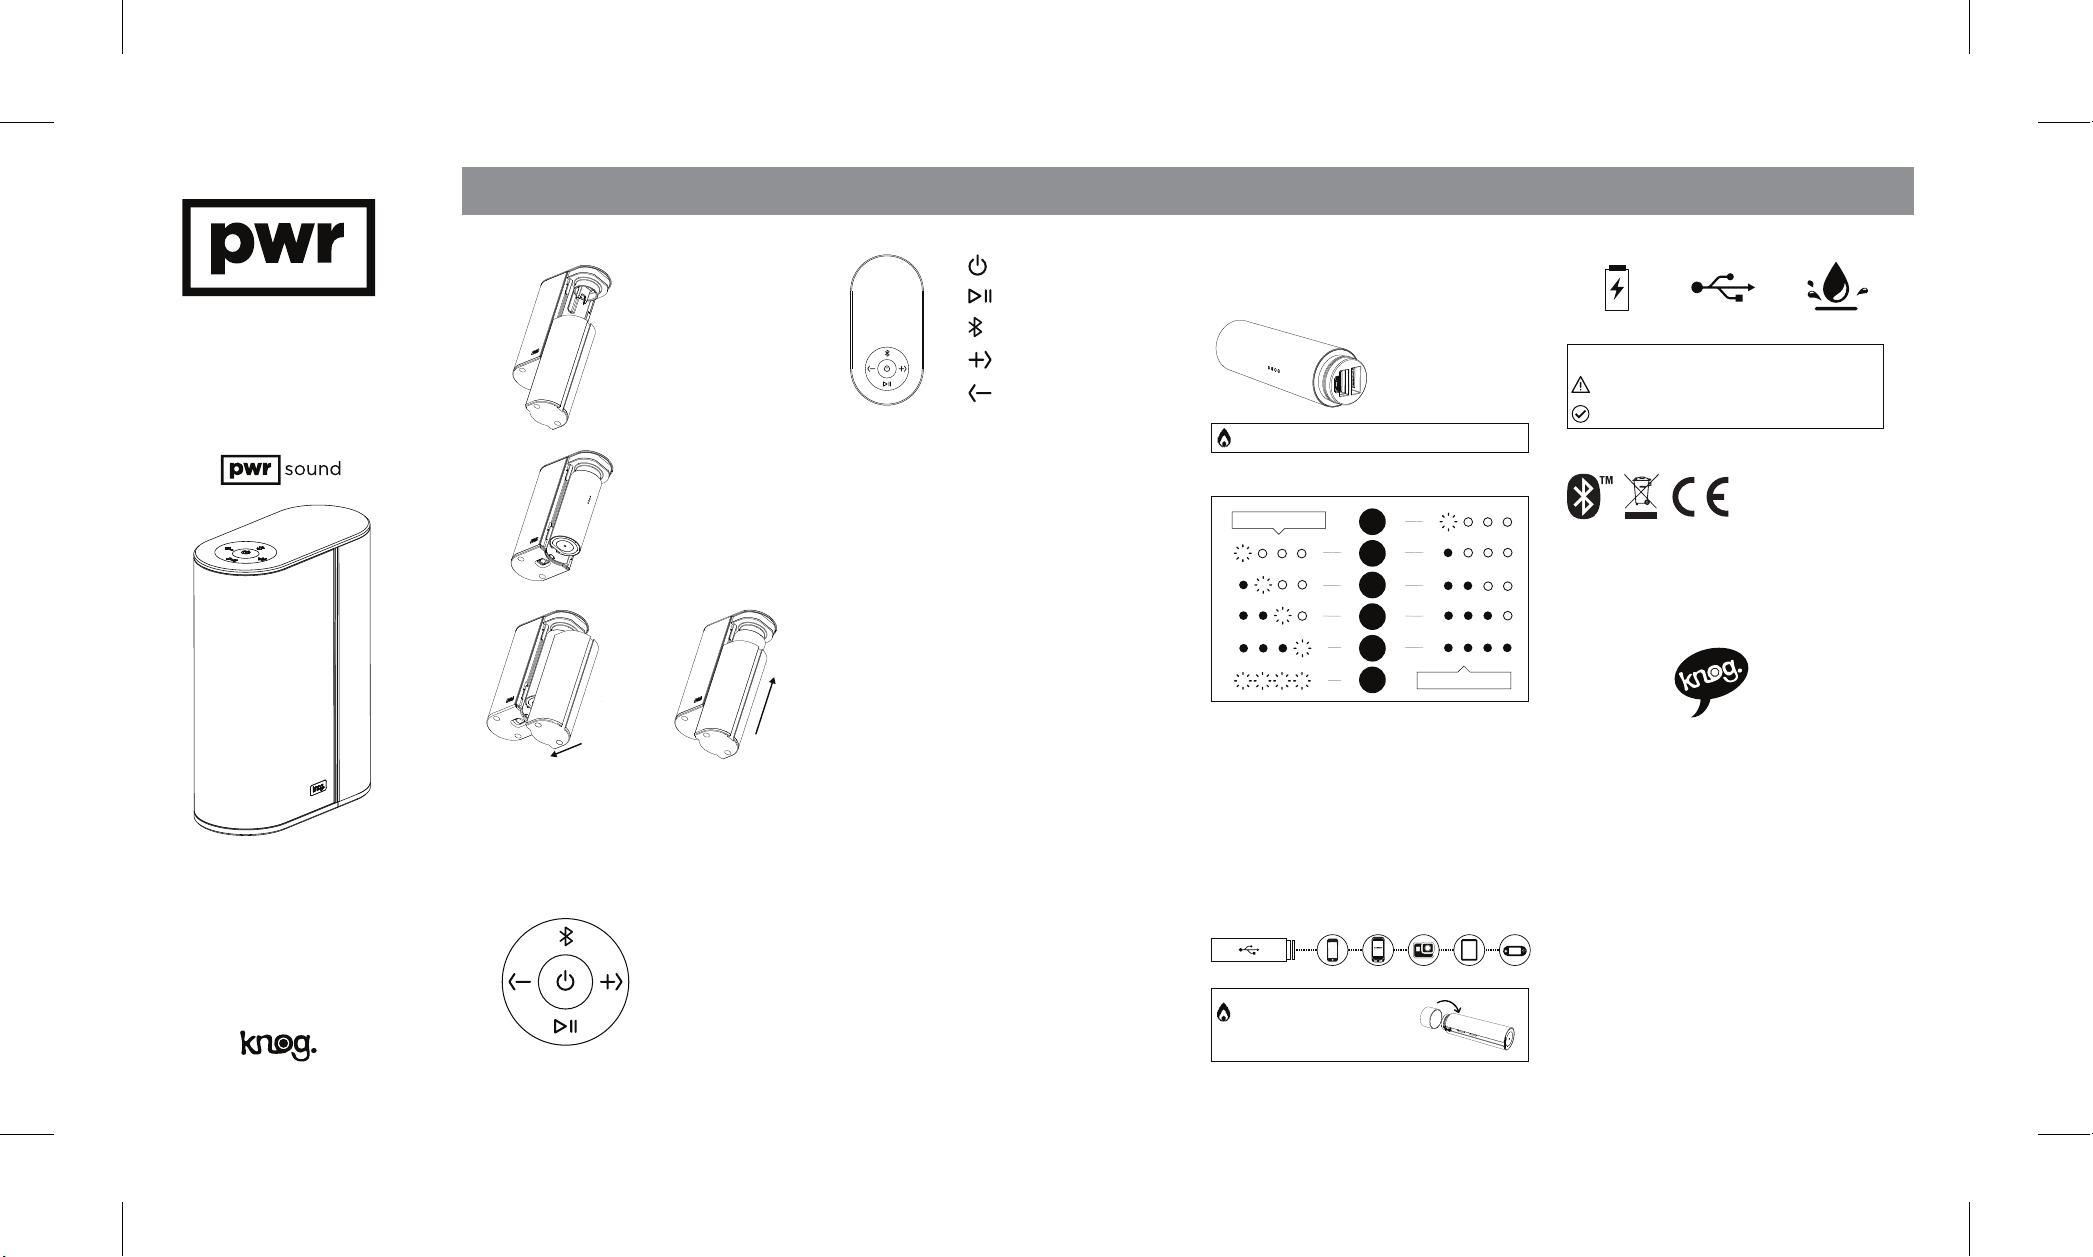
INSERT PWR BANK
PAIRING A DEVICE
PLACEMENT GUIDELINES
POWER
PWR FEATURES
BATTERY INDICATOR
CHECKING THE BATTERY STATUS
CHARGING DEVICES WITH YOUR
PWR BANK
EN QUICK START QUICK START
PWR Banks use a micro USB input to charge, this can be found
by pressing the RED cap release button and removing the CAP on
PWR Bank. Using the Micro USB cable provided, you can plug this
into any powered USB port or USB wall plug charger.
If your PWR Bank is not connected to a device, you can check the
battery status by pressing your finger on the base of the PWR
Bank, the red status LED’s will illuminate for 10 second to display
the charge status.
Charge times are as follows:
PWR Small: 3.5hr
PWR Medium: 5hr
Note: charge time can vary.
Do not charge below 10°C
HOT TIP: USING AN IPAD CHARGER IS FAST! (12W USB
POWER ADAPTER)
HOT TIP: KEEP A CAP ON IT! PWR
BANKS ARE NOT WATERPROOF
WITHOUT EITHER A LIGHTHEAD OR
CAP ON. CAP CAN BE FOUND IN
THE BACK OF THE FOAM PACKAGING.
To charge a device:
Connect the device’s charge cable to the female USB port on the
front of the PWR Bank. If all four LED’s flash during charge, this
means that the plugged in device is not compatible.
1. Release battery cover by
sliding button on underside
and sliding battery cover
down simultaneously
1. Press and hold power button to turn your speaker on.
If already on, press and hold
2. By default, the button lights will be flashing.
This means your speaker is in discoverable mode.
3. On your mobile device, select PWR sound in the Bluetooth
preferences.
4. When paired successfully, the lights will stop flashing and
remain on and you will hear the connection successful prompt.
Please note:
t The PWR sound will automatically connect to the last paired
device when powered on. If no device is available, it will default
to discoverable mode.
t To reset bluetooth connection, press and hold bluetooth button
for 1.5 seconds until you hear the disconnection prompt.
t For best Bluetooth® performance place your PWR Sound
t t PWR Sound will automatically turn off after 10 minutes of
inactivity
Button Icons will flash at a frequency of 2:1 when low battery
is detected. Your power banks battery level will also be displayed
next to the bluetooth icon on your iOS or Android device
Battery run times will vary slightly depending on temperature,
type of music being played, and how high the volume is.
Generally, at a medium to high volume, you can expect the
following run times:
Small PWR Bank: 15hrs
Medium PWR Bank: 25hrs
within 10m of your mobile device, and make sure there is a
clear line of sight between you and your speaker. Moving your
mobile device further away, can impact sound quality, and your
mobile device may disconnect from your PWR sound speaker.
t Keep other wireless equipment at least 1m away from your
speaker.
t Stand your PWR sound on its base. Standing your speaker
on any other side can affect sound quality.
t Place your speaker and your mobile device outside of and
away from other audio/video components and direct heat
sources.
CHARGES YOUR
DEVICES
WATER RESISTANT
(WHEN IN USE)
USB RECHARGE
OPERATION
OPERATION
CRITICAL
Battery Indicator can vary depending on operational conditions.
quick start guide
Power on/off - long press
Play / Pause audio
Bluetooth button
(see ‘pairing a device’ below)
Volume up - short press
Skip forward - long press
Volume down - short press
Skip back - long press
2. Insert PWR Bank (Small or
Medium only) so indicator
LEDs are facing out.
3. Replace the PWR Bank cover.
Align tabs on battery cover
with channels on main speaker
body, then slide battery cover
up, until you hear the click of
the slide catch locking into place
4. Press and hold top button to
turn on. Pair with phone and
operate as normal.
PLEASE NOTE:
THE LARGE PWR BANK IS NOT COMPATIBLE WITH
PWR SOUND.
THE FRAME MOUNT IS PWR SOUND COMPATIBLE.
3%
<25%
25-50%
50-75%
75+%
100%
WHEN CHARGING
WHEN IN USE
Knog Bluetooth Speaker
(MPS-936)
WARRANTY INF
This speaker is guaranteed for 2 years against manufacturing
defects only. The battery is guaranteed for 6 months against
manufacturing defects only. See the website for more details
O
KNOG.COM.AU/PWR

T
his device complies with part 15 of the FCC Rules. Operation is subject to the condition that this device does not cause harmful interference (1) this device may not cause harmful interference, and (2) this device
must accept any interference received, including interference that may cause undesired operation.
Changes or modifications not expressly approved by the party responsible for compliance
could void the user's authority to operate the equipment.
NOTE: This equipment has been tested and found to comply with the limits for a Class B digital device, pursuant to Part 15 of the FCC Rules. These limits are designed to provide reasonable protection against
harmful interference in a residential installation. This equipment generates, uses and can radiate radio frequency energy and, if not installed and used in accordance with the instructions, may cause harmful
interference to radio communications. However, there is no guarantee that interference will not occur in a particular installation.
If this equipment does cause harmful interference to radio or television reception,
which can be determined by turning the equipment off and on, the user is encouraged to try to correct the interference by one or more of the following measures:
-- Reorient or relocate the receiving antenna.
-- Increase the separation between the equipment and receiver.
-- C
onnect the equipment into an outlet on a circuit different
from that to which the receiver is connected.
-- Consult the dealer or an experienced radio/TV technician for help.
The device has been evaluated to meet general RF exposure requirement. The device can be used in portable exposure condition without restriction.
FCC ID: 2AQPFMPS-936
To maintain compliance with FCC’s RF Exposure guidelines, This equipment should be installed and operated with minimum distance between 20cm the radiator your body: Use only the supplied antenna.
 Loading...