

Page 1

ENGLISH
INSTRUCTION MANUAL
Toner-Pro / Probe-Pro Kit
• TRACE INDIVIDUAL
OR PAIRED WIRES
• TEST RJ11, RJ12,
AND RJ45 JACKS
• DETECTS
CONTINUITY AND
POLARITY
• 5 DISTINCT TONES
(3 CONSTANT,
2 ALTERNATING)
• EASY-TOUNDERSTAND
STATUS LEDs
• REPLACEABLE
PROBE TIP
VDV500-820
ESPAÑOL pág. 9
FRANÇAIS p. 17
VDV500-123
VDV500-063
Page 2
ENGLISH
GENERAL SPECIFICATIONS - VDV500-063 TONER-PRO
The Klein Tools VDV500-063 Toner-Pro is a professional-series tone generator for wire identification, wire tracing
and wire pair identification. It features several tone frequencies and strong power output for tracing wires.
Operating Altitude: 6562 ft. (2000 m) maximum
•
Relative Humidity: 10% – 90% non-condensing
•
Operating Temp: 14° to 122°F (-10° to 50°C)
•
Storage Temp: -4° to 140°F (-20° to 60°C)
•
Dimensions: 2.5" x 5" x 1" (64 x 127 x 25 mm)
•
Weight: 7.4 oz. (210 g) including batteries
•
Battery Type: 4 x 1.5V AAA Alkaline
•
Battery Life: Active: 120 hours
•
Standby/Storage: 3 years
Auto-Power Off: After 60 minutes of inactivity
•
Tones: Constant: 800Hz, 1000Hz, 1500Hz
•
Alternating: 800Hz/1000Hz, 1000Hz/1500Hz
Tone Power: 8dBm
•
Continuity Indication: Less than 10kΩ
•
Voltage Protection: Test Mode: 60V
•
Tone Mode:
20V through external 600Ω
T14
Specifications subject to change.
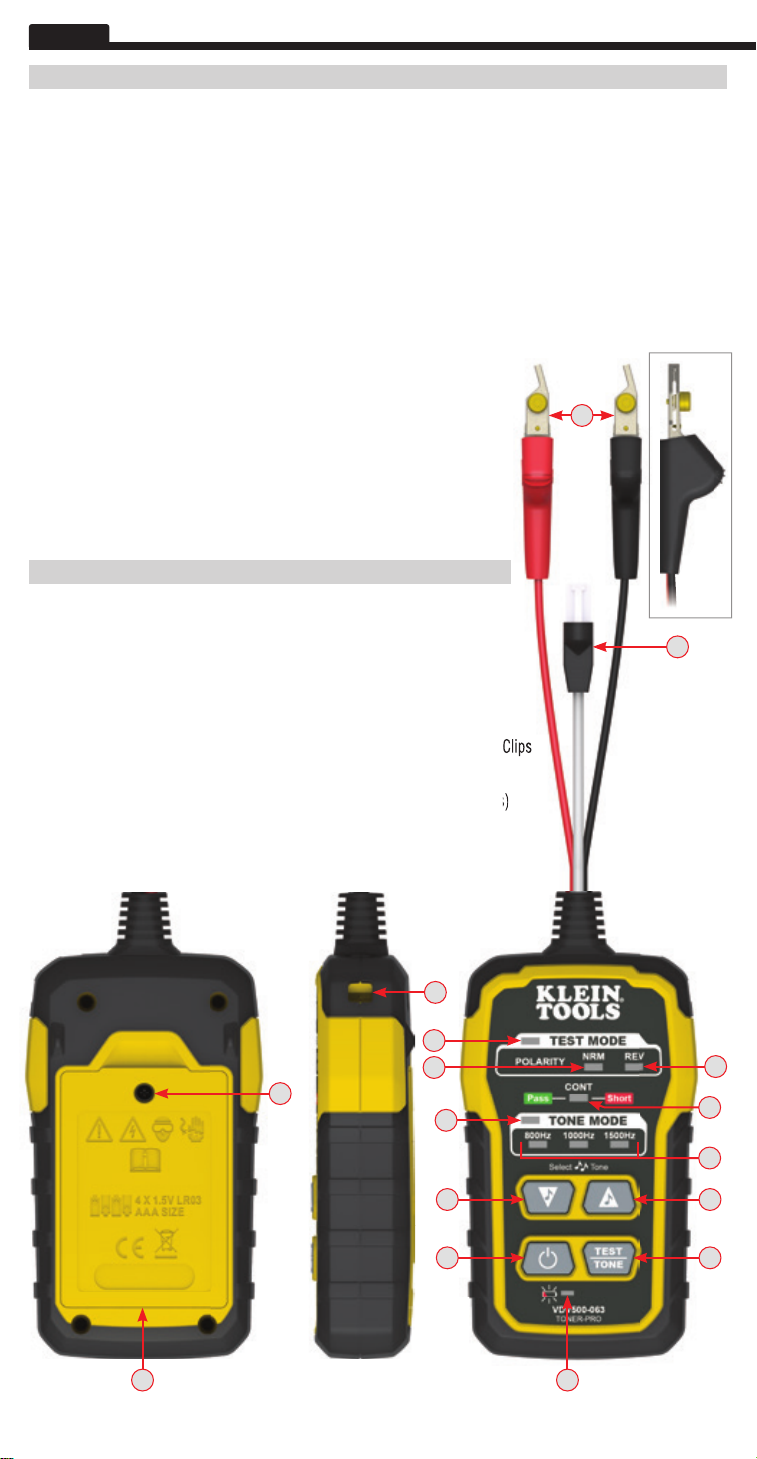
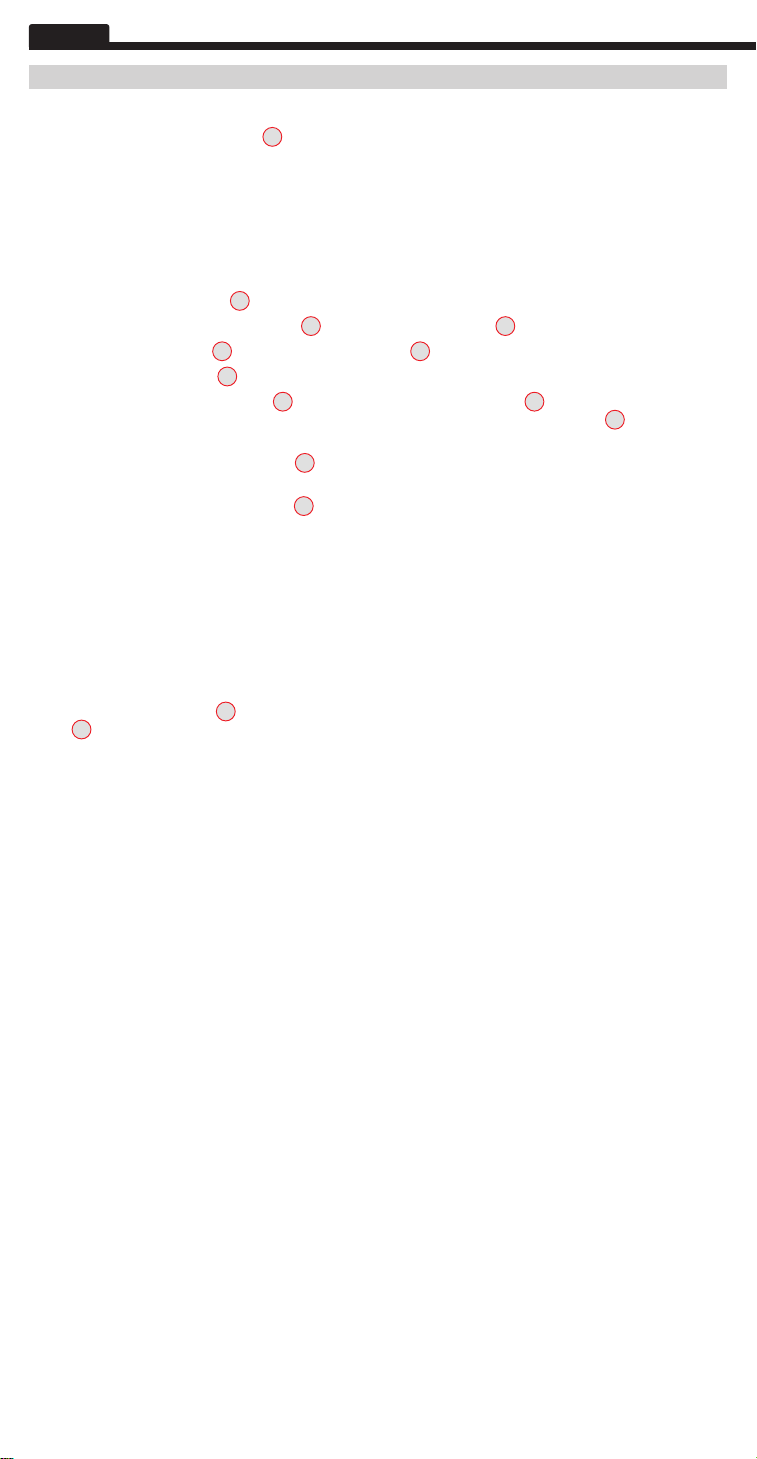
FEATURE DETAILS
T1
TEST MODE Indicator
T2
"NRM" (Normal) Polarity Indicator
T3
"REV" (Reverse) Polarity Indicator
T4
"CONT" (Continuity) Indicator
T5
TONE MODE Indicator
T6
Tone Frequency Indicators
T7
Tone Mode Down selector button
T8
Tone Mode Up selector button
T9
Power On/Off Button
T10
TEST/TONE Button
T11
Battery Status Indicator
T12
Lanyard Slot
T13
RJ11 Test Plug
T14
ABN (Angled Bed-of-Nails) Test Clips
T15
Battery Cover
T16
Battery Cover Screw (#2 Phillips)
T13
T12
T1
T2
T16
T5
T3
T4
T6
T7
T9
T8
T10
T11T15
2
Page 3
GENERAL SPECIFICATIONS - VDV500-123 PROBE-PRO
The Klein Tools VDV500-123 Probe-Pro is a professional-series tone tracer, featuring an inductive probe with
speaker for amplification, and LED light for use in dark spaces. It also features a headphone jack for use in
extreme noise environments.
Operating Altitude: 6562 ft. (2000 m) maximum
•
Relative Humidity: 10% – 90% non-condensing
•
Operating Temp: 14° to 122°F (-10° to 50°C)
•
Storage Temp: -4° to 140°F (-20° to 60°C)
•
Dimensions: 1.75" x 8.88" x 1.13" (44 x 226 x 29 mm)
•
Weight: 5.7 oz. (161.6 g) including batteries
•
Battery Type: 4 x 1.5V AAA Alkaline
•
Battery Life: Active: 25 hours
•
Standby/Storage: 3 years
Auto-Power Off: After 10 minutes of inactivity
•
Specifications subject to change.
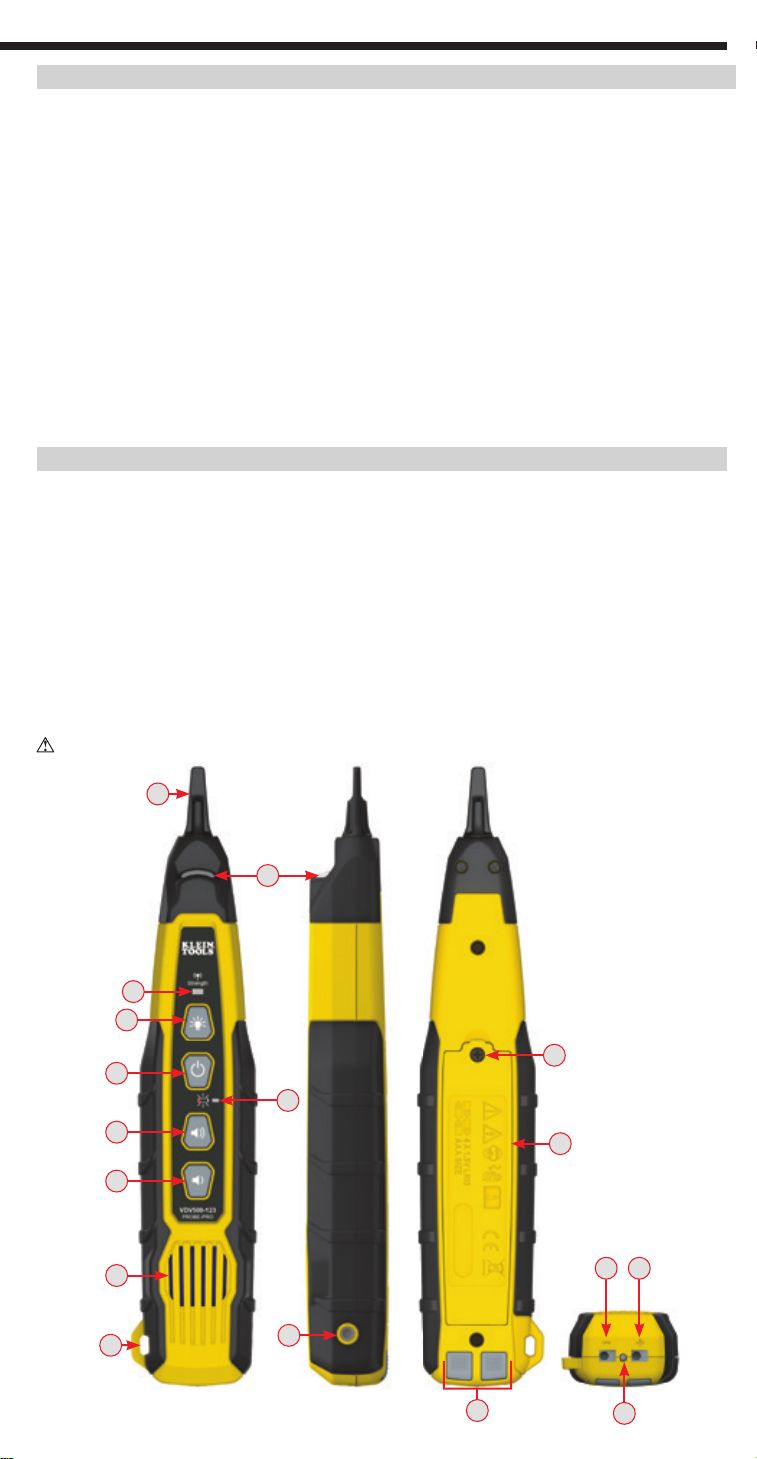
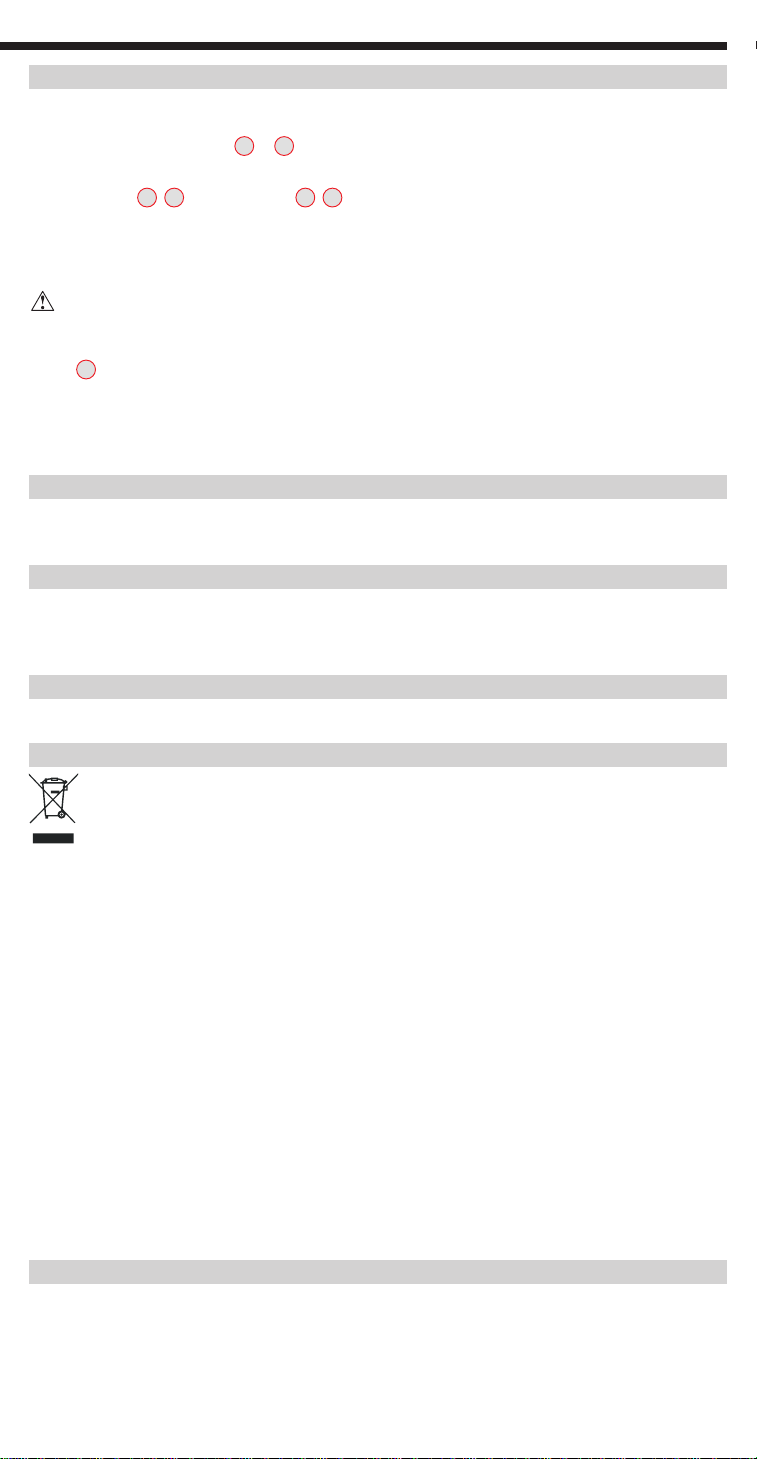
FEATURE DETAILS
P1
Replaceable Inductive Polymer Tip (VDV999-068)
P2
Worklight
P3
Worklight On/Off Button
P4
Signal Strength Indicator
P5
Power On/Off Button
P6
Volume Increase Button
P7
Volume Decrease Button
P8
Battery Status Indicator
P9
Speaker
*
CAUTION: Excessive volume can cause permanent hearing damage. Use as low a volume as possible.
P10
Lanyard Slot
P11
"-" (Negative) Terminal
P12
"+" (Positive) Terminal
P13
Terminal Release Buttons
P14
Verification Indicator
P15
Battery Cover
P16
Battery Cover Screw (#2 Phillips)
P17
3.5mm Headphone Jack*
P10
P5
P6
P7
P9
P1
P2
P4
P3
P16
P8
P15
P11 P12
P17
P13
P14
3
Page 4
ENGLISH
WARNINGS
To ensure safe operations and service of the instruments, follow these instructions. Failure to observe these
warnings can result in re, electric shock, severe injury or death.
The Toner-Pro and Probe-Pro are designed for use on extra-low voltage cabling systems (less than 60
•
volts) for testing when NOT energized.
The maximum voltage across ABN Test Clips of the Toner-Pro is 60 volts in Test mode, and 20 volts in
•
Continuity mode. Connecting the Probe-Pro to live mains AC power may damage it and pose a safety hazard
for the user.
DO NOT use instruments if they are wet, as it could pose a shock hazard.
•
DO NOT use instruments if they are damaged in any way.
•
Turn off instruments and disconnect all ABN Test Clips before attempting to replace batteries.
•
The battery door must be in place and secure before you operate the instrument.
•
DO NOT open the case, other than the battery compartment.
•
OPERATING INSTRUCTIONS
READ ALL INSTRUCTIONS BEFORE OPERATING AND RETAIN INSTRUCTIONS FOR FUTURE REFERENCE
CONTINUITY TEST
The Toner-Pro transmits frequencies on non-energized wires only. When the Toner-Pro is turned on, a continuity
test will be performed to determine if the 2 wires to be traced are in close proximity to each other, without a
conductive path between them. The "CONT" Indicator T4 wIll illuminate green to indicate pass. Attach the red
and black ABN Test Clips
to the wires to be tested. If the resistance of the circuit is less than 10kΩ, the
T14
"CONT" Indicator T4 will illuminate red and no toning can occur. If the "CONT" Indicator is illuminated green, a
tone can be generated and you may proceed.
SELECTING TONE FREQUENCY
The Toner-Pro defaults to the 800Hz frequency setting when powered on. Use the Tone Mode Up
and Tone
T8
Mode Down T7 selector buttons to change the frequency. The Tone Frequency Indicators T6 will display the
frequency being transmitted. If an alternating tone is selected, the two respective Tone Frequency Indicators
will blink.
Tones will cycle through the available frequencies in a continuous loop when a selector button is pressed
T6
repeatedly.
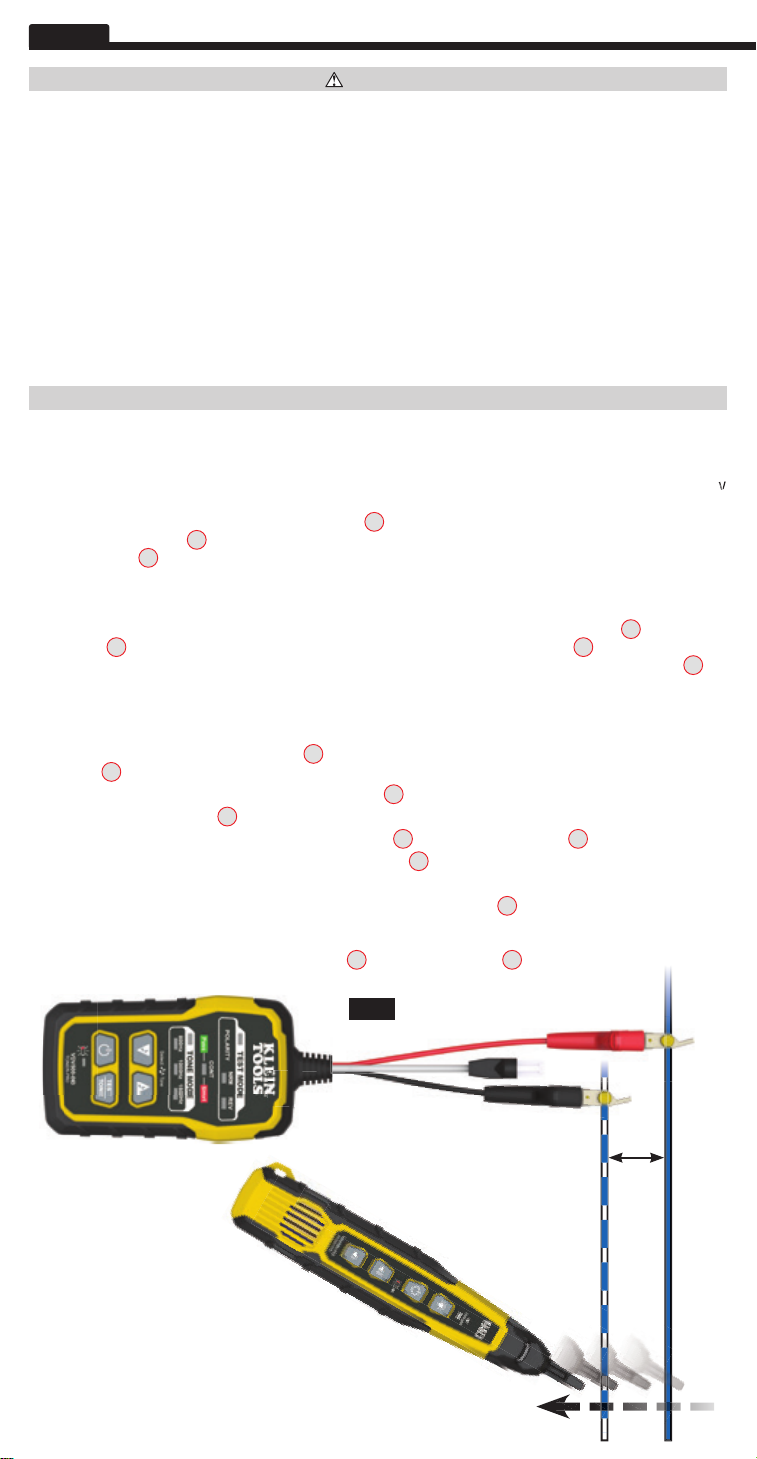
TRACING PAIRED WIRES (FIG. 1)
1. Connect the Toner-Pro’s red ABN Test Clip
Test Clip
to the other wire to be traced.
T14
to one of the wires of the pair to be traced. Connect the black ABN
T14
2. Turn Toner-Pro on by pressing the Power On/Off button T9.
3. Check the “CONT” Indicator T4. If illuminated green, you may proceed.
4. Select the preferred tone setting using the
Tone Mode UpT8 and/or
Tone Mode DownT7 selector buttons.
5. Turn the Probe-Pro on by pressing the Power On/Off button P5.
6. At the far end of the cable, spread the wires apart at least 2" (51 mm), if possible.
7. Use the Probe-Pro to scan the cable’s wire pairs. Move the Probe-Pro's tip P1 slowly across the wires (FIG. 1).
The Probe-Pro’s volume will increase as it approaches the toned pair. When the Probe-Pro’s volume is high over
the first wire, low in the middle (between) the two wires, and high over the second wire, you have located the pair
of wires you are tracing. Use the
Volume Increase
and
Volume Decrease
P6
buttons to adjust the volume.
P7
FIG. 1
2"
(51 mm)
4
Page 5
OPERATING INSTRUCTIONS
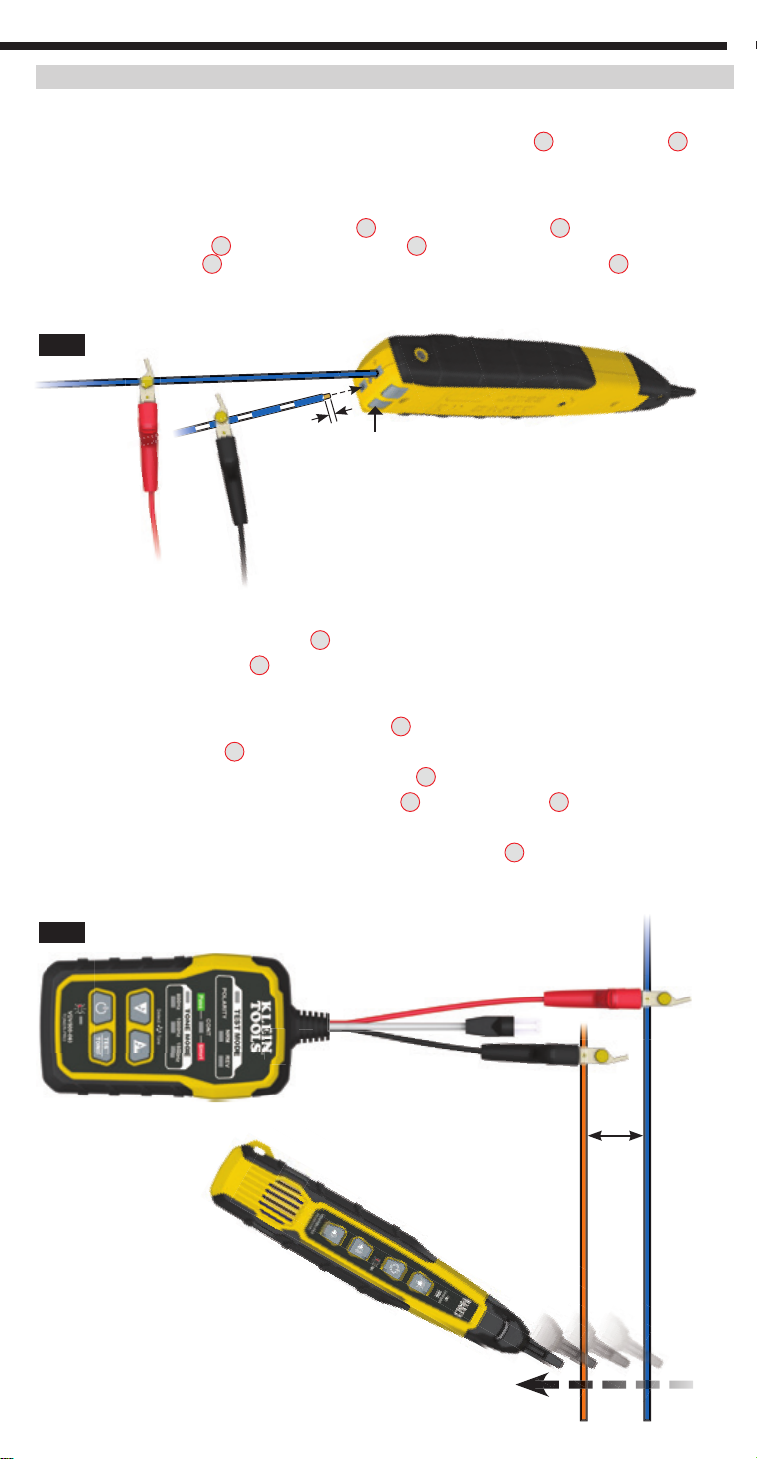
VERIFYING TONED PAIRS (FIG. 2)
1. To verify you have found the toned pair, connect the Toner-Pro's ABN Test Clips
or RJ11 Test Plug
T14
T13
end of the cable and initiate a tone.
2. On the other end of the cable, remove approximately 2 mm (3/32") of the outer jacket of each of the wires
believed to be the toned pair.
3. Insert the wire connected to the red ABN Test Clip
in the black ABN Test Clip
Terminal Release buttons
to the
"-" (Negative) Terminal
T14
, insert the wire(s) and release (FIG. 2). The
P13
to the
"+" (Positive) Terminal
T14
P11
and the wire curently
,
P12
. To access the terminals, press their respective
Verification Indicator
will illuminate
P14
when the correct pair is inserted.
FIG. 2
to one
2 mm
(3/32")
Press
TRACING NON-PAIRED WIRES (FIG. 3)
1. Connect the Toner-Pro’s red ABN Test Clip
2. Connect the black ABN Test Clip
to another wire in the cable, but preferably not in the same pair (connect to
T14
to the wire to be traced.
T14
ground, if available). When tracing a shielded cable, connect the red ABN Test Clip to the outer shield, and the
black ABN Test Clip to the center conductor or ground.
3. Turn Toner-Pro on by pressing the Power On/Off button
.
T9
4. Check the “CONT” Indicator T4. If illuminated green, you may proceed.
5. Turn the Probe-Pro on by pressing the Power On/Off button P5.
6. Select the preferred tone setting using the
Tone Mode UpT8 or
Tone Mode DownT7 selector buttons.
7. At the far end of the cable, spread the wires at least 2" (51 mm) apart, if possible.
8. Use the Probe-Pro to scan the cable’s wire pairs. Move the Probe-Pro's tip P1 slowly across the wires. The
Probe-Pro’s volume will increase as it approaches the toned wire.
FIG. 3
2"
(51 mm)
5
Page 6
ENGLISH
OPERATING INSTRUCTIONS
RJ11 / RJ12 / RJ45 TESTING
The Toner-Pro has an
RJ11 Test Plug
that can be used in place of the ABN clips to transmit the tone. The
T13
RJ11 plug works with RJ11, RJ12, or RJ45 jacks. The red and black ABN contacts are replaced by the 2 center
conductors of the inserted plug, i.e. pins 2 and 3 for RJ11, pins 3 and 4 for RJ12, and pins 4 and 5 for RJ45.
Use the Probe-Pro to locate the toned wires at the far end of the cable, as described in the TRACING PAIRED WIRES
section.
POLARITY AND VOLTAGE PRESENCE TESTING
The Toner-Pro may be used to test the polarity and type of voltage present.
1. Press the
2. Press the
Power On/Off button
TEST/TONE Select button
3. Connect the
ABN Test Clips
on the Toner-Pro.
T9
button
, or insert the
T14
. The "TEST MODE" indicator T1 will illuminate.
T10
RJ11 Test Plug
T13
.
4. Check the “CONT” Indicator T4. If illuminated green, you may proceed.
5. The
"NRM" (Normal) Polarity Indicator
T2 will illuminate if the red
(Plain Ol' Telephone Service) in the proper orientation. The
ABN Test Clip
"REV" (Reverse) Polarity Indicator
is connected to the POTS
T14
T3 will illuminate if
the wires are reversed.
"NRM" (Normal) Polarity Indicator
• The
T2 will illuminate
when the black ABN Test Clip detects higher voltage
than the red ABN Test Clip.
"REV" (Reverse) Polarity Indicator
• The
T3 w
ill illuminate
when the red ABN Test Clip detects higher voltage
than the black ABN Test Clip.
"NRM" (Normal) Polarity Indicator and "REV" (Reverse) Polarity Indicator will both illuminate when
• The
AC
voltage is present.
• When the
RJ11 Test Plug
is used, the
"NRM" (Normal) Polarity Indicator will illuminate on
a correctly wired and
powered POTS (Plain Ol' Telephone Service) phone jack.
NOTE: The POTS (Plain Ol' Telephone Service) color code convention (black/positive, red/negative) is the
opposite of the multimeter color code convention (red/positive, black/negative).
USING THE PROBE'S WORKLIGHT
The Probe-Pro has a worklight
to aid in illuminating dark or low-light work areas. Press the Worklight On/Off
P2
button P3 to turn the light on and off.
6
Page 7
MAINTENANCE
BATTERY REPLACEMENT
When the Low Battery Indicator
or
blinks, the batteries must be replaced.
T11
P8
1. Turn off instrument(s) before attempting to replace batteries.
2. Loosen screw
,
T16
P16
on battery cover
,
.
T15
P15
3. Remove and properly dispose of four 1.5V AAA batteries.
4. Install new batteries (note proper polarity).
5. Replace battery cover and fasten securely with screw.
To avoid risk of electric shock, do not operate while battery door is removed.
PROBE-PRO TIP REPLACEMENT (KLEIN CAT. NO. VDV999-068)
The tip
of the Probe-Pro is replaceable if damaged. To remove and replace tip:
P1
1. Turn tip 1/4 turn and pull gently to remove.
2. Insert new tip with key in proper orientation and push gently.
3. Rotate 1/4 turn to lock into place.
CLEANING
Be sure instrument is turned off and wipe with a clean, dry lint-free cloth.
Do not use abrasive
cleaners or solvents.
STORAGE
Remove the batteries when
instrument
is not in use for a prolonged period of time. Do not expose to high
temperatures or humidity. After a period of storage in extreme conditions exceeding the limits mentioned in the
GENERAL SPECIFICATIONS section, allow the equipment to return to normal operating conditions before using.
WARRANTY
www.kleintools.com/warranty
DISPOSAL / RECYCLE
Do not place equipment and its accessories in the trash. Items must be properly disposed of in accordance
with local regulations. Please see www.epa.gov or www.erecycle.org for additional information.
CUSTOMER SERVICE
KLEIN TOOLS, INC.
450 Bond Street
Lincolnshire, IL 60069
1-877-775-5346
customerservice@kleintools.com
www.kleintools.com
7
Page 8

ENGLISH
NOTES
8
Page 9

ESPAÑOL
MANUAL DE INSTRUCCIONES
Kit Toner-Pro / Probe-Pro
• TRAZA ALAMBRES
INDIVIDUALES Y DE PAR
• PRUEBA CONECTORES RJ11,
RJ12 Y RJ45
• DETECTA CONTINUIDAD
YPOLARIDAD
• 5TONOS DISTINTOS
(3CONSTANTES,
2 ALTERNANTES)
• LED DE ESTADO
FÁCILES DE
ENTENDER
• PUNTA DE SONDA
REEMPLAZABLE
VDV500-820
VDV500-123
VDV500-063
Page 10

ESPAÑOL
ESPECIFICACIONES GENERALES DEL TONER-PRO VDV500-063
El Toner-Pro VDV500-063 de Klein Tools es un generador de tono de serie profesional para identificación
dealambres, trazado de alambres e identificación de pares de alambres. Ofrece varias frecuencias de tono
yuna salida de gran potencia para el trazado de alambres.
Altitud de funcionamiento: 6562pies (2000m) como máximo
•
Humedad relativa: 10% a 90%, sin condensación
•
Temperatura de funcionamiento: 14° a 122°F (-10° a 50°C)
•
Temperatura de almacenamiento: -4° a 140°F (-20° a 60°C)
•
Dimensiones: 2,5" × 5" × 1" (64 × 127 × 25mm)
•
Peso: 7,4oz (210g) incluida la batería
•
Tipo de batería: 4baterías alcalinas AAA de 1,5V
•
Vida útil de la batería: En actividad: 120horas
•
Modo en espera/Almacenamiento: 3años
Función de apagado automático: después de 60minutos de inactividad
•
Tonos: Constante: 800Hz, 1000Hz, 1500Hz
•
Alternante: 800Hz/1000Hz, 1000Hz/1500Hz
Potencia del tono: 8dBm
•
Indicador de continuidad: Menos de 10kΩ
•
Protección de voltaje: Modo de prueba: 60V
•
Modo de tono:
20V por medio de 600Ω externos
T14
Especificaciones sujetas a cambios.
DETALLES DE LAS CARACTERÍSTICAS
T1
Indicador TEST MODE (prueba)
T2
Indicador de polaridad NRM (normal)
T3
Indicador de polaridad REV (inversa)
T4
Indicador CONT (continuidad)
T5
Indicador TONE MODE (tono)
T6
Indicadores de frecuencia de tono
T9
Botón de encendido y apagado
T10
Botón TEST/TONE (prueba/tono)
T11
Indicador del estado de batería
T12
Ranura para cuerda
T13
Conector de prueba RJ11
T14
Cordones de prueba ABN (con bornes
T13
deconexión multicontacto en ángulo)
T7
Botón de disminución del modo Tono
T8
Botón de aumento del modo Tono
T15
Cubierta del compartimento de las baterías
T16
Tornillo de la cubierta del compartimiento
delas baterías (n.º2 Phillips)
10
T16
T12
T1
T2
T5
T7
T9
T3
T4
T6
T8
T10
T11T15
Page 11

ESPECIFICACIONES GENERALES DEL PROBE-PRO VDV500-123
El Probe-Pro VDV500-123 de Klein Tools es un rastreador de tono de serie profesional que cuenta con una
sonda inductiva con altavoces para amplificación y luz LED para usarla en espacios oscuros. También incluye
un conector de auriculares para ambientes de ruido extremo.
Altitud de funcionamiento: 6562pies (2000m) como máximo
•
Humedad relativa: 10% a 90%, sin condensación
•
Temperatura de funcionamiento: 14° a 122°F (-10° a 50°C)
•
Temperatura de almacenamiento: -4° a 140°F (-20° a 60°C)
•
Dimensiones: 1,75" × 8,88" × 1,13" (44 × 226 × 29mm)
•
Peso: 5,7oz (161,6g) incluida la batería
•
Tipo de batería: 4 baterías alcalinas AAA de 1,5V
•
Vida útil de la batería: En actividad: 25horas
•
Modo en espera/Almacenamiento: 3años
Función de apagado automático: después de 10minutos de inactividad
•
Especificaciones sujetas a cambios.
DETALLES DE LAS CARACTERÍSTICAS
P1
Punta de polímero inductiva reemplazable (VDV999-068)
P2
Luz de trabajo
P3
Botón de encendido y apagado de luz de trabajo
P4
Indicador de intensidad de la señal
P5
Botón de encendido y apagado
P6
Botón de aumento de volumen
P7
Botón de disminución de volumen
P8
Indicador del estado de batería
P9
Altavoz
*
PRECAUCIÓN: Un nivel de volumen excesivo puede causar daños auditivos permanentes. Use un volumen
P10
Ranura para cuerda
P11
Terminal "-" (negativa)
P12
Terminal "+" (positiva)
P13
Botones de liberación de las terminales
P14
Indicador de verificación
P15
Cubierta del compartimento de las baterías
P16
Tornillo de la cubierta del compartimiento
de las baterías (n.º2 Phillips)
P17
Conector de auriculares de 3,5 mm*
tan bajo como sea posible.
P10
P5
P6
P7
P9
P1
P2
P4
P3
P16
P8
P15
P11 P12
P17
P13
P14
11
Page 12

ESPAÑOL
ADVERTENCIAS
Para garantizar el funcionamiento y servicio seguros de los instrumentos, siga estas instrucciones.
Elincumplimiento de estas advertencias puede provocar un incendio, choque eléctrico, lesiones
gravesola muerte.
El Toner-Pro y Probe-Pro están diseñados para usarse en sistemas de cableado de voltaje extra bajo
•
(menos de 60voltios) para pruebas cuando estos sistemas NO ESTÁN energizados.
La tensión máxima entre los cordones de prueba ABN del Toner-Pro es de 60voltios en el modo de Prueba
•
y de 20voltios en el modo de continuidad. Conectar el Probe-Pro a una fuente de alimentación de CA
activa puede dañarlo e implicar un riesgo de seguridad para el usuario.
NO utilice los instrumentos si están húmedos dado que podrían representar un riesgo de choque eléctrico.
•
NO utilice los instrumentos si están dañados.
•
Apague los instrumentos y desconecte todos los cordones de prueba ABN antes de intentar reemplazar las baterías.
•
La tapa del compartimiento de las baterías debe estar ajustada en su lugar antes de operar el instrumento.
•
NO abra la carcasa, excepto el compartimiento de las baterías.
•
INSTRUCCIONES DE FUNCIONAMIENTO
LEA TODAS LAS INSTRUCCIONES ANTES DE UTILIZAR LOS DISPOSITIVOS Y CONSÉRVELAS PARA
CONSULTARLAS EN EL FUTURO.
PRUEBA DE CONTINUIDAD
El Toner-Pro transmite frecuencias sobre alambres no energizados únicamente. Al encender el Toner-Pro,
se realizará una prueba de continuidad para determinar si los dos alambres que van a trazarse están muy
cerca uno del otro, sin un circuito conductor entre ellos. El indicador CONT (continuidad)
de color verde para dar la indicación de aprobación. Sujete los cordones de prueba ABN rojo y negro
se iluminará
T4
T14
a los alambres que van a probarse. Si la resistencia del circuito es inferior a 10kΩ, entonces el indicador
CONT (continuidad) T4 se iluminará de color rojo y no se producirá ningún tono. Si el indicador CONT
(continuidad) se ilumina de color verde, entonces se producirá un tono y podrá continuar.
SELECCIÓN DE LA FRECUENCIA DE TONO
La frecuencia predeterminada del Toner-Pro cuando está encendido es de 800Hz. Utilice el botón de aumento
del modo Tono T8 y el botón de disminución del modo Tono T7 para cambiar la frecuencia. Los indicadores
de frecuencia de tono T6 mostrarán la frecuencia transmitida. Si se selecciona un tono alternante, los dos
indicadores de frecuencia de tono correspondientes T6 parpadearán.
Los tonos recorrerán las frecuencias
disponibles en un ciclo continuo al presionar un botón de aumento o disminución de forma repetida.
TRAZADO DE PARES DE ALAMBRES (FIG. 1)
1. Conecte el cordón de prueba ABN rojo del Toner-Pro
Conecte el cordón de prueba ABN negro
al otro alambre que va a trazarse.
T14
a uno de los alambres del par que va a trazarse.
T14
2. Encienda el Toner-Pro presionando el botón de encendido y apagado T9.
3. Revise el indicador CONT (continuidad) T4. Si está iluminado de color verde, entonces puede continuar.
4. Seleccione la configuración de tono preferida utilizando el botón de
de
disminución del modo TonoT7.
5. Encienda el Probe-Pro presionando el botón de encendido y apagado
aumento del modo TonoT8 o el botón
.
P5
6. De ser posible, cree en el extremo del cable una separación de 2" (51mm) entre los cables.
7. Utilice el Probe-Pro para escanear los pares de alambres del cable. Mueva la punta del Probe-Pro
lentamente
P1
a lo largo de los alambres (FIG. 1). El volumen del Probe-Pro aumentará a medida que se acerca al par con tono.
Cuando el volumen del Probe-Pro es alto sobre el primer alambre, bajo en medio de (entre) los dos alambres y
alto sobre el segundo alambre, entonces habrá encontrado el par de alambres que está rastreando. Utilice el botón
de
aumento de volumen
y el botón de
P6
reducción de volumen
para ajustar el volumen.
P7
12
FIG. 1
2"
(51 mm)
Page 13

INSTRUCCIONES DE FUNCIONAMIENTO
VERIFICACIÓN DE LOS PARES CON TONO (FIG. 2)
1. Para verificar que ha encontrado el par con tono, conecte los cordones de prueba ABN del Toner-Pro
o el conector de prueba RJ11
a un extremo del cable e inicie un tono.
T13
T14
2. En el otro extremo del cable, retire aproximadamente 2mm (3/32") del revestimiento exterior de cada uno de
los alambres que se consideran como el par con tono.
3. Inserte el alambre conectado al cordón de prueba ABN rojo
conectado al cordón de prueba ABN negro
presione sus correspondientes
la liberación (FIG. 2). El
FIG. 2
botones de liberación de terminal
indicador de verificación
en la
terminal "-" (negativa)
T14
se iluminará cuando el par correcto sea insertado.
P14
en la
terminal "+" (positiva)
T14
P13
. Para acceder a las terminales ,
P11
, inserte el/los alambre/alambres y efectúe
y el alambre
,
P12
2 mm
(3/32")
Presione
TRAZADO DE ALAMBRES SIN PAR (FIG. 3)
1. Conecte el cordón de prueba ABN rojo del Toner-Pro
2. Conecte el cordón de prueba ABN negro
al otro alambre del cable, pero preferiblemente no en el mismo
T14
al alambre que va a trazarse.
T14
par (conecte a tierra de ser posible). Al trazar un cable blindado, conecte el cordón de prueba ABN rojo al
blindaje exterior y luego el cordón de prueba ABN negro al conductor central o a tierra.
3. Encienda el Toner-Pro presionando el botón de encendido y apagado
T9
.
4. Revise el indicador CONT (continuidad) T4. Si está iluminado de color verde, entonces puede continuar.
5. Encienda el Probe-Pro presionando el botón de encendido y apagado
6. Seleccione la configuración de tono preferida utilizando el botón de
de
disminución del modo TonoT7.
.
P5
aumento del modo TonoT8 o el botón
7. De ser posible, cree en el extremo del cable una separación de 2" (51mm) entre los alambres.
8. Utilice el Probe-Pro para escanear los pares de alambres del cable. Mueva la punta del Probe-Pro
lentamente
P1
a lo largo de los alambres. El volumen del Probe-Pro aumentará a medida que se acerca al alambre con tono.
FIG. 3
2"
(51 mm)
13
Page 14

ESPAÑOL
INSTRUCCIONES DE FUNCIONAMIENTO
PRUEBA CON LOS CONECTORES RJ11/RJ12/RJ45
El Toner-Pro tiene un
conector de prueba RJ11
que se puede usar en lugar de los cordones ABN para
T13
transmitir el tono. El conector RJ11 funciona con conectores RJ11, RJ12, o RJ45. Los contactos ABN negro
yrojo se reemplazan con los dos conductores centrales del conector insertado, es decir, las clavijas 2 y 3 para
el RJ11, clavijas 3 y 4 para el RJ12, y clavijas 4 y 5 para el RJ45.
Utilice el Probe-Pro para ubicar los alambres con tono en el extremo del cable como se describe en la sección
TRAZADO DE PARES DE ALAMBRES.
PRUEBA DE POLARIDAD Y PRESENCIA DEL VOLTAJE
El Toner-Pro puede utilizarse para probar la polaridad y tipo de voltaje presente.
1. Presione el
2. Presione el
botón de encendido y apagado
botón de selección TEST/TONE (prueba/tono)
T9 en el Toner-Pro.
. El indicador TEST MODE (modo de prueba)
T10
T1
se iluminará.
3. Conecte los
cordones de prueba ABN
o inserte el
T14
conector de prueba RJ11
T13
.
4. Revise el indicador CONT (continuidad) T4. Si está iluminado de color verde, entonces puede continuar.
indicador de polaridad NRM (normal)
5. El
(servicio telefónico ordinario) y con la orientación adecuada. El
T2 se iluminará si el
rojo
cordón de prueba ABN
indicador de polaridad REV (inversa)
se conecta al POTS
T14
T3
se iluminará
si se invierten los alambres.
• El
indicador de polaridad NRM (normal)
T2 se iluminará
cuando el cordón de prueba ABN negro detecte
unvoltaje mayor que el del cordón de prueba ABN rojo.
indicador de polaridad REV (inversa)
• El
T3 se iluminará
cuando el cordón de prueba ABN rojo detecte
unvoltaje mayor que el del cordón de prueba ABN negro.
indicador de polaridad NRM (normal) y el indicador de polaridad REV (inversa) se iluminarán cuando
• El
exista voltaje CA.
• Cuando el
conector de prueba RJ11
esté en uso, el
indicador de polaridad NRM (normal) se iluminará sobre
un conector telefónico POTS (servicio de telefonía tradicional) correctamente cableado y con corriente.
NOTA: la convención de códigos de color POTS (negro/positivo, rojo/negativo) es opuesta a la convención
de códigos de color de multímetros (rojo/positivo, negro/negativo).
USO DE LA LUZ DE TRABAJO DE LA SONDA
El Probe-Pro tiene una luz de trabajo
iluminación. Presione el botón de encendido y apagado de la luz de trabajo
para ayudar con la iluminación en áreas de trabajo oscuras o con poca
P2
para encender y apagar la luz.
P3
14
Page 15

MANTENIMIENTO
REEMPLAZO DE LA BATERÍA
Cuando el indicador de batería baja
o
se parpadea, se deben reemplazar las baterías.
T11
P8
1. Apague el/los instrumento/instrumentos antes de intentar reemplazar las baterías.
2. Afloje el tornillo
,
de la cubierta del compartimiento de las baterías
T16
P16
T15
,
.
P15
3. Retire y deseche correctamente las cuatro baterías AAA de 1,5V.
4. Instale baterías nuevas (tenga en cuenta la polaridad correcta).
5. Vuelva a colocar la cubierta del compartimiento de las baterías y asegúrela con el tornillo.
Para evitar el riesgo de choque eléctrico, no utilice la unidad sin haber colocado la tapa
delcompartimiento de las baterías.
REEMPLAZO DE LA PUNTA DEL PROBE-PRO (KLEIN CAT. N.ºVDV999-068)
La punta
del Probe-Pro puede reemplazarse en caso de que esté dañada. Para retirar y reemplazar la punta:
P1
1. Gire la punta 1/4 de vuelta y jale suavemente para retirarla.
2. Inserte la nueva punta con la llave y con la orientación apropiada y presione suavemente.
3. Gire 1/4 de vuelta para bloquearla en su posición.
LIMPIEZA
Asegúrese de que el instrumento esté apagado y limpie con un paño limpio y seco que no deje
pelusas.
Noutilice solventes ni limpiadores abrasivos.
ALMACENAMIENTO
Retire las baterías si no va a utilizar el
instrumento
durante un tiempo prolongado. No lo exponga a la
humedad ni a altas temperaturas. Luego de un período de almacenamiento en condiciones extremas que
sobrepasen los límites mencionados en la sección ESPECIFICACIONES GENERALES, deje que el equipo
vuelva a las condiciones de funcionamiento normales antes de utilizarlo.
GARANTÍA
www.kleintools.com/warranty
ELIMINACIÓN/RECICLAJE
No arroje el equipo ni sus accesorios a la basura. Los elementos se deben desechar correctamente de acuerdo
con las regulaciones locales. Visite www.epa.gov o www.erecycle.org para obtener más información.
SERVICIO AL CLIENTE
KLEIN TOOLS, INC.
450 Bond Street
Lincolnshire, IL 60069
1-877-775-5346
customerservice@kleintools.com
www.kleintools.com
15
Page 16

ESPAÑOL
NOTAS
16
Page 17

FRANÇAIS
MANUEL D’UTILISATION
Trousse Toner-Pro et Probe-Pro
• DÉTECTE LES FILS
INDIVIDUELS OU APPARIÉS
• TESTE LES PRISESRJ11,
RJ12 ET RJ45
• DÉTECTE LA CONTINUITÉ ET
LA POLARITÉ DU COURANT
• 5TONALITÉS DISTINCTES
(3CONSTANTES,
2EN ALTERNANCE)
• VOYANTS
DEL FACILES À
COMPRENDRE
• POINTE DE
LA SONDE
REMPLAÇABLE
VDV500-820
VDV500-123
VDV500-063
Page 18

FRANÇAIS
CARACTÉRISTIQUES GÉNÉRALES– TONER-PROVDV500-063
Le Toner-ProVDV500-063 de KleinTools est un générateur de tonalité de calibre professionnel permettant la
localisation et l’identification de fils individuels ou appariés. Il peut produire plusieurs fréquences de tonalités
et un signal puissant, pour localiser les fils.
Altitude de fonctionnement: 2000m (6562pi) maximum
•
Humidité relative: 10% à 90% sans condensation
•
Température de fonctionnement: -10°C à 50°C (14°F à 122°F)
•
Température d’entreposage: -20°C à 60°C (-4°F à 140°F)
•
Dimensions: 64x127x25mm (2,5x5x1po)
•
Poids: 210g (7,4oz) en tenant compte des piles
•
Type de pile: 4piles alcalinesAAA de 1,5V
•
Durée de vie des piles: En mode actif: 120heures
•
En mode veille ou lorsqu’entreposées: 3ans
Arrêt automatique: Après 60minutes d’inactivité
•
Tonalités: Constantes: 800Hz, 1000Hz, 1500Hz
•
En alternance: 800Hz/1000Hz, 1000Hz/1500Hz
Puissance de la tonalité: 8dBm
•
Indicateur de continuité: Moins de 10kΩ
•
Protection contre les surtensions: Mode Test: 60V
•
Mode tonalité:
20V par une source
T14
de 600Ω externe
Les caractéristiques techniques peuvent faire l’objet de modifications.
CARACTÉRISTIQUES DÉTAILLÉES
T1
Indicateur TEST MODE (mode Test)
T2
Indicateur NRM (polarité normale)
T3
Indicateur REV (polarité inversée)
T4
Indicateur CONT (continuité)
T5
Indicateur TONE MODE (mode Tonalité)
T6
Indicateurs de fréquence de tonalité
T7
Bouton de diminution de la tonalité
T8
Bouton d’augmentation de la tonalité
T9
Bouton marche/arrêt
T10
Bouton TEST/TONE (test/tonalité)
T11
Indicateur d'état de la batterie
T12
Fente pour dragonne
T13
Fiche de test RJ11
T14
Pinces de test à lit à clous coudé (ABN)
T15
Couvercle du compartiment à piles
T16
Vis du compartiment à piles
(cruciforme n
o
2)
T12
T1
T2
T16
T5
T7
T13
T3
T4
T6
T8
18
T9
T10
T11T15
Page 19

CARACTÉRISTIQUES GÉNÉRALES– PROBE-PRO VDV500-123
Le Probe-ProVDV500-123 de KleinTools est un détecteur de tonalité de calibre professionnel doté d’une
sonde inductive, d’un haut-parleur pour l’amplification du son et d’un éclairage à DEL pour l’utilisation dans
des endroits sombres. Elle dispose également d’une prise pour casque d’écoute pour une utilisation dans des
endroits extrêmement bruyants.
Altitude de fonctionnement: 2000m (6562pi) maximum
•
Humidité relative: 10% à 90% sans condensation
•
Température de fonctionnement: -10°C à 50°C (14°F à 122°F)
•
Température d’entreposage: -20°C à 60°C (-4°F à 140°F)
•
Dimensions: 44x226x29mm (1,75x8,88x1,13po)
•
Poids: 161,6 g (5,7 oz) en tenant compte des piles
•
Type de pile: 4piles alcalinesAAA de 1,5V
•
Durée de vie des piles: En mode actif: 25heures
•
En mode veille ou lorsqu’entreposées: 3ans
Arrêt automatique: Après 10minutes d’inactivité
•
Les caractéristiques techniques peuvent faire l’objet de modifications.
CARACTÉRISTIQUES DÉTAILLÉES
P1
Embout inductif en polymère remplaçable (VDV999-068)
P2
Lampe de travail
P3
Bouton marche/arrêt de la lampe de travail
P4
Indicateur de puissance du signal
P5
Bouton marche/arrêt
P6
Bouton d’augmentation du volume
P7
Bouton de diminution du volume
P8
Indicateur d'état de la batterie
P9
Haut-parleur
*
MISE EN GARDE: L’utilisation à un volume excessif peut causer une perte permanente de l’audition.
P10
Fente pour dragonne
P11
Borne «-» (négative)
P12
Borne «+» (positive)
P13
Boutons de libération des bornes
P14
Indicateur de vérification
P15
Couvercle du compartiment à piles
P16
Vis du compartiment à piles (cruciforme n
P17
Prise pour casque d’écoute 3,5 mm *
o
2)
Baissez le volume de l’appareil au maximum lorsque vous utilisez le casque d’écoute.
P10
P5
P6
P7
P9
P1
P2
P4
P3
P16
P8
P15
P11 P12
P17
P13
P14
19
Page 20

FRANÇAIS
AVERTISSEMENTS
Pour garantir une utilisation et un entretien sécuritaires de vos instruments, suivez ces consignes. Le non-respect
de ces avertissements peut entraîner un incendie, un choc électrique et des blessures graves, voire la mort.
Le Toner-Pro et le Probe-Pro sont conçus pour une utilisation sur des réseaux de câbles fonctionnant à
•
très basse tension (inférieure à 60volts) afin de tester ces derniers lorsqu’ils ne sont PAS sous tension.
La tension maximale entre les pincesABN de test du Toner-Pro est de 60volts en mode Test et de 20volts
•
en mode Continuité. La connexion du Probe-Pro à une source c.a. principale sous tension peut endommager
l’appareil et pose un risque d’accident pour l’utilisateur.
N’UTILISEZ PAS ces instruments s’ils sont mouillés; cela poserait un risque de choc électrique.
•
N’UTILISEZ PAS les instruments s’ils ont été endommagés.
•
Éteignez les appareils et déconnectez les pincesABN de test avant de remplacer les piles.
•
Veillez à ce que le couvercle du compartiment à piles soit fermement en place avant de faire fonctionner le instrument.
•
N’OUVREZ PAS le boîtier, sauf le couvercle du compartiment à piles.
•
INSTRUCTIONS D’UTILISATION
LISEZ TOUTES LES INSTRUCTIONS AVANT DE FAIRE FONCTIONNER LE PRODUIT ET CONSERVEZ-LES
ÀDES FINS DE RÉFÉRENCE
TEST DE CONTINUITÉ
Le Toner-Pro ne transmet des fréquences qu’à des fils hors tension. Lorsque le Toner-Pro est allumé, un test
de continuité est effectué pour déterminer si les deux fils à localiser sont proches l’un de l’autre et qu’ils ne
sont pas reliés par un chemin conducteur. L’indicateur CONT (continuité) T4 s’allume en vert quand le test
est réussi. Attachez les pincesABN de test rouge et noir
aux fils à tester. Si la résistance du circuit est
T14
inférieure à 10kΩ, l’indicateur CONT (continuité) T4 s’allume en rouge et aucune tonalité n’est émise. Si
l’indicateur CONT (continuité) est allumé en vert, une tonalité est générée et vous pouvez continuer.
SÉLECTION DE LA FRÉQUENCE DE TONALITÉ
La fréquence par défaut lors de l’allumage du Toner-Pro est de 800Hz. Utilisez les boutons d’augmentation
T8
et de
diminution de la fréquence T7 pour changer la fréquence. Les indicateurs de fréquence de tonalité T6 indiqueront
la fréquence transmise. Si une tonalité en alternance est sélectionnée, les deux indicateurs de fréquence de tonalité
clignotent.
T6
Lorsque vous appuyez sur un bouton de sélection de façon répétée, la tonalité joue toutes les fréquences
disponibles en boucle continue.
LOCALISATION DE FILS APPARIÉS (FIG. 1)
1. Connectez la pinceABN de test rouge du Toner-Pro
pinceABN de test noire
à l’autre fil à localiser.
T14
à l’un des fils de la paire à localiser. Connectez la
T14
2. Allumez le Toner-Pro en appuyant sur le bouton marche/arrêt T9.
3. Observez l’indicateur CONT (continuité) T4. S’il est vert, vous pouvez continuer.
4. Sélectionnez la tonalité de votre choix à l’aide des boutons
5. Allumez le Probe-Pro en appuyant sur le bouton marche/arrêt
d’augmentationT8 ou
.
P5
de diminutionT7 de la tonalité.
6. À l’extrémité du câble, écartez les fils d’au moins 51mm (2po) l’un de l’autre, si possible.
7. Balayez les fils de la paire à l’aide du Probe-Pro. Déplacez le bout du Probe-Pro
lentement entre les fils
P1
(FIG.1). Le volume du Probe-Pro augmente à l’approche de la bonne paire. Lorsque le volume du Probe-Pro
est élevé lorsque celui-ci passe au-dessus du premier fil, qu’il est faible entre les deux fils et élevé au-dessus
du second fil, vous avez trouvé la paire de fils que vous localisiez. Utilisez les boutons
diminution
du volume pour l’ajuster.
P7
d’augmentation
P6
et
de
20
FIG. 1
51mm
(2po)
Page 21

INSTRUCTIONS D’UTILISATION
VÉRIFICATION DE LA PAIRE (FIG. 2)
1. Pour vérifier que vous avez trouvé la bonne paire, connectez les pincesABN de test du Toner-Pro
de testRJ11
à l’une des extrémités du câble pour émettre une tonalité.
T13
ou la fiche
T14
2. À l’autre extrémité du câble, retirez environ 2mm (3/32po) de la gaine extérieure de chacun des fils de la
paire présumée.
3. Insérez le fil connecté à la pinceABN de test rouge
pinceABN de test noire
de libération
respectif
à la
borne «-» (négative)
T14
, insérez le(s) fil(s) et relâchez les boutons (FIG. 2). L’
P13
à la
borne «+» (positive)
T14
. Pour accéder aux bornes, appuyer sur leur
P11
et le fil connecté à la
,
P12
indicateur de vérification
bouton
P14
s’allume lorsque la bonne paire est insérée.
FIG. 2
2mm
(3/32po)
Appuyez sur
les boutons
LOCALISATION DE FIL NON-APPARIÉ (FIG. 3)
1. Connectez la pinceABN de test rouge du Toner-Pro
2. Connectez la pinceABN de test noire
à un autre fil du câble, de préférence pas dans la même paire
T14
au fil à localiser.
T14
(connectez à la terre si possible). Lorsque vous localisez un câble blindé, connectez la pinceABN de test
rouge au blindage et la pinceABN de test noire au conducteur central ou à la terre.
3. Allumez le Toner-Pro en appuyant sur le bouton marche/arrêt
T9
.
4. Observez l’indicateur CONT (continuité) T4. S’il est vert, vous pouvez continuer.
5. Allumez le Probe-Pro en appuyant sur le bouton marche/arrêt P5.
6. Sélectionnez la tonalité de votre choix à l’aide des boutons
d’augmentationT8 ou
de diminutionT7 de la tonalité.
7. À l’extrémité du câble, écartez les fils d’au moins 51mm (2po) l’un de l’autre, si possible.
8. Balayez les fils de la paire à l’aide du Probe-Pro. Déplacez le bout du Probe-Pro
lentement entre les fils.
P1
Le volume du Probe-Pro augmente à l’approche du bon fil.
FIG. 3
51mm
(2po)
21
Page 22

FRANÇAIS
INSTRUCTIONS D’UTILISATION
TEST RJ11/RJ12/RJ45
Le Toner-Pro est doté d’une
fiche de testRJ11
qui peut être utilisée au lieu des pincesABN pour transmettre
T13
la tonalité. La ficheRJ11 fonctionne avec les prisesRJ11, RJ12 et RJ45. Les contactsABN peuvent être remplacés
par les deux conducteurs centraux de la prise, soit les tiges2 et 3 pour RJ11, les tiges3 et 4 pour RJ12 et les
tiges4 et 5 pour RJ45.
Utilisez le Probe-Pro pour localiser les fils branchés à l’extrémité du câble, comme décrit dans la section
LOCALISATION DE FILS APPARIÉS.
TEST DE POLARITÉ ET PRÉSENCE DE TENSION
Le Toner-Pro peut être utilisé pour tester la polarité et le type de tension présente.
1. Appuyez sur le
2. Appuyez sur le
bouton marche/arrêt
bouton de sélection TEST/TONE (test/tonalité)
T9 du Toner-Pro.
. L’indicateur TEST MODE
T10
(mode Test)
T1
s’allumera.
3. Connectez la
pinceABN de test
, ou insérez la
T14
fiche de testRJ11
T13
.
4. Observez l’indicateur CONT (continuité) T4. S’il est vert, vous pouvez continuer.
5. L’
indicateur NRM (polarité normale)
téléphonique de base dans le bon sens. L’
• L’
indicateur NRM (polarité normale)
T2 s’allume si la
pinceABN de test
indicateur REV (polarité inversée)
s’allume
T2
si la pinceABN de test noire reçoit une tension plus élevée
rouge est connecté au service
T14
T3 s’allume si les fils sont inversés.
que la pinceABN de test rouge.
• L’
indicateur REV (polarité inversée)
T3 s’allume
si la pinceABN de test rouge reçoit une tension plus élevée
que la pinceABN de test noire.
indicateurs NRM (polarité normale) et REV (polarité inversée) s’allument
• Les
en présence d’une source
detension c.a.
• Lorsque la
fiche de testRJ11
est utilisée, l’
indicateur NRM (polarité normale) s’allume si
la prise téléphone
est correctement reliée au service téléphonique de base.
REMARQUE: La convention des codes de couleurs du service téléphonique de base (noir/positif et rouge/
négatif) est l’opposé de la convention des codes de couleurs de multimètres (rouge/positif et noir/négatif).
UTILISATION DE LA LAMPE DE TRAVAIL DE LA SONDE
Le Probe-Pro est doté d’une lampe de travail P2 pour les endroits sombres. Appuyez sur le bouton marche/arrêt
de la lampe de travail P3 pour allumer et éteindre la lampe de travail.
22
Page 23

ENTRETIEN
REMPLACEMENT DES PILES
Lorsque l’indicateur de piles faibles
T11
ou
clignote, remplacez les piles.
P8
1. Éteignez l’instrument avant de remplacer les piles.
2. Desserrez la vis
,
du couvercle du compartiment à piles
T16
P16
T15
,
.
P15
3. Retirez les quatre piles alcalinesAAA de 1,5V et jetez-les de la façon adéquate.
4. Mettez les nouvelles piles en place (tenez compte de la polarité).
5. Replacez le couvercle du compartiment à piles et fixez-le solidement à l’aide de la vis.
Pour éviter tout risque de choc électrique, n’utilisez pas l’appareil lorsque le couvercle du
compartiment à piles est retiré.
EMBOUT DE REMPLACEMENT POUR PROBE-PRO (N
L’embout
P1 du Probe-Pro est remplaçable s’il est endommagé. Pour retirer et remplacer l’embout:
O
VDV999-068 DU CAT. KLEIN)
1. Tournez l’embout d’un quart de tour et tirez délicatement dessus pour le retirer.
2. Insérez le nouvel embout avec la clé dans le bon sens et appuyez dessus délicatement.
3. Tournez-le d’un quart de tour pour le verrouiller en place.
NETTOYAGE
Assurez-vous que instrument est éteint, puis essuyez-le à l’aide d’un linge non pelucheux.
N’utilisez
pas de nettoyant abrasif ni de solvant.
ENTREPOSAGE
Retirez les piles lorsque vous prévoyez ne pas utiliser
instrument
pendant une longue période. N’exposez
pas l’appareil à des températures ou à un taux d’humidité élevés. Après une période d’entreposage dans
des conditions extrêmes (hors des limites mentionnées dans la section CARACTÉRISTIQUES GÉNÉRALES,
laissez l’appareil revenir à des conditions d’utilisation normales avant de l’utiliser.
GARANTIE
www.kleintools.com/warranty
MISE AU REBUT/RECYCLAGE
Ne mettez pas l’appareil et ses accessoires au rebut. Ces articles doivent être éliminés conformément
aux règlements locaux. Pour de plus amples renseignements, consultez les sites www.epa.gov ou
www.erecycle.org.
SERVICE À LA CLIENTÈLE
KLEINTOOLS, INC.
450Bond Street
Lincolnshire, IL60069
1-877-775-5346
customerservice@kleintools.com
www.kleintools.com
23
Page 24

KLEINTOOLS, INC.
450Bond Street
Lincolnshire, IL60069
1-877-775-5346
customerservice@kleintools.com
www.kleintools.com
1390301 Rev 06/19 F
 Loading...