

Klein Tools IR5 Instructions
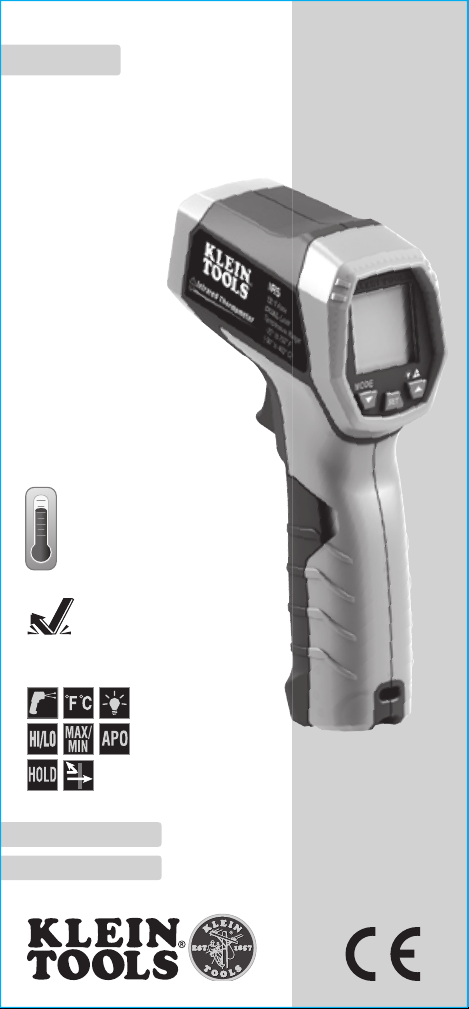
ENGLISH
INSTRUCTION MANUAL
Dual-laser Infrared
Thermometer
• DUAL-LASER
TARGETING
• 12:1 DISTANCETO-SPOT RATIO
• AUTO-SCAN
• MAX/MIN/AVG/DIFF
• HIGH/LOW ALARM
• BACKLIT DISPLAY
• AUTO POWER-OFF
• ADJUSTABLE EMISSIVITY
-22° –
752°F
-30° –
400°C
IR5
2m
ESPAÑOL pg. 11
FRANÇAIS pg. 21

ENGLISH
GENERAL SPECIFICATIONS
Klein Tools IR5 is a professional dual-laser targeting infrared
thermometer. It offers a wide measurement range, a tight distanceto-spot ratio, dual targeting lasers, and several calculation modes to
facilitate different temperature measurement applications.
• Operating Altitude: 6562 ft. (2000 m)
• Relative Humidity: <85% non-condensing
• Operating Temp: 32° to 122°F (0° to 50°C)
• Storage Temp: -4° to 140°F (-20° to 60°C)
• Measurement Range: -22° to 752°F (-30° to 400°C)
• Units: Settable to °F or °C
• Emissivity: 0.10-1.00 adjustable
• Optical Resolution (Distance-to-spot): 12:1
• Dimensions: 6.83" x 4.53" x 1.85" (173 x 115 x 47 mm)
• Weight: 9.84 oz. (279 g) including battery
• Battery Type: 1 x 9V battery
• Battery Life: (Estimates assume 9V Zinc-Carbon Battery)
10 hours continuous use w/laser and backlight on.
• Display: Backlit LCD with white backlight
• Display Resolution: 0.1°F (0.1° C)
• Calibration: Accurate for one year
• Lasers: FDA and IEC Class II
• Standards: Certified to IEC EN 61326-1:2006,
EN608251:1994+A2:2001+A1:2002
• Pollution degree: 2
• Drop Protection: 6.6 ft. (2m)
• Electromagnetic Environment: IEC EN 61326-1. This
equipment meets requirements for use in basic and controlled
electromagnetic environments like residential properties,
business premises, and light-industrial locations.
Specifications subject to change.
2

MEASUREMENT SPECIFICATIONS
• Response Time: <250ms
• Data hold: Yes
• MAX/MIN/Average/Differential: Yes
• Spectral Response: 8000-14000nm
≥32°F (≥0°C) ±4°F (±2°C) or ±2% (whichever is greater)
<32
°F
(<0°C)
±(4°F + 0.2°F per degree below 32°F)
±(2.2°C + 0.2°C per degree below 0°C)
• Repeatability: ±0.8% of reading or ±2°F(±1°C)
(whichever is greater).
• Temperature Correction Coefcient:
±0.2°F per °F (±0.1°C per °C), or
±0.2% of reading (whichever is greater) when ambient temperature
is above or below 70 – 77°F (21 – 25°C).
Specifications subject to change.
WARNINGS
To ensure safe operation and service of the meter, follow these
instructions. Failure to observe these warnings can result in
severe injury or death.
• Do not direct laser beam into eyes, as this can cause permanent
eye damage.
• Do not use the meter if the case is damaged in any way.
• Replace the battery as soon as low battery indicator appears.
• Service the meter immediately if it is acting abnormally.
• Be cautious of readings of reflective materials as the meter
may indicate that these surfaces are cooler than their actual
temperature (see Emissivity section).
• Avoid using the meter around strong electromagnetic fields.
SAFE PRACTICES
This meter is designed for professionals who understand the hazards
associated with their trade. While this meter causes no foreseeable
dangers beyond its targeting lasers; the objects being measured,
as well as the environment in which they reside, can be hazardous.
Common safety practices to follow when operating near temperature
critical environments are:
• Follow the manufacturer's maintenance procedures when
servicing equipment.
• Before using this meter to determine if an area is safe, verify
correct operation by measuring a known temperature value of a
comparable object.
• Properly maintain this meter and calibrate it regularly.
3
ENGLISH
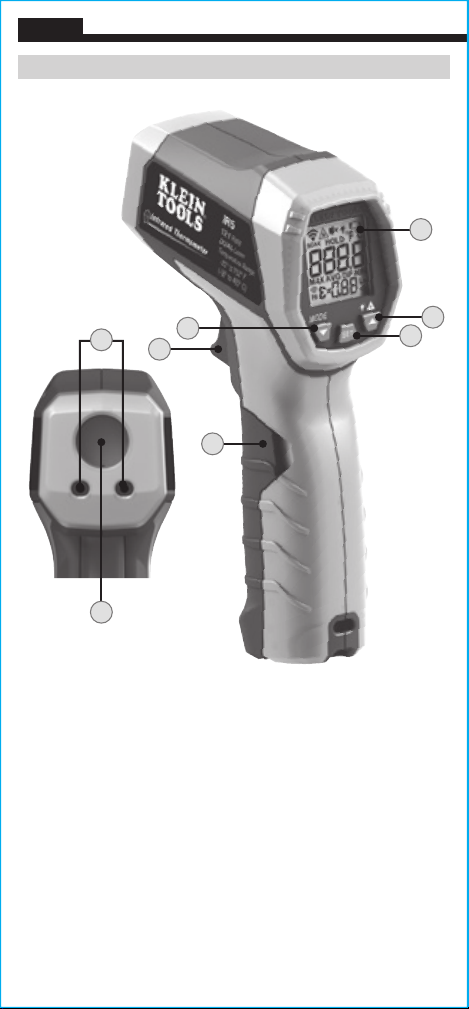
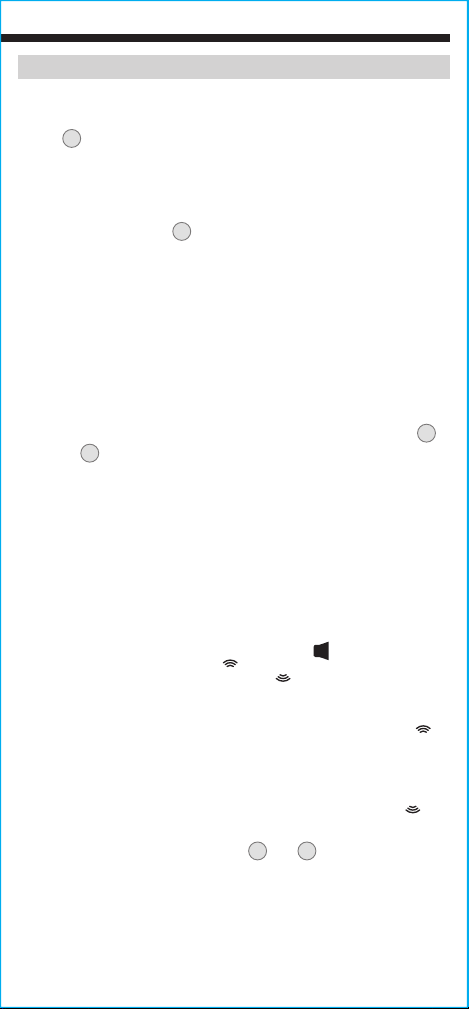
FEATURE DETAILS
4
8
1
5
6
Front
7
NOTE: There are no user-serviceable parts inside meter.
Control button – Selects mode and moves down through menus
1.
SET button – Sets selection
2.
Control button – Turns targeting lasers on/off, turns backlight on/off,
3.
LCD Display
4.
Trigger
5.
Battery compartment door
6.
IR temperature sensor
7.
Targeting lasers
8.
moves up through menus
3
2
4
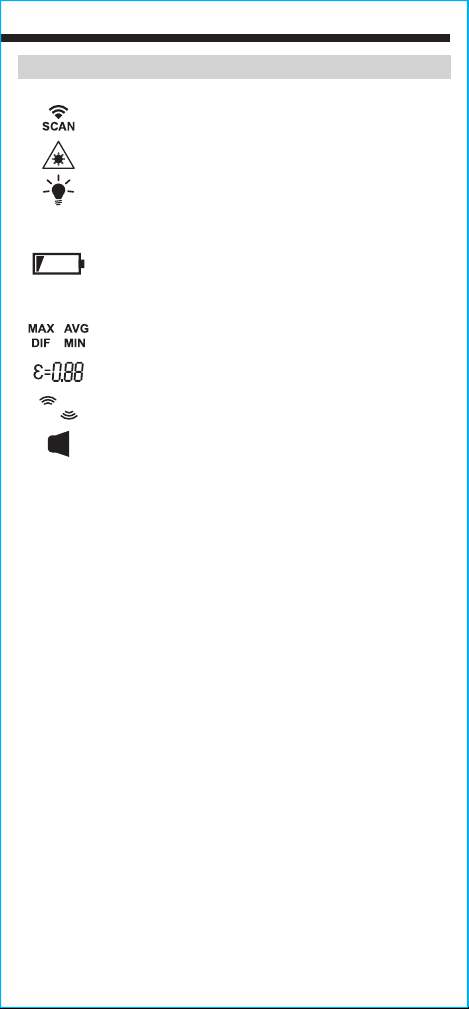
SYMBOLS ON LCD
Indicates active measurement
Targeting lasers active
Backlight active
HOLD
°F °C
Lo
Hi
Data Hold
Low battery indicator
Indicates active temperature scale
Indicates measurement mode
Emissivity
High / Low temperature limit indicators
Enable / disable audible temperature limit alarms
5
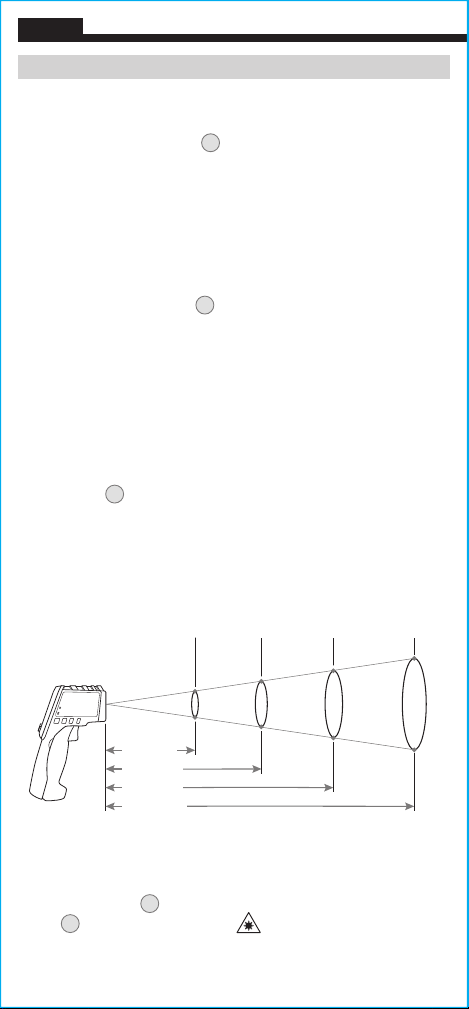
ENGLISH
0
.5"
1"
2"
4"
48"
(1219 mm)
OPERATING INSTRUCTIONS
TEMPERATURE MEASUREMENT
To measure temperature with the IR5, aim the meter at the object to
be measured, pull the trigger
and hold it depressed for at least 2
5
seconds. Releasing the trigger initiates Data Hold, "HOLD" will show
on the display, and the measurement will be held on the display.
If the display shows "OL" or "–OL" following a measurement, this
indicates that the surface temperature of the object being measured
is either above or below the measurement range of the meter.
TARGETING
The IR5 features dual lasers
to assist in targeting the
8
measurement area. The distance between the two laser spots on the
surface of the object being measured approximates the diameter
of the circular measurement area from which the infrared sensor is
collecting data. Measurement areas located far away from the meter
will be larger than those close to the meter.
The meter is configured with 12:1 optical resolution (distance-to-spot
ratio). The distance-to-spot ratio defines the size of the measurement
area relative to the distance between the measurement location and
the IR sensor
. Typical diameters of the measurement area as a
7
function of the distance between the meter and the target area are
depicted below for 12:1 optical systems (Fig. 1).
Fig. 1
6"
(152 mm)
12"
24"
(305 mm)
(610 mm)
Ø
(13 mm)
Ø
(25 mm)
Ø
(51 mm)
Ø
(102 mm)
Distance-to-Spot
TARGETING LASERS
The targeting lasers 8 may be turned on/off by long presses of control
button
6
. When on, the laser icon " " will be visible on the display.
3
OPERATING INSTRUCTIONS
BACKLIGHT
The backlight may be toggled on/off by short presses of control
button
. When on, the backlight icon will be visible on the display.
3
MODE SELECTIONS
When measuring temperature the meter continuously samples the
object being measured. Following a measurement, repeatedly press
the mode control button
1
to cycle through:
• the maximum temperature value measured ("MAX").
• the average value measured ("AVG").
• the difference between maximum and minimum values
measured ("DIFF").
• the minimum value measured ("MIN").
• press once more to exit the MODE menu.
SETTINGS
User adjustable settings may be defined using the SET control button
Press SET
to enter the settings menu, subsequent presses of SET cycle
2
.
2
through the following list of options:
• emissivity: set the numerical value of the emissivity to match
the surface being measured (see EMISSIVITY section below).
When in this setting the emissivity icon will flash on the display.
• units: Switch between °F (Fahrenheit) and °C (Celsius). When
in this setting the "°F" or "°C" icon will flash on the display,
indicating the temperature scale that is currently active.
• mute temperature limit alarms: (turn audible limit alarms on/
off). When in this setting the audible icon "
display. When on, the high "
when off they will not be visible.
"/low "Lo" icons will be visible and
Hi
"will flash on the
• high temperature limit setting: assign a numerical value to the
high temperature limit. When in this setting, the high icon "
will flash on the display.
• low temperature limit setting: assign a numerical value to the
low temperature limit. When in this setting, the low icon "
"
Hi
Lo
"
will flash on the display.
When in any setting, control buttons
and 3 function as up/down
1
to adjust settings and they may be used to select units, turn alarms
on or off, or adjust the numerical values of the respective parameters
up or down.
7

ENGLISH
OPERATING INSTRUCTIONS
EMISSIVITY
Emissivity is a measure of the ability of a surface to emit thermal
energy by radiation. Different types of surfaces (metals, masonry,
wood, etc.) emit thermal energy through radiation at different
efficiencies. Accordingly, these materials have different emissivity
coefficients which must be considered in order to make accurate
measurements with an infrared thermometer.
Emissivity on the IR5 may be adjusted from 0.10 to 1.00 to enable
accurate measurement of the temperature of most types of materials.
Generally speaking, shiny bright surfaces such as chrome, white
boards, etc. exhibit lower emissivity than flat black materials.
For guidance only, the chart below may be used to estimate
emissivity for many different types of materials. However, the
emissivity of surfaces is dependent upon many parameters such as
surface finish, temperature, shape of the object, etc.
This chart should be used for guidance only.
Material Emissivity
Asphalt 0.93
Red brick 0.93
Gray brick 0.75
Porcelain ceramic 0.92
Fired clay 0.91
Rough concrete 0.94
Cotton cloth 0.77
Smooth glass 0.92 - 0.94
Granite 0.45
Gravel 0.28
Smooth ice 0.97
Smooth white marble 0.56
Black paint 0.96
Hard rubber 0.94
Wood 0.80 - 0.90
Matte copper 0.22
Commercial sheet aluminum 0.09
Cold rolled steel 0.75 - 0.85
Find a comprehensive list of emissivity values at
https://www.kleintools.com/emissivity.
8
MAINTENANCE
BATTERY REPLACEMENT
When indicator is displayed on LCD, battery must be replaced.
1. Open the battery compartment 6 by pulling the battery
compartment cover at the indentations away from the trigger.
2. Remove exhausted 9V battery and dispose of appropriately.
3. Replace 9V battery and return battery compartment cover,
ensuring that it locks into place.
CLEANING
Be sure meter is turned off and wipe with a clean, dry lint-free
cloth.
Do not use abrasive cleaners or solvents.
Take care
to keep the sensor lens clean at all times. If required, loose
debris may be removed from lens using clean compressed air.
Lens may also be cleaned using a soft cloth or cotton swab
with water or rubbing alcohol
only
. Lens must be allowed to
completely dry prior to use.
STORAGE
Remove the battery when meter is not in use for a prolonged
period of time. Do not expose to high temperatures or
humidity. After a period of storage in extreme conditions
exceeding the limits mentioned in the General Specifications
section, allow the meter to return to normal operating
conditions before using.
WARRANTY
www.kleintools.com/warranty
DISPOSAL / RECYCLE
Do not place equipment and its accessories in the trash.
Items must be properly disposed of in accordance with local
regulations. Please see www.epa.gov or www.erecycle.org
for additional information.
CUSTOMER SERVICE
KLEIN TOOLS, INC.
450 Bond Street
Lincolnshire, IL 60069
1-877-775-5346
customerservice@kleintools.com
www.kleintools.com
9

ENGLISH
NOTES
 Loading...