

Page 1

ENGLISH
3000A
INSTRUCTION MANUAL
AC Current
Flex Clamp Meter
CL150
ESPAÑOL pg. 9
FRANÇAIS p. 17
Page 2

ENGLISH
GENERAL SPECIFICATIONS
The Klein Tools CL150 is a True RMS AC Flexible current clamp that
measures current from 0.01 to 3000 Amps.
• Environment: Indoor and outdoor
• Current Range: 0.01 to 3000A AC
Range Resolution Accuracy @ 77°F (25°C)
30.00A 0.01A +/-3% + 8 digits
300.0A 0.1A
3000A 1A
+/-3% + 5 digits
• Accuracy: see
FEATURE DETAILS - METER
• Display: 3000 count LCD
• Batteries: 2 x AAA Alkaline (included)
• Operating Altitude: 6562 ft. (2000m)
• Relative Humidity: Max. 80%
• Operating Temp: 41° to 104°F (5° to 40°C)
• Storage Temp: -4° to 140°F (-20° to 60°C)
• Dimensions: 10.5" x 4.12" x 1.06" (266 x 104 x 27 mm)
• Weight: 6.6 oz. (187 g) including batteries
• Standards: Conforms to: UL 61010-1, UL 61010-2-32.
Certified to: CSA STD C22.2#61010-1, 61010-2-32;
IEC EN 61010-1, 61010-2-32.
• Accuracy: ± (% of reading + # of least significant digits)
• Drop Protection: 6.6 ft. (2m)
• Pollution Degree: 2
• Safety Rating: CATIV 600V, CATIII 1000V, Class 2,
Double insulation
CAT IV: Measurement category IV is applicable to test and
measuring circuits connected at the source of the building’s
low-voltage MAINS installation.
• Electromagnetic Environment: IEC/EN 61326-1. This
equipment meets requirements for use in basic and controlled
electromagnetic environments like residential properties,
business premises, and light-industrial locations.
Specifications subject to change.
2
Page 3
WARNINGS
To ensure safe operation and service of the meter, follow these
instructions. Failure to observe these warnings can result in
severe injury or death.
• Read the instructions to ensure safe operation.
• Test on known live circuit before using.
• Never use the meter on a circuit with voltages that exceed the
category based rating of this meter.
• Do not use the meter during electrical storms or in wet
weather.
• Do not use the meter if it appears to be damaged; or if any
inner copper wire is exposed.
• To avoid false readings, replace the battery as soon as the low
battery indicator appears.
• Avoid using the meter around strong electromagnetic fields.
• Always adhere to local and national safety codes. Use personal
protective equipment to prevent shock and arc blast injury
where hazardous live conductors are exposed.
• Do not operate meter while battery door is removed.
• If the equipment is used in a manner not specified by the
manufacturer, the protection provided by the equipment may
be impaired.
SYMBOLS ON METER
Warning or Caution
Double Insulated Class II
Read Instructions
Do not apply around or
remove from HAZARDOUS
LIVE conductors.
SYMBOLS ON LCD
AC (Alternating Current) Amperage (Amps)
Low Battery Data Hold
MAX Maximum Value Hold MIN Minimum Value Hold
Auto-Power Off
3
Page 4
ENGLISH
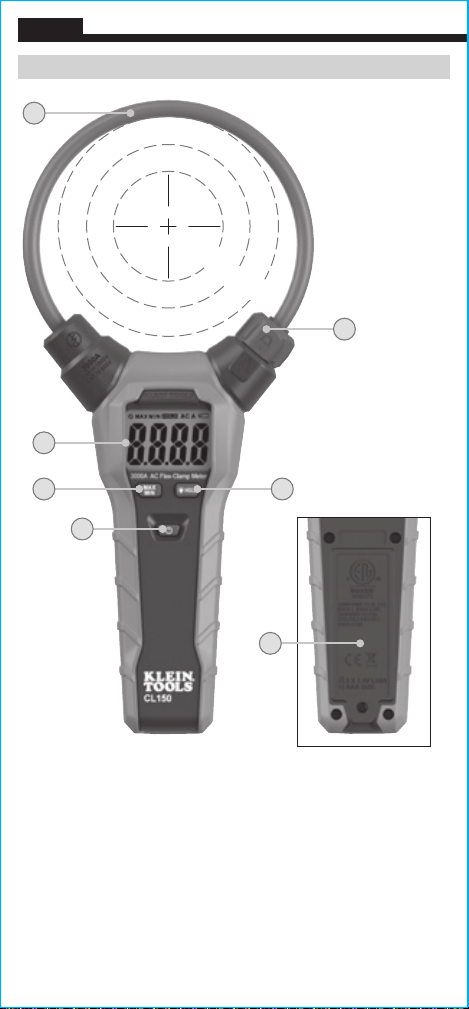
1
2
FEATURE DETAILS - METER
r1
r2
r3
6
3
5
4
7
NOTE: There are no user-serviceable parts inside meter.
18" Flexible Clamp
1.
3000 count LCD display
2.
"MAX/MIN" button
3.
Power Button
4.
"HOLD"/Backlight button
5.
Coil Lock Clamp
6.
Battery Door (Back)
7.
4
Radius 1.38" (35 mm):
r1.
1% error
Radius 2" (50 mm):
r2.
1.5% error
Radius 2.38" (60 mm):
r3.
2.0% error
Page 5
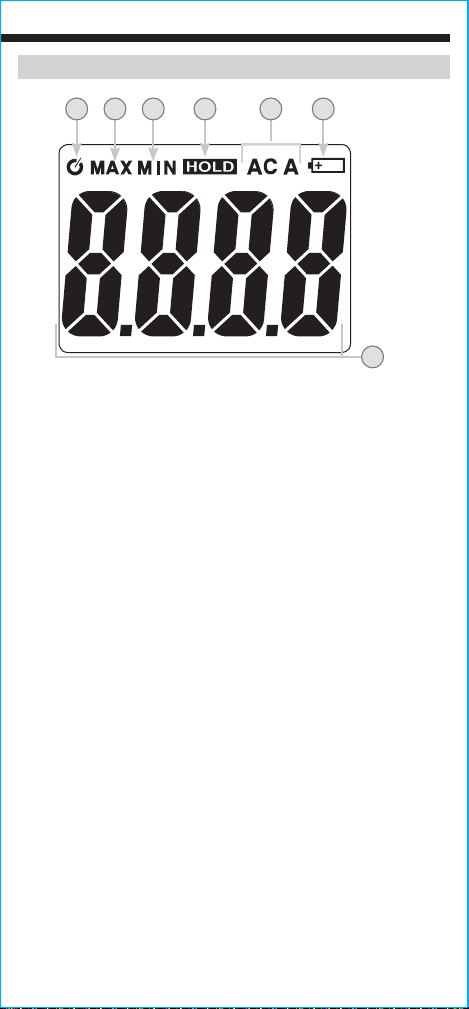
FEATURE DETAILS - LCD DISPLAY
A B C D E F
Auto-Power Off IconE.AC Amperage
A.
Maximum Value
B.
Minimum Value
C.
Data Hold
D.
Low Battery Icon
F.
Measurement
G.
G
5
Page 6
ENGLISH
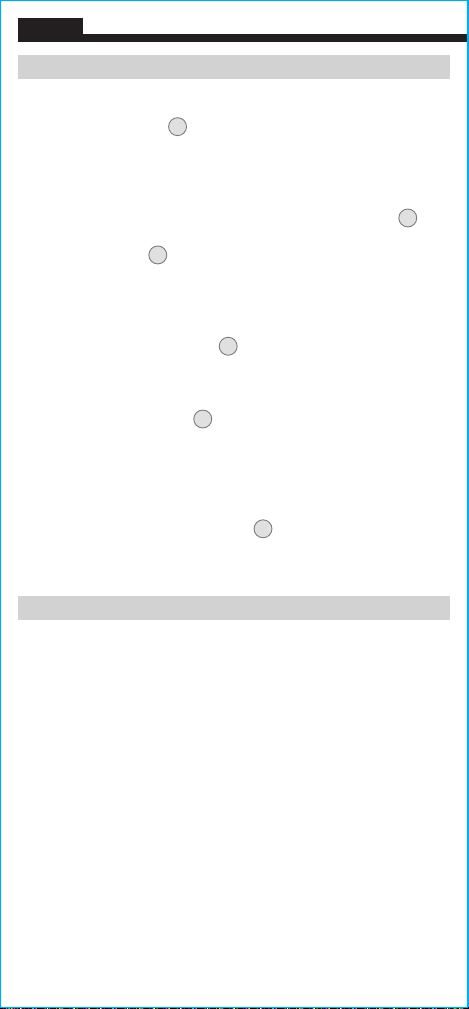
FUNCTION BUTTONS
ON/OFF
4
Press the Power button
to power on the meter. Long press the
Power button to power off the meter.
AUTO-POWER OFF
Auto power-off will automatically turn off the meter after 15 minutes
3
of inactivity to conserve battery life. Long press the Max/Min
for
more than one second to disable the auto power off function. The
A
Auto-Power Off icon
will disappear from the display. Power-on
again to re-enable the auto power off function. The Auto-Power Off
icon will reappear.
HOLD
5
Press the Hold/Backlight button
to hold the current reading on the
LCD. Press again to return to normal measurement mode.
MAX/MIN
5
Press the MAX/MIN button
, and the MAX icon will appear on
the LCD with the highest reading. Press again and the MIN icon will
appear on the LCD with the lowest reading. Long press for 3 seconds
to return to normal measurement mode.
BACKLIGHT
5
Long press the Hold/Backlight button
backlight on and off
.
for 3 seconds to turn the
OPERATING INSTRUCTIONS
1. Before each use, verify meter operation by measuring a known
current.
2. Open flex clamp coil lock, loop coil around wires to be measured,
and close coil lock.
3. Power on self-ranging meter, and directly read AC current in
Amps.
4. Refer to FEATURE BUTTON section to use other features such as
Hold, Max, and Min.
6
Page 7

MAINTENANCE
BATTERY REPLACEMENT
When the Low Battery indicator is displayed on the LCD,
the batteries must be replaced.
1. Loosen screw to remove
battery door.
2. Remove and recycle
exhausted batteries.
3. Install two new
AAA 1.5V batteries
(note proper polarity).
4. Replace battery door
and tighten screw.
Do not operate meter while battery door is removed.
CLEANING
Be sure meter is turned off and wipe with a clean, dry lint-free
cloth.
Do not use abrasive cleaners or solvents.
STORAGE
Remove the batteries when meter is not in use for a prolonged
period of time. Do not expose to high temperatures or humidity.
After a period of storage in extreme conditions exceeding the limits
mentioned in the General Specifications section, allow the meter to
return to normal operating conditions before using.
WARRANTY
www.kleintools.com/warranty
DISPOSAL / RECYCLE
Do not place equipment and its accessories in the trash.
Items must be properly disposed of in accordance with local
regulations. Please see www.epa.gov or www.erecycle.org
for additional information.
CUSTOMER SERVICE
KLEIN TOOLS, INC.
450 Bond Street
Lincolnshire, IL 60069
1-877-775-5346
customerservice@kleintools.com
www.kleintools.com
7
Page 8

ENGLISH
NOTES
8
Page 9

ESPAÑOL
3000 A
MANUAL DE INSTRUCCIONES
Multímetro de gancho exible
corriente CA
CL150
Page 10

ESPAÑOL
ESPECIFICACIONES GENERALES
El CL150 de Klein Tools es un gancho flexible True RMS de corriente CA que
mide corrientes de 0,01 a 3000amperios.
• Entorno: interiores y exteriores
• Rango de corriente: 0,01 a 3000amperios de CA
Rango Resolución Precisión @ 77°F (25°C)
30,00A 0,01A ± 3% + 8 dígitos
300,0A 0,1A
3000A 1A
± 3% + 5 dígitos
• Precisión: Vea los
• Pantalla: LCD con recuento de 3000
• Baterías: 2 baterías alcalinas AAA (incluidas)
• Altitud de funcionamiento: 6562pies (2000m)
• Humedad relativa: Máx. 80%
• Temperatura de operación: 41°F a 104°F (5°C a 40°C)
• Temperatura de almacenamiento: -4°F a 140°F (-20°C a 60°C)
• Dimensiones: 10,5" × 4,12" × 1,06" (266mm × 104mm × 27mm)
• Peso: 6,6 oz (187g) incluidas las baterías
• Normas: Cumple con: UL 61010-1, UL 61010-2-32.
• Precisión: ± (% de lectura + cantidad de dígitos menos significativos)
• Protección ante caídas: 6,6pies (2m)
• Grado de contaminación: 2
• Clasicación de seguridad: CATIV 600V, CATIII 1000V, clase 2,
DETALLES DE LAS CARACTERÍSTICAS - MULTÍMETRO
Certificado según las normas: CSA STD C22.2 N.° 61010-1,
doble aislamiento
61010-2-32; IEC EN 61010-1,
61010-2-32.
CATIV: La categoría IV de medición es aplicable a los circuitos de
medición y prueba conectados a la fuente de la instalación de red de
bajo voltaje de un edificio.
• Entorno electromagnético: IEC/EN 61326-1. Este equipo cumple con
los requisitos apropiados para su uso en entornos electromagnéticos
básicos y controlados, como propiedades residenciales,
establecimientos comerciales e instalaciones de industria ligera.
Especificaciones sujetas a cambios.
10
Page 11

ADVERTENCIAS
Para garantizar un funcionamiento y servicio seguros del multímetro,
siga estas instrucciones. El incumplimiento de estas advertencias puede
provocar lesiones graves o la muerte.
• Lea las instrucciones para garantizar un funcionamiento seguro.
• Antes de cada uso, verifique el funcionamiento del multímetro
midiendo una corriente conocida.
• Nunca debe utilizar este multímetro en un circuito con voltajes que
excedan la clasificación correspondiente a la categoría del multímetro.
• No utilice el multímetro durante tormentas eléctricas o en clima húmedo.
• No utilice el multímetro si en apariencia está dañado; o si cualquier
cable interior de cobre está expuesto.
• Para evitar lecturas falsas, reemplace la batería apenas aparezca el
indicador de batería baja.
• Evite utilizar el multímetro cerca de campos electromagnéticos intensos.
• Cumpla siempre con los códigos de seguridad locales y nacionales.
Utilice equipo de protección personal para prevenir lesiones por
choque y arco eléctrico en los lugares donde haya conductores activos
peligrosos expuestos.
• No haga funcionar el multímetro sin colocar la tapa del compartimento
de baterías.
• Si el equipo se usa de una manera contraria a lo especificado por el
fabricante, la protección proporcionada por el equipo puede verse
afectada.
SÍMBOLOS DEL MULTÍMETRO
Advertencia o precaución
Doble aislamiento Clase II
Lea las instrucciones
No utilice alrededor o
retire de entornos de
conductores ACTIVOS
PELIGROSOS.
SÍMBOLOS DE LA PANTALLA LCD
CA (corriente alterna) Amperaje (amperios)
Batería baja Retención de datos
MAX Retención del valor máximo MIN Retención del valor mínimo
Apagado automático
11
Page 12

ESPAÑOL
DETALLES DE LAS CARACTERÍSTICAS - MULTÍMETRO
1
r1
r2
r3
6
2
3
5
4
7
NOTA: El multímetro no contiene en su interior piezas
que el usuario pueda reparar.
Gancho flexible de 18"
1.
Pantalla LCD con recuento de 3000
2.
Botón “MAX/MIN”
3.
(MÁXIMO/MÍNIMO)
Botón de encendido
4.
Botón “HOLD” (RETENER)/
5.
de retroiluminación
Gancho de traba de bobinas
6.
Tapa del compartimiento de
7.
12
baterías (parte trasera)
Radio de 1,38" (35mm):
r1.
error de 1%
Radio de 2" (50mm):
r2.
error de 1,5%
Radio de 2,38" (60mm):
r3.
error de 2,0%
Page 13

DETALLES DE LAS CARACTERÍSTICAS - PANTALLA LCD
A B C D E F
G
Icono de apagado automáticoE.Amperaje de CA
A.
Valor máximo
B.
Valor mínimo
C.
Retención de datos
D.
Icono de batería baja
F.
Medición
G.
13
Page 14

ESPAÑOL
BOTONES DE FUNCIONES
ENCENDIDO/APAGADO
Presione el botón de encendido 4 para encender el multímetro. Mantenga
presionado el botón de encendido para apagar el multímetro.
APAGADO AUTOMÁTICO
La función de apagado automático apagará automáticamente el multímetro
después de 15minutos de inactividad para preservar la vida útil de la
batería. Mantenga presionado el botón “Max/Min” (Máximo/Mínimo)
3
durante más de un segundo para desactivar la función de apagado
automático. El icono de apagado automático
pantalla. Encienda nuevamente para que reaparezca la función de apagado
automático. El icono de apagado automático reaparecerá.
A
desaparecerá de la
“HOLD” (RETENER)
Presione el botón “Hold” (Retener)/de retroiluminación 5 para retener
la lectura en curso en la pantalla LCD. Presione nuevamente para volver al
modo de medición normal.
“MAX/MIN” (MÁXIMO/MÍNIMO)
Presione el botón “MAX/MIN” (MÁXIMO/MÍNIMO) 5, y el icono MAX
aparecerá en la pantalla LCD con la lectura más alta. Presione nuevamente y
el icono MIN aparecerá en la pantalla LCD con la lectura más baja. Presione
durante 3 segundos para volver al modo de medición normal.
RETROILUMINACIÓN
Mantenga presionado el botón “Hold” (Retener)/de retroiluminación 5
durante 3 segundos para encender y apagar la retroiluminación
.
INSTRUCCIONES DE OPERACIÓN
1. Antes de cada uso, verifique el funcionamiento del multímetro midiendo
una corriente conocida.
2. Abra la traba de bobinas del gancho flexible, enlace las bobinas alrededor
de los cables que desee medir y cierre la traba de bobinas.
3. Encienda el multímetro de rango automático y lea directamente la
corriente CA en amperios.
4. Consulte la sección BOTONES DE FUNCIONES para utilizar otras
funciones como “Hold” (Retener), “Max” (Máx.) y “Min” (Mín.).
14
Page 15

MANTENIMIENTO
REEMPLAZO DE LAS BATERÍAS
Cuando aparece el indicador de batería baja en la pantalla LCD,
se deben reemplazar las baterías.
1. Afloje el tornillo para retirar la tapa del
compartimento de baterías.
2. Retire y recicle las
baterías agotadas.
3. Instale dosbaterías
AAA nuevas de 1,5V
(tenga en cuenta la polaridad correcta).
4. Vuelva a colocar la tapa del compartimento
de baterías y apriete el tornillo firmemente.
No haga funcionar el multímetro sin colocar la tapa del
compartimento de baterías.
LIMPIEZA
Asegúrese de que el multímetro esté apagado y límpielo con un paño
limpio, seco, que no deje pelusas.
No utilice solventes ni limpiadores
abrasivos.
ALMACENAMIENTO
Retire las baterías si no va a utilizar el multímetro durante un tiempo
prolongado. No lo exponga a la humedad ni a altas temperaturas. Luego de
un período de almacenamiento en condiciones extremas que sobrepasen
los límites mencionados en la sección Especificaciones generales, deje que
el multímetro vuelva a las condiciones de funcionamiento normales antes
de utilizarlo.
GARANTÍA
www.kleintools.com/warranty
ELIMINACIÓN/RECICLAJE
No arroje el equipo ni sus accesorios a la basura. Los elementos
se deben desechar correctamente de acuerdo con las regulaciones
locales. Visite www.epa.gov o www.erecycle.org para obtener
más información.
SERVICIO AL CLIENTE
KLEIN TOOLS, INC.
450 Bond Street
Lincolnshire, IL 60069
1-877-775-5346
customerservice@kleintools.com
www.kleintools.com
15
Page 16

ESPAÑOL
NOTAS
16
Page 17

FRANÇAIS
3000 A
MANUEL D’UTILISATION
Multimètre à pince
exible pour courant c.a.
CL150
Page 18

FRANÇAIS
CARACTÉRISTIQUES GÉNÉRALES
Le CL150 de Klein Tools est un multimètre à pince flexible pour courant c.a.
avec mesure réelle de RMS qui mesure le courant de 0,01 à 3000A.
• Environnement: À l’intérieur et à l’extérieur
• Gamme d’intensité de courant: 0,01 à 3000A c.a.
Plage Résolution Précision à 25°C (77°F)
30,00A 0,01A ± (3%+8chiffres)
300,0A 0,1A
3000A 1A
± (3%+5chiffres)
• Précision: voir
• Afchage: Affichage ACL avec 3000lectures
• Piles: 2piles alcalinesAAA (incluses)
• Altitude de fonctionnement: 2000m (6562pi)
• Humidité relative: Max. 80%
• Température de fonctionnement: 5°C à 40°C (41°F à 104°F)
• Température d’entreposage: -20°C à 60°C (-4°F à 140°F)
• Dimensions:
• Poids: 187g (6,6oz) en tenant compte des piles
• Normes: Conforme aux normes: UL61010-1, UL61010-2-32.
Certifié conforme aux normes:
• Précision: ±
• Protection contre les chutes: 2 m (6,6pi)
• Niveau de pollution: 2
• Cote de sécurité: CATIV600V, CATIII 1000V, classe2,
CARACTÉRISTIQUES DÉTAILLÉES– MULTIMÈTRE
266mm x 104mm x 27mm (10,5po x 4,12po x 1,06po)
CSAC22.2 no61010-1, 61010-2-32;
IEC EN61010-1, 61010-2-32.
(% de la lecture + nombre de chiffres les moins significatifs)
double isolation
CATIV: La catégorie de mesureIV est applicable aux circuits de test
et de mesure connectés à la source de l’installation du RÉSEAU basse
tension du bâtiment.
• Environnement électromagnétique: IEC/EN61326-1. Cet équipement
répond aux exigences pour une utilisation dans des environnements
électromagnétiques ordinaires et contrôlés comme les zones
résidentielles, les locaux commerciaux et les sites industriels légers.
Les caractéristiques techniques peuvent faire l’objet de modifications.
18
Page 19

AVERTISSEMENTS
Pour garantir une utilisation et un entretien du multimètre sécuritaires,
suivez ces instructions. Le non-respect de ces avertissements peut
entraîner des blessures graves, voire la mort.
• Veuillez lire ces instructions afin que l’utilisation de l’appareil soit
sécuritaire.
• Avant chaque utilisation, vérifiez le fonctionnement du multimètre en
mesurant un courant de valeur connue.
• N’utilisez jamais le multimètre sur un circuit dont la tension dépasse la
tension correspondant à la cote de sécurité de l’appareil.
• N’utilisez pas le multimètre lors d’orages électriques ou par temps
humide.
• N’utilisez pas cet instrument s’il semble endommagé ou s’il y a
présence de fils de cuivre nus.
• Remplacez la pile dès que l’indicateur de piles faibles apparaît pour
éviter de mauvaises lectures.
• Évitez d’utiliser le multimètre près de champs électromagnétiques
puissants.
• Assurez-vous de respecter en tout temps les codes de sécurité locaux
et nationaux. Utilisez de l’équipement de protection individuelle pour
prévenir des blessures causées par les chocs électriques et les arcs
électriques lorsque des conducteurs nus alimentés dangereux sont
présents.
• N’utilisez pas le multimètre lorsque la porte du compartiment à piles
est retirée.
• Si ce produit est utilisé d’une manière n’ayant pas été indiquée par le
fabricant, la protection offerte par le produit pourrait être réduite.
SYMBOLES SUR LE MULTIMÈTRE
Avertissement ou mise en garde
Double isolation, classeII
Lire les instructions
Ne pas appliquer autour
de conducteurs nus
ALIMENTÉS potentiellement
DANGEREUX ou l’en retirer.
SYMBOLES À L’ÉCRANACL
C.A. (courant alternatif) Intensité de courant (A)
Pile faible Maintien des données
Maintien de la valeur maximale MIN
MAX
Arrêt automatique
Maintien de la valeur
minimale
19
Page 20

FRANÇAIS
CARACTÉRISTIQUES DÉTAILLÉES–MULTIMÈTRE
1
r1
r2
r3
2
6
3
5
4
7
REMARQUE: Ce multimètre ne contient aucune pièce
réparable par l’utilisateur.
Pince flexible de 18po
1.
Écran ACL jusqu’à 3000lectures
2.
Bouton MAX/MIN
3.
Bouton de mise sous tension
4.
Bouton HOLD
5.
(maintien des données)/rétroéclairage
Verrou
6.
Compartiment à piles (au dos)
7.
20
Rayon de 35mm (1,38po):
r1.
marge d’erreur de 1 %
Rayon de 50mm (2po):
r2.
marge d’erreur de 1,5 %
Rayon de 60mm (2,38po):
r3.
marge d’erreur de 2 %
Page 21

CARACTÉRISTIQUES DÉTAILLÉES–ÉCRAN ACL
A B C D E F
G
Icône d’arrêt automatiqueE.Intensité de courant c.a.
A.
Valeur maximale
B.
Valeur minimale
C.
Maintien des données
D.
Icône de pile faible
F.
Mesure
G.
21
Page 22

FRANÇAIS
BOUTONS DE FONCTION
MARCHE/ARRÊT
Appuyez sur le bouton de mise sous tension 4 pour allumer l’appareil.
Appuyez longuement sur le bouton de mise sous tension pour éteindre
l’appareil.
ARRÊT AUTOMATIQUE
Cette fonction éteindra automatiquement le multimètre après 15minutes
d’inactivité pour conserver la durée de vie de la batterie. Appuyez sur le
bouton Max/Min
arrêt automatique. L’icône d’arrêt automatique
Rallumez l’appareil pour réactiver la fonction arrêt automatique. L’icône
d’arrêt automatique réapparaîtra dans l’affichage.
3
pendant plus d’une seconde pour désactiver la fonction
A
disparaîtra de l’affichage.
HOLD
Appuyez sur le bouton Hold (maintien des données)/rétroéclairage 5
pour conserver la lecture actuelle à l’écran ACL. Appuyez de nouveau pour
retourner au mode de mesure normal.
MAX/MIN
Appuyez sur le bouton MAX/MIN 5, et l’icône MAX apparaîtra sur l’écran
ACL avec la lecture la plus haute. Appuyez de nouveau sur le bouton
MAX/MIN, et l’icône MIN apparaîtra sur l’écran ACL avec la lecture la plus
basse. Appuyez pendant 3secondes pour retourner au mode de mesure
normal.
RÉTROÉCLAIRAGE
Appuyez sur le bouton Hold (maintien des données)/rétroéclairage 5
et maintenez-le enfoncé pendant 3secondes pour allumer ou éteindre le
rétroéclairage
.
INSTRUCTIONS D’UTILISATION
1. Avant chaque utilisation, vérifiez le fonctionnement du multimètre en
mesurant un courant de valeur connue.
2. Ouvrez la pince à verrou flexible, enroulez la pince autour des fils qui
doivent être mesurés, puis fermez le verrou.
3. Allumez le multimètre à échelle automatique et lisez le courant c.a.
directement en ampères.
4. Consultez la section BOUTONS DE FONCTION pour utiliser d’autres
fonctions, comme HOLD (maintien des données), MAX et MIN.
22
Page 23

ENTRETIEN
REMPLACEMENT DES PILES
Lorsque l’indicateur de piles faibles apparaît sur l’écran ACL,
remplacez les piles.
1. Desserrez la vis pour retirer le couvercle
du compartiment à piles.
2. Retirez et recyclez
les piles à plat.
3. Mettez en place 2nouvelles
pilesAAA de 1,5V
(tenez compte de la polarité).
4. Replacez la porte du compartiment
à piles et resserrez solidement la vis.
N’utilisez pas le multimètre lorsque la porte du compartiment
à piles est retirée.
NETTOYAGE
Assurez-vous que l’appareil est éteint, puis essuyez-le à l’aide d’un linge
non pelucheux propre.
N’utilisez pas de nettoyant abrasif ou de solvant.
ENTREPOSAGE
Retirez les piles lorsque vous prévoyez ne pas utiliser le multimètre
pendant une longue période. N’exposez pas l’appareil à des températures
ou à un taux d’humidité élevés. Après une période d’entreposage dans
des conditions extrêmes (hors des limites mentionnées dans la section
Caractéristiques générales), laissez le multimètre revenir à des conditions
d’utilisation normales avant de l’utiliser.
GARANTIE
www.kleintools.com/warranty
MISE AU REBUT/RECYCLAGE
Ne mettez pas l’appareil et ses accessoires au rebut. Ces articles
doivent être éliminés conformément aux règlements locaux. Pour
de plus amples renseignements, consultez les sites www.epa.gov
ou www.erecycle.org.
SERVICE À LA CLIENTÈLE
KLEINTOOLS, INC.
450Bond Street
Lincolnshire, IL60069
1877775-5346
customerservice@kleintools.com
www.kleintools.com
23
Page 24

NOTES / NOTAS / REMARQUES
KLEIN TOOLS, INC.
450 Bond Street
Lincolnshire, IL 60069
1-877-775-5346
customerservice@kleintools.com
www.kleintools.com
1390187 Rev 11/17 A
 Loading...