

Page 1
ENGLISH
INSTRUCTION MANUAL
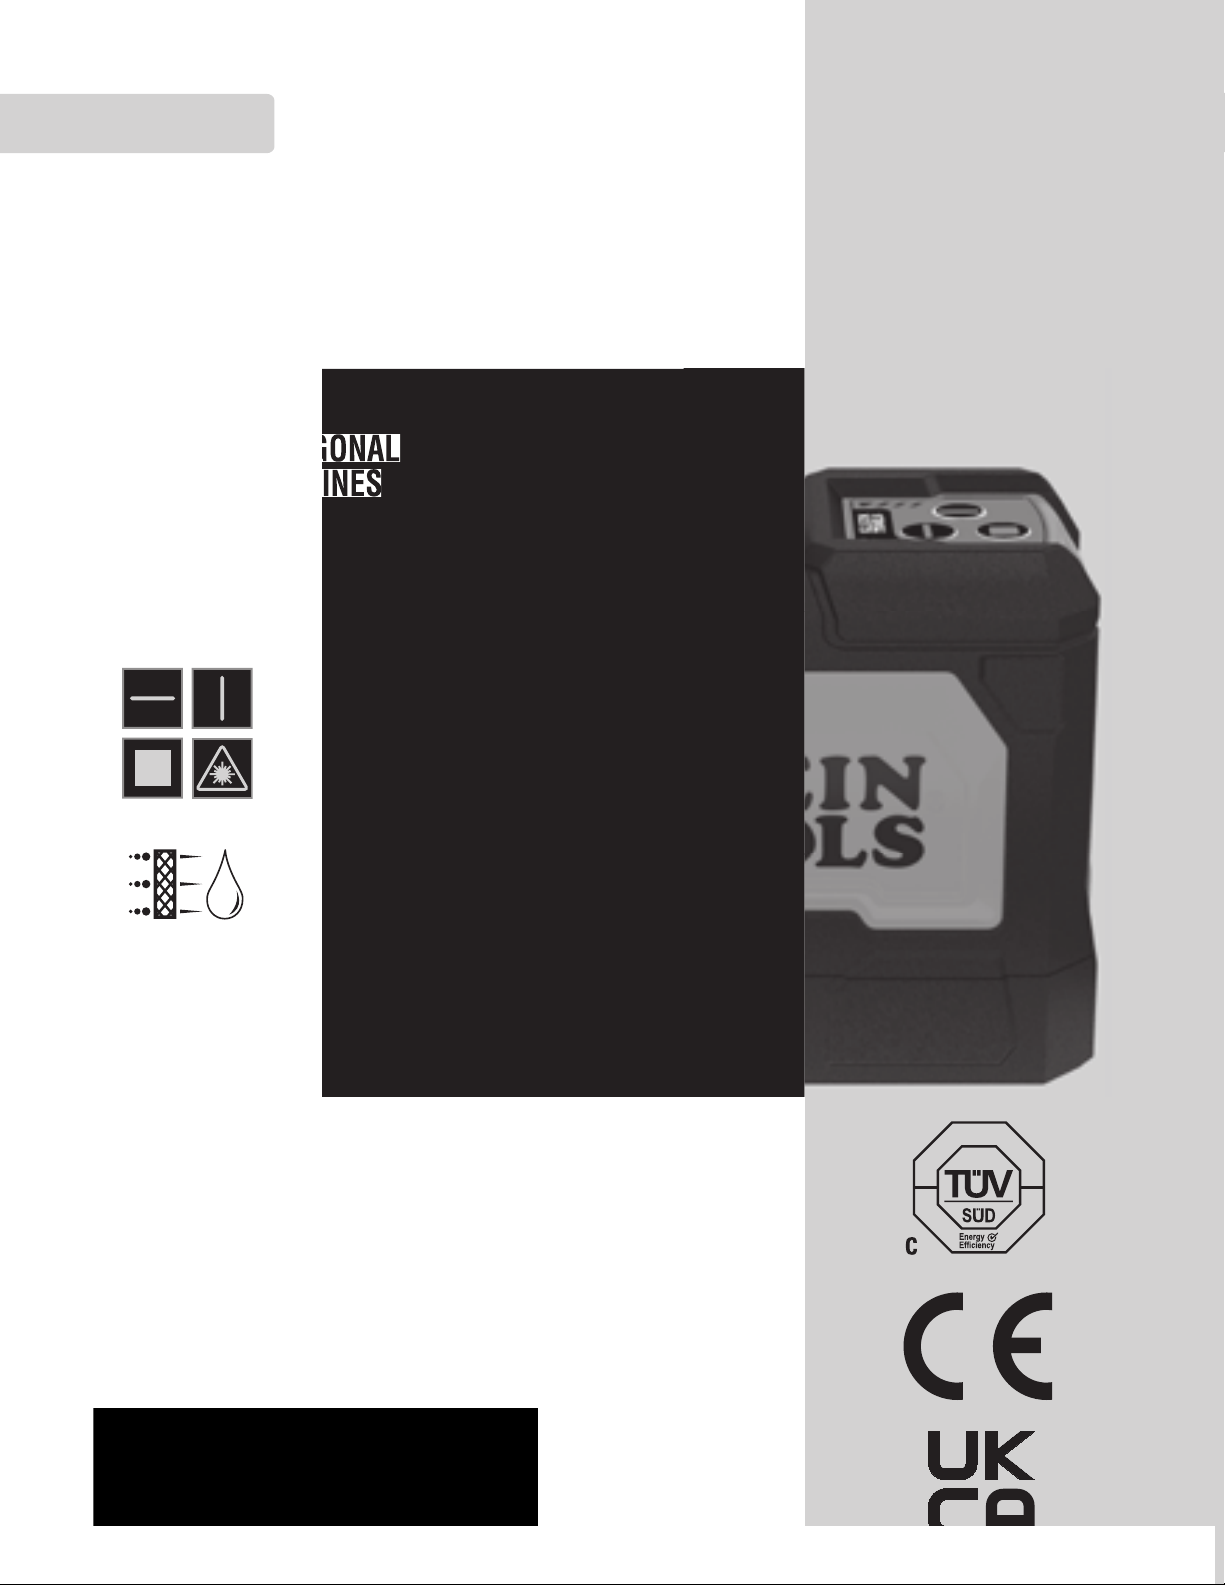
Rechargeable Self-Leveling
Green Planar Laser Level
• THREE ORTHOGONAL
360° PLANAR LINES
93PLL
IP54
Find Quality Products Online at: [email protected]
www.GlobalTestSupply.com
Page 2

ENGLISH
Li-ion battery
1ICR19/65-4
WARNING:
Do not incinerate
GENERAL SPECIFICATIONS
Klein Tools 93PLL is a self-leveling laser alignment instrument that can be used to
deliver three orthogonal 360° planar lines in the X, Y, and Z planes.
•
Operating Altitude: 6562 ft. (2000 m)
Relative Humidity: <80% non-condensing
•
•
Operating Temp: 20°F to 120°F (-10°C to 50°C)
•
Storage Temp: -5°F to 140°F (-20°C to 60°C)
Lasers: • 510-530 nm
•
• ≤1mW each beam, Class 2 Laser Product
Accuracy: +/- 4.5 mm per 15 m
•
•
Battery Type: Removable Li-Ion, 3.7V 10400 mAH
•
Battery Life: 9+ Hours (with all three lasers active)
Dimensions: 5.5" x 4.75" x 3.5" (140 x 120 x 88 mm)
•
•
Weight: 22.6 oz. (640 g) without batter
•
Calibration: Accurate for one year
Standards: Conforms to: EN61326-1:2013, EN60825-1:2014.
•
y
Conforms to NOM-001-SCFI-2018 Electronic Devices: Safety
Requirements and T
est Methods, based on NMX-I-60950-1-NYCE-2015
Information Technology Equipment - General Requirements.
Complies with: 21 CFR 1040.10 and 1040.11 except for deviations
pursuant to laser notice No. 50, dated June 24, 2007.
Ingress Protection: IP54 Dust & Water Resistant
•
•
Electromagnetic Environment: IEC EN61326-1:2013. This equipment meets
requirements for use in basic and controlled electromagnetic environments like
residential properties, business premises, and light-industrial locations.
Specifications subject to change.
2 3
Find Quality Products Online at: [email protected]
www.GlobalTestSupply.com
Page 3
WARNINGS
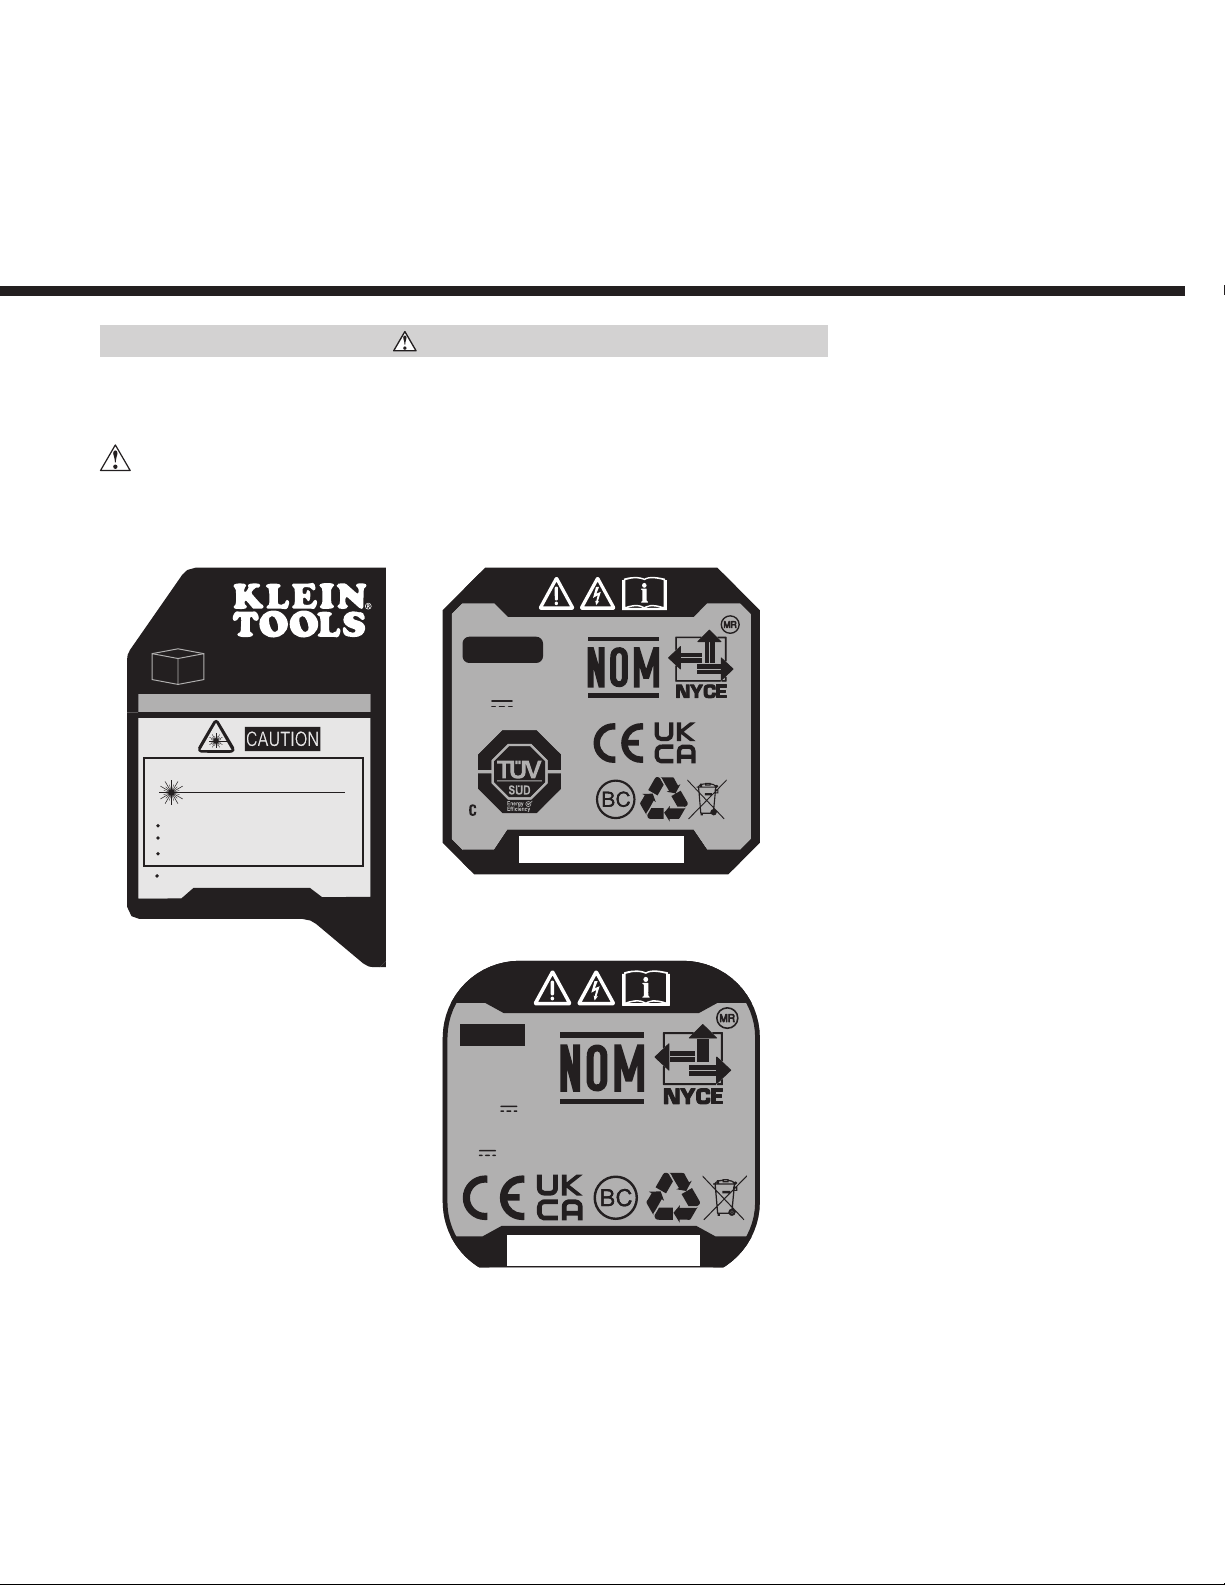
IP54
MMYYFF-HS
Input:
5V 2A
Model No. 93PLL
www.kleintools.com
Planar Laser Level
CLASS II LASER PRODUCT
LASER RADIATION:
DO NOT STARE INTO BEAM
Max. Output ≤1mW
Wavelength: 510-530nm
EN60825-1:2014
Complies with 21 CFR, PART1040
29026
Li-ion battery
1ICR19/65-4
MMYYFF-HS
WARNING:
Do not incinerate
Input:
5V 2.0A
Capacity:
10400mAh
(38.48Wh)
3.7V
To ensure safe operation and service of the instrument, follow these instructions.
Failure to observe these warnings can result in serious personal injury, re, or
electrical shock. Retain these instructions for future reference.
WARNING: LASER RADIATION. DO NOT STARE INTO BEAM. Class 2 Laser.
Warning label on side Warning label on bottom
Battery specications label
3
Find Quality Products Online at: [email protected]
www.GlobalTestSupply.com
Page 4
ENGLISH
.
0.25V.
REV
ECO
DESCRIPTION
CH
AP
DATE
1
FIRST RELEASE
WZB
10/24/201
9
DRAWING
NO.
BOTTOM
IP54
IP54
IP54
IP54
WARNINGS
• Exposing eyes to laser radiation can result in severe and permanent eye injuries. NEVER
look directly into the laser beam emitted by this instrument.
• Do not use the instrument if it appears to be damaged.
• Do not modify the instrument in any way, as to do so could result in emission of hazardous
laser radiation than could result in severe eye injuries.
• Do not use optical equipment such as lenses, prisms, optical scopes, etc. to transmit,
retransmit, or view the laser beam as this could result in severe eye injuries.
• This product should not be used by untrained operators or operators who have not read
and fully understood the instructions.
• This product should not be used in any location that could result in somebody looking at
or having their eyes inadvertently irradiated by the laser beam as this could result in severe
eye injuries.
• The instrument should be powered off following use to minimize the risks of inadvertently
exposure to hazardous laser radiation that could result in severe eye injuries.
• Do not remove warning labels from this instrument as this could result in serious personal
injury and increases the risk of exposure to hazardous laser irradiation.
• The instrument should be securely located in a tidy work environment prior to operation as
unexpected drops or movement of the instrument may result in damage to the instrument
and increases the risk of inadvertent exposure to laser radiation that could result in severe
eye injuries.
• This instrument is IP54 dust & water resistant. Following any contact with water, thoroughly
dry the instrument with a dry, lint-free cloth.
• There are no user serviceable parts in this instrument.
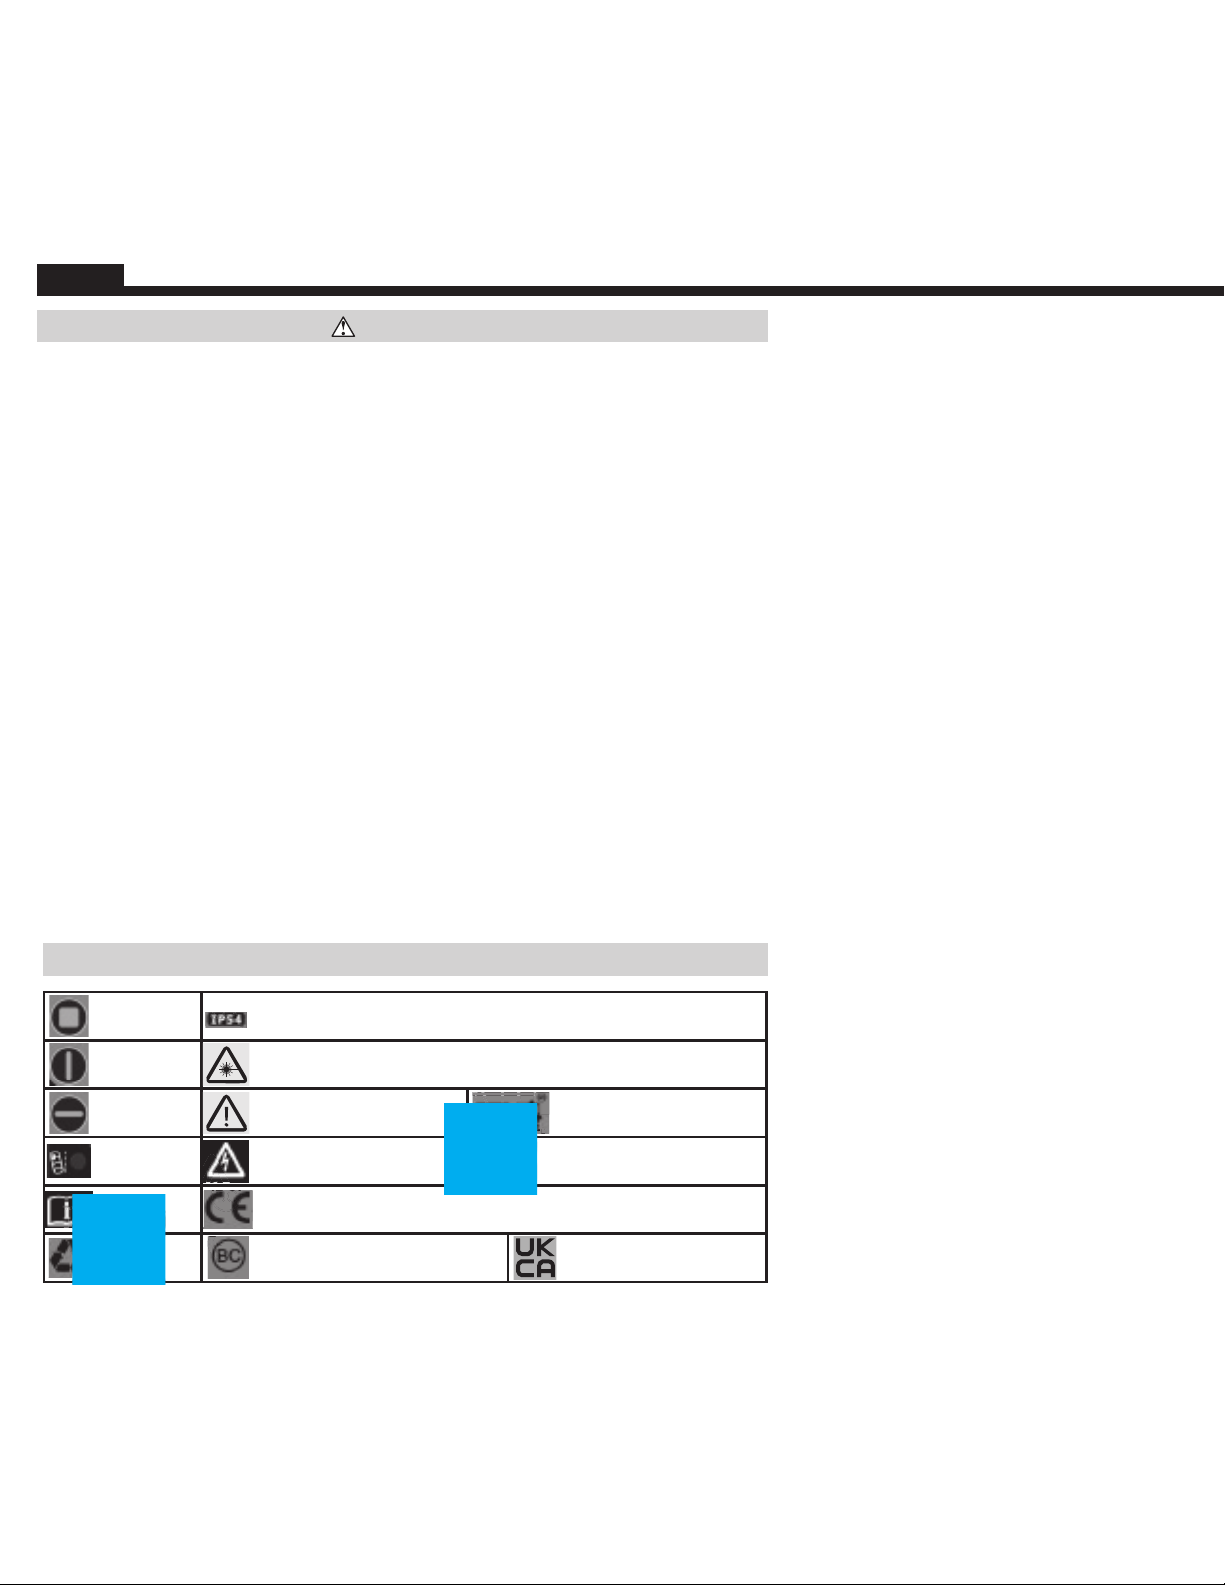
SYMBOLS ON INSTRUMENT
X-Plane
Laser
Y-Plane
Laser
Z-Plane
Laser
Out-Of-Level
Indicator
Read
instructions
Recycle
4 5
Ingress Protection IP54 Rating - Dust & Water Resistant
Hazardous laser radiation, DO NOT stare into beam or view direct-
ly with optical instruments
Warning or Caution
Warning –
Risk of electric shock
NOM-NYCE
WEEE –
Battery disposal
Conformité Européenne:
Conforms with European Economic Area directives
Conforms with BCS regulations
of California Energy Commission
UKCA - United Kingdom
Conformity Assessment
Find Quality Products Online at: [email protected]
www.GlobalTestSupply.com
Page 5
.
0.25V.
REV
ECO
DESCRIPTION
CH
AP
DATE
1
FIRST RELEASE
WZB
10/24/201
9
DRAWING
NO.
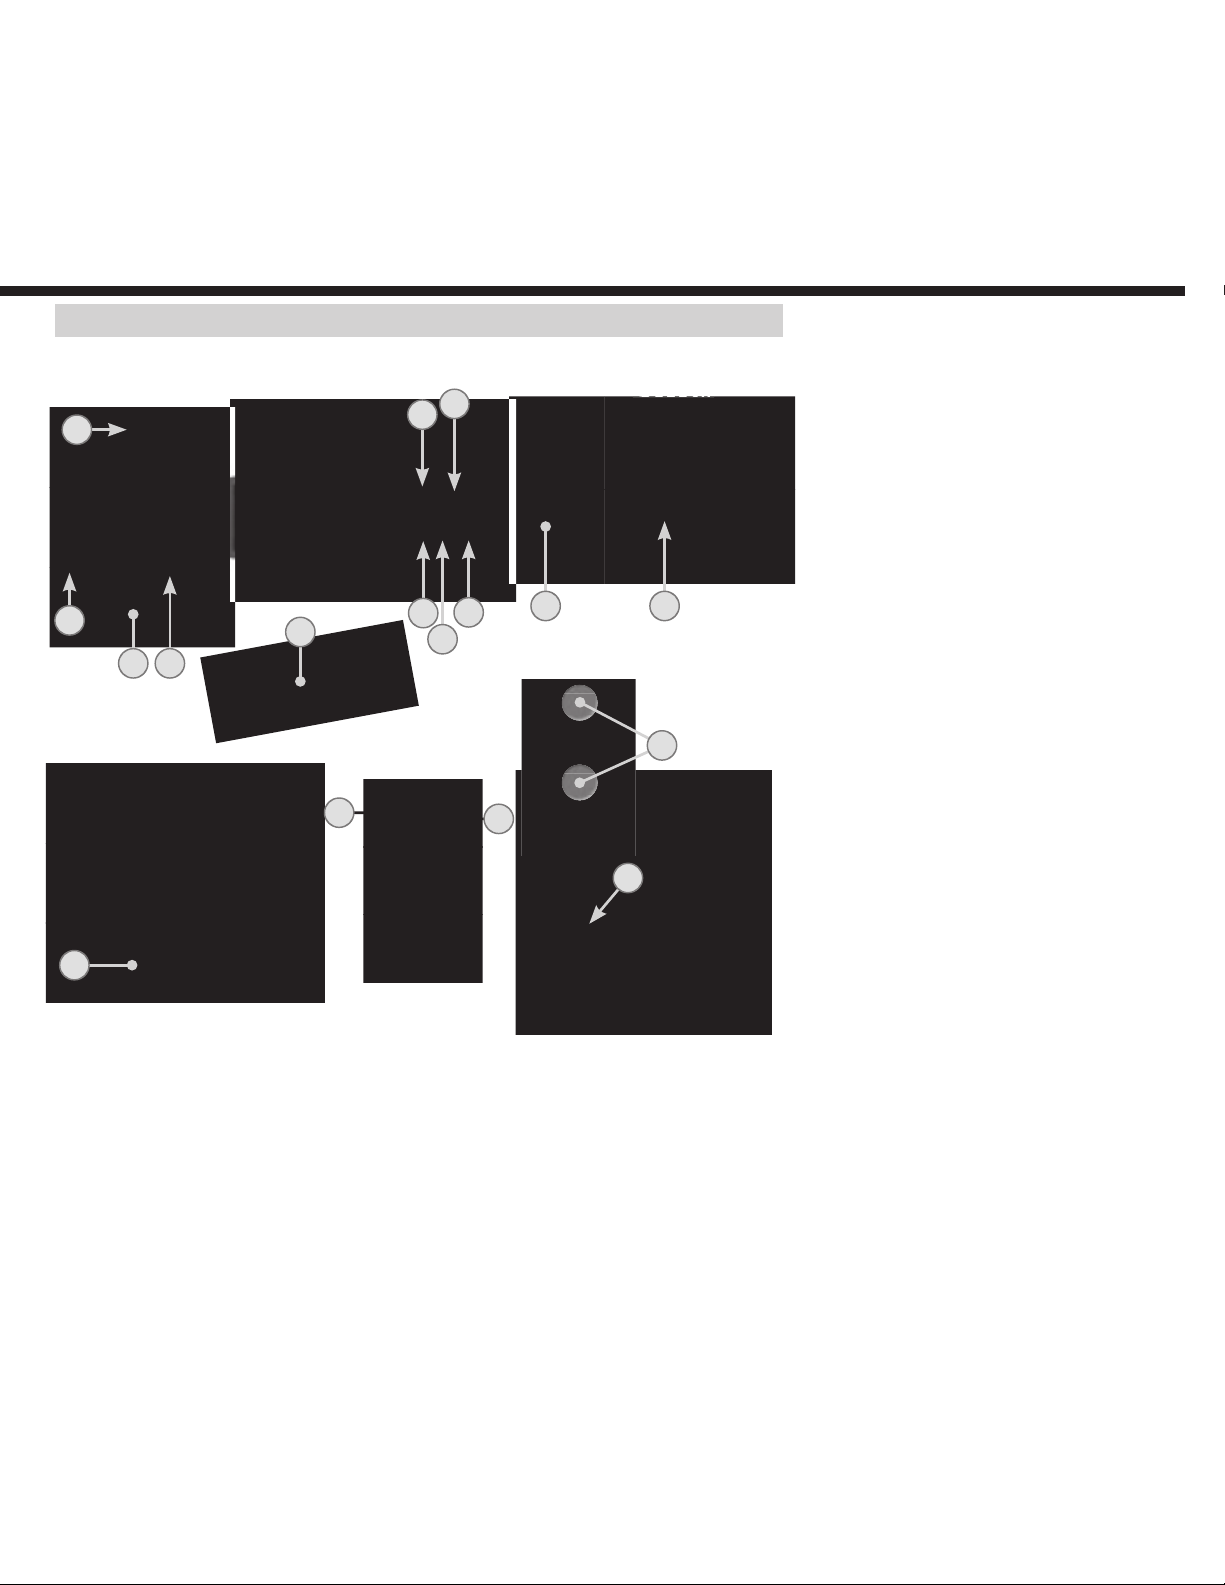
FEATURE DETAILS
BOTTOM
IP54
13
TOP
3
5
1
4
1112
2
BOTTOM
FRONT
7
9
810
BRACKET
SIDE
16
BATTERY
17
14
15
6
NOTE: No user-serviceable parts inside.
X-Plane Line On/Off Button
1.
Y-Plane Line On/Off Button
2.
Z-Plane Line On/Off Button
3.
4.
Excessive Tilt Indicator
Battery Level Indicator
5.
USB-C Charge-In Port
6.
X-Plane Aperture
7.
Y-Plane Aperture
8.
Z-Plane Aperture
9.
Find Quality Products Online at: [email protected]
Power/Pendulum Lock/Unlock Switch
10.
Bracket 1/4-20 Tripod Mount
11.
Battery Door
12.
USB-C Charging Cable
13.
Magnets
14.
1/4-20 Mounting Screw
15.
Li-Ion Battery Charge-In Port
16.
Li-Ion Battery Charge Indicator LED
17.
5
www.GlobalTestSupply.com
Page 6
ENGLISH
OPERATING INSTRUCTIONS
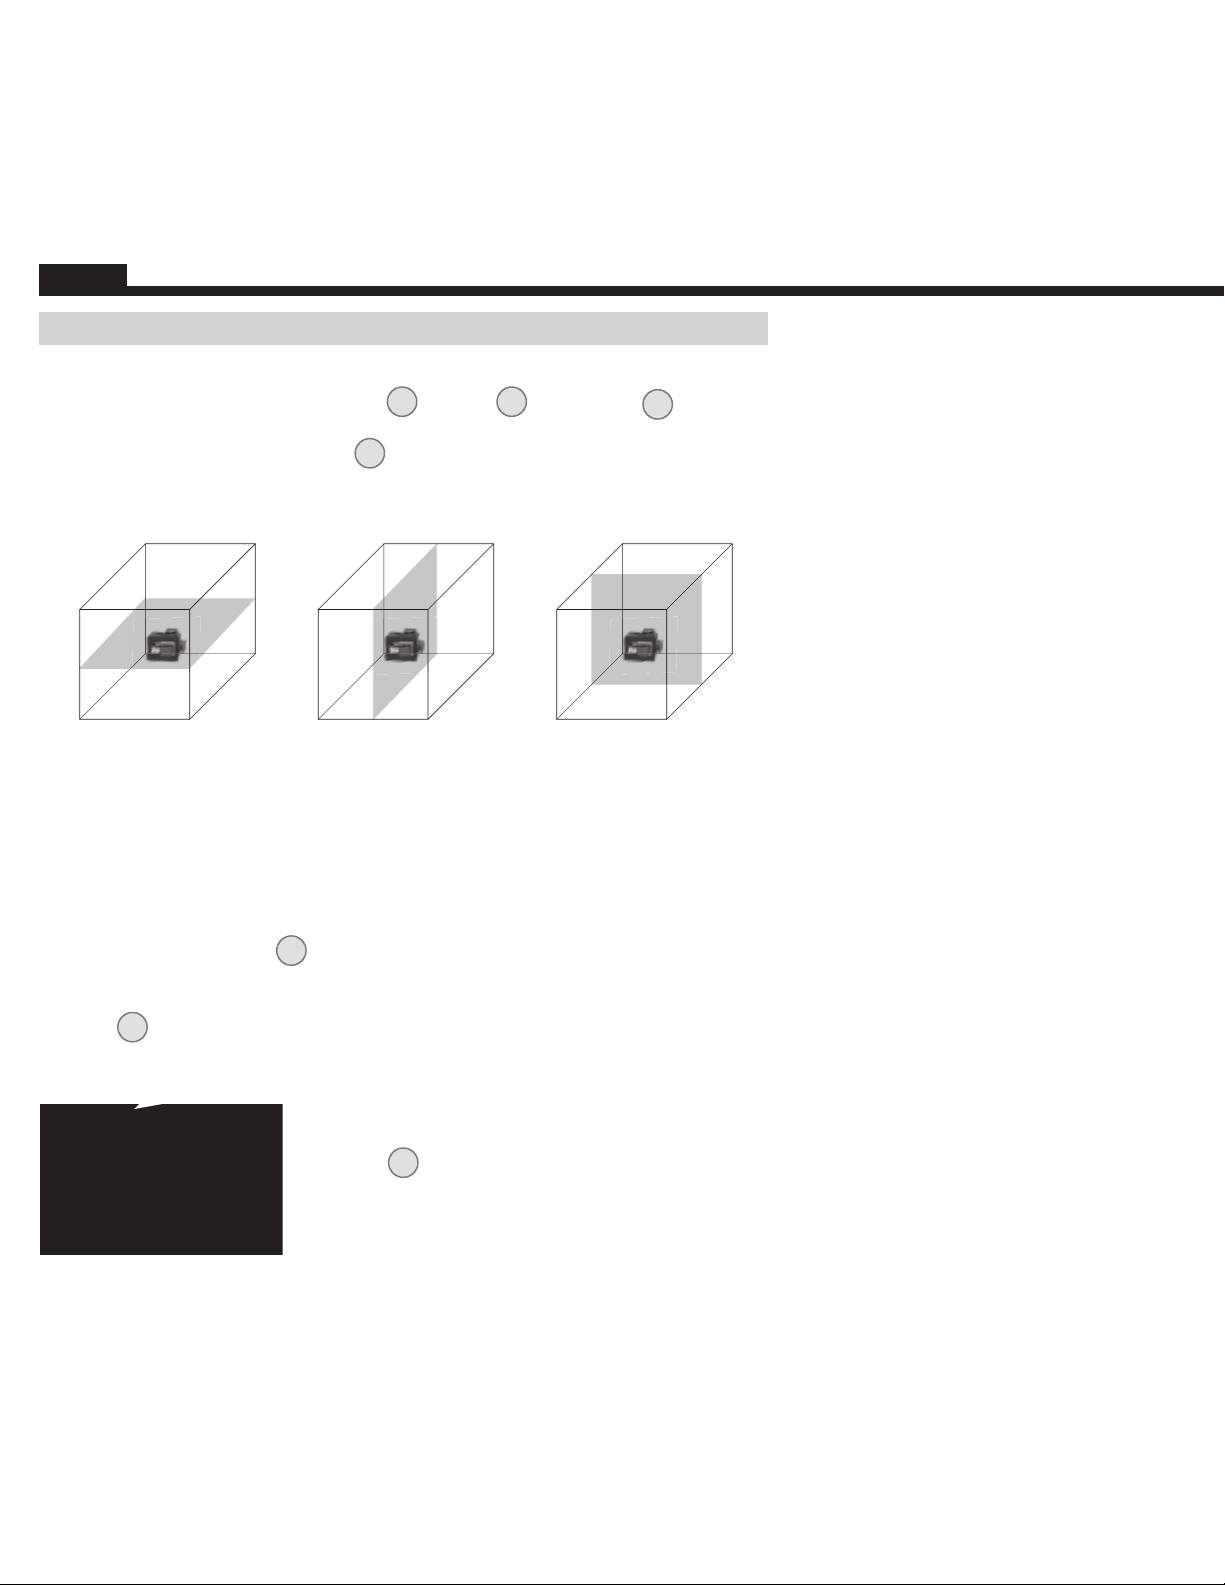
TURNING LASER BEAMS ON/OFF
Push the ON/OFF buttons for the X-Plane
turn ON and OFF their respective laser lines. These buttons are only active once the
Pendulum Lock/Unlock Slider Switch
Pendulum Slider Switch is moved from the Unlocked to the Locked position while the
laser beams are active, they will be turned OFF. The different laser lines can be operated
independently or simultaneously.
X-Plane Laser Line
1
, Y-Plane 2, and Z-Plane 3 lines to
has been set to the Unlocked position. If the
10
Z-Plane Laser LineY-Plane Laser Line
NOTE: The plumb spot can be found by locating the top and bottom laser line
intersections while projecting both Y-Plane and Z-Plane Laser lines simultaneously. The
bottom laser line intersection can be used to locate a specific point on a floor layout
while the top laser line intersection projects that same point to a ceiling.
PENDULUM SLIDER SWITCH & SELF-LEVELING
The laser assemblies are mounted on a pendulum so that the instrument can self-level.
The Pendulum Slider Switch
self-level. If the instrument is tilted by >4° from the horizontal plane, the pendulum will
not be capable of self-leveling; the active laser beams will flash and the Excessive Tilt
Indicator
The instrument must be repositioned on a more level geometry for the self-leveling
pendulum to function appropriately.
will blink to indicate that the instrument is not level and cannot self-level.
4
must be in the unlocked position for the instrument to
10
NOTE: If the instrument indicates that it is not level
(via flashing beams and/or a blinking Excessive Tilt
indicator
),
then it should not be used for laying
4
out level or plumb lines.
NOTE: Following use, the active laser beams must be
turned OFF and the Pendulum Slider Switch must be
Instrument Tilted Excessively
6 7
Find Quality Products Online at: [email protected]
placed in the Locked position prior to storage.
www.GlobalTestSupply.com
Page 7
OPERATING INSTRUCTIONS
MAGNETIC MOUNTING BRACKET
14
A magnetic mounting bracket is included with the product. The instrument can be
mounted on the bracket via its 1/4" threaded screw
15
. The bracket may be magnetically
attached to any ferrous structure such as steel studs, ducts, structural beams, and steel
doors. The bracket also feature a keyhole for mounting the instrument using a screw or
nail to non-ferrous structures. Once mounted to a structure via the mounting bracket, the
instrument can be rotated on the bracket through 360° to direct the laser beams.
RECHARGING BATTERY
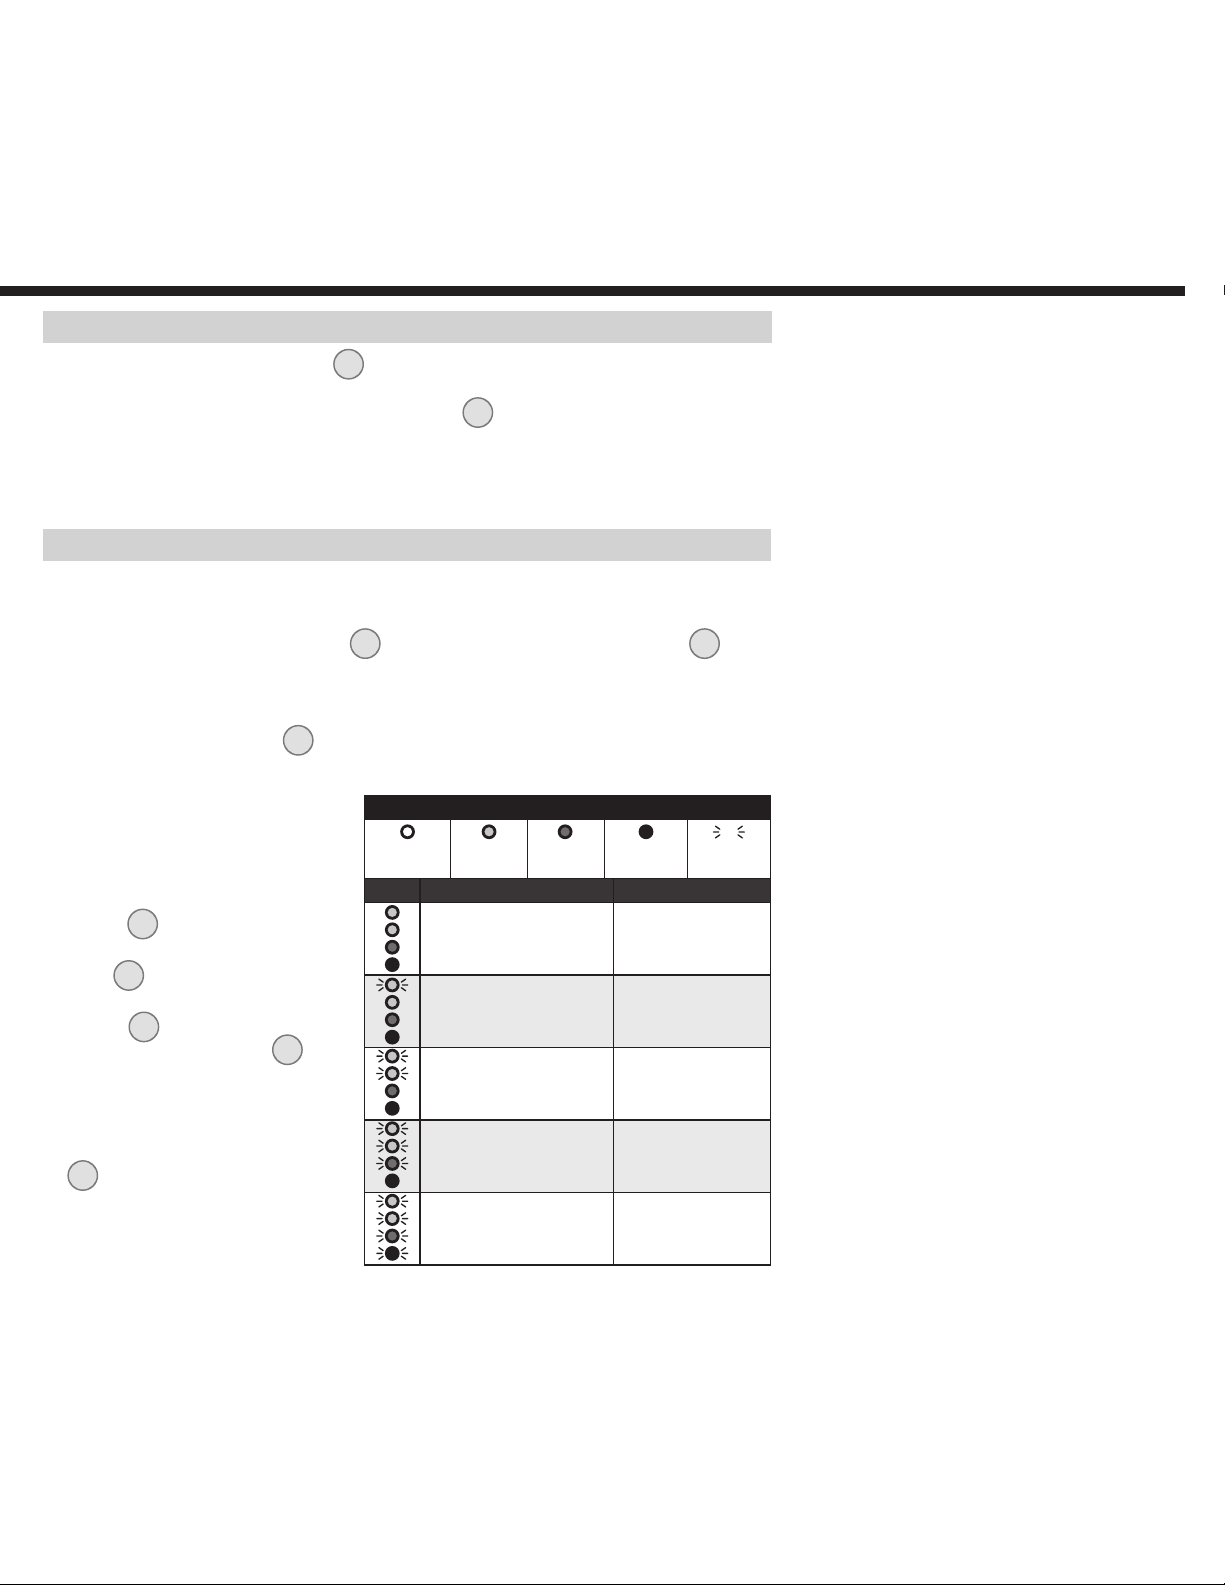
When the Red LED on the Battery Level Indicator blinks, the battery needs to be recharged:
Charging Battery via 93PLL USB-C Port:
1. Connect supplied charging cable’s 13 USB-C connection to the USB-C port 6 of
the 93PLL.
2. Connect the charging cable’s USB-A port to a charging source (5V DC, Min 2.0A, not
included).
3. The Battery Level Indicator
will illuminate to indicate charging status (TABLE 1).
5
4. A full charge can take up to 8.5 hours, depending on the charger’s output. Charge
completely before using.
Charging Battery via Battery Pack
TABLE 1
USB-C Port:
1. Ensure 93PLL is turned off by
locking the Power/Pendulum
Switch
10
.
2. Loosen screw from the Battery
Door
and remove battery.
12
3. Connect the supplied charging
cable’s
battery's Charge-In Port
USB-C connection to
13
16
.
4. Connect the charging cable’s
USB-A port to a charging source
(5.0V, min. 2.0A, not included).
5. Battery Charge Indicator LED
will blink red while charging,
17
and turn solid green when fully
charged. When fully charged,
disconnect cable from battery
and reinstall battery in 93PLL.
Not
Illuminated
LED Status % Charged
Green Yellow Red Blinking
Solid green
Solid green
Solid yellow
Solid red
Blinking green
Solid green
Solid yellow
Solid red
Blinking green
Blinking green
Solid yellow
Solid red
Blinking green
Blinking green
Blinking yellow
Solid red
Blinking green
Blinking green
Blinking yellow
Blinking red
100% charged
75% to 99% charged
50% to 74% charged
25% to 49% charged
0% to 24% charged
6. Close the battery door and secure with screw. Do not over-tighten.
7
Find Quality Products Online at: [email protected]
www.GlobalTestSupply.com
Page 8

ENGLISH
MAINTENANCE
•
Regularly inspect ports and charging cable for and debris, dirt, damage, and
corrosion.
•
DO NOT attempt to repair device or cable; replace as needed.
CLEANING
Be sure instrument is turned off and disconnected from all power sources. Wipe
with a clean, dry lint-free cloth.
Do not use abrasive cleaners or solvents.
RECHARGING
Recharge as needed. There are no pre-designated intervals at which to recharge as
long as you are using the unit regularly. Avoid discharging completely on a regular
basis, as this can impact overall life.
STORAGE
If storing for more than one month, charge completely before storage, and
recharge approximately every three months to avoid full discharge. Store in
cool temperatures, mild humidity, and away from direct sunlight (See GENERAL
SPECIFICATIONS section).
Leaving in a vehicle or other confined spaces in extreme hot temperatures can lead
to decrease in service life, overheating, or fire. Extreme cold temperatures below the
specified storage range can also harm performance and service life. Keep away from
corrosive chemicals and gases.
After taking out of storage, inspect visually to make sure device and all accessories
look satisfactory. Allow unit to return to ambient conditions before recharging.
WARRANTY
www.kleintools.com/warranty
DISPOSAL / RECYCLE
Do not place equipment and its accessories in the trash. Items must be properly
disposed of in accordance with local regulations. Please see www.epa.gov or
www.erecycle.org for additional information.
8
Find Quality Products Online at: [email protected]
www.GlobalTestSupply.com
 Loading...