

Page 1

Quick Start Guide
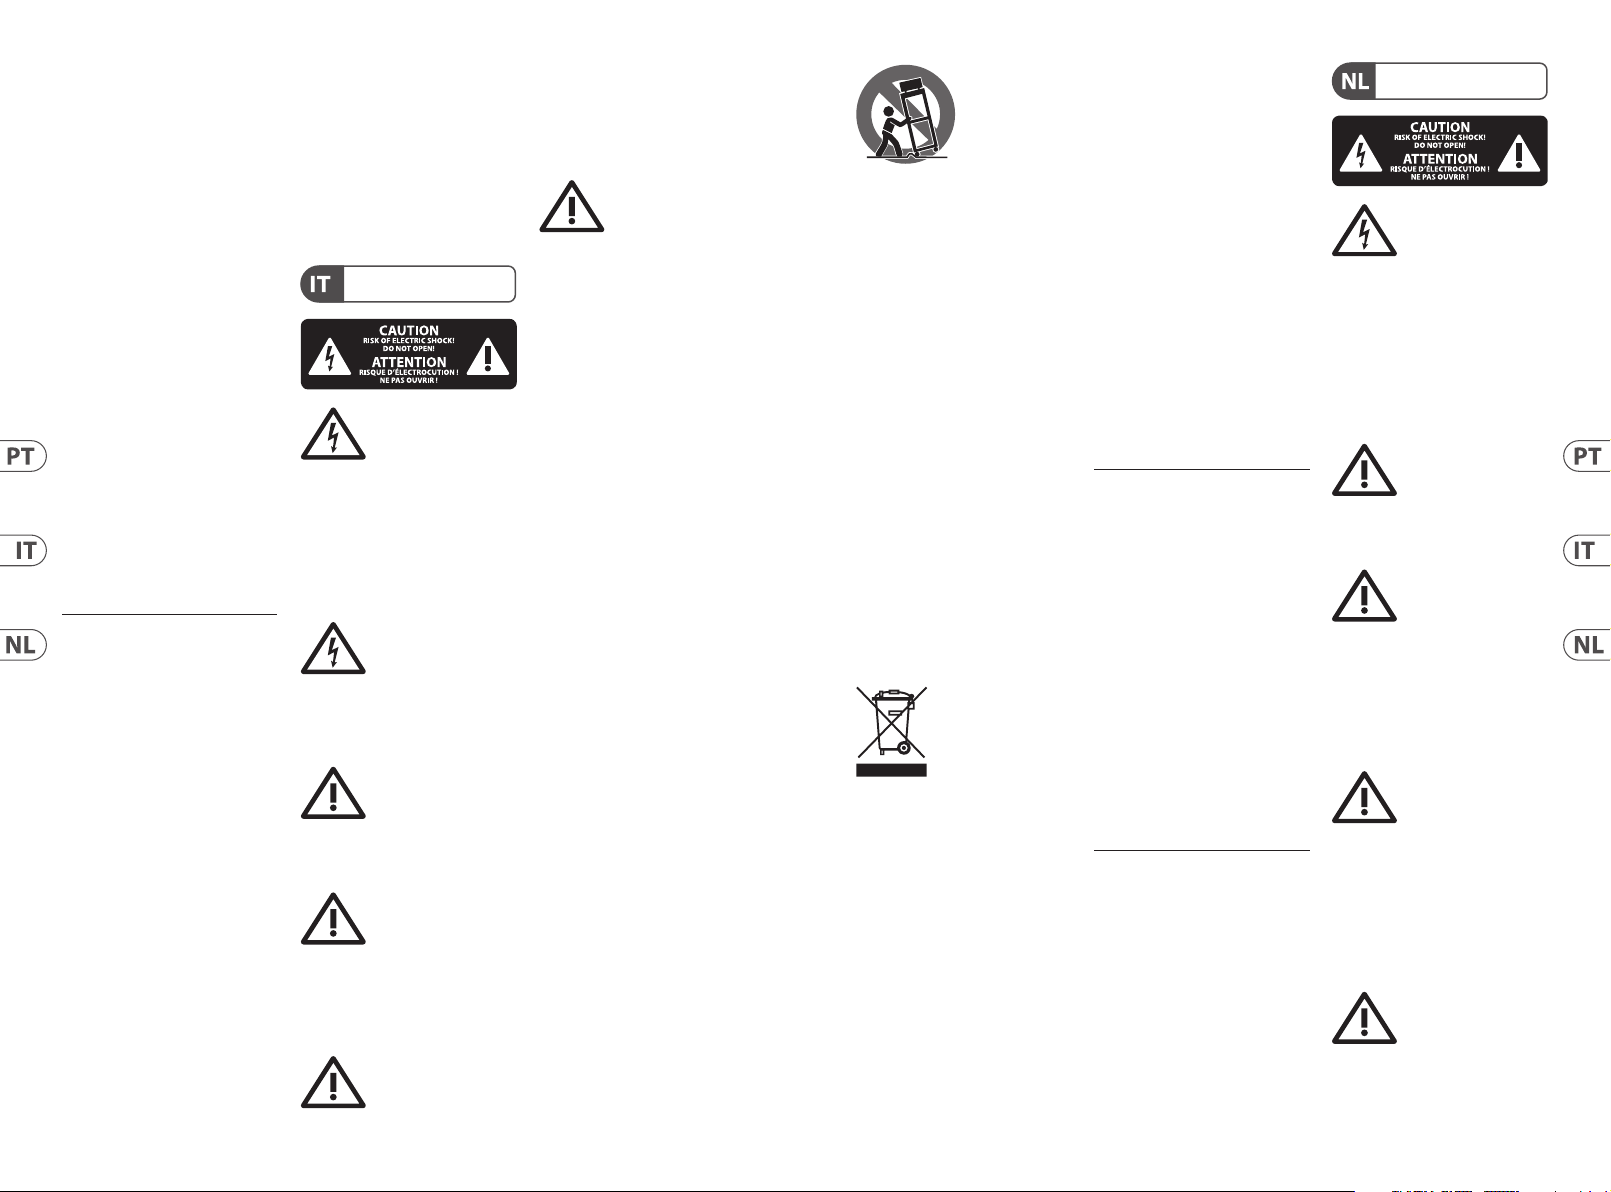
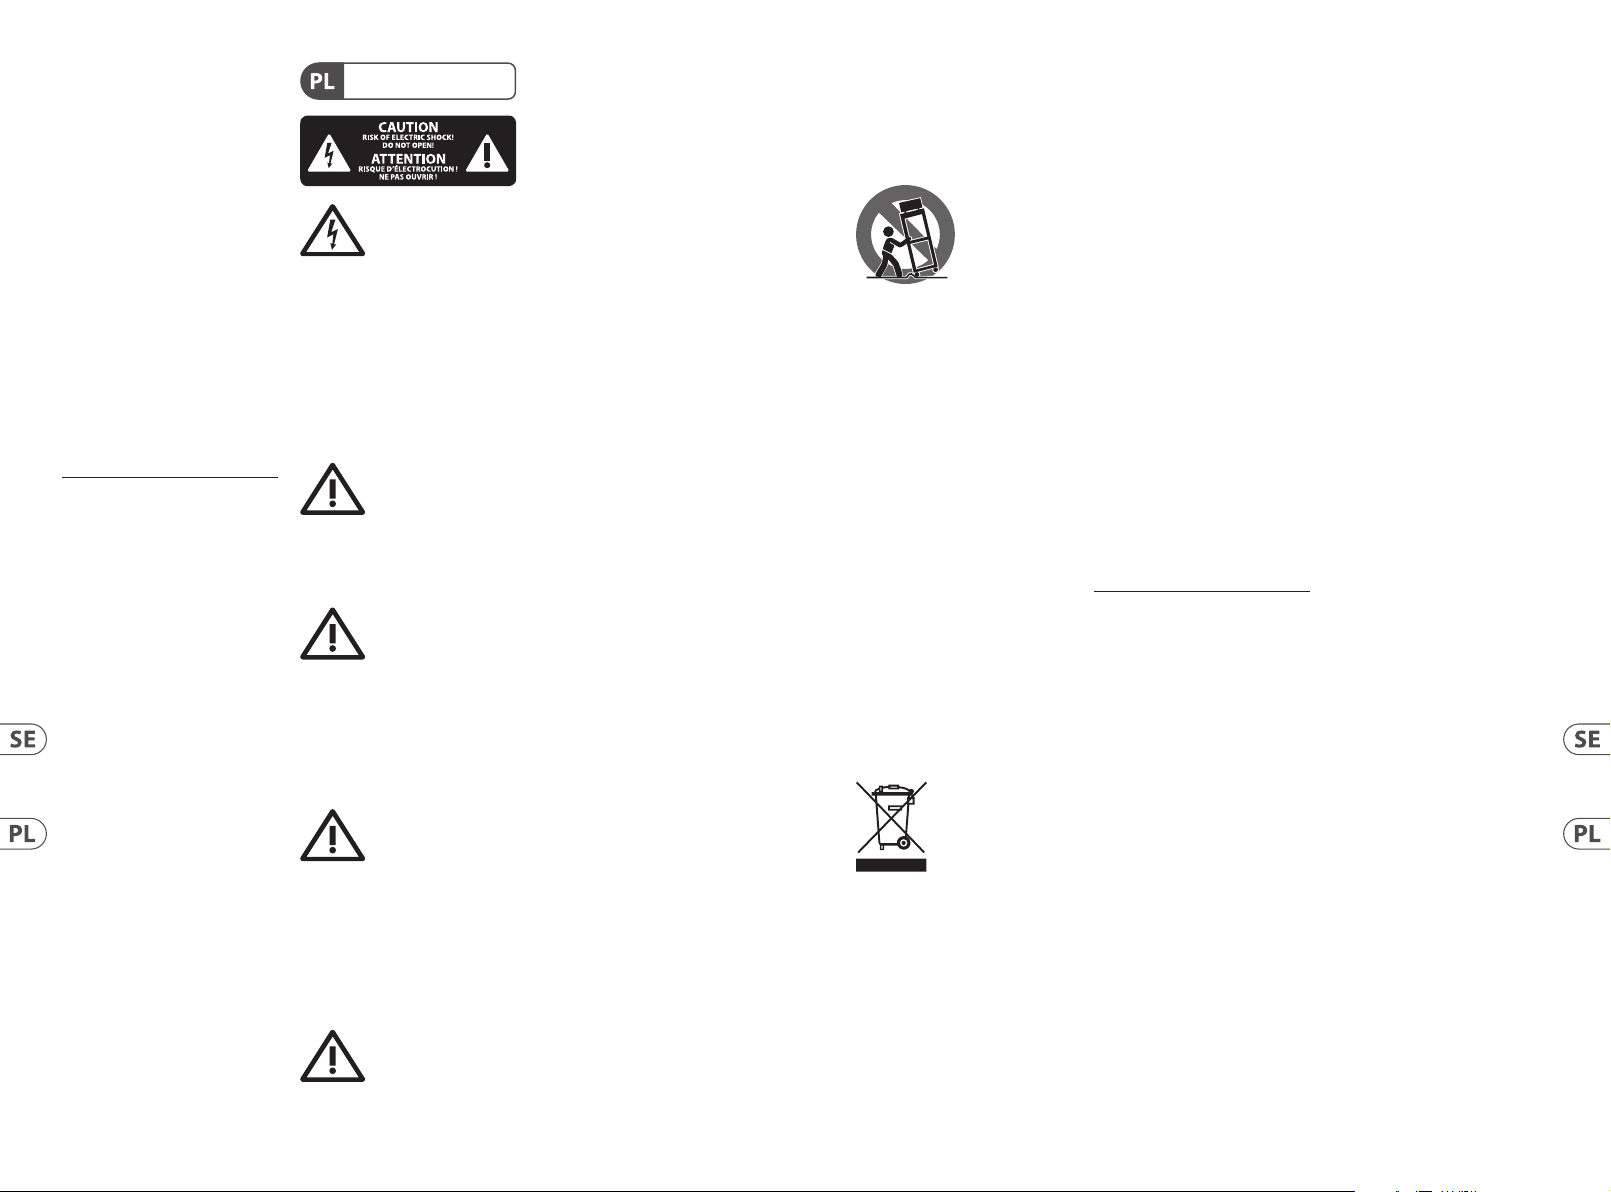
DN32-DANTE
Audinate Dante Expansion Module with up to 32 Bidirectional Channels
V 1.0
Page 2

2 3Quick Start GuideDN32-DANTE
1. Read these instructions.
15. The apparat us shall be connected
your coopera tion in the correct di sposal
more information about where you can
are subjec t to change without notice.
Atención
contacto s: dos polos y la puesta a
contacto, respectivamente, son los que
mesa especicados
tormentas o s i no va a utilizarlo durante
Important Safe ty
Instructions
Terminals marked with
this symbol carry
electr ical current of
sucient magnitude to constitute risk
of elect ric shock. Use only high- quality
professio nal speaker cables with ¼" TS
or twist-locking plugs pre -installed.
Allother installation or modication
should be performed only by
qualiedpersonnel.
This symbo l, wherever it
appears, ale rts you to the
presence of uninsulated
dangerous voltage inside the enclosure
- voltage that may b e sucient to
constitu te a risk ofshock.
This symbo l, wherever it
appears, ale rts you to
important operating and
maintenance instructions in the
accompanying literature. Please read
themanual.
Caution
To reduce the risk of
electr ic shock, do not
remove the top cover (or the r ear
section). No user serviceable parts inside.
Refer servicing to qualiedpersonnel.
Caution
To reduce the risk of
re or elec tric shock, do
not expos e this appliance to rain and
moisture. Th eapparatus shall not
be expose d to dripping or splashing
liquids and no ob jects lled with
liquids, such as v ases, shall be placed
on the apparatus.
Caution
These service instruc tions
are for use by qua lied
service p ersonnel only. Toreduce
the risk of ele ctric shock do not
perform any servicing other than that
contained in the operation instructions.
Repairshave to b e performed by
qualied servicepersonnel.
2. Keep these instructions.
3. Heed all warnings.
4. Follow all instruc tions.
5. Do not use this apparatus
near water.
6. Clean only w ith dry cloth.
7. Do not bloc k any ventilation
openings. Install in accordance with the
manufacturer ’s instructions.
8. Do not ins tall near any heat
sources such a s radiators, heat regis ters,
stoves, or othe r apparatus (including
ampliers) that produce heat.
9. Do not defeat the sa fety purpose
of the polari zed or grounding-typ e
plug. A polari zed plug has two blades
with one wider than the other.
A grounding -type plug has two blad es
and a third grounding prong. The wide
blade or the third prong are provided
for your saf ety. Ifthe provided plug
does not t into y our outlet, consult
an elect rician for replacement of th e
obsolete outlet.
10. Protect the power cord f rom being
walked on or pinc hed particularly
at plugs, convenience receptacles,
and the point wh ere they exit from
the apparatus.
11. Use only attachments/accessories
specie d by themanufacturer.
12. Use only wi th
the cart , stand,
tripod, bracket, or
table spec ied by
the manufacturer,
orsold with
the apparat us. When a cart is used,
use caution when moving the cart/
apparatus combination to avoid injury
from tip -over.
13. Unplug this apparatus during
lightning storms or when unused for
long periods of time.
14. Refer all servicing to qualied
service personnel. Servicing is require d
when the appa ratus has been damaged
in any way, such as power suppl y cord
or plug is damage d, liquid has been
spilled or obje cts have fallen into the
apparatus, t he apparatus has been
expose d to rain or moisture, does not
operate nor mally, or has beendr opped.
to a MAINS socket ou tlet with a
protective earthing connection.
16. Wh ere the MAINS plug or an
appliance coup ler is used as the
disconnect device, the disconnect
device shall remain readily operable.
17. Corr ect disposal of
this product: This
symbol indicates that
this product must not
be disposed of with
household waste, according to the
WEEE Direc tive (2012/19/EU) and your
national law. This prod uct should be
taken to a collec tion center licensed for
the recyc ling of waste electr ical and
electronic equipment (EEE).
The mishandlin g of this type of waste
could have a possib le negative impact
on the environment and human health
due to potentially hazardous
substances that are generally
associate d with EEE. At the same time,
of this produc t will contribute to the
ecient use of natural resources. For
take your waste equipment for
recycli ng, please contact your lo cal city
oce, or your household waste
collection se rvice.
18. Do n ot install in a conned space,
such as a book c ase or similar unit.
19. Do not place naked ame
sources, suc h as lighted candles,
on the apparatus.
20. Please keep the environmental
aspect s of battery dispo sal in mind.
Batteri es must be disposed- of at a
battery collection point.
21. This apparatus may be used i n
tropical an d moderate climates up
to 45°C.
LEGAL DISCLAIMER
Music Tribe accepts n o liability for
any loss which may b e suered by
any person who relies either wholly
or in part u pon any description,
photograph, or statement contained
herein. Technical specications,
appearances and other information
All trademar ks are the propert y
of their respective owners. Midas,
Klark Teknik, Lab G ruppen, Lake,
Tannoy, Turbosound, TC Electronic,
TC Helicon, Behringer, Bugera,
Oberheim, Auratone, Aston
Microphones and Coolaudio are
trademarks or registered trad emarks
of Music Tribe Global B rands Ltd.
© Music Tribe Global B rands Ltd.
2021 All rights rese rved.
LIMITED WARRANTY
For the applic able warranty terms a nd
conditions and additional information
regarding Music Tribe’s Limited
Warranty, please see complete details
online at musictribe.com/warranty.
Instrucciones de
seguridad
Las terminales marcadas
con este símb olo
transportan corr iente
eléctr ica de magnitud sucie nte como
para const ituir un riesgo de desc arga
eléctr ica. Utilicesolo cable s de altavoz
profesionales y de alta calidad con
conecto res TS de 6,3 mm o de bayoneta
prejados. Cualquier otra instalación o
modicación debe ser realizada
únicamente p or un técnicocualicado.
Este símbolo, siempre que
aparece, leadv ierte de la
presencia de voltaje
peligroso si n aislar dentro de la caja;
estevoltaj e puede ser suciente par a
constitu ir un riesgo dedescarga .
Este símbolo, siempre que
aparece, leadv ierte sobre
instrucciones operativas y
de mantenimiento que aparecen en la
documentación adjunta. Por favor,
leaelmanual.
Para reducir e l riesgo de
descarga e léctrica, no
quite la tapa (olapar te posterior).
Nohay piezas en e l interior del equipo
que puedan ser r eparadas por el
usuario. Sies ne cesario, póngase en
contacto con personal cuali cado.
Atención
Para reducir e l riesgo
de incendio o des carga
eléctr ica, no exponga este ap arato a la
lluvia, humeda d o alguna otra fuente
que pueda sal picar o derramar algún
líquido sobr e el aparato. Nocoloque
ningún tipo de recipiente para líquidos
sobre elapar ato.
Atención
Las instrucciones
de servicio deben
llevarlas a cabo exclusivamente
personal c ualicado. Paraevitar el
riesgo de una d escarga eléctr ica,
no realice reparaciones que no se
encuentren d escritas en el manual de
operaciones. Lasreparaciones deben
ser realizadas exclusivamente por
personalcualicado.
1. Lea las instrucciones.
2. Conserve e stas instruccion es.
3. Pres te atención a todas
las advertencias.
4. Siga todas las instrucciones.
5. No use e ste aparato cerca
del agua.
6. Limpie es te aparato con un
paño seco.
7. No bloquee las aberturas
de ventilación . Instale el equipo
de acuerdo con las instrucciones
del fabricante.
8. No instal e este equipo cerca de
fuentes de calor tales como radiadores,
acumuladore s de calor, estufas u otros
aparatos (incluyendo amplicadores)
que puedan producir calor.
9. No elimine o deshabilite nunca
la conexión a ti erra del aparato o del
cable de alimentación de corriente.
Unenchufe po larizado tiene dos polo s,
uno de los cuale s tiene un contacto
más ancho que el ot ro. Una clavija
con puest a a tierra dispone de tres
tierra. El con tacto ancho y el tercer
garantizan una mayor seguridad. Si el
enchufe suministrado con el equipo
no concuerda co n la toma de corriente,
consulte con un el ectricista par a
cambiar la toma d e corriente obsoleta.
10. Coloque el cable de suminis tro de
energía de manera que no pueda ser
pisado y que es té protegido de objetos
alados. As egúrese de que el cable de
suministro de energía esté protegido,
especialm ente en la zona de la clavija y
en el punto dond e sale del aparato.
11. Use únicamente los dispositivos
o accesorio s especicados por
el fabricante.
12. Use
únicamente la
carretilla,
plataforma,
trípode, soporte o
por el fabricante o suministrados junto
con el equipo. Alt ransportar el equi po,
tenga cuidado p ara evitar daños y
caídas al tropezar con algún obstác ulo.
13. Desenchufe el equipo durante
un periodo largo.
14. Confíe las reparaciones
únicamente a servicios técnicos
cualicados. La unidad requiere
mantenimiento siempre que haya
sufrido al gún daño, si el cable de
suministro de energía o el enchufe
presenta ran daños, sehubiera
derramado un líquido o hubieran caído
objetos dent ro del equipo, si el aparato
hubiera es tado expuesto a la hume dad
o la lluvia, si ha dejado d e funcionar de
manera norma l o si ha sufrido algún
golpe o caída.
15. Al conect ar la unidad a la toma de
corriente el éctrica asegúr ese de que
la conexión disponga de una unión
atierra.
16. Si e l enchufe o conector
de red sirve c omo único medio
de desconexión, éste debe ser
accesiblefácilmente.
Page 3

4 5Quick Start GuideDN32-DANTE
17. Cómo debe
son propiedad de sus respectivos
Attention
contact s plus une mise à la terre
17. Mise a u rebut
Lab Grupp en, Lake, Tannoy,
Global Brands Ltd. © Music Tribe Global
Pour connaître les termes et conditions
deshacers e de este
aparato: Es te símbolo
indica que es te aparato
no debe ser tratado
como basura or gánica, según lo
indicado en la D irectiva WEEE (2012/19/
EU) y a las normativa s aplicables en su
país. En lugar de el lo deberá llevarlo al
punto limpio más cercano para el
reciclaje de s us elementos eléctr icos/
electr ónicos (EEE). Al hacer esto estar á
ayudando a preve nir las posibles
consecuencias negativas para el medio
ambiente y la salu d que podrían ser
provocadas por una gestión inadecuada
de este tipo d e aparatos. Además,
el reciclaje d e materiales ayudará a
conservar los recur sos naturales. Para
más informa ción acerca del reciclaj e de
este aparat o, póngase en con tacto con
el Ayuntamiento d e su ciudad o con el
punto limpio local.
18. No instale es ta unidad en un
espacio muy r educido, tal como
encastrada en una librería o similar.
19. No coloque objetos con
llama, como una vela ence ndida,
sobre este aparato.
20. Tenga presente s todas las
advertenc ias relativas al reciclaj e
y correcta eliminación de las pilas.
Las pilas deben ser siempre eliminadas
en un punto limpio y n unca con el resto
de la basura org ánica.
21. Puede usar este aparato e n
lugares con cli mas tropicales y
moderados que soporten temperaturas
de hasta 45°C.
NEGACIÓN LEGAL
Music Tribe no admite ningún tipo
de responsabilidad por cualquier
daño o pérdida que pudiera sufrir
cualquier persona por conar total
o parcialmente en la descripciones,
fotografías o armaciones
contenidas en este documento.
Las especicaciones técnicas,
imágenes y otras informaciones
contenidas en este documento
están sujetas a modicac iones
sin previo avis o. Todas las marcas
comerciales que aparecen aquí
dueños. Midas, Klark Teknik, Lab
Gruppen, Lake, Tannoy, Turbosound,
TC Electron ic, TC Helicon, Behringer,
Bugera, Oberheim, Auratone, Aston
Microphones y Coolaudio son marcas
comerciales o marcas registradas
de Music Tribe Global B rands Ltd.
© Music Tribe Global B rands Ltd.
2021 Reservados todos los derechos.
GARANTÍA LIMITADA
Si quiere conocer los detalles y
condiciones aplicables de la garantía
así como información adicional sobre
la Garantía limi tada de Music Tribe,
consulte online toda la información en
la web musictribe.com/warranty.
Consignes de sécurité
Les points r epérés par ce
symbole portent une
tension électrique
susante po ur constituer un risque
d’électrocution. Utilisez uniquement
des câbles d’enceintes professionnels
de haute qualité ave c ches Jack mono
6,35 mm ou ches à verr ouillages déjà
installée s. Touteautre ins tallation ou
modication doit être eectuée
uniquement par un personnel qualié.
Ce symbole aver tit de la
présence d’une tension
dangereuse e t non isolée à
l’intérieu r de l’appareil - elle p eut
provoquer des chocs électriques.
Attention
Ce symbol signale les
consignes d’utilisation
et d’entre ! Tienimp ortantes dans
la document ation fournie. Lisez les
consignes de sécurité du manuel
d’utilisatio n del’appareil.
Pour éviter tout r isque
ne pas ouvri r le capot de l’appareil
de choc électrique,
ni démonter le panneau arrière.
L’intérieur de l’appareil ne possède
aucun élément réparable par
l’utilisateur. Lais sertoute réparation à
un professionnelqualié.
Attention
Pour réduire le s risques
de feu et de cho c
électrique, n’exposez pas cet appareil
à la pluie, à la moisissu re, auxgouttes
ou aux éclabo ussures. Ne posez pas
de récipient contenant un liquide sur
l’appareil (unvase par e xemple).
Attention
Ces consignes de
sécurité et d’entretien
sont destinées à un personnel
qualié. Pour évi ter tout risque de
choc électrique, n’eectuez aucune
réparation sur l’appareil qui ne soit
décrite p ar le manuel d’utilisation.
Les éventuelle s réparations doivent
être eectuées uniquement par un
technicienspécialisé.
1. Lisez ces consignes.
2. Conserve z ces consignes.
3. Respe ctez tous les aver tissements.
4. Respectez toutes les
consignes d’utilisation.
5. N’utilisez jamais l’appareil à
proximité d’un liquide.
6. Nettoy ez l’appareil avec u n
chion sec.
7. Veillez à ne pas empêcher la
bonne ventilat ion de l’appareil via ses
ouïes de ventila tion. Respectezles
consignes du fabricant concernant
l’install ation del’appareil.
8. Ne placez pas l ’appareil à
proximité d ’une source de chale ur telle
qu’un chauage, une cuisinière ou tout
appareil dégageant de la chaleur (y
compris un amp li depuissance).
9. Ne supprimez jamai s la sécurité
des prise s bipolaires ou des prise s
terre. Les pri ses bipolaires possè dent
deux contacts de largeur diérente.
Leplus large es t le contact de sécur ité.
Les prises te rre possèdent deux
servant d e sécurité. Si la prise du blo c
d’alimentation o u du cordon d’alimentation f ourni ne correspond pa s à
celles de votre i nstallation élect rique,
faites app el à un électricien po ur
eect uer le changement de prise.
10. Installez le cordon d’alimentation
de telle façon qu e personne ne puisse
marcher dess us et qu’il soit protégé
d’arêtes coupantes. Assurez-vous
que le cordon d’alimentation est
sufsamment protégé, notamment
au niveau de sa pr ise électrique et
de l’endroit où il es t relié à l’appareil;
cela est égale ment valable pour une
éventuelle rallonge électrique.
11. Utilisez exclusivement
des accessoi res et des appareils
supplémentaires recommandés par
lefabricant.
12. Utilisez
exclusivement des
chariots, des
diables,
desprésentoirs,
despieds et d es
surface s de travail recommandés p ar le
fabrica nt ou livrés avec le produit.
Déplacezprécautionneusement tout
chariot ou dia ble chargé pour éviter
d’éventuelles bles sures en cas dechute.
13. Débranchez l’appareil de la
tension sec teur en cas d’orage ou si
l’appareil reste inutilisé pendant une
longue période de temps.
14. Les travaux d’entretien de
l’appareil doiven t être eectués
uniquement par du personnel qualié.
Aucunentret ien n’est nécess aire sauf si
l’appareil est endommagé de quelque
façon que ce soi t (dommagessur le
cordon d’aliment ation ou la prise par
exemple), siun liquide ou un objet
a pénétré à l ’intérieur du châssis, si
l’appareil a été ex posé à la pluie ou
à l’humidité, s’il ne fonctionne pas
correc tement ou à la suite d’une chute.
15. L’appareil doit ê tre connecté à une
prise secteur dotée d’une protection
par mise à la terr e.
16. L a prise électriq ue ou la prise
IEC de tout appar eil dénué de bouton
marche/arrêt doit rester accessible
enpermanence.
appropriée de ce
produit: Ce symbole
indique qu’en accord
avec la direc tive DEEE
(2012/19/EU) et les lois en vigu eur dans
votre pays, ce pro duit ne doit pas être
jeté avec les déc hets ménagers.
Ce produit doi t être déposé dans un
point de collec te agréé pour le
recyclage des déchets d’équipements
électriques et élect roniques (EEE).
Une mauvaise man ipulation de ce type
de déchets pourrait avoir un impact
négatif sur l’environnement et la santé
à cause des su bstances potentiellem ent
dangereuses généralement associées à
ces équipements. En même temps,
votre coopér ation dans la mise au rebut
de ce produit contribuera à l’utilisation
ecace des ressources naturelles.
Pour plus d’informations sur l’endroit
où vous pouvez d époser vos déchets
d’équipements pour le recyclage,
veuillez conta cter votre mairie ou votr e
centre loca l de collecte des déche ts.
18. N’ins tallez pas l’appareil dans un
espace conné tel qu’une bibliothèque
ou meuble similaire.
19. Ne placez jamais d’objets
enammés, tels que des bougies
allumées, sur l’appareil.
20. Gardez à l ’esprit l’imp act
environnemental lorsque vous mettez
des piles au reb us. Les piles usées
doivent être d éposées dans un point de
collecte adapté.
21. Cet appareil peut être utilisé sous
un climat trop ical ou modéré avec des
températures de 45°C maximum.
DÉNI LÉGAL
Music Tribe ne peut êt re tenu pour
responsable pour toute perte pouvant
être subie pa r toute personne se
ant en part ie ou en totalité à
toute description, photographie
ou armatio n contenue dans ce
document. Les caractéristiques,
l’apparence et d’autres informations
peuvent fair e l’objet de modi cations
sans notic ation. Toutes les marques
appartiennent à leurs propriétaires
respec tifs. Midas, Klark Teknik,
Turbosound, TC Elec tronic, TC Helicon,
Behringer, Bugera, Oberheim,
Auratone, Aston Microphones et
Coolaudio sont d es marques ou
marques dép osées de Music Tribe
Brands Ltd. 2021 Tous droits ré servés.
GARANTIE LIMITÉE
de garantie applicables, ainsi que
les informations supplémentaires et
détaillée s sur la Garantie Limitée de
Music Tribe, consultez l e site Internet
musictribe.com/warranty.
Wichtige
Sicherheitshinweise
Vorsicht
Die mit dem Symbo l
markierten Anschlüsse
führen so vi el Spannung, dassdie
Gefahr eines Stromschlags besteht.
Verwenden Sie nur hochwertige,
professionelle Lautsprecherkabel
mit vorinstallierten 6,35 mm
MONO-Klinkensteckern oder
Lautsprecherstec ker mit
Drehverriegelung. Alle anderen
Installationen oder Modikationen
sollten nur von qualiziertem
Fachpersonal ausgeführt werden.
Achtung
Um eine Gefährdung
durch Stromschlag
auszuschließen, darf die
Geräteabdeckung bzw.
Geräterückwandnicht abgenommen
werden. ImInnern des Geräts benden
sich keine vom Benutzer reparierbaren
Teile. Reparaturarbeiten dürfen
nur von qualiziertem Personal
ausgeführtwerden.
Page 4

6 7Quick Start GuideDN32-DANTE
Coolaudio sind Warenzeichen oder
eléctr icos o aparelho não deve ser
que o cabo elé ctrico está prote gido.
dispositivo para evitar danos provocados
terem caído pa ra dentro do dispositivo;
Direct iva REEE (2012/19/EU) e a legislação
para um centr o de recolha licenciado para
Achtung
entsprechend ausgetauscht wird.
zusammen mit Ihren Haushaltsabf ällen
Stellen Sie keine Gegenstände mit
Um eine Gefährdung
Stromschlag auszuschließen, darf
durch Feuer bzw.
dieses Gerät weder Regen oder
Feuchtigkeit ausgesetzt werden
noch sollten Spritzwasser oder
tropfende Flüssigkeiten in das Gerät
gelangen können. Stellen Sie keine
mit Flüssigkeit gefüllten Gegenstände,
wie z. B. Vasen, aufdasG erät.
Achtung
Die Service-Hinweise sind
nur durch qualiziertes
Personal zu b efolgen. Umeine
Gefährdung durch Stromschlag zu
vermeiden, führen Sie bitte keinerlei
Reparatur en an dem Gerät durch,
dienicht in der Bedienungsanleitung
beschrieben sind. Reparaturen
sind nur von qualiziertem
Fachpersonaldurchzuführen.
1. Lesen Sie diese Hinweise.
2. Bewahren Sie diese Hinweise auf.
3. Beachten Sie alle Warnhinweise.
4. Befolgen Sie alle
Bedienungshinweise.
5. Bet reiben Sie das Gerät nicht in
der Nähe vonWasser.
6. Reinigen Sie das Gerät mit einem
trockenen Tuch.
7. Blockieren Sie nicht die
Belüftungsschlitze. Beachten
Sie beim Einbau de s Gerätes die
Herstellerhinweise.
8. Stellen Sie das Ger ät nicht in der
Nähe von Wärmeq uellen auf. Solche
Wärmequellen sind z. B. Heizkörper,
Herde oder andere Wärme erzeugende
Geräte (auch Verstärker).
9. Entfernen Sie in keinem Fall
die Sicherheitsvorrichtung von
Zweipol- oder geerdeten Steckern. Ein
Zweipolstecker hat zwei unterschiedlich
breite Steckkontak te. Ein geerdeter
Stecker hat zwei Steckkontakte
und einen dritten Erdungskontakt.
Derbreitere Ste ckkontakt oder der
zusätzliche Erdungskontakt dient
Ihrer Sicherheit. Falls das mitgelieferte
Steckerformat nicht zu Ihrer Steckdose
passt, wend en Sie sich bitte an
einen Elektriker, damit die Steckdose
10. Verlegen Sie das N etzkabel so,
dass es vor Tritte n und scharfen Kanten
geschützt ist und nicht beschädigt
werden kann. Ach ten Sie bitte
insbesondere im Bereich der Stecker,
Verlängerungskabel und an der Stelle,
an der das Net zkabel das Gerät verläss t,
aufausreichendenSchut z.
11. Das Gerät muss je derzeit mit
intaktem Schutzlei ter an das Stromnetz
angeschlossen sein.
12. Sollte der Hauptnet zstecker
oder eine Gerätesteckdose die
Funktionseinheit zum Abschalten sein,
muss diese immer zugänglich sein.
13. Verwenden Sie nur Zusatzgeräte/
Zubehörteile, dielaut Hersteller
geeignet sind.
14. Verwenden
Sie nur Wagen,
Standvorrichtungen, Stative,
Halter oder Tische,
die vom Hersteller
benannt oder im Lieferumfang des
Geräts enthalten sind. Falls Sie einen
Wagen benutzen, seien Sie vorsichtig
beim Bewegen der
Wagen- Gerätkombination,
umVerletzungen durch Stolpern
zuvermeiden.
15. Ziehen Sie den Netzstecker bei
Gewitter oder wenn Sie das Gerät
längere Zeit nicht benutzen.
16. L assen Sie alle Wartungsarbeiten
nur von qualiziertem ServicePersonal ausführen. EineWartung
ist notwendig, wenn das Gerät in
irgendeiner Weise beschädigt wurde
(z. B. Beschädigung des Netzkabels
oder Steckers), Gegenstände oder
Flüssigkeit in das Geräteinnere gelangt
sind, das Gerät Regen oder Feuchtigkeit
ausgesetzt wurde, das Gerät nicht
ordnungsgemäß funktioniert oder auf
den Boden gefallen ist.
17. Korrekte
Entsorgung dieses
Produkts: Dieses Symbol
weist darauf h in, das
Produkt entsprechend
der WEEE Direk tive (2012/19/EU) und
der jeweiligen nationalen Gesetze nicht
zu entsorg en. DiesesProdukt s ollte bei
einer autorisierten Sammelstelle für
Recycling elektrischer und
elektronischer Geräte (EEE) abgegeben
werden. Wegen bedenklicher
Substanzen, diegenerell mit
elektrischen und elektronischen
Geräten in Verbindung stehen, könnte
eine unsachgemäße Behandlung dieser
Abfallart eine negative Auswirkung auf
Umwelt und Gesundheit haben.
Gleichzeitig gewährleistet Ihr Beitr ag
zur richtigen Entsorgung dieses
Produkt s die eektive Nut zung
natürliche r Ressourcen. Fürweitere
Informationen zur Entsorgung Ihrer
Geräte bei einer Recycling-Stelle
nehmen Sie bitte Kontakt zum
zuständigen städtischen Büro,
Entsorgungsamt oder zu Ihrem
Haushaltsabfallentsorgerauf.
18. Inst allieren Sie das Gerät nicht
in einer beengten Umgebung, zum
Beispiel Bücherregal oder ähnliches.
19.
oenen Flammen, etwa brennende
Kerzen, auf das Ge rät.
20. Beachten Sie bei der Entsorgung
von Batter ien den UmweltschutzAspekt. Batterien müssen bei einer
Batterie -Sammelstelle entso rgt
werden.
21. Dieses Gerät ist in tropischen
und gemäßigten Klimazonen bis
45° C einsetzbar.
HAFTUNGSAUSSCHLUSS
Music Tribe übernimmt keine Haftung
für Verluste, die Personen entstanden
sind, die sich gan z oder teilweise auf
hier enthaltene Beschreibungen,
Fotos oder Aussagen verlassen haben.
Technische Daten, Erscheinungsbild
und andere Informationen können
ohne vorherige Ankündigung
geändert werden. Alle Warenzeichen
sind Eigentum der jeweiligen
Inhaber. Midas, Klark Teknik, Lab
Gruppen, L ake, Tannoy, Turbosound,
TC Electron ic, TC Helicon,
Behringer, Bugera
Auratone, Aston Microphones
, Oberheim,
und
eingetragene Warenzeichen der
Music Tribe Global Brands Ltd.
© Music Tribe Global B rands Ltd.
2021 Alle Rechte vorbehalten.
BESCHRÄNKTE GARANTIE
Die geltenden Garantiebedingungen
und zusätzliche Informationen
bezüglich der von Music Tribe
gewährten beschränkten
Garantie nden Sie online unter
musictribe.com/warranty.
Instruções de
Segurança Importantes
Aviso!
Terminais marcados
com o símbolo c arregam
corrente elétrica de magnitude
suciente pa ra constituir um risco d e
choque elétrico. Use apenas cabos
de alto-falantes de alta qualidade
com plugues TS de ¼" ou plugues
com trava de torção pré-instalados.
Todas as outras ins talações e
modicaçõ es devem ser efetuadas p or
pessoasqualicadas.
Este símbo lo, onde quer
que o encontre, ale rta-o
para a leitur a das
instruções de manuseamento que
acompanham o equipamento. Por favor
leia o manual deinstruções.
Atenção
De forma a dimi nuir
o risco de choq ue
eléctr ico, nãoremover a cobertur a
(ouasecção de trá s). Não existem peç as
substitu íveis por parte do utili zador no
seu interior. Para es se efeito recorrer a
um técnicoqualicado.
Atenção
Para reduzir o r isco de
incêndios ou choques
exposto à c huva nem à humidade.
Alémdisso, não deve s er sujeito a
salpicos, nem d evem ser colocados em
cima do aparel ho objectos contendo
líquidos, taiscomojarras.
Atenção
Estas ins truções de
operação devem ser
utilizada s, emexclusivo, por técnicos
de assistência qualicados. Para evitar
choques elé ctricos não proce da a
reparações ou intervenções, que
não as indicad as nas instruções
de operaçã o, salvo se poss uir as
quali-cações necess árias. Para evitar
choques elé ctricos não proce da a
reparações ou intervenções, que
não as indicad as nas instruções de
operação. S ó o deverá fazer se possuir
as qualicaçõesnecessárias.
1. Leia estas in struções.
2. Guarde estas instruções.
3. Pres te atenção a todos os avisos.
4. Siga todas as in struções.
5. Não utilize este dispositivo perto
de água.
6. Limpe ape nas com um pano seco.
7. Não obst rua as entradas de
ventilação. Ins tale de acordo com as
instruções do fabricante.
8. Não instale perto de quaisquer
fontes de cal or tais como radiadores,
bocas de ar qu ente, fogões de sala
ou outros aparelhos (incluindo
amplicadores) que produzam calor.
9. Não anule o object ivo de
seguranç a das chas polarizadas ou
do tipo de ligaç ão à terra. Uma cha
polariza da dispõe de duas palhetas
sendo uma mais lar ga do que a outra.
Uma cha do tipo li gação à terra dispõe
de duas palhet as e um terceiro dente
de ligação à ter ra. A palheta larga ou
o terceiro dente são fornecidos para
sua seguranç a. Se a cha fornecida
não encaixar na sua tomada, consulte
um elect ricista para a subst ituição da
tomada obsoleta.
10. Proteja o cabo de alimentaç ão de
pisadelas ou apertos, especialmente
nas chas, ex tensões, e no local de
saída da unidade. Certique-se de
Verique particularmente nas chas,
nos receptá culos e no ponto em que o
cabo sai doap arelho.
11. O aparelho tem de es tar sempre
conect ado à rede eléctric a com o
condutor de pr otecção intacto.
12. Se utiliz ar uma cha de
rede princ ipal ou uma tomada de
aparelhos para desligar a unidade
de funciona mento, esta deve estar
sempre acessível.
13. Utilize apenas ligações/acessórios
especic ados pelofabrican te.
14. Utilize apenas
com o carrin ho,
estrutura, tripé,
suporte, ou m esa
especicados pelo
fabricante ou
vendidos com o dis positivo.
Quandoutili zar um carrinho, tenha
cuidado ao mover o conjunto carrinho/
pela terpidação.
15. Desligue este dispositivo durante
as trovoadas ou q uando não for
utilizado durante longos períodos
detempo.
16. Qualquer tipo de reparação
deve ser sempr e efectuado por
pessoal qualicado. É necessária uma
reparação sempre que a unidade tiver
sido de alguma forma danicada,
como por exemp lo: no caso do cabo de
alimentação ou cha se encontrarem
danicados; naeventualidade de
líquido ter sido derramado ou objectos
no caso da unid ade ter estado expos ta
à chuva ou à humid ade; seesta
não funcionar normalmente, ou se
tiver caído.
17. Correcta eliminação
deste prod uto: este
símbolo indi ca que o
produto não de ve ser
eliminado juntamente
com os resíduos domésticos, segundo a
nacional. Es te produto deverá ser lev ado
a reciclage m de resíduos de
equipamentos eléctricos e elec trónicos
(EEE). O tratamento inc orrecto deste ti po
Page 5
8 9Quick Start GuideDN32-DANTE
de resíduos po de ter um eventual
elettr iche, non esporre ques to
esclusivamente a personale qualic ato.
lame, una più larga dell'altra. Una spina
12. Utilizzare
eciente del le risorse naturali. Per
Aansluitingen die gemerkt
op belangrijke bedienings
impacto negativo no ambiente e na
saúde humana devido a substâncias
potencialmente perigosas que estão
geralmente associadas aos EEE. Ao
mesmo tempo, a sua col aboração para a
eliminação co rrecta deste p roduto irá
contribuir para a utilização eciente dos
recurs os naturais. Paramais info rmação
acerca dos loc ais onde poderá deixa r o
seu equipamento usado para reciclagem,
é favor contactar os serviços municip ais
locais, a enti dade de gestão de resídu os
ou os serv iços de recolha de
resíduosdomésticos.
18. Não i nstale em lugares
connados, ta is como estantes ou
unidades similares.
19. Não coloque fontes de
chama, tais como ve las acesas,
sobre o aparelho.
20. Favor, obedecer os asp ectos
ambientais de d escarte de bateria.
Baterias deve m ser descartadas e m um
ponto de coletas de baterias.
21. Esse aparelho pode se r usado em
climas tropi cais e moderados até 45°C.
LEGAL RENUNCIANTE
O Music Tribe não se resp onsabiliza
por perda algu ma que possa ser
sofrida por qualquer pessoa que
dependa, seja de maneira completa
ou parcial, de qualquer descrição,
fotograa, ou declaração aqui
contidas. Dados técnicos, aparências
e outras informações est ão sujeitas
a modicações sem aviso prévio.
Todas as marcas são p ropriedade de seus
respectivos donos. Midas, Klark Teknik,
Lab Grupp en, Lake, Tannoy, Turbosound,
TC Electron ic, TC Helicon, Behringer,
Bugera
, Oberheim, Aur atone, Aston
Microphones
e Coolaudio são marcas ou
marcas registradas do Music Tribe Global
Brands Ltd. © Music Tribe G lobal Brands
Ltd. 2021 Todos direitos reservados.
GARANTIA LIMITADA
Para obter os ter mos de garantia
aplicáveis e cond ições e informações
adicionais a respeito da garantia
limitada do Mus ic Tribe, favor veri car
detalhes na í ntegra através do website
musictribe.com/warranty.
Informazioni importanti
Attenzione
I terminali contrassegnati
con il simbolo conducono
una corrente el ettrica sucien te a
costitui re un rischio di scossa el ettrica.
Usareunicam ente cavi per altoparlanti
(Speaker) d’elevata qualità con
connetto ri jack TS da ¼"pre-installati.
Ognialtra in stallazione o modic a deve
essere eett uata esclusivamente da
personale tecnico qualicato.
Attenzione
Questo simbolo, ovunque
appaia, avver te della
presenza di una tensione pericolosa
non isolata all'i nterno dello chassis,
tensione che può essere suciente per
costitui re un rischio di scossa el ettrica.
Attenzione
Questo simbolo,
ovunque appaia, segnala
import anti istruzioni oper ative e di
manutenzione nella documentazione
allegata. Si invita a leggere il manuale.
Attenzione
Per ridurre il r ischio di
scosse elettriche, non
rimuovere il coperchio superiore (o la
sezione posteriore). All'interno non ci
sono par ti riparabili dall'utente. Per la
manutenzione rivolgersi a perso nale
qualicato.
Attenzione
Per ridurre il rischio
di incendi o scos se
apparecch io a pioggia e umidità.
L'apparecch io non deve essere espos to
a gocciolio o schizzi di liquidi e nessun
oggetto contenente liquidi, come vasi,
deve essere co llocato sull'apparecchio.
Attenzione
Queste istruzioni di
servizio sono destinate
Per ridurre il r ischio di scosse
elettriche non eseguire interventi
di manutenzione diversi da quelli
contenuti nel manuale di istruzioni. Le
riparazioni devono essere eseguite da
personale di assistenza qualic ato.
1. Leggere queste istruzioni.
2. Conservare queste istruz ioni.
3. Pres tare attenzione a tut ti gli
avvisi.
4. Applicare tutte le istru zioni.
5. Non utilizzare questo dispositivo
vicino l'acqua.
6. Pulire esclusivamente con un
panno asciutto.
7. Non blocc are le aperture di
ventilazione. Installare in conformità
con le istru zioni del produttor e.
8. Non installare vicino a fonti di
calore come radiatori, termoregolatori,
stufe o alt ri apparecchi (inclusi
amplicatori) che producono calore.
9. Non escludere la sic urezza fornit a
dalla spina polar izzata o con messa
a terra. Una spina p olarizzata ha due
con messa a ter ra ha due lame e un
terzo polo di m essa a terra. La lama
larga o il terzo p olo sono forniti per
la vostra sic urezza. Se la spina for nita
non si adatt a alla presa, consultare un
elettr icista per la sostit uzione della
presa obsoleta.
10. Proteggere il cavo di
alimentazione dal calpestio o essere
schiacciato in particolare alle spine,
prese di cor rente e il punto in cui esce
dall'apparecchio.
11. Utilizzare esc lusivamente
dispositivi/accessori specic ati dal
produttore.
solo carrelli,
supporti, treppiedi,
stae o tavo li
indicati dal
produttore o
venduti con l'apparecchio. Utilizzando
un carrello, prestare attenzione quando
si sposta la combinazione carrello/
apparecchio per evitare lesioni dovute
al ribaltamento.
13. Scollegare questo apparecchio
durante i tempo rali o se non è utilizzato
per lunghi periodi di tempo.
14. Per tutte l e riparazioni rivolge rsi a
personale qualicato. La manutenzione
è necessaria quando l'apparecchio
è danneggiato in qualsiasi modo,
come danneggiamento del cavo
di alimentazione o della spina,
versamento di liquido o oggetti caduti
nell'apparecchio, se l'apparecchio è
stato espo sto a pioggia o umidità, se
non funziona normalmente o è caduto.
15. L'apparecchio deve essere
collegato a una pr esa di corrente
elettr ica con messa a terra di
protezione.
16. e la sp ina o una presa del
dispositivo è utilizzata come dispositivo
di disconnessione, deve essere
facilmente utilizzabile.
17. Smaltimento
corretto di ques to
prodotto: questo
simbolo indica che
questo dispositivo non
deve essere sma ltito
insieme ai riuti domestici, secondo la
Dirett iva RAEE (2012/19 / UE) e la vostra
legislazione nazionale. Questo prodot to
deve essere p ortato in un centro di
raccolta autorizzato per il riciclaggio di
riuti di apparecchiature elettriche ed
elettroniche (RAEE). La cattiva gestione
di questo tip o di riuti potrebbe aver e
un possibile impatto negativo
sull'ambiente e sulla salute umana a
causa di so stanze potenzialmente
pericolose che sono generalmente
associate alle apparecchiature
elettriche ed elettroniche. Nello stesso
tempo la vostra collaborazione al
corretto smaltimen to di questo
prodotto contribuirà all'utilizzo
ulteriori informazioni su dove è
possibile trasportare le apparecchiature
per il ricic laggio vi invitiamo a
contattare l'ucio comunale locale o il
servizio di raccolta dei riuti domestici.
18. Non inst allare in uno spazio
ristret to, come in una libreria o in una
struttura simile.
19. Non collocare sul dispositivo fonti
di amme libere, co me candele accese.
20. Per lo smaltimento delle batterie,
tenere in considerazione gli aspetti
ambientali. Le batterie devono essere
smaltite in un pu nto di raccolta delle
batterie es auste.
21. Questo apparecchio può essere
usato in climi t ropicali e temperati
no a 45°C.
DISCLAIMER LEGALE
Music Tribe non si assum e alcuna
responsabilità per eventuali danni
che posson o essere subiti da chiunq ue
si adi in tut to o in parte a qualsiasi
descrizione, fotograa o dichiarazione
contenuta qui. Speciche tecniche,
aspetti e altre informazioni sono
soggette a modiche senza preavviso.
Tutti i marchi son o di proprietà
dei rispet tivi titolari. Midas, K lark
Teknik, Lab Grup pen, Lake, Tannoy,
Turbosound, TC Elec tronic, TC Helicon,
Behringer, Bugera, Oberheim, Auratone,
Aston Mic rophones e Coolaudio son o
marchi o marchi registrati di Music Tribe
Global Brands Ltd. © Music Tribe Global
Brands Ltd. 2021 Tutti i diri tti riservati .
GARANZIA LIMITATA
Per i termini e le cond izioni di garanzia
applicabili e le informazioni aggiuntive
relative alla gar anzia limitata di Music
Tribe, consultare online i dettagli
completi su musictribe.com/warranty.
Belangrijke
veiligheidsvoorschriften
Waarschuwing
zijn met het s ymbool
voeren een zodanig hoge spanning dat
ze een risico vor men voor elektrisc he
schokken. Gebruikuitsluitend
kwalitatief hoogwaardige, in de
handel verkrijgbare luidsprekerkabels
die voorzie n zijn van ¼"TS stekkers.
Laatuitsluitend gekwaliceerd
persone el alleoverige installatie - of
modicatiehandelingenuitvoeren.
Dit symbo ol wijst u altijd
- en
onderhoudsvoorschrif ten in de
bijbehorende documenten. Wijvragen
u dringend de handleiding te lezen.
Attentie
Verwijder in geen
geval de bovens te
afdekking (vanhet achterste gedeelte)
anders be staat er gevaar voor een
elektrische schok. Hetapparaat bevat
geen te onderhouden onderdelen.
Reparatiewerkzaamheden mogen
uitsluitend door gekwaliceerd
personeel uitgevoerdworden.
Attentie
Om het risico o p brand
of elektrische schokken
te beperken, dient u te voorkomen
dat dit apparaat wordt blootgesteld
aan regen en voc ht. Hetapparaat
mag niet worden b lootgesteld aan
neerdruppelend of opspattend water
en er mogen geen met water gevulde
voorwer pen – zoals een vaas – op het
apparaat wordengezet.
Attentie
Deze
onderhoudsinstructies
zijn uitsluitend bedoeld voor
gekwaliceerd onderhoudspersoneel.
Omelektrische schokken te
voorkomen, mag u g een andere
Page 6

10 11Quick Start GuideDN32-DANTE
onderhoudshandelingen verrichten dan
13. Gebruik uitsluitend door de
bij aan een doelmatiger gebruik van de
1. Läs dessa anvisningar.
15. Dra ur anslutningskontakten und
kommit in i appar aten, eller när den har
människors hälsa, påverkas negativt på
Placera inte källo r med öppen eld,
in de bedieningsinstructies vermeld
staan. Reparatiewerkzaamheden
mogen alleen uitgevoerd worden door
gekwaliceerd onderhoudspersoneel.
1. Lees deze voorschriften.
2. Bewaar deze voorschriften.
3. Neem alle waarschuwingen
in acht.
4. Volg alle voor schriften op.
5. Gebr uik dit apparaat niet in de
buurt vanw ater.
6. Reinig het uitsluitend met een
drogedoek.
7. Let erop ge en van de ventilatieopeningen te bedekken. Plaats en
installee r het volgens de voor- schriften
van de fabrikant.
8. Het appar aat mag niet worden
geplaats t in de buurt van radiatore n,
warmte-uitlaten, kachels of andere
zaken (ook verste rkers) diewarmte
afgeven.
9. Maak de veiligheid waarin door
de polarisatie- of aardingsstekker
wordt voorzien, niet ongedaan.
Eenpolarisa tiestekker heef t twee
bladen, waar vaner een breder is dan
het andere. Een aardingsstekker heeft
twee blade n en een derde uitsteek sel
voor de aarding . Het bredere blad of
het derde uit steeksel zijn er vo or uw
veiligheid. Moc htde geleverde stekker
niet in uw stop contact passen, laat
het contac t dan door een elektr icien
vervangen.
10. Om beschadiging te voorkomen,
moetde str oomleiding zo gelegd
worden dat er nie t kan worden over
gelopen en dat ze b eschermd is
tegen scherpe kanten. Zorg zeker
voor voldoende bescherming aan de
stekkers, d everlengkabels en het punt
waar het netsnoer het apparaat verlaat.
11. Het toestel me t altijd met een
intacte aarddraad aan het stro omnet
aangeslotenzijn.
12. Wanneer de stekker
van het hoofdnetwerk of een
apparaatstopcontac t de functionele
eenheid voor het uitschakelen is,
dientdeze alti jd toegankelijk te zijn.
producent gespeci- ceerd toebehoren
c.q. onderdelen.
14. Gebruik
het apparaat
uitsluitend in
combinatie met de
wagen, hetstatief,
dedriepoot , de
beugel of taf el die door de producent
is aangegeven, of die in combinatie
met het appar aat wordt verkocht. Bij
gebruik van een wagen dient men
voorzich tig te zijn bij het verrijden va n
de combinatie wagen/apparaat en
letsel do or vallen tevoorkomen.
15. Bij onweer en als u he t apparaat
langere tijd niet gebruikt, haalt u de
stekker uit he tstopcontact.
16. L aat alle voorkomende reparaties
door vakkundig en bevoegd personeel
uitvoeren. Reparatiewerk-zaamheden
zijn nodig als he t toestel op enige wijze
beschadigd is geraakt, bijvoorbeeld
als de hoofd-stroomkabel of -stekker
is beschadi gd, als er vloeistof of
voorwerpen in terecht zijn gekomen,
als het aan regen o f vochtigheid
heeft bloot-ges taan, niet normaal
functioneer t of wanneer het
isgevallen.
17. Corre cte afvoer van
dit product: dit symbool
geef t aan dat u dit
produc t op grond van de
AEEA-richtlijn
(2012/19/EU) en d e
nationale wetgeving van uw land niet
met het gewone huishoudelijke afval
mag weggooie n. Dit product moet na
aoop van de nut tige levensduur naar
een ociële inzamelpost voor
afgedankte elektrische en elektronische
apparatuur (AEEA) worden gebracht,
zodat het kan wor den gerecycleerd .
Vanwegede potentieel gevaarlijke
stoen die in elektrische en
elektronische apparatuur kunnen
voorkomen, kane en onjuiste afvoer va n
afval van h et onderhavige typ e een
negatieve invl oed op het milieu en de
menselijke gezondheid hebben.
Eenjuiste af voer van dit produc t is
echter niet alleen beter voor het milieu
en de gezondhe id, maardraagt tevens
natuurlijke hul pbronnen. Voormeer
informati e over de plaatsen waar u uw
afgedankte apparatuur kunt inleveren,
kunt u contac t opnemen met uw
gemeente of de
plaatselijkereinigingsdienst.
18. Inst alleer niet in een kleine
ruimte, zoals ee n boekenkast of iets
dergelijks.
19. Plaats geen open vlamme n, zoals
brandende kaarsen, op het apparaat.
20. Houd rekening met de
milieuaspecten van het afvoeren van
batterijen. Batterijen moeten bij een
inzamelpunt voor batterijen worden
ingeleverd.
21. Dit apparaat kan worden geb ruikt
in tropische en gematigde klimaten
tot 45 ° C.
WETTELIJKE ONTKENNING
Music Tribe aanvaardt geen
aansprakelijkheid voor enig verlies
dat kan worden geleden door een
persoon die geheel of gedeeltelijk
vertrouwt op enige beschrijving,
foto of verklaring hierin. Technische
specicaties, verschijningen en
andere informatie kunnen zonder
voorafgaande kennisgeving worden
gewijzigd. Alle handelsmerken zijn
eigendom van hun respectievelijke
eigenaren. Midas, Klark Teknik,
Lab Gruppen, Lake, Tannoy,
Turbosound, TC Elec tronic, TC Helicon,
Behringer, Bugera, Oberheim,
Auratone, Aston Microphones en
Coolaudio zijn handelsmerken of
gedeponeerde handelsmerken
van Music Tribe Global Brands Ltd.
© Music Tribe Global Brands Ltd.
2021 Alle rechten voorbehouden.
BEPERKTE GARANTIE
Voor de toepasselijke
garantievoorwaarden en aanvullende
informatie met betrek king tot de
beperkte garantie van Music Tribe,
zie de volledige details online op
musictribe.com/warranty.
Viktiga
säkerhetsanvisningar
Varning
Uttag markerade med
symbolen leder elekt risk
strömst yrka som är tillräck ligt stark för
att utgör a en risk för elchock. Anv änd
endast högkvalitativa, kommersiellt
tillgängliga högtalarkablar med
förhandsinstallerade ¼"TSkontakter. Allannan installering eller
modikation bör endast utföras av
kompetentpersonal.
Den här symbolen
hänvisar till viktiga
punkter om användning
och underhå ll i den medfölljande
dokumentationen. Varvänlig och läs
bruksanvisningen.
Försiktighet
Minska risken för
elektriska stötar genom
att aldri g ta av höljet upptill på
apparaten (ellerta av b aksidan).
Inuti appar aten nns det inga delar
som kan repar eras av användaren.
Endastkvalicerad pers onal får
genomföra reparationer.
Försiktighet
För att minsk a risken
för brand och elektriska
stötar ska apparaten skyddas mot
regn och f ukt. Apparaten går inte
utsät tas för dropp eller spill o ch
inga vattenbehållare som vaser etc.
fårplaceras p å den.
Försiktighet
Serviceinstruktionen
är enbart avsedd
för kvalicerad serviceper sonal.
Föratt undvika risker genom
elektriska stötar, genomför inga
reparationer på apparaten, vilka inte
är beskriv na i bruksanvisninge n.
Endast kvalicerad fack personal får
genomförareparationerna.
2. Spara dessa anvisningar.
3. Beakt a alla varningar.
4. Följ alla anvisningar.
5. Använd i nte apparaten i närheten
av vatten.
6. Rengör end ast med torr trasa.
7. Blockera inte
ventilationsöppningarna.
Installeraenligt tillverkarens
anvisningar.
8. Installera aldrig intill värmek ällor
som värme- element, varmluft sintag,
spisareller an nan utrustning som avger
värme (inklus iveförstärkare).
9. Ändra aldrig en polariserad
eller jordad kon takt. Enpolariserad
kontakt har t vå blad – det ena bredare
än det andra. En j ordad kontakt har
två blad oc h ett tredje jords tift. Det
breda blade t eller jordstifte t är till för
din säkerhet . Omden medföljande
kontakten i nte passar i ditt ut tag,
skadu kontak ta en elektriker fö r att få
uttaget bytt.
10. Förlägg elkabeln så, at t det inte
är möjligt at t trampa på den och att
den är skydda d mot skarpa kanter och
inte kan skadas . Ge i synnerhet akt på
områdena omkring stickkontakterna,
förlängningskablarna och på det
ställe, där elkabeln lämnar apparaten,
ärtillräckligtskyddade.
11. Apparaten måste alltid
vara ansluten till elnätet med
intaktskyddsledare.
12. Om huvudko ntakten, ellerett
apparatuttag, fungerar som
avstängningsenhet måste denna alltid
varatillgänglig.
13. Använd endast tillkopplingar och
tillbehör som angetts av tillverkaren.
14. Använd
endast med vagn,
stativ, trefot,
hållareeller bor d
som angetts
av tillverkaren,
ellersom sål ts till-sammans med
apparaten. O m du använder en
vagn, var för siktig, när du för yttar
kombinationen vagn-apparat, för att
förhindra olycksfall genomsnubbling.
åskväder e ller när apparaten inte ska
användas under någon längre tid.
16. L åt kvalicerad personal utföra
all servi ce. Serviceär nödvändig
när apparaten har skadats, t.ex.när
en elkabel elle r kontakt är skadad,
vätskaeller främmande föremål har
fallit i golve t.
17. Kassera produkten
på rätt s ätt: den här
symbolen indikerar att
produkten inte ska
kastas i
hushållssoporna,
enligtWEEE dire ktivet (2012/19/EU)
ochgällande, nationell lagstiftning.
Produkte n ska lämnas till ett
auktoriserat återvinningsställe för
elektronisk och elektrisk utrustning
(EEE). Om den här sor tens avfall
hanteras på fe l sätt kan miljön, och
grund av potentiella risksubstanser
som ofta associeras med EEE.
Avfallshanteras pro dukten däremot på
rätt sät t bidrar detta til l att naturens
resurse r används på ett bra sät t.
Kontakta kommun, ansvarig
förvaltning eller
avfallshanteringsföretag för mer
information om återvinningscentral
där produk ten kanlämnas.
18. Ins tallera inte i ett trå ngt
utrym me, t.ex. i en bokhylsa eller
liknande enhet.
19.
t.ex. tända lju s, på apparaten.
20. Tänk på miljöaspekterna
vid kassering av batterier.
Batteri er måste kasseras på et t
batteriuppsamlingsställe.
21. Denna apparat kan användas
i tropiska och måttliga klimat
upp till 45 ° C.
Page 7
12 13Quick Start GuideDN32-DANTE
prądem nie należy wykony wać
uziemieniem. Wtyczka dwubiegunowa
posiada dwa w tyki kontakto we o różnej
urządzenia nie odpowiada standardowi
wktór ym kabel sieciowy pr zymocowany
sieciowe w urządzeniu pełnią funkcję
substanc ji niebezpiecznych z aliczanych
zapoznaj się ze w szystkimi szc zegółami
FRISKRIVNINGSKLAUSUL
Music Tribe tar inget ansvar för
någon förlust som kan drabbas av
någon person som helt eller delvis
förlitar sig på någon beskrivning,
fotogra eller uttalande som
nns här. Tekniska specikationer,
utseenden och annan information
kan ändras utan föregående
meddelande. Alla varumärken
tillhör respektive ägare. Midas, Klark
Teknik, Lab Gruppen, Lake, Tannoy,
Turbosound, TC Elec tronic, TC Helicon,
Behringer, Bugera, Oberheim,
Auratone, Aston Microphones och
Coolaudio är var umärken eller
registrerade varumärken som tillhör
Music Tribe Global Brands Ltd.
© Music Tribe Global Brands Ltd.
2021 Alla Rättigheter reserverade.
BEGRÄNSAD GARANTI
För tillämpliga garantivillkor och
ytterligare information om Music
Tribes begräns ade garanti, se
fullständig information online på
musictribe.com/warranty.
Ważne informacje o
bezpieczeństwie
Uwaga
Terminale oznaczone
symbolem przenoszą
wystarczająco wysokie napięcie
elektr yczne, aby stwor zyć ryzyko
porażenia prądem. Uż ywaj
wyłącznie wysokiej jakości
fabryc znie przygotowanyc h kabli
z zainstalowanymi wt yczkami
¼"TS. Wszystkie i nne instalacje lub
modyk acje powinny być wykonyw ane
wyłąc znie przez wykwalikowany
personel techniczny.
Ten symbol informuje o
ważnych wskazówkach
dotycz ących obsługi i
konserwacji urządzenia w dołączonej
dokumentacji. Proszę przeczytać
stosowne informacje w instrukcji
obsługi.
Uwaga
W celu wyeliminowania
zagrożenia por ażenia
prądem zabrania się zdejmowania
obudowy lu b tylnej ścianki urz ądzenia.
Elementyz najdujące się we wnętrzu
urządzen ia nie mogą być naprawiane
przez uż ytkownika. Napraw ymogą
być wykony wane jedynie przez
wykwalikowanypersonel.
Uwaga
W celu wyeliminowania
zagrożenia por ażenia
prądem lub za palenia się urządzenia
nie wolno wy stawiać go na działanie
deszczu i wilgotności oraz dopuszczać
do tego, aby do wnęt rza dostała się
woda lub inna ciecz. Nie należy st awiać
na urządze niu napełnionych cie czą
przedmiotów takich jak np. wazony lub
szklanki.
Uwaga
Prace serwisowe mogą
być wykony wane jedynie
przez wykwalikowany personel.
Wcelu uniknięcia zagrożenia porażenia
żadnych manipulacji, które nie
są opisane w instrukcji obsługi.
Naprawyw ykonywane mogą być
jedynie przez wykwalikowany
personeltechniczny.
1. Proszę przeczytać
poniższewskazówki.
2. Proszę przechowywać
niniejsząinstrukcję.
3. Należy pr zestrzegać wszystkich
wskazówek os trzegawczych.
4. Należy p ostępować zgodnie z
instrukcjąobsługi.
5. Urz ądzenia nie wolno uży wać w
pobliżuwody.
6. Urządzenie można cz yścić
wyłąc znie suchąszmatką.
7. Nie zasłaniać ot worów
wentylac yjnych. Wczasie pod łączania
urządzenia należy pr zestrzegać
zaleceńproducenta.
8. Nie stawia ć urządzenia w pobliżu
źródeł c iepła takich, jak gr zejniki,
piecelub urz ądzenia produkujące
ciepło (np.wz macniacze).
9. W żadnym wypa dku nie należy
usuwać zabe zpieczeń z wtyc zek
dwubiegun owych oraz wtyc zek z
szerokości. Wtyczkaz uziemieniem ma
dwa wt yki kontaktowe i trzec i wtyk
uziemienia. Szerszy wtyk kontak towy
lub dodatkowy wtyk uziemienia służą
do zapewnienia bezpieczeńst wa
użyt kownikowi. Jeśli format w tyczki
gniazdka, proszę zwrócić się do
elektryka z prośbą o wy mienienie
gniazda.
10. Kabel sieciow y należy ułożyć
tak, aby nie by ł narażony na deptanie i
działanie o strych krawędzi, c o mogłoby
doprowadzić do jego uszkodzenia.
Szczególną uwagę zwró cić należy na
odpowiednią ochronę miejsc w pobliżu
wtyc zek i przedłużac zy oraz miejsce,
jest dour ządzenia.
11. Urządzenie mu si być zawsze
podłąc zone do sieci sprawnym
przewodem z uziemieniem.
12. Jeżeli wtyk sieciow y lub gniazdo
wyłąc znika, tomuszą one być zawsze
łatwodos tępne.
13. Używ ać wyłącznie spr zętu
dodatkowego i akce soriów zgodnie z
zaleceniami producenta.
14. Uży wać
jedynie zalecanych
przez producenta
lub znajdujących
się w zestawi e
wóz ków,
stojaków, stat ywów, uchwytów i
stołów. Wprzypadku posługiwania
się wózkiem należy zachować
szczególną ostrożność w trakcie
przewożenia zes tawu, abyuniknąć
niebezpieczeńst wa potknięcia się i
zranienia.
15. W trakcie burzy oraz na
czas dłuż szego nieużywania
urządzen ia należy wyjąć wt yczkę z
gniazdkasieciowego.
16. Wykony wanie wszelkich
napraw należy zlecać jedynie
wykwali kowanym pracownikom
serwisu. Przeprowadzenie przeglądu
technicznego staje się konieczne, jeśli
urządzenie zostało uszkodzone w
jakikolwiek s posób (dotyczy to tak że
kabla siecio wego lub wtyczki), jeś li
do wnętrz a urządzenia dost ały się
przedmioty lub ciecz, jeśli urządzenie
wyst awione było na działanie d eszczu
lub wilgoci, jeśli urządzenie nie
funkcjonuje poprawnie oraz kiedy
spadło napodłogę.
17. Prawidłowa
utylizacja produktu:
Tensymbol wskaz uje,
żetego produk tu nie
należy wyr zucać razem
ze zwykłymi odpadami
domowymi, tylko zgodnie z dyrektywą
w sprawie zuż ytego sprzętu
elektrycznego i elektr onicznego
(WEEE) (2012/19/EU) oraz przepisami
krajowymi. Niniejsz y produkt należy
przekazać do autoryzowanego punktu
zbiórki zużytego sprzętu elektr ycznego
i elektronicznego. Niewłaściwe
postępowa nie z tego typu odpadami
może wywo łać szkodliwe dział anie na
środowisko naturalnej i zdrowie
człowie ka z powodu potencjalnych
jako zuży ty sprzęt elekt ryczny i
elektroniczny. Jednocześnie, Twój
wkład w prawidłową utylizację
niniejszego p roduktu przyc zynia się do
oszczędn ego wykorzyst ywania
zasobów naturalnych. Szczegółowych
informacj i o miejscach, w któr ych
można oddawać zu żyty sprzęt d o
recyklingu, udzielają urzędy miejskie,
przedsiębiorstwa uty lizacji odpadów
lub najbliższ y zakład utylizacji
odpadów.
18. Nie instaluj w ogranic zonej
przestrzeni, takiej jak półka na k siążki
lub podobny zes taw.
19. Nie st awiaj na urządzeniu źróde ł
otwartego ognia, takich jak zapalone
świece.
20. Należy pamiętać o
środowiskowych aspektach utylizacji
baterii. Baterie należy utylizować w
punkcie zbiórki baterii.
21. To urządzenie może być
używane w klimacie tropikalnym i
umiarkowanym do 45 ° C.
ZASTRZEŻENIA PRAWNE
Music Tribe nie ponosi
odpowiedzialności za jakiekolwiek
straty, które mogą ponie ść osoby,
które polegają w całości lub w
części na jakimkolwiek opisie,
fotograi lub oświadczeniu
zawartym w niniejszym dokumencie.
Specy kacje techniczne, w ygląd i
inne informacje mogą ulec zmianie
bez powiadomienia. Wszystkie
znaki towarowe s ą własnością
ich odpowiednich właścicieli.
Midas, Klark Teknik, Lab Gruppen,
Lake, Tannoy, Turbosound, TC
Electronic, TC Helicon, Behringer,
Bugera, Oberheim, Auratone, Aston
Microphones i Coolaudio są znakami
towarowymi lub zas trzeżonymi
znakami towarowymi rmy Music
Tribe Global Brands Ltd. © Music Tribe
Global Brands Ltd. 2021 Wszystkie
prawa zastrzeżone.
OGRANICZONA GWARANCJA
Aby zapoznać si ę z obowiązującymi
warunkami gwarancji i dodatkowymi
informacjami dotyc zącymi
ograniczonej gwarancji Music Tribe,
w trybie online pod adresem
musictribe.com/warranty.
Page 8
14 15Quick Start GuideDN32-DANTE
Warning
Failure to observe the following warnings may
lead to fatality or serious injury from re or
electric shock.
Before installing the card, you must refer to the owner’s
manual of the host device or to klarkteknik.com to verify that
your host device supports this card, and to verify the number
of cards that can be installed in combination with other Midas
or third-party cards.
• Do not attempt to disassemble or modif y the card.
Donot apply exce ssive force to board connec tors or
other board components. Mishandling of bo ard may
lead to shock, re hazard, or equipment failure.
• Dis connect the power cabl e from the main unit befo re
installing this card to eliminate shock hazard.
Caution
Failure to observe the following precautions may
lead to personal injury, or may result in damage
to equipment or other property.
• • Do not touch the board’s metallic leads (pins)
whenhandling the card. Pins are sharp and may
causeinjur y.
• • The card is electrostatic-sensitive.
Before handling the card, you should briey
touch the main unit ’s metal casing with
your bare hand so as to drain o any static
charge from your body. Music Tribe assumes no
responsibility for dat a loss, equipment damage,
or injury c aused by inappropriate handling or usage.
Advertencia
El incumplimiento de las siguientes advertencias
puede provocar la muerte o lesiones graves por
incendio o descarga eléctrica.
Antes de instalar la tarjeta, debe consultar el manual del
propietario del dispositivo host o klarkteknik.com para vericar
que su dispositivo host admite esta tarjeta y para vericar la
cantidad de tarjetas que se pueden instalar en combinación
con otros Midas o terceros. tarjetas de esta.
• • No intente desmontar ni mo dicar la tarjeta. No ap lique
fuerza excesiva a los con ectores de la placa ni a otros
componentes de la placa. El mal manejo de la placa
puede provocar descargas eléctricas, peligro de
incendio o falla s en el equipo.
• Desconec te el cable de alimentación de la unidad
principal antes de instalar esta tarjeta para eliminar el
peligro de descarga.
Precaución
El incumplimiento de las siguientes precauciones
puede provocar lesiones personales o puede
provocar daños en el equipo u otra propiedad.
• • No toque los cables metálicos (pines) de la placa
cuando manipule la tarjeta. Los alleres son alados y
pueden causar lesiones.
• • La tarjeta es sensible a la electricidad est ática.
Antes de manipular la tarjeta, debe tocar
brevemente la carcasa metálica de la unidad
principal con la mano desnuda para drenar
cualquier carga estática de su cuerpo. Music Tribe
no asume ninguna responsabilidad por la pérdida
de datos, daños al equipo o lesione s causadas por un
manejo o uso inadecuado.
Avertissement
Le non-respect des avertissements suivants peut
entraîner la mort ou des blessures graves par
incendie ou électrocution.
Avant d’installer la car te, vous devez vous référer au manuel du
propriétaire du périphérique hôte ou à klarkteknik.com pour
vérier que votre périphérique hôte prend en charge cette carte
et pour vérier le nombre de cartes pouvant être installées en
combinaison avec d’autres Midas ou tiers. cartes de fête.
• • N’essayez pas de démonter ou de modier la carte.
N’appliquez pas de force excessive sur les connec teurs
de la carte ou d’autres compos ants de la carte. Une
mauvaise manip ulation de la carte peut entraîner
un choc élec trique, un risque d’incendie ou une
défaillance de l’équipement.
• • Débranchez le câble d’alimentation de l’unité
principale avant d’installer cette c arte pour éliminer
tout risque d’électrocution.
Mise en garde
Le non-respect des précautions suivantes
peut entraîner des blessures corporelles ou
endommager l’équipement ou d’autres biens.
• • Ne touchez pas les ls métalliques (broc hes) de la
carte lor s de la manipulation de la car te. Les broches
sont tranchantes et peuvent causer des blessures.
• • La carte est sensible à l’élec tricité statique.
Avant de manipuler la carte, vous devez toucher
brièvement le boîtier métallique de l’unité
principale avec votre main nue pour évacuer
toute charge électrostatique de votre corps.
Music Tribe n’assume aucune responsabilité pour
la perte de données, les dommages matériels ou
les blessures causées par une manipulat ion ou une
utilisation inappropriée.
Warnung
Die Nichtbeachtung der folgenden Warnhinweise
kann zum Tod oder zu schweren Verletzungen
durch Feuer oder Stromschlag führen.
Bevor Sie die Karte installieren, müssen Sie die
Bedienungsanleitung des Hostgeräts oder klarkteknik.
com lesen, um zu überprüfen, ob Ihr Hostgerät diese Karte
unterstützt, und um die Anzahl der Karten zu überprüfen,
die in Kombination mit anderen MIDAS- oder Drittanbietern
installiert werden können. Partykarten.
• • Versuchen Sie nicht, die Karte zu zerlegen oder zu
modizieren. Üben Sie keine übermäßige Kraft auf
Platinenanschlüsse oder andere Platinenkomponenten
aus. Eine falsche Handhabung der Platine kann zu
Stößen, Brandgefahr oder Geräteausfall führen.
• • Trennen Sie das Netzkabel vom Hauptgerät, bevor
Sie diese Karte installieren, um die Gefahr eines
Stromschlags zu vermeiden.
Vorsicht
Die Nichtbeachtung der folgenden
Vorsichtsmaßnahmen kann zu Verletzungen
führen oder zu Schäden an Geräten oder anderen
Gegenständen führen.
• • Berühren Sie beim Umgang mit der Karte nic ht die
Metallkabel (Stifte) der Platine. Stifte sind scharf und
können Verletzungen verursachen.
• • Die Karte ist elektrostatisch e mpndlich.
Bevor Sie mit der Karte umgehen, sollten Sie
das Metallgehäuse des Hauptgeräts kurz
mit der bloßen Hand berühren, um statische
Auadung von Ihrem Körper abzuleiten.
Die Music Tribe übernimmt keine Verant wortung
für Datenverlust, Geräteschäden oder Verletzungen,
die durch unsachgemäße Handhabung oder
Verwendung verursacht werden.
Page 9

16 17Quick Start GuideDN32-DANTE
Warning
Failure to observe the following warnings may
lead to fatality or serious injury from re or
electric shock.
Before installing the card, you must refer to the owner’s
manual of the host device or to klarkteknik.com to verify that
your host device supports this card, and to verify the number
of cards that can be installed in combination with other Midas
or third-party cards.
• • Do not attempt to disassemble or modify the card. Do
not apply exces sive force to board connec tors or other
board components. Mishandling of board may lead to
shock, re ha zard, or equipment failure.
• • Disconnect the power c able from the main unit before
installing this card to eliminate shock hazard.
Caution
Failure to observe the following precautions may
lead to personal injury, or may result in damage
to equipment or other property.
• • Do not touch the board’s metallic leads (pins) when
handling the card. Pins are sharp and may cause injury.
• • The card is electrostatic-sensitive. Before
handling the card, you should br iey touch the
main unit ’s metal casing with your bare hand s o
as to drain o any static charge from your body.
Music Tribe assumes no responsibility for dat a loss,
equipment damage, or injury c aused by inappropriate
handling or usage.
avvertimento
La mancata osservanza delle seguenti avvertenze
può provocare la morte o lesioni gravi dovute a
incendi o scosse elettriche.
Prima di installare la scheda, è necessario fare riferimento al
manuale del proprietario del dispositivo host oa klarkteknik.
com per vericare che il dispositivo host supporti questa scheda
e per vericare il numero di schede che possono essere installate
in combinazione con altri MIDAS o terzi. carte di partito.
• • Non tentare di smontare o modicare la scheda.
Non applicare una forza e ccessiva ai connettori della
scheda o ad altri componenti della scheda. Un uso
improprio della scheda può causare scosse elettriche,
rischio di incendio o guasti alle apparecchiature.
• • Scollegare il cavo di alimentazione dall’unità
principale prima di inst allare questa scheda per
eliminare il rischio di scosse elettriche.
Attenzione
La mancata osservanza delle seguenti
precauzioni può causare lesioni personali o danni
alle apparecchiature o ad altre proprietà.
• • Non toccare i conduttori metallici (pin) della scheda
durante la manipolazione della scheda. I perni sono
alati e possono causare le sioni.
• • La scheda è sensibile all’elettricità statica.
Prima di maneggiare la scheda, toccare
brevemente l’involucro metallico dell’unità
principale con la mano nuda in modo da
scaricare qualsiasi carica statica dal corpo.
Music Tribe non si assume alcuna responsabilità per
la perdita di dati, danni alle apparecchiature o lesioni
causate da manipolazione o utilizzo inappropriati.
Waarschuwing
Het niet in acht nemen van de volgende
waarschuwingen kan de dood of ernstig letsel
door brand of elektrische schokken tot gevolg hebben.
Voordat u de kaart installeert, moet u de gebruikershandleiding
van het hostapparaat of naar klarkteknik.com raadplegen om te
controleren of uw hostapparaat deze kaart ondersteunt, en om
het aantal kaarten te veriëren dat kan worden geïnstalleerd in
combinatie met andere MIDAS of derde apparaten. feest kaarten.
• • Probeer de kaart niet uit elkaar te halen of aan
te passen. Oefen geen overmatige kracht uit op
kaartconnectoren of andere kaartcomponenten.
Verkeerd gebruik van de kaart kan leiden tot
schokken, brandgevaar of defecten aan de apparatuur.
• • Koppel de voedingskabel los van de hoofdeenheid
voordat u deze kaart installeert om het gevaar van
schokken te voorkomen.
Voorzichtigheid
Het niet in acht nemen van de volgende
voorzorgsmaatregelen kan persoonlijk letsel
of schade aan apparatuur of andere eigendommen tot
gevolg hebben.
• • Raak de metalen draden (pinnen) van de kaart niet
aan bij het hanteren van de kaart. Pinnen zijn scherp
en kunnen letsel veroorzaken.
• • De kaart is elektros tatisch gevoelig. Voo rdat u
de kaart aanraakt, moet u de metalen behuizing
van het hoo fdtoestel kort m et uw blote hand
aanraken om eventuele statische lading van
uw lichaam af te voeren. Music Trib e aanvaardt
geen aanspra kelijkheid vo or gegevensverlies,
schade aan app aratuur of letsel veroo rzaakt door
onjuiste behandeling of gebruik.
Varning
Underlåtenhet att följa följande varningar kan
leda till dödsfall eller allvarliga personskador på
grund av brand eller elchock.
Innan du installerar kortet måste du läsa ägarens
bruksanvisning för värdenheten eller klarkteknik.com för att
veriera att din värdenhet stöder detta kort och för att veriera
antalet kort som kan installeras i kombination med andra
MIDAS eller tredje- festkort.
• • Försök inte ta isär eller modiera kor tet. Använd inte
överdriven kr aft på kortkontak ter eller andra
kortkomponenter. Felaktig hantering av brädan kan
leda till stöt ar, brandrisk eller fel på utrustningen.
• • Koppla bort strömkabeln från huvudenheten innan du
installerar kortet för att eliminera stötar.
Varning
Underlåtenhet att följa följande
försiktighetsåtgärder kan leda till personskada
eller kan leda till skada på utrustning eller annan egendom.
• • Rör inte vid brädans metallk ablar (stift) när du
hanterar kor tet. Stiften är vassa oc h kan orsaka skador.
• • Kortet är elektrostatiskt känsligt. Innan du
hanterar kortet ska du kort beröra huvudenhetens
metallhölje med bara handen för att tömma bort
eventuell statisk laddning från kroppen. Music Tribe
tar inget ansvar för dataförlust, utrustningsskada eller
skada orsakad av olämplig hantering eller användning.
Page 10

18 19Quick Start GuideDN32-DANTE
Ostrzeżenie
Nieprzestrzeganie poniższych ostrzeżeń może
prowadzić do śmierci lub poważnych obrażeń w
wyniku pożaru lub porażenia prądem.
Przed zainstalowaniem karty należy zapoznać się z instrukcją
obsługi urządzenia hosta lub klarkteknik.com, aby sprawdzić,
czy urządzenie główne obsługuje tę kartę oraz sprawdzić
liczbę kart, które można zainstalować w połączeniu z innymi
urządzeniami MIDAS lub trzecimi karty imprezowe.
• • Nie próbuj rozbierać ani modykować karty.
Nie należy przykładać nadmiernej siły do zł ączy
pły ty ani innych elementów płyt y. Niewłaściwe
obchodzenie się z płytą może prowadzić do porażenia
prądem, pożaru lub awarii spr zętu.
• Odłącz kabel zasilający od jednostki głównej przed
zainstalowaniem tej karty, aby wyeliminować ryzyko
porażenia prądem.
Uwaga
Nieprzestrzeganie poniższych środków
ostrożności może prowadzić do obrażeń ciała lub
może spowodować uszkodzenie spr zętu lub innego mienia.
• • Nie dotykaj metalow ych wyprowadzeń (st yków)
pły ty podczas obs ługi karty. Kołki są ostre i mogą
spowodować obrażenia.
• • Karta jest wrażliwa na wyładowania
elektrostat yczne. Przed dotknięciem karty
należy krótko dotknąć metalową obudowę
jednostki głównej gołą ręką, aby usunąć
wszelkie ładunki elektrostatyczne z ciała.
Music Tribe nie ponosi odpowiedzialności za
utratę danych, us zkodzenie sprzętu lub obrażenia
ciała spowodowane niewłaściwą obsługą lub
użytkowaniem.
Page 11
20 21Quick Start GuideDN32-DANTE
1. Introduction
Dante is a high -performa nce digital media p rotocol designe d
to deliver au dio over a standard Et hernet IP netwo rk.
TheDN32-DANTE ca rd allows applicab le MIDAS digital mixe rs
to share up to 32 x 32 chan nels of audio with any ne twork
of Dante- enabled devices v ia single or redunda nt Ethernet
connec tion. Using exist ing network inf rastruct ure at 100 Mbit/s
or 1 Gbit/s, t he Dante protocol o ers very stab le, low-latency
transmis sion for a variet y of professiona l applications uni fying
multi-channel audio distribution across multiple locations or
device families.
2. Installation
Before y ou install the DN32-DANTE c ard in the expansi on slot of
your conso le, you must check kl arkteknik.co m to verify whet her
the conso le rmware suppor ts that card. We rec ommend that
you perio dically check you r console’s produc t page for console
rmware updates.
Caution – before i nstalling the DN32-DANTE c ard into the
console, yo u must make sure that th e console’s power switc h is
turned o . Malfun ctions or elec trical shock may o ccur otherwis e.
1. Make sure that th e mixer’s power is turn ed o.
2. Loosen the 2 scre ws left and righ t that fasten the slo t,
then remove t he slot cover or curre ntly-installe d card and
keep it in a sa fe place.
3. Before remov ing the DN32-DANTE card fr om its protec tive
bag, we reco mmend touching the g rounded metal c hassis of
the console to prevent electrostatic discharges aecting the
sensiti ve electronic co mponents. It is ge nerally a good idea
to hold the c ard either by the fac e plate or by the two small
handles, b ut never touching th e components on the c ircuit
board directly.
4. Align both edges o f the card with the gu ide rails inside the
slot and car efully inser t the card into the slo t. It should slide
in withou t any considerable r esistance. Push the c ard all the
way into the sl ot to ensure that the con tacts of the ca rd are
correc tly inserte d into the connecto r inside.
5. Fasten the card usi ng the included sc rews. Be aware
that damage o r malfunctio ns may occur if the car d is
not fastened.
3. Requirements
Minimum hardware:
Windows- based - Core 2 Duo CPU, 2 GHz
application - Ethernet port
- 1 GB RAM
Mac - 1.5 GHz CPU
- Etherne t port
- 512 MB RAM
4. Connector Plate
• • 2x RJ45 connec tors with integr ated LEDs
• • ACT/LINK LED (green) lights gr een when valid IP net work
connection exists.
• • 1 G LED (amber) lights when us ed in 1 GBit/s netwo rk.
• • 2x small handles (St) for re moving the expan sion card from
the slot
• • 2x outer screws f or xing the card in t he slot (M3 x 6 size).
• • 3x countersunk scr ews xing the PCBA to t he bracket.
Do not remove t hese!
Recommended Operating Systems:
Windows: Windows Windows 7 32-bit or 64-bit,
Windows 8 32-bi t or 64-bit
Mac: 10.6.8 Snow Leo pard, 10.7. 5 Lion,
10.8 Mountain L ion
Dante Contr oller applicatio n provided free o f charge at
audinate.com.
Dante Virtual Soundcard application optio nal at audinate.com.
Page 12

22 23Quick Start GuideDN32-DANTE
MIDAS M32
Router/Switch
Primary
Secondary
Laptop
Digital mixer with Dante card
5. Connection Scenarios
5.1 M32 with DN32-DANTE connection to
DanteTM network
M32 ➝ network router1 ➝ PC and other D ante-enabled a udio
devices, e.g . generic digtal co nsole with Dante ca rd
1
for advi ce on suitable n etwork ro uters for us e with Dante ne tworks v isit audinate .com
Here the PC p erforms 3 task s concurrentl y:
a) run Dante Controlle r app for signal rout ing
b) run X32-Edi t app, for M32 remote contr ol
c) ru n Dante Virtual So undcard, DVS, for re cording/playbac k of
all audio ch annels of both mixer s
5.2 M32 with DN32-DANTE
straight connection to PC / Mac and
Dante Virtual Soundcard
DVS2 , for recor ding/playback up to 32 x 32 cha nnels
2
for advice on using and licensing Dante Virtual Soundcard visit audinate.com
MIDAS M32
5.3 M32 with DN32-DANTE redundant
network infrastructure
M32 ➝ two separate routers with independent
wiring ➝ M32 + DL16
Primary
Laptop
Primary
Router/Switch
MIDAS M32
Secondary
M32 with DANTE redundant network infrastructure
Change D ante Contro ller netw ork cong uration ta b ’Switche d’ to ’Redun dant’
MIDAS M32
Secondary AES50
Router/Switch
DL16
Page 13

24 25Quick Start GuideDN32-DANTE
5.4 X32 with DN32-DANTE connection to
Midas PRO2 via DN9650 + CM1 Dante card
MIDAS Console
MIDAS M32
with DN32-DANTE
5.5 Two M32 consoles with DN32-DANTE
connection to DVS for recording
64 simultaneous tracks
• • Both consoles nee d to have DN32-DANTE cards ins talled.
Connec tone of the DN32-DANTE Ether net ports on con sole A
with the c ard installed in co nsole B.
• • Connect the seco nd port of conso le B, either direc tly with
the DAW-PC/Mac o r via a network rou ter to which the DAW
has access . This link will carr y all 64 channels to an d from
both consoles.
• • Tip: The console’s Ethernet remote control can be done
over the sam e network. For re mote controlling co nsole A
in this exa mple, it is sucient to u se a short patch c able
connec ting console A’s Remote conn ector with the f ree port
on DN32-DANTE. Sinc e both ports on D N32-DANTE of con sole
B are occup ied already, you would ne ed to patch a separate
cable to th e network route r.
• • Open the Dante Vir tual Soundcard d river control pan el and
switch it ON.
• • Run the Dante Controll er application to co ngure the vir tual
channel pa tch bay and route the ch annels between D ante
Virtu al Soundcard and th e consoles.
Laptop
for conguration
routing and mixer
remote control
Cat 5/6 AES50
@ 96 kHz
24 x 24 channels
KLARK TEKNIK DN9650
Network of Dante-enabled equipment
Router/Switch
Cat 5/6 Ethernet
@ 48 kHz Dante
32 x 32 channels
Cat 5/6 Ethernet,
Dante network @48 kHz
Midas M32
Console A
Midas M32
Console B
Two M32 conso les with DN32- DANTE conne ction to DV S for recor ding 64 simu ltaneou s tracks
Router
(optional)
Laptop/DAW
Page 14

26 27Quick Start GuideDN32-DANTE
6. Mixer Setup
The follow ing four M32 screen s have to do with congur ing the
DN32-DANTE and the s ignals to/from the c ard.
• • The SETUP/card screen show s a graphic of the DN32-DANTE
card when i t has been install ed correctly, and o ers advice
on setup.
• • The ROUTING/card out p age selects c hannel blocks th at will
be provid ed to the Dante netwo rk controller. (e.g. 8 Local
Output s and 3 x 8 signals from AE S50 Port A)
• • The SETUP/cong page selec ts the synchr onisation sourc e
and shows s tatus indicator s in the top ’global’ area
(which shoul d normally be “C” for DN32-DAN TE Card).
• • The ROUTING/home p age allows patching o f signals from the
DN32-DANTE card t o the Input Channel pr ocessing.
(e.g. channel 1-4 on Au x In)
Note that th e Dante network ro uting must be cong ured
exclusive ly using the Dante Cont roller Applicat ion for Mac/PC.
The signals t hat have been routed f rom the Dante Contr oller App
to the DN32-DANTE c ard are available for p atching to the input
channel ro uting on the conso le’s Routing/Home p age. Please
Synchronisation
A master wor d clock source mus t be selected f or the network.
The DN32-DANTE Br ooklyn II VCXO cloc k oers extre mely
low-jit ter. In this case the Set up/Cong page should l ook like this:
Note that th e status bar shows “C: 4 4K1” and a green light fo r
proper s ynchronisatio n of 44.1 kHz to the card.
The secon d green light “C: Dante ” indicates prope r installation of
the DN32-DANTE ca rd. The Dante Contro ller app congures t he
networ k for using the DN32-DANTE VC XO clock in this appl ication.
refer to au dinate.com for a compr ehensive set of doc umentation,
FAQ and forum ad vices on conguri ng the Dante Controll er and
Dante Virtual Soundcard applications.
Page 15
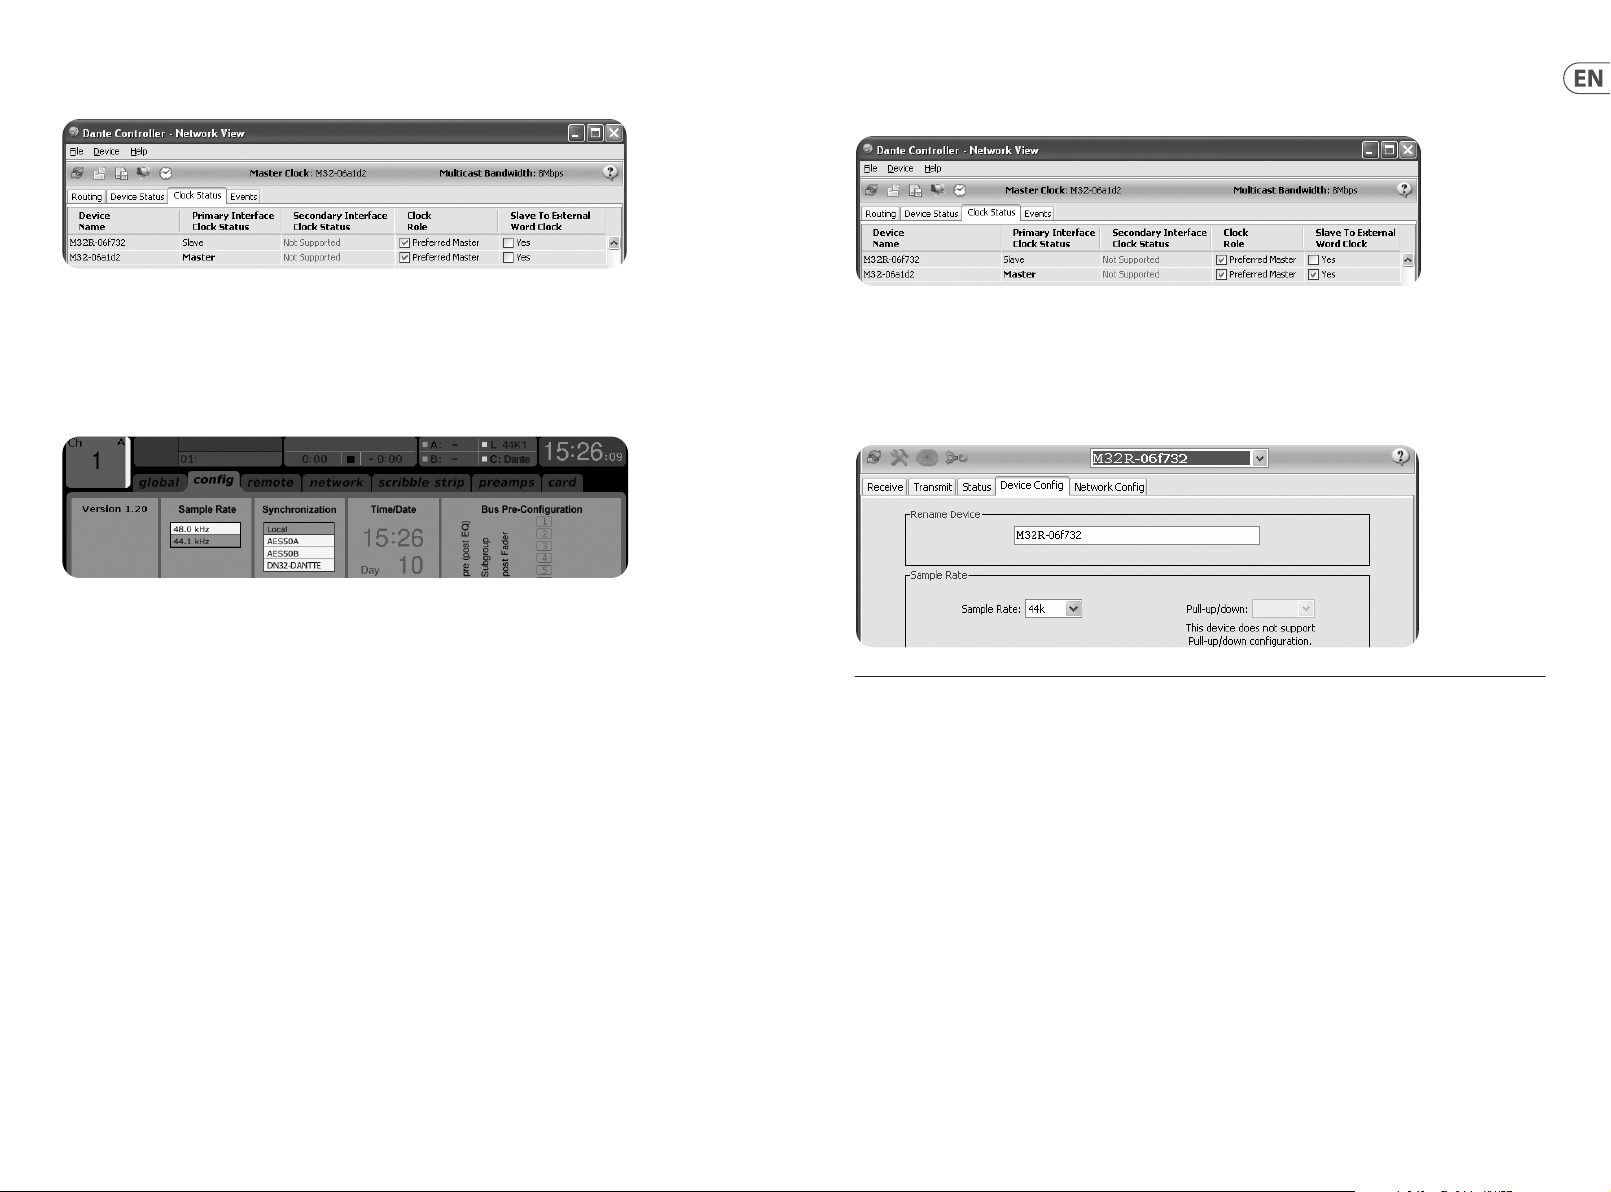
28 29Quick Start GuideDN32-DANTE
See the M32 lin e, which is congure d for Clock Status Ma ster in
the following example:
The Dante Con troller must now be c ongured for “Slave t o
Exter nal Word Clock” in t his application . See the M32
line, which i s congured Maste r in this example:
Note that th e check boxes for ’Slav e to External Word C lock’ are
unchecked in this application.
Alternative Synchronisation:
Use the inte rnal clock as mast er clock. In this ca se the
Setup/Con g page should look li ke this:
Note that th e status bar shows “L 4 4K1” and a green light fo r Local
(internal) c lock of 44.1 kHz.
The secon d green light “C: Dante ” indicates prope r installation of
the DN32-DANTE ca rd.
Renaming Dante Devices “Device View”
By defau lt, the DN32-DANTE card may sh ow up as “BKLYN-II-
06f732” i n the controller app. T he last six digit s represent a par t of
the card ’s Etherne t MAC address. Howeve r, t he controller’s Dev ice
View allows a ssigning a more des criptive name to th e network
device, se e example below.
7. Audinate Software Tools
Dante Controller
The Dante Con troller is a soft ware applicat ion provided by
Audinate wh ich allows users to co ngure and route au dio
around Dan te networks. I t is available for PCs r unning Windows
and Apple Ma cs running OSX 10.5. Dante Co ntroller must be
install ed on one or more PC/M ac computers on th e Dante
networ k in order to change any s ignal routing or cl ocking in the
networ k. Dante Controlle r is not required, wh en everythin g is
pre-co ngured, for run ning audio betwe en Dante devices over
the network.
Dante Virtual Soundcard
The Dante Vi rtual Soundca rd is a softwar e application tha t turns
your PC or Mac i nto a Dante-enabl ed device, allowing Dan te audio
trac to be t ransmitted and r eceived using the s tandard Etherne t
port. N o additional hardw are is required. O n Windows, the Dante
Virtu al Soundcard use s Steinberg’s ASIO audio i nterface, and ca n
be used wi th any audio applica tion that suppor ts ASIO or WDM.
On Mac OSX, t he Dante Virtual So undcard uses th e standard
Core Audio in terface, and can b e used by almost any s tandard
audio application.
Visit audi nate.com for furt her advice on downlo ading and
licensing these applications.
Page 16

30 31Quick Start GuideDN32-DANTE
1. Introducción
Dante es un pr otocolo de medios d igitales de alto re ndimiento
diseñado p ara entregar audi o a través de una red IP Eth ernet
estánd ar. La tarje ta DN32-DANTE permite qu e los mezcladores
digital es MIDAS aplicable s compartan has ta 32 x 32 canales de
audio con cu alquier red de dispo sitivos habilit ados para Dante a
través de un a conexión Ethern et única o redundan te. Utilizando
la infrae structura d e red existente a 100 M bit / so 1 Gbit / s,
el protoco lo Dante ofrece una t ransmisión muy es table y de
baja latencia para una variedad de aplicaciones profesionales
que unic an la distribuci ón de audio multica nal en múltiples
ubicaciones o familias de dispositivos.
4. Aline e ambos bordes de la t arjeta con los rie les de guía
dentro de la r anura e inserte c on cuidado la tarje ta en la
ranura. D ebe deslizarse h acia adentro sin una r esistencia
consider able. Empuje la tarje ta hasta el fondo e n la ranura
para ase gurarse de que los c ontactos de la tar jeta estén
insertados correctamente en el conector interior.
5. Fij e la tarjeta con los to rnillos incluido s. Tenga en cuenta que
pueden pr oducirse daño s o fallos de funcio namiento si no se
ja la tarje ta.
3. Requisitos
Hardware mínimo:
Basado e n Windows - Core 2 Du o CPU, 2 GHz
solicit ud - Puerto Et hernet
- 1 GB de RAM
Mac - CPU de 1,5 GHz
- Puerto Ethernet
- 512 MB de RAM
Sistemas operativos recomendados:
Ventanas: Window s Windows 7 de 32 bits o 64 b its,
Windows 8 de 32 bi ts o 64 bits
Mac: 10.6.8 Snow Leo pard, 10.7. 5 Lion,
10.8 Mountain L ion
La aplica ción Dante Control ler se proporcion a de forma gratuit a en
audinate.com.
La aplicación Dante Virtual Soundcard es opc ional en
audinate.com.
2. Instalación
Antes de ins talar la tarjeta D N32-DANTE en la ra nura de expansión
de su consol a, debe consultar kl arkteknik.com p ara vericar
si el rmwar e de la consola es compa tible con esa tarj eta. Le
recomendamos que consulte periódicamente la página del
produc to de su consola para o btener actualiz aciones del rmw are
de la consol a.
Precaución- antes de ins talar la tarjeta DN 32-DANTE en la
consola, debe asegurarse de que el interruptor de encendido de la
consola es té apagado. De lo cont rario, pueden pro ducirse averías o
descargas eléctricas.
1. A segúrese de qu e la batidora esté ap agada.
2. Aoje lo s 2 tornillos izquie rdo y derecho que su jetan
la ranura, lu ego retire la tapa d e la ranura o la tarjet a
actualmente instalada y guárdela en un lugar seguro.
3. Ante s de sacar la tarje ta DN32-DANTE de su bolsa pr otectora,
recomen damos tocar el chasi s metálico conec tado a tierra de
la consola p ara evitar desc argas electro státicas que af ecten
a los compon entes electr ónicos sensibles . Por lo general, es
una buena id ea sujetar la tarje ta por la placa fro ntal o por las
dos asas p equeñas, pero nunc a tocar los compon entes de la
placa de circuito directamente.
4. Placa de conector
• • 2x conectores R J45 con LED integra dos
• • El LED ACT / LINK (verde) se ilumin a en verde cuando exi ste
una conex ión de red IP válida.
• • 1 G LED (ámbar) se enciende cu ando se usa en una red d e 1
GBit / s.
• • 2x asas pequeñas (St) pa ra retirar la tarj eta de expansión
de la ranura
• • 2x tornillos ex teriores para ja r la tarjeta en la ranu ra
(tamaño M3 x 6).
• • 3 tornillos avellanad os que jan el PCBA al sop orte. ¡No los
quite!
Page 17

MIDAS M32
Router/Switch
Primary
Secondary
Laptop
Digital mixer with Dante card
32 33Quick Start GuideDN32-DANTE
5. Escenarios de conexión
5.1 M32 con conexión DN32-DANTE a la
red Dante
M32 router enr utador de red1 ➝ PC y otr os dispositivos d e audio
habilita dos para Dante, por eje mplo, consola digit al genérica con
tarjeta Dante
1
Para obte ner consejos s obre los enru tadores de r ed adecuad os para su uso co n redes
Dante, visite audinate.com
Aquí la PC real iza 3 tareas al mismo t iempo:
a) ejecu tar la aplicación D ante Controller par a el enrutamiento
b) ejecut ar la aplicación X32-Ed it, para el contro l remoto M32
c) eje cute Dante Virt ual Soundcard, DVS, p ara grabar /
TM
de señales
reprodu cir todos los canal es de audio de ambos me zcladores
5.2 M32 con conexión directa DN32DANTE a PC / Mac y tarjeta de sonido
virtual Dante
DVS2, para grab ar / reproducir has ta 32 x 32 canales
2
Para obte ner consejos s obre el uso y la co ncesión de lice ncias de Dante V irtual
Soundcard, visite audinate.com
MIDAS M32
5.3 M32 con infraestructura de red
redundante DN32-DANTE
M32 ➝ dos enrutadores separados con cableado
independiente ➝ M32 + DL16
Primary
Laptop
Primary
Router/Switch
MIDAS M32
M32 con inf raestr uctura d e red redund ante DANTE
Cambie l a pestaña d e congura ción de red d e Dante Contr oller
’Switched’ a ’Redundant’
Secondary
MIDAS M32
Secondary AES50
Router/Switch
DL16
Page 18

34 35Quick Start GuideDN32-DANTE
5.4 X32 con conexión DN32-DANTE a
Midas PRO2 vía DN9650 + tarjeta
Dante CM1
MIDAS Console
MIDAS M32
with DN32-DANTE
5.5 Dos consolas M32 con conexión
DN32-DANTE a DVS para grabar 64
pistas simultáneas
• • Ambas consolas deben tener instaladas tarjetas DN32-
DANTE. Conec te uno de los puer tos Ethernet DN32-DANTE e n
la consola A co n la tarjeta inst alada en la consola B.
• • Conecte el segun do puerto de la cons ola B, ya sea
direc tamente con el DAW-PC / Mac o med iante un enrutado r
de red al que te nga acceso el DAW. Este enlace lle vará los 64
canales hacia y desde ambas consolas.
• • Consejo: el control re moto Ethernet de la co nsola se puede
realizar a t ravés de la misma red. Pa ra el control remot o de
la consola A en e ste ejemplo, es suc iente usar un cabl e de
conexión corto que conecte el conector remoto de la consola
A con el puer to libre en DN32-DANTE. Dad o que ambos
puerto s en DN32-DANTE de la consola B ya e stán ocupados ,
necesit aría conectar u n cable separado a l enrutador de re d.
• • Abra el panel de cont rol del controlado r de la tarjeta de
sonido vi rtual Dante y encié ndalo.
• • Ejecute la aplicac ión Dante Controlle r para congurar la
bahía de conexión del canal virtual y enrutar los canales
entre Dant e Virtual Soundc ard y las consolas.
Laptop
for conguration
routing and mixer
remote control
Cat 5/6 AES50
@ 96 kHz
24 x 24 channels
KLARK TEKNIK DN9650
Network of Dante-enabled equipment
Router/Switch
Cat 5/6 Ethernet
@ 48 kHz Dante
32 x 32 channels
Cat 5/6 Ethernet,
Dante network @48 kHz
Midas M32
Console A
Midas M32
Console B
Dos cons olas M32 con co nexión DN32- DANTE a DVS par a grabar 64 p istas simu ltáneas
Router
(optional)
Laptop/DAW
Page 19

36 37Quick Start GuideDN32-DANTE
6. Conguración del mezclador
• • Las siguientes cua tro pantallas del M 32 tienen qu e ver con
la congur ación del DN32-DANTE y las señ ales hacia / desde
la tarjeta.
• • La pantalla SETUP / c ard muestra un grá co de la tarjeta
DN32-DANTE cuand o se ha instalado cor rectamente y o frece
consejos sobre la conguración.
• • La página ROUTING / ca rd out seleccion a los bloques de
canales q ue se proporciona rán al controlador d e red Dante.
(por ejemp lo, 8 salidas locale s y 3 x 8 señales del puer to
AES50 A)
• • La página SETUP / con g selecciona la fu ente de
sincroni zación y muest ra los indicadore s de estado en el área
’global’ supe rior (que normalmen te debería ser "C" par a la
tarjeta DN32-DANTE).
• • La página de inicio / R OUTING permite el pa rcheo de señales
desde la ta rjeta DN32-DANTE al proc esamiento del can al de
entrada. ( por ejemplo, canal 1-4 e n Aux In)
Tenga en cuenta q ue el enrutamient o de la red Dante debe
congurarse exclusivamente mediante la aplicación Dante
Controll er para Mac / PC. Las se ñales que se han enru tado
desde la ap licación Dante Cont roller a la tarjeta D N32-DANTE
están disponibles para parchear al enrutamiento del canal de
Sincronización
Se debe sel eccionar una fuen te de word clock maes tra para la red.
El reloj DN32-DANT E Brooklyn II VCXO of rece un jitter
extre madamente bajo. En es te caso, la página de in stalación /
conguración debería verse así:
Tenga en cuenta q ue la barra de est ado muestra "C: 4 4K1" y una luz
verde para u na sincronizac ión adecuada de 4 4,1 kH z con la tarjeta.
La segun da luz verde "C: Dante" indi ca la instalación c orrecta de
la tarjet a DN32-DANTE. La aplicac ión Dante Controlle r congura la
red para us ar el reloj DN32-DANTE VCXO en e sta aplicació n.
entrada en l a página de enrutam iento / inicio de la cons ola.
Consulte au dinate.com para obten er un conjunto comple to de
documen tación, pregunt as frecuentes y c onsejos del foro s obre
la congur ación de las aplicac iones Dante Contro ller y Dante
Virtual Soundcard.
Page 20

38 39Quick Start GuideDN32-DANTE
Vea la línea M32, que es tá congurada pa ra Clock Status Mas ter en
el siguiente ejemplo:
El control ador Dante ahora deb e congurarse com o "Esclavo de
Word Clock e xterno" en esta ap licación. Vea la línea M 32, que est á
congurada como maestra en este ejemplo:
Tenga en cuenta q ue las casillas de veri cación de "Es clavo de
Word Clock e xterno" no están m arcadas en esta ap licación.
Sincronización alternativa:
Utilice el r eloj interno como rel oj maestro. En est e caso, la página
de instalación / conguración debería verse así:
Tenga en cuenta q ue la barra de esta do muestra "L 44 K1" y u na luz
verde para e l reloj local (inter no) de 44,1 kHz.
La segun da luz verde "C: Dante" indi ca la instalación c orrecta de la
tarjet a DN32-DANTE.
Cambiar el n ombre de los dispos itivos Dante a "Vis ta de
dispositivos"
De forma p redeterminada, la t arjeta DN32-DANTE pue de aparecer
como “BKLYN-I I-06f732” en la ap licación del cont rolador. Los
últimos s eis dígitos repre sentan una part e de la dirección MAC
Etherne t de la tarjeta. Sin em bargo, la Vista de dis positivos
del controlador permite asignar un nombre más descriptivo al
disposit ivo de red, vea el ejempl o a continuación.
7. Herramientas de software de
Audinate
Controlador Dante
Dante Contr oller es una aplicac ión de softw are proporciona da por
Audinate qu e permite a los usuar ios congurar y enru tar audio
en redes Da nte. Está disponi ble para PC con Window s y Apple
Macs con OS X 10.5. Dante Controller deb e instalarse en u na o más
computa doras PC / Mac en la red Dan te para cambiar cua lquier
ruteo de s eñal o reloj en la red. No s e requiere Dante Cont roller,
cuando tod o está precong urado, para ejecu tar audio entre
disposit ivos Dante a través de la r ed.
Tarjeta de sonido virtual Dante
Dante Vir tual Soundcard e s una aplicación de s oftware que
convier te su PC o Mac en un disposi tivo habilitado p ara Dante,
lo que perm ite que el tráco de aud io Dante se transmit a y reciba
mediante e l puerto Ethern et estándar. No se requ iere hardware
adiciona l. En Windows, la tarje ta de sonido vir tual Dante utiliza
la inter faz de audio ASIO de Stei nberg y se puede ut ilizar con
cualquie r aplicación de aud io que admita ASIO o WDM . En Mac
OSX, la tarj eta de sonido vir tual Dante utiliz a la interfaz Cor e Audio
estánd ar y puede ser utiliz ada por casi cualq uier aplicación d e
audio estándar.
Visite aud inate.com para obtene r más consejos sobr e la descarga y
la licencia de estas aplicaciones.
Page 21

40 41Quick Start GuideDN32-DANTE
1. Avertissement
Dante est u n protocole multim édia numérique hau tes
perfo rmances conçu po ur fournir de l’audio su r un réseau IP
Etherne t standard. La ca rte DN32-DANTE permet a ux mélangeurs
numériq ues MIDAS applicabl es de partager j usqu’à 32 x 32 canaux
audio avec n’i mporte quel rés eau d’appareils comp atibles Dante
via une connexion Ethernet unique ou redondante. Utilisant
l’infr astructur e réseau exista nte à 100 Mbit / s ou 1 Gbit / s,
le protoco le Dante ore une tr ansmission très s table et à faible
latence pou r une variété d’applic ations profess ionnelles unian t
la distribution audio multicanal sur plusieurs emplacements ou
familles d’appareils.
4. Align ez les deux bords de l a carte avec les rai ls de guidage
à l’intér ieur de la fente et insé rez soigneusem ent la carte
dans la fente. I l devrait glisser s ans résistance co nsidérable.
Poussez la c arte à fond dans la f ente pour vous assur er que
les contac ts de la carte s ont correcte ment insérés dans le
connecteur à l’intérieur.
5. Fix ez la carte à l’aide des v is fournies. Sa chez que des
dommages ou des dysfonctionnements peuvent sur venir si
la carte n ’e st pas xée.
3. Exigences
Matériel minimum:
Basé sur Wi ndows - Process eur Core 2 Duo, 2 GHz
applicat ion - Port Ethe rnet
- 1 Go de RAM
Mac - Process eur 1,5 GHz
- Port Ethe rnet
- 512 Mo de RAM
Systèmes d’exploitation recommandés:
Les fenêt res: Window s Windows 7 32 bits ou 64 b its,
Windows 8 32 bi ts ou 64 bits
Mac: 10.6.8 Snow Leo pard, 10.7. 5 Lion,
10.8 Mountain L ion
Applica tion Dante Controll er fournie gratui tement sur
audinate.com.
Application Dante Virtual Soundcard en option sur audinate.com.
2. Installation
Avant d’ins taller la carte D N32-DANTE dans l ’e mplacement
d’extensi on de votre console, vo us devez vérier kla rkteknik.
com pour vér ier si le microlog iciel de la console p rend en charge
cette carte. Nous vous recommandons de consulter régulièrement
la page pro duit de votre conso le pour les mises à jou r du
microlo giciel de la console.
Mise en garde - avant d’inst aller la carte DN32-DANT E dans la
console, vous devez vous assurer que l’interrupteur d’alimentation
de la consol e est éteint. Sinon, d es dysfonct ionnements ou de s
chocs électriques peuvent sur venir.
1. A ssurez-vous que l ’alimenta tion de la table de mix age
est coup ée.
2. Des serrez les 2 vis gauc he et droite qui xen t le logement,
puis reti rez le couvercle du lo gement ou la cart e
actuellement installée et conservez-la en lieu sûr.
3. Avant d e retirer la cart e DN32-DANTE de son sac de
protection, nous vous recommandons de toucher le
châssis mé tallique mis à la terr e de la console pour év iter
les décharges électrostati ques aectant les composants
électroniques sensibles. Il est généralement judicieux de
tenir la car te soit par la plaqu e frontale, soit p ar les deux
petite s poignées, mais en ne t ouchant jamais dire ctement
les compo sants du circui t imprimé.
4. Plaque de connexion
• • 2x connecteur s RJ45 avec LED intégr ées
• • Le voyant ACT / LINK (vert) s’allum e en vert lorsqu ’une
connexi on réseau IP valide ex iste.
• • Le voyant 1 G (orange) s’allume lors qu’il est utilis é dans un
réseau à 1 Gb it / s.
• • 2x petites poign ées (St) pour retirer la c arte d’extensi on de
l’emplacement
• • 2x vis extérieu res pour xer la car te dans la fente (taille M 3
x 6).
• • 3x vis à tête fraisée xant le PCBA au suppor t. Ne les
supprimez pas!
Page 22

42 43Quick Start GuideDN32-DANTE
MIDAS M32
Router/Switch
Primary
Secondary
Laptop
Digital mixer with Dante card
5. Scénarios de connexion
5.1 M32 avec connexion DN32-DANTE au
réseau Dante
M32 ➝ rout eur réseau1 ➝ PC et autres p ériphérique s audio
compatibles Dante, par exemple console numérique générique
avec car te Dante
1
pour obte nir des conse ils sur les rout eurs réseau a pproprié s à utiliser ave c les réseau x
Dante, visitez audinate.com
Ici, le PC e ectue 3 tâches s imultanément:
a) exéc uter l’application Da nte Controller pou r le routage
du signal
b) exécute r l’application X32-Ed it, pour la télécomm ande M32
c) ex écuter Dante Vir tual Soundcard, DV S, pour
l’enregist rement / la lectu re de tous les canaux a udio des
deux mixeurs
TM
5.2 M32 avec connexion directe
DN32-DANTE à PC / Mac et carte son
virtuelle Dante
DVS2, pour l’enreg istrement / la lec ture jusqu’à 32 x 32 canau x
2
pour obte nir des conse ils sur l’utilis ation et la lice nce de la carte s on virtue lle Dante,
visitez audinate.com
MIDAS M32
5.3 M32 avec infrastructure réseau
redondante DN32-DANTE
M32 ➝ deux r outeurs séparé s avec câblage
indépendant ➝ M32 + DL16
Primary
Laptop
Primary
Router/Switch
MIDAS M32
M32 avec infrastructure réseau redondante DANTE
Change z l’onglet de co ngurat ion du résea u Dante Cont roller ’Swi tched’ en
’Redundant’
Secondary
MIDAS M32
Secondary AES50
Router/Switch
DL16
Page 23

44 45Quick Start GuideDN32-DANTE
5.4 X32 avec connexion DN32-DANTE à
Midas PRO2 via carte DN9650 +
CM1 Dante
MIDAS Console
MIDAS M32
with DN32-DANTE
5.5 Deux consoles M32 avec connexion
DN32-DANTE à DVS pour enregistrer
64 pistes simultanées
• • Les deux consoles d oivent avoir des car tes DN32-DANTE
install ées. Connecte z l’un des ports Eth ernet DN32-DANTE
sur la conso le A avec la carte ins tallée dans la conso le B.
• • Connectez le deu xième port de la co nsole B, soit direc tement
avec le DAW-PC / Mac, s oit via un routeur ré seau auquel
le DAW a accès. Ce lien tr ansportera le s 64 canaux vers et
depuis les deux consoles.
• • Conseil: la télécomma nde Ethernet de la con sole peut être
eec tuée sur le même rés eau. Pour la console de co ntrôle à
distanc e A dans cet exemple, il su t d’utiliser un cour t câble
de raccord ement reliant le conn ecteur distan t de la console
A au port li bre sur DN32-DANTE. Étant do nné que les deux
port s sur DN32-DANTE de la console B s ont déjà occupés,
vous devez r accorder un câble s éparé au routeur ré seau.
• • Ouvrez le panneau d e conguration du pi lote Dante Virtua l
Soundc ard et mettez-le s ous tension.
• • Exécutez l’applic ation Dante Contro ller pour congure r la
baie de patc h de canal virtu el et acheminer les c anaux entre
la carte s on virtuelle Da nte et les consoles .
Laptop
for conguration
routing and mixer
remote control
Cat 5/6 AES50
@ 96 kHz
24 x 24 channels
KLARK TEKNIK DN9650
Network of Dante-enabled equipment
Router/Switch
Cat 5/6 Ethernet
@ 48 kHz Dante
32 x 32 channels
Cat 5/6 Ethernet,
Dante network @48 kHz
Midas M32
Console A
Midas M32
Console B
Deux con soles M32 ave c connexi on DN32-DANTE à DVS p our enreg istrer 6 4 pistes sim ultanée s
Router
(optional)
Laptop/DAW
Page 24

46 47Quick Start GuideDN32-DANTE
6. Conguration du mélangeur
• • Les quatre écrans M32 suivants concernent la conguration
du DN32-DANTE et de s signaux de / vers la ca rte.
• • L’écran SE TUP / card ache un gr aphique de la cart e
DN32-DANTE lorsqu’elle a été correctement installée et
propose des conseils de conguration.
• • La page ROUTING / car d out sélectio nne les blocs de ca naux
qui seron t fournis au contrô leur de réseau Dante. (p ar
exemple 8 s orties local es et 3 x 8 signaux du por t A AES50)
• • La page SETUP / cong s électionne la s ource de
synchr onisation et ach e les indicateur s d’état dans la zone
«globale» supérieure (qui devrait normalement être «C»
pour la car te DN32-DANTE).
• • La page ROUTING / home p ermet de patcher l es signaux de la
carte D N32-DANTE ver s le traitement du can al d’entrée.
(par exemp le canal 1-4 sur Aux In)
Notez que le r outage réseau Dan te doit être congu ré
exclusive ment à l’aide de l’applicat ion Dante Controlle r pour
Mac / PC. Les si gnaux qui ont été ache minés de l’applicat ion
Dante Controller vers la carte DN32-DANTE sont disponibles
pour le racc ordement au routa ge du canal d’entrée sur l a page
Synchronisation
Une source d ’horloge de mot s maître doit êtr e sélectionné e pour
le réseau. L’horl oge DN32-DANTE Brookly n II VCXO ore une gigu e
extrê mement faible. Dan s ce cas, la page Setup / Co ng devrait
ressembler à ceci:
Notez que la b arre d’état ache «C: 4 4K1» et un voyant vert po ur
une sync hronisation cor recte de 44,1 kHz avec la ca rte.
Le deuxiè me voyant vert «C: Dan te» indique une ins tallation
correc te de la carte DN32-DANTE . L’applic ation Dante Contro ller
congure l e réseau pour utili ser l’horloge DN 32-DANTE VCXO dan s
cette application.
Routing / H ome de la console. Veuille z consulter audinate.c om
pour une do cumentation com plète, une FAQ et des consei ls de
forum sur l a conguration de s applications Dan te Controller et
Dante Virtual Soundcard.
Page 25

48 49Quick Start GuideDN32-DANTE
Voir la ligne M32, qui e st congurée po ur Clock Status Mas ter dans
l’exemple suivant:
Le contrôl eur Dante doit mainten ant être conguré p our «Slave to
Exter nal Word Clock» dans c ette applicat ion. Voir la ligne M32,
qui est con gurée Master dan s cet exemple:
Notez que le s cases à cocher «E sclave vers Word Cloc k externe» ne
sont pas co chées dans cett e application.
Synchronisation alternative:
Utilise z l’horloge inter ne comme horloge m aître. Dans ce cas,
la page Set up / Cong devrait re ssembler à ceci:
Notez que la b arre d’état ache «L 4 4K1» et un voyant ve rt pour
l’horlo ge locale (intern e) de 44,1 kHz.
Le deuxiè me voyant vert «C: Dan te» indique une ins tallation
correc te de la carte DN32-DANTE .
Renommer les appareils Dante «Device View»
Par défau t, la carte DN32-DANTE peu t apparaître com me
«BKLYN-II- 06f732» dans l’appl ication du contrô leur. Les six
dernier s chires repr ésentent une par tie de l’adresse MAC
Etherne t de la carte. Cepend ant, la vue des périp hériques du
contrôleur permet d’attribuer un nom plus descriptif au
périphérique réseau, voir l’exemple ci-dessous.
7. Outils logiciels Audinate
Contrôleur Dante
Le contrôl eur Dante est une app lication logici elle fournie par
Audinate qu i permet aux utili sateurs de congu rer et d’acheminer
l’audio autou r des réseaux Dante. Il e st disponible po ur les PC
exécut ant Windows et les Mac A pple exécutant O SX 10.5. Dante
Controll er doit être inst allé sur un ou plusieur s ordinateurs PC /
Mac sur le rés eau Dante an de modi er le routage ou l’h orloge
du signal sur l e réseau. Le contrô leur Dante n’est pas néces saire,
lorsqu e tout est précon guré, pour exécut er l’audio entre les
appareils Dante sur le réseau.
Carte son virtuelle Dante
La car te son virtuell e Dante est une applic ation logiciell e qui
transf orme votre PC ou Mac en u n appareil compati ble Dante,
permet tant au trac audi o Dante d’être transmi s et reçu à l’aide
du port Et hernet standa rd. Aucun matériel su pplémentaire
n’est requis. S ous Windows, la car te son virtue lle Dante utilise
l’inter face audio ASIO de Ste inberg et peut êtr e utilisée avec
toute appl ication audio pre nant en charge ASIO ou WD M. Sous
Mac OSX, la ca rte son virt uelle Dante utilise l ’interface Cor e Audio
standar d et peut être util isée par presque t outes les applica tions
audio standard.
Visitez au dinate.com pour plus d e conseils sur le téléc hargement
et la licence d e ces applications .
Page 26

50 51Quick Start GuideDN32-DANTE
1. Einführung
Dante ist ein leistungsstarkes digitales Medienprotokoll, das
Audio über ein Standard-Ethernet-IP-Netzwerk liefert. Mit der
DN32-DANTE-Karte können anwendbare MIDAS-Digitalmixer
über eine einzelne oder redundante Ethernet-Verbindung bis
zu 32 x 32 Audiokanäl e mit jedem Netz werk von Dante-f ähigen
Geräten gemeinsam nutzen. Unter Verwendung der vorhandenen
Netz werkinfrast ruktur mit 100 Mbi t / s oder 1 Gbit / s bietet
das Dante-Protokoll eine sehr stabile Übertragung mit geringer
Latenz für eine Vielzahl professioneller Anwendungen, die die
Mehrkanal-Audioverteilung über mehrere Standorte oder
Gerätefamilien vereinheitlichen.
4. Richten Sie beide Kanten der Karte an den Führungsschienen
im Steckpl atz aus und setze n Sie die Karte vors ichtig in den
Steckpla tz ein. Es sollte oh ne nennenswert en Widerstand
hineingleiten. Schieben Sie die Karte ganz in den Steckplatz,
um sicher zustellen, dass di e Kontakte der Kar te richtig in den
Anschluss im Inneren eingesetzt sind.
5. Befes tigen Sie die Karte mit den mitgelieferten Schrauben.
Beachten Sie, dass Schäden oder Fehlfunktionen auftreten
können, wenn d ie Karte nicht be festigt ist.
3. Bedarf
Mindesthardware:
Windows- basiert - Core 2 Duo CPU, 2 GHz
Anwendung - Ethernet Anschluss
- 1 GB RAM
Mac - 1,5 GHz CPU
- Ethernet Anschluss
- 512 MB RAM
Empfohlene Betriebssysteme:
Windows: Windows Windows 7 32-Bit oder 64-Bit,
Windows 8 32-Bi t oder 64-Bit
Mac: 10.6.8 Schne eleopard, 10.7.5 Löwe,
10.8 Berglöwe
Die Dante Con troller-Anwendung w ird kostenlos auf au dinate.com
zur Verfügung gestellt.
Dante Virtual Soundcard-Anwendung optional bei audinate.com.
2. Installation
Bevor Sie die DN32-DANTE-Karte im Erweiterungssteckplatz Ihrer
Konsole installieren, müssen Sie auf klarkteknik.com überprüfen,
ob die Konsolenrmware diese Karte unterstützt. Wir empfehlen,
dass Sie die P roduktseite I hrer Konsole regel mäßig auf Firmware Updates f ür die Konsole über prüfen.
Vor sicht- Bevor Sie die DN32-DANTE-Ka rte in die Konsole
einbauen, müssen Sie sicherstellen, dass der Netzschalter der
Konsole ausgeschaltet ist. Andernfalls können Fehlfunktionen
oder Stromschläge auf treten.
1. Stellen Sie sicher, dass der Mixer ausgeschaltet ist.
2. Löse n Sie die 2 Schrauben li nks und rechts , mit denen
der Steckp latz befesti gt ist. Entfer nen Sie dann die
Steckplatzabdeckung oder die derzeit installierte Karte und
bewahren Sie sie an einem sicheren Ort auf.
3. Bevo r Sie die DN32-DANTE-Kar te aus der Schutz hülle
nehmen, empfehlen wir, das geerdete Metallgehäuse
der Konsol e zu berühren, um zu ver hindern, dass
elektrostatische Entladungen die empndlichen
elektronischen Komponenten beeinträchtigen. Im
Allgemein en ist es eine gute Id ee, die Karte ent weder an der
Frontplat te oder an den beid en kleinen Grie n zu halten,
aber niemals die Komponenten auf der Leiterplatte direkt
zu berühren.
4. Anschlussplatte
• • 2x RJ45-Anschlüsse mit integrierten LEDs
• • Die ACT / LINK-LED (grün) leuc htet grün, wenn eine gü ltige
IP-Netzwerkverbindung besteht.
• • 1 G LED (gelb) leuchtet bei Ver wendung in einem 1 GBit /
s-Netzwerk.
• • 2x kleine Grie (St) zum Entfernen der Erweiterungskarte
aus dem Steck platz
• • 2x äußere Schrauben zur Befestigung der Karte im
Steckpla tz (Größe M3 x 6).
• • 3x S enkschrauben, mit denen die PCBA an der Halterung
befestigt ist. Entfernen Sie diese nicht!
Page 27

52 53Quick Start GuideDN32-DANTE
MIDAS M32
Router/Switch
Primary
Secondary
Laptop
Digital mixer with Dante card
5. Verbindungsszenarien
5.1 M32 mit DN32-DANTE-Verbindung
zum DanteTM-Netzwerk
M32 ➝ network router1 ➝ PC and other D ante-enabled a udio
devices, e.g . generic digtal co nsole with Dante ca rd
1
for advi ce on suitable n etwork ro uters for us e with Dante ne tworks v isit audinate .com
Hier führ t der PC 3 Aufgaben g leichzeitig aus:
a) run Dan te Controller app fo r signal routing
b) run X32-Edi t app, for M32 remote contr ol
c) ru n Dante Virtual So undcard, DVS, for re cording/playbac k of
all audio ch annels of both mixer s
5.2 M32 mit direkter DN32-DANTEVerbindung zu PC / Mac und Dante
Virtual Soundcard
DVS2, für Aufn ahme / Wiedergabe vo n bis zu 32 x 32 Kanälen
2
Ratsc hläge zur Verw endung und Liz enzierung d er Dante Virt ual Soundc ard finden Sie
unter audinate.com
MIDAS M32
5.3 M32 mit redundanter DN32-DANTENetzwerkinfrastruktur
M32 ➝ zwei separate Router mit unabhängiger
Verkabelung ➝ M32 + DL16
Primary
Laptop
Primary
Router/Switch
MIDAS M32
M32 mit redundanter DANTE-Netzwerkinfrastruk tur
Ändern Sie die Registerkarte "Netzwerkkonguration" von Dante Controller in
"Redundant".
Secondary
MIDAS M32
Secondary AES50
Router/Switch
DL16
Page 28

54 55Quick Start GuideDN32-DANTE
5.4 X32 mit DN32-DANTE-Verbindung zu
Midas PRO2 über DN9650 + CM1
Dante-Karte
MIDAS Console
Cat 5/6 AES50
@ 96 kHz
24 x 24 channels
KLARK TEKNIK DN9650
MIDAS M32
with DN32-DANTE
Cat 5/6 Ethernet
@ 48 kHz Dante
32 x 32 channels
5.5 Zwei M32-Konsolen mit DN32DANTE-Verbindung zum DVS zur
Aufnahme von 64 gleichzeitigen Spuren
• • Auf beiden Konsolen müssen DN32-DANTE-Karten installiert
sein. Verbinden Sie einen der DN32-DANTE-Ethernet-Ports
an Konsole A mi t der in Konsole B inst allierten Kar te.
• • Verbinde n Sie den zweiten Por t von Konsole B
entwed er direkt mit dem DAW-PC / Ma c oder über
einen Net zwerkroute r, au f den die DAW Zugri hat.
Diese Verbi ndung übertr ägt alle 64 Kanäle zu u nd von
beiden Konsolen.
• • Tipp: Die Ethernet-Fernbedienung der Konsole kann über
dasselbe Netzwerk erfolgen. Für die Fernsteuerung von
Konsole A in d iesem Beispiel is t es ausreichend, ei n kurzes
Patchkabel zu verwenden, das den Remote-Anschluss
von Konsole A m it dem freien Ansc hluss an DN32-DANTE
verbinde t. Da beide Ports a n DN32-DANTE von Konsole B
bereit s belegt sind, müss ten Sie ein separate s Kabel an den
Netzwerkrouter anschließen.
• • Önen Sie das Bedienfeld des Dante Virtual Soundcard-
Treibers und schalten Sie es ein.
• • Führen Sie die Dante Controller-Anwendung aus, um den
Patch-Schac ht für virtue lle Kanäle zu kongur ieren und die
Kanäle zw ischen der vir tuellen Dante Soun dcard und den
Konsolen weiterzuleiten.
Laptop
for conguration
routing and mixer
remote control
Cat 5/6 Ethernet,
Dante network @48 kHz
Router/Switch
Network of Dante-enabled equipment
Midas M32
Console A
Midas M32
Console B
Zwei M32-Ko nsolen mit D N32-DANTE-Ver bindung zu m DVS zur Aufn ahme von 64 gl eichzeit igen Spure n
Router
(optional)
Laptop/DAW
Page 29

56 57Quick Start GuideDN32-DANTE
6. Mixer-Setup
• • Die folgenden vier M32-Bildschirme haben mit der
Konguration des DN32-DANTE und der Signale zur / von der
Karte zu t un.
• • Der Bildschirm SE TUP / Karte zeigt ei ne Grak der
DN32-DANTE-Kar te, wenn diese korr ekt installie rt wurde,
und gibt Hinweise zur Einrichtung.
• • Auf der Seite ROUTING / Kartenausgang werden Kanalblöcke
ausgewählt, die dem Dante-Netzwerkcontroller zur
Verfügu ng gestellt werde n. (zB 8 lokale Ausgänge u nd 3 x 8
Signale von AE S50 Port A)
• • Auf der Seite SETUP / con g wird die Synchron isationsquell e
ausgewählt und Statusanzeigen im oberen Bereich ’global’
angezeigt (normalerweise sollte dies für die DN32-DANTEKarte „C“ s ein).
• • Die ROUTING / Homepag e ermöglicht das Pat chen von
Signalen vo n der DN32-DANTE-Karte a uf die
Eingangskanalverarbeitung. (zB Kanal 1-4 bei Aux In)
Beachten Sie, dass das Dante-Netzwerkrout ing ausschließlich
mit der Dante Controller-Anwendung für Mac / PC konguriert
werden mus s. Die Signale, die von de r Dante Controller Ap p an
die DN32-DANTE-K arte weitergel eitet wurden, könne n auf der
Routing- / Homepage der Konsole auf das Eingangskanal-Routing
Synchronisation
Für das Netzwerk muss eine Hauptworttaktquelle ausgewählt
werden. Di e DN32-DANTE Brooklyn II VC XO-Uhr bietet ex trem
wenig Jit ter. In diesem Fall sollte di e Setup / Cong-Seite
folgendermaßen aussehen:
Beachten S ie, dass in der Statusle iste „C: 44K1“ und grüne s Licht
für die or dnungsgemäße Sync hronisation von 4 4,1 k Hz mit der
Karte angezeigt werden.
Das zweit e grüne Licht „C: Dant e“ zeigt die ordnung sgemäße
Installa tion der DN32-DANTE-Kar te an. Die Dante Contr oller-App
konguriert das Netzwerk für die Verwendung der DN32-DANTE
VCXO-Uhr in dieser Anwendung.
gepatcht werden. Unter audinate.com nden Sie eine umfassende
Dokumentation, häug gestellte Fragen (FAQ) und Forenhinweise
zur Konguration der Anwendungen Dante Controller und Dante
Virtual Soundcard.
Page 30

58 59Quick Start GuideDN32-DANTE
Siehe die M32-Le itung, die im folge nden Beispiel fü r Clock Status
Master konguriert ist:
Der Dante -Controller mus s jetzt in dies er Anwendung für „Slave t o
External Word Clock“ konguriert sein. Siehe die M32-Leitung, die
in diesem Beispiel als Master konguriert ist:
Beachten S ie, dass die Kontrollk ästchen für "Slave to E xternal
Word Clock" in dieser Anwendung deaktiviert sind.
Alternative Synchronisation:
Verwende n Sie die interne Uhr als Ha uptuhr. In diesem Fall soll te
die Setup / Cong-Seite folgendermaßen aussehen:
Beachten S ie, dass in der Statusle iste „L 44K1“ und ein grü nes Licht
für den lok alen (internen) Takt von 4 4,1 kH z angezeigt werden.
Das zweit e grüne Licht „C: Dant e“ zeigt die ordnung sgemäße
Installa tion der DN32-DANTE-Kar te an.
Umbenennen von Dante-Geräten in „Geräteansicht“
Standardm äßig wird die DN32-DANTE-K arte in der Contro ller-App
möglicherweise als „BKLYN-II-06f732“ angezeigt. Die letzten
sechs Ziern repräsentieren einen Teil der Ethernet-MAC-Adresse
der Kar te. In der Geräteansic ht des Controller s können Sie dem
Netzwerkgerät jedoch einen aussagekräftigeren Namen zuweisen
(siehe Beispiel unten).
7. Software-Tools prüfen
Dante Controller
Der Dante Con troller ist eine von A udinate bereitge stellte
Softwareanwendung, mit der Benutzer Audio in DanteNetzwerken kongurieren und weiterleiten können. Es ist für
PCs mit Wi ndows und Apple Mac s mit OSX 10.5 verfüg bar. Dante
Controll er muss auf einem oder m ehreren PC / Mac-Comput ern
im Dante-Netzwerk installiert sein, um das Signal-Routing oder
die Taktung im N etzwerk zu änd ern. Dante Controll er ist nicht
erforderlich, wenn alles vorkonguriert ist, um Audio zwischen
Dante-Geräten über das Netzwerk auszuführen.
Virtuelle Dante-Soundkarte
Die Dante Virtual Soundcard ist eine Sof twareanwendung,
die Ihren PC oder Mac in ein Dante-fähiges Gerät verwandelt
und das Senden und Empfangen von Dante-Audioverkehr über
den Standard-Ethernet-Port ermöglicht. Es ist keine zusätzliche
Hardware e rforderlic h. Unter Windows ver wendet die Dante
Virtu al Soundcard das A SIO-Audio-Int erface von Steinbe rg
und kann mit jeder Audioanwendung verwendet werden,
die ASIO od er WDM unterstüt zt. Unter Mac OS X ver wendet
die Dante Virtual Soundcard die Standard-Core -AudioSchnit tstelle und kann v on fast jeder Stan dard-Audioanwend ung
verwendet werden.
Besuche n Sie audinate.com, um weit ere Information en zum
Herunterladen und Lizenzieren dieser Anwendungen zu erhalten.
Page 31

60 61Quick Start GuideDN32-DANTE
1. Introduction
Dante é um prot ocolo de mídia digit al de alto desempe nho
projeta do para fornece r áudio em uma rede IP Ethe rnet padrão. A
placa DN32-DANTE p ermite que mixer s digitais MIDAS apli cáveis
compar tilhem até 32 x 32 canais de áudi o com qualquer rede de
disposit ivos habilitado s para Dante por meio de u ma conexão
Etherne t única ou redundan te. Usando a infrae strutura de red e
existe nte a 100 Mbit / s ou 1 Gbit / s, o pro tocolo Dante ofere ce
transmis são muito estáve l e de baixa latência par a uma variedade
de aplicativos prossionais unicando a distribuição de áudio
multica nal em vários locai s ou famílias de disp ositivos.
2. Instalação
Antes de ins talar a placa DN32-DANTE no s lot de expansão de s eu
console, vo cê deve vericar kla rkteknik.com p ara vericar se o
rmware do c onsole suport a essa placa. Rec omendamos que você
veriqu e periodicament e a página de produto d o console para
atualizações de rmware do console.
Cuidado - a ntes de instalar a pl aca DN32-DANTE no console,
certi que-se de que o bot ão liga / desliga do cons ole esteja
desligad o. De outra forma, po dem ocorrer malf uncionamentos o u
choque elétrico.
1. C ertique-s e de que o mixer está de sligado.
2. Afro uxe os 2 parafuso s esquerdo e direi to que prendem o slot
e, em seguid a, remova a tampa do slot o u a placa atualmente
instala da e guarde-a em um loc al seguro.
3. Ante s de remover a placa DN32-DANT E de sua embalagem
protetor a, recomendamos to car no chassi de met al aterrado
do console p ara evitar que des cargas eletro státicas afet em
os compon entes eletrônico s sensíveis. Em gera l, é uma
boa ideia s egurar a placa pela p laca frontal ou p elas duas
pequena s alças, mas nunca toc ar os componente s da placa
de circuito diretamente.
4. Alinh e ambas as bordas da pla ca com os trilhos- guia dentro
do slot e insir a cuidadosamen te a placa no slot. Deve
deslizar sem qualquer resistência considerável. Empurre
o cart ão totalmente para d entro do slot para gar antir que
os contato s do cartão est ejam inseridos cor retamente no
conector interno.
5. Ape rte a placa usan do os parafusos in cluídos. Estej a ciente
de que pode m ocorrer danos ou ma u funcionamento s e o
cart ão não for preso.
3. Requisitos
Hardware mínimo:
Baseado e m Windows - CPU Core 2 Duo, 2 GH z
inscriç ão - Conexão de Red e
- 1 GB de R AM
Mac - CPU de 1,5 GHz
- Conexão de Rede
- 512 MB de RAM
4. Placa Conectora
• • 2 conectores R J45 com LEDs integrad os
• • O LED ACT / LINK (verde) acende em ver de quando existe u ma
conexão de rede IP válida.
• • O LED 1 G (âmbar) acende quando us ado em uma rede de 1
GBit / s.
• • 2x pequenas alça s (St) para rem over o cartão de ex pansão
do slot
• • 2 parafusos ex ternos para xar a p laca no slot (tamanho
M3 x 6).
• • 3 parafusos esc areados que xam o PC BA ao suporte. Não
remova isso!
Sistemas operacionais recomendados:
Janelas: Window s Windows 7 de 32 bits ou 6 4 bits,
Windows 8 de 32 bi ts ou 64 bits
Mac: 10.6.8 Leopa rdo da neve, 10.7.5 Leão,
10.8 Leão da mont anha
O aplicati vo Dante Controller é f ornecido grat uitamente em
audinate.com.
Aplicativo Dante Virtual Soundcard opcional em audinate.com.
Page 32

62 63Quick Start GuideDN32-DANTE
MIDAS M32
Router/Switch
Primary
Secondary
Laptop
Digital mixer with Dante card
5. Cenários de conexão
5.1 M32 com conexão DN32-DANTE à
rede Dante
M32 ➝ rotea dor de rede 1 ➝ PC e outro s dispositivos de á udio
habilita dos para Dante, por ex emplo, console digi tal genérico com
placa Dante
1
para obte r conselhos s obre roteado res de rede ade quados par a uso com rede s Dante,
visite audinate.com
Aqui, o PC exec uta 3 tarefas si multaneamente:
a) exec ute o aplicativo Dant e Controller para ro teamento
b) execute o a plicativo X32-Edit , para controle rem oto M32
c) ex ecute Dante Virt ual Soundcard, DVS, p ara gravação /
TM
de sinal
reprodu ção de todos os cana is de áudio de ambos os mi xers
5.2 M32 com conexão direta DN32DANTE para PC / Mac e placa de som
virtual Dante
DVS2, para grava ção / reproduçã o de até 32 x 32 canais
2
para obte r conselhos s obre como usa r e licenciar a plac a de som Dante Vi rtual, visi te
audinate.com
MIDAS M32
5.3 M32 com infraestrutura de rede
redundante DN32-DANTE
M32 ➝ dois ro teadores separa dos com ação
independente ➝ M32 + DL16
Primary
Laptop
Primary
Router/Switch
MIDAS M32
Secondary
M32 com inf raestr utura de re de redunda nte DANTE
Altere a g uia de cong uração de re de do Dante Co ntroller ’ Switched ’ para ’Red undant’
MIDAS M32
Secondary AES50
Router/Switch
DL16
Page 33

64 65Quick Start GuideDN32-DANTE
5.4 X32 com conexão DN32-DANTE a
Midas PRO2 via cartão DN9650 +
CM1 Dante
MIDAS Console
MIDAS M32
with DN32-DANTE
5.5 Dois consoles M32 com conexão
DN32-DANTE para DVS para gravação de
64 trilhas simultâneas
• • Ambos os consoles p recisam ter plac as DN32-DANTE
instala das. Conecte uma da s portas Ether net DN32-DANTE no
console A co m a placa instalada n o console B.
• • Conecte a segund a porta do conso le B, diretamente com o
DAW-PC / Mac ou por me io de um roteador de red e ao qual o
DAW tem acesso. Es te link levará todos o s 64 canais de e para
os dois consoles.
• • Dica: O controle rem oto Ethernet do cons ole pode ser
feito na me sma rede. Para o consol e de controle remoto A
neste exe mplo, é suciente us ar um cabo de patch cu rto
conec tando o conector r emoto do console A com a p orta livre
no DN32-DANTE. Com o ambas as portas n o DN32-DANTE do
console B já e stão ocupadas , você precisará co nectar um
cabo sep arado ao roteador de r ede.
• • Abra o painel de contr ole do driver da plac a de som virtual
Dante e ligue -o.
• • Execute o aplica tivo Dante Controlle r para congurar o pa tch
bay do canal v irtual e rotear os c anais entre a placa d e som
Dante Vir tual e os consoles.
Laptop
for conguration
routing and mixer
remote control
Cat 5/6 AES50
@ 96 kHz
24 x 24 channels
KLARK TEKNIK DN9650
Network of Dante-enabled equipment
Router/Switch
Cat 5/6 Ethernet
@ 48 kHz Dante
32 x 32 channels
Cat 5/6 Ethernet,
Dante network @48 kHz
Midas M32
Console A
Midas M32
Console B
Dois con soles M32 com c onexão DN32- DANTE para DV S para grava ção de 64 tr ilhas simul tâneas
Router
(optional)
Laptop/DAW
Page 34

66 67Quick Start GuideDN32-DANTE
6. Conguração do Mixer
• • As quatro telas M32 a seg uir têm a ver com a congur ação do
DN32-DANTE e dos sin ais de / para a placa.
• • A tela CONFIGURAÇÃO / placa m ostra um gráco da p laca
DN32-DANTE quand o ela foi instalada co rretamente e
oferece c onselhos sobre a co nguração.
• • A página ROUTING / car d out seleciona blo cos de canais que
serão fo rnecidos ao cont rolador de rede Dant e. (por
exemplo, 8 s aídas locais e 3 x 8 sinais d a porta A AES50)
• • A página SETUP / cong s eleciona a fonte de si ncronização e
mostra o s indicadores de s tatus na área ’global’ s uperior
(que normalm ente deve ser “C” para pla ca DN32-DANTE).
• • A página inicial / ROUT ING permite o patch de s inais da placa
DN32-DANTE para o p rocessamento do c anal de entrada.
(por exemp lo, canal 1-4 em Aux In)
Obser ve que o roteamento da re de Dante deve ser cong urado
exclusiv amente usando o apli cativo Dante Contr oller para Mac /
PC. Os sinai s que foram roteado s do aplicativo Dante Co ntroller
para a plac a DN32-DANTE estão dispo níveis para patchi ng para
o roteament o do canal de entrada n a página Routing / Hom e
Sincronização
Uma fonte me stre de wordcloc k deve ser selecio nada para a rede.
O relógio DN 32-DANTE Broo klyn II VCXO ofere ce jitter
extre mamente baixo. Nes te caso, a página Set up / Cong deve ser
semelhan te a esta:
Obser ve que a barra de sta tus mostra “C: 44 K1” e u ma luz verde
para sinc ronização adeq uada de 44,1 kHz com o cart ão.
The secon d green light “C: Dante ” indicates prope r installation of
the DN32-DANTE ca rd. The Dante Contro ller app congures t he
networ k for using the DN32-DANTE VC XO clock in this appl ication.
do console. C onsulte audinate.com p ara obter um conjunto
abrangente de documentação, perguntas frequentes e conselhos
do fórum s obre a conguraçã o dos aplicativos D ante Controller e
Dante Virtual Soundcard.
Page 35

68 69Quick Start GuideDN32-DANTE
Siehe die M32-Le itung, die im folge nden Beispiel fü r Clock Status
Master konguriert ist:
The Dante Con troller must now be c ongured for “Slave t o
Exter nal Word Clock” in t his application . See the M32 line, which is
congured Master in this example:
Beachten S ie, dass die Kontrollk ästchen für "Slave to E xternal
Word Clock" in dieser Anwendung deaktiviert sind.
Alternative Synchronisation:
Verwende n Sie die interne Uhr als Ha uptuhr. In diesem Fall soll te
die Setup / Cong-Seite folgendermaßen aussehen:
Beachten S ie, dass in der Statusle iste „L 44K1“ und ein grü nes Licht
für den lok alen (internen) Takt von 4 4,1 kH z angezeigt werden.
Das zweit e grüne Licht „C: Dant e“ zeigt die ordnung sgemäße
Installation der DN32-DANTE-Karte an.
Renomeando dispositivos Dante para "Visualização
de dispositivos"
Por padrão, o c artão DN32-DANTE pod e aparecer como
“BKLYN-II- 06f732” no aplic ativo do controlad or. Os últimos seis
dígitos re presentam uma pa rte do endereço Et hernet MAC da
placa. No en tanto, o Device View do c ontrolador perm ite atribuir
um nome mais d escritivo ao dis positivo de rede, vej a o
exemplo ab aixo.
7. Ferramentas de software Audinate
Dante Controller
O Dante Contr oller é um aplicati vo de software f ornecido pela
Audinate qu e permite aos usuár ios congurar e rote ar áudio
nas redes D ante. Ele está dispo nível para PCs com Wi ndows e
Apple Mac s com OSX 10.5. O Dante Controll er deve ser instala do
em um ou mais com putadores PC / Mac n a rede Dante para
alterar qua lquer roteamento de s inal ou clock na rede. O D ante
Controll er não é necessári o, quando tudo está p ré-congurad o,
para exec utar áudio entre d ispositivos Dante n a rede.
Placa de Som Virtual Dante
O Dante Vir tual Soundcard é u m aplicativo de sof tware que
transf orma seu PC ou Mac em um di spositivo habili tado para
Dante, perm itindo que o tráfe go de áudio Dante seja t ransmitido
e recebid o usando a porta Et hernet padrão. N enhum hardware
adiciona l é necessário. No Wi ndows, a placa de som Da nte Virtual
usa a inter face de áudio ASIO d a Steinberg e pode ser u sada
com qualque r aplicativo de áudi o que suporte ASI O ou WDM.
No Mac OSX, a pl aca de som Dante Vir tual usa a interf ace Core
Audio padr ão e pode ser usada po r quase todos os apli cativos de
áudio padr ão.
Visite aud inate.com para obter ma is conselhos sobr e como baixar
e licenciar esses aplicativos.
Page 36

70 71Quick Start GuideDN32-DANTE
1. Introduzione
Dante è un prot ocollo multimed iale digitale ad alte p restazioni
proget tato per fornir e audio su una rete IP Ethe rnet standard . La
scheda DN 32-DANTE conse nte ai mixer digital i MIDAS applicabili
di condiv idere no a 32 x 32 canali audio co n qualsiasi rete di
dispositivi abilitati Dante tramite connessione Ethernet singola
o ridonda nte. Utilizzando l ’infrastr uttura di rete es istente a 100
Mbit / so 1 Gbi t / s, il protocollo Dant e ore una trasmis sione
molto st abile a bassa latenz a per una varietà di a pplicazioni
professionali che uniscono la distribuzione audio multicanale su
più posizi oni o famiglie di disp ositivi.
2. Installazione
Prima di ins tallare la scheda D N32-DANTE nello slot di espa nsione
della tua con sole, devi control lare klarktekn ik.com per veric are
se il rmwar e della console supp orta quella sch eda. Si consiglia di
controll are periodicam ente la pagina del pro dotto della conso le
per gli aggiornamenti del rmware della console.
Attenzione - prima di inst allare la scheda DN32-DAN TE
nella conso le, è necessario as sicurarsi che l ’interrutto re di
alimenta zione della consol e sia spento. In caso con trario,
potrebbero vericarsi malfunzionamenti o scosse elettriche.
1. A ssicurati che il m ixer sia spento.
2. Allen tare le 2 viti a sinist ra ea destra che ssano lo slot,
quindi ri muovere il coperchi o dello slot o la scheda
attualm ente installata e co nservarla in un l uogo sicuro.
3. Pri ma di rimuovere la sch eda DN32-DANTE dalla sua cus todia
protet tiva, si consiglia di to ccare il telaio met allico con messa
a terra del la console per evit are scariche ele ttrostatic he che
interessano i componenti elettronici sensibili. In genere è
una buona id ea tenere la scheda p er il frontalino o p er le
due piccole m aniglie, ma senza mai t occare dirett amente i
componenti sul circuito stampato.
4. Allin eare entrambi i bor di della scheda con le g uide
all’inter no dello slot e inser ire con cautela la sc heda
nello slot. Dovrebbe scorrere senza alcuna resistenza
consider evole. Spingere la sc heda no in fondo nell o slot per
assicur arsi che i contat ti della scheda sian o correttame nte
inseriti nel connettore all’interno.
5. Fis sare la scheda uti lizzando le vit i incluse. Tenere prese nte
che potrebbero vericarsi danni o malfunzionamenti se la
scheda no n è ssata.
3. Requisiti
Hardware minimo:
Basato su W indows - CPU Core 2 D uo, 2 GHz
applica zione - Por ta Ethernet
- 1 GB di RA M
Mac - CPU da 1,5 GHz
- Por ta Ethernet
- 512 MB di RAM
4. Piastra connettore
• • 2x connettori R J45 con LED integrat i
• • Il LED ACT / LINK (verde) si accende i n verde quando esist e
una connessione di rete IP valida.
• • 1 LED G (ambra) si accende se util izzato in una rete da 1
GBit / s.
• • 2x piccole maniglie (St) pe r rimuovere la sche da di
espansione dallo slot
• • 2x viti esterne p er ssare la sched a nello slot (dimensioni
M3 x 6).
• • 3 viti a testa svas ata che ssano il PC BA alla staa. Non
rimuoverli!
Sistemi operativi consigliati:
Finest re: Window s Windows 7 a 32 o 64 bit,
Windows 8 a 32 o 64 b it
Mac: 10.6.8 Snow Leo pard, 10.7. 5 Lion,
10.8 Mountain L ion
Applica zione Dante Control ler fornita grat uitamente su
audinate.com.
Applicazione Dante Virtual Soundcar d opzionale su audinate.com.
Page 37

72 73Quick Start GuideDN32-DANTE
MIDAS M32
Router/Switch
Primary
Secondary
Laptop
Digital mixer with Dante card
5. Scenari di connessione
5.1 M32 con connessione DN32-DANTE
alla rete DanteTM
M32 ➝ rout er di rete1 ➝ PC e altri disposi tivi audio abilit ati per
Dante, ad es. Co nsole digtal gene rica con scheda Da nte
1
per consi gli sui router di r ete adatti d a utilizz are con le reti Dan te, visitare a udinate.com
Qui il PC ese gue 3 attività c ontemporaneame nte:
a) eseg uire l’app Dante Contro ller per l’instr adamento
del segnale
b) esegui re l’app X32-Edit, per il con trollo remoto M32
c) es eguire Dante Vir tual Soundcard , DVS, per la registra zione /
riprodu zione di tutti i c anali audio di entra mbi i mixer
5.2 M32 con connessione diretta
DN32-DANTE a PC / Mac e Dante
Virtual Soundcard
DVS2, per la regi strazione / rip roduzione no a 32 x 32 canali
2
per consi gli sull’utili zzo e la licenza d ella Dante Vir tual Soundc ard visita au dinate.com
MIDAS M32
5.3 M32 con infrastruttura di rete
ridondante DN32-DANTE
M32 ➝ due rou ter separati con c ablaggio
indipendente ➝ M32 + DL16
Primary
Laptop
Primary
Router/Switch
MIDAS M32
M32 con infrastruttura di rete ridondante DANTE
Modicare la scheda della congurazione di rete di Dante Controller
"Switched" in "Redundant"
Secondary
MIDAS M32
Secondary AES50
Router/Switch
DL16
Page 38

74 75Quick Start GuideDN32-DANTE
5.4 X32 con connessione DN32-DANTE a
Midas PRO2 tramite DN9650 + scheda
Dante CM1
MIDAS Console
MIDAS M32
with DN32-DANTE
5.5 Due console M32 con connessione
DN32-DANTE a DVS per la registrazione di
64 tracce simultanee
• • Entrambe le consol e devono avere le sche de DN32-DANTE
installa te. Collegare una dell e porte Etherne t DN32-DANTE
sulla conso le A con la scheda ins tallata nella conso le B.
• • Collegare la second a porta della cons ole B, direttam ente con
la DAW-PC / Mac o trami te un router di rete a cu i la DAW ha
accesso. Qu esto collegamen to trasporter à tutti i 64 canal i da
e verso ent rambe le console.
• • Suggerimento: il controllo remoto Ethernet della console può
essere e seguito sulla ste ssa rete. Per il contro llo remoto della
console A in q uesto esempio, è su ciente utiliz zare un cavo
patch cor to che collega il conn ettore remoto d ella console
A con la por ta libera su DN32-DANTE. Poi ché entrambe le
porte su D N32-DANTE della console B so no già occupate,
sarà nece ssario collega re un cavo separato al r outer di rete.
• • Aprire il pannello d i controllo del dri ver Dante Virtual
Soundc ard e accenderlo.
• • Eseguire l’applica zione Dante Controller per congurare il
patch bay del canale virtuale e instradare i canali tra Dante
Virtu al Soundcard e le con sole.
Laptop
for conguration
routing and mixer
remote control
Cat 5/6 AES50
@ 96 kHz
24 x 24 channels
KLARK TEKNIK DN9650
Network of Dante-enabled equipment
Router/Switch
Cat 5/6 Ethernet
@ 48 kHz Dante
32 x 32 channels
Cat 5/6 Ethernet,
Dante network @48 kHz
Midas M32
Console A
Midas M32
Console B
Two M32 conso les with DN32- DANTE conne ction to DV S for recor ding 64 simu ltaneou s tracks
Router
(optional)
Laptop/DAW
Page 39

76 77Quick Start GuideDN32-DANTE
6. Mixer Setup
Le seguen ti quattro sche rmate M32 hanno a che fare c on la
congura zione del DN32-DANTE e dei se gnali da / per la sched a.
• • La schermata SET UP / scheda mostr a un’immagine della
scheda DN 32-DANTE quand o è stata installa ta correttam ente
e ore consigli sulla congurazione.
• • La pagina ROUTING / ca rd out seleziona i b locchi di canali che
verranno f orniti al contro ller di rete Dante. (ad es. 8 us cite
locali e 3 x 8 se gnali dalla port a AES50)
• • La pagina SETUP / con g seleziona la sorg ente di
sincroni zzazione e mos tra gli indicato ri di stato nell’area
"globale" superiore (che normalmente dovrebbe essere "C"
per la sche da DN32-DANTE).
• • La pagina ROUTING / ho me consente l’assegn azione dei
segnali dalla scheda DN32-DANTE all’elaborazione del canale
di ingres so. (es. canale 1-4 su Aux In)
Si noti che il r outing di rete Dante d eve essere congu rato
esclusivamente utiliz zando l’applicazione Dante Controller
per Mac / PC. I s egnali che sono st ati instradati da ll’app Dante
Controll er alla scheda DN32-DANTE so no disponibili per
l’assegna zione al routing de l canale di ingress o nella pagina
Sincronizzazione
È necess ario selezionar e una sorgente di word c lock master per la
rete. L’orologio DN32-DANTE Br ooklyn II VCXO or e un jitter
estrem amente basso. In ques to caso la pagina S etup / Cong
dovrebb e essere simile a que sta:
Notare ch e la barra di stato mo stra "C: 44K1" e una luce ver de per
la corret ta sincroniz zazione di 44,1 kHz con la sc heda.
La secon da luce verde “C: Dante” in dica la corrett a installazion e
della sche da DN32-DANTE. L’a pp Dante Controller c ongura
la rete per l ’utiliz zo dell’orologio DN32-DANTE VC XO in
questa applicazione.
Routing / H ome della console. Fare ri ferimento a audin ate.com
per una serie completa di documentazione, domande frequenti
e consigli sui forum sulla congurazione delle applicazioni Dante
Controller e Dante Virtual Soundcard.
Page 40

78 79Quick Start GuideDN32-DANTE
Vedere la riga M 32, che è congurata pe r Clock Status Mast er nel
seguente esempio:
Dante Contr oller deve ora esse re congurato per "S lave to External
Word Clock " in questa applic azione. Vedere la riga M 32, che è
congurata come Master in questo esempio:
Notare ch e le caselle di contr ollo per "Slave to Ex ternal Word
Clock" sono deselezionate in questa applicazione.
Sincronizzazione alternativa:
Usa l’orolog io interno come orol ogio principal e. In questo caso la
pagina Se tup / Cong dovrebb e essere simile a que sta:
Notare ch e la barra di stato mo stra "L 44K1" e una luce ver de per il
clock loc ale (interno) di 44,1 kHz.
La secon da luce verde “C: Dante” in dica la corrett a installazion e
della sche da DN32-DANTE.
Ridenominazione dei dispositivi Dante "Vista dispositivo"
Per impostazione predenita, la scheda DN32-DANTE potrebbe
essere visualizzata come "BKLYN-II-06f 732" nell’app controller.
Le ultime s ei cifre rappre sentano una par te dell’indiriz zo MAC
Etherne t della scheda. Tutta via, la Vista dispos itivo del controll er
consente d i assegnare un nome p iù descritt ivo al dispositivo di
rete, veder e l’esempio di seguit o.
7. Strumenti software Audinate
Dante Controller
Dante Contr oller è un’applicazio ne software f ornita da Audinat e
che conse nte agli utenti di con gurare e instrada re l’audio attorno
alle reti Da nte. È disponibile per P C con Windows e Apple M ac
con OSX 10.5. Dante Con troller deve esse re installato su uno o p iù
computer P C / Mac sulla rete Dante pe r modicare l’in stradamento
o il clock de l segnale nella rete. D ante Controller non è n ecessario,
quando tut to è precongur ato, per eseguire l ’a udio tra i disposit ivi
Dante sulla re te.
Dante Virtual Soundcard
Dante Vir tual Soundcard è u n’applica zione soft ware che trasfo rma
il tuo PC o Mac in u n dispositivo abil itato per Dante, cons entendo
la trasmis sione e la ricezione d el traco audio Dante u tilizzando
la port a Ethernet stand ard. Non è richies to alcun hardware
aggiunti vo. Su Windows, Dante Vir tual Soundca rd utilizza
l’inter faccia audio ASI O di Steinberg e può ess ere utilizzat a con
qualsiasi ap plicazione audi o che supporti A SIO o WDM. Su Mac
OSX, Dante Vi rtual Soundc ard utilizza l ’interfaccia Co re Audio
standar d e può essere utili zzata da quasi tu tte le applicazi oni
audio standard.
Visita au dinate.com per ulteri ori consigli sul dow nload e sulla
licenza di queste applicaz ioni.
Page 41

80 81Quick Start GuideDN32-DANTE
1. Invoering
Dante is een k rachtig digitaa l mediaprotocol d at is ontworpen om
audio te leve ren via een standaa rd Ethernet IP-ne twerk. Met de
DN32-DANTE-kaart kunnen toepasselijke MIDA S digitale mixers
tot 32 x 32 audiokan alen delen met elk net werk van Danteapparaten via een enkele of redundante Ethernet-verbinding.
Door gebr uik te maken van de bes taande netwer kinfrastru ctuur
van 100 Mbit / s of 1 G bit / s, biedt het Dant e-protocol een z eer
stabie le transmissie met la ge latentie voor een ve rscheidenhei d
aan professionele toepassingen die meerkanaals audiodistributie
over meerdere locaties of apparaatfamilies verenigen.
2. Installatie
Voordat u de DN32-DANT E-kaart in de uit breidingssleu f van
uw consol e installeert , moet u klarktek nik.com controle ren om
te controleren of de consolermware die kaart ondersteunt.
We raden u aan om re gelmatig de produ ctpagina van uw c onsole
te control eren op rmware- updates voor de cons ole.
Voorzichtigheid - Voordat u de DN32-DANTE -kaart in de conso le
install eert, moet u er voor zorgen dat de aan / u it-schakelaar
van de conso le is uitgeschakel d. Anders kunnen s toringen of
elektrische schokken optreden.
1. Z org ervoor dat de mi xer is uitgeschake ld.
2. Draa i de 2 schroeven link s en rechts los waa rmee de sleuf
is bevest igd, verwijder ve rvolgens de sleu fafdekking of d e
momentee l geïnstalleer de kaart en bewaar d eze op een
veilige plaats.
3. Voord at u de DN32-DANTE-kaart u it de bescherme nde tas
haalt, rad en we u aan het geaarde me talen chassis van de
console aa n te raken om elektro statische ont ladingen te
voorkomen die de gevoelige elektronische componenten
aantast en. Het is over het algem een een goed idee o m de
kaart bi j de voorplaat of bij de t wee kleine hand vatten vast
te houden, ma ar de componenten op d e printplaat nooi t
rechts treeks aan te ra ken.
4. Lijn b eide randen van de kaa rt uit met de gelei derails in
de sleuf en s teek de kaart voo rzichtig in de sleu f. Het moet
zonder noemenswaardige weerstand naar binnen glijden.
Duw de kaar t helemaal in de sleu f om ervoor te zorge n dat
de contac ten van de kaart co rrect in de conne ctor binnenin
worden gestoken.
5. Bev estig de kaart m et de meegeleverd e schroeven. Houd e r
rekening mee dat er schade of storingen kunnen optreden
als de kaar t niet is vastgemaa kt.
3. Vereisten
Minimale hardware:
Windows- gebaseerd - Core 2 Du o CPU, 2 GHz
toepassing - Ethernet-poort
- 1 GB RA M
Mac - CPU van 1,5 GHz
- Ethernet-poort
- 512 MB RAM
4. Connector plaat
• • 2x RJ45-connectoren met geïntegreerde leds
• • ACT / LINK-led (groen) bran dt groen als er een gel dige
IP-netwerkverbinding bestaat.
• • 1 G LED (oranje) licht op bij gebr uik in 1 GBit / s-net werk.
• • 2x kleine handgre pen (St) voor het verwij deren van de
uitbreidingskaart uit de sleuf
• • 2x buitenste sch roeven om de kaart i n de sleuf te bevesti gen
(maat M3 x 6).
• • 3x verzonken schro even waarmee de pri ntplaat aan de
beugel is bevestigd. Verwijder deze niet!
Aanbevolen besturingssystemen:
Ramen: Windows Windows 7 32-bi ts of 64-bit s,
Windows 8 32-bits of 64-bits
Mac: 10.6.8 Snow Leo pard, 10.7. 5 Lion,
10.8 Mount ain Lion
De Dante Cont roller-applicat ie wordt gratis aang eboden op
audinate.com.
Dante Virtual Soundcard-applicat ie optioneel op audinate.com.
Page 42

82 83Quick Start GuideDN32-DANTE
MIDAS M32
Router/Switch
Primary
Secondary
Laptop
Digital mixer with Dante card
5. Verbindingsscenario’s
5.1 M32 met DN32-DANTE-verbinding
met DanteTM-netwerk
M32 ➝ netwerkrouter1 ➝ PC en a ndere Dante-com patibele
audioapparaten, bijv. Generieke digitale console met Dante-kaart
1
Bezoek a udinate.com vo or advies ove r geschik te netwerk routers vo or gebruik me t
Dante-netwerken
Hier voer t de pc 3 taken tegelij kertijd uit:
a) voer de Da nte Controller-app ui t voor signaalrout ering
b) voer de X32-Edit-app ui t voor M32-afstandsbediening
c) vo er Dante Virtual So undcard, DVS, uit voo r het opnemen /
afspelen van alle audiokanalen van beide mixers
5.2 M32 met DN32-DANTE rechtstreekse
verbinding met pc / Mac en Dante
Virtual Soundcard
DVS2, voor opnem en / afspelen tot 32 x 32 kanal en
2
Bezoek a udinate.com vo or advies ove r het gebruik v an en licentie s voor Dante
Virtual Soundcard
MIDAS M32
5.3 M32 met DN32-DANTE redundante
netwerkinfrastructuur
M32 ➝ twe e afzonderlijke r outers met onaf hankelijke
bedrading ➝ M32 + DL16
Primary
Laptop
Primary
Router/Switch
MIDAS M32
M32 met redundante DANTE-netwerkinfrastructuur
Verander het Dante Controller netwerkconguratietabblad 'Overgeschakeld'
naar 'Redundant'
Secondary
MIDAS M32
Secondary AES50
Router/Switch
DL16
Page 43

84 85Quick Start GuideDN32-DANTE
5.4 X32 met DN32-DANTE-verbinding
met Midas PRO2 via DN9650 + CM1
Dante-kaart
MIDAS Console
MIDAS M32
with DN32-DANTE
5.5 Twee M32-consoles met DN32DANTE-verbinding met DVS voor het
opnemen van 64 gelijktijdige tracks
• • Op beide consoles m oeten DN32-DANTE-kaar ten zijn
geïnstalleerd. Verbind een van de DN32-DANTE Ethernetpoort en op console A met de ka art die in console B i s
geïnstalleerd.
• • Verbind de t weede poor t van console B, ofwe l rechtstre eks
met de DAW-PC / Mac of v ia een netwerkr outer waartoe d e
DAW toegang hee ft. Deze link dra agt alle 64 kanalen va n en
naar beide consoles.
• • Tip: De Ethernet-afstandsbediening van de console
kan via het zelfde netwer k worden uitgevoe rd. Voor
afstandsbedieningsconsole A in dit voorbeeld is het
voldoend e om een korte patch kabel te gebruiken d ie de
Remote- connector van co nsole A verbindt m et de vrije poor t
op DN32-DANTE. Aangezien beide poorten op DN32-DANTE
van consol e B al bezet zijn, zou u een a parte kabel naar d e
netwerkrouter moeten verbinden.
• • Open het conguratiescherm van de Dante Virtual
Soundcard-stuurprogramma en schakel het in.
• • Start de Dante Contr oller-applicatie o m de patch-bay voor
het vir tuele kanaal te cong ureren en de kanalen t ussen
Dante Vir tual Soundcard e n de consoles te rout eren.
Laptop
for conguration
routing and mixer
remote control
Cat 5/6 AES50
@ 96 kHz
24 x 24 channels
KLARK TEKNIK DN9650
Network of Dante-enabled equipment
Router/Switch
Cat 5/6 Ethernet
@ 48 kHz Dante
32 x 32 channels
Cat 5/6 Ethernet,
Dante network @48 kHz
Midas M32
Console A
Midas M32
Console B
Twee M32-co nsoles met D N32-DANTE-ve rbindin g met DVS voor he t opnemen v an 64 gelijk tijdig e tracks
Router
(optional)
Laptop/DAW
Page 44

86 87Quick Start GuideDN32-DANTE
6. Mixer instellen
De volgend e vier M32-schermen h ebben te maken met het
congure ren van de DN32-DANTE en de sign alen van / naar
de kaart .
• • Het SETUP / card-s cherm toont een af beelding van de
DN32-DANTE-kaa rt wanneer deze co rrect is geïns talleerd,
en geef t advies over de ins tallatie.
• • De ROUTING / card out-p agina selecte ert kanaalblok ken die
aan de Dante -netwerkcont roller worden gelev erd. (bijv. 8
lokale uit gangen en 3 x 8 signalen va n AES50 poort A)
• • De SETUP / conguratiepagina selecteert de
synchr onisatiebron en t oont statusind icatoren in het
bovenste 'gl obale' gebied (wat nor maal gesproken "C" zou
moeten zij n voor de DN32-DANTE-kaar t).
• • De ROUTING / homepagi na maakt het mogel ijk om signalen
van de DN32-DANTE- kaart naar de ver werking van het
ingangskanaal te patchen. (bijv. kanaal 1-4 op Aux In)
Merk op dat de D ante-netwer kroutering uit sluitend moet wo rden
gecong ureerd met behulp v an de Dante Controlle r-applicatie
voor Mac / pc . De signalen die van de Dan te Controller-app naa r
de DN32-DANTE-k aart zijn gerout eerd, zijn besch ikbaar voor
patching n aar de routing van het i ngangskanaal op de Ro uting
Synchronisatie
Er moet een h oofdwoordkl okbron worden ge selecteerd vo or het
netwer k. De DN32-DANTE Brookl yn II VCXO-klok bi edt extreem
lage jit ter. In dit geval zou de Setu p / Cong-pagina er a ls volgt uit
moeten zien:
Merk op dat de s tatusbalk “C: 4 4K1” toont en ee n groen licht voor
een juist e synchronisat ie van 44,1 kHz naar de kaar t.
Het twee de groene lampje “C: D ante” geeft aan d at de DN32DANTE-kaar t correct is g eïnstalleerd. D e Dante Controller-ap p
congure ert het netwe rk voor het gebrui k van de DN32-DANTE
VCXO-k lok in deze applicat ie.
/ Home-p agina van de console. R aadpleeg audina te.com voor
een uitgebreide set documentatie, veelgestelde vragen en
forumadviezen over het congureren van de Dante Controller en
Dante Virtual Soundcard-toepassingen.
Page 45

88 89Quick Start GuideDN32-DANTE
Zie de M32-lijn, d ie is geconguree rd voor Clock Statu s Master in
het volgende voorbeeld:
De Dante Cont roller moet nu in dez e applicatie word en
gecong ureerd voor "Slave naa r externe woord klok". Zie de
M32-lijn, die in dit voorbeeld Master is gecongureerd:
Merk op dat de s electievak jes voor 'Slaaf naar ex terne woordk lok'
niet zijn aangevinkt in deze toepassing.
Alternatieve synchronisatie:
Gebruik d e interne klok als ho ofdklok. In dit ge val zou de
Setup / Con g-pagina er als vol gt uit moeten zien:
Merk op dat de s tatusbalk “L 4 4K1” toont en ee n groen lampje
voor Lokal e (interne) klok van 44,1 kHz.
Het twee de groene lampje “C: D ante” geeft aan d at de
DN32-DANTE-kaart correct is geïnstalleerd.
De naam van Dante-apparaten wijzigen in "Apparaatweergave"
Standaard k an de DN32-DANTE-kaart w orden weergegev en als
"BKLYN-II- 06f732" in de contr oller-app. De laatst e zes cijfers
verteg enwoordigen een de el van het Etherne t MAC-adr es van
de kaart . In de apparaatwe ergave van de control ler kan echter
een meer b eschrijvende na am aan het netwerk apparaat worden
toegewezen, zie het onderstaande voorbeeld.
7. Audinate-softwaretools
Dante-controller
De Dante Controller is een softwareapplicat ie van Audinate
waarmee gebruikers audio kunnen congureren en rond Dantenetwer ken kunnen routere n. Het is beschikb aar voor pc's met
Windows en A pple Macs met OSX 10.5. Dan te Controller moet
op een of mee r pc / Mac-computers op he t Dante-netwe rk zijn
geïnsta lleerd om signaalr outering of klokk en in het netwerk te
wijzigen. Dante Controller is niet vereist, wanneer alles vooraf is
gecong ureerd, voor het af spelen van audio tu ssen Danteapparaten via het net werk.
Dante virtuele geluidskaart
De Dante Vir tual Soundcar d is een softw aretoepassing d ie
uw pc of Mac in e en Dante-apparaa t verandert, waa rdoor
Dante-audioverkeer kan worden verzonden en ontvangen via de
standaa rd Ethernet-poo rt. Er is geen ex tra hardware verei st. Op
Windows ge bruikt de Dante Vi rtual Soundc ard de ASIO-audio interf ace van Steinberg en ka n deze worden gebru ikt met elke
audiotoepassing die ASIO of WDM ondersteunt. Op Mac OSX
gebruik t de Dante Virtu al Soundcard de st andaard Core Audio interf ace en kan deze door bi jna elke standaard au diotoepassing
worden gebruikt.
Bezoek au dinate.com voor verde r advies over het down loaden en
licentiëren van deze toepassingen.
Page 46

90 91Quick Start GuideDN32-DANTE
1. Wprowadzenie
Dante to wy sokowydajny cy frowy proto kół multimedia lny
przeznaczony do dostarc zania dźwięku przez standardową
sieć Ethernet IP. Kar ta DN32-DANTE umożliwia odpowiednim
mikser om cyfrow ym MIDAS współd zielenie do 32 x 32 kanałów
audio z dowol ną siecią urządz eń obsługując ych Dante za
pośredn ictwem pojed ynczego lub nadm iarowego połąc zenia
Ethernet. Wykorzystując istniejącą infrastruk turę sieciową
o szybko ści 100 Mbit / s lub 1 Gbit / s, p rotokół Dante ofe ruje
bardzo stabilną transmisję o niskim opóźnieniu dla różnych
profesjonalnych aplikacji, jednocząc wielok anałową dystrybucję
dźwięku w wielu lokalizacjach lub rodzinach urz ądzeń.
4. Wyr ównaj obie krawędz ie karty z prowa dnicami wewnątr z
gniazda i os trożnie włóż kar tę do gniazda. Powin ien wsunąć
się bez wię kszego oporu . Wciśnij ka rtę do końca do gnia zda,
aby upewni ć się, że styki kar ty są prawidł owo włożone do
złącza znajdującego się w środku.
5. Przymo cuj kartę za p omocą dołą czonych śrub. Nal eży pamięta ć,
że jeśli kar ta nie zostani e zamocowana, może doj ść do
uszkodzenia lub nieprawidłowego działania.
3. Krav
Minsta hårdvara:
Windows- baserad - Core 2 Duo CPU, 2 GHz
Ansökan - Ethernet-port
- 1 GB RA M
Mac - 1,5 GHz CPU
- Ethernet-port
- 512 MB RAM-m inne
Rekommenderade operativsystem:
Windows: Windows Windows 7 32-bitars eller
64-bi tars, Windows 8 32-bi tars eller
64-bitars
Mac: 10.6.8 Snow Leo pard, 10.7. 5 Lion,
10.8 Mountain L ion
Dante Controller-applikationen tillhandahålls gratis på
audinate.com.
Dante Virtual Soundcard-applikat ion valfritt på audinate.com.
2. Instalacja
Przed zainstalowaniem karty DN32-DANTE w gnieździe rozszerzeń
konsoli nal eży sprawdzić wi trynę klark teknik.com, aby spr awdzić,
czy op rogramowanie kons oli obsługuje t ę kartę. Zalecam y
okreso we sprawdzanie str ony produktu kon soli pod kątem
aktualizacji oprogramowania układowego konsoli.
Uwaga - pr zed zainstalow aniem karty DN32-DAN TE w konsoli
należy u pewnić się, że wył ącznik zasilani a konsoli jest wy łączony.
W przeci wnym razie mogą w ystąpić awari e lub porażenie prąd em.
1. U pewnij się, że zasilan ie miksera jes t wyłączone.
2. Odk ręć 2 śruby mocujące g niazdo po lewej i prawej s tronie,
a następn ie zdejmij pokry wę gniazda lub ak tualnie
zainst alowaną kartę i pr zechowuj ją w bezp iecznym miejsc u.
3. Pr zed wyjęciem ka rty DN32-DANTE z torby o chronnej
zalecamy dotknięcie uziemionej metalowej obudowy
konsoli, aby zapobiec wyładowaniom elektrostatycznym
wpł ywającym na wr ażliwe element y elektronic zne.
Generaln ie dobrym pomys łem jest trz ymanie kart y za płytę
czoł ową lub za dwa małe uc hwyty, ale nigdy n ie dotykaj
bezpośrednio elementów na płytce drukowanej.
4. Anslutningsplatta
• • 2x RJ45-kontakter med integrerade lysdioder
• • ACT / LINK LED (grön) lyser gr önt när det nns en gilt ig
IP-nätverksanslutning.
• • 1 G LED (gult) tänds när den anv änds i 1 GBit / s-nätver k.
• • 2x små handtag (St) för at t ta bort exp ansionskortet
från kortplatsen
• • 2x yttre skr uvar för att fä sta kortet i kor tplatsen (stor lek
M3 x 6).
• • 3x försänkt a skruvar som fäs ter PCBA i fästet . Ta i nte
bort dessa!
Page 47

92 93Quick Start GuideDN32-DANTE
MIDAS M32
Router/Switch
Primary
Secondary
Laptop
Digital mixer with Dante card
5. Anslutningsscenarier
5.1 M32 med DN32-DANTE-anslutning till
DanteTM-nätverk
M32, nätver ksrouter1, PC och andr a Dante-aktive rade ljudenheter,
t.ex. gene risk digtal-kon sol med Dante-ko rt
1
för råd om l ämpliga nätv erksrout rar för använ dning med Dant e-nätver k, besök
audinate.com
Här utf ör PC: n tre uppgif ter samtidig t:
a) kör Dante Controller-appen för signalrutt
b) kör X32-Edit-ap pen för M32-ärrkont roll
c) kör D ante Virtual Sou ndcard, DVS, för insp elning /
uppspelning av alla ljudkanaler i båda mixrarna
5.2 M32 med DN32-DANTE rak
anslutning till PC / Mac och Dante
Virtual Soundcard
DVS2, för insp elning / uppspelnin g av upp till 32 x 32 kanaler
2
för råd om a nvändning oc h licensierin g av Dante Virt ual Soundca rd besök
audinate.com
MIDAS M32
5.3 M32 med DN32-DANTE redundant
nätverksinfrastruktur
M32 ➝ två separata routrar med oberoende
ledningar ➝ M32 + DL16
Primary
Laptop
Primary
Router/Switch
MIDAS M32
Secondary
M32 med DANTE redundant nätverksinfrastruktur
Ändra Dante Controller-nätverkskongurationsiken 'Switched' till 'Redundant'
MIDAS M32
Secondary AES50
Router/Switch
DL16
Page 48

94 95Quick Start GuideDN32-DANTE
5.4 X32 med DN32-DANTE-anslutning till
Midas PRO2 via DN9650 + CM1
Dante-kort
MIDAS Console
MIDAS M32
with DN32-DANTE
5.5 Två M32-konsoler med DN32-DANTEanslutning till DVS för inspelning av
64 samtidiga spår
• • Båda konsolerna måste ha DN32-DANTE-kort installerade.
Anslut en av DN32-DAN TE Ethernet-por tarna på konsol A
med kort et installerat i kon sol B.
• • Anslut den andra por ten på konsol B, anti ngen direkt med
DAW-PC / Mac eller vi a en nätverksro uter som DAW har
tillgång ti ll. Denna länk tar alla 6 4 kanalerna till oc h från
båda konsolerna.
• • Tips: Konsolens Eth ernet-ärrkontr oll kan göras via sa mma
nätver k. För ärrst yrning av konsol A i det h är exemplet
är det tillr äckligt att anvä nda en kort patchka bel för att
ansluta kon sol A: s ärrkontak t med ledig por t på DN32DANTE. Eft ersom båda por tarna på DN32-DANTE i konso l
B redan är upp tagna, måste du lapp a en separat kabel t ill
nätverksroutern.
• • Öppna Dante Virtual Soundcard-drivrutins kontrollpanel
och slå på de n.
• • Kör Dante Controller-applikationen för att kongurera
patchfacket för virtuell kanal och dir igera kanalerna mellan
Dante Virtual Soundcard och konsolerna.
Laptop
for conguration
routing and mixer
remote control
Cat 5/6 AES50
@ 96 kHz
24 x 24 channels
KLARK TEKNIK DN9650
Network of Dante-enabled equipment
Router/Switch
Cat 5/6 Ethernet
@ 48 kHz Dante
32 x 32 channels
Cat 5/6 Ethernet,
Dante network @48 kHz
Midas M32
Console A
Midas M32
Console B
Två M32-kons oler med DN32- DANTE-ans lutning ti ll DVS för ins pelning av 6 4 samtidig a spår
Router
(optional)
Laptop/DAW
Page 49

96 97Quick Start GuideDN32-DANTE
6. Mixerinställning
Följande f yra M32-skärmar ha r att göra med at t kongurera
DN32-DANTE och sig nalerna till / frå n kortet.
• • INSTÄLLNING / kortskär men visar en bild av DN32-DANT E-
kortet nä r det har installer ats korrekt oc h ger råd
om installation.
• • ROUTING / card out-sid an väljer kanalbloc k som kommer att
skickas till Dante-nätverk skontrollen. (t.ex. 8 lokala
utgångar o ch 3 x 8 signaler från AE S50-port A)
• • INSTÄLLNING / kongurationssidan väljer
synkroniseringskälla och visar statusindikatorer i det översta
'globala' områ det (som normalt ska v ara "C" för
DN32-DANTE-kort).
• • ROUTING / hemsidan tillåter patchning av signaler från
DN32-DANTE-kortet till ingångskanalbearbetningen.
(t.ex. kanal 1- 4 på Aux In)
Observera att Dante-nätverksr uttningen måste kongureras
exklusi vt med Dante Contr oller-applikatio nen för Mac /
PC. Signalerna som har dirigerats från Dante Controllerappen till D N32-DANTE-kortet är ti llgängliga för patc hning
Synkronisering
En huvudo rdklockkälla må ste väljas för nät verket. DN32-DANTE
Brookl yn II VCXO-klock an erbjuder ex tremt låg jitter. I det ta fall
ska sidan Se tup / Cong se ut så här :
Obser vera att statu sfältet visar “C : 44K1” och ett grönt l jus för
korrek t synkroniser ing av 44,1 kHz till kortet.
Den andra g röna lampan "C: Dante" ind ikerar korrekt in stallation
av DN32-DANTE-kortet. Dante Controller-appen kongurerar
nätver ket för att använda D N32-DANTE VCXO-kloc kan i
denna applikation.
till ingångskanalrutten på konsolens Routing / Startsi da.
Se audinat e.com för en omfat tande uppsätt ning dokumentat ion,
vanliga f rågor och råd om hur du ko ngurerar Dante Con troller
och Dante Virtual Soundcard-applik ationer.
Page 50

98 99Quick Start GuideDN32-DANTE
Se M32-raden, s om är kongurerad f ör Clock Status Mas ter i
följande exempel:
Dante Contr oller måste nu kongu reras för "Slave to E xternal
Word Clock " i denna applikatio n. Se M32-linjen, som är
kongurerad Master i detta exempel:
Obser vera att krys srutorna för 'S lav till extern or dklocka' är
avmarkerade i den här applikationen.
Alternativ synkronisering:
Använd den in terna klockan so m huvudklocka. I d etta fall ska
sidan Set up / Cong se ut så här:
Obser vera att statu sfältet visar “ L 44K1” och ett grön t ljus för lokal
(intern) kloc ka på 44,1 kHz.
Den andra g röna lampan "C: Dante" ind ikerar korrekt in stallation
av DN32-DANTE-kor tet.
Byta na mn på Dante-enhe ter till "Device View "
Som stan dard kan DN32-DANTE-kor tet visas som “BKLYN- II-
06f732” i c ontroller-appen. D e sista sex sir orna represent erar en
del av korte ts Ethernet MAC-adress. St yrenhetens enh etsvy tillåt er
dock at t tilldela ett mer b eskrivande namn t ill nätverks enheten,
se exempel nedan.
7. Audinate Software Tools
Dante Controller
Dante Controller är en programvara som tillhandahålls av
Audinate so m gör det möjligt fö r användare att kon gurera
och dirig era ljud runt Dante -nätverk. Den ä r tillgänglig för
datorer so m kör Windows och App le Mac-datore r som kör OSX
10.5. Dante Contro ller måste insta lleras på en eller er a PC /
Mac-datorer i Dante-nätverket för att kunna ändra signalruttning
eller kloc kning i nätverke t. Dante Controller k rävs inte, när
allt är för kongurerat, f ör att köra ljud mella n Dante-enheter
via nätverket.
Dante virtuellt ljudkort
Dante Vir tual Soundcard ä r ett program so m förvandlar di n PC
eller Mac til l en Dante-aktive rad enhet som gör at t Danteljudtra k kan sändas och ta s emot med Ethernet- porten.
Ingen yt terligare hård vara krävs. På Windo ws använder Dante
Virtu al Soundcard Steinb ergs ASIO-ljud gränssnitt oc h kan
användas me d alla ljudapplikat ioner som stöder A SIO eller
WDM. På Mac OSX använder Dante Virtual Soundcard standard
Core Audio -gränssnit tet och kan användas av n ästan alla
standardljudapplikationer.
Besök au dinate.com för yt terligare råd om ne dladdning och
licensiering av dessa applikationer.
Page 51

100 101Quick Start GuideDN32-DANTE
1. Wprowadzenie
Dante to wy sokowydajny cy frowy proto kół multimedia lny
przeznaczony do dostarc zania dźwięku przez standardową
sieć Ethernet IP. Kar ta DN32-DANTE umożliwia odpowiednim
mikser om cyfrow ym MIDAS współd zielenie do 32 x 32 kanałów
audio z dowol ną siecią urządz eń obsługując ych Dante za
pośredn ictwem pojed ynczego lub nadm iarowego połąc zenia
Ethernet. Wykorzystując istniejącą infrastruk turę sieciową
o szybko ści 100 Mbit / s lub 1 Gbit / s, p rotokół Dante ofe ruje
bardzo stabilną transmisję o niskim opóźnieniu dla różnych
profesjonalnych aplikacji, jednocząc wielok anałową dystrybucję
dźwięku w wielu lokalizacjach lub rodzinach urz ądzeń.
4. Wyr ównaj obie krawędz ie karty z prowa dnicami wewnątr z
gniazda i os trożnie włóż kar tę do gniazda. Powin ien wsunąć
się bez wię kszego oporu . Wciśnij ka rtę do końca do gnia zda,
aby upewni ć się, że styki kar ty są prawidł owo włożone do
złącza znajdującego się w środku.
5. Pr zymocuj kar tę za pomocą do łączonych śrub. Na leży
pamięta ć, że jeśli karta n ie zostanie zamo cowana, może
dojść do uszkodzenia lub nieprawidłowego działania.
3. Wymagania
Minimalny sprzęt:
Opart y na systemie Win dows - Proceso r Core 2 Duo, 2 GHz
podanie - Port Ethe rnet
- 1 GB pamięc i RAM
Prochow iec - proceso r 1,5 GHz
- Port Ethe rnet
- 512 MB pamięci RA M
Zalecane systemy operacyjne:
Okna: Windows Windows 7 32-b itowy lub
64-bi towy, Windows 8 32-bitow y lub
64-bitow y
Prochow iec: 10.6.8 Snow Leopar d, 10.7.5 Lio n,
10.8 Mountain L ion
Aplikacj a Dante Controller ud ostępniana bezp łatnie na stro nie
audinate.com.
Aplikacja Dante Virtual Soundcard jest opcj onalna na
audinate.com.
2. Instalacja
Przed zainstalowaniem karty DN32-DANTE w gnieździe rozszerzeń
konsoli nal eży sprawdzić wi trynę klark teknik.com, aby spr awdzić,
czy op rogramowanie kons oli obsługuje t ę kartę. Zalecam y
okreso we sprawdzanie str ony produktu kon soli pod kątem
aktualizacji oprogramowania układowego konsoli.
Uwaga - pr zed zainstalow aniem karty DN32-DAN TE w konsoli
należy u pewnić się, że wył ącznik zasilani a konsoli jest wy łączony.
W przeci wnym razie mogą w ystąpić awari e lub porażenie prąd em.
1. U pewnij się, że zasilan ie miksera jes t wyłączone.
2. Odk ręć 2 śruby mocujące g niazdo po lewej i prawej s tronie,
a następn ie zdejmij pokry wę gniazda lub ak tualnie
zainst alowaną kartę i pr zechowuj ją w bezp iecznym miejsc u.
3. Pr zed wyjęciem ka rty DN32-DANTE z torby o chronnej
zalecamy dotknięcie uziemionej metalowej obudowy
konsoli, aby zapobiec wyładowaniom elektrostatycznym
wpł ywającym na wr ażliwe element y elektronic zne.
Generaln ie dobrym pomys łem jest trz ymanie kart y za płytę
czoł ową lub za dwa małe uc hwyty, ale nigdy n ie dotykaj
bezpośrednio elementów na płytce drukowanej.
4. Płytka łącząca
• • 2x złącza RJ 45 ze zintegrowanymi di odami LED
• • Dioda ACT / LINK (zielon a) świec i się na zielono, gdy ist nieje
prawidł owe połączen ie sieciowe IP.
• • Dioda LED 1 G (bursz tynowa) świec i, gdy jest uży wana w
sieci 1 GBi t / s.
• • 2x małe uchwy ty (St) do wyjmowani a karty rozs zerzeń z
gniazda
• • 2x zewnętrzne ś ruby do mocowania kar ty w gnieździ e
(rozmiar M3 x 6).
• • 3x wkręty z łbem s tożkowym mocuj ące PCBA do wspornik a.
Nie usuwaj ich!
Page 52

102 103Quick Start GuideDN32-DANTE
MIDAS M32
Router/Switch
Primary
Secondary
Laptop
Digital mixer with Dante card
5. Scenariusze połączeń
5.1 M32 z połączeniem DN32-DANTE do
sieci Dante
M32 ➝ router sieciowy1➝ PC i inne ur ządzenia audio z obs ługą
Dante, np. Ogó lna konsola cyf rowa z kartą Dant e
1
Porady do tyczące o dpowiedni ch routerów si eciowych d o użytk u z sieciami Dant e
można znaleźć na stronie audinate.com
Tutaj komputer w ykonuje jednoc ześnie 3 zadania:
a) uruc hom aplikację Dante Co ntroller do kiero wania sygnału
b) uruchom aplikację X32-Edit do zdalnego sterowania M32
c) ur uchom Dante Virt ual Soundcard, DVS, d o nagrywania /
TM
odtwa rzania wszys tkich kanałów a udio obu mikser ów
5.2 M32 z prostym połączeniem
DN32-DANTE do komputera PC / Mac i
wirtualnej karty dźwiękowej Dante
DVS2, do nagry wania / odtwar zania do 32 x 32 kanałów
2
Porady dotyczące uży wania i licencjonowania wirtualnej karty dźwiękowej Dante
można znaleźć na stronie audinate.com
MIDAS M32
5.3 M32 z redundantną infrastrukturą
sieciową DN32-DANTE
M32 ➝ dwa od dzielne router y z niezależnym
okablowaniem ➝ M32 + DL16
Primary
Laptop
Primary
Router/Switch
MIDAS M32
Secondary
M32 z redundantną infrastrukturą sieciową DANTE
Zmień zakładkę konguracji sieci Dante Controller „Switched” na „Redundant”v
MIDAS M32
Secondary AES50
Router/Switch
DL16
Page 53

104 105Quick Start GuideDN32-DANTE
5.4 X32 z połączeniem DN32-DANTE do
Midas PRO2 przez kartę DN9650 +
CM1 Dante
MIDAS Console
MIDAS M32
with DN32-DANTE
5.5 Dwie konsole M32 z połączeniem
DN32-DANTE do DVS do nagrywania 64
jednoczesnych ścieżek
• • Obie konsole muszą mieć zainstalowane kart y DN32-DANTE.
Połąc z jeden z portów Et hernet DN32-DANTE na konso li A z
kartą z ainstalowaną w kon soli B.
• • Podłącz drugi p ort konsoli B bez pośrednio do DAW-PC / Mac
lub przez r outer sieciow y, d o którego DAW ma dostęp. To
łącze bę dzie przenosić w szystkie 6 4 kanały do iz obu ko nsol.
• • Wskazówka: zdalne ste rowanie konsolą pr zez Ethernet
można wy konać za pośrednic twem tej samej si eci. W
przy padku konsoli zdaln ego sterowania A w t ym przykład zie
wyst arczy użyć kr ótkiego kabla po łączenioweg o łączącego
złącze R emote konsoli A z wolnym p ortem DN32-DANTE.
Ponieważ o ba porty na DN32-DANTE ko nsoli B są już zaję te,
należa łoby podłącz yć osobny kabel do r outera sieciowe go.
• • Otwórz panel s terowania sterow nika Dante Virtu al
Soundc ard i włącz go.
• • Uruchom aplikacj ę Dante Controller, aby skon gurować
krosownicę kanałów wirtualnych i przeki erować kanały
pomiędzy wirtualną kartą dźwiękową Dante a konsolami.
Laptop
for conguration
routing and mixer
remote control
Cat 5/6 AES50
@ 96 kHz
24 x 24 channels
KLARK TEKNIK DN9650
Network of Dante-enabled equipment
Router/Switch
Cat 5/6 Ethernet
@ 48 kHz Dante
32 x 32 channels
Cat 5/6 Ethernet,
Dante network @48 kHz
Midas M32
Console A
Midas M32
Console B
Dwie kon sole M32 z poł ączenie m DN32-DANTE do DV S do nagry wania 64 je dnocze snych ście żek
Router
(optional)
Laptop/DAW
Page 54

106 107Quick Start GuideDN32-DANTE
6. Konguracja miksera
Poniższ e cztery ekr any M32 dotyczą kon guracji DN32-DANTE i
sygnał ów do / z karty.
• • Ekran SETUP / card po kazuje grakę kar ty DN32-DANTE,
gdy zost ała ona prawidł owo zainstalowan a i oferuje porady
dotyczące konguracji.
• • Strona ROUTING / card o ut wybiera blok i kanałów, które
zostaną d ostarczone do s terownika siec iowego Dante. (np. 8
wyjść lo kalnych i 3 x 8 sygnałó w z portu A AES50)
• • Ekran SETUP / card po kazuje grakę kar ty DN32-DANTE,
gdy zost ała ona prawidł owo zainstalowan a i oferuje porady
dotyczące konguracji.
• • Strona ROUTING / home um ożliwia krosowan ie sygnałów z
kart y DN32-DANTE do przetw arzania Input Cha nnel.
(np. kanał 1-4 na Au x In)
Należy p amiętać, że routi ng sieciowy Dante m usi być
skongurowany wyłącznie za pomocą aplikacji Dante Controller
dla kompute rów Mac / PC. Sygnały, k tóre został y skierowane
z aplikacj i Dante Controller do k arty DN32-DANTE, są d ostępne
do krosow ania do routingu ka nału wejścioweg o na stronie
Synchronizacja
Dla sieci m usi być wybrane źr ódło zegara głów nego. Zegar
DN32-DANTE Broo klyn II VCXO oferuj e wyjątkowo niski ji tter.
W tym pr zypadku str ona Setup / Cong powi nna wyglądać
następująco:
Zwróć uwa gę, że pasek stanu po kazuje „C: 44K1” i zielo ne światło
dla prawid łowej synchron izacji 44,1 kHz z kartą.
Drugie zi elone światło „C: D ante” oznacza pr awidłową insta lację
kart y DN32-DANTE. Aplikacja Da nte Controller kong uruje sieć do
korzy stania z zegara DN32-DANT E VCXO w tej aplikacji.
Routing / H ome konsoli. Odwie dź stronę audina te.com w celu
uzysk ania obszernego ze stawu dokument acji, często z adawanych
pytań i po rad na forum na temat ko nguracji aplik acji Dante
Controller i Dante Virtual Soundcard.
Page 55

108 109Quick Start GuideDN32-DANTE
Zobacz linię M32, która jest skongurowana jako zegar stanu
główne go w poniższy m przykładz ie:
Kontrole r Dante musi być teraz skon gurowany jako „Slave to
Exter nal Word Clock” w te j aplikacji. Zobac z linię M32, która jes t
skongurowana jako Master w tym przykładzie:
Zwróć uwa gę, że pola wyboru „ Slave to External Wo rd Clock” nie
są zaznaczone w tej aplikacj i.
Alternatywna synchronizacja:
Użyj zega ra wewnętrzne go jako zegara główn ego. W tym
przypadku stro na Setup / Cong powinna wyglądać następująco:
Zwróć uwa gę, że pasek stanu po kazuje „L 44K1” i zielo ne światło
dla lokaln ego (wewnętrzne go) zegara 44,1 kHz.
Drugie zi elone światło „C: D ante” oznacza pr awidłową insta lację
kart y DN32-DANTE.
Zmiana nazwy urządzeń Dante na „Widok urządzenia”
Domyślni e karta DN32-DANTE może po jawić się w aplikacji
sterown ika jako „BKLYN-II- 06f732”. Ostatnie sze ść cyfr
reprezen tuje część adre su MAC karty w sie ci Ethernet.
Jednak widok urządzenia kontrolera umożliwia przypisanie
bardzie j opisowej nazw y do urządzenia sie ciowego,
patrz przykład poniżej.
7. Audinate Software Tools
Kontroler Dante
Kontroler Dante to aplikacja dostarczana przez Audinate,
która umożliwia użytkownikom kongurowanie i kierowanie
dźwię ku w sieciach Dante. Je st dostępny dla komp uterów
PC z syste mem Windows i Apple Ma c z systemem OSX 10.5.
Kontrole r Dante musi być zainst alowany na jednym lub w ięcej
komputer ach PC / Mac w sieci Dante w ce lu zmiany trasowani a
sygnał u lub taktowania w si eci. Kontroler Dant e nie jest
wymagany, gdy wszystko jest wstępnie skongurowane, do
uruchamiania dźwięku między urządzeniami Dante w sieci.
Wirtualna karta dźwiękowa Dante
Dante Virtual Soundcard to aplikacja, która zamienia
komputer P C lub Mac w urządzeni e obsługujące Dant e,
umożliwi ając przesyłan ie i odbieranie ruc hu audio Dante za
pomocą s tandardowego po rtu Ethernet . Nie jest wymaga ny
żaden dod atkowy sprzęt. W s ystemie Window s wirtualna kar ta
dźwię kowa Dante wykorz ystuje inter fejs audio Steinber g ASIO i
może być uży wana z dowolną aplik acją audio obsł ugującą ASIO
lub WDM. W sy stemie Mac OSX wir tualna karta dź więkowa
Dante wy korzystuje s tandardowy int erfejs Core Audio i m oże być
używ ana przez prawie k ażdą standardow ą aplikację audio.
Odwied ź audinate.com, aby uz yskać dalsze porad y dotyczące
pobierania i licencjonowania t ych aplikacji.
Page 56

110 111Quick Start GuideDN32-DANTE
Specications Other important information
Connectors
RJ45, Gigab it Ethernet 1 GBit /s,
’PRIMARY’ and ’SECONDARY’
Input/Output Characteristics
Input / Out put channels 32 / 32
Sample rates 44.1 kHz / 48 kHz
Sample word length 24-Bit PCM
Clock synchronisation, onboard high-qualit y
Dante net work clock, bas ed upon IEEE1588
PTP (precision time control)
System audi o latency depend s on Dante
Controller network conguration
Dual-input Gigabit Ethernet ports
Indicator
Ethernet Link, LED indicator in socket,
ashes with network activity
1 Gbit/s Eth ernet Link, LED ind icator in socket 2 LED, amber
System Requirements
PC Hardware, minimum
Windows applications, *recommended
(ASIO and WDM au dio device inter face)
Mac OSX applications
(Intel CPU onl y, n o PPC support, Cor eAudio)
Dante Controller App Dante Virtual Soundcard
CPU 1 GHz
RAM 512 MB
Display 1024 x 768
Wired Ethernet interface
XP SP3 32-Bit
*Win7 32-/64-Bi t
Win8 32-/64-Bit
Mac OSX 10.6.8,
10.7.5, 10. 8, 10.9
Console ’Local’
Dante network clock ’DN32-DANTE’
0.25 ms, 0.5 ms,
1 ms or 5 ms
Ethernet Switch Mode or
Dante Redundancy Mode
2 LED, green
2
or
CPU Dual Core
RAM 1 GB
Wired Ethernet
interf ace, 1 GB/s
require d for channel
counts hi gher than
32 x 32
@ 48 kHz
Win7 32-/64-Bit
Win8 32-/64-Bit
Mac OSX 10.5, 10.6.8,
10.7.5, 10. 8, 10.9
Important information Aspectos importantes
1. Register online.
Pleaseregister your new Music Tribe
equipment right after you purchase it by
visiting musictribe.com. Registeringyour
purchase using our simple online
form helps us to process your repair
claims more quickly and eciently.
Also, read the terms and conditions of
our warranty, ifapplicable.
2. Malfunction. Should your
Music Tribe Authorized Reseller not be
located in your vicinity, you may contact
the Music Tribe Authorized Fulller for
your country listed under “Support” at
musictribe.com. Shouldyour country not
be listed, pleasecheck if your problem
can be dealt with by our “OnlineSupport”
which may also be found under “Support”
at musictribe.com. Alternatively, please
submit an online warranty claim at
musictribe.com BEFORE returning
theproduct.
3. Power Connections.
Beforeplugging the unit into a power
socket, please make sure you are using the
correct mains voltage for your particular
model. Faulty fuses must be replaced
with fuses of the same type and rating
withoutexception.
1. Registro online.
Lerecomendamos que registre su nuevo
aparato Music Tribe justo después de
su compra accediendo a la página web
musictribe.com. Elregistro de su compra
a través de nuestro sencillo sistema
online nos ayudará a resolver cualquier
incidencia que se presente a la mayor
brevedad posible. Además,aproveche
para leer los términos y condiciones
de nuestra garantía, siesaplicable en
sucaso.
2. Averías. En el caso de que no
exista un distribuidor Music Tribe en las
inmediaciones, puede ponerse en contacto
con el distribuidor Music Tribe de su
país, queencontrará dentro del apartado
“Support” de nuestra página web
musictribe.com. En caso de que su país no
aparezca en ese listado, acceda a la sección
“Online Support” (quetambiénencontrará
dentro del apartado “Support” de nuestra
páginaweb) y compruebe si su problema
aparece descrito y solucionado allí.
Deforma alternativa, envíenos a través
de la página web una solicitud online de
soporte en periodo de garantía ANTES de
devolvernoselaparato.
3. Conexiones de corriente.
Antes de enchufar este aparato a una
salida de corriente, asegúrese de que
dicha salida sea del voltaje adecuado
para su modelo concreto. En caso de
que deba sustituir un fusible quemado,
deberáhacerlo por otro de idénticas
especicaciones, sinexcepción.
Informations importantes
1. Enregistrez-vous
enligne. Prenezle temps
d’enregistrer votre produit Music Tribe
aussi vite que possible sur le site Internet
musictribe.com. Lefait d’enregistrer le
produit en ligne nous permet de gérer
les réparations plus rapidement et plus
ecacement. Prenezégalement le
temps de lire les termes et conditions de
notregarantie.
2. Dysfonctionnement. Si vous
n’avez pas de revendeur Music Tribe près
de chez vous, contactez le distributeur
Music Tribe de votre pays: consultez la
liste des distributeurs de votre pays dans
la page “Support” de notre site Internet
musictribe.com. Si votre pays n’est pas
dans la liste, essayez de résoudre votre
problème avec notre “aideen ligne”
que vous trouverez également dans la
section “Support” du site musictribe.com.
Vouspouvez également nous faire
parvenir directement votre demande de
réparation sous garantie par Internet sur
le site musictribe.com AVANT de nous
renvoyer leproduit.
3. Raccordement au secteur.
Avant de relier cet équipement au secteur,
assurez-vous que la tension secteur
de votre région soit compatible avec
l’appareil. Veillez à remplacer les fusibles
uniquement par des modèles exactement
de même taille et de même valeur
électrique — sans aucuneexception.
Audinat e is a regist ered trad emark of Aud inate Pty L td. Dante is a tr ademark of A udinate Pt y Ltd. Mac is a t rademark o f Apple Inc . Windows is a r egistere d tradema rk of
Micros oft Corp oration i n the United St ates in oth er countri es. All othe r tradema rks are the p ropert y of their r espect ive owners . Audinate p roduct s are protec ted by one or
more of US Pa tents 7747725, 8 005939, 7978696, 8171152 and ot her patent s pending o r issued, se e www.aud inate.com /patents .
Page 57

112 113Quick Start GuideDN32-DANTE
Other important information
Weitere wichtige
Informationen
1. Online registrieren.
Bitteregistrieren Sie Ihr neues
Music Tribe-Gerät direkt nach dem
Kauf auf der Website musictribe.com.
WennSie Ihren Kauf mit unserem
einfachen online Formular registrieren,
könnenwir Ihre Reparaturansprüche
schneller und ezienter bearbeiten.
Lesen Sie bitte auch unsere
Garantiebedingungen, fallszutreend.
2. Funktionsfehler. Sollte sich
kein Music Tribe Händler in Ihrer Nähe
benden, können Sie den Music Tribe
Vertrieb Ihres Landes kontaktieren, der
auf musictribe.com unter „Support“
aufgeführt ist. Sollte Ihr Land nicht
aufgelistet sein, prüfen Sie bitte, ob Ihr
Problem von unserem „Online Support“
gelöst werden kann, den Sie ebenfalls
auf musictribe.com unter „Support“
nden. Alternativ reichen Sie bitte
Ihren Garantieanspruch online auf
musictribe.com ein, BEVOR Sie das
Produktzurücksenden.
3. Stromanschluss. Bevor Sie das
Gerät an eine Netzsteckdose anschließen,
prüfen Sie bitte, obSie die korrekte
Netzspannung für Ihr spezielles Modell
verwenden. Fehlerhafte Sicherungen
müssen ausnahmslos durch Sicherungen
des gleichen Typs und Nennwerts
ersetztwerden.
Outras Informações
Importantes
1. Registre-se online. Porfavor,
registreseu novo equipamento
Music Tribe logo após a compra visitando
o site musictribe.com Registrar sua
compra usando nosso simples formulário
online nos ajuda a processar seus
pedidos de reparos com maior rapidez
e eciência. Além disso, leia nossos
termos e condições de garantia,
caso sejanecessário.
2. Funcionamento
Defeituoso. Casoseufornecedor
Music Tribe não esteja localizado nas
proximidades, vocêpode contatar
um distribuidor Music Tribe para o
seu país listado abaixo de “Suporte”
emmusictribe.com. Se seu país não estiver
na lista, favor checar se seu problema pode
ser resolvido com o nosso “SuporteOnline”
que também pode ser achado abaixo
de “Suporte”em musictribe.com.
Alternativamente, favorenviar uma
solicitação de garantia online em
musictribe.com ANTES da devolução
doproduto.
3. Ligações. Antes de ligar a unidade
à tomada, assegure-se de que está a
utilizar a voltagem correcta para o modelo
em questão. Osfusíveis com defeito
terão de ser substituídos, sem qualquer
excepção, porfusíveis do mesmo tipo e
correntenominal.
Informazioni importanti
1. Registratevi online.
Vi invitiamo a registrare il nuovo
apparecchio Music Tribe subito
dopo averlo acquistato visitando
musictribe.com. La registrazione
dell’acquisto tramite il nostro semplice
modulo online ci consente di elaborare
le richieste di riparazione in modo più
rapido ed eciente. Leggete anche
i termini e le condizioni della nostra
garanzia, qualora applicabile.
2. Malfunzionamento. Nel caso
in cui il rivenditore autorizzato Music
Tribe non si trovi nelle vostre vicinanze,
potete contattare il Music Tribe Authorized
Fulller per il vostro paese, elencato in
“Support” @ musictribe.com. Se la vostra
nazione non è elencata, controllate se
il problema può essere risolto tramite
il nostro “Online Support”che può
anche essere trovato sotto “Support”
@ musictribe.com. In alternativa,
inviate una richiesta di garanzia online
su musictribe.com PRIMA di restituire
il prodotto.
3. Collegamento
all’alimentazione. Prima di
collegare l’unità a una presa di corrente,
assicuratevi di utilizzare la tensione di rete
corretta per il modello specico. I fusibili
guasti devono essere sostituiti, senza
eccezioni, con fusibili dello stesso tipo e
valore nominale.
Belangrijke informatie Viktig information Ważna informacja
1. Registreer online. Registreer
uw nieuwe Music Tribe-apparatuur
direct nadat u deze hebt gekocht door
naar musictribe.com te gaan. Door
uw aankoop te registreren via ons
eenvoudige online formulier, kunnen
wij uw reparatieclaims sneller en
eciënter verwerken. Lees ook de
voorwaarden van onze garantie, indien
van toepassing.
2. Storing. Mocht uw door
Music Tribe geautoriseerde wederverkoper
niet bij u in de buurt zijn gevestigd, dan
kunt u contact opnemen met de door
Music Tribe Authorized Fulller voor
uw land vermeld onder “Support” op
musictribe.com. Als uw land niet in de
lijst staat, controleer dan of uw probleem
kan worden opgelost door onze "Online
Support", die u ook kunt vinden onder
"Support" op musictribe.com. U kunt ook
een online garantieclaim indienen op
musictribe.com VOORDAT u het product
retourneert.
3. Stroomaansluitingen.
Voordat u het apparaat op een stopcontact
aansluit, moet u ervoor zorgen dat u de
juiste netspanning voor uw specieke
model gebruikt. Defecte zekeringen
moeten zonder uitzondering worden
1. Registrera online. Registrera
din nya Music Tribe-utrustning direkt
efter att du köpt den genom att besöka
musictribe.com. Att registrera ditt
köp med vårt enkla onlineformulär
hjälper oss att behandla dina
reparationsanspråk snabbare och
mer eektivt. Läs också villkoren i vår
garanti, om tillämpligt.
2. Fel. Om din Music Tribeauktoriserade återförsäljare inte nns i
din närhet kan du kontakta Music Tribe
Authorized Fulller för ditt land listat
under “Support” på musictribe.com.
Om ditt land inte är listat, kontrollera
om ditt problem kan hanteras av vår
“Onlinesupport” som också nns under
“Support” på musictribe.com. Alternativt
kan du skicka in ett online-garantianspråk
på musictribe.com INNAN du returnerar
produkten.
3. Strömanslutningar. Innan du
ansluter enheten till ett eluttag, se till att
du använder rätt nätspänning för just din
modell. Felaktiga säkringar måste bytas ut
mot säkringar av samma typ och märkning
utan undantag.
1. Zarejestrować online.
Zarejestruj swój nowy sprzęt Music Tribe
zaraz po zakupie na stronie musictribe.
com. Zarejestrowanie zakupu za pomocą
naszego prostego formularza online
pomaga nam szybciej i efektywniej
rozpatrywać roszczenia dotyczące
naprawy. Przeczytaj również warunki
naszej gwarancji, jeśli dotyczy.
2. Awaria. Jeśli Twój autoryzowany
sprzedawca Music Tribe nie znajduje się
w pobliżu, możesz skontaktować się z
autoryzowanym dostawcą Music Tribe
dla swojego kraju, wymienionym w
sekcji „Wsparcie” na stronie musictribe.
com. Jeśli Twojego kraju nie ma na
liście, sprawdź, czy Twój problem może
zostać rozwiązany przez nasze „Wsparcie
online”, które można również znaleźć w
sekcji „Wsparcie” na stronie musictribe.
com. Alternatywnie, prześlij zgłoszenie
gwarancyjne online na musictribe.com
PRZED zwrotem produktu.
3. Połączenia zasilania. Przed
podłączeniem urządzenia do gniazdka
sieciowego upewnij się, że używasz
odpowiedniego napięcia sieciowego dla
danego modelu. Wadliwe bezpieczniki
należy bez wyjątku wymienić na
bezpieczniki tego samego typu i wartości.
vervangen door zekeringen van hetzelfde
type en dezelfde waarde.
Page 58

114 115Quick Start GuideDN32-DANTE
FEDERAL COMMUNICATIONS
COMMISSION COMPLIANCE
INFORMATION
DN32-DANTE
Responsi ble Party Name: Music Tribe Comm ercial NV Inc.
Address: 5270 Procyon Street,
Phone Number: +1 702 800 8290
DN32-DANTE
This equi pment has been test ed and found to compl y with the limits
for a Class B d igital device, pur suant to part 15 of the FCC Rul es.
These lim its are designed t o provide reasonab le protectio n against
harmful interference in a residential installation. This equipment
generate s, uses and can radi ate radio frequen cy energy and, if n ot
install ed and used in accorda nce with the instr uctions, may cau se
harmful interference to radio communications. However, there is no
guarantee that interference will not occur in a particular installation.
If this equ ipment does caus e harmful inter ference to radio or te levision
recepti on, which can be dete rmined by turning t he equipment o and
on, the user i s encouraged to tr y to correct th e interference by o ne or
more of the following measures:
• • Reorient or relocate the receiving antenna.
• • Increas e the separation b etween the equ ipment and receive r.
• • Connec t the equipment in to an outlet on a circu it dierent fro m that
to which the r eceiver is connec ted.
Consult th e dealer or an experi enced radio/T V technician for he lp.
This devic e complies with Par t 15 of the FCC rules. Oper ation is subject t o
the following two conditions:
(1) this device may not c ause harmful inte rference, and
(2) this device mu st accept any inter ference receive d, including
interference that may cause undesired operation.
Important information:
Changes or m odications to t he equipment not ex pressly approve d by
Music Tribe ca n void the user’s autho rity to use the eq uipment.
Las Vegas NV 8 9118,
United States
Hereby, Music Trib e declares that this p roduct is in comp liance with
Directive 2014/30/EU, Directive 2011/65/EU and Amendment 2015/863/
EU, Direct ive 2012/19/EU, Regulatio n 519/2012 REACH S VHC and
Directive 1907/2006/EC.
Full text o f EU DoC is available at ht tps://community.music tribe.com/
EU Represe ntative: Music Tribe Br ands DK A/S
Address: I b Spang Olsens Gade 17, DK - 8200 Aarhus N, D enmark
Page 59

 Loading...