


 Loading...
Quick Instruction Manual
AI Binocular Thermal Imaging System
Quick Instruction Manual
Version: V2.0
Quick Instruction Manual
1. Product Introduction
1.1Product Introduction
This Intelligent AI binocular thermal imaging system is composed of AI binocular temperature detecting and AI thermal imaging screening system. Integrating high accuracy thermal temperature detecting sensor, built-in intelligent face capture algorithm and ISP image processing technology. The device features consist of face detection, temperature detection and face image capturing snapshot. The AI thermal imaging screening system can accurately detect body temperature, capturing face picture and creates record for tracking and tracing purposes. It can effectively help to monitor and detect body temperature at entrances or exits which can be widely used at schools, commercial or residential buildings, and metro or railway stations thus contributing efficient prevention.
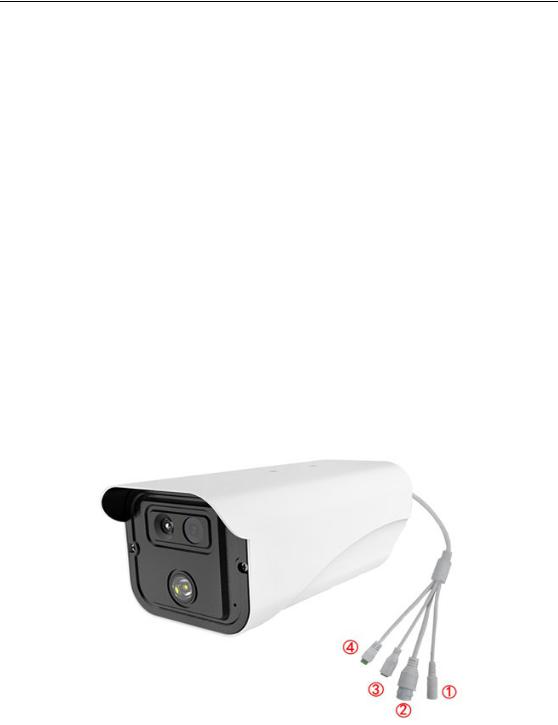
1.2Product Appearance
1.3 Device Interface Function Definition
Interface No. |
Interface Name |
Functional Indicators |
|
1 |
Power Interface |
12VDC Adapter Port |
|
2 |
Network Interface |
RJ45 Network Interface Port |
|
3 |
Relay Interface |
+ NO Normally Open Port |
|
- COM Public Port |
|||
|
|
||
|
|
1: Audio Input |
|
4 |
Audio Interface |
2: Audio Ground |
|
3: Audio Output |
|||
|
|
||
|
|
4: Empty |

Quick Instruction Manual
2.Device Installation
2.1Installation Position
1.The Thermal Imager Camera should be positioned in front of the aisle facing entrances or facing backwards for exits for temperature screening and image capture snapshots;
2.Installation height recommend 2 meters (approx. 6 feet) or higher with an overlook view angle of 0~15°;
3.For better body temperature screening accuracy, recommended distance range is from 1.5 to 2.5 meters (approx. 5 to 8 feet) which has been strictly tested for optimum results.
2.2Installation Environment Standard
1.Illumination Environment Requirements: Position camera where there is no backlight, light reflection on human face, or shadows to ensure better face capturing results. If the face image snapshot is not bright or sharp, it is recommeded to increase or reposition the Thermal Imager camera (General Suggested 250~800 Lux).
2.Light and Wind Environment Requirements: The Thermal Imager Device is suggested to be installed indoor, ensuring there is no wind current between device and human. Avoid direct sunlight or high temperature devices to prevent screening temperature inaccuracy.
3.Quick Instructions
3.1Device Connection
Power the Thermal Imager camera and direct connect the RJ45 network cable from the camera to the LAN port on PC or Laptop. On your computer browse to the folder where you extracted the TMT camera’s software then double-click the executable file “IPCFaceId.exe” (there is no software installation process for the TMT camera you are only required to run the IPCFaceId.exe application)
Loading...