

KJB SGC7005WF, SGC7007WF, SGC7010WF, SGC7040WF, SGC7050WF User Manual
...
K J B S e c u r i t y P r o d u c t s | w w w . m y s l e u t h g e a r . c o m | 8 0 0 . 5 9 0 . 4 2 7 2
Page 1
Table of Contents
Introduction
2
Includes
2
Quick Setup Guide
3
SG Home® Cloud Subscription Plans
4
Features
5
Setup
6
Live Viewing
7
Camera Menu & Settings
8
SG Home® Menu & Settings
10
Reset Instructions
11
PIR Placement Chart
12
LED Chart
12
Specifications
13
Frequently Asked Questions
14
Products Line & Reset Button
18
Warnings & Precautions
23
Warranty & Disclaimers
25
SG Home® CVR Manual
K J B S e c u r i t y P r o d u c t s | w w w . m y s l e u t h g e a r . c o m | 8 0 0 . 5 9 0 . 4 2 7 2
Page 2
SG Home® Electric & Battery CVRs Introduction
Thank you for purchasing your SG Home® Cloud Video Recording System (CVR). Before getting started, allow
us to introduce some of the main features of your hidden camera. SG Home® CVR cameras allow for live
viewing of the camera and cloud storage of the event recordings. You can access the camera or video
recording from anywhere using our free SG Home® App. Event notifications alert you when the hidden camera
detects activity in your home or office. Connect up to 4 cameras on one ultra-secure cloud account, view live s
video and download your recordings from all cameras onto your tablet or smart phone. You can immediately
record or take pictures of any suspicious event in real-time allowing you to view them from your local drive and
in the SG Home® App.
For all event notifications, our cameras use PIR to detect motion. PIR (Passive Infrared) is the most accurate
form of notification, creating less false triggers than other motion activated cameras. There is a 2 second start
up, so place your camera accordingly to see how to best place your camera using the PIR Chart (on page 12).
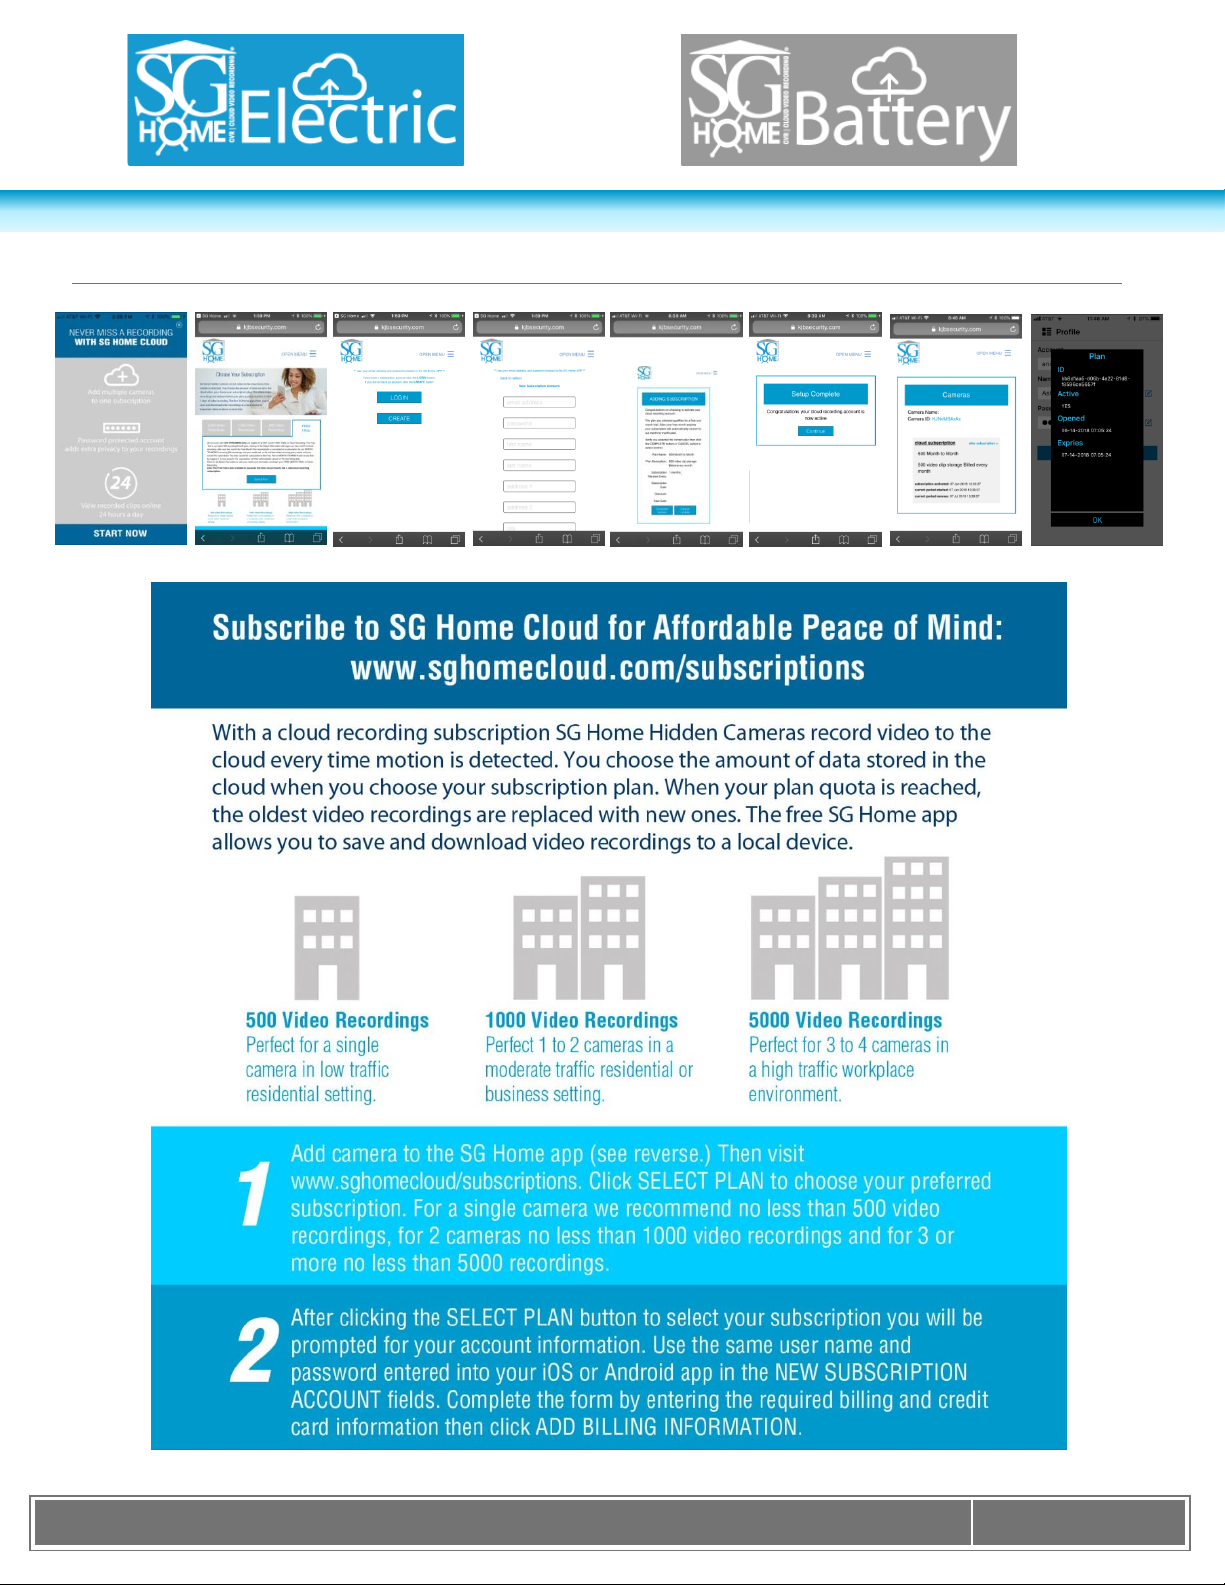
Our SG Home® CVRs do not come standard with a subscription account. In order to take full advantage of our
Cloud Recording System, you need to sign up for a cloud subscription plan. A subscription plan is required for
storage of your video files you can select the plan with the number of recordings that would work best for you
(see page 4). Follow this link to purchase your subscription plan. www.sghomecloud.com/subscriptions
Our entire line of SleuthGear® hidden cameras are designed and assembled in Nashville, TN USA backed by
our 1 year warranty. Visit www.sleuthgear.com to see the entire line of SleuthGear® hidden cameras.
Includes
SG Home® Electric or Battery CVR Camera by SleuthGear®
Battery Pack & USB charging cable (Battery models)
AC Power Cable (Electric models)
Quick Setup Guide
More Resources:
SG Home Manual: www.kjbsecurity.com/technical-support/docs
Reset Guide: www.kjbsecurity.com/technical-support/docs
Video Tutorials: youtube.com/kjbsecurityproducts
Questions: Reach us at support@kjbsecuirty.com

K J B S e c u r i t y P r o d u c t s | w w w . m y s l e u t h g e a r . c o m | 8 0 0 . 5 9 0 . 4 2 7 2
Page 3
Quick Setup Guide
Step 1. Download the SG Home® App from Apple Store or Google Play store to your smart phone or tablet.
Press SIGN UP on the login screen to create a secure account. Connect the power supply, and power on the
camera. Battery models: charge the battery pack first for approximately 10 hours for a full charge.
Step 2. After logging into the SG Home® App, press '+' at the top right of the screen to add a camera to your
account.
Step 3. Follow the on-screen instructions to select your 2.4 GHz Wi-Fi network and enter your Wi-Fi
password. Please note: Cameras DO NOT work on 5 GHz networks.
o Apple devices: The App chooses the network your device is currently connected to. If necessary,
temporarily leave the App to switch to your preferred network. Then return to the App and press 'Next' to
enter the network password.
o Android devices: Select the preferred network from the dropdown list in the app, then press 'Next' to enter
the network password. If necessary, press SCAN to search for available networks.
Step 4. Follow the on-screen instructions and select your camera’s I.D. (ex. Device_KJxxxxxxxx) to set up
your camera on Wi-Fi and create a unique camera password: Note: This is the password for the camera only,
not the password for your wireless network or the app login.
o Apple devices: Create a unique camera password and press 'Next'. Temporarily leave the App and go to
settings on your phone or tablet, access the Wi-Fi. Under Choose Networks find the cameras I.D. (ex.
Device_KJxxxxxxxx) from the list of available networks. Select cameras I.D. It will move from list to become
the Wi-Fi ID. Once you see this then return to App and continue setup in the App. Wait for the Wi-Fi icon to
show in the status bar before starting step 5.
o Android devices: Select the camera’s network from the dropdown list in the app, then press NEXT to create
a unique camera password. If necessary, press SCAN to search for available networks. Note: You will enter
a password for access to the camera. This is the password for the camera only, not the password for your
wireless network or the App login. You will have two new passwords: one for the app login and one for the
camera. Please make note of these passwords for future reference as they are unique only to you.
o Step 5. Wi-Fi setup is complete when you see the green checkmark. Press FINISH to return to SG Home®
Cameras list and begin viewing real time video. Note: If you type in the wrong Wi-Fi Password, you can still
get the green check mark. The App cannot verify your password. Your device will not be connected to the
Wi-Fi network and will not be online. You will have to do a hard reset on the device so you can see the
camera ID in your WiFi Settings. To find the reset button look for your device under the Product Line in the
back of your manual. You will have to reset up your camera by following Steps 2-5.
All devices: There may be a few seconds delay while your device reconnects to your network and the App
logs back in to the servers to retrieve your camera list.
Step 6. Sign up for your desired SG Home
®
Subscription Plan. (See page 4.)
K J B S e c u r i t y P r o d u c t s | w w w . m y s l e u t h g e a r . c o m | 8 0 0 . 5 9 0 . 4 2 7 2
Page 4
SG Home® Subscription Plans
K J B S e c u r i t y P r o d u c t s | w w w . m y s l e u t h g e a r . c o m | 8 0 0 . 5 9 0 . 4 2 7 2
Page 5
Features
HD Recording | 720P Resolution: 1280x720p
Cloud Storage: Subscription Based
Watch Live Video and Recorded Video from Anywhere at Anytime
Event Notifications so you always know what is taking place in your home or office
Use on multiple smart devices
Share your account with one other user
Place cameras in different locations and View on One Device
Indoor & Outdoor Hidden video Surveillance System (select models)
120˚ Wide Angle Lens Captures More Area than Ever Before
Long Lasting Rechargeable Battery using PIR Sensor Provides up to 90 Days of Standby (Battery
models)
Night Vision – Hidden IR Lights Capture Video at Night (select models)
Time & Date Stamped Files
Fast Start Up – From PIR Trigger to Record in 2 Seconds, Nothing Captures Video Faster
1 Year Manufacturer’s Warranty
Setup
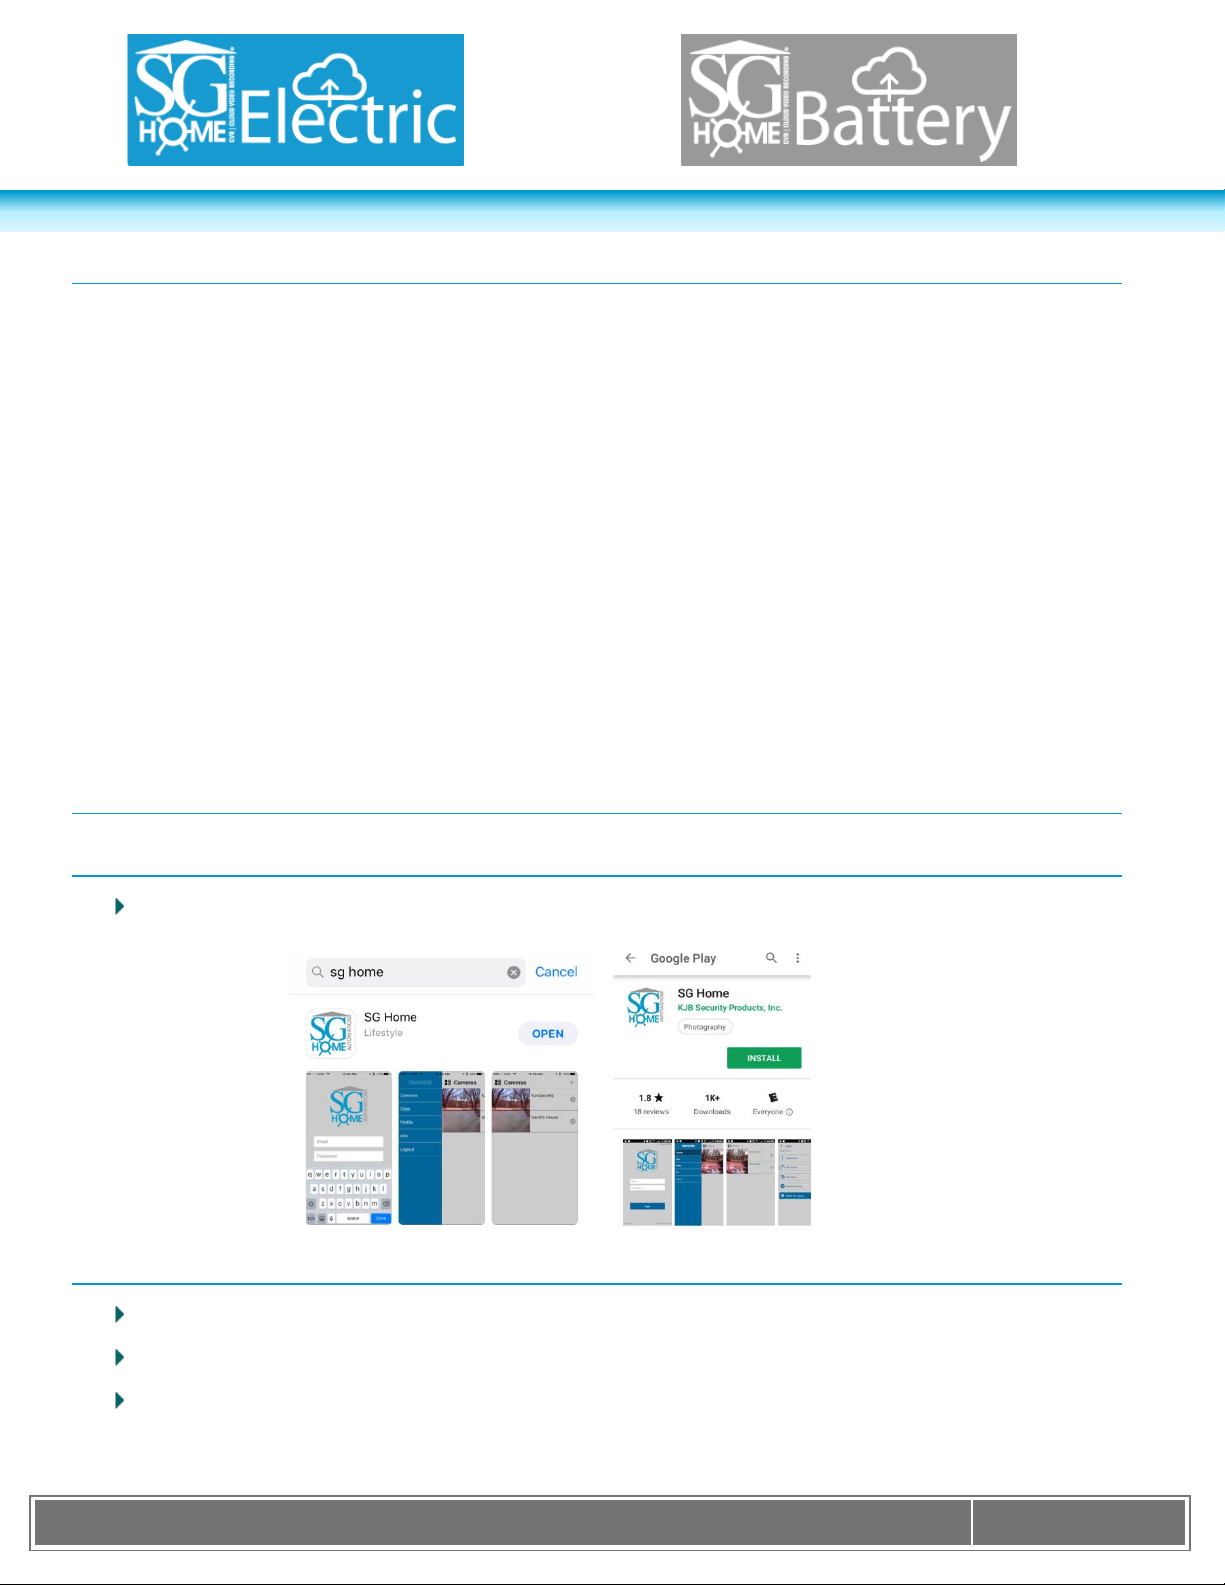
SG Home® App Installation
Search for “SG Home” in the App Store on your Device and install it on your smart phone or tablet.
SG Home® App Sign Up
Click on the sign up button in lower left
Enter email, name, and create password. Click Next.
The App will ask for activation code, enter activation code (sent to your email address in previous step).
The email will come from email address: ‘eacMgr (voipservice@mail.ntut.edu.tw)’.
K J B S e c u r i t y P r o d u c t s | w w w . m y s l e u t h g e a r . c o m | 8 0 0 . 5 9 0 . 4 2 7 2
Page 6
Apple Device
Android Device
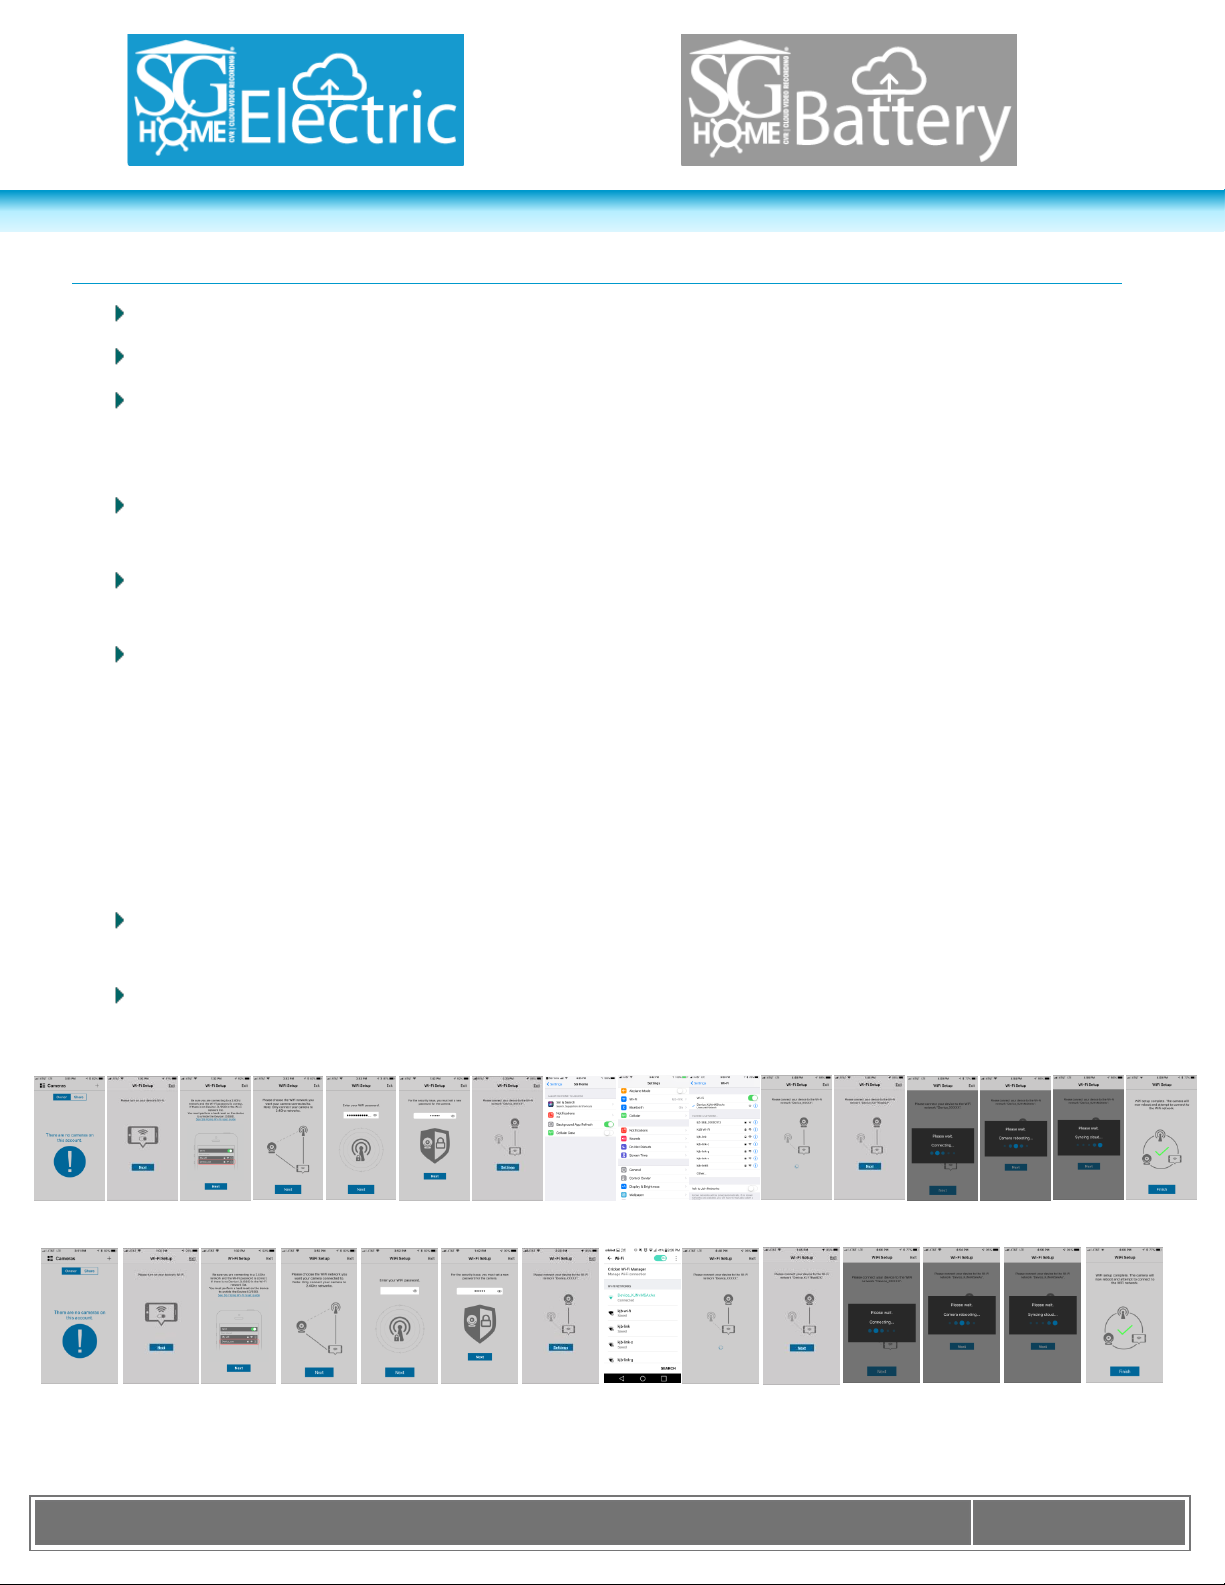
Adding your Camera to your Device
Power on the camera
Open the SG Home® App on your device and then press the ‘+’ button.
In the next screen, will direct you to choose the 2.4Ghz WiFi network you want your camera connected
to. Go to the settings ensure that your device is connected to the WiFi network that you want your
camera to be on. Then go back into the SG Home® App and click on the “Next” button.
You will be asked to enter your WiFi password now. If you have not set your WiFi password before, it
can usually be found on the back of your WiFi router.
The next step is setting a password for your camera. Be sure to write it down somewhere or use a
password you can remember.
Now that you have set a password, the App will direct you to connect your device to the camera. Click
the “Settings” button; it will redirect you out of the App to your Device Settings.
o For Apple: Click Settings, Scroll up to the top of your settings, Select Wi-Fi and click the WiFi
network labelled “Device_KJ********”.
o Scroll and click the WiFi network labelled “Device_KJ********”.
For Android:
Give your device about 10 seconds to establish the connection. Once connected, return back to the SG
Home® App. A Loading Screen will appear, then select the ‘Next’ button.
Next Screen few screen will say “Please Wait…Connecting…”, “Please wait…Camera Rebooting…”,
and “Please wait…Syncing cloud…”. Once Connected, select the ‘Finish’ under the Green Check Mark.
The device is now connected to the camera. Click on the link in the app and it will pull up a live view. The
example below shows a camera that has been set up on the SG Home® App.
Please Note: The Bluetooth function on the Speaker will not work while connecting. Plug the device in, but do
not power on the switch on the top. Once connected to your WiFi network, the Bluetooth function will work fine.
K J B S e c u r i t y P r o d u c t s | w w w . m y s l e u t h g e a r . c o m | 8 0 0 . 5 9 0 . 4 2 7 2
Page 7
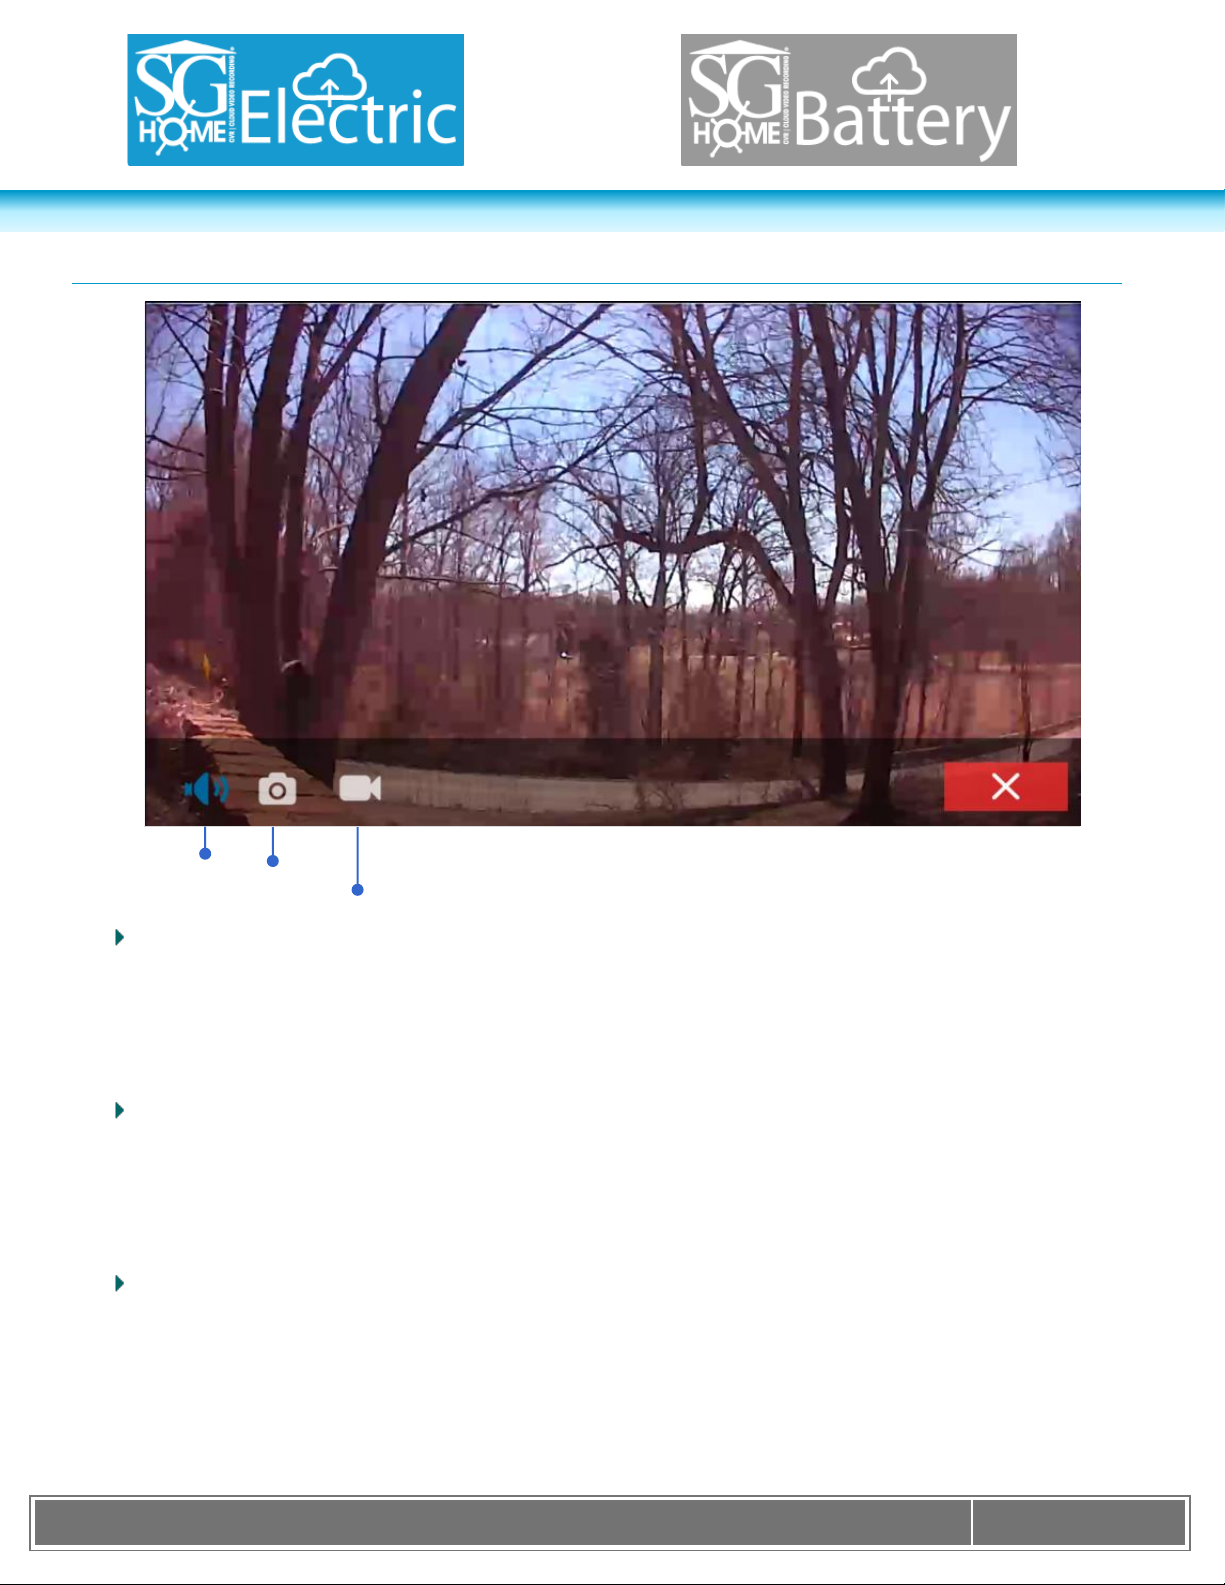
Video
Resolution
Video
Encoding
Format
Video Recording
Mic
AAC
Snapshot
Live View
Snapshot
Used for taking still pictures while in live view
Tap Camera icon to take pictures
Pictures are stored in Local Media on SG Home® App
Mic
This feature is only available to law enforcement and for export.
Record audio with video
Tap mic icon to enable/disable mic
Video Recording
Used to record video while using live view
Tap video recorder icon to start/stop recording
Videos stored in Local Media on SG Home® App
K J B S e c u r i t y P r o d u c t s | w w w . m y s l e u t h g e a r . c o m | 8 0 0 . 5 9 0 . 4 2 7 2
Page 8
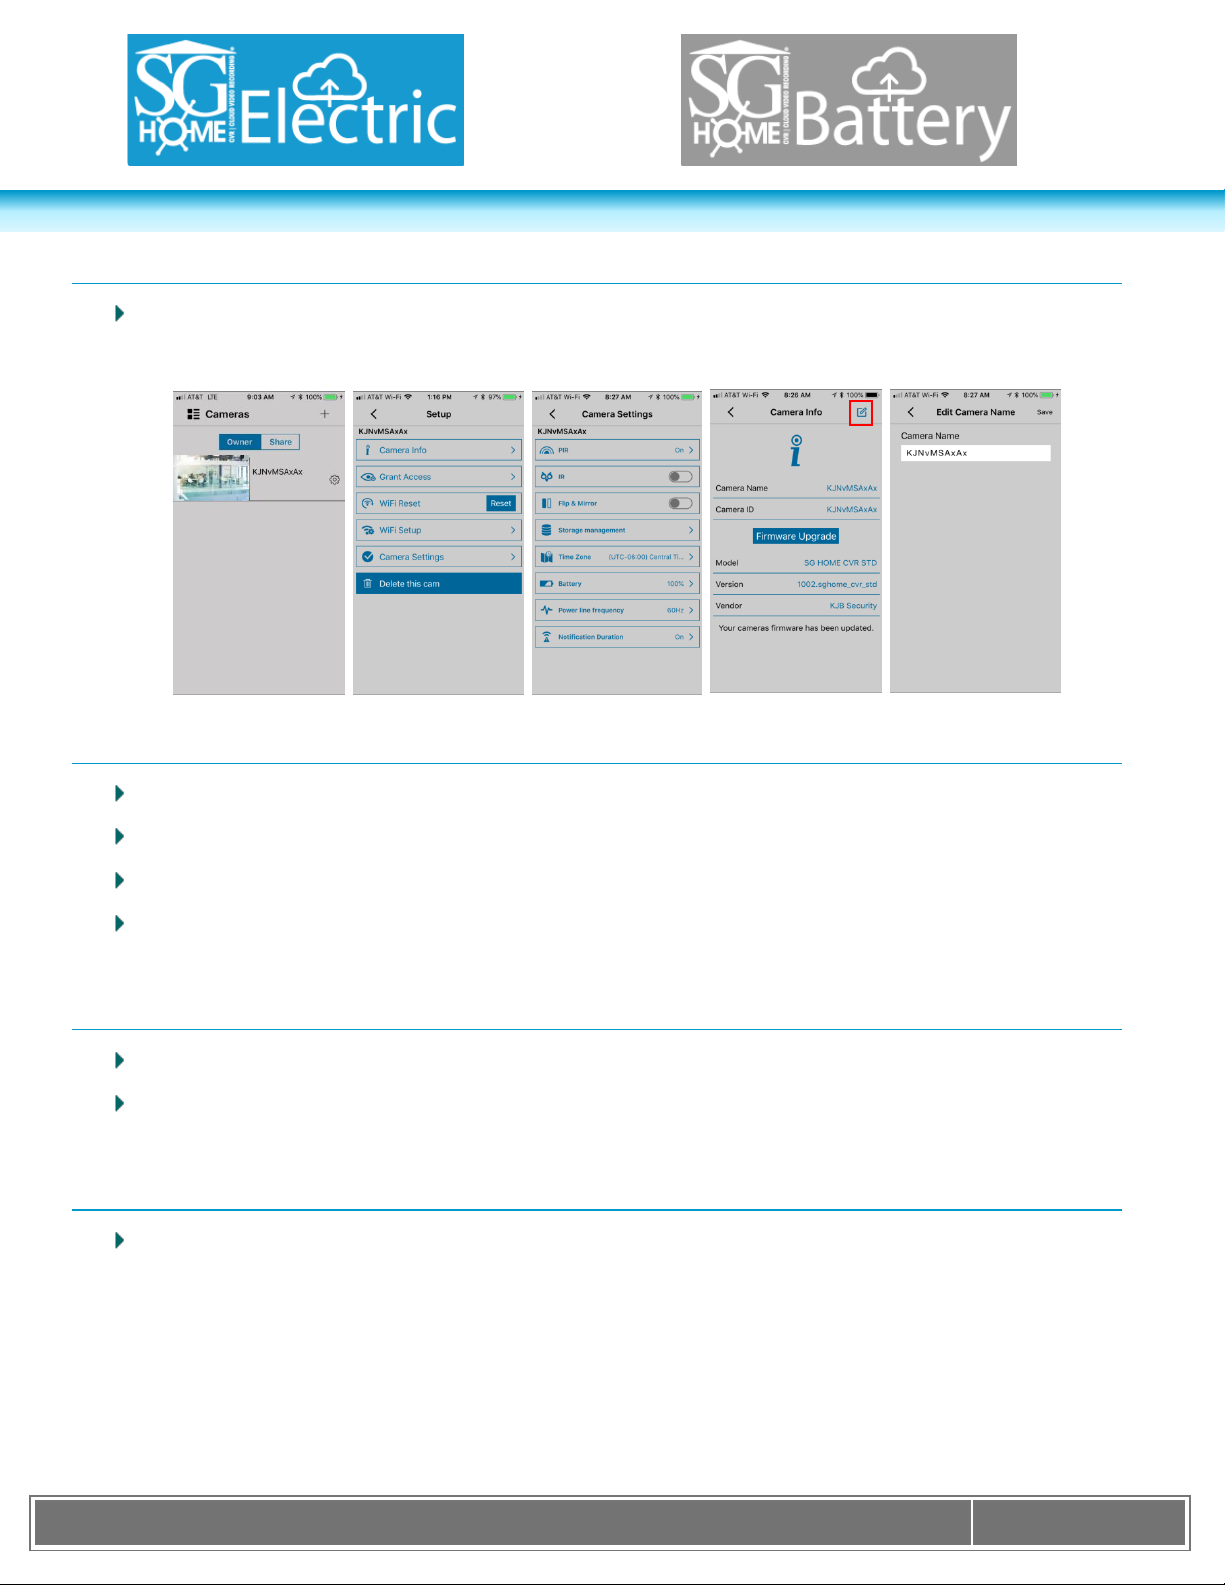
Camera Setup
In the SG Home® App, tap the icon that looks like a gear located next to the added camera. This will bring
you to the setup menu shown below.
Camera Info
From here you can edit the camera’s name.
IR Filter factory default is Black and White to see Color set to off, as shown above.
The Camera ID, displayed as the devices network before connecting camera, is displayed here.
Selecting ‘Firmware Upgrade’ gives the applications Model, Version, and Vendor Information. This will
also search for any needed firmware upgrade.
WiFi Reset
The WiFi Reset will reset the camera.
The camera’s WiFi network will display after selecting the reset button. The camera will be removed from
the SG Home® App and must be set up again for viewing.
WiFi Setup
This is used if you need to move your camera to a new Wi-Fi connection. It will enable you to connect
your camera to another WiFi network.
 Loading...