

Page 1

Manufacturer warrants all Covert Video and Sleuth Gear Hidden Video Products (Product)
Manufacturer’s Limited Warranty
assembled and sold by Manufacturer to be free of defects in material and workmanship, subject to
the following conditions. The duration of Manufacturer's warranty with respect to the Product is
limited to one (1) year from the date of sale to the original consumer purchaser only for Products
delivered within the fifty (50) states of the United States, District of Columbia, or the possessions
and territories of the United States
No other express warranties are made with respect to any Product. All implied
warranties, including warranties of merchantability and fitness for a particular purpose
are limited to the warranty period set forth above. This warranty is not transferable and
applies only to the original consumer purchaser of the Product.
Manufacturer will, as its sole obligation under this warranty, replace or repair, at its option,
any Product that does not conform to this warranty. Under no circumstances will the Manufacturer
issue credit or give a refund for Product covered by this warranty. Furthermore, under no circumstances will Manufacturer be liable for any incidental or consequential damages under this warranty or any implied warranties.
What Is Not Covered. This limited warranty does not cover Products that in Manufacturer’s judgment have damage resulting from any (i) deviation from Manufacturer's operating
instructions as printed in Manufacturer's catalog or on any packaging, labels or other literature
provided with a Product, (ii) installation of a Product in a manner which is inconsistent with Manufacturer's written instructions, (iii) alteration, modification of or tempering with a Product, (iv)
misuse, (v) neglect, (vi) abuse, (vii) accident, (viii) power surge, static electricity or other electrical discharge, (ix) normal wear and tear, (x) commercial use, (xi) service by anyone other than a
Manufacturer authorized repair facility, or (xii) other improper application, installation or operation
of the Product. Or, (xiii) have been purchased from inventory clearance or liquidation sales or
other sales in which Manufacturer expressly disclaims its warranty obligation pertaining to the
Product.
How you (the Customer) can get service: To obtain warranty service during the war-
ranty period, you must return the defective Product with the original receipt to the original place
of purchase. Contact them for return instructions.
If warranty service is needed at any time during the warranty period, the purchaser will be
required to furnish a sales receipt/proof of purchase indicating the date of purchase, amount paid
and place of purchase. Customers who fail to provide such proof of purchase will be charged for
the repair of any Product.
How state law relates to the warranty: Some states do not allow limitations on how long
implied warranties last, or the exclusion or the limitation of incidental or consequential damages.
So the above limitations or exclusions may not apply to you. This warranty gives you specific legal
rights. You may also have other rights that may vary from state to state.
NO PERSON IS AUTHORIZED BY MANUFACTURER TO MODIFY OR ADD TO THIS
LIMITED WARRANTY.
For warranty information on Products delivered outside the United States please contact the origi-
nal place of purchase.
IT IS THE USER’S RESPONSIBILITY TO ENSURE THAT THIS EQUIPMENT IS USED IN ACCORDANCE WITH
THE LAW(S) OF THE JURISDICTION IN WHICH THIS EQUIPMENT IS UTILIZED.
DO NOT ATTEMPT TO RETURN PRODUCT TO ORIGINAL MANUFACTURER, AS THIS PRODUCT HAS BEEN
MODIFIED AND IS NO LONGER SUBJECT TO ORIGINAL MANUFACTURER’S WARRANTY. IN THE CASE OF
A DEFECTIVE PRODUCT, CONTACT PLACE OF PURCHASE FOR RETURN PROCEDURE.
THIS EQUIPMENT HAS BEEN TESTED AND HAS BEEN FOUND TO BE IN COMPLIANCE WITH THE LIMITS
FOR A CLASS B DIGITAL DEVICE, PURSUANT TO PART 15 OF THE FCC RULES. THESE LIMITS ARE DE-
SIGNED TO PROVIDE REASONABLE PROTECTIONS AGAINST HARMFUL INTERFERENCE IN A RESIDEN-
TIAL INSTALLATION. THIS EQUIPMENT USES, GENERATES AND CAN RADIATE RADIO FREQUENCY EN-
ERGY AND IF NOT INSTALLED AND USED IN ACCORDANCE WITH INSTRUCTIONS, MAY CAUSE HARMFUL
INTERFERENCE TO RADIO COMMUNICATIONS.
Part 15 Low Power:
ANY CHANGES OR MODIFICATIONS TO THIS EQUIPMENT WITHOUT THE EXPRESS AUTHORIZATION OF
THE MANUFACTURER COULD VOID THE USER’S AUTHORITY TO OPERATE THIS EQUIPMENT. (RULE 15.21
OF THE FCC)
By
Table of Contents
Quick Set Up Guide 1
Unit Picture and Diagrams 2-6
Remote Control 7
Menu and Settings 7-11
Media Player (TL Player) 12
Video Playback 13-15
Specification—FAQ
FAQ
17-18
Page 2

Quick Setup Guide
1. Take out the Zone Shield® unit and plug it into any available wall outlet for power.
2. Facing the back of the unit locate the Video-Out Jack (see insert). Using the
included Video Cable plug the cable into the Video-Out Jack. Connect the other end of
the Video Cable to a Television video input jack.
3. Change the video input or auxiliary on your TV. The input select button is usually
located on the TV’s remote control or on the front panel of the TV itself. However,
some TV’s may require you to select the video input from the on-screen menu. Consult
the owner’s manual for specific instructions.
4. When you have a picture on your Television use the included remote and press the
Menu button to enter menu screen. (see diagram for remote functions on page 7)
5. Set up Time and Date using the enclosed remote. Go to Main Menu> Date/Time
Setup (see page 7) then return to the main menu.
6. Find the SD card slot (see insert) and insert the SD card.
7. Place the unit in the desired location for video surveillance. Factory default settings
will record 24x7 using motion detection.
Features and Functions of the Zone Shield DVR by SleuthGear®
Frame Rate Settings for Recording: You can record 30, 15 & 8 FPS Quality is ad-
justable, Super, Low, Standard & High.. Use this setting to gain more recording capacity. See page 9 for details.
Motion Setting: This allows three motion sensitivity settings, High, Medium and
Low. See page 9 for details.
Continuous Recording: You may record continuously without using motion, please
refer to Capacity Chart on page 9.
Playback: On your TV by using the RCA output on the unit or on your PC using the
supplied TL player CD enclosed. See page 10 for details.
File Search: From unit push play button on your remote, see quick search or list all to
find files. See page 10 for details.
Storage: the unit is set to default to overwrite video when card is full using the first in
first out rule: you can change the overwrite function by choosing Full Stop from the
storage menu. You may also delete all files from the delete all functions. This action
will reformat your SD Card, see page 8for details.
Password: you can set up a password for the unit, please write the number down in a
safe place, if the password is lost there is no way to recover it. So please choose this
option carefully. See page 10. Write down your password on page 16.
System Setting Menu
Time and Date Stamp: You can display time and date on your video file. It will be
embedded in the actual video by the default setting. You can also adjust date format
before you start your recording.
Factory Default menu :This list’s the factory default settings. Here you may reset at
anytime back to factory default. See page 10.
Frequently asked Questions & Trouble Shooting
Q. When I change the time of a scheduled recording it does not change why?
A. Before you can change a recording time you must first reset it to “From 00:00 to
00:00” then you will be able to change it.
Q. What media player software should I use to playback the recorded files?
A. Please use only the provided software on the enclosed CD TL Player.
Q. No video/Blue Screen?
A. Make sure you have inserted the micro SD card into the large SD card adapter that
came with your accessories. You may have a defective card please try another SD Card.
Check to see if the lock on the SD card in the “lock” position. If so, make sure the card is
unlocked. Make sure you have inserted the SD card in the unit before powering on your
unit.
Q. What happens if there are no video files on my SD Card?
A. The unit is set by default to motion, if you have had no activity you will have no video
files. You can change the default recording settings please see pg 8. Or you may need to
reformat your SD card.
Q. I can’t find my video files?
A. You need to access your SD card on your PC go to My Computer and find the Devices
with Removable Storage click on the ( drives are different on PC just find your removable
storage drive) drive and open the .dvr File
Q. How do I playback my video
A. You can press the play button on the provided remote control to play the recorded files
back on your Television. You must have the output cable plug into your Television. Then
select the proper input on your TV to display the Video from the camera unit
Q. How do I Re-set my unit back to the way I got it.
A. Restoring the unit to its factory default settings can be done in the menu > System
Setup> Factory Default.
For units that have Night Vision (IR’s) not all Zone Shield ® units come with this option check your receipt .
Q. Why is my Night Vision images not that bright?
A. Covert placement of the camera and IR sensor affect image quality in each individual
product form. Move the unit to different location to test the video quality. You will experience pixilation with any night vision camera. SleuthGear® strives to maintain a balance between creating a reliable hidden camera and recording in extreme low light conditions.
While SleuthGear® makes a concerted effort to test Night Vision products in different
low lighting situations, we cannot replicate every lightening condition imaginable in the
customer’s location.
1 18
Page 3
Operating
Video input
Video
MENU
Record
Recording Frame
Video Recording
Pre-recording
Post
Playback
Playback
Recording
Time/Date
Time Date Stamp
Daylight Saving
Recording
Power
Power
Firmware
Operation
System
format
Compression
OSD
Resolution
recording
mode
Playback
Control
LED
Search
Quality
Stamp
mat
Storage
IR remote
Supply
Failure
Power (Red)/Recording (Green &
Upgrade
temperature
Specifications
NTSC or PAL
720x240 (NTSC) / 720x288
Rate
Mode
Schedule continuous, Schedule motion
Yes, 10~60
For-
Time
Auto
Via device itself or included bundled software for PC
Fast Forward, Backward: x2/ x4/ x8, Frame by
By Time, By
4 Levels adjustable (Super, High, Normal,
(1) yy-mm-dd, (2) dd-mm-yy, (3) mm-dd-yy, 3 formats
Micro SD card (support SDHC) up to
Yes, through Micro SD
Non-OS
H.264
English
6/8, 13/15, 25/30
Supported
selectable
12VDC
0~+50℃
(Auto-detect)
sec
Event
Yes
by OSD
Yes
control
Recovery
fps
(PAL)
card
What's in the box
Zone Shield® By SleuthGear® Unit
1 SD Card
1 USB Card Reader
1 Remote Control
1 Video Cable
1 CD with provided Media player and manual
Standard)
32GB
Yellow)
Frame
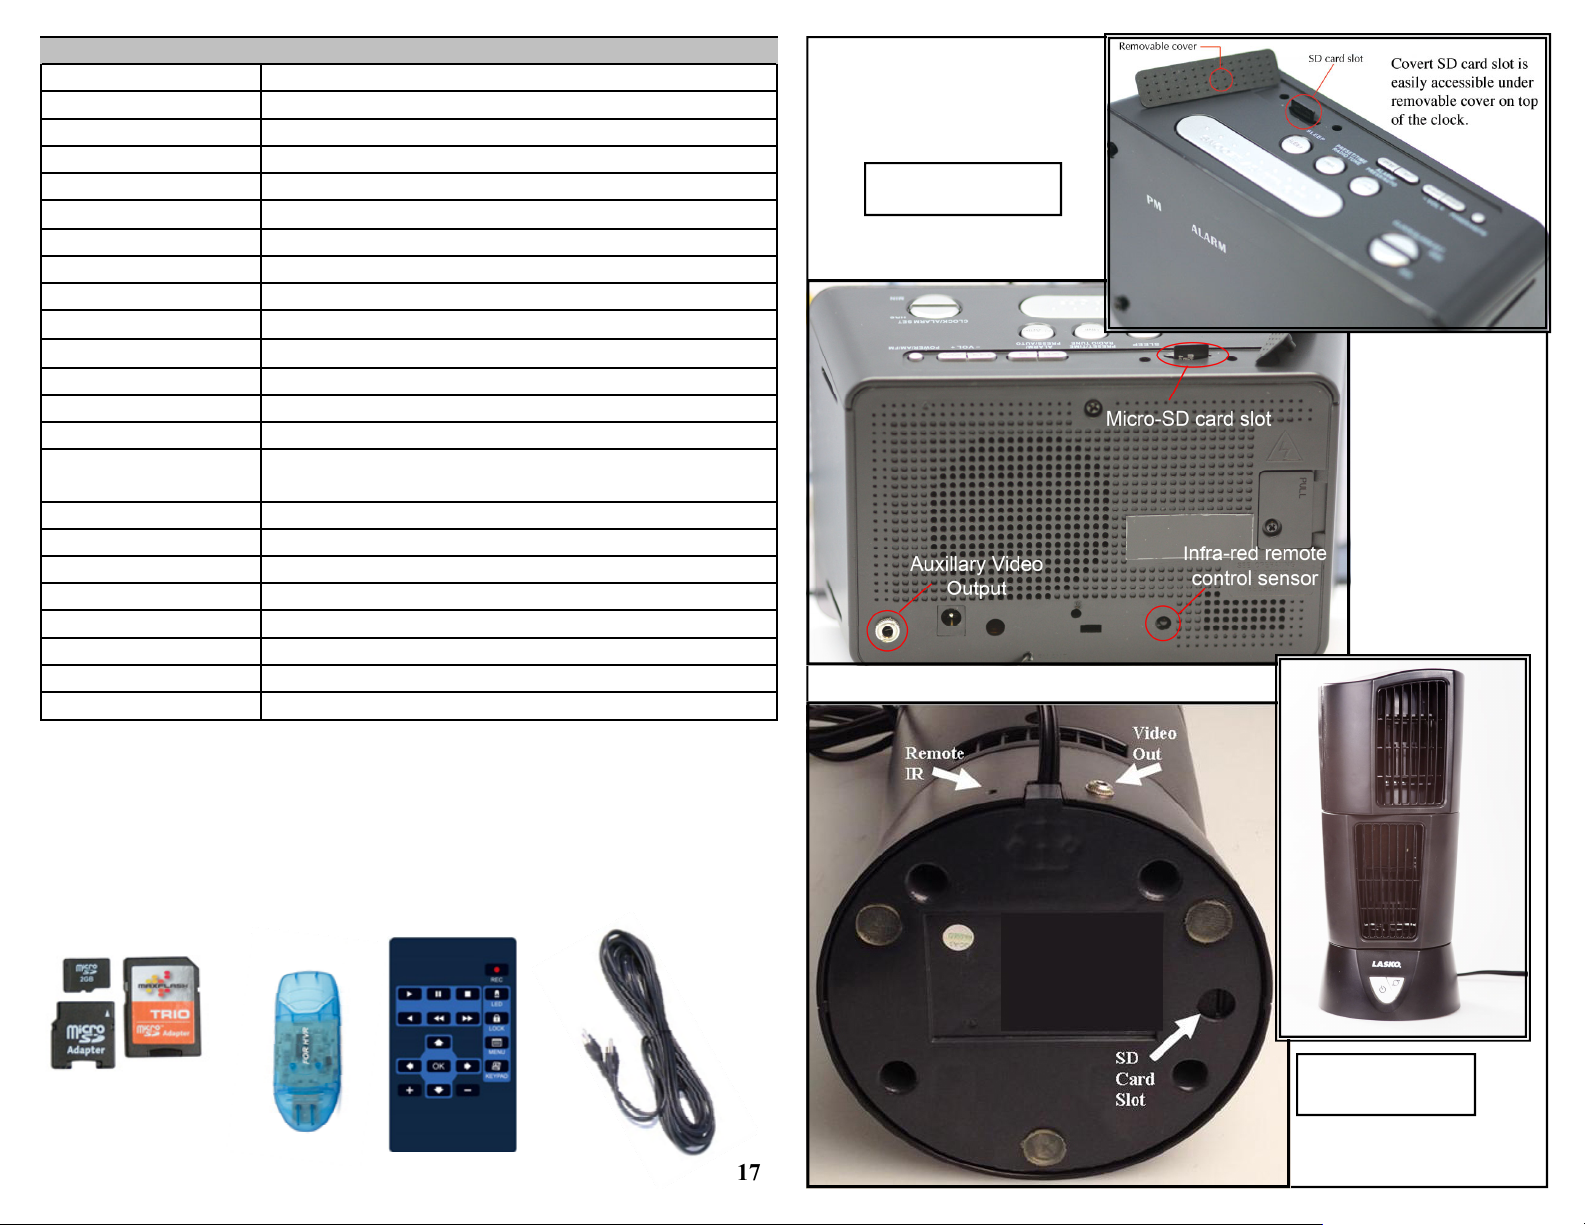
Clock Radio
Oscillating Fan
217
Page 4

Safety Precautions and Notes
Use only the included power supply to operate your Zone Shield DVR by SleuthGear® system.
Depending on you unit most operate at 110v only, please look at your unit carefully to avoid damaging the unit and voiding the warranty. All units come with
American standard style plugs. (Adaptor for other countries would be required).
SD Card Slot
Air Purifier
Wall Mount Air Purifier
To avoid electrical shock, do not attempt to open the unit. Opening the unit
VOIDS the warranty. To prevent fire or shock hazard, do not expose this product
to rain or moisture. Do not operate near bath tub, sink, or swimming pool.
Avoid operation in moist environments.
Do not overload electrical outlets or extension cords as this may result in fire or
electric shock, this unit works only on 120 Volt unless otherwise labeled.
Power surges or over voltage (i.e. 220 Volt) will damage the unit and void the
warranty. A surge suppressor should be used . Prevention and protection are the
responsibility of the user.
Make a note of your password below
User___________________ Password__________________
Default Password 1234
Floor model Air Purifier
SD card slot
Video out
3 16
Page 5

Playback Files
Admin
DVD Player
Move the mouse cursor to
the place you want to
enlarge. Right click to
zoom in. Right click
again to go back to the
original .
Click
the login dialog box appears key
in account and password
Default: root/ root
* Display information: On/Off
* Date format: yyyy/mm/dd
dd/mm/yyyy
mm/dd/yyyy
* Time/Date position:
Top Left/ Bottom Right
Press to
change account and password in Admin area.
Note: keep new password in
a safe place as it can not be
recovered.
iPod Dock
415
Page 6

Backup Files
Mantel Clock
Power in/
Video Out
Rectangle Clock
SD Card Slot
Press and
choose backup format (DVR/ WMV/
AVI/ JPG) and choose backup channel.
* Backup as DVR format: Can only
backup four channels
* Backup as WMV/ JPG format:
backup four channels or individual
channel
* Backup as AVI format: backup four
channels or individual channel;
backup resolution as CIF or D1.
During the playback, you can press
to set
start time to backup file.
Then, press
to set end
time to backup file.
* Green bar: backup start time
* Red bar: backup end time
SD Card Slot
Power in/
Video Out
Press
to
export backup file to PC, or
Press
to
cancel Backup Start time and End
time
5 14
Page 7

Search Files
Wall Clock
Click
Press and then
press .
Picture Frame
Select a folder with DVR files
and press “OK”
Double click the selected recording file to playback or click
the selected recording file and
press “Open” to playback.
File searching method:
* List all time : list all the recording
sessions in the folder you
browse.
* List file event : list the event
which you select in “List all
time”
* Search all event : list all the
events in the folder you
browse (max. 1000 events)
* Format storage : Format SD
card easily
613
Page 8

Remote Control Functions
TL Player
Software version
Player function
Playback display
Playback control
Note: The LED Button will turn
of the lights on the DVR board.
Playback functional buttons
File information
7 12
Page 9

SD card times are approximate
11
8
Page 10

9
Press on the remote control to get into playback menu
10
 Loading...