

Page 1

UNDERCOUNTER REFRIGERATOR
Use and Care Guide and Installation Instruction
For questions about features, operation/performance, parts, accessories, or service, call: 1-800-422-1230
or visit our website at... www.kitchenAid.com
In Canada, call: 1-800-807-6777, or visit our website at... www.KitchenAid.ca
TABLE OF CONTENTS
REFRIGERATOR SAFETY ................................................2
Proper Disposal of your Old Refrigerator ........................3
INSTALLATION REQUIREMENTS ....................................3
Tools and Parts ...............................................................3
Location Requirements ...................................................3
Product Dimensions ........................................................4
Custom Overlay Panel ....................................................4
Handle (Optional) ...........................................................5
Electrical Requirements .................................................. 5
INSTALLATION INSTRUCTIONS ...................................... 5
Unpack the Refrigerator .................................................5
Custom Overlay Panel Installation ..................................6
Installation and Door Closing .......................................... 7
USING REFRIGERATOR ................................................... 7
Controls ..........................................................................7
Normal Sounds ............................................................... 8
Refrigerator Shelves .......................................................9
Door Bins ........................................................................9
Lights .............................................................................. 9
CARE AND CLEANING ..................................................... 9
Cleaning .........................................................................9
Removing Base Grille ...................................................10
Vacation Care ............................................................... 10
Moving Care .................................................................10
TROUBLESHOOTING ..................................................... 11
ASSISTANCE .................................................................. 13
In the U.S.A ...................................................................13
In Canada ..................................................................... 13
Accessories .................................................................. 13
W11515231B
Page 2
REFRIGERATOR SAFETY
Your safety and the safety of others are very important.
We have provided many important safety messages in this manual and on your appliance. Always read and obey all
safety messages.
This is the safety alert symbol.
This symbol alerts you to potential hazards that can kill or hurt you and others.
All safety messages will follow the safety alert symbol and either the word “DANGER” or “WARNING.”
These words mean:
You can be killed or seriously injured if you don’t immediately follow
instructions.
You can be killed or seriously injured if you don’t follow instructions.
All safety messages will tell you what the potential hazard is, tell you how to reduce the chance of injury, and tell you
what can happen if the instructions are not followed.
IMPORTANT SAFETY INSTRUCTIONS
WARNING:
precautions:
Plug into a grounded 3 prong outlet.
Do not remove ground prong.
Do not use an adapter.
Do not use an extension cord.
Disconnect power before servicing.
Replace all parts and panels before operating.
Remove doors from your old refrigerator.
Use non flammable cleaner.
Do not store or use petrol, flammable liquids or gas
in the vicinity of this or other electrical appliances.
The fumes can cause fires or explosions.
Do not store explosive substances such as aerosol
cans with a flammable propellant in this refrigerator.
Do not use or place electrical devices inside the
refrigerator compartments if they are not of the type
expressly authorized by the manufacturer.
Use two or more people to move and install
refrigerator.
To reduce the risk of fire, electric shock, or injury when using your refrigerator, follow these basic
This appliance is not intended for use by persons
(including children) with reduced physical, sensory
or mental capabilities, or lack of experience and
knowledge, unless they have been given supervision
or instruction concerning use of the appliance by a
person responsible for their safety.
Children should be supervised to ensure that they
do not play with the appliance.
To avoid the risk of children becoming trapped and
suffocating, do not allow them to play or hide inside
the refrigerator.
If the power supply cord is damaged, it must be
replaced by the manufacturer or its service agent or
a similarly qualified person.
Keep ventilation openings, in the appliance
enclosure or in the built-in structure, clear of
obstruction.
Do not use mechanical devices or other means to
accelerate the defrosting process, other than those
recommended by the manufacturer
Do not damage the refrigerant circuit.
SAVE THESE INSTRUCTIONS
2
Page 3
Proper Disposal of your Old Refrigerator
WARNING: Risk of child entrapment. Before You
Throw Away Your Old Refrigerator or Freezer:
Take off the door.
Leave the shelves in place so that children may not easily
climb inside.
Suffocation Hazard
Remove doors or lid from your old appliance.
Failure to do so can result in death or brain damage.
IMPORTANT: Child entrapment and
suffocation are not problems of the past.
Junked or abandoned refrigerators are still
dangerous –even if they will sit for “just a
few days.”
If you are getting rid of your old
refrigerator, please follow these
instructions to help prevent accidents.
Important information to know about disposal of
refrigerants:
Dispose of refrigerator in accordance with Federal and Local
regulations. Refrigerants must be evacuated by a licensed, EPA
certified refrigerant technician in accordance with established
procedures.
Location Requirements
Explosion Hazard
Keep flammable materials and vapors, such as gasoline,
away from refrigerator.
Failure to do so can result in death, explosion, or fire.
IMPORTANT: This appliances is intended to be used in
household and similar applications such as:
Staff kitchen areas in shops, offi ce and other working
environments;
Farm houses and by clients in hotels, motels and other resi-
dential type environments;
Bed and breakfast type environments;
Catering and similar non-retail applications.
NOTES:
For the refrigerator to be fl ush with the front of the base
cabinets, remove any baseboards or moldings from the rear
of the opening. Refer “Product Dimensions” and later in this
section, “Opening Dimensions.”
It is recommended that you do not install the refrigerator near
an oven, radiator, or other heat source.
Do not install in a location where the temperature will fall
below 55 °F (13 °C). For best performance, do not install the
refrigerator behind a cabinet door or block the base grille.
INSTALLATION
REQUIREMENTS
Tools and Parts
Gather the required tools and parts before starting
installation.
Tools and parts needed:
Phillips screwdriver.
Custom Overlay Door Panel - Refer “Custom Overlay
Panel Preparation”.
Custom handle and mounting hardware (optional).
Parts supplied:
M4 x 30 flathead screws (8).
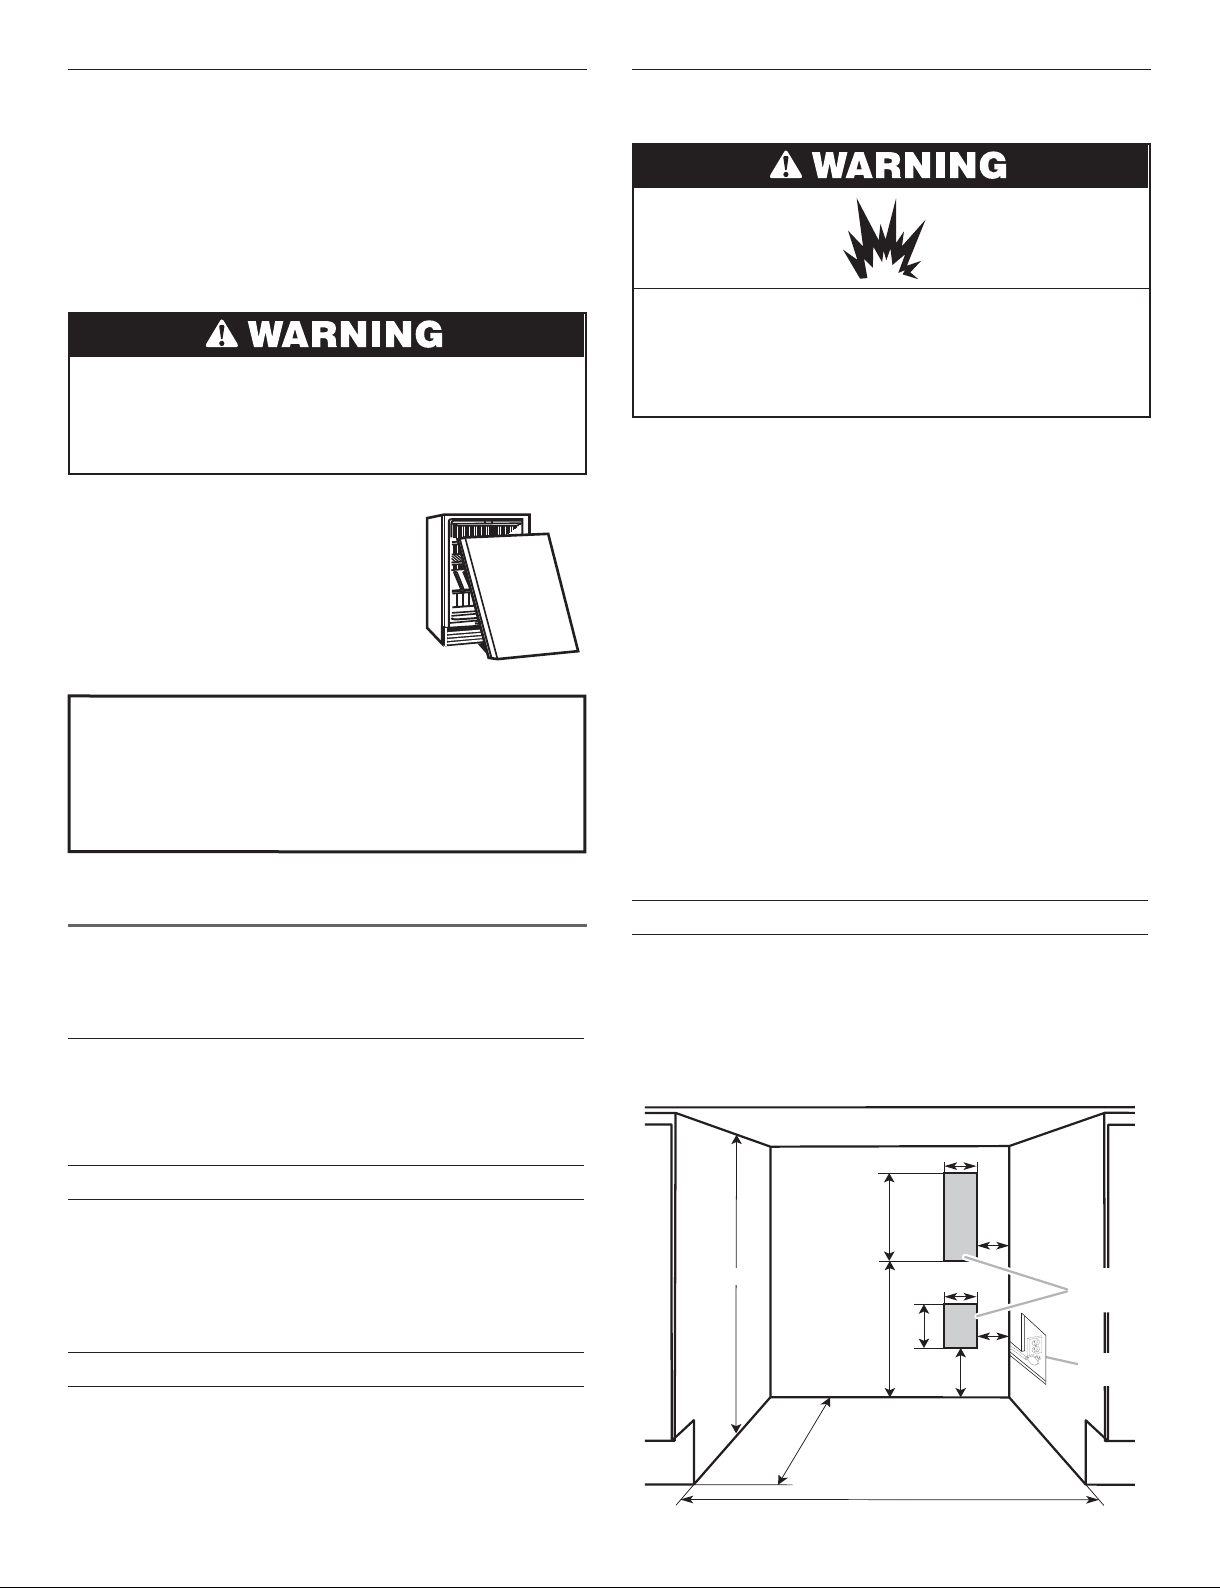
Opening Dimensions:
Height dimensions are shown with the leveling legs
extended to the minimum height.
NOTE: When leveling legs are fully extended, add 5/8”
(15 mm) to the height dimensions. Refer “Product Dimensions.”
If the fl oor of the opening is not level with the kitchen
fl oor, shim the opening to make it level with the kitchen fl oor.
G
I
C
E
H
B
A
F
G
F
D
Recessed
receptacle
locations
Utility
opening
3
Page 4
Opening and utility location dimensions
Opening width - A
Opening depth - B
Opening height - C
Dimension - D
Dimension - E 21
Dimension - F 1
Dimension - G 3” (7.55 cm)
Dimension - H 4
Dimension - I 9
For fl ush installation, the power outlet can be installed in
adjacent cabinetry with a cutout on the power cord side for
routing of the power cord.
The power outlet can also be recessed on the back wall
behind the unit as per recommended receptacle locations in
the above illustration.
24” (60.96 cm) min.
24” (60.96 cm) min.
1
34
/2” (87.6 cm) min.
35” (88.9 cm) max.
1
12
/16” (30.64 cm)
3
/4” (55.16 cm)
3
/4” (4.44 cm)
1
/2” (11.37 cm)
1
/4” (23.47 cm)
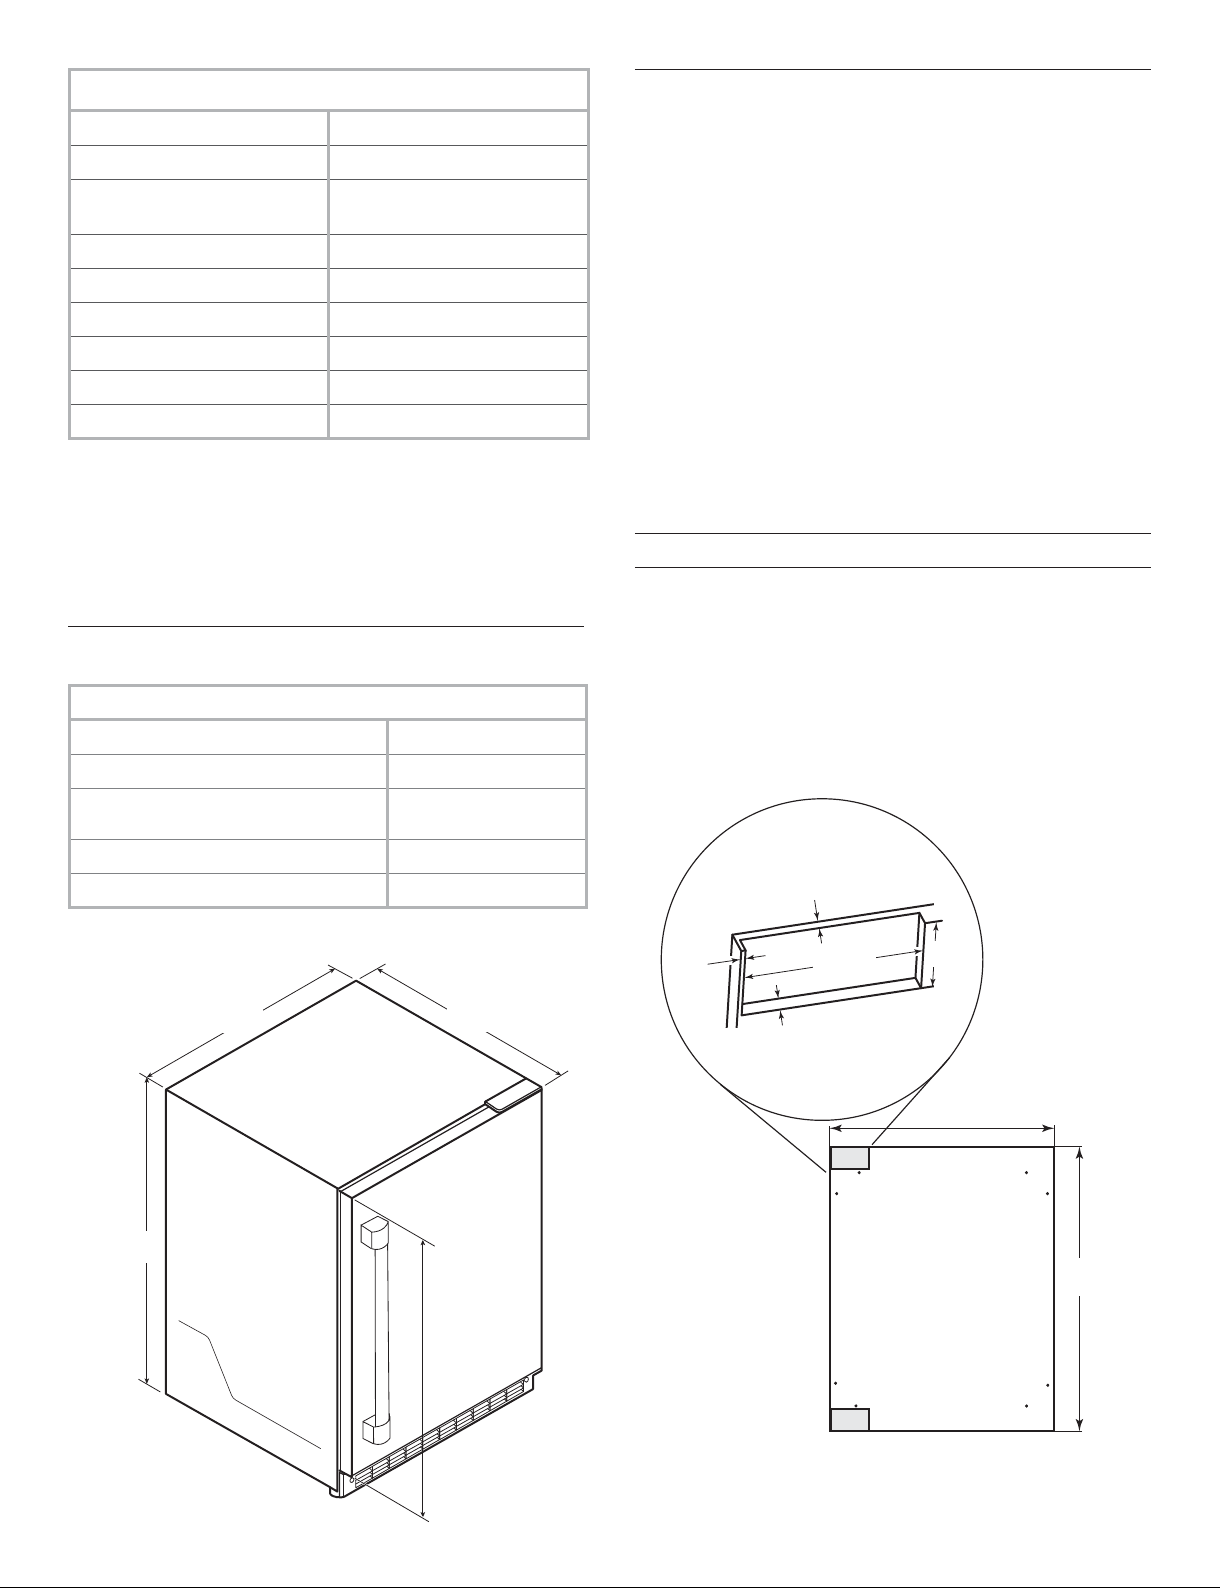
Product Dimensions
Overall product
Width (up to hinge cover)
Height (up to hinge cover) 34
Panel ready models depth
(with 3/4” panel and no handle)
Raw Door Height
Depth (no handle)
7
/8” (60.72 cm)
23
3
/8” (87.32 cm)
13
23
/16” (60.5 cm)
5
/8” (77.75 cm)
30
5
/8” (60.01 cm)
23
Custom Overlay Panel
NOTE: For standard stainless steel or glass door models, skip
these instructions and go to “Electrical Requirements” section.
If you plan to install a custom overlay panel, you will need to
create the panel yourself or consult a qualifi ed cabinetmaker
or carpenter. Refer dimension drawings for panel
specifi cations.
IMPORTANT:
The thickness of the overlay panel must be 3/4” (19 mm).
Custom solid door overlay panel must not weigh more than
20 lb (9.07 kg).
Custom glass door overlay panel must not weigh more than
10 lb (4.54 kg).
Overlay panels weighing more than recommended may
cause damage to your appliance.
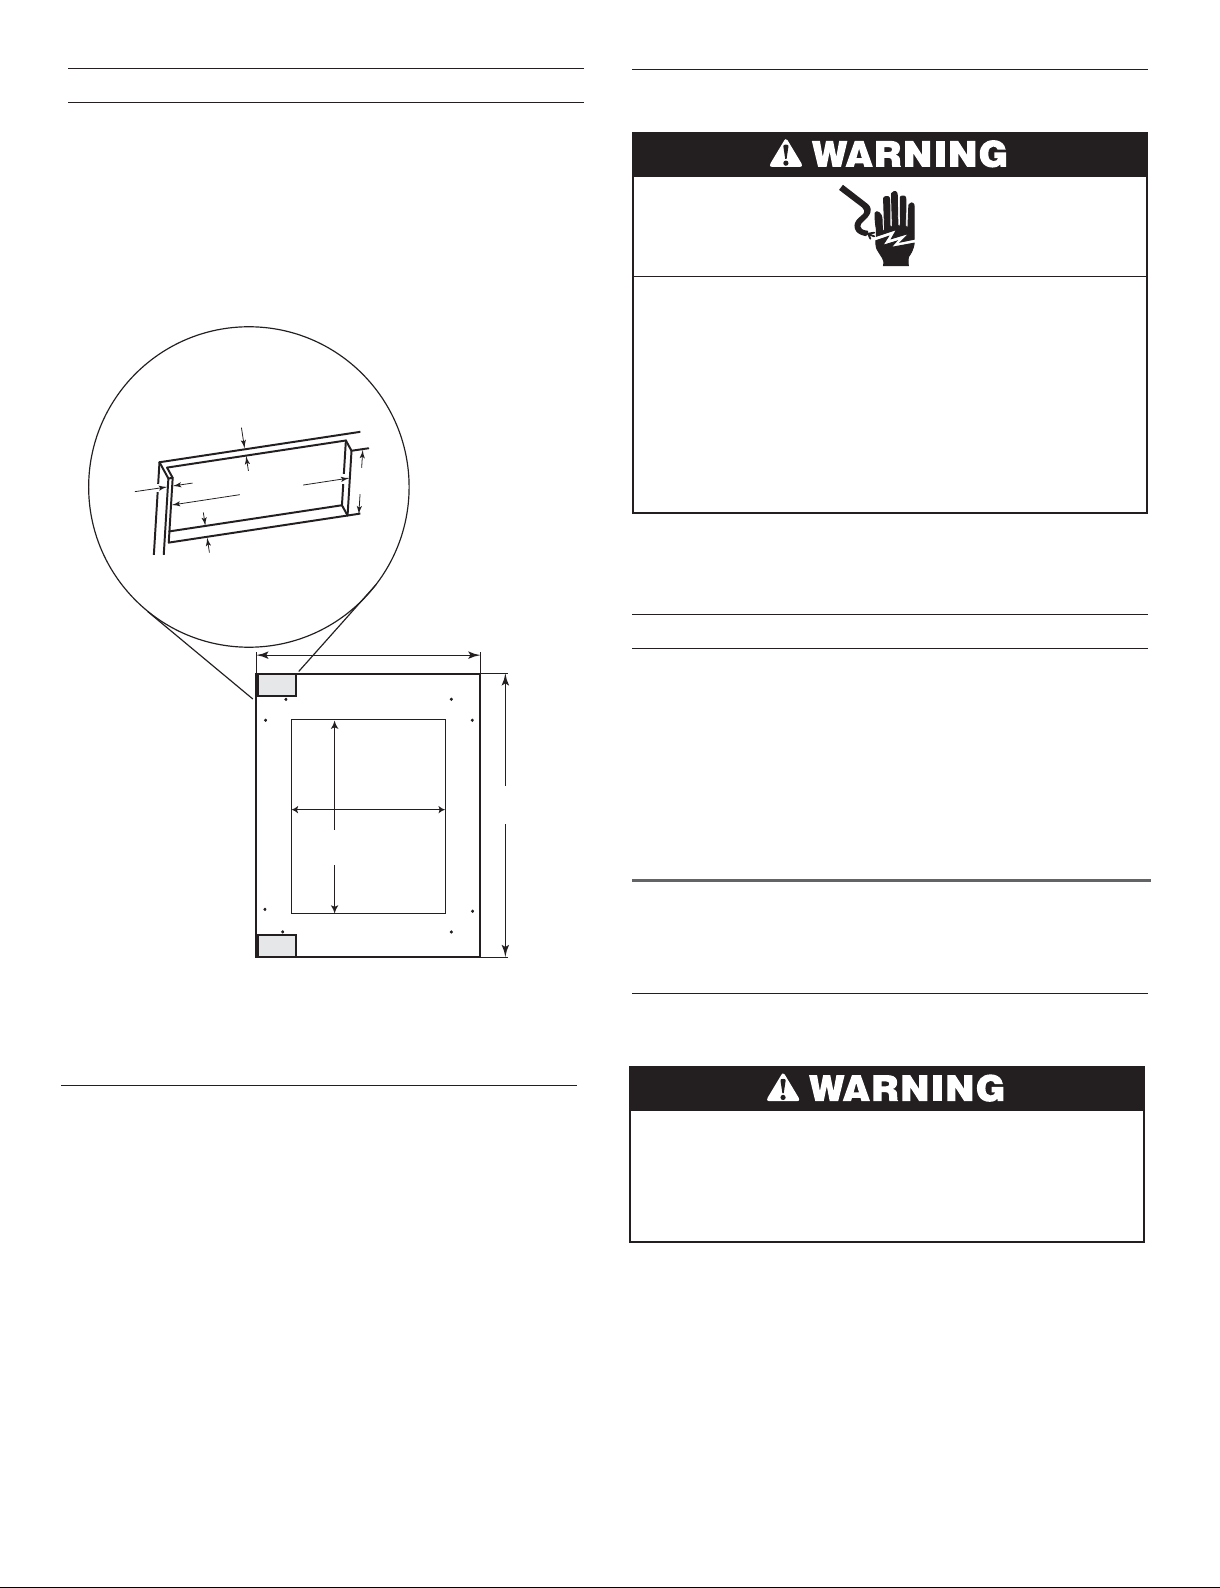
Solid door overlay panel - Preparation:
Create the custom overlay panel using the dimensions shown
in the illustration “Solid door overlay panel and hinge routing
dimensions”. Rout shaded areas to a 1/2” (12 mm) depth as
shown.
IMPORTANT: The following graphic shows a custom panel
for a door with the hinges installed on the right-hand side.
If your refrigerator has the hinges installed on the left-hand
side, rotate the custom frame 180° so the hinge markings will
be on the left.
1/4"
(7 mm)
NOTE: The power cord is 60” (152.4 cm) long.
7
/8”
23
(60.72 cm)
3
/8”
34
(87.32 cm)
30
(77.5 cm)
Depth
(no handle)
5
/8”
1/8"
(3 mm)
1/2"
(12 mm)
415/16”
(125 mm)
2"
(53 mm)
233/4”
(60.3 cm)
305/8”
(77.75 cm)
Solid door overlay panel and hinge routing dimensions
4
Page 5
Glass door overlay panel - Preparation:
Create the custom overlay panel using the dimensions shown
in the illustration “Glass door overlay panel and hinge routing
dimensions”. Rout shaded areas to a 1/2” (12 mm) depth as
shown.
IMPORTANT: The following graphic shows a custom panel
for a door with the hinges installed on the right-hand side.
If your refrigerator has the hinges installed on the left-hand
side, rotate the custom frame 180° so the hinge markings
will be on the left.
Electrical Requirements
Electrical Shock Hazard
Plug into a grounded 3 prong outlet.
Do not remove ground prong.
1/8"
(3 mm)
1/2"
(12 mm)
1/4"
(7 mm)
415/16”
(125 mm)
2113/16”
(55.4 cm)
2"
(53 mm)
233/4”
(60.3 cm)
171/16”
(43.3 cm)
305/8”
(77.75 cm)
Do not use an adapter.
Do not use an extension cord.
Failure to follow these instructions can result in death,
fire, or electrical shock.
Before you move your refrigerator into its fi nal location, it
is important to make sure you have the proper electrical
connection.
Recommended grounding method:
A 115 V, 60 Hz, AC only, 15 A or 20 A fused, grounded
electrical supply is required. It is recommended that a
separate circuit serving only your refrigerator be provided.
Use an outlet that cannot be turned off by a switch.
Do not use an extension cord.
NOTE: Before performing any type of installation, cleaning,
or removing a light bulb, unplug refrigerator or disconnect
power.
INSTALLATION
INSTRUCTIONS
Glass door overlay panel and hinge routing dimensions
Handle (optional)
Custom handles are typically attached to the custom overlay
door panel only.
Refer instructions received with KitchenAid handle kits to
install these handles on custom wood panels.
Custom handle needs to be installed on the door panel with
countersunk holes and installed before the custom overlay
door panel has been installed on the refrigerator door.
Unpack the Refrigerator
Excessive Weight Hazard
Use two or more people to move and install or
uninstall appliance.
Failure to do so can result in back or other injury.
Before using your refrigerator, all packaging materials should
be removed and the interior should be cleaned.
Remove tape and glue residue from surfaces before turning
on the refrigerator. With your fi ngers, rub a small amount of
liquid dish soap over any adhesive and wipe with warm water
to remove.
Do not use sharp instruments, rubbing alcohol, fl ammable
fl uids, or abrasive cleaners to remove tape or glue.
These can damage the surfaces of your refrigerator.
For more information, refer “Refrigerator Safety” section.
5
Page 6
Dispose of and/or recycle all packaging materials.
After all packaging materials have been removed, clean the
inside of your refrigerator. Refer the cleaning instructions in
“Cleaning” section.
Important information to know about glass shelves
and covers:
Do not clean glass shelves or covers with warm water when
they are cold. Shelves and covers may break if exposed to
sudden temperature changes or impact, such as bumping.
Tempered glass is designed to shatter into many small, pebblesize pieces. This is normal. Glass shelves and covers are heavy.
Use both hands when removing them to avoid dropping.
NOTE: For standard stainless steel or glass door models, skip
to “Door Closing” section.
Custom Overlay Panel Installation
IMPORTANT:
Create custom overlay panel according to the specifi cations
in the “Custom Overlay Panel” section.
KitchenAid is not responsible for the removal or addition of
molding or decorative panels that would not allow access to
the refrigerator for service.
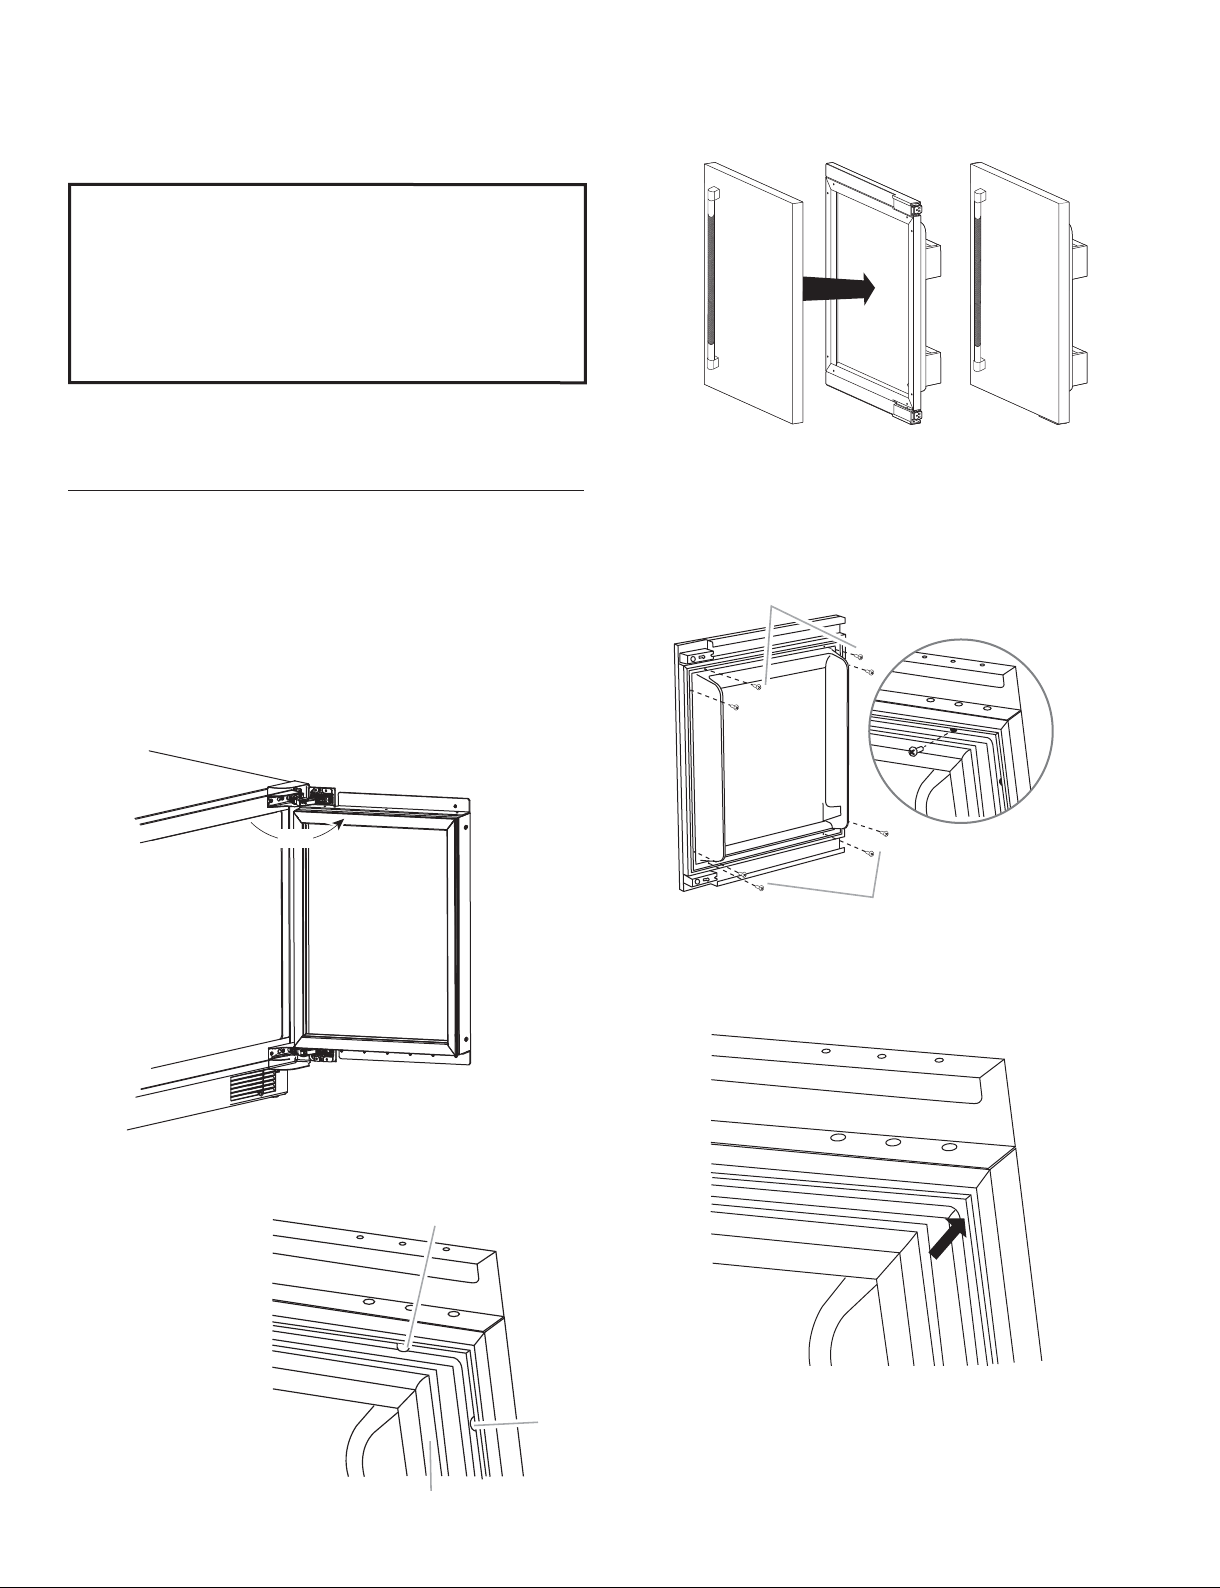
3. Using two people, hold the custom overlay panel against
the door. Be sure that the top and bottom hinges fit
accurately into the routing on back of the custom wood
panel.
NOTE: Handle needs to be installed before the custom
overlay door panel has been installed on the refrigerator
door.
4. Fasten the custom panel to the door using two wood
screws (provided in installation kit) at each corner.
A
1. Open the door completely to 115°.
115°
2. Remove the gasket from the corners of the door, pulling
gently until the two screw holes in each corner of the door
can be seen.
NOTE: The gasket
does not have to be
removed from the
door, only the
corners.
A
A
A. M4 x 30 fl athead screws (provided in installation kit)
5. Press the gasket firmly back into it’s original position.
A. Screw holes
B. Gasket
6
A
B
Page 7
Installation and Door Closing
Your refrigerator has four leveling legs. If your refrigerator
seems unsteady or you want the door to close more easily,
adjust the refrigerator’s tilt using the instructions below.
Electrical Shock Hazard
Plug into a grounded 3 prong outlet.
Do not remove ground prong.
Do not use an adapter.
Do not use an extension cord.
Failure to follow these instructions can result in death,
fire, or electrical shock.
1. Plug into a grounded 3 prong outlet.
Excessive Weight Hazard
Use two or more people to move and install or uninstall
appliance.
Failure to do so can result in back or other injury.
When moving your Refrigerator:
Your refrigerator is heavy. When moving the refrigerator
for cleaning or service, be sure to cover the oor with
cardboard or hardboard to avoid door damage.
Always pull the refrigerator straight out when moving it.
Do not wiggle or “walk” the refrigerator when trying to
move it, as oor damage could occur.
2. Move the refrigerator into its final location.
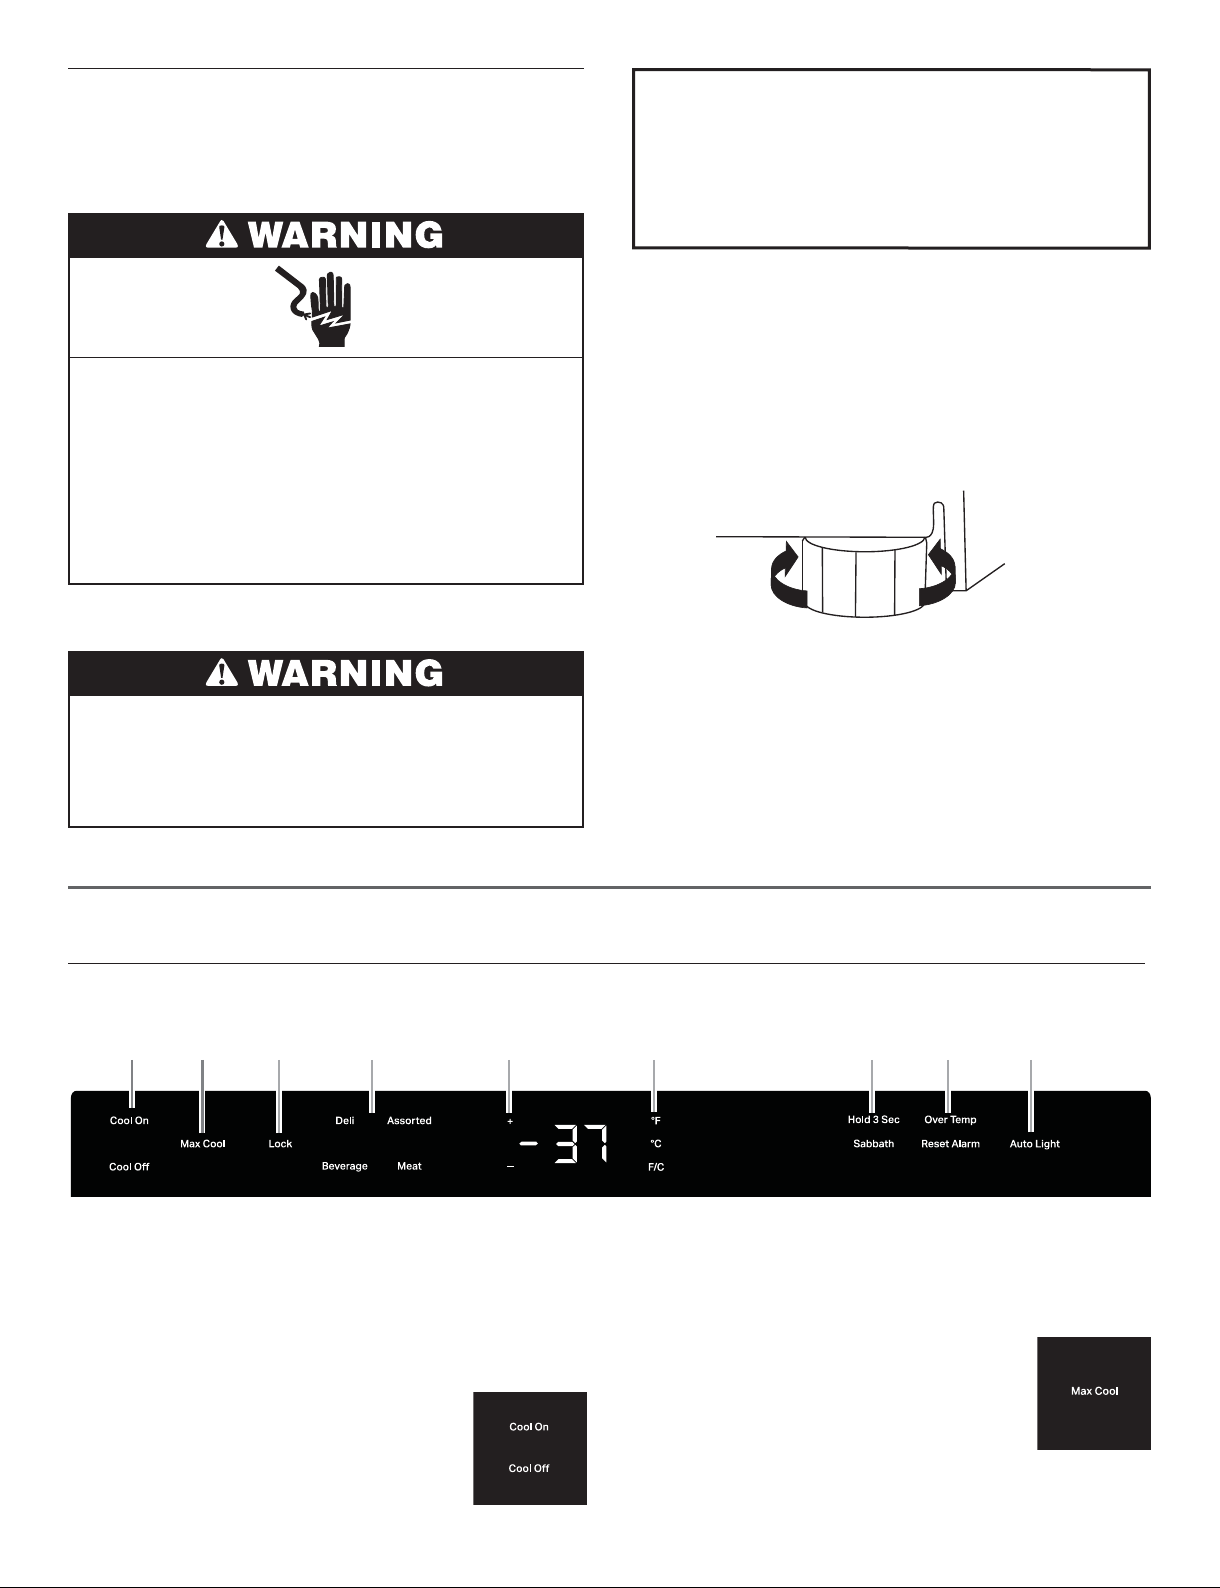
3. Turn the leveling legs to the right to lower the refrigerator,
or turn the leveling legs to the left to raise it. It may take
several turns of the leveling legs to adjust the tilt of the
refrigerator.
NOTE: Having someone push against the top of the
refrigerator takes some weight off the leveling legs.
This makes it easier to adjust the leveling legs.
4. Open the door and check that it closes as easily as you
like. If not, tilt the refrigerator slightly more to the rear by
turning both front leveling screws to the right.
It may take several more turns, and you should turn both
leveling legs the same amount.
USING REFRIGERATOR
Controls
1 2 3 4 5 6 7 8 9
NOTES:
The control panel is located at the top of the compartment
and facing front.
The control of the refrigerator has no mechanical parts or
buttons. When disconnected, the control panel displays
nothing and may be diffi cult to locate.
1. Turning Control On/Off
The first time that the refrigerator is plugged
in, the control will be in Cool Off mode.
Cool On and Cool Off will be the only
options that display.
Press Cool On for 3 seconds to turn on the refrigerator.
All menus and recommended temperature settings will
be displayed.
2. Max Cool
Decrease internal temperatures to their lowest
point for 24 hours.
Press Max Cool to turn on the feature.
The feature will activate.
Press Max Cool to turn off the feature and return to the
previous settings.
7
Page 8
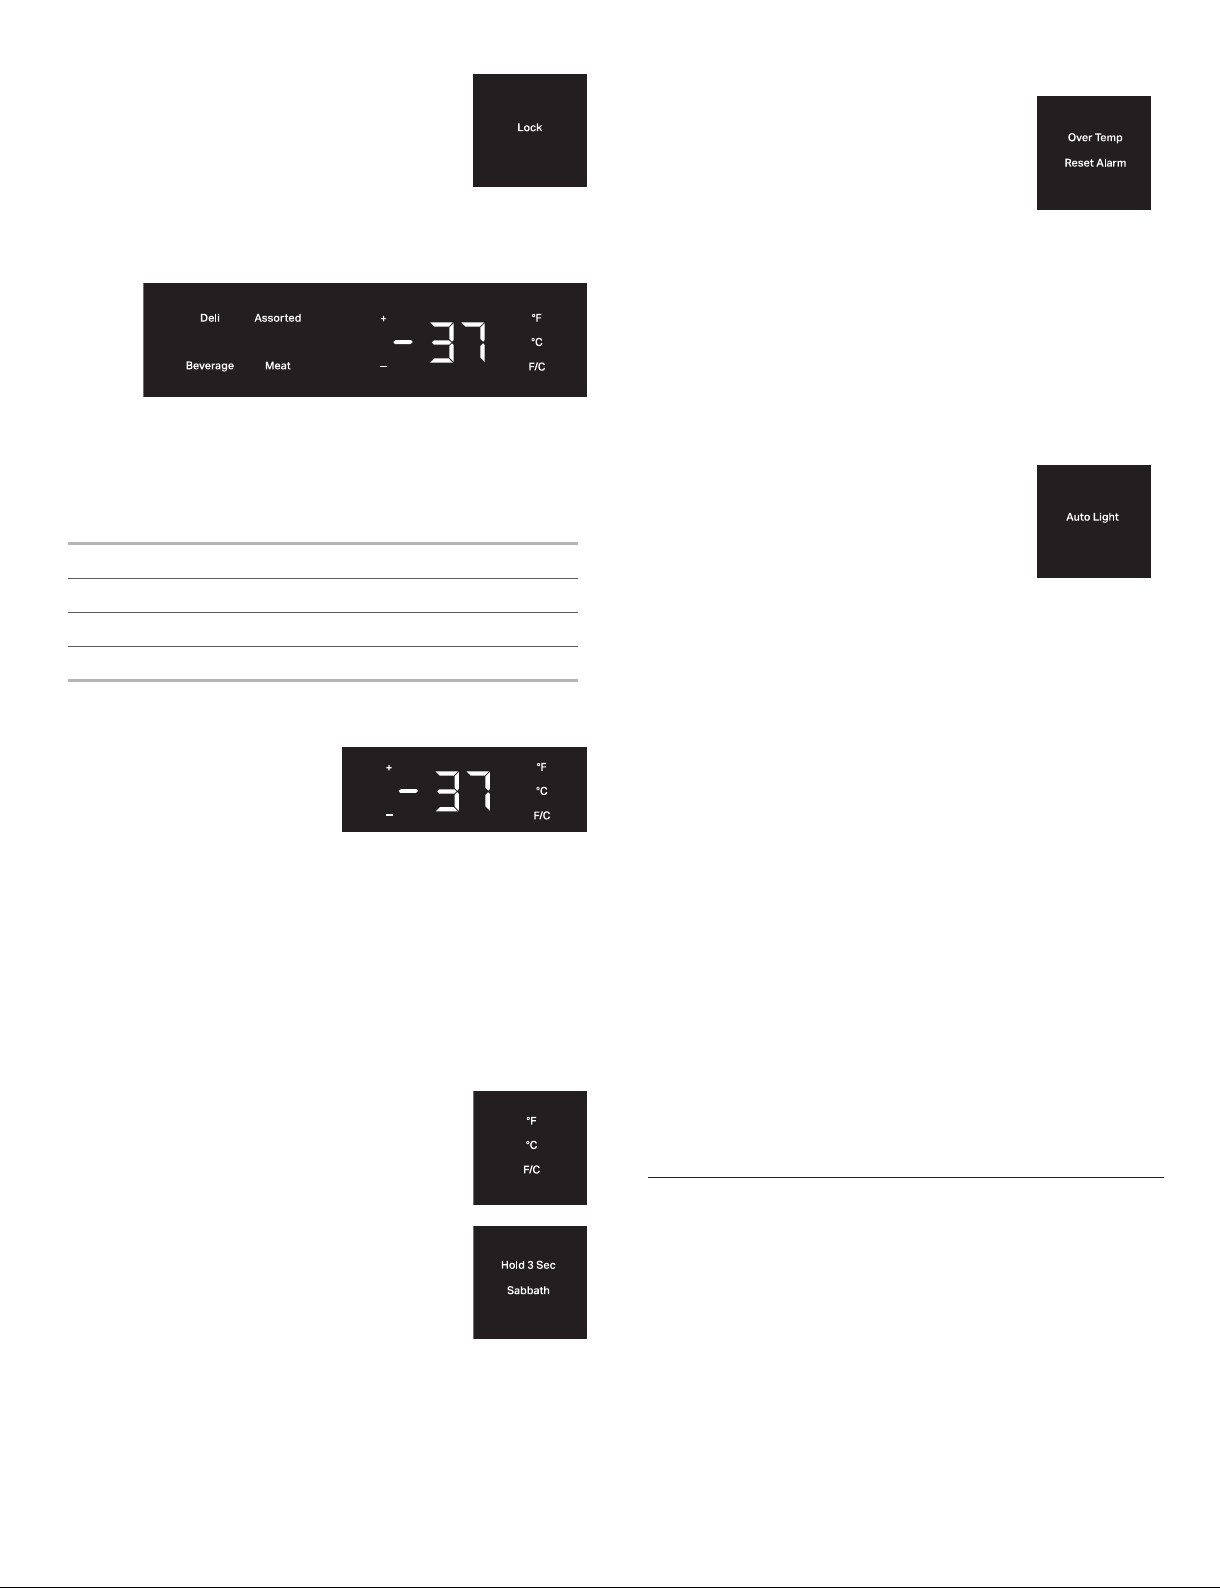
3. Control Lock
Avoids unintended temperature changes and
makes it easy to clean the controls.
To activate Lock Mode, press and hold LOCK
for 3 seconds. After the countdown, all other
displays will turn off and become
unavailable except Cool On, Cool Off and Lock.
4. Using Presets
For your convenience, your refrigerator also has controls
that are preset to recommended storage temperatures for
specific products. Pressing any preset option will set the
temperature value to recommended temperature for each
category:
Deli: 39 °F (3 °C)
Assorted: 37 °F (2 °C)
Beverage: 34 °F (1 °C)
Meat: 32 °F (0 °C)
Press and hold SABBATH for 3 seconds to turn off the
feature and turn on the display.
8. Over Temp Alarm
Helps avoid food from spoiling by giving an
audible and visual alert if the temperature
rises above the preset range for 4 hours.
The audio alarm will shut off automatically when the
temperature returns to normal. To let you know an Over
Temperature condition occurred, the indicator light will
continue to flash until the Reset Alarm touch pad is
pressed. If the over temperature condition is still present
when an Over Temp reset is performed, the indicator light
will continue to reactivate every 4 hours until the
refrigerator temperature is below preset range.
NOTE: These features will not appear on your control
unless your refrigerator is above preset range and the
alarm requires a reset.
9. Auto Light (Glass Door Models)
The refrigerator has a sensor that will turn
on the interior display light automatically
when someone walks by. When motion is no
longer detected, the interior display light
will go off after 2 minutes.
Press the Auto Light option to activate this feature.
When the Auto Light is not activated, the interior
display light will only turn on when the door is opened.
5. Adjusting the Temperatures
To adjust set point
temperatures, press “+” (plus)
or “-” (minus) until the desired
temperature setting is
reached. The control is set correctly when milk and
beverages are as cold as you like it.
NOTES:
The default recommended temperature for the refrigerator
is 37 °F (2 °C). The set point range for this model is 32 °F
to 42 °F (0 °C to 5 °C).
Wait at least 24 hours between adjustments so the
refrigerator can acclimate.
6. Viewing Celsius/Fahrenheit Temperatures
Press the F/C touch pad to toggle between
displaying the temperature in degrees
Fahrenheit and degrees Celsius.
The corresponding indicator will illuminate.
7. Sabbath Mode
Allows the door of the refrigerator to be
opened or closed on the Sabbath or other
religious holidays without directly turning on
or off any lights, digital readouts, fans, valves,
tones or alarms. By selecting this feature, the
temperature set points remain unchanged,
but the control panel lights, interior lights, and control
audio turn off. For most efficient refrigerator operation, it is
recommended to exit the Sabbath Mode when it is no
longer required.
Press and hold SABBATH for 3 seconds to turn on the
feature. After the 3-second countdown, the feature will
activate and all other displays will turn Off.
NOTE: Leaving the light on for an extended period of time
will slightly increase the temperature of the refrigerator.
10. Door Open Alarm
Helps avoid food from spoiling by giving an audio and
visual alert if the door is left open for 5 minutes.
If the door is open longer than 5 minutes, an alarm will
sound every 2 minutes until the door is closed or any
control is pressed.
11. Showroom Mode
This mode is used only when the refrigerator is on
display in a retail store. To activate Showroom Mode,
press and hold both Cool On and Sabbath for 3 seconds.
If you unintentionally turn on Showroom Mode, Cool Off
will light up on the display, and the controls will appear to
work. Exit Showroom Mode by pressing and holding
COOL ON and SABBATH at the same time for 3 seconds.
Normal Sounds
Your new refrigerator may make sounds that your old one
didn’t make. Because the sounds are new to you, you might
be concerned about them. Most of the new sounds are
normal. Hard surfaces, such as the fl ooring and surrounding
structures, can make the sounds seem louder. The following
describes the kinds of sounds and what may be making them.
Your refrigerator is designed to run more effi ciently to keep
your food at the desired temperatures and to minimize
energy usage. The high effi ciency compressor and fans
may cause your refrigerator to run longer than your old one.
You may also hear a pulsating or high-pitched sound from
the compressor or fans adjusting to optimize performance.
8
Page 9
Rattling noises may come from the fl ow of refrigerant or
items stored inside the refrigerator.
As each cycle ends, you may hear a gurgling sound due
to the refrigerant fl owing in your refrigerator.
You may hear water running into the drain pan when the
refrigerator is defrosting.
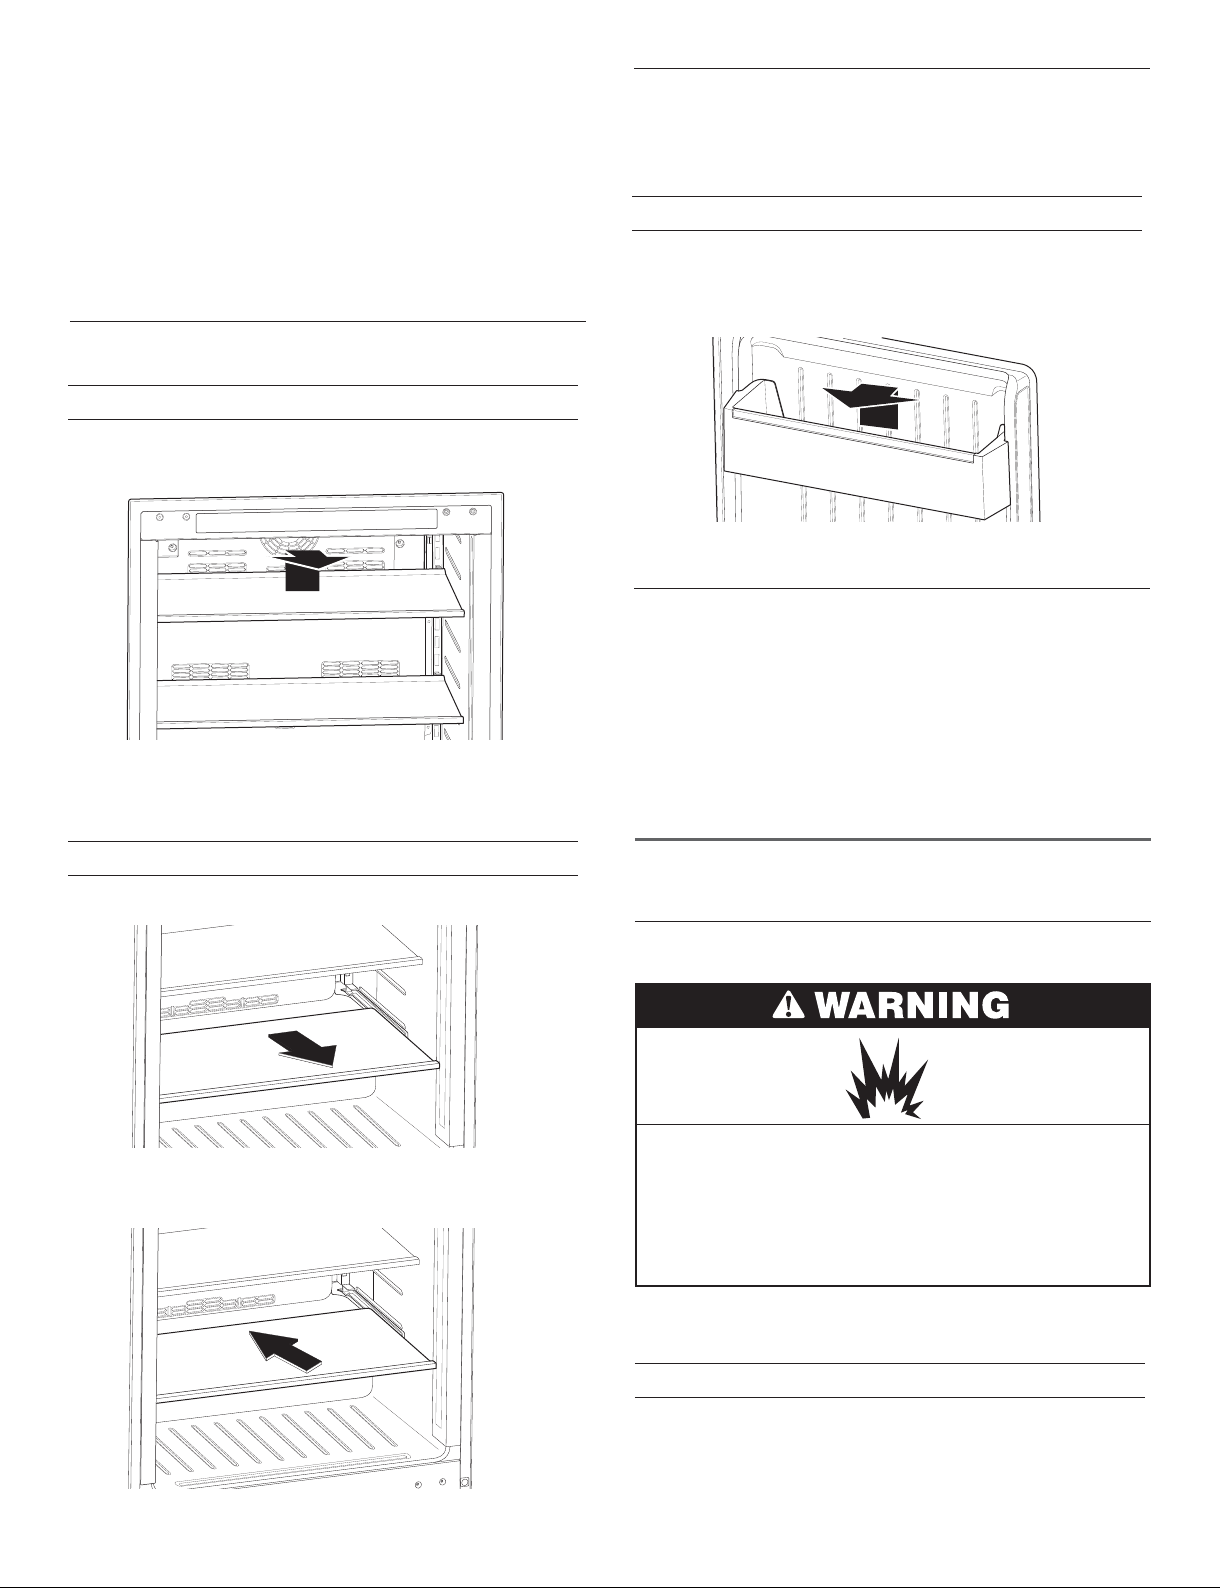
Door Bins (Solid Door Models)
Your refrigerator has two door bin locations for maximum
storage capacity.
To remove and replace the door bins:
You may hear clicking sounds when the refrigerator starts
or stops running.
Refrigerator Shelves
To remove or adjust upper shelves:
1. Remove the shelf by lifting it up and out of the shelf
brackets.
2. Replace the shelf by inserting it into the shelf brackets.
NOTE: Be sure the shelf is leveled.
1. Remove the door bin by tilting it forward and pulling it out.
2. Replace the bin by placing the rear of the bin under the
support on the door and sliding into place.
Lights
The refrigerator has an interior light that illuminates when the
door is opened.
NOTE: The light is an LED which does not need to be
replaced. If the LED does not illuminate when the door is
opened, call Service. Refer “Assistance” section for contact
information.
To remove and replace bottom shelf:
1. The very bottom glass shelf slides straight out.
2. Replace the shelf by aligning the edges with the guides
and pushing it in toward the back of the refrigerator.
CARE AND CLEANING
Cleaning
Explosion Hazard
Risk of fire or explosion.
Flammable refrigerant used.
Do not use mechanical devices to defrost refrigerator.
Do not puncture refrigerant tubing.
Clean the refrigerator once a month to avoid buildup of
odors. Wipe up spills immediately.
To clean your refrigerator:
1. Unplug refrigerator or disconnect power.
2. Remove all shelves and bins from inside the refrigerator.
9
Page 10

3. Hand wash, rinse, and dry removable parts and interior
surfaces thoroughly. Use a clean sponge or soft cloth and
a mild detergent in warm water.
To avoid damaging wooden tines and trim pieces, wipe
them off with a clean sponge or soft cloth and warm water.
Do not use detergent or immerse the entire rack into water
when cleaning.
Do not use abrasive or harsh cleaners such as window
sprays, scouring cleansers, fl ammable fl uids, cleaning
waxes, concentrated detergents, bleaches or cleansers
containing petroleum products on plastic parts, interior and
door liners or gaskets. Do not use paper towels, scouring
pads, or other harsh cleaning tools. These can scratch or
damage materials.
To help remove odors, you can wash interior walls with a
mixture of warm water and baking soda (2 tbs to 1 qt [26 g
to 0.95 L] of water).
Removing Base Grille
You must remove the base grille to access the condenser
coils for cleaning.
To remove the base grille:
1. Open the refrigerator door.
4. Wash stainless steel and painted metal exteriors with a
clean sponge or soft cloth and a mild detergent in warm
water. Do not use abrasive or harsh cleaners, or cleaners
containing chlorine. These can scratch or damage
materials. Dry immediately with a soft, dry cloth to absorb
any remaining water.
NOTE: To keep your stainless steel refrigerator looking like
new and to remove minor scuffs or marks, it is
recommended that you use the manufacturer’s approved
Stainless Steel Cleaner and Polish.
IMPORTANT:
This cleaner is for stainless steel parts only!
Do not allow the Stainless Steel Cleaner and Polish to come
into contact with any plastic parts such as the trim pieces,
dispenser covers or door gaskets. If unintentional contact
does occur, clean plastic part with a sponge and mild
detergent in warm water. Dry immediately with a soft, dry
cloth to absorb any remaining water.
5. Replace the shelves and bins.
Condenser cleaning
A. Screws
2. Using a Phillips screwdriver, remove the two screws.
3. Remove the base grille.
A
To replace the base grille:
1. Open the refrigerator door.
2. Position the base grille so that both tabs align and the base
grille snaps into place. Replace two screws. Tighten the
screws.
Vacation Care
If you choose to turn the refrigerator off before you leave,
follow these steps.
1. Remove all food from the refrigerator.
2. Unplug the refrigerator.
3. Clean the refrigerator. Refer “Cleaning” section.
4. Tape a rubber or wood block to the top of the door to prop
it open far enough for air to get in. This stops odor and
mold from building up.
Explosion Hazard
Risk of fire or explosion due to puncture of refrigerant
tubing.
Follow handling instructions carefully.
Flammable refrigerant used.
1. Remove the base grille to access condenser for cleaning.
Refer “Removing Base Grille” section.
2. Clean the condenser coils regularly. They are located
behind the base grille. Coils may need to be cleaned as
often as every other month. This may help save energy.
10
Moving Care
When you are moving your refrigerator to a new home, follow
these steps to prepare it for the move.
1. Remove all food from the refrigerator.
2. Unplug the refrigerator.
3. Clean, wipe, and dry it thoroughly.
4. Take out all removable parts, wrap them well, and tape
them together so they don’t shift and rattle during the
move.
5. Tape the doors shut and tape the power cord to the
refrigerator.
When you get to your new home, put everything back and
refer to the “Installation Instructions” section.
Page 11
TROUBLESHOOTING
Try the solutions suggested here first in order to avoid the cost of an unnecessary service call.
Electrical Shock Hazard
Plug into a grounded 3 prong outlet.
Do not remove ground prong.
Do not use an adapter.
Do not use an extension cord.
Failure to follow these instructions can result in death,
fire, or electrical shock.
GENERAL OPERATION Possible Causes and/or Recommended Solutions
Refrigerator will not operate
The motor seems to run too much
Power supply cord unplugged? Plug into a grounded 3 prong outlet.
Is outlet working? Plug in a lamp to see if the outlet is working.
Household fuse blown, or a circuit breaker tripped? Replace the fuse or reset the
circuit. If the problem continues, call an electrician.
Are controls on? Be sure that the refrigerator controls are on. Refer “Controls”
section.
Is the temperature outside hotter than normal? Expect the motor to run longer
under warm conditions. At normal temperatures, expect your motor to run about
40 % to 80 % of the time. Under warmer conditions, expect it to run even more of
the time.
Has a large amount of food just been added to the refrigerator? Adding a large
amount of food warms the refrigerator. It is normal for the motor to run longer in
order to cool the refrigerator back down.
Is the door opened often? Expect the motor to run longer when this occurs.
In order to conserve energy, try to get everything you need out of the refrigerator at
once, keep food organized so it is easy to fi nd, and close the door as soon as the
food is removed.
Is the control set correctly for the surrounding conditions? Refer “Controls”
section.
Is the door closed completely? Push the door fi rmly shut. If it will not shut all the
way, refer “The door will not close completely” later in this section.
Are the condenser coils dirty? This obstructs air transfer and makes the motor
work harder. Clean the condenser coils. Refer “Cleaning” section.
11
Page 12
TEMPERATURE AND MOISTURE
Possible Causes and/or Recommended Solutions
Temperature is too warm
There is interior moisture buildup
Is the door opened often? Be aware that the refrigerator will warm up when this
occurs. In order to keep the refrigerator cool, try to get everything you need out of
the refrigerator at once, keep food organized so it is easy to fi nd, and close the
door as soon as the food is removed.
Has a large amount of food just been added to the refrigerator? Adding a large
amount of food warms the refrigerator. It can take several hours for the refrigerator
to return to the normal temperature.
Is the control set correctly for the surrounding conditions? Refer “Using the
Controls.”
Is the base grille blocked? For best performance, do not install the refrigerator
behind a cabinet door or block the base grille.
Is the door opened often? To avoid humidity buildup, try to get everything you
need out of the refrigerator at once, keep food organized so it is easy to fi nd, and
close the door as soon as the food is removed. When the door is opened, humidity
from the room air enters the refrigerator. The more often the door is opened, the
faster humidity builds up, especially when the room itself is very humid.
Is it humid? It is normal for moisture to build up inside the refrigerator when the air
is humid.
Is the food packaged correctly? Check that all food is securely wrapped. Wipe off
damp food containers before placing in the refrigerator.
Is the control set correctly for the surrounding conditions? Refer “Controls”
section.
DOOR
The door is difficult to open
The door will not close completely
Possible Causes and/or Recommended Solutions
Explosion Hazard
Use nonflammable cleaner.
Failure to do so can result in death, explosion, or fire.
Is the gasket dirty or sticky? Clean the gasket and the surface that it touches.
Rub a thin coat of paraffi n wax on the gasket following cleaning.
Are food packages blocking the door open? Rearrange containers so that they fi t
more tightly and take up less space.
Are the shelves out of position? Put the shelves back into their correct positions.
Refer “Refrigerator Use” for more information.
Is the gasket sticking? Clean the gasket and the surface that it touches. Rub a thin
coat of paraffi n wax on the gasket following cleaning.
12
Page 13

ASSISTANCE
If you need service:
Before calling for assistance or service, please check
“Troubleshooting.” It may save you the cost of a service call.
If you still need help, follow the instructions below.
When calling, please know the purchase date and the
complete model and serial number of your appliance.
This information will help us to better respond to your
request. Please refer to the warranty page in this manual
for more information on service.
If you need replacement parts:
Component parts should be replaced with like components
and servicing should be done by factory authorized service
personnel, so as to minimize the risk of possible ignition
due to incorrect parts or improper service.
In Canada
Call the KitchenAid Canada Customer eXperience Centre toll
free: 1-800-807-6777.
Our Consultants Provide Assistance With:
Features and specifi cations on our full line of appliances.
Use and maintenance procedures.
Accessory and repair parts sales.
Referrals to local dealers, repair parts distributors, and
services companies. KitchenAid Canada designated
service technicians are trained to fulfi ll the product warranty
and provide after-warranty service, anywhere in Canada.
For Further Assistance
In the U.S.A.
Call the KitchenAid Customer eXperience Center
toll free: 1-800-422-1230.
Our Consultants Provide Assistance With:
Features and specifi cations on our full line of appliances.
Installation information.
Use and maintenance procedures.
Accessory and repair parts sales.
Specialized customer assistance (Spanish speaking,
hearing impaired, limited vision, etc.).
Referrals to local dealers, repair parts distributors, and
service companies. KitchenAid designated service
technicians are trained to fulfi ll the product warranty and
provide after-warranty service, anywhere in the United
States.
To locate the KitchenAid designated service company in
your area, you can also look in your telephone directory
Yellow Pages.
For Further Assistance
If you need further assistance, you can write to KitchenAid
with any questions or concerns at:
KitchenAid Brand Home Appliances
Customer eXperience Center
553 Benson Road
Benton Harbor, MI 49022-2692
Please include a daytime phone number in your
correspondence.
If you need further assistance, you can write to KitchenAid
Canada with any questions or concerns at:
KitchenAid Canada
Customer eXperience Centre
200 – 6750 Century Ave.
Mississauga, Ontario L5N 0B7
Please include a daytime phone number in your
correspondence.
Accessories
The following accessories are available for your wine cellar.
To order an accessory, contact us and ask for the Part
Number.
In the U.S.A., visit our webpage
www.kitchenaid.com/accessories or call 1-800-442-9991.
In Canada, visit our webpage www.whirlpoolparts.ca
or call 1-800-807-6777.
Stainless Steel Cleaner and Polish
Order Part #4396095
13
Page 14

RÉFRIGÉRATEUR SOUS COMPTOIR
Guide d’Utilisation et d’Entretien et Instructions d’Installation
Pour des questions sur les fonctionnalités, fonctionnement/performance, pièces, accessoires ou service, appelez le: 1-800-422-1230
ou visitez notre site Web à ... www.kitchenAid.com
Au Canada, pour assistance, installation ou service, composez le 1-800-807-6777 ou visitez notre site web à... www.KitchenAid.ca
TABLE DES MATIÈRES
SÉGURITÉ DU RÉFRIGÉRATEUR.................................. 15
Mise au Rebut du Vieux Réfrigérateur .......................... 16
EXIGENCES D’INSTALLATION ...................................... 16
Outils et Pièces ............................................................. 16
Exigences d’Emplacement ...........................................16
Dimensions du Produit .................................................. 17
Panneau Décoratif Personnalisé ................................... 17
Poignées (Facultatif) .....................................................18
Spécifi cations Électriques.............................................18
INSTRUCTIONS D’INSTALLATION ................................ 18
Déballage du Réfrigérateur ..........................................18
Installation du Panneau Personnalisé ........................... 19
Installation et Fermeture de la Porte ..............................20
UTILISATION DU RÉFRIGÉRATEUR ..............................20
Commandes .................................................................20
Sons Normaux ..............................................................21
Tablettes du Réfrigérateur ............................................ 22
Balconnets de Porte (modèles avec porte pleine) ........ 22
Lampes ......................................................................... 22
ENTRETIEN ET NETTOYAGE .........................................22
Nettoyage ..................................................................... 22
Enlever la Grille de la Base ........................................... 23
Entretien Avant les Vacances........................................23
Précautions à Prendre Avant un Déménagement .........23
DÉPANNAGE ...................................................................24
ASSISTANCE .................................................................. 26
Aux États-Unis ..............................................................26
Au Canada ....................................................................26
Accessoires .................................................................. 26
14
Page 15

SÉCURITÉ DU RÉFRIGÉRATEUR
Votre sécurité et celle des autres est très importante.
Nous donnons de nombreux messages de sécurité importants dans ce manuel et sur votre appareil ménager. Assurezvous de toujours lire tous les messages de sécurité et de vous y conformer.
Voici le symbole d’alerte de sécurité.
Ce symbole d’alerte de sécurité vous signale les dangers potentiels de décès et de blessures graves à
vous et à d’autres. Tous les messages de sécurité suivront le symbole d’alerte de sécurité et le mot
“DANGER” ou “AVERTISSEMENT”. Ces mots signifient:
Risque possible de décès ou de blessure grave si vous ne suivez pas
immédiatement les instructions.
Risque possible de décès ou de blessure grave si vous ne suivez pas
les instructions.
Tous les messages de sécurité vous diront quel est le danger potentiel et vous disent comment réduire le risque de
blessure et ce qui peut se produire en cas de non-respect des instructions.
IMPORTANTES INSTRUCTIONS DE SÉCURITÉ
AVERTISSEMENT: Pour réduire les risques d’incendie, de décharge électrique ou de blessures lors de l’utilisation
du réfrigérateur, prendre quelques précautions fondamentales, y compris les suivantes:
Brancher sur une prise de courant à 3 alvéoles,
reliée à la terre.
Ne pas enlever la prise de liaison à la terre.
Ne pas utiliser d’adaptateur.
Ne pas utiliser de rallonge.
Déconnecter la source de courant électrique
avant l’entretien.
Replacer pièces et panneaux avant de faire la
mise en marche.
Enlever les portes de votre ancien réfrigérateur.
Utiliser un produit de nettoyage ininflammable.
Ne pas utiliser ou conserver d’essence ni de liquides
ou gaz inflammables à proximité de cet ou d’autres
appareils électriques. Les fumées peuvent causer
des incendies ou des explosions.
Ne pas conserver de substances explosives, par
exemple des bombes aérosols contenant un agent
propulseur, dans ce réfrigérateur.
Ne pas utiliser ni placer dans les compartiments du
réfrigérateur des dispositifs électriques d’un type
autre que celui expressément autorisé par le
fabricant.
Utiliser deux personnes ou plus pour déplacer et
installer le réfrigérateur.
Cet appareil ne convient pas à une utilisation par
des personnes (y compris des enfants) à capacités
physiques, sensorielles ou mentales réduites, ou
possédant un manque d’expérience et de
connaissances, à moins qu’elles ne soient placées
sous supervision ou qu’elles aient reçu des
instructions concernant l’utilisation de l’appareil par
une personne responsable de leur sécurité.
Les enfants doivent être placés sous surveillance
afin de s’assurer qu’ils ne jouent pas avec l’appareil.
Pour éviter le risque que des enfants restent
enfermés à l’intérieur et s’asphyxient, ne pas les
laisser jouer ou se cacher dans le réfrigérateur.
Si le cordon d’alimentation est endommagé, il doit
être remplacé par le fabricant ou son technicien
d’entretien ou une personne possédant une
qualification similaire.
Les prises d’air de l’enceinte de l’appareil ou de la
structure encastré doivent être dégagées en tout
temps.
Ne pas utiliser d’appareils mécaniques ou d’autres
moyens pour accélérer le dégivrage que ceux
recommandés par le fabricant.
Ne pas endommager le circuit frigorigène.
CONSERVER CES INSTRUCTIONS
15
Page 16

Mise au Rebut du Vieux Réfrigérateur
AVERTISSEMENT: Risque de coincement de
l’enfant. Avant de jeter votre ancien réfrigérateur ou
congélateur:
Enlevez les portes.
Laissez les étagères en place afin que les enfants ne
puissent pas facilement grimper à l’intérieur.
Risque de Suffoquer
Enlever les portes ou le couvercle de votre vieil appareil.
Le non-respect de cette instruction peut causer un
décès ou des lésions cérébrales.
IMPORTANT: Le risque qu’un enfant
puisse se retrouver coincé et suffoquer
n’est pas chose du passé.
Les réfrigérateurs jetés ou abandonnés
restent dangereux, même s’ils ne restent
à l’extérieur que pour “quelques jours
seulement”. Si l’ancien réfrigérateur doit
être mis au rebut, suivre les instructions
suivantes afin d’éviter les accidents.
Renseignements importants à propos de la mise au
rebut des fluides réfrigérants:
Mettre le réfrigérateur au rebut conformément à la
réglementation fédérale et locale. Les fluides réfrigérants
doivent être évacués par un technicien certifié et agréé par
l’EPA conformément aux procédures établies.
Exigences d’Emplacement
Risque d’Explosion
Garder les matériaux et les vapeurs inflammables, telle
que l’essence, loin du réfrigérateur.
Le non-respect de cette instruction peut causer
un décès, une explosion ou un incendie.
IMPORTANT: Cet appareil est destiné à un usage domestique
et à d’autres usages similaires comme:
Espace de cuisine pour personnel de boutiques, bureaux et
autres environnements professionnels.
Fermes et par les clients des hôtels, motels et autres
environnements de type résidentiel.
Environnements de type chambres d’hôtes.
Banquets et autres utilisations non commerciales semblables.
REMARQUES:
Pour que le réfrigérateur soit en affl eurement avec la façade
des armoires inférieures, retirer toutes les moulures ou plinthes
de l’arrière de l’ouverture. Consulter la section « Dimensions
du produit » et plus loin dans cette section “Dimensions de
l’ouverture”.
Il est conseillé de ne pas installer le réfrigérateur près d’un four,
d’un radiateur ou de toute autre source de chaleur.
Ne pas installer l’appareil dans un endroit où la température
pourrait descendre sous 55 °F (13 °C). Pour obtenir le meilleur
rendement, ne pas installer le réfrigérateur derrière une porte
d’armoire ni obstruer la grille de la base.
Dimensions de l’ouverture:
EXIGENCES
D’INSTALLATION
Outils et Pièces
Rassembler les outils et pièces nécessaires avant
d’entreprendre l’installation.
Outils et pièces nécessaires:
Tournevis à tête cruciforme.
Panneau de porte décoratif personnalisé – voir la section
“Dimensions du panneau décoratif personnalisé”.
Poignée personnalisée et matériel de fi xation (facultatif).
Pièces fournies:
8 vis fraisées de M4 x 30.
16
Les dimensions de hauteur indiquées correspondent à la
confi guration selon laquelle les pieds de nivellement sont
déployés à la hauteur minimale.
REMARQUE: Lorsque les pieds de nivellement sont
complètement déployés, ajouter 5/8” (15 mm) aux dimensions
de hauteur. Voir la section “Dimensions du produit”.
Si le plancher de l’ouverture n’est pas au même niveau que
le plancher de la cuisine, installer des cales pour établir un
niveau uniforme avec le plancher de la cuisine.
G
I
C
E
H
B
A
F
G
F
D
Emplacements
de prises
encastrées
Ouverture pour
raccordement
électrique
Page 17

Dimensions de l’ouverture et de l’emplacement
pour raccordement électrique
Largeur de l’ouverture - A
Profondeur de l’ouverture - B
Hauteur de l’ouverture - C
Dimension - D
Dimension - E 21
Dimension - F 1
Dimension - G 3” (7.55 cm)
Dimension - H 4
Dimension - I 9
Pour une installation en affl eurement, la prise de courant peut
être installée dans des armoires adjacentes avec une découpe
du côté du cordon d’alimentation pour l’acheminement du
cordon d’alimentation.
La prise de courant peut également être encastrée sur le mur
arrière derrière l’appareil, conformément aux emplacements
recommandés pour les prises dans l’illustration ci-dessus.
24” (60.96 cm) mín.
24” (60.96 cm) mín.
1
34
/2” (87.6 cm) mín.
35” (88.9 cm) max.
1
/16” (30.64 cm)
12
3
/4” (55.16 cm)
3
/4” (4.44 cm)
1
/2” (11.37 cm)
1
/4” (23.47 cm)
Dimensions du Produit
Produit entier
Largeur (jusqu’au cache charnière)
Hauteur (jusqu’au cache charnière)
Profondeur des modèles compatibles
avec les panneaux (avec panneau de
3/4” et sans poignée)
Hauteur de porte
Profondeur (sans poignée)
237/8” (60.72 cm)
343/8” (87.32 cm)
2313/16” (60.5 cm)
305/8” (77.75 cm)
5
/8” (60.01 cm)
23
Panneau Décoratif Personnalisé
REMARQUE: Pour les modèles standards en acier inoxydable
ou avec porte en verre, passer ces instructions et commencer
directement à la section “Spécifications électriques”.
Pour l’installation d’un panneau décoratif personnalisé,
l’installateur devra fabriquer lui-même le panneau ou
consulter un ébéniste ou menuisier qualifi é. Consulter le dessin
des dimensions pour les spécifi cations du panneau.
IMPORTANT:
L’épaisseur du panneau décoratif doit être de 3/4” (19 mm).
Le poids du panneau décoratif plein personnalisé ne doit
pas dépasser 20 lb (9,07 kg).
Le poids du panneau décoratif en verre personnalisé ne doit
pas dépasser 10 lb (4,54 kg).
Un panneau décoratif pesant plus que la limite
recommandée risque d’endommager l’appareil.
Panneau décoratif plein personnalisé - Préparation:
Fabriquer le panneau décoratif personnalisé en utilisant
les dimensions indiquées dans l’illustration “dimensions du
panneau décoratif plein personnalisé et position des
charnières”. Les zones foncées doivent être creusées de
1/2” (12 mm) comme indiqué.
IMPORTANT: L’illustration suivante présente un panneau
personnalisé pour une porte dont les charnières sont
installées du côté droit. Si les charnières de votre cave à
vin sont installées du côté gauche, faire tourner le cadre
personnalisé de 180° pour que les marques de charnière
se retrouvent du côté gauche.
1/4"
(7 mm)
REMARQUE: La longueur du cordon d’alimentation est de 60”
(152,4 cm). de largo.
237/8”
(60.72 cm)
343/8”
(87.32 cm)
Profondeur
(aucune poignée)
5
30
/8”
(77.5 cm)
1/8"
(3 mm)
1/2"
(12 mm)
415/16”
(125 mm)
2"
(53 mm)
233/4”
(60.3 cm)
Dimensions du panneau décoratif plein personnalisé
et position des charnières.
305/8”
(77.75 cm)
17
Page 18

Panneau décoratif en verre personnalisé
Préparation:
Fabriquer le panneau décoratif personnalisé en utilisant
les dimensions indiquées dans l’illustration “dimensions du
panneau décoratif en verre personnalisé et position des
charnières”. Les zones foncées doivent être creusées de 1/2”
(12 mm) comme indiqué.
IMPORTANTE: L’illustration suivante présente un panneau
personnalisé pour une porte dont les charnières sont
installées du côté droit. Si les charnières de votre
réfrigérateur sont installées du côté gauche, faire tourner le
cadre personnalisé de 180° pour que les marques de
charnière se retrouvent du côté gauche.
1/4"
(7 mm)
1/8"
(3 mm)
415/16”
(125 mm)
2"
(53 mm)
Spécifi cations Électriques
Risque de Décharge Électrique
Brancher sur une prise à 3 alvéoles reliée à la terre.
Ne pas enlever la broche de liaison à la terre.
Ne pas utiliser un adaptateur.
Ne pas utiliser un câble de rallonge.
Le non-respect de ces instructions peut causer
un décès, un incendie ou un décharge électrique.
Avant de placer le réfrigérateur à son emplacement fi nal,
il est important de s’assurer d’avoir le raccordement
électrique approprié.
Méthode recommandée de mise à la terre:
1/2"
(12 mm)
233/4”
(60.3 cm)
171/16”
(43.3 cm)
2113/16”
(55.4 cm)
Dimensions du panneau décoratif en verre personnalisé
et position des charnières.
305/8”
(77.75 cm)
Poignées (facultatif)
Des poignées personnalisées sont habituellement fi xées
seulement sur le panneau de porte personnalisé.
Consulter les instructions reçues avec la trousse de
poignée KitchenAid pour installer ces poignées sur les
panneaux de bois personnalisés.
Les poignées personnalisées doivent être installées sur le
panneau de porte à l’aide de trous fraisés, avant d’installer
le panneau sur la porte du réfrigérateur.
18
Chaque appareil doit être alimenté par un circuit à 115 VAC
à 60 Hz relié à la terre et protégé par un fusible de 15 A ou
20 A. Il est recommandé d’utiliser un circuit distinct pour
alimenter le réfrigérateur uniquement. Utiliser une prise de
courant dont l’alimentation ne peut pas être interrompue par
un interrupteur. Ne pas utiliser de rallonge.
REMARQUE: Avant d’exécuter tout type d’installation,
de nettoyage ou de remplacement d’ampoule d’éclairage,
débrancher le réfrigérateur ou déconnecter la source de
courant électrique.
INSTRUCTIONS
D’INSTALLATION
Déballage du Réfrigérateur
Risque du Poids Excessif
Utiliser deux personnes ou plus pour déplacer et
installer ou désinstaller l’appareil.
Le non-respect de cette instruction peut causer une
blessure au dos ou d’autre blessure.
Avant d’utiliser le réfrigérateur, tous les matériaux d’emballage
doivent être enlevés et l’intérieur doit être nettoyé.
Enlever tout résidu de ruban adhésif et de colle des surfaces
du réfrigérateur avant de le mettre en marche. Frotter une
petite quantité de savon à vaisselle liquide avec ses doigts
sur tout adhésif et essuyer avec de l’eau chaude pour enlever.
Ne pas utiliser d’instruments coupants, d’alcool à friction,
de liquides infl ammables ou de nettoyants abrasifs pour
enlever le ruban adhésif ou la colle. Ces produits peuvent
endommager les surfaces du réfrigérateur. Pour plus de
renseignements, consulter la section “Sécurité du
réfrigérateur”.
Page 19

Jeter ou recycler tous les matériaux d’emballage.
Une fois que tous les matériaux d’emballage ont été retirés,
nettoyer l’intérieur de votre réfrigérateur. Consulter les
instructions de nettoyage dans la section “Nettoyage”.
Importants renseignements à savoir au sujet
des tablettes et des couvercles en verre:
Ne pas nettoyer les tablettes ou couvercles en verre avec de
l’eau tiède quand ils sont froids. Les tablettes et les couvercles
peuvent se briser s’ils sont exposés à des changements
soudains de température ou à un impact tel que coup brusque.
Le verre trempé est conçu pour éclater en d’innombrables
pièces minuscules. Ceci est normal. Les tablettes et les
couvercles en verre sont lourds. Les saisir à deux mains lors de
leur dépose afin d’éviter de les faire tomber.
REMARQUE: Pour les modèles standards en acier
inoxydable ou avec porte en verre, passer la section
“Fermeture de la porte”.
3. À deux personnes, maintenir le panneau personnalisé
contre la porte. S’assurer que les charnières du haut et du
bas s’insèrent parfaitement dans les fentes au dos du
panneau personnalisé.
REMARQUE: Les poignées doivent être installées sur le
panneau de porte avant d’installer ce dernier sur la porte du
réfrigérateur.
Installation du Panneau Personnalisé
IMPORTANT:
Réaliser le panneau décoratif personnalisé selon les
spécifi cations de la section “Panneau décoratif
personnalisé”.
KitchenAid n’est pas responsable des opérations
d’enlèvement et de réinstallation des moulures ou panneaux
décoratifs qui entraveraient l’accès au réfrigérateur lors
d’une intervention de réparation.
1. Ouvrir
complètement
la porte à 115°.
115°
4. Fixer le panneau personnalisé sur la porte à l’aide de deux
vis à bois (fournies dans l’ensemble d’installation) à
chaque coin.
A
A
A. Vis à tête fraisée M4 x 30 (incluses dans la trousse
d’installation)
5. Appuyer fermement sur le joint pour le remettre à sa
place.
2. Retirer le joint d’étanchéité des coins de la porte en tirant
doucement jusqu’à ce que les deux trous de vis dans
chaque coin de la porte soient visibles.
REMARQUE: Le joint
d’étanchéité n’a pas
besoin d’être enlevé
de la porte, seulement
les coins.
A. Trous de vis
B. Joint d’étanchéité
A
A
B
19
Page 20

Installation et Fermeture de la Porte
Le réfrigérateur dispose de quatre pieds de nivellement.
Si votre réfrigérateur semble instable ou si on souhaite
que la porte se ferme plus facilement, ajuster l’inclinaison
du réfrigérateur en observant les instructions suivantes.
Déplacement de votre Réfrigérateur:
Votre réfrigérateur est lourd. Lors du déplacement du
réfrigérateur pour un nettoyage, un entretien ou réparation,
veiller à recouvrir le plancher avec du carton ou un
panneau de fibre dur pour éviter qu’il ne subisse tout
dommage. Toujours tirer le réfrigérateur tout droit lors du
déplacement. Ne pas incliner la cave à vin d’un côté ou
de l’autre ni la “faire marcher” en essayant de le
déplacer, car le plancher pourrait être endommagé.
2. Déplacer le réfrigérateur à sa position finale.
Risque de Décharge Électrique
Brancher sur une prise à 3 alvéoles reliée à la terre.
Ne pas enlever la broche de liaison à la terre.
Ne pas utiliser un adaptateur.
Ne pas utiliser un câble de rallonge.
Le non-respect de ces instructions peut causer
un décès, un incendie ou un décharge électrique.
1. Brancher l’appareil sur une prise à 3 alvéoles reliée à la
terre.
Risque du Poids Excessif
Utiliser deux personnes ou plus pour déplacer et
installer ou désinstaller l’appareil.
Le non-respect de cette instruction peut causer une
blessure au dos ou d’autre blessure.
UTILISATION DU RÉFRIGÉRATEUR
3. Tourner les pieds de nivellement vers la droite pour
abaisser le réfrigérateur ou tourner les pieds de nivellement
vers la gauche pour le lever. Il peut être nécessaire de
tourner les pieds de nivellement plusieurs fois pour ajuster
l’inclinaison du réfrigérateur.
REMARQUE: Si une autre personne pousse le haut du
réfrigérateur, le poids devient moins lourd sur les pieds de
nivellement. Ceci rend plus facile l’ajustement des pieds
d’aplomb.
4. Ouvrir la porte et s’assurer qu’elle ferme comme vous
le désirez. Sinon, incliner le réfrigérateur un peu plus
vers l’arrière en tournant les deux vis de nivellement
avant vers la droite. Plusieurs tours peuvent être
nécessaires et il convient de tourner les deux vis de
réglage de l’aplomb de façon égale.
Commandes
1 2 3 4 5 6 7 8 9
REMARQUES:
Le tableau de commande se trouve dans la partie
supérieure et fait face vers l’avant.
La commande du réfrigérateur ne comporte aucune pièce
ou aucun bouton mécaniques. Lorsqu’elle est déconnectée,
la commande n’affi che rien et peut être diffi cile à repérer.
1. Mise en Marche/Arrêt de la Commande
La première fois que le réfrigérateur est
branché, la commande est réglée en mode
Cool Off (refroidissement désactivé).
Cool On (refroidissement activé) et Cool Off
(refroidissement désactivé) sont les seules
options affichées.
20
Appuyer sur Cool On (refroidissement activé) pendant 3
secondes pour mettre en marche le réfrigérateur. Tous les
menus et les réglages de température recommandés
s’affichent.
2. Max Cool (refroidissement maximal)
Diminuez la température interne à son point le
plus bas pendant 24 heures.
Appuyer sur Max Cool (refroidissement
maximal) pour activer la caractéristique.
La caractéristique sera activée.
Appuyer sur Max Cool (refroidissement maximal) pour
désactiver la caractéristique et revenir aux réglages
précédents.
Page 21

3. Control Lock (verrouillage des commandes)
Évite les changements de température
inattendus et facilite le nettoyage des
commandes.
Pour activer le mode de verrouillage, appuyer
sur LOCK (verrouillage) pendant 3 secondes.
Après le compte à rebours, tous les autres
affichages s’éteignent et deviennent indisponibles sauf Cool
On (refroidissement activé), Cool Off (refroidissement
désactivé) et Lock (verrouillage).
4. Utilisation des Préréglages
Pour votre commodité, le réfrigérateur est également équipé
de commandes préréglées à des températures
d’entreposage recommandées pour des produits
spécifiques. En appuyant sur une option de préréglage, la
température sera réglée au niveau recommandé pour
chaque catégorie de produits:
Deli (Produits de spécialité) : 39 °F (3 °C)
Assorted (Assortiment): 37 °F (2 °C)
Beverage (Boisson) 34 °F (1 °C)
Meat (Viande): 32 °F (0 °C)
5. Réglage des Températures
Pour ajuster les réglages de
température, appuyer sur la
touche “+” (plus) ou “– “
(moins) jusqu’à ce que la température désirée soit atteinte.
La commande est réglée correctement lorsque le lait et les
boissons sont à la température idéale.
REMARQUES:
La température recommandée par défaut du réfrigérateur
est de 37 °F (2 °C). La fourchette de points de réglages
pour ce modèle est de 32 °F à 42 °F (0 °C à 5 °C).
Attendre au moins 24 heures entre les réglages pour que le
réfrigérateur s’adapte.
6. Visualisation de la Température en
Degrés Celsius/Fahrenheit
Appuyer sur la touche tactile F/C pour alterner
l’affichage de la température en degrés
Fahrenheit ou en degrés Celsius.
Le témoin correspondant s’allumera.
7. Mode Sabbath (Sabbat)
Permet d’ouvrir ou de fermer la porte du
réfrigérateur le jour du sabbat ou lors d’autres
fêtes religieuses sans allumer ou éteindre
directement les lumières, les affichages
numériques, les ventilateurs, les vannes, les
tonalités ou les alarmes. En sélectionnant cette
caractéristique, les points de réglage de température
restent inchangés, mais les lumières du panneau de
commande, les lampes intérieur et les signaux sonores du
panneau de commande sont désactivés.
Pour un fonctionnement plus efficace du réfrigérateur, il est
recommandé de sortir du mode Sabbat lorsque celui-ci
n’est plus nécessaire.
Appuyer sur SABBATH (Sabbat) pendant 3 secondes pour
activer la caractéristique. Après le compte à rebours de 3
secondes, la caractéristique s’active et tous les autres
affi chages s’éteignent.
Appuyer sur SABBATH (Sabbat) pendant 3 secondes pour
désactiver la caractéristique et activer l’affi chage.
8. Alarme de Dépassement de Température
Permet d’éviter que les aliments ne se gâtent
en donnant une alerte sonore et visuelle si la
température dans l’une ou l’autre des zones
dépasse la plage prédéfinie pendant 4 heures.
L’alarme sonore s’éteint automatiquement lorsque la
température revient à la normale. Pour vous avertir d’un
dépassement de température, le témoin lumineux continue
de clignoter jusqu’à ce que l’on appuie sur la touche Reset
Alarm (réinitialisation de l’alarme). Si le dépassement de
température persiste après une réinitialisation de l’alarme de
dépassement de température, le témoin lumineux continue
de se réactiver toutes les 4 heures jusqu’à ce que la
température du réfrigérateur descende en dessous de la
plage des températures préréglées.
REMARQUE: Ces caractéristiques ne s’affichent pas sur la
commande à moins que la température du réfrigérateur
dépasse la plage des températures préréglées et que
l’alarme doit être réinitialisée.
9. Lampe Automatique (modèles avec porte en verre)
Le réfrigérateur est équipé d’un détecteur
qui illumine automatiquement l’intérieur
lorsqu’une personne passe devant. Lorsque
plus aucun mouvement n’est détecté, la
lampe intérieure s’éteint après 2 minutes.
Appuyer sur l’option Auto Light (lampe auto)
pour activer cette caractéristique.
Lorsque la fonction Autor Light (lampe auto) n’est pas ctivée,
la lampe d’intérieur ne s’allume que lorsque la porte est
ouverte.
REMARQUE: La température du réfrigérateur augmente
légèrement si la lumière est laissée allumée pendant une
période prolongée.
10. Alarme de Porte Ouverte
Permet d’éviter que les aliments ne se gâtent en donnant
une alerte sonore et visuelle si la porte reste ouverte
pendant 5 minutes.
Si la porte est laissée ouverte pendant plus de 5 minutes,
l’avertisseur retentira toutes les 2 minutes jusqu’à ce que
l’on ferme la porte ou que l’on appuie sur n’importe quelle
touche.
11. Mode d’Exposition
Ce mode est utilisé uniquement lorsque le réfrigérateur est
en exposition dans le magasin. Pour activer le mode
d’Exposición, maintenez les touches Cool On et Sabbath en
même temps pendant 3 secondes. Si l’on active
involontairement le mode d’exposition, “Cool Off”
(refroidissement désactivé) s’allume sur l’affichage et les
commandes semblent fonctionner. Sortir du mode
d’exposition en appuyant simultanément sur Cool On
(refroidissement activé) et SABBATH (Sabbat) pendant 3
secondes.
Sons Normaux
Il est possible que le réfrigérateur neuf émette des sons
que l’appareil précédent ne produisait pas. Comme ces
sons sont nouveaux, ils peuvent vous inquiéter. La plupart
de ces nouveaux sons sont normaux. Les sons peuvent
vous sembler plus forts avec des surfaces dures comme
le plancher et les structures adjacentes. Les descriptions
suivantes indiquent le genre de sons et leur cause possible.
Votre réfrigérateur est conçu pour fonctionner plus
effi cacement afi n de conserver les aliments aux
températures désirées et pour réduire la consommation
d’énergie. Le compresseur et les ventilateurs très effi caces
21
Page 22

peuvent faire fonctionner votre réfrigérateur plus longtemps
que l’ancien. Il se peut également que vous entendiez un
bruit saccadé ou aigu provenant du compresseur ou des
ventilateurs se règlent pour optimiser la performance.
Des vibrations sonores peuvent provenir de l’écoulement
du réfrigérant ou d’articles placés dans le réfrigérateur.
À la fi n de chaque programme, vous pouvez entendre un
gargouillement attribuable au réfrigérant qui se trouve
dans votre réfrigérateur.
Vous pouvez entendre l’écoulement de l’eau dans le plat
de récupération d’eau de dégivrage lorsque le réfrigérateur
dégivre.
Vous pouvez entendre des déclics lorsque le réfrigérateur
se met en marche ou s’arrête.
Tabletes du Réfrigérateur
Pour enlever et ajuster les tablettes supérieures:
1. Ôter la tablette en la soulevant pour la sortir des
supports de tablette.
Balconnetes de Porte
(Modèles avec porte pleine)
Le réfrigérateur comporte deux emplacements pour balconnets
de porte pour une capacité de rangement maximale.
Retrait et réinstallation des balconnets de porte:
1. Enlever le balconnet de porte en l’inclinant vers l’avant
pour le sortir.
2. Réinstaller le
balconnet en
plaçant l’arrière
du balconnet
sous le support
de la porte et en
le glissant en
place.
Lampes
Le réfrigérateur est muni d’une lampe intérieure qui s’allume
lorsque la porte est ouverte.
2. Réinstaller la tablette en l’insérant dans les supports de
tablette.
REMARQUE: Vérifier que la tablette est d’aplomb.
Pour enlever et réinstaller la tablette du bas:
1. Pour retirer la
tablette située
tout en bas,
tirer tout droit
vers
l’extérieur.
REMARQUE: La lampe est une DEL qui n’a pas besoin d’être
remplacée. Si la DEL ne s’allume pas quand on ouvre la
porte, appeler le service de dépannage.
Consulter la section « Assistance » pour obtenir les
coordonnées.
ENTRETIEN ET NETTOYAGE
Nettoyage
Risque d’Explosion
Risque d’incendie ou d’explosion.
Fluide frigorigène inflammable utilisé.
Ne pas utiliser d’appareils mécaniques pour dégivrer le
réfrigérateur.
Ne pas perforer la tubulure de réfrigération.
2. Réinstaller la
tablette en
alignant les
bords avec
les glissières
et en la
poussant vers
l’arrière du
réfrigérateur.
22
Nettoyer le réfrigérateur une fois par mois pour empêcher
une accumulation d’odeurs. Essuyer les renversements
immédiatement.
Pour nettoyer le réfrigérateur:
1. Débrancher le réfrigérateur ou déconnecter la source de
courant électrique.
2. Retirer toutes les tablettes et tous les balconnets de
l’intérieur du réfrigérateur.
Page 23

3. Laver à la main, rincer et sécher les pièces amovibles et
les surfaces internes soigneusement. Utiliser une éponge
propre ou un linge doux et un détergent doux dans de
l’eau tiède.
Afi n d’éviter d’endommager les tiges en bois et les
garnitures, les essuyer avec une éponge propre ou un
chiffon doux et de l’eau tiède. Ne pas utiliser de détergent
ni immerger le porte bouteilles tout entier dans l’eau lors du
nettoyage.
Ne pas utiliser de nettoyants puissants ou abrasifs tels que
les nettoyants à vitre en atomiseurs, nettoyants à récurer,
liquides infl ammables, cires nettoyantes, détergents
concentrés, agents de blanchiment ou nettoyants contenant
du pétrole sur les pièces en plastique, les garnitures
intérieures et garnitures de portes ou sur les joints de portes.
Ne pas utiliser d’essuie-tout, de tampons à récurer ou
d’autres outils de nettoyage abrasifs. Ces produits risquent
d’égratigner ou d’endommager les matériaux.
Pour aider à éliminer les odeurs, on peut laver les parois
intérieures avec un mélange d’eau tiède et de bicarbonate
de soude (2 c. à soupe pour 1 pte [26 g pour 0,95 L] d’eau).
4. Laver les surfaces extérieures en acier inoxydable et
surfaces extérieures peintes avec une éponge propre ou un
linge doux et un détergent doux dans de l’eau tiède.
Ne pas utiliser de produits de nettoyage forts ou abrasifs, ni
de nettoyants à base de chlore. Ces produits risquent
d’égratigner ou d’endommager les matériaux.
Séchez immédiatement avec un chiffon doux et sec pour
absorber l’eau restante.
REMARQUE: Pour que votre réfrigérateur en acier
inoxydable conserve son aspect neuf et pour enlever les
petites égratignures ou marques, il est recommandé
d’utiliser le nettoyant et poli pour acier inoxydable approuvé
par le fabricant.
IMPORTANT:
Ce nettoyant doit être utilisé sur les pièces en acier
inoxydable uniquement!
Veiller à ce que le nettoyant et poli pour acier inoxydable
n’entre pas en contact avec les pièces de plastique comme
les garnitures, couvercles de distributeurs ou joints de
porte. En cas de contact non intentionnel, nettoyer la pièce
de plastique avec une éponge et un détergent doux dans
de l’eau tiède. Séchez immédiatement avec un chiffon doux
et sec pour absorber l’eau restante.
5. Replacer les tablettes et balconnets.
Nettoyage du condensateur
Enlever la Grille de la Base
La grille de la base doit être retirée pour pouvoir accéder
aux serpentins du condenseur lors du nettoyage.
Pour enlever la grille de la base:
1. Ouvrir la porte du réfrigérateur.
A. Vis
2. À l’aide d’un tournevis à tête cruciforme, ôter les deux vis.
3. Retirer la grille de la base.
A
Pour replacer la grille de la base:
1. Ouvrir la porte du réfrigérateur.
2. Positionner la grille de la base de façon à ce que les
onglets soient alignés et que la grille de la base s’emboîte.
Réinstaller les deux vis. Serrer les vis.
Entretien Avant les Vacances
Pour arrêter le réfrigérateur avant de partir, suivre ces étapes.
1. Enlever tous les aliments du réfrigérateur.
2. Débrancher le réfrigérateur.
3. Nettoyer le réfrigérateur. Se reporter à la section “Nettoyage”.
4. À l’aide d’un ruban adhésif, placer un bloc de
caoutchouc ou de bois dans la partie supérieure de la
porte de façon à ce qu’elle soit suffisamment ouverte
pour permettre l’entrée de l’air à l’intérieur, afin d’éviter
l’accumulation d’odeur ou de moisissure.
Risque d’Explosion
Risque d’incendie ou d’explosion causé par la
perforation de la tubulure de réfrigération.
Suivre avec attention les instructions de manipulation.
Fluide frigorigène inflammable utilisé.
1. Retirer la grille de la base pour pouvoir accéder au
condenseur aux fi ns de nettoyage. Se reporter à la section
“Retrait de la grille de la base”.
2. Nettoyer régulièrement les serpentins du condenseur.
Ils sont situés derrière le casier de la base. Il se peut que
les serpentins aient besoin d’être nettoyés tous les deux
mois. Ce nettoyage peut aider à économiser de l’énergie.
Précautions à Prendre Avant
un Déménagement
Lors du déménagement et du déplacement du réfrigérateur
dans une nouvelle habitation, suivre ces étapes pour préparer
le déménagement.
1. Enlever tous les aliments du réfrigérateur.
2. Débrancher le réfrigérateur.
3. Nettoyer, essuyer et sécher à fond.
4. Retirer toutes les pièces amovibles, bien les envelopper
et les attacher ensemble avec du ruban adhésif pour
qu’elles ne bougent et ne s’entrechoquent pas durant le
déménagement.
5. Fermer les portes à l’aide de ruban adhésif et fixer le
cordon d’alimentation au réfrigérateur.
Lors de l’arrivée au nouveau domicile, remettre tout en
place et consulter la section “Instructions d’Installation”.
23
Page 24

DÉPANNAGE
Essayer d’abord les solutions suggérées ici afin d’éviter le coût d’une intervention de dépannage inutile.
Risque de Décharge Électrique
Brancher sur une prise à 3 alvéoles reliée à la terre.
Ne pas enlever la broche de liaison à la terre.
Ne pas utiliser un adaptateur.
Ne pas utiliser un câble de rallonge.
Le non-respect de ces instructions peut causer
un décès, un incendie ou un décharge électrique.
UTILISATION GÉNÉRALE Causes Possibles et Solutions Recommandées
Le réfrigérateur ne fonctionne pas
Le moteur semble fonctionner trop
Le cordon d’alimentation électrique est-il débranché? Brancher l’appareil sur une
prise à 3 alvéoles reliée à la terre.
La prise électrique fonctionne-t-elle? Brancher une lampe pour voir si la prise
fonctionne.
Un fusible du domicile est-il grillé ou un disjoncteur s’est-il déclenché?
Remplacer le fusible ou remettre le disjoncteur en fonction. Si le problème persiste,
appeler un électricien.
Les commandes sont-elles activées? S’assurer que les commandes du
réfrigérateur sont activées. Se reporter à la section “Commandes”.
La température ambiante est-elle plus élevée que d’habitude? Prévoir que le
moteur fonctionnera plus longtemps dans des conditions de chaleur. Pour des
températures normales, prévoir que le moteur fonctionne environ 40 % à 80 % du
temps. Dans des conditions plus chaudes, prévoir un fonctionnement encore plus
fréquent.
Vient-on d’ajouter une grande quantité d’aliments au réfrigérateur? L’ajout d’une
grande quantité d’aliments réchauffe le réfrigérateur. Il est normal que le moteur
fonctionne plus longtemps afi n de refroidir de nouveau le réfrigérateur.
La porte est-elle ouverte fréquemment? Prévoir que le moteur fonctionne plus
longtemps dans ce cas. Afi n de conserver l’énergie, essayer de sortir du
réfrigérateur tout ce dont vous avez besoin en une fois, garder les aliments
organisés de sorte qu’ils soient faciles à trouver et fermer la porte dès que les
aliments ont été retirés.
24
Le réglage est-il correct pour les conditions existantes? Se reporter à la section
“Commandes”.
La porte est-elle bien fermée? Bien fermer la porte. Si elle ne ferme pas
complètement, voir “La porte ne ferme pas complètement” plus loin dans cette
section.
Les serpentins du condenseur sont-ils sales? Cette situation fait obstruction au
transfert de l’air et fait travailler davantage le moteur. Nettoyer les serpentins du
condenseur. Se reporter à la section “Nettoyage”.
Page 25

TEMPÉRATURE ET HUMIDITÉ
Causes Possibles et Solutions Recommandées
La température est trop élevée
Il y a accumulation d’humidité à
l’intérieur
La porte est-elle ouverte fréquemment? Prévoir que le réfrigérateur se réchauffera
dans ce cas. Pour garder le réfrigérateur froid, essayer de sortir du réfrigérateur
tout ce dont vous avez besoin en une fois, garder les aliments organisés de sorte
qu’ils soient faciles à trouver et fermer la porte dès que les aliments ont été retirés.
Vient-on d’ajouter une grande quantité d’aliments au réfrigérateur? L’ajout d’une
grande quantité d’aliments réchauffe le réfrigérateur. Plusieurs heures peuvent être
nécessaires pour que le réfrigérateur revienne à la température normale.
Le réglage est-il correct pour les conditions existantes? Consulter la section
“Utilisation des commandes”.
La grille de la base est-elle obstruée? Pour obtenir le meilleur rendement, ne pas
installer le réfrigérateur derrière une porte d’armoire ni obstruer la grille de la base.
La porte est-elle ouverte fréquemment? Pour éviter l’accumulation d’humidité,
essayer de sortir du réfrigérateur tout ce dont vous avez besoin en une fois, garder
les aliments organisés de sorte qu’ils soient faciles à trouver et fermer la porte dès
que les aliments ont été retirés. Lorsque la porte est ouverte, l’humidité de l’air
extérieur pénètre dans le réfrigérateur. Plus la porte est ouverte, plus l’humidité
s’accumule rapidement, surtout lorsque la pièce est très humide.
La pièce est-elle humide? Il est normal que de l’humidité s’accumule à l’intérieur
du réfrigérateur lorsque l’air est humide.
Les aliments sont-ils bien emballés? Vérifi er que tous les aliments sont bien
emballés. Essuyer les contenants humides avant de les placer dans le réfrigérateur.
Le réglage est-il correct pour les conditions existantes? Se reporter à la section
“Commandes”.
PORTE
Utiliser un produit de nettoyage ininflammable.
Le non-respect de cette instruction peut causer un
décès, une explosion ou un incendie.
La porte est difficile à ouvrir
La porte ne ferme pas complètement
Causes Possibles et Solutions Recommandées
Risque d’Explosion
Le joint est-il sale ou collant? Nettoyer le joint et la surface avec laquelle il est en
contact. Frotter en appliquant une fi ne couche de paraffi ne sur le joint après le
nettoyage.
Les aliments emballés empêchent-ils la porte de fermer? Réorganiser les
contenants de sorte qu’ils soient plus rapprochés et prennent moins d’espace.
Les tablettes sont-elles bien en place? Remettre les tablettes à la bonne position.
Consulter la section « Utilisation du réfrigérateur » pour plus de renseignements.
Le joint colle-t-il? Nettoyer le joint et la surface avec laquelle il est en contact.
Frotter en appliquant une fi ne couche de paraffi ne sur le joint après le nettoyage.
25
Page 26

ASSISTANCE
Si vous avez besoin d’un entretien:
Avant de faire un appel pour assistance ou dépannage,
vérifiez la section “Dépannage”. Cette vérification peut
vous faire économiser le coût d’une intervention de
dépannage. Pour de l’aide supplémentaire, suivez les
instructions ci-dessous.
Avant d’appeler, avoir à portée de la main la date d’achat,
ainsi que les numéros de modèle et de série complets de
l’appareil. Ces renseignements nous aideront à mieux
répondre à votre demande. Consultez la page de garantie
du présent manuel pour plus d’information sur l’entretien.
Au Canada
Téléphoner sans frais au Centre pour l’eXpérience de la
clientèle de KitchenAid Canada au: 1-800-807-6777.
Nos Consultants Fournissent de l’Assistance Pour:
Caractéristiques et spécifi cations de notre gamme
complète d’appareils ménagers.
Procédés d’utilisation et d’entretien.
Si vous avez besoin de pièces de rechange:
Les composants doivent être remplacés par des
composants similaires et l’entretien doit être effectué par
une personne d’entretien autorisée par l’usine, ce qui
permettra de réduire les risques d’ignition possible causés
par l’utilisation de mauvaises pièces ou le mauvais
entretien.
Aux États-Unis
Téléphoner au Centre pour l’eXpérience de la clientèle de
KitchenAid sans frais: 1-800-422-1230.
Nos Consultants Fournissent de l’Assistance Pour:
Caractéristiques et spécifi cations de notre gamme
complète d’appareils ménagers.
Renseignements d’installation.
Procédés d’utilisation et d’entretien.
Vente d’accessoires et de pièces de rechange.
Assistance spécialisée au client (langue espagnole,
malentendants, malvoyants, etc.).
Les références aux concessionnaires, compagnies
d’entretien et de réparation, et distributeurs de pièces de
rechange locaux. Les techniciens d’entretien désignés
par KitchenAid sont formés pour remplir la garantie des
produits et fournir un service après garantie partout aux
États-Unis.
Pour localiser la compagnie d’entretien désignée par
KitchenAid dans votre région, vous pouvez également
consulter les Pages jaunes.
Vente d’accessoires et de pièces de rechange.
Les références aux concessionnaires, compagnies
d’entretien et de réparation, et distributeurs de pièces de
rechange locaux. Les techniciens d’entretien désignés par
KitchenAid Canada sont formés pour remplir la garantie
des produits et fournir un service après garantie, partout au
Canada.
Pour Plus d’Assistance:
Si vous avez besoin de plus d’assistance, vous pouvez
écrire à KitchenAid Canada en soumettant toute question
ou problème à:
KitchenAid Canada
Customer eXperience Centre
200 – 6750 Century Ave.
Mississauga, Ontario L5N 0B7
Dans votre correspondance, veuillez indiquer un numéro
de téléphone où l’on peut vous joindre dans la journée.
Accessoires
Les accessoires pour cave à vin suivants sont disponibles.
Pour commander un accessoire, veuillez communiquer
avec nous et demander le numéro de pièce correspondant.
Aux États-Unis, visitez notre site web à
www.kitchenaid.com/accessories
ou composer le 1-800-442-9991.
Pour Plus d’Assistance
Si vous avez besoin de plus d’assistance, vous pouvez
écrire à KitchenAid en soumettant toute question ou
problème à:
KitchenAid Brand Home Appliances
Customer eXperience Center
553 Benson Road
Benton Harbor, MI 49022-2692
Dans votre correspondance, veuillez indiquer un numéro
de téléphone où l’on peut vous joindre dans la journée.
26
Au Canada, visitez notre site web à
www.whirlpoolparts.ca ou composer le 1-800-807-6777.
Nettoyant et poli pour acier inoxydable
Commander la pièce n° 4396095
Page 27

REFRIGERADOR COMPACTO
Guía de Uso y Cuidados e Instrucciones de Instalación
Para preguntas sobre los recursos, operaciones/desempeño, piezas, accesorios o servicio, llamar al: 1-800-422-1230
o acceda a nuestro sitio web... www.kitchenAid.com
En Canadá, llamar al: 1-800-807-6777, o acceda a nuestro sitio web... www.KitchenAid.ca
TABLA DE CONTENIDO
SEGURIDAD DEL REFRIGERADOR .............................. 28
Cómo Deshacerse Adecuadamente de su
Refrigerador Anterior .................................................... 29
REQUISITOS DE INSTALACIÓN ....................................29
Herramientas y Piezas .................................................. 29
Requisitos de la Localización ....................................... 29
Dimensiones del Producto ............................................ 30
Panel Recubierto Personalizado ................................... 30
Manija (Opcional) .........................................................31
Requisitos Eléctricos ....................................................31
INSTRUCCIONES DE INSTALACIÓN .............................31
Desempaque del Refrigerador .....................................31
Instalación del Panel Recubierto Personalizado ........... 32
Instalación y Cierre de la Puerta ................................... 33
USO DEL REFRIGERADOR ...........................................33
Controles ......................................................................33
Sonidos Normales .........................................................34
Estantes del Refrigerador ............................................. 35
Compartimientos en las Puertas .................................. 35
Iluminación ...................................................................35
CUIDADOS Y LIMPIEZA ................................................. 35
Limpieza ....................................................................... 35
Removiendo la Rejilla de la Base .................................36
Cuidados de Vacaciones ..............................................36
Cuidados de Desplazamiento.......................................36
RESOLUCIÓN DE PROBLEMAS ....................................37
ASISTENCIA ...................................................................39
En EE.UU ...................................................................... 39
En Canadá .................................................................... 39
Accesorios .................................................................... 39
27
Page 28

SEGURIDAD DEL REFRIGERADOR
Su seguridad y la de los demás es muy importante.
Hemos provisto muchos mensajes de seguridad importantes en este manual y en su aparato. Siempre lea y obedezca
a todos los mensajes de seguridad.
Este es el símbolo de alerta de seguridad.
Ese símbolo le alertará con respecto a posibles peligros que pueden matar o herir a usted o a otros.
Todos los mensajes de seguridad acompañarán el símbolo de alerta de seguridad y las palabras
“PELIGRO” o “ADVERTENCIA”. Esas palabras significan:
Usted puede morir o resultar gravemente herido si no sigue
inmediatamente las instrucciones.
Usted puede morir o resultar gravemente herido si no sigue las
instrucciones.
Todos los mensajes de seguridad le dirán cuáles son los posibles peligros, cómo reducir las posibilidades de lesiones
y dirán qué podrá ocurrir si se dejan de seguir las instrucciones.
INSTRUCCIONES DE SEGURIDAD IMPORTANTES
ALERTA: Para reducir el riesgo de incendio, choque eléctrico o lesión al utilizar su refrigerador, siga estas
siguientes precauciones básicas:
Conéctelo en un tomacorriente de 3 polos con
toma de tierra.
No retire la clavija con toma de tierra.
No utilice un adaptador.
No utilice una extensión eléctrica.
Desconecte de la energía antes de realizar el
mantenimiento.
Sustituya todas las piezas y paneles antes de
operar.
Retire las puertas de su refrigerador antiguo.
No utilice un limpiador inflamable.
No almacene o utilice gasolina, líquidos inflamables
o gas alrededor de ese o de otros aparatos
eléctricos. Los vapores pueden causar incendios o
explosiones.
No almacene sustancias explosivas, como latas de
aerosol, con un propulsor inflamable en su
refrigerador.
No utilice o inserte aparatos eléctricos en los
compartimientos del refrigerador si estos no son del
tipo expresamente autorizado por el fabricante.
Utilice dos o más personas para mover e instalar
el refrigerador.
Este aparato no ha sido diseñado para ser utilizado
por personas (incluyendo niños) con capacidades
físicas, sensoriales o mentales reducidas, o con
falta de experiencia y conocimiento, a menos que
ellos reciban supervisión o instrucción con respecto
al uso del aparato por una persona responsable por
su seguridad.
Los niños deben ser supervisados para garantizar
que no jugarán con el aparato.
Para evitar riesgo de que algún niño quede
encerrado y con peligro de asfixia, no permita que
ellos jueguen o que se escondan dentro del
refrigerador.
Si el cable de alimentación está dañado, debe ser
sustituido por el fabricante, su agente de servicio o
por una persona igualmente calificada.
Mantenga las aberturas de ventilación del nicho o
de la estructura integrada del aparato libres de
obstrucción.
No utilice aparatos mecánicos u otros medios para
acelerar el proceso de descongelamiento además
de aquellos recomendados por el fabricante.
No dañe el circuito de refrigeración.
28
GUARDE ESTAS INSTRUCCIONES
Page 29

Cómo Deshacerse Adecuadamente de
su Refrigerador Anterior
ADVERTENCIA: Riesgo de niños atrapados. Antes
de desechar su refrigerador o congelador anterior:
Saque las puertas.
Requisitos de la Localización
Deje los estantes en su lugar para los niños no puedan
introducirse con facilidad.
Peligro de Asfixia
Quite las puertas o la tapa de su electrodoméstico
anterior.
No seguir esta instrucción puede ocasionar la muerte o
daño al cerebro.
IMPORTANTE: El atrapamiento y la asfixia
de los niños no son problemas del
pasado. Los refrigeradores tirados y
abandonados igual constituyen un peligro,
incluso si van a quedar ahí “por unos
pocos días”. Si está por deshacerse de su
refrigerador anterior, siga las instrucciones
a continuación para evitar accidentes.
Información importante para saber acerca del
desecho de refrigerantes:
Deshágase del refrigerador siguiendo los reglamentos federales
y locales. Los refrigerantes deberán ser evacuados por un
técnico certificado en refrigeración por EPA (Agencia de
Protección del Medioambiente) según los procedimientos
establecidos.
Peligro de Explosión
Mantenga materiales inflamables y vapores, como
gasolina, lejos del refrigerador.
No hacerlo podrá resultar en muerte, explosión o incendio.
IMPORTANTE: Ese aparato ha sido diseñado para ser usado en
ambientes domésticos y aplicaciones similares, tales como:
Áreas con personal de cocina en tiendas, ofi cinas y otros
ambientes de trabajo;
Haciendas y por clientes en hoteles, moteles y otros tipos de
ambientes residenciales;
Ambientes del tipo albergues;
Buffet y otras aplicaciones no comerciales.
NOTAS:
Para que el refrigerador quede al ras con la parte delantera
de los gabinetes de la base, retire los zócalos o molduras de
la parte trasera de la abertura. Consulte “Dimensiones del
producto” y más adelante en esta sección, “Dimensiones de
Abertura”.
Se recomienda que el refrigerador no sea instalado cerca de
un horno, radiador, u otra fuente de calor.
No instale en un local donde la temperatura caerá por debajo
de los 55 °F (13 °C). Para un mejor desempeño, no instale el
refrigerador por detrás de una puerta de alacena ni bloquee
la rejilla de la base.
Dimensiones de abertura:
REQUISITOS DE
INSTALACIÓN
Herramientas y Piezas
Reúna las herramientas y piezas necesarias antes de empezar
la instalación.
Herramientas y piezas necesarias:
Destornillador Phillips.
Panel de Puerta Superior Personalizado - “Puerta de Panel
Recubierto Personalizado”.
Mango personalizado y equipo de montaje (opcional).
Piezas provistas:
Tornillos de cabeza plana M4 x 30 (8).
Las dimensiones de altura se muestran con las patas de
nivelación extendidas en su altura mínima.
NOTA: Cuando las patas de nivelación estuvieren totalmente
extendidas, añada 5/8” (15 mm) a las dimensiones de altura.
Vea “Dimensiones del Producto”.
Si el piso de la abertura no está nivelado con el piso de la
cocina, calce la abertura para nivelarla con el piso de la cocina.
G
I
C
E
H
B
A
F
G
F
D
Ubicación de
receptáculos
empotrados
Abertura de
uso general
29
Page 30

Dimensiones de la apertura y localización de
los servicios
Ancho de la abertura - A
Profundidad de la abertura- B
Altura de la abertura - C
Dimensión - D
Dimensión - E 21
Dimensión - F 1
Dimensión - G 3” (7.55 cm)
Dimensión - H 4
Dimensión - I 9
24” (60.96 cm) mín.
24” (60.96 cm) mín.
1
34
/2” (87.6 cm) mín.
35” (88.9 cm) max.
1
/16” (30.64 cm)
12
3
/4” (55.16 cm)
3
/4” (4.44 cm)
1
/2” (11.37 cm)
1
/4” (23.47 cm)
Panel Recubierto Personalizado
NOTA: Para modelos estándar de acero inoxidable o de
puertas de vidrio, omita esas instrucciones y proceda a la
sección “Requisitos Eléctricos”.
Si está planeando instalar un panel recubierto personalizado,
usted mismo deberá crear el panel o consultar un fabricante
de gabinetes o carpintero califi cado. Consulte los dibujos de
las dimensiones para las especifi caciones del panel.
IMPORTANTE:
El espesor del panel recubierto debe ser 3/4” (19 mm).
El panel recubierto personalizado de la puerta sólida no
debe pesar más de 20 lb (9,07 kg).
El panel recubierto personalizado de la puerta de vidrio no
debe pesar más de 10 lb (4,54 kg).
Para instalación al ras, el tomacorriente puede ser
instalado en un gabinete adyacente con un corte en el lado
del cable de alimentación para encaminarlo hasta allí.
El tomacorriente también puede ser empotrado en la pared
posterior, por detrás de la unidad, según la localización de
receptáculo recomendada en la ilustración arriba.
Dimensiones del Producto
General del producto
Ancho (hasta la tapa de la bisagra)
Altura (hasta la tapa de la bisagra)
Profundidad de modelos con paneles
listos (con un panel de 3/4” y sin
mango)
Altura de la puerta
Profundidad (sin manija)
NOTA: El cable de alimentación tiene 60” (152,4 cm) de largo.
237/8”
(60.72 cm)
237/8” (60,72 cm)
343/8” (87,32 cm)
2313/16” (60,5 cm)
305/8” (77,75 cm)
5
/8” (60,01 cm)
23
Profundidad
(sin manija)
Páneles recubiertos que pesan más de lo recomendado
pueden dañar su aparato.
Panel recubierto de puerta sólida - Preparación:
Cree el panel recubierto personalizado utilizando las
dimensiones exhibidas en la ilustración “Dimensiones del
panel recubierto de puerta sólida y encaminamiento de las
bisagras”. Encamine las áreas sombreadas con una
profundidad de 1/2” (12 mm), según la exhibición.
IMPORTANTE: Los gráficos siguientes muestran un panel
personalizado para una puerta con bisagras instaladas a
su derecha. Si su refrigerador tiene bisagras instaladas a
su izquierda, gire la estructura personalizada 180° para que
las marcas de las bisagras estén a la izquierda.
1/4"
(7 mm)
1/8"
(3 mm)
1/2"
(12 mm)
415/16”
(125 mm)
2"
(53 mm)
3
/8”
34
(87.32 cm)
30
5
30
/8”
(77.5 cm)
233/4”
(60.3 cm)
305/8”
(77.75 cm)
Dimensiones del panel recubierto de puerta sólida y
encaminamiento de las bisagras.
Page 31

Panel recubierto de puerta de vidrio - Preparación:
Cree el panel recubierto personalizado utilizando las
dimensiones que se muestran en la ilustración “Dimensiones
del panel recubierto de puerta de vidrio y encaminamiento de
las bisagras”. Encamine las áreas sombreadas con una
profundidad de 1/2” (12 mm), según la exhibición.
IMPORTANTE: Los gráficos siguientes muestran un panel
personalizado para una puerta con bisagras instaladas a
su derecha. Si su refrigerador tiene bisagras instaladas a
su izquierda, gire la estructura personalizada 180° para
que las marcas de las bisagras estén a la izquierda.
1/4"
(7 mm)
1/8"
(3 mm)
1/2"
(12 mm)
415/16”
(125 mm)
2"
(53 mm)
Requisitos Eléctricos
Peligro de Choque Eléctrico
Conéctelo en un tomacorriente de 3 polos con toma de
tierra.
No retire la clavija con toma de tierra.
No utilice un adaptador.
No utilice una extensión eléctrica.
No seguir estas instrucciones podrá resultar en muerte,
incendio o choque eléctrico.
Antes de mover su refrigerador hasta su localización
fi nal, asegúrese de que usted posee la conexión eléctrica
adecuada.
Método de puesta a tierra recomendado:
233/4”
(60.3 cm)
171/16”
(43.3 cm)
2113/16”
(55.4 cm)
Dimensiones del panel recubierto de puerta de vidrio y
encaminamiento de las bisagras.
305/8”
(77.75 cm)
Manija (opcional)
Las manijas personalizadas suelen estar fi jadas solamente
al panel recubierto personalizado de la puerta.
Consulte las instrucciones recibidas con los kits de manijas
KitchenAid para instalar esas manijas en paneles de madera
personalizados.
Las manijas personalizadas deben ser instaladas en el panel
de la puerta con agujeros avellanados e instaladas antes que
el panel recubierto personalizado de la puerta sea instalado
en la puerta del refrigerador.
Una fuente de alimentación de 115 VAC, 60 Hz, 15 A o 20 A
con fusibles y puesta a tierra es necesaria.
Se recomienda un circuito separado para alimentar
solamente a su refrigerador. Utilice un tomacorriente que
no puede ser apagado por un interruptor. No utilice una
extensión eléctrica.
NOTA: Antes de realizar algún tipo de instalación, limpieza o
de quitar una bombilla, desconecte el refrigerador de la
fuente de alimentación.
INSTRUCCIONES DE
INSTALACIÓN
Desempaque del Refrigerador
Peligro
Use dos o más personas para mover e instalar o
desinstalar el aparato.
No seguir esta instrucción puede ocasionar una lesión en
la espalda u otro tipo de lesiones.
Antes de utilizar su refrigerador, deberá quitar todos los
materiales de embalaje y limpiar el interior.
Quite los residuos de cinta adhesiva y de pegamento de las
superfi cies antes de encender su refrigerador.
Con sus dedos, frote una pequeña cantidad de detergente
para platos sobre cualquier adhesivo y limpie con agua
caliente para eliminarlo.
No utilice instrumentos afi lados, alcohol para frotar, fl uidos
infl amables o limpiadores abrasivos para eliminar cinta
adhesiva o pegamento. Ellos pueden dañar las superfi cies
de Peso Excesivo
31
Page 32

de su refrigerador. Para más información, vea la sección
“Seguridad del Refrigerador”.
Deshágase de y/o recicle todos los materiales de embalaje.
Después que todos los materiales de embalaje han sido
quitados, limpie el interior de su refrigerador. Vea las
instrucciones de limpieza de la sección “Limpieza”.
Información importante que hay que saber sobre
los estantes de vidrio y las cubiertas:
No limpie los estantes de vidrio o las cubiertas con agua
caliente cuando estén fríos. Los estantes y las cubiertas pueden
romperse si se exponen a cambios repentinos de temperatura
o impacto, como los choques. El vidrio templado está diseñado
para romperse en muchos trozos pequeños del tamaño de una
piedra. Esto es normal. Los estantes y las cubiertas de vidrio
son pesados. Use ambas manos al quitarlos para evitar que se
caigan.
3. Utilizando dos personas, sostenga el panel recubierto
personalizado contra la puerta. Asegúrese de que las
bisagras superior e inferior se ajustan correctamente en
el encaminamiento por detrás del panel personalizado de
madera.
NOTA: Para modelos estándar de acero inoxidable o de
puertas de vidrio, omita la sección “Cerrando la Puerta”.
Instalación del Panel Recubierto
Personalizado
IMPORTANTE:
Cree el panel recubierto personalizado según las
especifi caciones de la sección “Panel Recubierto
Personalizado”.
KitchenAid no es responsable por la remoción o adición
de estructuras o paneles decorativos que imposibilitan
el acceso a el
refrigerador para
mantenimiento.
1. Abra la puerta
completamente
en 115°.
115°
NOTA: La manija debe ser instalada antes que el panel
recubierto de la puerta sea instalado en la puerta del
refrigerador.
4. Fije en panel personalizado a la puerta utilizando dos
tornillos de madera (provistos en el kit de instalación)
en cada esquina.
A
A
A. Tornillos de cabeza plana M4 x 30 (provistos en el kit de
instalación)
5. Presione la junta firmemente de nuevo en su posición
original.
2. Retire las juntas de las esquinas de la puerta, jalando
suavemente hasta que sea posible ver los dos orifícios de
tornillos en cada esquina de la puerta.
NOTA: No es necesario
quitar toda la junta de
la puerta, solo las
esquinas.
A. Orifi cios de los tornillos
B. Junta
32
A
A
B
Page 33

Instalación y Cierre de la Puerta
Su refrigerador tiene cuatro patas de nivelación.
Si siente que su refrigerador no está nivelado o si desea que
la puerta se cierre con más facilidad, ajuste la inclinación del
refrigerador utilizando las instrucciones abajo.
Peligro de Choque Eléctrico
Conéctelo en un tomacorriente de 3 polos con toma de
tierra.
No retire la clavija con toma de tierra.
No utilice un adaptador.
No utilice una extensión eléctrica.
No seguir estas instrucciones podrá resultar en muerte,
incendio o choque eléctrico.
1. Conéctelo en un tomacorriente de 3 polos con toma de
tierra.
Al mover su Refrigerador:
Su refrigerador es pesado. Al mover el refrigerador para
limpieza o mantenimiento, asegúrese de cubrir la puerta
con cartón o HDF para evitar que la puerta sufra daños.
Siempre jale el refrigerador directamente para fuera al
moverlo. No menee o “camine” con el refrigerador al
intentar moverlo, pues eso podría dañar la puerta.
2. Mueva el refrigerador hasta su localización final.
3. Gire las patas de nivelación a la derecha para bajar el
refrigerador o gire las patas de nivelación a la izquierda
para levantarlo. Pueden ser necesarios diversos giros de
las patas de nivelación para ajustar la inclinación del
refrigerador.
NOTA: Hacer que alguien empuje la parte superior del
refrigerador reduce un poco del peso de las patas de
nivelación. Eso facilita el ajuste de las patas de nivelación.
4. Abra la puerta y verifique si se cierra tan fácilmente como
le gustaría. Si no, incline el refrigerador un poco más
Peligro
Use dos o más personas para mover e instalar o
desinstalar el aparato.
No seguir esta instrucción puede ocasionar una lesión en
la espalda u otro tipo de lesiones.
de Peso Excesivo
hacia atrás girando los dos tornillos de nivelación
delanteros a la derecha. Puede que sea necesario dar
más vueltas, y las dos patas de nivelación deben ser
giradas en la misma proporción.
USO DEL REFRIGERADOR
Controles
1 2 3 4 5 6 7 8 9
NOTAS:
El panel de control está situado en la parte superior del
compartimiento y orientado hacia el frente.
El control del refrigerador no tiene piezas mecánicas ni
botones. Cuando se desconecta, el panel de control no
muestra nada y puede ser difícil de localizar.
1. Encender / Apagar el Control
Al conectar el refrigerador por la primera vez,
el control estará en el modo Cool Off (Enfriar
desactivado). Cool On (Enfriar activado) y
Cool Off (Enfriar desactivado) serán las
únicas opciones presentadas.
Presione Cool On (Enfriar activado) por 3 segundos para
encender el refrigerador. Todos los menús y
configuraciones de temperatura recomendadas serán
presentados.
2. Max Cool
Disminuir las temperaturas internas a su
punto más bajo durante 24 horas.
Presione Max Cool para activar la función.
La función se activará.
Presione Max Cool para desactivar la función y volver a la
confi guración anterior.
33
Page 34

3. Bloqueo del Control
Evita cambios de temperatura no deseados
y facilita la limpieza de los controles.
Para activar el modo de Bloqueo, mantenga
presionado Lock (Bloquear) durante 3
segundos. Después de la cuenta regresiva,
todas las demás pantallas se apagarán y no están
disponibles excepto Cool On (Enfriar activado), Cool Off
(Enfriar desactivado) y Lock (Bloquear).
4. Uso de los Preajustes
Para su conveniencia, su refrigerador también tiene
controles que están preestablecidos a las temperaturas de
almacenamiento recomendadas para productos
específicos. Presionando cualquier opción preestablecida,
el valor de la temperatura será la temperatura
recomendada para cada categoría:
Delicatesen: 39 °F (3 °C)
Surtido: 37 °F (2 °C)
Bebida: 34 °F (1 °C)
Carne: 32 °F (0 °C)
5. Ajustando las Temperaturas
Para ajustar las temperaturas
del punto de ajuste, presione
“+” (más) o “-” (menos) hasta
que se alcance el ajuste de temperatura deseado.
El control se ajusta correctamente cuando la leche y las
bebidas están tan frías como se desea.
NOTAS:
La temperatura recomendada predeterminada para el
refrigerador es de 37 °F ( 2 °C). El rango del punto de
ajuste para este modelo es de 32 °F a 42 °F (0 °C a 5 °C).
Espere al menos 24 horas entre los ajustes para que el
refrigerador pueda aclimatarse.
6. Viendo Temperaturas Celsius/ Fahrenheit
Presione el panel táctil F/C para alternar
entre exhibir la temperatura en grados
Fahrenheit y grados Celsius. El indicador
correspondiente se encenderá.
7. Modo de Sabbath (Sábado)
Permite que la puerta del refrigerador
permanezca abierta o cerrada durante el
sábado u otros feriados religiosos sin
encender o apagar directamente cualquier
luz, lectura digital, ventilador, válvula, sonido
o alarma. Al seleccionar ese recurso, el valor
objetivo de la temperatura no cambiará, pero las luces del
panel de control, las luces interiores y el audio de control
serán apagados. Para una operación más eficiente del
refrigerador, se recomienda salir del modo de Sabbath
(Sábado) cuando ese deje de ser necesario.
Presione y mantenga Sabbath (Sábado) presionado por 3
segundos para encender el recurso. Después de la cuenta
regresiva de 3 segundos, el recurso será activado y todos
los otros visualizadores serán apagados.
34
Presione y mantenga Sabbath (Sábado) presionado
por 3 segundos para apagar el recurso y encender el
visualizador.
8. Alarma de Exceso de Temperatura
Ayuda a evitar que los alimentos y las bebidas
se echen a perder al dar una alerta sonora y
visual si la temperatura sube por encima del
rango preestablecido durante 4 horas.
La alarma acústica se apagará automáticamente cuando la
temperatura vuelva a la normalidad. Para avisarle que
ocurrió una condición de temperatura excesiva, la luz
indicadora continuará parpadeando hasta que se presione
el panel táctil Reset Alarm (Reinicio de la Alarma). Si la
condición de exceso de temperatura todavía existir cuando
un reinicio de Over Temp (Excesso de Temperatura) es
realizado, la luz indicadora continuará a ser reactivada
cada 4 horas hasta que la temperatura del refrigerador
esté por debajo del rango preestablecido.
NOTA: Esos recursos no aparecerán en su control a menos
que su refrigerador esté por encima del rango
preestablecido y la alarma deba ser reiniciada.
9. Luz Automática (modelos de puerta de vidrio)
El refrigerador tiene un sensor que enciende
la luz de la pantalla interior automáticamente
cuando alguien pasa por allí. Cuando ya no
se detecta movimiento, la luz de la pantalla
interior se apagará después de 2 minutos.
Presione la opción de Luz Automática para
activar esta función.
Cuando la luz automática no está activada, la luz de la
pantalla interior solo se encenderá cuando se abra la
puerta.
NOTA: Si se deja la luz encendida durante un período
prolongado, la temperatura del refrigerador aumentará
ligeramente.
10. Alarma de Puerta Abierta
Ayuda a evitar que el alimento y la bebida se echen a
perder dando una alerta sonora y visual si se deja la
puerta abierta por más de 5 minutos.
Si se deja la puerta abierta por más de 5 minutos, una
alarma sonará cada 2 minutos hasta que la puerta se cierre
o se presione algún control.
11. Modo Sala de Exposición
Este modo es utilizado solamente cuando el refrigerador
está en exhibición en una tienda minitorista. Para activar
el modo Sala de exposición mantenga presionado al
mismo tiempo, Cool On (Enfriar activado) y Sabbath
(Sábado), durante 3 segundos. En caso que encienda el
modo de Sala de exposición, Cool Off (Enfriar
desactivado) se encenderá en el visualizador, y los
controles aparecerán para operación. Salga del modo de
Sala de Exposición al mantener presionados Cool On
(Enfriar activado) y Sabbath (Sábado) al mismo tiempo
por 3 segundos
Sonidos Normales
Su nuevo refrigerador puede producir ruidos que su
refrigerador anterior no producía. Como esos sonidos le
son nuevos, ellos pueden preocuparle. La mayor parte de
esos nuevos sonidos son normales. Superfi cies duras, como
el piso y las estructuras adyacentes, pueden hacerlos sonar
más alto. Lo siguiente describe los tipos de sonidos y qué
les pueden estar produciendo.
Su refrigerador está diseñado para funcionar de forma más
efi ciente para mantener sus alimentos a las temperaturas
deseadas y para minimizar el uso de energía.
Page 35

El compresor de alta efi ciencia y los ventiladores pueden
hacer su refrigerador funcionar por más tiempo que su
refrigerador anterior. Puede que usted también escuche
un sonido pulsado o agudo del compresor o ventiladores
ajustándose para un desempeño óptimo.
Un ruido de cascabeleo puede originarse del fl ujo del
refrigerante o de artículos almacenados dentro del
refrigerador.
A medida que cada ciclo termina, usted podrá escuchar
un sonido de gorgoteo debido al fl ujo del refrigerante en
su refrigerador.
Usted podrá escuchar agua corriendo en la bandeja de
drenaje cuando el refrigerador es descongelado.
Usted podrá escuchar sonidos de clics cuando el
refrigerador empieza o para de funcionar.
Estantes del Refrigerador
Para quitar o ajustar los estantes superiores:
1. Retire el estante levantándolo y sacándolo de los soportes
del estante.
Compartimientos en las Puertas
(modelos de puerta sólida)
Su refrigerador tiene dos ubicaciones con compartimientos
para brindar una capacidad máxima de almacenamiento.
Para quitar y reemplazar los compartimientos de la
puerta:
1. Retire el compartimiento de la puerta inclinándolo hacia
adelante y sacándolo.
2. Vuelva a colocar
el recipiente
colocando la parte
trasera del mismo
bajo el soporte de
la puerta y
deslizándolo en
su lugar.
Iluminación
El refrigerador tiene una luz interior que se ilumina cuando se
abre la puerta.
2. Vuelva a colocar el estante insertándolo en los soportes
del estante.
NOTA: Para retirar y volver a colocar el estante inferior
asegúrese de que el estante esté nivelado.
El estante inferior se desliza hacia afuera:
1. El estante
inferior se
desliza hacia
afuera.
2. Vuelva a
colocar el
estante
alineando los
bordes con las
guías y
empujándolo
hacia la parte
trasera del
refrigerador.
NOTA: La luz es un LED que no necesita ser reemplazado.
Si el LED no se ilumina cuando la puerta se abre, llame al
servicio técnico. Consulte la sección “Asistencia” para
obtener información de contacto.
CUIDADOS Y LIMPIEZA
Limpieza
Peligro de Explosión
Riesgo de incendio o explosión.
Refrigerante inflamable utilizado.
No use dispositivos mecánicos para descongelar el
refrigerador.
No perfore la tubería del refrigerante.
Limpie el refrigerador una vez al mes para evitar el acúmulo
de olores. Limpie derrames inmediatamente.
Para limpiar su Refrigerador:
1. Desconecte el refrigerador o la fuente de alimentación.
2. Retire todas las estanterías del interior del refrigerador.
35
Page 36

3. Lave a mano, enjuague y seque las piezas removibles y
las superficies interiores con atención. Utilice una esponja
limpia o un paño y detergente suaves en agua caliente.
Para evitar dañar dientes de madera y piezas de recorte,
límpielos con una esponja limpia o un paño suave y
agua caliente. No utilice detergente o sumerja la estantería
entera en agua al limpiar.
No utilice limpiadores abrasivos o duros, como limpiadores
en aerosol de ventanas, limpiadores de fregar, fl uidos
infl amables, ceras de limpieza, detergentes concentrados,
blanqueadores o limpiadores que contengan productos de
petróleo en piezas de plástico, en el interior y en los
revestimientos de las puertas o juntas. No utilice toallas de
papel, estropajos u otras herramientas duras de limpieza.
Estos pueden rayar o dañar los materiales.
Para ayudar a eliminar olores, usted puede lavar las paredes
interiores con una mezcla de agua caliente y bicarbonato de
sodio [2 cucharitas para 1 qt (26 g para 0,95 L) de agua].
4. Lave acero inoxidable y exteriores de metal pintado con
una esponja limpia o con un paño y detergente suaves
en agua caliente. No utilice limpiadores abrasivos,
limpiadores duros o limpiadores que contienen cloro.
Estos pueden rayar o dañar los materiales.
Seque inmediatamente con un paño suave y seco para
absorber los restos de agua.
NOTA: Para mantener su refrigerador de acero inoxidable
como nuevo y para eliminar rayas y marcas menores,
se recomienda que utilice el limpiador y pulidora de acero
Inoxidable aprobados por el fabricante. Para más
información sobre limpiadores, vea la sección “Accesorios”.
IMPORTANTE:
¡Ese limpiador sirve solamente para piezas de acero
inoxidable!
No permita que el limpiador y pulidora de acero
inoxidable entre en contacto con piezas de plástico, como
las piezas de recorte, las tapas del dispensador o las
juntas de la puerta. En caso de contacto no intencional,
limpie la pieza de plástico con una esponja y detergente
suave en agua caliente. Seque inmediatamente con un
paño suave y seco para absorber los restos de agua.
5. Vuelva a colocar las estanterías.
Limpieza del condensador
Removiendo la Rejilla de la Base
Debe quitarse la rejilla de la base para acceder a las
bobinas del condensador para limpieza.
Para quitar la rejilla de la base:
1. Abra la puerta del refrigerador.
A. Tornillos
2. Utilizando un destornillador Phillips, retire los dos
tornillos.
3. Retire la rejilla de la base.
A
Para sustituir la rejilla de la base:
1. Abra la puerta del refrigerador.
2. Coloque la rejilla de la base para que las dos pestañas se
alineen y esta se encaje en la posición.
Vuelva a poner los dos tornillos. Apriete los tornillos.
Cuidados de Vacaciones
Si elige apagar el refrigerador antes de partir, siga estos
pasos.
1. Retire todos los alimentos y las bebidas del refrigerador.
2. Desconecte el refrigerador.
3. Limpie el refrigerador. Vea la sección “Limpieza”.
Peligro de Explosión
Riesgo de incendio o explosión a causa de la
perforación de la tubería del refrigerante.
Siga con cuidado las instrucciones de manipulación.
Refrigerante inflamable utilizado.
1. Retire la rejilla de la base para acceder al condensador
para limpieza. Vea la sección “Para Quitar la Rejilla de la
Base”.
2. Limpie las bobinas del condensador regularmente.
Estas están localizadas por detrás de la rejilla de la base.
Las bobinas deben ser limpiadas una vez cada dos
meses. Eso puede ayudar a ahorrar energía.
36
4. Coloque una goma o un bloque de madera con una cinta
adhesiva en la parte superior de la puerta para mantenerla
suficientemente abierta para que el aire pueda entrar.
Eso impedirá la acumulación de olores y moho.
Cuidados de Desplazamiento
Al mover su refrigerador a su nuevo hogar, siga estos pasos
para prepararlo para el desplazamiento.
1. Retire todos los alimentos y las bebidas del refrigerador.
2. Desconecte el refrigerador
3. Limpie, frote y seque bien el refrigerador.
4. Retire todas las piezas removibles, envuélvelas bien y
fíjelas con cinta para que no se desplacen y hagan ruidos
durante la mudanza.
5. Cierre las puertas y prenda el cable de alimentación a el
refrigerador con cinta.
Al llegar en su nuevo hogar, ponga todo en su respectivo
lugar y consulte las “Instrucciones de Instalación” que ha
recibido con el refrigerador.
Page 37

RESOLUCIÓN DE PROBLEMAS
Intente las soluciones sugeridas aquí primero para evitar los costos de llamadas innecesarias de servicio de atención al cliente.
Peligro de Choque Eléctrico
Conéctelo en un tomacorriente de 3 polos con toma de
tierra.
No retire la clavija con toma de tierra.
No utilice un adaptador.
No utilice una extensión eléctrica.
No seguir estas instrucciones podrá resultar en muerte,
incendio o choque eléctrico.
FUNCIONAMIENTO EN GENERAL Causas Posibles y/o Soluciones Recomendadas
El refrigerador no funciona
Parece que el motor funciona por
mucho tiempo
¿El cable de alimentación está desconectado? Conéctelo en un tomacorriente de
3 polos con toma de tierra.
¿El tomacorriente está funcionando? Conecte una lámpara para verifi car si el
tomacorriente está funcionando.
¿Fusible doméstico quemado o un disyuntor disparado? Sustituya el fusible o
reinicie el circuito. Si el problema persiste, llame a un electricista.
¿Los controles están encendidos? Asegúrese de que los controles del
refrigerador están encendidos. Consulte la sección “Controles”.
¿La temperatura externa está más elevada de lo normal? Espere que el motor
funcione por más tiempo en condiciones más calientes. Bajo temperaturas
normales, espere que el motor funcione alrededor del 40 % al 80 % del tiempo.
Bajo condiciones más calientes, espere que este funcione por más tiempo.
¿Se acaba de añadir una gran cantidad de alimentos al refrigerador? Añadir
una gran cantidad de alimentos calienta el refrigerador. Es normal que el motor
funcione más tiempo para enfriar el refrigerador.
¿Las puertas se abren con frecuencia? Espere que el motor funcione por más
tiempo cuando eso se pasa. Para conservar energía, intente tomar todo lo que
necesita del refrigerador de una sola vez. Guarde los alimentos organizados para
que sean fáciles de encontrar y cierre la puerta después de retirar los alimentos.
¿Los controles se con guraron correctamente para las condiciones del
ambiente? Consulte la sección “Controles”.
¿La puerta se cerró completamente? Empuje la puerta con fi rmeza para cerrarla
bien. Si la puerta no se cierra completamente, vea “La puerta no se cierra
completamente”, más adelante, en esta sección.
¿Las bobinas del condensador están sucias? Eso obstruye la transferencia del
aire y hace que el motor trabaje más duro. Limpie las bobinas del condensador.
Vea la sección “Limpieza”.
37
Page 38

TEMPERATURA Y HUMEDAD
Causas Posibles y/o Soluciones Recomendadas
La temperatura está demasiado
caliente
Hay acúmulo de humedad interior
¿Las puertas se abren con frecuencia? Sepa que el refrigerador se calentará
cuando eso pasa. Para mantener el refrigerador frío, intente tomar todo lo que
necesita del refrigerador de una sola vez. Guarde los alimentos organizados para
que sean fáciles de encontrar y cierre la puerta después de retirar los alimentos.
¿Se acaba de añadir una gran cantidad de alimentos al refrigerador? Añadir una
gran cantidad de alimentos calienta el refrigerador. El refrigerador puede pasar
varias horas en volver a la temperatura normal.
¿Los controles se con guraron correctamente para las condiciones del
ambiente? Consulte la sección “Controles”.
¿La rejilla de la base está trabada? Para un mejor desempeño, no instale el
refrigerador por detrás de una puerta de alacena ni bloquee la rejilla de la base.
¿Las puertas se abren con frecuencia? Para evitar el acúmulo de humedad,
intente tomar todo lo que necesita del refrigerador de una sola vez. Guarde los
alimentos organizados para que sean fáciles de encontrar y cierre la puerta
después de retirar los alimentos. Cuando la puerta es abierta, la humedad de la
habitación entra en el refrigerador. Entre más se abra la puerta, más rápido la
humedad se acumula, en especial si la habitación en sí es muy húmeda.
¿Está húmedo? Es normal que la humedad se acumule en el interior del
refrigerador cuando el aire está húmedo.
¿Están los alimentos empaquetados correctamente? Compruebe que todos los
alimentos estén bien envueltos. Limpie los contenedores de alimento húmedos
antes de que se colocan en el refrigerador.
PUERTA
Utilice un limpiador no inflamable.
No hacerlo podrá resultar en muerte, explosión o
incendio.
Es difícil abrir la puerta
La puerta no se cierra completamente
¿Los controles se con guraron correctamente para las condiciones del
ambiente? Consulte la sección “Controles”.
Causas Posibles y/o Soluciones Recomendadas
Peligro de Explosión
¿El empaque está sucio y pegajoso? Limpie la junta y la superfi cie que entra en
contacto con ella. Aplique una delgada capa de parafi na sobre la junta después de
la limpieza.
¿Los paquetes de alimentos están bloqueando la puerta abierta? Reacomode
los contenedores para que se ajusten más y ocupen menos espacio.
¿Las estanterías no están bien posicionadas? Vuelva a insertar las estanterías en
sus posiciones correctas. Consulte la sección “Estantes del Refrigerador” para
obtener más información.
38
¿El empaque está pegajoso? Limpie la junta y la superfi cie que entra en contacto
con ella. Aplique una delgada capa de parafi na sobre la junta después de la
limpieza.
Page 39

ASISTENCIA
Si necesita servicio:
Antes de llamar para solicitar asistencia o servicio, verifique
“Resolución de problemas”. Puede ahorrarle el costo de un
servicio. Si aún necesita ayuda, siga las instrucciones a
continuación.
Cuando llame, sepa la fecha de compra y el modelo
completo y número de serie de su aparato.
Esta información nos ayudará a responder mejor a su
solicitud. Consulte la página de garantía de este manual.
para obtener más información sobre el servicio.
Si necesita piezas de repuesto:
Los componentes deben reemplazarse por componentes
similares y el servicio debe ser realizado por personal
autorizado de la fábrica, para minimizar el riesgo
de posible ignición debido a piezas incorrectas o servicio
inadecuado.
En EE.UU.
Llame al centro para la eXperiencia del cliente de
KitchenAid sin costo alguno al: 1-800-422-1230.
Nuestros consultores ofrecen ayuda para:
Características y especifi caciones de nuestra línea
completa de electrodomésticos.
Información sobre la instalación.
Procedimiento para el uso y mantenimiento.
Venta de accesorios y partes para reparación.
Asistencia especializada para el consumidor (habla
hispana, problemas de audición, visión limitada, etc.).
Recomendaciones con distribuidores locales, compañías
que dan servicio y distribuidores de partes para
reparación. Los técnicos designados por KitchenAid están
capacitados para cumplir con la garantía de producto y
ofrecer servicio una vez que la garantía termine, en
cualquier lugar de Estados Unidos.
Para localizar a una compañía de servicio designada por
KitchenAid en su área, también puede consultar la sección
amarilla de su guía telefónica.
En Canadá
Llame al Centro para la eXperiencia del cliente de
KitchenAid en Canadá sin costo alguno al: 1-800-807-6777.
Nuestros consultores ofrecen ayuda para:
Características y especifi caciones de nuestra línea
completa de electrodomésticos.
Procedimiento para el uso y mantenimiento.
Venta de accesorios y partes para reparación.
Recomendaciones con distribuidores locales, compañías
que dan servicio y distribuidores de partes para
reparación. Los técnicos designados por KitchenAid
Canada están capacitados para cumplir con la garantía del
producto y ofrecer servicio una vez que la garantía termine,
en cualquier lugar de Canadá.
Para obtener asistencia adicional:
Si necesita asistencia adicional, puede escribir a KitchenAid
Canada con sus preguntas o dudas a:
KitchenAid Canada
Customer eXperience Centre
200 – 6750 Century Ave.
Mississauga, Ontario L5N 0B7
Por favor incluya en su correspondencia un número de
teléfono en el que se le pueda localizar durante el día.
Accesorios
Los siguientes accesorios están disponibles para su bodega.
Para hacer un pedido de un accesorio, contáctenos y pida
los números de pieza.
En EE.UU., visite nuestro sitio de internet en
www.kitchenaid.com/accessories o llame al 1-800-442-9991.
En Canadá, visite nuestro sitio de internet en
www.whirlpoolparts.ca o llame al 1-800-807-6777.
Para obtener asistencia adicional
Si necesita asistencia adicional, puede escribir a KitchenAid
con sus preguntas o dudas a:
KitchenAid Brand Home Appliances
Customer eXperience Center
553 Benson Road
Benton Harbor, MI 49022-2692
Por favor incluya en su correspondencia un número de
teléfono en el que se le pueda localizar durante el día.
Limpiador de acero inoxidable
Pida la pieza No. 4396095
39
Page 40

®
/™ ©2020 All rights reserved. Used under license in Canada.
Tous droits réservés. Utilisé sous licence au Canada.
W11515231B 12/2020
Todos los derechos reservados. Usado en Canadá bajo licencia.
 Loading...