

Page 1
OUTDOOR ICE MAKER
Use & Care Guide
For questions about features, operation/performance, parts, accessories or service, call: 1-800-422-1230
In Canada, call for assistance 1-800-461-5681, for installation and service, call: 1-800-807-6777 or visit our website at...
www.kitchenaid.com or www.KitchenAid.ca
MACHINE À GLAÇONS D'EXTÉRIEUR
Guide d’utilisation et d’entretien
Au Canada, pour assistance composez le 1-800-461-5681, pour installation ou service composez le 1-800-807-6777 ou visitez notre site web à...
www.KitchenAid.ca
Table of Contents/Table des matières.............................................................................2
91A1VL11A/2225453B
Page 2

TABLE OF CONTENTS
TABLE DES MATIÈRES
ICE MAKER SAFETY......................................................................3
INSTALLATION INSTRUCTIONS..................................................3
Unpack the Ice Maker..................................................................3
Location Requirements................................................................4
Electrical Requirements ...............................................................4
Water Supply Requirements........................................................5
Leveling ........................................................................................5
Connect Water Supply.................................................................5
Drain Connection .........................................................................6
Normal Sounds ............................................................................6
ICE MAKER USE ............................................................................6
Using the Controls .......................................................................6
ICE MAKER CARE..........................................................................7
Cleaning........................................................................................7
Vacation and Moving Care...........................................................9
Winterizing....................................................................................9
TROUBLESHOOTING ..................................................................10
Ice Maker Operation...................................................................10
Ice Production............................................................................10
Ice Quality...................................................................................10
ASSISTANCE OR SERVICE.........................................................11
In the U.S.A. ...............................................................................11
In Canada ...................................................................................11
Accessories................................................................................11
WARRANTY ..................................................................................12
SÉCURITÉ DE LA MACHINE À GLAÇONS ................................13
INSTRUCTIONS D’INSTALLATION.............................................13
Déballage de la machine à glaçons ...........................................13
Emplacement d’installation........................................................14
Spécifications électriques ..........................................................14
Spécifications de l’alimentation en eau .....................................15
Nivellement.................................................................................15
Raccordement à l'alimentation en eau ......................................15
Raccordement au conduit d'évacuation....................................16
Sons normaux ............................................................................16
UTILISATION DE LA MACHINE À GLAÇONS............................17
Utilisation des commandes........................................................17
ENTRETIEN DE LA MACHINE À GLAÇONS..............................17
Nettoyage ...................................................................................17
Précautions à prendre pour les vacances
et avant un déménagement .......................................................20
Préparation pour l'hiver..............................................................20
DÉPANNAGE.................................................................................21
Fonctionnement de la machine à glaçons.................................21
Production de glaçons ...............................................................21
Qualité des glaçons....................................................................21
ASSISTANCE OU SERVICE.........................................................22
Aux États-Unis............................................................................22
Au Canada..................................................................................22
Accessoires ................................................................................22
GARANTIE .................................................................................23
2
Page 3
ICE MAKER SAFETY
Your safety and the safety of others are very important.
We have provided many important safety messages in this manual and on your appliance. Always read and obey all safety
messages.
This is the safety alert symbol.
This symbol alerts you to potential hazards that can kill or hurt you and others.
All safety messages will follow the safety alert symbol and either the word “DANGER” or “WARNING.”
These words mean:
You can be killed or seriously injured if you don't immediately
DANGER
WARNING
All safety messages will tell you what the potential hazard is, tell you how to reduce the chance of injury, and tell you what can
happen if the instructions are not followed.
IMPORTANT SAFETY INSTRUCTIONS
WARNING : To reduce the risk of fire, electric shock, or injury when using your ice maker, follow these basic
precautions
■ Plug into a grounded 3 prong outlet.
■ Do not remove ground prong.
■ Do not use an adapter.
■ Do not use an extension cord.
:
follow instructions.
can be killed or seriously injured if you don't
You
instructions.
■ Disconnect power before cleaning.
■ Disconnect power before servicing.
■ Replace all parts and panels before operating.
■ Use two or more people to move and install ice maker.
follow
SAVE THESE INSTRUCTIONS
INSTALLATION INSTRUCTIONS
Unpack the Ice Maker
WARNING
Excessive Weight Hazard
Use two or more people to move and install ice maker.
Failure to do so can result in back or other injury.
Removing packaging materials
Before using, remove tape and glue from your ice maker. This
includes the tape holding the door closed. Remove the accessory
bag from the ice storage bin.
The ice maker is covered with a protective film. Completely
remove the film before installing the ice maker.
■ To remove any remaining tape or glue, rub the area briskly
with your thumb. Tape or glue residue can also be easily
removed by rubbing a small amount of liquid dish soap over
the adhesive with your fingers. Wipe with warm water
and dry.
■ Do not use sharp instruments, rubbing alcohol, flammable
fluids, or abrasive cleaners to remove tape or glue. These
products can damage the surface of your ice maker.
Cleaning before use
After you remove all of the packaging materials, clean the inside
of your ice maker before using it. See the cleaning instructions in
the “Ice Maker Care” section.
3
Page 4
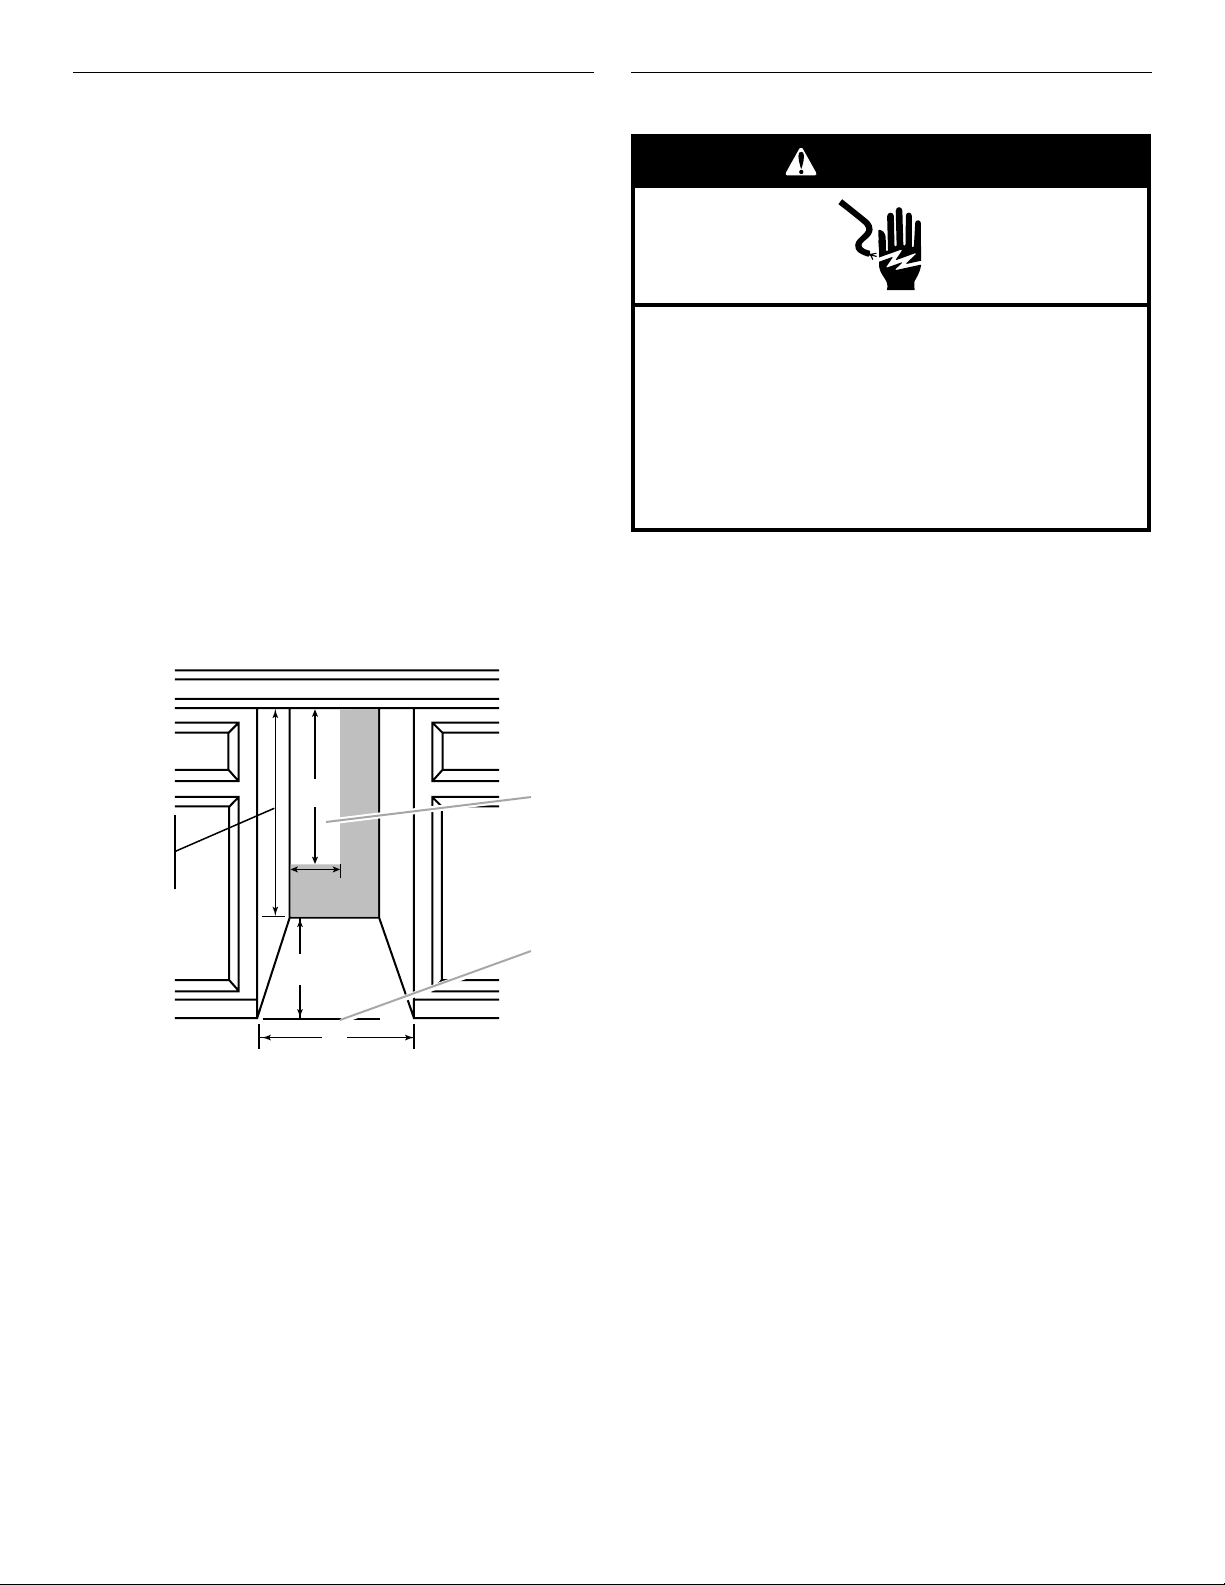
Location Requirements
A
B
■ To ensure proper ventilation for your ice maker, the front side
must have at least 15" (38.1 cm) of clearance. The unit may
be closed-in on the top and three sides, but the installation
should allow the ice maker to be pulled forward for servicing
if necessary.
■ Installation of the ice maker requires a cold water supply inlet
of ¹⁄₄" (6.35 mm) OD soft copper tubing with a shutoff valve
and either a gravity-drain system or condensate pump to
carry the water to an existing drain.
■ Choose a well ventilated area with temperatures above 45°F
(7°C) and below 100°F (38°C). Best results are obtained
between 70°F (21°C) and 90°F (32°C). It is recommended that
the unit be installed in an area protected from the elements,
such as wind, rain, water spray, or drip.
■ When installing the ice maker under a counter, follow the
recommended opening dimensions shown. Place electrical
and plumbing fixtures in the recommended location as
shown.
NOTE: Do not kink or pinch the power supply cord between
the ice maker and cabinet.
Do not kink or pinch the water supply line between the ice
maker and cabinet.
Do not kink or pinch the drain line (on some models) between
the ice maker and cabinet.
25"
(63.5 cm)
34"
(86.4 cm)
Min.
1/2
34
"
(87.6 cm)
Max.
A. Recommended Location for Electrical and Plumbing
Fixtures
B. Floor Level
■ You should choose a location where the floor is even. It is
important for the ice maker to be level in order to work
properly. If needed, you can adjust the height of the ice maker
by changing the height of the front and rear leveling legs. See
“Leveling.”
■ For better performance and higher energy efficiency, do not
operate in direct sunlight.
81/2"
(21.6 cm)
24"
(60.1 cm)
(38.1 cm)
15"
Electrical Requirements
WARNING
Electrical Shock Hazard
Plug into a grounded 3 prong outlet.
Do not remove ground prong.
Do not use an adapter.
Do not use an extension cord.
Failure to follow these instructions can result in death,
fire, or electrical shock.
Before you move your ice maker into its final location, it is
important to make sure you have the proper electrical
connection:
A 115 Volt, 60 Hz., AC only, 15- or 20-amp electrical supply,
properly grounded in accordance with the National Electrical
Code and local codes and ordinances, is required.
It is recommended that a separate circuit, serving only your ice
maker, be provided. Use a receptacle which cannot be turned off
by a switch or pull chain.
IMPORTANT: If this product is connected to a GFCI (Ground
Fault Circuit Interrupter) protected outlet, nuisance tripping of the
power supply may occur, resulting in loss of cooling. Ice quality
may be affected. If nuisance tripping has occurred, and if the
condition of the ice appears poor, dispose of it.
Recommended grounding method
For your personal safety, this appliance must be grounded. This
appliance is equipped with a power supply cord having a 3 prong
grounding plug. To minimize possible shock hazard, the cord
must be plugged into a mating, 3 prong, grounding-type wall
receptacle, grounded in accordance with the National Electrical
Code and local codes and ordinances. If a mating wall receptacle
is not available, it is the personal responsibility of the customer to
have a properly grounded, 3 prong wall receptacle installed by a
qualified electrician.
4
Page 5

Water Supply Requirements
G
A cold water supply with water pressure of between 30 and
120 psi (207 and 827 kPa) is required to operate the ice maker. If
you have questions about your water pressure, call a licensed,
qualified plumber.
Reverse Osmosis Water Supply
IMPORTANT: The pressure of the water supply coming out of a
reverse osmosis system going to the water inlet valve of the ice
maker needs to be between 30 and 120 psi (207 and 827 kPa).
If a reverse osmosis water filtration system is connected to your
cold water supply, the water pressure to the reverse osmosis
system needs to be a minimum of 40 to 60 psi (276 to 414 kPa).
The reverse osmosis system must provide 1 gal. (3.79 L) of water
per hour to the ice maker for proper ice maker operation.
If the water pressure to the reverse osmosis system is less than
40 to 60 psi (276 to 414 kPa):
■ Check to see whether the sediment filter in the reverse
osmosis system is blocked. Replace the filter if necessary.
■ Allow the storage tank on the reverse osmosis system to refill
after heavy usage.
If you have questions about your water pressure, call a licensed,
qualified plumber.
Leveling
It is important for the ice maker to be level in order to work
properly. Depending upon where you install the ice maker, you
may need to make several adjustments to level it.
Tools required
■ Carpenter’s level
To adjust the leveling legs
Your ice maker has four adjustable leveling legs to help you
steady the product and make sure it is level.
NOTE: It is easier to adjust the leveling legs if you have another
person to assist you.
1. Place a carpenter’s level on top of the product to see whether
the ice maker is level from front to back and side to side.
2. Push up on the top front of the ice maker, and then locate the
leveling legs that are on the bottom of the product.
3. Change the height of the legs as follows:
■ Turn the leveling legs to the right to lower that side of the
ice maker.
■ Turn the leveling legs to the left to raise that side of the ice
maker.
NOTE: The ice maker should not wobble. Use shims to add
stability when needed.
Connect Water Supply
Read all directions thoroughly before you begin.
IMPORTANT:
■ Plumbing shall be installed in accordance with the
International Plumbing Code and any local codes and
ordinances.
■ Use copper tubing and check for leaks.
■ Install copper tubing only in areas where temperatures will
remain above freezing.
■ Close the shutoff valve when the water temperature is below
freezing to avoid damage to the tubing.
■ Do not operate ice maker when the water supply is off.
Connecting the water
Connect the ice maker to the water supply using the ¹⁄₂" (1.3 cm)
water inlet on the rear of the ice maker. Be sure to use a potable
water supply. The water supply line must have a shutoff valve and
a bin drain outlet installed.
A
B
C
D
E
F
H
A. Water supply inlet
B. Shutoff valve
C. Drain valve
D. Bin drain outlet
E. Vent
F. Drain tube outlet
G. 2" Air gap
H. Floor Drain
4. Use a carpenter's level to make sure the ice make is level
from front to back and side to side. If the ice maker is not
level, repeat steps 2 and 3. If the ice maker is level, go to the
“Connect Water Supply” section.
5
Page 6
Drain Connection
A
Gravity drain system
Connect the ice maker drain to your drain in accordance with the
International Plumbing Code and any local codes and
ordinances. The ice maker is provided with a gravity drain
system, follow these guidelines when installing drain lines. This
will help keep water from flowing back into the ice maker storage
bin and potentially flowing onto the floor causing water damage.
■ Drain lines must have a minimum of ⁵⁄₈" (15.88 mm) inside
diameter.
■ Drain lines must have a 1" drop per 48" (2.54 cm drop per
122 cm) of run or ¹⁄₄" drop per 12" (6.35 mm per 30.48 cm)
and must not have low points where water can settle.
■ The floor drains must be large enough to accommodate
drainage from all drains.
■ You must maintain a 2" (5.08 cm) air gap between the drain
tube outlet and the floor drain.
Connecting the Drain
After ensuring that the drain system is adequate, follow these
steps to properly place the ice maker:
WARNING
Normal Sounds
Your new ice maker may make sounds that are not familiar to
you. Because the sounds are new to you, you might be
concerned about them. Most of the new sounds are normal. Hard
surfaces, such as the floor, walls and cabinets, can make the
sounds seem louder than they actually are. The following
describes the kinds of sounds that might be new to you and what
may be making them.
■ When you first start the ice maker, you may hear water
running. The ice maker is programmed to fill the water
reservoir before it begins to make ice.
■ You will hear a buzzing sound when the water valve opens to
fill the water reservoir for each cycle.
■ Rattling noises may come from the flow of the refrigerant or
the water line. Items stored on top of the ice maker can also
make noises.
■ The high-efficiency compressor may make a pulsating or high
pitched sound.
■ Water running over the evaporator plate may make a
splashing sound.
■ Water running from the evaporator plate to the water reservoir
may make a splashing sound.
■ As each cycle ends, you may hear a gurgling sound due to
the refrigerant flowing in your ice maker.
■ You may hear air being forced over the condenser by the
condenser fan.
■ During the harvest cycle you may hear low popping sounds
as the ice drops into the bin.
Electrical Shock Hazard
Plug into a grounded 3 prong outlet.
Do not remove ground prong.
Do not use an adapter.
Do not use an extension cord.
Failure to follow these instructions can result in death,
fire, or electrical shock.
1. Plug in ice maker or reconnect power.
WARNING
Excessive Weight Hazard
Use two or more people to move and install ice maker.
Failure to do so can result in back or other injury.
2. Push the ice maker into position so that the ice maker drain
tube outlet is positioned over the floor drain.
3. Recheck the ice maker to be sure that it is level. See
“Leveling.”
4. If it is required by your local sanitation code, seal the cabinet
to the floor with an approved caulking compound after all
water and electrical connections have been made.
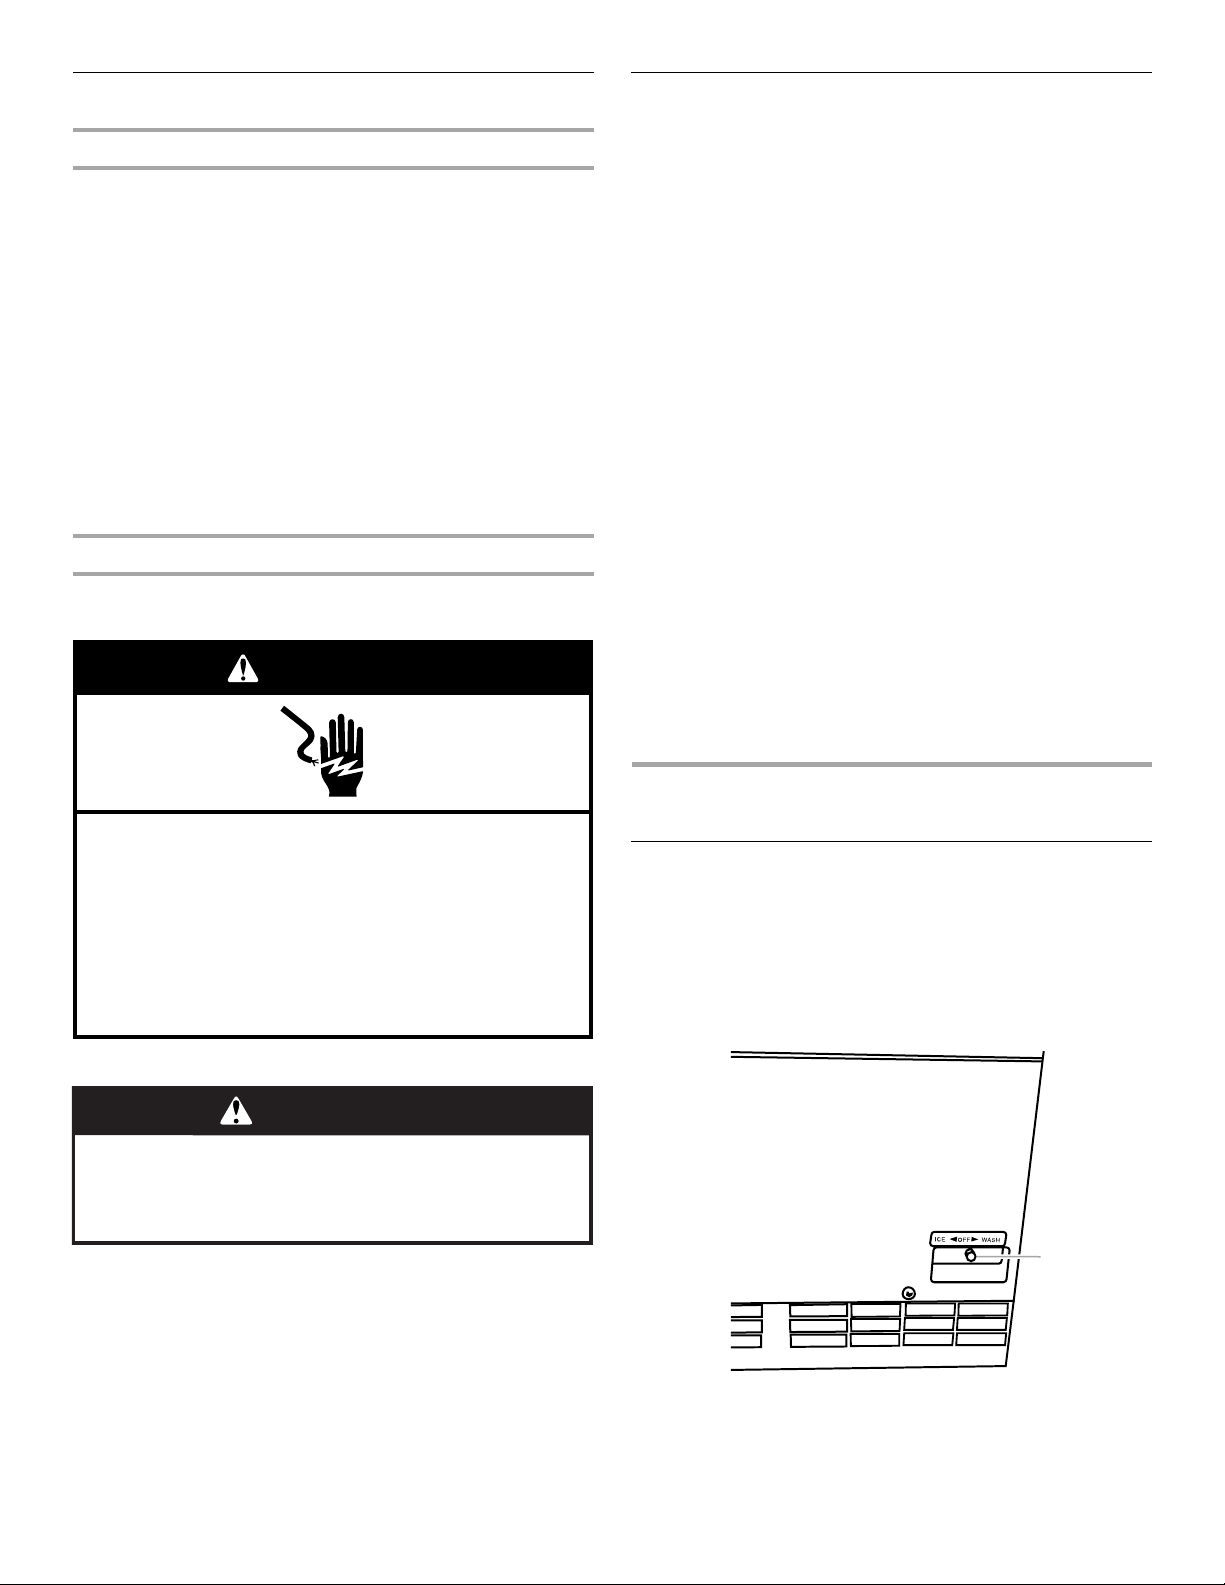
ICE MAKER USE
Using the Controls
The ice maker control is located on the bottom of the ice maker
just above the base grille. You must open the ice maker door to
access the control.
1. To start ice production, move the switch to ICE. Depending
on the air and water temperature, the ice maker will produce
the first batch of ice in less than 1 hour.
2. To stop ice maker operation, move the switch to OFF.
OFF
A. Control switch
NOTE: The WASH setting is used whenever solutions are
circulated through the ice maker for cleaning. Only the water
pump, water valve and fan motor are operating at this setting.
See “Cleaning.”
6
Page 7

ICE MAKER CARE
C
D
Cleaning
The ice making system and the air cooled condenser need to be
cleaned regularly for the ice maker to operate at peak efficiency
and to avoid premature failure of system components. See “Ice
Maker System” and “Condenser.”
Exterior Surfaces
Wash stainless steel exteriors with a clean sponge or soft cloth
and a mild detergent in warm water. Do not use abrasive or harsh
cleaners. Dry thoroughly with a soft cloth.
NOTE: To keep your Stainless Steel ice maker looking like new
and to remove minor scuffs or marks, it is suggested that you use
the manufacturer’s approved Stainless Steel Cleaner & Polish.
IMPORTANT: This cleaner is for Stainless Steel parts only!
Do not allow the Stainless Steel Cleaner & Polish to come into
contact with any plastic parts such as the trim pieces, dispenser
covers or door gaskets. If accidental contact does occur, clean
plastic part with a sponge and mild detergent in warm water. Dry
thoroughly with a soft cloth. To order the cleaner, see
“Accessories.”
Ice Maker System
Minerals that are removed from water during the freezing cycle
will eventually form a hard scaly deposit in the water system.
Cleaning the system regularly helps remove the mineral scale
buildup. How often you need to clean the system depends upon
how hard your water is. With hard water of 15 to 20 grains/gal.
(4 to 5 grains/liter), you may need to clean the system as often as
every 6 months.
NOTE: Use 4 oz (148 mL) of Outdoor Ice Maker Cleaner
(Part #4396736) mixed with 1 gal. (3.8 L) of warm (90°F to 95°F
[32°C to 35°C]) water to remove scaly deposit.
1. Move the control switch to the OFF position.
2. To remove the cubes that remain on the evaporator, turn the
ice machine on for approximately 3 minutes. The harvest
cycle will drop the cubes into the bin.
3. Move the switch to the OFF position.
4. Close the water supply line shutoff valve.
5. Remove the ice from the bin.
6. Disconnect the suction tube from the water tank. Squeeze
both plastic tabs to release the joint and pull the pipe clear.
A
B
A. Water Tank
B. Suction Tube
C. Drain
D. Joint
7. Remove the water tank and drain the water. To remove the
tank, spread the tabs on both sides to unlock and pull the
tank toward you.
8. Replace the water tank.
9. Slowly pour the diluted cleaning solution into the water tank.
10. Move the control switch to WASH.
11. Allow the ice maker to wash for approximately 15 minutes.
12. After the ice maker has washed, move the control switch to
the OFF position.
13. Remove the water tank and drain the cleaning solution.
14. Replace the water tank, and open the shutoff valve.
15. Move the control switch to WASH and allow to wash another
5 minutes to circulate clean water.
16. After 5 minutes, move the control switch to the OFF position,
then immediately move it to WASH and circulate clean water
for another 5 minutes. Repeat this procedure 3 times.
Sanitizing
After you have cleaned the water system, you should sanitize it
as well.
To sanitize the water system:
1. Make sure that the ice maker control switch is OFF and close
the water supply shutoff valve.
2. Remove the water tank and drain the water.
3. Replace the water tank.
4. Dilute 1 tbs (15 mL) of household bleach with 1 gal. (3.8 L) of
water.
5. Slowly pour the sanitizing solution into the water tank.
6. Move the control switch to WASH and allow the ice maker to
wash for 15 minutes.
7. Move the control switch to the OFF position, remove the
water tank and drain the sanitizing solution. Replace the
water tank.
8. Repeat steps 5 - 7 one time.
9. Open the shutoff valve and turn the control switch to WASH.
10. Allow the ice maker to rinse for 5 minutes. Move the control
switch to OFF, then immediately move it back to WASH.
Repeat this procedure 2 times to completely rinse the
machine.
11. Move the control switch to ICE to restart ice making.
7
Page 8
Condenser
A
C
D
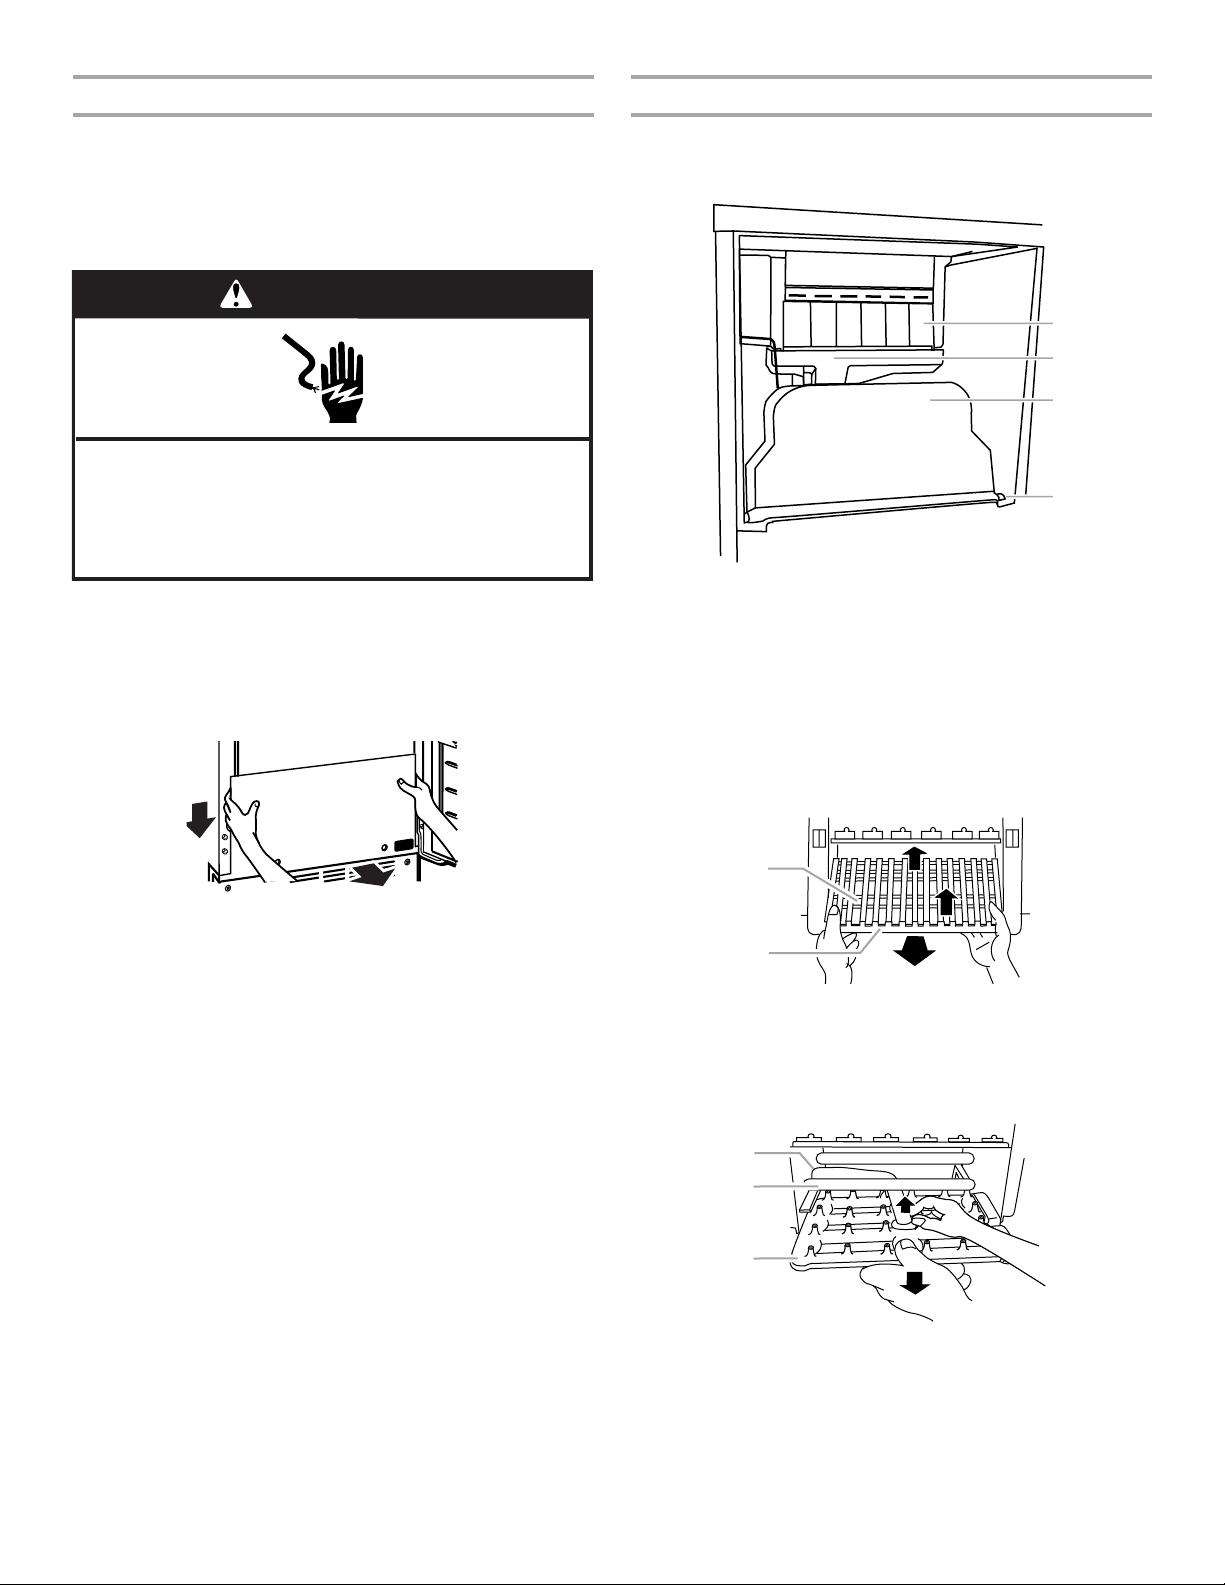
Interior Components
A dirty or clogged condenser:
■ Obstructs proper airflow.
■ Reduces ice making capacity.
■ Causes higher than recommended operating temperatures
which may lead to component failure.
WARNING
Electrical Shock Hazard
Disconnect power before cleaning.
Replace all parts and panels before operating.
Failure to do so can result in death or electrical shock.
1. Unplug ice maker or disconnect power.
2. Using a Phillips screwdriver, remove the two screws in the
lower access panel and the two screws from the base grille
area of the front panel support.
3. Pull out on the base grille then pull down on the panel to
remove.
1. Unplug ice maker or disconnect power.
2. Open the storage bin door and remove any ice that is in the
bin.
B
A. Separators
B. Water Tank
C. Slope
D. Shaft
3. Remove the slope by bending it in the center and releasing it
from the shafts.
4. Remove the water tank, and drain the water.
5. Remove the separators by lifting each separator up and
pushing back.
6. Lift off the ice chute from the rear and front frames.
4. Remove dirt and lint from the condenser fins and the unit
compartment with a brush attachment on a vacuum cleaner.
5. Replace the lower access panel using the two screws.
6. Plug in ice maker or reconnect power.
A
B
A. Frame Pipe
B. Ice Chute
7. Below the ice chute is the spray assembly. Pull the discharge
tube from the spray assembly and pull the assembly toward
you.
A
B
C
A. Discharge tube
B. Frame pipe
C. Spray assembly
8
Page 9

8. Remove the two caps from the side of the spray assembly.
A
B
A. Spray Nozzles
B. Caps
9. Wash the interior components with mild soap or detergent
and warm water. Rinse in clean water. Then clean the same
parts with a solution of 1 tbs (15 mL) of household bleach in
1 gal. (3.8 L) of warm water. Rinse again thoroughly in warm
water. If the nozzles on the spray assembly are clogged,
clean them with a wire brush.
10. Clean the scoop and inside of the ice bin.
11. Replace the caps on the spray assembly and slide it back
into place. Reattach the discharge tube.
12. Slide in the ice chute until it clicks into place.
13. Replace the water tank, separators and slope.
14. Plug in ice maker or reconnect power.
Winterizing
The ice maker must be shut down if temperatures drop below
45°F (7°C). Additionally, if temperatures drop below 32°F (0°C)
the water must be drained completely from the ice maker and all
water lines to avoid damage.
1. Remove the water tank and drain the water.
2. After the water has drained from the ice maker, close the
drain valve.
3. Before using again, clean the ice maker and storage bin.
4. Discard the first 3 batches of ice produced.
Vacation and Moving Care
WARNING
Electrical Shock Hazard
Disconnect power before servicing.
Replace all parts and panels before operating.
Failure to do so can result in death or electrical shock.
To shut down the ice maker:
1. Unplug ice maker or disconnect power.
2. Shut off the water supply and open the drain valve.
3. Remove all ice from storage bin.
4. Remove the water tank and drain the water.
5. After the water has drained from the ice maker, close the
drain valve.
6. Before using again, clean the ice maker and storage bin.
7. Discard the first 3 batches of ice produced.
NOTE: All components of the ice maker are permanently
lubricated at the factory. They should not require any additional
oiling throughout the normal life of the machine.
9
Page 10

TROUBLESHOOTING
Try the solutions suggested here first in order to avoid the cost of an unnecessary service call.
■ Is the condenser dirty? Dirt or lint may be blocking the
Ice Maker Operation
airflow through the condenser. See the “Condenser” section.
Ice maker does not run
WARNING
Electrical Shock Hazard
Plug into a grounded 3 prong outlet.
Do not remove ground prong.
Do not use an adapter.
Do not use an extension cord.
Failure to follow these instructions can result in death,
fire, or electrical shock.
■ Is the power cord plugged in? Plug into a grounded 3 prong
outlet.
■ Has a household fuse or circuit breaker tripped? Replace
the fuse or reset the circuit.
■ Is the temperature cooler than normal? Ambient
temperature must be above 45°F (7°C). Otherwise, bin
thermostat may sense cold ambient temperature and shut off
even though bin is not full of ice. Also, unit may not restart
once it does shut off.
■ Is the control set to ICE? Be sure that the control is set to
ICE.
Ice Production
Ice maker runs but produces no ice
■ Is the control set to ICE? Be sure that the control is set to
ICE.
■ Is the water supply connected? Make sure the water supply
is properly connected and turned on.
WARNING
Electrical Shock Hazard
Disconnect power before servicing.
Replace all parts and panels before operating.
Failure to do so can result in death or electrical shock.
■ Is there scale buildup in the ice maker? If there is white
scale buildup in the ice maker’s water or freezing system, you
should clean the ice maker. See the “Ice Maker System” and
the “Interior Components” sections.
■ Is there at least 15" (38.1 cm) clearance in front of the ice
maker? The ice maker must have at least 15" (38.1 cm) of
clearance in the front to operate properly.
■ Is the spray tube clogged? If the spray tube is clogged,
water cannot enter the ice making mechanism. Clean the
spray tube. See the “Interior Components” section.
Ice Quality
Taste in ice cubes
■ Is there unusually high mineral content in the water
supply? The water may need to be filtered or treated.
■ Are there food items stored in the ice bin? Do not store any
foods in the ice bin.
■ Were all the packaging materials removed? Make sure that
all packaging materials were removed at the time of
installation.
Ice maker runs but produces very little ice
■ Is the temperature hotter than normal? Ambient
temperatures of more than 100°F (37°C) will normally reduce
ice production.
10
Page 11

ASSISTANCE OR SERVICE
Before calling for assistance or service, please check
“Troubleshooting.” It may save you the cost of a service call. If
you still need help, follow the instructions below.
When calling, please know the purchase date and the complete
model and serial number of your appliance. This information will
help us to better respond to your request.
If you need replacement parts
If you need to order replacement parts, we recommend that you
only use factory specified parts. Factory specified parts will fit
right and work right because they are made with the same
precision used to build every new KITCHENAID
To locate factory specified parts in your area, call us or your
nearest designated service center.
In the U.S.A.
Call the KitchenAid Customer eXperience Center
toll free: 1-800-422-1230.
Our consultants provide assistance with:
■ Features and specifications on our full line of appliances.
■ Installation information.
■ Use and maintenance procedures.
■ Accessory and repair parts sales.
■ Specialized customer assistance (Spanish speaking, hearing
impaired, limited vision, etc.).
■ Referrals to local dealers, repair parts distributors, and
service companies. KitchenAid designated service
technicians are trained to fulfill the product warranty and
provide after-warranty service, anywhere in the United States.
To locate the KitchenAid designated service company in your
area, you can also look in your telephone directory Yellow
Pages.
®
appliance.
In Canada
Call the KitchenAid Canada Customer Interaction Centre toll free:
1-800-807-6777
Our consultants provide assistance with:
■ Use and maintenance procedures.
■ Accessory and repair parts sales.
■ Referrals to local dealers, repair parts distributors, and
services companies. KitchenAid Canada designated service
technicians are trained to fulfill the product warranty and
provide after-warranty service, anywhere in Canada.
For further assistance
If you need further assistance, you can write to KitchenAid
Canada with any questions or concerns at:
Customer Interaction Centre
KitchenAid Canada
1901 Minnesota Court
Mississauga, Ontario L5N 3A7
Please include a daytime phone number in your correspondence.
To order accessories, call 1-800-442-9991 and ask for the
appropriate part number listed below or contact your authorized
KitchenAid dealer. In Canada, call 1-800-807-6777.
Stainless Steel Cleaner & Polish
Order Part #4396095
Outdoor Ice Maker Cleaner
Order Part #4396736
.
Accessories
For further assistance
If you need further assistance, you can write to KitchenAid with
any questions or concerns at:
KitchenAid Brand Home Appliances
Customer eXperience Center
553 Benson Road
Benton Harbor, MI 49022-2692
Please include a daytime phone number in your correspondence.
11
Page 12

KITCHENAID® ICE MAKER WARRANTY
ONE YEAR LIMITED WARRANTY
For one year from the date of purchase, when this major appliance is operated and maintained according to instructions attached to or
furnished with the product in a residential setting, KitchenAid or KitchenAid Canada (hereafter “KitchenAid”) will pay for factory
specified parts and repair labor to correct defects in materials or workmanship. Service must be provided by a KitchenAid designated
service company.
SECOND THROUGH FIFTH YEAR LIMITED WARRANTY ON SEALED REFRIGERATION SYSTEM PARTS
In second through fifth years from the date of purchase, when this product is operated in a residential setting, and is maintained
according to the instructions furnished with the product, KitchenAid will pay for replacement parts and repair labor costs to correct
defects in materials or workmanship in the sealed refrigeration system. These parts are compressor, evaporator, condenser, dryer/
strainer, and connecting tubing. Service must be performed by a KitchenAid designated service company.
ITEMS KITCHENAID WILL NOT PAY FOR
1. Service calls to correct the installation of your major appliance, to instruct you how to use your major appliance, to replace or repair
house fuses or to correct house wiring or plumbing.
2. Service calls to repair or replace appliance light bulbs, air filters or water filters. Those consumable parts are excluded from warranty
coverage.
3. Repairs when your major appliance is used for other than normal, single-family household use.
4. Damage resulting from accident, alteration, misuse, abuse, fire, flood, acts of God, improper installation, installation not in
accordance with electrical or plumbing codes, or use of products not approved by KitchenAid.
5. Any food loss due to refrigerator or freezer product failures.
6. Replacement parts or repair labor costs for units operated outside the United States or Canada.
7. Pickup and delivery. This major appliance is designed to be repaired in the home.
8. Repairs to parts or systems resulting from unauthorized modifications made to the appliance.
9. Expenses for travel and transportation for product service in remote locations.
10. The removal and reinstallation of your appliance if it is installed in an inaccessible location or is not installed in accordance with
published installation instructions.
DISCLAIMER OF IMPLIED WARRANTIES; LIMITATION OF REMEDIES
CUSTOMER'S SOLE AND EXCLUSIVE REMEDY UNDER THIS LIMITED WARRANTY SHALL BE PRODUCT REPAIR AS PROVIDED
HEREIN. IMPLIED WARRANTIES, INCLUDING WARRANTIES OF MERCHANTABILITY OR FITNESS FOR A PARTICULAR PURPOSE,
ARE LIMITED TO ONE YEAR OR THE SHORTEST PERIOD ALLOWED BY LAW. KITCHENAID SHALL NOT BE LIABLE FOR
INCIDENTAL OR CONSEQUENTIAL DAMAGES. SOME STATES AND PROVINCES DO NOT ALLOW THE EXCLUSION OR LIMITATION
OF INCIDENTAL OR CONSEQUENTIAL DAMAGES, OR LIMITATIONS ON THE DURATION OF IMPLIED WARRANTIES OF
MERCHANTABILITY OR FITNESS, SO THESE EXCLUSIONS OR LIMITATIONS MAY NOT APPLY TO YOU. THIS WARRANTY GIVES
YOU SPECIFIC LEGAL RIGHTS AND YOU MAY ALSO HAVE OTHER RIGHTS, WHICH VARY FROM STATE TO STATE OR PROVINCE
TO PROVINCE.
Outside the 50 United States and Canada, this warranty does not apply. Contact your authorized KitchenAid dealer to determine if
another warranty applies.
If you need service, first see the “Troubleshooting” section of the Use & Care Guide. After checking “Troubleshooting,” additional help
can be found by checking the “Assistance or Service” section or by calling KitchenAid. In the U.S.A., call 1-800-422-1230. In Canada,
call 1-800-807-6777. 9/05
Keep this book and your sales slip together for future
reference. You must provide proof of purchase or installation
date for in-warranty service.
Write down the following information about your major appliance
to better help you obtain assistance or service if you ever need it.
You will need to know your complete model number and serial
number. You can find this information on the model and serial
number label located on the product.
Dealer name____________________________________________________
Address ________________________________________________________
Phone number __________________________________________________
Model number __________________________________________________
Serial number __________________________________________________
Purchase date __________________________________________________
12
Page 13

SÉCURITÉ DE LA MACHINE À GLAÇONS
Votre sécurité et celle des autres est très importante.
Nous donnons de nombreux messages de sécurité importants dans ce manuel et sur votre appareil ménager. Assurez-vous de
toujours lire tous les messages de sécurité et de vous y conformer.
Voici le symbole d’alerte de sécurité.
Ce symbole d’alerte de sécurité vous signale les dangers potentiels de décès et de blessures graves à vous
et à d’autres.
Tous les messages de sécurité suivront le symbole d’alerte de sécurité et le mot “DANGER” ou
“AVERTISSEMENT”. Ces mots signifient :
Risque possible de décès ou de blessure grave si vous ne
DANGER
AVERTISSEMENT
Tous les messages de sécurité vous diront quel est le danger potentiel et vous disent comment réduire le risque de blessure et
ce qui peut se produire en cas de non-respect des instructions.
IMPORTANTES INSTRUCTIONS DE SÉCURITÉ
AVERTISSEMENT :
de la machine à glaçons, il convient d'observer certaines précautions élémentaires :
■ Brancher sur une prise à 3 alvéoles reliée à la terre.
■ Ne pas enlever la broche de liaison à la terre.
■ Ne pas utiliser un adaptateur.
■ Ne pas utiliser un câble de rallonge.
■ Utiliser deux ou plus de personnes pour déplacer et
installer la machine à glaçons.
Pour réduire le risque d'incendie, de choc électrique ou de blessures lors de l'utilisation
suivez pas immédiatement les instructions.
Risque possible de décès ou de blessure grave si vous
ne suivez pas les instructions.
■ Déconnecter la source de courant électrique avant le
nettoyage.
■ Déconnecter la source de courant électrique avant
l'entretien.
■ Replacer pièces et panneaux avant de faire la remise
en marche.
CONSERVEZ CES INSTRUCTIONS
INSTRUCTIONS D’INSTALLATION
Déballage de la machine à glaçons
AVERTISSEMENT
Risque du poids excessif
Utiliser deux ou plus de personnes pour déplacer et
installer la machine à glaçons.
Le non-respect de cette instruction peut causer
une blessure au dos ou d'autre blessure.
Enlever les matériaux d'emballage
Enlever le ruban adhésif et la colle de votre machine à glaçons
avant de l'utiliser y compris le ruban qui maintient la porte
fermée. Enlever le sachet accessoire du bac de conservation des
glaçons.
La machine à glaçons est couverte d'un film protecteur. Enlever
complètement le film avant d'installer la machine à glaçons.
■ Pour enlever ce qui reste du ruban adhésif ou de la colle,
frotter la surface vivement avec le pouce. La colle ou l'adhésif
qui reste peut être facilement enlevé en frottant avec les
doigts et une petite quantité de savon liquide pour la vaisselle
sur l'adhésif. Rincer à l'eau tiède et essuyer.
■ Ne pas utiliser d'instrument coupant, d'alcool à friction, de
liquides inflammables ou de nettoyants abrasifs pour enlever
le ruban adhésif ou la colle. Ces produits peuvent
endommager la surface de votre machine à glaçons.
Nettoyage avant l'utilisation
Après avoir enlevé tous les matériaux d'emballage, nettoyer
l'intérieur de la machine à glaçons avant de l'utiliser. Voir les
instructions de nettoyage dans la section “Entretien de la
machine à glaçons”.
13
Page 14

Exigences d'emplacement
A
B
■ Pour assurer une bonne aération de votre appareil, l’avant
doit avoir au moins 15" (38,1 cm) de dégagement. Les autres
côtés et le dessus de l’appareil peuvent être dissimulés, mais
l’installation doit permettre de tirer la machine à glaçons vers
l’avant pour y faire les travaux d’entretien requis.
■ Pour installer la machine à glaçons, il faut avoir un tuyau
d’alimentation en eau froide de ¹⁄₄" (6,35 mm) de dia. ext. en
cuivre mou avec un robinet et un système de vidange par
gravité ou une pompe à condensat pour pousser l’eau vers
un drain existant.
■ Choisir un endroit bien aéré où la température est supérieure
à 45°F (7°C) et inférieure à 100°F (38°C). Pour tirer le meilleur
rendement de l’appareil, la température ambiante doit se
situer entre 70°F (21°C) et 90°F (32°C). Il est recommandé
d'installer à un endroit protégé contre les éléments, comme le
vent, la pluie, les embruns ou les gouttes.
■ Lorsque l’appareil est installé sous un comptoir, observer les
dimensions d’ouverture recommandées. Placer les
composants électriques et de plomberie dans la zone
recommandée sur l’illustration.
REMARQUE :
Il ne faut pas écraser ni pincer le cordon d’alimentation
électrique entre l’appareil et l’armoire.
Il ne faut pas écraser ni pincer la canalisation d'alimentation
en eau entre la machine à glaçons et le placard.
Il ne faut pas écraser ni pincer le tuyau d'évacuation (sur
certains modèles) entre la machine à glaçons et l'armoire.
25"
(63,5 cm)
34"
(86,4 cm)
Min.
1/2
34
"
(87,6 cm)
Max.
A. Zone recommandée pour les composants
électriques et de plomberie
B. Niveau du plancher
81/2"
(21,6 cm)
24"
(60,1 cm)
(38,1 cm)
15"
Spécifications électriques
AVERTISSEMENT
Risque de choc électrique
Brancher sur une prise à 3 alvéoles reliée à la terre.
Ne pas enlever la broche de liaison à la terre.
Ne pas utiliser un adaptateur.
Ne pas utiliser un câble de rallonge.
Le non-respect de ces instructions peut causer
un décès, un incendie ou un choc électrique.
Avant de déplacer la machine à glaçons à sa place définitive, il
faut s’assurer que le raccordement électrique a été fait
correctement.
Il faut un circuit d’alimentation électrique CA seulement de
115 volts, 60 Hz, de 15 ou 20 ampères, mis à la terre
conformément aux instructions du Code national de l’électricité
et des codes et règlements locaux.
Il est recommandé de réserver un circuit spécial à la machine à
glaçons. Utiliser une boîte où l’alimentation ne peut pas être
coupée à l’aide d’un commutateur ou d'un interrupteur à tirage.
IMPORTANT : Si ce produit est connecté à une prise protégée
par un disjoncteur de fuite à la terre, un déclenchement
intempestif peut se produire et causer une perte de
refroidissement. La qualité des glaçons peut en être affectée. Si
un déclenchement intempestif se produit et si les glaçons
semblent être de piètre qualité, jeter le tout.
Méthode de mise à la terre recommandée
Pour votre propre sécurité, cet appareil doit être mis à la terre.
L’appareil comporte un cordon d’alimentation électrique à trois
broches pour la mise à la terre. Pour minimiser les risques de
choc électrique, le cordon d’alimentation électrique doit être
branché sur une prise de courant murale de configuration
correspondante, à trois alvéoles, reliée à la terre conformément
au Code national de l’électricité et aux codes et règlements
locaux. S’il n’y a pas de prise de courant correspondante, il
incombe au client de faire installer une prise de courant murale à
trois alvéoles mise à la terre par un électricien qualifié.
■ Il est recommandé de choisir un emplacement où le plancher
est uniforme. Il est important que la machine à glaçons soit
d’aplomb pour bien fonctionner. Au besoin, il est possible de
régler la hauteur de la machine à glaçons en changeant la
position des pieds de nivellement avant et arrière. Voir la
section “Nivellement”.
■ Pour un meilleur fonctionnement et un meilleur rendement
énergétique, ne pas faire fonctionner l’appareil directement
sous les rayons solaires.
14
Page 15

Spécifications de l’alimentation en eau
G
Une alimentation en eau froide avec une pression entre 30 et
120 lb/po2 (207 et 827 kPa) est nécessaire pour faire fonctionner
la machine à glaçons. Si vous avez des questions au sujet de la
pression de votre eau, appeler un plombier qualifié agréé.
Alimentation en eau par osmose inverse
IMPORTANT : La pression de l'alimentation en eau entre le
système d'osmose inverse et la valve d'arrivée d'eau de la
machine à glaçons doit être entre 30 et 120 lb/po² (207 et
827 kPa).
Si un système de purification de l'eau par osmose inverse est
raccordé à votre alimentation en eau froide, la pression de l'eau
au système doit être d'un minimum de 40 à 60 lb/po² (276 à
414 kPa). Le système d'osmose inverse doit fournir 1 gal. (3,79 L)
d'eau par heure pour un fonctionnement correct de la machine à
glaçons.
Si la pression de l'eau au système d'osmose inverse est
inférieure à 40 à 60 lb/po
■ Vérifier si le filtre du système d'osmose inverse est bloqué et
le remplacer si nécessaire.
■ Laisser le réservoir du système d'osmose inverse se remplir
après une utilisation intense.
Si vous avez des questions au sujet de la pression de votre eau,
appeler un plombier qualifié agréé.
2
(276 à 414 kPa) :
Nivellement
Il est important que la machine à glaçons soit d'aplomb pour bien
fonctionner. Selon l'endroit où vous installez la machine à
glaçons, vous pourrez avoir à effectuer plusieurs ajustements
pour la mettre d'aplomb.
Outils requis
■ Niveau
Ajustement des pieds de nivellement
La machine à glaçons comporte 4 pieds de nivellement réglables
pour vous aider à stabiliser le produit et à vous assurer qu'il est
d'aplomb.
REMARQUE : Il sera plus facile d'ajuster les pieds de nivellement
avec l’aide d’une autre personne.
1. Placer un niveau sur le dessus du produit pour voir si la
machine à glaçons est d'aplomb d'avant en arrière et
transversalement.
2. Pousser vers le haut sur la partie avant de la machine à
glaçons pour repérer les pieds de nivellement qui se trouvent
sur le fond de l’appareil.
3. Changer la hauteur des pieds comme suit :
■ Tourner les pieds de nivellement vers la droite pour
abaisser ce côté de la machine à glaçons.
■ Tourner les pieds de nivellement vers la gauche pour
soulever ce côté de la machine à glaçons.
REMARQUE : La machine à glaçons ne devrait pas osciller.
Utiliser des cales pour accroître la stabilité au besoin.
4. Utiliser un niveau pour revérifier que la machine à glaçons est
bien d'aplomb d'avant en arrière et transversalement. Dans le
cas contraire, répéter les étapes 2 et 3. Si la machine est
d'aplomb, passer à la section “Raccordement à l'alimentation
en eau”.
Raccordement à l'alimentation en eau
IMPORTANT :
■ L'installation des circuits de plomberie doit être conforme aux
prescriptions du Code de plomberie international et de toute
réglementation locale.
■ Utiliser un tube en cuivre et vérifier s'il y a des fuites.
■ Installer seulement des tuyaux en cuivre là où les
températures resteront au-dessus du point de congélation.
■ Fermer le robinet d'arrêt lorsque la température de l'eau est
en dessous du point de congélation pour éviter
d'endommager la tuyauterie.
■ Ne pas faire fonctionner la machine à glaçons lorsque
l'alimentation en eau est fermée.
Raccordement de l'eau
Raccorder la machine à glaçons à l'alimentation en eau en
utilisant l'orifice d'entrée d'eau de ¹⁄₂" (1,3 cm) situé à l'arrière de
la machine à glaçons. S'assurer d'utiliser une alimentation en eau
potable. La canalisation d'alimentation en eau doit comporter un
robinet d'arrêt et un orifice de sortie de vidange installés.
A
B
C
D
E
F
H
A. Orifice d'entrée d'eau
B. Robinet d'arrêt
C. Robinet de vidange
D. Orifice de sortie de
vidange
E. Évent
F. Sortie du tube de
décharge
G. Espace d'air, 2"
H. Siphon de plancher
15
Page 16

Raccordement au conduit d'évacuation
1. Brancher la machine à glaçons ou reconnecter la source de
courant électrique.
Vidange par gravité
Il faut raccorder le tuyau de vidange à votre drain de vidange
conformément aux prescriptions du Code de plomberie
international et aux codes et règlements locaux. La machine à
glaçons est fournie avec un drain de vidange par gravité; suivre
les instructions ci-dessous lors de l'installation des tuyaux de
vidange. Ceci aidera à éviter l'eau d'être refoulée dans le bac
d'entreposage de la machine à glaçons et de couler sur le
plancher pouvant ainsi causer des dommages.
■ Les tuyaux de vidange doivent avoir au moins ⁵⁄₈" (15,88 mm)
de diamètre intérieur.
■ Les tuyaux de vidange doivent avoir une pente de 1" pour
chaque 48" (2,54 cm pour chaque 122 cm) de longueur ou
une pente de ¼" pour chaque 12" de longueur (6,35 mm/
30,48 cm) et ne comporter aucun point bas où l'eau pourrait
stagner.
■ Les drains de vidange de plancher doivent être suffisamment
grands pour recevoir l'eau de vidange provenant de toutes
sources.
■ Il faut maintenir un écart anti-retour de 2" (5,08 cm) entre le
tuyau de la pompe de vidange et le drain de plancher.
Raccordement du conduit d'évacuation
Après avoir vérifié que le système de vidange est adéquat, suivre
les instructions ci-dessous pour installer la machine à glaçons
correctement :
AVERTISSEMENT
Risque de choc électrique
Brancher sur une prise à 3 alvéoles reliée à la terre.
Ne pas enlever la broche de liaison à la terre.
Ne pas utiliser un adaptateur.
Ne pas utiliser un câble de rallonge.
Le non-respect de ces instructions peut causer
un décès, un incendie ou un choc électrique.
AVERTISSEMENT
Risque du poids excessif
Utiliser deux ou plus de personnes pour déplacer et
installer la machine à glaçons.
Le non-respect de cette instruction peut causer
une blessure au dos ou d'autre blessure.
2. Pousser la machine à glaçons à son emplacement de sorte
que le tuyau de vidange de la machine soit placé au-dessus
du drain de plancher.
3. Vérifier à nouveau la machine à glaçons pour s'assurer qu'elle
est bien d'aplomb. Voir la section “Nivellement”.
4. Si le code sanitaire local l'exige, sceller la machine sur le
plancher à l'aide d'un produit de calfeutrage approuvé une
fois que les raccordements d'eau et d'électricité ont été faits.
Sons normaux
Il est possible que votre nouvelle machine à glaçons émette des
bruits qui ne vous sont pas familiers. Comme ces bruits sont
nouveaux, ils peuvent vous inquiéter. La plupart de ces nouveaux
bruits sont normaux. Des surfaces dures comme le plancher, les
murs ou les armoires peuvent amplifier les bruits. Les
descriptions suivantes indiquent les différents bruits qui peuvent
être nouveaux pour vous et leur cause.
■ Lors de la mise en marche initiale de la machine à glaçons, il
est possible que vous entendiez l'eau couler. La machine à
glaçons est programmée pour remplir le réservoir d'eau avant
le début de la fabrication de glaçons.
■ Vous entendrez un bourdonnement lorsque la valve d'eau
s'ouvre pour remplir le réservoir d'eau pour chaque
programme.
■ Des cliquetis peuvent venir du débit du réfrigérant ou de la
canalisation d'eau. Les articles posés sur le dessus de la
machine à glaçons peuvent également faire du bruit.
■ Le compresseur à haute efficacité peut produire un son aigu
ou des pulsations.
■ L'eau coulant sur la plaque d'évaporation peut produire un
son d'éclaboussement.
■ L'eau coulant de la plaque d'évaporation au réservoir d'eau
peut produire un son d'éclaboussement.
■ À la fin de chaque programme, vous pouvez entendre un
gargouillement provenant du réfrigérant qui circule dans votre
machine à glaçons.
■ Vous pouvez entendre de l'air qui est transmis au condenseur
par le ventilateur du condenseur.
■ Lors du programme de collecte des glaçons, vous pouvez
entendre de faibles sons brefs lorsque les glaçons tombent
dans le bac.
16
Page 17

UTILISATION DE LA MACHINE À GLAÇONS
A
C
D
Utilisation des commandes
La commande de la machine à glaçons est située sur le fond de
l'appareil juste au-dessus de la grille de la base. Il faut ouvrir la
porte de la machine à glaçons pour accéder à la commande.
1. Pour mettre en marche la production de glaçons, placer le
commutateur sur ICE (glaçons). Selon la température de l'air
et de l'eau, la machine à glaçons produira le premier lot de
glaçons en moins d'une heure.
2. Pour arrêter le fonctionnement de la machine à glaçons,
tourner le commutateur à OFF (arrêt).
ENTRETIEN DE LA MACHINE À GLAÇONS
OFF
A. Interrupteur de commande
REMARQUE : Le réglage WASH (lavage) est utilisé lorsqu'on fait
circuler des solutions dans la machine à glaçons pour le
nettoyage. Seuls la pompe à eau, le robinet de prise d'eau et le
moteur du ventilateur fonctionnent à ce réglage. Voir
“Nettoyage”.
Nettoyage
Pour que la machine à glaçons fonctionne au niveau d'efficacité
maximum et pour que les composants du système ne subissent
pas de défaillance, on doit nettoyer régulièrement la machine et
le condenseur refroidi à l'air. Voir les sections “Machine à
glaçons” et “Condenseur”.
Surfaces externes
Nettoyer les surfaces externes d'acier inoxydable avec de l'eau
tiède contenant un détergent doux (utiliser une éponge ou un
chiffon doux propre). Ne pas utiliser de produit de nettoyage
abrasif ou énergique. Sécher parfaitement avec un chiffon doux.
REMARQUE : Pour entretenir l'aspect de produit neuf de la
machine à glaçons en acier inoxydable, et pour éliminer les
éraflures mineures, on suggère l'emploi du produit de nettoyage/
polissage de l'acier inoxydable recommandé par le fabricant.
IMPORTANT : Ce produit de nettoyage est à utiliser uniquement
sur les composants d'acier inoxydable!
Ne pas laisser le produit de nettoyage/polissage de l'acier
inoxydable entrer en contact avec des composants de plastique pièces de garniture, couvercle du distributeur ou joint de porte.
En cas de contact accidentel, nettoyer le composant de plastique
avec une éponge et de l'eau tiède contenant un détergent doux;
sécher parfaitement avec un chiffon doux. Pour la commande du
produit de nettoyage, voir la section “Accessoires”.
Système de production de glaçons
dureté de l'eau locale. Lorsque la dureté de l'eau est de 15 à
20 grains/gal. (4 à 5 grains/litre), il peut être nécessaire de
nettoyer le système à intervalles de 6 mois.
REMARQUE :Utiliser 4 oz (148 mL) du nettoyant pour l'extérieur
de la machine à glaçons (pièce n° 4396736) mélangés à 1 gal
(3,8 L) d'eau tiède (90°F à 95°F [32°C à 35°C]) pour éliminer le
dépôt de tartre.
1. Placer le bouton de commande à la position OFF (arrêt).
2. Pour enlever les glaçons qui restent dans l'évaporateur, faire
fonctionner la machine à glaçons pendant environ 3 minutes.
Les glaçons tomberont dans le bac durant l'étape de récolte.
3. Placer le commutateur à la position OFF (arrêt).
4. Fermer le robinet d'arrêt de la canalisation d'arrivée d'eau.
5. Retirer les glaçons du bac.
6. Déconnecter le tube d'aspiration du réservoir d'eau. Presser
les deux languettes en plastique pour libérer le joint et
dégager le tuyau.
A
B
Les composés minéraux qui se séparent de l'eau à l'occasion de
la congélation s'accumuleront pour former finalement un dépôt
de tartre dur dans le système de circulation de l'eau. Pour
éliminer ces accumulations, on doit nettoyer régulièrement le
circuit. La fréquence de nettoyage nécessaire dépendra de la
A Reservoir d'eau
B. Tube d'aspiration
C. Drain
D. Joint
17
Page 18

7. Retirer le réservoir d'eau et vider l'eau. Pour retirer le
réservoir, écarter les pattes des deux côtés pour déverrouiller,
puis tirer le réservoir vers soi.
7. Placer le bouton de commande à la position OFF (arrêt),
retirer le réservoir d'eau et vider la solution de désinfection.
Réinstaller le réservoir d'eau.
8. Répéter une fois les étapes 5 à 7.
9. Ouvrir le robinet d'arrêt de la canalisation d'arrivée d'eau et
placer le bouton de commande à la position WASH (lavage).
10. Laisser la machine à glaçons effectuer une opération de
rinçage pendant 5 minutes. Placer le bouton de commande à
la position OFF (arrêt), puis immédiatement à la position
WASH (lavage). Répéter ce processus 2 fois pour le rinçage
total du circuit.
11. Placer le bouton de commande à la position ICE (production
de glaçons) pour la reprise de la production de glaçons.
8. Réinstaller le réservoir d'eau.
9. Verser lentement la solution de nettoyage diluée dans le
réservoir d'eau.
10. Placer le bouton de commande à la position WASH (lavage).
11. Laisser le processus de lavage de la machine à glaçons se
dérouler pendant environ 15 minutes.
12. Après le lavage de la machine à glaçons, placer le bouton de
commande à la position OFF (arrêt).
13. Retirer le réservoir d'eau et vider la solution de nettoyage.
14. Réinstaller le réservoir d'eau, et ouvrir le robinet d'arrêt de la
canalisation d'eau.
15. Placer le bouton de commande à la position WASH (lavage)
et laisser le système effectuer une autre opération de lavage
de 5 minutes avec circulation d'eau propre.
16. Après 5 minutes, placer le bouton de commande à la position
OFF (arrêt) puis immédiatement à la position WASH (lavage),
et laisser l'eau propre circuler encore pendant 5 minutes.
Répéter ce processus 3 fois.
Désinfection
Après avoir nettoyé le circuit d'eau avec un produit de détartrage,
on doit également exécuter une opération de désinfection du
circuit.
Désinfection du circuit :
1. Vérifier que le bouton de commande de la machine à glaçons
est à la position OFF (arrêt), et fermer le robinet d'arrêt de la
canalisation d'arrivée d'eau.
2. Retirer le réservoir d'eau et vider l'eau.
3. Remettre le réservoir d'eau en place.
4. Diluer 1 c. à soupe (15 mL) d'eau de Javel dans 1 gal. (3,8 L)
d'eau.
5. Verser lentement la solution de désinfection dans le réservoir
d'eau.
6. Placer le bouton de commande à la position WASH (lavage),
et laisser la solution de désinfection circuler pendant
15 minutes.
Condenseur
Si le condenseur est souillé ou encrassé :
■ La circulation d'air est déficiente.
■ La capacité de génération de glaçons est réduite.
■ La température de fonctionnement de la machine à glaçons
est plus élevée, et ceci peut conduire à une défaillance de
composants.
AVERTISSEMENT
Risque de choc électrique
Déconnecter la source de courant électrique avant le
nettoyage.
Replacer pièces et panneaux avant de faire la remise
en marche.
Le non-respect de ces instructions peut causer
un décès ou un choc électrique.
1. Débrancher la machine à glaçons ou déconnecter la source
de courant électrique.
2. Avec un tournevis Phillips, ôter les deux vis fixant le panneau
de l'ouverture d'accès inférieure, et les deux vis de la zone de
la grille de la base sur le support du panneau avant.
3. Écarter la grille de la base, puis tirer sur le panneau vers le
bas pour l'enlever.
18
4. Enlever les souillures et autres débris accumulés sur les
lames de l'échangeur de chaleur et dans le compartiment du
module - utiliser un aspirateur muni de son suceur à brosse.
5. Réinstaller le panneau de l'ouverture d'accès inférieure - fixer
le panneau avec les deux vis.
6. Brancher la machine à glaçons ou reconnecter la source de
courant électrique.
Page 19

Composants internes
A
C
D
A
B
1. Débrancher la machine à glaçons ou déconnecter la source
de courant électrique.
2. Ouvrir la porte du bac d'entreposage, et enlever tous les
glaçons qui s'y trouvent.
3. Enlever le volet de protection - faire fléchir légèrement le volet
au centre pour dégager les extrémités des pitons de
pivotement.
B
7. L'ensemble de vaporisation se trouve sous la goulotte à
glaçons. Tirer pour séparer le tube de décharge de
l'ensemble de vaporisation d'eau; on doit ensuite tirer
l'ensemble vers soi.
A
B
C
A. Tube de décharge
B. Châssis
C. Ensemble de vaporisation d'eau
8. Enlever les deux embouts sur les côtés de l'ensemble de
vaporisation d'eau.
A. Séparateurs
B. Réservoir d'eau
C. Volet de protection
D. Pitons de pivotement
4. Retirer le réservoir d'eau et vider l'eau.
5. Enlever les séparateurs : soulever chaque séparateur et
pousser vers l'arrière.
6. Soulever la goulotte à glace pour la séparer des parties avant
et arrière du châssis.
A
B
A. Châssis
B. Goulotte à glace
A. Buses de vaporisation
B. Embout
9. Laver les composants internes avec de l'eau tiède contenant
un détergent ou savon doux. Rincer avec de l'eau propre.
Désinfecter ensuite les mêmes composants avec une
solution de 1 c. à soupe (15 mL) d'eau de Javel dans 1 gal.
(3,8 L) d'eau tiède. Rincer de nouveau parfaitement avec de
l'eau tiède. Si les buses de vaporisation d'eau sont
obstruées, on doit les nettoyer avec un goupillon métallique.
10. Nettoyer la pelle de prélèvement des glaçons et l'intérieur du
bac à glaçons.
11. Réinstaller les embouts sur l'ensemble de vaporisation d'eau;
effectuer la remise en place. Reconnecter le tube de
décharge.
12. Insérer la goulotte à glaçons - on doit percevoir un déclic lors
de la mise en place.
13. Réinstaller le réservoir d'eau, les séparateurs et le volet de
protection.
14. Brancher la machine à glaçons ou reconnecter la source de
courant électrique.
19
Page 20

Précautions à prendre pour les vacances et
avant un déménagement
AVERTISSEMENT
Risque de choc électrique
Déconnecter la source de courant électrique avant
l'entretien.
Replacer pièces et panneaux avant de faire la remise
en marche.
Le non-respect de ces instructions peut causer
un décès ou un choc électrique.
Arrêt de la machine à glaçons :
1. Débrancher la machine à glaçons ou déconnecter la source
de courant électrique.
2. Fermer l'alimentation en eau et ouvrir le robinet de vidange.
3. Enlever tous les glaçons du bac d'entreposage.
4. Enlever le réservoir d'eau et vider l'eau.
5. Une fois que l'eau est vidée de la machine à glaçons, fermer
le robinet de vidange.
6. Avant d'utiliser l'appareil de nouveau, nettoyer la machine à
glaçons et le bac à glaçons.
7. Jeter les 3 premières quantités de glaçons produites.
REMARQUE : Tous les composants de la machine à glaçons ont
reçu une lubrification permanente à l'usine. Aucune autre
lubrification ne devrait être nécessaire pendant toute la durée de
vie normale de la machine.
Préparation pour l'hiver
La machine à glaçons doit être éteinte si les températures
descendent au-dessous de 45°F (7°C). De plus, si les
températures descendent en-dessous de 32°F (0°C), l'eau doit
être vidée complètement de la machine à glaçons et de toutes les
canalisations d'eau pour éviter tout endommagement.
1. Enlever le réservoir d'eau et vider l'eau.
2. Une fois que l'eau est vidée de la machine à glaçons, fermer
le robinet de vidange.
3. Avant d'utiliser l'appareil de nouveau, nettoyer la machine à
glaçons et le bac à glaçons.
4. Jeter les 3 premières quantités de glaçons produites.
20
Page 21

DÉPANNAGE
Essayer les solutions suggérées ici d'abord afin d'éviter le coût d'une visite de service non nécessaire.
Fonctionnement de la machine à glaçons
La machine à glaçons ne fonctionne pas
AVERTISSEMENT
Risque de choc électrique
Brancher sur une prise à 3 alvéoles reliée à la terre.
Ne pas enlever la broche de liaison à la terre.
Ne pas utiliser un adaptateur.
Ne pas utiliser un câble de rallonge.
Le non-respect de ces instructions peut causer
un décès, un incendie ou un choc électrique.
■ Le cordon d'alimentation est-il branché? Brancher sur une
prise reliée à la terre (à trois alvéoles).
■ Un fusible est-il grillé ou un disjoncteur s'est-il ouvert?
Remplacer le fusible ou remettre le disjoncteur en fonction.
■ La température est-elle plus basse que d'habitude? La
température ambiante doit être supérieure à 45°F (7°C).
Sinon, le thermostat du bac peut détecter une température
ambiante basse et s'arrêter même si le bac n'est pas plein de
glaçons. L'appareil peut aussi ne pas se remettre en marche
une fois éteint.
■ La commande est-elle réglée sur ICE (glaçons)? S'assurer
que la commande est réglée à ICE (glaçons).
Production de glaçons
La machine à glaçons fonctionne mais ne produit pas de
glaçons
La machine à glaçons fonctionne mais produit très peu
de glaçons
■ La température est-elle plus élevée que d'habitude? Les
températures ambiantes supérieures à 100°F (37°C) réduiront
normalement la production de glaçons.
AVERTISSEMENT
Risque de choc électrique
Déconnecter la source de courant électrique avant
l'entretien.
Replacer pièces et panneaux avant de faire la remise
en marche.
Le non-respect de ces instructions peut causer
un décès ou un choc électrique.
■ Le condensateur est-il sale? De la saleté ou de la charpie
peut bloquer le débit d'air passant dans le condensateur. Voir
la section “Condensateur”.
■ Y a-t-il une accumulation de tartre dans la machine à
glaçons? S'il y a une accumulation blanche de tartre dans le
système d'eau ou de congélation de la machine à glaçons, il
faut nettoyer l'appareil. Voir les sections “Système de la
machine à glaçons” et “Composants internes”.
■ Y a-t-il un espace d'au moins 15" (38,1 cm) devant la
machine à glaçons? La machine à glaçons doit avoir un
espace d'au moins 15" (38,1 cm) à l'avant pour fonctionner
correctement.
■ Le vaporisateur est-il obstrué? Si le vaporisateur est
obstrué, l'eau ne peut pas entrer dans le mécanisme de
fabrication de glaçons. Nettoyer le vaporisateur. Voir la
section “Composants internes”.
■ La commande est-elle réglée sur ICE (glaçons)? S'assurer
que la commande est réglée sur ICE (glaçons).
■ L'alimentation en eau est-elle raccordée? S'assurer que
l'alimentation en eau est correctement reliée et branchée.
Qualité des glaçons
Les glaçons ont un goût
■ Y a-t-il un contenu de minéraux anormalement élevé dans
l'alimentation en eau? L'eau peut avoir besoin d'être filtrée
ou traitée.
■ Y a-t-il des aliments dans le bac à glaçons? Ne pas
conserver d'aliment dans le bac à glaçons.
■ Tous les matériaux d'emballage ont-ils été enlevés?
S'assurer que tous les matériaux d'emballage ont été enlevés
au moment de l'installation.
21
Page 22

ASSISTANCE OU SERVICE
Avant de demander une assistance ou un service, veuillez vérifier
la section “Dépannage”. Cette vérification peut vous faire
économiser le coût d’une visite de réparation. Si vous avez
encore besoin d’aide, suivre les instructions ci-dessous.
Lors d’un appel, veuillez connaître la date d’achat et les numéros
au complet de modèle et de série de votre appareil. Ces
renseignements nous aideront à mieux répondre à votre
demande.
Si vous avez besoin de pièces de rechange
Si vous avez besoin de commander des pièces de rechange,
nous vous recommandons d’utiliser seulement des pièces
spécifiées par l'usine. Les pièces spécifiées par l'usine
conviendront bien et fonctionneront bien parce qu’elles sont
fabriquées selon les mêmes spécifications précises utilisées pour
construire chaque nouvel appareil KITCHENAID
Pour localiser des pièces spécifiées par l'usine dans votre
région, téléphoner au centre de service désigné le plus proche.
Téléphoner sans frais au Centre d’interaction avec la clientèle de
KitchenAid Canada LP au 1-800-807-6777.
Nos consultants fournissent l’assistance pour :
■ Procédés d’utilisation et d’entretien.
■ Vente d’accessoires et de pièces de rechange.
■ Les références aux concessionnaires, compagnies de service
de réparation et distributeurs de pièces de rechange locaux.
Les techniciens de service désignés par KitchenAid Canada
sont formés pour remplir la garantie des produits et fournir un
service après la garantie, partout au Canada.
®
.
Pour plus d’assistance
Si vous avez besoin de plus d’assistance, vous pouvez écrire à
KitchenAid Canada en soumettant toute question ou
problème au :
Centre d'interaction avec la clientèle
KitchenAid Canada
1901 Minnesota Court
Mississauga, Ontario L5N 3A7
Dans votre correspondance, veuillez indiquer un numéro de
téléphone où on peut vous joindre dans la journée.
Accessoires
Pour commander des accessoires, composez le 1-800-442-9991
et demandez le numéro de pièce approprié mentionné cidessous ou contactez votre marchand autorisé KitchenAid. Au
Canada, composez le 1-800-807-6777.
Nettoyant et poli pour acier inoxydable
Commandez le n° de pièce 4396095
Nettoyant por machine à glaçons d’extérieur
Commandez le n° de pièce 4396736
22
Page 23

GARANTIE DE LA MACHINE À GLAÇONS KITCHENAID®
GARANTIE LIMITÉE DE UN AN
Pendant un an à compter de la date d'achat, lorsque ce gros appareil ménager est utilisé et entretenu conformément aux instructions
jointes à ou fournies avec le produit, dans un contexte résidentiel, KitchenAid ou KitchenAid Canada (ci-après désignées “KitchenAid”)
paiera pour les pièces spécifiées par l'usine et la main-d'œuvre pour corriger les vices de matériaux ou de fabrication. Le service doit
être fourni par une compagnie de service désignée par KitchenAid.
GARANTIE LIMITÉE DE LA DEUXIÈME À LA CINQUIÈME ANNÉE INCLUSIVEMENT SUR
De la deuxième à la cinquième année inclusivement à compter de la date d'achat, lorsque ce produit est utilisé dans un contexte
résidentiel, et entretenu conformément aux instructions fournies avec le produit, KitchenAid paiera pour les pièces de rechange et la
main-d'œuvre pour la correction des vices de matériaux ou de fabrication sur le système de réfrigération scellé. Ces pièces
comprennent : compresseur, évaporateur, condenseur, séchoir/grille et conduits de connexion. Le service doit être exécuté par une
compagnie de service désignée par KitchenAid.
1. Les visites de service pour rectifier l'installation du gros appareil ménager, montrer à l'utilisateur comment utiliser l'appareil,
remplacer ou réparer des fusibles ou rectifier le câblage ou la plomberie du domicile.
2. Les visites de service pour réparer ou remplacer les ampoules électriques de l'appareil, les filtres à air ou les filtres à eau. Ces
pièces consomptibles ne sont pas couvertes par la garantie.
3. Les réparations lorsque le gros appareil ménager est utilisé à des fins autres que l’usage unifamilial normal.
4. Les dommages imputables à : accident, modification, usage impropre ou abusif, incendie, inondation, actes de Dieu, installation
fautive ou installation non conforme aux codes d'électricité ou de plomberie, ou l'utilisation de produits non approuvés par
KitchenAid.
5. Toute perte d'aliments due à une défaillance du réfrigérateur ou du congélateur.
6. Le coût des pièces de rechange et de la main-d'œuvre pour les appareils utilisés hors des États-Unis ou du Canada.
7. Le ramassage et la livraison. Ce gros appareil ménager est conçu pour être réparé à domicile.
8. Les réparations aux pièces ou systèmes résultant d'une modification non autorisée faite à l'appareil.
9. Les frais de voyage ou de transport pour le service d'un produit dans les régions éloignées.
10. La dépose et la réinstallation de votre appareil si celui-ci est installé dans un endroit inaccessible ou n'est pas installé
conformément aux instructions d'installation fournies.
CLAUSE D'EXONÉRATION DE RESPONSABILITÉ AU TITRE DES GARANTIES IMPLICITES; LIMITATION DES RECOURS
LE SEUL ET EXCLUSIF RECOURS DU CLIENT DANS LE CADRE DE LA PRÉSENTE GARANTIE LIMITÉE CONSISTE EN LA
RÉPARATION PRÉVUE CI-DESSUS. LES GARANTIES IMPLICITES, Y COMPRIS LES GARANTIES APPLICABLES DE QUALITÉ
MARCHANDE ET D'APTITUDE À UN USAGE PARTICULIER, SONT LIMITÉES À UN AN OU À LA PLUS COURTE PÉRIODE AUTORISÉE
PAR LA LOI. KITCHENAID N'ASSUME AUCUNE RESPONSABILITÉ POUR LES DOMMAGES FORTUITS OU INDIRECTS. CERTAINES
JURIDICTIONS NE PERMETTENT PAS L'EXCLUSION OU LA LIMITATION DES DOMMAGES FORTUITS OU INDIRECTS, OU LES
LIMITATIONS DE LA DURÉE DES GARANTIES IMPLICITES DE QUALITÉ MARCHANDE OU D'APTITUDE À UN USAGE PARTICULIER,
DE SORTE QUE CES EXCLUSIONS OU LIMITATIONS PEUVENT NE PAS S'APPLIQUER DANS VOTRE CAS. CETTE GARANTIE VOUS
CONFÈRE DES DROITS JURIDIQUES SPÉCIFIQUES ET VOUS POUVEZ ÉGALEMENT JOUIR D'AUTRES DROITS QUI PEUVENT
VARIER D'UNE JURIDICTION À UNE AUTRE.
À l'extérieur du Canada et des 50 États des États-Unis, cette garantie ne s'applique pas. Contacter votre marchand KitchenAid autorisé
pour déterminer si une autre garantie s'applique.
Si vous avez besoin de service, voir d'abord la section “Dépannage” du Guide d'utilisation et d'entretien. Après avoir vérifié la section
“Dépannage”, de l'aide supplémentaire peut être trouvée en vérifiant la section “Assistance ou service” ou en appelant KitchenAid. Aux
É.-U., composer le 1-800-422-1230. Au Canada, composer le 1-800-807-6777. 9/05
LESPIÈCESDUSYSTÈMEDERÉFRIGÉRATIONSCELLÉ
KITCHENAID NE PRENDRA PAS EN CHARGE
Conservez ce manuel et votre reçu de vente ensemble pour
référence ultérieure. Pour le service sous garantie, vous
devez présenter un document prouvant la date d'achat ou
d'installation.
Inscrivez les renseignements suivants au sujet de votre gros
appareil ménager pour mieux vous aider à obtenir assistance ou
service en cas de besoin. Vous devrez connaître le numéro de
modèle et le numéro de série au complet. Vous trouverez ces
renseignements sur la plaque signalétique située sur le produit.
Nom du marchand ______________________________________________
Adresse ________________________________________________________
Numéro de téléphone ___________________________________________
Numéro de modèle______________________________________________
Numéro de série ________________________________________________
Date d’achat____________________________________________________
23
Page 24

91A1VL11A/2225453B
©
2007. All rights reserved.
Tous droits réservés.
® Marque déposée/TM Marque de commerce de KitchenAid, U.S.A., Emploi sous licence par KitchenAid Canada au Canada
® Registered Trademark/TM Trademark of KitchenAid, U.S.A., KitchenAid Canada licensee in Canada
Printed in U.S.A.
Imprimé aux É.-U.
7/07
 Loading...