

KitchenAid KSCS25FKSS01, KSCS25FKWH02 Installation Guide

Kitchen_kid ®
INSTALLATION INSTRUCTIONS
IMPORTANT: READ AND SAVE THESE INSTRUCTIONS. INSTALLATION REQUIRES 2 OR MORE PEOPLE.
INSTRUCTIONS D'INSTALLATION
IMPORTANT : LIRE ET CONSERVER CES INSTRUCTIONS.
L'INSTALLATION NI2CESSITE L'INTERVENTION DE 2 PERSONNES OU PLUS.
Table of Contents/Table des matieres ....................................................... 2
2221514A
TABLE OF CONTENTS
TABLE DES MATIERES
REFRIGERATOR SAFETY .......................................................... 2
INSTALLATION REQUIREMENTS ................................................ 3
Tools and Parts ............................................................................ 3
Product Dimensions ..................................................................... 3
Door and Side Panels .................................................................. 4
Location Requirements ................................................................ 5
Electrical Requirements ............................................................... 6
Water Supply Requirements ........................................................ 6
INSTALLATION INSTRUCTIONS .................................................. 6
Unpack Refrigerator ..................................................................... 6
Install New Water Line ................................................................. 6
Water Supply Connection ............................................................ 7
Plug in Refrigerator ...................................................................... 7
Level Refrigerator ......................................................................... 7
Replace Base Grille ...................................................................... 8
Complete Installation ................................................................... 8
ASSISTANCE OR SERVICE ........................................................... 8
SI_CURITI_ DU RI_FRIGCRATEUR ............................................. 9
EXIGENCES D'INSTALLATION ..................................................... 9
Outillage et pieces necessaires ................................................... 9
Dimensions du produit ................................................................. 9
Panneaux lat6raux et de porte ................................................... 11
Emplacement d'installation ........................................................ 12
Sp6cifications electriques .......................................................... 12
Sp6cifications de I'alimentation en eau ..................................... 12
INSTRUCTIONS B'INSTALLATION ............................................. 13
Deballage du refrig_rateur .......................................................... 13
Installation d'une nouvelle canalisation d'eau ........................... 13
Raccordement a I'alimentation en eau ...................................... 14
Brancher le refrigerateur ............................................................. 14
Nivellement du r6frig6rateur ....................................................... 14
Reinstallation de la grille de la base ........................................... 15
Achever I'installation .................................................................. 15
ASSISTANCE OU SERVICE ........................................................ 15
REFRIGERATOR SAFETY
Your safety and the safety of others are very important.
We have provided many important safety messages in this manual and on your appliance. Always read and obey all
safety messages.
This symbol alerts you to potential hazards that can kill or hurt you and others.
All safety messages will follow the safety alert symbol and either the word "DANGER" or
This is the safety alert symbol.
"WARNING." These words mean:
You can be killed or seriously injured if you don't
immediately follow instructions.
You can be killed or seriously injured if you don't
follow instructions.
All safety messages will tell you what the potential hazard is, tell you how to reduce the chance of injury, and tell you
what can happen if the instructions are not followed.
INSTALLATION
REQUIREMENTS
IMPORTANT:
• Observe all governing codes and ordinances.
• Installer: Leave Installation Instructions with homeowner.
• Homeowner: Keep Installation Instructions for future
reference and for the local electrical inspector's use.
• Keep cardboard shipping piece or plywood under
refrigerator until it is installed in the operating position.
• Comply with installation specifications and dimensions.
• Remove any moldings or decorative panels that prevent
the refrigerator from being serviced.
• Contact a qualified electrical installer.
Tools needed:
Make sure that you have the tools necessary for proper
installation:
• Hand drill or electric drill • 7/16in. and 1/2in. open-end
(properly grounded) wrenches
• 1/4in, nut driver and • Two adjustable wrenches
drill bit
• Flat-blade screwdriver • Socket wrench
Parts needed:
• Your refrigerator dealer has a kit available with a 1/4in.
(6.35 mm) saddle-type shutoff valve, a union, and copper
tubing.
• Or you can purchase a 1/4in. (6.35 mm) copper tubing with
shutoff valve and a 1/4in. (6.35 mm) compression fitting
(coupling).
• Depending on water line connections, you may also need
a 1/4in. (6.35 mm) nut and 1/4in. (6.35 mm) ferrule.
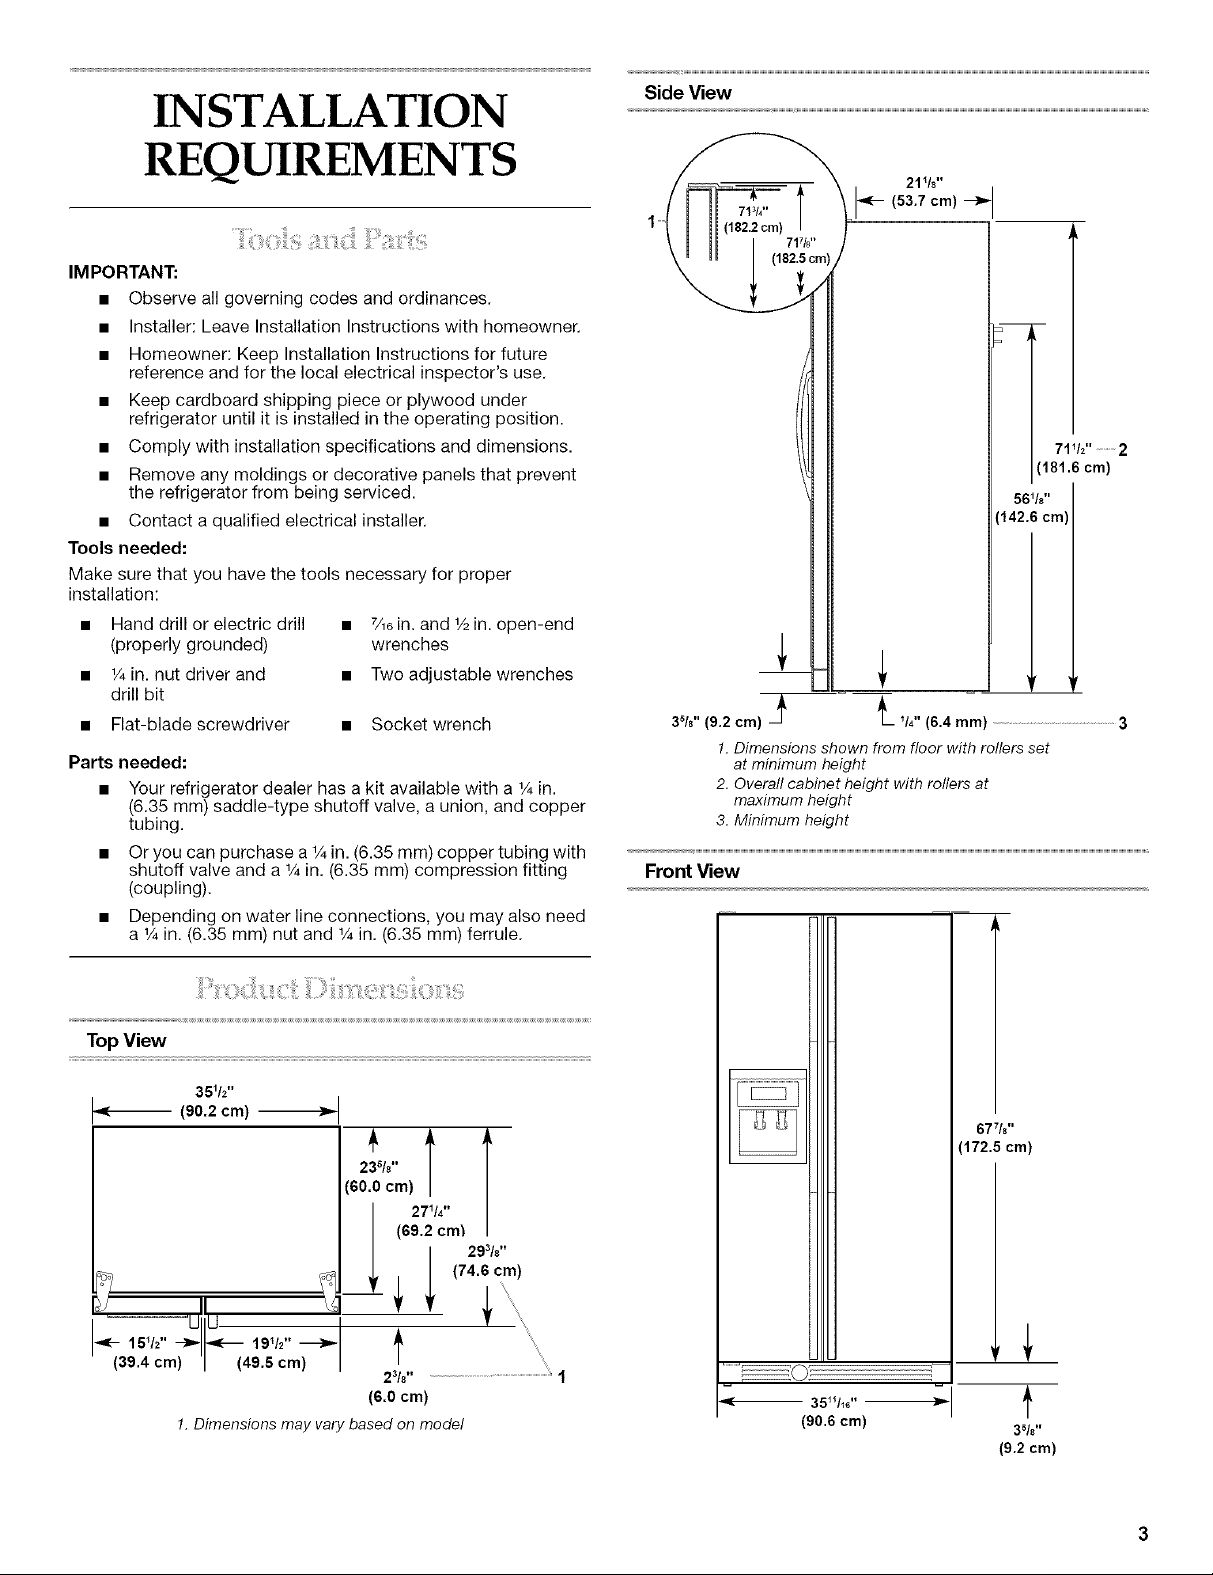
Side View
= 5t (181.6,_,,711/2"2cm)
(142 cm
1
3°/8,,19.2cml2 t ,/.,,16.4r.r.) ..........................................................3
1.Dimensions shown from floor with rollersset
at minimum height
2. Overaflcabinet height with rollers at
maximum height
3. Minimum height
Front View
m
Top View
35112"
(90.2 cm)
•_- 15_/2"-_-I[.,_-- 19112"
(39.4 cm) I (49.5 cm)
1. Dimensionsmay vary based on model
23/8......................................................1
(S.0cm)
677/8''
(172.5cm)
R
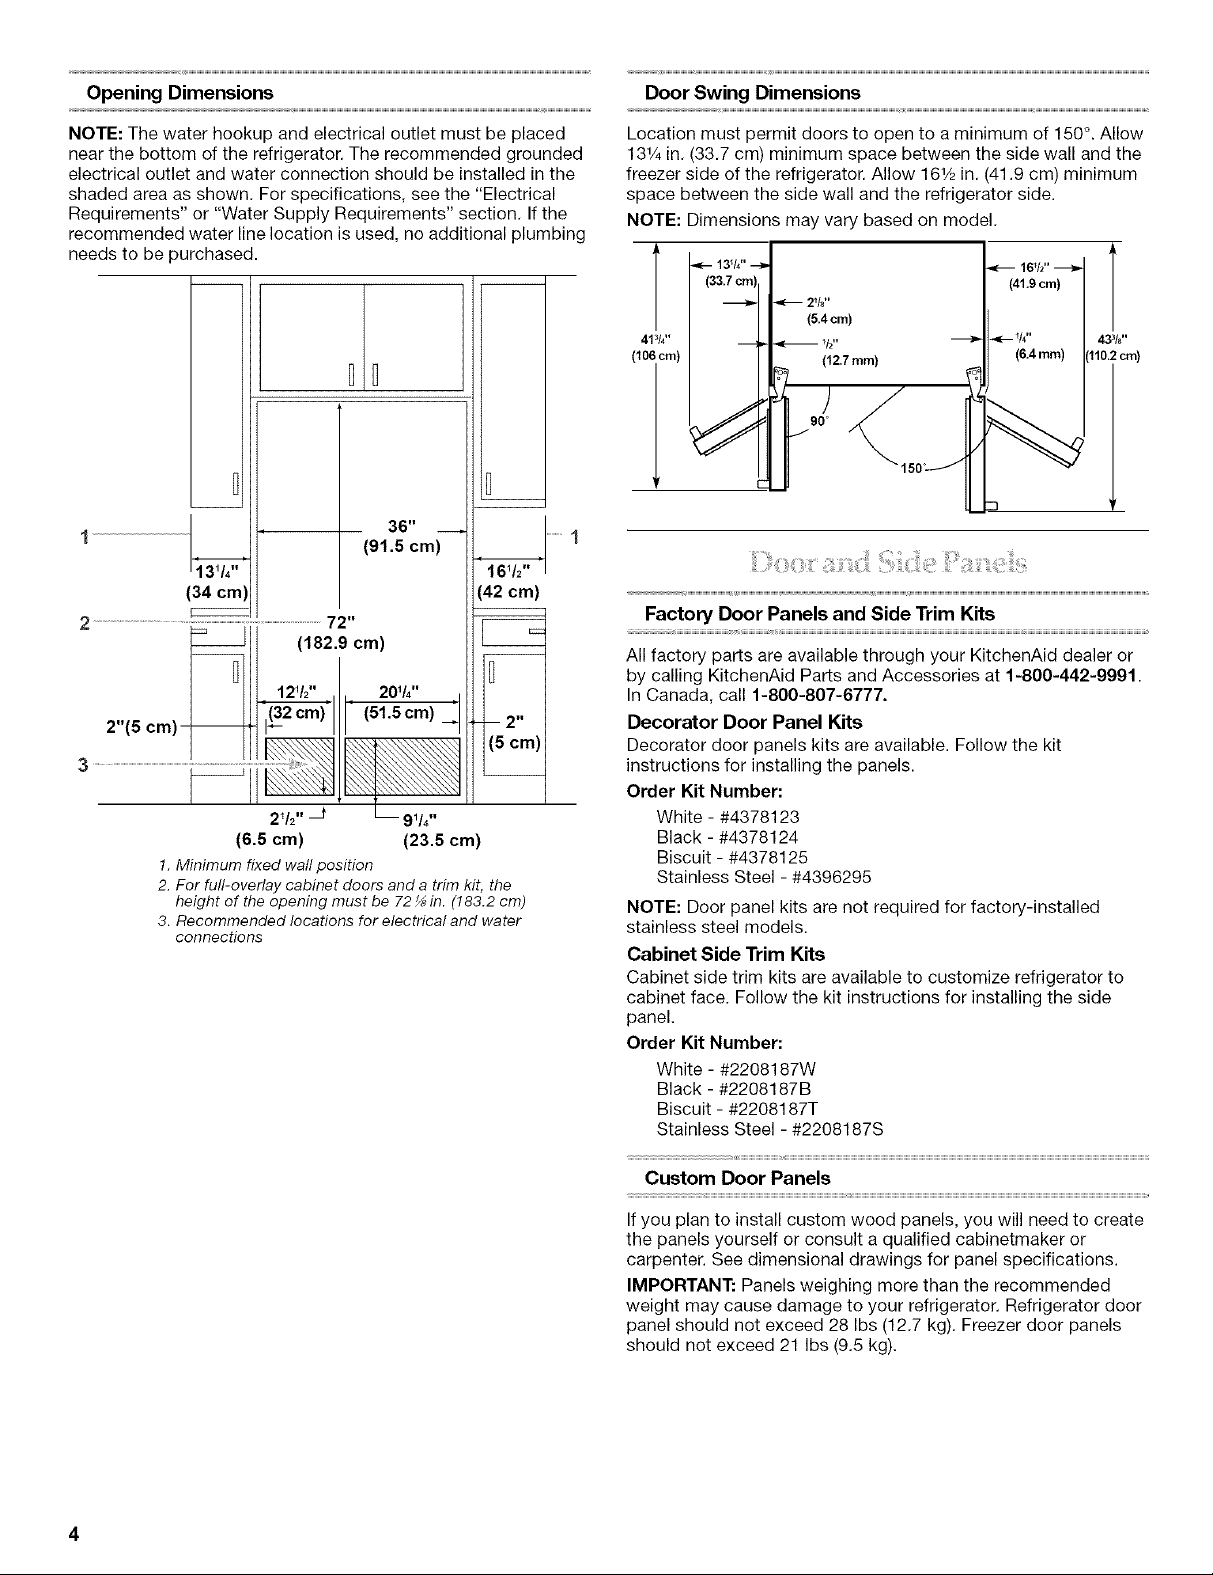
Opening Dimensions
Door Swing Dimensions
NOTE: The water hookup and electrical outlet must be placed
near the bottom of the refrigerator. The recommended grounded
electrical outlet and water connection should be installed in the
shaded area as shown. For specifications, see the "Electrical
Requirements" or "Water Supply Requirements" section. If the
recommended water line location is used, no additional plumbing
needs to be purchased.
36- __ --I
1 _ (91.5 cm) _ .............1
(34 cm) (42 cm)
2 .............. _ .............................................72"
('182.9 cm)
I 11, 12v2" . 20v," ,
2"(5 cm) ''"_ 1_2'"cm) (51.5cm) _ -- 2"
.........................................................................--
2_/_'' _ _- 91/4"
16.5 era) (23.5 era)
1.Minimum fixed wall position
2. For full-overlay cabinet doors and a trim kit, the
height of the opening must be 72_ in. (183.2 cm)
3. Recommended locations forelectrical and water
connections
Location must permit doors to open to a minimum of 150°. Allow
13V4in. (33.7 cm) minimum space between the side wall and the
freezer side of the refrigerator. Allow 16V=in. (41.9 cm) minimum
space between the side wall and the refrigerator side.
NOTE: Dimensions may vary based on model.
(41.9 cm) I
41_/_''
(lOicm)
Factory Door Panels and Side Trim Kits
All factory parts are available through your KitchenAid dealer or
by calling KitchenAid Parts and Accessories at 1-800-442-9991.
In Canada, call 1-800-807-6777.
Decorator Door Panel Kits
Decorator door panels kits are available. Follow the kit
instructions for installing the panels.
Order Kit Number:
White - #4378123
Black - #4378124
Biscuit - #4378125
Stainless Steel - #4396295
NOTE: Door panel kits are not required for factory-installed
stainless steel models.
Cabinet Side Trim Kits
Cabinet side trim kits are available to customize refrigerator to
cabinet face. Follow the kit instructions for installing the side
panel.
Order Kit Number:
White - #2208187W
Black - #2208187B
Biscuit - #2208187T
Stainless Steel - #2208187S
- _/_" 43_t¢'
(6.4 mm) 110.2 crn)
Custom Door Panels
If you plan to install custom wood panels, you will need to create
the panels yourself or consult a qualified cabinetmaker or
carpenter. See dimensional drawings for panel specifications.
IMPORTANT: Panels weighing more than the recommended
weight may cause damage to your refrigerator. Refrigerator door
panel should not exceed 28 Ibs (12.7 kg). Freezer door panels
should not exceed 21 Ibs (9.5 kg).
4
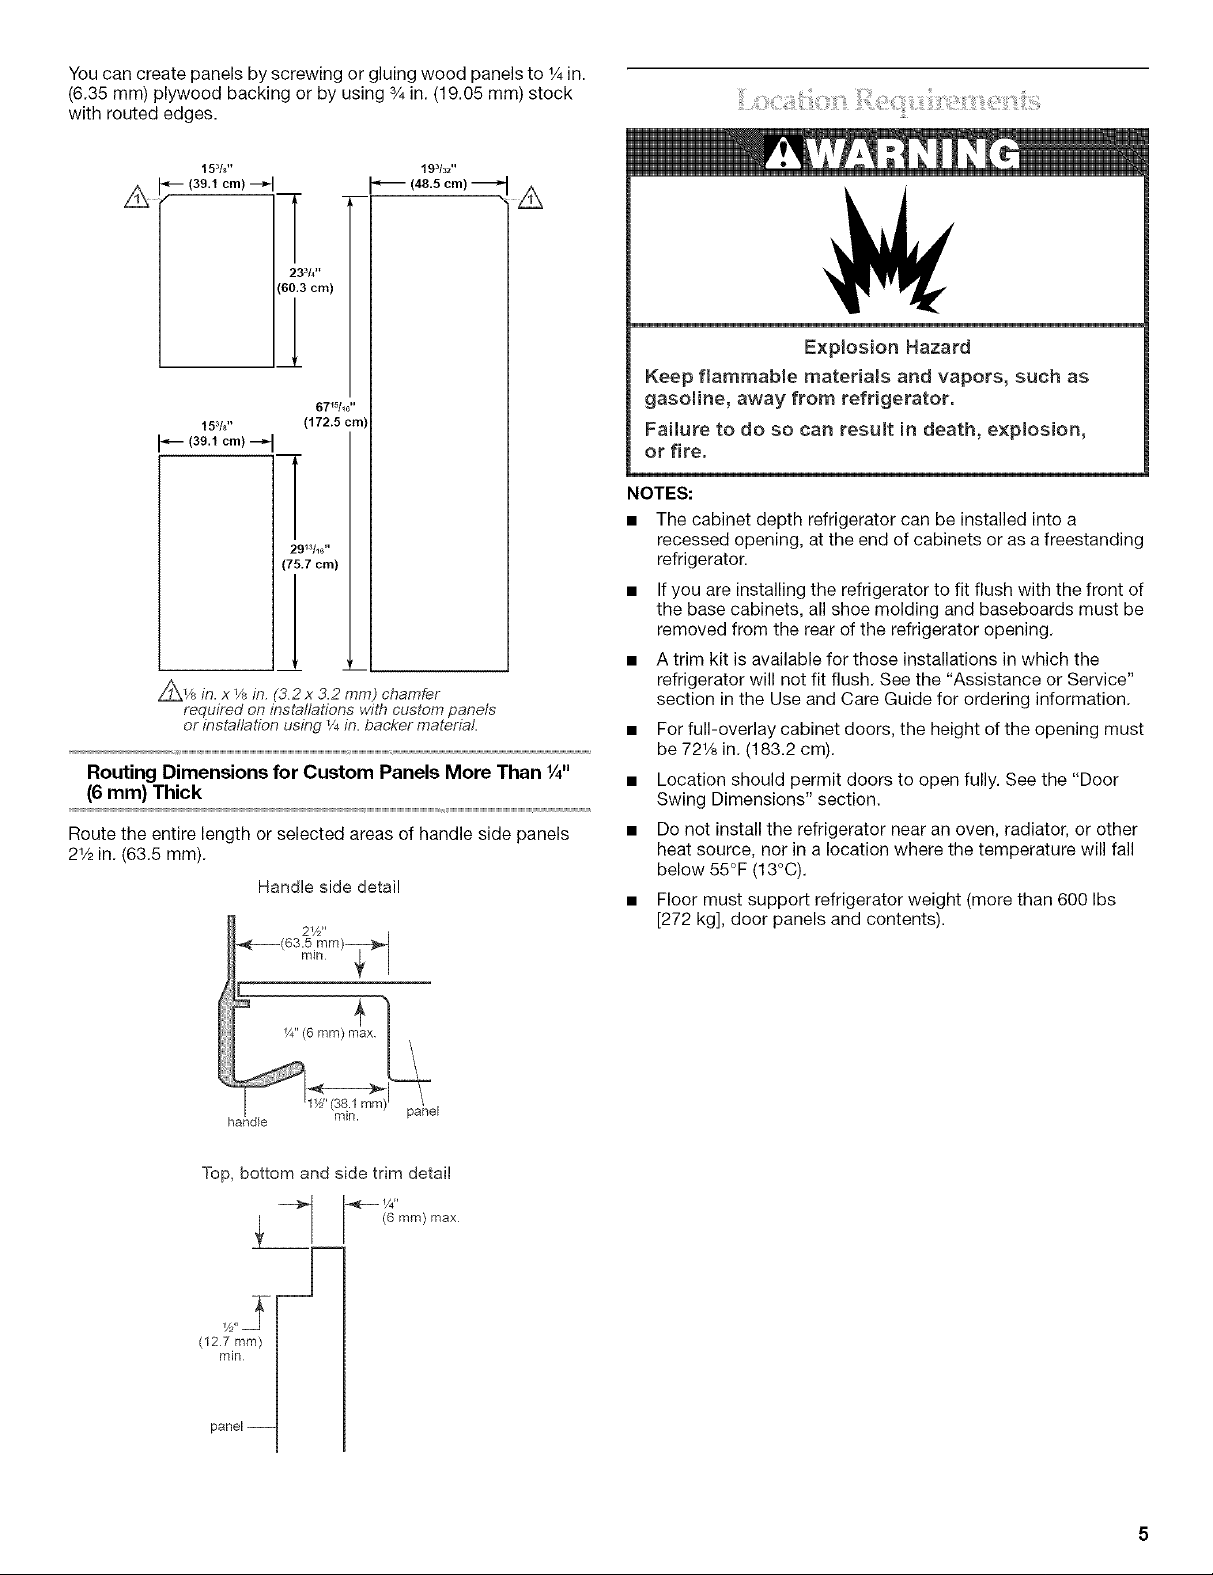
You can create panels by screwing or gluing wood panels to 1/4in.
(6.35 mm) plywood backing or by using 3/4in. (19.05 mm) stock
with routed edges.
153/8''
/_ _ (39.1 cm)--_1
153/8,, (172.5 cm)
(39.1 cm)
[--
233/4''
(60.3 cm)
67_/W '
29W_"
(75.7 crn)
193/32''
_'_ (48.5 cm) -_
/_I/R in. x l/8 in.(3.2x 3.2 mr,q) chamfer
required on installations with custompane/s
or instaflation using 1/4in. backer material
Routing Dimensions for Custom Panels More Than 1/4H
(6 mm) Thick
Route the entire length or selected areas of handle side panels
21/2in. (63.5 mm).
Handle side detail
Explosion Hazard
Keep flammable materials and vapors, such as
gasoline, away from refrigerator.
Failure to do so can result in death, explosion,
or fire.
NOTES:
• The cabinet depth refrigerator can be installed into a
recessed opening, at the end of cabinets or as a freestanding
refrigerator.
• If you are installing the refrigerator to fit flush with the front of
the base cabinets, all shoe molding and baseboards must be
removed from the rear of the refrigerator opening.
• A trim kit is available for those installations in which the
refrigerator will not fit flush. See the "Assistance or Service"
section in the Use and Care Guide for ordering information.
• For full-overlay cabinet doors, the height of the opening must
be 721/8in. (183.2 cm).
• Location should permit doors to open fully. See the "Door
Swing Dimensions" section.
• Do not install the refrigerator near an oven, radiator, or other
heat source, nor in a location where the temperature will fall
below 55°F (13°C).
• Floor must support refrigerator weight (more than 600 Ibs
[272 kg], door panels and contents).
ha_d_e mln.
Top, bottom and side trim detail
_. (6 mm) max
W'J
(127 ram)
min
panel --
 Loading...