

KITCHENAID KRFD 9010 User Manual

Instructions for use


Before using the appliance 4
Protecting the environment 4
Precautions and general recommendations 5
Product description 6
Touch Temperature Controls (select models) 7
Water Dispenser 8
Use of ice maker and water dispenser 9
Water filter 10
Guide to internal components 11
Guide to storage and thawing of food 13
Maintenance and cleaning 15
Preparing the appliance for absence 16
Troubleshooting guide/After-sales service 17
After-sales service 19
Appliance dimensions 20
Installation 21
Water connection 25
Electrical connection 26
Electrical connection for Great Britain and Ireland only 26
• Your new appliance is designed exclusively for domestic use.
To get the most out of your new appliance, read the user handbook thoroughly. The handbook
contains a description of the product and useful tips for storing food.
Keep this handbook for future consultation.
• After unpacking, make sure that the appliance is undamaged and that the doors close properly. Any
damage must be reported to your dealer within 24 hours after delivery of the appliance.
• Wait at least two hours before switching on the appliance to ensure the refrigerant circuit has settled
and is fully efficient.
• Installation of the appliance and electrical connections must be carried out by a qualified engineer, in
accordance with the manufacturer’s instructions and local safety regulations.
• Clean the inside of the appliance before using it.
Before using the appliance
1. Packing
The packaging material is entirely recyclable, and
marked with the recycling symbol . Follow
local regulations for scrapping. Keep all the
packaging materials (plastic bags, polystyrene, etc.)
out of reach of children, as they can be potentially
dangerous.
2. Scrapping/Disposal
The appliance is manufactured using recyclable
materials.
This appliance is marked according to the
European directive 2002/96/EC on Waste Electrical
and Electronic Equipment (WEEE). By ensuring this
product is disposed of correctly, you will help
prevent a potential negative impact on the
environment and on human health, which could
otherwise be caused by inappropriate waste
handling of this product.
The symbol on the product, or on the
documents accompanying the product, indicates
that this appliance should not be treated as
household waste. Before scrapping, cut off the
power cable and remove the doors and shelving so
that children cannot become trapped inside the
appliance.
Disposal must be carried out in accordance with
local environmental regulations for waste disposal.
It should be sent immediately to an approved
recycling collection point for electrical and
electronic equipment. Do not leave the appliance
outside, where is can be potentially dangerous to
children.
For more detailed information about treatment,
recovery and recycling of this product, please
contact your Local Authority, or the shop where
you purchased the product.
Information:
This appliance does not contain CFCs. The
refrigerant circuit contains R134a (HFC) or R600a
(HC) (see the rating plate inside the appliance).
Appliances with Isobutane (R600a): isobutane is a
natural gas hich does not have an environmental
impact, but is highly flammable. Therefore, make
sure the refrigerant circuit pipes are not damaged.
Declaration of conformity
• This appliance is designed to store food and is
manufactured in conformity with Regulation
(EC) No. 1935/2004.
• This appliance is designed, manufactured, and
retailed in compliance with:
- safety objectives of the “Low Voltage”
Directive 2006/95/CE (which replaces
73/23/CEE and subsequent amendments).
- the protection requirements of the “EMC”
Directive 89/336/EEC
amended by Directive 2004/108/EEC.
• The electrical safety of the appliance can only
be guaranteed if the product is
connected to an approved earth
connection.
Protecting the environment
4

5
INSTALLATION
• The appliance must be handled and installed by
two or more people.
• Be careful not to damage flooring (e.g. parquet)
whilst moving the appliance.
• During installation, make sure the power cable
is not damaged.
• Ensure that your appliance is not installed near a
heat source.
• To guarantee adequate ventilation, leave a space
on both sides and above the appliance, following
the installation instructions.
• Keep the appliance ventilation openings free.
• Do not damage the appliance refrigerant circuit
pipes.
• Install and level the appliance on a floor strong
enough to take its weight and in a place suitable
for its size and use.
• Install the appliance in a dry and well-ventilated
place. The appliance is manufactured for use in
various climates Refer to the temperature table
below and the climatic class given on the rating
plate for the operating temperature range. The
appliance may not work properly if it is left for
long periods at a temperature above or below
the specified range.
Climatic class Amb. T. (°C) Amb. T. (°F)
SN From 10 to 32 From 50 to 90
N From 16 to 32 From 61 to 90
ST From 16 to 38 From 61 to 100
T From 16 to 43 From 61 to 110
• Check the voltage specified on the rating plate
corresponds to that of your home.
• Do not use single/multi adapters or extension
cords.
• For the water connection, use the pipe supplied
with the new appliance; do not reuse that of the
previous appliance.
• Power cable modification or replacement must
only be carried out by qualified personnel.
• It must be possible to disconnect the appliance
from the power supply by unplugging it or by
means of a mains double-pole switch installed
upstream of the socket.
SAFETY
• Do not store or use petrol, flammable liquids or
gas in the vicinity of this or other electrical
appliances, the vapours may explode and cause
fires.
• Do not use mechanical, electric or chemical
means other than those recommended by the
Manufacturer to speed up the defrost process.
• Do not use or place electrical appliances inside
the product unless they are authorised by the
Manufacturer.
• This appliance is not designed for use by young
children or the infirm without supervision.
• To avoid the risk of children becoming trapped
and suffocating, do not allow them to play, or
hide inside the appliance.
• Do not swallow the contents (non-toxic) of the
ice packs (in some models).
• Do not eat ice cubes or ice lollies immediately
after taking them out of the freezer since they
may cause cold burns.
USE
• Before carrying out any maintenance or cleaning
operation, unplug the appliance or disconnect it
from the power supply.
• All appliances equipped with an ice-maker and
water dispenser must be connected to a water
supply that delivers drinking water with a mains
water pressure of between 0.24 and 0.83MPa
(2.4 and 8.3 bar / 35 and 120 PSI). Ice-makers
and/or water dispensers not directly connected
to the water supply must be filled with drinking
water only.
• Only use the refrigerator compartment for
storing fresh food and only use the freezer
compartment for storing frozen food, freezing
fresh food and making ice cubes.
• Do not store glass containers with liquids in the
freezer since they may burst.
The Manufacturer declines any liability if the
above advice and precautions are not observed and followed.
Precautions and general recommendations
6
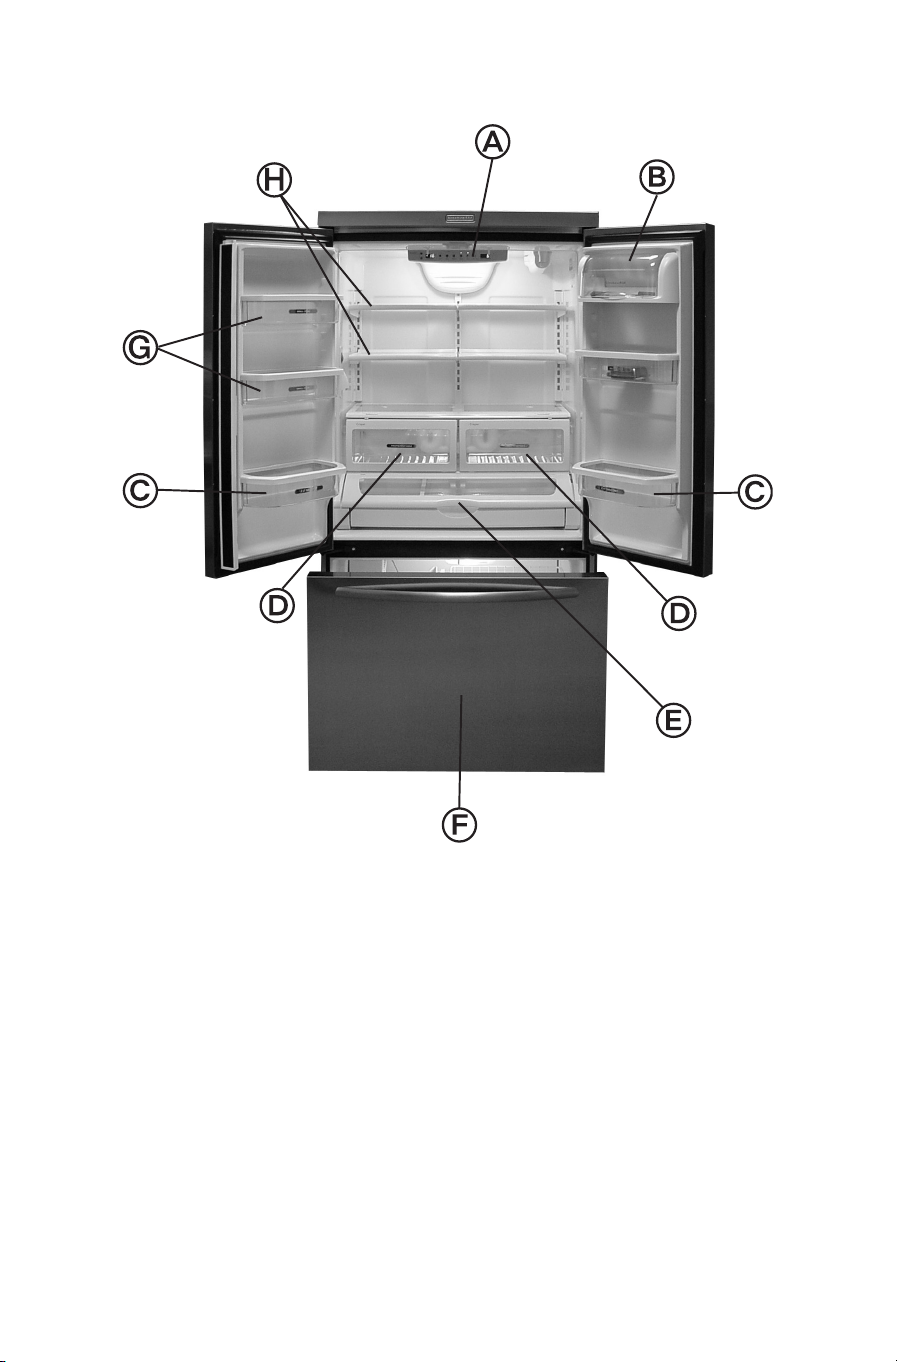
Product description
A. Control panel
B. Dairy compartment
C. Bottle balcony
D. Fruits & vegetables crispers
E. Dely drawer
F. Freezer compartment
G. Middle balconies
H. Glass shelves
7
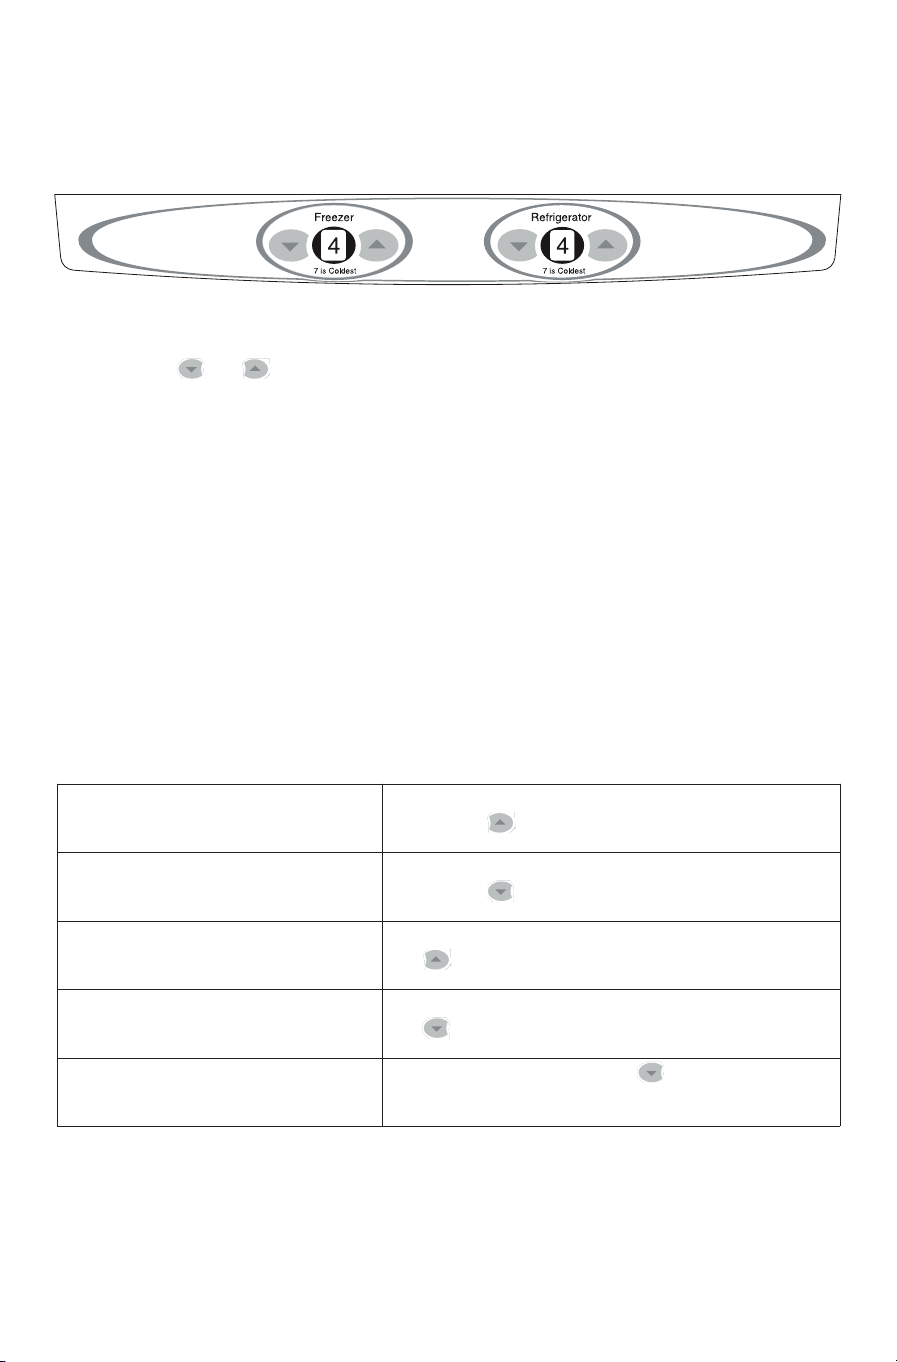
The controls are located at the top front of the refrigerator compartment.
Control
Initial Control Settings
After plugging the refrigerator in, set the controls.
• Pressing the or pads adjusts the controls to the desired setting.
• The temperature control range for both compartments is 1 through 7 (coldest).
• Set the Freezer control on 4.
• Set the Refrigerator control on 4.
• Let the refrigerator run at least 8 to 12 hours before adding food.
Warm Cabinet Surfaces
At times, the front of the refrigerator cabinet may be warm to the touch. This is a normal occurrence that
helps prevent moisture from condensing on the cabinet. This condition will be more noticeable when you
first start the refrigerator, during hot weather and after excessive or lengthy door openings.
Adjusting the Controls
• 24 hours after adding food, you may decide that one or both compartments should be colder or
warmer. If so, adjust the control(s) as indicated in the Temperature Control Guide table below.
• Except when starting the refrigerator, do not change either control more than one number at a time.
• Allow 24 hours for temperatures to stabilize.
Temperature Control Guide
Touch Temperature Controls (select models)
Refrigerator too warm Set the Refrigerator control to next higher number by
pressing the pad.
Refrigerator too cold Set the Refrigerator control to next lower number by
pressing the pad.
Freezer too warm Set the Freezer control to next higher number by pressing
the pad.
Freezer too cold Set the Freezer control to next lower number by pressing
the pad.
Turn control OFF Press the Refrigerator or freezer pad until a dash (—)
appears in the display.
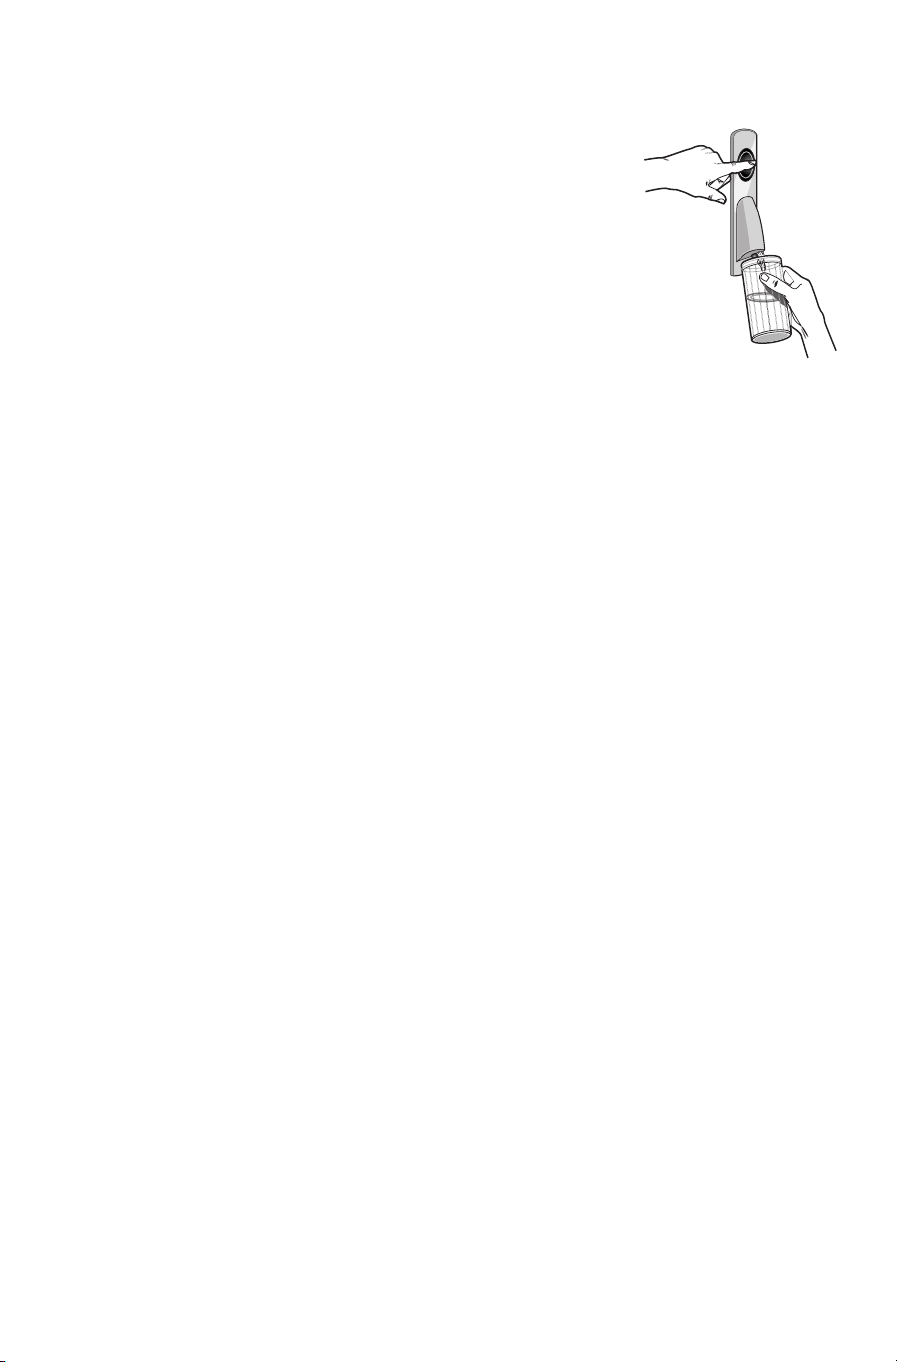
Water Dispenser
If you did not flush the water system when the refrigerator was first installed,
dispense water into a container until you draw 8 to 12 L (2 to 3 gal.) or for
approximately 6 to 7 minutes after the water begins dispensing and discard.
The water you draw and discard will rinse out the pipes. Allow several hours
for the refrigerator to cool down and chill the water.
Dispensing Water
1. Hold a container under the dispenser while pressing the button.
2. Release the button to stop dispensing.
NOTE: Dispense enough water every week to maintain a fresh supply.
User preferences
The control centre allows you to set user preferences, if desired.
8
Automatic Ice Maker
Connect the ice maker to the water supply as
instructed. Proper water flow and a level
refrigerator are essential for optimal ice
maker performance.
Ice Maker Operation
• To turn on the ice maker,
push the metal arm down
from locked position.
• Lift the arm up and lock
into position to turn off
the ice maker.
Operating Instructions
• Confirm the ice bin is in place and that the ice
maker arm is in the down position.
• After freezer section reaches between -17° to 18°C (2° to 0°F), ice maker fills with water and
begins operating. You will have a complete
batch of ice approximately every three hours.
• Allow approximately 24 hours after installation
to receive the first batch of ice.
• Discard any ice created within the first 12 hours
of operation to ensure the ice is free of any
impurities.
• Ice production can be stopped by raising the ice
maker arm until a gentle click is heard.
• The ice maker will remain in the off position
until the arm is pushed down.
• The first one or two batches of ice may contain
undersized and irregular cubes. This is due to
air being in the supply line. This will disappear.
• When the ice cubes are ejected it is usual for
several cubes to be joined together at the ends.
These are easily broken apart. The ice maker
will continue to make ice until the supply of ice
cubes in the ice storage bin raises the ice maker
arm, shutting the ice maker off.
• Certain sounds may accompany the various ice
maker cycles. The motor may hum, ice cubes
will rattle as they fall into an empty storage pan
and the water valve may click or “buzz”
occasionally. This is entirely normal.
• If the supply of ice cubes is not used frequently,
the ice will become cloudy, shrink, stick
together and taste ‘stale’. If this happens discard
the entire contents of the ice storage bin and
wash the bin in lukewarm water. Be sure to dry
the bin thoroughly before replacing it. The ice
storage bin should be emptied periodically to
ensure the ice is fresh.
• Beverages and foods should not be placed in the
ice storage bin for quick chilling. These items
can block the ice maker arm, causing the ice
maker to malfunction.
• Turn off (arm up) the ice maker when the water
supply is to be shut off for several hours.
To Remove the Ice Bin:
• Pull it forward, away from the ice maker. To
avoid the ice maker dumping ice while the
storage bin is removed, turn the ice maker off
by raising the ice maker arm.
To Install the Ice Storage Bin:
• Reverse the above procedure. Then turn on the
ice maker by lowering the ice maker arm.
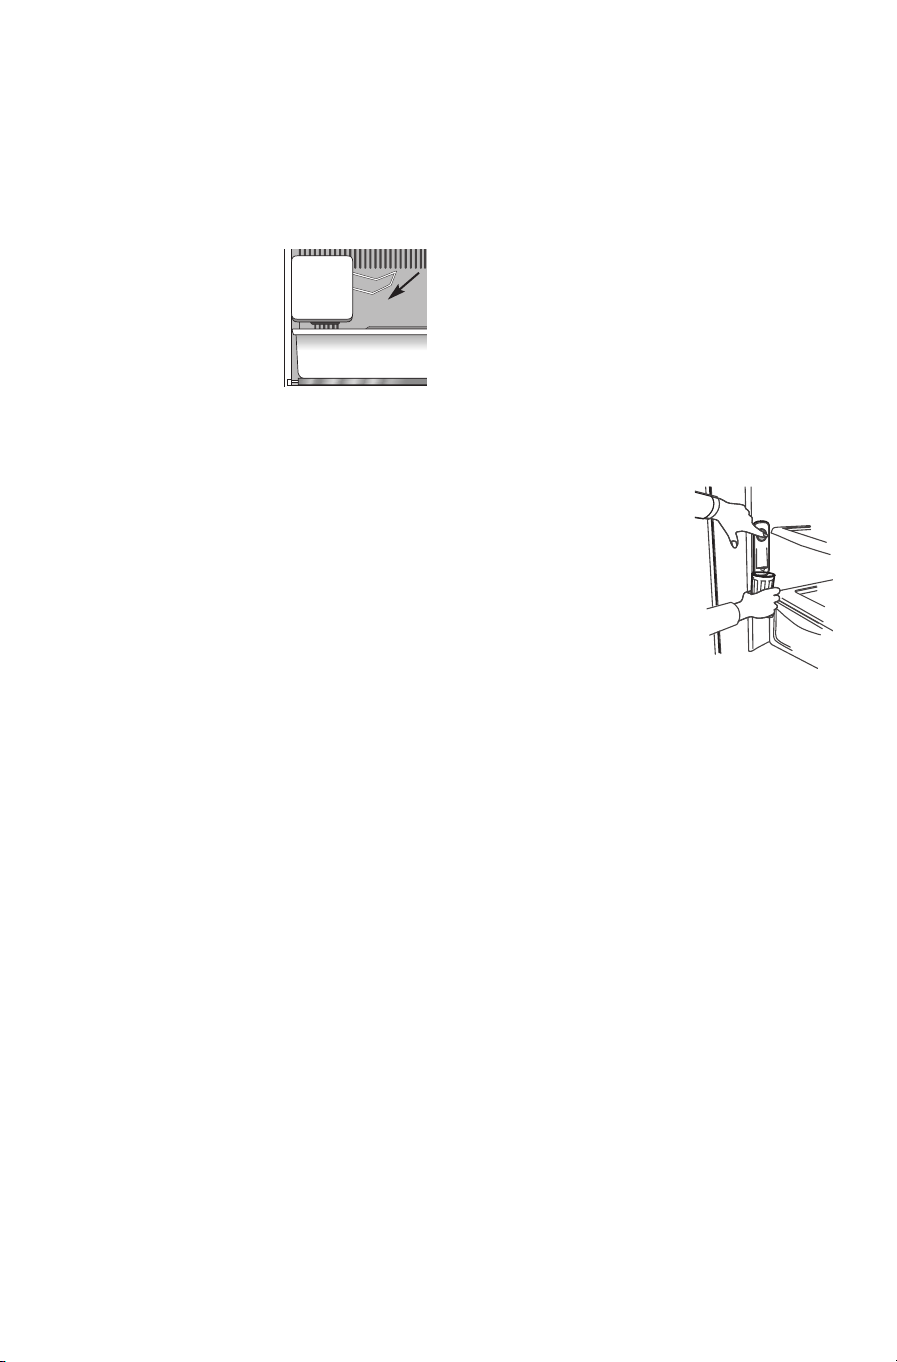
Water Dispenser
• The Water Dispenser is
located on the left side
wall of the fresh food
section. This design is for
cold water dispensing only.
To Dispense Water:
• Hold a container under the
spout and press the
dispenser pad.
Use of ice maker and water dispenser
9
 Loading...