


Quick Reference Guide
Cooking gestures are
invisible ingredients.
They turn inspiration
into emotions and
emotions into a
masterpiece.
It’s all about artisanality,
that’s why we take it so
seriously.
Thanks for choosing

Index
EN �����������������������������������������������������������������������������������������������������������������������������������������������pag� 3

Light Std
,
Oven
Quick reference guide
EN
Cooking gestures are
invisible ingredients.
They turn inspiration
into emotions and
emotions into a
masterpiece.
It’s all about artisanality
that’s why we take it so
seriously.
Thanks for choosing
3
B C D
E
I H G F
pesce, eco termoventilato.
Istruzioni per l’uso del forno
DESCRIZIONE PANNELLO COMANDI
INSERIMENTO DI GRIGLIE E ALTRI ACCESSORI ALL’INTERNO DEL FORNO
1. Inserire la griglia orizzontalmente, con la parte rialzata “A” orientata verso l’alto (Fig. 1).
2. Gli altri accessori, come la leccarda e la piastra dolci, vanno inseriti con la parte sollevata sulla sezione
piatta “B” rivolta verso l’alto (Fig. 2).
(Fig. 1)
(Fig. 2)
Quick Guide
THANK YOU FOR BUYING A
KITCHENAID PRODUCT
In order to receive a more complete assistance, please
register your product on www . kitchenaid . eu/ register
Oven Parts and Features
3
6
7
11
10
1
2
5
12
4
13
8
9
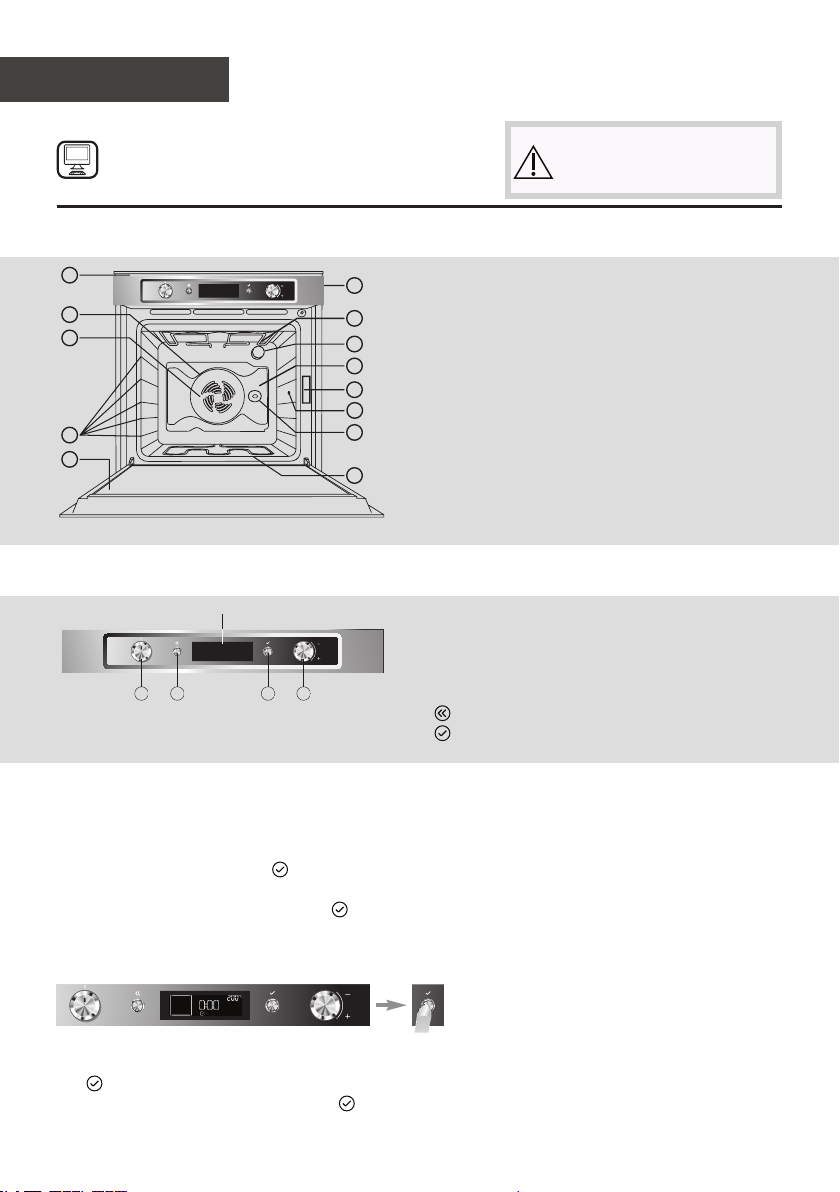
Control Panel
DISPLAY
1 3 4 2
Before using the appliance
carefully read the Safety
Instruction.
1. Control panel
2. Upper heating element/grill
3. Cooling fan (not visible)
4. Data plate (please do not remove)
5. Lamp
6. Circular heating element (not visible)
7. Fan
8. Rotisserie (if supplied)
9. Lower heating element (not visible)
10. Door
11. Position of shelves (the level is shown on the
front of the oven)
12. Rear wall
13. Meat probe connection
1. Function knob: to switch the oven on/off and
select the various functions
2. Browse knob: to navigate through the
suggested menus on the display and change the
pre-set values
3. Back button: to return to the previous screen
4. OK button: to conrm and activate selected
functions
Getting Started and Daily Oven Use
The rst time you switch on your new oven, you will need to set the language and the time of day�
Turn the Browse knob to scroll through the list of available languages� Once you have found your
language of choice, press the button to conrm. Immediately after, “12:00” will ash on the display
indicating that you should set the time of day. To do so, turn the Browse knob until the display shows
the correct time of day, then press the button to conrm.
DAILY OVEN USE
1. Switching on the oven and selecting a function
By turning the Function knob, you will switch on the oven and see all of the possible functions and
their related submenus on the display. If the parameters correspond with what you would like, press
the button to conrm. To change the parameter on the display, turn the Browse knob until you see
the value you would like then press the button to conrm.
4

2. Selecting Special Functions
Per ritardare la fine della cottura, posticipando l’avvio del forno,
procedere come segue:
1. Ruotare la manopola “Navigazione” fino a visualizzare l’ora in cui si desidera terminare la cottura (ad
esempio 16:00).
2. Confermare il valore prescelto premendo il tasto : i due punti dell’ora di fine cottura lampeggiano,
ad indicare che l’impostazione è stata effettuata correttamente.
3. Il forno ritarderà l’avvio automaticamente in modo da terminare la cottura all’ora pre-impostata.
In ogni momento, è possibile modificare i valori impostati (temperatura, livello del grill, tempo
di cottura) utilizzando il tasto per tornare indietro, la manopola “Navigazione” per
modificare i valori e il tasto per confermare.
CONTAMINUTI
Questa funzione può essere utilizzata solo a forno spento ed è utile, ad esempio, per controllare il tempo
di cottura della pasta.
Il tempo massimo che è possibile impostare è di 23 ore e 59 minuti.
1. Con la manopola “Funzioni” sullo zero, ruotare la manopola “Navigazione” fino a visualizzare il tempo
desiderato.
2. Premere il tasto per avviare il conto alla rovescia. Allo scadere del tempo impostato sul display
appare “END” accompagnato da un segnale acustico. Per interromperlo, premere il tasto (sul
display appare l’ora corrente).
SELEZIONE FUNZIONI SPECIALI
Posizionando l’indice della manopola “Funzioni” in corrispondenza di “SCONGELAMENTO” si accede ad
un sottomenu contenente diverse funzioni speciali.
Per esplorare, selezionare ed avviare una di queste funzioni, procedere come segue:
Istruzioni per l’uso del forno
warm risinDEFRO
Turn the Functions knob to the SPECIAL FUNCTIONS symbol: DEFROST will appear on the display as
the rst special function. Turn the Browse knob to scroll through the list of functions�
Once you have found the function you desire, press the button to conrm.
For more details, please refer to the Instructions for Use Manual or www.kitchenaid.eu�
Table of Functions
Traditional: T / Special: S / Grill: G Food Type Shelves Levels/Accessories
T Switching Off To interrupt the cooking cycle and switch off the oven
T Lamp To switch on/off the lamp inside the oven
S Defrost Any 1 3
S Keep Warm Any dish that has just been cooked 1 3
S Yoghurt Ingredients for yoghurt 1 1 / Drip tray
S Rising Sweet or savoury dough 1 2
S Slow Cooking Meat 1 3 / Meat probe
S Slow Cooking Fish 1 3
S Eco Forced Air Roasts, stuffed meat 1 3 / Meat probe
Any 1 3
T Conventional
T Convection Bake
T Forced Air Various dishes simultaneously
T Maxi Cooking Large cuts of meat (over 2.5 kg) 1 1 or 2
G Grill
G Turbo grill Large pieces of meat, poultry 1
T Settings
S Bread/Pizza Two programmes with default settings
T Fast Preheating Use this function to rapidly preheat the oven
Please refer to the Instructions for Use Manual or www.kitchenaid.eu for more information on the
cooking functions.
Pizza, sweet or savoury pies with juicy
llings
Meat, lled cakes (cheese cake, strudel,
fruit pie), stuffed vegetables
1 1 or 2
1 3
1 3
2 1, 4
3 1, 3, 5
Meat, steak, kebabs, sausages,
vegetables, bread
1 4 or 5 / Drip tray
1 or 2 / Drip tray,
Rotisserie
To set the language, time of day, display brightness, volume of the
acoustic signal and energy savings
5

Accessories
Wire shelf
Drip tray
Baking tray
Meat Probe
Accessory
Rotisserie
(if supplied)
Sliding rack guides
(if supplied)
Please Note: The number of oven accessories may vary depending on the model purchased.
It is possible to purchase accessories separately from the Customer Service Center.
MEAT PROBE ACCESSORY
The meat probe included with your oven allows you to measure the precise temperature on the inside
of the food during cooking so your dishes are cooked to perfection.
You can programme the internal temperature that you desire for the dish you are preparing.
We suggest that the meat probe be used as outlined in the Instructions for Use Manual or at
www.kitchenaid.eu
Food can be cooked directly on this shelf or the shelf can be used as support for
cookware, baking pans or any oven safe container.
By inserting this tray under the wire shelf, you can collect cooking juices; you can also cook
meat, sh, vegetables, at bread, etc. directly on the tray.
Bread or pastry dishes can be cooked on this tray, as well as roasted meat, sh en
papillote, etc�
This accessory is useful for measuring the internal temperature of the food during cooking.
Poultry and large pieces of meat are cooked uniformly with this accessory.
These guides make it easy to insert and remove shelves and trays.
Cleaning
Before cleaning your appliance, please ensure that it is cold and disconnected from the electricity
grid. It is best to avoid the use of steam cleaning equipment, steel wool pads, abrasive cloths and
corrosive detergents that could damage the appliance.
Troubleshooting
If you experience problems in operating your oven:
1. First check that there is an electrical current and that the oven is properly connected to the
electricity grid;
2. Switch off the oven then switch it back on to see if the problem is solved;
3. If you see an “F” immediately followed by an error code on the display, contact your nearest
Customer Service Center.
It will be necessary to provide the following information to the technician: the precise type and
model of the oven, the assistance code (visible on the right-hand inside edge when the oven door is
open) and the error code that appears on the display. This information will enable the technician to
immediately identify the type of intervention required.
If the oven needs to be repaired, we suggest you refer to an Authorised Technical Service Center.
6

Please refer to our website www.kitchenaid.eu for complete instructions for use.
In addition, you will nd a lot more useful information about your products, such as inspiring
recipes created and tested by our brand ambassadors or the nearest KitchenAid cookery school.
7

EN
Printed in Italy
400011128915
 Loading...