

Kitchenaid Khm620acs0, Khm620aer0, Khm620awh0 Owner's Manual
6
SPEED
VITESSES
VELOCIDADES
HAND MIXERS
INSTRUCTIONS AND RECIPES
BATTEURS
À MAIN
INSTRUCTIONS ET RECETTES
BATIDORAS
MANUALES
INSTRUCCIONES Y RECETAS
KHM620
U.S.A./En EE.UU.:
1-800-541-6390
Canada/En Canadá:
1-800-807-6777
W10250600A
KitchenAid.com
KitchenAid.ca

Proof of Purchase and Product Registration
Always keep a copy of the sales receipt
showing the date of purchase of your
hand mixer. Proof of purchase will assure
you of in-warranty service.
Before you use your hand mixer, please
fill out and mail your product registration
card packed with the unit. This card will
Model Number ______________________________________________________________
Serial Number _______________________________________________________________
Date Purchased ______________________________________________________________
Store Name and Location ______________________________________________________
enable us to contact you in the unlikely
event of a product safety notification and
assist us in complying with the provisions
of the Consumer Product Safety Act. This
card does not verify your warranty.
Please complete the following for your
personal records:
Preuve d’achat et enregistrement du produit
Veuillez conserver une copie du coupon de
caisse indiquant la date d’achat de votre
Batteur à main. La preuve d’achat vous
assure du service d’après-vente sous garantie.
Avant d’utiliser votre Batteur à main, veuillez
remplir et poster la carte d’enregistrement
du produit accompagnant l’appareil.
Grâce à cette carte, nous pourrons vous
Numéro de modèle __________________________________________________________
appeler dans l’éventualité improbable d’un
avis de sécurité et nous conformer plus
facilement aux dispositions de la loi sur la
sécurité des produits de consommation.
Cette carte ne confirme pas votre garantie.
Veuillez remplir ce qui suit pour vos
dossiers personnels :
Numéro de série _____________________________________________________________
Date d’achat ________________________________________________________________
Nom du marchand et adresse __________________________________________________
Comprobante de compra y registro del producto
Siempre conserve una copia del recibo de
ventas que especifique la fecha de compra
de su batidora manual. El comprobante
de compra le asegurará el servicio técnico
bajo garantía.
Antes de utilizar la batidora manual,
complete y envíe por correo su tarjeta
de registro del producto que viene junto
con la unidad. Esta tarjeta nos permitirá
Número del modelo __________________________________________________________
Número de serie _____________________________________________________________
Fecha de compra ____________________________________________________________
Nombre de la tienda y dirección ________________________________________________
contactarnos con usted en el improbable
caso de notificación de algún problema de
seguridad con el producto y nos ayudará a
cumplir con las cláusulas de la Consumer
Product Safety Act (Ley sobre la seguridad
de los productos para el consumidor). Esta
tarjeta no asegura su garantía.
Complete lo siguiente para su
registro personal:


Table of Contents
INTRODUCTION
Proof of Purchase & Product Registration .............................................. Inside Front Cover
Hand Mixer Safety .........................................................................................................2
Important Safeguards ....................................................................................................3
Electrical Requirements .................................................................................................. 3
FEATURES AND OPERATION
Hand Mixer Features ......................................................................................................4
How to Use the Hand Mixer ...........................................................................................5
To Attach Accessories ..............................................................................................5
To Remove Accessories ............................................................................................6
To Operate the Speed Control .........................................................................................6
Speed Control Guide for 6-speed Hand Mixer .................................................................7
Accessories for your KitchenAid
CARE AND CLEANING
Care and Cleaning .........................................................................................................8
Troubleshooting .............................................................................................................9
RECIPES
Raspberry Cream Cheese Spread ....................................................................................9
Honey-Walnut Cream Cheese Spread ............................................................................. 9
Mashed Potatoes .........................................................................................................10
Savory Sweet Potatoes .................................................................................................10
Apple Waffles ............................................................................................................... 11
Peach Coffee Cake ....................................................................................................... 11
Whipped Cream ..........................................................................................................12
Lemon Pudding Cake ....................................................................................................12
Oatmeal-Nut Snack Cake ..............................................................................................13
Buttercream Frosting ...................................................................................................13
®
Hand Mixer ..................................................................8
ENGLISH
Continued on next page
1
Table of Contents
WARRANTY AND SERVICE INFORMATION
KitchenAid
Hassle-Free Replacement Warranty – 50 United States and District of Columbia .......... 15
Hassle-Free Replacement Warranty – Canada ...............................................................15
ENGLISH
How to Arrange for Warranty Service in Puerto Rico ....................................................15
How to Arrange for Service after the Warranty Expires – All Locations .........................16
How to Arrange for Service Outside These Locations ...................................................16
How to Order Accessories and Replacement Parts ........................................................16
®
Hand Mixer Warranty ............................................................................... 14
Hand Mixer Safety
Your safety and the safety of others are very important.
We have provided many important safety messages in this manual and on your
appliance. Always read and obey all safety messages.
This is the safety alert symbol.
This symbol alerts you to potential hazards that can kill or hurt you
and others.
All safety messages will follow the safety alert symbol and either
the word “DANGER” or “WARNING.” These words mean:
You can be killed or seriously
DANGER
WARNING
injured if you don’t immediately
follow instructions.
You can be killed or seriously injured
if you don’t follow instructions.
All safety messages will tell you what the potential hazard is, tell you how to
reduce the chance of injury, and tell you what can happen if the instructions are
not followed.
2

IMPORTANT SAFEGUARDS
When using electrical appliances, basic safety precautions should always be followed
including the following:
1. Read all instructions.
2. To avoid risk of electrical shock, do not put Hand Mixer in water or other liquid.
3. Close supervision is necessary when any appliance is used near or by children.
4. Unplug Hand Mixer from outlet when not in use, before putting on or taking off
parts, and before cleaning.
5. Avoid contacting moving parts. Keep hands, hair, clothing, as well as spatulas and
other utensils away from all accessories during operation to reduce the risk of injury
to persons and/or damage to the hand mixer.
6. Do not operate the hand mixer with a damaged cord or plug or after the hand
mixer malfunctions, or is dropped or damaged in any manner. Return the hand
mixer to the nearest Authorized Service Center for examination, repair or electrical or
mechanical adjustment.
7. The use of attachments not recommended or sold by KitchenAid may cause fire,
electric shock or injury.
8. Do not use the hand mixer outdoors.
9. Do not let the cord hang over the edge of table or counter.
10. Do not let cord contact hot surface, including the stove.
11. Remove any accessories from hand mixer before washing.
12. This product is designed for household use only.
SAVE THESE INSTRUCTIONS
ENGLISH
Electrical Requirements
Volts: 120 A.C. only. Hertz: 60
NOTE: This hand mixer has a polarized
plug (one blade is wider than the other).
To reduce the risk of electric shock, this
plug will fit in a polarized outlet only one
way. If the plug does not fit fully in the
outlet, reverse the plug. If it still does not
fit, contact a qualified electrician. Do not
modify the plug in any way.
3
KHM620
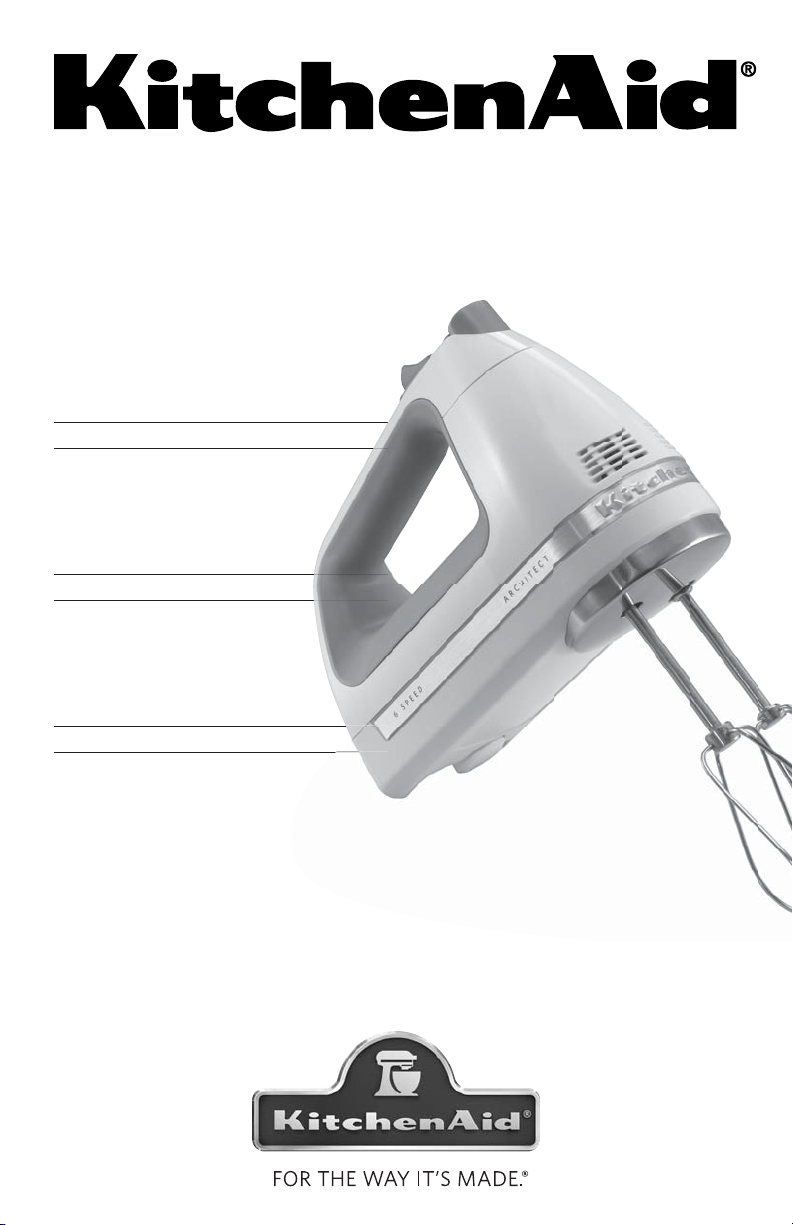
Hand Mixer Features
The KitchenAid® 6-speed hand mixer offers a host of conveniences, including
a powerful yet lightweight motor, intuitive speed control, and easy-to-clean design.
The Turbo Beater™ Accessories that come with your hand mixer have an open shape
ENGLISH
with no center post: this design permits thorough mixing with no clogging, little
splashing, and minimal food collection.
Your hand mixer is designed to mix cookie doughs and cake batters, mash potatoes,
and whip heavy cream and egg whites. With the optional dough hooks and liquid
blender rod, the hand mixer can also knead yeast bread doughs and blend smoothies,
milkshakes, soups, and sauces.
The KitchenAid
reliability that have been built into KitchenAid
®
hand mixer is designed to deliver the same legendary quality and
®
Stand Mixers since 1919.
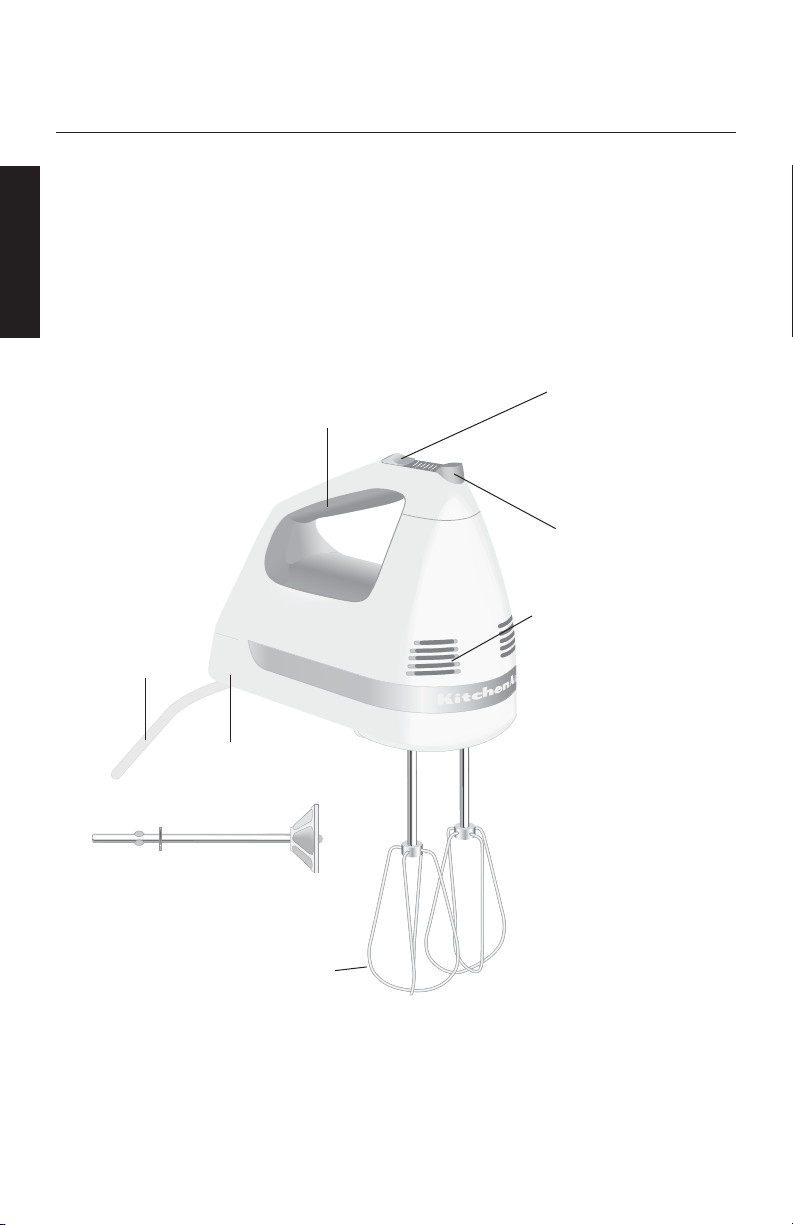
Soft-Grip
Handle
Easy-To-Clean
Design
Lockable Swivel
Cord
Non-Tip
Heel Rest
Liquid Blender Rod Accessory
Turbo Beater™
Accessories
Easy-To-Use
Speed Control
1
Of
3
f
5
2
4
6
Oversized Beater
Ejector Button
Air Vents
4

KHM620
Hand Mixer Features
Easy-To-Use Speed Control
Features a positive “click” at each speed
setting.
Soft-Grip Handle
Elastomer grip provides comfort at all
speeds.
Easy-To-Clean Design
Smooth styling has no ingredient-trapping
cracks or crevices. Makes cleanup easy.
Oversized Beater Ejection Button
Makes for easy, single-handed ejection
of beaters.
Lockable Swivel Cord
Round shape will not trap ingredients.
Lockable swivel cord makes mixing
convenient at any angle.
Non-Tip Heel Rest
Holds hand mixer stable when not in use.
How To Use the Hand Mixer
Be sure to read and follow the specific
instructions in this manual for proper use
of this hand mixer.
WARNING
Injury Hazard
Unplug mixer before touching
beaters.
Failure to do so can result in
broken bones, cuts or bruises.
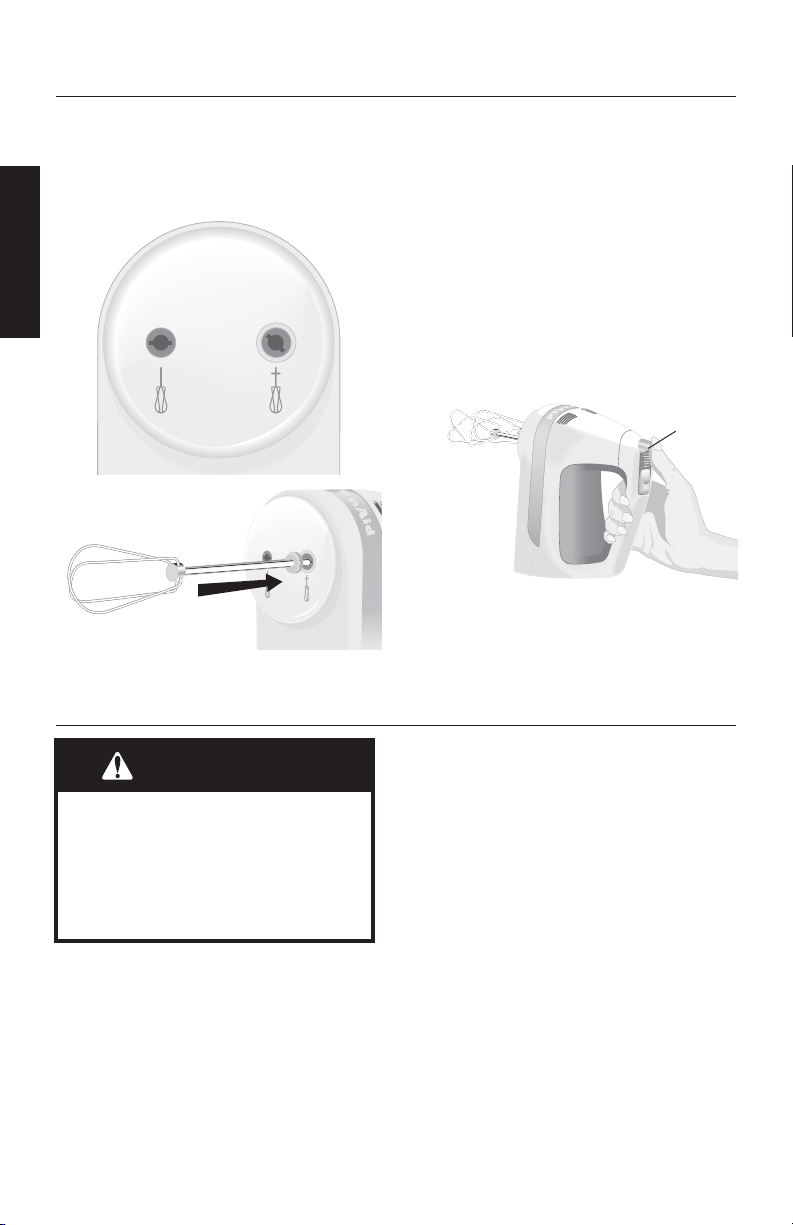
To Attach Accessories
1. Make sure the Speed Control is in the
“Off” position.
2. Unplug the hand mixer from the
electrical outlet.
Air Vents
Positioned to avoid clogging from batters
and other mixtures.
Turbo Beater™ Accessories
Self-cleaning mixing action. Dishwashersafe, high quality stainless steel.
Liquid Blender Rod
Designed to mix smoothies, diet drink mixes,
chocolate milk, milkshakes, ice tea, soups,
and sauces. Mixes from 8 to 32 oz (240 to
950 mL) of liquid.
KitchenAid Brand Quality
Your hand mixer is built and tested to
meet KitchenAid standards for optimum
performance and durability.
3. Each pair of accessories will have
one accessory with a collar (B), and
one without (A). The hand mixer has
a specific opening for each. Single
accessories, like the optional Pro Whisk
or Liquid Blender Rod, will always have
a collar (B).
B
A
ENGLISH
5
How To Use the Hand Mixer
4. Insert the accessory with a collar (B)
into the larger opening (B) of the
hand mixer. Line up the flanges on the
accessory with the slots in the opening
ENGLISH
and push in until it locks into place.
A
5. Insert the accessory without a collar
(A) into the smaller opening (A) of the
hand mixer. Line up the flanges on the
accessory with the slots in the opening
and push in until it locks into place.
To Remove Accessories
1. Make sure the Speed Control is in the
“Off” position.
2. Unplug the hand mixer from the
electrical outlet.
B
3. Press the Ejector Button (C) to release
the accessories from the hand mixer,
then remove them.
C
5
3
2
1
FF
O
To Operate the Speed Control
WARNING
Injury Hazard
Unplug mixer before touching
beaters.
Failure to do so can result in
broken bones, cuts or bruises.
1. Make certain the Speed Control is
in the “Off” position by sliding it
backward as far as possible. “OFF/O”
will be visible on the speed control
pad when the switch is in the “Off”
position.
2. Plug the hand mixer into an electrical
outlet.
3. Always start mixing at the lowest speed
by sliding the Speed Control forward
to the first position mark, which is
Speed 1.
4. To increase the hand mixer speed, slide
the Speed Control forward. To decrease
the hand mixer speed, slide the Speed
Control backward.
5. When the mixing job is finished, shut
off the hand mixer by sliding the
Speed Control backward as far as
possible. Unplug the hand mixer before
removing the accessories.
6

Speed Control Guide for 6-speed Hand Mixer
5
3
1
always be set on the lowest
4
speed to start mixing. Move to
2
higher speeds as needed.
OFF
The 6-speed hand mixer should
6
Speed 1 For slow stirring,
combining, and starting all
mixing procedures.
Speed 2 Use this speed to
stir in nuts, chocolate chips,
shredded cheese, onions, olives, and other
chunky ingredients. Mix flour and other
dry ingredients with liquids or other moist
mixtures. Helps keep ingredients from
splashing out of bowl.
Speed 3 Stir batters and gelatin
mixtures. Combine heavy mixtures, such
as cookie dough. Mix light cream cheese
spreads. Mash potatoes.
Speed 4 Combine heavy cream cheese
mixtures. Mash squash.
Speed 5 Blend butter and sugar. Mix
muffins, quick breads, cake batters, and
frostings.
Speed 6 Beat egg whites and meringue
mixtures. Whip heavy cream and mousse
mixtures.
NOTE: The Turbo Beater™ Accessories are
not designed for mixing and kneading
bread dough. Special dough hook
attachments are available. See “Accessories
for Your KitchenAid
®
Hand Mixer” for
details and ordering information.
ENGLISH
7

Accessories for Your KitchenAid® Hand Mixer
Liquid Blender Rod
A great way to mix up smoothies, diet
drink mixes, chocolate milk, ice tea, and
milkshakes. Also invaluable for soups and
sauces that require light blending. The
ENGLISH
1
8
/2" (21.6 cm) long Liquid Blender Rod
attaches to the hand mixer like a regular
beater and can mix from 8 to 32 oz (240
to 950 mL) of liquid. Hand wash with mild
detergent.
Dough Hooks
A must-have attachment for the bread
baker. The stainless steel Dough Hooks
enable your hand mixer to knead yeast
bread doughs, saving you untold time and
effort. The Dough Hooks attach to the hand
mixer like regular beaters and are
dishwasher-safe for quick cleanup.
Care and Cleaning
WARNING
Electrical Shock Hazard
Do not put in water.
Doing so can result in death or
electrical shock.
Pro Whisk
Designed to produce fluffier whipped
cream and egg whites, the stainless steel
Pro Whisk will also ensure smooth sauces
and puddings. The Pro Whisk attaches to
the hand mixer like a regular beater and is
dishwasher safe for easy cleanup.
To order these accessories
In U.S.A:
visit KitchenAid.com,
or call 1-800-541-6390
In Canada:
call 1-800-807-6777
Always unplug hand mixer before
cleaning. Do not immerse hand mixer in
water. Wipe hand mixer with a warm,
sudsy cloth; then wipe clean with a damp
cloth. Dry with a soft cloth.
Turbo Beater™ Accessories,
Dough Hooks
Always remove accessories from
hand mixer before cleaning. Wash in
dishwasher, or by hand in warm, sudsy
water. Rinse and wipe dry.
Liquid Blender Rod*
Always remove blender rod from hand
mixer before cleaning. Hand wash in
warm, sudsy water. Rinse, and wipe dry.
*
WARNING
Injury Hazard
Unplug mixer before touching
beaters.
Failure to do so can result in
broken bones, cuts or bruises.
Power Cord
Wipe cord with a warm, sudsy cloth; then
wipe clean with a damp cloth. Dry with a
soft cloth.
* These accessories are not included with all
hand mixer models; see “Accessories for your
KitchenAid® Hand Mixer” for details and
information on ordering.
8

Troubleshooting
First try the solutions suggested here and
possibly avoid the cost of service.
If your hand mixer should
malfunction or fail to operate, check
the following:
1. Is the hand mixer plugged in?
2. Is the fuse in the circuit to the hand
mixer in working order? If you have
a circuit breaker box, make sure the
circuit is closed.
3. Try unplugging the hand mixer, then
plug it back in.
Raspberry Cream Cheese Spread
1 package (8 oz)
(225 g) light cream
cheese
3 tbs (45 mL) seedless
raspberry preserves
1
/4 tsp (1 mL) grated
orange peel
Place all ingredients in small bowl. Beat on Speed 4
about 1 minute, or until smooth and creamy, scraping
bowl once or twice. Serve with mini-bagels or crackers,
if desired.
Yield: 10 servings (2 tbs [25 mL] per serving).
Per serving: About 64 cal., 2 g protein, 6 g carb, 4 g total
fat, 2 g saturated fat, 8 mg cholesterol, 128 mg sodium.
If the problem cannot be fixed with the
steps provided in this section, then
contact KitchenAid or an Authorized
Service Center.
U.S.A./Puerto Rico: 1-800-541-6390,
Canada: 1-800-807-6777,
Mexico: 01-800-024-17-17
(JV Distribuciones)
or
01-800-902-31-00
(Industrias Birtman)
See the KitchenAid Warranty and Service
section for additional details. Do not
return the hand mixer to the retailer – they
do not provide service.
ENGLISH
Honey-Walnut Cream Cheese Spread
1 package (8 oz)
(225 g) light cream
cheese
2 tbs (25 mL) honey
1
/4 cup (50 mL) chopped
walnuts
Place cream cheese and honey in small bowl. Beat on
Speed 4 about 1 minute, or until smooth and creamy,
scraping bowl once or twice. Add walnuts. Beat on Speed
2 about 20 seconds, or until combined. Serve with minibagels or crackers, if desired.
Yield: 10 servings (2 tbs [25 mL] per serving).
Per serving: About 80 cal., 3 g protein, 5 g carb, 6 g total
fat, 3 g saturated fat, 8 mg cholesterol, 128 mg sodium.
9

Mashed Potatoes
2 lbs (1 kg) (about
6 medium) russet
potatoes, peeled, cut
into quarters, and
ENGLISH
boiled
1
/4 cup (50 mL)
margarine or butter,
softened
1
/2 tsp (2 mL) salt
1
/8 tsp (0.5 mL) black
pepper
1
/4 -1/3 cup (50-75 mL)
lowfat milk, warmed
Drain potatoes well. Return to hot saucepan. Add
margarine, salt, and pepper. Beat on Speed 3 about
20 seconds, or until potatoes are broken up. Continuing
on Speed 3, slowly add milk. Beat about 45 seconds, or
until smooth. Serve immediately.
1
Yield: 8 servings (about
/2 cup [125 mL] per serving).
Per serving: About 137 cal., 3 g protein, 19 g carb,
6 g total fat, 1 g saturated fat, 0 mg cholesterol, 221 mg
sodium.
VARIATIONS
Garlic Mashed Potatoes
Add 6 to 8 large, peeled cloves garlic to potatoes
before boiling.
Yield: 8 servings (about
1
/2 cup [125 mL] per serving).
Per serving: About 140 cal., 3 g protein, 20 g carb,
6 g total fat, 1 g saturated fat, 0 mg cholesterol, 222 mg
sodium.
Carrot and Leek Mashed Potatoes
Add 2 medium carrots, cut into 1" (2.5 cm) pieces, and
1 medium leek, cut into 1" (2.5 cm) pieces, to potatoes
before boiling. Cook until tender.
Yield: 10 to 12 servings (about
1
/2 cup [125 mL] per
serving).
Per serving: About 154 cal., 3 g protein, 23 g carb,
6 g total fat, 1 g saturated fat, 0 mg cholesterol, 231 mg
sodium.
Pesto Mashed Potatoes
Prepare potatoes as directed. Add
1
/4 cup (50 mL)
prepared pesto. Beat on Speed 3 about 15 seconds, or
until blended.
Yield: 8 servings (about
1
/2 cup [125 mL] per serving).
Per serving: About 176 cal., 4 g protein, 20 g carb,
10 g total fat, 2 g saturated fat, 1 mg cholesterol,
276 mg sodium.
Savory Sweet Potatoes
2 lbs (1 kg) sweet
potatoes (about 3
medium), scrubbed,
unpeeled, and boiled
1
/3 cup (75 mL) thinly
sliced green onions
1
/2 tsp (2 mL) dried
marjoram leaves
Dash cayenne pepper
1
/3 cup (75 mL) reduced-
sodium chicken broth
1
/2 cup (125 mL) nonfat
sour cream
Drain potatoes well; cool slightly. Cut ends from potatoes.
Slip off and discard peels.
Place potatoes, onions, marjoram, and pepper in large
bowl. Beat on Speed 2 about 10 seconds, or until
potatoes are broken up. Add broth. Beat on Speed 3
about 30 seconds, or until smooth. Add sour cream. Beat
on Speed 1 about 20 seconds, or until blended. Serve
immediately.
1
Yield: 8 servings (about
/2 cup (125 mL) per serving).
Per serving: About 166 cal., 4 g protein, 36 g carb,
1 g total fat, 0 g saturated fat, 0 mg cholesterol, 50 mg
sodium.
10

Apple Waffles
2 eggs, separated
3 tbs (45 mL)
margarine or butter,
melted
1 cup (250 mL) lowfat
milk
3
/4 cups (425 mL)
1
all-purpose flour
1 tbs (15 mL) baking
powder
1
/2 tsp (2 mL) cinnamon
1 cup (250 mL)
shredded apple
1 medium ripe peach,
peeled and chopped
1
/2 cup (125 mL)
reduced-fat
sour cream
1
/4 cup (50 mL)
margarine or
butter, softened
1
/2 cup (125 mL)
sugar, divided
1
/4 cup (50 mL) fat-free
egg substitute
1 cup (250 mL)
all-purpose flour
1
/2 tsp (2 mL) baking
powder
1
/2 tsp (2 mL) baking
soda
1
/4 tsp (1 mL) salt
1 peach, peeled and
sliced
Place egg whites in small bowl. Beat on Speed 6 about
40 seconds, or until stiff peaks form. Set aside.
Place egg yolks, margarine, and milk in medium bowl.
Beat on Speed 1 about 20 seconds, or until blended. Add
flour, baking powder, and cinnamon. Beat on Speed 2
about 30 seconds, or until blended. Beat on Speed 3
about 20 seconds, or until smooth. Add apple. Beat on
Speed 1 about 15 seconds, or until combined. Add egg
whites. Beat on Speed 2 about 15 seconds, or
until blended.
Spray waffle iron with no-stick cooking spray. Heat
according to manufacturer’s directions. Pour about
1
/3 cup (75 mL) batter for each waffle onto iron. Bake
until steaming stops and waffles are golden brown.
Yield: 6 servings (1 waffle per serving).
Per serving: About 242 cal., 7 g protein, 34 g carb,
9 g total fat, 2 g saturated fat, 75 mg cholesterol,
239 mg sodium.
Peach Coffee Cake
Spray 8" x 8" x 2" (20 cm x 20 cm x 5 cm) baking dish
with no-stick cooking spray.
Place chopped peach in small bowl. Mash with fork. Add
sour cream. Beat on Speed 1 about 1 minute, or until
well mixed.
Place margarine and sugar, reserving 1 tbs (15 mL), in
medium bowl. Beat on Speed 3 about 1 minute, or until
fluffy. Add egg substitute. Beat on Speed 3 about
20 seconds, or until smooth. Add peach mixture,
reserving
30 seconds, or until smooth. Add flour, baking powder,
baking soda, and salt. Beat on Speed 2 about 30 seconds,
or until blended. Beat on Speed 3 for 30 to 60 seconds,
or just until smooth.
Pour batter into baking dish. Drizzle with reserved 1/3 cup
(75 mL) peach mixture. Top with peach slices. Sprinkle
with reserved 1 tbs (15 mL) sugar. Bake at 350°F (180°C)
for 30 to 35 minutes, or until wooden pick inserted in
center comes out clean. Cool slightly. Serve warm.
Yield: 9 servings.
Per serving: About 169 cal., 3 g protein, 26 g carb,
6 g total fat, 1 g saturated fat, 4 mg cholesterol, 227 mg
sodium.
1
/3 cup (75 mL). Beat on Speed 3 about
ENGLISH
11

Whipped Cream
1 cup (250 mL) heavy
cream
2 tbs (25 mL)
powdered sugar
ENGLISH
1
/2 tsp (2 mL) vanilla
Place cream in medium bowl. Beat on Speed 6 about
30 seconds, or until soft peaks form. Continuing on
Speed 6, gradually add powdered sugar and vanilla.
Beat about 30 seconds, or until stiff.
Yield: 16 servings (2 tbs [25 mL] per serving).
Per serving: About 48 cal., 0 g protein, 1 g carb,
5 g total fat, 3 g saturated fat, 17 mg cholesterol, 5 mg
sodium.
VARIATIONS:
Amaretto Whipped Cream
Substitute 2 tbs (25 mL) amaretto liqueur for
the vanilla.
Per serving: About 54 cal., 0 g protein, 2 g carb,
5 g total fat, 3 g saturated fat, 17 mg cholesterol, 6 mg
sodium.
Cappuccino Whipped Cream
Add 2 tsp (10 mL) instant coffee granules or crystals to
cream before whipping. Increase powdered sugar to
1
/4 cup (50 mL).
Per serving: About 52 cal., 0 g protein, 2 g carb,
5 g total fat, 3 g saturated fat, 17 mg cholesterol, 6 mg
sodium.
Spiced Whipped Cream
1
Add
/4 tsp (1 mL) cinnamon and 1/8 tsp (0.5 mL) nutmeg
with powdered sugar.
Per serving: About 48 cal., 0 g protein, 1 g carb,
5 g total fat, 3 g saturated fat, 17 mg cholesterol, 5 mg
sodium.
Lemon Pudding Cake
3 eggs, separated
3
/4 cup (175 mL)
lowfat milk
1
/4 cup (50 mL) fresh
lemon juice
1 tsp (5 mL) grated
lemon peel
1 cup (250 mL) sugar
3
/4 cup (175 mL)
all-purpose flour
1
/4 tsp (1 mL) salt
Place egg whites in medium bowl. Beat on Speed 6 for
1
1 to 1
/2 minutes, or until stiff peaks form. Set aside.
Place egg yolks in large bowl. Beat on Speed 2 about
30 seconds. Add milk, lemon juice, and grated peel.
Beat on Speed 2 about 30 seconds, or until combined.
Add remaining ingredients. Beat on Speed 1 about 10 to
20 seconds, or until blended. Beat on Speed 2 about
1 minute, or until smooth and frothy. Fold in egg whites
with spatula, just until combined.
1
Spoon batter into ungreased 1
/2 qt (11/2 L) soufflé or
casserole dish. Place dish in large, shallow baking pan.
Add hot water to pan to 1" (2.5 cm) depth. Place in oven.
Bake at 350°F (180°C) for 35 to 45 minutes, or until
golden brown. Cool slightly. Serve warm.
Yield: 6 servings.
Per serving: About 241 cal., 6 g protein, 48 g carb,
3 g total fat, 1 g saturated fat, 109 mg cholesterol,
143 mg sodium.
12

Oatmeal-Nut Snack Cake
11/2 cups (375 mL) quick-
cooking oats
1
/4 cups (300 mL)
1
boiling water
1
/2 cup (125 mL)
margarine or butter,
softened
1
/2 cups (375 mL) firmly
1
packed brown sugar
2 eggs
1
/2 cups (375 mL) all-
1
purpose flour
1 tsp (5 mL) baking
soda
1
/2 tsp (2 mL) baking
powder
1 tsp (5 mL) cinnamon
1
/4 tsp (1 mL) salt
1
/2 cup (125 mL)
chopped walnuts
Buttercream Frosting
1/4 cup (50 mL) butter,
softened
1
/2 tsp (2 mL) vanilla
2 tbs (25 mL) lowfat
milk
2 cups (500 mL)
powdered sugar
Grease and flour 13" x 9" x 2" (33 cm x 23 cm x 5 cm)
baking pan. Combine oats and boiling water in medium
bowl. Let stand 10 minutes.
Place margarine, brown sugar, and eggs in large bowl.
Beat on Speed 2 about 30 seconds, or until blended. Beat
on Speed 3 about 1 minute, or until smooth and creamy.
Add flour, baking soda, baking powder, cinnamon, and
salt. Beat on Speed 2 about 30 seconds, or until blended.
Beat on Speed 3 about 1 minute, or until well mixed.
Add oatmeal. Beat on Speed 2 about 30 seconds, or
until combined. Add walnuts. Beat on Speed 2 about
10 seconds, or until combined.
Spread batter in pan. Bake at 350°F (180°C) for 30 to
35 minutes, or until toothpick inserted in center comes
out clean. Cool completely. Frost with Maple Buttercream
Frosting (below), if desired.
Yield: 16 servings.
Per serving: About 235 cal., 4 g protein, 35 g carb,
9 g total fat, 2 g saturated fat, 27 mg cholesterol,
206 mg sodium.
Place all ingredients in large bowl. Beat on Speed 4 for
30 to 60 seconds, or until smooth and creamy.
Yield: 16 servings (frosting for 13" x 9" x 2"
[33 cm x 23 cm x 5 cm] cake).
Per serving: About 75 cal., 0 g protein, 13 g carb,
3 g total fat, 2 g saturated fat, 8 mg cholesterol, 30 mg
sodium.
VARIATIONS
Maple Buttercream Frosting
1
/4 tsp (1 mL) maple extract.
Add
Yield: 16 servings (frosting for 13" x 9" x 2"
[33 cm x 23 cm x 5 cm] cake).
Per serving: About 75 cal., 0 g protein, 13 g carb,
3 g total fat, 2 g saturated fat, 8 mg cholesterol, 30 mg
sodium.
ENGLISH
13

KitchenAid® Hand Mixer Warranty
Length of
Warranty:
50 United States, the
District of Columbia,
ENGLISH
Canada, and Puerto
Rico: One-year limited
warranty from date of
purchase.
DISCLAIMER OF IMPLIED WARRANTIES; LIMITATION OF REMEDIES IMPLIED
WARRANTIES, INCLUDING TO THE EXTENT APPLICABLE WARRANTIES OF
MERCHANTABILITY OR FITNESS FOR A PARTICULAR PURPOSE, ARE EXCLUDED TO THE
EXTENT LEGALLY PERMISSIBLE. ANY IMPLIED WARRANTIES THAT MAY BE IMPOSED BY
LAW ARE LIMITED TO ONE YEAR, OR THE SHORTEST PERIOD ALLOWED BY LAW. SOME
STATES AND PROVINCES DO NOT ALLOW LIMITATIONS OR EXCLUSIONS ON HOW LONG
AN IMPLIED WARRANTY OF MERCHANTABILITY OR FITNESS LASTS, SO THE ABOVE
LIMITATIONS OR EXCLUSIONS MAY NOT APPLY TO YOU.
KitchenAid
Will Pay For:
50 United States, the
District of Columbia
and Canada: Hassle-free
replacement of your hand
mixer. See the following
page for details on how to
arrange for replacement.
OR
In Puerto Rico:
The replacement parts
and repair labor costs to
correct defects in materials
and workmanship. Service
must be provided by an
Authorized KitchenAid
Service Center. To arrange
for service, follow the
instructions.
KitchenAid
Will Not Pay For:
A. Repairs when Hand
Mixer is used in other
than normal single
family home use.
B. Damage resulting from
accident, alteration,
misuse or abuse or
use with products
not approved by
KitchenAid.
C. Replacement parts
or repair labor costs
for hand mixer when
operated outside the
country of purchase.
IF THIS PRODUCT FAILS TO WORK AS WARRANTED, CUSTOMER’S SOLE AND EXCLUSIVE
REMEDY SHALL BE REPAIR OR REPLACEMENT ACCORDING TO THE TERMS OF THIS
LIMITED WARRANTY. KITCHENAID AND KITCHENAID CANADA DO NOT ASSUME ANY
RESPONSIBILITY FOR INCIDENTAL OR CONSEQUENTIAL DAMAGES. This warranty gives
you specific legal rights and you may also have other rights which vary from state to
state or province to province.
14

Hassle-Free Replacement Warranty –
50 United States and District of Columbia
We’re so confident the quality of our
products meets the exacting standards of
KitchenAid that, if your hand mixer should
fail within the first year of ownership,
KitchenAid will arrange to deliver an
identical or comparable replacement to
your door free of charge and arrange to
have your original hand mixer returned
to us. Your replacement unit will also be
covered by our one year limited warranty.
Please follow these instructions to receive
this quality service.
If your KitchenAid
within the first year of ownership, simply
call our toll-free Customer Satisfaction
Center at 1-800-541-6390 Monday
through Friday, 8 a.m. to 8 p.m. (Eastern
Time), or Saturday, 10 a.m. to 5 p.m. Give
the consultant your complete shipping
address. (No P.O. Box numbers, please.)
When you receive your replacement
hand mixer, use the carton and packing
materials to pack up your original hand
mixer. In the carton, include your name
and address on a sheet of paper along
with a copy of the proof of purchase
(register receipt, credit card slip, etc.).
®
hand mixer should fail
Hassle-Free Replacement Warranty – Canada
We’re so confident the quality of our
products meets the exacting standards
of the KitchenAid
hand mixer should fail within the first
year of ownership, KitchenAid Canada
will replace your hand mixer with an
identical or comparable replacement. Your
replacement unit will also be covered
by our one year limited warranty. Please
follow these instructions to receive this
quality service.
®
brand that, if your
If your KitchenAid
fail within the first year of ownership,
take the hand mixer or ship collect to an
Authorized KitchenAid Service Centre.
In the carton include your name and
complete shipping address along with a
copy of the proof of purchase (register
receipt, credit card slip, etc.). Your
replacement hand mixer will be returned
prepaid and insured. If you are unable to
obtain satisfactory service in this manner
call our toll-free Customer eXperience
Centre at 1-800-807-6777.
Or write to us at:
Customer eXperience Centre
KitchenAid Canada
1901 Minnesota Court
Mississauga, ON L5N 3A7
®
hand mixer should
ENGLISH
How To Arrange for Warranty Service
in Puerto Rico
Your KitchenAid® hand mixer is covered
by a one-year limited warranty from
the date of purchase. KitchenAid will
pay for replacement parts and labor
costs to correct defects in materials and
workmanship. Service must be provided by
an Authorized KitchenAid Service Center.
Take the hand mixer or ship prepaid and
insured to an Authorized KitchenAid
Service Center. Your repaired hand mixer
will be returned prepaid and insured.
If you are unable to obtain satisfactory
service in this manner, call toll-free
1-800-541-6390 to learn the location
of a Service Center near you.
15
 Loading...