

KitchenAid KGCV465MSS, KGCV465MMT Technical Education

TECHNICAL EDUCATION
Pro Line
Gas Cooktop
KAC-40
With TripleTier
Crown Burner
Models: KGCV465MSS & KGCV465MMT
JOB AID 4317358

FORWARD
This KitchenAid Job Aid, “Pro Line Gas Cooktop With TripleTier Crown Burner,” (Part No.
4317358), provides the technician with information on the installation, operation, and service of the
Pro Line Gas Cooktop. It is to be used as a training Job Aid and Service Manual. For specific
information on the model being serviced, refer to the “Use and Care Guide,” or “Wiring Diagram”
provided with the cooktop.
The Wiring Diagram used in this Job Aid is typical and should be used for training purposes only.
Always use the Wiring Diagram supplied with the product when servicing the unit.
GOALS AND OBJECTIVES
The goal of this Job Aid is to provide detailed information that will enable the service technician to
properly diagnose malfunctions and repair the Pro Line Gas Cooktop.
The objectives of this Job Aid are to:
• Understand and follow proper safety precautions.
• Successfully troubleshoot and diagnose malfunctions.
• Successfully perform necessary repairs.
• Successfully return the cooktop to its proper operational status.
WHIRLPOOL CORPORATION assumes no responsibility for any repairs made
on our products by anyone other than Authorized Service Technicians.
Copyright © 2004, Whirlpool Corporation, Benton Harbor, MI 49022
- ii -

TABLE OF CONTENTS
Page
GENERAL............................................................................................................................... 1-1
KitchenAid Model & Serial Number Designations.............................................................. 1-1
Model & Serial Number Label And Wiring Diagram Locations .......................................... 1-2
Specifications..................................................................................................................... 1-3
KitchenAid Warranty .......................................................................................................... 1-4
INSTALLATION INFORMATION ........................................................................................... 2-1
L.P. Gas Conversion.......................................................................................................... 2-1
THEORY OF OPERATION ..................................................................................................... 3-1
TripleTier
Crown Burner ................................................................................................... 3-1
COMPONENT ACCESS ......................................................................................................... 4-1
Component Locations ........................................................................................................ 4-1
Removing The Burners And Cooktop ................................................................................ 4-2
Removing A Burner Base & Ignitor .................................................................................... 4-4
Removing A Standard Gas Valve And The Ignition Switch Assembly............................... 4-6
Removing The TripleTier
Crown Burner Ignition Switch And Gas Valve ......................... 4-8
Removing The Spark Module & Power Cord ................................................................... 4-10
COMPONENT TESTING ........................................................................................................ 5-1
Ignition Switches ................................................................................................................ 5-1
WIRING DIAGRAM................................................................................................................. 6-1
Wiring Diagram .................................................................................................................. 6-1
- iii -

— NOTES —
- iv -

GENERAL
KITCHENAID MODEL & SERIAL NUMBER DESIGNATIONS
MODEL NUMBER
MODEL NUMBER K GC V 4 6 5 M S S 0
K = KITCHENAID BRAND
PRODUCT IDENTIFICATION
EC = ELECTRIC COOKTOP
GC = GAS COOKTOP
MERCHANDISING SCHEME
C = CERAMIC GLASS
D = DOWNDRAFT VENT
E = ELECTRONICS
G = GRILL / GRIDDLE
M = MODULAR / DOWNDRAFT
N = INTERNATIONAL COLLECTION
P = COMMERCIAL
S = STANDARD PORCELAIN METAL
T = TEMPERED GLASS
V = VBL PRO LINE SERIES
X = 208 VOLTS
CAPACITY / SIZE / SERIES / CONFIGURATION
1ST POSITION 2ND POSITION
1 = STANDARD 0 = 30" WIDE
2 = GRILL / GRIDDLE 2 = 42˝ OR 12˝ WIDE
3 = TEMPERED GLASS 3 = 33˝ WIDE
4 = COMMERCIAL 5 = 15˝ WIDE
5 = CERAMIC GLASS 6 = 36˝ WIDE
8 = MODULAR DOWNDRAFT 8 = 48˝ WIDE
0 = 2 BURNER / ELE. SYS.
FEATURES
0 = STANDARD ELEMENTS / BURNERS
1 = RADIANT ELEMENTS
2 = DUAL ELEMENTS
3 = SEALED BURNERS WITH GRIDDLE
4 = SEALED BURNERS WITH GRILL & GRIDDLE
5 = SEALED BURNERS / CAST ELEMENTS
OR SEALED BURNERS WITH TRIPLE TIER
6 = 5 BURNERS / ELEMENTS
7 = HALOGEN ELEMENTS / OR 6 BURNERS
8 = TOUCH CONTROLS
9 = INDUCTION
YEAR OF INTRODUCTION
M = 2003
COLOR CODE
MT = METEORITE
SS = BRUSHED STAINLESS STEEL
ENGINEERING CHANGE
0 = BASIC RELEASE
SERIAL NUMBER
SERIAL NUMBER X P 2 7 06472
MANUFACTURING SITE
X = OXFORD
YEAR OF PRODUCTION
P = 2003
WEEK OF PRODUCTION
27th Week
PRODUCT SEQUENCE NUMBER
1-1

MODEL & SERIAL NUMBER LABEL
AND WIRING DIAGRAM LOCATIONS
The Model/Serial Number label and Wiring Diagram locations are shown below.
Model & Serial Number Label Location
(Bottom Of Front Panel)
Wiring Diagram Location
(Behind Front Panel)
1-2
SPECIFICATIONS
p
p
(
y)
p
g
Model Number KGCV465MMT / SS
Release Info
Model Description Sealed Cookto
Size-Configuration
Dimensions/Specifications
Exterior Dimensions
Overall Height (in)
Overall Width (in) 36"
Overall Depth (in) 26 7/8"
Cutout Height (in) (Measure Or Min/Max) 7 1/4"
Cutout Width (in) (Measure Or Min/Max)
Cutout Depth (in) (Measure Or Min/Max)
Weight
Net Weight (lbs) 151
Shipping Weight (lbs) 171
Ratings
Electric Voltage/Phase/Frequency (Hz) 120 V/Single Phase/60 Hz
Circuit Amps 15 Am
Exterior
Cooktop Controls Push-to-Turn
Cooktop Control Type Infinite
Cooktop Control # 5
Gas Cooktop Burners Yes
Gas Burner Type Sealed
Gas Burner Configuration
Gas R Front Output (BTU)(Nat/LP) 6000 BTU/5000 BTU
Gas L Front Output (BTU)(Nat/LP) 6000 BTU/5000 BTU
Gas R Rear Output (BTU)(Nat/LP) 15000 BTU/12000 BTU
Gas L Rear Output (BTU)(Nat/LP) 15000 BTU/12000 BTU
Gas Center Output (BTU)(Nat/LP)
Gas Ignition Electronic
LP Conversion Kit Included
Interior Accessories
Wok Ring InstaWok(TM) Ring Included
Miscellaneous
Installation Instructions Part/Comment
Service Manual Part/Comment 4317358
Use & Care Guide Part/Comment 8285400
Agency Approvals AGA,CGA
Power Cord Length & # Wires 3 1/2 Foot/3 Wire
Warranty
Full 12 Mo
Extended
Gas Burners 2nd throu
36" with Low Simmer to
Ultra Power Wok Burner
7 1/2" (Not Including Grates or
Backs
22 1/4" (Cutout Back to Corner
Triple Tier Flame: Ultra Simmer
lash); Backsplash: 6 1/2"
36" (Front Console); 35 1/4"
Cooktop Bod
of Notch); Notch: Varies
600 BTU/600 BTU to Ultra
Power 18000 BTU/14000 BTU
8285418; LP Conversion,
8285441
h 5th year, parts
1-3

KITCHENAID WARRANTY
ONE-YEAR FULL WARRANTY
For one year from the date of purchase, when this appliance is operated and maintained according to instructions attached to or furnished with the product, KitchenAid will pay for factory specified parts and repair labor
costs to correct defects in materials or workmanship. Service must be provided by a KitchenAid designated
service company.
SECOND THROUGH FIFTH YEAR LIMITED WARRANTY ON ELECTRIC ELEMENTS,
CERAMIC GLASS COOKTOP, GAS BURNERS, AND SOLID STATE TOUCH CONTROL SYSTEM
On electric ranges and electric cooktops, in the second through fifth years from the date of purchase, when this
appliance is operated and maintained according to instructions attached to or furnished with the product,
KitchenAid will pay for factory specified parts for any electric element to correct defects in materials or workmanship.
On ceramic glass ranges and ceramic glass cooktops, in the second through fifth years from the date of purchase, when this appliance is operated and maintained according to instructions attached to or furnished with
the product, KitchenAid will pay for factory specified parts for the ceramic glass cooktop. KitchenAid warrants
that the ceramic glass cooktop will not discolor, the cooktop pattern will not wear off, the rubber seal between the
ceramic glass cooktop and porcelain edge will not crack, the ceramic glass cooktop will not crack due to thermal
shock and the surface unit elements will not burn out.
On gas ranges and gas cooktops, in the second through fifth years from the date of purchase, when this appliance is operated and maintained according to instructions attached to or furnished with the product, KitchenAid
will pay for factory specified parts for any gas burner to correct defects in materials or workmanship.
On ranges and built-in ovens, in the second through fifth years from the date of purchase, when this appliance is
operated and maintained according to instructions attached to or furnished with the product, KitchenAid will pay
for factory specified parts for the porcelain oven cavity/inner door if the part rusts through due to defects in
materials or workmanship. KitchenAid will pay for factory specified parts for solid state touch control system and
Magnetron tube in combination ovens to correct defects in materials or workmanship.
SIXTH THROUGH TENTH YEAR LIMITED WARRANTY ON RANGES AND BUILT-IN OVENS
PORCELAIN OVEN CAVITY/INNER DOOR
On ranges and built-in ovens only, in the sixth through tenth years from date of purchase, when this appliance is
operated and maintained according to instructions attached to or furnished with the product, KitchenAid will pay
for factory specified parts for the oven cavity/inner door if the part rusts through due to defects in materials or
workmanship.
KitchenAid will not pay for:
1. Service calls to correct the installation of your appliance, to instruct you how to use your appliance, to replace
house fuses or correct house wiring, or to replace owner-accessible light bulbs.
2. Repairs when your appliance is used in other than normal, single-family household use.
3. Pickup and delivery. Your appliance is designed to be repaired in the home.
4. Damage resulting from accident, alteration, misuse, abuse, fire, flood, improper installation, acts of God or
use of products not approved by KitchenAid or KitchenAid Canada.
5. Repairs to parts or systems resulting from unauthorized modifications made to the appliance.
6. Replacement parts or repair labor costs for units operated outside the United States or Canada.
7. In Canada, travel or transportation expenses for customers who reside in remote areas.
8. Any labor costs during the limited warranty periods.
KITCHENAID AND KITCHENAID CANADA SHALL NOT BE LIABLE
FOR INCIDENTAL OR CONSEQUENTIAL DAMAGES.
Some states or provinces do not allow the exclusion or limitation of incidental or consequential damages, so this
exclusion or limitation may not apply to you. This warranty gives you specific legal rights, and you may also have
other rights which vary from state to state or province to province.
Outside the 50 United States and Canada, this warranty does not apply. Contact your authorized
KitchenAid dealer to determine if another warranty applies.
If you need service, first see the “Troubleshooting” section of the Use and Care Guide. After checking “Troubleshooting,” additional help can be found by checking the “Assistance or Service” section, or by calling the
KitchenAid Customer Interaction Center, 1-800-422-1230 (toll-free), from anywhere in the U.S.A. In Canada,
contact your KitchenAid designated service company or call 1-800-807-6777.
1-4
INSTALLATION INFORMATION
L.P. GAS CONVERSION
To convert the cooktop for use with L.P. gas,
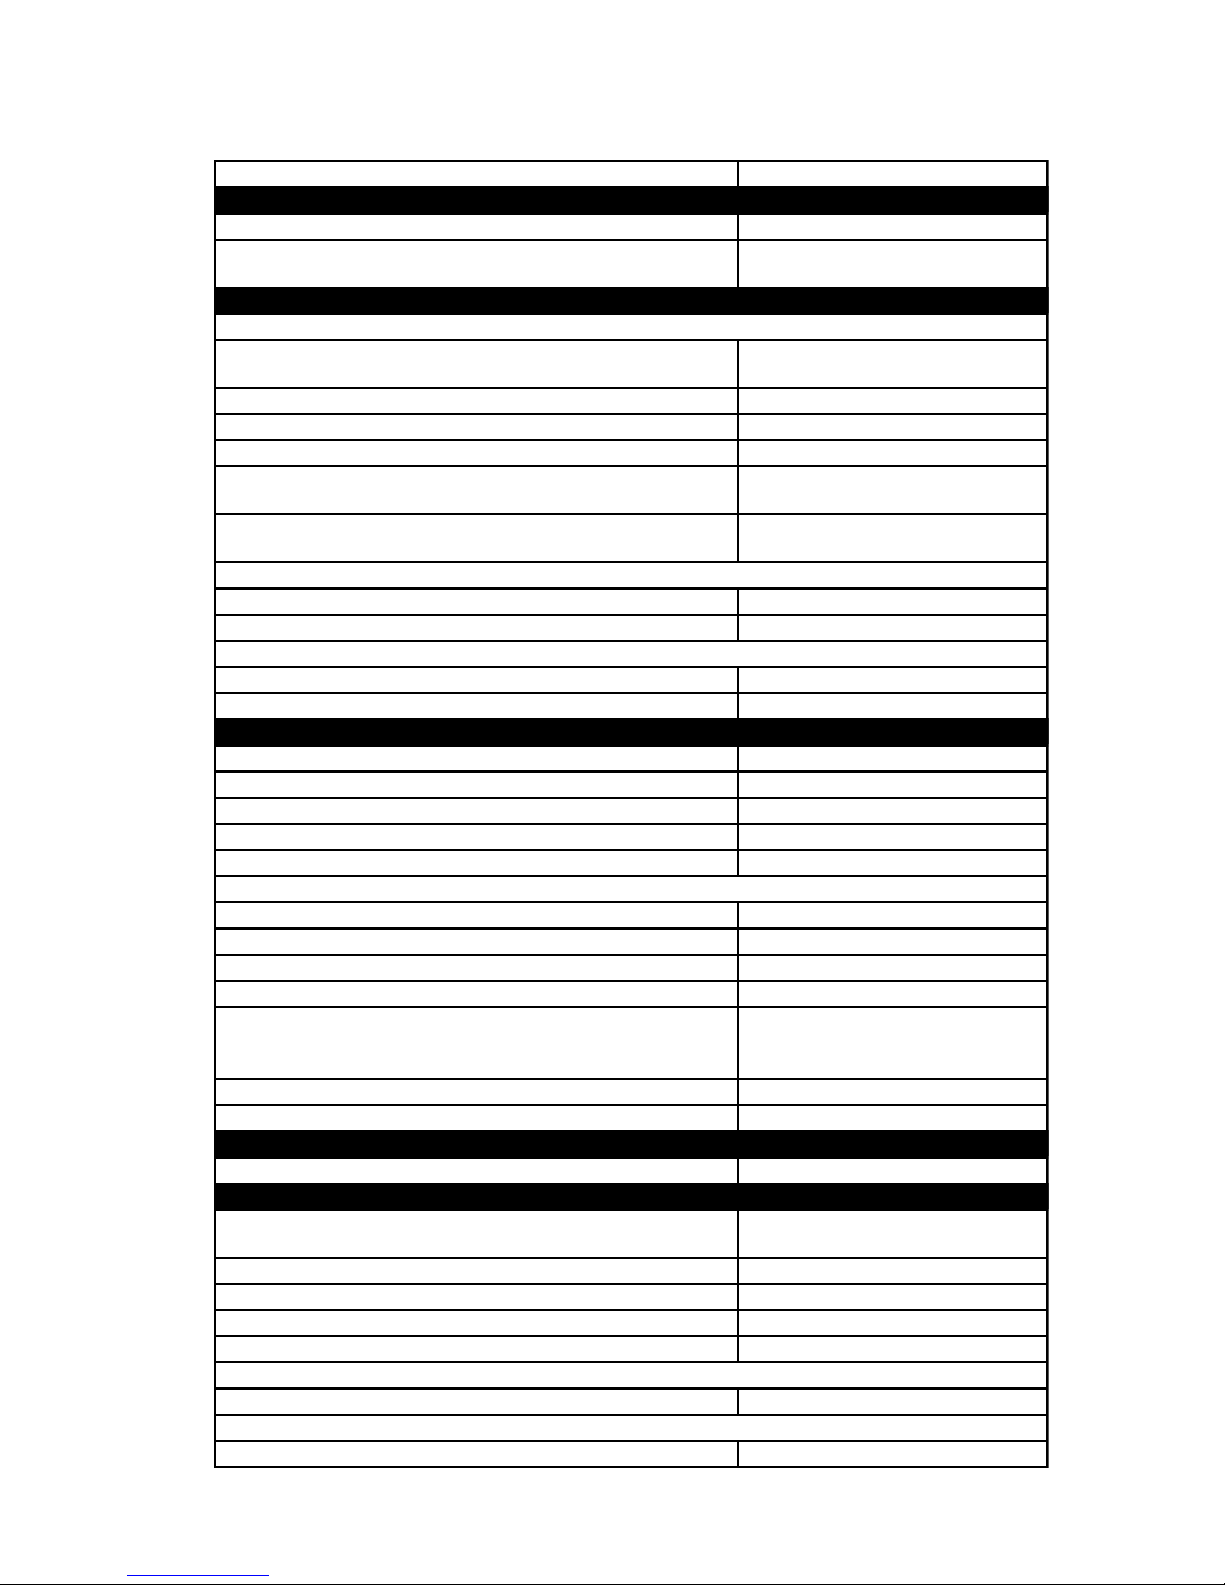
WARNING
perform the following steps.
Electrical Shock Hazard
Disconnect power before
servicing.
Replace all parts and panels
before operating.
Failure to do so can result in
death or electrical shock.
Fire Hazard
Shut off gas supply line valve.
Make all conversions before
turning gas supply valve back on.
Failure to follow these instructions
can result in explosion, fire, or
other injury.
NOTE: Gas conversion from natural to L.P.
gas must be done by a qualified installer.
1. Turn off gas supply to the cooktop.
2. Disconnect power to the cooktop.
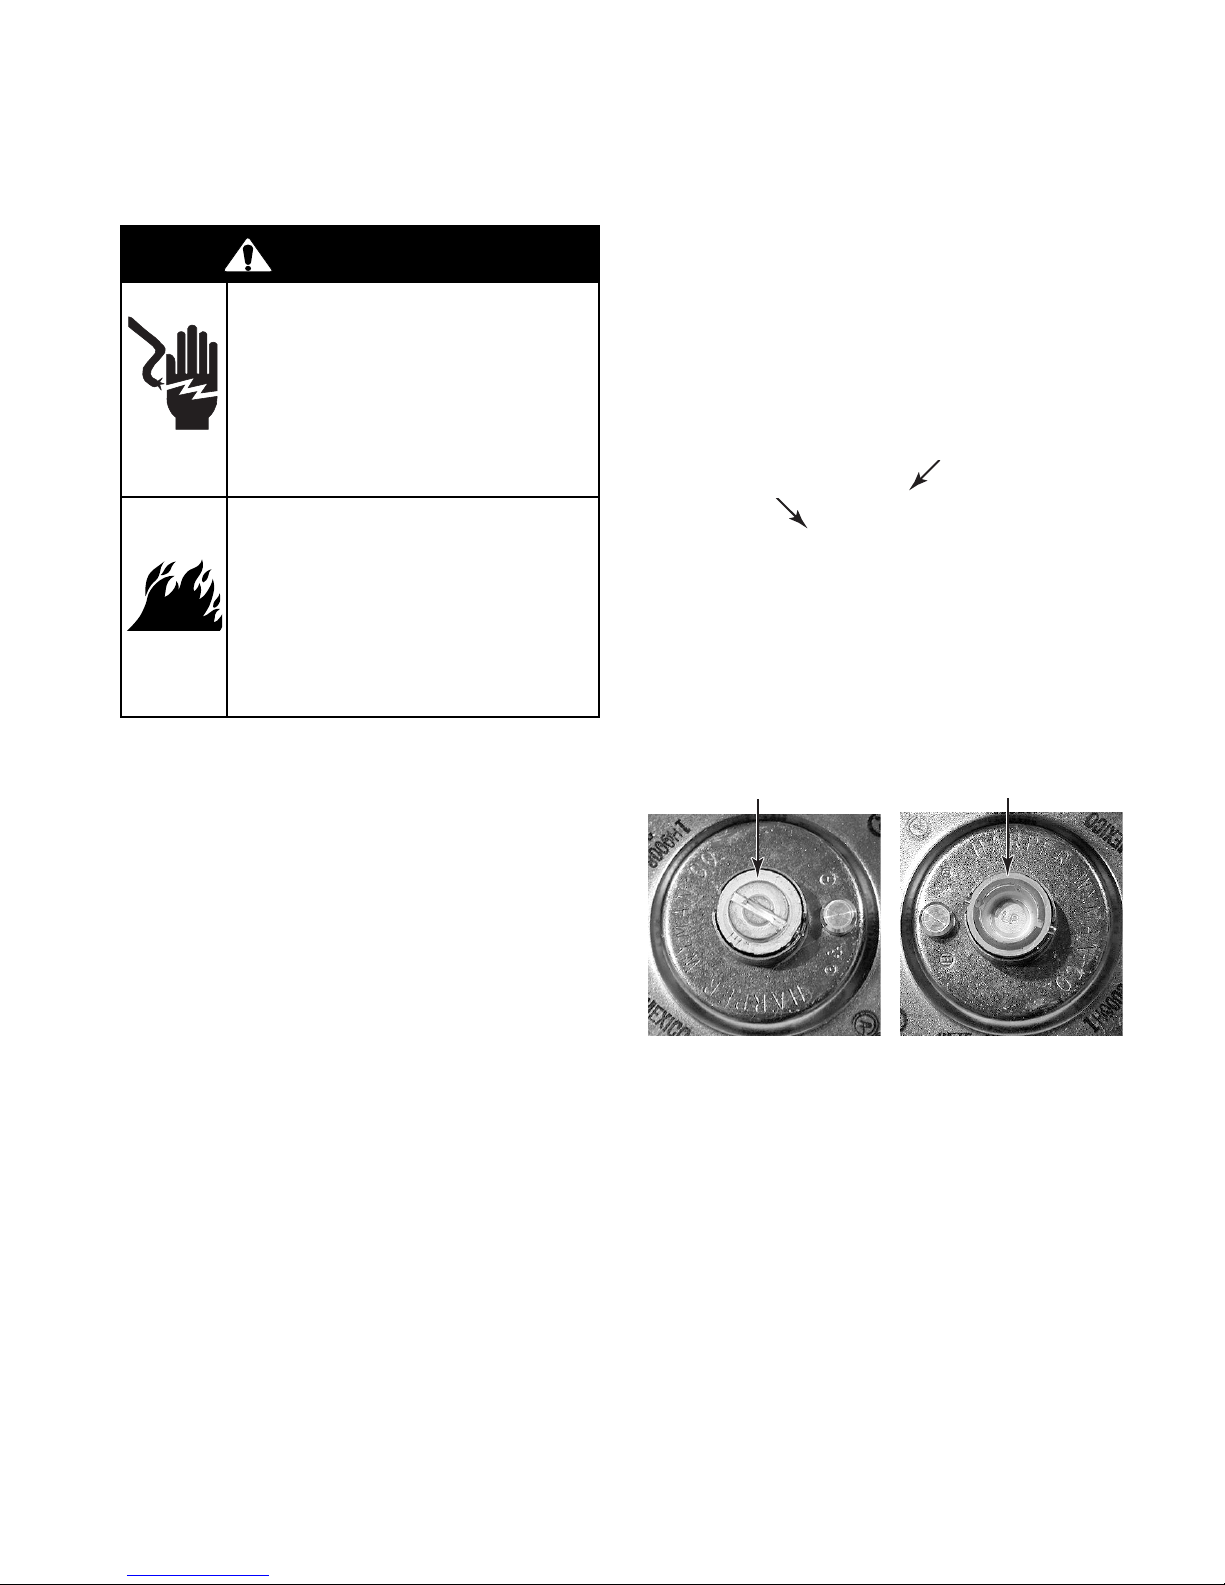
3. Use a screwdriver and remove the access
cap on the gas distribution valve.
Access Cap
Gas Distribution
Valve
4. Turn the access cap so that the letters L.P.
are facing up and then reinstall the cap on
the valve.
NAT Position L.P. Position
2-1
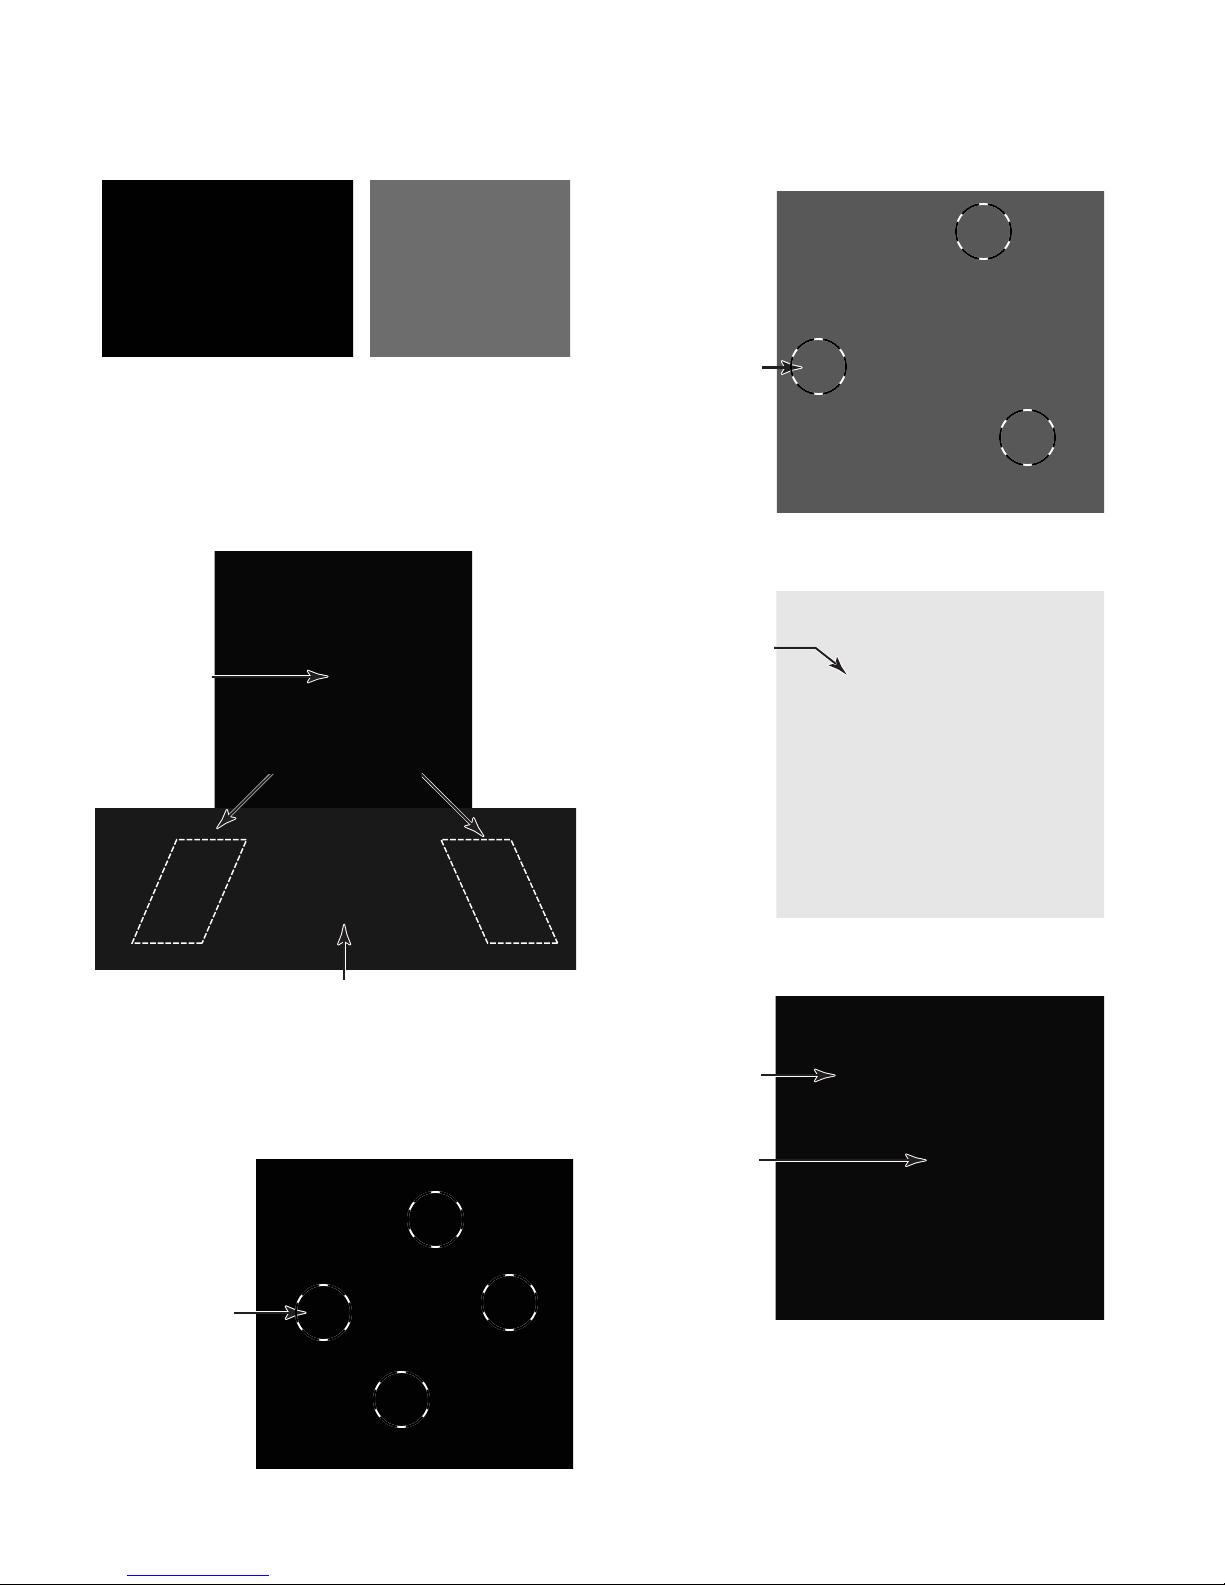
5. Remove the grates from the cooktop and
the burner caps from the burner bases.
6. To convert the left and right front and
rear burners, use a 7 mm nut driver, and
remove the orifices . NOTE: Place a small
piece of masking tape along the inside
edge of the nut driver to help keep the
orifice in the driver.
b) Remove the three T-20 torx screws
from the burner cover and remove the
cover.
Burner Cover
Screw (1 of 3)
c) Remove the two T-20 torx screws from
the orifice cover and remove the cover.
Burner
Orifice
TripleTier Crown Burner
7. To convert the TripleTier Crown
burner:
a) Remove the four T-20 torx screws from
the burner ring and remove the ring.
Orifice Cover
(2 Screws)
d) Use a 7 mm nut driver and remove the
two burner orifices.
External
Burner
Orifice
Internal
Burner
Orifice
Burner Ring
Screw (1 of 4)
2-2
 Loading...