

KitchenAid KGCV465 User Manual
PRO LINE™ COMMERCIAL STYLE GAS COOKTOP
Use & Care Guide
For questions about features, operation/performance, parts accessories or service, call:
In Canada, call for assistance
1-800-461-5681
www.kitchenaid.com
, for installation and service, call:
www.KitchenAid.ca
or
1-800-807-6777
1-800-422-1230
or visit our website at...
TABLE DE CUISSON AU GAZ PROLINE™ STYLE COMMERCIAL
Guide d’utilisation et d’entretien
Au Canada, pour assistance composez le
Table of Contents/Table des matières.............................................................................2
1-800-461-5681
, pour installation ou service composez le
www.KitchenAid.ca
1-800-807-6777
ou visitez notre site web à...
Models/Modèle KGCV465
8286612
TABLE OF CONTENTS
TABLE DES MATIÈRES
COOKTOP SAFETY........................................................................2
PARTS AND FEATURES ............................................................ 4
COOKTOP USE........................................................................... 5
Cooktop Controls.........................................................................5
Surface Burners ...........................................................................6
Dual Valve TripleTier™ Flame Burner
with InstaWok™ Ring...................................................................8
Home Canning .............................................................................8
Cookware ..................................................................................... 8
COOKTOP CARE........................................................................ 9
General Cleaning..........................................................................9
TROUBLESHOOTING ....................................................................9
ASSISTANCE OR SERVICE.........................................................10
WARRANTY .............................................................................. 11
SÉCURITÉ DE LA TABLE DE CUISSON .................................13
PIÈCES ET CARACTÉRISTIQUES...........................................15
UTILISATION DE LA TABLE DE CUISSON.............................16
Commandes de la table de cuisson ..........................................16
Brûleurs de surface ....................................................................17
Brûleur à double soupape TripleTier™
avec InstaWok™ ........................................................................19
Préparation de conserves à la maison.......................................19
Ustensiles de cuisson ................................................................19
ENTRETIEN DE LA TABLE DE CUISSON ...............................20
Nettoyage général ......................................................................20
DÉPANNAGE.................................................................................21
ASSISTANCE OU SERVICE.........................................................21
GARANTIE.....................................................................................23
COOKTOP SAFETY
Your safety and the safety of others are very important.
We have provided many important safety messages in this manual and on your appliance. Always read and obey all
safety messages.
This is the safety alert symbol.
This symbol alerts you to potential hazards that can kill or hurt you and others.
All safety messages will follow the safety alert symbol and either the word “DANGER” or
“WARNING.” These words mean:
You can be killed or seriously injured if you don't
immediately follow instructions.
can be killed or seriously injured if you don't
You
follow instructions.
All safety messages will tell you what the potential hazard is, tell you how to reduce the chance of injury, and tell you
what can
happen if the instructions are not followed.
2

WARNING: If the information in this manual is not followed exactly, a fire or explosion
may result causing property damage, personal injury or death.
– Do not store or use gasoline or other flammable vapors and liquids in the vicinity of this
or any other appliance.
– WHAT TO DO IF YOU SMELL GAS:
Do not try to light any appliance.
•
Do not touch any electrical switch.
•
Do not use any phone in your building.
•
Immediately call your gas supplier from a neighbor's phone. Follow the gas supplier's
•
instructions.
If you cannot reach your gas supplier, call the fire department.
•
– Installation and service must be performed by a qualified installer, service agency or
the gas supplier.
IMPORTANT SAFETY INSTRUCTIONS
WARNING: To reduce the risk of fire, electrical
shock, injury to persons, or damage when using the
cooktop, follow basic precautions, including the
following:
CAUTION: Do not store items of interest to
■
children in cabinets above the cooktop – children
climbing on the cooktop to reach items could be
seriously injured.
■ Proper Installation – The cooktop, when installed,
must be electrically grounded in accordance with
local codes or, in the absence of local codes, with
National Electrical Code, ANSI/NFPA 70 or the
the
Canadian Electrical Code, Part 1.
cooktop is properly installed and grounded by a
qualified technician.
■ This cooktop is equipped with a three-prong
grounding plug for your protection against shock
hazard and should be plugged directly into a properly
grounded receptacle. Do not cut or remove the
grounding prong from this plug.
Be sure the
SAVE THESE INSTRUCTIONS
■ Disconnect the electrical supply before servicing
the cooktop.
■ Never Use the Cooktop for Warming or Heating the
Room.
■ Injuries may result from the misuse of the cooktop
such as stepping, leaning, or sitting on the top
surface.
■ Maintenance – Keep cooktop area clear and free
from combustible materials, gasoline, and other
flammable vapors and liquids.
■ Storage on the cooktop – Flammable materials
should not be stored on or near surface units.
■ Top burner flame size should be adjusted so it does
not extend beyond the edge of the cooking utensil.
The California Safe Drinking Water and Toxic Enforcement Act requires the Governor of California to publish a list
of substances known to the State of California to cause cancer, birth defects, or other reproductive harm, and
requires businesses to warn of potential exposure to such substances.
WARNING: This product contains a chemical known to the State of California to cause cancer, birth defects, or
other reproductive harm.
This appliance can cause low-level exposure to some of the substances listed, including benzene, formaldehyde,
carbon monoxide, toluene, and soot.
3
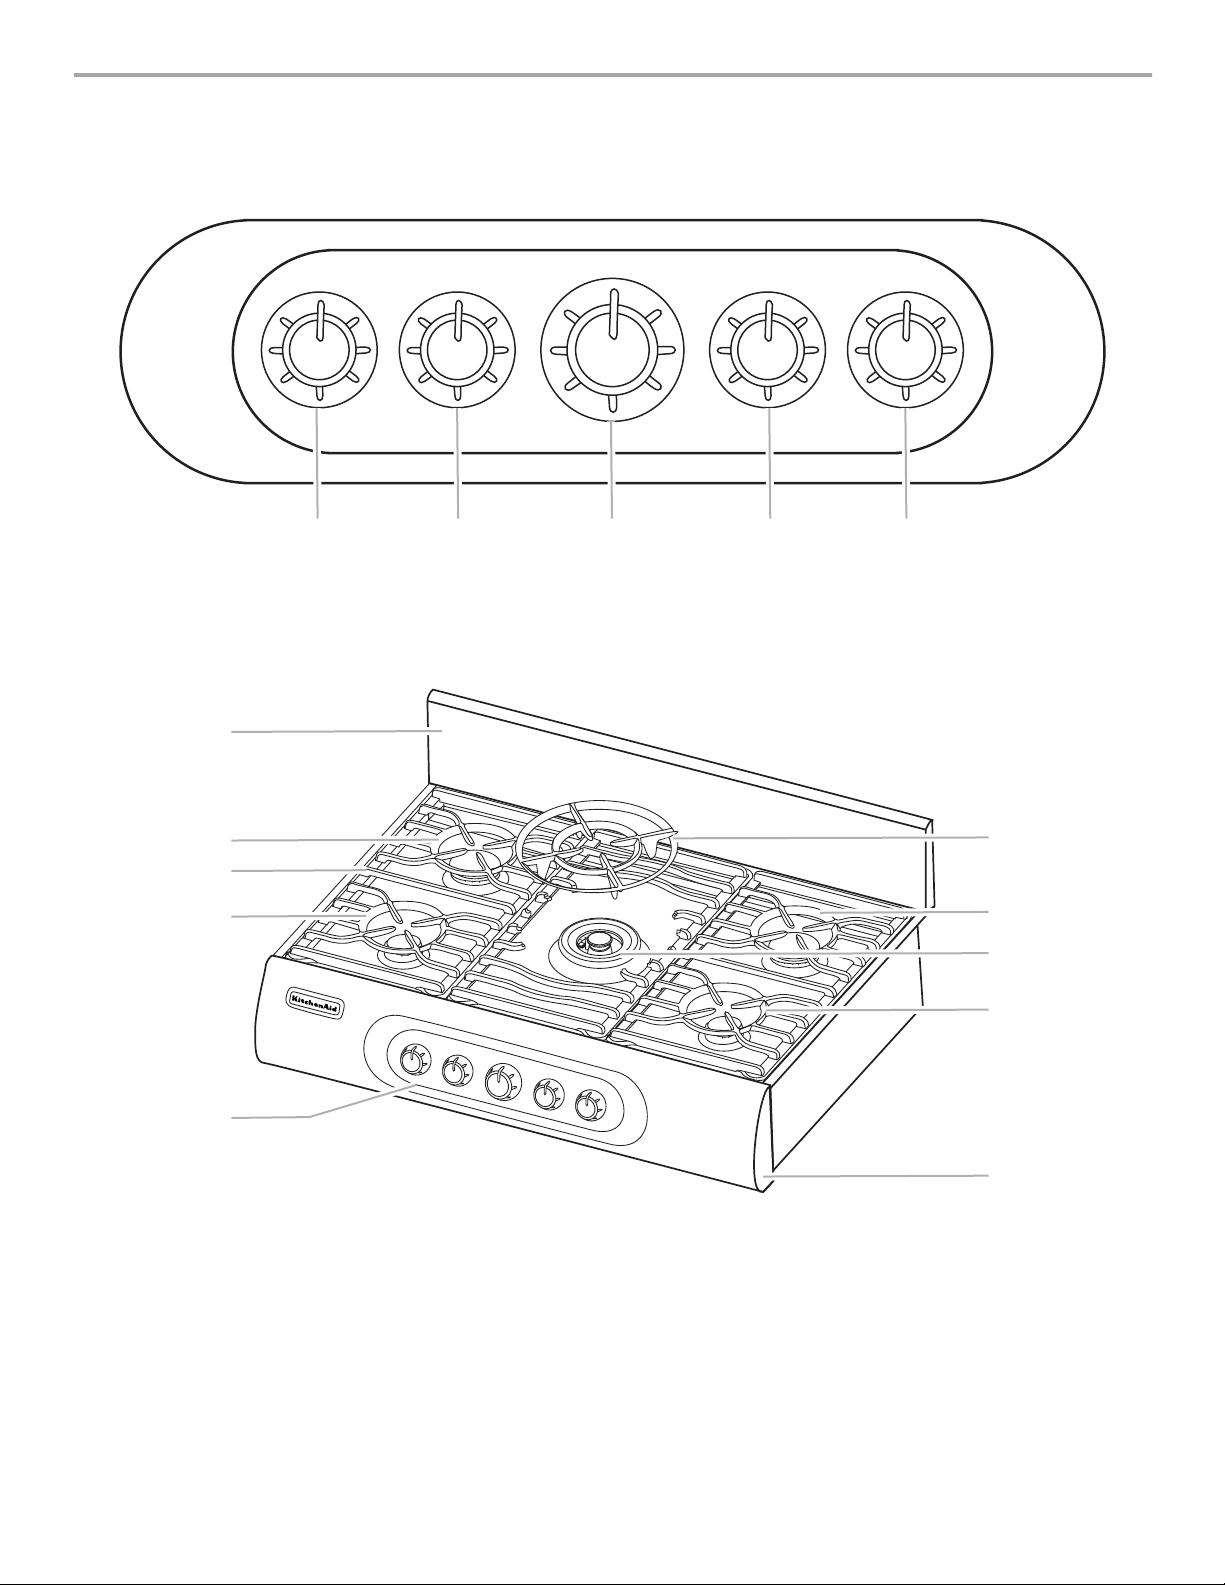
Control Panel
0
PARTS AND FEATURES
1. Left Front Control Knob
(6K BTU)
Cooktop
1
2
3
4
1
2. Left Rear Control Knob
(15K BTU)
2
3
3. Dual Valve TripleTier™
Flame Burner Knob
(18K BTU)
4
4. Right Rear Control Knob
(15K BTU)
5
5. Right Front Control
Knob (6K BTU)
1
9
8
7
5
1. Backsplash
2. Left Rear Burner (15K BTU)
3. Lateral Burner Grate
4
4. Left Front Burner (6K BTU)
5. Control Panel
6. Slots
7. Right Front Burner (6K BTU)
8. Dual Valve TripleTier™ Flame
Burner (18K BTU)
6
9. Right Rear Burner (15K BTU)
10. InstaWok™ Ring
COOKTOP USE
Cooktop Controls
WARNING
Fire Hazard
Do not let the burner flame extend beyond the
edge of the pan.
Turn off all controls when not cooking.
Failure to follow these instructions can result in
death or fire.
IMPORTANT:
Gas. If you wish to use L.P. Gas, an L.P. Gas Conversion Kit is
included with your new cooktop. See the instructions included
with the L.P. Gas Conversion Kit for details on making this
conversion.
Electric igniters automatically light the surface burners when
control knobs are turned to LITE.
The TripleTier™ Flame Burner (18,000 BTU [British Thermal
Units]) provides the highest heat setting, and is ideal for cooking
large quantities of food or liquid, using large pots and pans.
The medium burners (15,000 BTU) provide the high heat setting,
and are ideal for cooking large quantities of food or liquid, using
larger pots and pans.
The small burners (6,000 BTU) allow more accurate simmer
control at the lowest setting, and are ideal for cooking smaller
quantities of food, using smaller pots and pans.
Before setting a control knob, place filled cookware on the grate.
Do not operate a burner while using empty cookware or without
any cookware on the grate.
NOTE:
not ignite, listen for a clicking sound. If you do not hear the igniter
click, TURN THE BURNER OFF. Check for a tripped circuit
breaker or blown fuse.
Check that the control knob is pressed completely down on the
valve shaft. If the spark igniter still does not operate, call a trained
repair specialist.
Proper grounding and polarity are necessary for correct operation
of the electric ignition system. If the wall receptacle does not
provide correct polarity, the igniters will become grounded and
occasionally click, even after the burner has ignited. Contact a
trained repair specialist to check the wall receptacle to see
whether it is wired with the correct polarity.
Your cooktop is factory set for use with Natural
Visually check that the burner has lit. If the burner does
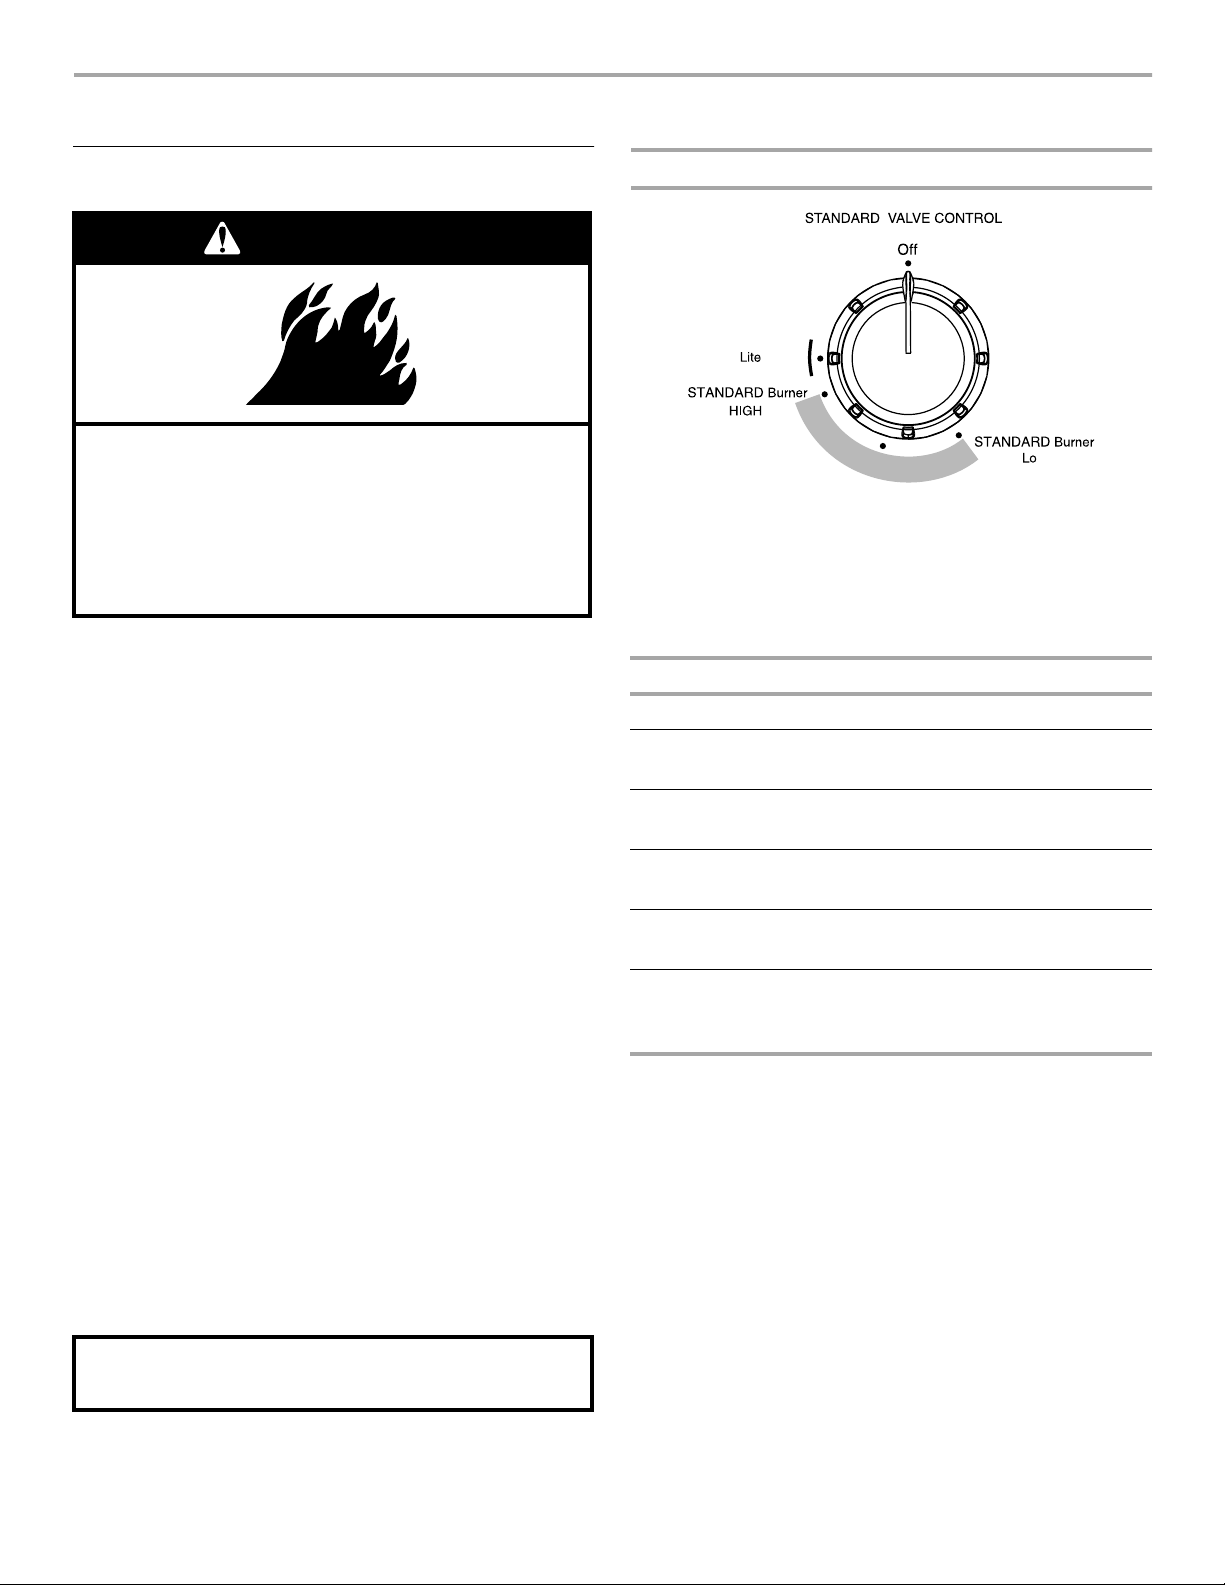
Standard Valve Control
To Se t:
1.
Push in and turn knob counterclockwise to LITE.
All surface burners will click. Only the burner with the control
knob turned to LITE will produce a flame.
2.
Turn knob anywhere between HI and LO. Use the following
chart as a guide when setting heat levels.
SETTING RECOMMENDED USE
LITE
HI
MED to HI
MED
MED to LO
LO
■
Light the burner.
■
Start food cooking.
■
Bring liquid to a boil.
■
Hold a rapid boil.
■
Quickly brown or sear food.
■
Fry or sauté foods.
■
Hold a slow boil.
■
Cook soups, sauces and gravies.
■
Stew or steam foods.
■
Keep food warm.
■
Melt chocolate or butter.
■
Simmer.
REMEMBER: When cooktop is in use, the entire cooktop area may become hot.
5
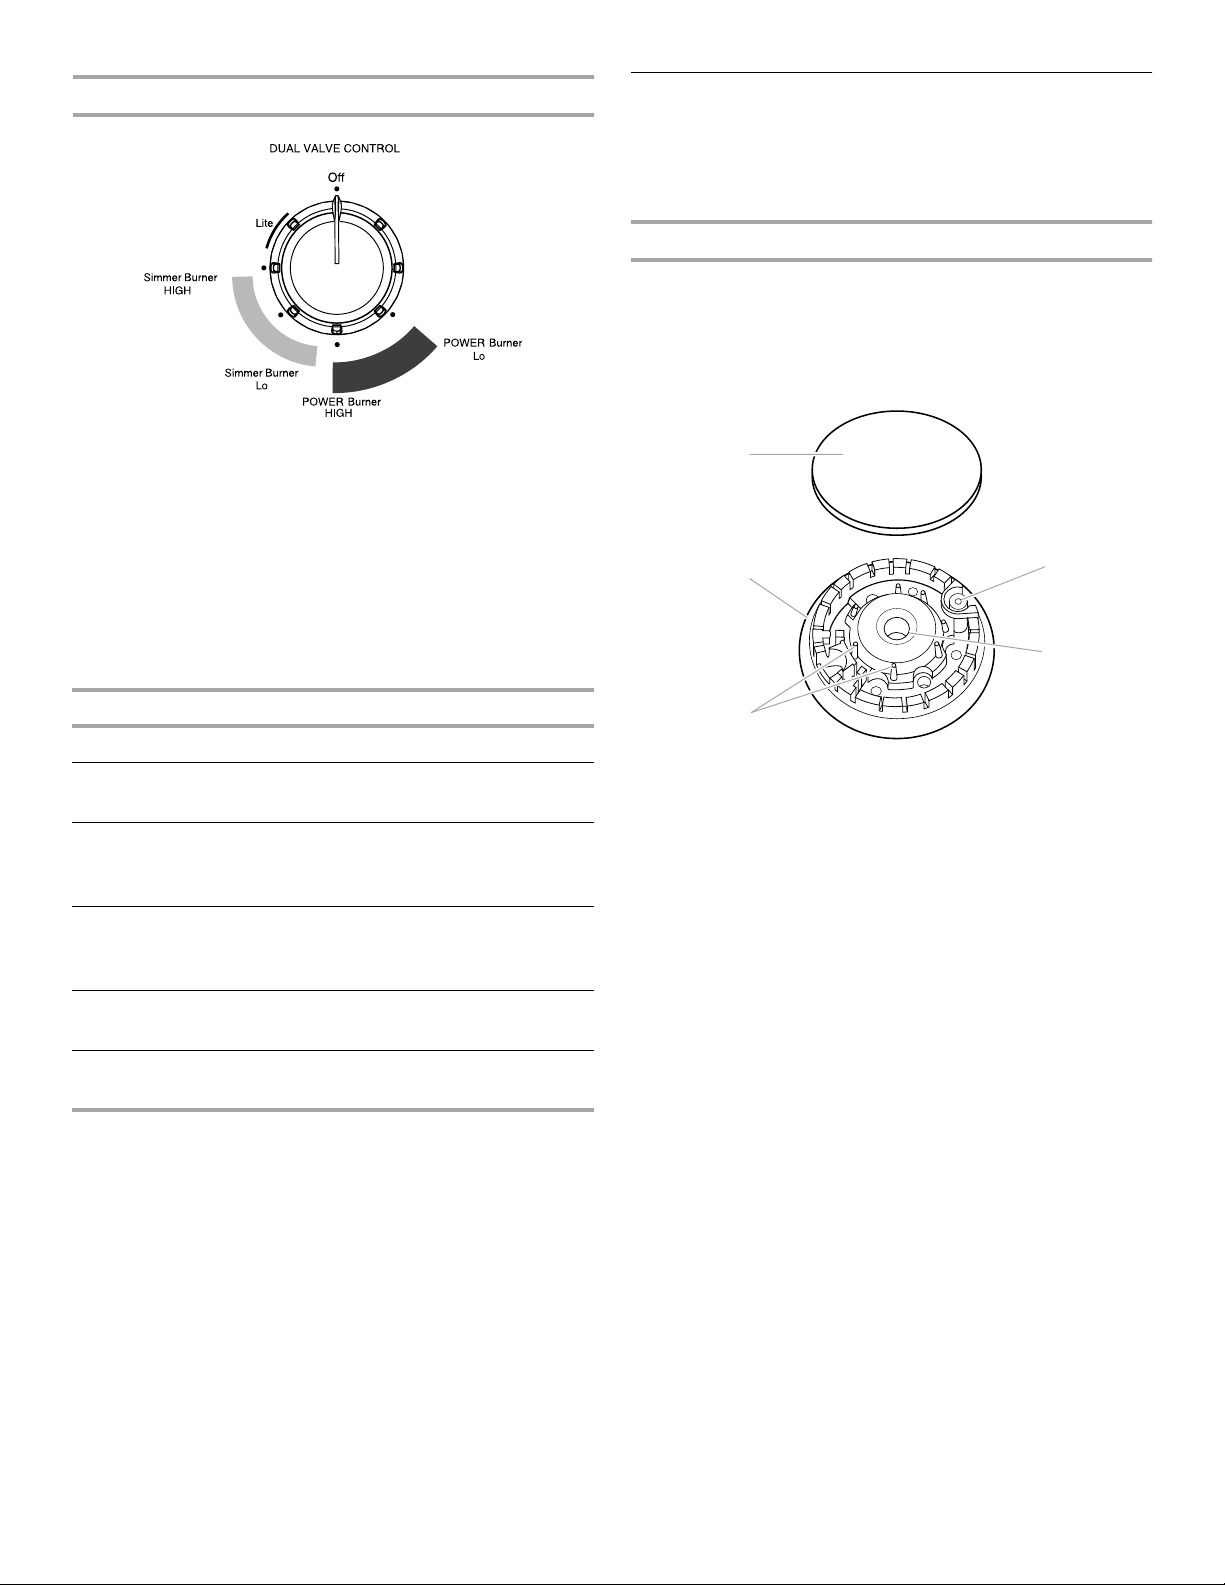
Dual Valve TripleTier™ Burner Control
Surface Burners
IMPORTANT:
ventilation air around the burner grate edges. Before cleaning,
make sure all controls are off and the oven and cooktop are cool.
Do not use oven cleaners, bleach or rust removers.
Burner Cap Alignment
Always keep the burner cap in place when using a surface
burner. A clean burner cap will help prevent poor ignition and
uneven flames. Always clean the burner cap after a spillover and
routinely remove and clean the caps according to the “General
Cleaning” section.
Standard Burner
Do not obstruct the flow of combustion and
To Se t:
1.
Push in and turn knob counterclockwise to LITE.
All surface burners will click.
the control knob turned to
2.
Turn knob anywhere between SIMMER BURNER HI and LO.
3.
Push in and turn knob counterclockwise to POWER BURNER
HIGH. All three rings will produce a flame.
4.
Turn knob anywhere between POWER BURNER HI and
POWER BURNER LO.
Use the following chart as a guide when setting heat levels.
SETTING RECOMMENDED USE
LITE
SIMMER BURNER HI
SIMMER BURNER LO
POWER BURNER HI
POWER BURNER
MED
Only the simmer burner with
will produce a flame.
LITE
■
Light the burner.
■
Cook soups, sauces and gravies.
■
Stew or steam foods.
■
Keep food warm.
■
Melt chocolate or butter.
■
Simmer.
■
Start food cooking.
■
Bring liquid to a boil.
■
WOK cooking.
■
Hold a rapid boil.
■
Quickly brown or sear food.
1
2
4
5
3
1. Burner cap
2. Burner base
3. Alignment pins
4. Igniter
5. Gas tube opening
POWER BURNER LO
6
■
Fry or sauté foods.
■
Hold a slow boil.
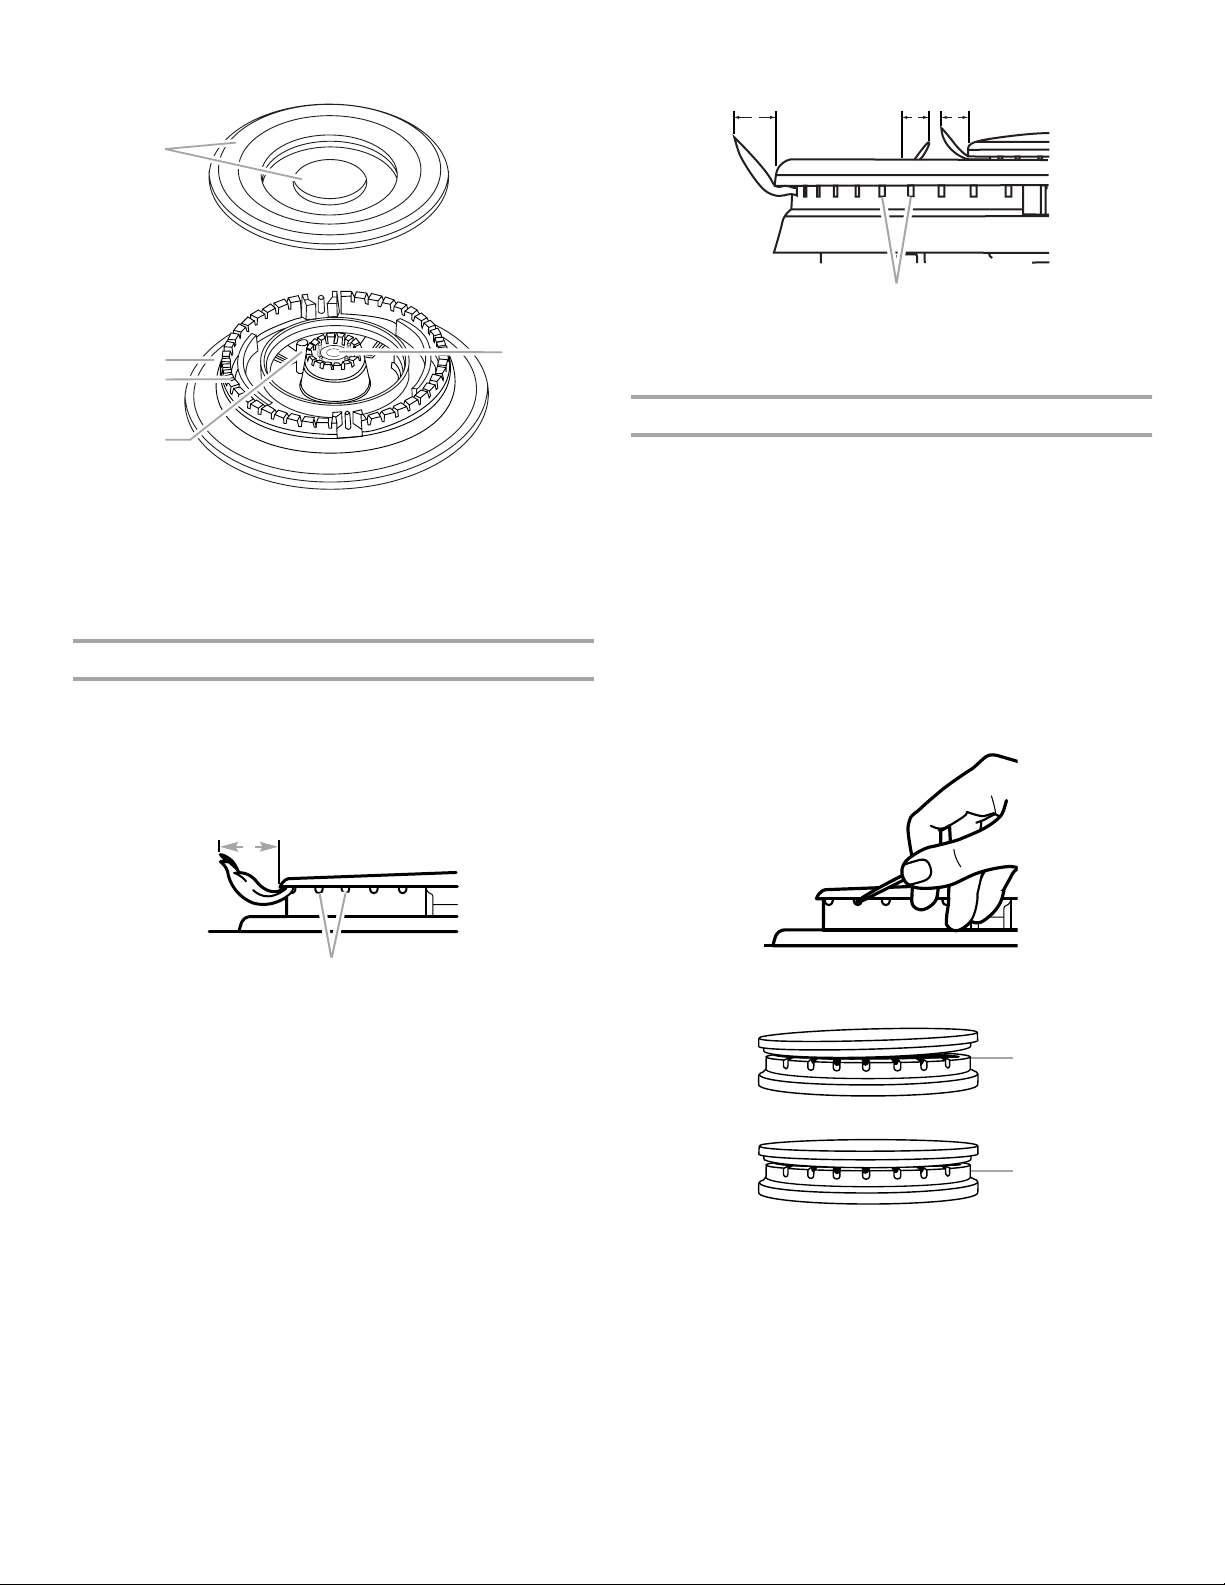
Dual Valve TripleTier™ Flame Burner
5
1
2
3
4
1. Dual Valve TripleTier™ Flame
Burner Caps
2. Burner base
3. Alignment pins
4. Igniter
5. Gas tube opening
Gas tube opening
Gas must flow freely throughout the gas tube opening for the
burner to light properly. Keep this area free of soil and do not
allow spills, food, cleaning agents or any other material to enter
the gas tube opening. Protect it from spill overs by always using a
burner cap.
Standard Burner
TripleTier™ Flame Burner
221
3
³⁄₄
1.
in. (19.1 mm)
³⁄₈
in. (9.53 mm)
2.
3. Burner ports
Burner ports
Check burner flames occasionally for proper size and shape as
shown above. A good flame is blue in color, not yellow. Keep this
area free of soil and do not allow spills, food, cleaning agents or
any other material to enter the burner ports.
To Cl ea n:
1.
Remove the burner cap from the burner base and clean
according to “General Cleaning” section.
2.
Clean the gas tube opening with a damp cloth.
3.
Clean clogged burner ports with a straight pin as shown. Do
not enlarge or distort the port. Do not use a wooden
toothpick. If the burner needs to be adjusted, contact a
trained repair specialist.
1
2
¹⁄₂
1. 1-1
in. (25-38 mm)
2. Burner ports
4.
Replace the burner cap, making sure the alignment pins on
the cap are properly aligned with the burner base.
1
2
1. Incorrect
2. Correct
5.
Turn on the burner. If the burner does not light, check cap
alignment. If the burner still does not light, do not service the
sealed burner yourself. Contact a trained repair specialist.
7
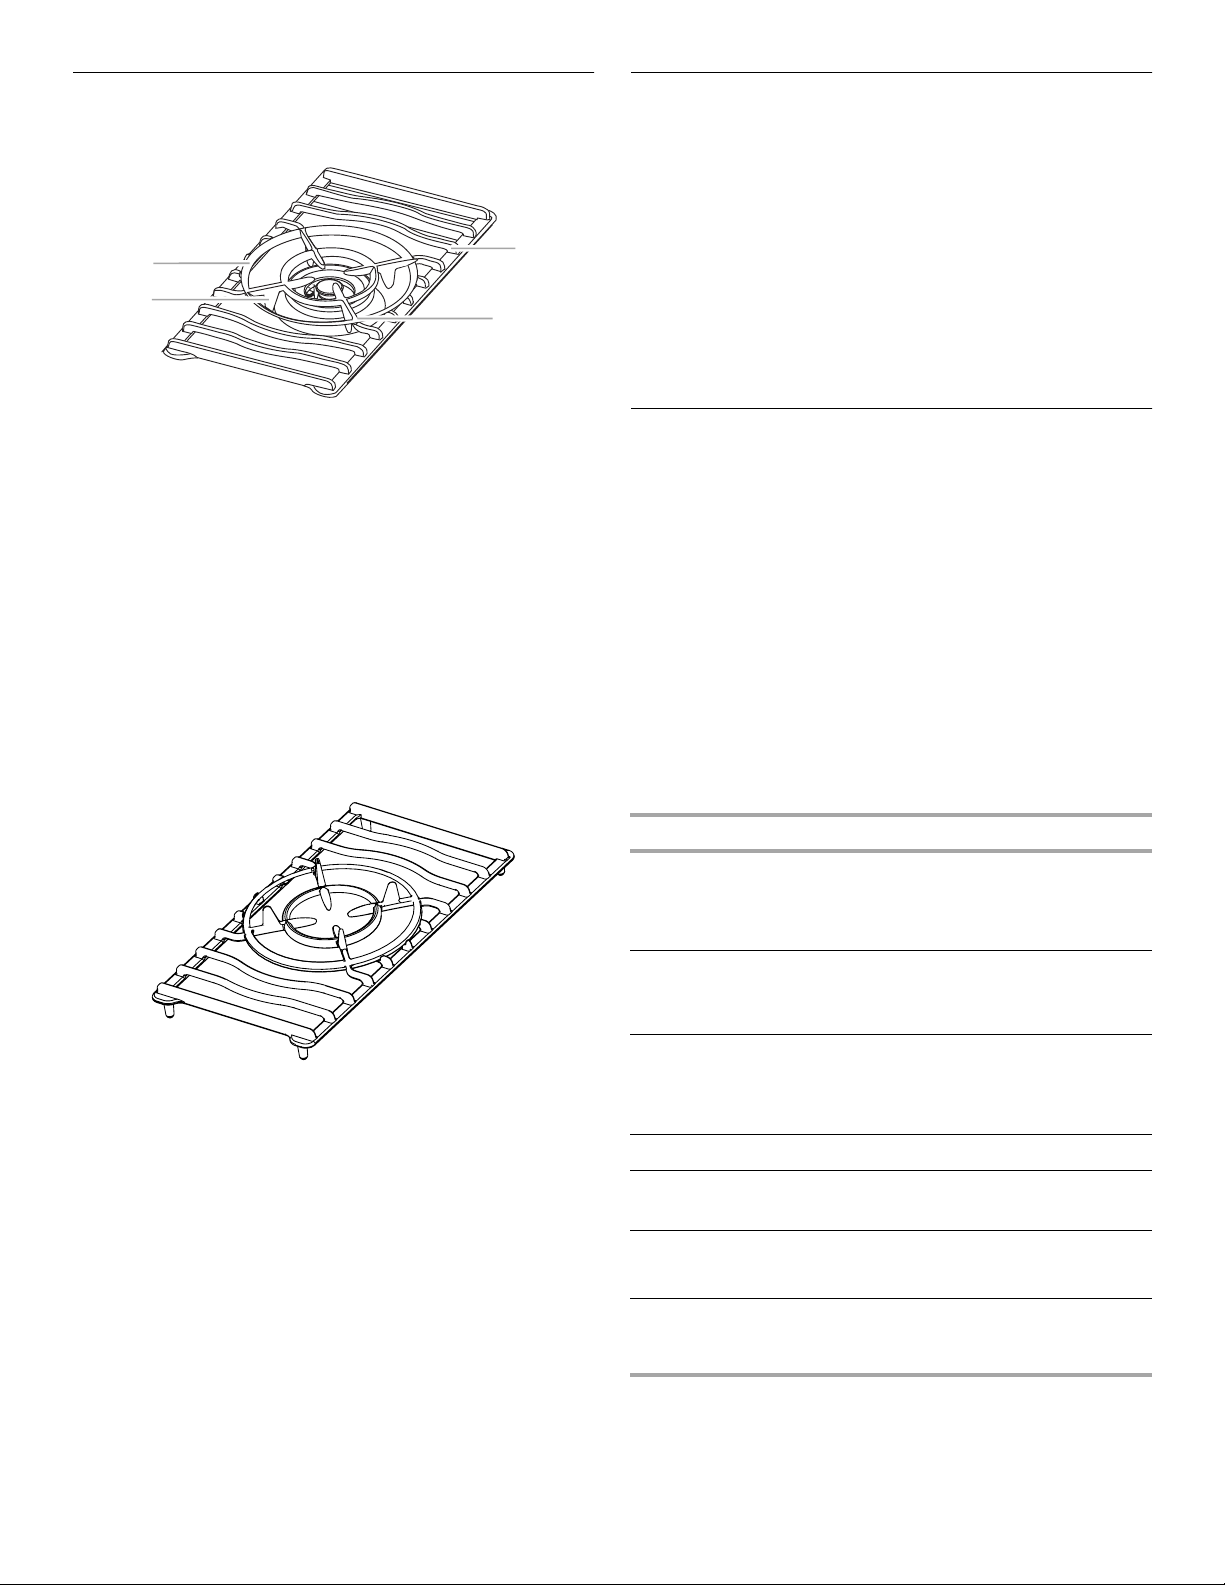
Dual Valve TripleTier™ Flame Burner
2
with InstaWok™ Ring
1
3
1. InstaWok™ Ring
2. Grid Base
3. WOK Supports
4. Support Guides
The Dual Valve TripleTier™ Flame Burner with InstaWok™ Ring is
a multifunction burner that provides the best simmering and the
maximum power all in the same burner. The InstaWok™ Ring
supports 12 in. to 14 in. (30.5 cm to 35.6 cm) WOK pans.
The Dual Valve TripleTier™ Flame Burner with InstaWok™ Ring is
functioned by a Dual Valve Control knob, which controls two
separate burners. See “Dual Valve Control” section.
To Use the InstaWok™ Ring:
1.
Make sure the control knob is in the OFF position.
2.
Allow the grate to cool completely before handling.
3.
Remove grate from cooktop and flip the grate over so that the
WOK supports are facing right-side up.
4
Home Canning
When canning for long periods, alternate the use of surface
cooking areas, elements or surface burners between batches.
This allows time for the most recently used areas to cool.
■
Center the canner on the grate or largest surface cooking
area or element. Canners should not extend more than 1 in.
(2.5 cm) outside the cooking area.
■
Do not place canner on two surface cooking areas, elements
or surface burners at the same time.
■
For more information, contact your local U.S. Government
Agricultural Department Extension Office. In Canada, contact
Agriculture Canada. Companies that manufacture home
canning products can also offer assistance.
Cookware
IMPORTANT:
cooking area, element or surface burner.
Ideal cookware should have a flat bottom, straight sides, a well-
fitting lid and the material should be of medium-to-heavy
thickness.
Rough finishes may scratch the cooktop. Aluminum and copper
may be used as a core or base in cookware. However, when used
as a base they can leave permanent marks on the cooktop or
grates.
Cookware material is a factor in how quickly and evenly heat is
transferred, which affects cooking results. A nonstick finish has
the same characteristics as its base material. For example,
aluminum cookware with a nonstick finish will take on the
properties of aluminum.
Use the following chart as a guide for cookware material
characteristics.
Never leave empty cookware on a hot surface
4.
Place the wok Ring within the guides.
COOKWARE CHARACTERISTICS
Aluminum
Cast iron
Ceramic or
Ceramic glass
Copper
Earthenware
Porcelain enamelon-steel or cast
iron
Stainless steel
■
Heats quickly and evenly.
■
Suitable for all types of cooking.
■
Medium or heavy thickness is best for
most cooking tasks.
■
Heats slowly and evenly.
■
Good for browning and frying.
■
Maintains heat for slow cooking.
■
Follow manufacturer’s instructions.
■
Heats slowly, but unevenly.
■
Ideal results on low to medium heat
settings.
■
Heats very quickly and evenly.
■
Follow manufacturer’s instructions.
■
Use on low heat settings.
■
See stainless steel or cast iron.
■
Heats quickly, but unevenly.
■
A core or base of aluminum or copper on
stainless steel provides even heating.
8
 Loading...