

Page 1
KFP1642
INSTRUCTIONS
INSTRUCTIONS
INSTRUCCIONES
Page 2
Welcome to the World oF KitchenAid®.
We’re committed to helping you
create a lifetime of delicious meals for
family and friends. To help ensure the
longevity and performance of your
appliance, keep this guide handy. It will
empower you with the best way to
use and care for your product. Your
satisfaction is our #1 goal. Remember
to register your product online at
www.kitchenaid.com, or by
mail using the attached
Product Registration Card.
USA: 1.800.832.7173
2
Canada: 1.800.807.6777
Join us in the kitchen at www.proline.kitchenaid.com.
Scan with your mobile device for recipes, tips, and more.
KitchenAid.com
KitchenAid.ca
Page 3

FOOD PROCESSOR INSTRUCTIONS
Table of ConTenTs
FOOD PROCESSOR SAFETY
Important safeguards ................................................................................................. 4
Electrical requirements .............................................................................................5
PARTS AND FEATURES
Parts and accessories ................................................................................................. 6
Selecting the right tools ............................................................................................. 8
USING YOUR FOOD PROCESSOR
Attaching the work bowl ......................................................................................... 12
Attaching the lid and safety lock .............................................................................. 12
Using the 3-in-1 feed tube ....................................................................................... 13
Using the speed controls ......................................................................................... 14
USING YOUR ACCESSORIES
Preparing the dicing kit for rst use .........................................................................15
Installing/using the dicing disc .................................................................................. 16
Installing/removing the multipurpose blade .............................................................17
Installing/removing the prep bowl ........................................................................... 18
Installing/removing the shredding, julienne, and parmesan discs ............................. 19
Installing/removing the slicing disc ........................................................................... 20
Adjusting the slicing thickness.................................................................................. 20
Installing/removing the mini-bowl and mini-blade ................................................... 21
Installing/removing the egg whip or dough blade .................................................... 22
Installing/removing the citrus press ......................................................................... 23
Removing accessories and work bowl .....................................................................24
CARE AND CLEANING .............................................................................................. 25
TIPS FOR GREAT RESULTS ...................................................................................... 26
TROUBLESHOOTING ................................................................................................ 29
WARRANTY AND SERVICE ...................................................................................... 30
English
PROOF OF PURCHASE & PRODUCT REGISTRATION
Always keep a copy of the itemized sales receipt showing the date of purchase of your Food
Processor. Proof of purchase will assure you of in-warranty service. Before you use your Food
Processor, please ll out and mail your product registration card packed with the unit, or
register on-line at www.kitchenaid.com. This card will enable us to contact you in the unlikely
event of a product safety notication and assist us in complying with the provisions of the
Consumer Product Safety Act. This card does not verify your warranty. Please complete the
following for your personal records:
Model Number _______________________________________________________________________
Serial Number _______________________________________________________________________
Date Purchased ______________________________________________________________________
Store Name _________________________________________________________________________
3
Page 4

Your safety and the safety of others are very important.
We have provided many important safety messages in this manual and on your
appliance. Always read and obey all safety messages.
This is the safety alert symbol.
This symbol alerts you to potential hazards that can kill or hurt you
and others.
All safety messages will follow the safety alert symbol and either the
word “DANGER” or “WARNING.” These words mean:
You can be killed or seriously injured
DANGER
WARNING
All safety messages will tell you what the potential hazard is, tell you how to reduce
the chance of injury, and tell you what can happen if the instructions are not followed.
if you don't immediately follow
instructions.
You can be killed or seriously injured
if you don't follow instructions.
IMPORTANT SAFEGUARDS
When using electrical appliances, basic safety precautions should always
be followed, including the following:
1. Read all instructions.
2. To protect against risk of electrical shock, do not put Food Processor in water
or other liquid.
3. Close supervision is necessary when any appliance is used by or near children.
4. Unplug from the outlet when not in use, before putting on or taking off parts,
and before cleaning.
5. Avoid contacting moving parts.
6. Do not operate any appliance with a damaged cord or plug, or after the appliance
malfunctions, or is dropped or damaged in any manner. Return appliance to the nearest
Authorized Service Facility for examination, repair, or electrical or mechanical adjustment.
7. The use of attachments not recommended or sold by KitchenAid may cause re,
electric shock, or injury.
8. Do not use outdoors.
9. Do not let cord hang over edge of table or counter.
10. Keep hands and utensils away from moving blades or discs while processing food to
reduce the risk of severe injury to persons or damage to the Food Processor. A scraper
may be used but must be used only when the Food Processor is not running.
11. Blades are sharp. Handle carefully.
12. To reduce the risk of injury, never place cutting blade or discs on base without rst
putting bowl properly in place.
13. Be certain cover is securely locked in place before operating appliance.
14. Never feed food by hand. Always use the food pusher.
15. Do not attempt to defeat the cover interlock mechanism.
16. This product is designed for household use only.
SAVE THESE INSTRUCTIONS
4
Page 5
FOOD PROCESSOR SAFETYFOOD PROCESSOR SAFETY
17. Do not use appliance other than intended use.
18. Disconnect from supply circuit before cleaning or servicing.
19. CAUTION: Do not open until blade stops.
20. CAUTION: To ensure continued protection against risk of electric shock, connect to
properly grounded outlets only.
SAVE THESE INSTRUCTIONS
Electrical requirements
Volts: 120 VAC
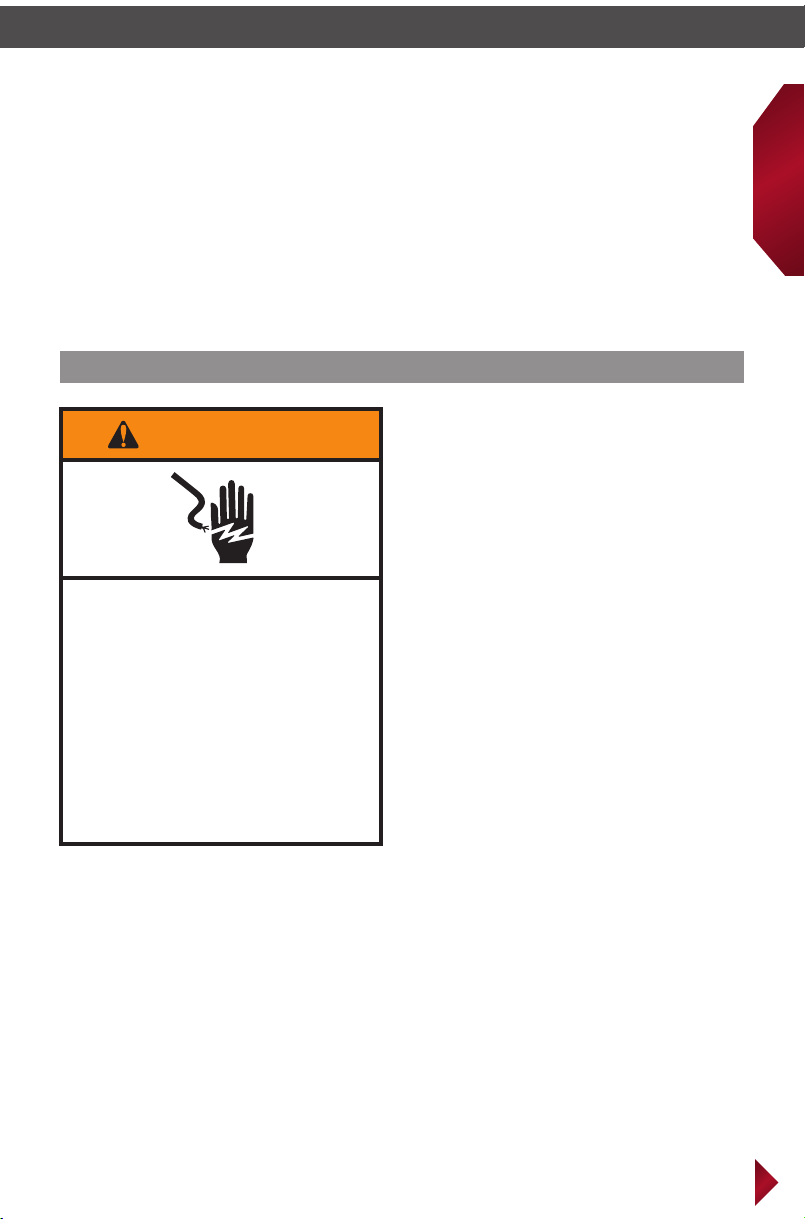
WARNING
Electrical Shock Hazard
Plug into a grounded 3 prong
outlet.
Do not remove ground prong.
Do not use an adapter.
Do not use an extension cord.
Failure to follow these
instructions can result in
death, fire, or electrical shock.
Hertz: 60 Hz
NOTE: This Food Processor is equipped
with a three prong grounded plug. If the
plug does not fit fully in the outlet, contact
a qualified electrician. Do not modify the
plug in any way.
Do not use an extension cord. If the power
supply cord is too short, have a qualified
electrician or serviceman install an outlet
near the appliance.
English
5
Page 6
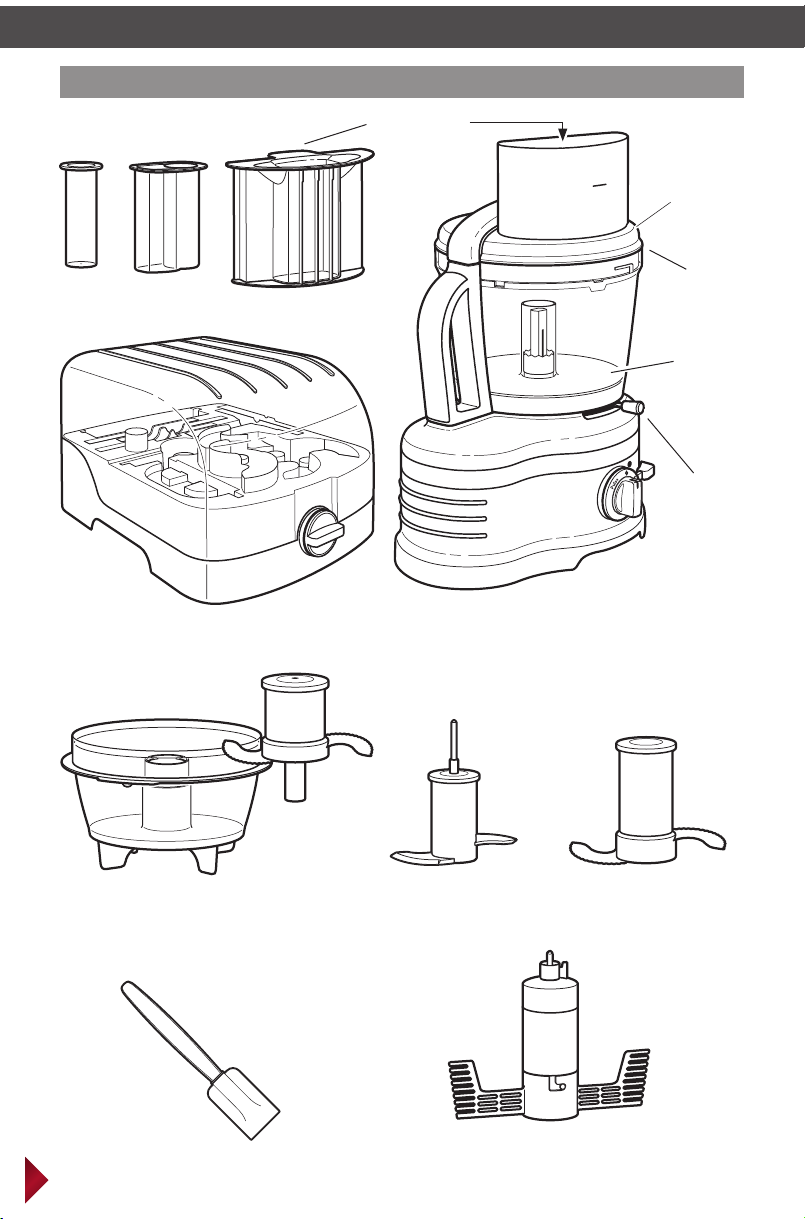
Parts and accessories
Accessory case
3-piece food
pusher
Work bowl
cover
with 3-in-1
feed tube
Ultratight
seal
16-Cup
(4 L)
work bowl
Externally
adjustable blade
control
Die-cast base
mini-bowl and mini-blade
6
4-Cup (1 L)
Spatula
Dough blade
Stainless steel
multipurpose blade
Egg whip
(select models only)
Page 7
PARTS AND FEATURESPARTS AND FEATURES
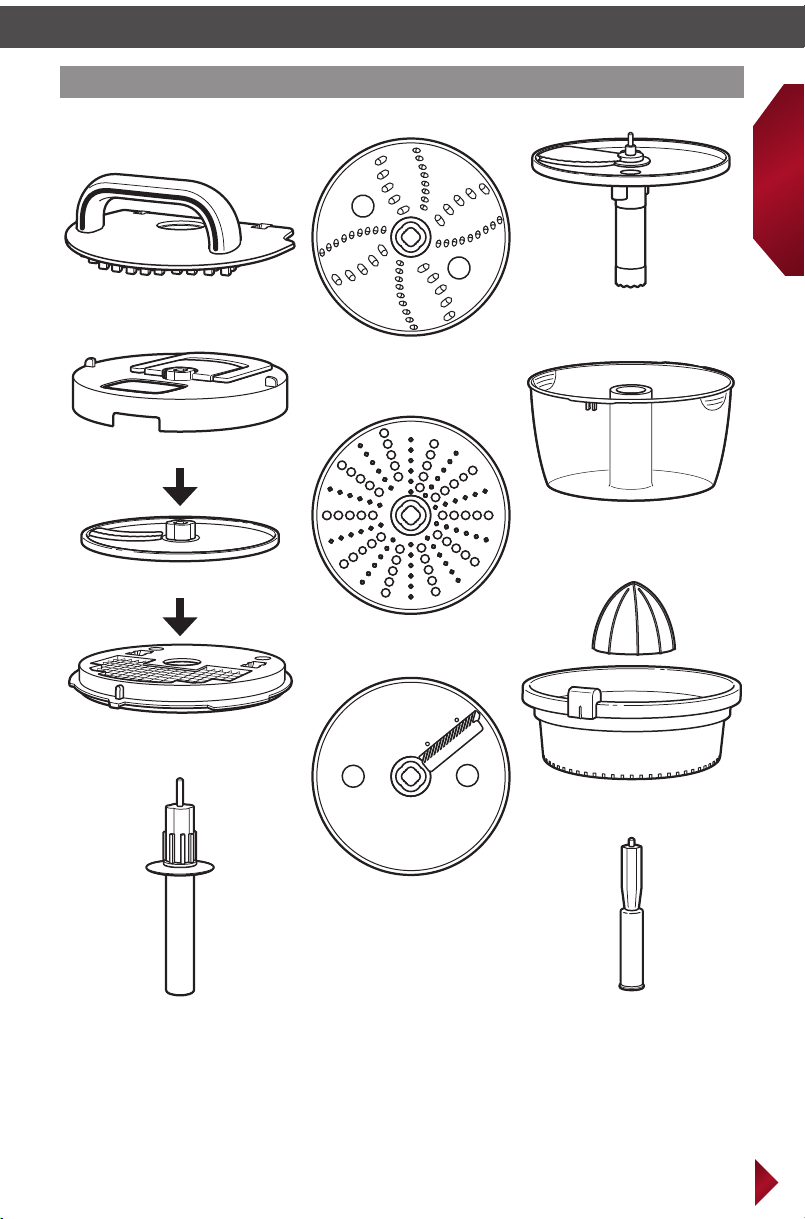
Parts and accessories
DICING KIT
8mm Grid cleanout tool
➄
Dicing kit lid
➃
8mm Dicing kit blade*
➂
English
Externally adjustable slicing
disc (thin to thick)
Reversible (2 mm and 4 mm)
shredding disc*
10-Cup (2.4 L)
prep bowl
Dicing kit grid
➁
Disc adapter
(*Use this adapter)
Parmesan/Ice shaving disc*
(select models only)
Citrus press
(select models only)
Julienne disc*
(select models only)
Citrus press adapter
(select models only)
7
Page 8
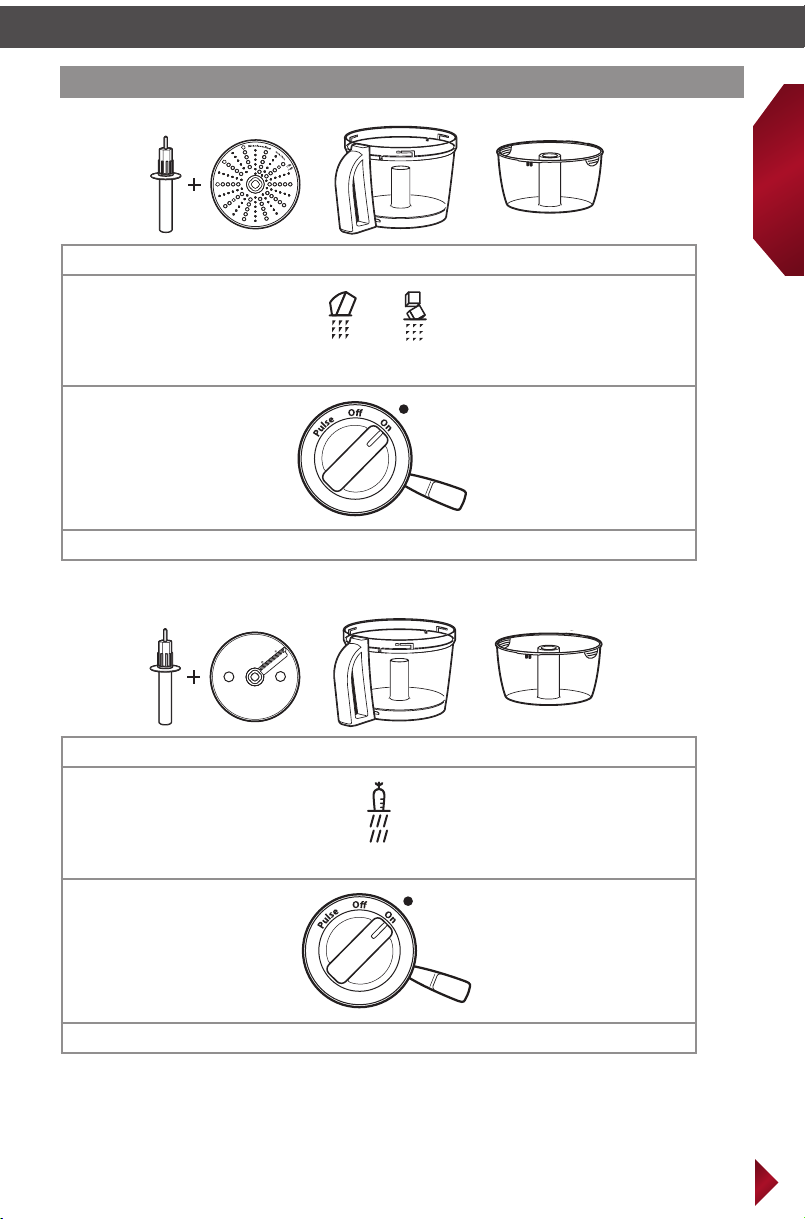
Selecting the right tools
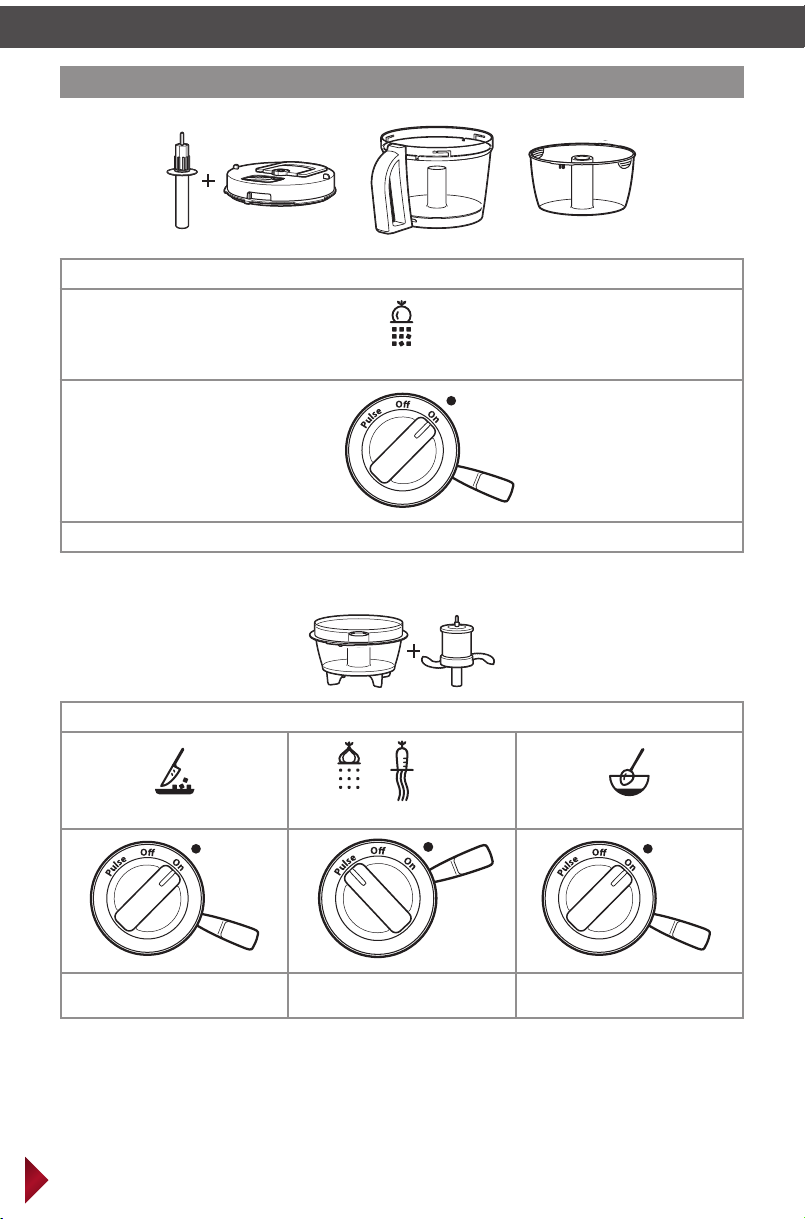
Dicing kit with disc adapter used with work bowl and an optional prep bowl
Potatoes, Tomatoes, Onions, Cucumbers, Fruit, Vegetables
+
Optional
Dice
High
Low
Mini-bowl used with mini multipurpose stainless steel blade
Chop
High
Low
Vegetables, Fruit,
Fresh herbs, Nuts, Meat
Mince
Puree
High
Low
Vegetables, Fruit Pesto, Sauces, Cake batter, Cream
Mix
NOTE: For best results when chopping, begin with the speed lever set to “High” then change setting to
“Low”.
8
High
Low
Page 9
PARTS AND FEATURESPARTS AND FEATURES
Selecting the right tools
+
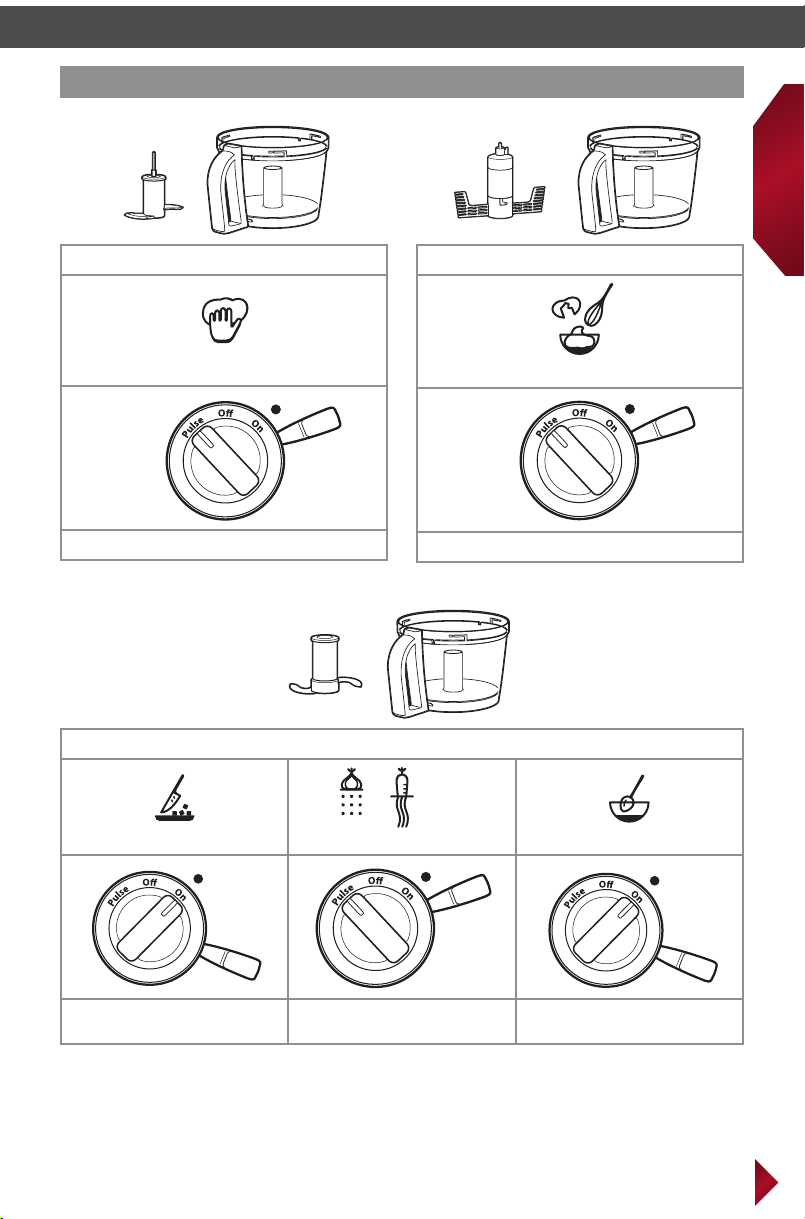
Plastic dough blade used with work bowl
Knead
High
Low
Yeast dough
Multipurpose stainless steel blade used with work bowl
+
English
Egg whip* used with work bowl
Whip
High
Low
Eggs
+
Chop
High
Low
Vegetables, Fruit,
Fresh herbs, Nuts, Meat
Mince
Puree
High
Low
Vegetables, Fruit Pesto, Sauces, Cake batter,
Mix
High
Low
Pie dough, Cream
NOTE: For best results when chopping, begin with the speed lever set to “High” then change setting to
“Low”.
* Available with select models only.
9
Page 10
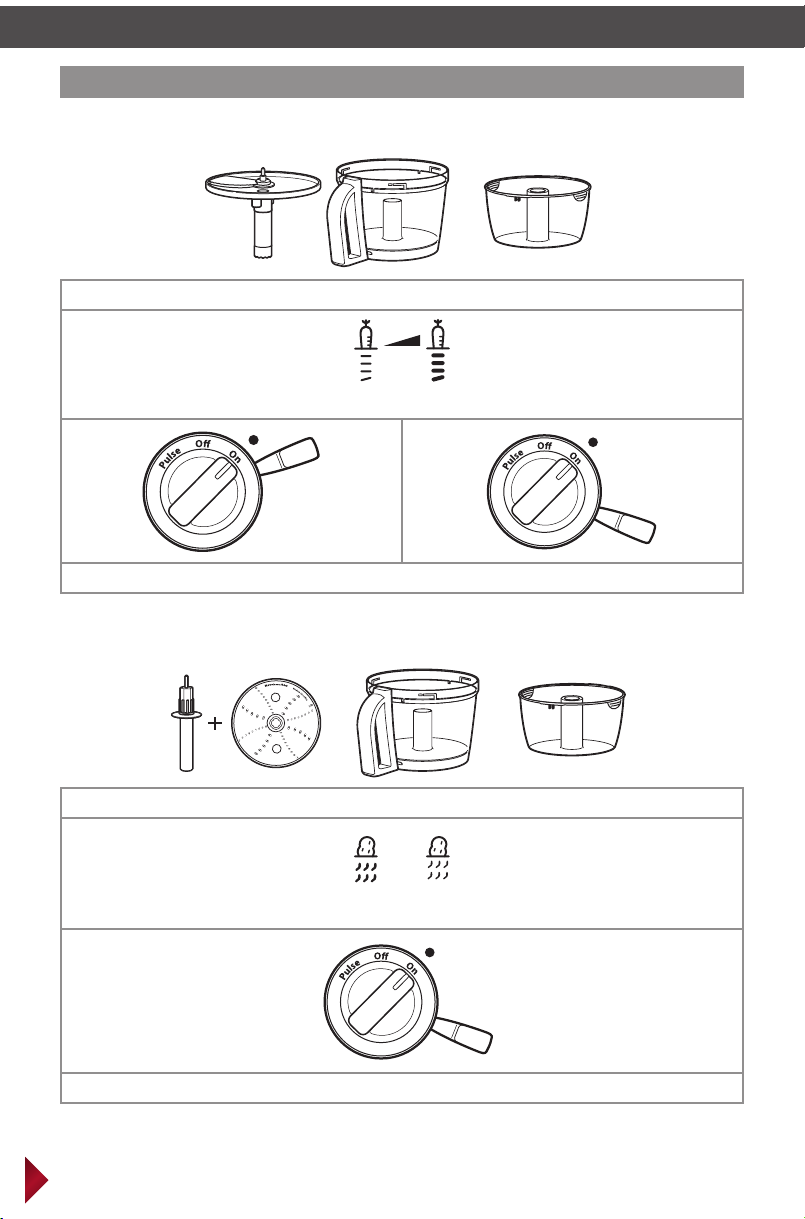
Selecting the right tools
Use other settings than suggested below to adjust results to your personal preferences.
+
Optional
Adjustable slicing disc used with work bowl and an optional prep bowl
Slice
thin
High
Low
Potatoes, Tomatoes, Fruit (soft), Vegetables (soft), Fruit (hard), Vegetables (hard)
Slice
thick
High
Low
+
Optional
Reversible shredding disc used with work bowl and optional prep bowl
Shred
medium
Shred
ne
High
Low
Vegetables, Cheese (freeze 30 min. prior), Chocolate, Fruit (hard)
10
Page 11
PARTS AND FEATURESPARTS AND FEATURES
Selecting the right tools
Parmesan/ice shaving disc* used with work bowl and optional prep bowl
+
English
Optional
Grate Shave
High
Low
Hard cheese, Ice, Chocolate
Julienne disc* used with work bowl and optional prep bowl
Carrots, Zucchini, Potatoes, Vegetables
* Available with select models only.
+
Optional
Julienne
High
Low
11
Page 12
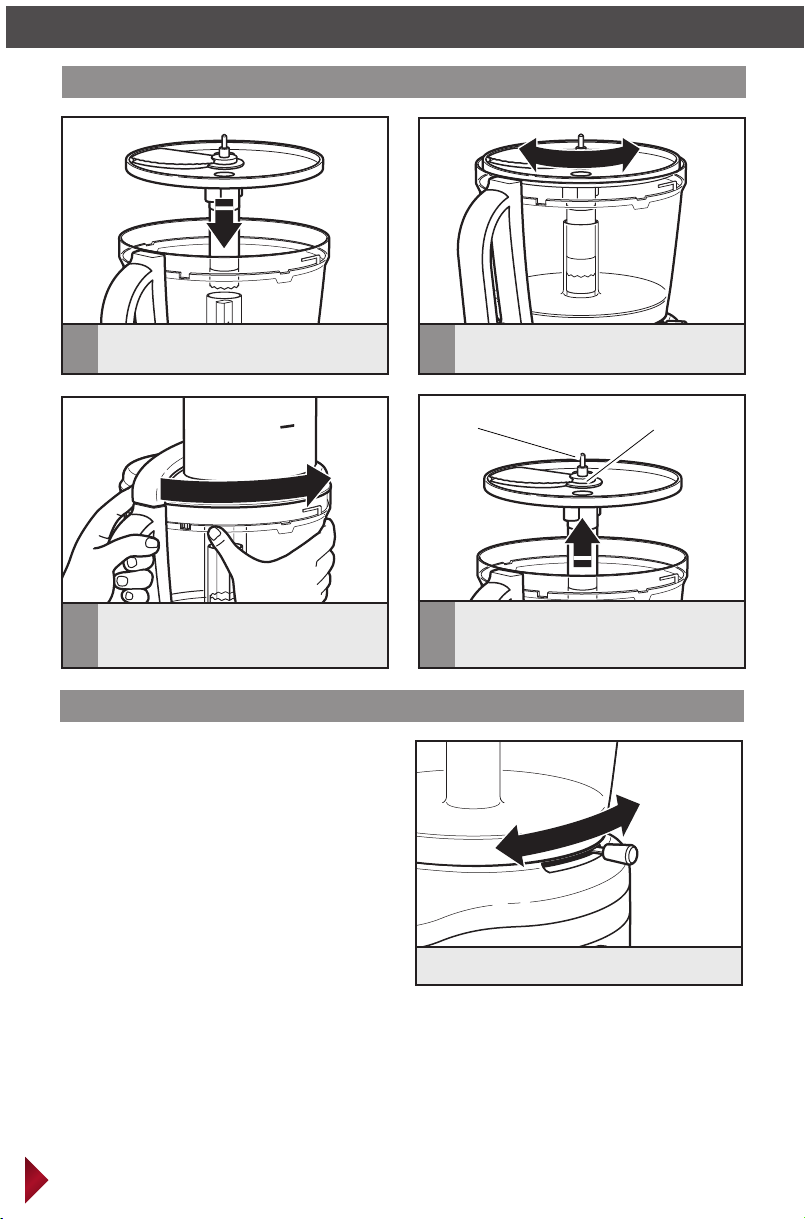
Attaching the work bowl
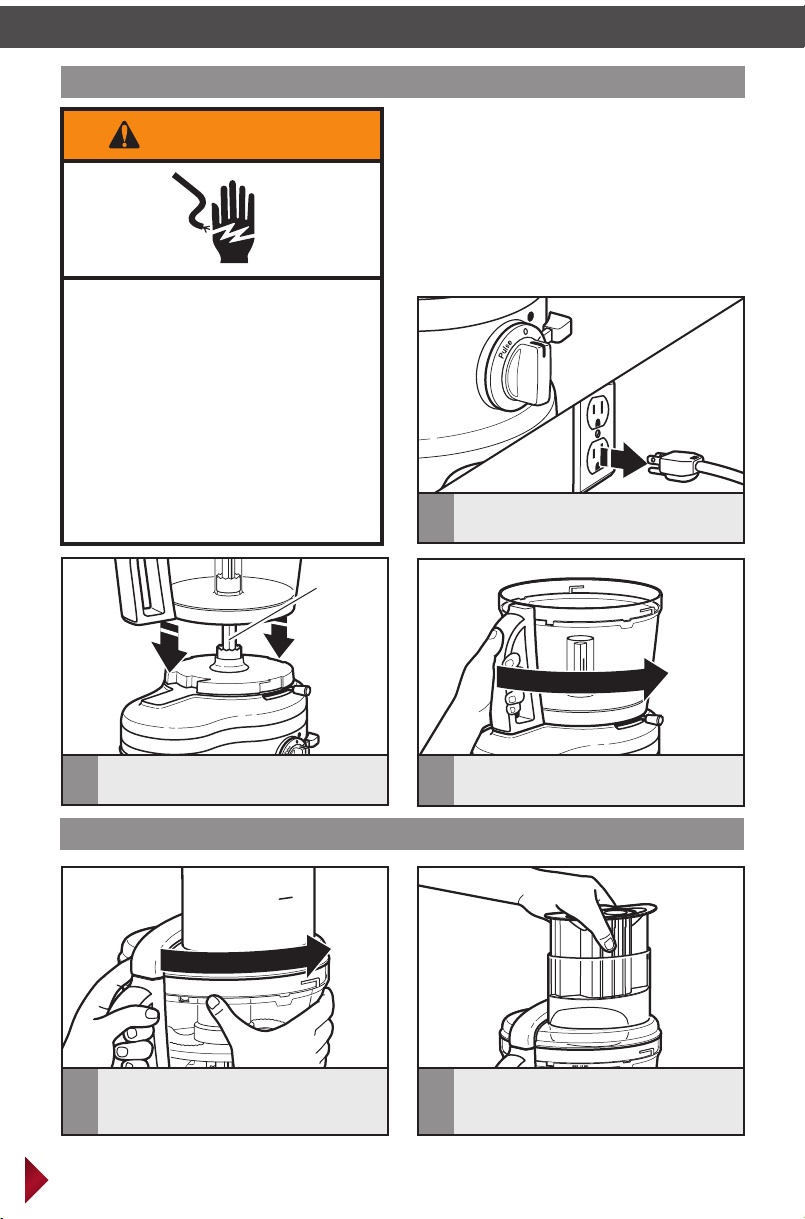
WARNING
Electrical Shock Hazard
Plug into a grounded 3 prong
outlet.
Do not remove ground prong.
Do not use an adapter.
Do not use an extension cord.
Failure to follow these
instructions can result in
death, fire, or electrical shock.
Power
shaft
Before rst use
Before using your Food Processor
for the first time, wash the bowls
and accessories as described in the
“Care and Cleaning” section.
Be sure the Food Processor is turned off,
1
unplugged, and placed on a level surface.
Place the work bowl on the base
2
as shown.
Turn work bowl to lock it on the base.
3
Attaching the lid and safety lock
Install the work bowl lid, aligning
1
the tabs and locking it into place. The
Ultratight seal is spill resistant.
TIP: It is easier to attach the lid when the large feed tube is removed. After attaching the
lid, make sure to insert the large feed tube.
12
The large feed tube must be inserted
2
into the lid for the Food Processor to
run.
Page 13
USING YOUR FOOD PROCESSORUSING YOUR FOOD PROCESSOR
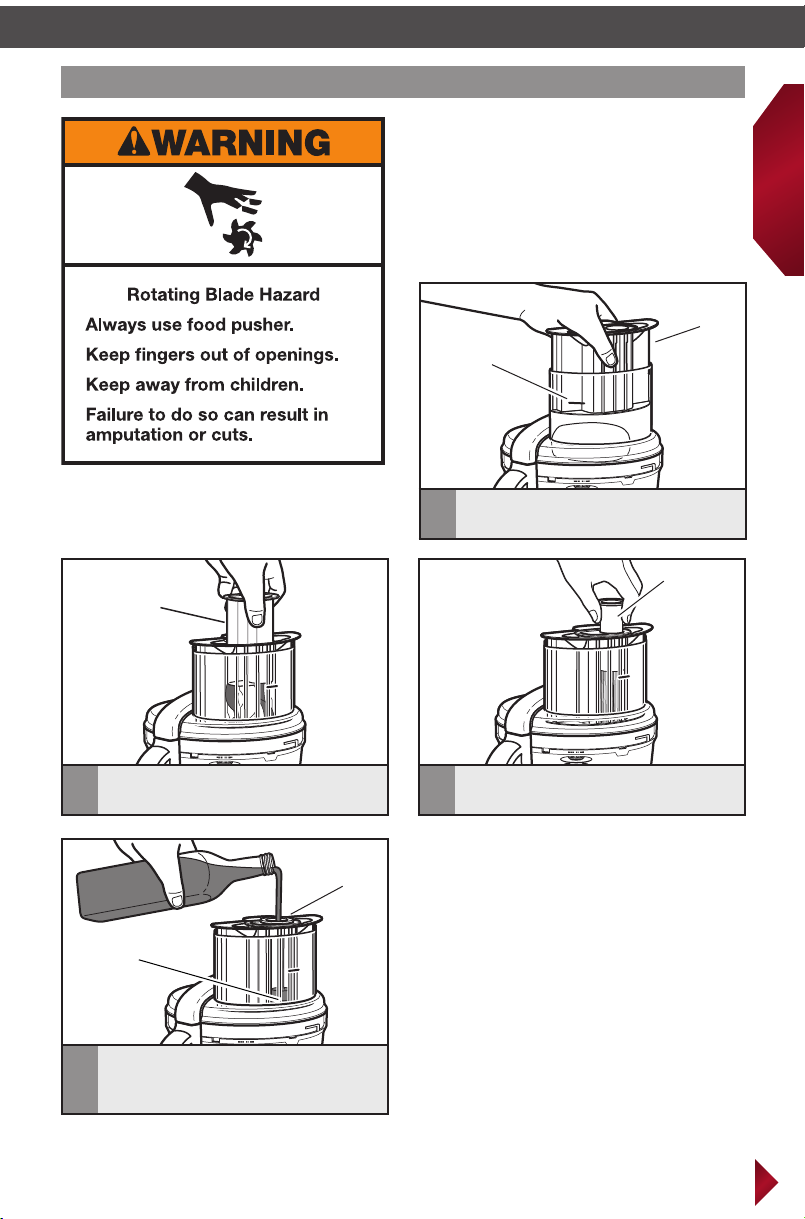
Using the 3-in-1 feed tube
Before use
Before operating the Food Processor,
be sure the work bowl, blades and work
bowl cover are properly assembled on
the Food Processor base.
Large food
pusher
Max Fill
line
Use entire feed tube and the large
1
food pusher to process large items.
English
Medium food
pusher
Use the medium food pusher in the
2
feed tube to process smaller items.
Drizzle
hole
Use the drizzle hole in the small food
4
pusher to slowly drizzle oil or other
liquid ingredients into the work bowl.
Small food
pusher
Use the small food pusher to slice or
3
shred the smallest, thinnest items.
TIP: The drizzle hole flow rate is ideal
for making mayonnaise.
Small
food
pusher
13
Page 14

USING YOUR FOOD PROCESSOR
Using the speed controls
NOTE: If the Food Processor fails to operate, make sure the work bowl and cover
are properly locked on the base, and the large food pusher is fully in place.
High
Low
To turn on, ip the speed lever to High
1
or Low, then turn the dial to ON.
High
Low
To pulse, ip the speed lever to
3
High or Low, then turn the dial to
PULSE to start processing; the dial
will automatically go back to OFF
position to stop. The pulse control
allows precise control of the duration
and frequency of processing.
NOTE: The speed lever must be in the OFF
position in order to change speeds.
To stop, turn the dial to OFF.
2
High
Low
14
Page 15
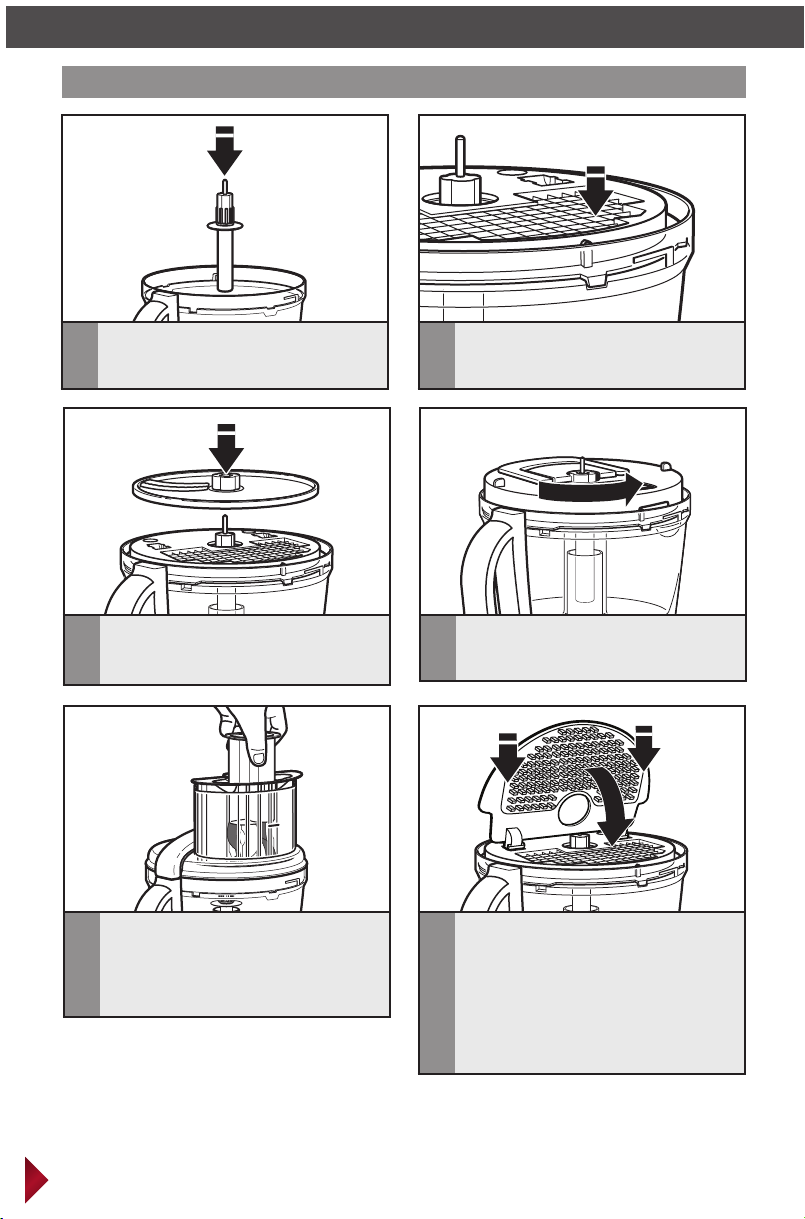
Preparing the dicing kit for rst use
IMPORTANT: Follow these directions in order to properly wash all parts of the dicing kit
before using it for the first time.
Using the handle, place the assembled
dicing kit into the work bowl.
1
English
When placing kit in the work bowl, line
up the kit’s tab with the groove in the
2
work bowl.
Using the handle, remove the dicing kit
lid from the dicing kit.
4
Rotate the dicing kit lid, using the finger
tabs until it unlocks.
3
Clean each part of the dicing kit in the
dishwasher, or with a soft cloth and
5
warm water.
15
Page 16
USING YOUR ACCESSORIES
Installing/using the dicing kit
Place the disc adapter onto the
power shaft.
1
Place the dicing kit blade ➂, making sure
it is securely seated.
3
Place the dicing kit grid ➁, with the grid
facing front, and line up the kit’s tab
2
with the groove in the work bowl.
Place the dicing kid lid ➃ onto the
4
assembled kit with the hole facing front,
and lock into place.
Place the lid on the Food Processor
5
and use the medium feed tube to dice
the desired items. If lid does not fully
close, make sure the dicing kit and the
dicing grid are each fully seated.
16
After dicing, remove the dicing kid lid
6
➃ and the dicing kit blade ➂, and place
the dicing kit cleanout tool ➄ in the
notches on the dicing kit grid, then push
cleanout tool down into the dicing grid.
This will push remaining food out of the
grid, enabling you to wash the dicing
kit more efficiently.
NOTE: Hard foods like carrots may require
more force to remove with the dicing kit
cleanout tool. It is normal for some food to
remain in the grid until washing is complete.
Page 17
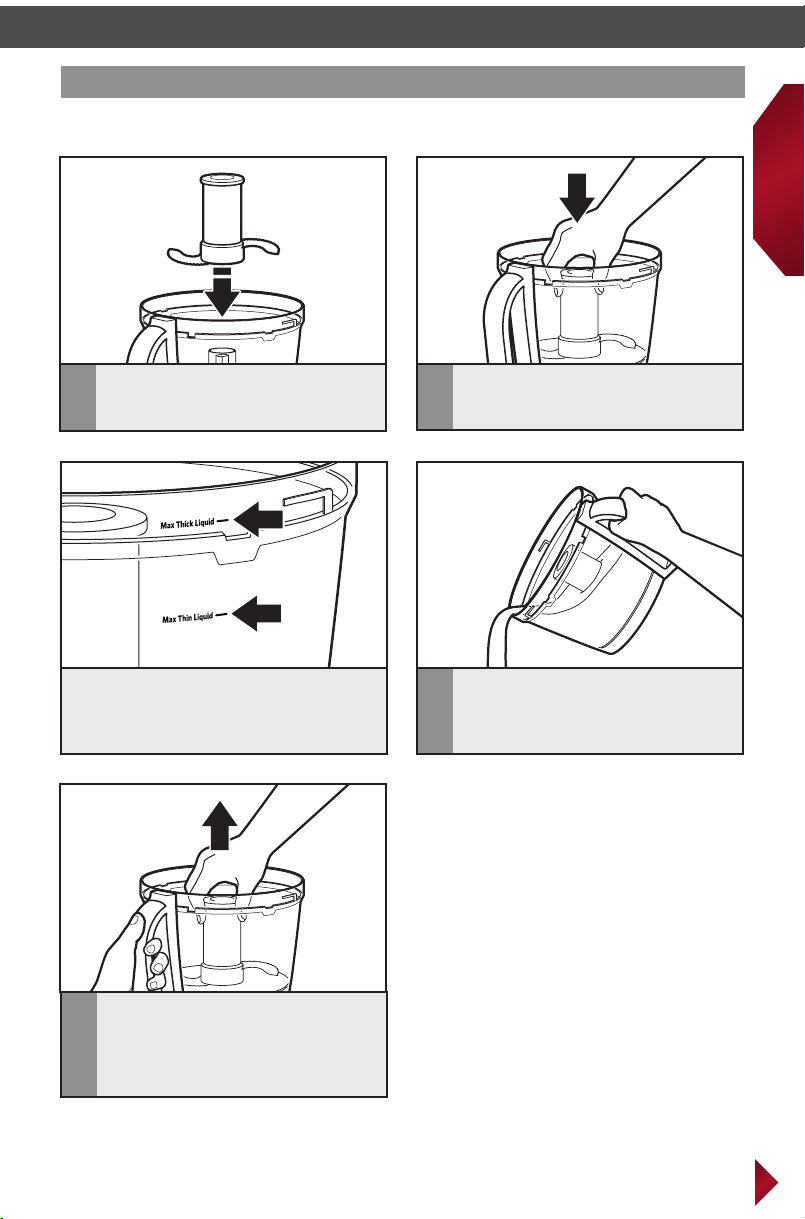
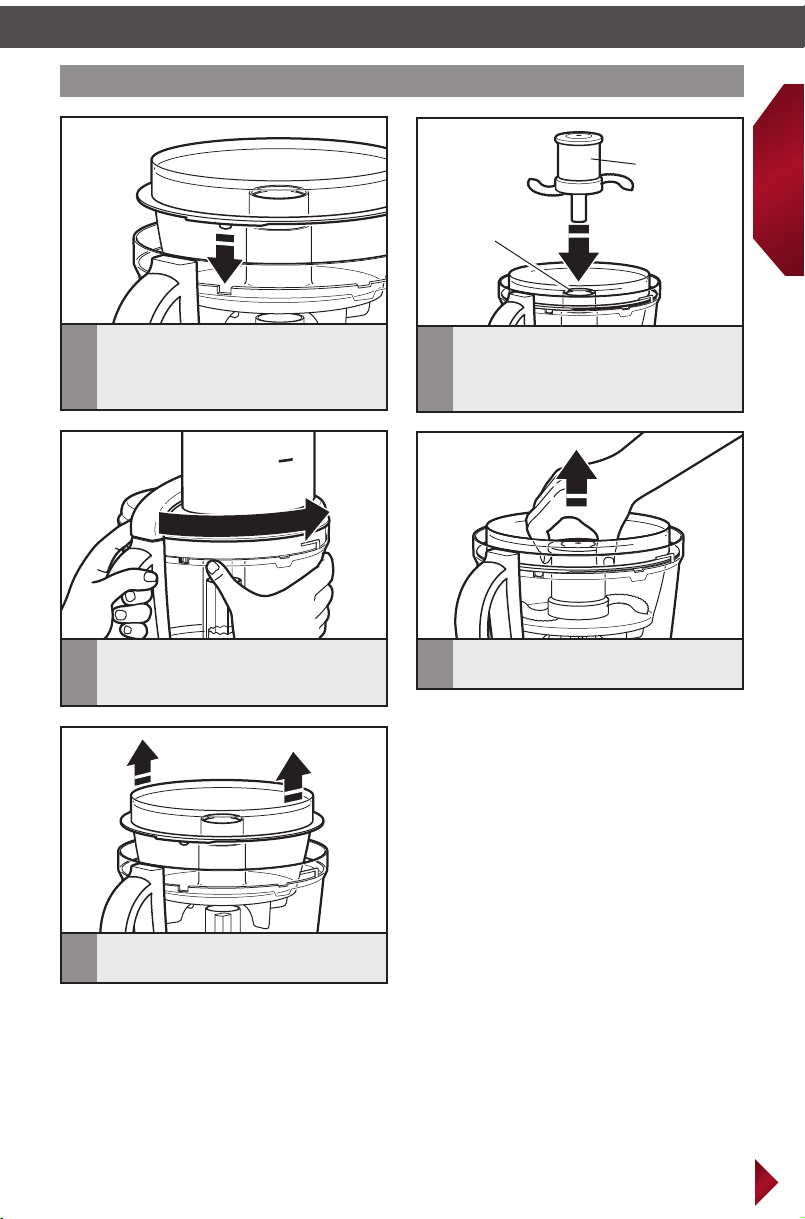
Installing/removing the multipurpose blade
NOTE: The multipurpose blade has a spill resistant seal and can be left in work bowl, or removed
before the contents are emptied.
English
Place the blade on the power shaft.
1
Liquid level graphics on the side of the
bowl indicate the maximum recommended
levels for thick and thin liquids in the
Food Processor.
Press down firmly on the blade. You will
2
hear a click when the accessory locks
into place.
The multipurpose blade has a leak
3
resistant seal, so you may leave the
blade in the bowl while pouring out
the ingredients.
Firmly secure the work bowl with one
4
hand, using the handle, not the rim of
the bowl. Then remove the blade by
grasping and pulling it straight up.
17
Page 18
USING YOUR ACCESSORIES
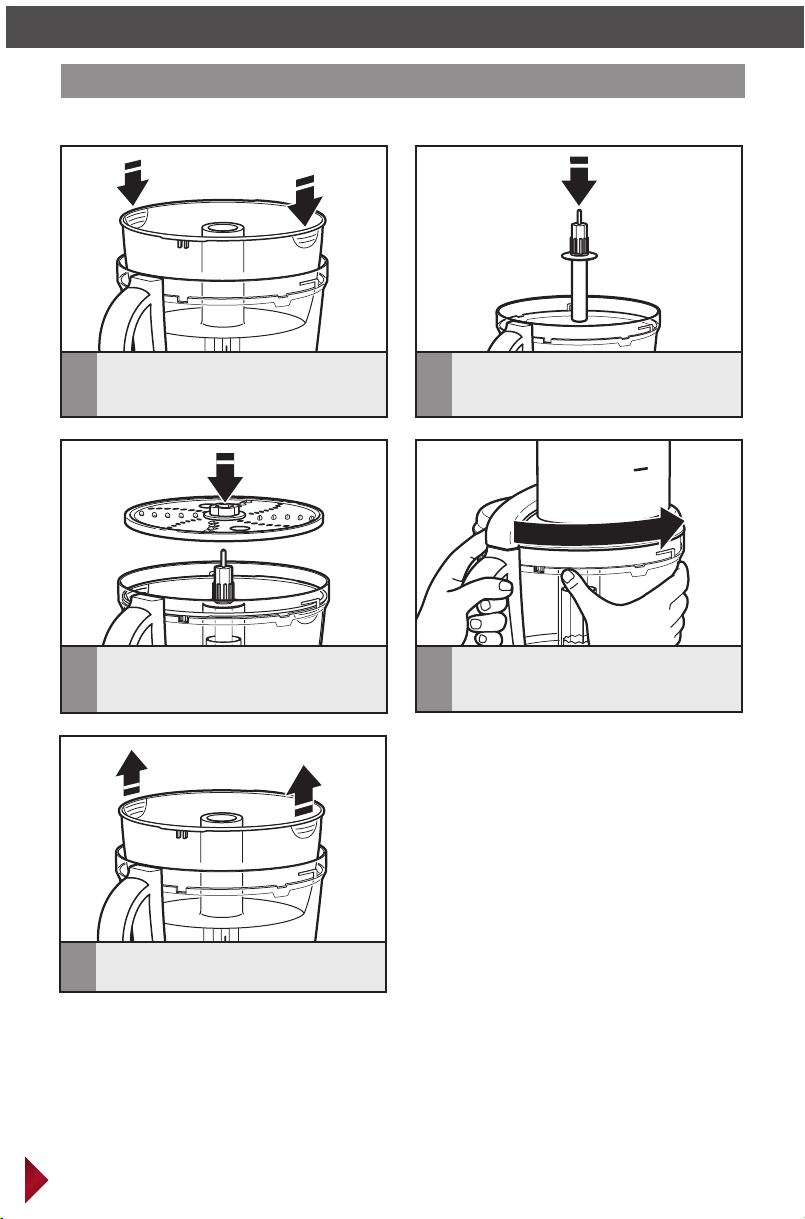
Installing/removing the prep bowl
NOTE: The prep bowl can be used only with the discs and the dicing kit.
To use the prep bowl, place into the
1
work bowl, using the two finger grips.
Place the desired disc on the power
3
shaft. Do not use any blades with the
prep bowl.
Place the adapter on the power shaft.
2
Install the work bowl lid, aligning
4
the tabs and locking it into place.
After processing, remove the prep bowl
5
using the two finger grips.
IMPORTANT: Discs and adapters must be removed before removing bowls.
18
Page 19
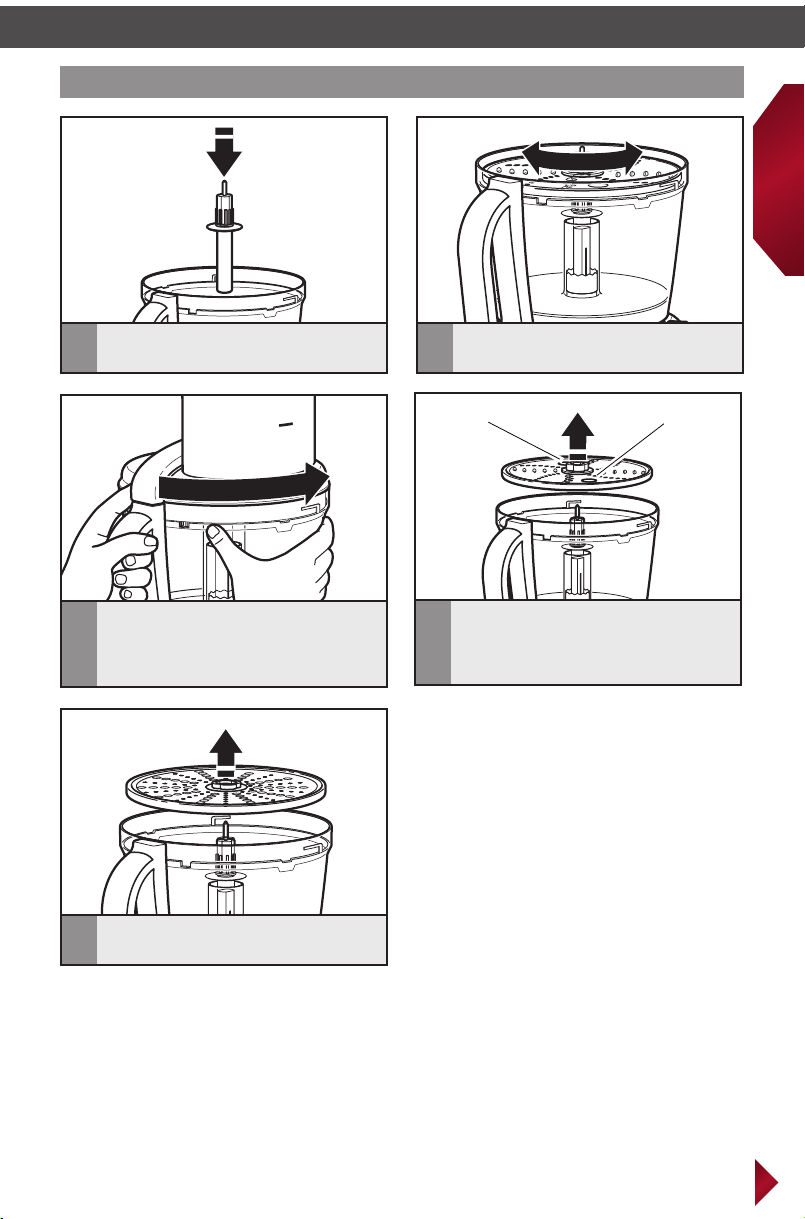
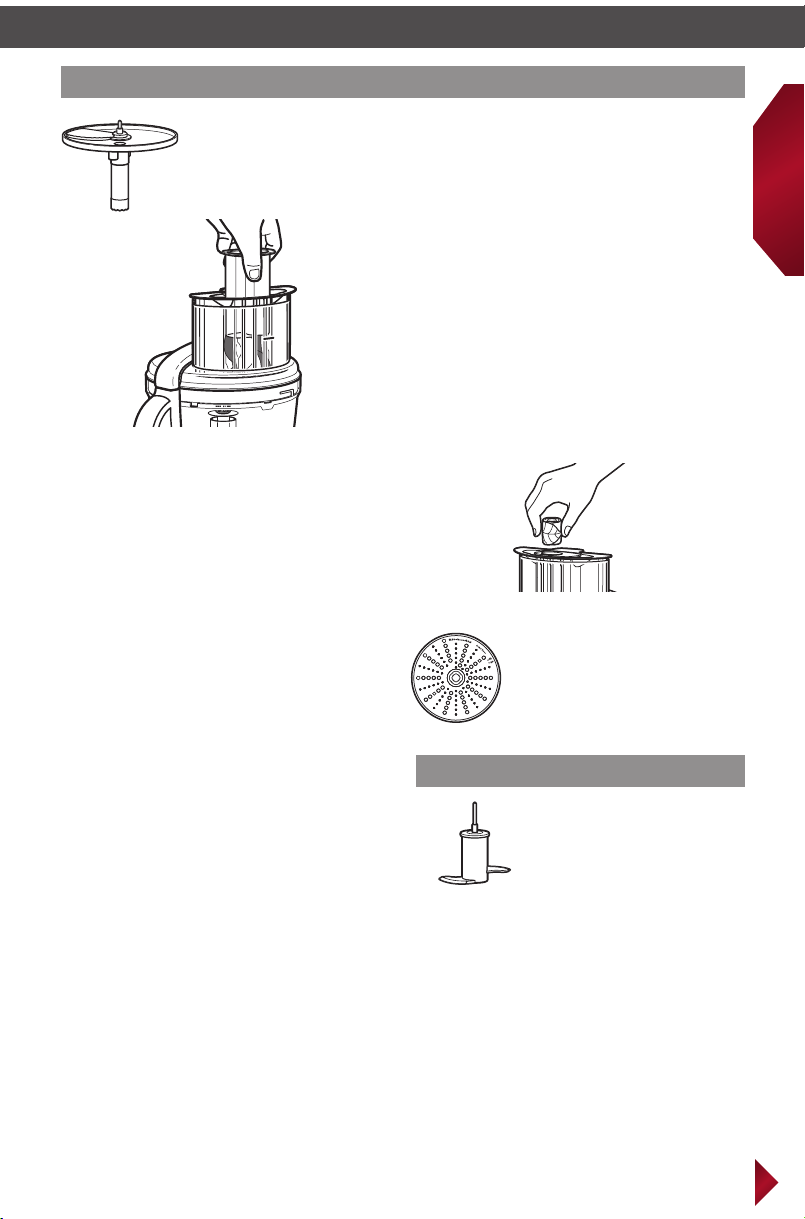
Installing/removing the shredding, julienne*, and parmesan* discs
English
Place the adapter on the power shaft.
1
Install the work bowl lid, aligning
the tabs and locking it into place.
3
Slightly rotate the disc until it drops
2
into place onto the adapter.
Finger grip holeFinger grip hole
To remove shredding disc and julienne
disc, remove work bowl lid and
4
using the 2 finger grip holes, lift the
disc straight up.
To remove the parmesan disc after
5
processing, lift off of adapter.
IMPORTANT: Discs and adapters must be removed before removing bowls.
* Available with select models only.
19
Page 20
USING YOUR ACCESSORIES
Installing/removing the slicing disc
Place the disc on the power shaft.
1
Install the work bowl lid, aligning
the tabs and locking it into place.
3
Adjusting the slicing thickness
NOTE: Changing thickness settings with
other discs or blades installed will have no
effect on operation.
Be aware, it is possible to change the thickness
of your slices by changing pressure on the food
item when guiding it into the feed tube. Use
more pressure for a thicker slice, or use less
pressure for a thinner slice.
Slightly rotate the disc until it drops
2
into place.
Finger grip holeFinger grip hole
To remove slicing disc, remove work
bowl lid and using the 2 finger grip
4
holes, lift the disc straight up.
Thinner
Thicker
Move lever to desired thickness setting.
IMPORTANT: Discs and adapters must be removed before removing bowls.
20
Page 21
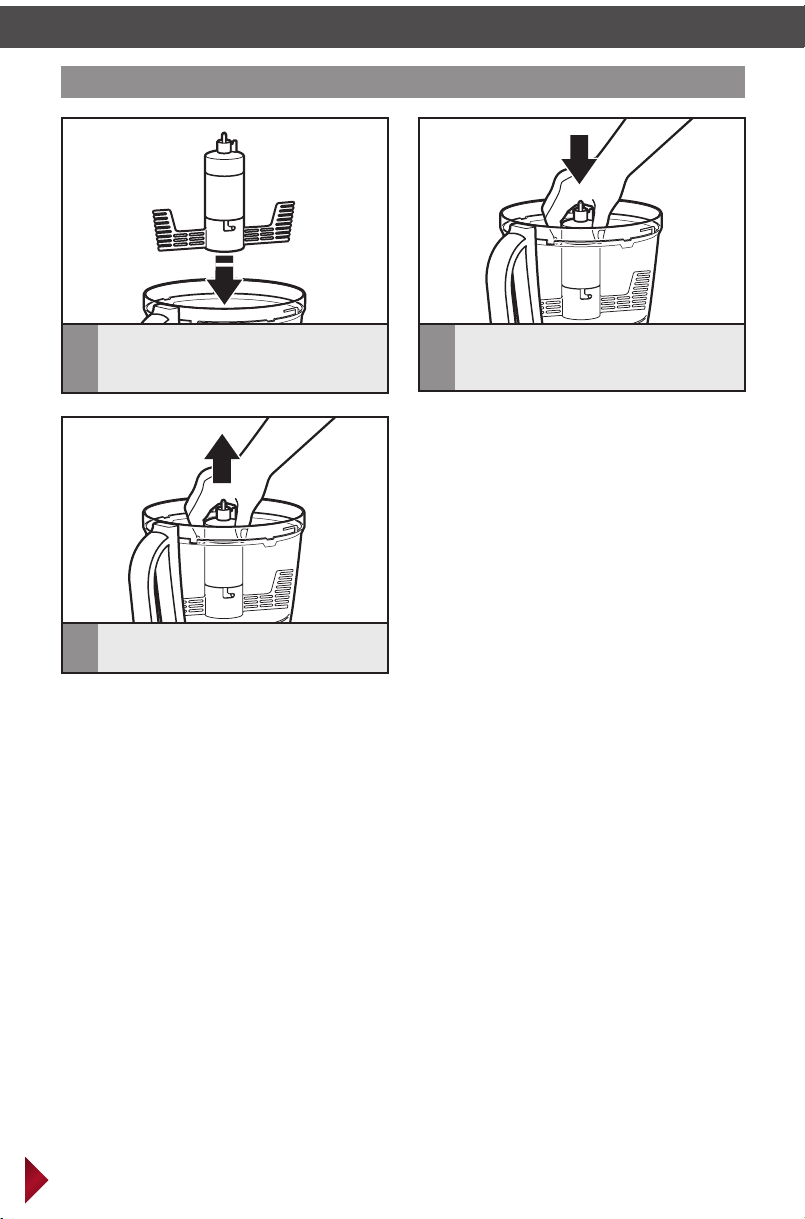
Installing/removing the mini-bowl and mini-blade
Power shaft
Mini-blade
English
Place the mini-bowl inside the work
bowl, making sure the tab on the
1
mini-bowl lines up with the notch
in the work bowl.
Install the work bowl lid, aligning
the tabs and locking it into place.
3
Press down firmly on the mini-blade.
You will hear a click when it locks
2
into place.
Remove the work bowl lid. Grasp and
4
pull the mini-blade straight up.
Using the two finger grips lift the
5
mini-bowl up.
IMPORTANT: Discs and adapters must be removed before removing bowls.
21
Page 22
USING YOUR ACCESSORIES
Installing/removing the egg whip* or dough blade
Place the egg whip or dough blade onto
power shaft.
1
After processing, firmly grasp egg whip
3
or dough blade and lift straight up.
IMPORTANT: Discs and adapters must be removed before removing bowls.
Press down firmly on the egg whip or
dough blade. You will hear a click when
2
the accessory locks into place.
* Available with select models only.
22
Page 23
USING YOUR ACCESSORIES
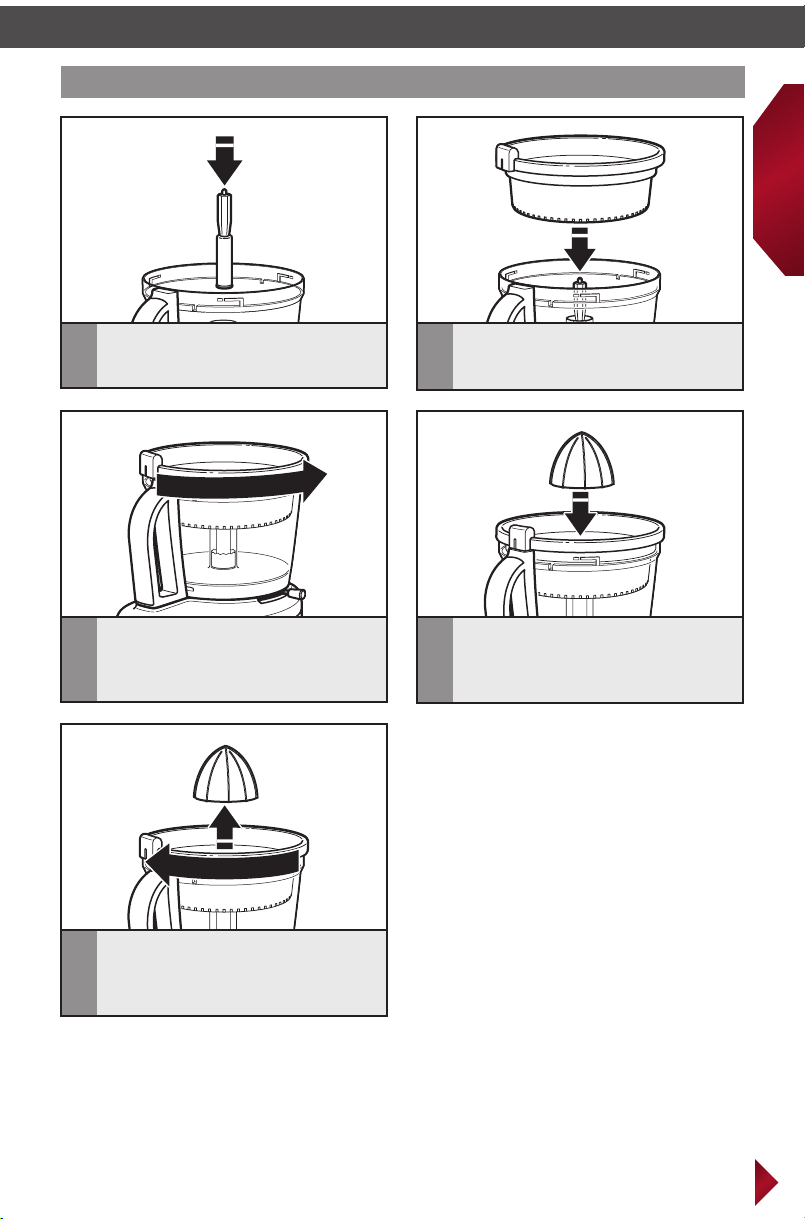
Installing/removing the citrus press*
English
Place the citrus press adapter onto the
power shaft.
1
Turn the basket counter-clockwise until
the clip locks into the handle.
3
Place the strainer basket in the work
bowl with the locking clip positioned to
2
the left of the work bowl handle.
Place the cone inside the strainer
basket, connecting it to the adapter. It
4
may be necessary to rotate the cone
until it drops into place.
After processing, lift cone from strainer
basket, turn strainer basket to unlock
5
from the handle, as shown, and lift from
the work bowl. Remove the adapter.
IMPORTANT: Discs and adapters must be removed before removing bowls.
* Available with select models only.
23
Page 24
USING YOUR ACCESSORIES
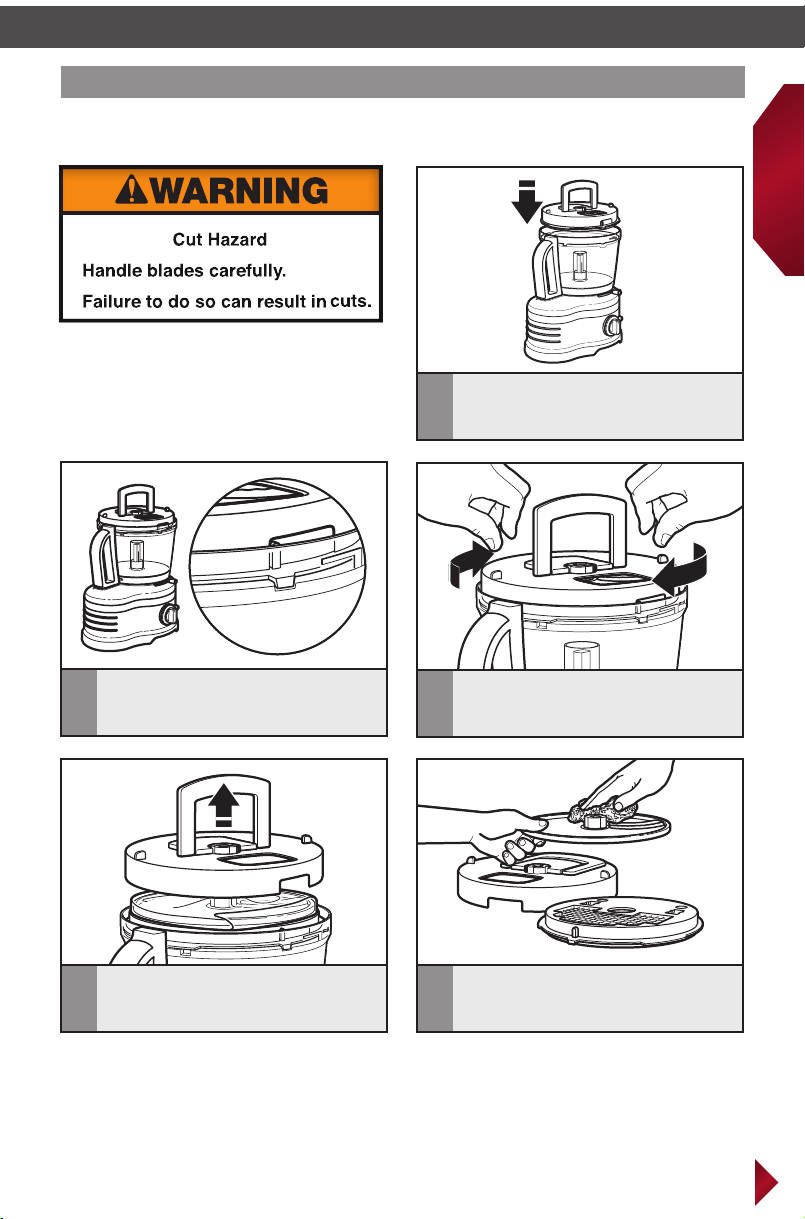
Removing accessories and work bowl
IMPORTANT: Be sure the Food Processor is off and unplugged before disassembling.
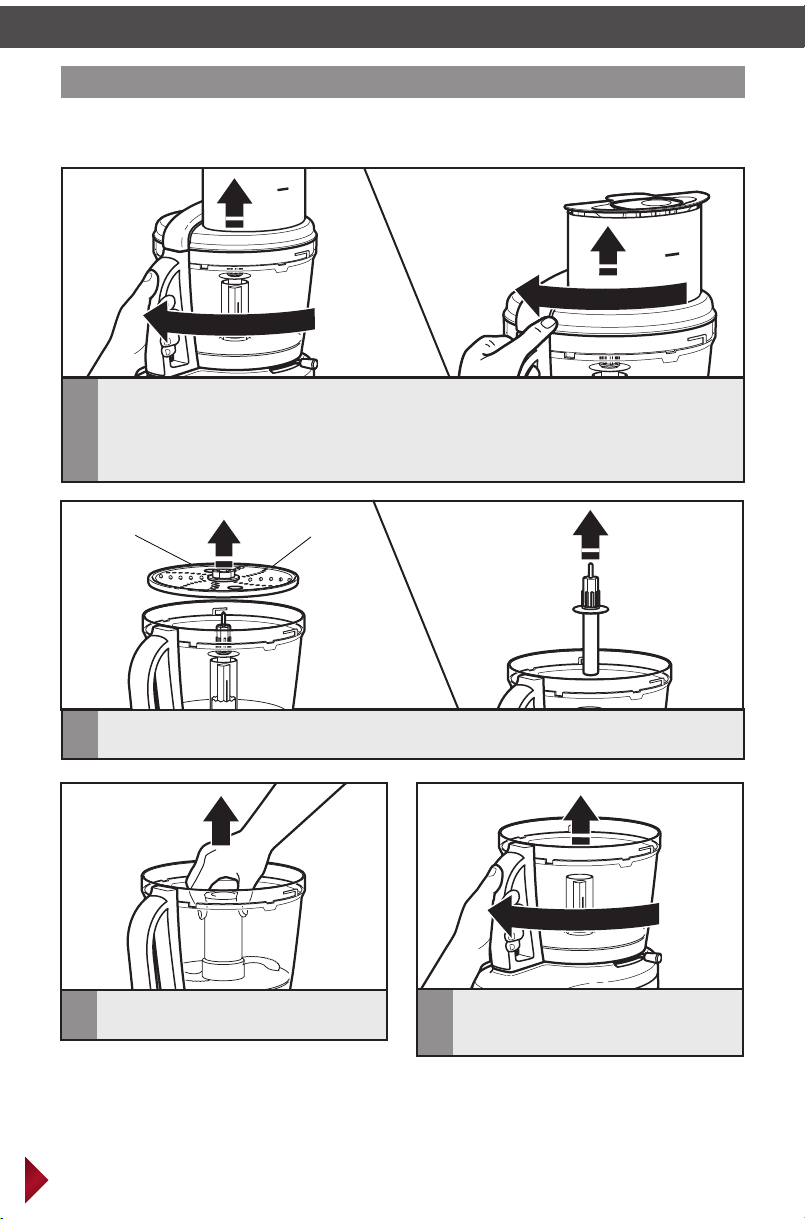
To remove work bowl from Food Processor before removing accessories: Turn the
1
work bowl and lift to remove, and then turn and lift the lid.
To remove accessories before removing work bowl from Food Processor: Turn the
work bowl cover to unlock, as shown, and lift the lid to remove, continuing next steps with
bowl still attached to Food Processor.
Finger grip
hole
To remove disc accessories: Hold the disc by the 2 finger grips; lift it straight up. Then
2
remove the adapter.
To remove blade accessories: Grasp
3
blade and pull straight up.
Finger grip
hole
If work bowl is still attached to
Food Processor: Turn the work bowl
4
and lift to remove.
24
Page 25
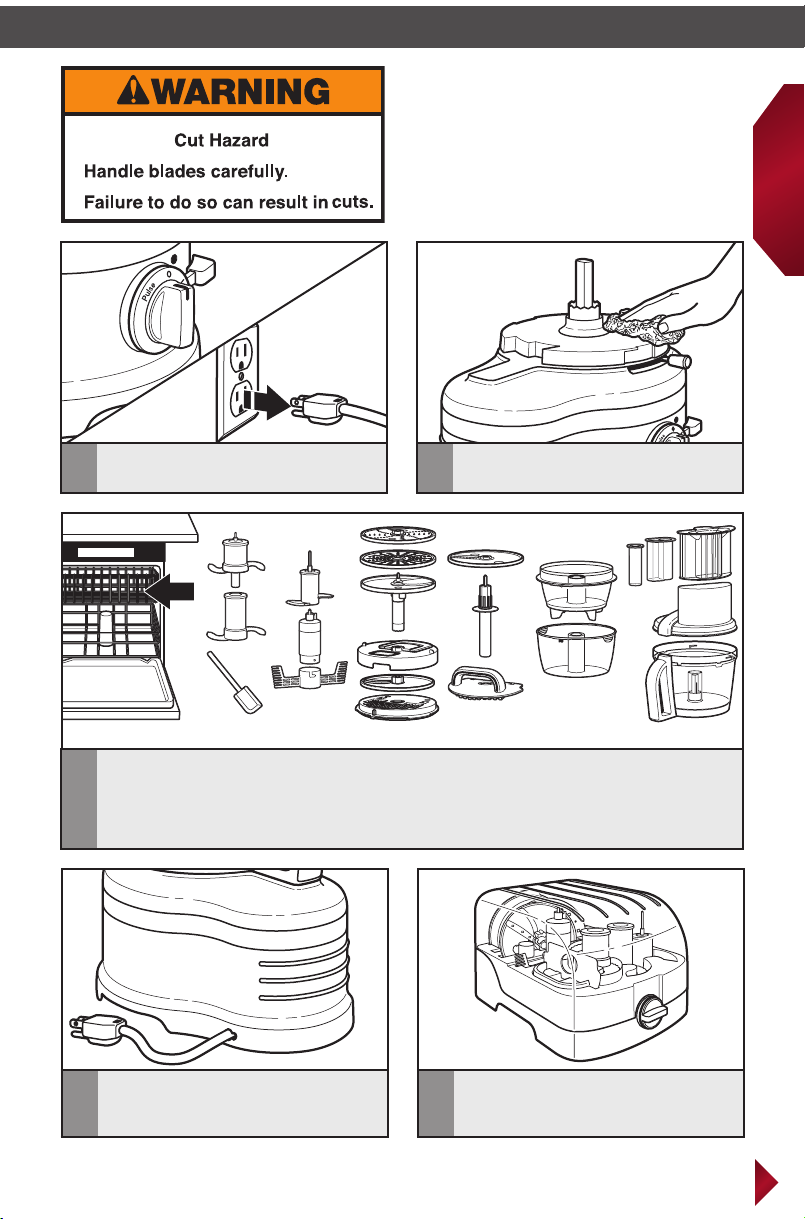
IMPORTANT: Never use abrasive cleansers or
scouring pads on the Food Processor. They may
scratch or cloud the work bowl and cover.
English
Be sure the Food Processor is off and
1
unplugged before disassembling.
All the other parts of the Food Processor are dishwasher safe.
3
- Load parts away from exposed heating elements in the dishwasher.
- Bowls should be loaded upside down, not on their sides.
- Avoid using high temperature settings such as sanitize or steam settings.
Clean the base and cord with a warm,
2
sudsy cloth. Dry with a soft cloth.
To store, push the cord back inside of
the Food Processor base.
4
Store discs, shaft, and blades in the
5
provided storage case and in a location
out of the reach of children.
25
Page 26
TIPS FOR GREAT RESULTS
Using the Multipurpose Blade
To chop fresh fruits
or vegetables:
Peel, core, and/or remove
1
/2-inch (2.5-4 cm) pieces. Process food
1
to desired size, using short pulses, 1 to
2 seconds each time. Scrape sides of bowl,
if necessary.
To puree cooked fruits and vegetables
(except potatoes):
Add 1/4 cup (60 ml) liquid from recipe per
1 cup (235 ml) of food. Process food, using
short pulses, until nely chopped. Then
process continuously until reaching desired
texture. Scrape sides of bowl, if necessary.
To prepare mashed potatoes:
Shred hot cooked potatoes using the
shredding disc. Exchange shredding disc
for multipurpose blade. Add softened butter,
milk, and seasonings. Pulse 3 to 4 times,
2 to 3 seconds each time, until smooth and
milk is absorbed. Do not over process.
To chop dried (or sticky) fruits:
The food should be cold. Add 1/4 cup
(60 ml) our from recipe per 1/2 cup
(120 ml) dried fruit. Process fruit, using
short pulses, until reaching desired texture.
26
seeds. Cut food in 1 to
To nely chop citrus peel:
With sharp knife, peel colored portion
(without white membrane) from citrus.
Cut peel in small strips. Process until
nely chopped.
To mince garlic or to chop fresh herbs
or small quantities of vegetables:
With processor running, add food through
the feed tube. Process until chopped. For
best results, make sure work bowl and
herbs are very dry before chopping.
To chop nuts or make nut butters:
Process up to 3 cups (710 ml) of nuts to
desired texture, using short pulses, 1 to 2
seconds each time. For a coarser texture,
process smaller batches, pulsing 1 or 2
times, 1 to 2 seconds each time. Pulse more
often for ner texture. For nut butters,
process continuously until smooth. Store in
refrigerator.
To chop cooked or raw meat,
poultry or seafood:
The food should be very cold. Cut in
1-inch (2.5 cm) pieces. Process up to
1 pound (455 g) at a time to desired size,
using short pulses, 1 to 2 seconds each time.
Scrape sides of bowl, if necessary.
To make bread, cookie,
or cracker crumbs:
Break food into 1
1
/2 to 2-inch (3.5-5 cm)
pieces. Process until ne. For larger pieces,
pulse 2 to 3 times, 1 to 2 seconds each time.
Then process until ne.
To melt chocolate in a recipe:
Combine chocolate and sugar from recipe
in work bowl. Process until nely chopped.
Heat liquid from recipe. With processor
running, pour hot liquid through the feed
tube. Process until smooth.
To grate hard cheeses,
such as Parmesan and Romano:
Never attempt to process cheese that
cannot be pierced with the tip of a sharp
knife. You can use the multi-purpose blade
to grate hard cheeses. Cut cheese in 1 inch
(2.5 cm) pieces. Place in work bowl. Process,
using short pulses, until coarsely chopped.
Process continuously until nely grated. Pieces
of cheese can also be added through the feed
tube while the processor is running.
NOTE: Processing nuts and other hard
foods may scratch the surface nish on
the inside of the bowl.
Page 27
TIPS FOR GREAT RESULTS
Using a Slicing or Shredding Disc
To slice or shred fruits or
vegetables that are long
and relatively small in
diameter, such as celery,
carrots, and bananas:
Cut food to t feed tube vertically or
horizontally, and pack feed tube securely
to keep food positioned properly. Process
using even pressure.
Or use the small feed tube in the two-piece
food pusher. Position food vertically in
the tube and use the small food pusher
to process food.
To slice or shred fruits and vegetables
that are round, such as onions, apples,
and green peppers:
Peel, core, and remove seeds. Cut in halves
or quarters to t feed tube. Position in feed
tube. Process using even pressure.
To slice or shred fruits and vegetables
that are small, such as strawberries,
mushrooms, and radishes:
Position food vertically or horizontally in
layers within the feed tube. Fill feed tube
in order to keep food positioned properly.
Process, using even pressure. Or use the
small feed tube in the two-piece food pusher.
Position food vertically in the tube and use
the small food pusher to process food.
To slice uncooked meat or poultry,
such as stir-fry meats:
Cut or roll food to t feed tube. Wrap
and freeze food until hard to the touch,
30 minutes to 2 hours, depending on
thickness of food. Check to be sure you
can still pierce food with the tip of a sharp
knife. If not, allow to thaw slightly. Process,
using even pressure.
To slice cooked meat or poultry,
including salami, pepperoni, etc.:
Food should be very cold. Cut in pieces to
t feed tube. Process food using rm, even
pressure.
To shred spinach and other leaves:
Stack leaves. Roll up and stand up in feed
tube. Process using even pressure.
To shred rm and soft cheeses:
Firm cheese should be very
cold. For best results with soft
cheeses, such as mozzarella,
freeze 10 to 15 minutes before
processing. Cut to t feed tube.
Process using even pressure.
Using the Dough Blade
The dough blade is specially
designed for mixing and
kneading yeast dough quickly
and thoroughly.
For the best results, do not
knead recipes which use more than 4 cups
(500 g) of our.
English
27
Page 28

TIPS FOR GREAT RESULTS
Helpful Hints
• To avoid damage to the blade or motor,
do not process food that is so hard or
rmly frozen that it cannot be pierced
with the tip of a sharp knife. If a piece
of hard food, such as a carrot, becomes
wedged or stuck on the blade, stop the
processor and remove the blade. Gently
remove food from the blade.
• Do not overll work bowl or mini-bowl.
For liquids, follow the maximum ll
levels indicated on the work bowl. When
chopping, the work bowl should be no
more than 1/3 to 1/2 full. Use the
mini-bowl for up to 4 cups (1 L)
of liquid or 4 cups (500 g) dry ingredients.
• Position slicing discs so the cutting surface
is just to the right of the feed tube. This
allows the blade a full rotation before
contacting the food.
• To capitalize on the speed of the
processor, drop ingredients to be chopped
through the feed tube while the processor
is running.
• Different foods require varying degrees
of pressure for best shredding and slicing
results. In general, use light pressure
for soft, delicate foods (strawberries,
tomatoes, etc.), moderate pressure for
medium foods (zucchini, potatoes, etc.),
and rmer pressure for harder foods
(carrots, apples, hard cheeses, partially
frozen meats, etc.).
• Soft and medium-hard cheese may spread
out or roll up on the shredding disc. To
avoid this, shred only well-chilled cheese.
• Sometimes slender foods, such as
carrots or celery, fall over in the feed
tube, resulting in an uneven slice. To
minimize this, cut food in several pieces
and pack the feed tube with the food.
For processing small or slender items,
the small feed tube in the two piece food
pusher will prove especially convenient.
• When preparing a cake or cookie batter,
use the multipurpose blade to cream
fat and sugar rst. Add dry ingredients
last. Place nuts and fruit on top of our
mixture to prevent overchopping. Process
nuts and fruits, using short pulses, until
blended with other ingredients. Do
not overprocess.
• When shredded or sliced food piles
up on one side of the bowl, stop the
processor and redistribute the food
using a spatula.
• When food quantity reaches the bottom
of a slicing or shredding disc, remove
the food.
• A few larger pieces of food may
remain on top of the disc after slicing
or shredding. If desired, cut these by
hand and add to mixture.
• Organize processing tasks to minimize
bowl cleanup. Process dry or rm
ingredients before liquid ingredients.
• To clean ingredients from the
multipurpose blade easily, just empty
the work bowl, replace the lid, and pulse
1 to 2 seconds to spin the blade clean.
• After removing the work bowl cover,
place it upside down on the counter.
This will help keep the counter clean.
• Use the spatula to remove ingredients
from the work bowl.
• Your Food Processor is not designed
to perform the following functions:
- Grind coffee beans, grains, or
hard spices
- Grind bones or other inedible
parts of food
- Liquefy raw fruits or vegetables
- Slice hard-cooked eggs or
unchilled meats.
• If any plastic parts should discolor due to
the types of food processed, clean them
with lemon juice.
28
Page 29

If your Food Processor should malfunction or fail to operate, check the following:
Food Processor doesn’t run:
• Make sure that the bowl and lid are properly
aligned and locked in place and the large
food pusher is inserted in the feed tube.
• When using the large feed tube opening,
make sure that food is not above the
Max. Fill line on the feed tube.
• Check to make sure the Food Processor
is plugged in.
• Is the fuse in the circuit to the Food
Processor in working order? If you have
a circuit breaker box, be sure the circuit
is closed.
• Unplug the Food Processor, then plug it
back into the outlet.
• If the Food Processor is not at room
temperature, wait until it reaches room
temperature and retry.
• If the speed lever does not move, make sure
the dial is in the Off position.
• For easy lid rotation, it is possible to
remove the seal, or just apply vegetable
oil to the seal.
Food Processor not shredding or
slicing properly:
• Make sure the raised-blade side of the
disc is positioned face up on the adapter.
• If using the adjustable slicing blade, make
sure it is set to the correct thickness.
• Make sure ingredients are suitable for
slicing or shredding.
If the work bowl cover won’t close:
• Make sure the disc is installed correctly,
with the raised nub on top, and is
positioned properly on the drive adapter.
• Try to close again, with the large food
pusher removed.
If the problem is not due to one of the above
items, see the “Warranty and Service” section.
Do not return the Food Processor to the
retailer. Retailers do not provide service.
English
29
Page 30

WARRANTY AND SERVICE
KitchenAid® Pro-Line Total Replacement Limited Warranty
for the 50 United States, the District of Columbia,
Puerto Rico, and Canada
This warranty extends to the purchaser and any succeeding owner for KitchenAid Pro-Line
products operated in the 50 United States, the District of Columbia, Puerto Rico, and Canada.
Length of Limited Five Years from the date of purchase.
Total Replacement
Warranty:
KitchenAid Will Pay Hassle-Free Replacement of your Pro-Line product. See
for Your Choice of: the next page for details on how to arrange for replacement,
or call the Customer eXperience Center toll-free at
1-800-832-7173.
OR
The replacement parts and repair labor costs to correct
defects in materials and workmanship. Service must be
provided by an Authorized KitchenAid Service Center.
KitchenAid Will A. Repairs when your Pro-Line product is used in other than
Not Pay for: normal single family home use.
B. Damage resulting from accident, alteration, misuse or
abuse.
C. Any shipping or handling costs to deliver your
Pro-Line product to an Authorized Service Center.
D. Replacement parts or repair labor costs for Pro-Line
products operated outside the 50 United States,
District of Columbia, Puerto Rico, and Canada.
DISCLAIMER OF IMPLIED WARRANTIES IMPLIED WARRANTIES, INCLUDING
ANY IMPLIED WARRANTY OF MERCHANTABILITY OR IMPLIED WARRANTY OF
FITNESS FOR A PARTICULAR PURPOSE, ARE LIMITED TO FIVE YEARS OR THE
SHORTEST PERIOD ALLOWED BY LAW. Some states and provinces do not allow
limitations on the duration of implied warranties or merchantability or tness, so this
limitation may not apply to you. This warranty gives you specic legal rights, and you also
may have other rights that vary from state to state and province to province.
DISCLAIMER OF REPRESENTATIONS OUTSIDE OF WARRANTY KitchenAid
makes no representations about the quality, durability or need for service or repair of this
appliance other than the representations contained in this Warranty. If you want longer or
more comprehensive coverage than the limited warranty that comes with this appliance,
you should ask KitchenAid or your retailer about buying a service contract.
LIMITATION OF REMEDIES; EXCLUSION OF INCIDENTAL AND
CONSEQUENTIAL DAMAGES YOUR SOLE AND EXCLUSIVE REMEDY UNDER
THIS LIMITED WARRANTY SHALL BE PRODUCT REPLACEMENT OR REPAIR AS
PROVIDED HEREIN. KITCHENAID SHALL NOT BE RESPONSIBLE FOR INCIDENTAL
OR CONSEQUENTIAL DAMAGES. Some states and provinces do not allow the exclusion
or limitation of incidental or consequential damages, so these limitations and exclusions
may not apply to you. This warranty gives you specic legal rights, and you also may have
other rights that vary from state to state and province to province.
30
Page 31

Hassle-Free Replacement Warranty –
50 United States, District of Columbia, and Puerto Rico
We’re so condent the quality of our
products meets the exacting standards of
KitchenAid that, if your Pro-Line product
should fail within the rst ve years of
ownership, KitchenAid will arrange to deliver
an identical or comparable replacement to
your door free of charge and arrange to
have your original Pro-Line product returned
to us. Your replacement unit will also be
covered by our ve year limited warranty.
Please follow these instructions to receive
this quality service.
If your Pro-Line product should fail within
the rst ve years of ownership, simply call
our toll-free Customer eXperience Center
at 1-800-832-7173 Monday through Friday.
Please have your original sales receipt
available when you call. Proof of purchase
will be required to initiate the claim. Give the
consultant your complete shipping address.
(No P.O. Box numbers, please.)
When you receive your replacement
Pro-Line product, use the carton and
packing materials to pack up your original
Pro-Line product.
Hassle-Free Replacement Warranty – Canada
English
We’re so condent the quality of our
products meets the exacting standards
of the KitchenAid
Pro-Line product should fail within the rst
ve years of ownership, KitchenAid Canada
will replace your Pro-Line product with an
identical or comparable replacement. Your
replacement unit will also be covered by our
ve year limited warranty. Please follow these
instructions to receive this quality service.
If your Pro-Line product should fail within
the rst ve years of ownership, take the
Pro-Line product or ship collect to an
Authorized KitchenAid Service Centre. In
®
brand that, if your
Arranging for Service after the Warranty Expires,
or Ordering Accessories and Replacement Parts
In the United States and Puerto Rico:
For service information, or to order
accessories or replacement parts, call
toll-free at 1-800-832-7173 or write to:
Customer eXperience Center,
KitchenAid Small Appliances,
P.O. Box 218, St. Joseph, MI 49085-0218
Outside the United States
and Puerto Rico:
Consult your local KitchenAid dealer or the
store where you purchased your Pro-Line
product for information on how to obtain
service.
the carton include your name and complete
shipping address along with a copy of
the proof of purchase (register receipt,
credit card slip, etc.). Your replacement
Pro-Line product will be returned prepaid
and insured. If you are unable to obtain
satisfactory service in this manner call our
toll-free Customer eXperience Centre at
1-800-832-7173.
Or write to us at:
Customer eXperience Centre
KitchenAid Canada
200 - 6750 Century Ave.
Mississauga, ON L5N 0B7
For service information in Canada:
Call toll-free 1-800-832-7173.
Or write to:
Customer eXperience Centre
KitchenAid Canada
200 - 6750 Century Ave.
Mississauga, ON L5N 0B7
®/™ © 2013 KitchenAid. All rights reserved. Used under license in Canada.
31
Page 32

bienvenue dans le monde de Kitchenaid®.
Nous nous engageons à vous aider
à créer de délicieux repas pour
votre famille et vos amis, et ce
durant tout le cycle de vie de
l’appareil. Pour contribuer
à la durabilité et à une bonne
performance de votre appareil,
conserver ce guide à portée
de main. Il vous permettra
d’utiliser et d’entretenir votre
produit de la meilleure manière
qui soit. Votre satisfaction
est notre objectif numéro 1.
Ne pas oublier d’enregistrer
votre produit en ligne
sur www.kitchenaid.com
ou par courrier à l’aide
de la carte d’enregistrement
du produit ci-jointe.
USA: 1.800.832.7173
32
Canada: 1.800.807.6777
Rejoignez-nous au coin cuisine sur www.proline.kitchenaid.com.
Scannez ici avec votre appareil portable pour accéder à des recettes,
des conseils et plus encore.
KitchenAid.com
KitchenAid.ca
Page 33

INSTRUCTIONS DU ROBOT CULINAIRE
TABLE DES MATIÈRES
SÉCURITÉ DU ROBOT CULINAIRE
Consignes de sécurité importantes ......................................................................... 34
Spécications électriques .........................................................................................35
PIÈCES ET CARACTÉRISTIQUES
Pièces et accessoires ............................................................................................... 36
Sélectionner les bons outils ..................................................................................... 38
UTILISATION DU ROBOT CULINAIRE
Montage du bol de travail ........................................................................................ 42
Fixation du couvercle et dispositif de verrouillage de sécurité ................................ 43
Utilisation de la goulotte d’alimentation 3-en-1 ...................................................... 44
Utilisation des commandes de vitesse ..................................................................... 45
UTILISATION DES ACCESSOIRES
Préparation de l’ensemble de tranchage en dés pour la première utilisation ..........46
Installation/utilisation de l’ensemble du disque à trancher ...................................... 47
Installation/retrait de la lame multifonction ............................................................. 48
Installation/retrait du bol de préparation ................................................................. 49
Installation/retrait des disques à broyer, à julienne et râpe à parmesan .................. 50
Installation/retrait du disque à trancher ................................................................... 51
Réglage de l’épaisseur de tranchage ........................................................................ 51
Installation/retrait du mini-bol et de la mini-lame .................................................... 52
Installation/retrait du fouet à œufs et de la lame pétrisseuse .................................. 53
Installation/retrait du presse-agrumes ..................................................................... 54
Retrait des accessoires et du bol de travail..............................................................55
ENTRETIEN ET NETTOYAGE ................................................................................... 56
CONSEILS POUR DE BONS RÉSULTATS .............................................................. 57
DÉPANNAGE ................................................................................................................61
GARANTIE ET DÉPANNAGE ....................................................................................62
Français
PREUVE D’ACHAT ET ENREGISTREMENT DU PRODUIT
Veuillez toujours conserver une copie détaillée du ticket de caisse indiquant la date d’achat
du robot culinaire. La preuve d’achat vous garantit le bénéce du service d’assistance sous
garantie. Avant d’utiliser le robot culinaire, veuillez remplir et poster la carte d’enregistrement
du produit emballée avec l’appareil, ou enregistrer celui-ci en ligne sur www.kitchenaid.com.
Grâce à cette carte, nous pourrons vous contacter dans l’éventualité improbable d’un avis
de sécurité concernant le produit; ceci nous aidera aussi à nous conformer aux dispositions
du Consumer Product Safety Act. Cette carte ne conrme pas votre garantie. Veuillez remplir
ce qui suit pour vos dossiers personnels :
Numéro de modèle ___________________________________________________________________
Numéro de série _____________________________________________________________________
Date d’achat _______________________________________________________________________
Nom du magasin _____________________________________________________________________
33
Page 34

SÉCURITÉ DU ROBOT CULINAIRE
Votre sécurité et celle des autres est très importante.
Nous donnons de nombreux messages de sécurité importants dans ce manuel et sur
votre appareil ménager. Assurez-vous de toujours lire tous les messages de sécurité
et de vous y conformer.
Voici le symbole d’alerte de sécurité.
Ce symbole d’alerte de sécurité vous signale les dangers
potentiels de décès et de blessures graves à vous et à d’autres.
Tous les messages de sécurité suivront le symbole d’alerte de
sécurité et le mot “DANGER” ou “AVERTISSEMENT”. Ces mots
signifient :
Risque possible de décès ou de
DANGER
AVERTISSEMENT
Tous les messages de sécurité vous diront quel est le danger potentiel et vous
disent comment réduire le risque de blessure et ce qui peut se produire en cas de
non-respect des instructions.
blessure grave si vous ne suivez pas
immédiatement les instructions.
Risque possible de décès ou de
blessure grave si vous ne suivez pas
les instructions.
CONSIGNES DE SÉCURITÉ
IMPORTANTES
Lors de l’utilisation d’appareils électriques, il faut toujours observer certaines
précautions élémentaires de sécurité, y compris les suivantes :
1. Lire toutes les instructions.
2. Pour éviter tout risque de choc électrique, ne pas immerger le robot culinaire
dans de l’eau ou tout autre liquide.
3. Une surveillance étroite s’impose lorsqu’un appareil ménager est utilisé par
ou à proximite d’enfants.
4. Débrancher la bouilloire lorsqu’elle n’est pas utilisée et avant le nettoyage. Attendre
que l’appareil ait refroidi avant d’installer ou de retirer des pièces, et avant de
nettoyer l’appareil.
5. Éviter tout contact avec les pièces en mouvement.
6. Ne pas faire fonctionner un appareil dont le cordon ou la prise est endommagé(e),
lorsque l’appareil ne fonctionne pas correctement ou lorsqu’il a été endommagé d’une
quelconque façon. Retourner l’appareil au centre de service agréé le plus proche pour
examen, réparation ou réglage.
7. L’utilisation d’accessoires non recommandés par le fabricant de l’appareil peut
entraîner un incendie, un choc électrique ou des blessures corporelles.
8. Ne pas utiliser à l’extérieur.
9. Ne pas laisser le cordon pendre sur le côté d’une table ou d’un comptoir.
10. Garder les mains et les ustensiles à l’écart des lames ou disques lors de la préparation
des aliments pour éviter toute blessure corporelle grave ou dommages au robot
culinaire. On peut utiliser un grattoir, mais il doit être employé uniquement lorsque
le robot culinaire ne fonctionne pas.
11. Les lames sont aiguisées. Les manipuler avec précaution.
12. Pour réduire le risque de blessure, ne jamais placer la lame ou les disques sur la base sans
installer correctement le bol au préalable.
CONSERVER CES INSTRUCTIONS
34
Page 35

13. S’assurer que le couvercle est bien verrouillé avant de faire fonctionner l’appareil.
14. Ne jamais introduire les aliments à la main. Toujours utiliser le poussoir pour introduire
les aliments.
15. Ne pas tenter d’outrepasser le dispositif de verrouillage du couvercle.
16. Ce produit est conçu uniquement pour un usage domestique d’intérieur.
17. Ne pas utiliser l’appareil pour un autre usage que celui pour lequel il est conçu.
18. Déconnecter l’appareil du circuit d’alimentation électrique avant d’effectuer tout
nettoyage ou entretien.
19. MISE EN GARDE : Ne pas ouvrir l’appareil avant que la lame n’ait cessé de tourner.
20. MISE EN GARDE : An de protéger en tout temps l’appareil contre un risque de choc
électrique, brancher l’appareil uniquement sur une prise de courant adéquatement reliée
à la terre.
CONSERVER CES INSTRUCTIONS
Spécications électriques
Volts : 120 VCA
AVERTISSEMENT
Risque de choc électrique
Brancher sur une prise à 3
alvéoles reliée à la terre.
Ne pas enlever la broche de
liaison à la terre.
Ne pas utiliser un adaptateur.
Ne pas utiliser un câble de
rallonge.
Le non-respect de ces
instructions peut causer un
décès, un incendie ou un choc
électrique.
Hertz : 60 Hz
REMARQUE : Ce robot culinaire
comporte une fiche à trois alvéoles reliée
à la terre. Si la fiche ne s’enfonce pas
complètement dans la prise, appeler un
électricien qualifié. Ne pas modifier la prise
de quelque manière que ce soit.
Ne pas utiliser de câble de rallonge. Si le
cordon d’alimentation électrique est trop
court, faire installer une prise près de
l’appareil électroménager par un électricien
ou un technicien de service qualifié.
Français
35
Page 36

PIÈCES ET CARACTÉRISTIQUES
Pièces et accessoires
Coffret
d’accessoires
Poussoir
alimentaire
en 3 parties
Couvercle du bol
de travail avec
goulotte
d’alimentation
3-en-1
Fermeture
Ultratight
Bol de
travail de
16 tasses (4 L)
Commande
de lame
externe
réglable
Socle
coulé sous
pression
Mini-bol de 4 tasses (1 L)
et mini-lame
36
Spatule
Lame
pétrisseuse
Lame en acier
inoxydable multifonction
Fouet à œufs
(sur certains modèles
uniquement)
Page 37

Pièces et accessoires
ENSEMBLE DE TRANCHAGE
➃
➂
tranchage en dés de 8 mm*
EN DÉS
Outil de nettoyage
➄
de grille (8 mm)
Couvercle de l’ensemble
de tranchage en dés
Lame de l’ensemble de
Disque à broyer réversible
(2 mm et 4 mm)*
Râpe à parmesan/glace*
(sur certains modèles
uniquement)
Disque à trancher
avec système de réglage
externe (tranchage
n à épais)
Français
Bol de préparation
de 10 tasses (2,4 L)
Grille de l’ensemble
➁
de tranchage en dés
Adaptateur de disque
(*Utiliser cet
adaptateur)
Presse-agrumes
(sur certains modèles
uniquement)
Disque à julienne*
(sur certains modèles
uniquement)
Adaptateur pour
presse-agrumes
(sur certains modèles
uniquement)
37
Page 38

PIÈCES ET CARACTÉRISTIQUES
Sélectionner les bons outils
+
Ensemble de tranchage en dés avec adaptateur de disque,
bol de travail et bol de préparation facultatif
Trancher en dés
Pommes de terre, tomates, oignons, concombres, fruits, légumes
Facultatif
High
Low
Mini-bol utilisé avec lame en acier inoxydable multifonction
Hacher
High
Low
Légumes, fruits, nes herbes fraîches,
noix, viande
Émincer
Réduire en
purée
High
Low
Légumes, fruits Pesto, sauces, pâte à gâteau, crème
REMARQUE : Pour de meilleurs résultats lors du hachage, commencer la préparation avec
le levier placé sur “High” (élevée) puis le modier et le placer sur “Low” (basse).
38
Mélanger
High
Low
Page 39

Sélectionner les bons outils
+
Lame pétrisseuse en plastique utilisée
avec le bol de travail
Pétrir
High
Low
Pâte au levain
Lame en acier inoxydable multifonction utilisée avec bol de travail
+
+
Fouet à œufs* utilisé avec bol de travail
Fouetter
High
Low
Œufs
Français
Hacher
High
Low
Légumes, fruits, nes herbes fraîches,
noix, viande
Émincer
Réduire en
purée
High
Low
Légumes, fruits Pesto, sauces, pâte à gâteau,
Mélanger
pâte à tarte crème
REMARQUE : Pour de meilleurs résultats lors du hachage, commencer la préparation avec
le levier placé sur “High” (élevée) puis le modier et le placer sur “Low” (basse).
* Disponible avec certains modèles uniquement.
High
Low
39
Page 40

PIÈCES ET CARACTÉRISTIQUES
Sélectionner les bons outils
Selon vos préférences, vous pouvez utiliser d’autres réglages que les réglages suggérés ci-dessous.
+
Facultatif
Disque de tranchage réglable utilisé avec bol de travail et bol de préparation facultatif
Trancher - épaisTrancher - n
High
Low
Pommes de terre, tomates, fruits (à chair souple), légumes (à chair souple),
fruits (à chair ferme), légumes (à chair ferme)
High
Low
+
Facultatif
Disque à broyer réversible utilisé avec bol de travail et bol de préparation facultatif
Broyer
- moyen
Broyer
- n
High
Low
Légumes, fromage (à congeler 30 minutes avant), chocolat, fruits (à chair ferme)
40
Page 41

Sélectionner les bons outils
+
Râpe à parmesan/glace utilisée* avec bol de travail et bol de préparation facultatif
Facultatif
Râper Réduire en
copeaux
High
Low
Fromage à pâte dure, glace, chocolat
+
Facultatif
Disque à julienne* utilisé avec bol de travail et bol de préparation facultatif
Julienne
High
Français
Carottes, courgettes, pommes de terre, légumes
* Disponible avec certains modèles uniquement.
Low
41
Page 42

UTILISATION DU ROBOT CULINAIRE
Montage du bol de travail
AVERTISSEMENT
Risque de choc électrique
Brancher sur une prise à 3
alvéoles reliée à la terre.
Ne pas enlever la broche de
liaison à la terre.
Ne pas utiliser un adaptateur.
Ne pas utiliser un câble de
rallonge.
Le non-respect de ces
instructions peut causer un
décès, un incendie ou un choc
électrique.
Axe
du socle
Avant la première utilisation
Avant d’utiliser le robot culinaire pour la
première fois, laver les bols et accessoires
à la main tel que décrit dans la section
“Nettoyage et entretien”.
S’assurer que le robot culinaire est
éteint, débranché et placé sur une
1
surface plane.
Placer le bol de travail sur le socle
2
tel qu’indiqué.
42
Tourner le bol de travail pour
3
le verrouiller sur le socle.
Page 43

UTILISATION DU ROBOT CULINAIRE
Fixation du couvercle et dispositif de verrouillage de sécurité
Installer le couvercle du bol de travail
1
en alignant les onglets et le verrouiller.
La fermeture Ultratight est résistante
aux renversements.
ASTUCE : Le couvercle est plus facile à fixer lorsque la goulotte d’alimentation de grande taille est
retirée. Après avoir fixé le couvercle, ne pas oublier d’insérer la goulotte d’alimentation de grande taille.
La goulotte d’alimentation de grande
2
taille doit être insérée dans le couvercle
pour que le robot puisse fonctionner.
Français
43
Page 44

Utilisation de la goulotte d’alimentation 3-en-1
Avant utilisation
Avant d’utiliser le robot culinaire,
s’assurer que le bol de travail, les lames
et le couvercle du bol de travail sont
correctement assemblés sur le socle
du robot culinaire.
Ligne de
remplissage
maximal
Utiliser toute la goulotte d’alimentation
ainsi que le poussoir alimentaire de
1
grande taille pour mélanger les aliments
de grande taille.
Poussoir
alimentaire
de
grande taille
44
Poussoir
alimentaire
de taille
moyenne
Utiliser le poussoir alimentaire de taille
moyenne dans la goulotte d’alimentation
2
pour mélanger des aliments plus petits.
de petite taille
Orice
de
versement
en let
Pour verser en mince let de l’huile ou
4
tout autre ingrédient liquide dans le bol
de travail, utiliser l’orice de versement
en let du poussoir alimentaire de
petite taille.
Poussoir
alimentaire
Poussoir
alimentaire
de
petite taille
Utiliser le poussoir alimentaire de
petite taille pour trancher ou broyer
3
les articles les plus petits/ns.
ASTUCE : Le débit de l’orifice de versement
en filet est idéal pour faire de la mayonnaise.
Page 45

UTILISATION DU ROBOT CULINAIREUTILISATION DU ROBOT CULINAIRE
Utilisation des commandes de vitesse
REMARQUE : Si le robot culinaire ne fonctionne pas, vérifier que le bol de travail et son couvercle
sont bien verrouillés sur le socle et que le poussoir alimentaire de grande taille est bien en place.
High
Low
Pour mettre en marche le robot, placer
1
le levier de vitesse sur High (élevée) ou
Low (basse) puis tourner le bouton sur
ON (marche).
High
Low
Pour le faire fonctionner par impulsion,
3
placer le levier de vitesse sur High
(élevée) ou Low (basse) puis tourner
le bouton à PULSE (impulsion) pour
démarrer le mixage; le bouton reviendra
automatiquement à la position OFF
(arrêt) pour arrêter le mixage. Le
bouton « Pulse » permet de contrôler
avec précision la durée et la fréquence
de la préparation.
REMARQUE : Le levier de vitesse doit être
en position OFF (arrêt) pour que l’on puisse
changer de vitesse.
Pour l’arrêter, tourner le bouton
2
à OFF (arrêt).
High
Low
Français
45
Page 46

Préparation de l’ensemble de tranchage en dés pour
la première utilisation
IMPORTANT : Suivre ces instructions pour laver correctement toutes les pièces
de l’ensemble de tranchage en dés avant de l’utiliser pour la première fois.
À l’aide de la poignée, placer l’ensemble
de tranchage en dés assemblé dans le
1
bol de travail.
Au moment de placer l’ensemble
dans le bol de travail, aligner l’onglet
2
de l’ensemble avec la fente dans
le bol de travail.
À l’aide de la poignée, retirer le
couvercle de l’ensemble de tranchage
4
en dés de l’ensemble.
46
Faire pivoter le couvercle de l’ensemble
de tranchage en dés avec le doigt
3
jusqu’à ce qu’il se déverrouille.
Nettoyer chaque pièce de l’ensemble
de tranchage en dés au lave-vaisselle ou
5
avec un chiffon doux et de l’eau tiède.
Page 47

UTILISATION DES ACCESSOIRESUTILISATION DES ACCESSOIRES
Installation/utilisation de l’ensemble du disque à trancher
Placer l’adaptateur de disque sur l’axe
du socle.
1
Placer la lame de l’ensemble de
tranchage en dés en s’assurant qu’elle
3
est bien fixée.
Placer la grille de l’ensemble de
tranchage en dés – orienter la grille vers
2
l’avant et aligner l’onglet de l’ensemble
avec la fente dans le bol de travail.
Placer le couvercle de l’ensemble
4
de tranchage en dés sur l’ensemble
assemblé en orientant l’orifice vers
l’avant puis le verrouiller.
Français
Placer le couvercle sur le robot culinaire
5
et utiliser le poussoir alimentaire de
taille moyenne pour trancher en dés
les aliments souhaités. Si le couvercle
ne ferme pas complètement, s’assurer
que l’ensemble de tranchage en dés
et la grille de tranchage en dés sont
parfaitement installés.
REMARQUE : Les aliments à chair ferme comme les carottes nécessitent plus de force pour être
dégagées avec l’outil de nettoyage de l’ensemble de tranchage en dés. Il est normal que certains
aliments restent coincés dans la grille tant que le nettoyage n’est pas terminé.
Une fois le tranchage en dés effectué,
6
retirer le couvercle et la lame de
tranchage en dés, et placer l’outil de
nettoyage de l’ensemble de tranchage
en dés dans les encoches de la grille
de l’ensemble puis introduire l’outil de
nettoyage dans la grille de tranchage en
dés. Cela pousse les aliments qui restent
à ressortir de l’autre côté de la grille et
permet de nettoyer plus efficacement
l’ensemble de tranchage en dés.
47
Page 48

Installation/retrait de la lame multifonction
REMARQUE : La lame multifonction comporte un dispositif de fermeture résistant aux renversements.
On peut la laisser dans le bol de travail ou la retirer pour pouvoir vider le contenu du bol.
Placer la lame sur l’axe du socle.
1
Les indications de niveau de liquide sur le
côté du bol indiquent les niveaux maximaux
recommandés pour les liquides (épais ou
non) que l’on peut verser dans le robot
culinaire.
Enfoncer fermement la lame. Un déclic
2
retentit au moment du verrouillage de
l’accessoire.
La lame multifonction comporte un
3
dispositif de fermeture résistant aux
fuites. On peut donc la laisser dans le bol
alors qu’on déverse les ingrédients.
Tenir fermement le bol de travail d’une
4
main à l’aide de la poignée – ne pas le
tenir par son pourtour. Retirer ensuite
la lame : la saisir et la soulever tout droit
hors du bol.
48
Page 49

UTILISATION DES ACCESSOIRESUTILISATION DES ACCESSOIRES
Installation/retrait du bol de préparation
REMARQUE : Le bol de préparation peut être utilisé uniquement avec les disques/râpes
et l’ensemble de tranchage en dés.
Pour utiliser le bol de préparation, le
1
placer dans le bol de travail en le tenant
par les deux encoches de saisie.
Placer le disque/la râpe souhaité(e) sur
3
l’axe du socle. Ne pas utiliser de lame
avec le bol de préparation.
Placer l’adaptateur sur l’axe du socle.
2
Installer le couvercle du bol de travail
4
en alignant les onglets et le verrouiller.
Français
Après avoir réalisé le mélange, retirer le
5
bol de préparation en le tenant par les
deux encoches de saisie.
IMPORTANT : On doit retirer les disques/râpes et adaptateurs avant de retirer les bols.
49
Page 50

Installation/retrait des disques à broyer, à julienne*
et râpe à parmesan*
Placer l’adaptateur sur l’axe du socle.
1
Installer le couvercle du bol de travail
en alignant les onglets et le verrouiller.
3
Faire pivoter légèrement le disque/
la râpe jusqu’à ce qu’il/elle s’insère sur
2
l’adaptateur.
Encoche de saisie
pour les doigts
Pour retirer le disque à broyer et le
disque à julienne, retirer le couvercle du
bol de travail et soulever le disque tout
4
droit vers le haut en le tenant par les
deux encoches de saisie.
Encoche de saisie
pour les doigts
Pour retirer la râpe à parmesan une
fois le mélange effectué, soulever
5
l’adaptateur.
IMPORTANT : On doit retirer les disques/râpes et adaptateurs avant de retirer les bols.
* Disponible avec certains modèles uniquement.
50
Page 51

UTILISATION DES ACCESSOIRESUTILISATION DES ACCESSOIRES
Installation/retrait du disque à trancher
Placer l’adaptateur sur l’axe du socle.
1
Installer le couvercle du bol de travail
en alignant les onglets et le verrouiller.
3
Réglage de l’épaisseur de tranchage
REMARQUE : Le fait de modifier les réglages
d’épaisseur des autres disques/râpes ou lames
installées sur l’appareil n’aura pas d’incidence sur
le fonctionnement.
Ne pas oublier qu’il est possible de modifier
l’épaisseur des tranches en modifiant la pression
exercée sur l’aliment lorsqu’on le guide dans la
goulotte d’alimentation. Utiliser plus de pression
pour obtenir des tranches plus épaisses ou moins
pour des tranches plus fines.
Faire pivoter légèrement le disque/la
2
râpe jusqu’à ce qu’il/elle s’insère.
Encoche de saisie
pour les doigts
Pour retirer le disque à trancher, retirer
le couvercle du bol de travail et soulever
4
le disque tout droit vers le haut en le
tenant par les deux encoches de saisie.
Plus nes
Encoche de saisie
pour les doigts
Français
Plus
épaisses
Placer le levier au réglage d’épaisseur
souhaité.
IMPORTANT : On doit retirer les disques/râpes et adaptateurs avant de retirer les bols.
51
Page 52

Installation/retrait du mini-bol et de la mini-lame
Axe du socle
Mini-lame
Faire tourner le mini-bol à l’intérieur du
bol de travail en veillant à ce que l’onglet
1
du mini-bol soit aligné avec la fente du
bol de travail.
Installer le couvercle du bol de travail
en alignant les onglets et le verrouiller.
3
Enfoncer fermement la mini-lame.
Un déclic retentit lorsque la mini-lame
2
se verrouille.
Retirer le couvercle du bol de travail.
Saisir la mini-lame et la tirer tout droit
4
vers le haut.
Soulever le mini-bol en le tenant par les
5
deux encoches de saisie.
IMPORTANT : On doit retirer les disques/râpes et adaptateurs avant de retirer les bols.
52
Page 53

UTILISATION DES ACCESSOIRESUTILISATION DES ACCESSOIRES
Installation/retrait du fouet à œufs* et de la lame pétrisseuse
Placer le fouet à oeufs ou la lame
pétrisseuse sur l’axe du socle.
1
Une fois le mixage terminé, saisir
fermement le fouet à œufs ou
3
la lame pétrisseuse et le/la tirer
tout droit vers le haut.
IMPORTANT : On doit retirer les disques/râpes et adaptateurs avant de retirer les bols.
Enfoncer fermement le fouet à œufs
ou la lame prétrisseuse. Un déclic
2
retentit au moment du verrouillage
de l’accessoire.
Français
* Disponible avec certains modèles uniquement.
53
Page 54

UTILISATION DES ACCESSOIRES UTILISATION DES ACCESSOIRES
Installation/retrait du presse-agrumes*
Placer l’adaptateur de presse-agrumes
sur l’axe du socle.
1
Tourner le panier dans le sens
antihoraire jusqu’à ce que l’agrafe
3
s’emboîte dans la poignée.
Placer le panier-passoire dans le bol
de travail en orientant l’agrafe de
2
verrouillage à gauche de la poignée du
bol de travail.
Placer le cône à l’intérieur du panierpassoire en le connectant à l’adaptateur.
4
Il faudra peut-être faire pivoter le cône
jusqu’à ce qu’il s’insère.
Une fois l’extraction terminée,
dégager le cône du panier-passoire
en le soulevant et faire tourner le
5
panier-passoire pour déverrouiller la
poignée tel qu’illustré puis le dégager
du bol de travail. Retirer l’adaptateur.
IMPORTANT : On doit retirer les disques/râpes et adaptateurs avant de retirer les bols.
* Disponible avec certains modèles uniquement.
54
Page 55

UTILISATION DES ACCESSOIRES
Retrait des accessoires et du bol de travail
IMPORTANT : S’assurer que le robot culinaire est éteint et débranché avant de le démonter.
Pour retirer le bol de travail du robot culinaire avant de retirer les accessoires :
1
Faire pivoter le bol de travail et le soulever pour le dégager. Faire pivoter ensuite
le couvercle et le soulever.
Pour retirer des accessoires avant de retirer le bol de travail du robot culinaire :
Faire pivoter le couvercle du bol de travail pour le déverrouiller (tel qu’indiqué) et
le soulever pour le dégager. Exécuter ensuite les étapes suivantes avec le bol toujours
fixé au robot culinaire.
Encoche de saisie
pour les doigts
Retrait des disques/râpes : Tenir le disque/la râpe par les deux encoches de saisie
2
et le/la tirer tout droit vers le haut. Retirer ensuite l’adaptateur.
Encoche de saisie
pour les doigts
Français
Retrait des lames : Saisir la lame et la
tirer tout droit vers le haut.
3
Si le bol de travail est encore fixé au
robot culinaire : Faire pivoter le bol de
4
travail et le soulever pour le retirer.
55
Page 56

IMPORTANT : Ne jamais utiliser de nettoyants
abrasifs ou de tampons à récurer sur le robot
culinaire. Ils pourraient rayer ou ternir le bol de
préparation et son couvercle.
S’assurer que le robot culinaire
est éteint et débranché avant de
1
le démonter.
Toutes les autres pièces du robot culinaire sont lavables au lave-vaisselle.
3
- Placer les pièces à l’écart des éléments chauffants apparents du lave-vaisselle.
- Les bols doivent être chargés à l’envers et non sur le côté.
- Éviter d’utiliser des réglages de température élevés tels que les réglages sanitize
(assainissement) ou steam (vapeur).
Nettoyer le socle et le cordon avec
un chiffon imbibé d’eau tiède et
2
savonneuse. Sécher avec un chiffon
doux.
56
Page 57

ENTRETIEN ET NETTOYAGEENTRETIEN ET NETTOYAGE
Pour remiser le robot culinaire, ranger
le cordon à l’intérieur du socle du robot
4
culinaire.
Ranger les disques/râpes, l’axe du
5
socle et les lames dans le coffret de
rangement fourni et placer celui-ci dans
un endroit hors de portée des enfants.
CONSEILS POUR DE BONS RÉSULTATS
Utilisation de la lame multifonction
en morceaux de 1 à 1 ½ po (2,5 - 4 cm). Réduire
les aliments à la taille souhaitée par de brèves
impulsions de 1 à 2 secondes. Racler les parois du
bol, au besoin.
Pour réduire en purée les fruits et les
légumes cuits (à l’exception des pommes
de terre) : Pour chaque tasse (235 ml)
d’aliments, ajouter ¼ de tasse (60 ml) de
liquide compris dans la recette. Hacher
nement les aliments en utilisant de brèves
impulsions. Mélanger ensuite continuellement
jusqu’à obtenir la consistance désirée. Racler
les parois du bol, au besoin.
Pour préparer de la purée de pommes
de terre : Broyer les pommes de terre cuites
encore chaudes à l’aide du disque à broyer.
Remplacer le disque à broyer par la lame
multifonction. Ajouter le beurre ramolli, le
lait et l’assaisonnement. Mixer par impulsion
à 3 ou 4 reprises, 2 à 3 secondes à la fois,
pour incorporer le lait et obtenir une purée
homogène. Ne pas mixer plus que nécessaire.
Pour hacher les fruits
et les légumes frais :
eler, évider et/ou épépiner les
P
aliments. Couper les aliments
Français
57
Page 58

CONSEILS POUR DE BONS RÉSULTATS
Pour hacher les fruits secs (ou collants) :
Les aliments doivent être froids. Pour chaque
½ tasse (120 ml) de fruits secs, ajouter ¼
de tasse (60 ml) de farine comprise dans la
recette. Mixer les fruits par brèves impulsions
jusqu’à obtenir la consistance désirée.
Pour hacher nement les écorces
d’agrumes : À l’aide d’un couteau aiguisé,
peler uniquement la partie colorée de l’écorce
des agrumes (et non pas la membrane
blanche). Tailler l’écorce en nes lamelles. Les
hacher nement.
Pour émincer l’ail ou hacher les nes herbes
ou de petites quantités de légumes :
Introduire les aliments dans la goulotte
d’alimentation alors que le robot est en
marche. Mixer jusqu’à ce que les aliments
soient hachés. P
s’assurer que les herbes et le bol sont
parfaitement secs avant le hachage.
Pour hacher les noix ou préparer du
beurre de noix : Mixer jusqu’à 3 tasses
(710 ml) de noix et les hacher par de
brèves impulsions de 1 à 2 secondes jusqu’à
l’obtention de la consistance désirée. Pour
obtenir une texture plus grossière, mixer
par impulsion de petites quantités à 1 ou
2 reprises, 1 à 2 secondes par impulsion.
Pour obtenir une texture plus ne, multiplier
le nombre d’impulsions. Pour obtenir du
beurre de noix, mixer continuellement
jusqu’à l’obtention d’un mélange homogène.
Conserver le beurre de noix au réfrigérateur.
our de meilleurs résultats,
Pour hacher la viande, la volaille et les
fruits de mer crus ou cuits : Les aliments
doivent être très froids. Les couper en
morceaux de 1 po (2,5 cm). Mixer jusqu’à
1 livre (455 g) d’aliments à la fois par de
brèves impulsions de 1 à 2 secondes, jusqu’à
l’obtention de la taille désirée. Racler les parois
du bol, au besoin.
Pour préparer de la chapelure et émietter
les biscuits ou les craquelins : Casser les
aliments en morceaux de 1 ½ po à 2 po (3,5
à 5 cm). Mixer jusqu’à l’obtention de nes
miettes. Pour mixer de plus gros morceaux,
les hacher par impulsion à 2 ou 3 reprises,
1 à 2 secondes par impulsion. Mixer jusqu’à
l’obtention de nes miettes.
Pour faire fondre le chocolat nécessaire
à une recette : Dans le bol de préparation,
ajouter le chocolat et le sucre compris dans
la recette. Les hacher nement. Chauffer le
liquide indiqué par la recette. Introduire le
liquide chaud dans la goulotte d’alimentation
alors que le robot est en marche. Mixer jusqu’à
l’obtention d’un mélange homogène.
Pour râper les fromages à pâte dure tels
que le parmesan et le romano : Ne jamais
tenter de mixer du fromage qui ne peut pas être
percé avec la pointe d’un couteau aiguisé. On
peut utiliser la lame multifonction pour râper
les fromages à pâte dure. Couper le fromage
en morceaux de 1 po (2,5 cm). Les placer dans
le bol de préparation. Râper grossièrement
le fromage par de brèves impulsions. Mixer
continuellement jusqu’à ce que le fromage
soit nement râpé. On peut aussi ajouter
des morceaux de fromage par la goulotte
d’alimentation alors que le robot est en marche.
REMARQUE : Le mixage de noix
et d’autres ingrédients durs pourrait
égratigner le ni de la paroi interne du bol.
58
Page 59

CONSEILS POUR DE BONS RÉSULTATS
Utilisation des disques à trancher ou à râper
Pour trancher ou broyer
les fruits et les légumes
de forme allongée et de
diamètre relativement
étroit, comme le céleri, les
carottes et les bananes :
Couper les aliments pour les passer
horizontalement ou verticalement dans
la goulotte d’alimentation et les tasser
fermement pour les maintenir en place. Mixer
en appliquant une pression uniforme. On peut
aussi utiliser la petite goulotte dans le poussoir
à deux pièces. Placer les aliments en position
verticale dans la goulotte et utiliser le petit
poussoir pour les préparer.
Pour trancher ou broyer les fruits et les
légumes de forme arrondie, comme les
oignons, les pommes, et les poivrons
verts : Peler, évider et épépiner les aliments.
Couper l’aliment en deux ou en quarts pour
le faire passer dans la goulotte. Positionner la
goulotte d’alimentation. Mixer en appliquant
une pression uniforme.
Pour trancher ou broyer les fruits et
les légumes de petite taille, tels que les
fraises, les champignons et les radis :
Placer les aliments dans la goulotte
d’alimentation, en rangées horizontales ou
verticales. Remplir la goulotte d’alimentation
de sorte que les aliments soient bien
maintenus en place. Mixer en appliquant
une pression uniforme. On peut aussi
utiliser la petite goulotte dans le poussoir à
deux pièces. Placer les aliments en position
verticale dans la goulotte et utiliser le petit
poussoir pour les préparer.
Pour trancher la viande ou la volaille
non cuite, comme pour la préparation
des viandes sautées : Couper ou rouler
l’aliment pour pouvoir l’introduire dans
la goulotte d’alimentation. Envelopper
l’aliment et le placer au congélateur jusqu’à
durcissement, soit 30 minutes à 2 heures,
selon son épaisseur. Inspecter l’aliment pour
assurer qu’on peut le percer avec la pointe
d’un couteau aiguisé. Si non, il faudra le
décongeler légèrement. Mixer en appliquant
une pression uniforme.
Pour trancher les viandes et volaille
cuites, y compris le saucisson, le
pepperoni, etc. : L’aliment doit être très
froid. Couper l’aliment en morceaux pour
l’introduire dans la goulotte. Mixer les
aliments en appliquant une pression forte
et uniforme.
Pour broyer les épinards et autres
feuilles : Empiler les feuilles. Les enrouler
et les placer verticalement dans la goulotte.
Mixer en appliquant une pression uniforme.
Pour broyer les fromages à pâte dure
et à pâte molle : Les fromages à pâte
dure doivent être très froids.
Pour obtenir de bons résultats
avec les fromages à pâte molle
comme la mozzarella, les placer
au congélateur pendant 10 à 15
minutes avant de les préparer.
Couper les fromages de sorte
qu’ils puissent être introduits dans la goulotte
d’alimentation. Mixer en appliquant une
pression uniforme.
Utilisation de la lame
de pétrissage
La lame de pétrissage a
été spécialement conçue
pour mélanger et pétrir
rapidement et efcacement
les pâtes au levain. Pour de
meilleurs résultats, ne pas pétrir la pâte des
recettes nécessitant plus de 4 tasses (500 g)
de farine.
Français
59
Page 60

CONSEILS POUR DE BONS RÉSULTATS
Conseils utils
• Pour éviter d’endommager la lame ou
le moteur du robot, ne pas mixer des
aliments très durs ou complètement
congelés qui ne peuvent être percés
avec la pointe d’un couteau aiguisé. Si
un morceau d’aliment dur, telle une
carotte, reste calé ou coincé sur la lame,
arrêter le robot et retirer la lame. Enlever
délicatement l’aliment de la lame.
• Ne pas trop remplir le bol de préparation
ou le mini-bol. Pour les liquides, respecter
les niveaux de remplissage maximaux
indiqués sur le bol de travail. Lors du
hachage, le bol de travail ne doit pas être
rempli au-delà du tiers ou de la moitié.
Utiliser le mini-bol pour mélanger jusqu’à
4 tasses (1 L) de liquide ou 4 tasses (500 g)
de matières solides.
• Placer les disques à trancher de manière
à ce que la surface tranchante soit
positionnée directement à droite de la
goulotte d’alimentation. Ceci permettra
à la lame de faire un tour complet avant
d’entrer en contact avec l’aliment.
• Pour tirer partie de la vitesse du robot,
placer dans la goulotte d’alimentation les
ingrédients à hacher alors que le robot est
en marche.
• Pour obtenir de bons résultats lors du
tranchage et du broyage, les aliments à
préparer nécessitent différents degrés
de pression. D’une manière générale,
appliquer une légère pression pour les
aliments mous et délicats (tels que les
fraises, les tomates, etc.), une pression
modérée pour les aliments moyennement
fermes (tels que les courgettes, les
pommes de terre, etc.) et une pression
plus ferme pour les aliments plus durs (tels
que les carottes, les pommes, les fromages
à pâte dure, les viandes partiellement
congelées, etc.).
• Les fromages à pâte molle ou
moyennement dure pourraient s’étaler
ou s’enrouler sur le disque à broyer. Pour
éviter ce problème, le fromage doit être
bien refroidi avant d’être broyé.
• Les aliments plus ns comme les carottes
ou le céleri peuvent parfois passer trop
rapidement au travers de la goulotte
d’alimentation, ce qui peut entraîner un
tranchage irrégulier. Pour minimiser ce
risque, couper les aliments en plusieurs
morceaux et les tasser dans la goulotte
d’alimentation. La petite goulotte
d’alimentation dans le poussoir à deux
pièces convient particulièrement à la
préparation de petits ingrédients.
• Lors de la préparation d’une pâte à gâteau
ou à biscuits, utiliser d’abord la lame
multifonction pour réduire en crème les
matières grasses et le sucre. Ajouter les
ingrédients secs en dernier. Mettre les
noix et les fruits par dessus le mélange de
farine pour en éviter le hachage excessif.
Hacher par de brèves impulsions les noix
et les fruits pour les incorporer aux autres
ingrédients. Ne pas hacher excessivement.
• Lorsque les aliments tranchés ou broyés
s’accumulent contre la paroi du bol,
arrêter le robot et répartir les aliments
à l’aide d’une spatule.
• Retirer les aliments lorsque la préparation
atteint le bas du disque à trancher ou
à broyer.
• Il restera peut-être quelques gros
morceaux d’aliments sur le disque
après le tranchage ou le broyage. Si
on le souhaite, on peut les couper
à la main et les ajouter au mélange.
• An de minimiser la fréquence de
nettoyage du bol, planier les étapes de
préparation avant de commencer. Mixer
les ingrédients secs ou fermes avant les
ingrédients liquides.
60
Page 61

• Pour supprimer facilement les ingrédients
restés sur la lame multifonction, il suft de
vider le bol de préparation, remettre le
couvercle en place et mixer par impulsions
pendant 1 à 2 secondes pour nettoyer
la lame.
• Après avoir retiré le couvercle du bol
de préparation, le placer à l’envers sur
le comptoir. Ceci vous permettra de
ne pas salir le comptoir.
• Utiliser la spatule pour retirer les
ingrédients du bol de travail.
• Votre robot culinaire n’est pas conçu
pour effectuer les tâches suivantes :
- Moudre les grains de café, les céréales
les épices dures
- Broyer les os ou d’autres parties
et d’aliments non comestibles
- Liquéer les légumes et fruits crus
- Trancher les œufs durs et les viandes
non refroidies.
• Toute pièce en plastique ayant subi
une décoloration (causée par l’aliment
à préparer) peut être nettoyé avec du
jus de citron.
DÉPANNAGE
En cas de dysfonctionnement ou de non fonctionnement du robot culinaire, vérier
les points suivants :
Le robot culinaire ne fonctionne pas :
• S’assurer que le bol et le couvercle sont
correctement assemblés et verrouillés, et
que le poussoir de grande taille est inséré
dans la goulotte d’alimentation.
• Lorsqu’on utilise la grande goulotte
d’alimentation, s’assurer que les aliments
ne dépassent pas la ligne de remplissage
maximum indiquée sur la goulotte
d’alimentation.
• Vérier que le robot culinaire est branché.
• Le fusible dans le circuit du robot culinaire
est-il en état de marche? Si l’on possède un
disjoncteur, s’assurer que le circuit est fermé.
• Débrancher le robot culinaire et le
rebrancher dans la prise.
• Si le robot culinaire n’est pas à la
température ambiante, patienter jusqu’à ce
qu’il l’atteigne, puis réessayer.
• Si le levier de vitesse ne bouge pas, s’assurer
que le bouton est à la position d’arrêt.
• Pour faciliter la rotation du couvercle, on
peut retirer le dispositif de fermeture ou
appliquer de l’huile végétale sur le dispositif
de fermeture.
Le robot culinaire ne broie pas ou ne
tranche pas correctement :
• S’assurer que le côté du disque sur lequel la
lame dépasse est orienté vers le haut
sur l’adaptateur.
• Si l’on utilise le disque à trancher réglable,
veiller à choisir l’épaisseur appropriée.
• S’assurer que les aliments peuvent être
tranchés ou broyés.
Si le couvercle du bol de travail ne se
ferme pas :
• S’assurer que le disque est correctement
installé avec le piton orienté vers le haut,
et qu’il est correctement placé sur la tige
d’entraînement.
• Retirer le poussoir alimentaire et essayer
à nouveau de fermer le couvercle.
Si le problème n’est pas attribuable à l’une
des raisons indiquées ci-dessus, voir la section
“Garantie et dépannage”.
Ne pas renvoyer le robot culinaire chez le
détaillant. Les détaillants n’assurent aucun
service après-vente.
Français
61
Page 62

GARANTIE ET DÉPANNAGE
Garantie limitée de remplacement intégral des produits
KitchenAid
®
Pro-Line pour les 50 États des États-Unis,
le district fédéral de Columbia, Porto Rico et le Canada
La présente garantie couvre l’acheteur et les propriétaires suivants des produits KitchenAid
Pro-Line lorsqu’ils sont utilisés dans les 50 États des États-Unis, le district fédéral de
Columbia, Porto Rico et au Canada.
Durée de la garantie limitée Cinq ans à compter de la date d’achat.
de remplacement intégral :
KitchenAid prendra Le remplacement satisfaction totale du produit Pro-Line. Voir
en charge les éléments la page suivante pour plus de détails concernant la procédure
suivants à votre choix : à suivre pour un remplacement, ou appeler le numéro sans
frais1-800-832-7173 du centre de service à la clientèle.
OU
corriger les vices de matériaux et de fabrication. Le service
doit être fourni par un centre de réparation agréé KitchenAid.
KitchenAid ne paiera A. Les réparations lorsque le produit Pro-Line est utilisé à
pas pour : des ns autres que l’usage domestique unifamilial normal.
B. Les dommages causés par : accident, altération, mésusage
ou abus.
C. Tout frais d’expédition ou de manutention pour livrer le
produit Pro-Line à un centre de réparation agréé.
D. Les frais des pièces de rechange ou de main d’œuvre
pour les produits Pro-Line lorsqu’ils sont utilisés à
l’extérieur des 50 États des États-Unis, du district fédéral
de Columbia, de Porto Rico et du Canada.
CLAUSE D’EXONÉRATION DE RESPONSABILITÉ AU TITRE DES GARANTIES
IMPLICITES LES GARANTIES IMPLICITES, Y COMPRIS LES GARANTIES IMPLICITES
DE QUALITÉ MARCHANDE OU D’APTITUDE À UN USAGE PARTICULIER, SONT
LIMITÉES À CINQ ANS OU À LA PLUS COURTE PÉRIODE AUTORISÉE PAR LA LOI.
Certains États et provinces ne permettent pas de limitation sur la durée des garanties
implicites ou de qualité marchande ou d’aptitude à un usage particulier, de sorte que la
limitation ci-dessus peut ne pas être applicable dans votre cas. Cette garantie vous confère
des droits juridiques spéciques et vous pouvez également jouir d’autres droits qui peuvent
varier d’une juridiction à l’autre.
EXONÉRATION DE RESPONSABILITÉ DANS LES DOMAINES NON
COUVERTS PAR LA GARANTIE KitchenAid décline toute responsabilité au titre de
la qualité, de la durabilité ou en cas de dépannage ou de réparation nécessaire sur cet
appareil ménager autre que les responsabilités énoncées dans la présente garantie. Si vous
souhaitez une garantie plus étendue ou plus complète que la garantie limitée fournie avec
cet appareil ménager, adressez-vous à KitchenAid ou à votre détaillant pour obtenir les
modalités d’achat d’un contrat de services.
LIMITATION DES RECOURS; EXCLUSION DES DOMMAGES FORTUITS
OU INDIRECTS LE SEUL ET EXCLUSIF RECOURS DU CLIENT DANS LE CADRE
DE LA PRÉSENTE GARANTIE LIMITÉE CONSISTE EN LE REMPLACEMENT OU
LA RÉPARATION PRÉVUE PAR LA PRÉSENTE. KITCHENAID N’ASSUME AUCUNE
RESPONSABILITÉ POUR LES DOMMAGES FORTUITS OU INDIRECTS. Certains États
et certaines provinces ne permettent pas l’exclusion ou la limitation des dommages fortuits
ou indirects de sorte que ces limitations et exclusions peuvent ne pas être applicables dans
votre cas. Cette garantie vous confère des droits juridiques spéciques et vous pouvez
également jouir d’autres droits qui peuvent varier d’une juridiction à l’autre.
62
Les frais de pièces de rechange et de main-d’œuvre pour
Page 63

Garantie de remplacement sans difculté – pour les 50 États
des États-Unis, le district fédéral de Columbia et Porto Rico
Nous sommes tellement certains que la
qualité de nos produits satisfait aux normes
exigeantes de KitchenAid que si le produit
Pro-Line cesse de fonctionner au cours des
cinq premières années suivant son acquisition,
KitchenAid livrera gratuitement à votre
porte un produit Pro-Line de remplacement
identique ou comparable et prendra les
dispositions nécessaires pour que le produit
Pro-Line d’origine nous soit retourné.
L’appareil de remplacement sera également
couvert par notre garantie limitée de cinq ans.
Veuillez suivre ces instructions pour bénécier
de ce service de qualité.
Si votre produit Pro-Line cesse de fonctionner
durant les cinq premières années suivant son
acquisition, il vous suft d’appeler le Centre
d’eXpérience clientèle au 1-800-832-7173
du lundi au vendredi. Veuillez avoir votre
reçu de vente à portée de main au moment
de votre appel. Une preuve d’achat est
indispensable pour que votre réclamation
puisse être traitée. Fournissez votre adresse
de livraison complète au représentant. (Pas de
boîte postale)
À réception du produit Pro-Line de rechange,
utiliser le carton et les matériaux d’emballage
pour emballer le produit
Pro-Line d’origine.
Garantie de remplacement sans difculté - Canada
Français
Nous sommes tellement certains que la qualité
de nos produits satisfait aux normes exigeantes
de la marque KitchenAid® que si le produit
Pro-Line cesse de fonctionner au cours des
cinq premières années suivant son acquisition,
KitchenAid Canada remplacera le produit
Pro-Line par un appareil de remplacement
identique ou comparable. L’appareil de
remplacement sera également couvert par
notre garantie limitée de cinq ans. Veuillez
suivre ces instructions pour bénécier de ce
service de qualité.
Si le produit Pro-Line cesse de fonctionner
durant les cinq premières années suivant
son acquisition, apporter ou réexpédier le
produit Pro-Line port dû vers un Centre de
réparation KitchenAid agréé. Veuillez indiquer
vos nom et adresse d’expédition complets
dans le carton et joignez une copie de votre
preuve d’achat (reçu de caisse, facture
de règlement par de carte de crédit etc.).
Votre produit Pro-Line de rechange sera
retourné port payé et assuré. Si le service
que vous obtenez de cette manière n’est pas
satisfaisant, appelez sans frais notre centre
eXpérience clientèle au 1-800-832-7173.
Ou écrivez-nous à :
Centre eXpérience clientèle
KitchenAid Canada
200 - 6750 Century Ave.
Mississauga, ON L5N 0B7
Obtenir un dépannage une fois la garantie expirée ou
commander des accessoires et pièces de rechange
Aux États-Unis et à Porto Rico :
Pour des informations sur le service de
dépannage ou pour commander des
accessoires ou des pièces de rechange,
composer le numéro sans frais
1-800-832-7173 ou écrire à :
Centre eXpérience clientèle
KitchenAid Small Appliances,
P.O. Box 218, St. Joseph, MI 49085-0218
En dehors des États-Unis et de P
Rico :
Consulter le revendeur KitchenAid local
ou le détaillant auprès duquel le produit
orto
Pro-Line a été acheté pour obtenir la marche
à suivre pour une intervention de dépannage.
Pour des informations concernant toute
intervention de dépannage au Canada :
Composer le numéro sans frais
1-800-832-7173.
Ou écrire à l’adresse suivante :
Centre eXpérience clientèle
KitchenAid Canada
200 - 6750 Century Ave.
Mississauga, ON L5N 0B7
®/™ © 2013 KitchenAid. Tous droits réservés. Utilisé sous licence au Canada.
63
Page 64

Bienvenido al mundo de Kitchenaid®.
Estamos comprometidos a ayudarle
a crear deliciosas comidas para su
familia y amistades por toda la vida.
Para ayudar a asegurar la larga
duración y el desempeño de su
aparato, mantenga esta guía a mano.
Ésta le proveerá información sobre
la mejor manera de usar y cuidar
su producto. Su satisfacción es
nuestra meta número 1. Recuerde
registrar su producto en línea en
www.kitchenaid.com, o bien
por correo usando la Tarjeta
de registro del
producto adjunta.
USA: 1.800.832.7173
64
Canada: 1.800.807.6777
Únase a nosotros en la cocina, visite www.proline.kitchenaid.com.
Escanee con su aparato móvil para ver recetas, consejos y demás.
KitchenAid.com
KitchenAid.ca
Page 65

INSTRUCCIONES PARA EL PROCESADOR DE ALIMENTOS
ÍNDICE
SEGURIDAD DEL PROCESADOR DE ALIMENTOS
Salvaguardias importantes ....................................................................................... 66
Requisitos eléctricos ................................................................................................ 67
PIEZAS Y CARACTERÍSTICAS
Piezas y accesorios .................................................................................................. 68
Cómo seleccionar las herramientas adecuadas ....................................................... 70
CÓMO USAR EL PROCESADOR DE ALIMENTOS
Cómo sujetar el tazón de trabajo ............................................................................ 74
Cómo sujetar la tapa y el mecanismo de seguridad ................................................ 75
Cómo usar el tubo de alimentación 3 en 1.............................................................. 76
Cómo usar los controles de velocidad .................................................................... 77
USING YOUR ACCESSORIES
Cómo preparar el juego para cortar en cubos por primera vez ............................ 78
Cómo instalar y usar el disco para cortar en cubos................................................. 79
Cómo instalar y quitar la cuchilla multiuso .............................................................. 80
Cómo instalar y quitar el tazón de preparación ...................................................... 81
Cómo instalar y quitar los discos ralladores en tiras, para cortar
en juliana y para parmesano .................................................................................... 82
Cómo instalar y quitar el disco rebanador .............................................................. 83
Cómo regular el grosor de las rebanadas ................................................................ 83
Cómo instalar y quitar el minitazón y la minicuchilla ............................................... 84
Cómo instalar y quitar el batidor de huevos o la paleta para masa ......................... 85
Cómo instalar y quitar la prensa para cítricos ......................................................... 86
Cómo quitar los accesorios y el tazón de trabajo ................................................... 87
CUIDADO Y LIMPIEZA .............................................................................................. 88
CONSEJOS PARA OBTENER RESULTADOS IDEALES ........................................ 89
SOLUCIÓN DE PROBLEMAS .................................................................................... 93
GARANTÍA Y SERVICIO ............................................................................................ 94
Español
PROOF OF PURCHASE & PRODUCT REGISTRATION
Guarde siempre una copia del recibo de compra, en el cual se muestra la fecha de compra
de su procesador de alimentos. La prueba de compra le asegurará el servicio bajo la garantía.
Antes de usar el procesador de alimentos, llene y envíe por correo la tarjeta de registro del
producto, que fue empacada con la unidad, o regístrelo en línea, en www.kitchenaid.com.
Esta tarjeta nos permitirá contactarle en el caso improbable de que haya una noticación de
seguridad relacionada con el producto, y nos ayudará a cumplir con lo dispuesto en Consumer
Product Safety Act (Ley de seguridad de productos al consumidor). Esta tarjeta no conrma
su garantía. Sírvase completar lo siguiente para su información personal:
Número de modelo ___________________________________________________________________
Número de serie _____________________________________________________________________
Fecha de compra _____________________________________________________________________
Nombre de la tienda __________________________________________________________________
65
Page 66

SEGURIDAD DEL PROCESADOR DE ALIMENTOS
Su seguridad y la seguridad de los demás es muy importante.
Hemos incluido muchos mensajes importantes de seguridad en este manual y en su
electrodoméstico. Lea y obedezca siempre todos los mensajes de seguridad.
Este es el símbolo de advertencia de seguridad.
Este símbolo le llama la atención sobre peligros potenciales que
pueden ocasionar la muerte o una lesión a usted y a los demás.
Todos los mensajes de seguridad irán a continuación del símbolo
de advertencia de seguridad y de la palabra “PELIGRO” o
“ADVERTENCIA”. Estas palabras significan:
Si no sigue las instrucciones
PELIGRO
ADVERTENCIA
Todos los mensajes de seguridad le dirán el peligro potencial, le dirán cómo reducir
las posibilidades de sufrir una lesión y lo que puede suceder si no se siguen
las instrucciones.
de inmediato, usted puede morir o
sufrir una lesión grave.
Si no sigue las instrucciones, usted
puede morir o sufrir una lesión grave.
SALVAGUARDIAS IMPORTANTES
Al utilizar aparatos eléctricos, se deben seguir las precauciones básicas
de seguridad, entre las que se incluyen las siguientes:
1. Lea todas las instrucciones.
2. Para protegerse contra el riesgo de choque eléctrico, no ponga el procesador
de alimentos en agua ni en ningún otro líquido.
3. Es necesario supervisar cuidadosamente a los niños cuando usen cualquier aparato
o cuando éste se use cerca de ellos.
4. Desenchufe del contacto cuando no esté en uso, antes de colocar o quitar partes
y antes de la limpieza.
5. Evite tocar las partes que estén en movimiento.
6. No utilice ningún electrodoméstico con un cable o enchufe dañado, si el electrodoméstico
no ha funcionado correctamente, si se ha caído o si está dañado de alguna forma. Devuelva
el aparato al lugar de servicio técnico autorizado más cercano para su inspección,
reparación o ajuste eléctrico o mecánico.
7. El uso de aditamentos de accesorio no recomendados por el fabricante del aparato
puede ocasionar un incendio, choque eléctrico o heridas a personas.
8. No lo use al aire libre.
9. No deje que el cable cuelgue del borde de la mesa o del mostrador.
10. Mantenga las manos y los utensilios lejos de las cuchillas o los discos mientras estos
se mueven al picar los alimentos; esto reducirá el riesgo de lesiones serias a personas
o daños al procesador de alimentos. Puede usarse un raspador, pero se debe utilizar
solamente cuando el procesador de alimentos no esté funcionando.
11. Las cuchillas son losas. Manipúlelas con cuidado.
12. Para reducir el riesgo de lesiones, nunca coloque la cuchilla de corte ni los discos
en la base sin primero haber colocado el tazón en su lugar adecuadamente.
13. Asegúrese de que la cubierta esté asegurada apropiadamente en su lugar antes
de operar el aparato.
14. Nunca introduzca los alimentos con las manos. Siempre utilice el empujador
de alimentos.
GUARDE ESTAS INSTRUCCIONES
66
Page 67

15. No intente quitar el mecanismo de enclavamiento de la cubierta.
16. Este producto ha sido diseñado únicamente para uso dentro del hogar.
17. No dé al aparato un uso diferente de aquél para el cual fue diseñado.
18. Desconéctelo del circuito del suministro de energía antes de limpiarlo o darle
mantenimiento.
19. CUIDADO: No lo abra hasta que la cuchilla no se detenga.
20. CUIDADO: Para asegurar la protección continua contra el riesgo de choque eléctrico,
conéctelo solamente a contactos con conexión a tierra.
GUARDE ESTAS INSTRUCCIONES
Requisitos eléctricos
Voltios: 120 VCA
ADVERTENCIA
Peligro de Choque Eléctrico
Conecte a un contacto de pared
de conexión a tierra de 3
terminales.
No quite la terminal de
conexión a tierra.
No use un adaptador.
No use un cable eléctrico de
extensión.
No seguir estas instrucciones
puede ocasionar la muerte,
incendio o choque eléctrico.
Hertzios: 60 Hz
NOTA: Este procesador de alimentos
tiene un enchufe de conexión a tierra de
tres terminales. Si el enchufe no encaja
por completo en el contacto, póngase en
contacto con un electricista competente.
No modifique el enchufe de ninguna manera.
No use un cable eléctrico de extensión.
Si el cable de suministro eléctrico es
demasiado corto, haga que un electricista
o técnico de servicio competente instale
un contacto cerca del electrodoméstico.
Español
67
Page 68

PIEZAS Y CARACTERÍSTICAS
Piezas y accesorios
Estuche para
accesorios
Empujador
de alimentos
de 3 partes
Cubierta para
tazón de trabajo
con tubo de
alimentación
3 en 1
Sello
ultrahermético
Tazón
de trabajo de
16 tazas (4 L)
Control
de cuchilla
regulable
desde
el exterior
Base de
metal
fundido
Minitazón de 4 tazas (1 L)
y minicuchilla
Espátula
68
Paleta para
masa
Batidor de huevos
(solamente en modelos selectos)
Cuchilla de acero
inoxidable multiuso
Page 69

Piezas y accesorios
JUEGO PARA
CORTAR EN CUBOS
Herramienta de 8 mm
➄
para la limpieza con rejillas
Tapa del juego para
➃
cortar en cubos
Disco reversible para rallar
en tiras (de 2 mm y 4 mm)*
Disco rebanador regulable
desde el exterior
(de no a grueso)
Tazón de preparación
de 10 tazas (2,4 L)
Cuchilla de 8 mm
➂
del juego para cortar
en cubos*
Rejilla del juego para
➁
cortar en cubos
Adaptador de disco
(*Use este
adaptador)
Español
Disco para rallar
parmesano/hacer hielo
en copos *
(solamente en modelos
selectos)
Prensa para cítricos
(solamente en
modelos selectos)
Disco para cortar en juliana *
(solamente en modelos
selectos)
Adaptador de la prensa
para cítricos
(solamente en modelos
selectos)
69
Page 70

PIEZAS Y CARACTERÍSTICAS PIEZAS Y CARACTERÍSTICAS
Cómo seleccionar las herramientas adecuadas
+
Opcional
El juego para cortar en cubos con adaptador de discos se usa con el tazón de trabajo
y un tazón de preparación optativo
Cortar en cubos
High
Low
Papas, tomates, cebollas, pepinos, frutas y vegetales
El minitazón se usa con la cuchilla de acero inoxidable multiuso
Picar
Moler
Hacer puré
Mezclar
High High High
Low Low Low
Vegetales, frutas, hierbas frescas,
nueces, carne
Vegetales, frutas Pesto, salsas, masa para pasteles,
cremas
NOTA: Para obtener los mejores resultados al picar, comience con la palanca de velocidad jada en
“High” (Alta) y luego cambie el ajuste a “Low” (Baja).
70
Page 71

Cómo seleccionar las herramientas adecuadas
+
La cuchilla de plástico para masa se usa con el
tazón de trabajo
Amasar
High High
Masa de levadura
La cuchilla de acero inoxidable multiuso se usa con el tazón de trabajo
+
El batidor de huevos* se usa con el tazón de trabajo
Batir
LowLow
Huevos
Español
+
Picar
Moler
Hacer puré
Mezclar
High High High
Low Low Low
Vegetales, frutas, hierbas frescas,
nueces, carne
Vegetales, frutas Pesto, salsas, masa para pasteles,
masa para pais, cremas
NOTA: Para obtener los mejores resultados al picar, comience con la palanca de velocidad jada en
“High” (Alta) y luego cambie el ajuste a “Low” (Baja).
* Disponible solamente con modelos selectos.
71
Page 72

PIEZAS Y CARACTERÍSTICAS PIEZAS Y CARACTERÍSTICAS
Cómo seleccionar las herramientas adecuadas
Use otros ajustes diferentes de los sugeridos a continuación para regular los resultados
según sus preferencias personales.
+
Opcional
El disco rebanador regulable se usa con el tazón de trabajo y un tazón de preparación optativo
Rebanadas
delgadas
Rebanadas
gruesas
High High
Low Low
Papas, tomates frutas (blandas), vegetales (blandos), frutas (duras), vegetales (duros)
+
Opcional
El disco rallador en tiras reversible se usa con el tazón de trabajo y un tazón de preparación optativo
en tiras
Ralle o corte
en tiras nas
High
Ralle o corte
medivanas
Low
Vegetales, queso (congelado 30 minutos antes), chocolate, frutas (duras)
72
Page 73

Cómo seleccionar las herramientas adecuadas
+
El disco para rallar parmesano y hielo en copos* se usa con el tazón de trabajo
y un tazón de preparación optativo
Opcional
trozos
Hacer copos
Rallar en
pequeños
High
Low
Queso duro, hielo, chocolate
+
Opcional
El disco para cortar en juliana* se usa con el tazón de trabajo y un tazón de preparación optativo
Juliana
High
Español
Zanahorias, calabacines, papas, vegetales
* Disponible solamente con modelos selectos.
Low
73
Page 74

CÓMO USAR EL PROCESADOR DE ALIMENTOS
Cómo sujetar el tazón de trabajo
Antes del primer uso
ADVERTENCIA
Peligro de Choque Eléctrico
Conecte a un contacto de pared
de conexión a tierra de 3
terminales.
No quite la terminal de
conexión a tierra.
No use un adaptador.
No use un cable eléctrico de
extensión.
No seguir estas instrucciones
puede ocasionar la muerte,
incendio o choque eléctrico.
Eje
eléctrico
Antes de usar el procesador de alimentos
por primera vez, lave los tazones y los
accesorios como se describe en la sección
“Cuidado y limpieza”.
Cerciórese de que el procesador de
alimentos esté apagado, desenchufado y
1
colocado sobre una superficie nivelada.
Coloque el tazón de trabajo sobre la
2
base, como se muestra.
74
Gire el tazón de trabajo para
3
engancharlo sobre la base.
Page 75

CÓMO USAR EL PROCESADOR DE ALIMENTOS
Cómo sujetar la tapa y el mecanismo de seguridad
Instale la tapa del tazón de trabajo,
1
alineando las lengüetas y trabándola
en su lugar. El sello ultrahermético es
resistente a salpicaduras.
SUGERENCIA: Es más fácil sujetar la tapa cuando se quita el tubo de alimentación grande. Después
de sujetar la tapa, cerciórese de insertar el tubo de alimentación grande.
El tubo de alimentación grande debe
2
insertarse dentro de la tapa para que
funcione el procesador de alimentos.
Español
75
Page 76

Cómo usar el tubo de alimentación 3 en 1
Antes del uso
Antes de poner a funcionar el procesador
de alimentos, cerciórese de que el tazón
de trabajo, las cuchillas y la cubierta
del tazón de trabajo estén ensambladas
correctamente en la base del procesador
de alimentos.
Línea de
llenado
máximo
Use el tubo de alimentación y el
empujador de alimentos grande para
1
procesar alimentos grandes.
Empujador
de alimentos
grande
Empujador
de alimentos
mediano
Use el empujador de alimentos
mediano en el tubo de alimentación
2
para procesar alimentos más pequeños.
Use el empujador de alimentos
pequeño para rebanar o rallar en tiras
3
los alimentos más pequeños y más
Empujador
de
alimentos
pequeño
nos.
Oricio
para
verter
líquidos
Use el oricio para verter líquidos en
4
el empujador de alimentos pequeño
Empujador
de alimentos
pequeño
SUGERENCIA: El ritmo de flujo del orificio
para verter líquidos es ideal para hacer
mayonesa.
para verter lentamente aceite u otros
ingredientes líquidos dentro del tazón
76
de trabajo.
Page 77

CÓMO EL PROCESADOR DE ALIMENTOSCÓMO USAR EL PROCESADOR DE ALIMENTOS
Cómo usar los controles de velocidad
NOTA: Si el procesador de alimentos no funciona, asegúrese de que el tazón de trabajo
y la tapa estén bien asegurados en la base, y que el empujador de alimentos grande esté
por completo en su lugar.
High
Low
Para encenderlo, gire la palanca de
1
velocidad hacia High (Alta) o Low (Baja);
luego gire el cuadrante hacia ON
(Encendido).
High
Low
Para usar el modo de pulsar, gire
3
la palanca de velocidad hacia High
(Alta) o Low (Baja) y gire el cuadrante
hacia PULSE (Pulsar), para comenzar
a procesar; el cuadrante volverá
automáticamente hacia la posición de
OFF (Apagado) para detenerse. El
control de pulso permite un control
preciso de la duración y la frecuencia
del procesamiento.
NOTA: Para poder cambiar las velocidades, la
palanca de velocidad deberá estar en la posición
de OFF (Apagado).
Para detener el funcionamiento, gire el
2
cuadrante hacia OFF (Apagado).
High
Low
Español
77
Page 78

Cómo preparar el juego para cortar en cubos por primera vez
IMPORTANTE: Siga estas instrucciones para lavar debidamente todas las piezas del juego para cortar
en cubos, antes de usarlo por primera vez.
Usando la manija, coloque el juego para
cortar en cubos ensamblado dentro del
1
tazón de trabajo.
Cuando coloque el juego en el tazón de
trabajo, alinee la lengüeta del juego con
2
la ranura en el tazón de trabajo.
Usando la manija, quite la tapa del juego
4
para cortar en tubos.
78
Gire la tapa del juego para cortar en
cubos, usando las lengüetas para los
3
dedos, hasta que se desbloquee.
Limpie cada pieza del juego para cortar
en tubos en la lavavajillas o con un paño
5
suave y agua tibia.
Page 79

CÓMO USAR LOS ACCESORIOSCÓMO USAR LOS ACCESORIOS
Cómo instalar y usar el disco para cortar en cubos
Coloque el adaptador del disco sobre
el eje eléctrico.
1
Coloque la cuchilla del juego para cortar
en cubos, cerciorándose de que esté
3
encajada y segura.
Coloque la rejilla del juego para cortar
en cubos, mirando hacia el frente, y
2
alinee la lengüeta del juego con la ranura
en el tazón de trabajo.
Coloque la tapa del juego para cortar en
4
cubos sobre el juego ensamblado, con el
orificio mirando hacia delante y la traba
en su lugar.
Español
Coloque la tapa en el procesador de
5
alimentos y use el tubo de alimentación
mediano para cortar en cubos los
alimentos deseados. Si la tapa no se
cierra por completo, cerciórese de que
el juego para cortar en cubos y la rejilla
están encajados por completo.
NOTA: Los alimentos duros, como las zanahorias, pueden necesitar más fuerza para removerlos
con la herramienta para limpiar el juego de cortar en cubos. Es normal que algunos alimentos
permanezcan en la rejilla hasta que termine de lavarla.
Después de cortar en cubos, quite la
6
tapa del juego para cortar en cubos y la
cuchilla para cortar en cubos; coloque
la herramienta para limpiar el juego
para cortar en cubos en las muescas
de la rejilla del mismo; luego empuje la
herramienta para limpiar hacia abajo, en la
rejilla para cortar en cubos. Esto hará que
el alimento restante se empuje hacia fuera
de la rejilla, permitiéndole lavar el juego
para cortar en cubos más eficazmente.
79
Page 80

Cómo instalar y quitar la cuchilla multiuso
NOTA: La cuchilla multiuso tiene un sello resistente a salpicaduras, y puede dejarse
en el tazón de trabajo o quitarse antes de quitar el contenido.
Coloque la cuchilla/paleta en el eje
1
eléctrico.
Las imágenes del nivel de líquido que se
encuentran en los lados del tazón indican
los niveles máximos recomendados
para líquidos espesos y más ligeros en el
procesador de alimentos.
Presione con firmeza sobre la cuchilla.
2
Escuchará un chasquido cuando el
accesorio encaja y se traba en su lugar.
La cuchilla multiuso tiene un sello
3
resistente a fugas, de manera que puede
dejarla en el tazón mientras vierte los
ingredientes.
Asegure con firmeza el tazón de trabajo
4
con una mano, usando la manija y no el
borde del tazón. Luego quite la cuchilla
agarrándola y jalándola directamente
hacia arriba.
80
Page 81

CÓMO USAR LOS ACCESORIOSCÓMO USAR LOS ACCESORIOS
Cómo instalar y quitar el tazón de preparación
NOTA: El tazón de preparación puede usarse solamente con los discos y el juego para cortar en cubos.
Para usar el tazón de preparación,
1
colóquelo en el tazón de trabajo
usando las dos áreas rebordeadas
para los dedos.
Coloque el disco deseado sobre el eje
3
eléctrico. No use ninguna cuchilla con
el tazón de preparación.
Coloque el adaptador sobre
2
el eje eléctrico.
Instale la tapa del tazón de trabajo,
4
alineando las lengüetas y trabándola
en su lugar.
Español
Después de procesar, quite el tazón
5
de preparación usando las áreas
rebordeadas para los dedos.
IMPORTANTE: Los discos y los adaptadores deberán quitarse antes de quitar los tazones.
81
Page 82

Cómo instalar y quitar los discos ralladores en tiras, para cortar en
juliana* y para parmesano*
Coloque el adaptador sobre
1
el eje eléctrico.
Instale la tapa del tazón de trabajo,
alineando las lengüetas y trabándola
en su lugar.
3
Gire lentamente el disco hasta que caiga
2
en su lugar, sobre el adaptador.
Oricio para
los dedos
Para quitar el disco rallador en tiras y el
disco para cortar en juliana, quite la tapa
del tazón de trabajo y levante el disco
4
en forma recta usando los dos orificios
para los dedos.
Oricio para
los dedos
Para quitar el disco para rallar
parmesano después de procesarlo,
5
levante el adaptador.
IMPORTANTE: Los discos y los adaptadores deberán quitarse antes de quitar los tazones.
* Disponible solamente con modelos selectos.
82
Page 83

CÓMO USAR LOS ACCESORIOSCÓMO USAR LOS ACCESORIOS
Cómo instalar y quitar el disco rebanador
Coloque el disco sobre el eje eléctrico.
1
Instale la tapa del tazón de trabajo,
alineando las lengüetas y trabándola
3
en su lugar.
2
Oricio para
los dedos
4
Cómo regular el grosor de las rebanadas
NOTA: El cambiar los ajustes de espesor
con otros discos o cuchillas instalados no
afectará el funcionamiento.
Tenga cuidado, ya que al cambiar la presión
en el alimento cuando lo guía dentro
del tubo de alimentación, es posible que
cambie el espesor de las rebanadas. Ejerza
mayor presión para una rebanada más
gruesa, o menos presión para una rebanada
más fina.
Más
delgada
Mueva la palanca hacia el ajuste de espesor
deseado.
Gire lentamente el disco hasta que caiga
en su lugar.
Oricio para
los dedos
Español
Para quitar el disco rebanador, quite la
tapa del tazón de trabajo y levante el
disco en forma recta usando los dos
orificios para los dedos.
Más gruesa
IMPORTANTE: Los discos y los adaptadores deberán quitarse antes de quitar los tazones.
83
Page 84

Cómo instalar y quitar el minitazón y la minicuchilla
Eje eléctrico
Minicuchilla
Coloque el minitazón dentro del tazón
de trabajo, cerciorándose de que la
1
lengüeta en el minitazón esté alineada
con la muesca en el tazón de trabajo.
Instale la tapa del tazón de trabajo,
alineando las lengüetas y trabándola en
3
su lugar.
Presione con firmeza hacia abajo sobre
la minicuchilla. Escuchará un chasquido
2
cuando la misma encaja y se traba en
su lugar.
Quite la tapa del tazón de trabajo. Tome
y jale la minicuchilla directo hacia arriba.
4
Levante el minitazón usando las dos
5
áreas rebordeadas para los dedos.
IMPORTANTE: Los discos y los adaptadores deberán quitarse antes de quitar los tazones.
84
Page 85

CÓMO USAR LOS ACCESORIOSCÓMO USAR LOS ACCESORIOS
Cómo instalar y quitar el batidor de huevos* o la paleta para masa
Coloque el batidor de huevos o la paleta
para masa sobre el eje eléctrico.
1
Después de procesar, agarre con
firmeza el batidor de huevos o la paleta
3
para masa y levántelo/la en sentido
recto.
IMPORTANTE: Los discos y los adaptadores deberán quitarse antes de quitar los tazones.
Presione con firmeza el batidor de
huevos o la paleta para masa. Escuchará
2
un chasquido cuando el accesorio encaja
y se traba en su lugar.
Español
* Disponible solamente con modelos selectos.
85
Page 86

CÓMO USAR LOS ACCESORIOS CÓMO USAR LOS ACCESORIOS
Cómo instalar y quitar la prensa para cítricos*
Coloque el adaptador de la prensa para
cítricos sobre el eje eléctrico.
1
Gire la canasta hacia la izquierda hasta
que el sujetador se trabe en la manija.
3
Coloque la canasta coladora en el tazón
de trabajo con el sujetador de bloqueo
2
colocado a la izquierda de la manija del
tazón de trabajo.
Coloque el cono dentro de la canasta
coladora, conectándolo al adaptador. Es
4
posible que sea necesario girar el cono
hasta que encaje en su lugar.
Después de procesar, levante el cono
de la canasta coladora, gire la misma
para desbloquearla de la manija (como
5
se muestra) y levántela del tazón de
trabajo. Quite el adaptador.
IMPORTANTE: Los discos y los adaptadores deberán quitarse antes de quitar los tazones.
* Disponible solamente con modelos selectos.
86
Page 87

CÓMO USAR LOS ACCESORIOS
Cómo quitar los accesorios y el tazón de trabajo
IMPORTANTE: Cerciórese de que el procesador de alimentos esté apagado y desenchufado
antes de desensamblarlo.
Para quitar el tazón de trabajo del procesador de alimentos antes de quitar los
1
accesorios: Gire el tazón de trabajo y levántelo para quitarlo; luego gire la tapa y levántela.
Para quitar los accesorios antes de quitar el tazón de trabajo del procesador
de alimentos: Gire la tapa del tazón de trabajo para desbloquearla, como se muestra,
y levante la tapa para quitarla siguiendo los pasos a continuación con el tazón todavía sujeto
al procesador de alimentos.
Oricios para
los dedos
Para quitar los accesorios de disco: Sostenga el disco sujetándolo en los 2 orificios para los
2
dedos; levántelo en sentido recto. Después quite el adaptador.
Para quitar los accesorios de
cuchillas: Tome la cuchilla y jálela
3
directamente hacia arriba
Oricios para
los dedos
Si el tazón de trabajo todavía está
sujeto al procesador de alimentos: Gire
4
el tazón de trabajo y levántelo para quitarlo.
Español
87
Page 88

CUIDADO Y LIMPIEZA
IMPORTANTE: Nunca use limpiadores
abrasivos ni estropajos de metal con el
procesador de alimentos. Estos pueden
rayar o deslustrar tazón de trabajo y la tapa.
Cerciórese de que el procesador de
alimentos esté apagado y desenchufado
1
antes de desensamblarlo.
Todas las otras partes del procesador de alimentos son lavables en lavavajillas.
3
- Cargue las piezas lejos de los elementos calefactores que estén expuestos en la lavavajillas.
- Los tazones deberán cargarse boca abajo, no de costado.
- Evite usar ajustes altos de temperatura, tales como el ajuste sanitario o con vapor.
Limpie la base y el cable con un paño
tibio y jabonoso. Seque con un paño
2
suave.
88
Page 89

CUIDADO Y LIMPIEZA
Para guardar, empuje el cable dentro
de la base del procesador de alimentos.
4
Guarde los discos, el eje y las cuchillas
5
en el estuche provisto, en un lugar fuera
del alcance de los niños.
CONSEJOS PARA OBTENER RESULTADOS IDEALES
Cómo usar la cuchilla multiuso
Para picar frutas o
vegetales frescos: Pele,
saque las semillas. Corte los
1
/2 pulgada (2,5 a 4 cm). Procese los alimentos
1
hasta que alcancen el tamaño deseado con
pulsos cortos, de 1 a 2 segundos cada uno.
Raspe los lados del tazón si es necesario.
Para hacer puré de frutas y vegetales
(excepto papas) cocidos: Agregue 1/4 taza
(60 ml) de líquido según la receta por cada taza
(235 ml) de alimentos. Procese los alimentos
usando pulsos cortos hasta que estén picados
nos. A continuación procese continuamente
hasta alcanzar la consistencia deseada. Raspe
los lados del tazón si es necesario.
Para preparar puré de papas: Corte las
papas cocidas y calientes en tiras con el disco
para rallar en tiras. Cambie el disco para rallar
en tiras por la cuchilla multiuso. Agregue
mantequilla ablandada, leche y condimentos.
Haga de 3 a 4 pulsos, de 2 a 3 segundos cada
uno, hasta que esté suave y se haya absorbido
la leche. No procese en exceso.
Para picar frutas secas (o pegajosas): Los
alimentos deben estar fríos. Agregue 1/4 taza
(60 ml) de harina según la receta por cada 1/2
taza (120 ml) de fruta seca. Procese la fruta
con pulsos cortos hasta alcanzar la consistencia
deseada.
alimentos en trozos de 1 a
Español
89
Page 90

CONSEJOS PARA OBTENER RESULTADOS IDEALES
Para picar namente la cáscara de cítricos:
Con un cuchillo alado, pele la porción de color
(sin la membrana blanca) de los cítricos. Corte
la cáscara en tiras pequeñas. Procese hasta que
se haya picado namente.
Para moler ajo o para picar hierbas frescas
o pequeñas cantidades de vegetales: Con
el procesador en marcha, agregue los alimentos
a través del tubo de alimentación. Procese
hasta que se hayan picado. Para obtener los
mejores resultados, asegúrese de que el tazón
de trabajo y las hierbas estén completamente
secos antes de picarlos.
secos o hacer mantequilla de frutos
secos: Procese hasta 3 tazas (710 ml) de
frutos secos a la consistencia deseada, usando
pulsos cortos de 1 a 2 segundos cada vez.
Para una consistencia más gruesa, procese
tandas más pequeñas, pulsando 1 o 2 veces
de 1 a 2 segundos cada vez. Haga más pulsos
para obtener una consistencia más na. Para
las mantequillas de frutos secos, procese
continuamente hasta que esté suave. Guarde
en el refrigerador.
Para picar carne de res, de aves o
mariscos cocidos o crudos: Los alimentos
deben estar muy fríos. Corte en trozos de
1 pulgada (2,5 cm). Procese hasta 1 libra
(455 g) a la vez hasta alcanzar el tamaño
deseado, usando pulsos cortos de 1 a 2
segundos cada vez. Raspe los lados del tazón
si es necesario.
Para picar frutos
Para hacer migas de pan, galletas
o galletas saladas: Corte en trozos de
11/2 a 2 pulgadas (3,5 a 5 cm). Procese el
alimento hasta que esté no. Para los trozos
más grandes, haga de 2 a 3 pulsos de 1 a 2
segundos cada vez. Continúe procesando el
alimento hasta que esté no.
Para derretir chocolate para una receta:
Combine el chocolate y la azúcar según la
receta en el tazón de trabajo. Procese hasta
que se haya picado namente. Caliente el
líquido según la receta. Con el procesador en
marcha, vierta el líquido a través del tubo de
alimentación. Procese hasta que esté suave.
Para rallar quesos duros en trozos
pequeños, tales como parmesano y
romano: Nunca intente procesar queso
que no se pueda pinchar con la punta de
un cuchillo alado. Usted puede utilizar la
cuchilla multiuso para rallar quesos duros en
trozos pequeños. Corte el queso en trozos
de 1 pulgada (2,5 cm). Colóquelos en el
tazón de trabajo. Procese con pulsos cortos
hasta que estén picados gruesos. Procese
continuamente hasta que estén rallados en
trozos nos. Los trozos de queso también
se pueden agregar a través del tubo de
alimentación mientras el procesador está
funcionando.
NOTA: El procesar frutos secos y otros
alimentos duros puede rayar el acabado
de la supercie interior del tazón.
90
Page 91

CONSEJOS PARA OBTENER RESULTADOS IDEALES
Cómo usar el disco rebanadoro rallador
Para rebanar o rallar en
tiras frutas o vegetales
largos y con un diámetro
relativamente pequeño,
tales como apio,
zanahorias y bananas:
Corte los alimentos de modo que encajen
de manera vertical u horizontal en el tubo
de alimentación; colóquelos de manera
ajustada para que se mantengan en la posición
correcta. Procese haciendo presión uniforme.
Asimismo puede usar el tubo de alimentación
pequeño en el empujador de alimentos de dos
partes. Coloque los alimentos verticalmente
en el tubo y use el empujador pequeño para
procesarlos.
Para rebanar o rallar en tiras frutas y
vegetales redondos, tales como cebollas,
manzanas y pimientos verdes: Pele y saque
las semillas. Corte por la mitad o en cuartos
para que los trozos pasen a través del tubo de
alimentación. Introduzca los trozos en el tubo
de alimentación. Procese haciendo presión
uniforme.
Para rebanar o rallar frutas y
vegetales pequeños, tales como fresas,
champiñones y rábanos: Coloque los
alimentos vertical u horizontalmente en
capas, dentro del tubo de alimentación. Llene
el tubo de alimentación para mantener los
alimentos en la posición correcta. Procese
haciendo presión constante. Asimismo puede
usar el tubo de alimentación pequeño en
el empujador de alimentos de dos partes.
Coloque los alimentos verticalmente en
el tubo y use el empujador pequeño para
procesarlos.
Para rebanar la carne de res o de ave
cruda como las carnes para freír con
poco aceite: Corte o haga rollos con
la carne para que pase a través del tubo
de alimentación. Envuelva y congele los
alimentos hasta que se sientan duros al tacto,
de 30 minutos a 2 horas, según el grosor del
alimento. Revise que aun pueda pinchar los
alimentos con la punta de un cuchillo alado.
Si no es así, espere a que se descongele un
poco el alimento. Procese haciendo presión
constante.
Para rebanar la carne de res o de ave
cocida, incluyendo salami, salchichón,
etc.: Los alimentos deben estar muy fríos.
Corte en trozos que pasen a través del tubo
de alimentación. Procese presionando con
rmeza constantemente.
Para rallar espinaca y otros vegetales
de hoja en tiras: Apile las hojas. Hágalas un
rollo y colóquelo horizontalmente en el tubo
de alimentación. Procese haciendo presión
uniforme.
Español
Para rallar en tiras quesos de
consistencia rme y suave:
El queso de consistencia rme
debe estar muy frío. Para
obtener los mejores resultados
con los quesos suaves, tales
como mozzarella, colóquelos
en el congelador 10 a 15 minutos antes de
procesarlos. Corte el queso de modo que
pase a través del tubo de alimentación.
Procese haciendo presión uniforme.
Cómo usar la paleta para masa
La paleta para masa se ha
diseñado especícamente
para mezclar y amasar
la masa de levadura
rápidamente y a fondo.
Para obtener los mejores
resultados, no amase para
las recetas que requieran más de 4 tazas
(500 g) de harina.
91
Page 92

CONSEJOS PARA OBTENER RESULTADOS IDEALES
Consejos útiles
• Para evitar daños a la cuchilla o al motor, no
procese alimentos que se hayan congelado
hasta estar tan duros o rmes que no se
puedan pinchar con la punta de un cuchillo
alado. Si un trozo de un alimento duro, tal
como una zanahoria, se aplasta o se atasca
en la cuchilla, detenga el procesador y quite
la cuchilla. Retire los alimentos de la cuchilla
cuidadosamente.
• No sobrellene el tazón de trabajo ni el
minitazón. Para los alimentos líquidos, siga
los niveles de llenado máximo indicados
en el tazón de trabajo. Cuando pique, no
debe llenar el tazón de trabajo más de 1/3
o a la mitad. Use el minitazón para hasta 4
tazas (1 L) de líquido o 4 tazas (500 g) de
ingredientes secos.
• Coloque los discos rebanadores de modo
que la supercie de corte esté justo a la
derecha del tubo de alimentación. Esto
permite que la cuchilla dé un giro completo
antes de hacer contacto con los alimentos.
• Para usar al máximo la velocidad del
procesador, deje caer los ingredientes a picar
a través del tubo de alimentación mientras el
procesador esté funcionando.
• Distintos alimentos requieren distintos
grados de presión para obtener los mejores
resultados de rallado en tiras y rebanado. En
general, use poca presión para los alimentos
suaves y delicados (fresas, tomates, etc.),
presión media para los alimentos de tamaño
mediano (calabacines, papas, etc.) y presión
más rme para los alimentos más duros
(zanahorias, manzanas, quesos duros, carnes
congeladas parcialmente, etc.).
• El queso suave y medio duro se puede
extender o enrollar en el disco rallador
en tiras. Para evitar que esto ocurra, ralle
solamente el queso bien frío.
• Algunas veces los alimentos nos, tales
como las zanahorias o el apio, se caen en
el tubo de alimentación, lo que resulta en
rebanadas desiguales. Para minimizar esto,
corte los alimentos en varios trozos y llene
el tubo de alimentación con alimento por
completo. Para procesar artículos pequeños
o nos, el tubo de alimentación pequeño
que se encuentra en el empujador de dos
partes resultará útil.
• Cuando prepare un pastel o masa para
galletas, use la cuchilla multiuso para batir la
materia grasa y el azúcar primero. Agregue
los ingredientes secos por último. Coloque
los frutos secos arriba de la mezcla de harina
para evitar picarlos en exceso. Procese
los frutos secos y las frutas usando pulsos
cortos hasta que se combinen con los otros
ingredientes. No procese en exceso.
• Cuando los alimentos rallados en tiras o
rebanados se apilen en un lado del tazón,
detenga el procesador y redistribuya los
alimentos con una espátula.
• Saque los alimentos una vez que éstos
alcancen la parte inferior de un disco
rebanador o rallador en tiras.
• Puede ser que unos cuantos trozos más
grandes de alimentos permanezcan arriba
del disco después de rebanar o rallar en
tiras. Si lo desea, corte éstos a mano y
agréguelos a la mezcla.
• Organice las tareas de procesamiento para
minimizar la limpieza dele tazón. Procese
los ingredientes secos o duros antes que los
líquidos.
• Para limpiar los ingredientes de la cuchilla
multiuso con facilidad, simplemente vacíe
el tazón de trabajo, vuelva a colocar la tapa
y haga pulsos de 1 a 2 segundos para que al
girar se limpie la cuchilla.
92
Page 93

CONSEJOS PARA OBTENER RESULTADOS IDEALES
• Después de quitar la tapa del tazón
de trabajo, colóquela al revés sobre el
mostrador. Esto ayuda·a mantener el
mostrador limpio.
• Use la espátula para sacar los ingredientes
del tazón de trabajo.
- Licuar frutas o vegetales frescos
- Rebanar huevos cocidos o carnes
a temperatura ambiente.
Si cualquier parte de plástico se decolorara
•
debido a los tipos de alimentos procesados,
límpiela con jugo de limón.
• Su procesador de alimentos no se ha
diseñado para realizar las siguientes
funciones:
- Moler granos de café, granos
o especias duras
- Moler huesos u otras partes de los
alimentos que no sean comestibles
SOLUCIÓN DE PROBLEMAS
Si su procesador de alimentos falla o no funciona, revise lo siguiente:
El procesador de alimentos no funciona:
• Asegúrese de que el tazón y la tapa estén
bien alineados y asegurados en su lugar y
que el empujador de alimentos grande esté
insertado en el tubo de alimentación.
• Cuando utilice la abertura grande del
tubo de alimentación, asegúrese de que el
alimento no esté por arriba de la línea de
Max. Fill (Llenado máximo) en el tubo de
alimentación.
• Cerciórese de que el procesador de
alimentos esté enchufado.
• ¿Está funcionando adecuadamente el fusible
en el circuito que va a al procesador de
alimentos? Si tiene una caja de cortacircuitos,
asegúrese de que el circuito esté cerrado.
• Desenchufe el procesador de alimentos y
luego vuelva a enchufarlo en el contacto.
• Si el procesador de alimentos no está a
temperatura ambiente, espere hasta que
alcance la temperatura ambiente y vuelva a
intentar.
• Si no se mueve la palanca de velocidad,
cerciórese de que el cuadrante esté en la
posición de Off (Apagado).
• Para que la tapa gire con facilidad, es posible
quitar el sello o simplemente aplicar aceite
vegetal al mismo.
El procesador de alimentos no ralla
en tiras o no rebana adecuadamente:
• Asegúrese que el lado del disco con el
lo en relieve esté colocado mirando
hacia arriba sobre el adaptador.
• Si va a utilizar la cuchilla rebanadora
regulable, asegúrese de que esté ajustada
en el grosor correcto.
• Asegúrese de que los ingredientes sean
apropiados para rebanar o rallar en tiras.
Si la tapa del tazón de trabajo no se cierra:
• Asegúrese de que el disco se haya instalado
correctamente, con el nudo en relieve en la
parte superior, y colocado adecuadamente
en el adaptador de transmisión.
• Intente cerrarla nuevamente, habiendo
quitado el empujador de alimentos grande.
Si el problema no se debe a lo mencionado
anteriormente, consulte la sección “Garantía
y servicio”.
No devuelva el procesador de alimentos al
minorista. Los minoristas no proveen servicio.
Español
93
Page 94

GARANTÍA Y SERVICIO
Garantía limitada de reemplazo total de KitchenAid®
Pro-Line para los 50 estados de los Estados Unidos,
el Distrito de Columbia, Puerto Rico y Canadá
Esta garantía se extiende al comprador y a cualquier propietario subsiguiente para los
productos KitchenAid Pro-Line usados en los 50 estados de Estados Unidos, el Distrito
de Columbia, Puerto Rico y Canadá.
Duración de la Cinco años a partir de la fecha de compra.
garantía limitada
de reemplazo total:
KitchenAid pagará por lo Reemplazo sin dicultades para su producto Pro-Line.
siguiente, a su elección: Consulte la siguiente página para obtener detalles acerca de
cómo hacer arreglos para el reemplazo o llame al Centro
para la eXperiencia del cliente, sin cargo, al
1-800-832-7173.
O BIEN
Los costos de las piezas de repuesto y del trabajo de
reparación para corregir los defectos en los materiales y la
mano de obra. El servicio deberá ser provisto por un centro
de servicio autorizado por KitchenAid.
KitchenAid no A. Reparaciones cuando su producto Pro-Line ha sido
pagará por: empleado para nes ajenos al uso doméstico normal de
una sola familia.
B. Daños causados por accidente, alteración, uso indebido
o abuso.
C. Cualquier gasto de envío o manejo para llevar el producto
Pro-Line a un centro de servicio autorizado.
D. Piezas de repuesto o costos de mano de obra para la
reparación de los productos Pro-Line usados fuera de los
50 estados de Estados Unidos, el Distrito de Columbia,
Puerto Rico y Canadá.
EXCLUSIÓN DE GARANTÍAS IMPLÍCITAS LAS GARANTÍAS IMPLÍCITAS,
INCLUYENDO CUALQUIER GARANTÍA IMPLÍCITA DE COMERCIABILIDAD O
GARANTÍA IMPLÍCITA DE CAPACIDAD PARA UN PROPÓSITO PARTICULAR, SERÁN
LIMITADAS A CINCO AÑOS O AL PERÍODO MÁS CORTO PERMITIDO POR LEY.
Algunos estados y provincias no permiten la limitación de la duración de las garantías
implícitas de comerciabilidad o capacidad, de modo que la limitación arriba indicada quizá
no le corresponda. Esta garantía le otorga derechos legales especícos y es posible que
usted tenga también otros derechos que varían de un estado a otro y de una provincia a
otra. EXCLUSIÓN DE DECLARACIONES FUERA DE LA GARANTÍA KitchenAid
no hace declaraciones acerca de la calidad, durabilidad o necesidad de servicio técnico o
reparación de este electrodoméstico aparte de las declaraciones incluidas en esta Garantía.
Si usted desea una garantía con una duración más prolongada o más completa que la
garantía limitada que se incluye con este electrodoméstico, deberá dirigirse a KitchenAid
o a su distribuidor para la compra de un contrato de servicio.
LIMITACIÓN DE RECURSOS; EXCLUSIÓN DE DAÑOS INCIDENTALES Y
CONSECUENTES SU ÚNICO Y EXCLUSIVO RECURSO SEGÚN LOS TÉRMINOS DE
ESTA GARANTÍA LIMITADA SERÁ EL DE REEMPLAZAR O REPARAR EL PRODUCTO
SEGÚN SE ESTIPULA EN LA PRESENTE. KITCHENAID NO SE RESPONSABILIZARÁ
POR DAÑOS INCIDENTALES O CONSECUENTES. Algunos estados y provincias no
permiten la exclusión o limitación de daños incidentales o consecuentes, de modo que
estas limitaciones y exclusiones quizás no le correspondan. Esta garantía le otorga derechos
legales especícos y es posible que usted tenga también otros derechos que varían de
un estado a otro y de una provincia a otra.
94
Page 95

Garantía de reemplazo sin dicultades – En los cincuenta estados
de Estados Unidos, el Distrito de Columbia y Puerto Rico
Conamos tanto en que la calidad de
nuestros productos cumple con las exigentes
normas de KitchenAid que, si su producto
Pro-Line presentara alguna falla durante los
primeros cinco años de compra, KitchenAid
se encargará de entregar un reemplazo
idéntico o comparable a su domicilio
sin cargo y de devolvernos su producto
Pro-Line original. La unidad de reemplazo
estará también cubierta por nuestra garantía
limitada de cinco años. Sírvase seguir estas
instrucciones para recibir este servicio
de calidad.
Si su producto Pro-Line fallara durante
los primeros cinco años de compra,
simplemente llame a nuestro número
gratuito del Centro para la eXperiencia
del cliente al 1-800-832-7173, de lunes a
viernes. Sírvase tener a mano el recibo de
compra original cuando llame. Se requerirá
la prueba de compra para iniciar un proceso
de reclamo. Proporcione al asesor su
dirección de envío completa. (No números
de apartados postales, por favor.)
Cuando usted reciba el producto Pro-Line
de reemplazo, use el cartón y los materiales
de empaque para empacar el producto
Pro-Line original.
Garantía de reemplazo sin dicultades - en Canadá
Conamos tanto en que la calidad de nuestros
productos cumple con las exigentes normas
de KitchenAid
presentara alguna falla durante los primeros
cinco años de compra, KitchenAid Canada
lo reemplazará con un producto Pro-Line
idéntico o un reemplazo comparable. La
unidad de reemplazo estará también cubierta
por nuestra garantía limitada de cinco años.
Sírvase seguir estas instrucciones para recibir
este servicio de calidad.
Si su producto Pro-Line presentara alguna
falla durante los primeros cinco años de
compra, llévelo o envíelo a cobro revertido
a un Centro de servicio autorizado por
®
que, si su producto Pro-Line
KitchenAid. En la caja, incluya su nombre y
domicilio de envío completo en una hoja de
papel junto con la copia del comprobante
de compra (recibo de la caja registradora,
recibo de pago de la tarjeta de crédito, etc.).
Su producto Pro-Line de reemplazo será
devuelto con porte prepagado y asegurado.
Si no puede obtener un servicio satisfactorio
de esta manera, llame a nuestro número
gratuito del Centro para la eXperiencia del
cliente al 1-800-832-7173.
O bien escríbanos a:
Customer eXperience Centre
KitchenAid Canada
200 - 6750 Century Ave.
Mississauga, ON L5N 0B7
Cómo obtener servicio técnico después de que expire la
garantía o cómo pedir accesorios y piezas de repuesto
En los Estados Unidos y Puerto Rico:
Para obtener información acerca del servicio
técnico o para pedir accesorios o piezas de
repuesto, llame sin costo al 1-800-832-7173
o escriba a:
Customer eXperience Center,
KitchenAid Small Appliances,
P.O. Box 218, St. Joseph, MI 49085-0218
Fuera de los Estados Unidos
y Puerto Rico:
Consulte a su distribuidor local de
KitchenAid o a la tienda donde compró
su producto Pro-Line para obtener
información sobre el servicio técnico.
Para obtener información acerca del
servicio en Canadá:
Llame sin costo al1-800-832-7173.
O bien escriba a:
Customer eXperience Centre
KitchenAid Canada
200 - 6750 Century Ave.
Mississauga, ON L5N 0B7
Español
®/™ © 2013 KitchenAid. Todos los derechos reservados. Usada en Canadá bajo licencia.
95
Page 96

®/™ © 2013 KitchenAid. All rights reserved. Used under license in Canada.
®/™ © 2013 KitchenAid. Tous droits réservés. Emploi sous licence au Canada.
®/™ © 2013 KitchenAid. Todos los derechos reservados. Usada en Canadá bajo licencia.
W10545030B
01/13
 Loading...