

KitchenAid KBFU271, KFFU271TSS, KFFU271 User Manual

FREESTANDING AND BUILT-IN
OUTDOOR REFRESHMENT CENTER
Installation Instructions and Use & Care Guide
For questions about features, operation/performance, parts, accessories or service, call: 1-800-422-1230
In Canada, for assistance, installation and service, call: 1-800-807-6777
or visit our website at www.kitchenaid.com
or visit our website at www.KitchenAid.ca
COMPTOIR POUR RAFRAÎCHISSEMENTS
D'EXTÉRIEUR - AUTOPORTANT ET ENCASTRÉ
Instructions d’installation et Guide d’utilisation et d’entretien
Au Canada, pour assistance, installation ou service composez le 1-800-807-6777 ou visitez notre site web à...
www.KitchenAid.ca
Table of Contents/Table des matières.............................................................................2
Models/Modèles KFFU271 KBFU271
W10110733
TABLE OF CONTENTS
TABLE DES MATIÈRES
OUTDOOR REFRESHMENT CENTER SAFETY ..........................2
INSTALLATION REQUIREMENTS................................................3
Tools and Parts ............................................................................3
Location Requirements................................................................ 3
INSTALLATION INSTRUCTIONS..................................................4
Built-In Refreshment Center ........................................................4
Freestanding Refreshment Center...............................................5
REFRESHMENT CENTER CARE ..................................................6
General Cleaning..........................................................................6
ASSISTANCE OR SERVICE...........................................................7
In the U.S.A. .................................................................................7
Accessories..................................................................................7
In Canada .....................................................................................7
WARRANTY ....................................................................................8
SÉCURITÉ COMPTOIR POUR
RAFRAÎCHISSEMENTS D'EXTÉRIEUR........................................9
EXIGENCES D'INSTALLATION...................................................10
Outillage et pièces......................................................................10
Exigences d'emplacement.........................................................10
INSTRUCTIONS D'INSTALLATION.............................................11
Comptoir pour rafraîchissements encastré ...............................11
Comptoir pour rafraîchissements autoportant ..........................12
ENTRETIEN DU COMPTOIR POUR
RAFRAÎCHISSEMENTS ...............................................................13
Nettoyage général ......................................................................13
ASSISTANCE OU SERVICE.........................................................14
Accessoires ................................................................................14
GARANTIE.....................................................................................14
OUTDOOR REFRESHMENT CENTER SAFETY
Your safety and the safety of others are very important.
We have provided many important safety messages in this manual and on your appliance. Always read and obey all safety
messages.
This is the safety alert symbol.
This symbol alerts you to potential hazards that can kill or hurt you and others.
All safety messages will follow the safety alert symbol and either the word “DANGER” or “WARNING.”
These words mean:
You can be killed or seriously injured if you don't immediately
DANGER
WARNING
All safety messages will tell you what the potential hazard is, tell you how to reduce the chance of injury, and tell you what can
happen if the instructions are not followed.
follow instructions.
can be killed or seriously injured if you don't
You
instructions.
follow
2
INSTALLATION REQUIREMENTS
Tools and Parts
Gather the required tools and parts before starting installation.
Read and follow the instructions provided with any tools listed
here.
Tools ne ede d
■ Level
■ Phillips screwdriver
■ Tape measure
■ Slip-joint pliers
■ Pipe wrench
■ Adjustable wrench
Built-In Models
A
B
C
Parts needed
■ NSF or UPC listed water connection lines
■ All weather clear silicone
Location Requirements
IMPORTANT: Observe all governing codes and ordinances.
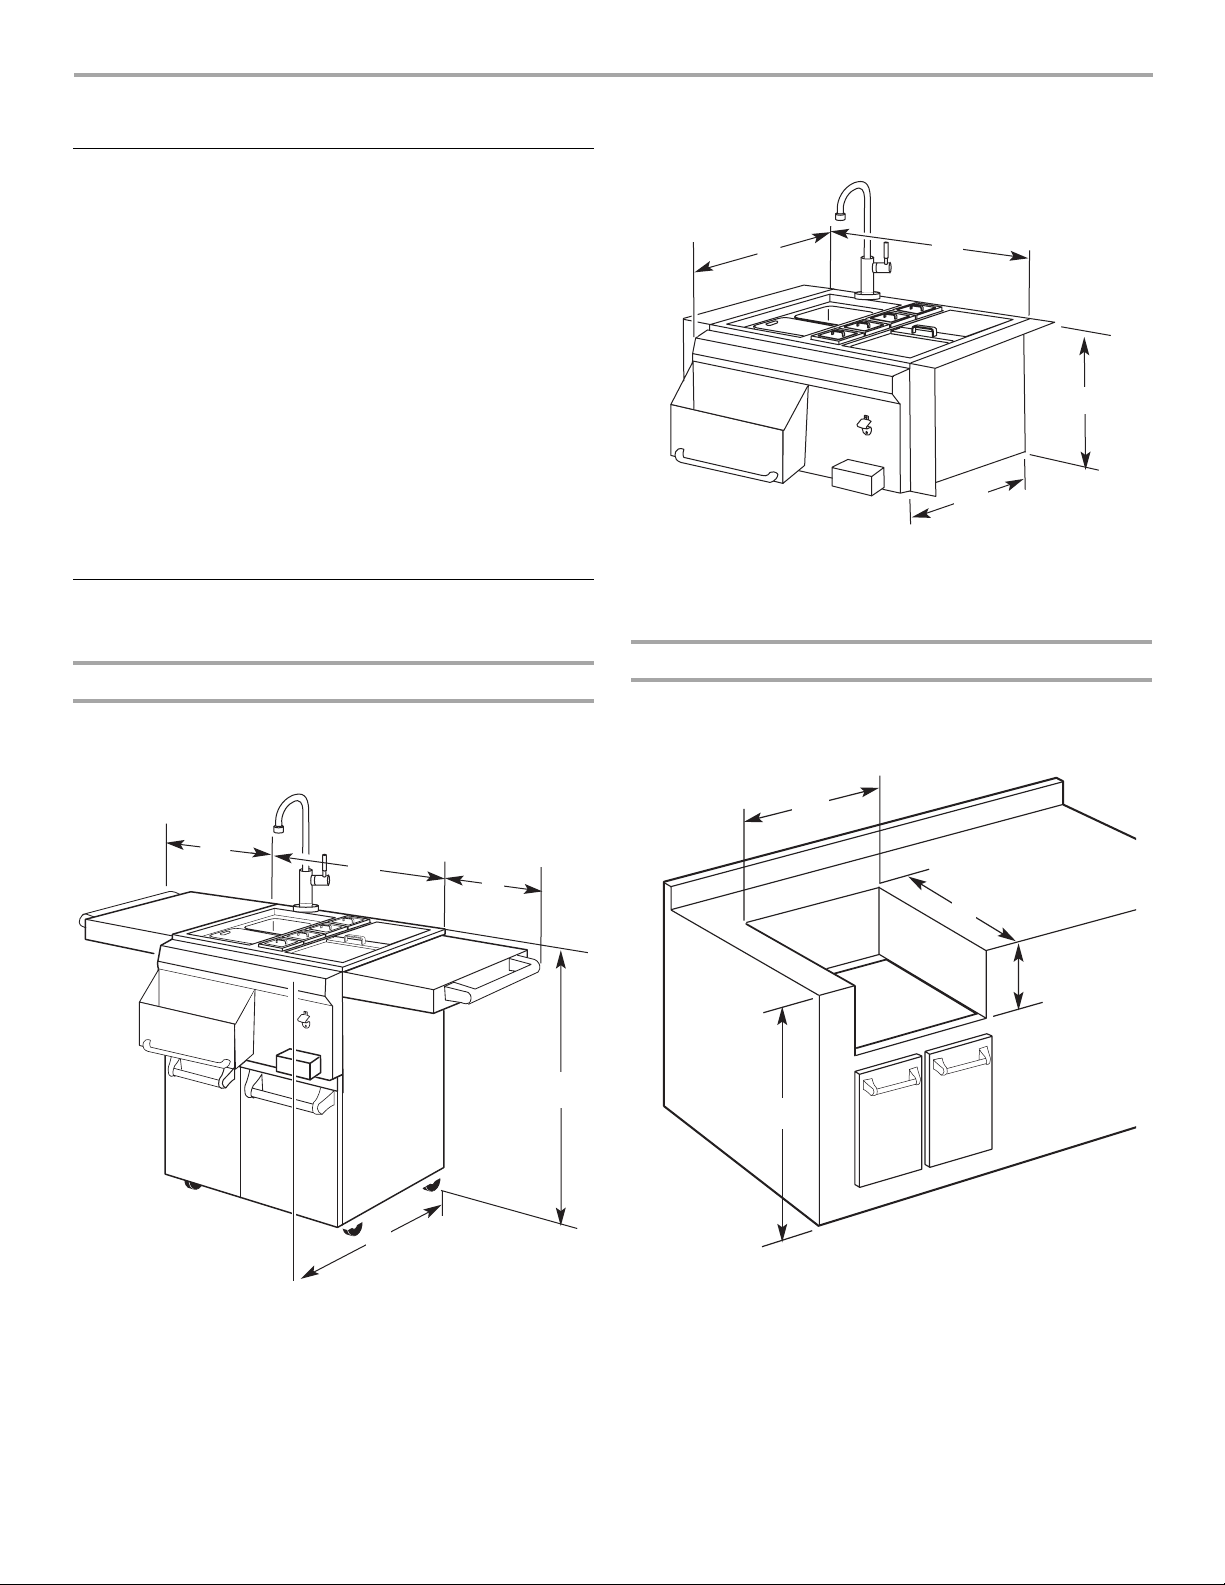
Product Dimensions
Freestanding Models
The freestanding model must have suitable drain systems in
accordance with local codes for the ice bin and sink drains.
A
B
A
D
A. 26³⁄₈" (67.0 cm)
B. 30" (76.2 cm)
C. 10" (25.4 cm)
D. 22³⁄₄" (57.8 cm)
Cabinet Dimensions (for built-in model)
Provide suitable drain systems in accordance with local codes for
ice bin and sink drains. The drains and filter must be accessible.
A
D
B
D
A. 17¹⁄₄" (43.8 cm)
B. 30" (76.2 cm)
C. 36⁷⁄₈" (93.7 cm)
D. 26³⁄₈" (67.0 cm)
C
C
A. 30¹⁄₂" (77.5 cm)
B. 10³⁄₄" (27.3 cm)
C. 35¹⁄₂" (90.2 cm) min.
D. 23" (58.4 cm)
3
INSTALLATION INSTRUCTIONS
C
E
A
A
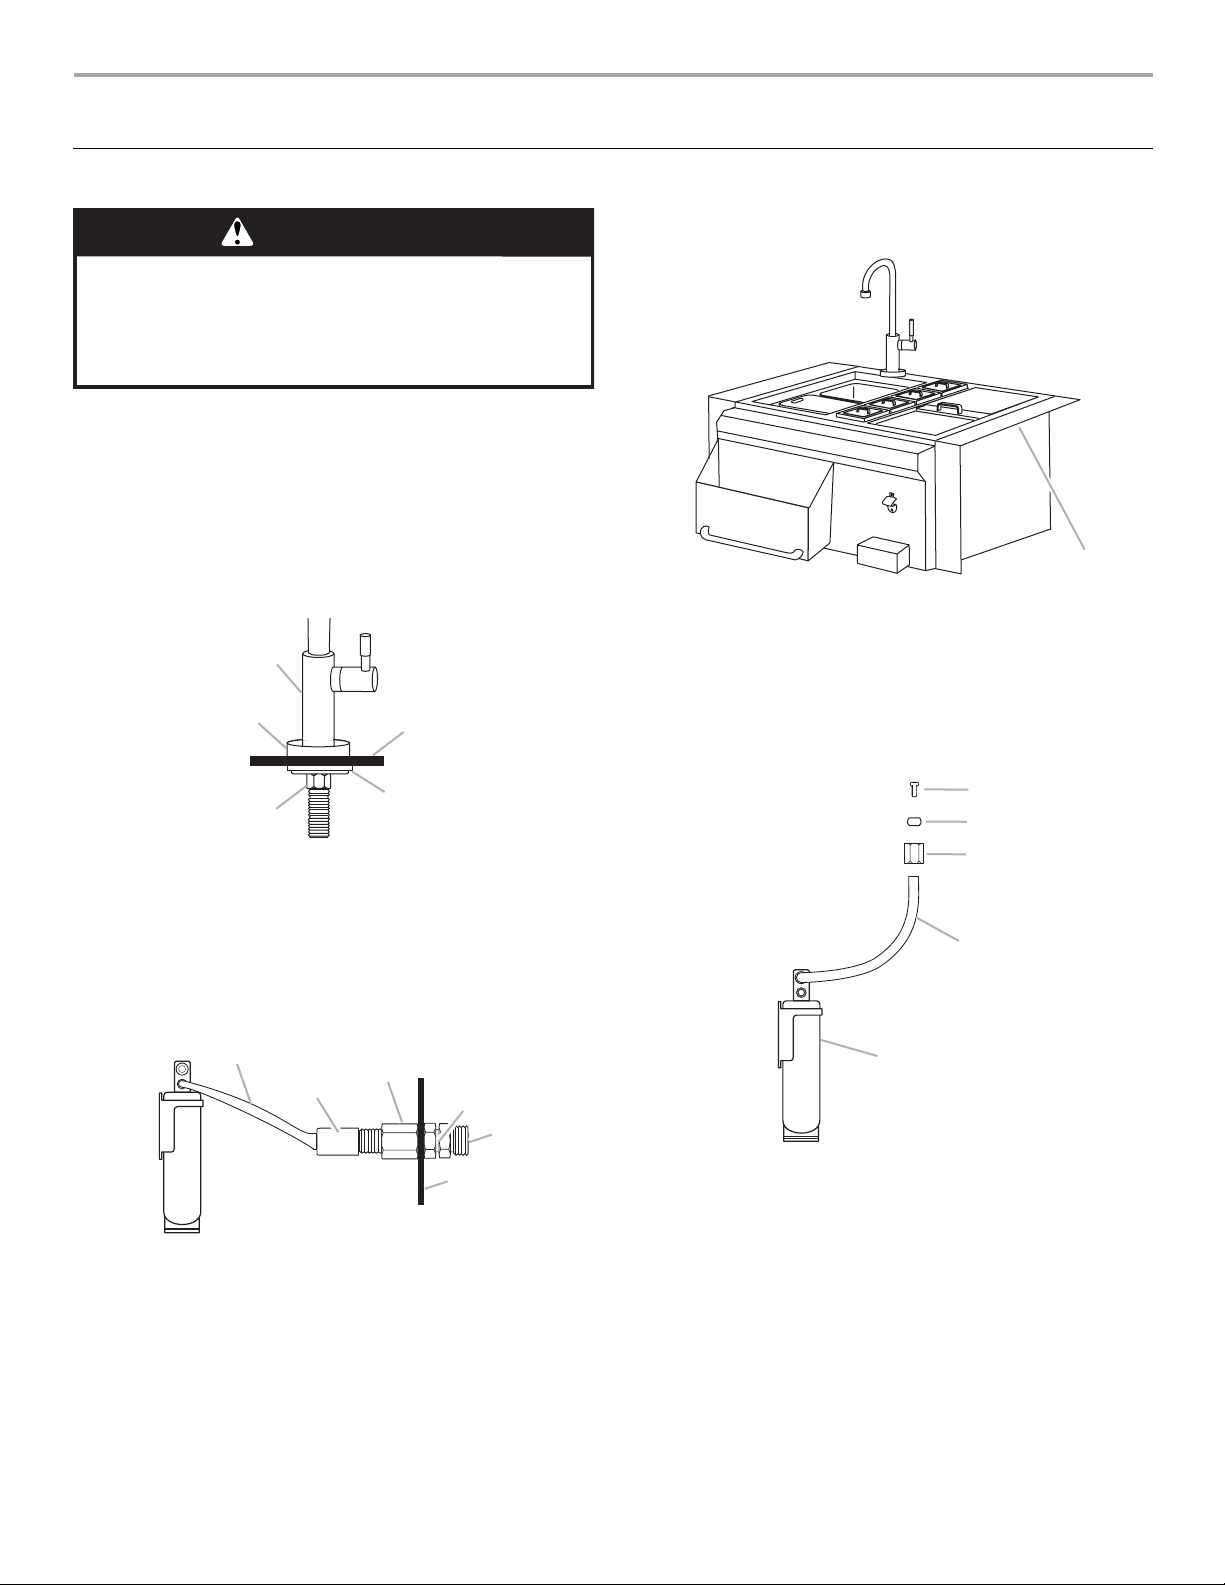
Built-In Refreshment Center
WARNING
Excessive Weight Hazard
Use two or more people to move and install
refreshment center.
Failure to do so can result in back or other injury.
Use a certified plumber to connect and install potable water
supply and drain system to outdoor refreshment center
according to local code requirements.
1. Using two or more people, set the refreshment center on a
covered surface.
2. Check that you have the drain connections, in accordance
with local codes, under the refreshment center.
3. Remove the faucet from the ice bin.
4. Install the faucet and fasten securely.
6. Ice bin drain and sink drain fittings to be connected to drain
system in accordance with local code requirements.
A. Underside of mounting trim
A
B
E
A. Faucet
B. Brass escutcheon with “O” ring
C. Sink
D. Plastic washer
E. Locking nut
5. Install water inlet connection in a convenient location under
the cutout. Position the water inlet connection so that the
plastic hose easily reaches the filter inlet connection.
A
B
A. Tubing from water filter (inlet)
B. Hose connector
C. Hose connector nut
D
C
D
F
D. Brass locking nut
E. Inlet connector
F. Exterior side of mounting panel
7. Apply a bead of all weather clear silicone on the under side of
the two sides of mounting trim.
8. Using two or more people, place the refreshment center into
the cutout. Immediately remove any excess silicone.
9. Connect the plastic hose from the water filter to the faucet
connection and securely tighten.
B
C
D
E
A. Plastic tube insert
B. Plastic ferrule
C. Compression nut
D. Plastic hose
E. Filter
4
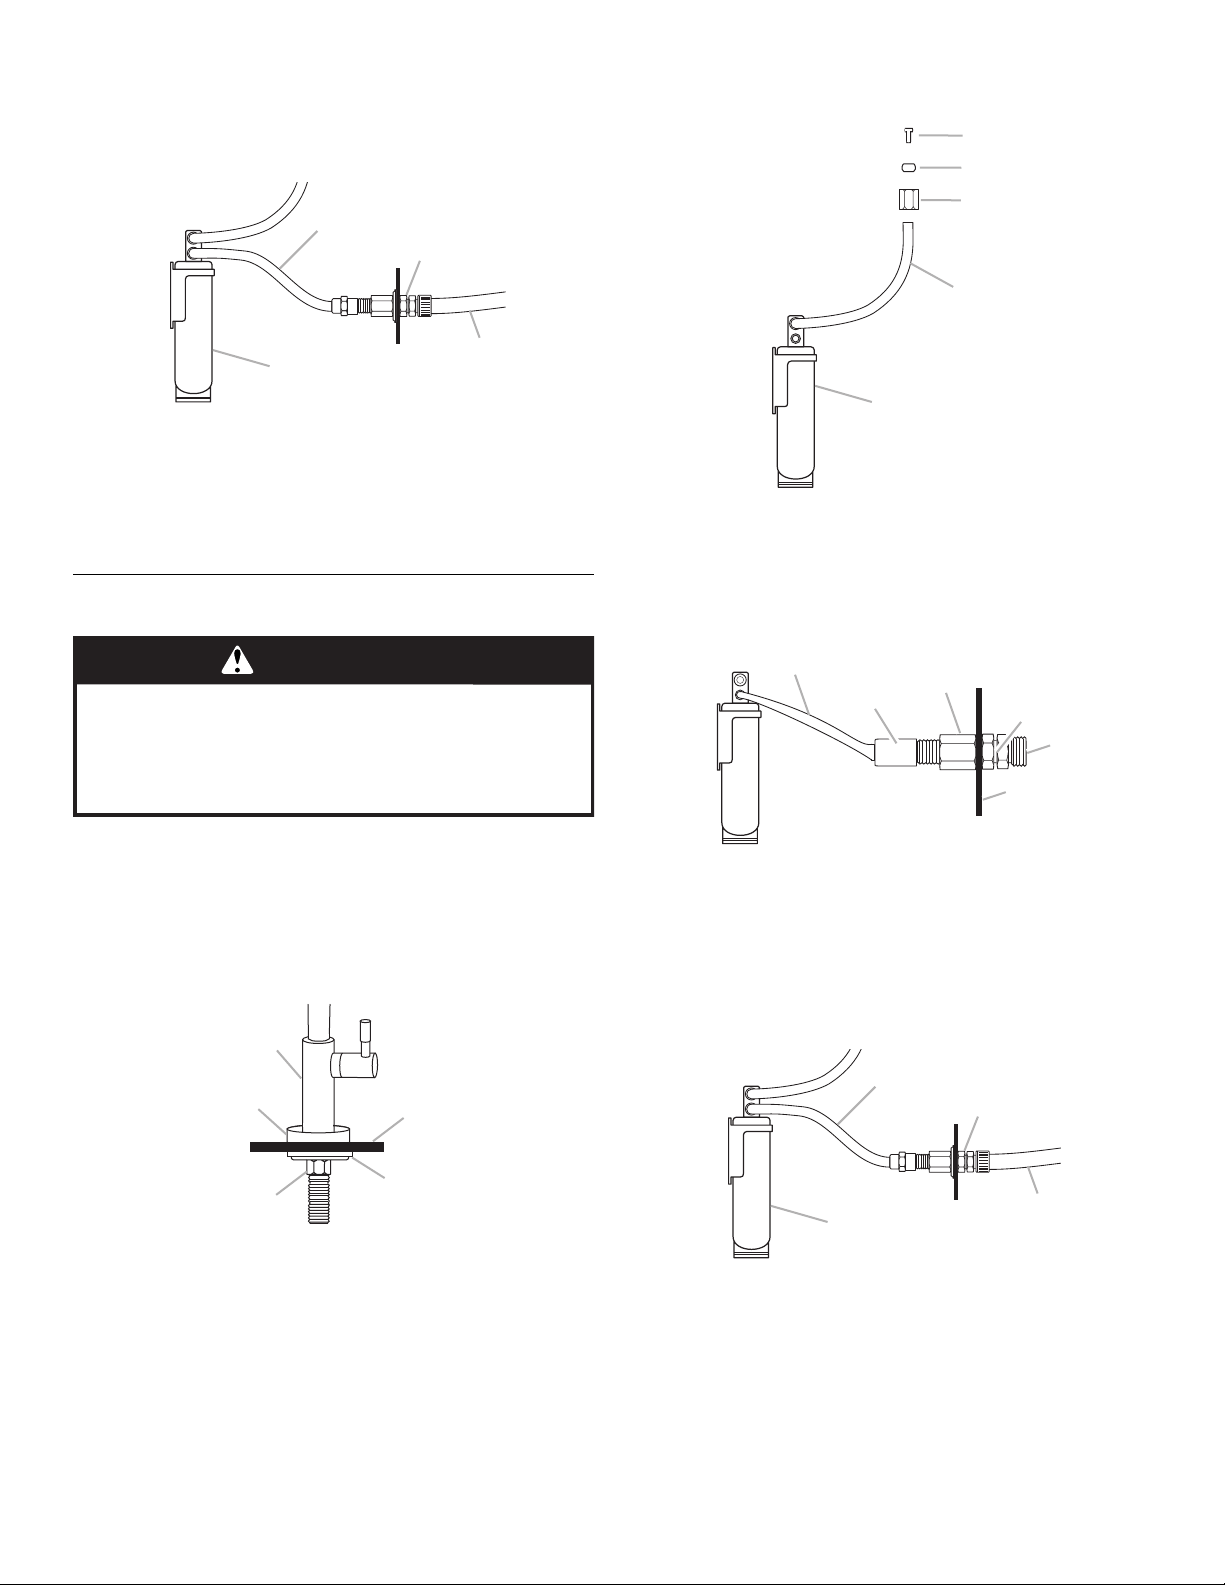
10. Attach the plastic cold water hose from the water inlet
C
A
E
connection to the inlet side of the filter. Use NSF or UPC
listed water connection line for water supply to inlet
connector. Potable water supply system must be connected
to inlet connector according to local code requirements.
A
B
4. Connect the plastic line from the water filter to the faucet
connection and securely tighten.
B
C
D
C
D
A. Plastic hose
B. Inlet connector
C. Filter
D. NSF or UPC listed water supply line or hose
11. Unwrap the sliding cover and place into frame on top of the
ice bin.
Freestanding Refreshment Center
WARNING
Excessive Weight Hazard
Use two or more people to move and install
refreshment center.
Failure to do so can result in back or other injury.
Use a certified plumber to connect and install potable water
supply and drain system to outdoor refreshment center
according to local code requirements.
1. Check that you have adequate drain connections for the
refreshment center.
2. Remove the faucet from the ice bin.
3. Install the faucet and securely fasten.
A
E
A. Plastic tube insert
B. Plastic ferrule
C. Compression nut
D. Plastic hose
E. Filter
5. Install water inlet connection through hole provided in cabinet
rear panel.
A
B
C
D
F
A. Tubing from water filter (inlet)
B. Hose connector
C. Hose connector nut
D. Brass locking nut
E. Inlet connector
F. Exterior side of mounting panel
6. Attach the plastic cold water hose from the water inlet
connection to the inlet side of the filter. Use NSF or UPC
listed water connection line for water supply to inlet
connector. Potable water supply system must be connected
to inlet connector according to local code requirements.
B
E
A. Faucet
B. Brass escutcheon with “O” ring
C. Sink
D. Plastic washer
E. Locking nut
A
B
D
D
C
A. Plastic hose
B. Inlet connector
C. Filter
D. NSF or UPC listed water supply line or hose
7. Unwrap the sliding cover and place into frame on top of the
ice bin.
8. Rotate the side shelves up into their locked position or leave
down as needed.
9. Lock the front locking caster wheels to keep refreshment
center from moving.
5
 Loading...