

KitchenAid KEYS677E, KEYS777E, KGYS677E, KGYS777E User Manual
Models
KEYS677E, KGYS677E
KEYS777E, KGYS777E
Use & Care Guide
Electric and
Gas Dryers
A Note to You................... 2
Understanding
Dryer Safety .................. 3-4
Getting to Know
Your Dryer........................5
Checking Your Vent......... 6
Operating Your Dryer ...... 8
Caring for Your Dryer ....14
Troubleshooting............ 19
Requesting Assistance
or Service....................... 21
Index ............................... 23
Warranty.........................24
PART NO. 3405630 Rev. A
1•800•422•1230
Call with questions
or comments

A Note to You
Thank you for buying a KITCHENAID
KitchenAid designs the best tools for the most important room in your house. To ensure that you enjoy many
years of trouble-free operation, we developed this Use and Care Guide. It contains valuable information
concerning how to operate and maintain your new appliance properly and safely. Please read it carefully.
Also, please complete and mail the enclosed Product Registration Card.
®
appliance!
For assistance or service
Call the Consumer Assistance Center toll free ...................................................................... 1-800-422-1230
If you need assistance or service, first see the “Troubleshooting” section of this book. After checking
“Troubleshooting,” additional help can be found by checking the “Requesting Assistance or Service”
section, or by calling the telephone number above.
When calling, you will need to know your appliance’s complete model number and serial number. You can
find this information on the model and serial number label (see diagram on page 5).
Keep this book and the sales slip together in a safe place for future reference. You must provide proof
of purchase or installation date for in-warranty service.
Model Number_____________________________
Serial Number _____________________________
Date Installed _____________________________
Builder/Dealer Name _______________________
Address __________________________________
Phone____________________________________
2
Understanding Dryer Safety
Your safety is important to us.
This guide contains safety symbols and statements.
Please pay special attention to these symbols and
follow any instructions given. Here is a brief explanation of the use of the symbol.
WARNING: For your safety, the information in this manual must be followed to
minimize the risk of fire or explosion, or to prevent property damage, personal injury,
or loss of life.
– Do not store or use gasoline or other flammable vapors and liquids in the vicinity
of this or any other appliance.
– WHAT TO DO IF YOU SMELL GAS:
• Do not try to light any appliance.
• Do not touch any electrical switch; do not use any phone in your building.
• Clear the room, building, or area of all occupants.
• Immediately call your gas supplier from a neighbor’s phone.
Follow the gas supplier’s instructions.
• If you cannot reach your gas supplier, call the fire department.
This symbol alerts you to hazards
such as fire, electrical shock, or
other injuries.
– Installation and service must be performed by a qualified installer, service agency,
or the gas supplier.
continued on next page
3

Understanding Dryer Safety
IMPORTANT SAFETY INSTRUCTIONS
WARNING – To reduce the risk of fire, electric shock, or injury to persons when using the
dryer, follow basic precautions, including the following:
•Read all instructions before using
the dryer.
•Do not dry articles that have been previ-
ously cleaned in, washed in, soaked in,
or spotted with gasoline, dry-cleaning
solvents, other flammable, or explosive
substances as they give off vapors that
could ignite or explode.
•Do not allow children to play on or in
the dryer. Close supervision of children
is necessary when the dryer is used
near children.
•Before the dryer is removed from service
or discarded, remove the door to the
drying compartment.
•Do not reach into the dryer if the drum
is moving.
•Do not install or store the dryer where
it will be exposed to the weather.
•Do not tamper with controls.
•Do not repair or replace any part of the
dryer or attempt any servicing unless
specifically recommended in this Use and
Care Guide or in published user-repair
instructions that you understand and have
the skills to carry out.
•Do not use fabric softeners or products to
eliminate static unless recommended by
the manufacturer of the fabric softener or
product.
•Do not use heat to dry articles containing
foam rubber or similarly textured rubberlike materials.
•Clean lint screen before or after each load.
•Keep area around the exhaust opening
and adjacent surrounding areas free from
the accumulation of lint, dust, and dirt.
•The interior of the dryer and exhaust duct
should be cleaned periodically by qualified
service personnel.
•See Installation Instructions for grounding
requirements.
– SAVE THESE INSTRUCTIONS –
4

Getting to Know Your Dryer
The parts and features of your dryer are illustrated on this page. Become familiar with all parts and
features before using your dryer. Page references are included next to some features. Refer to those
pages for more information about the features.
NOTE: The drawings in this book may vary from your dryer model. They are designed to show the
different features of all models covered by this book. Your model may not include all features.
SELECTRA™
controls
(p. 8)
Cycle control
knob
(pp. 8-12)
Model and
serial number
label
(p. 2)
Drum light
(p. 16)
Dryer drum
(p. 15)
TIMED DRY
RACK DRY
AIR TUMBLE
Start button
(p. 9)
ELECTRONIC SENSOR DRY:
OFF
REGULAR / HEAVY
10
20
QUICK PRESS
IRONING DAMP
40
50
60
EXTRA DRY
OFF
RACK DRY
10
20
Energy Preferred
*
VERY DRY
Automatic Setting
TOWELS
LESS DRY
*
COOL DOWN
OFF
VERY DRY
LESS DRY
COOL DOWN
ELECTRONIC SENSOR DRY:
PERMANENT PRESS
EXTRA CARE
OFF
TEMP
FABRIC
EX
LOW
DELICATES KNITS P PRESS HEAVY
MED
LOW
MED
HI OFF ON OFF ON
HI
CYCLE SIGNALEXTRA CARETEMPERATURE
Selectra
Easy Clean
PUSH TO START
Lint screen
(p. 14)
Exhaust grill
Electronic
dryness
sensor
(p. 10)
Wide-opening
hamper door
Additional feature on models
KEYS777E and KGYS777E:
ULTRA LOW temperature setting
(on model KEYS777E)
EXTRA LOW temperature setting
(on model KGYS777E)
5
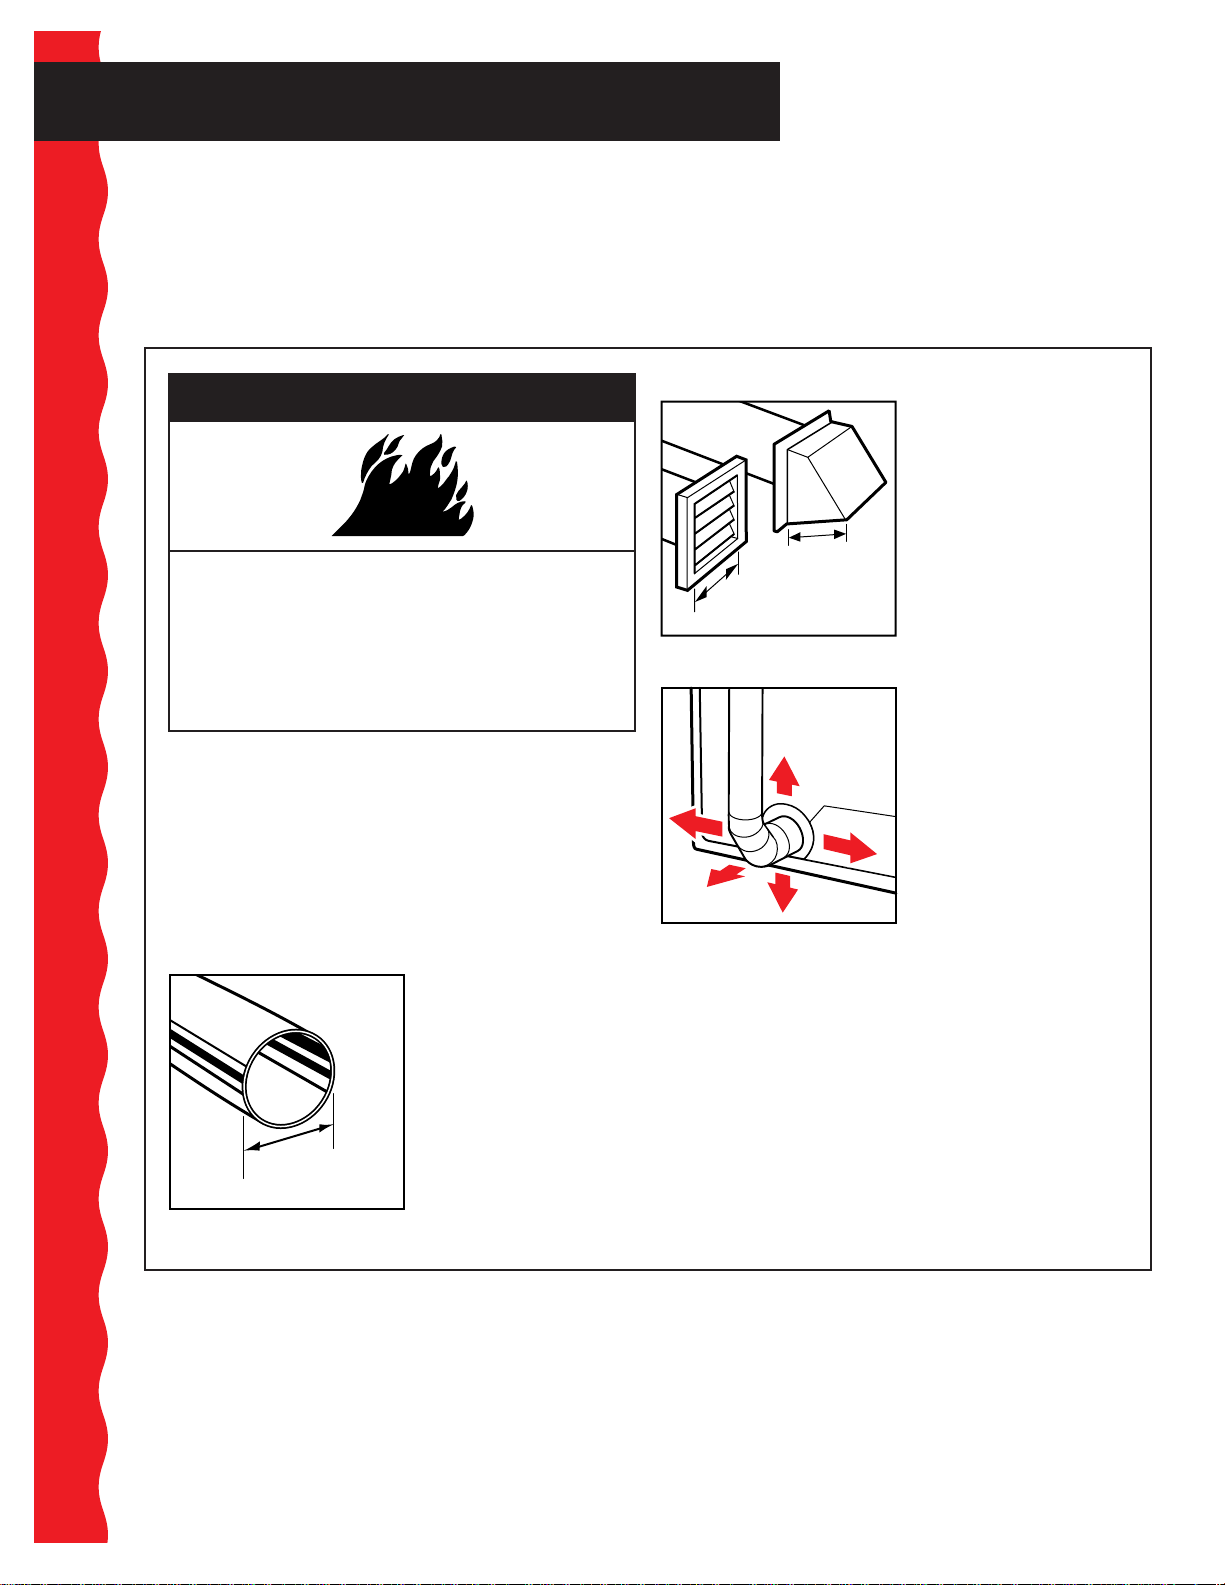
Checking Your Vent
4"
4"
Your dryer must be properly installed and vented to achieve maximum drying efficiency and shorten
drying times. Install your dryer in a well-ventilated room where the temperature is always above
45°F (7°C). Also make sure that your dryer is leveled. Refer to your Installation Instructions for more
information.
Venting
2. Use a 4" exhaust hood. Smaller hoods increase
wWARNING
Fire Hazard
Use a heavy metal vent.
Do not use a plastic vent.
Do not use a metal foil vent.
Failure to follow these instructions can result
in death or fire.
If the dryer is not properly installed and vented, it
will not be covered under the warranty.
3. The exhaust vent can be routed up, down, left,
drying times.
right, or straight out the
back of the dryer. Space
requirements are listed
in your Installation
Instructions.
NOTE: Service calls caused by improper venting
will be paid for by the customer, whether it was a
paid installation or self-installed. For paid installation, call the company that installed the vent for
adjustment.
1. Four-inch heavy metal or flexible metal vent must
be used. Do not use
plastic vent or flexible
metal foil vent. Do not
kink or crush flexible
metal vent. It must be
completely extended to
allow adequate exhaust
air to flow. Check vent
4"
length requirements of vent.
after installation. Refer
to your Installation
Instructions for proper
6
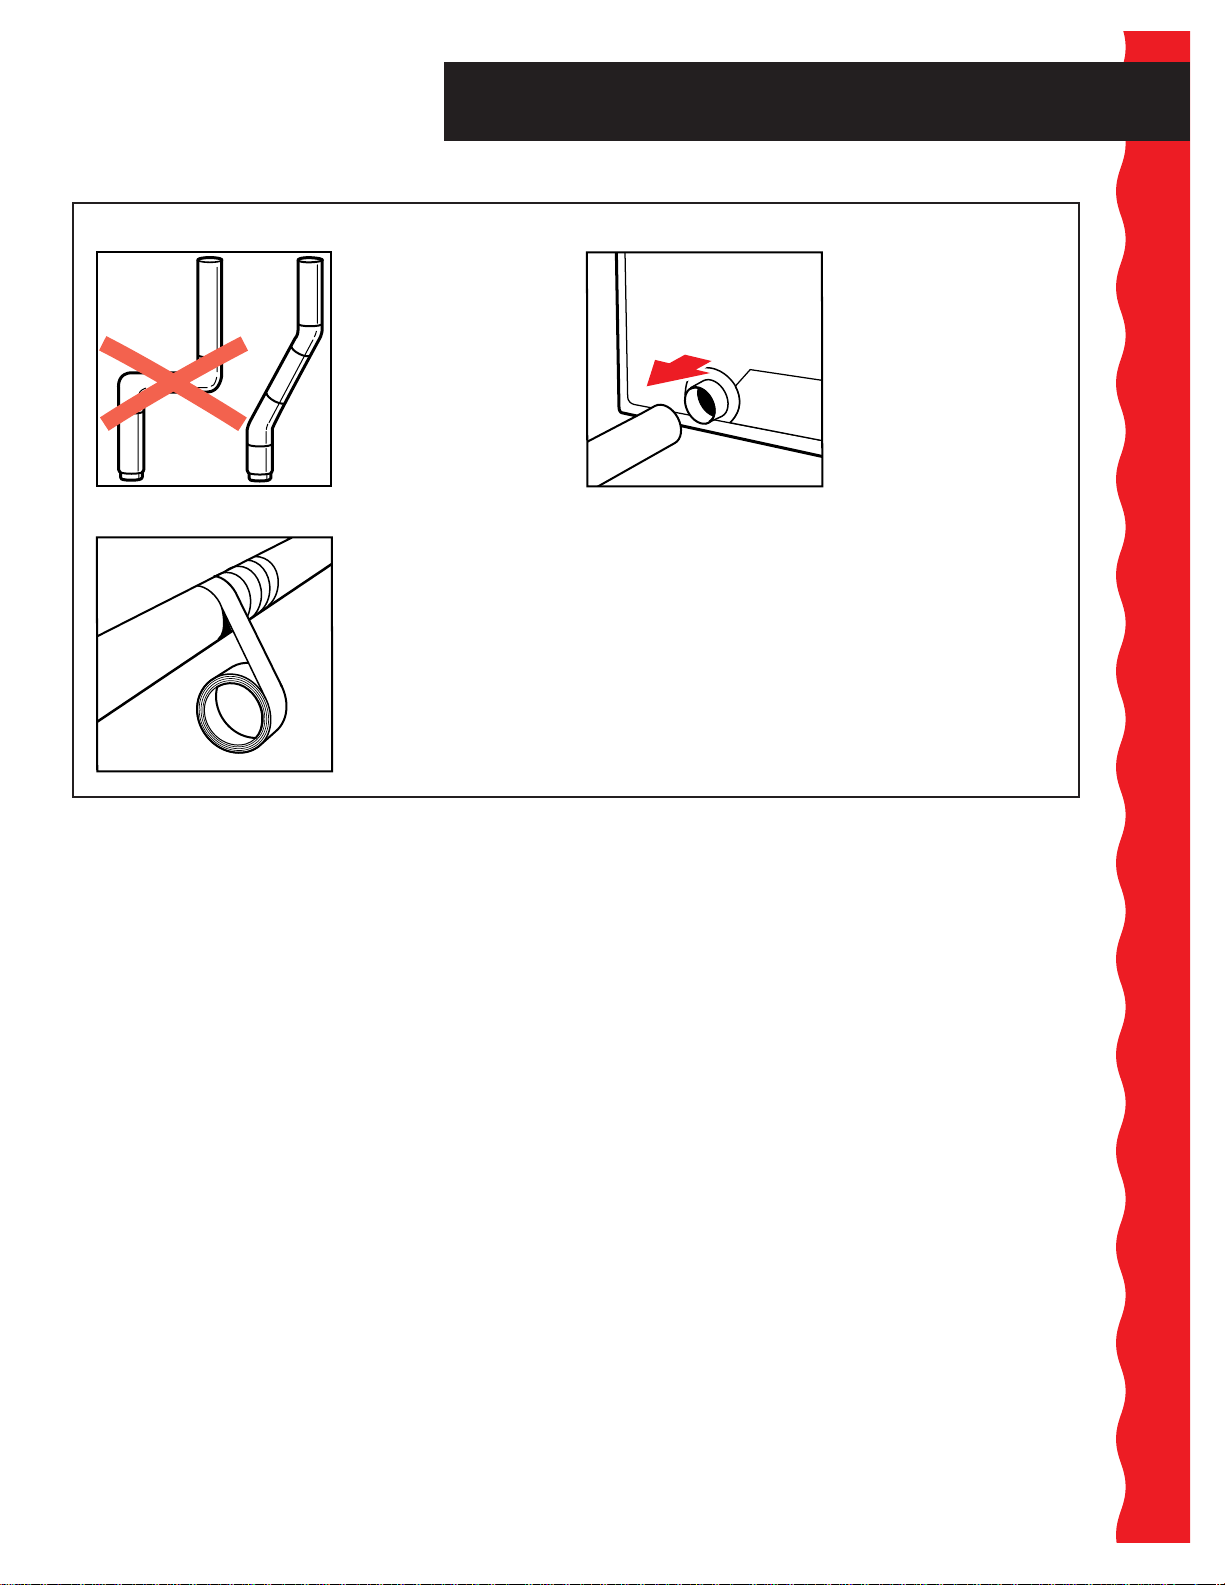
Venting (cont.)
Checking Your Vent
4. Use the straightest path possible when routing the
exhaust vent. Avoid 90°
turns, if possible. Allow
room when using
elbows or making turns.
Bend vent gradually to
avoid kinking.
5. Use duct tape to seal all joints. Do not use screws
to secure vent. Lint may
catch on screws.
6. Clean exhaust vent periodically, depending on use,
but at least every 2 years,
or when installing your
dryer in a new location.
• Disconnect vent from
the dryer and clean one
section at a time until
you reach the exhaust
hood.
• Use the hose attach-
ment on your vacuum,
or a pole or wire with a
feather duster or rag attached, to clean out lint.
• Be sure the flapper on the outside end of vent
moves freely.
• When cleaning is complete, be sure to follow the
Installation Instructions supplied with your dryer
for final product check.
7
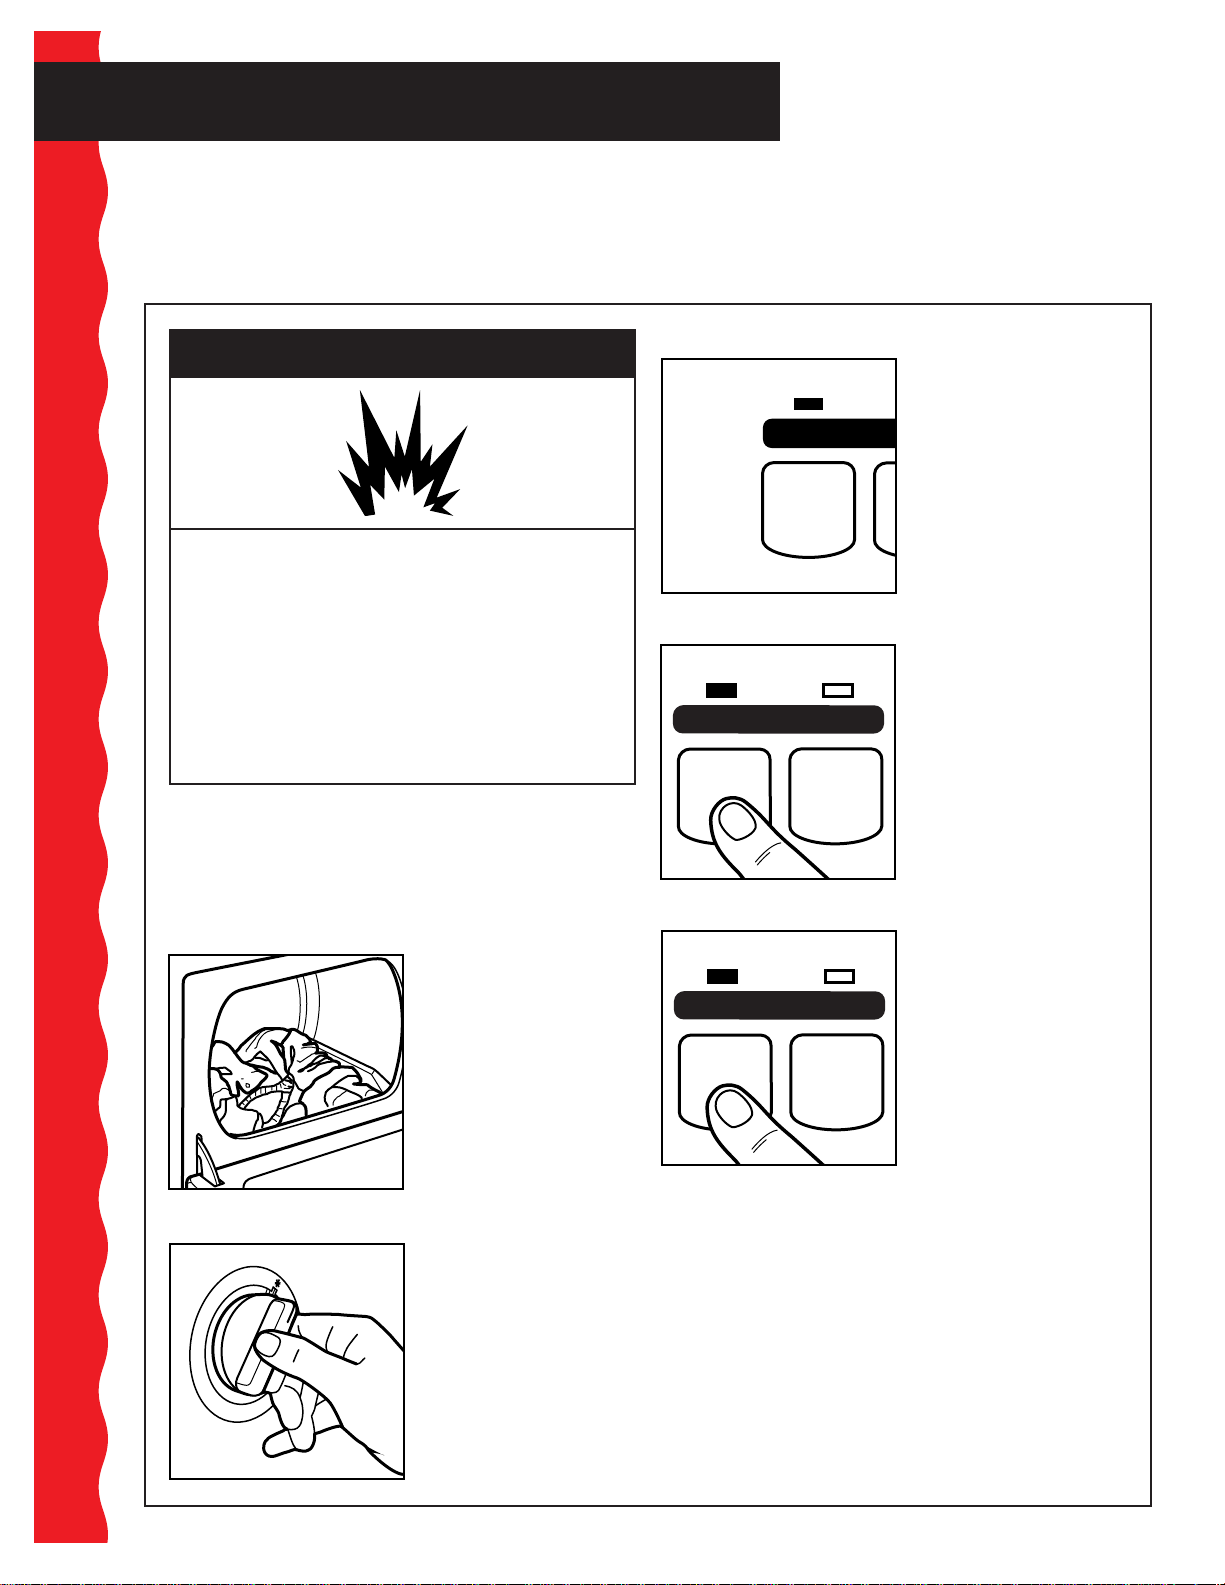
Operating Your Dryer
PE
To get the best dryer results possible, you must use your dryer correctly. This section tells you how to
use your dryer properly and efficiently.
Starting your dryer
3. Set the Temperature selector to the recommended
wWARNING
Explosion Hazard
Never place items in the dryer that are
dampened with gasoline or other
flammable fluids.
No washer can completely remove oil.
Do not dry anything that has ever had any
type of oil on it (including cooking oils).
Doing so can result in death, explosion,
or fire.
Before using your dryer, wipe the dryer drum with a
damp cloth to remove dust from storing and shipping.
If your dryer has a Consumer Buy Guide, remove it
and place it with this Use and Care Guide.
1. Load clothes loosely into the dryer and close the
door. Do not pack the
dryer; allow space for
clothes to tumble freely.
TEM
TEMP
4. (OPTIONAL STEP) Set the Cycle Signal selector to
LOW
CYCLE SIGNAL
ON
5. (OPTIONAL STEP) Your dryer has an Extra Care
OFF
EXTRA CARE
ON
OFF
setting for the type of
fabric being dried.
The cycle descriptions
on pages 10-12 include
temperature setting
suggestions.
On if you want the dryer
to sound a signal when a
cycle is finished. The
signal is helpful when you
are drying permanent
press, synthetics, and
other items that should
be removed from the
dryer as soon as it stops.
feature to protect your
clothing from wrinkling
once the dryer stops.
• On models KEYS777E
and KGYS777E, set the
Extra Care selector to Off
if you want the dryer to
stop after cool-down.
(See page 10.)
2. Turn the Cycle Control Knob to the recommended
cycle for the type of load
being dried, as described on pages 10-12.
• Use the Energy
Preferred Automatic
Setting (*) in the Regular/Heavy cycle to dry
most heavyweight and
mediumweight loads.
8
 Loading...