

KitchenAid KES0503CA User Manual

NESPRESSO BY KITCHENAID
We’re committed to helping you
create a lifetime of delicious meals
for family and friends. To help ensure
the longevity and performance of your
appliance, keep this guide handy. It will
empower you with the best way to
use and care for your product. Your
satisfaction is our #1 goal. Remember
to register your product online at
www.kitchenaid.com or by mail
using the enclosed Product
Registration Card.
Nespresso is a unique system creating
the perfect espresso, time after time.
All Nespresso machines are equipped
with a unique system that guarantees
up to 19 bar pressure. Each parameter
has been calculated with great
precision to ensure that all aromas
from each Grand Cru can be extracted,
to give the coffee body and create an
exceptionally thick and smooth crema.
Join us in the kitchen at www.kitchenaid.com.
and www.nespresso.com/kitchenaid.
USA: 1.800.541.6390
Canada: 1.800.807.6777
For coffee capsule and Aeroccino (KES0504 only) questions, or for weekend calls,
2
please contact Nespresso at 1.800.562.1465 (USA) or 1.855.325.5781 (Canada).
nespresso.com/kitchenaid
KES0503
KES0504
KitchenAid.com
KitchenAid.ca

ESPRESSO MACHINE INSTRUCTIONS
TABLE OF CONTENTS
ESPRESSO MACHINE SAFETY
Important safeguards .......................................................................................... 4
Electrical requirements ...................................................................................... 7
PARTS AND FEATURES
Parts and accessories .......................................................................................... 8
ASSEMBLING THE ESPRESSO MACHINE
Preparing the Espresso Machine for use ............................................................ 9
OPERATING THE ESPRESSO MACHINE
Preheating ......................................................................................................... 10
Brewing espresso ............................................................................................. 11
Automatic standby mode ................................................................................. 12
CARE AND CLEANING
Cleaning the Espresso Machine ........................................................................ 13
Emptying the Espresso Machine ....................................................................... 14
Descaling .......................................................................................................... 15
TROUBLESHOOTING ......................................................................................... 17
WARRANTY AND SERVICE ............................................................................... 18
English
PROOF OF PURCHASE & PRODUCT REGISTRATION
Always keep a copy of the itemized sales receipt showing the date of purchase of your
Espresso Machine. Proof of purchase will assure you of in-warranty service. Before you
use your Espresso Machine, please ll out and mail your product registration card packed
with the unit, or register online at www.kitchenaid.com. This card will enable us to contact
you in the unlikely event of a product safety notication and assist us in complying with the
provisions of the Consumer Product Safety Act. This card does not verify your warranty.
Please complete the following for your personal records:
Model Number ______________________________________________________________________
Serial Number ______________________________________________________________________
Date Purchased _____________________________________________________________________
Store Name ________________________________________________________________________
3
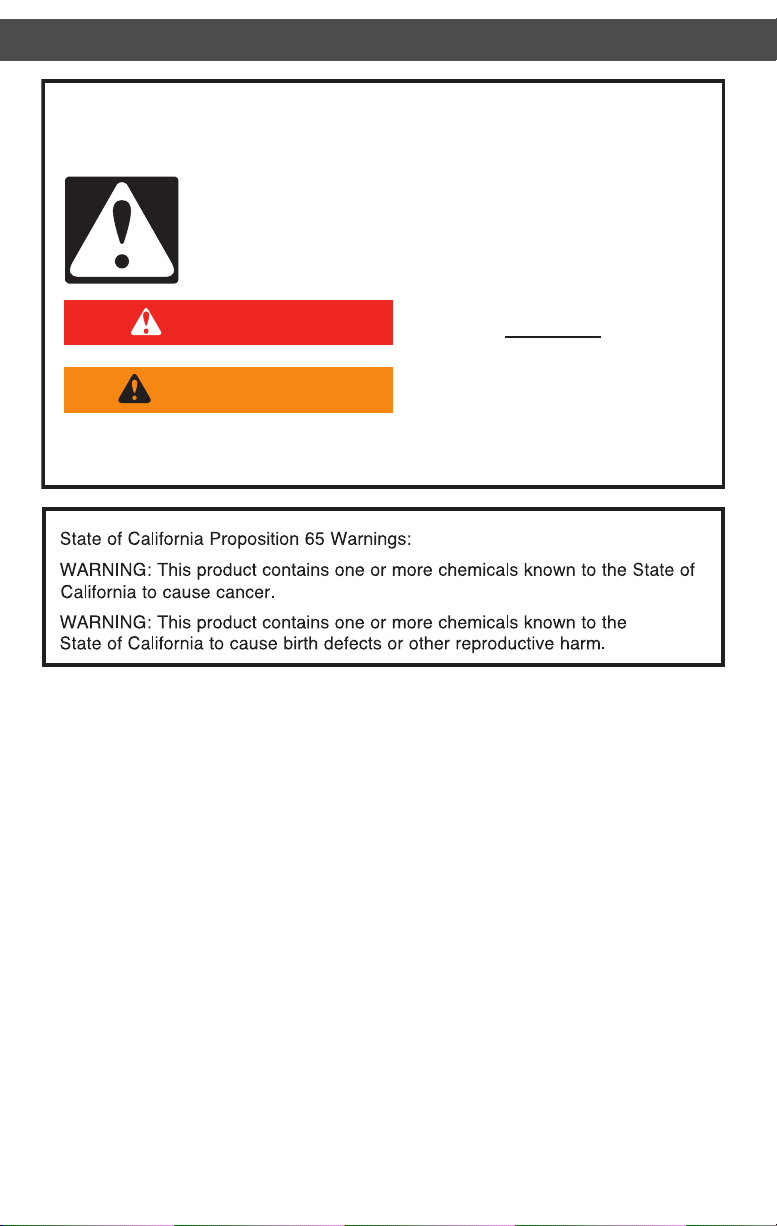
Your safety and the safety of others are very important.
We have provided many important safety messages in this manual and on your
appliance. Always read and obey all safety messages.
This is the safety alert symbol.
This symbol alerts you to potential hazards that can kill or hurt you
and others.
All safety messages will follow the safety alert symbol and either the
word “DANGER” or “WARNING.” These words mean:
You can be killed or seriously injured
DANGER
WARNING
All safety messages will tell you what the potential hazard is, tell you how to reduce
the chance of injury, and tell you what can happen if the instructions are not followed.
if you don't immediately follow
instructions.
You can be killed or seriously injured
if you don't follow instructions.
IMPORTANT SAFEGUARDS
When using electrical appliances, basic safety precautions should always
be followed, including the following:
1. Read all instructions.
2. Do not touch hot surfaces. Use handles or knobs.
3. To protect against re, electric shock and personal injury do not immerse cord,
plugs, or appliance in water or other liquids.
4. Close supervision is necessary when any appliance is used by or near children.
Keep appliance, capsules and accessories out of the reach of children.
5. Unplug from outlet when not in use, before cleaning and before servicing.
Allow to cool before putting on or taking off parts, and before cleaning.
6. Do not operate any appliance with a damaged cord or plug, or after appliance
malfunctions or has been damaged in any manner. Return the appliance to the
nearest authorized service center for examination, repair or adjustment.
7. The use of accessory attachments not recommended by the appliance
manufacturer may result in re, electric shock, or personal injury.
8. Do not use outdoors.
9. Do not let cord hang over edge of table or counter, or touch hot surfaces.
10. Do not place on or near a radiator, hot gas or electric burner, in a heated oven,
open ame, or similar.
4

ESPRESSO MACHINE SAFETYESPRESSO MACHINE SAFETY
11. This product is designed for indoor household use only. Not designed for
commercial use.
12. The safety precautions are part of the appliance. Read them carefully before
using your new appliance for the rst time. Keep them in a place where you
can nd and refer to them later on.
13. The appliance is intended to prepare beverages according to
these instructions.
14. Do not use the appliance for any use other than the intended use.
15. This appliance has been designed for indoor, non-extreme temperature
conditions use only.
16. Protect the appliance from direct sunlight, prolonged splashes and humidity.
17. This appliance is intended to be used in households and similar applications
only such as: staff kitchen areas in shops, ofces and other working
environments; by clients in hotels, motels and other residential type
environments; bed and breakfast type environments.
18. This appliance may be used by persons with reduced physical, sensory
or mental capabilities, or whose experience or knowledge is not sufcient,
provided they are supervised or have received instruction to use the device
safely and understand the dangers. Children should not use the device
as a toy.
19. The manufacturer accepts no responsibility and the warranty will not apply
for any commercial use, inappropriate handling or use of the appliance,
any damage resulting from use for other purposes, faulty operation, nonprofessional repair or failure to comply with the instructions.
Avoid risk of fatal electric shock and re
20. In case of an emergency: immediately remove the plug from
the power socket.
21. Only plug the appliance into suitable, easily accessible, grounded
mains connections.
22. The appliance must only be connected after installation.
23. Make sure that the voltage of the power source is the same as that specied
on the rating plate.
24. The use of an incorrect connection voids the warranty.
25. Do not pull the cord over sharp edges, clamp it or allow it to hang down.
26. Keep the cord away from heat and moisture.
27. To disconnect, turn any control to off, then remove the plug from the outlet.
28. To avoid hazardous damage, never place the appliance on or beside hot
surfaces such as radiators, stoves, ovens, gas burners, open ames,
or similar.
29. Always place the appliance on a horizontal, stable and even surface.
30. The surface must be resistant to heat and uids such as water, coffee,
descaling agent or similar.
31. Disconnect the appliance from the mains when not in use for a long period.
32. Disconnect by pulling out the plug and not by pulling the cord itself or the
cord may become damaged.
33. Never touch the cord with wet hands.
34. Never put the appliance or part of it in a dishwasher.
35. Electricity and water together are dangerous and can lead to
fatal electric shocks.
English
5

36. Do not open the appliance; dangerous voltage inside.
37. Do not dismantle the appliance.
38. Do not put anything into any openings; doing so may cause re
or electric shock!
39. The appliance has a polarized plug (one blade is wider than the other). To
reduce the risk of electric shock, this plug is intended to t into a polarized
outlet only one way. If the plug does not t fully into the outlet, reverse the
plug. If it still does not t, contact a qualied electrician. Do not attempt to
modify the plug in any way.
40. Do not use an extension cord. If the power supply cord is too short, have a
qualied electrician or serviceman install an outlet near the appliance.
Avoid possible harm when operating the appliance
41. Never leave the appliance unattended during operation.
42. Do not use the appliance if it is damaged or not operating perfectly.
Immediately remove the plug from the power socket. Contact the Nespresso
Club for examination, repair or adjustment. A damaged appliance can cause
electric shocks, burns and re.
43. Always close the lever completely and never lift it during operation; scalding
may occur.
44. Do not put ngers under coffee outlet, risk of scalding.
45. Do not put ngers into the capsule compartment or capsule shaft;
danger of injury!
46. Water could ow around a capsule when not perforated by the blades and
damage the appliance.
47. Never use a damaged or deformed capsule.
48. If a capsule is stuck in the capsule compartment, turn the machine off and
unplug it before any operation; call the Nespresso Club.
49. Fill the water tank only with fresh and drinkable water.
50. Do not overll water tank.
51. Empty water tank if the appliance will not be used for an extended time
(holidays, etc.).
52. Replace water in water tank when the appliance is not operated during a
weekend or a similar period of time.
53. Do not use the appliance without the drip tray and drip grid to avoid spilling
any liquid on surrounding surfaces.
54. Do not use any strong cleaning agent or solvent cleaner.
55. Use a damp cloth and mild cleaning agent to clean the surface
of the appliance.
56. Do not use a steam or pressure cleaner to clean the appliance; this may
damage the appliance to the point of creating a life-threatening hazard.
57. To clean machine, use only clean cleaning tools.
58. When unpacking the machine, remove the plastic lm on the drip grid
and dispose.
59. This appliance is designed for Nespresso coffee capsules available exclusively
through the Nespresso Club or your Nespresso authorized representative.
60. All KitchenAid appliances pass stringent controls.
6
ESPRESSO MACHINE SAFETYESPRESSO MACHINE SAFETY
61. Reliability tests under practical conditions are randomly performed
on selected units.
62. Some units can therefore show traces of previous use.
63. KitchenAid reserves the right to change instructions without prior notice.
Descaling
64. Nespresso descaling agent, when used correctly, helps to ensure the proper
functioning of your machine over its lifetime and that your coffee experience is
as perfect as on the rst day. For the correct amount and procedure to follow,
consult the user manual included in the Nespresso descaling kit.
CAUTION: the descaling solution can be harmful. Avoid contact with eyes, skin and
surfaces. Never use any product other than the Nespresso descaling kit available
at the Nespresso Club to avoid damage to your machine. Be careful not to use
other products (vinegar type) that leave a taste to coffee. The table will indicate the
descaling frequency required for the optimum performance of your machine, based
on water hardness (see Descaling section). For any additional questions you may
have regarding descaling, please contact your Nespresso Club.
SAVE THESE INSTRUCTIONS
Pass them on to any subsequent user.
This Instruction Manual is also available as a PDF
at nespresso.com and kitchenaid.com.
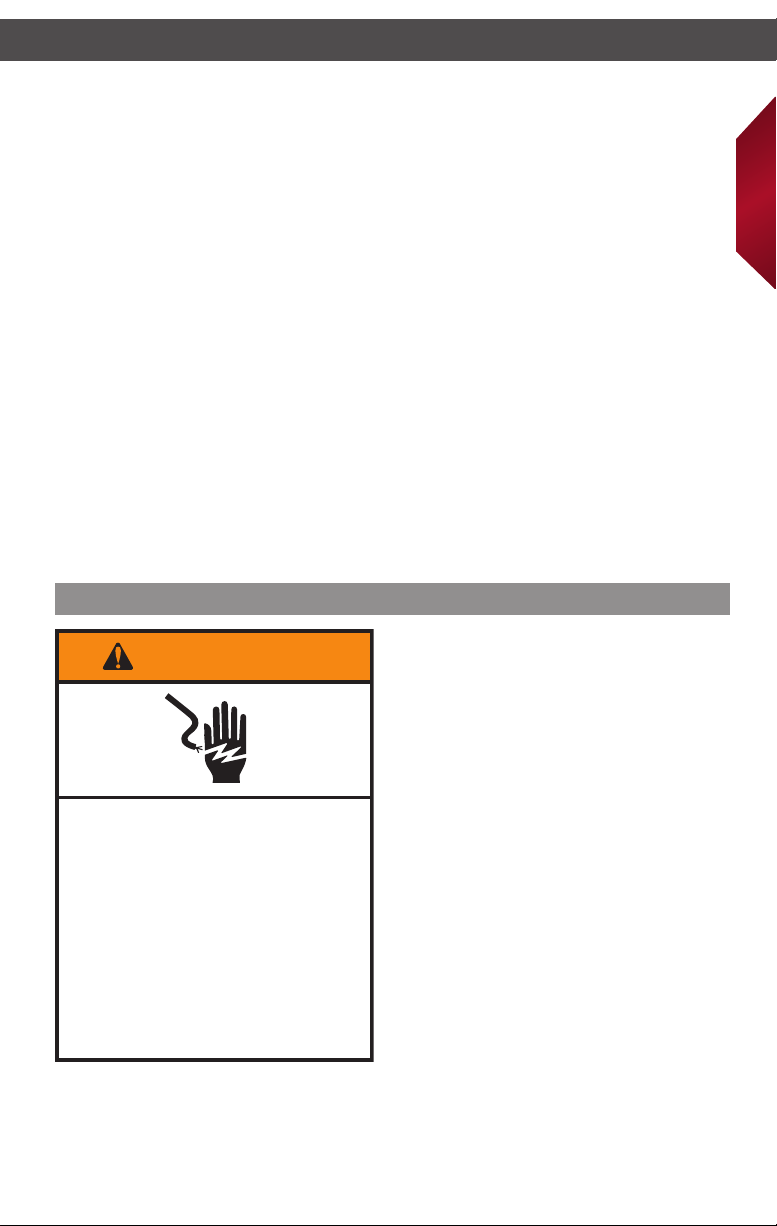
Electrical requirements
English
WARNING
Electrical Shock Hazard
Plug into a grounded 3 prong
outlet.
Do not remove ground prong.
Do not use an adapter.
Do not use an extension cord.
Failure to follow these
instructions can result in
death, fire, or electrical shock.
Voltage: 120 Volts
Frequency: 60 Hertz
NOTE: If the plug does not fit in the
outlet, contact a qualified electrician.
Do not modify the plug in any way.
Do not use an adapter.
Do not use an extension cord. If the
power supply cord is too short, have
a qualified electrician or serviceman
install an outlet near the appliance.
7
PARTS AND FEATURES
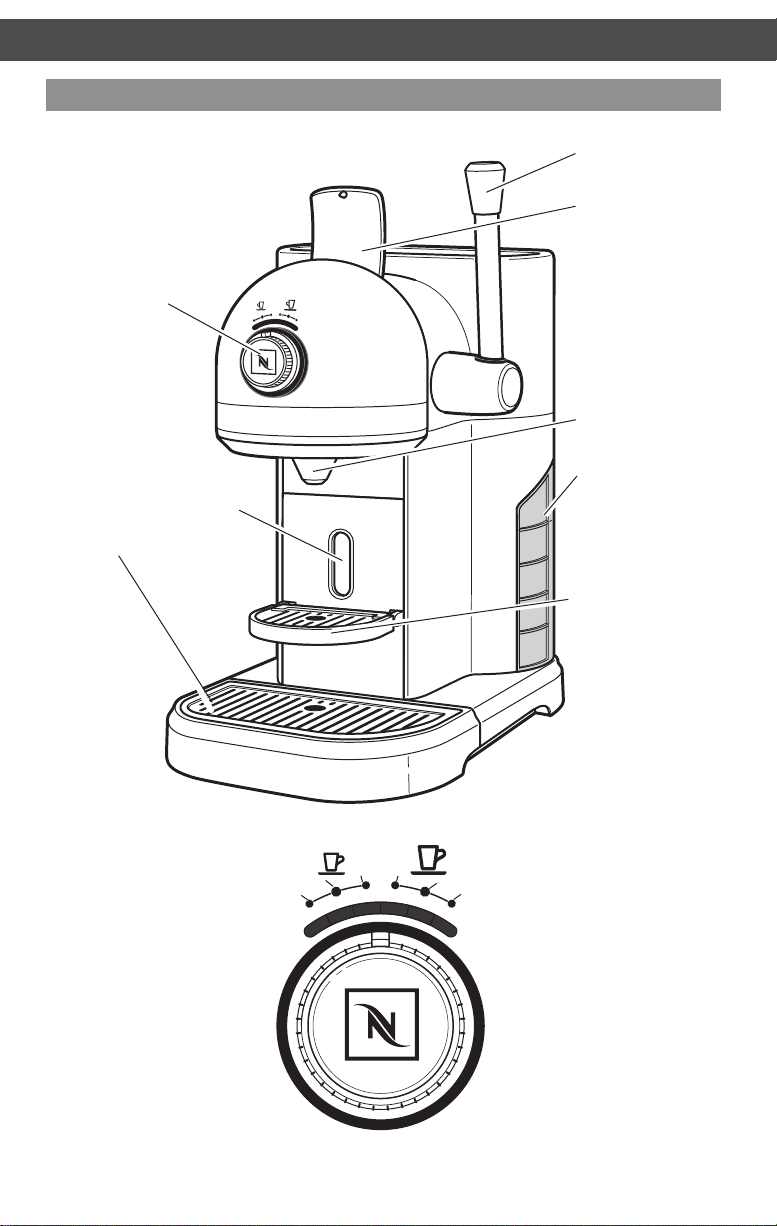
Parts and accessories
Brewing
button/ Selection dial
(see details below)
Handle
Capsule door
(use handle to open)
Espresso spout
Maintenance unit:
Capsule disposal container
(not shown)
Drip grid
SELECTION DIAL Settings
1: 25 ml / 0.8 oz (ristretto)
2: 40 ml /1.35 oz (espresso)
3: 60 ml / 2 oz
4: 90 ml / 3 oz
5: 110 ml / 3.7 oz (lungo)
6: 130 ml / 4.4 oz
Water tank
Cup holder
SPECIAL FUNCTION Settings
4
3
2
1
1: Automatic standby: 15 min.
5
6
2: Automatic standby: 20 min.
3: Automatic standby: 30 min.
4: Descaling function
5: Emptying function
6: Return to factory settings
8
Preparing the Espresso Machine for rst use
WARNING
Electrical Shock Hazard
Plug into a grounded 3 prong
outlet.
Do not remove ground prong.
Do not use an adapter.
Do not use an extension cord.
Failure to follow these
instructions can result in
death, fire, or electrical shock.
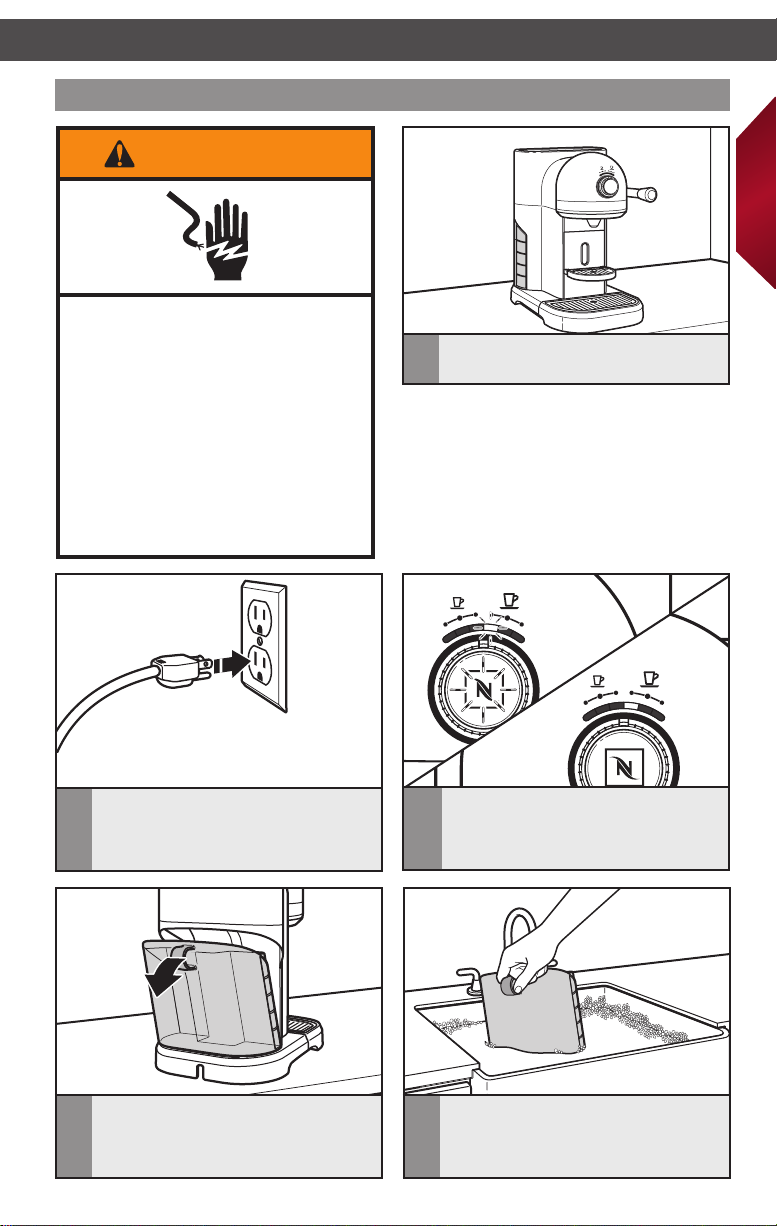
Place the Espresso Machine on a clean,
1
dry, level surface.
English
Plug the cord into a grounded 3 prong
2
outlet.
Tip the water tank slightly, then
4
remove by pulling the water tank
out from the Espresso Machine.
When the Espresso Machine is turned
3
on, the LED will flash as it warms up.
When the machine is ready, the LED
will glow continuously.
Wash the water tank in hot, soapy
5
water and rinse with clean water. Dry
with a soft cloth. The water tank cannot
be washed in the dishwasher.
9

ASSEMBLING THE ESPRESSO MACHINE
Fill the water tank with fresh, cold,
6
drinking water (the water level should
be at or below the “max” fill line).
NOTE: Press water tank in until it snaps completely into place to assure proper function.
Place the water tank back on the
7
Espresso Machine.
x 3
Before brewing espresso for the first
8
time, make sure to run plain water
through the Espresso Machine, on the
“lungo” setting three times.
OPERATING THE ESPRESSO MACHINE
Preheating
NOTE: You can change your desired
volume selection while the Espresso
Machine is heating up. When you do
this, the LED bar will no longer ash,
but remains lit over the selected
portion size and the brew button
continues to ash while the Espresso
Machine heats up. Press the brew button.
Once the correct temperature is reached,
the brew cycle will start on its own.
When the Espresso Machine is turned
1
on, the LED will flash as it warms up.
When the machine is ready, the LED
will glow continuously.
10
OPERATING THE ESPRESSO MACHINE
Brewing espresso
English
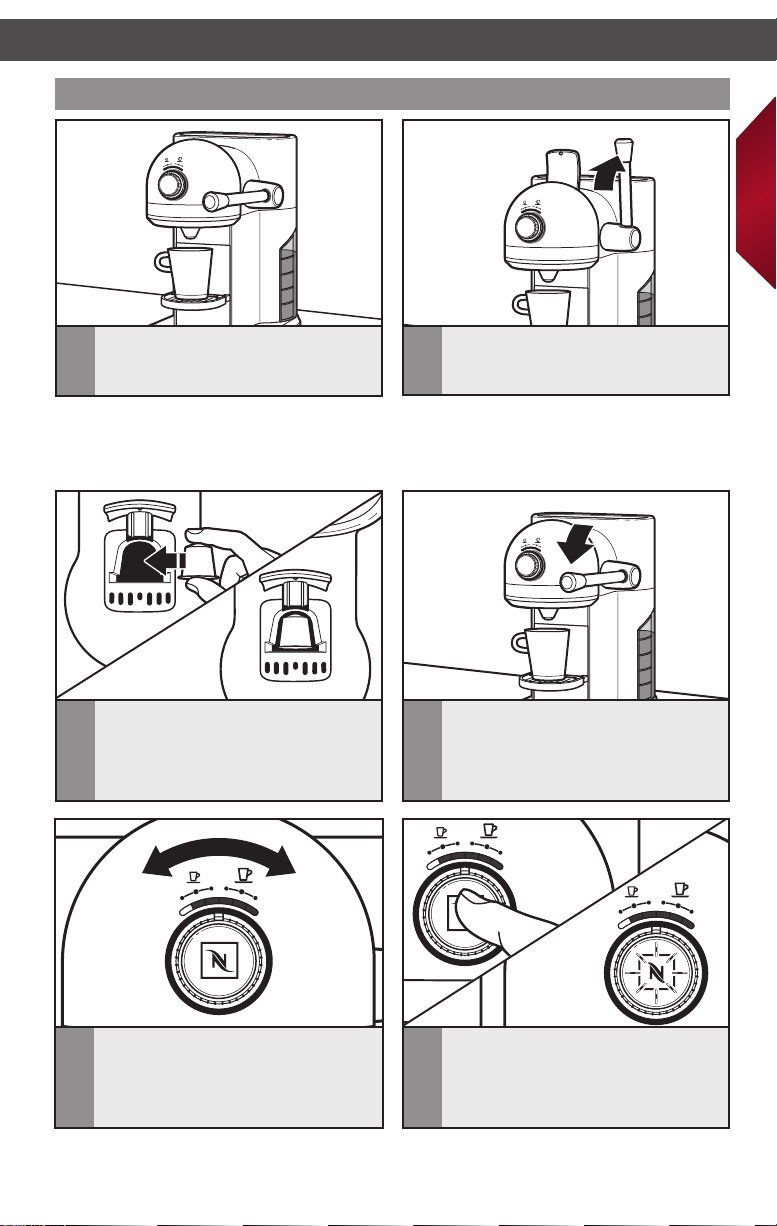
Place your cup on the cup holder.
1
NOTE: To avoid damage and injury due to hot vapor when brewing, open the capsule
door ONLY by the handle 3 seconds after the brewing cycle has completed. Never try
to pull up the capsule door with your fingers.
Select the capsule you want to use.
3
Hold the capsule as shown, with the
foil cap facing towards you, and drop
into the capsule loading compartment
on top of the machine.
Lift the handle to raise the lid on the
2
capsule loading compartment to its
fully upright position.
Lower the handle to close the capsule
4
compartment. Make sure the handle is
rotated to a horizontal position. The
capsule loading compartment should
be fully closed.
Turn the selection dial to your desired
5
volume setting: 1: 25 ml (ristretto),
2: 40 ml (espresso), 3: 60 ml, 4: 90 ml,
5: 110 ml (lungo), or 6: 130 ml.
NOTE: When the Espresso Machine is turned on, it will automatically come on at the
setting that was selected most in the last 11 uses.
Press the brew button. The espresso
6
will begin to brew. Press the brew
button a second time if you want to
top off the cup, or if you want to stop
the brewing cycle early.
11
OPERATING THE ESPRESSO MACHINE
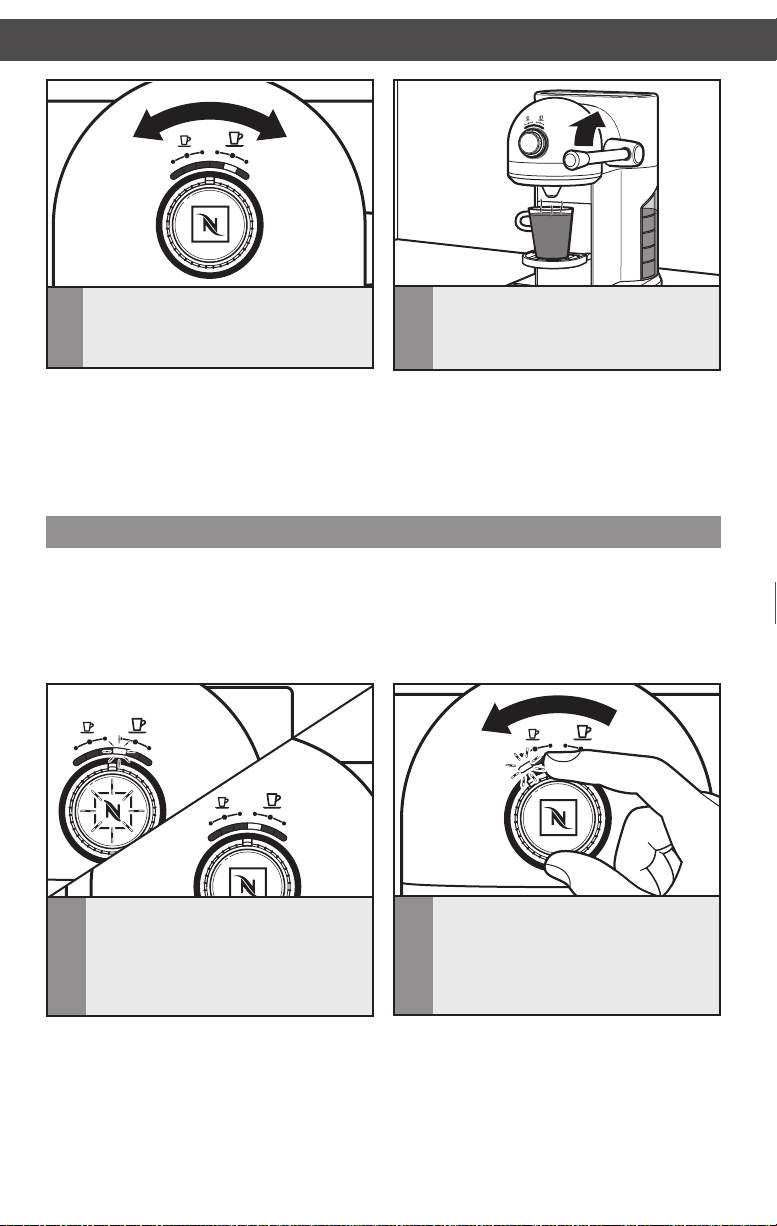
You can change your selection mid-brew
7
by turning the selection dial to a new
selection before brewing ends.
After your espresso is finished brewing,
8
lift the handle to its fully upright position
to drop the used capsule into the
disposal container.
NOTE: Eject the capsule after each
coffee or before turning off the machine.
The capsule disposal container holds up
to 14 used capsules. See the “Care and
cleaning” section for more information.
Automatic standby mode
When the Espresso Machine is plugged in, it automatically goes into stand-by mode. You
must either press the brew button or rotate the dial to wake up the Espresso Machine.
After 9 minutes of non-use, it turns to a low-consumption mode, and the heater powers off.
If you prefer to change this standby time, you can set it for 15 minutes, 20 minutes, or 30
minutes, using the following directions:
When the Espresso Machine is turned
1
on, the LED will flash as it warms up.
When the machine is ready, the LED
will glow continuously.
12
Rotate the selection dial until the light
2
is over the left most position and hold
for 6 seconds. The light will hold steady
before changing to 2 blinks per second.
The Espresso Machine is now ready to
reset the standby time.
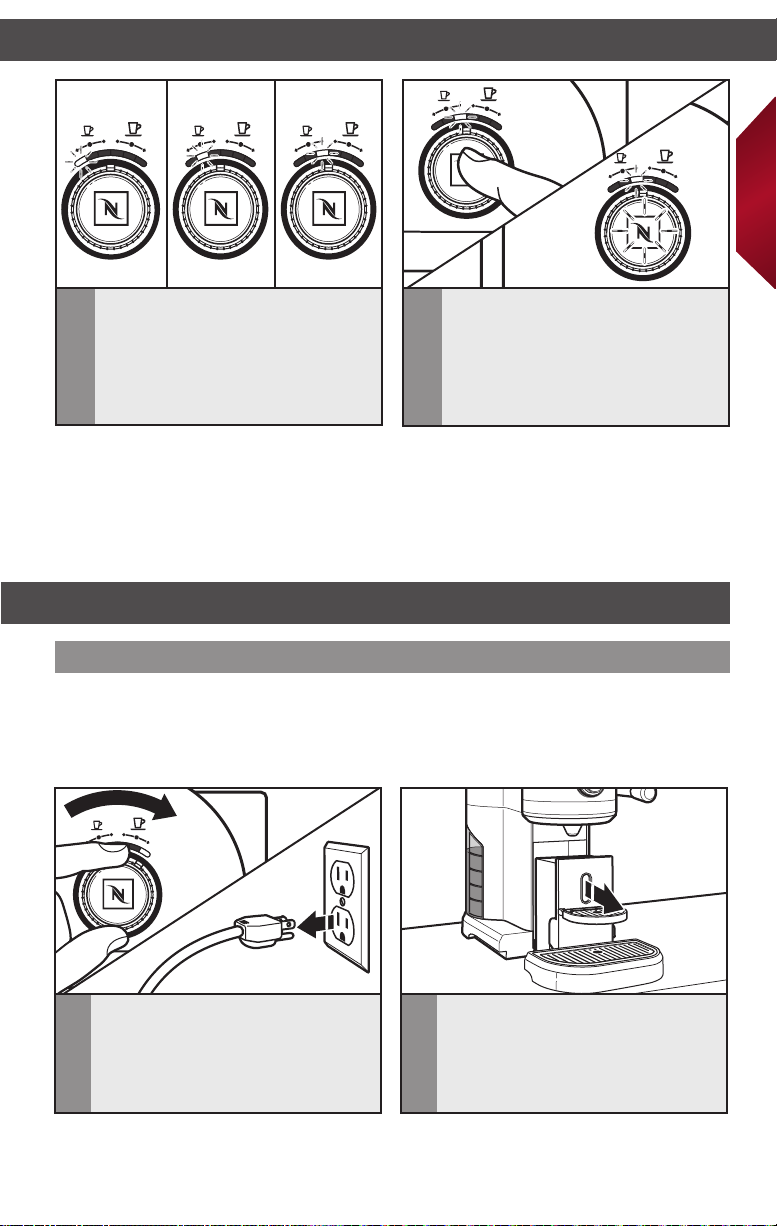
15 min. 20 min. 30 min.
English
Turn the selection dial to the left most
3
position to reset the standby time to
15 minutes; turn to the second left
position to reset the standby time to
20 minutes; or turn to the third left
position to reset the standby time to
30 minutes.
NOTE: To get back to the factory preset of 9 minutes if you have reset to another standby
time, turn the selection dial to the rst left position and hold for 6 seconds (the blinking
LED will change to 2 blinks per second). Then, rotate the selection dial to the far right
position and press the brew button. The Espresso Machine will return to factory settings
and automatically go into ready mode.
Press the brew button again. The
4
Espresso Machine will blink 3 times
to confirm that you have exited the
programming mode.
CARE AND CLEANING
Cleaning the Espresso Machine
Keeping the Espresso Machine clean is vital to brewing the best espresso possible.
Stale coffee oils will ruin the flavor of even the most expertly prepared coffee.
NOTE: Do not clean Espresso Machine with abrasive cleaners, steel wool, or other
abrasive materials.
Turn off the Espresso Machine by
1
turning the dial all the way to right and
holding it for 6 seconds. Unplug from
the wall outlet, or disconnect power.
Let the Espresso Machine, and any
attached parts or accessories, cool.
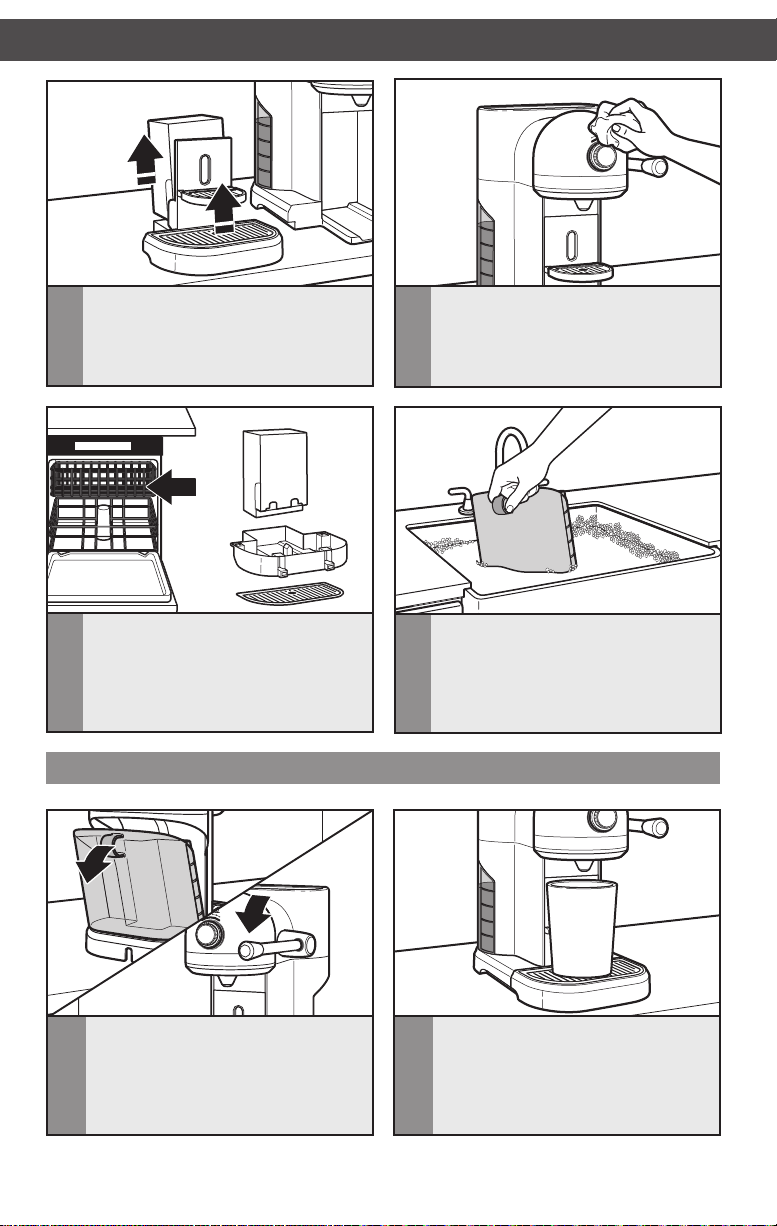
Slide the maintenance unit out from the
2
base by pulling it towards you.
13
CARE AND CLEANING
Remove and empty the capsule disposal
3
container. Then remove the drip grid
from the drip tray.
Wash the capsule disposal container,
5
drip grid, and drip tray in the top rack
of a dishwasher, or by hand in warm,
soapy water. If washing by hand, be
sure to rinse with clean water and
dry with a soft cloth.
Emptying the Espresso Machine
Wipe the Espresso Machine housing
4
with a clean damp cloth and dry with a
soft cloth. Do not use abrasive cleansers
or scouring pads when cleaning the
housing, or any part or accessory.
Wash the water tank in hot, soapy
6
water and rinse with clean water. Dry
with a soft cloth. The water tank
cannot be washed in the dishwasher.
Tip the water tank slightly, then
1
remove by pulling the water tank
out from the Espresso Machine. Make
sure the capsule compartment is fully
closed by lowering the handle to a
horizontal position.
14
Place an empty container under the
2
coffee outlet.
CARE AND CLEANING
English
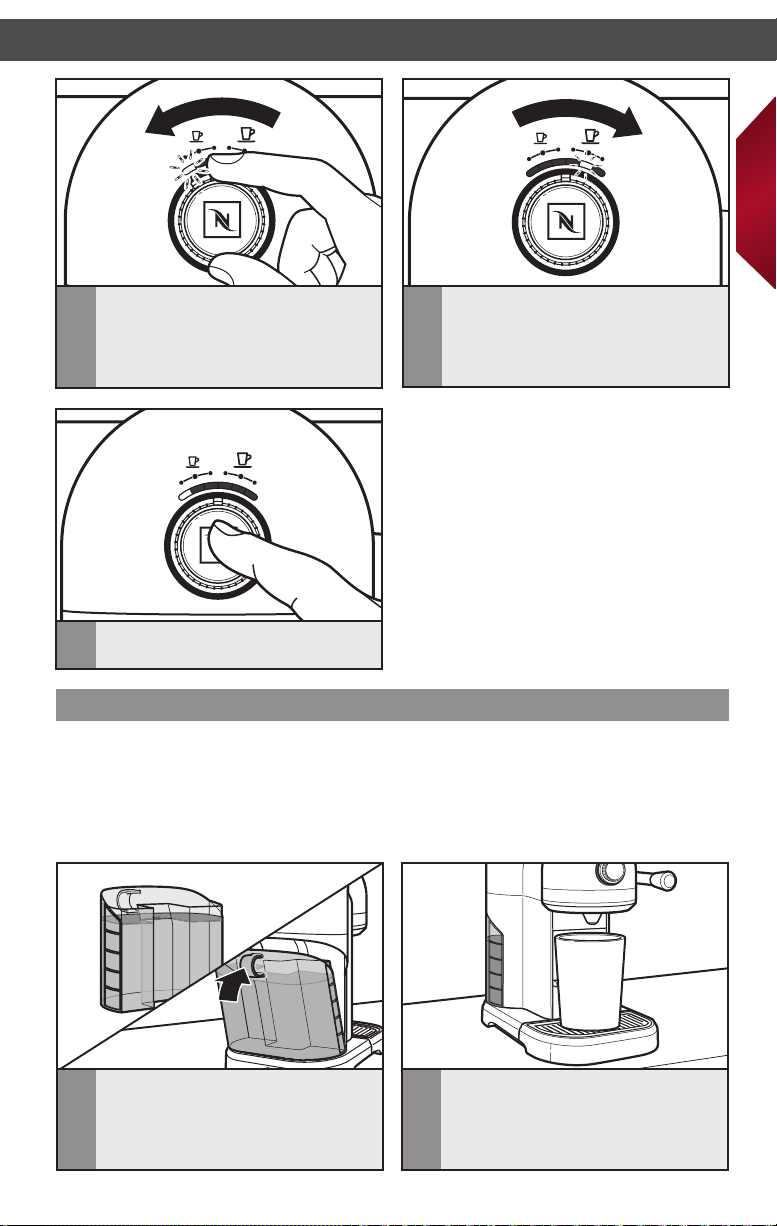
Enter the emptying mode by turning
3
the brew button to the left most
position and holding it for 6 seconds
until the light starts to blink.
Press the brew button.
5
Then rotate the selection dial until
4
the blinking light is above the middle
right position and press the brew
button. The emptying cycle will run
until the tank is empty.
NOTE: Once Espresso Machine has
emptied, allow it to cool down for 10
minutes before using.
Descaling
Calcium deposits (“scale”) from water will build up in the Espresso Machine over time
and may impair espresso quality. Scale should be removed every month; local hard-water
conditions may require more frequent descalings. Use the Nespresso brand packaged
descaling agent available online to remove scale. Follow the directions on the package.
KitchenAid does not recommend using home remedies or water and vinegar solutions
to descale the Espresso Machine.
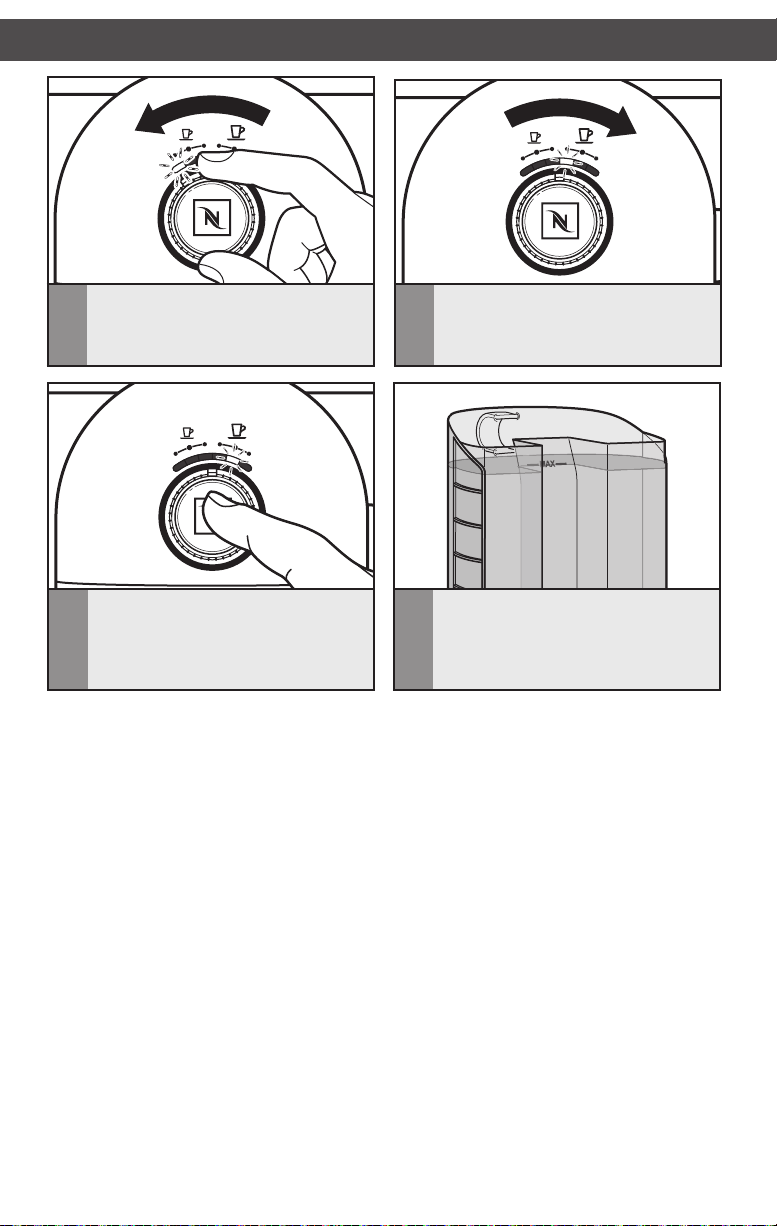
Fill the water tank with water to
1
the “max” fill line and then add the
descaling agent to tank per package
directions. Replace tank on espresso
machine.
Place an empty container under the
2
coffee outlet.
15
CARE AND CLEANING
Enter descaling mode by turning the
3
brew button to the left most position
and holding it for 6 seconds until the
light starts to blink.
Press the brew button to start descaling
5
and run until the water tank is empty.
Then rotate the selection dial until
4
the blinking light is above the first
right position.
Fill the water tank with water to the
6
“max” fill line a second time and repeat
the cycle with water only to rinse. The
Espresso Machine will automatically
proceed to ready mode when finished.
16
1. If the power on indicator remains off
and the Espresso Machine fails to heat
when the Brewing button is pressed:
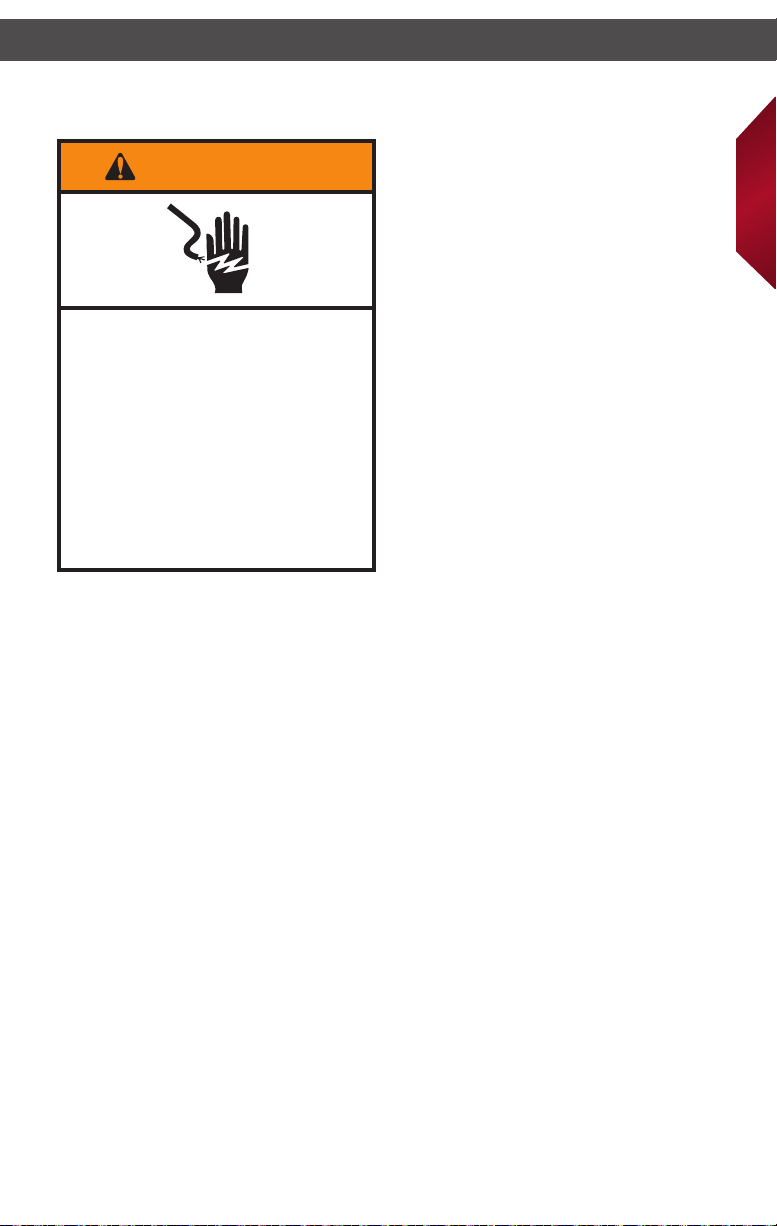
WARNING
Electrical Shock Hazard
Plug into a grounded 3 prong
outlet.
Do not remove ground prong.
Do not use an adapter.
Do not use an extension cord.
Failure to follow these
instructions can result in
death, fire, or electrical shock.
• Check to see if the Espresso Machine is
plugged into a grounded 3-prong outlet;
if it is, unplug, plug it back in, and press
the Brewing button again. If the Espresso
Machine still does not operate, check the
fuse or circuit breaker on the electrical
circuit the machine is connected to and
make certain the circuit is closed.
2. If coffee does not ow from the
spout…
• Water tank may be empty.
• Espresso Machine may need to
be descaled.
• Capsule container may need to
be emptied:
- Check to see that there is not a capsule
blocked inside the Espresso Machine.
- Check to see that the capsule was
inserted in the correct orientation.
- Check to see that the handle is
completely closed, see “Brewing
espresso” section.
NOTE: If not cleared the brew water
will ow into the capsule container to
the maintenance unit. (Lift drip grid and
check if unbrewed water is present).
3. If coffee grounds found in cup:
The handle/capsule door was opened too soon.
Wait 3 seconds after the brewing cycle has
completed before opening the capsule door.
4. If the LEDs in position 1 and 6 blink
alternately at 2 blinks per second:
• This indicates the “overheating” error
code. The lights will continue to ash until
the Espresso Machine is ready, or it enters
standby mode.
5. If the LEDs in position 1 and 6 blink
3 times alternately every 2 seconds at
two blinks per second:
• This indicates the “electronic” error code.
Allow the Espresso Machine to go into
standby mode, then check to see if the
error is still there after reactivating.
If the problem cannot be xed with the
steps above, see the “Warranty and
service” section.*
English
*DO NOT return the Espresso Machine to the retailer – they do not provide service. Please see
the “Warranty and service” section for more information.
17

KitchenAid® Espresso Machine Warranty
for the 50 United States, the District of Columbia,
Puerto Rico, and Canada
This warranty extends to the purchaser and any succeeding owner for Espresso Machines
operated in the 50 United States, the District of Columbia, Puerto Rico, and Canada.
Length of Warranty: Two Year Full Warranty from date of purchase.
KitchenAid Will Pay Hassle-Free Replacement of your Espresso Machine.
for Your Choice of: See the next page for details on how to arrange for service,
or call the Customer eXperience Center toll-free at
1-800-541-6390.
OR
The replacement parts and repair labor costs to correct
defects in materials and workmanship. Service must be
provided by an Authorized KitchenAid Service Center.
KitchenAid Will A. Repairs when Espresso Machine is used in other
Not Pay for: than normal single family home use.
B. Damage resulting from accident, alteration, misuse
or abuse.
C. Any shipping or handling costs to deliver your Espresso
Machine to an Authorized Service Center.
D. Replacement parts or repair labor costs for Espresso
Machine operated outside the 50 United States, District
of Columbia, Puerto Rico, and Canada.
DISCLAIMER OF IMPLIED WARRANTIES; LIMITATION OF REMEDIES
IMPLIED WARRANTIES, INCLUDING TO THE EXTENT APPLICABLE WARRANTIES
OF MERCHANTABILITY OR FITNESS FOR A PARTICULAR PURPOSE, ARE
EXCLUDED TO THE EXTENT LEGALLY PERMISSIBLE. ANY IMPLIED WARRANTIES
THAT MAY BE IMPOSED BY LAW ARE LIMITED TO ONE YEAR, OR THE SHORTEST
PERIOD ALLOWED BY LAW. SOME STATES AND PROVINCES DO NOT ALLOW
LIMITATIONS OR EXCLUSIONS ON HOW LONG AN IMPLIED WARRANTY
OF MERCHANTABILITY OR FITNESS LASTS, SO THE ABOVE LIMITATIONS OR
EXCLUSIONS MAY NOT APPLY TO YOU.
IF THIS PRODUCT FAILS TO WORK AS WARRANTED, CUSTOMER’S SOLE AND
EXCLUSIVE REMEDY SHALL BE REPAIR OR REPLACEMENT ACCORDING TO THE
TERMS OF THIS LIMITED WARRANTY. KITCHENAID AND KITCHENAID CANADA
DO NOT ASSUME ANY RESPONSIBILITY FOR INCIDENTAL OR CONSEQUENTIAL
DAMAGES. This warranty gives you specic legal rights and you may also have other
rights which vary from state to state or province to province.
18
 Loading...