

KitchenAid KEMC307KSS03, KEMC308KBL0, KEMC308KBL02, KEMC308KBT01, YKEMC308KM02 Owner’s Manual
...
Kitchen_kid _
BUILT-IN ELECTRIC CONVECTION OVEN
i!llii_,,:_,_,::?,,i!!!ii:i_:Ci_i:__!_i_:?_iiiilliii:i¸v_iiiCi!i!ii_::!!_
For questions about features, operation/performance, parts accessories or service, call: 1-800-422-1230
In Canada, call for assistance 1-800-461-5681, for installation and service, call: 1-800-807-6777 or visit our website at...
www.kitchenaid.com or www. KitchenAid.ca
Table of Contents .................................................................................................. 2
Models KEMC307 KEMC308 KEMC377 KEMC378 YKEMC307 YKEMC308
4456573
TABLE OF CONTENTS
OVEN SAFETY ............................................................................ 3
PARTS AND FEATURES ............................................................ 5
ELECTRONIC OVEN CONTROL ................................................ 6
Display(s) ...................................................................................... 6
Start .............................................................................................. 6
Lower Oven Cancel ...................................................................... 6
Clock ............................................................................................ 6
Tones ............................................................................................ 7
Fahrenheit and Celsius ................................................................. 7
Timer ............................................................................................. 7
Control Lock ................................................................................. 8
Oven Temperature Control .......................................................... 8
OVEN USE ....................................................................................... 8
Aluminum Foil............................................................................... 8
Positioning Racks and Bakeware ................................................ 8
Bakeware ...................................................................................... 9
Oven Vent ..................................................................................... 9
Baking and Roasting .................................................................... 9
Broil Maxi/Econo ........................................................................ 10
Convection Cooking ................................................................... 11
Convection Bake ........................................................................ 11
Convection Roast ....................................................................... 11
Convection Broil ......................................................................... 13
Convect Full Meal ...................................................................... 13
EasyConvect TM Conversion ....................................................... 14
Sabbath Mode ............................................................................ 15
Dehydrating ................................................................................ 16
Proofing Bread ........................................................................... 16
Temperature Probe .................................................................... 16
Timed Cooking ........................................................................... 18
OVEN CARE .................................................................................. 19
Self-Cleaning Cycle .................................................................... 19
General Cleaning ........................................................................ 20
Oven Lights ................................................................................ 21
Oven Door .................................................................................. 21
TROUBLESHOOTING .................................................................. 22
ASSISTANCE OR SERVICE ......................................................... 23
WARRANTY .............................................................................. 24
OVEN SAFETY
Your safety and the safety of others are very important.
We have provided many important safety messages in this manual and on your appliance. Always read and obey all
safety messages.
This symbol alerts you to potential hazards that can kill or hurt you and others.
All safety messages will follow the safety alert symbol and either the word "DANGER" or
This is the safety alert symbol.
"WARNING." These words mean:
You can be killed or seriously injured if you don't
immediately follow instructions.
You can be killed or seriously injured if you don't
follow instructions.
All safety messages will tell you what the potential hazard is, tell you how to reduce the chance of injury, and tell you
what can happen if the instructions are not followed.
iMPORTANT SAFETY iNSTRUCTiONS
WARNmNG: To reduce the risk of fire, eUectrbaU
shock, injury to persons, or damage when using the
oven, follow basic precautions, including the following:
m Proper installation - Be sure the oven is properUy
installed and grounded by a qualified technician,
m Never Use the Oven for Warming or Heating the
Room,
m Do Not Leave Children Alone - Children should not
be left alone or unattended in area where oven is in
use, They should never be allowed to sit or stand
on any part of the oven,
m Wear Proper Apparel - Loose-fitting or hanging
garments should never be worn while using the oven,
m User Servicing - Do not repair or replace any part of
the oven unless specifically recommended in the
manual, All other servicing should be referred to a
qualified technician,
m Storage in Oven - Flammable materials should not
be stored in an oven,
m Do Not Use Water on Grease Fires - Smother fire or
flame or use dry chemical or foam-type extinguisher,
m Use Only Dry Potholders - Moist or damp potholders
on hot surfaces may result in burns from steam, Do
not let potholder touch hot heating elements, Do not
use a towel or other bulky cloth,
m
Use Care When Opening Door - Let hot air or steam
escape before removing or replacing food,
m
Do Not Heat Unopened Food Containers - Build-up
of pressure may cause container to burst and result
in injury.
m
Keep Oven Vent Ducts Unobstructed.
m
Placement of Oven Racks - Always place oven racks
in desired location while oven is cool. If rack must be
moved while oven is hot, do not let potholder contact
hot heating element in oven.
DO NOT TOUCH HEATING ELEMENTS OR
INTERIOR SURFACES OF OVEN - Heating
elements may be hot even though they are dark in
color. Interior surfaces of an oven become hot
enough to cause burns. During and after use, do
not touch, or let clothing or other flammable materials
contact heating elements or interior surfaces of oven
until they have had sufficient time to cool. Other
surfaces of the oven may become hot enough to
cause burns - among these surfaces are oven vent
openings and surfaces near these openings, oven
doors, and windows of oven doors.
SAVE THESE iNSTRUCTiONS
iMPORTANT SAFETY iNSTRUCTiONS
For self-cleaning ovens:
• Do Not Clean Door Gasket - The door gasket is
essential for a good seal. Care should be taken not
to rub, damage, or move the gasket.
• Do Not Use Oven Cleaners - No commercial oven
cleaner or oven liner protective coating of any kind
should be used in or around any part of the oven.
• Clean Only Parts Listed in Manual.
• Before Self-Cleaning the Oven - Remove broiler pan
and other utensils.
SAVE THESE iNSTRUCTiONS
The California Safe Drinking Water and Toxic Enforcement Act requires the Governor of California to publish a Hst
of substances known to the State of Cafifomia to cause cancer, birth defects, or other reproductive harm, and
requires businesses to warn of potentiaU exposure to such substances,
WARNUNG: This product contains a chemicaU known to the State of California to cause cancer, birth defects, or
other reproductive harm,
This appfiance can cause UowqeveUexposure to some of the substances Hsted, incDding benzene, formaUdehyde,
carbon monoxide, and toDene,
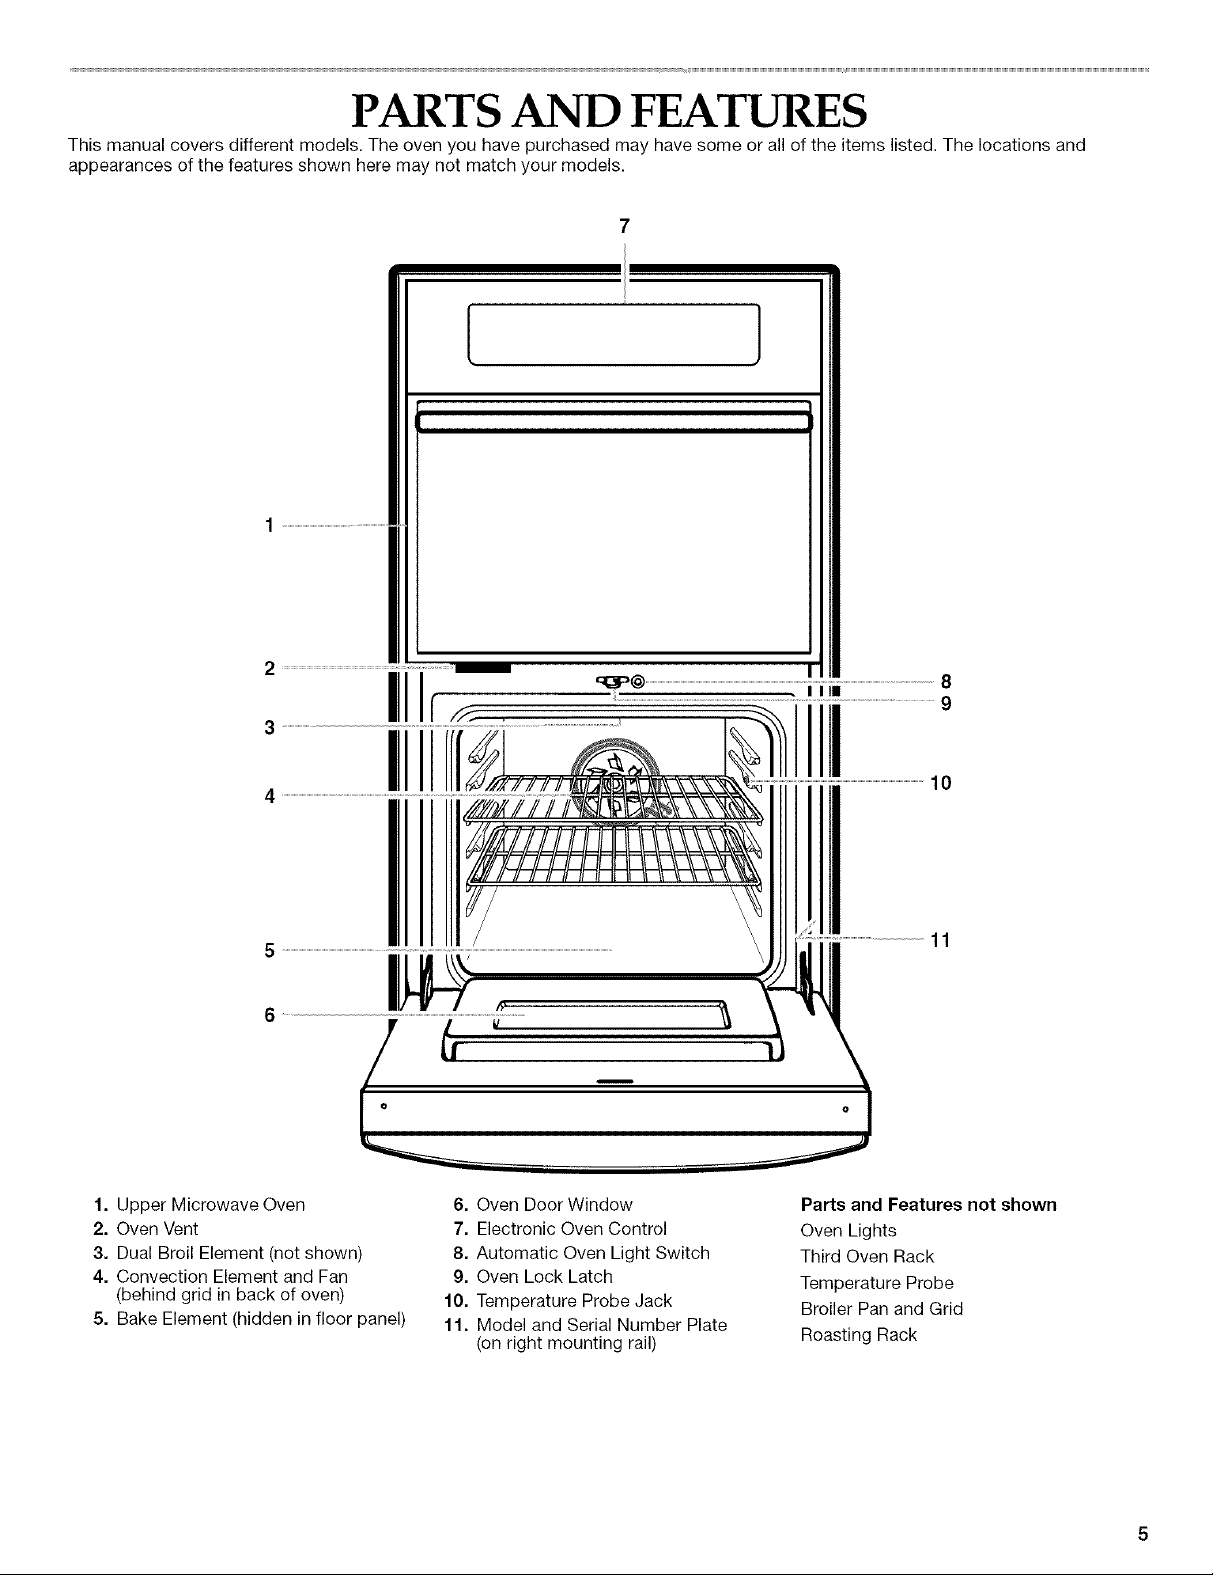
PARTS AND FEATURES
This manual covers different models. The oven you have purchased may have some or all of the items listed. The locations and
appearances of the features shown here may not match your models.
1. Upper Microwave Oven
2. Oven Vent
3. Dual Broil Element (not shown)
4. Convection Element and Fan
(behind grid in back of oven)
5. Bake Element (hidden in floor panel)
6. Oven Door Window
7. Electronic Oven Control
8. Automatic Oven Light Switch
9. Oven Lock Latch
10. Temperature Probe Jack
11. Model and Serial Number Plate
(on right mounting rail)
I0
11
Parts and Features not shown
Oven Lights
Third Oven Rack
Temperature Probe
Broiler Pan and Grid
Roasting Rack
ELECTRONIC OVEN CONTROL
BAKED OTHER
8 9 10
2 3 4 5
1. Lower Oven Display
2. Lower Oven Start and Cancel
3. Number Pads
4. Control Lock
5. Upper Oven Display, Time of Day/
Timer Display
When power is first supplied to the appliance, everything on the
display(s) will light up for 5 seconds. Then, "PF id = 27" or
"PF id = 30" will appear. Press LOWER OVEN CANCEL to clear
display(s).
Any other time "PF id = 27" or "PF id = 30" appears, a power
failure occurred. Press LOWER OVEN CANCEL and reset the
clock if needed.
Lower Oven Display (combination oven models)
When the lower oven is in use, this display shows the lower oven
temperature, heat source(s) and start time.
During lower oven Timed Cooking, this display also shows a
vertical bar and minute time countdown and the stop time (if
entered).
If "Err" appears on the display, an invalid pad was pressed.
Press LOWER OVEN CANCEL and retry your entry.
When the lower oven is not in use, this display is blank.
Upper Oven Display (combination oven models),
Display (single oven models)
When the upper oven or single oven is in use, this display shows
the upper oven or single oven heat source(s), cooking power,
quantities, weights and/or help prompts.
If "RETRY" flashes on the display for one second, an invalid pad
was pressed. Retry your entry.
When the upper oven or single oven is not in use, this display
shows the time of day or Timer countdown.
6. Timer
7. Clock
8. Lower Oven Setting Selectors
9. EasyConvect TM Conversion
10. Timed Cooking
11. Convect Full Meal
12. Lower Oven Light
13. Upper Oven Control
(see separate Use and Care Guide)
The START pad begins any lower oven function except the Timer.
If not pressed within 5 seconds after pressing a pad, "START?"
will appear on the lower oven display as a reminder. If not
pressed within 4 minutes after pressing a pad, the oven display
will return to inactive mode (blank) and the programmed function
will be canceled.
The LOWER OVEN CANCEL pad stops any lower oven function
except for the Clock, Timer and Control Lock.
The cooling fan may continue to operate even after LOWER
OVEN CANCEL is pressed depending on the oven temperature.
This is a 12-hour clock and does not show a.m. or p.m.
To Set:
Before setting, make sure the ovens, Timer and Timed Cooking
are off.
1. Touch CLOCK SET • START.
2. Touch the number pads to set the time of day.
3. Touch CLOCK SET ° START, START or EASY MINUTE START.
To remove the time of day from the display: Touch and hold
CLOCK SET ° START for 5 seconds.
To return the time of day to the display: Touch CLOCK
SET ° START. The time should not have to be reset.
Tonesareaudiblesignals,indicatingthefollowing:
One tone
• Valid pad touch
• Oven is preheated
• Function has been entered
Three tones
• Invalidpadtouch
The temperature is preset in Fahrenheit, however it can be
changed to Celsius.
To Change: Press and hold BROIL/MAXl//ECONO for 5 seconds.
Depending on your model, a tone will sound and "C°'' or "C" will
appear on the display for 3 seconds, or until you press CANCEL.
Repeat to change back to Fahrenheit.
When in Fahrenheit, "°F" follows the oven temperature.
When in Celsius, only .....follows the oven temperature.
Four tones
• End-of-cycle
• Reminder, repeating each minute after the end-of-cycle tones
All Tones (combination oven models only)
All of the above tones are preset on, but can be turned off.
To Turn Off/On: Touch and hold STOP TIME for 5 seconds. A
tone will sound and "Snd oFF" will appear on the lower oven
display for 3 seconds. Repeat to change back to "Snd on."
Tone Volume 2.
The volume is preset at high, but can be changed to low. 3.
To Change: Touch and hold the number pad "7" for 5 seconds. A
tone will sound and "Snd Lo" will appear on the lower oven
display for 3 seconds. Repeat to change back to "Snd HI."
REMINDER TONES
The Timer and Timed Cooking reminder tones are preset on, but 4.
can be turned off. Reminder tones do not include end-of-cycle
tones. On combination oven models, if "All Tones" have been
turned off, the reminder tones cannot be independently turned
on.
Timer
To Turn Tones Off/On: Touch and hold TIMER SET * START until
a tone sounds. Repeat to turn back on.
The Timer can be set in minutes and seconds or hours and
minutes, and counts down the set time. The Timer does not start
or stop the oven.
To Set:
1. Touch TIMER SET • START.
Touch again to switch between MIN/SEC and HR/MIN.
If no action is taken after one minute, the display will return to
the time of day mode.
Touch the number pads to set length of time.
Touch TIMER SET • START or EASY MINUTE START.
If not touched within 5 seconds, the display will return to the
time of day mode and the programmed function will be
canceled.
When the set time ends, if enabled, end-of-cycle tones will
sound, then reminder tones will sound every minute.
Touch TIMER CANCEL anytime to cancel the Timer and/or
stop reminder tones.
Remember, touching the OFF/CANCEL pad(s) will turn the
respective oven(s) off.
The time can be reset during the countdown by repeating the
above steps.
Timed Cooking (combination oven models only)
To Turn Tones Off/On: Touch and hold COOK TIME until a tone
sounds and the lower oven display returns to inactive mode
(blank). Repeat to turn back on.
TheControlLockshutsdownthecontrolpanelpadstoprevent
unintendeduseoftheoven(s).
Whenthecontrolislocked,onlytheCLOCKSET°START,TIMER
SET°STARTandTIMERCANCELpadswillfunction.
TheControlLockispresetunlocked,butcanbelocked.
ToLock/UnlockControl:Beforelocking,makesuretheoven(s),
TimerandTimedCookingareoff.Touchandholdthenumber
pad3CONTROLLOCKuntil"CONTROLLOCK"andapictureof
alockappearonthedisplay,about3seconds.Repeattounlock
andremove"CONTROLLOCK"fromthedisplay.
IMPORTANT:Donotuseathermometertomeasureoven
temperaturebecauseopeningtheovendoorandelementor
burnercyclingmaygiveincorrectreadings.
Theovenprovidesaccuratetemperatures;however,itmaycook
fasterorslowerthanyourpreviousoven,sothetemperature
calibrationcanbeadjusted.ItcanbechangedinFahrenheitor
Celsius.
Aminussignmeanstheovenwillbecoolerbythedisplayed
amount.Nosignmeanstheovenwillbewarmerbythedisplayed
amount.Usethefollowingchartasaguide.
ADJUSTMENT°F COOKSFOOD
(ADJUSTMENT°C}
5°to10°F(3°to6°C) ...a little more
15° to 20°F (9° to 12°C) ...moderately more
25° to 35°F (15° to 21°C) ...much more
-5° to -10°F (-3° to -6°C) ...a little less
OVEN USE
Odors and smoke are normal when the oven is used the first few
times, or when it is heavily soiled.
IMPORTANT: The health of some birds is extremely sensitive to
the fumes given off. Exposure to the fumes may result in death to
certain birds. Always move birds to another closed and well
ventilated room.
IMPORTANT: Do not line the oven bottom with any type of foil,
liners or cookware because permanent damage will occur to the
oven bottom finish.
• Do not cover entire rack with foil because air must be able to
move freely for best cooking results.
• Tocatch spills, place foil on rack below dish. Make sure foil is
at least 1 in. (2.5 cm) larger than the dish and that it is turned
up at the edges.
• Do not cover food with aluminum foil when convection
cooking (on some models).
IMPORTANT: Never place food or bakeware directly on the oven
door or bottom. Permanent damage will occur to the porcelain
finish.
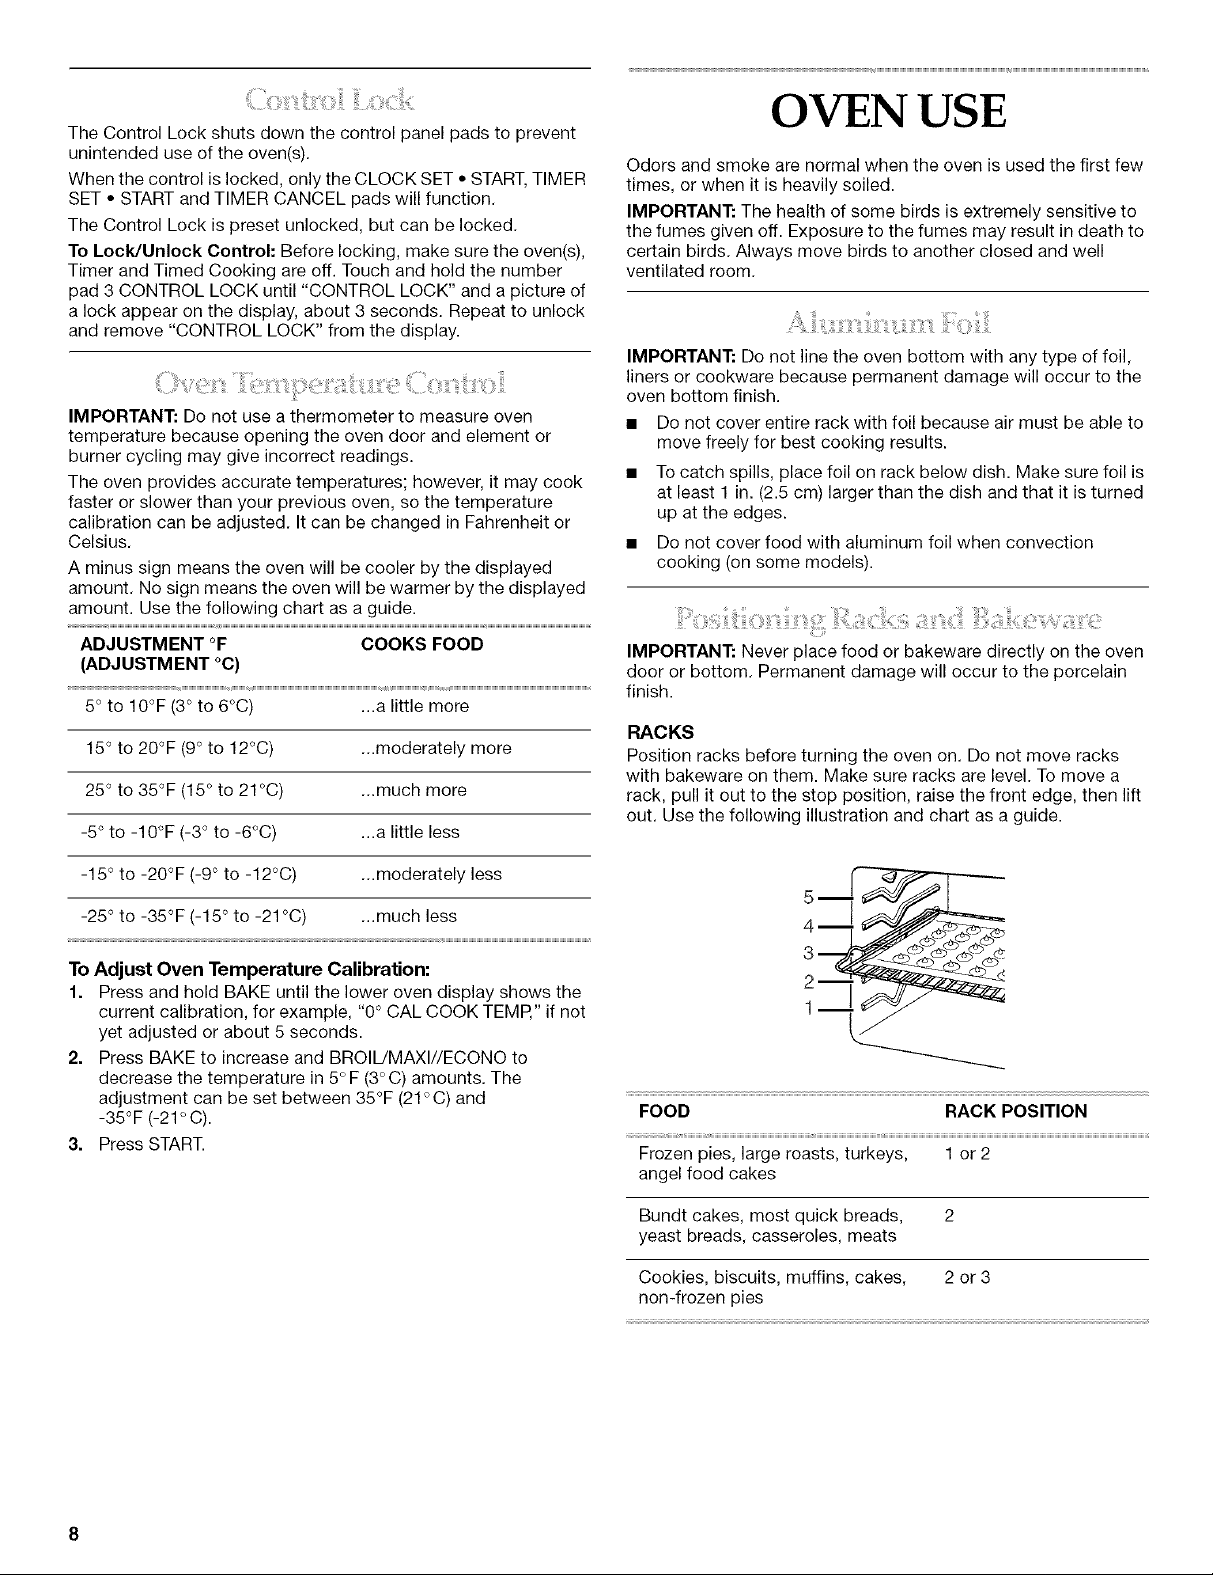
RACKS
Position racks before turning the oven on. Do not move racks
with bakeware on them. Make sure racks are level. To move a
rack, pull it out to the stop position, raise the front edge, then lift
out. Use the following illustration and chart as a guide.
-15 ° to -20°F (-9° to -12°C) ...moderately less
-25 ° to -35°F (-15 ° to -21 °C) ...much less
To Adjust Oven Temperature Calibration:
1. Press and hold BAKE until the lower oven display shows the
current calibration, for example, "0° CAL COOK TEMP," if not
yet adjusted or about 5 seconds.
2. Press BAKE to increase and BROIL/MAXl//ECONO to
decrease the temperature in 5° F (3°C) amounts. The
adjustment can be set between 35°F (21°C) and
-35°F (-21° C).
3. Press START.
L<
FOOD RACK POSITION
Frozen pies, large roasts, turkeys, 1 or 2
angel food cakes
Bundt cakes, most quick breads, 2
yeast breads, casseroles, meats
Cookies, biscuits, muffins, cakes, 2 or 3
non-frozen pies
 Loading...