

Page 1
KEK1032
Page 2
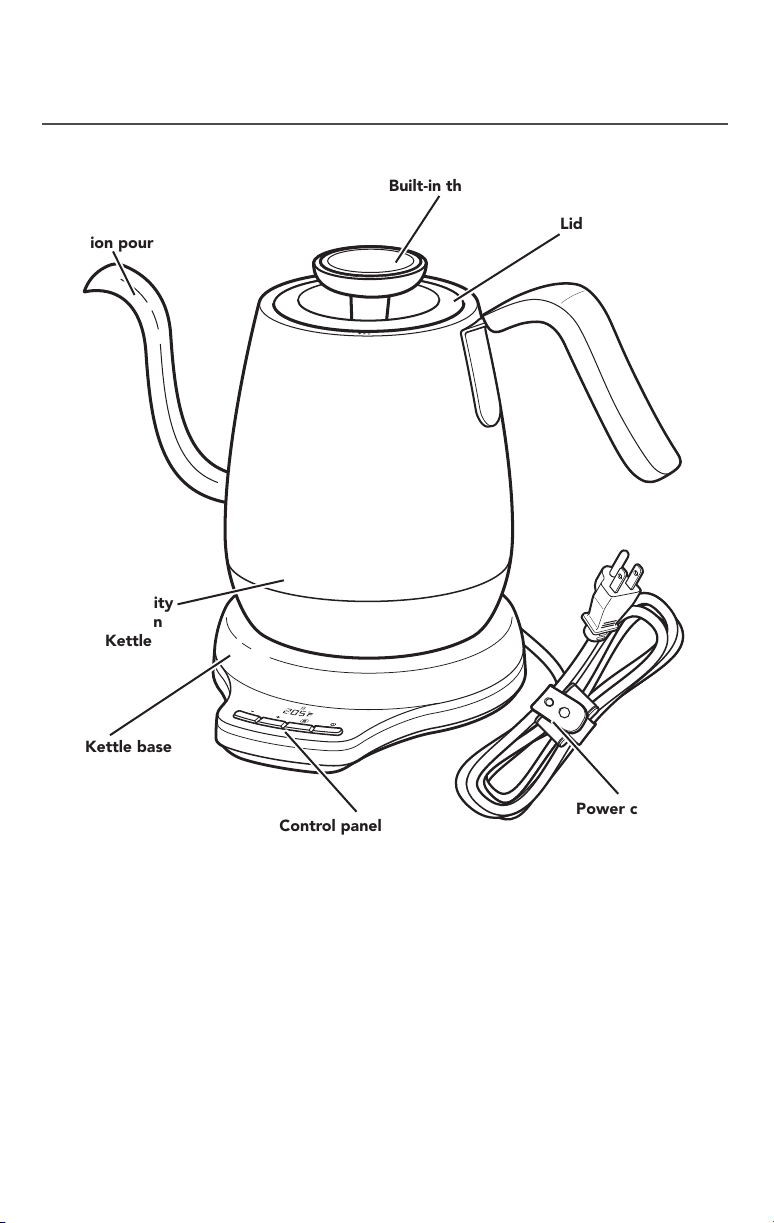
PARTS AND FEATURES
PARTS AND ACCESSORIES
Goose-neck spout
designed for
expert-quality
precision pour control
1-L capacity
Precision
Kettle
Kettle base
with digital display
Built-in thermometer
Lid
2 | PARTS AND FEATURES
Control panel with
Hold Temp feature and
F°/C° change function
Power cord with
attached cord wrap
Page 3
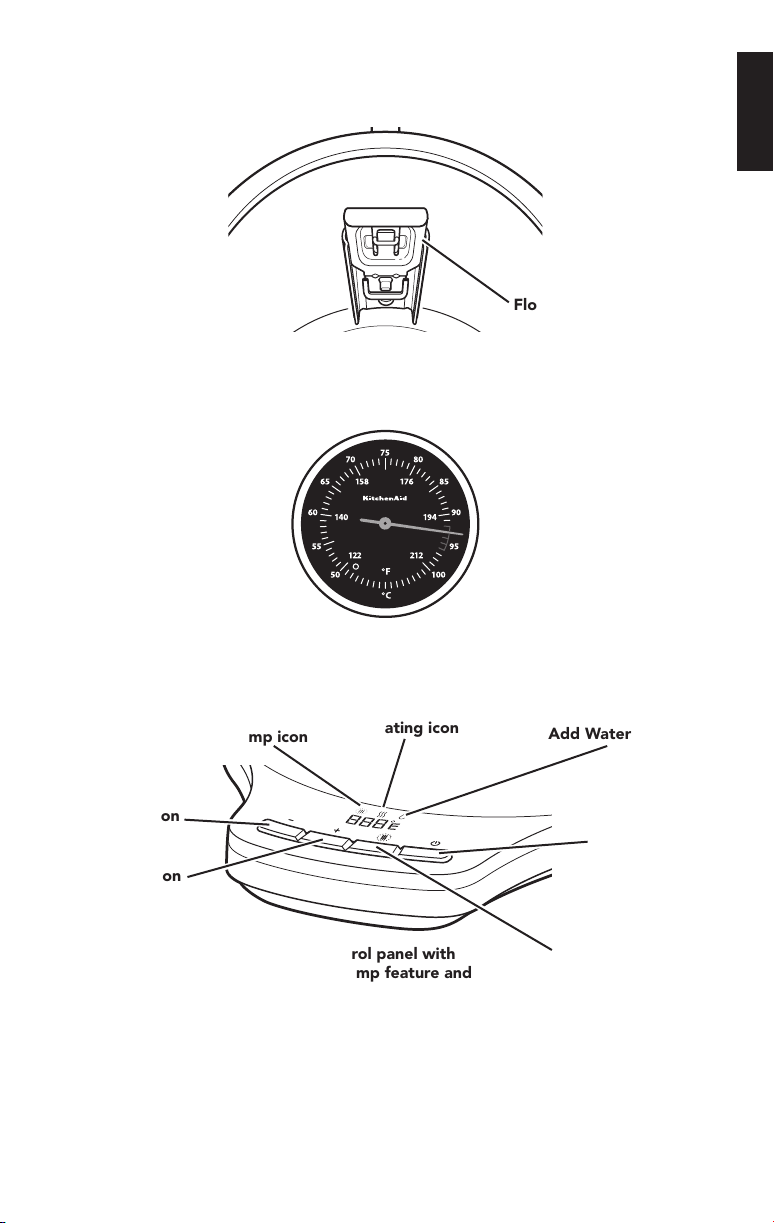
PARTS AND FEATURES
3-position precision flow
control (inside body)
Built-in thermometer dial
ENGLISH
Flow control lever
Since 1919
- button
+ button
Hold Temp icon
Heating icon
Control panel with
Hold Temp feature and
F°/C° change function
Add Water icon
Power button
Hold Temp button
PARTS AND FEATURES | 3
Page 4
PRECISION KETTLE SAFETY
IMPORTANT SAFEGUARDS
When using electrical appliances, basic safety precautions should always
be followed, including the following:
1. Read all instructions.
2. Do not touch hot surfaces. Use handles.
3. To protect against re, electrical shock, and injury to persons, do not immerse
base, cord, plug, or the Precision Kettle in water or other liquids.
4. Use close supervision when using the Precision Kettle near or by children.
5. Unplug the Precision Kettle from outlet when not in use and before cleaning.
Allow to cool before putting on or taking off parts, and before cleaning the
appliance.
6. Do not operate the Precision Kettle with a damaged cord or plug or after the
appliance malfunctions or has been damaged in any manner. Return appliance
to the nearest Authorized Service Center for examination, repair, or adjustment.
7. Use of replacement parts or accessory attachments not recommended by
manufacturer may result in re, shock, or injury to persons.
8. Do not use outdoors.
9. Do not let cord hang over counter or table edges, or allow to come into contact
with heated surfaces.
4 | PRECISION KETTLE SAFETY
Page 5

PRECISION KETTLE SAFETY
10. Do not place on or near a hot gas or electric burner, or in a heated oven.
11. The Precision Kettle should only be used to heat water.
12. Do not use the Precision Kettle without lid properly closed.
13. Do not use the Precision Kettle with loose or weakened handle.
14. Do not use the appliance for other than intended use.
15. Do not clean the Precision Kettle with abrasive cleaners, steel wool,
or other abrasive materials.
16. Do not overll the Precision Kettle.
17. Scalding may occur if the lid is removed during the heating cycle.
18. To disconnect, turn the control to “off,” then remove plug from wall outlet.
SAVE THESE INSTRUCTIONS
This product is designed for household use only.
ELECTRICAL REQUIREMENTS
Voltage: 120 VAC
Frequency: 60 Hz
Wattage: 1000 W
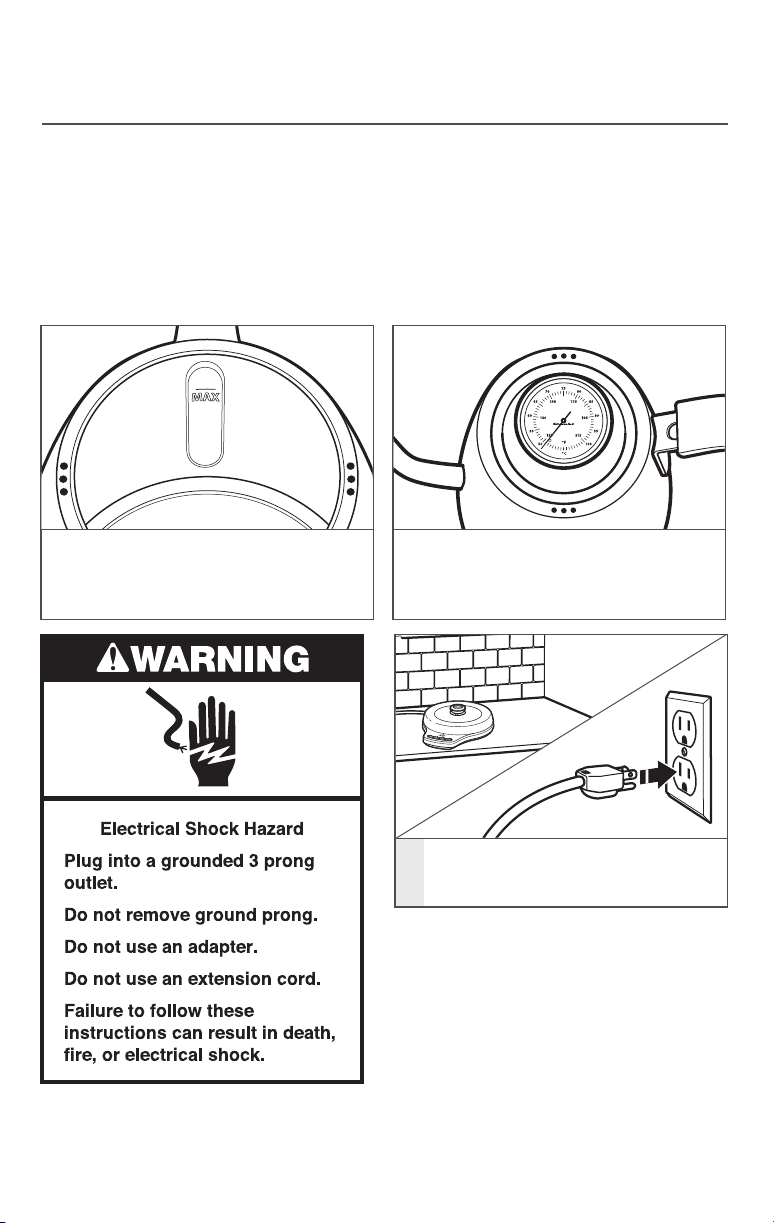
NOTE: The Precision Kettle has a
3 prong grounded plug. To reduce the
risk of electrical shock, this plug will fit
in an outlet only one way. If the plug
does not fit in the outlet, contact a
qualified electrician. Do not modify
the plug in any way.
Do not use an extension cord. If the power
supply cord is too short, have a qualified
electrician or service technician install an
outlet near the appliance.
A short power supply cord (or detachable
power supply cord) should be used to
reduce the risk resulting from becoming
entangled in or tripping over a longer
cord.
ENGLISH
PRECISION KETTLE SAFETY | 5
Page 6
USING THE PRECISION KETTLE
PREPARING THE PRECISION KETTLE FOR USE
Before first use
Before using your Precision Kettle for the rst time, wash the kettle and all accessories,
including the lid, with warm, soapy water, then rinse with clean water and dry. Fill the
Precision Kettle with water to the MAX ll line (see example below) and run one cycle at
the maximum temperature. To avoid damage, do not fully immerse the Precision Kettle in
water, and do not use abrasive cleaners or scouring pads.
NOTE: The entire Precision Kettle is hand wash only. To avoid damage, do not wash any
part of the Precision Kettle, its accessories, or the base with power cord in a dishwasher.
Since 1919
IMPORTANT: Be sure that the vent holes
Fill the Precision Kettle with water to the
MAX ll line inside the Kettle.
at the top of the kettle are clean and free
of obstruction, or the Precision Kettle
may overflow.
6 | USING THE PRECISION KETTLE
Place the base with power cord on
a flat, sturdy surface and plug it into
1
a 3 prong grounded outlet.
FOR DETAILED INFORMATION ON
USING THE PRECISION KETTLE
Visit kitchenaid.com/quickstart for
additional instructions with videos and tips
on how to use your Precision Kettle.
Page 7

USING THE PRECISION KETTLE
ELEVATION*
BREW/STEEP TEMPERATURE SUGGESTIONS
The KitchenAid® Precision Kettle allows you to condently pour with precision. It features
the industry-standard 1-liter capacity carafe. Select your desired brewing temperature
customizable in 1-degree increments ranging from 140-212°F (60-100°C), with the option
to hold for 30 minutes. A brew-range thermometer is displayed on the lid to keep track
of your water temperature while you pour so you know you are within your preferred
brewing range.
NOTE: The Precision Kettle is designed for water only. Do not put any other liquids
or substances in the Precision Kettle.
ENGLISH
BEVERAGE Coffee
SUGGESTED
92-96°C 80°C 85°C 90°C 95°C 100°C
Green
Tea
White
Tea
Oolong
Tea
Black
Tea
Herbal
Tea
TEMPERATURE
(C°/F°)
196-205°F 176°F 185°F 194°F 203°F 212°F
SUGGESTED
BREW/
STEEP TIME
3-5 1-3 3-5 3-5 4-5 5-7
(MINUTES)
The above suggestions are points of reference. KitchenAid
recommends that you experiment with temperature and
brew/steep times to nd the perfect formula for your
preferred cup of coffee or tea.
For easy reference, the suggested temperature range for
brewing coffee is shown in red on the built-in thermometer.
Since 1919
ALTITUDE BOILING POINT REFERENCE GUIDE
This chart shows the boiling point of water at different altitudes. Please refer to this chart
in order to adjust your temperature setting according to the elevation in your area.
90.5°/194.9°
91.6°/196.8°
92.6°/198.7°
93.7°/200.6°
94.7°/202.5°
95.8°/204.4°
96.8°/206.3°
97.9°/208.2°
98.9°/212°
100°/212°
BOILING POINT °C/°F
*Elevation shown in feet above sea level.
USING THE PRECISION KETTLE | 7
Page 8
USING THE PRECISION KETTLE
CHANGING THE FLOW CONTROL
TIP: Prior to first use, fill the Precision Kettle with room-temperature water and pour at
each flow control setting to become familiar with the different flow rates.
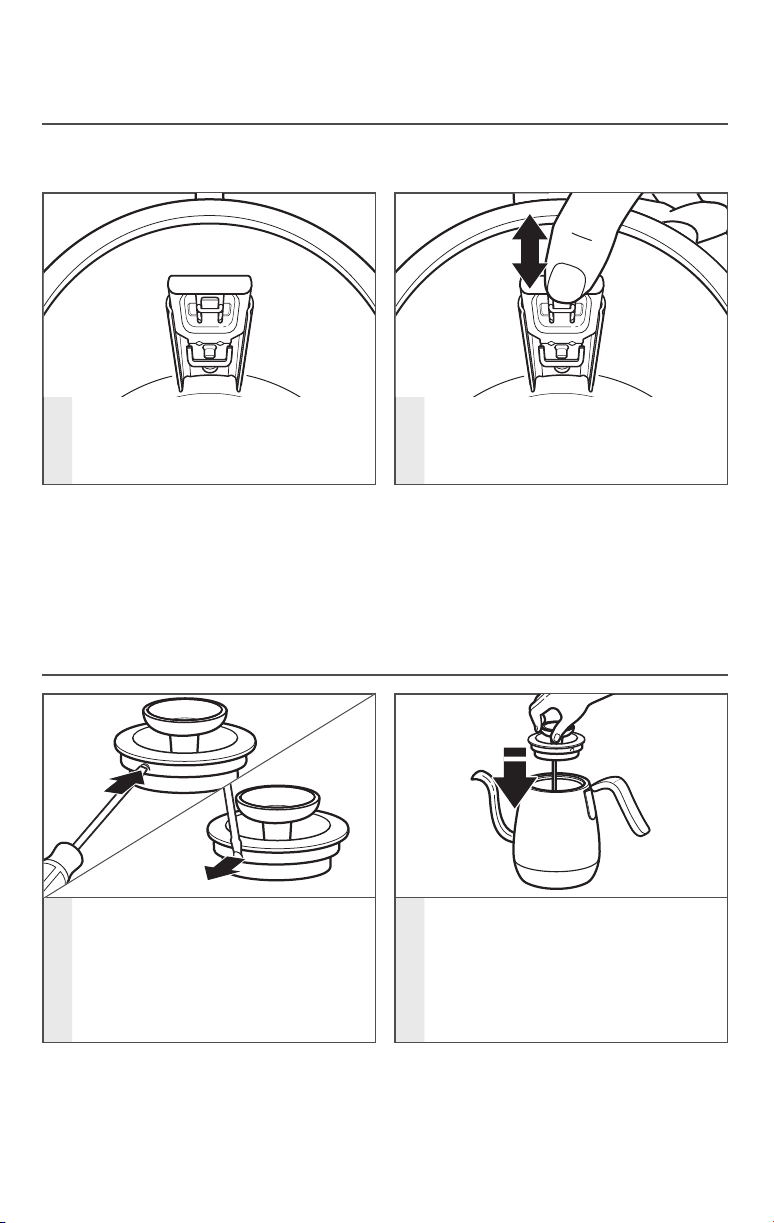
Your Precision Kettle has three flow
control settings. The flow control
1
lever inside the kettle is used to
change the settings.
NOTE: After heating water, be sure to empty the Precision Kettle and allow it to cool
completely before changing any flow rate settings.
TIP: The flow control lever is meant to come out for cleaning. If you pull up too
far while changing the flow rate settings and the lever comes out, it can easily slide
back into place.
Push the lever down for more
restricted flow; pull the lever up
2
for less restricted flow.
CUSTOMIZING THE KETTLE LID TENSION AND FLOW
CONTROL LEVER
If you feel the lid is too hard or too
easy to remove, try adjusting the
tension. Use a small tool, such as a
small screwdriver, to adjust the three
1
tabs on the kettle rim. Push in to
create less tension; pull out to create
more.
After adjusting tabs, put the lid back
on the Precision Kettle to test the
setting and see if your adjustment
2
is satisfactory. Continue to adjust
as needed.
8 | USING THE PRECISION KETTLE
Page 9
USING THE PRECISION KETTLE
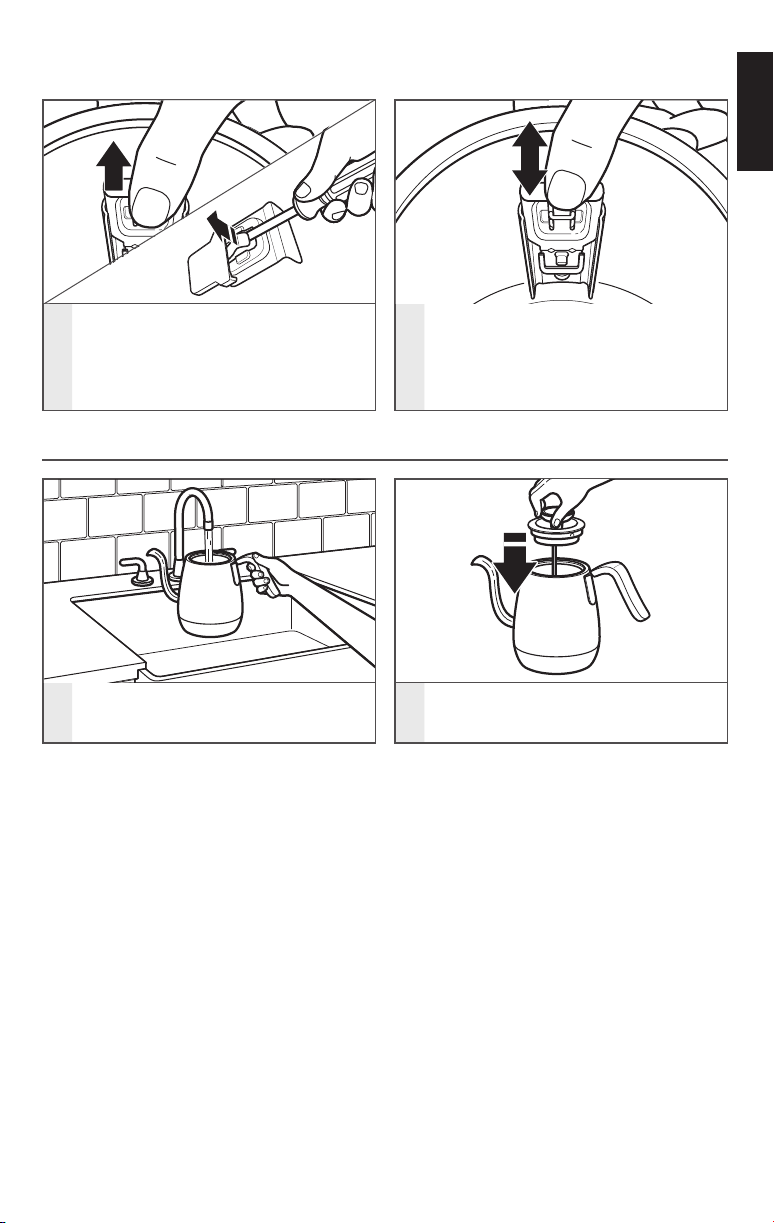
If you feel the flow control is too easy
or too hard to move, use your fingers
to adjust the tab on the flow control
3
lever. Push in to create less tension;
pull out to create more.
FILLING THE PRECISION KETTLE WITH WATER
Test the flow control to see if the
tension is correct; continue to adjust
4
if needed.
ENGLISH
Remove lid from the Precision Kettle
1
and fill with water.
NOTE: Do not fill past the MAX fill line of
1 liter.
IMPORTANT: There must be a minimum
of 1 cup (.25 L) of water for the Precision
Kettle to operate. If the water level drops
below this point, the Add Water icon will
light, and you will need to add water to
the Kettle before continuing use.
Replace the lid and put the Precision
2
Kettle back on the base.
USING THE PRECISION KETTLE | 9
Page 10
USING THE PRECISION KETTLE
HEATING WATER
NOTE: The temperature can be displayed in Celsius (C) or Fahrenheit (F). To toggle
between Celsius and Fahrenheit, hold the “-” and “+” buttons down at the same
time. Refer to the “Altitude boiling point reference guide” for information on the peak
temperature setting for your altitude.
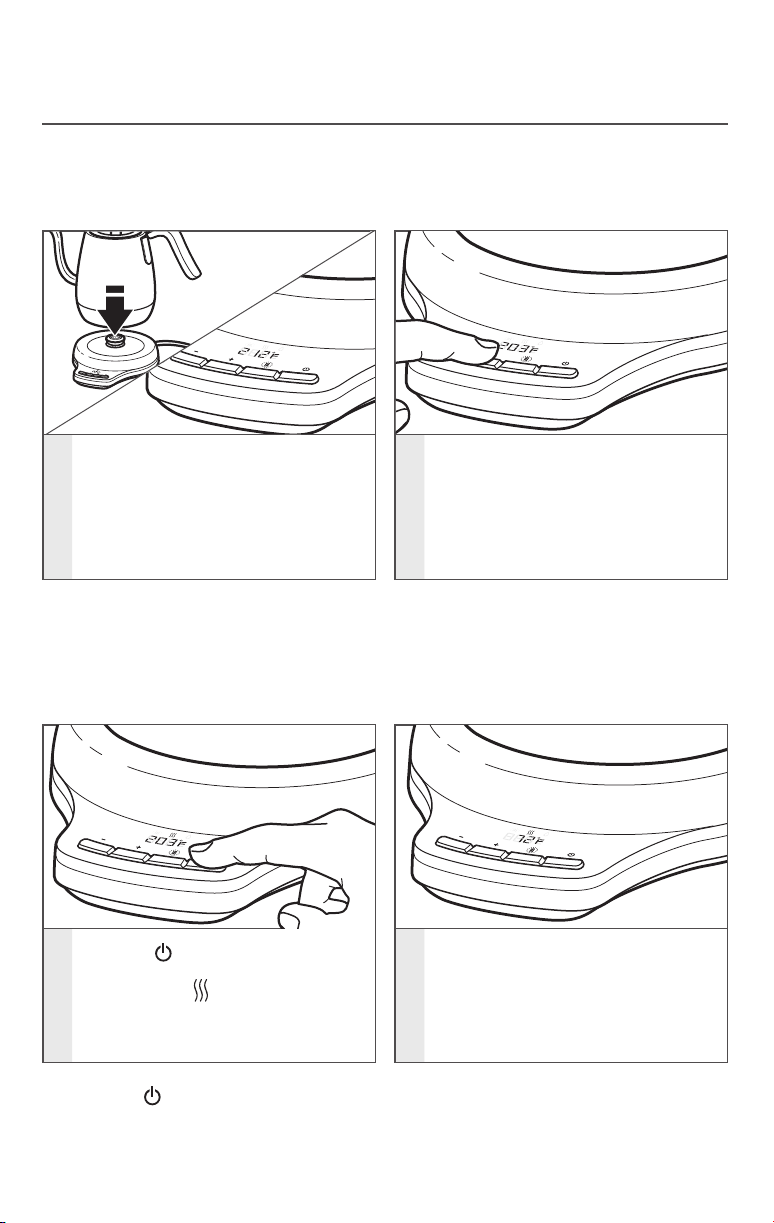
When the Precision Kettle is first
placed on the base, the display will
show 212°F or 100°C*. After a few
1
moments, the display will update to
show the actual temperature of the
water in the Precision Kettle.
*The Precision Kettle has a temperature
memory feature for your last selected
temperature (between 140-212°F
[60-100°C]). This feature will determine
the temperature that appears on the
display after the first use.
Press the (Power) button to save
temperature and to begin heating
the water. The (Heating icon) will
3
be displayed on the LCD screen to
indicate that the Precision Kettle
is heating.
Press the “-” or “+” buttons to select
your desired water temperature
between 140-212°F (60-100°C).
For faster temperature adjustment,
2
hold the “-” or “+” button down
for 3 seconds, and the temperature
readout will scroll faster.
While heating, the temperature
that shows on the display screen
4
is the actual water temperature,
not the selected temperature.
NOTE: The button does not function
when the Precision Kettle is off the base.
10 | USING THE PRECISION KETTLE
Page 11
USING THE PRECISION KETTLE
IMPORTANT: Please see the “Altitude
boiling point reference guide” for peak
boiling temperature at your altitude.
If using the Precision Kettle at higher
altitudes, the Precision Kettle will boil
continuously at a lower temperature
until all the water has evaporated. If this
happens, the Kettle will turn off.
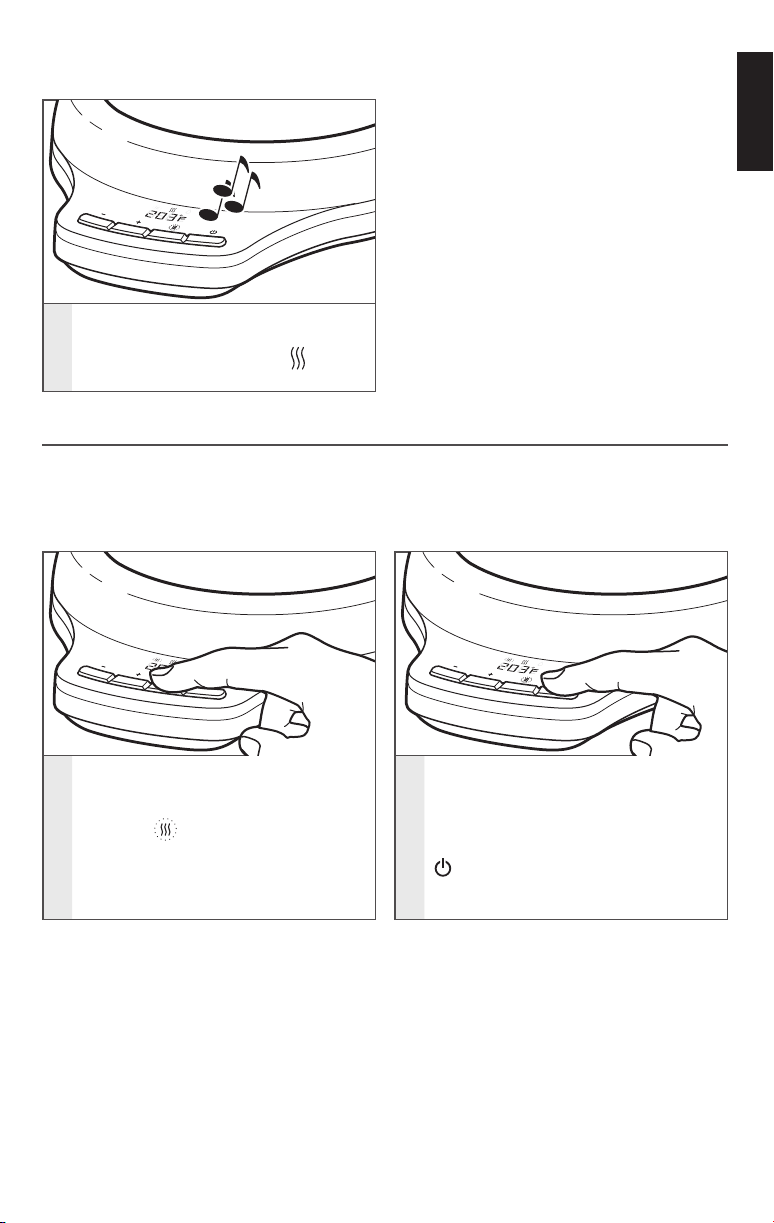
Once the selected temperature has
been reached, the heater will turn off,
5
a chime will sound, and the will
turn off.
USING THE HOLD TEMP MODE
When using Hold Temp mode, please see the “Altitude boiling point reference guide” for
peak boiling temperature at your altitude. If using the Precision Kettle at higher altitudes,
the Precision Kettle will boil continuously at a lower temperature until it has evaporated. If
this happens, the Kettle will turn off.
ENGLISH
As long as the Precision Kettle is on
To activate the Hold Temp mode,
press the (Hold Temp) button after
1
your preferred temperature has been
selected.
NOTE: The Precision Kettle must be on the base in order to activate the Hold Temp
feature. Once the Kettle is removed from the base, the Kettle will turn off.
TIP: Hold Temp mode works for all temperatures within the range of 140-212°F
(60-100°C). Altitude affects the Hold Temp mode; see the “Altitude boiling point
reference guide” on page 7. Hold Temp is accurate within +/- 4°F (2°C).
the base, it will maintain the desired
temperature for up to 30 minutes.
To cancel Hold Temp before
2
30 minutes have passed, press the
button, or press the Hold Temp
button again, or remove kettle from
the base.
USING THE PRECISION KETTLE | 11
Page 12
USING THE PRECISION KETTLE
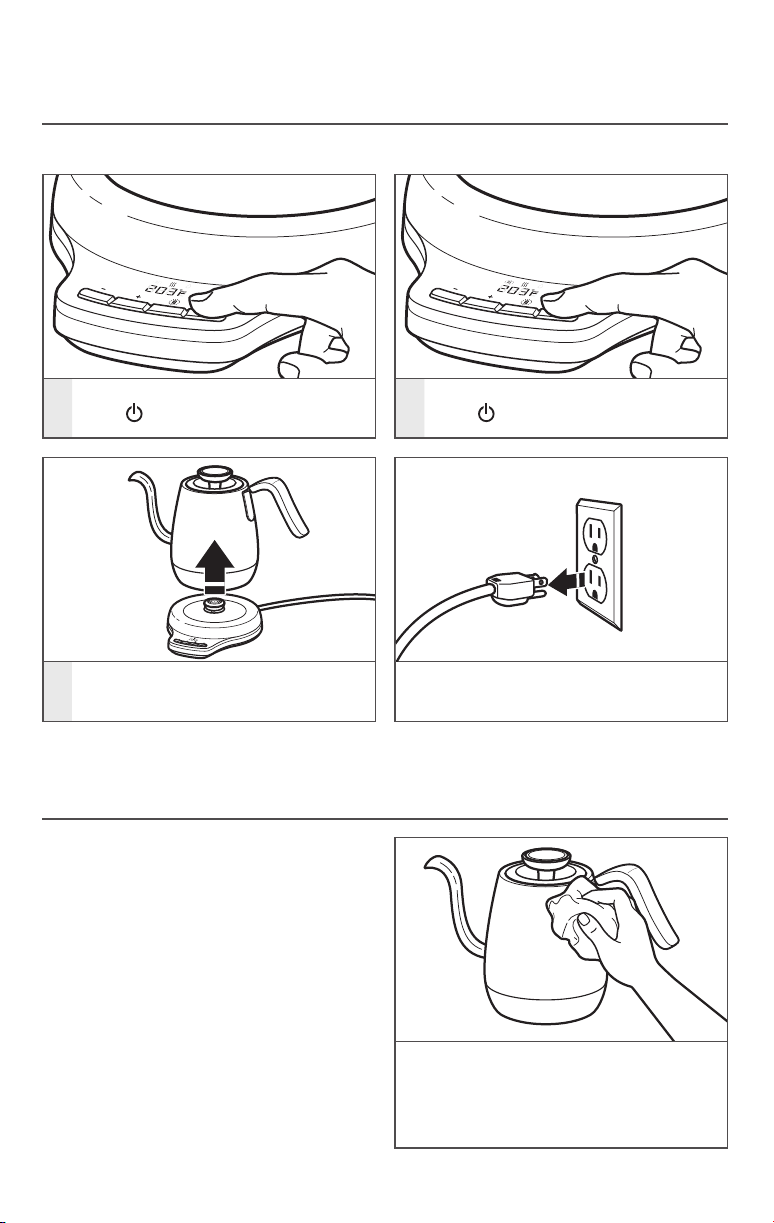
TURNING OFF THE PRECISION KETTLE
The Precision Kettle can be turned off in several ways:
1
Press while in heating mode.
Lift the Precision Kettle off the base.
3
CARE AND CLEANING
CLEANING THE EXTERIOR
IMPORTANT: Before cleaning, always
disconnect the Precision Kettle from the
electrical outlet. Make sure the Precision
Kettle has cooled completely.
2
Press while in Hold Temp mode.
NOTE: Unplug the Precision Kettle when
not in use.
12 | CARE AND CLEANING
The exterior of the Precision Kettle may
be cleaned with a damp cloth. Dry and
polish the Precision Kettle with a soft
cloth. Abrasives and scouring agents of
any kind are not recommended.
Page 13
CARE AND CLEANING
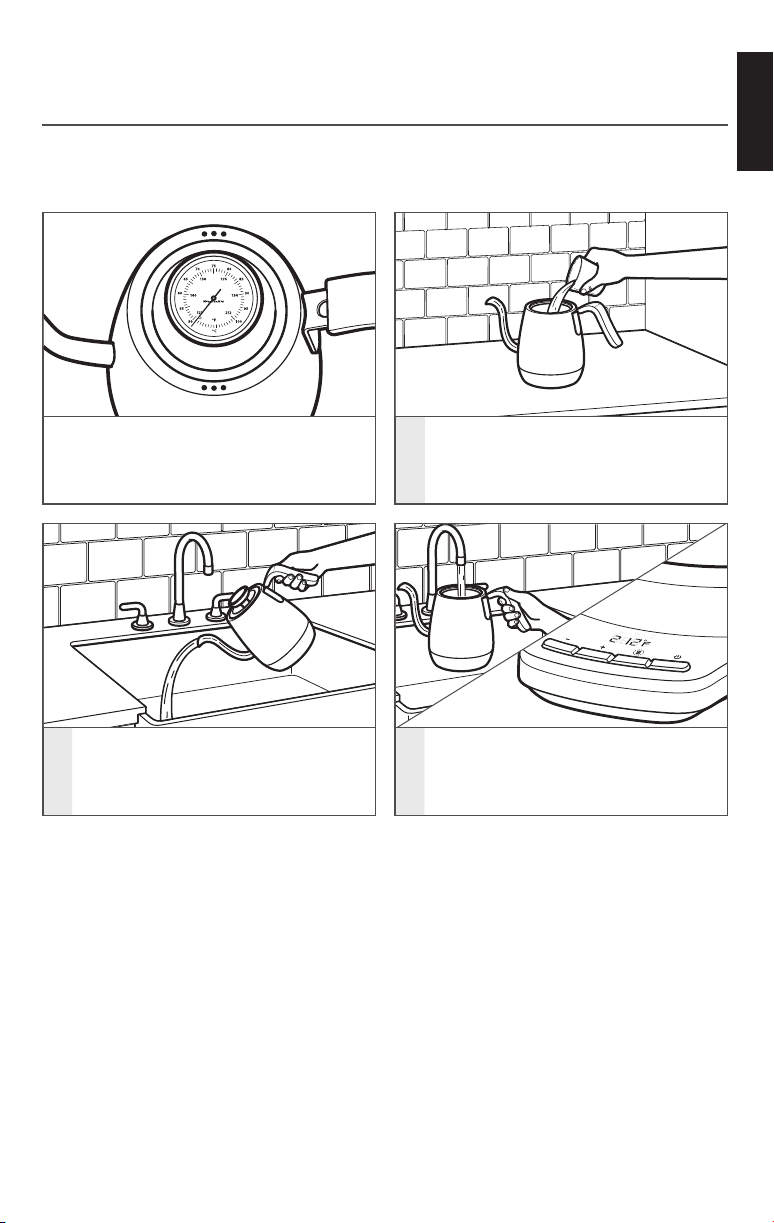
REMOVING MINERAL DEPOSITS FROM THE INTERIOR
To get the best performance from your Precision Kettle, decalcication will be necessary.
Calcium deposits may form on the interior of the Precision Kettle. The cleaning interval
will depend on the hardness of the water you put in the Precision Kettle.
Since 1919
ENGLISH
IMPORTANT: Be sure that the vent
holes at the top of the kettle are
clean and free of obstructions, or the
Precision Kettle may overflow.
Empty the solution from the
2
Precision Kettle.
NOTE: If desired, the flow control lever
and built-in thermometer can be removed
for further cleaning.
FOR DETAILED INFORMATION ON CLEANING THE PRECISION KETTLE
Visit kitchenaid.com/quickstart for additional instructions with videos and tips on how
to use your Precision Kettle.
Fill the Precision Kettle with
1cup(.25L) of white vinegar and
1
3cups(.75L) of water. Boil and allow
to stand overnight.
Fill the Precision Kettle with water,
bring to a boil, and drain the water.
3
Complete this step twice. The
Precision Kettle is now ready to use.
CARE AND CLEANING | 13
Page 14
WARRANTY AND SERVICE
KITCHENAID® PRECISION KETTLE WARRANTY FOR
THE 50 UNITED STATES, THE DISTRICT OF COLUMBIA,
PUERTO RICO, AND CANADA
This warranty extends to the purchaser and any succeeding owner for the Precision Kettle
operated in the 50 United States, the District of Columbia, Puerto Rico, and Canada.
Length of Warranty: One Year Full Warranty from date of purchase.
KitchenAid Will Pay
for Your Choice of:
Hassle-Free Replacement of your Precision Kettle.
See the next page for details on how to arrange for
service, or call the Customer eXperience Center
toll-free at 1-800-541-6390.
OR
The replacement parts and repair labor costs to correct
defects in materials and workmanship. Service must be
provided by an Authorized KitchenAid Service Center.
KitchenAid Will
Not Pay for:
DISCLAIMER OF IMPLIED WARRANTIES; LIMITATION OF REMEDIES
IMPLIED WARRANTIES, INCLUDING TO THE EXTENT APPLICABLE WARRANTIES
OF MERCHANTABILITY OR FITNESS FOR A PARTICULAR PURPOSE, ARE EXCLUDED
TO THE EXTENT LEGALLY PERMISSIBLE. ANY IMPLIED WARRANTIES THAT MAY
BE IMPOSED BY LAW ARE LIMITED TO ONE YEAR, OR THE SHORTEST PERIOD
ALLOWED BY LAW. SOME STATES AND PROVINCES DO NOT ALLOW LIMITATIONS
OR EXCLUSIONS ON HOW LONG AN IMPLIED WARRANTY OF MERCHANTABILITY
OR FITNESS LASTS, SO THE ABOVE LIMITATIONS OR EXCLUSIONS MAY NOT APPLY
TO YOU.
IF THIS PRODUCT FAILS TO WORK AS WARRANTED, CUSTOMER’S SOLE AND
EXCLUSIVE REMEDY SHALL BE REPAIR OR REPLACEMENT ACCORDING TO THE
TERMS OF THIS LIMITED WARRANTY. KITCHENAID AND KITCHENAID CANADA
DO NOT ASSUME ANY RESPONSIBILITY FOR INCIDENTAL OR CONSEQUENTIAL
DAMAGES. This warranty gives you specic legal rights and you may also have other
rights which vary from state to state or province to province.
A. Repairs when your Precision Kettle is used
in other than normal single family home use.
B. Damage resulting from accident, alteration,
misuse, or abuse.
C. Any shipping or handling costs to deliver your
Precision Kettle to an Authorized Service Center.
D. Replacement parts or repair labor costs for Precision
Kettles operated outside the 50 United States,
District of Columbia, Puerto Rico, and Canada.
14 | WARRANTY AND SERVICE
Page 15

WARRANTY AND SERVICE
HASSLE-FREE REPLACEMENT WARRANTY—50 UNITED STATES,
DISTRICT OF COLUMBIA, AND PUERTO RICO
We’re so condent the quality of our
products meets the exacting standards
of KitchenAid that, if your Precision
Kettle should fail within the rst year
of ownership, KitchenAid will arrange
to deliver an identical or comparable
replacement to your door free of charge
and arrange to have your original Precision
Kettle returned to us. Your replacement
unit will also be covered by our one year
limited warranty.
If your Precision Kettle should fail within
the rst year of ownership, simply call our
HASSLE-FREE REPLACEMENT WARRANTY—CANADA
toll-free Customer eXperience Center at
1-800-541-6390 Monday through Friday.
Please have your original sales receipt
available when you call. Proof of purchase
will be required to initiate the claim. Give
the consultant your complete shipping
address. (No P.O. Box numbers, please.)
When you receive your replacement
Precision Kettle, use the carton, packing
materials, and prepaid shipping label
to pack up your original Precision Kettle
and send it back to KitchenAid.
ENGLISH
We’re so condent the quality of our
products meets the exacting standards of
the KitchenAid brand that, if your Precision
Kettle should fail within the rst year of
ownership, we will replace your Precision
Kettle with an identical or comparable
replacement. Your replacement unit will
also be covered by our one year limited
warranty.
If your Precision Kettle should fail within
the rst year of ownership, simply call our
toll-free Customer eXperience Center at
1-800-807-6777 Monday through Friday.
Please have your original sales receipt
available when you call. Proof of purchase
will be required to initiate the claim. Give
the consultant your complete shipping
address.
When you receive your replacement
Precision Kettle, use the carton, packing
materials, and prepaid shipping label to
pack up your original Precision Kettle
and send it back to KitchenAid.
ARRANGING FOR SERVICE AFTER THE WARRANTY EXPIRES,
OR ORDERING ACCESSORIES AND REPLACEMENT PARTS
In the United States and Puerto Rico:
For service information, or to order
accessories or replacement parts, call
toll-free at 1-800-541-6390 or write to:
Customer eXperience Center,
KitchenAid Small Appliances,
P.O. Box 218, St. Joseph, MI 49085-0218
Outside the United States
and Puerto Rico:
Consult your local KitchenAid dealer
or the store where you purchased the
Precision Kettle for information on
how to obtain service.
For service information in Canada:
Call toll-free 1-800-807-6777.
For service information in Mexico:
Call toll-free 01-800-0022-767.
®/™ ©2018 KitchenAid. All rights reserved. KITCHENAID and the design of the stand mixer
are trademarks in the U.S. and elsewhere. Used under license in Canada.
WARRANTY AND SERVICE | 15
Page 16

PIÈCES ET CARACTÉRISTIQUES
PIÈCES ET ACCESSOIRES
Bec en col de
cygne conçu pour
verser avec précision
Carafe de
1 litre
Socle de la bouilloire
avec affichage
numérique
Thermomètre intégré
Panneau de commande
avec option de maintien
de la température et
affichage en °F/°C
Couvercle
Cordon d’alimentation
avec attache
16 | PIÈCES ET CARACTÉRISTIQUES
Page 17

PIÈCES ET CARACTÉRISTIQUES
Icône de maintien
de la température
- Bouton
+ Bouton
Levier de réglage à
3 positions (à l’intérieur)
Since 1919
Cadran du thermostat
intégré
Icône de chauffage
Levier de réglage
de l’écoulement
Icône d’ajout d’eau
Bouton de mise
sous tension
FRANÇAIS
Panneau de commande
avec option de maintien
de la température et
affichage en °F/°C
PIÈCES ET CARACTÉRISTIQUES | 17
Bouton de maintien de
la température
Page 18

SÉCURITÉ DE LA BOUILLOIRE DE PRÉCISION
IMPORTANTES MESURES
DE PROTECTION
Lors de l’utilisation d’appareils électriques, il faut toujours observer certaines
précautions élémentaires de sécurité, y compris les suivantes :
1. Lire toutes les instructions.
2. Ne pas toucher les surfaces chaudes. Utiliser les poignées.
3. Pour éviter les incendies, chocs électriques ou blessures corporelles, ne pas
immerger le socle, le cordon, la prise ou la bouilloire de précision dans l’eau ou
tout autre liquide.
4. Exercer une surveillance attentive lorsque la bouilloire de précision est utilisée
près ou par des enfants.
5. Débrancher la bouilloire de précision lorsqu’elle n’est pas utilisée et avant tout
nettoyage, et avant de nettoyer l’appareil. Attendre que l’appareil ait refroidi
avant d’installer ou de retirer des pièces, et avant de nettoyer l’appareil.
6. Ne pas faire fonctionner la bouilloire de précision si sa prise ou son cordon est
endommagé, lorsqu’elle ne fonctionne pas correctement ou lorsqu’elle a été
endommagée d’une quelconque façon. Retourner l’appareil au centre de service
agréé le plus proche pour examen, réparation ou réglage.
18 | SÉCURITÉ DE LA BOUILLOIRE DE PRÉCISION
Page 19

SÉCURITÉ DE LA BOUILLOIRE DE PRÉCISION
7. L’utilisation de pièces de rechange et d’accessoires non recommandés par
le fabricant peut entraîner un incendie, un choc électrique ou des blessures
corporelles.
8. Ne pas utiliser à l’extérieur.
9. Ne pas laisser le cordon pendre sur le côté d’une table ou d’un comptoir, ou
toucher une surface chaude.
10. Ne pas placer sur ou près d’un brûleur électrique ou à gaz chaud, ou dans un
four chaud.
11. La bouilloire de précision doit être utilisée uniquement pour chauffer de l’eau.
12. Ne pas faire fonctionner la bouilloire de précision si le couvercle n’est pas bien fermé.
13. Ne pas faire fonctionner la bouilloire de précision si la poignée est instable ou
abîmée.
14. Ne pas utiliser l’appareil pour un autre usage que celui pour lequel il est conçu.
15. Ne pas nettoyer la bouilloire de précision avec des nettoyants abrasifs, des
tampons en laine d’acier ou tout autre produit abrasif.
16. Ne pas trop remplir la bouilloire de précision.
17. Enlever le couvercle pendant le programme de chauffage peut provoquer un
risque d’ébouillantage.
18. Pour déconnecter l’appareil, tourner les commandes à “arrêt”, puis débrancher
la che de la prise murale.
CONSERVER CES INSTRUCTIONS
Ce produit est conçu uniquement pour un usage domestique.
SPÉCIFICATIONS ÉLECTRIQUES
FRANÇAIS
Tension : 120 V CA
Fréquence : 60 Hz
Puissance : 1000 W
REMARQUE : La bouilloire de précision
comporte une fiche à 3 broches reliée à la
terre. Pour réduire le risque de décharge
électrique, cette fiche ne peut être
insérée dans une prise que dans un seul
sens. Si cette fiche ne convient pas à la
prise, contacter un électricien qualifié. Ne
pas modifier la prise de quelque manière
que ce soit.
Ne pas utiliser de rallonge. Si le cordon
d’alimentation électrique est trop court,
faire installer une prise près de l’appareil
électroménager par un électricien ou un
technicien de service qualifié.
On doit utiliser un cordon d’alimentation
court (ou détachable) afin de réduire le
risque qu’une personne s’emmêle dans un
cordon d’alimentation qui serait plus long
ou trébuche dessus.
SÉCURITÉ DE LA BOUILLOIRE DE PRÉCISION | 19
Page 20

UTILISATION DE LA BOUILLOIRE DE PRÉCISION
PRÉPARATION DE LA BOUILLOIRE DE PRÉCISION EN VUE DE L’UTILISER
Avant la première utilisation
Avant d’utiliser la bouilloire de précision pour la première fois, laver la bouilloire et
tous les accessoires, y compris le couvercle, à l’eau chaude et savonneuse, puis rincer
dans une eau propre et sécher. Remplir d’eau la bouilloire de précision jusqu’à la ligne
de remplissage MAX (voir l’exemple ci-dessous) et faire bouillir une fois à température
maximale. Pour éviter tout dommage, ne pas complètement immerger la bouilloire de
précision dans l’eau et ne pas utiliser de nettoyants abrasifs ou de tampons à récurer.
REMARQUE : Les pièces de la bouilloire de précision ne doivent être lavées qu’à la main.
Pour éviter tout dommage, ne pas mettre la bouilloire de précision, les accessoires ou le
socle avec le cordon d’alimentation dans un lave-vaisselle.
Since 1919
Remplir d’eau la bouilloire de précision
jusqu’à la ligne MAX située à l’intérieur
de la carafe.
IMPORTANT : S’assurer que les trous
d’évacuation situés sur le dessus de la
carafe sont propres et bien dégagés,
sinon, la bouilloire pourrait déborder.
Placer le socle avec le cordon
d’alimentation sur une surface de
1
niveau et brancher l’appareil dans une
prise à trois alvéoles reliée à la terre.
POUR OBTENIR DES RENSEIGNEMENTS
DÉTAILLÉS SUR L’UTILISATION
DE LA BOUILLOIRE DE PRÉCISION :
Visiter le kitchenaid.com/quickstart pour
obtenir des instructions supplémentaires
incluant des vidéos et des conseils sur la
façon d’utiliser la bouilloire de précision.
20 | UTILISATION DE LA BOUILLOIRE DE PRÉCISION
Page 21

UTILISATION DE LA BOUILLOIRE DE PRÉCISION
ÉLÉVATION*
SUGGESTIONS DE TEMPÉRATURES D’INFUSION
La bouilloire de précision de KitchenAid® permet de verser avec soin. Elle possède une
carafe de 1 litre – la norme de l’industrie. Sélectionner votre température d’infusion
personnalisée entre 140°F et 212°F (60°C et 100°C) par augmentation de 1 degré et
utiliser l’option de maintien qui garde au chaud pendant 30 minutes. Le couvercle est
muni d’un thermostat de degré d’infusion pour vous permettre de toujours savoir que
l’eau pendant le service est toujours à la température souhaitée.
REMARQUE : La bouilloire de précision est conçue pour être utilisée avec de
l’eau seulement. Ne pas verser d’autres liquides ou substances dans la bouilloire
de précision.
FRANÇAIS
BOISSON Café
TEMPÉRATURE
SUGGÉRÉE (°C/°F)
Thé
vert
92-96° 80° 85° 90° 95° 100°
196-205° 176° 185° 194° 203° 212°
Thé
blanc
Thé
Oolong
Thé
noir
DURÉE D’INFUSION
SUGGÉRÉE (EN
3-5 1-3 3-5 3-5 4-5 5-7
MINUTES)
Les suggestions précédentes sont données à titre de référence
seulement. KitchenAid recommande d’expérimenter avec les
températures et durées d’infusion pour trouver la combinaison
parfaite pour préparer votre tasse de thé ou de café préféré.
Since 1919
Pour une consultation facile, la plage de température
suggérée pour l’infusion de café est indiquée en rouge sur le
thermomètre intégré.
GUIDE DE RÉFÉRENCE D’ÉBULLITION SELON L’ALTITUDE
Ce tableau indique le point d’ébullition de l’eau à différentes altitudes. Consulter
ce tableau pour effectuer le réglage de la température en fonction de l’altitude
de votre région.
À L’EXTÉRIEUR DE LA PLAGE IDÉALE
94.7°/202.5°
95.8°/204.4°
96.8°/206.3°
97.9°/208.2°
98.9°/212°
100°/212°
POINT D’ÉBULLITION °C/°F
*Altitude indiquée en pieds au-dessus du niveau de la mer.
UTILISATION DE LA BOUILLOIRE DE PRÉCISION | 21
90.5°/194.9°
91.6°/196.8°
92.6°/198.7°
93.7°/200.6°
Tisane
Page 22

UTILISATION DE LA BOUILLOIRE DE PRÉCISION
RÉGLAGE DE L’ÉCOULEMENT
CONSEIL : Avant la première utilisation, remplir la bouilloire de précision d’eau à la
température de la pièce et verser en utilisant chacun des réglages d’écoulement pour
vous familiariser avec chacun des réglages.
Votre bouilloire de précision est munie
de trois réglages d’écoulement. Le
levier de réglage de l’écoulement
1
situé à l’intérieur de la bouilloire
permet de modifier le réglage.
REMARQUE : Après avoir fait chauffer de l’eau, s’assurer de vider la bouilloire de
précision et lui permettre de refroidir complètement avant de modifier le réglage de
l’écoulement.
CONSEIL : Le levier de réglage de l’écoulement peut être retiré pour le nettoyer. Il
peut sortir de son emplacement s’il est relevé avec trop de force pendant le réglage de
l’écoulement. Le levier est cependant facile à remettre en place.
Descendre le levier pour réduire
l’écoulement; le relever pour
2
augmenter l’écoulement.
PERSONNALISER LA TENSION DU COUVERCLE DE LA BOUILLOIRE
ET LE LEVIER DE RÉGLAGE DE L’ÉCOULEMENT
Si le couvercle semble trop difcile
ou facile à enlever, essayer d’en
régler la tension. Utiliser un outil,
comme un petit tournevis, pour
1
ajuster les trois onglets situés sur le
bord de la bouilloire. Insérer pour
créer moins de tension; retirer pour
en créer plus.
22 | UTILISATION DE LA BOUILLOIRE DE PRÉCISION
Après avoir réglé les onglets, remettre
le couvercle en place et vérifier que
2
tout fonctionne selon vos préférences.
Continuer à ajuster au besoin.
Page 23

UTILISATION DE LA BOUILLOIRE DE PRÉCISION
Si le levier de réglage de
l’écoulement semble trop difficile ou
trop facile à bouger, utiliser les doigts
3
pour en ajuster l’onglet. Insérer pour
créer moins de tension; retirer pour
en créer plus.
REMPLIR D’EAU LA BOUILLOIRE DE PRÉCISION
Essayer le levier pour vérifier la
4
tension; continuer à ajuster au besoin.
FRANÇAIS
Enlever le couvercle de la bouilloire
1
de précision, puis la remplir d’eau.
REMARQUE : Ne pas remplir au-delà de
la ligne MAX 1 litre.
IMPORTANT : Pour fonctionner, la
bouilloire de précision doit contenir un
minimum de 1 tasse (0,25 l) d’eau. Si
le niveau d’eau descend sous ce point,
l’icône d’ajout d’eau s’allumera. Il faudra
ajouter de l’eau dans la bouilloire avant
de continuer à l’utiliser.
UTILISATION DE LA BOUILLOIRE DE PRÉCISION | 23
Replacer le couvercle et placer la
2
bouilloire de précision sur son socle.
Page 24

UTILISATION DE LA BOUILLOIRE DE PRÉCISION
CHAUFFAGE DE L’EAU
REMARQUE : La température peut s’afficher en Celsius (C) ou en Fahrenheit (F). Pour
passer entre Celsius et Fahrenheit, maintenir enfoncés les boutons « – » et « + » en
même temps. Consulter le « Guide de référence d’ébullition selon l’altitude » pour
connaître le meilleur réglage de température selon votre altitude.
Lorsque la bouilloire de précision
est placée pour la première fois sur
son socle, l’affichage indique 212°F
ou 100°C*. Après quelques instants,
1
l’affichage se met à jour et indique la
température actuelle de l’eau dans la
bouilloire de précision.
*La bouilloire de précision possède une
fonction qui garde en mémoire la dernière
température sélectionnée (entre 140°F
et 212°F [60°C et 100°C]). Cette fonction
détermine la température affichée après
la première utilisation.
Appuyer sur le bouton de mise
sous tension ( ) pour enregistrer
la température et commencer à
chauffer l’eau. L’icône (icône de
3
chauffage) s’affiche à l’écran ACL
pour indiquer que la bouilloire de
précision chauffe.
Appuyer sur les boutons « - » ou « +
» pour sélectionner une température
d’eau entre 140°F et 212°F (60°C et
100°C). Pour un réglage plus rapide
2
de la température, maintenir enfoncé
le bouton « – » ou « + » pendant 3
secondes, la température affichée
défilera plus rapidement.
Pendant le chauffage, l’écran
affiche la température actuelle
4
de l’eau, pas la température
sélectionnée.
REMARQUE : Le bouton est inactif
lorsque la bouilloire de précision n’est pas
sur son socle.
24 | UTILISATION DE LA BOUILLOIRE DE PRÉCISION
Page 25

UTILISATION DE LA BOUILLOIRE DE PRÉCISION
IMPORTANT : Consulter le « Guide de
référence d’ébullition selon l’altitude »
pour connaître le point d’ébullition selon
votre altitude. Si la bouilloire de précision
est utilisée à une altitude supérieure, l’eau
bouillira en continu à une température
inférieure jusqu’à ce qu’elle soit évaporée.
Si cette situation se produit, la bouilloire
s’éteint.
Une fois la température sélectionnée
atteinte, le chauffage se ferme, une
5
sonnerie retentit et l’icône s’éteint.
UTILISATION DU MODE DE MAINTIEN DE LA TEMPÉRATURE
Consulter le « Guide de référence d’ébullition selon l’altitude » avant d’utiliser le mode
de maintien de la température pour connaître le point d’ébullition selon votre altitude. Si
la bouilloire de précision est utilisée à une altitude supérieure, l’eau bouillira en continu à
une température inférieure jusqu’à ce qu’elle soit évaporée. Si cette situation se produit,
la bouilloire s’éteint.
FRANÇAIS
Ce mode permet de maintenir l’eau
à la température désirée pendant un
Pour activer le mode de maintien de
la température, appuyer sur l’icône
1
(maintien de la température) après
avoir sélectionné la température
souhaitée.
REMARQUE : Cette bouilloire de précision doit être placée sur sa base pour activer le
mode de maintien de la température. La bouilloire s’éteint une fois retirée de son socle.
CONSEIL : Le mode de maintien de la température fonctionne à toutes les
températures entre 140°F et 212°F (60°C et 100°C). L’altitude affecte le mode de
maintien de la température; consulter le « Guide de référence d’ébullition selon
l’altitude » à la page 21. Maintien la température avec une précision de +/ – 4°F (2°C).
UTILISATION DE LA BOUILLOIRE DE PRÉCISION | 25
maximum de 30 minutes lorsque la
bouilloire de précision est laissée sur
son socle. Pour annuler le maintien
2
au chaud avant la fin des 30 minutes,
appuyer sur le bouton appuyer de
nouveau sur le bouton de maintien au
chaud ou retirer la bouilloire de son socle.
Page 26

UTILISATION DE LA BOUILLOIRE DE PRÉCISION
ARRÊT DE LA BOUILLOIRE DE PRÉCISION
La bouilloire de précision peut être éteinte de différentes façons :
Appuyer sur lorsqu’elle est en
1
mode chauffage.
Soulever la bouilloire de sa base.
3
2
REMARQUE : Débrancher la bouilloire de
précision lorsqu’elle n’est pas utilisée.
ENTRETIEN ET NETTOYAGE
NETTOYAGE DE L’EXTÉRIEUR
IMPORTANT : Avant le nettoyage,
toujours débrancher la bouilloire de
précision de la source d’électricité.
S’assurer que la bouilloire de précision
est froide.
Appuyer sur lorsqu’elle est en
mode maintien de la
26 | ENTRETIEN ET NETTOYAGE
L’extérieur de la bouilloire de précision
peut être nettoyé à l’aide d’un chiffon
humide. Sécher et polir la bouilloire de
précision à l’aide d’un chiffon doux. Les
produits abrasifs et produits à récurer ne
sont pas recommandés.
Page 27

ENTRETIEN ET NETTOYAGE
SUPPRIMER LES DÉPÔTS DE MINÉRAUX DE L’INTÉRIEUR
Une décalcication est nécessaire pour obtenir le meilleur rendement de votre bouilloire
de précision. Des dépôts de calcium peuvent se former sur l’intérieur de la bouilloire
de précision. La fréquence de nettoyage dépend de la dureté de l’eau versée dans la
bouilloire de précision.
Since 1919
IMPORTANT : S’assurer que les trous
d’évacuation situés sur le dessus de la
carafe sont propres et bien dégagés,
sinon, la bouilloire pourrait déborder.
Vider le mélange de la bouilloire
2
de précision.
REMARQUE : Pour un nettoyage plus
en profondeur, le levier de réglage de
l’écoulement et le thermomètre intégré
peuvent être enlevés.
POUR OBTENIR DES RENSEIGNEMENTS DÉTAILLÉS SUR LE NETTOYAGE
DE LA BOUILLOIRE DE PRÉCISION
Visiter le kitchenaid.com/quickstart pour obtenir des instructions supplémentaires
incluant des vidéos et des conseils sur la façon d’utiliser la bouilloire de précision.
Verser 1tasse (0,25l) de vinaigre
et 3tasses (0,75l) d’eau dans la
1
bouilloire de précision. Faire bouillir
et laisser reposer pendant la nuit.
Remplir d’eau la bouilloire de
précision, porter à ébullition et vider.
Répéter ces étapes deux fois. La
3
bouilloire de précision est désormais
prête à l’utilisation.
FRANÇAIS
ENTRETIEN ET NETTOYAGE | 27
Page 28

GARANTIE ET DÉPANNAGE
GARANTIE ET DÉPANNAGE DE LA BOUILLOIRE DE PRÉCISION
KITCHENAID® POUR LES 50 ÉTATS DES ÉTATS-UNIS, LE DISTRICT
FÉDÉRAL DE COLUMBIA, PORTO RICO ET LE CANADA
La présente garantie couvre l’acheteur et les propriétaires suivants de la bouilloire de
précision lorsqu’elle est utilisé dans les 50 États des États-Unis, le district fédéral de
Columbia, à Porto Rico et au Canada.
Durée de la garantie : Garantie complète d’un an à compter de la date d’achat.
KitchenAid prendra en
charge les éléments
suivants à votre choix :
KitchenAid ne paiera
pas pour :
CLAUSE D’EXONÉRATION DE RESPONSABILITÉ AU TITRE DES GARANTIES
IMPLICITES; LIMITATION DES RECOURS
LES GARANTIES IMPLICITES, Y COMPRIS DANS LA MESURE APPLICABLE LES
GARANTIES DE QUALITÉ MARCHANDE OU D’APTITUDE À UN USAGE PARTICULIER,
SONT EXCLUES DANS LA MESURE AUTORISÉES PAR LA LOI. TOUTE GARANTIE
IMPLICITE POUVANT ÊTRE IMPOSÉE PAR LA LOI EST LIMITÉE À UN AN, OU À LA
PLUS COURTE PÉRIODE AUTORISÉE PAR LA LOI. CERTAINES JURIDICTIONS NE
PERMETTENT PAS LA LIMITATION DE LA DURÉE DE VALIDITÉ DES GARANTIES
IMPLICITES DE QUALITÉ MARCHANDE OU D’APTITUDE À UN USAGE PARTICULIER;
PAR CONSÉQUENT LES LIMITATIONS OU EXCLUSIONS STIPULÉES DANS LES
PRÉSENTES PEUVENT NE PAS VOUS ÊTRE APPLICABLES.
SI CE PRODUIT NE FONCTIONNE PAS TEL QUE GARANTI, LE SEUL ET
UNIQUE RECOURS DU CLIENT CONSISTE À EN OBTENIR LA RÉPARATION
OU LE REMPLACEMENT CONFORMÉMENT AUX TERMES DE LA PRÉSENTE
GARANTIE LIMITÉE. KITCHENAID ET KITCHENAID CANADA DÉCLINENT TOUTE
RESPONSABILITÉ AU TITRE DES DOMMAGES FORTUITS OU INDIRECTS. Cette
garantie vous confère des droits juridiques spéciques et vous pouvez également jouir
d’autres droits qui peuvent varier d’un État à l’autre ou d’une province à l’autre.
KitchenAid prendra en charge les éléments suivants
à votre choix : Remplacement sans difculté de la
bouilloire de précision. Voir la page suivante pour plus
de détails concernant la procédure à suivre pour un
dépannage, ou appeler le numéro sans frais
1-800-541-6390 du Centre eXpérience clientèle.
OU
Les frais des pièces de rechange et de main-d’œuvre
pour corriger les vices de matériaux et de fabrication.
Le service doit être fourni par un centre de dépannage
agréé KitchenAid.
A. Les réparations lorsque la bouilloire de précision
est utilisé à des ns autres qu’un usage domestique
unifamilial normal.
B. Les dommages causés par : accident, altération,
mésusage ou abus.
C. Tout frais d’expédition ou de manutention pour livrer
la bouilloire de précision à un centre de dépannage
agréé.
D. Les pièces de rechange ou frais de main d’œuvre
pour la bouilloire de précision lorsqu’elle est utilisé
à l’extérieur des 50 États des États-Unis, du district
fédéral de Columbia, de Porto Rico et du Canada.
28 | GARANTIE ET DÉPANNAGE
Page 29

GARANTIE ET DÉPANNAGE
GARANTIE DE REMPLACEMENT SANS DIFFICULTÉ – 50 ÉTATS
DES ÉTATS-UNIS, DISTRICT FÉDÉRAL DE COLUMBIA ET PORTO RICO
Nous sommes tellement certains que
la qualité de nos produits satisfait aux
normes exigeantes de KitchenAid que si la
bouilloire de précision cesse de fonctionner
au cours de la première année suivant son
acquisition, KitchenAid livrera gratuitement
à votre porte un appareil de remplacement
identique ou comparable et prendra les
dispositions nécessaires pour que la bouilloire
de précision d’origine nous soit retourné.
L’appareil de remplacement sera également
couvert par notre garantie limitée d’un an.
Veuillez suivre ces instructions pour bénécier
de ce service de qualité.
Si votre bouilloire de précision cesse de
fonctionner durant la première année suivant
son acquisition, il vous suft d’appeler notre
Centre eXpérience clientèle au numéro sans
frais 1-800-541-6390, du lundi au vendredi.
Veuillez avoir votre reçu de vente à portée de
main au moment de votre appel. Une preuve
d’achat est indispensable pour que votre
réclamation puisse être traitée. Fournissez
votre adresse de livraison complète au
représentant (pas de boîte postale).
À réception de la bouilloire de précision de
rechange, utiliser le carton et les matériaux
d’emballage pour emballer la bouilloire de
précision d’origine.
GARANTIE DE REMPLACEMENT SANS DIFFICULTÉ – CANADA
Nous sommes tellement certains que la
qualité de nos produits satisfait aux normes
exigeantes de la marque KitchenAid que si la
bouilloire de précision cesse de fonctionner
au cours de la première année suivant son
acquisition, KitchenAid Canada remplacera
la bouilloire de précision par un appareil de
remplacement identique ou comparable.
L’appareil de remplacement sera également
couvert par notre garantie limitée d’un an.
Si la bouilloire de précision cesse de
fonctionner durant la première année suivant
son acquisition, il vous suft d’appeler notre
Centre d’eXpérience à la clientèle au
1-800-807-6777, du lundi au vendredi.
Veuillez avoir votre reçu de vente à portée
de main au moment de votre appel. Une
preuve d’achat est indispensable pour
que votre réclamation puisse être traitée.
Fournissez votre adresse de livraison
complète au représentant.
Après avoir reçu la bouilloire de précision
de rechange, utiliser le carton, les matériaux
d’emballage et l’étiquette d’expédition
prépayée pour emballer la bouilloire
de précision d’origine et la renvoyer
à KitchenAid.
FRANÇAIS
OBTENIR UN DÉPANNAGE UNE FOIS LA GARANTIE EXPIRÉE OU
COMMANDER DES ACCESSOIRES ET PIÈCES DE RECHANGE
Aux États-Unis et à Porto Rico :
Pour des informations sur le service de
dépannage ou pour commander des
accessoires ou des pièces de rechange,
composer le numéro sans frais
1-800-541-6390 ou écrire à :
Customer eXperience Center,
KitchenAid Small Appliances,
P.O. Box 218, St. Joseph, MI 49085-0218
®/™ ©2018 KitchenAid. Tous droits réservés. KITCHENAID et la forme du batteur sur socle
sont des marques de commerce aux É.-U. et dans d’autres pays. Utilisé sous licence au Canada.
En dehors des États-Unis et de Porto Rico :
Consulter le revendeur KitchenAid local
ou le détaillant auprès la bouilloire de
précision a été acheté pour connaître la
marche à suivre en cas d’intervention de
dépannage nécessaire.
Pour des informations concernant toute
intervention de dépannage au Canada :
1-800-807-6777.
Pour des informations concernant toute
intervention de dépannage au Mexique :
01-800-0022-767.
GARANTIE ET DÉPANNAGE | 29
Page 30

PIEZAS Y CARACTERÍSTICAS
PIEZAS Y ACCESORIOS
Boquilla cuello de cisne
diseñada para un control
de vertido de precisión
de calidad de experto
Tetera de
precisión con
1 l de
capacidad
Base de tetera con
pantalla digital
Termómetro integrado
Tapa
Panel de control con la
función de mantener la
temperatura y cambio de
30 | PIEZAS Y CARACTERÍSTICAS
Cable de alimentación
con almacenamiento de
cable incorporado
°F/°C
Page 31

PIEZAS Y CARACTERÍSTICAS
Control de flujo de
precisión de 3 posiciones
(cuerpo interno)
Since 1919
Dial del termómetro
integrado
Palanca de control
de flujo
ESPAÑOL
Ícono de mantener la
temperatura
- botón
+ botón
Ícono de calentar
Panel de control con
la función de mantener
la temperatura y
cambio de °F/°C
Ícono para
agregar agua
Botón de
encendido
Botón para mantener
la temperatura
PIEZAS Y CARACTERÍSTICAS | 31
Page 32

SEGURIDAD DE LA TETERA DE PRECISIÓN
SALVAGUARDIAS IMPORTANTES
Al utilizar aparatos eléctricos, se deben seguir las precauciones básicas
de seguridad, entre las que se incluyen las siguientes:
1. Lea todas las instrucciones.
2. No toque las supercies calientes. Use agarraderas.
3. Para proteger contra incendios, electrocución y lesiones a las personas, no sumerja
la base, el cable, el enchufe ni la tetera de precisión en agua o en otros líquidos.
4. Supervise la operación cuidadosamente cuando use la tetera de precisión cerca
de niños.
5. Desenchufe la tetera de precisión del contacto cuando no esté en uso y antes
de limpiarla el aparato. Deje que se enfríe antes de colocar o quitar piezas y
antes de limpiar el aparato.
6. No opere la tetera de precisión que tenga un cable o enchufe dañado, que
haya funcionado mal o que se haya dañado de alguna manera. Envíe el
electrodoméstico al centro de servicio autorizado más cercano para su
examen, reparación o regulación.
32 | SEGURIDAD DE LA TETERA DE PRECISIÓN
Page 33

SEGURIDAD DE LA TETERA DE PRECISIÓN
7. El uso de piezas de repuesto o accesorios no recomendados por el fabricante
puede causar incendios, electrocución o lesiones a personas.
8. No lo use al aire libre.
9. No deje que el cable cuelgue sobre los bordes de la mesa o el mostrador, ni
permita que entre en contacto con supercies calientes.
10. No lo coloque cerca ni encima de un quemador eléctrico o a gas que esté
caliente ni en el interior de un horno caliente.
11. La tetera de precisión debe usarse solo para calentar agua.
12. No use la tetera de precisión si la tapa no está debidamente cerrada.
13. No use la tetera de precisión si la manija está oja o desgastada.
14. No dé al aparato un uso diferente de aquél para el cual que fue diseñado.
15. No limpie la tetera de precisión con limpiadores abrasivos, estropajos de acero
u otros materiales abrasivos.
16. No llene la tetera de precisión en exceso.
17. Pueden producirse quemaduras si retira la tapa durante el ciclo de calor.
18. Para desconectar, gire cualquier control hacia “off” (apagado) y quite el enchufe
del contacto de pared.
GUARDE ESTAS INSTRUCCIONES
Este producto ha sido diseñado únicamente para uso doméstico.
REQUISITOS ELÉCTRICOS
Tensión: 120 VCA
Frecuencia: 60 Hz
Vatiaje: 1000 W
NOTA: La tetera de precisión tiene un
enchufe de 3 terminales con conexión
a tierra. Para reducir el riesgo de
electrocución, este enchufe encajará
en un contacto de pared de una sola
manera. Si el enchufe no encaja en el
tomacorriente, póngase en contacto con
un electricista competente. No modifique
el enchufe de ninguna manera.
No use un cable eléctrico de extensión.
Si el cable de suministro eléctrico es
demasiado corto, haga que un electricista
o un técnico de servicio competente
instale un tomacorriente cerca del
electrodoméstico.
Deberá usarse un cable de suministro
eléctrico corto (o un cable de suministro
eléctrico desmontable) para reducir el
riesgo de enredarse o tropezar con un
cable más largo.
ESPAÑOL
SEGURIDAD DE LA TETERA DE PRECISIÓN | 33
Page 34

USO DE LA TETERA DE PRECISIÓN
PREPARACIÓN DE LA TETERA DE PRECISIÓN PARA EL USO
Antes del primer uso
Antes de utilizar la tetera de precisión por primera vez, lave la tetera y todos los accesorios,
incluida la tapa, en agua jabonosa tibia; después, enjuague con agua limpia y seque.
Rellene la tetera de precisión con agua hasta la línea de llenado MAX (vea el ejemplo más
adelante) y ejecute 1 ciclo con la temperatura máxima. Para evitar daños, no sumerja la
tetera de precisión por completo en el agua y no utilice limpiadores o estropajos abrasivos.
NOTA: La totalidad de la tetera de precisión se debe lavar a mano únicamente. Para
evitar daños, no lave en lavavajillas ninguna pieza de la tetera de precisión, los accesorios
ni la base con el cable eléctrico.
Since 1919
IMPORTANTE: Asegúrese de que
Llene la tetera de precisión con agua
hasta la línea de llenado MAX dentro de
la tetera.
los orificios de ventilación de la parte
superior de la tetera estén limpios y no
tengan obstrucciones, o la tetera de
precisión podría desbordarse.
34 | USO DE LA TETERA DE PRECISIÓN
Coloque la base con el cable de
alimentación sobre una superficie
plana y sólida y enchúfela en una
1
toma para tres clavijas con conexión
a tierra.
PARA OBTENER INFORMACIÓN
DETALLADA SOBRE EL USO DE LA
TETERA DE PRECISIÓN
Visite kitchenaid.com/quickstart para
ver instrucciones adicionales con videos
y consejos sobre el uso de la tetera de
precisión.
Page 35

USO DE LA TETERA DE PRECISIÓN
ELEVACIÓN*
SUGERENCIAS DE TEMPERATURA PARA INFUSIONES
La tetera de precisión KitchenAid® permite que vierta con precisión. Incluye una jarra
con capacidad de 1 litro, el estándar de la industria. Seleccione su temperatura deseada
personalizable en aumentos de 1 grado en el rango de 140 a 212°F (60 a 100°C), con la
opción de mantenerla durante 30 minutos. Se muestra un termómetro con rango para
infusiones en la tapa para hacer seguimiento de la temperatura del agua mientras la
vierte, de manera que se mantenga dentro del rango preferido.
NOTA: La tetera de precisión está diseñada solo para agua. No ponga otros líquidos o
sustancias en la tetera de precisión.
BEBIDAS Café
TEMPERATURA
SUGERIDA (°C/°F)
Té
verde
92-96° 80° 85° 90° 95° 100°
196-205° 176° 185° 194° 203° 212°
Té
blanco
Té
oolong*
Té
negro
Té de
hierbas
TIEMPO DE
MACERADO/
INFUSIÓN SUGERIDO
3-5 1-3 3-5 3-5 4-5 5-7
(MINUTOS)
*té tradicional chino
Las sugerencias mencionadas son puntos de referencia.
KitchenAid recomienda que experimente con temperaturas
y tiempos de macerado e infusión para encontrar la fórmula
perfecta para su taza de té o café preferida.
Since 1919
Como referencia, el rango de temperatura sugerido para
el café se muestra en rojo en el termómetro integrado.
GUÍA DE REFERENCIA DE PUNTOS DE EBULLICIÓN SEGÚN LA ALTURA
En esta altura se muestra el punto de ebullición del agua a diferentes alturas. Consulte
esta tabla cuando use la tetera de precisión y tenga en consideración el punto de
ebullición en su zona en especíco.
FUERA DEL RANGO IDEAL
94.7°/202.5°
95.8°/204.4°
96.8°/206.3°
97.9°/208.2°
98.9°/212°
100°/212°
PUNTO DE EBULLICIÓN °C/°F
*Elevación mostrada en pies sobre el nivel del mar.
USO DE LA TETERA DE PRECISIÓN | 35
90.5°/194.9°
91.6°/196.8°
92.6°/198.7°
93.7°/200.6°
ESPAÑOL
Page 36

USO DE LA TETERA DE PRECISIÓN
RÉGLAGE DE L’ÉCOULEMENT
SUGERENCIA: Antes del primer uso, llene la tetera de precisión son agua a
temperatura ambiente y viértala con cada opción de control de flujo para familiarizarse
con las diferentes velocidades de flujo.
Su tetera de precisión tiene tres
opciones de control de flujo. La
palanca de control de flujo dentro
1
de la tetera se usa para cambiar las
opciones.
NOTA: Después de calentar el agua, asegúrese de vaciar la tetera de precisión y deje
que se enfríe completamente antes de cambiar la opción de flujo.
SUGERENCIA: La palanca de control de flujo debe salirse para poder realizar la
limpieza. Si tira demasiado mientras cambia las opciones de flujo y la palanca se sale,
se puede volver a poner en su lugar fácilmente.
Empuje la palanca hacia abajo para
obtener un flujo más restringido; tire
2
la palanca hacia arriba para un flujo
menos restringido.
PERSONALIZACIÓN DE LA TENSIÓN DE LA TAPA DE LA TETERA Y
DE LA PALANCA DE CONTROL DE FLUJO
Si siente que la tapa está muy
tensa o muy suelta, pruebe ajustar
los niveles de tensión. Use una
herramienta pequeña, como un
1
destornillador pequeño, para ajustar
las tres pestañas del borde de la
tetera. Empuje para crear menos
tensión; tire para crear más.
Después de ajustar las pestañas,
vuelva a poner la tapa en la tetera de
precisión para probar el ajuste y ver si
2
es satisfactorio. Siga ajustando según
sea necesario.
36 | USO DE LA TETERA DE PRECISIÓN
Page 37

USO DE LA TETERA DE PRECISIÓN
Si siente que la palanca de control
de flujo está muy suelta o muy tensa
para mover, use sus dedos para
3
ajustar la lengüeta en la palanca de
control de flujo. Empuje para crear
menos tensión; tire para crear más.
LLENADO DE LA TETERA DE PRECISIÓN CON AGUA
Pruebe el control de flujo para ver si
la tensión es correcta; continúe para
4
ajustar si es necesario.
ESPAÑOL
Retire la tapa de la tetera de precisión
1
y llénela con agua.
NOTA: No llene por encima de la línea de
llenado MAX de 1 L.
IMPORTANTE: Debe haber un mínimo
de 1 taza (0,25 L) de agua para que la
tetera de precisión funcione. Si el nivel
de agua está bajo este punto, el icono
para agregar agua se encenderá, y
necesitará agregar agua a la tetera antes
de continuar usándola.
Vuelva a poner la tapa y ponga
la tetera de precisión nuevamente
2
en la base.
USO DE LA TETERA DE PRECISIÓN | 37
Page 38

USO DE LA TETERA DE PRECISIÓN
CALENTAR AGUA
NOTA: La temperatura puede mostrarse en grados Celsius (C) o Fahrenheit (F). Para
intercambiar entre grados Celsius y Fahrenheit, mantenga presionados los botones “-”
y “+” al mismo tiempo. Consulte la “Guía de referencia de punto de ebullición según la
altura” para obtener información sobre el ajuste de temperatura máxima para su altura.
Cuando ponga la tetera de precisión
en la base por primera vez, aparecerá
212°F o 100°C* en la pantalla.
Después de algunos momentos, la
1
pantalla se actualizará para mostrar la
temperatura real del agua en la tetera
de precisión.
*La tetera de precisión tiene una función
de memoria de la última temperatura
seleccionada (entre 140 y 212°F [60 y
100°C]). Esta función determinará la
temperatura que aparecerá en la pantalla
después del primer uso.
Presione el botón de encendido
para guardar la temperatura y
comenzar a calentar el agua. Aparecerá
3
el ícono (Ícono de calentar) en la
pantalla LCD para indicar que la tetera
de precisión se está calentando.
Presione los botones “-” o “+” para
seleccionar la temperatura de agua
deseada entre 140 y 212°F (60 a
100°C). Para ajustar la temperatura
más rápidamente, mantenga
2
presionado el botón “-” o “+”
durante 3 segundos, y la lectura
de la temperatura avanzará más
rápidamente.
Mientras calienta el agua, la
temperatura que aparece en la
pantalla es la temperatura real
4
del agua, no la temperatura
seleccionada.
NOTA: El botón de encendido ( ) no
funciona correctamente cuando la tetera
de precisión no está en la base.
38 | USO DE LA TETERA DE PRECISIÓN
Page 39

USO DE LA TETERA DE PRECISIÓN
IMPORTANTE: Consulte la “Guía de
referencia de puntos de ebullición según
la altura” para encontrar la temperatura
de ebullición máxima en su altura. Si
usa la tetera de precisión a alturas más
elevadas, el agua de la tetera de precisión
hervirá continuamente a temperaturas
más bajas hasta que toda el agua se haya
evaporado. Si esto ocurre, la tetera se
apagará
Una vez que se haya alcanzado
la temperatura seleccionada, el
calentador se apagará, se escuchará
5
un sonido de campana y el se
apagará.
USO DEL MODO PARA MANTENER LA TEMPERATURA
Cuando use el modo para mantener la temperatura, consulte la “Guía de referencia de
puntos de ebullición según la altura” para encontrar la temperatura de ebullición máxima
en su altura. Si usa la tetera de precisión a alturas más elevadas, el agua de la tetera de
precisión hervirá continuamente a temperaturas más bajas hasta que se haya evaporado.
Si esto ocurre, la tetera se apagará.
Mientras la tetera de precisión esté
en la base, la temperatura deseada
Para activar el modo para mantener
la temperatura, presione el botón
1
(Mantener temperatura) después de
seleccionar su temperatura preferida.
NOTA: La tetera de precisión debe estar en la base para activar la función de mantener
la temperatura. Una vez que la tetera de precisión se quita de la base, ésta se apagará.
CONSEJO: El modo de mantener la temperatura funciona para todas las temperaturas
dentro del rango de 140 a 212°F (60 a 100°C). La altura afecta el modo de mantener la
temperatura; consulte la “Guía de referencia de punto de ebullición según la altura” en
la página 35. El modo para mantener la temperatura es preciso en el rango de +/- 4°F
(2°C).
se mantendrá hasta por 30 minutos.
Para cancelar la función para mantener
la temperatura antes de que hayan
2
pasado 30 minutos, presione el botón
o bien, presione el botón para
mantener la temperatura de nuevo, o
quite la tetera de la base.
ESPAÑOL
USO DE LA TETERA DE PRECISIÓN | 39
Page 40

USO DE LA TETERA DE PRECISIÓN
CÓMO APAGAR LA TETERA DE PRECISIÓN
La tetera de precisión puede apagarse de varias maneras:
Presione el botón de encendido
mientras se encuentre en el modo de
1
calentar.
Levante la tetera de precisión de la
3
base.
CUIDADO Y LIMPIEZA
LIMPIEZA DEL EXTERIOR
IMPORTANTE: Antes de realizar la
limpieza, desconecte siempre la tetera
de precisión del contacto de electricidad.
Asegúrese de que la tetera de precisión
se haya enfriado completamente.
Presione el botón de encendido
mientras se encuentre en el modo
2
para mantener la temperatura.
NOTA: Desconecte la tetera de precisión
cuando no se encuentre en uso.
40 | CUIDADO Y LIMPIEZA
El exterior de la tetera de precisión se
puede limpiar con un paño húmedo.
Seque y pula la tetera de precisión con
un paño suave. No se recomienda usar
ningún tipo de agentes abrasivos ni
productos de limpieza para pulir.
Page 41

CUIDADO Y LIMPIEZA
RETIRAR DEPÓSITOS DE MINERALES DEL INTERIOR
Para obtener el mejor rendimiento de su tetera de precisión, tendrá que descalcicarla.
Se pueden formar depósitos de calcio en el interior de la tetera de precisión. El intervalo
entre una limpieza y otra dependerá de la dureza del agua que se coloque en la tetera
de precisión.
Since 1919
IMPORTANTE: Asegúrese de que
los orificios de ventilación de la parte
superior de la tetera estén limpios y no
tengan obstrucciones, o la tetera de
precisión podría desbordarse.
Vacíe la solución de la tetera
2
de precisión.
NOTA: Si lo desea, puede retirar
la palanca de control de flujo y el
termómetro integrado para realizar una
limpieza más profunda.
PARA OBTENER INFORMACIÓN DETALLADA SOBRE LA LIMPIEZA DE LA TETERA
DE PRECISIÓN
Visite kitchenaid.com/quickstart para ver instrucciones adicionales con videos y consejos
sobre el uso de la tetera de precisión.
Llene la tetera de precisión con 1taza
(0,25l) de vinagre blanco y 3tazas
1
(0,75l) de agua. Haga hervir y deje
reposar hasta el día siguiente.
Llene la tetera de precisión con
agua, póngala a hervir y vacíe el
agua. Realice este paso dos veces.
3
La tetera de precisión ya estará lista
para el uso.
ESPAÑOL
CUIDADO Y LIMPIEZA | 41
Page 42

GARANTÍA Y SERVICIO
GARANTÍA DE LA TETERA DE PRECISIÓN KITCHENAID® PARA LOS
50 ESTADOS DE ESTADOS UNIDOS, EL DISTRITO DE COLUMBIA,
PUERTO RICO Y CANADÁ
Esta garantía se extiende al comprador y a cualquier propietario subsiguiente para la
tetera de precisión usadas en los cincuenta estados de Estados Unidos, el Distrito de
Columbia, Puerto Rico y Canadá.
Duración de la garantía: Un año de garantía completa a partir de la fecha
KitchenAid pagará por lo
siguiente, a su elección:
KitchenAid no pagará
por:
EXCLUSIÓN DE GARANTÍAS IMPLÍCITAS; LIMITACIÓN DE RECURSOS
LAS GARANTÍAS IMPLÍCITAS, INCLUYENDO EN LA MEDIDA QUE
CORRESPONDA LAS GARANTÍAS DE COMERCIABILIDAD O DE CAPACIDAD
PARA UN PROPÓSITO PARTICULAR, SON EXCLUIDAS EN LA MEDIDA EN QUE
SEA LEGALMENTE PERMISIBLE. TODA GARANTÍA QUE SEA IMPUESTA POR
LEY SERÁ LIMITADA A UN AÑO O AL PERÍODO MÁS CORTO PERMITIDO POR
LEY. ALGUNOS ESTADOS Y PROVINCIAS NO PERMITEN LAS LIMITACIONES O
EXCLUSIONES ACERCA DE CUÁNTO DEBE DURAR UNA GARANTÍA IMPLÍCITA
DE COMERCIABILIDAD O CAPACIDAD, DE MODO QUE LAS LIMITACIONES O
EXCLUSIONES ARRIBA MENCIONADAS PUEDEN NO APLICARSE EN SU CASO.
SI ESTE PRODUCTO NO FUNCIONA COMO LO INDICA LA GARANTÍA, EL
ÚNICO Y EXCLUSIVO RECURSO DEL CLIENTE SERÁ EL DE REPARARLO O
REEMPLAZARLO SEGÚN LOS TÉRMINOS DE ESTA GARANTÍA LIMITADA.
KITCHENAID Y KITCHENAID CANADA NO SE RESPONSABILIZARÁN POR
DAÑOS INCIDENTALES O CONSECUENTES. Esta garantía le otorga derechos
legales especícos, y es posible que usted tenga también otros derechos, los
cuales varían de un estado a otro o de una provincia a otra.
de compra.
Reemplazo sin dicultades de su tetera de precisión.
Consulte la siguiente página para obtener detalles
acerca de cómo obtener el servicio o llame al
Centro para la eXperiencia del cliente, sin cargo,
al 1-800-541-6390.
O BIEN
Los costos de las piezas de repuesto y del trabajo de
reparación para corregir los defectos en los materiales
y la mano de obra. El servicio deberá ser provisto por
un Centro de servicio autorizado por KitchenAid.
A. Reparaciones cuando su tetera de precisión
se use para nes ajenos al uso doméstico normal
de una familia.
B. Daños causados por accidente, alteración,
uso indebido o abuso.
C. Cualquier gasto de envío o manejo para llevar
la tetera de precisión a un centro de servicio
autorizado.
D. Piezas de repuesto o costos de mano de obra
para teteras de precisión operados fuera de los
cincuenta estados de Estados Unidos y Distrito
de Columbia, Puerto Rico y Canadá.
42 | GARANTÍA Y SERVICIO
Page 43

GARANTÍA Y SERVICIO
GARANTÍA DE REEMPLAZO SIN DIFICULTADES – EN LOS
CINCUENTA ESTADOS DE ESTADOS UNIDOS, EL DISTRITO
DE COLUMBIA Y PUERTO RICO
Conamos tanto en que la calidad de nuestros
productos cumple con las exigentes normas
de KitchenAid que, si la tetera de precisión
presentara alguna falla durante el primer
año de compra, KitchenAid se encargará de
entregar un reemplazo idéntico o comparable
a su domicilio sin cargo y arreglará la
devolución de la tetera de precisión original
a nosotros. La unidad de reemplazo estará
también cubierta por nuestra garantía limitada
de un año.
Si la tetera de precisión fallara durante el
primer año de compra, simplemente llame a
nuestro Centro para la eXperiencia del cliente
al
1-800-541-6390
Tenga a mano el recibo de compra original
cuando llame. Se requerirá el comprobante
de compra para iniciar un proceso de reclamo.
Proporcione al asesor su dirección de envío
completa (no proporcionar números de
apartados postales).
Cuando usted reciba la tetera de precisión
de reemplazo, use la caja y los materiales de
empaque y la etiqueta de envío prepagado
para empacar la tetera de precisión
y envíela a KitchenAid.
, de lunes a viernes.
original
GARANTÍA DE REEMPLAZO SIN DIFICULTADES – EN CANADÁ
Conamos tanto en que la calidad de nuestros
productos cumple con las exigentes normas
de KitchenAid que, si
presentara alguna falla durante el primer año
de compra, KitchenAid Canada reemplazará
tetera de precisión
La unidad de reemplazo estará también cubierta
por nuestra garantía limitada de un año.
Si la tetera de precisión fallara durante el
primer año de compra, simplemente llame
a nuestro Centro para la eXperiencia del
la tetera de precisión
con uno idéntico o similar.
cliente al
Tenga a mano el recibo de compra original
cuando llame. Se requerirá el comprobante de
compra para iniciar un proceso de reclamo.
la
Proporcione al asesor su dirección de envío
completa.
Cuando usted reciba la tetera de precisión
de reemplazo, use la caja y los materiales de
empaque y la etiqueta de envío prepagado
para empacar la tetera de precisión
y envíela a KitchenAid.
1-800-807-6777
, de lunes a viernes.
original
CÓMO OBTENER SERVICIO TÉCNICO DESPUÉS DE QUE EXPIRE
LA GARANTÍA O CÓMO PEDIR ACCESORIOS Y PIEZAS DE REPUESTO
ESPAÑOL
En los Estados Unidos y Puerto Rico:
Para obtener información acerca del
servicio técnico o para pedir accesorios
o piezas de repuesto, llame sin costo al
1-800-541-6390 o escriba a:
Centro para la eXperiencia del cliente,
KitchenAid Small Appliances,
P.O. Box 218, St. Joseph, MI 49085-0218
®/™ ©2018 KitchenAid. Todos los derechos reservados. KITCHENAID y el diseño
de la batidora con base son marcas registradas en EE.UU. y en otras partes.
Usada en Canadá bajo licencia.
Fuera de los Estados Unidos y Puerto Rico:
Consulte a su distribuidor local de KitchenAid
o a la tienda donde compró
precisión
servicio técnico.
Para obtener información acerca del
servicio en Canadá:
Llame sin costo al 1-800-807-6777.
Para obtener información acerca del
servicio en México:
Llame sin costo al 01-800-0022-767.
para obtener información sobre el
GARANTÍA Y SERVICIO | 43
la tetera de
Page 44

DISCOVER MORE. DÉCOUVREZ PLUS. DESCUBRA MÁS.
KITCHENAID.COM/QUICKSTART
PRODUCT QUESTIONS OR RETURNS
QUESTIONS SUR LE PRODUIT OU LES RETOURS
PREGUNTAS SOBRE EL PRODUCTO O DEVOLUCIÓNES
USA: 1.800.541.6390 | KitchenAid.com
CANADA: 1.800.807.6777 | KitchenAid.ca
MEXICO: KitchenAid.com.mx
LATIN AMERICA: KitchenAid-Latam.com
®/™ ©2018 KitchenAid. All rights reserved. KITCHENAID and the design of the stand mixer
®/™ ©2018 KitchenAid. Tous droits réservés. KITCHENAID et la forme du batteur sur socle sont des
®/™ ©2018 KitchenAid. Todos los derechos reservados. KITCHENAID y el diseño de la batidora con
W11030459A 04/18
are trademarks in the U.S. and elsewhere. Used under license in Canada.
marques de commerce aux É.-U. et dans d’autres pays. Utilisé sous licence au Canada.
base son marcas registradas en EE.UU. y en otras partes. Usada en Canadá bajo licencia.
 Loading...