

KitchenAid KEHU309SSS01 Owner's Manual

BUILT-IN CONVECTION MICROWAVE OVEN
Use & Care Guide
For questions about features, operation/performance, parts, accessories or service, call: 1-800-422-1230
In Canada, for assistance, installation and service, call: 1-800-807-6777
or visit our website at www.kitchenaid.com
or visit our website at www.KitchenAid.ca
FOUR À MICRO-ONDES ENCASTRÉ -
CUISSON PAR CONVECTION
Guide d’utilisation et d’entretien
Au Canada, pour assistance, installation ou service composez le 1-800-807-6777 ou visitez notre site Web à
www.KitchenAid.ca
Table of Contents/Table des matières.............................................................................2
Model/Modèle KEHU309
W10138787B

TABLE OF CONTENTS
TABLE DES MATIÈRES
BUILT-IN MICROWAVE OVEN SAFETY.......................................3
Electrical Requirements ...............................................................4
Turntable ......................................................................................5
Convection Rack..........................................................................5
Browning Pan and Handle...........................................................5
Baking Tray ..................................................................................6
KITCHENAID™ Steamer Vessel ..................................................6
MICROWAVE OVEN CONTROL....................................................7
Control Panel................................................................................7
Interactive Touch Display.............................................................7
Main Menu....................................................................................8
Menu Demonstration....................................................................8
Settings & Info..............................................................................9
Sound ...........................................................................................9
Display Contrast...........................................................................9
Temp Format................................................................................9
Languages (on some models)......................................................9
Clock ............................................................................................9
Start - Add Time.........................................................................10
Upper Oven Off - Cancel ...........................................................10
Clear ...........................................................................................10
Control Lock...............................................................................10
Timer...........................................................................................10
BUILT-IN MICROWAVE OVEN USE ...........................................10
Food Characteristics..................................................................11
Cooking Guidelines....................................................................11
Cookware and Dinnerware ........................................................11
Aluminum Foil and Metal ...........................................................12
Positioning Baking Tray .............................................................12
Microwave Cooking Power........................................................12
Doneness ...................................................................................13
Sensor Cook...............................................................................13
Manual Method Cooking............................................................13
Reheat ........................................................................................14
Defrost........................................................................................15
Steam Cooking...........................................................................16
Boil & Simmer.............................................................................16
Bake............................................................................................17
Roast ..........................................................................................18
Browning Pan.............................................................................19
Grill .............................................................................................20
Cook ...........................................................................................20
Soften and Melt..........................................................................21
Popcorn......................................................................................22
EasyConvect™ System Conversion..........................................22
Food Type ..................................................................................23
Warm Hold .................................................................................23
BUILT-IN MICROWAVE OVEN CARE.........................................24
General Cleaning........................................................................24
TROUBLESHOOTING ..................................................................25
ASSISTANCE OR SERVICE.........................................................26
WARRANTY ..................................................................................27
SÉCURITÉ DU FOUR À MICRO-ONDES ENCASTRÉ...............28
Spécifications électriques ..........................................................29
Plateau rotatif .............................................................................30
Grille de convection....................................................................30
Plat à brunir et poignée..............................................................31
Plaque de cuisson......................................................................31
Cuiseur vapeur KITCHENAID™.................................................31
COMMANDE DU FOUR À MICRO-ONDES ...............................32
Tableau de commande ..............................................................32
Afficheur tactile interactif............................................................32
Menu principal............................................................................33
Démonstration du menu.............................................................34
Réglages et informations ...........................................................34
Son .............................................................................................34
Contraste d'affichage.................................................................35
Format de la température...........................................................35
Langues (sur certains modèles) .................................................35
Horloge .......................................................................................35
Démarrer - ajouter du temps......................................................35
Arrêt/annulation du four supérieur .............................................35
Effacer.........................................................................................35
Verrouillage des commandes.....................................................35
Minuterie.....................................................................................36
UTILISATION DU FOUR À MICRO-ONDES ENCASTRÉ..........36
Caractéristiques des aliments....................................................36
Guide de cuisson........................................................................36
Ustensiles de cuisson et vaisselle..............................................37
Papier d'aluminium et métal.......................................................37
Positionnement de la plaque de cuisson...................................38
Puissance de cuisson des micro-ondes....................................38
Degré de cuisson .......................................................................38
Cuisson par détection................................................................39
Méthode de cuisson manuelle...................................................39
Réchauffage ...............................................................................40
Décongélation ............................................................................41
Cuisson à la vapeur....................................................................42
Faire bouillir et mijoter................................................................43
Cuisson au four ..........................................................................44
Rôtissage....................................................................................45
Plat à brunir ................................................................................46
Gril ..............................................................................................47
Cuisson.......................................................................................48
Ramollir et faire fondre...............................................................48
Maïs éclaté .................................................................................49
Conversion du système EasyConvect™ ...................................49
Type d'aliment............................................................................50
Garder au chaud.........................................................................51
ENTRETIEN DU FOUR À MICRO-ONDES ENCASTRÉ ............52
Nettoyage général ......................................................................52
DÉPANNAGE.................................................................................53
ASSISTANCE OU SERVICE.........................................................54
GARANTIE.....................................................................................56
2
BUILT-IN MICROWAVE OVEN SAFETY
Your safety and the safety of others are very important.
We have provided many important safety messages in this manual and on your appliance. Always read and obey all safety
messages.
This is the safety alert symbol.
This symbol alerts you to potential hazards that can kill or hurt you and others.
All safety messages will follow the safety alert symbol and either the word “DANGER” or “WARNING.”
These words mean:
You can be killed or seriously injured if you don't immediately
DANGER
WARNING
All safety messages will tell you what the potential hazard is, tell you how to reduce the chance of injury, and tell you what can
happen if the instructions are not followed.
IMPORTANT SAFETY INSTRUCTIONS
When using electrical appliances basic safety precautions should be followed, including the following:
WARNING: To reduce the risk of burns, electric shock,
fire, injury to persons, or exposure to excessive microwave
energy:
■ Read all instructions before using the microwave oven.
■ Read and follow the specific “PRECAUTIONS TO AVOID
POSSIBLE EXPOSURE TO EXCESSIVE MICROWAVE
ENERGY” found in this section.
■ The microwave oven must be grounded. Connect only to
properly grounded outlet. See “GROUNDING
INSTRUCTIONS” found in this section.
■ Install or locate the microwave oven only in accordance
with the provided Installation Instructions.
■ Some products such as whole eggs in the shell and sealed
containers – for example, closed glass jars – may explode
and should not be heated in the microwave oven.
■ Use the microwave oven only for its intended use as
described in this manual. Do not use corrosive chemicals
or vapors in the microwave oven. This type of oven is
specifically designed to heat, cook, or dry food. It is not
designed for industrial or laboratory use.
■ Oversized foods or oversized metal utensils should not be
inserted in the microwave oven as they may create a fire or
risk of electric shock.
follow instructions.
can be killed or seriously injured if you don't
You
instructions.
■ Do not clean with metal scouring pads. Pieces can burn off
the pad and touch electrical parts involving a risk of electric
shock.
■ Do not store any materials, other than manufacturer's
recommended accessories, in this oven when not in use.
■ Do not operate the microwave oven if it has a damaged
cord or plug, if it is not working properly, or if it has been
damaged or dropped.
■ Do not deep fry in oven. Microwavable utensils are not
suitable and it is difficult to maintain appropriate deep frying
temperatures.
■ Do not use paper products when appliance is operated in
the “PAN BROWN” mode.
■ Do not cover racks or any other part of the oven with metal
foil. This will cause overheating of the oven.
■ As with any appliance, close supervision is necessary
when used by children.
■ The microwave oven should be serviced only by qualified
service personnel. Contact nearest authorized service
company for examination, repair, or adjustment.
■ Do not cover or block any openings on the microwave
oven.
follow
SAVE THESE INSTRUCTIONS
3

IMPORTANT SAFETY INSTRUCTIONS
■ Liquids, such as water, coffee, or tea are able to be
overheated beyond the boiling point without appearing to be
boiling. Visible bubbling or boiling when the container is
removed from the microwave oven is not always present.
THIS COULD RESULT IN VERY HOT LIQUIDS
SUDDENLY BOILING OVER WHEN THE CONTAINER IS
DISTURBED OR A SPOON OR OTHER UTENSIL IS
INSERTED INTO THE LIQUID.
To reduce the risk of injury to persons:
– Do not overheat the liquid.
– Stir the liquid both before and halfway through heating it.
– Do not use straight-sided containers with narrow necks.
– After heating, allow the container to stand in the
microwave oven for a short time before removing the
container.
– Use extreme care when inserting a spoon or other utensil
into the container.
■ Do not store the microwave oven outdoors. Do not use this
product near water - for example, near a kitchen sink, in a
wet basement, or near a swimming pool, and the like.
■ See door surface cleaning instructions in the “Oven Care”
section.
■ To reduce the risk of fire in the oven cavity:
– Do not overcook food. Carefully attend the microwave
oven if paper, plastic, or other combustible materials are
placed inside the oven to facilitate cooking.
– Remove wire twist-ties from paper or plastic bags before
placing bags in oven.
– If materials inside the oven should ignite, keep oven door
closed, turn oven off, and disconnect the power cord, or
shut off power at the fuse or circuit breaker panel.
– Do not use the cavity for storage purposes. Do not leave
paper products, cooking utensils, or food in the cavity
when not in use.
SAVE THESE INSTRUCTIONS
PRECAUTIONS TO AVOID POSSIBLE EXPOSURE TO
EXCESSIVE MICROWAVE ENERGY
(a) Do not attempt to operate this oven with the door open
since open-door operation can result in harmful exposure
to microwave energy. It is important not to defeat or
tamper with the safety interlocks.
(b) Do not place any object between the oven front face and
the door or allow soil or cleaner residue to accumulate on
sealing surfaces.
Electrical Requirements
Observe all governing codes and ordinances. The microwave
oven is connected to both 120-volt sides of the 208/240-volt
circuit required for electrical connections. If the incoming voltage
to the microwave oven is less than 120 volts, cooking times may
be longer. Have a qualified electrician check your electrical
system.
This device complies with Part 18 of the FCC Rules.
(c) Do not operate the oven if it is damaged. It is particularly
important that the oven door close properly and that there
is no damage to the:
(1) Door (bent),
(2) Hinges and latches (broken or loosened),
(3) Door seals and sealing surfaces.
(d) The oven should not be adjusted or repaired by anyone
except properly qualified service personnel.
GROUNDING INSTRUCTIONS
For a permanently connected microwave oven:
The microwave oven must be connected to a grounded,
metallic, permanent wiring system, or an equipment
grounding conductor should be run with the circuit
conductors and connected to the equipment grounding
terminal or lead on the microwave oven.
SAVE THESE INSTRUCTIONS
4
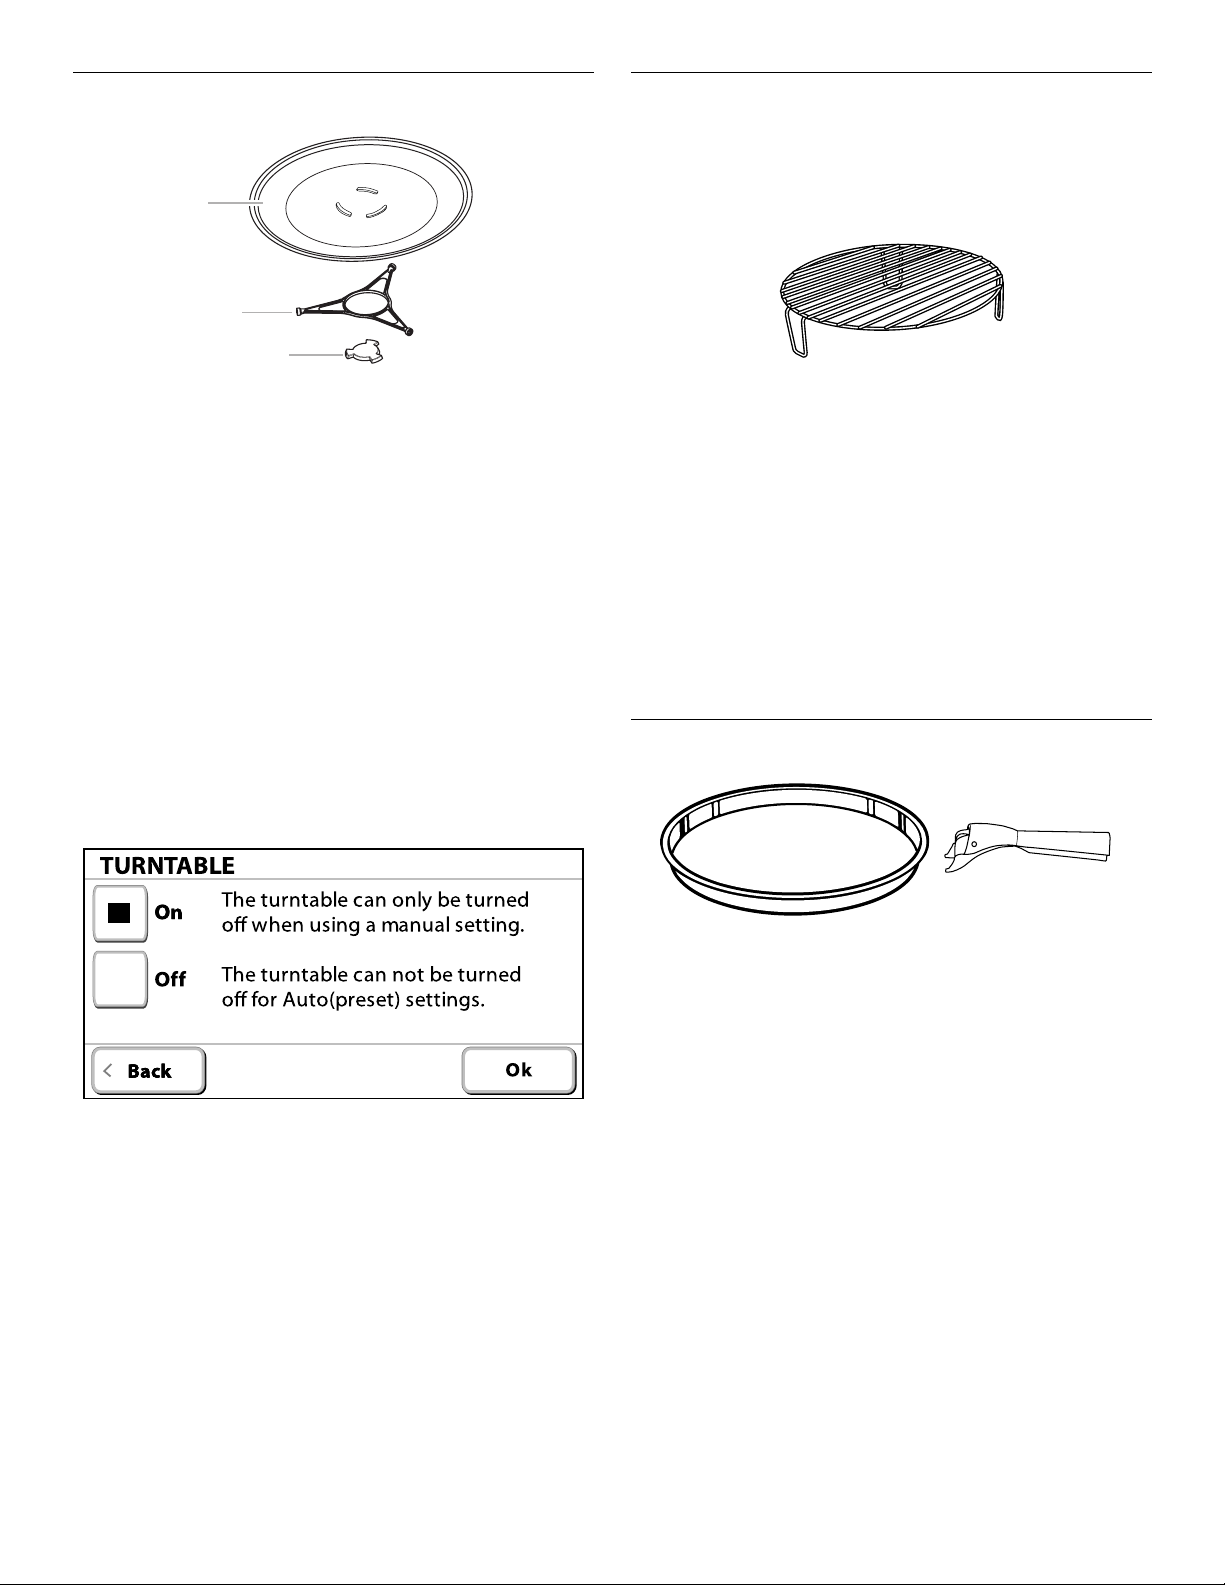
Turn t a b le
A
B
C
A. Turntable
B. Support and rollers
C. Hub
The turntable rotates in both directions to help cook food more
evenly. Do not operate the microwave oven without having the
turntable in place. See “Assistance or Service” to reorder any of
the parts.
The raised, curved lines in the center of the turntable bottom fit
between the 3 spokes of the hub. The hub turns the turntable
during microwave oven use. The rollers on the support should fit
inside the turntable bottom ridge.
To Tu rn O n/O ff:
For best microwave performance it is recommended to always
leave the turntable on. If necessary, the turntable can be turned
off (except during an auto function).
This is helpful when cooking with a dish that is larger than the
turntable.
1. From the Main Menu touch MORE CHOICES.
2. Touch TURNTABLE ON/OFF.
The display shows the Turntable On/Off screen.
Convection Rack
The convection rack provides optimal heat circulation for grilling
and convection cooking (on some models).
In combination with the baking tray, the convection rack places
food close to the grill element, making it ideal for fast browning of
small amounts of food with the grilling function.
■ The rack will become hot. Always use oven mitts or pot
holders when handling.
■ To avoid damage to the microwave oven, do not allow the
rack to touch the inside cavity walls, ceiling or floor.
■ Always use the turntable or the baking tray.
■ To avoid damage to the microwave oven, do not store the
rack in the oven.
■ Two-level cooking is not recommended.
■ For best results, do not place popcorn bags on the rack.
■ The rack is designed specifically for this oven. For best
cooking results, do not attempt to use any other rack in this
oven.
■ See “Assistance or Service” section to reorder.
Browning Pan and Handle
3. Select OFF, then touch OK.
Repeat to turn the turntable back on.
The browning pan is ideal for rapidly browning and crisping the
bottom of food, such as cookies and pizza.
The material coating the bottom absorbs microwaves and
transfers the heat to the pan and food. The browning pan reaches
436°F (210°C) in approximately 3 minutes, at which time it stops
absorbing microwaves and holds this optimal frying temperature.
■ The browning pan will become hot. Always use the handle
and oven mitts or pot holders when handling. Place gripping
end on the edge of pan, squeeze handle, and lift pan.
■ Do not allow the browning pan or handle to touch the inside
cavity walls, ceiling or floor.
5
■ Always use the turntable.
■ To avoid damage to the microwave oven, do not use another
metal object with the browning pan.
■ The browning pan is designed specifically for this oven. Do
not use it in any other oven.
■ Use only wooden or plastic cooking utensils to help avoid
scratches.
■ See “Assistance or Service” section to reorder.
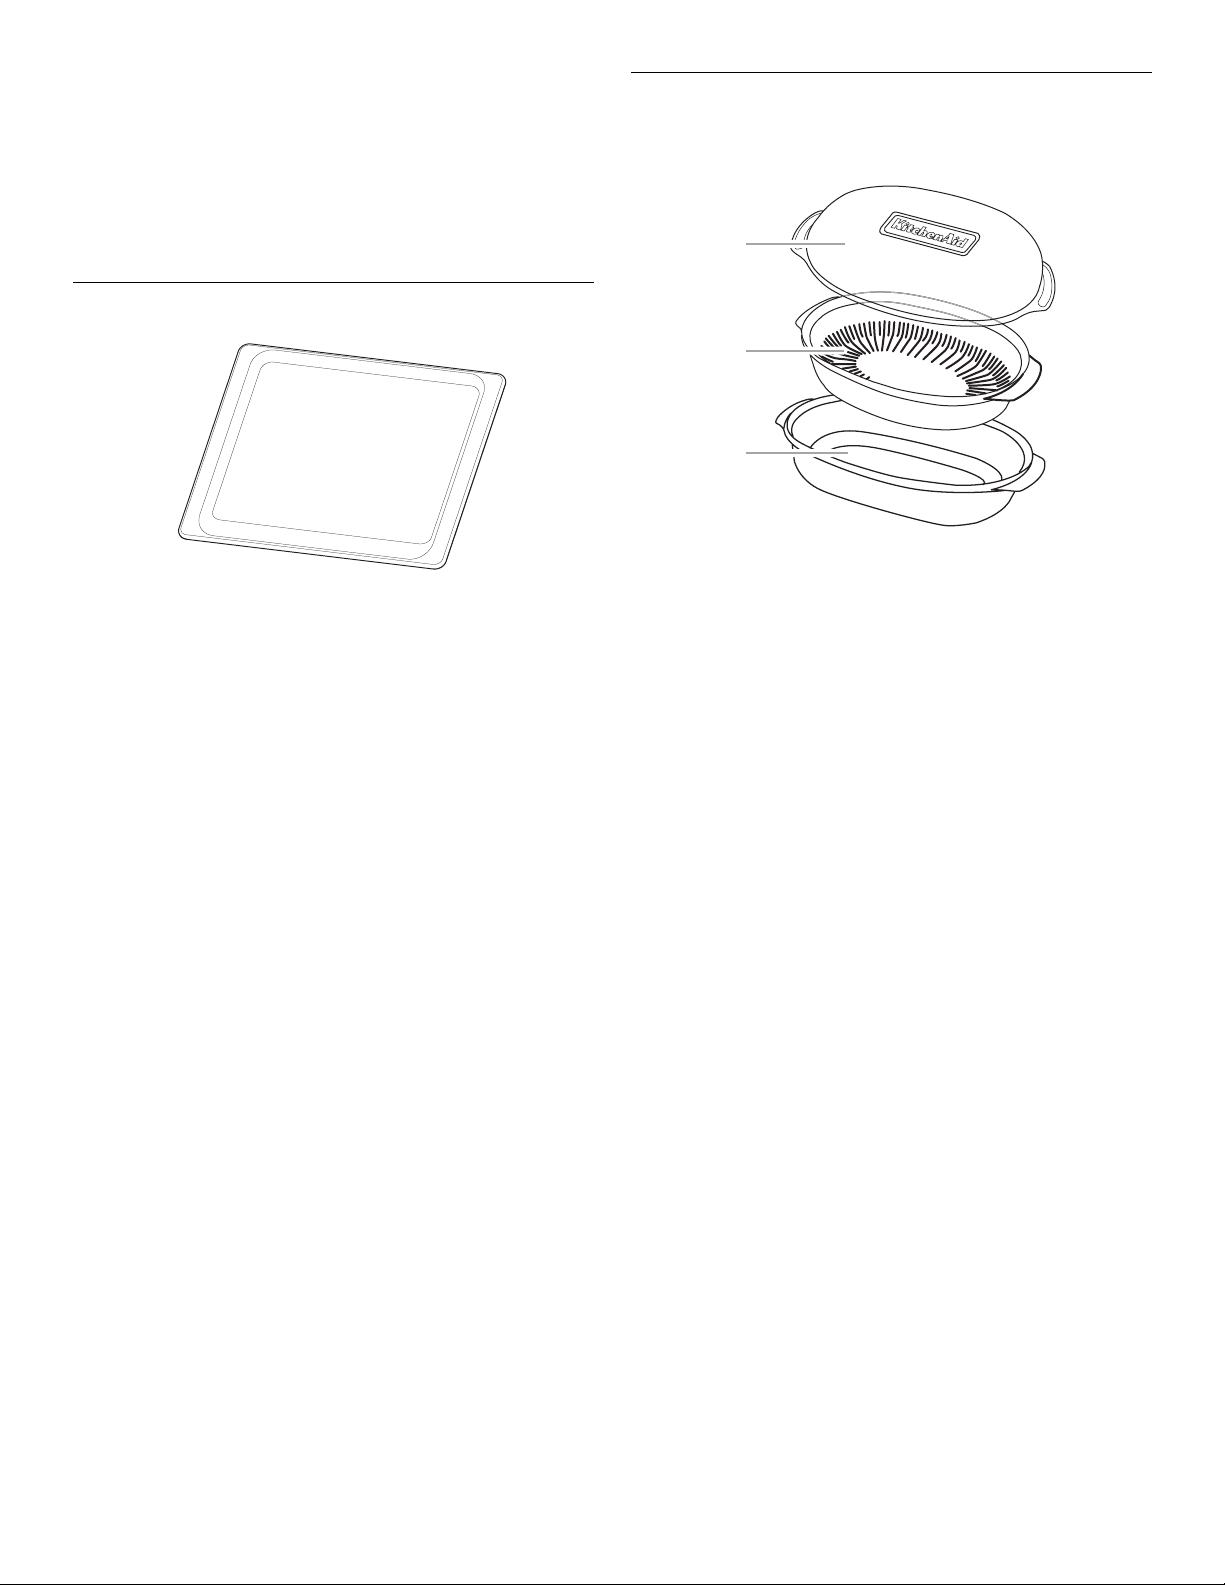
Baking Tray
■ Baking Tray can be used only with convection cooking and
grilling (on some models).
■ To avoid damage to the microwave oven, do not use in
combination with microwave cooking.
■ Baking Tray will become hot. Always use oven mitts or pot
holders when handling.
■ See “Positioning Baking Tray” section before using.
■ See “Assistance or Service” section to reorder.
KITCHENAID™ Steamer Vessel
Use the KITCHENAID™ Steamer Vessel with the Steam Cook
feature to steam foods.
A
B
C
A. Lid
B. Insert
C. Base
■ The steamer vessel will become hot. Always use oven mitts
or pot holders when handling.
■ Steamer vessel is designed to be used only in the microwave.
To avoid damaging steamer vessel, do not use in a
convectional- or combination-type oven, or any other
convection function, crisp or on electric or gas burners.
■ Do not use plastic wrap or aluminum foil when covering the
food.
■ Always place the steamer on the glass turntable. Check that
the turntable turns freely before starting the oven.
■ Do not remove lid while the bowl is inside the oven, as the
rush of steam will disrupt the sensor settings.
■ To avoid scratching, use plastic utensils.
■ Do not overfill with water. See steam chart in the “Steam
Cooking” section for the amount of water recommended.
Lid: Always use the lid when steaming. Place directly over the
insert and base or just the base.
Insert: Use when steam cooking to keep foods such as fish and
vegetables out of the water. Place insert with food directly over
the base. Do not use when simmering.
Base: For steam cooking, place water in base. For simmering
foods such as rice, potatoes, pasta and vegetables, place food
and water/liquid in base.
See “Assistance or Service” section to order replacements. See
“General Cleaning” section for instructions on cleaning.
6
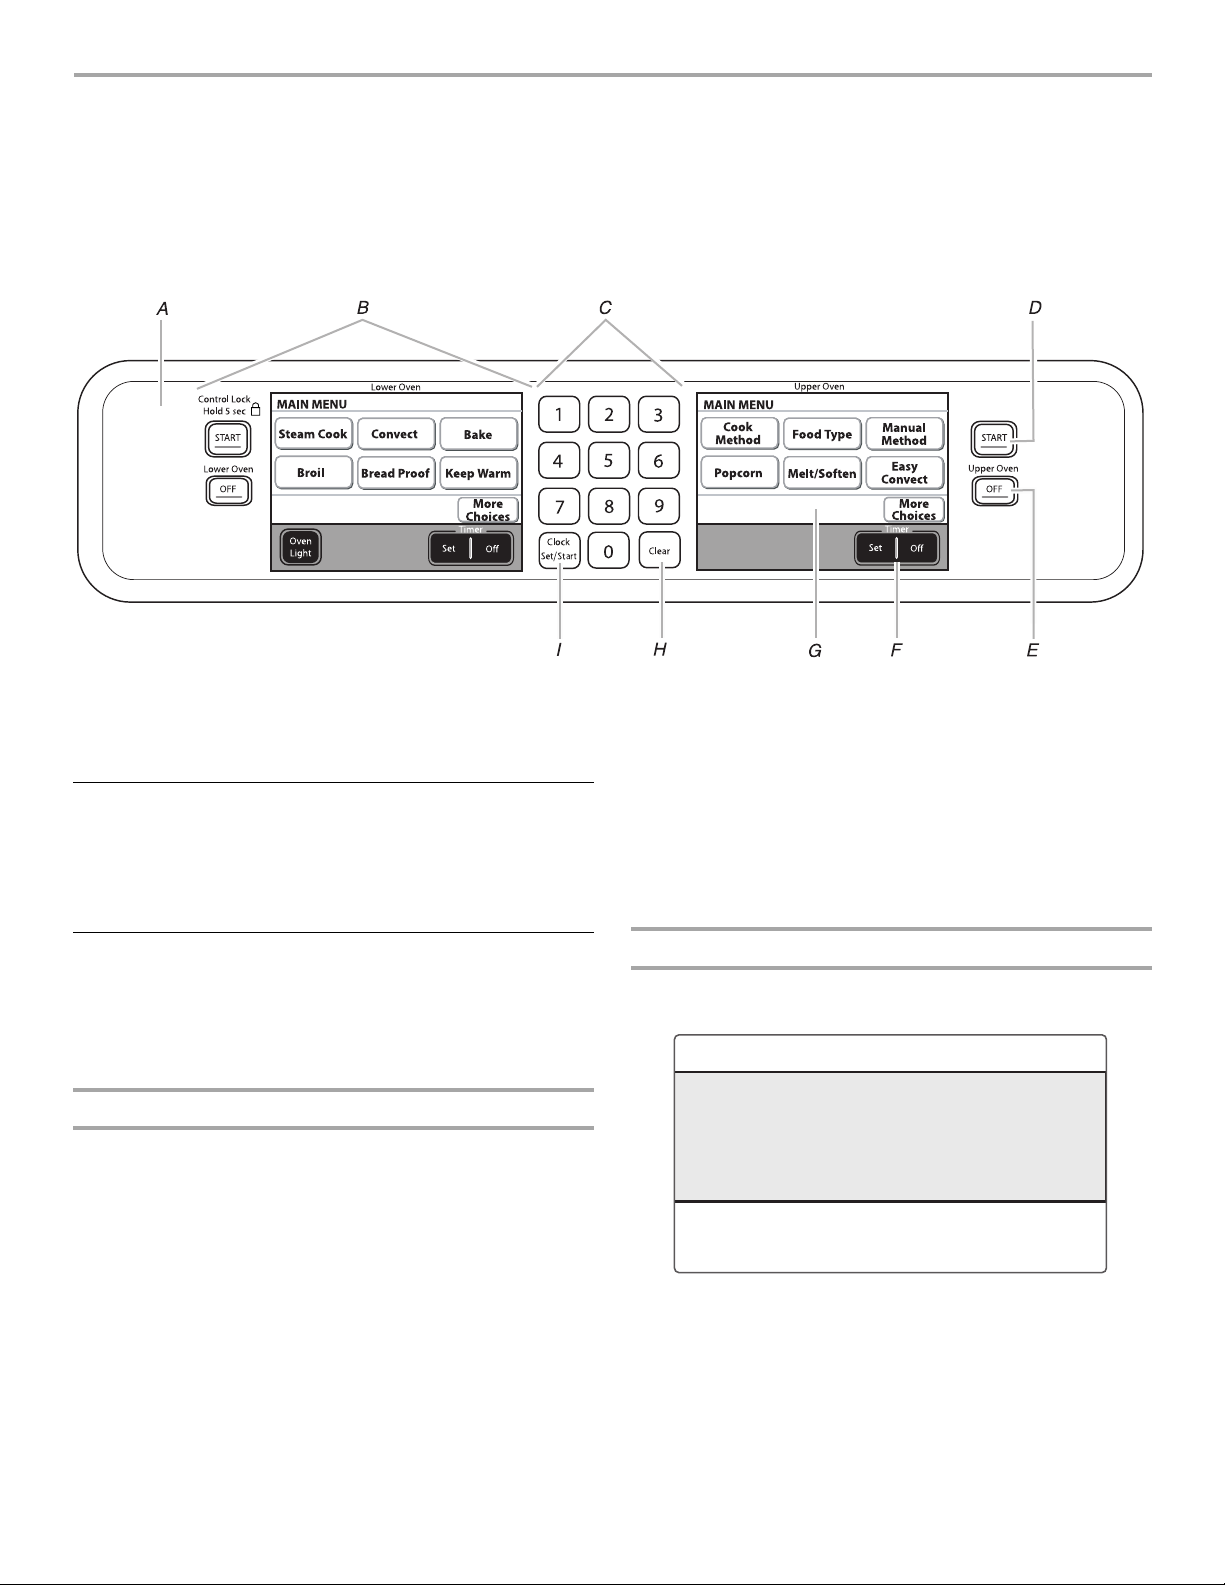
MICROWAVE OVEN CONTROL
This manual covers different models. The oven you have purchased may have some or all of the items listed. The locations and
appearances of the items shown here may not match those of your model.
The microwave oven’s controls are accessed through its control panel and interactive touch display.
NOTE: Due to the sensitivity of the control panel, we have provided special instructions for cleaning the panel as well as the touch
screen display. See “General Cleaning” section for cleaning instructions.
Control Panel
Add a
Minute
A. Control panel
B. Lower oven controls (see separate Use and Care Guide)
C. Number keys
D. Start/control lock (hold 5 seconds)
E. Off
Control Panel
The control panel houses the control menu and function controls.
The control pads are very sensitive, and require only a light touch
to activate.
For more information about the individual controls, see their
respective sections in this manual.
Interactive Touch Display
The display area functions as both a display and an interactive,
menu-driven touch control. It is designed to be easily navigable,
guiding you through the menus, offering multiple selections,
accepting your input and executing your commands. It also
provides instructions, tips, and graphics.
Display
When power is first supplied to the microwave oven or, when
power has been interrupted for more than 10 seconds, the clock
will be set to 12:00 P.M. To set the time, follow the instructions in
the “Clock” section. To bypass setting the clock and begin using
the oven, touch Start, Off or Clear.
On combination oven models, the left display shows the lower
oven and the right display shows the upper microwave oven.
When the oven(s) are in use (active mode), the display shows the
oven temperature, heat source(s) and timer, if set.
The main menu display may display “Fan Cooling” after the end
of a cooking cycle. The oven cavity fan is used to vent humidity
and/or heat from the oven cavity and may continue to run for
5-10 minutes after a cooking cycle has ended. The microwave
may be used as normal during this cooling period. Food can be
removed or placed in the microwave during this time.
After approximately 2 minutes of inactivity, the display will go into
standby (sleep) mode. When the oven is in operation, the display
will remain active.
F. Tim er S et / Of f
G. Interactive touch display
H. Clear
I. Clock
When the oven(s) are not in use (sleep mode), the display shows
the time of day, if is set to be displayed. On the combination oven
the time of day will appear in the right display. To turn the clock
display on/off, see the “Clock” section.
During programming, the display shows menus and the
appropriate selections for the respective cooking function. To
view the main menu screens, see the “Main Menu” section.
Touc h S cre en
The LCD touch screen is used to make menu selections, adjust
settings and input commands.
A
B
C
A. Title/description region
B. Menu and selection/settings input region
C. Command input region
Menu selections and input adjustments are made in the center
portion of the screen, and the command inputs (OK, Adjust
Settings, Browning, Back, Exit, etc.) are made in the bottom
portion of the screen. Screen titles and descriptions are
displayed in the top portion of the screen, which accepts no
input. A light- to medium-pressure touch of the fingertip will
activate the menu selection.
7
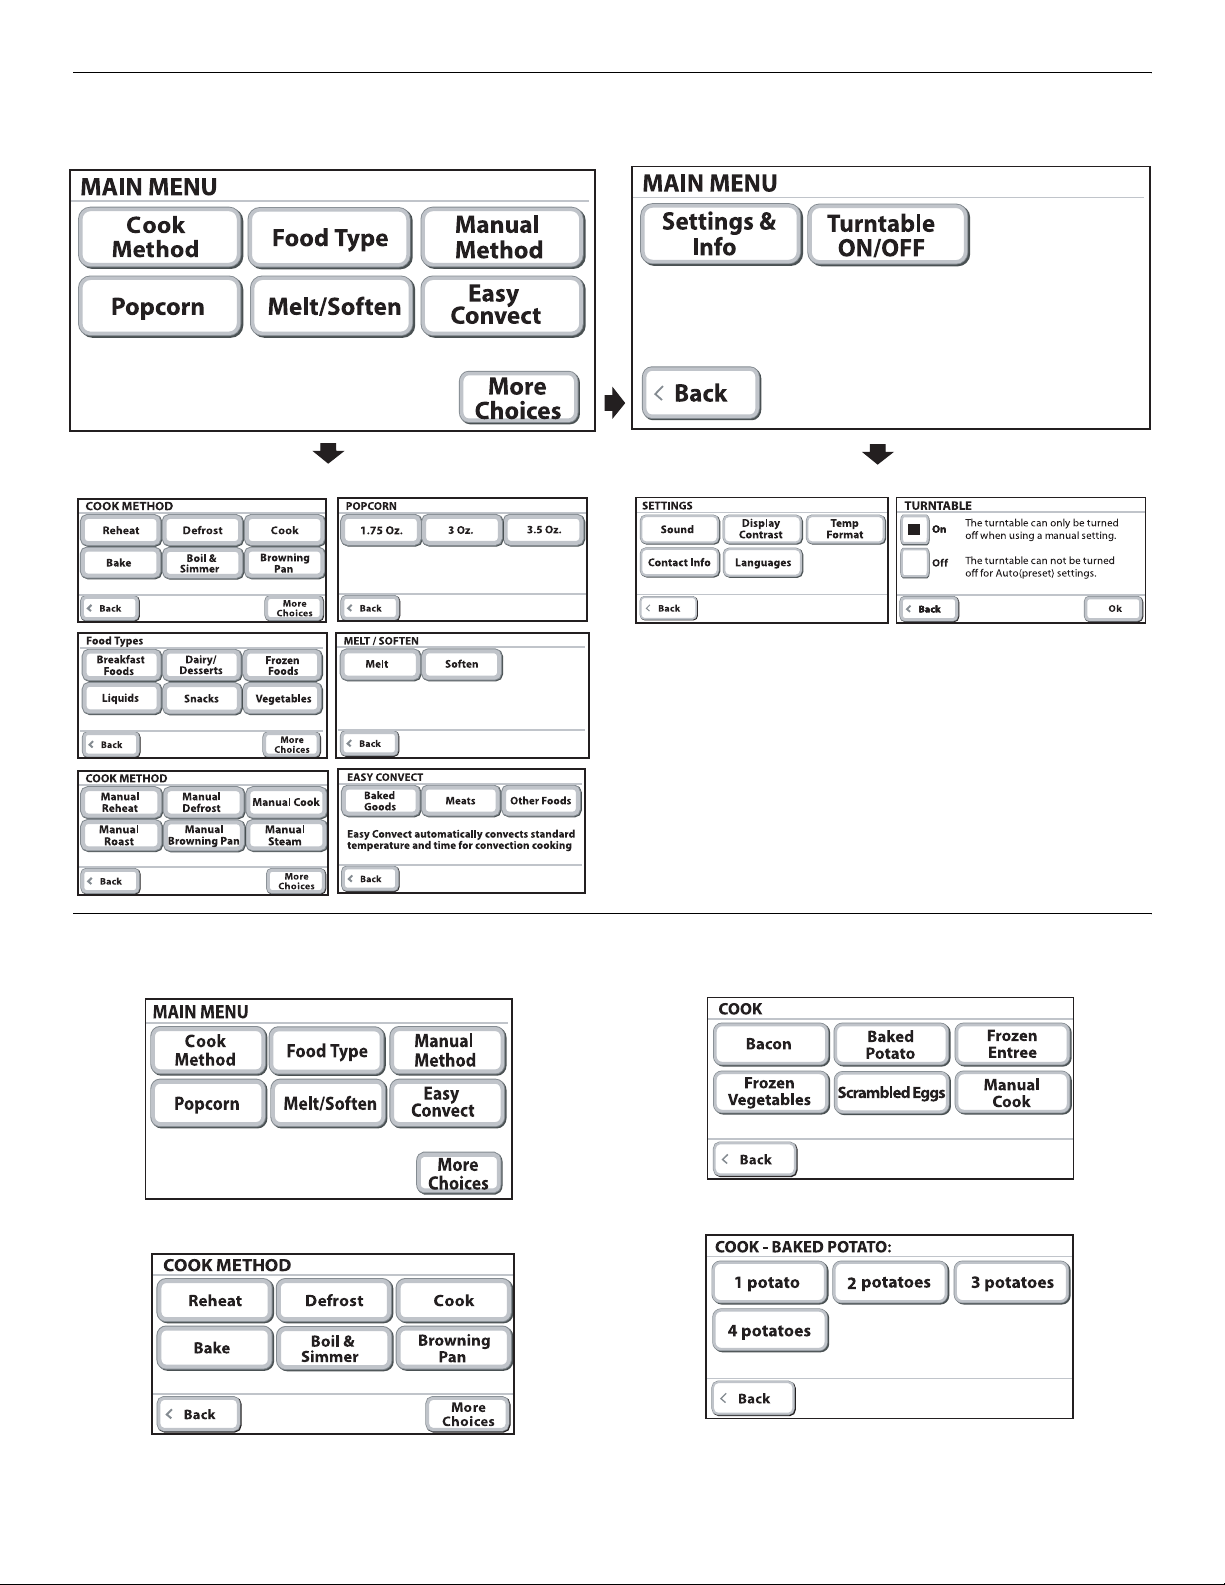
Main Menu
From the Main Menu, all automatic cooking programs can be activated; all manual cooking can be programmed; settings can be
adjusted; and instructions, preparation and tips can be accessed.
1. On the Main Menu touch COOK METHOD.
2. On the Cook Method menu touch COOK.
Menu Demonstration
3. On the Cook menu touch BAKED POTATO.
4. On the Baked Potato menu select the quantity.
8
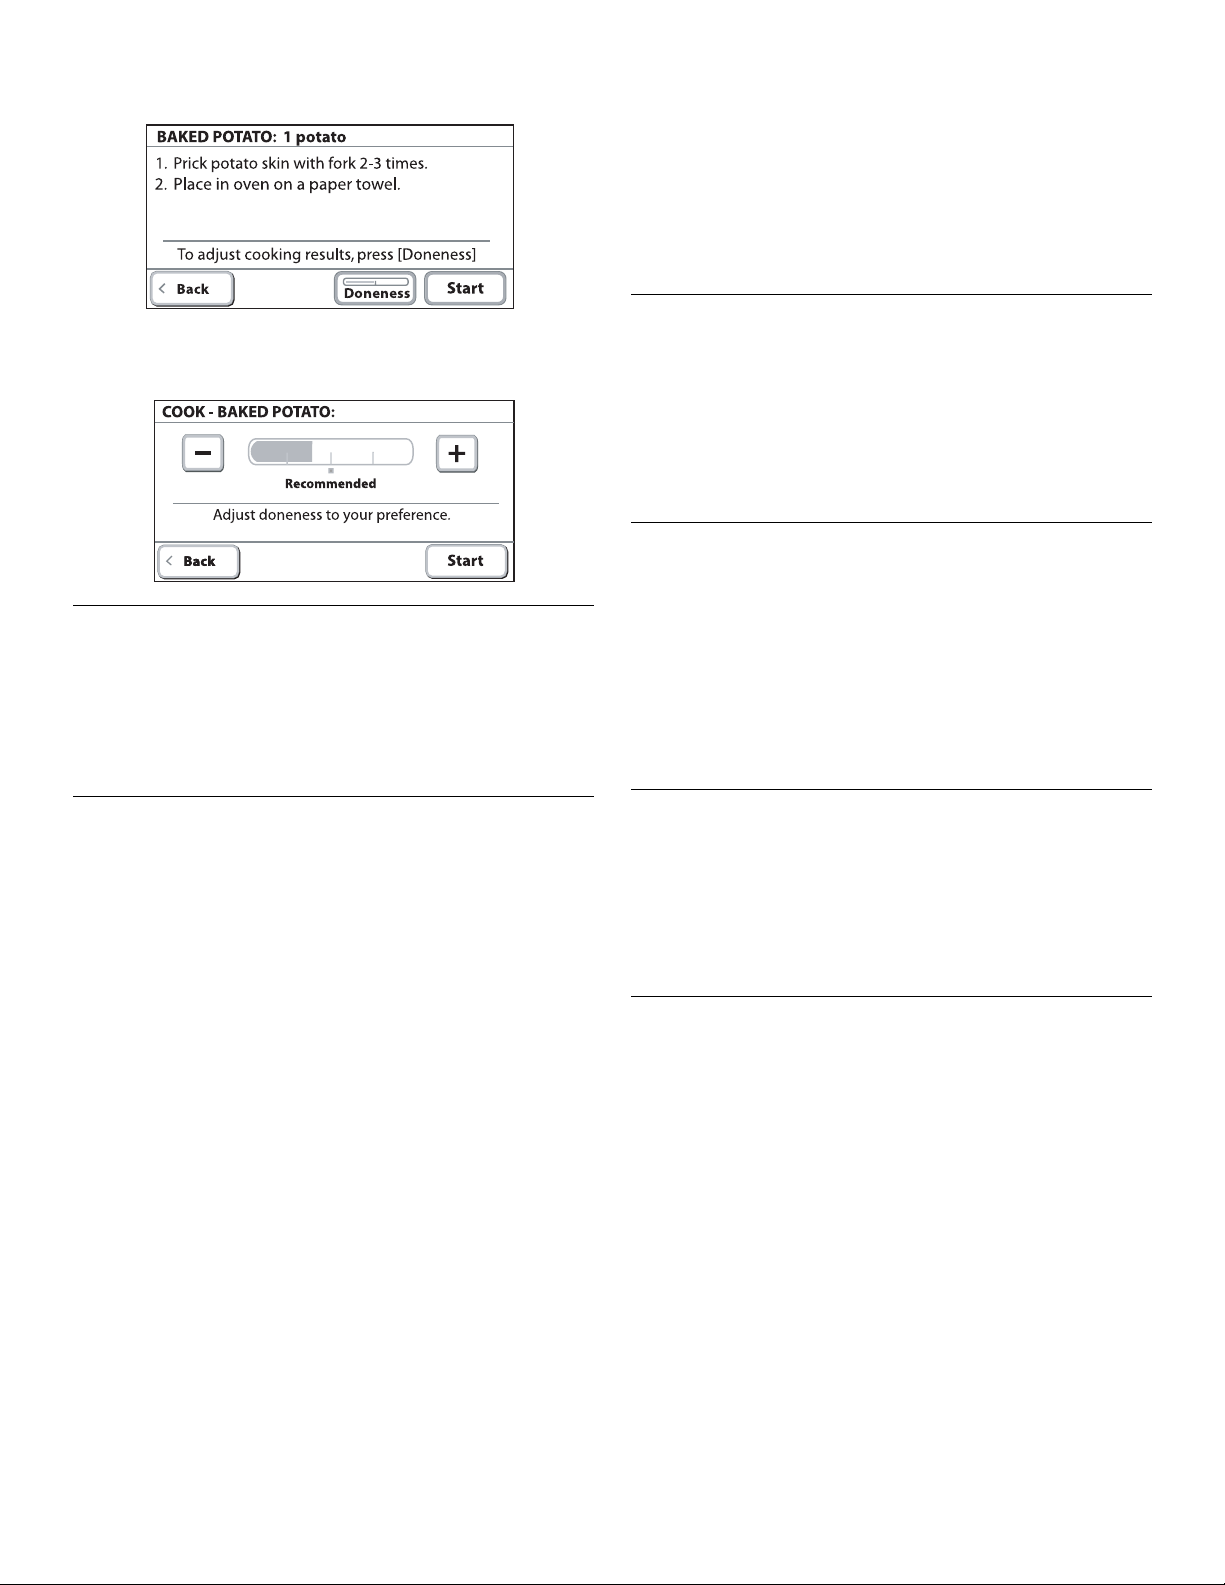
5. Read and follow the preparation directions that appear in the
display.
To Change:
1. From the main menu touch MORE CHOICES.
2. Touch SETTINGS & INFO.
3. Touch SOUND.
4. To change the sound level, touch the “plus” (+) or “minus” (-)
signs to increase or decrease to the desired level.
5. Touch OK.
NOTE: To turn the sound off touch the “minus” (-) sign until the
bar disappears to the left.
6. To change the doneness setting, touch DONENESS and
touch the “plus” (+) or “minus” (-) key to increase or decrease
the desired level.
Settings & Info
Your oven provides you with the ability to control several of the
default settings and access information through the on-screen
display. These include: Sound, Display Contrast, Temp Format,
Contact Info and Languages.
To access the Settings menu, see the following sections.
Sound
Audible signals will sound indicating the following:
One beep
■ Valid key touch
■ Function has been entered
One chime
■ Preheat cycle has been completed
Two chimes
■ End of a cooking cycle
Three beeps
■ Invalid key touch
Four chimes
■ When timer reaches zero
■ Includes using the Timer for functions other than cooking.
Tone Volume (Sound)
■ The programmed volume can be changed. On combination
ovens, you can change the sound from either display.
Changing the sound on one display changes the sound for
both ovens.
Display Contrast
To Adjust the Display Contrast:
1. From the main menu touch MORE CHOICES.
2. Touch SETTINGS & INFO.
3. Touch DISPLAY CONTRAST.
4. Touch + (plus) or - (minus) to increase/decrease the display
contrast to the desired setting.
5. Touch OK.
Temp Format
The temperature is programmed in Fahrenheit; however, it can be
changed to Celsius.
To Change:
1. From the Main Menu touch MORE CHOICES.
2. Touch SETTINGS & INFO.
3. Touch TEMP FORMAT.
4. Touch F FAHRENHEIT or C CELCIUS.
5. Touch OK.
Languages (on some models)
To Change Language Setting:
1. From the main menu touch MORE CHOICES.
2. Touch SETTINGS & INFO.
3. Touch LANGUAGES.
4. Touch ENGLISH or FRANÇAIS (French).
5. Touch OK.
Clock
This is a 12-hour clock. Before setting, make sure the oven(s),
Timer and Timed Cooking are off.
To Se t:
1. Touch CLOCK SET/START.
2. Touch the number keys to set the time of day.
3. Touch AM or PM.
4. Touch OK.
To change the clock display setting:
1. Touch CLOCK SET/START.
2. Touch ON DISPLAY or OFF DISPLAY.
3. Select desired option.
4. Touch OK.
9

Start - Add Time
The microwave oven Start key begins all oven functions. Once a
cooking setup function is complete, the Start key will illuminate
until touched. If not touched within 2 minutes after entering a
cooking function, the display will return to the sleep mode and
the programmed function will be canceled.
For added convenience, Start is also available on some display
screens, and provides the same function as the Start key on the
control panel.
Touching Start when the microwave oven is off will start
1 minute of cook time at 100% power. Touching Start while the
microwave oven is operating will add 1 minute of cook time to the
current cycle. Multiple 1-minute increments can be added by
repeatedly touching Start.
At the end of each cooking cycle the end screen is displayed. At
this stage, time can be added by choosing the “Add Time” option
or to keep food warm by choosing the “Warm Hold” option. See
the “Warm Hold” section.
Upper Oven Off - Cancel
The UPPER OVEN OFF key stops the respective oven functions
except for the Clock, Timer and Control Lock. The oven cooling
fan may continue to operate even after an oven function has been
cancelled or completed, depending on the oven temperature.
If the UPPER OVEN OFF key is touched, the display will return to
the Main Menu from any menu.
The CANCEL key will appear during a cooking cycle. If CANCEL
is touched, the cooking cycle will be cancelled and the display
will return to the Main Menu.
Clear
During programming, the CLEAR key changes the numeric
programming values, such as minutes, seconds and cook power
that are active in the display to their default value.
For example, while entering a cook time, touching CLEAR will
change the time you have already entered to “0:00.”
The CLEAR key gives an invalid signal if touched during a
cooking cycle. See “Sounds” section.
Control Lock
The Control Lock shuts down the control panel keys to avoid
unintended use of the oven(s). The Control Lock will remain set
after a power failure, if set before the power failure occurs.
When the control is locked, only the TIMER SET, TIMER OFF and
OVEN LIGHT keys will function.
The Control Lock is preset unlocked, but can be locked.
To Lock Control: From the upper oven control panel, touch and
hold START for approximately 5 seconds, until “CONTROLS
LOCKED” and a lock icon appears in the display and a
confirmation tone sounds indicating the oven control has been
locked. “Controls locked” and the lock icon will appear in the
display for approximately 5 seconds.
If a key is touched while the controls are locked, the invalid key
touch tone will sound and a reminder message will be displayed
indicating that the control is locked.
To Unlock Control: Repeat to unlock the control. A tone will
sound and a controls unlocked message will be displayed for
approximately 5 seconds.
Timer
The Timer is set in hours and minutes and counts down the set
time. Times of more than one hour will count down by the minute.
In the last hour, the time will count down by minute and second.
NOTE: The Timer does not start or stop the oven.
To Se t:
1. Touch TI M ER SE T.
2. Use the “plus” (+) or “minus” (-) keys to adjust the time or
enter the desired timer setting using the numerical keys.
3. Touch START TIMER.
If Start Timer is not touched, the control will continue to wait.
When the set time ends, if enabled, end-of-cycle tones will
continuously repeat until the Timer Off key is touched.
4. Touch TIMER OFF anytime to cancel the Timer or stop the
reminder tones.
If UPPER OVEN OFF key is touched, the respective oven will turn
off; however, the Timer can only be turned off using the Timer Off
key.
BUILT-IN MICROWAVE
OVEN USE
A magnetron in the oven produces microwaves which reflect off
the metal floor, walls and ceiling and pass through the turntable
and appropriate cookware to the food. Microwaves are attracted
to and absorbed by fat, sugar and water molecules in the food,
causing them to move, producing friction and heat which cooks
the food.
■ To avoid damage to the microwave oven, do not lean on or
allow children to swing on the microwave oven door.
■ To avoid damage to the microwave oven, do not operate
microwave oven when it is empty.
■ The turntable must be in place and correct side up when
microwave oven is in use. Do not use if turntable is chipped
or broken. See “Assistance or Service” section to reorder.
■ Baby bottles and baby food jars should not be heated in
microwave oven.
■ Clothes, flowers, fruit, herbs, wood, gourds, paper, including
brown paper bags and newspaper, should not be dried in
microwave oven.
■ Paraffin wax will not melt in the microwave oven because it
does not absorb microwaves.
■ Use oven mitts or pot holders when removing containers from
microwave oven.
■ Do not overcook potatoes. At the end of the recommended
cook time, potatoes should be slightly firm. Let potatoes
stand for 5 minutes. They will finish cooking while standing.
■ Do not cook or reheat whole eggs inside the shell. Steam
buildup in whole eggs may cause them to burst. Cover
poached eggs and allow a standing time.
10

Food Characteristics
When microwave cooking, the amount, size and shape, starting
temperature, composition and density of the food affect cooking
results.
Amount of Food
The more food heated at once, the longer the cook time needed.
Check for doneness and add small increments of time if
necessary.
Size and Shape
Smaller pieces of food will cook more quickly than larger pieces,
and uniformly shaped foods cook more evenly than irregularly
shaped food.
Starting Temperature
Room temperature foods will heat faster than refrigerated foods,
and refrigerated foods will heat faster than frozen foods.
Composition and Density
Foods high in fat and sugar will reach a higher temperature, and
will heat faster than other foods. Heavy, dense foods, such as
meat and potatoes, require a longer cook time than the same size
of a light, porous food, such as cake.
Cooking Guidelines
Covering
Covering food helps retain moisture, shorten cook time and
reduce spattering. Use the lid supplied with cookware. If a lid is
not available, wax paper, paper towels or plastic wrap approved
for microwave ovens may be used. Plastic wrap should be turned
back at one corner to provide an opening to vent steam.
Condensation on the door and cavity surfaces is normal during
heavy cooking.
Stirring and Turning
Stirring and turning redistribute heat evenly to avoid overcooking
the outer edges of food. Stir from outside to center. If possible,
turn food over from bottom to top.
Arranging
If heating irregularly shaped or different sized foods, arrange the
thinner parts and smaller sized items toward the center. If
cooking several items of the same size and shape, place them in
a ring pattern, leaving the center of the ring empty.
Turntable On/Off
For best performance, the turntable should be on during
microwave cooking.
If using oversized cookware that does not turn freely on the
turntable, turn the turntable off. Select turntable “Off” on the
Option menu.
When microwave cooking with the turntable off, food should be
turned halfway through the cooking process.
Cookware and Dinnerware
Cookware and dinnerware must fit on the turntable. Always use
oven mitts or pot holders when handling because any dish may
become hot from heat transferred from the food. Do not use
cookware and dinnerware with gold or silver trim. Use the
following chart as a guide, then test before using.
MATERIAL RECOMMENDATIONS
Aluminum Foil,
Metal
Browning Dish Bottom must be at least ³⁄₁₆" (5 mm) above
Ceramic Glass,
Glass
China,
Earthenware
Melamine Follow manufacturer’s recommendations.
Paper: Towels,
Dinnerware,
Napkins
Plastic: Wraps,
Bags, Covers,
Dinnerware,
Containers
Pottery and Clay Follow manufacturer’s recommendations.
Silicone
Bakeware
Straw, Wicker,
Wooden
Containers
Styrofoam
®†
See “Aluminum Foil and Metal” section.
the turntable. Follow manufacturer’s
recommendations.
Acceptable for use.
Follow manufacturer’s recommendations.
Use nonrecycled and those approved by
the manufacturer for microwave oven use.
Use those approved by the manufacturer
for microwave oven use.
Follow manufacturer’s recommendations.
Do not use in microwave oven.
Do not use in microwave oven.
Piercing
Before heating, use a fork or small knife to pierce or prick foods
that have a skin or membrane, such as potatoes, egg yolks,
chicken livers, hot dogs, and sausage. Prick in several places to
allow steam to vent.
Shielding
Use small, flat pieces of aluminum foil to shield the thin pieces of
irregularly shaped foods, bones and foods such as chicken
wings, leg tips and fish tail. See “Aluminum Foil and Metal” first.
Standing Time
Food will continue to cook by the natural conduction of heat even
after the microwave cooking cycle ends. The length of standing
time depends on the volume and density of the food.
Wax Paper Acceptable for use.
To Test Cookware or Dinnerware for Microwave Use:
1. Place cookware or dinnerware in microwave oven with
1 cup (250 mL) of water beside it.
2. Cook at 100% cooking power for 1 minute.
Do not use cookware or dinnerware if it becomes hot and the
water stays cool.
†®STYROFOAM is a Registered Trademark of The Dow Chemical Company.
11
Aluminum Foil and Metal
Always use oven mitts or pot holders when removing dishes from
the microwave oven.
Aluminum foil and some metal can be used in the microwave
oven. If not used properly, arcing (a blue flash of light) can occur
and cause damage to the microwave oven.
OK for Use
Racks and bakeware supplied with the microwave oven (on some
models), aluminum foil for shielding, and approved meat
thermometers may be used with the following guidelines:
■ To avoid damage to the microwave oven, do not allow
aluminum foil or metal to touch the inside cavity walls, ceiling
or floor.
■ Always use the turntable.
■ To avoid damage to the microwave oven, do not allow
contact with another metal object during microwave cooking.
Microwave Cooking Power
Many recipes for microwave cooking specify which cooking
power to use by percent, name or number. For example,
70%=7=Medium-High.
Use the following chart as a general guide for the suggested
cooking power of specific foods.
MICROWAVE COOKING POWER CHART
PERCENT/NAME NUMBER USE
100%, High
(default setting)
90% 9 Cooking small, tender pieces
10 Quick heating convenience
foods and foods with high
water content, such as soups,
beverages and most
vegetables.
of meat, ground meat, poultry
pieces and fish fillets.
Heating cream soups.
Do Not Use
Metal cookware and bakeware, gold, silver, pewter, nonapproved meat thermometers, skewers, twist ties, foil liners
such as sandwich wrappers, staples and objects with gold or
silver trim or a metallic glaze should not be used in the
microwave oven.
Positioning Baking Tray
Baking tray can only be used with convection cooking and
grilling. To avoid damage to the microwave oven,do not use
baking tray in combination with microwave cooking.
Place baking tray on slide rails as shown below. Push in tray to
stop position. Check that the baking tray is level.
For best cooking results, use baking tray only in the
recommended position.
A
B
80% 8 Heating rice, pasta or
70%,
Medium-High
60% 6 Cooking sensitive foods such
50%, Medium 5 Cooking ham, whole poultry
40% 4 Melting chocolate.
30%, MediumLow, Defrost
20% 2 Softening butter, cheese, and
7 Reheating a single serving of
3 Defrosting bread, fish, meats,
casseroles.
Cooking and heating foods
that need a cook power lower
than high. For example, whole
fish and meat loaf.
food.
as cheese and egg dishes,
pudding and custards.
Cooking non-stirrable
casseroles, such as lasagna.
and pot roasts.
Simmering stews.
Heating bread, rolls and
pastries.
poultry and precooked foods.
ice cream.
12
A. Slide rail
B. Baking tray
10%, Low 1 Taking chill out of fruit.
To Set a Cooking Power other than 100%:
1. Touch the number keys to set a length of time to cook.
2. Touch PO W ER.
3. Using the Microwave Cooking Power chart above, enter the
corresponding number for the desired power level.
4. Touch STA RT.
The display will count down the cook time.
When the stop time is reached, the oven will shut off
automatically and the end screen will appear on the display.
If enabled, end-of-cycle tones will sound, then reminder
tones will sound every minute.
5. Touch OFF or open the door to clear the display and/or stop
reminder tones.
Doneness
Doneness is a function used for adjusting the cook time. This
feature is used on all automatic cooking functions with the
exception of Popcorn and EasyConvect™.
Doneness may be adjusted to more done, less done or back to
recommended doneness (default).
Doneness function is not active for manual cooking.
Doneness key will be automatically activated during the
programming sequence. The following demonstrates how to
access and change the Doneness function.
Example Demonstration:
1. From the Main Menu touch COOK METHOD.
2. Touch DEFROST.
3. Touch BREAD.
4. Once a food weight in a valid range has been entered, touch
CONTINUE. If the weight is not correct an error tone will
sound.
5. The Doneness key is now active. Touch DONENESS.
Sensor Cook
During the Sensor Cook function a sensor automatically adjusts
for the cook time and power level.
The microwave oven display will show the time countdown once
the sensor identifies the cooking duration.
If the microwave oven door is opened during a sensor function
the microwave oven will turn off, and any additional operations
will be canceled.
For best cooking performance:
Before using a sensor cook function, make sure power has been
supplied to the microwave oven for at least 2 minutes, the room
temperature is not above 95°F (35°C), and the outside of the
cooking container and the microwave oven cavity are dry.
Sensing Bar
The sensing bar is a visual picture of the sensing process. It will
appear during sensor cooking functions above the word
“Sensing.”
6. Touch the “plus” (+) or “minus” (-) keys to change the
Doneness setting.
7. Touch START.
Manual Method Cooking
The Manual Method control on the Main Menu is for manual
cooking. There are several methods from which to choose. Some
of the methods have set power levels that cannot be changed.
Use the following chart as a guide.
METHOD COOKWARE POWER/TEMP
Reheat Microwave-safe 10-100%; 100% default
Defrost Microwave-safe 20% only
Cook Microwave-safe 10-100%; 100% default
Roast Microwave and
heat-safe
Melt Microwave-safe 30% only
Grill Microwave and
heat-safe
Boil & Simmer Steamer vessel Enter desired time.
Browning Pan Browning Pan 80% only
Soften Microwave-safe 20% only
Steam Cook Steamer vessel Enter desired time.
Keep Warm Microwave-safe 10% only
SETTINGS
0-30%, default 0%
225°-450°F (107°-232°C)
default 350°F (177°C)
0-40%, default 0%
13

To Us e:
1. Touch MANUAL METHOD.
2. Select a method from the chart above.
3. Touch the number keys to set a length of time to cook.
If using 100% cook power, skip to Step 5.
4. Touch POWER then enter the desired power level. See the
Microwave Cooking Power Chart in the “Microwave Cooking
Power” section.
If using Roast, touch TEMP, then enter desired temperature.
NOTE: Doneness function is not available for Manual
Cooking.
5. Touch START.
The display will count down the cook time.
When the stop time is reached, the oven will shut off
automatically and the end screen will appear on the display.
If enabled end-of-cycle tones will sound, then reminder tones
will sound every minute.
6. Touch OFF or open the door to clear the display and/or stop
reminder tones.
To Change Cook Time and Cooking Power:
The cook time and cooking power can be changed after touching
Start without interrupting cooking.
During time countdown “Adjust Settings” will appear on the
display.
1. Touch ADJUST SETTINGS.
2. Repeat steps 1-3 above
OR
See “Start-Add Time” section to add time to the cooking
cycle.
Reheat
Times and cooking powers have been preprogrammed for
reheating a number of food types.
Use the following chart as a guide.
CUSTOM REHEAT CHART
FOOD QUANTITY
Dinner Plate
Place food on plate. Cover with plastic
wrap and vent. Let stand 2-3 minutes
after reheating.
Sauce
Place in microwave-safe container.
Cover with plastic wrap and vent. Stir
and let stand 2-3 minutes after
reheating.
Soup
Place in microwave-safe container.
Cover with plastic wrap and vent. Stir
and let stand 2-3 minutes after
reheating.
Pizza Leftover
Place on a paper towel.
8-16 oz (227-454 g)
1-4 cups (250 mL-1 L)
1-4 cups (250 mL-1 L)
1-3 slices (3 oz [85 g]
each)
FOOD QUANTITY
Casserole
Place in microwave-safe container.
Cover with plastic wrap and vent. Stir
and let stand 2-3 minutes after
reheating.
Beverage
Do not cover.
Manual* Default power level
*Manual Reheat requires that a cook time and a power level be
entered if using other than 100%.
1-4 cups (250 mL-1 L)
1-2 cups (250 mL500 mL)
100%.
To Use Programmed Reheat:
1. From the Main Menu touch COOK METHOD.
2. From the Cook Method Menu touch REHEAT.
3. Follow the menu screens to select the specific food item and
quantity.
If the food is Dinner Plate the sensor will automatically
determine the cooking time.
To change the doneness settings, touch the Doneness key
and touch the “plus” (+) or “minus” (-) keys to increase or
decrease to the desired doneness level.
4. Touch STA RT.
When the stop time is reached, the oven will shut off
automatically.
If enabled end-of-cycle tones will sound, then reminder tones
will sound every minute.
5. Touch OFF or open the door to clear the display and/or stop
reminder tones.
To Use Manual Reheat:
1. From the Main Menu touch MANUAL METHOD.
2. From the Method Cook menu touch MANUAL REHEAT.
3. Skip to Step 5
OR
1. From the main menu touch COOK METHOD.
2. From the Cook Method menu touch REHEAT.
3. From the Reheat menu touch MORE CHOICES.
4. Touch MANUAL REHEAT.
5. Enter the desired cook time using the numerical keypad.
6. To change the preprogrammed power, touch POWER and
enter the desired power using the numerical keypad.
7. Touch START. The upper oven display will count down the
reheat time.
When the stop time is reached, the oven will shut off
automatically.
If enabled end-of-cycle tones will sound, then reminder tones
will sound every minute.
8. Touch OFF or open the door to clear the display and/or stop
reminder tones.
IMPORTANT: Heated liquids can splash out during and after
heating. A wooden stir stick placed in the cup or bowl during
heating may help avoid this.
14

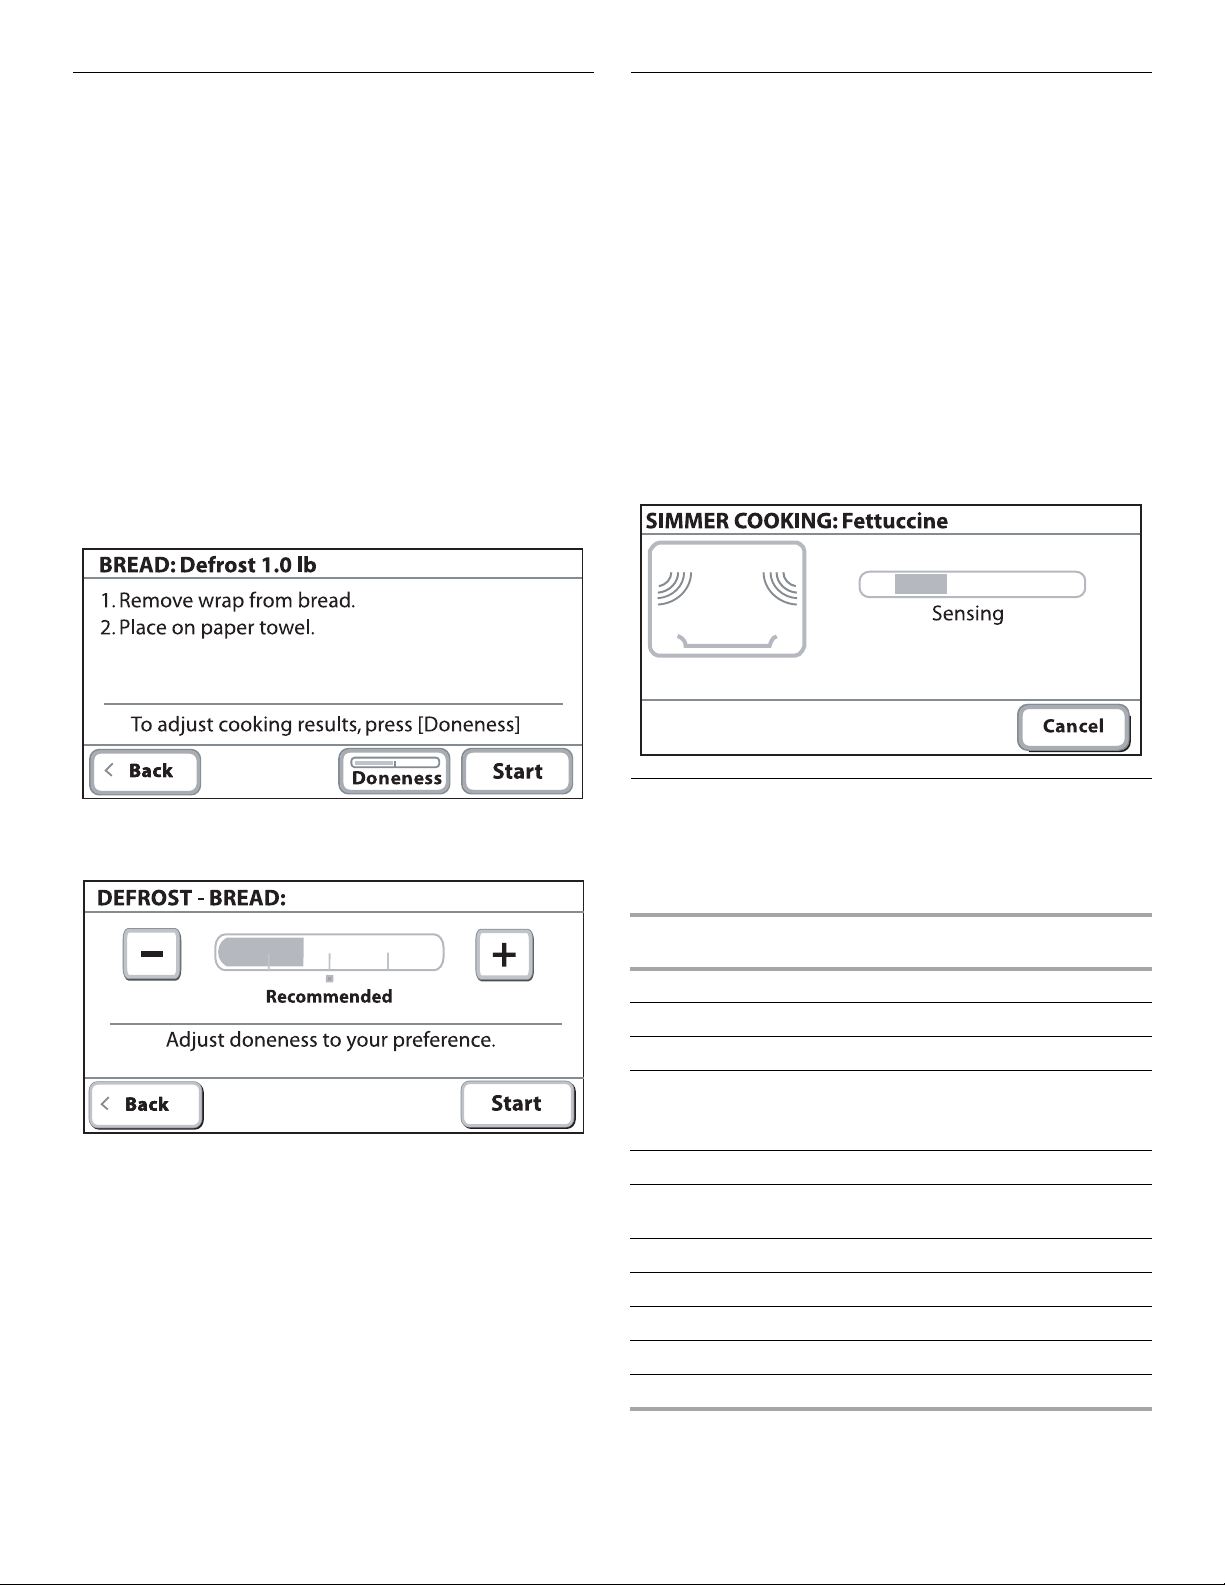
Defrost
The Defrost feature can be used, or the microwave oven can be
manually set to defrost by using 30% cook power.
■ For optimal results, food should be 0°F (-18°C) or colder
when defrosting.
■ Unwrap foods and remove lids (from fruit juice) before
defrosting.
■ Shallow packages will defrost more quickly than deep blocks.
■ Separate food pieces as soon as possible during or at the
end of the cycle for more even defrosting.
■ Foods left outside the freezer for more than 20 minutes or
frozen ready-made food should not be defrosted using the
Custom Defrost feature, but should be defrosted manually.
■ Use small pieces of aluminum foil to shield parts of food such
as chicken wings, leg tips and fish tails. See “Aluminum Foil
and Metal” first.
■ Times and cooking powers have been preprogrammed for
defrosting a number of food types. For each food category a
precise amount of food can be entered or preprogrammed
quantities can be selected.
■ Manual Defrost requires that a cook time and power level be
entered if using other than 30% cook power.
To Use Programmed Defrost with Precise Amount of Food:
1. From the main menu touch COOK METHOD.
2. From the Cook Method Menu touch DEFROST.
3. Select the appropriate food category.
4. Enter the POUNDS using the numerical keypad and/or touch
OUNCES and enter the amount using the numerical keypads.
5. Once a food weight in a valid range has been entered, touch
CONTINUE. If the weight is not correct an error tone will
sound.
To change the doneness settings, touch the Doneness key
and touch the “plus” (+) or “minus” (-) keys to increase or
decrease to the desired level.
6. Touch START.
When the stop time is reached, the oven will shut off
automatically.
If enabled end-of-cycle tones will sound, then reminder tones
will sound every minute.
7. Touch OFF or open the door to clear the display and/or stop
reminder tones.
To Use Programmed Defrost with Weight Unknown:
If the precise weight of the food is unknown, use the following
chart as a reference.
FOOD SETTING QUANTITY
Bread Bagel
Muffin
Roll
Small
Medium
Large
Small
Medium
Large
Small
Medium
Large
2-8 pieces
1-6 pieces
1-6 pieces
4-16 pieces
1-6 pieces
1-6 pieces
2-8 pieces
1-6 pieces
1-6 pieces
FOOD SETTING QUANTITY
Fish/
Seafood
Fillet
Steak
Shrimp
1-6 pieces
1-4 pieces
1-4 cups
(236 mL-1 L)
Scallops
1-4 cups
(236 mL-1 L)
Meat Ground
1-4 cups
(236 mL-1 L)
Chops
Steak
Poultry Breast
Pieces Small
Small
Medium
Large
Small
Medium
Large
Medium
Large
1-6 pieces
1-6 pieces
1-4 pieces
1-6 pieces
1-4 pieces
1-2 pieces
1-6 pieces
1-6 pieces
1-4 pieces
1-4 pieces
1. From the Main Menu touch COOK METHOD.
2. From the Cook Method Menu touch DEFROST.
3. Follow the menu screens to select the specific food item.
4. Touch WEIGHT UNKNOWN.
5. Select food type.
6. Select the number of pieces or cups.
To change the doneness settings, touch the Doneness key
and touch the “plus” (+) or “minus” (-) to increase or decrease
to the desired level.
7. Touch STA RT.
Depending on the food type selected, the cycle will stop once
or twice to allow you to check the food. Tones will sound,
and “TURN OVER FOOD” will appear on the display. Open
the door, turn food, close door, and touch CONTINUE.
When the stop time is reached, the oven will shut off. If
enabled end-of-cycle tones will sound, then reminder tones
will sound every minute.
8. Touch OFF or open the door to clear the display and/or stop
reminder tones.
To Use Manual Defrost:
1. From the Main Menu touch MANUAL METHOD.
2. From the Manual Cook menu touch MANUAL DEFROST
3. Skip to Step 5
OR
1. From the Main Menu touch COOK METHOD.
2. From the Cook Method menu touch DEFROST.
3. Touch MANUAL DEFROST.
4. Touch the number keys to set a length of time to defrost.
NOTE: Doneness function is not available for Manual Defrost.
5. Touch START. The upper oven display will count down the
defrost time.
When the stop time is reached, the oven will shut off
automatically.
If enabled end-of-cycle tones will sound, then reminder tones
will sound every minute.
15
6. Touch OFF or open the door to clear the display and/or stop
reminder tones.
Use the following chart as a guide when defrosting meat, poultry,
or fish.
DEFROST PREPARATION CHART
MEAT
Beef: ground, steaks, roast,
stew
Lamb: stew and chops
Pork: chops, ribs, roasts,
sausage
POULTRY
The narrow or fatty areas of
irregular shaped cuts should
be shielded with foil before
defrosting.
Do not defrost less than
¼ lb (113 g) or two 4 oz (113 g)
patties.
Place all meats in microwavesafe baking dish.
4. Follow the menu screens to select the specific food item and
quantity.
To change the doneness settings, touch the Doneness key
and touch the “plus” (+) or “minus” (-) keys to increase or
decrease to the desired level.
5. Read the preparation directions that appear on the display.
Example:
Chicken: whole and cut up Place in microwave-safe
Cornish hens
Turkey : breast
FISH
Fillets, Steaks, Whole,
Shellfish
baking dish, chicken breast
side up.
Remove giblets from whole
chicken.
Place in microwave-safe
baking dish.
Steam Cooking
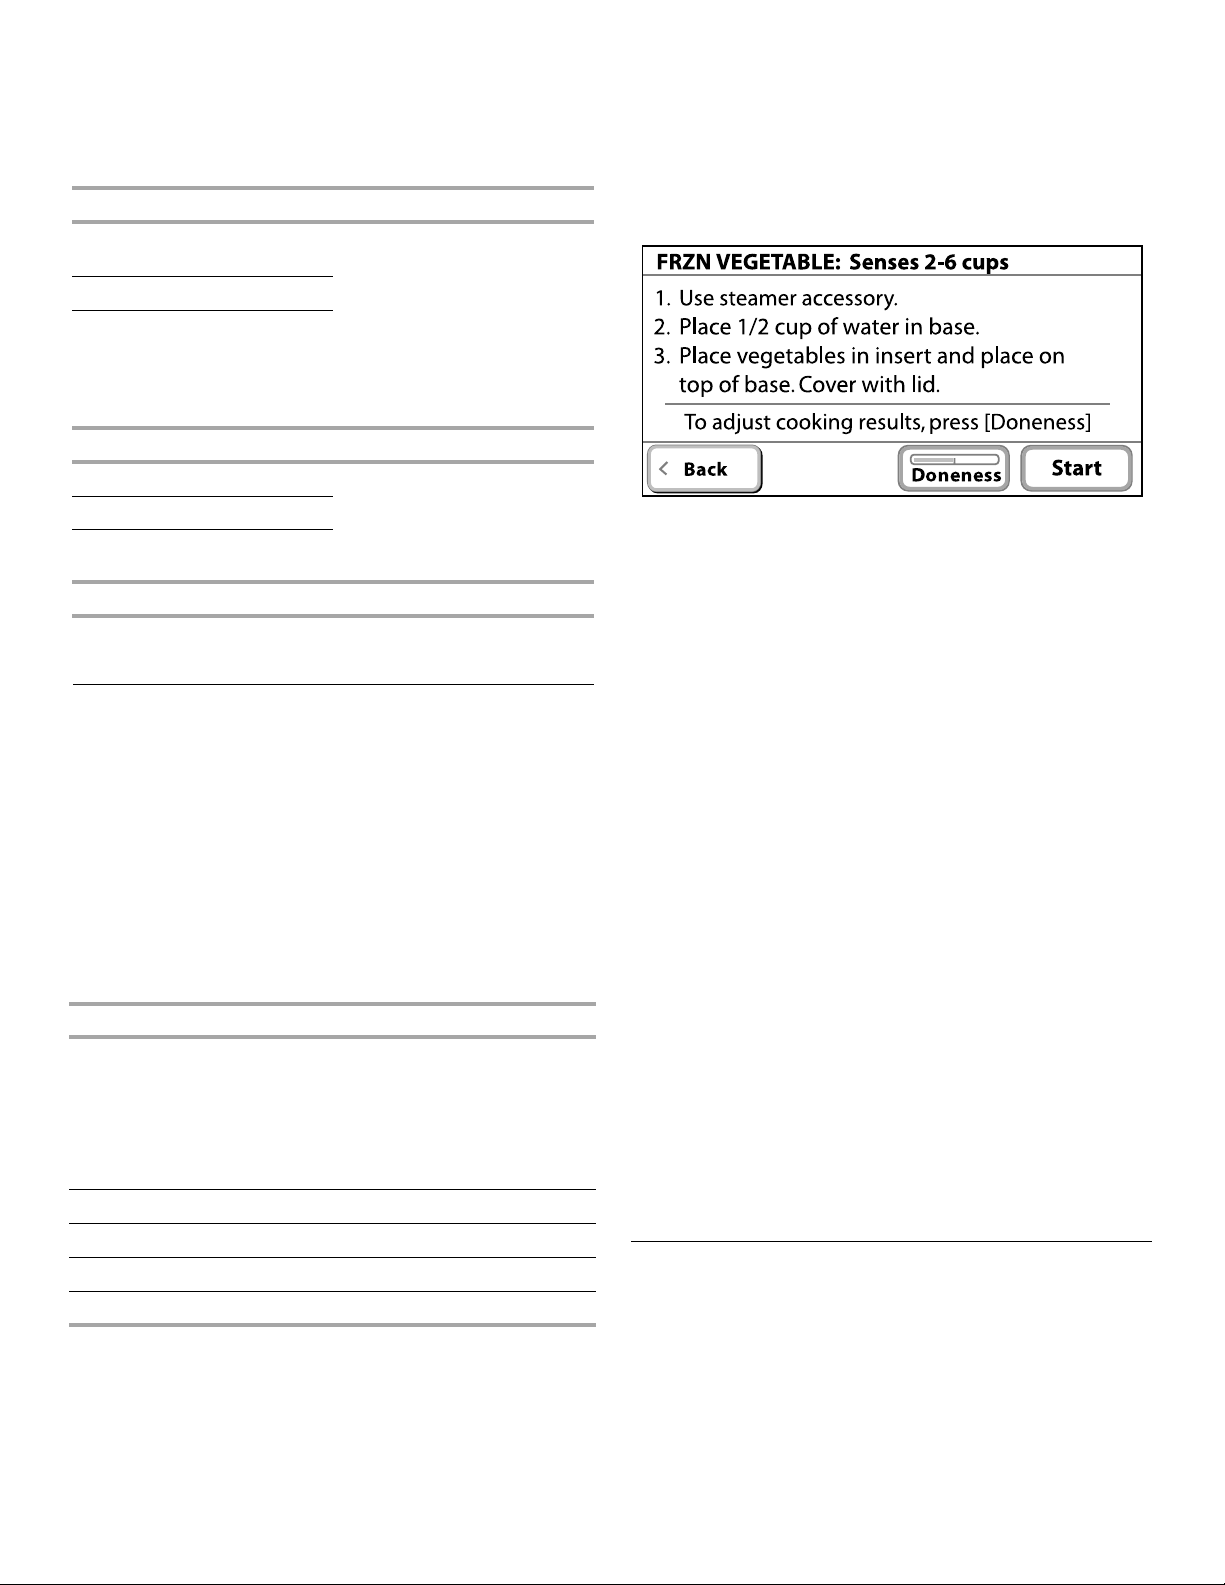
Steam Cook is a sensor cooking function that uses microwaves
to steam food. Always use steamer vessel. See the “KitchenAid®
Steamer Vessel” section before using. Use Steam Cook for foods
such as vegetables, fish and potatoes.
■ Times and cooking powers have been preprogrammed for
steaming a number of food types.
■ Manual Steam Cook requires that a cook time be entered.
■ It is recommended to add ½ cup (118 mL) of water to
Steamer Vessel before steaming.
Use the following chart as a guide.
STEAM COOKING CHART
FOOD CATEGORY QUANTITY
Fresh vegetables
Green beans, carrots, cauliflower,
red potato, spinach, summer
squash, broccoli
Asparagus
Corn on the cob
Frozen vegetables 2-6 cups (473 mL-1.4 L)
Fish fillets 8-16 oz (226-454 g)
2-6 cups (473 mL-1.4 L)
4-18 oz (113-510 g)
1-4 ears
6. Touch STA RT.
When the steam time has ended, the oven will shut off
automatically.
If enabled end-of-cycle tones will sound, then reminder tones
will sound every minute.
7. Touch OFF or open the door to clear the display and/or stop
reminder tones.
To Use Manual Steam:
1. From the Main Menu touch MANUAL METHOD.
2. From the Manual Cook menu touch MANUAL STEAM.
3. Skip to Step 5
OR
1. From the Main Menu touch COOK METHOD.
2. From the Cook Method menu touch MORE CHOICES.
3. Touch STEAM COOK.
4. From the Steam Cook menu touch MANUAL STEAM.
5. Enter the desired steam time using the numerical keypad.
NOTE: Doneness function is not available for Manual Steam.
6. Touch STA RT.
“STEAMING” and the sensing bar will appear on the display.
Once the boiling point is reached the display will start to
count down the steam time.
When the stop time is reached, the oven will shut off
automatically.
If enabled end-of-cycle tones will sound, then reminder tones
will sound every minute.
7. Touch OFF or open the door to clear the display and/or stop
reminder tones.
Shrimp 5-10 oz (142-284 g)
Manual 1-4 servings
To Use Programmed Steam:
1. From the Main Menu touch COOK METHOD.
2. From the Cook Method Menu touch MORE CHOICES.
3. Touch STEAM COOK.
16
Boil & Simmer
Boil & Simmer is a sensor function, and uses only microwaves to
simmer your food.
■ Follow recommended water and food amounts that appear
on the display.
■ Use the provided steamer vessel base and lid, or a
microwavable dish with a loose-fitting lid.
■ For best cooking results, do not use plastic wrap as a cover
during the Boil & Simmer cycle.

■ Do not remove the lid while the dish is still in the oven, as the
rush of steam will disrupt the sensor readings.
Use the following chart as a guide.
PASTA CHART
FOOD
FOOD QUANTITY
CATEGORY
Dried Pasta Fettuccine, spaghetti
Macaroni, penne, rotini
2-8 oz
(57-227 g)
½-2 cups
(118-473 mL)
Fresh Pasta Linguine, ravioli, tortellini 9-18 oz
(255-510 g)
White Rice Long or short grain ½-2 cups
(118-473 mL)
■ Use the Manual Simmer function for foods such as soups,
casseroles, stews and other liquid food.
■ Manual Boil & Simmer requires that a cook time be entered.
To use Programmed Boil & Simmer
1. From the Main Menu touch COOK METHOD.
2. From the Cook Method Menu touch BOIL & SIMMER.
3. Follow the menu screens to select the specific food item and
quantity to be cooked.
4. Read the preparation directions that appear on the display.
Example: When Fettuccine is selected from the Food menu,
a double text line appears: “Place water in steamer container.
Add salt and 1 tsp of oil. Cover with lid. At signal, add pasta.”
Manual Boil & Simmer:
1. From the Main Menu touch MANUAL METHOD.
2. From the Manual Cook menu touch MORE CHOICES.
3. Touch MANUAL SIMMER.
4. Skip to Step 4 below
OR
1. From the Main Menu touch COOK METHOD.
2. From the Cook Method menu touch BOIL & SIMMER.
3. Touch MANUAL BOIL & SIMMER.
4. Enter the desired simmer time using the numerical keypad.
5. See the “Manual Simmer Chart” for instructions.
NOTE: Doneness function is not available for Manual Steam.
6. Touch STA RT.
7. “SIMMERING” and the sensing bar will appear on the display.
Once the boiling point is reached the timer will begin to count
down the simmer time.
When the simmering time has ended, the oven will shut off
automatically.
If enabled end-of-cycle tones will sound, then reminder tones
will sound every minute.
8. Touch OFF or open the door to clear the display and/or stop
reminder tones.
MANUAL SIMMER CHART
FOOD INSTRUCTIONS
Pasta* Add 1 tbs (15 mL) oil to water. Place the
dish containing water in oven. Enter 1
second of simmer time. The water will
heat to a boil and then the oven will turn
off. Place the pasta in the water and
cover the dish. Repeat steps 1-3 under
“To Use Manual Simmer,” then enter the
actual simmer time desired.
Rice and
Vegetables
Soup and
liquid foods
Place water and food in dish. Place dish
in oven. Set simmer time.
Place food in dish and place dish in oven.
Set simmer time
To change the doneness settings, touch the Doneness key
and touch the “plus” (+) or “minus” (-) keys to increase or
decrease to the desired level.
5. Touch START.
6. If simmering pasta, when water begins to boil, a tone will
sound and “ADD PASTA, STIR AND COVER” will appear on
the display.
7. Open door, remove container, add food to boiling water,
replace container in oven, close door and touch CONTINUE.
The display will count down the simmer time after the water
returns to a boil.
8. If simmering rice, when water begins to boil, the display will
count down the simmer time.
When the stop time is reached, the oven will shut off
automatically.
If enabled end-of-cycle tones will sound, then reminder
tones will sound every minute.
9. Touch OFF to clear the display and/or stop reminder tones.
*Use a dish large enough to completely cover food with water.
Bake
The oven has a baking function which uses the convection and
grill elements to bake. Times and cooking powers have been
preprogrammed for 2 settings: Bread and Cookies.
■ The microwave oven cavity and door will become hot during
the Bake cycle. The use of oven mitts is recommended.
■ The convection rack will become very hot. Use oven mitts to
remove pan from microwave oven to a heat-safe surface.
■ Always use the convection rack for baking. Place convection
rack directly on turntable.
To Use Programmed Bake:
1. From the Main Menu touch COOK METHOD.
2. From the Cook Method menu touch BAKE.
3. Select the appropriate Food category.
If the food is BREAD, select the quantity.
17
 Loading...