

KitchenAid KEBC177HBL3, KEBS107DSS8, KEBS277DWH11, KEBS277DBT11, KEBS277DBL11 Owner’s Manual
...
KitchenAJd ®
BUILT-INELECIRICCONVECTION SINGLE
AND DOUBLEOVENS
Use & Care Guide
In the U.S.A, for questions about features, operation, pa_formance, parts, accessories or service, call: 1-800-422-1230
In Canada, for product-related questions call 1-800-461-5681, for parts, accessories, installation and service call: 1-800-8074777 or
www.kitchenaid.com or www.kitchenaid.com/canada
Table of Contents .......................................................................................................... 2
visit our website at...
Models KEBC107 KEBC177 KEBC208 KEBC278 KEBS107 KEBS147 KEB8177 KEBS207
KEBS206 KEBS247 KEBS2T/ KEBS278 YK]EBS107 YIKEBS177 YIKEB$_08
,I,161852B

i1,, , , m,,, ,,,,,. ,i,i
TABLE OF CONTENTS
OVEN SAFETY .................................................................. 3
PARTS AND FEATURES .................................................. 5
ELECTRONIC OVEN CONTROL ..................................... 6
St_ .,o..o. * ..._..o,_ ............ *.......,o...* ............ *............ ,H..o.*...--...Hu...*,6
LowerOvenCancel/ Off,
UpperOvenCancel/ Offand CancelOff....................................6
Clock............................................................................................6
F_mtmhett;mdCeLqtus.................................................................7
ContndLock.........................,..............,..............,..............,..........7
OvenTemperatureControl..........................................................8
SabbathMode..............................................................................8
OVEN USE ........................................................................... 9
AluminumFoil...............................................................................9
PositioningRacks andBakeware................................................9
Bakeware....................................................................................10
MeetThermometer.....................................................................10
OvenVent(s)...............................................................................10
BakingandRoasting..................................................................11
ConvectionBaking.....................................................................11
ConvectionRoasting..................................................................12
Maxiand EconoBroiling............................................................12
ConvectionBroiling....................................................................13
ConvectFullMeal ......................................................................14
ConvectionTemperatureConversion........................................15
Dehydrating................................................................................ 16
ProofingBreed...........................................................................16
TemperatureProbe....................................................................17
Tin'rodCooking......................................................................:....18
OVEN CARE. .................................................................... 19
S_-OeaninoCyOe....................................................................19
c_r_g ......................................................................................20
o.m Ughts................................................................................21
OvenDoor..................................................................................21
TROUBLESHOOTING .................................................. 22
ASSISTANCE OR SERVICE ............................................. 23
IntheU.S.A................................................................................23
In Canada...................................................................................23
WARRANTY ...................................................................... 24
2

OVEN SAFEI
Your safety end the safety of others are very Important.
We have provided many important safety messages in this manual and on your appliance, Always read and obey all
safety messages,
This symbol alerts you to potential hazards that can killor hurt you and others.
All safety messages will follow the safety alert symbol and either the word "DANGER" or
This isthe safety alert symbol.
=WARNING." These words mean:
You can be killed or seriously Injured if you don't
Immediately follow instructions.
You can be killed or seriously injured if you don't
follow Instructions.
All safety messages willtell you what the potential hazard is, tell you how to reduce the chance of injury, and tell you
what can happen ifthe instructionsare not followed.
IMPORTANT SAFETY INSTRUCTIONS
WARNING: To reduce the risk of fire, electrical
shock, injury to persons, or damage when using the
oven, follow basic precautions, including the following:
• Proper Installation - Be sure the oven is propedy
installed and grounded by a qualified technician.
• Never Use the Oven for Warming or Heating the
Room.
• Do Not Leave Children Alone - Children should not
be left alone or unattended in area where oven is in
use. They should never be allowed to sit or stand
on any part of the oven.
• Wear Proper Apparel - Loose-fitting or hanging
garments should never be wom while using the oven.
• User Servicing - Do not repair or replace any part of
the oven unless specifically recommended in the
manual. All other servicing should be referred to a
qualified technician.
• Storage in Oven - Flammable materials should not
be stored in an oven.
• Do Not Use Water on Grease Fires - Smother fire or
flame or use dry chemical or foam-type extinguisher.
• Use Only Dry Potholders - Moist or damp potholders
on hot surfaces may result in bums from steam. Do
not let potholder touch hot heating elements. Do not
use a towel or other bulky cloth.
• Use Care When Opening Door - Let hot air or steam
escape before removing or replacing food.
• Do Not Heat Unopened Food Containers - Build-up
of pressure may cause container to burst and result
in injury.
• Keep Oven Vent Ducts Unobstructed.
• Placement of Oven Racks - Always place oven recks
in desired location while oven is cool. If rack must be
moved while oven is hot, do not let potholder contact
hot heating element in oven.
• DO NOT TOUCH HEATING ELEMENTS OR
INTERIOR SURFACES OF OVEN - Heating
elements may be hot even though they are dark in
color. Interior surfaces of an oven become hot
enough to cause bums. Dudng and after use, do
not touch, or let clothing or other flammable materials
contact heating elements or interior surfaces of oven
until they have had sufficient time to cool. Other
surfaces of the oven may become hot enough to
cause bums - among these surfaces are oven vent
openings and surfaces near these openings, oven
doors, and windows of oven doors.
SAVE THESE INSTRUCTIONS
3

IMPORTANT SAFETY INSTRUCTIONS
For serf-deaning ovens:
• Do Not Clean Door Gasket - The door gasket is
essential for a good seal. Care should be taken not
to rub, damage, or move the gasket.
• Do Not Use Oven Cleaners - No commercial oven
cleaner or oven liner protective coating of any kind
should be used in or around any part of the oven.
• Clean Only Parts Listed in Manual.
• Before Self-Cleaning the Oven - Remove broiler pan
and other utensils.
SAVE THESE INSTRUCTIONS
The Califomia Safe Ddnking Water and Toxic Enforcement Act requires the Governor of Califomia to publish a list
of substances known to the State of California to cause cancer, birth defects, or other reproductive harm, and
Cequires businesses to warn of potential exposure to such substances.
WARNING: Thisproduct contains a chemical known to the State of California to cause cancer, birth defects, or
other reproductive harm.
This appliance can cause low-level exposure to some of the substances listed, including benzene, formaldehyde,
carbon monoxide, and toluene,
4
i
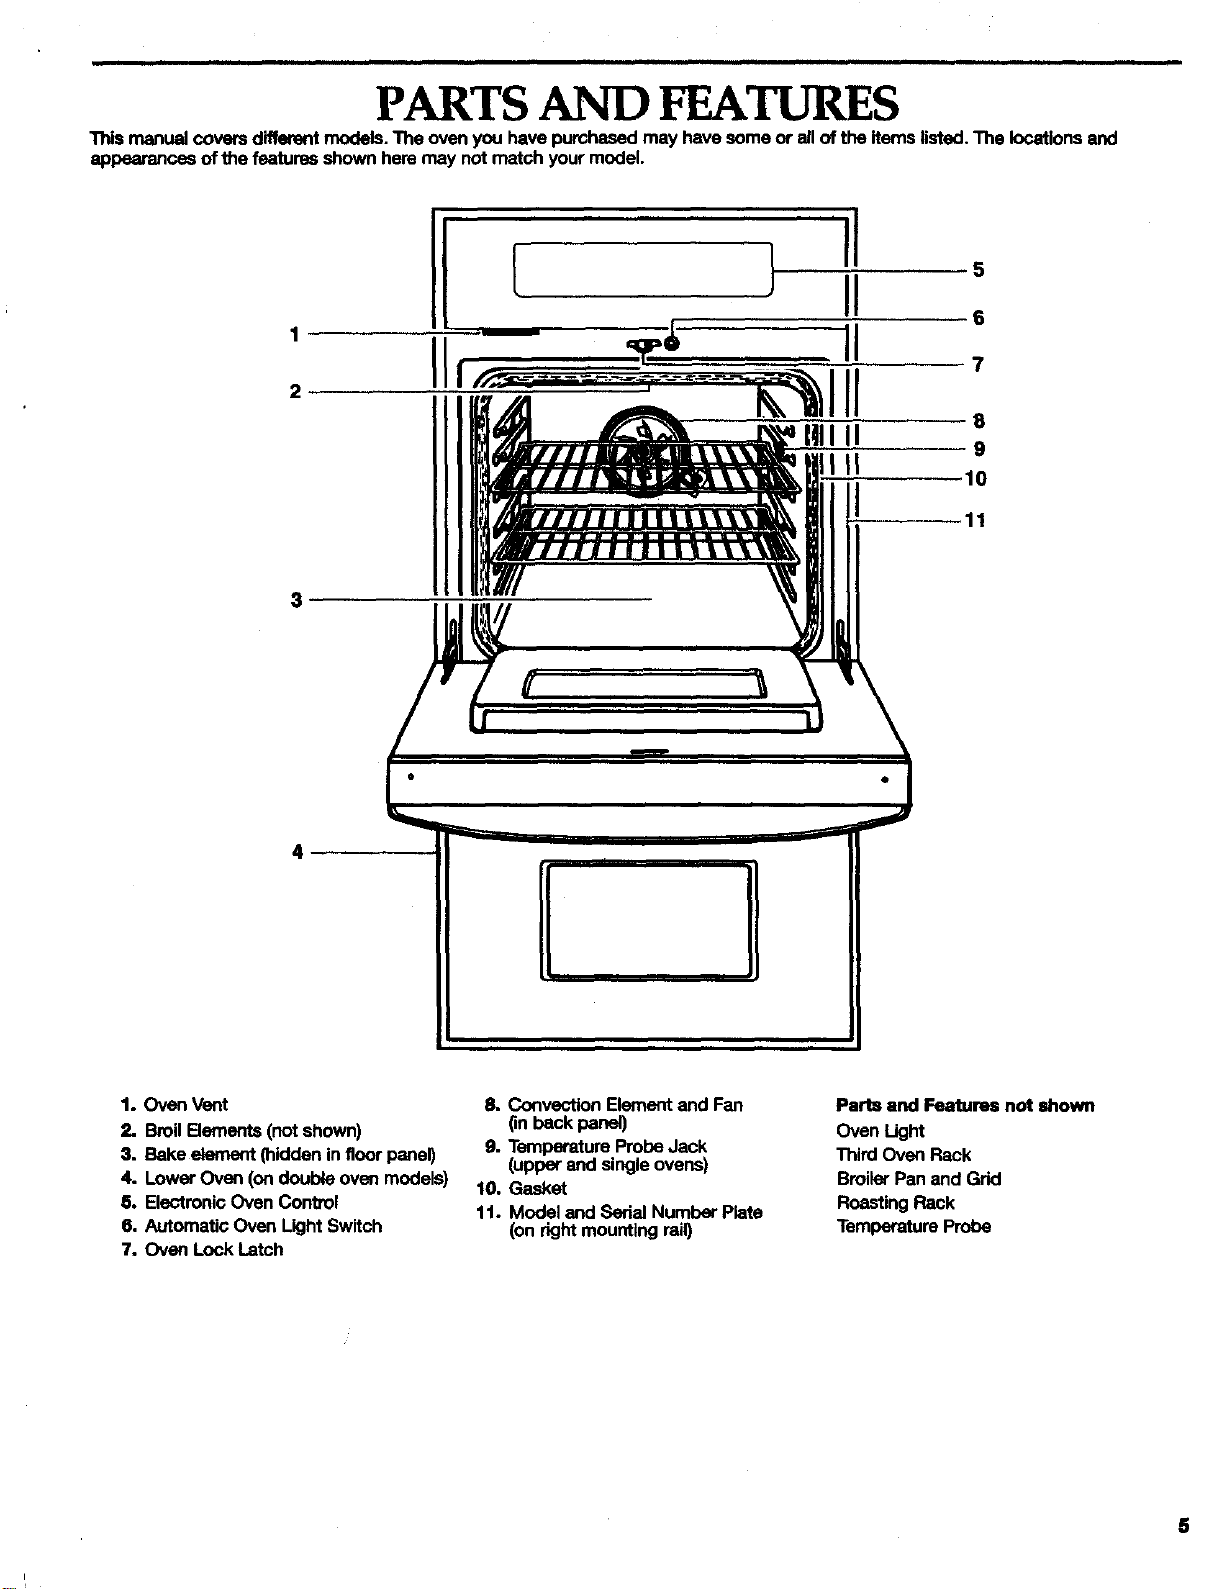
PARTSAND FEATURES
Thismanualcoversdifferent models.The ovenyou have purchasedmay havesomeor alloftheitemslisted. The locationsand
appeerence_ofthe featuresshownhem may notmatchyourmodel.
1
2
11
3
4
1. OvenVent
2. BroilBements (notshown)
3. Bakeelement(hiddeninfloor penal)
4. LowerOven (ondoubleoven models)
5. ElectronicOven Control
6. AutomaticOven LightSwitch
7. Oven LockLatch
8. Convection Element and Fen
(in back panel)
9. Temperature Probe Jack
(upper and single ovens)
10, Gasket
11. Model and Serial Numbar Plste
(on right mounting rail)
Parts and Features not shown
Oven Light
Third Oven Rack
Broiler Pan and Grid
Roasting Rack
Temperature Probe
5

ELECTRONIC OVEN CONTROL
manualcoversdifferentmodels.The ovenyouhave pumhesedmay havesome orallof the itemslisted.The locationsand
appearancesofthe itemsshownheremay not match yourmodel.
1 2 3 4 5 6 7
9
1. Oven Display
2. Timed Cooking
3. NumberPads
4. ControlLock
,5. Clock
6. Tmle of Day,Timer Display
10 11 12 13 14
7. Start
8. Upper or LowerOven Selectors
(ondoubleovenmodels)
9. Oven OptionSelectors
10. ConvectionTemperatureConversion
11. Cenvect FullMeal
Displays
When power is first supplied to the appliance, everything on the
displays will light up for 5 seconds. Then, "PF" will appear on the
oven display end a time of day will appear on the Time of Day
display. Press LOWER OVEN CANCEL/OFF, UPPER OVEN
CANCEL / OFF or CANCEL OFF to clear the oven display.
Any other time =PF" appears, a power failure occurred. Prses
LOWER OVEN CANCEL / OFF, UPPER OVEN CANCEL / OFF or
CANCEL OFF and reset the clock if needed.
OvenD a ay
When the oven(s) are in use, this display shows the oven
temperature, heat source(s) end start time. On double oven
models, this display will also show which OVen is being set, The
left cavity symbol represents the upper oven and the dght cavity
symbol repr"_--=entsthe lower oven.
In addition, during Timed Cooking, this display shows a vertical
bar and time countdown end the stop time ('dentered).
If =Err= appears on the oven display, an invalid pad was pressed,
Press LOWER OVEN CANCEL / OFF, UPPER OVEN CANCEL /
OFF or CANCEL OFF end retry your entry.
When the ovens are not in use, this display is blank.
Time of Day, "rimer Display
This displayshowsthetime ofday or Timer countdown.
12. Oven Ught
13. Timer
14. Upper and Lower Oven Cancel / Off
(_ouble oven models)
ancel Off (single oven models)
The STARTpad beginsall ovenfunctions exceptthe Timer,
ControlLockend SabbathMode. ff notpressedwithin5 seconds
after pressingapad, =START?"willappearonthe ovendisplayas
a reminder.Ifnot pressedwithin5 minutesafterpressinga pad,
the ovendisplaywill returnto inactivemode(blank)end the
programmedfunction willbe cancelled.
Lower Oven Cancel/Off, Upper Oven
Cancel / Off and Cm cel Off
The LOWER OVEN CANCEL / OF_, UPPER OVEN CANCEL / OFF
end CANCEL OFF pads stop their respective oven functions
except for the Clock, Timer, Control Lock end Sabbath Mode.
The cooling fan may continue to operate even after pressed,
depending on the oven temperature.
Clock
This is a 12 hour clock and does not show a.m. or p.m.
To Set:
Beforesetting, makesuretheoven(s),TimerandTimed Cooking
ere off.The alock cen be set whentheoven(s)m on, howaver
the starttimewilldisappear,
1. PressCLOCK SET- START.
2. Prass_e numberpads to set thetime ofday.
3. PressCLOCKSET. STARTorSTART.
To Remove/Return Time of Day h_m Di_. Pressand hold
CLOCKSET. STARTfor 5seconds.Repeatto re-display.The
time shouldnotheve to be reset.
6
i
_ones
T_ areaudible_gea{s,indicatingthefol{owing:
()hetone
• V_idpex:lpress
• Oven ispreheated
• Functionhasbeenentered
_ tones
• Invalidpad press
Four tmtes
• End-of-cycle
• Reminder,repeatingeach minuteafterthe and-of-cycletones
Fahrenheit and Celsius
The temperatureispresetinFahrenheit,howeverit canbe
changedto Celsius.
To Change: Pressand hold BROIL. MAXl- •ECONO for 5
seconds.Atone willsoundand =C"willappear onthe displayfor
3 seconds.Repe_tto changebackto Fahrenheit."F" willappear
onthe displayfor 3 seconds.
Whenin Fahrenheit,"°F"followstheoventemperature.
WheninCelsius,only"°" followsthe oventemperature.
_111_er
TheTimercan be set in minutesandsecondsor hoursand
minutesandcounts downthe settime. It donsnotstartorstop
the oven.
Tone Volume
The volume is preset at high, but can be changed to low.
To Change: Prees and hold the number pad "7" for 5 seconds. A
tone will sound and =Snd Lo" will appear on the oven display for
3 seconds. Repeat to change back to "Snd Hi".
N I
All Tones (double oven models)
All of the above tones are preset on, but can be turned off.
To "rum Off/On: Press end held STOP TIME for 5 seconds. A
tone will sound and "Snd OFF" will appear on the oven display
for 3 seconds. Repeat to change beck to =Snd On".
ii L
Pad Press Tones (single oven models)
imll i i
The singletonessignalingavalid pad pressarepreseton, but
canbe turnedoff.
To Turn Off/On: Press and hold STOP TIME for 5 seconds. A
tone will sound and "Snd oFF" will appear on the oven display for
3 seconds. Repeat to change back to "Snd on".
End-of-Cycleand ReminderTones
The Timer and Timed Cooking end-of-cycle and reminder tones
are preset on, but can be tumed off. However, on double oven
medals, if all tones have been turned off, the and-of-cycle and
reminder tones cannot be independently turned on.
To Turn Tones Off/On: Press and hold COOK TIME until a tone
sounds and "EOC OFF =appears on the display. Repeat to turn
beck on. "EOC On" will appear on the display.
Rerninder Tones Only
The Timer and Timed Cooking reminder tones are preset on, but
can be turned off. However, on double oven models, if ell tones
have been turned off, the reminder tones cannot be
independently tumed on.
To Turn Tones Off/On: Press and hold TIMER SET. START until
a tone sounds and "nAg OFF" appears on the display. Repeat to
turn beck on. "nAg On" will appear on the display.
To Set:
1. PressTIMER SET- START.
Pressagainto switchbetweenMIN/SEC and HR/MIN.
Ifno actionistaken afteroneminute,the displaywillreturnto
the time ofday mode.
2. Pressthenumberpadsto set thelength oftime.
3. PressTIMER SET. STARTorSTART.
If notpressedwithin5 seconds,the displaywillreturnto the
timeof day mode and the programmedfunctionwillbe
cancelled.
Whenthe set timeends, "END"willappear inthe displayand
ifenabled, and-of-cycle toneswillsound,then reminder
toneswillsoundevery minute.
4. PressTIMER CANCELanytimeto canceltheTimer orstop
the remindertones.
*Remember,ifa CancelOff pad is pr-,_ssd,the respective
ovenwilltum off.
The timecan beresetdudngcountdownby repeatingthe
above steps.
Control Lock
The Control Lock shuts down the control panel pads to prevant
unintanded use of the ovan(s). The Control Lock will remain set
after a power failure if set before the power failure.
When the control is locked, only the CLOCK SET- START,TIMER
SET. START,TIMER CANCEL and OVEN LIGHT pads will
function. On single oven models, CANCEL OFF will also function
if pressed for one second.
Before locking, make sure the oven(s), Timer, Timed Cooking and
Sabbath Mode are off. On double ovan models, the Control Lock
can be set if the oven(s) are on. The ovan(s) will automatically turn
off. Press a Cancel/Off pad to clear the display.
The Control Lock is preset unlocked, but can he locked.
To Lock/Unlock Control: Press and hold the number pad 3
CONTROL LOCK until "CONTROL LOCK" and a picture of a lock
appear on the display after about 3 seconds. Repeat to unlock
end remove =CONTROL LOCK" from the display.
7

Oven Temperature ContIol
IMPORTANT:. Do not use a thermometer to measure oven
temperature because opening the oven door end element or
btmler cycling may give incorrect readings.
oven(s) provide accurate temperatures; however, they may
cook faster or slower then your previous oven, so the
temperature calibration can be adjusted. It can be changed in
Fahrenheit or Celsius.
A minus sign means the oven will be cooler by the displayed
amount. No sign means the oven will be warmer by the displayed
amount. Use the following chert as a guide.
ADJUSTMENT °F
COOKS FOOD
(ADJUSTMENT°C)
i
5= to 10°F (3° to 6°C)
15" to 20°F (9° to 120C) ...moderately more
25° to 35°F (15° to 21°(3) ...much more
-5° to -10°F (-3° to -6°(3) .,.a little less
-15° to -20°F (-9° to -12°(3) ...moderately less
-25 ° to -35_F (-15 ° to -21°(3) ...much less
To Acqust Oven Temperatum Calibration:
1. Pre6s and hold BAKE for about 5 esconds until the oven
display shows the current calibration, for example, "O°F CAL
COOK TEMP', if not yet adjusted.
2, On double ovens only, press UPPER OVEN or LOWER OVEN
to select oven.
Each oven calibration can be independently set.
...a little more
3. Press BAKEto increaseend BROIL- MAXI • •ECONO to
decreasethetemperaturein 5°F (3°C) amounts,The
adjustmentcanbe set between350F(21°C)and
-35°F(-21°(3).
4. PressSTART.
ii
Sabbath Mode
The Sabbeth Mode sets the oven to remain on in a bake setting
until turned off. A timed Sabbath Mode can also be set to keep
the oven on for only part of the Sabbath.
When the Sabbath Mode is set, the number pads are active. On
single oven models, CANCEL OFF and START are also active. On
double oven models, UPPER and LOWER OVEN end UPPER and
LOWER OVEN CANCEL / OFF are also active.
No tones will sound and the displays wilt not show messages or
temperature chenges. The heat source k_onswill appear lit on the
oven display and the cooling fan will remain on throughout the
bake function.
Whenthe ovendoorisopenedor closed,the ovenlightwillnot
turn on or off andthe heatingelements will notturnon or off
knmed_ely.
ffa powerfailure occurswhenthe SabbathMode isset, theoven
willreturnto theSabbath Mode in an untimedbakewitha
temperature of 350°F (177°(3).
ToEnable:
Before the Sabbath Mode can be regularly set, the overt(=)must
first be enabled with a one time only set up. On double oven
models, the following steps will enable both ovens.
1. On double ovens, open the upper oven door.
On single ovens, open the oven door.
2. On double ovens, press UPPER OVEN CANCEL / OFE
On single ovens press CANCEL OFF.
3. Press the number pads 7, 8, 9, 6, in this order.
4. Press START.
"SAb On" will appear on the display.
Press a Cancel/Off pad to clear the display.
5. Close oven door.
To Disable:
The oven can be disabled of the ability to set the Sabbath Mode.
When disabled, the Sabbath Mode cannot be regulmly set until
m-enabled. On double oven models, the following steps will
disable both ovens.
1. On double ovens, open the upper oven door.
On single ovens, open the oven door.
On double ovens, press UPPER OVEN CANCEL / OFF.
On single ovens press CANCEL OFE
3. Press the number pads 7, 8, 9, 6, in this order.
4. Press UPPER OVEN CANCEL / OFF or CANCEL O_.
"SAb OFF" will appear on the display.
Press a Cancel/Off pad to clear the display.
5. Close oven door.
ToRegulUsSet,unume
1. On double ovens only, press UPPER OVEN or LOWER OVEN.
Each oven can be independently set.
2. PressOVENUGHT to desiredo_ion.
3. PressBAKE.
Pressthe numberpads to entera temperatureotherthan
350°F (177°C).The bake range canbe set between 1700F
and 5000F(77°C and2600C).
4.
Pre_ START.
5.
Press and hold the number pad 6 for about 5 seconds until
"SAb ON" appears on the oven dleplay.
6.
To turn off the Sabbath Mode on the ovan(s) any time, press
and hold the number pad 6 for about 5 seconds until "SAb
ON" disappears from the oven display.
ToRegu dySet,TUne
1. On double ovens only, press UPPER OVEN or LOWER OVEN.
Each oven can be independently set.
2. Press OVEN LIGHTto desired option.
3. Press BAKE.
Press the number pads to enter a temperature other than
350°F (1770C). The bake range can be set botwesn 170=F
and 500°F (77_C and 260"C).
4. Press COOK TIME.
5. Press the number pads to enter the length of Sahbeth Mode
time, up to 9 hours 59 minutes.
6. On double ovens only, if setting the second ovan, repeat
steps I through 5.
8
 Loading...