

Page 1
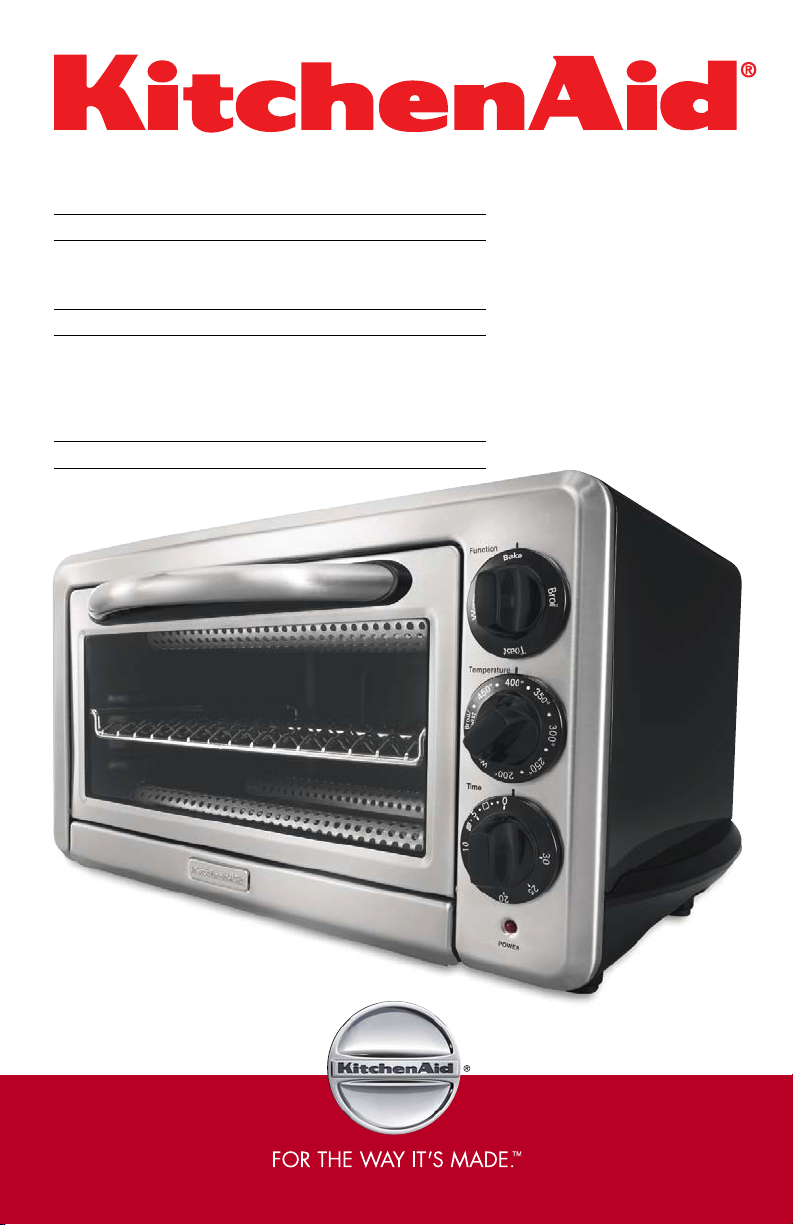
COUNTERTOP OVEN
INSTRUCTIONS AND RECIPES
FOUR DE COMPTOIR
INSTRUCTIONS ET RECETTES
HORNO DE LA MESADA
DE COCINA
INSTRUCCIONES Y RECETAS
KCO1005
6
SLICE
TRANCHE
REBANADA
USA: 1-800-541-6390
Canada: 1-800-807-6777
KitchenAid.com
KitchenAid.ca
Page 2

Proof of Purchase & Product Registration
Always keep a copy of the sales receipt
showing the date of purchase of your
Countertop Oven. Proof of purchase will
assure you of in-warranty service.
Before you use your Countertop Oven, please
fill out and mail your product registration
card packed with the unit. This card will
Model Number: KCO1005
Serial Number _______________________________________________________________
Date Purchased ______________________________________________________________
Store Name _________________________________________________________________
enable us to contact you in the unlikely event
of a product safety notification and assist
us in complying with the provisions of the
Consumer Product Safety Act. This card does
not verify your warranty.
Please complete the following for your
personal records:
Preuve d’achat et enregistrement du produit
Veuillez conserver une copie du coupon de
caisse indiquant la date d’achat de votre four
de comptoir. La preuve d’achat vous assure
du service d’après-vente sous garantie.
Avant d’utiliser votre four, veuillez remplir
et poster la carte d’enregistrement du
produit accompagnant l’appareil. Grâce à
Numéro de modèle : KCO1005
Numéro de série _____________________________________________________________
cette carte, nous pourrons vous appeler
dans l’éventualité improbable d’un avis de
sécurité et nous conformer plus facilement
aux dispositions de la loi sur la sécurité des
produits de consommation. Cette carte ne
confirme pas votre garantie.
Veuillez remplir ce qui suit pour vos
dossiers personnels :
Date d’achat ________________________________________________________________
Nom du marchand et adresse __________________________________________________
Comprobante de compra y registro del producto
Siempre conserve una copia del recibo de
venta que especifique la fecha de compra
de su horno de la mesada de cocina. El
comprobante de compra le asegurará el
servicio técnico bajo garantía.
Antes de utilizar el horno de la mesada de
cocina, complete y envíe por correo su tarjeta
de registro del producto que viene junto
con la unidad. Esta tarjeta nos permitirá
Número del modelo: KCO1005
Número de serie _____________________________________________________________
Fecha de compra _____________________________________________________________
Nombre de la tienda __________________________________________________________
contactarnos con usted en el improbable
caso de una notificación de algún problema
de seguridad con el producto y nos ayudará
a cumplir con las cláusulas de la Consumer
Product Safety Act (Ley sobre la seguridad
de los productos para el consumidor). Esta
tarjeta no asegura su garantía.
Complete lo siguiente para su registro
personal:
Page 3

Table of Contents
INTRODUCTION
Proof of Purchase & Product Registration .............................................. Inside Front Cover
Countertop Oven Safety ..................................................................................................2
Important Safeguards .....................................................................................................2
Electrical Requirements ...................................................................................................3
FEATURES AND OPERATION
Countertop Oven Features ..............................................................................................4
Preparing the Countertop Oven for Use
Before First Use .......................................................................................................6
Before Each Use ......................................................................................................6
Understanding Positions of the Wave-Rack™ Oven Rack .................................................7
Baking (and reheating) with the Countertop Oven ..........................................................8
Broiling (and top browning) with the Countertop Oven ..................................................8
Toasting with the Countertop Oven ................................................................................9
Warming (plus keeping warm and heating) with the Countertop Oven ...........................9
CARE AND CLEANING
Cleaning the Countertop Oven ......................................................................................10
Troubleshooting ...........................................................................................................10
COUNTERTOP OVEN TIPS
Countertop Oven Use Tips ...........................................................................................11
Food Cooking Tips ........................................................................................................11
Helpful Hints .................................................................................................................12
ENGLISH
RECIPES
Asian Chicken Drummettes ..........................................................................................12
Warm Italian Crostini ...................................................................................................13
Beef Nachos Grande .....................................................................................................13
Oven-Roasted Vegetables ..............................................................................................14
Blueberry Lemon Scones ..............................................................................................14
Broiled Mustard-Caper Salmon ....................................................................................15
Garlic-Herb Roast Cornish Hens ......................................................................................15
Prosciutto Provolone Pizza ............................................................................................16
Citrus Shortbread Squares .............................................................................................17
Caramel-Cashew Chocolate Brownies ............................................................................18
WARRANTY AND SERVICE INFORMATION
KitchenAid
Hassle-Free Replacement Warranty – 50 United States and District of Columbia ...........20
Hassle-Free Replacement Warranty – Canada ................................................................20
How to Arrange for Warranty Service in Puerto Rico .....................................................20
How to Arrange for Service After the Warranty Expires – All Locations ..........................21
How to Arrange for Service Outside these Locations .....................................................21
How to Order Accessories and Replacement Parts .........................................................21
®
Countertop Oven Warranty .......................................................................19
1
Page 4
Countertop Oven Safety
Your safety and the safety of others are very important.
We have provided many important safety messages in this manual and on your
appliance. Always read and obey all safety messages.
ENGLISH
All safety messages will tell you what the potential hazard is, tell you how to
reduce the chance of injury, and tell you what can happen if the instructions are
not followed.
This is the safety alert symbol.
This symbol alerts you to potential hazards that can kill or hurt you
and others.
All safety messages will follow the safety alert symbol and either
the word “DANGER” or “WARNING.” These words mean:
You can be killed or seriously injured
DANGER
WARNING
if you don’t immediately follow
instructions.
You can be killed or seriously injured
if you don’t follow instructions.
IMPORTANT SAFEGUARDS
When using electrical appliances, basic safety precautions should always be followed
including the following:
1. Read all instructions.
2. Do not touch hot surfaces. Use handles or knobs.
3. To protect against electrical shock do not immerse cord, plugs, or any parts of the
oven in water or other liquids.
4. Close supervision is necessary when any appliance is used by or near children.
5. Unplug from outlet when not in use and before cleaning. Allow to cool before
putting on or taking off parts.
6. Do not operate any appliance with a damaged cord or plug, or after the appliance
malfunctions, or has been damaged in any manner. Return appliance to the nearest
Authorized Service Center for examination, repair, or adjustment.
7. The use of accessory attachments not recommended by the appliance manufacturer
may cause injuries.
8. Do not let cord hang over edge of table or counter, or touch hot surfaces.
9. Do not place on or near a hot gas or electric burner, or in a heated oven.
10. Extreme caution must be used when moving an appliance containing hot oil or
other hot liquids.
11. Use extreme caution when removing broiler pan tray or disposing of hot grease.
12. Oversize foods or metal utensils must not be inserted in a Countertop Oven as they
may create a fire or risk of electric shock.
13. A fire may occur if the Countertop Oven is covered or touching flammable material,
including curtains, draperies, walls, and the like, when in operation. Do not store any
item on top of the appliance when in operation.
2
Page 5
14. Do not clean with metal scouring pads. Pieces can break off the pad and touch
electrical parts, creating a risk of electric shock.
15. Extreme caution should be exercised when using containers constructed of materials
other than metal or glass.
16. Do not store any materials, other than manufacturers recommended accessories, in
this oven when not in use.
17. Do not place any of the following materials in the oven: paper, cardboard, plastic, or
anything similar.
18. Do not cover crumb drawer or any part of the oven with metal foil. This will cause
overheating of the oven.
19. Turn oven off by turning the Time control knob to its 0 (off) position.
20. Do not use outdoors.
21. Do not use appliance for other than intended use.
22. This product is designed for household use only.
SAVE THESE INSTRUCTIONS
Electrical Requirements
Volts: 120 V.A.C.
WARNING
Electrical Shock Hazard
Plug into a grounded 3 prong
outlet.
Do not remove ground prong.
Do not use an adapter.
Do not use an extension cord.
Failure to follow these
instructions can result in death,
fire, or electrical shock.
Hertz: 60 Hz
NOTE: This Countertop Oven has a
3 prong grounded plug. To reduce the
risk of electrical shock, this plug will fit in
an outlet only one way. If the plug does
not fit in the outlet, contact a qualified
electrician. Do not modify the plug in
any way.
Do not use an extension cord. If the
power-supply cord is too short, have a
qualified electrician or serviceman install
an outlet near the appliance.
ENGLISH
3
Page 6
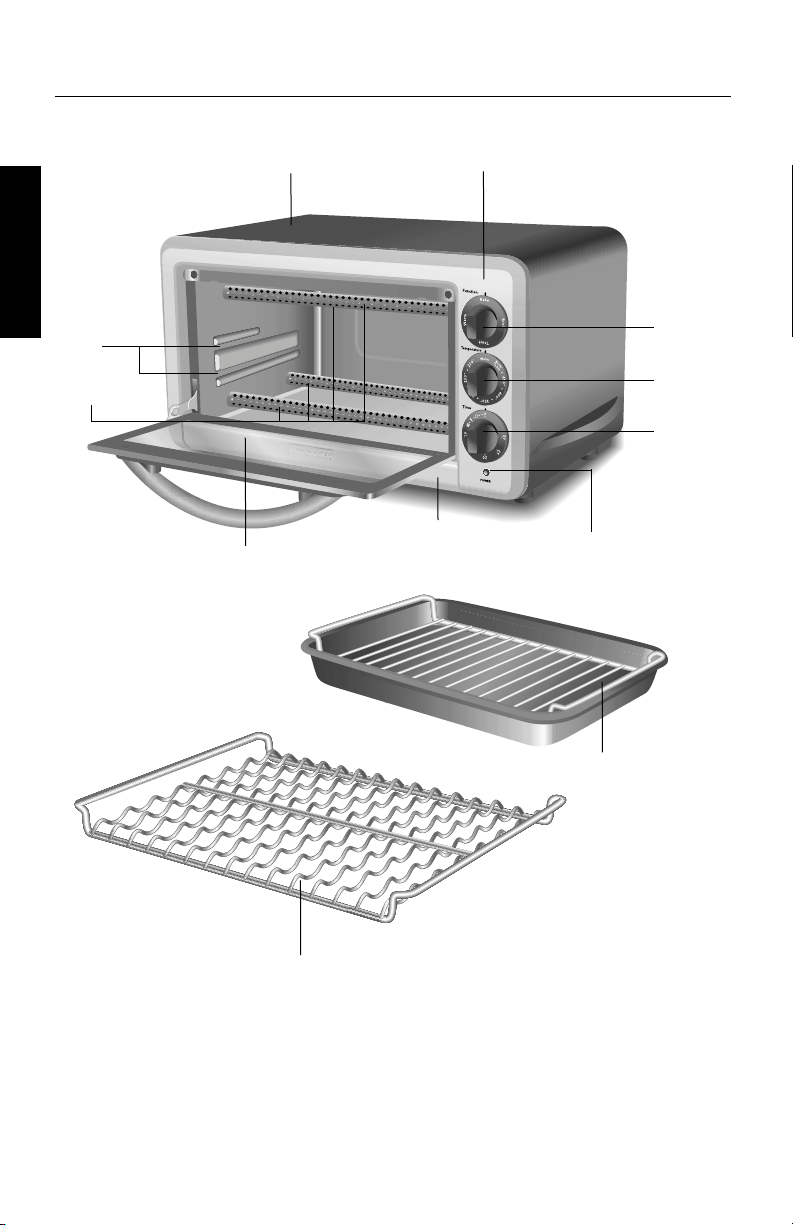
Countertop Oven Features
ENGLISH
RackPositioning
Slots
Cooking
Elements
Oven
Cabinet
Oven Door
Control
Panel
Full-width
Crumb Drawer
Function
Control
Knob
Temperature
Control
Knob
Time
Control
Knob
(0 position
is “off”)
Power
“on”
Light
Wave-Rack™
Oven Rack
Broil Pan
with Grill
4
Page 7
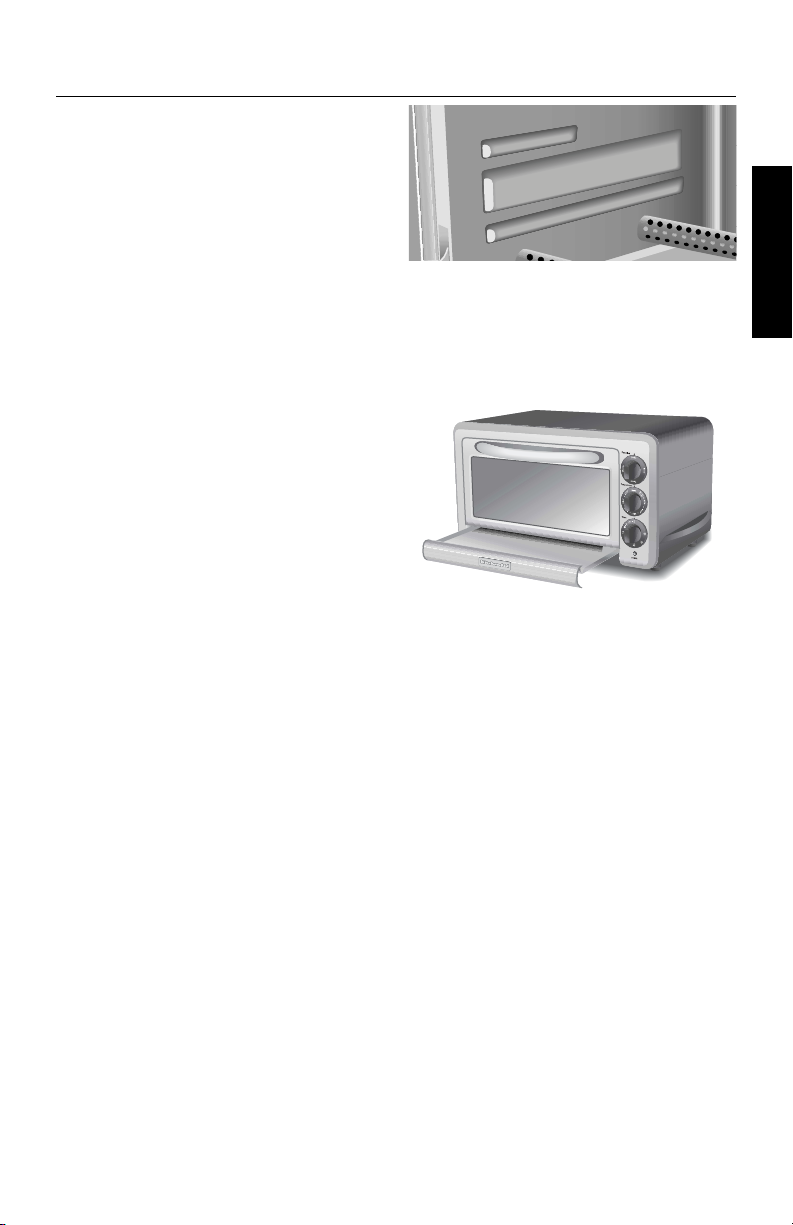
Countertop Oven Features
Cooking Elements
Four cooking elements produce up to
1400 watts for baking, broiling, toasting,
and warming.
Control Panel
Three large knobs have versatile settings
for Function, Temperature, and Time.
A Power “on” indicator light glows red
when the oven is operating.
Broil Pan with Grill
An easy-to-clean broil pan is used with
a special grill for baking, broiling, and
warming. This pan with grill combination
rests on the Wave-Rack™ oven rack.
Wave-Rack™ Oven Rack
Unique wave-pattern rack lets air circulate
around the bread for even toasting.
The 6-slice capacity rack is reversible for
optimal cooking positions.
Oven Cavity
The 0.5 cu ft (0.014 cu meters) cavity
features a nonstick Teflon
ease of cleaning.
®
coating for
Rack-Positioning Slots
Upper and lower slots along the oven
sides, combined with the reversible
Wave-Rack™ oven rack, can hold the food
in up to 4 cooking positions.
Full-Width Crumb Drawer
The crumb drawer is designed for easy
removal and cleaning. Crumb drawer is
located under the oven door, and can be
removed without opening the door.
ENGLISH
Oven Door
The durable metal-framed door has
a large stainless steel handle and a
see-through, tempered glass window.
Oven Cabinet
Stylish stainless steel front is matched
with baked enamel-coated sides.
5
Page 8

Preparing the Countertop Oven for Use
Before First Use
1. Place the Countertop Oven on a dry,
flat, level surface such as a countertop
ENGLISH
or table.
2. Be sure the sides, back and top of the
oven are at least four inches away from
any walls, cabinets or objects on the
counter or table.
3. Remove all accessories and wash in
hot, sudsy water. Dry thoroughly before
placing in the oven.
NOTE: Upon first use, the oven may
produce light smoke. This is normal.
Before Each Use
1. Remove all items not required for the
next cooking procedure.
WARNING
Electrical Shock Hazard
Plug into a grounded 3 prong
outlet.
Do not remove ground prong.
Do not use an adapter.
Do not use an extension cord.
Failure to follow these
instructions can result in death,
fire, or electrical shock.
2. Plug into a grounded 3 prong outlet.
The Countertop Oven should be the
only appliance operating on the circuit.
3. The Countertop Oven is now ready to use.
6
Page 9
Understanding Positions
of the Wave-Rack™ Oven Rack
Food cooks uniformly as warmed air moves around the Wave-Rack™ oven rack. Up to 6
slices of bread may be placed directly on the rack for toasting. This unique 4-position rack
also holds the broil pan with grill, baking pans or dishes, and standard bakeware. Here is
a guide to adjusting your Wave-Rack™ oven rack for optimal cooking performance.
ENGLISH
Position A
Use the upper slots along oven walls. Slide
in the Wave-Rack™ oven rack, using a
rack-up orientation.
Position B
Again, use the upper slots along oven
walls. Slide in the Wave-Rack™ oven rack,
this time using a rack-down orientation.
Position C
Use the lower slots along oven walls. Slide
in the Wave-Rack™ oven rack, using a
rack-up orientation.
Position D
Again, use the lower slots along oven
walls. Slide in the Wave-Rack™ oven rack,
this time using a rack-down orientation.
7
Page 10

Baking (and reheating)
with the Countertop Oven
Both the top and bottom elements will
cycle on and off while baking in order to
maintain the desired oven temperature.
ENGLISH
Suggested Positions: When first using the
oven, position the Wave-Rack™ oven rack
as shown by Position C in ”Understanding
Positions of the Wave-Rack™ Oven Rack”
on page 7. Then, adjust as needed for your
cooking situation. Remember to allow space
for food to rise.
1. Place the rack in a low position so that
the food to be baked or heated will be
in the center of the oven.
2. Close door.
3. Turn the Function control knob
to Bake.
4. Turn the Temperature control knob
clockwise to the desired temperature.
Bake according to package or recipe
instructions (usually 350° – 425°F
[177°C – 218°C]).
Broiling (and top browning)
with the Countertop Oven
5. Preheat the oven for 5 minutes for
baking (and reheating) by turning the
Time control knob clockwise past the
10 minute position, then moving it
back to a 5 position. After 5 minutes,
the bell will sound and the oven will
automatically shut off.
6. Place the food in the center of the
rack. Close door.
7. Turn the Time control knob clockwise
to the desired time. When the time
has elapsed, the bell will ring and the
oven will automatically shut off. Turn
the Time control knob to 0 (off) if
food is removed before the time
has elapsed.
8. For longer cooking times, make two
settings of the Time control knob.
Example: For a total of 45 minutes,
make one 30 minute setting with
the Time control knob. Then, when
time elapses, set for an additional
15 minutes. When the food is done,
remove pan and grill from the oven.
Only the top elements will heat when this
oven function is selected.
Recommended Positions: Use the
upper slots along oven walls. Slide in the
Wave-Rack™ oven rack, using a
rack-down orientation (see Position B
on page 7). Place the broil pan with grill
(with food) on oven rack.
NOTE: Food to be broiled should be at
least 1-inch (2.5 cm) from the heating
elements on the top of the oven. For
delicate foods such as fish or chicken,
or for less browning, place the rack in a
lower position.
1. Place the food to be broiled on the
grill with broil pan, and then close the
oven door.
2. Set Function control knob to Broil.
3. Turn the Temperature control knob
clockwise to Broil/Toast.
4. Turn the Time control knob clockwise
to the desired time.
5. Monitor the broiling progress.
6. When broiling food on both sides, set
the Time control knob for the time
desired for one side. When the bell
rings, the oven will automatically shut
off. Open the door. Use a potholder to
pull the rack and pan about half way
out of the oven. Turn the food, slide
the rack and pan back into the oven,
and close the door. Turn the Time
control knob to a desired time for the
other side.
7. When the time elapses, a bell will ring
and the oven will automatically
shut off.
8. If food is to be removed before the
bell rings, turn the Time control knob
to 0 (off) to shut off the Countertop
Oven. Then, remove the food.
8
Page 11

Toasting with the Countertop Oven
Both the top and bottom elements will
heat when this function is used.
Recommended Positions: Use the
lower slots along oven walls. Slide in the
Wave-Rack™ oven rack, using a rack-up
orientation (see Position C on page 7).
1. For best results, place the bread to
be toasted directly on the rack and
toward center of the oven.
NOTE: For best results, do not use broil
pan when toasting.
2. Toast up to six slices of bread. When
toasting only one or two slices of
bread, center the bread in the oven.
3. Close the door.
4. Turn the Function control knob to the
Toast setting.
5. Turn the Temperature control knob
clockwise to the Broil/Toast setting.
6. Turn the Time control knob clockwise
to the desired toast color. For Dark
toast, turn the control to the dark icon
(between 5 and 10). For Light toast,
first turn the control past the
10-minute indicator mark, and then
turn control back to the light icon
(between 0 and 5).
TIP: For more consistent results, preheat
oven for 5 minutes prior to first batch
of toast.
7. The bell will ring and the oven will
automatically shut off when the
Countertop Oven has
finished toasting.
8. Turn the Time control knob to 0 (off) if
toast is removed before the bell rings.
9. Adjust Time control knob settings as
needed to get desired results.
NOTE: It is normal for condensation to
form on the door when toasting moist or
fresh breads.
ENGLISH
Warming (plus keeping warm and heating)
with the Countertop Oven
Select the rack-positioning slots,
Wave-Rack™ oven rack, and broil pan
with grill positions to match the size of
food being heated. Only the lower heating
element is on during warming.
Suggested Positions: Use the broil pan
with grill combination. When first using
the oven, position the Wave-Rack™ oven
rack as shown in Position C on page 7.
Then, adjust as needed for your cooking
situation.
1. Turn the Function control knob to the
Warm setting.
2. Turn the Temperature control knob to
a desired setting.
3. Turn the Time control knob to a
desired setting.
9
Page 12
Cleaning the Countertop Oven
• Make sure the Time control knob is in
the 0 (off) position. Then, unplug from
the wall socket before cleaning.
• Allow oven and accessories to cool
completely before cleaning.
ENGLISH
• Do not use abrasive cleaners or metal
scouring pads. This could scratch
the surface.
• Wipe the outside of the oven with a
clean, damp cloth and dry thoroughly.
A nonabrasive liquid cleaner may be
used for stubborn stains. Rinse and
dry thoroughly.
• Hand washing is recommended for
racks and pan. Remove all items from
the Countertop Oven. Wash the rack,
broil pan, and grill in hot, sudsy water.
Rinse and dry thoroughly. To clean the
crumb drawer, slide it out of the oven
and brush off crumbs. Wipe with a
damp cloth and dry thoroughly.
NOTE: The Wave-Rack™ oven rack, broil
pan, and grill are dishwasher safe.
Troubleshooting
• If your Countertop Oven should fail
to operate, check the following:
WARNING
Electrical Shock Hazard
Plug into a grounded 3 prong
outlet.
Do not remove ground prong.
Do not use an adapter.
Do not use an extension cord.
Failure to follow these
instructions can result in death,
fire, or electrical shock.
• To remove baked-on stains, scrub with
a paste made from baking soda and
water. Rinse and dry thoroughly.
• The walls on the inside of the oven
have a Teflon
cleaning. Remove heavy spatter after
use with a nylon or polyester mesh pad,
sponge or cloth dampened with warm
water. Dry with a paper towel or soft,
dry cloth.
IMPORTANT: Do not use cleaning agents,
cleansers or metal scouring pads on the
inner oven coating as this may reduce
its effectiveness.
1. Is the Countertop Oven plugged into a
grounded 3 prong outlet?
2. Is the fuse in the circuit to the
Countertop Oven in working order? If
you have a circuit breaker box, make
sure the circuit is closed.
3. Try unplugging the Countertop Oven,
then plug it back in.
If the problem cannot be corrected,
see the KitchenAid Warranty and
Service section on pages 19-21. Do
not return the Countertop Oven to the
retailer – they do not provide service.
®
coating for easy
10
Page 13

Countertop Oven Use Tips
Setting very short times
When setting timer for 5 minutes or less,
turn the Time control knob beyond the
10-minute mark. Then, turn the knob
back to the desired time.
Are guesstimates okay?
Experience will teach you how much
time to use for toasting various kinds of
bread. Frozen, dark or whole grain breads
require a longer time. Fresh, soft or white
breads require a shorter time.
For foods that melt
When cooking small pieces of foods or
foods that will melt, use the broil pan.
This will prevent food from falling onto
the cooking elements.
To minimize cleanup
Spray the broil pan with nonstick cooking
spray for easier cleanup when cooking
wet or sticky foods. Wash pan thoroughly
after each use to prevent buildup of
cooking spray.
Food Cooking Tips
Size limits for food
For best results, food and/or oven-safe
containers (see section on “Choosing
Bakeware for Countertop Use,” page 12)
must fit into the Countertop Oven without
touching the cooking elements or inside walls
of oven. The door must close completely.
When oven is off
Turn the Temperature control knob
to Warm, or minimum setting, when
Countertop Oven is not in use.
For extended use
When cooking for a long time at high
temperatures, you may detect a slight
odor from the oven insulation materials.
This is normal.
ENGLISH
• Check food cooking progress through
the clear, tempered glass door window.
Your Countertop Oven wiII be more
energy efficient if you open the door
less often.
• Be sure all foods and/or containers fit in
the Countertop Oven without touching
cooking elements or preventing door
from closing.
• Remove all plastic and/or paper
wrappers from foods before cooking.
• Use only loosely covered oven-safe
containers; airtight containers may
cause food to boil over or splatter.
• Follow package directions when
preparing frozen or packaged foods.
Preheating the oven is not necessary.
• Oven surfaces can become hot during
cooking. Touch only the door handle
and knobs during oven operation.
• Do not place items on top or near
Countertop Oven while in use.
• Replace cardboard, glass or plastic
lids with aluminum foil for use in the
Countertop Oven.
11
Page 14

Helpful Hints
Choosing Bakeware for Countertop
Oven Use
• The broil pan included with the oven is
suitable for items such as cookies, rolls,
ENGLISH
biscuits, nachos and pork chops.
• A variety of standard baking dishes, such
as a 9-inch (22.9 cm) round or square
cake pan, a 6-cup (1.5 liters) muffin pan,
small baking sheets, and 1- and 2-quart
(0.95-ml and 1.9-liters) round, square
and rectangular casserole dishes, may be
used. The oven door must
close completely.
• Choose bakeware made of metal,
oven-safe glass or ceramic.
Asian Chicken Drummettes
1 piece (1-in. [2.5 cm]
long) peeled
gingerroot, cut into
quarters
2 cloves garlic
1
⁄4 cup (60 ml) orange
marmalade
1
⁄4 cup (60 ml) soy sauce
2 tablespoons (30 ml)
white wine
1 teaspoon (5 ml) dark
sesame oil
2 green onions, cut
into 1-inch (2.5 cm)
pieces
2 pounds (905 g)
chicken wing
drummettes*
• Use lowest Wave-Rack™ oven rack
position when using deep, oven-safe
glass or ceramic containers and allow at
least 1-inch (2.5 cm) air space between
the top of the container and the upper
cooking elements.
• Do not use glass lids. If a cover is
desired, use a loosely fitted sheet of
aluminum foil.
• Many convenience foods are packaged
in nonmetallic containers suitable for
use in microwave ovens. Check package
directions to determine if the container
is suitable for use in a regular oven.
In food processor, position multipurpose blade in work
bowl. With processor running, add gingerroot and
garlic through feed tube. Process until chopped, 8 to
10 seconds. Add marmalade, soy sauce, wine, oil, and
onions. Process to blend and chop onions, about
10 seconds.
Remove to shallow pan or large, resealable food
storage plastic bag. Add chicken; coat with marinade.
Cover or seal. Refrigerate 8 hours or overnight, turning
occasionally.
Place chicken and marinade in broil pan. Bake
with oven rack in up position in lower slots of oven
(Position C on page 7) at 375°F (191°C) for 13 to
18 minutes, or until internal temperature of chicken
is 180°F (82°C), turning once.
Broil 5 to 8 minutes, or until brown. Serve warm.
Yield: 6 to 8 servings (about 3 drummettes
per serving).
1
*If drummettes are unavailable, use 2
whole chicken wings. Remove and discard wing tips.
Separate remaining 2 sections of each wing at joint using a
sharp knife.
Per Serving: About 260 cal, 18 g pro, 10 g carb,
15 g total fat, 4 g sat fat, 65 mg chol, 690 mg sod.
⁄2 pounds (1.1 g)
12
Page 15

Warm Italian Crostini
14 slices (1⁄4-in. [625 cm]
thick) French bread
4 teaspoons (20 ml)
extra virgin olive oil
6 leaves fresh basil
1
⁄2 -1 small clove garlic
1
⁄8 teaspoon (.5 ml) salt
2 ounces (55 g)
smoked provolone
cheese, chilled
1 large Roma tomato
Beef Nachos Grande
Place bread on grill in broil pan. Drizzle with oil. Bake
with oven rack in up position in lower oven slots (Position
C on page 7) at 425°F (218°C) for 1 to 3 minutes, or until
lightly crisp (do not brown).
In food processor, position multipurpose blade in work
bowl. With processor running, add basil through feed
tube. Process about 10 seconds, or until chopped. Add
garlic and salt. Process 5 to 10 seconds, or until chopped.
Position shredding disc in work bowl. Add cheese. Process
to shred.
Position multipurpose blade in work bowl. Pulse
1 to 2 seconds, or until mixed. Remove cheese mixture
and set aside.
Position slicing disc in work bowl. Add tomato. Process
to slice.
Top each bread slice with tomato and 1 rounded
teaspoon cheese mixture. Bake an additional 2 to
3 minutes, or until cheese melts. Serve warm.
Yield: 7 servings (2 crostini per serving).
Tip: Crostini may be assembled up to 1 hour
before heating.
Per Serving: About 80 cal, 3 g pro, 5 g carb,
6 g total fat, 2 g sat fat, 5 mg chol, 150 mg sod.
ENGLISH
1⁄4 pound (115 g) deli or
leftover roast beef*,
cut into
1
⁄2-inch
(1.25 cm) cubes
2 teaspoons (10 ml)
dry Mexican, fajita,
or taco seasoning
5 cups (about 5 oz.
[140 g]) tortilla chips
1 cup (4 oz. [115 g])
shredded sharp
Cheddar cheese,
divided
4 green onions, thinly
sliced
1
⁄2 cup (120 ml) sliced
ripe olives
1
⁄4 cup (60 ml) salsa
1
⁄4 cup (60 ml)
sour cream
In food processor, position multipurpose blade in work
bowl. Add beef and seasoning. Pulse 4 times, 1 to
2 seconds each time, or until finely chopped.
1
Layer chips evenly in broil pan. Sprinkle with
(80 ml) cheese. Top evenly with beef, onions, olives,
and remaining
2
⁄3 cup (160 ml) cheese.
⁄3 cup
Bake with oven rack in down position in lower slots of
oven (Position D on page 7) at 350°F (177°C) for 10 to
15 minutes, or until cheese is melted and bubbly. Top
with salsa and sour cream.
Yield: 6 servings.
* If desired, substitute seasoned, cooked beef strips and
omit Mexican seasoning.
Per Serving: About 260 cal, 11 g pro, 19 g carb,
16 g total fat, 7 g sat fat, 30 mg chol, 590 mg sod.
13
Page 16

Oven-Roasted Vegetables
8 medium (about 1 lb.
[455 g]) red potatoes,
cut into eighths
1
⁄2 cups (355 ml) fresh
1
ENGLISH
broccoli florets
1 cup (235 ml) fresh
cauliflower florets
1 medium onion, cut
into thin wedges
1 small red pepper, cut
into eighths
2 cloves garlic, minced
3 tablespoons (45 ml)
olive oil
1 tablespoon (15
ml) chopped fresh
marjoram leaves
3
⁄4 teaspoon (4 ml) salt
1
⁄4 teaspoon (1 ml)
black pepper
2 cups (475 ml)
all-purpose flour
3 tablespoons (45 ml)
granulated sugar
1 tablespoon (15 ml)
baking powder
3
⁄4 teaspoon (4 ml) salt
1
⁄4 cup (60 ml) cold
butter or margarine,
cut into
1
⁄2-inch
(1.25 cm) pieces
1
⁄2 cup (120 ml)
whipping cream
2 eggs
1
⁄2 teaspoon (2 ml)
grated lemon peel
1 cup (235 ml) fresh
blueberries
1 cup (235 ml)
powdered sugar
2-3 tablespoons
(30-45 ml) fresh
lemon juice
In large bowl, combine all ingredients in order listed. Toss
to coat evenly. Spread vegetable mixture in broil pan.
Bake with oven rack in up position in lower slots of oven
(Position C on page 7) at 425°F (218°C) for 20 to 30
minutes, or until vegetables are tender and browned,
stirring occasionally.
1
Yield: 10 servings (
⁄2 cup [120 ml] per serving).
Per Serving: About 90 cal, 2 g pro, 12 g carb,
4 g total fat, 0.5 g sat fat, 0 mg chol, 180 mg sod.
Blueberry Lemon Scones
In food processor, position multipurpose blade in work
bowl. Add flour, granulated sugar, baking powder, and
salt. Process 3 to 4 seconds. Add butter. Process 10 to
15 seconds, or until crumbly. Remove to medium bowl.
Position multipurpose blade in work bowl. Add cream,
eggs, and lemon peel. Process 3 to 4 seconds, or
until mixed.
Gently stir blueberries into flour mixture. Add cream
mixture; stir gently just until moistened. Gather into a
ball. Divide dough in half. Pat each half into a
5-inch (12.7 cm) circle on floured surface. With floured
knife, cut each circle into 4 wedges. Place in ungreased
broil pan
Bake with oven rack in up position in lower slots of
oven (Position C on page 7) at 375°F (191°C) for 12 to
18 minutes, or until golden brown. Cool 10 minutes.
Meanwhile, in small bowl, mix powdered sugar and
enough lemon juice for drizzling consistency. Drizzle over
warm scones.
Yield: 8 servings (1 scone per serving).
Per Serving: About 320 cal, 5 g pro, 47 g carb,
12 g total fat, 7 g sat fat, 90 mg chol, 430 mg sod.
1
⁄2 inch (1.25 cm) apart.
14
Page 17

Broiled Mustard-Caper Salmon
11⁄2 pounds ((680 g)
fresh salmon fillets
2 tablespoons (30 ml)
mayonnaise
1 tablespoon (15 ml)
capers
2 teaspoons (10 ml)
Dijon mustard
1 teaspoon (5 ml)
chopped fresh dill
Fresh dill, if desired
Garlic-Herb Roast Cornish Hens
1 clove garlic
2 tablespoons (30 ml)
fresh basil leaves
2 teaspoons (10 ml)
fresh rosemary leaves
1
⁄2 teaspoon (2 ml) salt
1
⁄8 teaspoon (.5 ml)
black pepper
1 tablespoon (15 ml)
plus 1 teaspoon (5 ml)
olive oil, divided
2 Cornish game hens
(about 24 oz. [680
g] each), giblets
removed
1
⁄3 cup (80 ml) water
Place salmon skin-side down on grill in broil pan.
In small bowl, combine mayonnaise, capers, mustard, and
1 teaspoon (5 ml) dill; mix well. Spread 2 teaspoons
(10 ml) of mixture on top of salmon.
Broil with oven rack in up position in lower slots of oven
(Position C on page 7) for 15 to 20 minutes, or until
fish flakes easily with fork. Serve with remaining sauce.
Garnish with additional fresh dill, if desired.
Yield: 4 servings.
Per Serving: About 330 cal, 39 g pro, 0 g carb,
18 g total fat, 2.5 g sat fat, 110 mg chol,
250 mg sod.
In food processor, position mini bowl and mini blade in
work bowl. With processor running, add garlic, basil, and
rosemary through feed tube. Process 5 to 10 seconds,
or until chopped. Scrape down sides of bowl. Add salt,
pepper, and 1 tablespoon (15 ml) oil. Pulse 2 times, about
2 seconds each time.
Place hens, breast side up, in broil pan. Loosen skin from
breasts; rub herb mixture over breasts under skin. Truss
hen legs with kitchen string, if desired. Brush tops of skin
with remaining 1 teaspoon (5 ml) oil. Pour water into pan
around hens.
Bake with oven rack in down position in lower slots of
oven (Position D on page 7) at 350°F (177°C) for 55 to
70 minutes, or until temperature in thickest part of thigh
is 180°F (82°C). Make sure hens are not touching the
upper heating element.
Yield: 4 servings.
Per Serving: About 440 cal, 34 g pro, 0 g carb,
32 g total fat, 8 g sat fat, 200 mg chol,
390 mg sod.
ENGLISH
15
Page 18

Prosciutto Provolone Pizza
Crust
1
⁄2 ounce (15 g) fresh
Parmesan cheese, cut
into 1-inch (2.5 cm)
ENGLISH
pieces
1
⁄2 cups (355 ml)
1
all-purpose flour
1
⁄2 teaspoon (2 ml) sugar
1
⁄2 teaspoon (2 ml) salt
1
⁄2 teaspoon (2 ml)
dried basil
1
⁄2 cup (120 ml) water
1 tablespoon (15 ml)
olive oil
1 teaspoon (5 ml)
active dry yeast
Cornmeal
Topping
8-10 large fresh basil
leaves
2 tablespoons (30 ml)
fresh oregano leaves
1 clove garlic
3 ounces (85 g)
provolone or
mozzarella cheese,
chilled
2 large Roma tomatoes
2 ounces (55 g) thinly
sliced prosciutto or
ham
In food processor, position multipurpose blade in work
bowl. With processor running, add Parmesan cheese
through feed tube. Process 25 to 30 seconds, or until
finely grated. Add flour, sugar, salt, and dried basil.
Process 4 to 8 seconds, or until mixed.
In small saucepan, combine water and oil. Heat over
low heat until warm, 105°F (41°C) to 115°F (46°C). Stir
in yeast to dissolve. With processor running, slowly
add yeast mixture through feed tube. Process 1 to 1
1
⁄4
minutes, or until dough forms a ball. Remove dough to
greased bowl, turning dough to grease all sides. Cover;
let rise in warm place until double in size, about 45 to
60 minutes.
Punch dough down. Lightly sprinkle greased broil pan
with cornmeal. Press dough into bottom and
1
⁄2 inch (1.25 cm) up sides of pan.
Meanwhile, in food processor, position mini bowl and
mini blade in work bowl. With processor running, add
fresh basil and oregano through feed tube. Process 8 to
10 seconds, or until chopped. Add garlic. Process 5 to
10 seconds, or until chopped. Remove and set aside.
Position shredding disc in work bowl. Add provolone
cheese. Process to shred. Remove and set aside.
Position slicing disc in work bowl. Add tomatoes.
Process to slice. Remove and set aside. Top pizza crust
1
⁄2 provolone cheese, tomatoes, and basil mixture.
with
Position slicing disc in work bowl. Add prosciutto. Process
to slice.
Spread prosciutto and remaining provolone cheese on
pizza. Bake with oven rack in up position in lower slots of
oven (Position C on page 7) at 400°F (204°C) for 10 to
18 minutes, or until crust is deep golden brown and top
is golden brown. Serve hot.
Yield: 6 servings.
Per Serving: About 220 cal, 11 g pro, 25 g carb,
8 g total fat, 3.5 g sat fat, 20 mg chol,
540 mg sod.
16
Page 19

Citrus Shortbread Squares
11⁄4 cups (295 ml)
all-purpose flour
1
⁄2 cup (120 ml)
powdered sugar
1⁄8 teaspoon (.5 ml) salt
2 teaspoons (10 ml)
finely chopped
crystallized ginger,
if desired
1
⁄2 -2 teaspoons (7-10 ml)
1
grated orange peel,
orange portion only
1 teaspoon (5 ml)
grated lemon peel,
yellow portion only
3
⁄4 cup (175 ml) cold
butter or margarine,
cut into 1-inch
(2.5 cm) pieces
Glaze
1
⁄3 cup (80 ml)
powdered sugar
1
⁄4 teaspoon (1 ml)
grated orange peel,
orange portion only
1
2-2
⁄2 teaspoons (10-12 ml)
fresh orange juice
In food processor, position multipurpose blade
in work bowl. Add flour,
1
⁄2 cup (120 ml) powdered
sugar, salt, ginger, if desired, and orange and lemon
peels. Process 10 seconds, or until mixed. Add butter.
Process 25 to 30 seconds, or until soft dough forms.
With lightly floured hands, press dough onto bottom
of ungreased 8 x 8 x 2-inch (20.3 x 20.3 x 5 cm) baking
pan. Bake with oven rack in up position in lower slots of
oven (Position C on page 7) at 300°F (149°C) for 15 to 20
minutes, or until set and lightly browned. Cool 10 minutes.
Meanwhile, in glass measuring cup, blend glaze
ingredients, adding orange juice just to drizzling
consistency. Drizzle over partially cooled bars.
Cool completely.
Yield: 16 servings (1 square per person).
Per Serving: About 130 cal, 1 g pro, 13 g carb,
9 g total fat, 5 g sat fat, 25 mg chol, 20 mg sod.
ENGLISH
17
Page 20

Caramel-Cashew Chocolate Brownies
20 individually wrapped
caramels
3 tablespoons (45 ml)
whipping cream
ENGLISH
3
⁄4 cup (175 ml) butter
or margarine,
softened
1
⁄2 cups (355 ml) sugar
1
3 eggs
1 teaspoon (5 ml) vanilla
1 cup (235 ml)
all-purpose flour
1
⁄2 cup (120 ml)
unsweetened cocoa
powder
1
⁄8 teaspoon (.5 ml) salt
4 ounces (115 g)
semisweet chocolate,
coarsely chopped
1 cup (235 ml) roasted
cashews, coarsely
chopped
1 ounce (30 g) white
baking chocolate,
chopped, if desired
1
⁄2 teaspoon (2 ml)
vegetable oil, if
desired
In small saucepan over low heat, heat caramels and
cream, stirring until melted and smooth. Set aside.
In mixer bowl, place butter, sugar, eggs, and vanilla. With
mixer, beat at medium speed until creamy. Add flour,
cocoa, and salt. Mix on low speed until moistened. Stir in
semisweet chocolate and cashews. Spread in greased
9 x 9 x 2-inch (23 x 23 x 5 cm) baking pan. Drizzle
caramel evenly over top.
Bake with oven rack in down position in lower slots of
oven (Position D on page 7) at 325°F (163°C) for 25 to
30 minutes, or until set in center.
In small microwave-safe bowl, add white chocolate and
oil, if desired. Microwave on High for 45 to
60 seconds, or until melted. Stir until smooth. Drizzle
over brownies. Cool 30 minutes. Refrigerate 1
1
⁄2 to
2 hours to set chocolate.
Yield: 16 servings (1 brownie per serving).
Per Serving: About 330 cal, 5 g pro, 40 g carb,
18 g total fat, 9 g sat fat, 65 mg chol, 115 mg sod.
18
Page 21

KitchenAid® Countertop Oven Warranty
Length of
Warranty:
50 United States, the
District of Columbia,
Canada, and
Puerto Rico: One-year
limited warranty from
date of purchase.
DISCLAIMER OF IMPLIED WARRANTIES; LIMITATION OF REMEDIES IMPLIED
WARRANTIES, INCLUDING TO THE EXTENT APPLICABLE WARRANTIES OF
MERCHANTABILITY OR FITNESS FOR A PARTICULAR PURPOSE, ARE EXCLUDED TO THE
EXTENT LEGALLY PERMISSIBLE. ANY IMPLIED WARRANTIES THAT MAY BE IMPOSED BY
LAW ARE LIMITED TO ONE YEAR, OR THE SHORTEST PERIOD ALLOWED BY LAW. SOME
STATES AND PROVINCES DO NOT ALLOW LIMITATIONS OR EXCLUSIONS ON HOW LONG
AN IMPLIED WARRANTY OF MERCHANTABILITY OR FITNESS LASTS, SO THE ABOVE
LIMITATIONS OR EXCLUSIONS MAY NOT APPLY TO YOU.
KitchenAid Will
Pay For:
50 United States, the
District of Columbia
and Canada:
Hassle-free replacement
of your Countertop Oven.
See the following page for
details on how to arrange
for replacement.
OR
In Puerto Rico:
The replacement parts
and repair labor costs to
correct defects in materials
and workmanship. Service
must be provided by an
Authorized KitchenAid
Service Center. To arrange
for service, follow the
instructions on page 20.
KitchenAid Will Not
Pay For:
A. Repairs when
Countertop Oven is
used in other than
normal single family
home use.
B. Damage resulting from
accident, alteration,
misuse or abuse or
use with products
not approved by
KitchenAid.
C. Replacement parts
or repair labor costs
for Countertop Oven
when operated
outside the country of
purchase.
ENGLISH
IF THIS PRODUCT FAILS TO WORK AS WARRANTED, CUSTOMER’S SOLE AND EXCLUSIVE
REMEDY SHALL BE REPAIR OR REPLACEMENT ACCORDING TO THE TERMS OF THIS
LIMITED WARRANTY. KITCHENAID AND KITCHENAID CANADA DO NOT ASSUME ANY
RESPONSIBILITY FOR INCIDENTAL OR CONSEQUENTIAL DAMAGES. This warranty gives
you specific legal rights and you may also have other rights which vary from state to
state or province to province.
19
Page 22

Hassle-Free Replacement Warranty –
50 United States and District of Columbia
We’re so confident the quality of our
products meets the exacting standards
of KitchenAid that, if your Countertop
ENGLISH
Oven should fail within the first year
of ownership, KitchenAid will arrange
to deliver an identical or comparable
replacement to your door free of charge
and arrange to have your original
Countertop Oven returned to us. Your
replacement unit will also be covered
by our one year limited warranty. Please
follow these instructions to receive this
quality service.
If your KitchenAid
should fail within the first year of
ownership, simply call our toll-free
Customer Satisfaction Center at
1-800-541-6390 Monday through
Friday, 8 a.m. to 8 p.m. (Eastern Time),
or Saturday, 10 a.m. to 5 p.m. Give
the consultant your complete shipping
address. (No P.O. Box numbers, please.)
When you receive your replacement
Countertop Oven, use the carton and
packing materials to pack up your original
Countertop Oven. In the carton, include
your name and address on a sheet of paper
along with a copy of the proof of purchase
(register receipt, credit card slip, etc.)
®
Countertop Oven
Hassle-Free Replacement Warranty – Canada
We’re so confident the quality of our
products meets the exacting standards
of the KitchenAid
Countertop Oven should fail within the
first year of ownership, KitchenAid Canada
will replace your Countertop Oven with
an identical or comparable replacement.
Your replacement unit will also be covered
by our one year limited warranty. Please
follow these instructions to receive this
quality service.
®
brand that, if your
If your KitchenAid
should fail within the first year of
ownership, take the Countertop Oven or
ship collect to an Authorized KitchenAid
Service Centre. In the carton include your
name and complete shipping address
along with a copy of the proof of purchase
(register receipt, credit card slip, etc.)
Your replacement Countertop Oven will
be returned prepaid and insured. If you
are unable to obtain satisfactory service
in this manner call our toll-free Customer
Interaction Centre at 1-800-807-6777.
Or write to us at:
Customer Interaction Centre
KitchenAid Canada
1901 Minnesota Court
Mississauga, ON L5N 3A7
®
Countertop Oven
How to Arrange for Warranty Service
in Puerto Rico
Your KitchenAid® Countertop Oven is
covered by a one-year limited warranty
from the date of purchase. KitchenAid
will pay for replacement parts and labor
costs to correct defects in materials and
workmanship. Service must be provided by
an Authorized KitchenAid Service Center.
Take the Countertop Oven or ship prepaid
and insured to an Authorized KitchenAid
Service Center. Your repaired Countertop
Oven will be returned prepaid and insured.
If you are unable to obtain satisfactory
service in this manner, call toll-free
1-800-541-6390 to learn the location of a
Service Center near you.
20
Page 23

How to Arrange for Service
after the Warranty Expires – All Locations
Before calling for service, please review the
Troubleshooting section on page 10.
For service information in the 50
United States, District of Columbia,
and Puerto Rico,
call toll-free 1-800-541-6390.
Or write to:
Customer Satisfaction Center
KitchenAid Portable Appliances
P.O. Box 218
St. Joseph, MI 49085-0218
Or contact an Authorized Service Center
near you.
How to Arrange for Service
Outside these Locations
Consult your local KitchenAid dealer
or the store where you purchased the
Countertop Oven for information on how
to obtain service.
For service information in Canada,
call toll-free 1-800-807-6777.
Or write to:
Customer Interaction Centre
KitchenAid Canada
1901 Minnesota Court
Mississauga, ON L5N 3A7
For service information in Mexico,
call toll-free
01-800-024-17-17
(JV Distribuciones)
Or
01-800-902-31-00
(Industrias Birtman)
ENGLISH
How to Order Accessories
and Replacement Parts
To order accessories or replacement
parts for your Countertop Oven
in the 50 United States, District of
Columbia, and Puerto Rico,
call toll-free 1-800-541-6390 Monday
through Friday, 8 a.m. to 8 p.m. (Eastern
Time), or Saturday, 10 a.m. to 5 p.m.
Or write to:
Customer Satisfaction Center,
KitchenAid Portable Appliances,
P.O. Box 218,
St. Joseph, MI 49085-0218
To order accessories or replacement
parts for your Countertop Oven
in Canada,
call toll-free 1-800-807-6777.
Or write to:
Customer Interaction Centre
KitchenAid Canada
1901 Minnesota Court
Mississauga, ON L5N 3A7
To order accessories or replacement parts
for your Countertop Oven in Mexico,
call toll-free
01-800-024-17-17
(JV Distribuciones)
Or
01-800-902-31-00
(Industrias Birtman)
21
Page 24

FRANÇAIS
22
Page 25

Table des matières
INTRODUCTION
Preuve d’achat et enregistrement du produit ...............................Deuxième de couverture
Sécurité du four de comptoir ........................................................................................24
Consignes de sécurité importantes ................................................................................24
Contraintes électriques ..................................................................................................25
CARACTÉRISTIQUES ET FONCTIONNEMENT
Caractéristiques du four de comptoir ............................................................................26
Préparation du four de comptoir avant l’utilisation
Avant la première utilisation ..................................................................................28
Avant chaque utilisation ........................................................................................28
Présentation et explication des positions de la grille de four Wave-Rack™ .....................29
Cuisson (et réchauffage) à l’aide du four de comptoir ...................................................30
Rôtissage (et brunissage) à l’aide du four de comptoir ..................................................31
Grillage à l’aide du four de comptoir ............................................................................32
Réchauffage (plus conservation de la chaleur et chauffage) à l’aide du four de comptoir ......32
ENTRETIEN ET NETTOYAGE
Nettoyage du four de comptoir ....................................................................................33
Dépannage ...................................................................................................................33
CONSEILS SUR LE FOUR DE COMPTOIR
Conseils d’utilisation sur le four de comptoir .................................................................34
Conseils sur la cuisson des aliments ..............................................................................34
Conseils utiles ...............................................................................................................35
FRANÇAIS
RECETTES
Pilonnets de poulet asiatique ........................................................................................35
Crostinis italiens tièdes ..................................................................................................36
Grands nachos au boeuf ...............................................................................................37
Légumes rôtis au four ...................................................................................................37
Scones au citron et aux bleuets .....................................................................................38
Saumon grillé aux câpres et à la moutarde ...................................................................39
Poules de Cornouailles à l’ail et aux fines herbes ...........................................................39
Pizza au jambon à l’italienne et au provolone ...............................................................40
Carrés sablés aux agrumes ............................................................................................41
Carrés au chocolat cajous au caramel ...........................................................................42
INFORMATION SUR LA GARANTIE ET LES RÉPARATIONS
Garantie du four de comptoir KitchenAid
Garantie de satisfaction totale et de remplacement –
50 États des États-Unis, district fédéral de Columbia .....................................................44
Garantie de satisfaction totale et de remplacement – Canada .......................................44
Comment obtenir une réparation sous garantie à Puerto Rico ......................................44
Comment obtenir une réparation hors garantie – tous les territoires .............................45
Comment obtenir une réparation en dehors de ces territoires .......................................45
Comment commander des accessoires et des pièces de rechange .................................45
®
....................................................................43
23
Page 26

Sécurité du four de comptoir
Votre sécurité et celle des autres est très importante.
Nous donnons de nombreux messages de sécurité importants dans ce manuel
et sur votre appareil ménager. Assurez-vous de toujours lire tous les messages
de sécurité et de vous y conformer.
Voici le symbole d’alerte de sécurité.
Ce symbole d’alerte de sécurité vous signale les dangers
potentiels de décès et de blessures graves à vous et à d’autres.
Tous les messages de sécurité suivront le symbole d’alerte de sécurité
et le mot “DANGER” ou “AVERTISSEMENT”. Ces mots signifient :
FRANÇAIS
DANGER
AVERTISSEMENT
Tous les messages de sécurité vous diront quel est le danger potentiel et vous
disent comment réduire le risque de blessure et ce qui peut se produire en cas
de non-respect des instructions.
Risque possible de décès ou de
blessure grave si vous ne suivez pas
immédiatement les instructions.
Risque possible de décès ou de
blessure grave si vous ne suivez
pas les instructions.
CONSIGNES DE SÉCURITÉ
IMPORTANTES
Lors de l’utilisation d’appareils électriques, des précautions élémentaires de sécurité
devraient toujours être observées, incluant les suivantes :
1. Lisez toutes les instructions.
2. Ne touchez pas à des surfaces chaudes. Utilisez les poignées ou les boutons.
3. Pour éviter les chocs électriques, ne plongez pas le cordon, les fiches ou tout
autre composant du four dans l’eau ou d’autres liquides.
4. Il est nécessaire de surveiller de près l’utilisation de cet appareil par des enfants
ou à proximité de ceux-ci.
5. Débranchez l’appareil de la prise de courant quand vous ne l’utilisez pas ou avant
de le nettoyer. Laissez-le refroidir avant de monter ou de démonter des pièces.
6. N’utilisez pas un appareil dont le cordon ou la fiche sont endommagés, s’il présente
un défaut de fonctionnement ou s’il est endommagé. Renvoyez l’appareil au centre de
réparation autorisé le plus proche pour le faire inspecter, réparer ou ajuster.
7. L’utilisation d’accessoires non recommandés par le fabricant de l’appareil peut
causer des blessures.
8. Ne laissez pas pendre le cordon du bord de la table ou du comptoir, ni toucher
des surfaces chaudes.
9. Ne placez pas l’appareil sur un brûleur électrique ou au gaz chaud, ni sur un
four ayant chauffé ou à proximité de ceux-ci.
24
24
Page 27

10. Une extrême prudence est de mise lors du déplacement d’un appareil contenant
de l’huile chaude ou d’autres liquides chauds.
11. Usez de grande prudence quand vous sortez un plat du four ou jetez de la graisse chaude.
12. Des aliments ou des ustensiles de grand format ne peuvent pas être mis dans un
four de comptoir car ils présentent un risque d’incendie ou de chocs électriques.
13. Un incendie peut se produire si le four de comptoir est couvert ou entre en
contact avec des matières inflammables (rideau, draperie, mur ou objet similaire)
pendant qu’il fonctionne. Ne placez rien sur le four pendant qu’il fonctionne.
14. Ne le nettoyez pas avec un tampon à récurer en métal. Des particules métalliques
pourraient s’en détacher et toucher à des pièces électriques, ce qui présente un risque de choc.
15. Soyez extrêmement prudent lorsque vous utilisez des contenants faits de
matériaux autres que le métal ou le verre.
16. Ne rangez rien d’autre dans le four que les accessoires recommandés par le fabricant.
17. Ne placez pas une ou plusieurs des matières suivantes dans le four : papier,
carton, plastique ou produit du genre.
18. Ne couvrez pas le tiroir ramasse-miettes ou toute autre pièce du four avec du
papier d’aluminium. Cela causera une surchauffe du four.
19. Éteignez le four en tournant le bouton de commande Time (durée) à la position 0 (arrêt).
20. N’utilisez pas l’appareil à l’extérieur.
21. N’utilisez pas l’appareil pour un usage autre que celui prévu.
22. Ce produit est réservé à un usage domestique.
CONSERVEZ CES INSTRUCTIONS
Contraintes électriques
FRANÇAIS
AVERTISSEMENT
Risque de choc électrique
Brancher sur une prise à 3
alvéoles reliée à la terre.
Ne pas enlever la broche de
liaison à la terre.
Ne pas utiliser un adaptateur.
Ne pas utiliser un câble de
rallonge.
Le non-respect de ces
instructions peut causer
un décès, un incendie ou un
choc électrique.
Tension : 120 volts c.a.
Fréquence : 60 Hz
NOTA : Ce four de comptoir est muni
d’une fiche de terre à 3 broches. Pour
réduire les risques de choc électrique,
cette fiche ne peut rentrer dans la prise
que d’une façon. S’il est impossible
d’introduire la fiche dans la prise, appelez
un électricien compétent. Ne modifiez pas
la prise de quelque façon que ce soit.
N’utilisez pas de rallonge. Si le cordon
fourni est trop court, demandez à un
électricien ou à un technicien compétent
d’installer une prise près de l’appareil.
25
Page 28

Caractéristiques du four de comptoir
Glissières de
positionnement
de la grille
FRANÇAIS
Éléments
de cuisson
Porte du four
Boîtier
du four
Panneau de
commande
Tiroir ramasse-miettes
pleine grandeur
Témoin
d’alimentation
Bouton de
commande
des
fonctions
Bouton de
commande
de la
température
Bouton de
commande
de réglage
de la durée
(0 correspond
à la position
« off » [arrêt])
Grille de four
Wave-Rack™
26
26
Plateau de
rôtissage
avec grilloir
Page 29

Caractéristiques du four de comptoir
Éléments de cuisson
Quatre éléments de cuisson fournissent
jusqu’à 1 400 watts pour la cuisson,
le rôtissage, le grillage et le réchauffage
des aliments.
Panneau de commande
Les trois gros boutons ont des réglages
polyvalents pour Fonction, Température
et Temps. Un indicateur lumineux rouge
est allumé quand le four fonctionne.
Plateau de rôtissage avec grilloir
Un plateau de rôtissage, facile à nettoyer,
est utilisé avec un grilloir spécialement conçu
pour la cuisson, le rôtissage et le réchauffage.
Ce plateau de rôtissage avec grilloir repose
sur la grille de four Wave-Rack™.
Grille de four Wave-Rack™
Une grille ondulée, de conception unique,
permet à l’air de circuler autour du pain
pour procurer un grillage uniforme. D’une
capacité de 6 tranches, elle est réversible ce
qui permet d’assurer une cuisson optimale.
Glissières de positionnement
de la grille
Des glissières supérieure et inférieure,
situées le long des parois latérales du four,
et la grille de four réversible Wave-Rack™
permettent de placer les aliments dans
4 positions de cuisson différentes.
FRANÇAIS
Cavité du four
La cavité de 0,014 mètre cube (0,5 pied
cube) est pourvue d’un revêtement en
®
Teflon
qui facilite le nettoyage.
Tiroir ramasse-miettes pleine grandeur
Le tiroir ramasse-miettes est conçu pour
être facile à retirer et à nettoyer. Il se
trouve sous la porte du four. Il est possible
de l’enlever sans avoir à ouvrir la porte.
Porte du four
La porte à cadre métallique durable est
dotée d’une poignée en acier inoxydable
et d’un hublot en verre trempé.
Boîtier du four
De concept élégant, la partie avant en
acier inoxydable est assortie aux parois
latérales recouvertes d’émail cuit.
27
Page 30

Préparation du four de
comptoir avant l’utilisation
Avant la première utilisation
1. Placez le four de comptoir sur une
surface sèche, plane et de niveau
comme un comptoir ou une table.
2. Assurez-vous que les parois latérales,
arrière et supérieure du four se
trouvent à une distance minimale de
10 cm (4 po) des murs, des armoires
ou des objets se trouvant sur le
comptoir ou la table.
3. Enlevez tous les accessoires du four
FRANÇAIS
et lavez-les dans de l’eau chaude
mousseuse. Séchez-les complètement
avant de les replacer dans le four.
NOTA : Il est possible qu’une légère
fumée se dégage du four lors de la
première utilisation. Ceci est normal.
Avant chaque utilisation
1. Retirez tous les accessoires qui ne sont pas
nécessaires pour la prochaine utilisation.
AVERTISSEMENT
Risque de choc électrique
Brancher sur une prise à 3
alvéoles reliée à la terre.
Ne pas enlever la broche de
liaison à la terre.
Ne pas utiliser un adaptateur.
Ne pas utiliser un câble de
rallonge.
Le non-respect de ces
instructions peut causer
un décès, un incendie ou un
choc électrique.
2. Branchez l’appareil dans une prise
triphasée mise à la masse. Le four de
comptoir doit être le seul appareil
fonctionnant sur le circuit.
3. Le four de comptoir est maintenant prêt
à être utilisé.
28
28
Page 31

Présentation et explication des positions
de la grille de four Wave-Rack™
L’aliment cuit uniformément pendant que l’air chauffé circule autour de la grille de four
Wave-Rack™. Jusqu’à 6 tranches de pain peuvent être placées directement sur la grille
pour le grillage. Cette grille unique à 4 positions retient le plateau de rôtissage avec
grilloir, les moules ou les plats et les ustensiles de cuisson standard. Veuillez consulter
le guide de positionnement de la grille de four Wave-Rack™ ci-dessous pour obtenir un
rendement de cuisson optimal.
Position A
Utilisez les glissières supérieures situées le
long des parois du four. Faites coulisser la
grille de four Wave-Rack™ dans le four, en
la plaçant vers le haut (dans une position
de U inversé).
Position B
Une fois de plus, utilisez les glissières
supérieures situées le long des parois du four.
Faites coulisser la grille de four Wave-Rack™
dans le four, en la plaçant cette fois vers le
bas (dans une position de U).
Position C
Utilisez les glissières inférieures situées le
long des parois du four. Faites coulisser la
grille de four Wave-Rack™ dans le four, en
la plaçant vers le haut (dans une position
de U inversé).
Position D
Une fois de plus, utilisez les glissières
inférieures situées le long des parois du four.
Faites coulisser la grille de four Wave-Rack™
dans le four, en la plaçant cette fois (dans
une position de U).
FRANÇAIS
29
Page 32

Cuisson (et réchauffage) à l’aide
du four de comptoir
Les éléments du bas et du haut s’allumeront et
s’éteindront plusieurs fois pendant la cuisson
pour conserver la température désirée.
Positions suggérées : Lors de la première
utilisation du four, placez la grille de four
Wave-Rack™ à la position C de la manière
indiquée dans la section « Présentation et
explication de la grille de four Wave-Rack™ »
à la page 29. Ajustez-la ensuite en fonction
des besoins de cuisson. N’oubliez pas de
prévoir suffisamment d’espace pour que les
FRANÇAIS
aliments puissent lever.
1. Placez la grille dans une position basse
de manière à ce que les aliments qui
cuisent ou chauffent se trouvent au
centre du four.
2. Fermez la porte.
3. Tournez le bouton de commande
Function (fonction) à Bake (cuire).
4. Tournez le bouton de commande
Temperature (température) dans
le sens des aiguilles d’une montre
jusqu’à l’intensité désirée. Faites cuire
les aliments en suivant les directives
de l’emballage ou de la recette
(177 °C – 218 °C [350 °F – 425 °F]).
5. Préchauffez le four pendant 5 minutes
pour cuire ou réchauffer des aliments.
Pour ce faire, tournez le bouton de
commande Time (durée) dans le sens
des aiguilles d’une montre dépassez
la position 10 minutes, puis revenez
à la position 5 minutes. Après 5
minutes, la sonnerie retentira et le
four s’éteindra automatiquement.
6. Placez les aliments au centre de la
grille. Fermez la porte.
7. Tournez le bouton de commande
Time (durée) dans le sens des
aiguilles d’une montre jusqu’à la
durée désirée. Lorsque l’intervalle de
temps prédéterminé se sera écoulé, la
sonnerie retentira et le four s’éteindra
automatiquement. Placez le bouton de
commande Time (durée) à la position
0 (arrêt) si les aliments sont sortis du
four avant que l’intervalle de temps
prédéterminé ne soit écoulé.
8. Pour des durées de cuisson plus
longues, il sera nécessaire de régler la
durée de cuisson deux fois à l’aide du
bouton de commande Time (durée).
Exemple : Pour une durée de cuisson
totale de 45 minutes, réglez le bouton
de commande Time (durée) à 30
minutes. Une fois ce temps écoulé,
ajoutez 15 minutes. Lorsque les
aliments sont prêts, sortez le plateau
de rôtissage avec grilloir du four.
30
30
Page 33

Rôtissage (et brunissage) à l’aide
du four de comptoir
Seuls les éléments supérieurs chauffent lorsque
cette fonction du four est sélectionnée.
Positions recommandées : Utilisez les
glissières supérieures situées le long des
parois du four. Faites coulisser la grille
de four Wave-Rack™, en la plaçant vers
le haut (voir la position B à la page 29).
Placez le plateau de rôtissage avec grilloir
(ainsi que les aliments) sur la grille du four.
NOTA : Les aliments à rôtir doivent se
trouver à une distance minimale de 2,5
cm (1 po) des éléments de cuisson du
haut du four. Pour les aliments délicats
comme le poisson et le poulet, ou pour
réduire le brunissage, placez la grille dans
une position inférieure.
1. Placez l’aliment à rôtir sur le grilloir du
plateau de rôtissage, puis fermez la
porte du four.
2. Tournez le bouton de commande
Function (fonction) à Broil (rôtir).
3. Tournez le bouton de commande
Temperature (température) dans le
sens des aiguilles d’une montre à
Broil/Toast (rôtir/griller).
4. Tournez le bouton de commande Time
(durée) dans le sens des aiguilles d’une
montre jusqu’à la durée désirée.
5. Surveillez le procédé de rôtissage.
6. Lors du rôtissage des deux côtés
d’un aliment, réglez le bouton de
commande Time (durée) pour la
durée désirée sur un côté. Le four
s’éteindra automatiquement après
que la sonnerie aura retenti. Ouvrez la
porte. Utilisez une poignée pour tirer
à demi le plateau de rôtissage avec
grilloir hors du four. Tournez l’aliment,
replacez le plateau de rôtissage avec
grilloir dans le four et fermez la porte.
Réglez le bouton de commande Time
(durée) à la durée de cuisson désirée
pour l’autre côté.
7. Lorsque l’intervalle de temps
prédéterminé se sera écoulé, la
sonnerie retentira et le four s’éteindra
automatiquement.
8. Si l’aliment doit être sorti du four
avant que la sonnerie retentisse,
tournez le bouton de commande
Time (durée) à 0 (arrêt) pour éteindre
l’appareil. Sortez l’aliment du four.
FRANÇAIS
31
Page 34

Grillage à l’aide du four de comptoir
Les éléments inférieur et supérieur chaufferont
lorsque cette fonction est sélectionnée.
Positions recommandées : Utilisez les
glissières inférieures situées le long des
parois du four. Faites coulisser la grille de
four Wave-Rack™, en la plaçant vers le
haut (voir la position C à la page 29).
1. Pour de meilleurs résultats, placez le
pain à griller directement sur la grille
et vers le centre du four.
NOTA : Pour obtenir de meilleurs résultats,
ne pas utiliser la lèchefrite pour faire
FRANÇAIS
des rôties.
2. Il est possible de griller un maximum
de six tranches de pain. Lors du
grillage d’une ou deux tranches de
pain, placez-les au centre du four.
3. Fermez la porte.
4. Tournez le bouton de commande Function
(fonction) au réglage Toast (griller).
5. Tournez le bouton de commande
Temperature (température) dans le
sens des aiguilles d’une montre au
réglage Broil/Toast (rôtir/griller).
6. Tournez le bouton de commande Time
(durée) dans le sens des aiguilles d’une
montre jusqu’à l’intensité de grillage
voulue. Pour obtenir des rôties dorées,
placez la commande sur l’icône foncée
(entre la position 5 et 10). Pour des
rôties claires, positionnez d’abord la
commande un peu après le repère de 10
minutes, puis replacez-la sur l’icône de
grillage léger (entre la position 0 et 5).
CONSEIL : Pour des résultats plus
uniformes, préchauffez le four
pendant 5 minutes avant de faire
griller les premières rôties.
7. La sonnerie retentira et le four
s’éteindra automatiquement lorsque le
grillage sera terminé.
8. Placez le bouton de commande Time
(durée) à la position 0 (arrêt) si la
rôtie est retirée du four avant que la
sonnerie ne retentisse.
9. Vous pouvez modifier le réglage du
bouton de commande Time (durée), au
besoin, pour obtenir les résultats désirés.
NOTA : Il est normal que de la
condensation se forme sur la porte
car de l’humidité se dégage des pains
humides ou frais.
Réchauffage (plus conservation de la chaleur
et chauffage) à l’aide du four de comptoir
Choisissez les glissières de positionnement
de la grille, la grille de four Wave-Rack™
et le plateau de rôtissage avec grilloir
qui conviennent à la taille des aliments à
chauffer. Seul l’élément du bas fonctionne
lors du réchauffage.
Positions suggérées : Utilisez le plateau
de rôtissage avec grilloir. Lors de la première
utilisation du four, placez la grille de four
Wave-Rack™ à la position C de la page 29.
Ajustez-la ensuite en fonction des besoins
de cuisson.
1. Tournez le bouton de commande
Function (fonction) au réglage Warm
(réchauffer).
2. Tournez le bouton de commande
Temperature (température) au réglage
désiré.
3. Tournez le bouton de commande Time
(durée) au réglage désiré.
32
Page 35

Nettoyage du four de comptoir
• Assurez-vous que le bouton de
commande Time (durée) est à la position
0 (arrêt). Débranchez ensuite l’appareil
de la prise murale avant de le nettoyer.
• Laissez le four et les accessoires refroidir
complètement avant de les nettoyer.
• N’utilisez pas de produits nettoyants
abrasifs ni de tampons à récurer. Ils
pourraient égratigner la surface.
• Essuyez l’extérieur du four avec un ligne
propre et humide, puis séchez-le bien.
Un produit nettoyant liquide non abrasif
peut être utilisé pour déloger les taches
tenaces. Rincez et séchez complètement.
• Il est recommandé de nettoyer les
grilles et les plateaux à la main.
Retirez tous les accessoires du four de
comptoir. Nettoyez la grille, le plateau
de rôtissage et le grilloir dans de l’eau
chaude mousseuse. Rincez et séchez
complètement. Pour nettoyer le tiroir
ramasse-miettes, faites-le glisser du four
et enlevez les miettes à l’aide d’une
brosse. Passez un linge humide, puis
séchez complètement.
Dépannage
AVERTISSEMENT
Risque de choc électrique
Brancher sur une prise à 3
alvéoles reliée à la terre.
Ne pas enlever la broche de
liaison à la terre.
Ne pas utiliser un adaptateur.
Ne pas utiliser un câble de
rallonge.
Le non-respect de ces
instructions peut causer
un décès, un incendie ou un
choc électrique.
NOTA : La grille de four Wave-Rack™, le
plateau de rôtissage et le grilloir vont au
lave-vaisselle.
• Pour enlever les taches cuites, frottez-les
à l’aide d’une pâte faite de bicarbonate
de sodium et d’eau. Rincez et séchez
complètement.
• Les parois à l’intérieur du four sont
enduites de Teflon
le nettoyage. Retirez les grosses
éclaboussures après utilisation à l’aide
d’un tampon à mailles en nylon ou
en polyester, une éponge ou un linge
humecté d’eau tiède. Séchez à l’aide
d’un essuie-tout ou d’un chiffon doux
et sec.
IMPORTANT : N’utilisez pas d’agents
nettoyants, de détergents ni de tampons à
récurer en métal sur le revêtement intérieur
car ils pourraient réduire son efficacité.
• Si le four de comptoir de four ne
fonctionne pas, vérifiez les points
suivants :
1. Le four de comptoir est-il branché
dans la prise à trois broches?
2. Le fusible du circuit alimentant le
four de comptoir est-il en état de
fonctionner? Si vous disposez d’une
boîte de disjoncteurs, assurez-vous
que le circuit est fermé.
3. Essayez de débrancher le four de
comptoir, puis de le rebrancher.
Si le problème ne peut être corrigé,
consultez la section Garantie et
réparation des produits KitchenAid
des pages 43 à 45. Ne retournez pas
le four de comptoir chez le détaillant,
car celui-ci n’offre pas de service de
réparation.
®
pour faciliter
FRANÇAIS
33
Page 36

Conseils d’utilisation sur le four de comptoir
Réglage des durées de cuisson
très courtes
Lors du réglage de la minuterie pour
une durée 5 minutes ou moins, tournez
le bouton de commande au-delà du
repère de 10 minutes. Replacez ensuite le
bouton de commande à la durée désirée.
Est-il possible d’estimer le temps
de cuisson?
L’expérience vous guidera quant au temps
de cuisson requis pour griller différentes
sortes de pain. Les pains gelés, foncés ou
FRANÇAIS
entiers nécessitent un temps de grillage
plus long. Les pains frais, mous ou blancs
grillent en moins de temps.
Pour les aliments qui fondent
Utilisez le plateau de rôtissage si vous
faites cuire de petites quantités d’aliments
ou des aliments qui fondent. Cela évitera
que des aliments ne tombent sur les
éléments de cuisson.
Pour réduire le nettoyage
Vaporisez le plateau de rôtissage d’un
aérosol de cuisson antiadhésif pour
faciliter le nettoyage lors de la cuisson
d’aliments humides ou collants. Lavez
soigneusement le plateau après chaque
utilisation pour éviter une accumulation
d’aérosol de cuisson.
Limites quant à la taille des aliments
Pour de meilleurs résultats, les aliments et
les contenants allant au four (voir la section
« Choix des ustensiles de cuisson à utiliser
avec le four de comptoir », page 35) doivent
pouvoir loger dans le four de comptoir
sans toucher les éléments de cuisson ou
les parois intérieures du four. La porte doit
fermer complètement.
Lorsque le four est éteint
Tournez le bouton de commande
Temperature (température) à Warm
(réchauffer) ou au réglage minimum lorsque
le four de comptoir n’est pas utilisé.
Pour une utilisation prolongée
Si vous cuisinez pendant une période
prolongée à des températures élevées, il
est possible que vous détectiez une légère
odeur provenant des matériaux isolants
du four. Ceci est normal.
Conseils sur la cuisson des aliments
• Vérifiez le degré de cuisson des aliments
par le hublot de porte fait de verre trempé
transparent. Votre four de comptoir
consommera moins d’énergie si vous limitez
la fréquence d’ouverture de la porte.
• Assurez-vous que les aliments et les
contenants peuvent être placés dans
le four de comptoir sans toucher
les éléments de cuisson et qu’ils
n’empêchent pas la porte de fermer.
• Retirez tout emballage de plastique ou
de papier des aliments avant la cuisson.
• Utilisez seulement des contenants de
plastique légèrement couverts conçus pour
aller au four; des contenants hermétiques
peuvent entraîner une ébullition à gros
bouillons ou des éclaboussures.
• Suivez les directives fournies sur
l’emballage lorsque vous préparez des
aliments congelés ou emballés. Il n’est
pas nécessaire de préchauffer le four.
• Les surfaces du four peuvent devenir
chaudes pendant la cuisson. Touchez
seulement la poignée de porte et
les boutons pendant que le four
fonctionne.
• Ne placez pas d’objet sur le dessus du
four de comptoir ou près de celui-ci s’il
fonctionne.
• Remplacez les couvercles de carton,
de verre ou de plastique par du papier
d’aluminium lorsque vous utilisez le
four de comptoir.
34
34
Page 37

Conseils utiles
Choix des ustensiles de cuisson à
utiliser avec le four de comptoir
• Le plateau de rôtissage fourni avec le
four convient à des aliments comme
des biscuits, des pains mollets, des
biscuits, des nachos et des côtelettes
de porc.
• Une variété d’ustensiles de cuisson,
comme des moules à gâteaux ronds ou
carrés de 22,9 cm (9 po), des moules à
muffins de 1,5 litre (6 tasses), de petites
plaques à pâtisserie, et des casseroles
rondes, carrées et rectangulaires de
0,95 ml et 1,9 litre (1 et 2 pintes)
peuvent être utilisés. La porte doit
fermer complètement.
• Choisissez des ustensiles faits de métal,
de verre ou de céramique allant au four.
Pilonnets de poulet asiatique
1 morceau de racine
de gingembre de
2,5 cm (1 po) de
long pelé et coupé
en quartiers
2 gousses d’ail
1
60 ml (
⁄4 tasse) de
marmelade d’orange
1
60 ml (
⁄4 tasse) de
sauce soya
30 ml (2 cuillerées à
soupe) de vin blanc
1
5 ml (
⁄8 de cuillerée à
thé) d’huile de
sésame foncée
2 oignons verts, coupés
en morceaux de
2,5 cm (1 po)
905 g (2 lb) de pilonnets
de poulet*
Dans un robot culinaire, placez la lame polyvalente dans
un bol de préparation. Ajoutez la racine de gingembre
et l’ail par l’orifice d’alimentation pendant que le robot
culinaire fonctionne. Faites fonctionner le robot culinaire
pendant 8 à 10 secondes ou jusqu’à ce que les aliments
soient coupés en morceaux. Ajoutez la marmelade, la
sauce soya, le vin, l’huile et les oignons. Mélangez et
hachez les oignons pendant une dizaine de secondes.
Déposez dans un plat étroit ou dans un grand sac
de plastique pour aliments réutilisable. Ajoutez le
poulet, recouvrez de marinade. Couvrez ou fermez
hermétiquement. Réfrigérez pendant 8 heures ou toute la
nuit, en tournant occasionnellement.
Placez le poulet et la marinade dans le plateau de
rôtissage. Placez la grille vers le haut dans les glissières
inférieures du four (position C de la page 29). Faites cuire
au four à 190 °C (375 °F) pendant 13 à 18 minutes, ou
jusqu’à ce que la température interne du poulet atteigne
82 °C (180 °F).
Faites rôtir pendant 5 à 8 secondes ou jusqu’à ce que le
poulet soit doré. Servez chaud.
Quantité : 6 à 8 portions (environ 3 pilonnets par portion).
*S’il est impossible de trouver des pilonnets, utilisez 1,1 g
1
⁄2 lb) d’ailes de poulet entières. Retirez et jetez les pointes
(2
des ailes. Séparez les 2 sections restantes de chaque aile au
niveau de l’articulation en utilisant un couteau coupant.
Par portion : Environ 260 calories, 18 g de protéines,
10 g de glucides, 15 g de lipides, 4 g de graisse saturée,
65 mg de cholestérol, 690 mg de sel.
• Utilisez la grille Wave-Rack™ à la
position la plus basse lors de l’emploi
de contenants en verre et en céramique
profonds conçus pour aller au four et
laissez au moins 2,5 cm (1 po) entre le
dessus du contenant et les éléments de
cuisson supérieurs.
• N’utilisez pas de couvercles en verre. Si
vous désirez couvrir les aliments, utilisez
un papier d’aluminium sans serrer.
• Plusieurs aliments de commodité sont
emballés dans des contenants non
métalliques convenant à une utilisation
au micro-ondes. Vérifiez les directives
sur l’emballage pour déterminer si le
contenant peut être utilisé dans un
four ordinaire.
FRANÇAIS
35
Page 38

Crostinis italiens tièdes
Baguette française
coupée en 14 tranches
de 625 cm (
20 ml (4 cuillerées à thé)
d’huile d’olive
extra-vierge
6 feuilles de basilic frais
1
⁄2 à 1 petite gousse d’ail
(1
⁄8 de cuillerée à thé)
5 ml
de sel
55 g (2 oz) de provolone
fumé, refroidi
FRANÇAIS
1 grosse tomate Roma
1
⁄4 po)
Placez le pain sur le grilloir du plateau de rôtissage.
Vaporisez légèrement d’huile. Placez la grille vers le haut
dans les glissières inférieures (position C de la page 29).
Faites cuire le pain au four à 218 °C (425 °F) pendant 1 à
3 minutes, ou jusqu’à ce qu’il soit légèrement croustillant
(ne le faites pas brunir).
Dans un robot culinaire, placez la lame polyvalente dans
un bol de préparation. Ajoutez le basilic par l’orifice
d’alimentation pendant que le robot culinaire fonctionne.
Mélangez pendant environ 10 secondes ou jusqu’à ce
que le pain soit coupé en morceaux. Ajoutez l’ail et le
sel. Faites fonctionner le robot culinaire pendant 5 à 10
secondes ou jusqu’à ce que l’ail soit coupé en morceaux.
Placez le disque déchiqueteur dans le bol de préparation.
Ajoutez le fromage. Râpez-le.
Placez la lame polyvalente dans le bol de préparation.
Faites fonctionner le robot culinaire en mode Pulse
(impulsion) pendant 1 à 2 secondes ou jusqu’à ce que le
tout soit mélangé. Transvasez le mélange au fromage et
réservez le tout.
Placez le disque éminceur dans le bol de préparation.
Ajoutez la tomate. Tranchez-la.
Garnissez chaque tranche de pain d’une tomate et d’une
cuillerée à thé comble de mélange au fromage. Faites
cuire pendant 2 ou 3 minutes additionnelles ou jusqu’à ce
que le fromage fonde. Servez chaud.
Quantité : 7 portions (2 crostinis par portion).
Conseil : Les crostinis peuvent être préparés jusqu’à
1 heure avant la cuisson.
Par portion : Environ 80 calories, 3 g de protéines,
5 g de glucides, 6 g de lipides, 2 g de graisse saturée,
5 mg de cholestérol, 150 mg de sel.
36
36
Page 39

Grands nachos au boeuf
115 g (1⁄4 lb) de charcuterie
ou de restes de rôti
de bœuf, coupés en
cubes de 1,25 cm
1
⁄2 po)
(
10 ml (2 cuillerées à thé)
d’épices mexicaines,
à fajitas ou à tacos
5 tasses (environ 140 g
[5 oz]) de chips
tortillas
1 tasse (environ 115 g
[4 oz]) de fromage
Cheddar fort râpé,
divisé
4 oignons verts émincés
1
120 ml (
⁄2 tasse) d’olives
mûres tranchées
1
60 ml (
60 ml (
⁄4 tasse) de salsa
1
⁄4 tasse) de
crème sure
Légumes rôtis au four
8 pommes de terre
rouges de grosseur
moyenne (environ
455 g [1 lb]), coupées
en huitièmes
1
355 ml (1
235 ml (1 tasse) de fleurs
1 oignon moyen, coupé
1 petit piment rouge,
2 gousses d’ail, émincées
45 ml (3 cuillerées à
15 ml (1 cuillerée à
4 ml (
1 ml (
⁄2 tasse) de
fleurs de brocoli
de choux-fleurs
en fines rondelles
coupé en huitièmes
soupe) d’huile d’olive
soupe) de feuilles
de marjolaine
fraîchement coupées
3
⁄4 cuillerée à thé)
de sel
1
⁄4 cuillerée à thé )
de poivre noir
Dans un robot culinaire, placez la lame polyvalente
dans un bol de préparation. Ajoutez le boeuf et les
assaisonnements. Faites fonctionner le robot culinaire en
mode Pulse (impulsion) (4 impulsions de 1 à 2 secondes)
ou jusqu’à ce que le tout soit émincé.
Étalez des couches uniformes de chips dans le plateau de
rôtissage. Saupoudrez avec 80 ml (
Recouvrez uniformément de boeuf, d’oignons, d’olives et
du restant de fromage (160 ml [
1
⁄3 tasse) de fromage.
2
⁄3 tasse]).
Placez la grille vers le bas dans les glissières inférieures
du four (position D de la page 29). Faites cuire au four à
177 °C (350 °F) pendant 10 à 15 minutes, ou jusqu’à ce
que le fromage ait fondu et que des bulles se forment.
Garnissez de salsa et de crème sure.
Quantité : 6 portions
* Au besoin, remplacez les languettes de boeuf cuites et
assaisonnées et omettez l’assaisonnement mexicain.
Par portion : Environ 260 calories, 11 g de protéines,
19 g de glucides, 16 g de lipides, 7 g de graisse saturée,
30 mg de cholestérol, 590 mg de sel.
Dans un grand bol, combinez tous les ingrédients dans
l’ordre énuméré. Remuez pour couvrir uniformément.
Étalez le mélange de légumes dans le plateau de rôtissage.
Placez la grille vers le haut dans les glissières inférieures
du four (position C de la page 29). Faites cuire au four
à 218 °C (425 °F) pendant 20 à 30 minutes, ou jusqu’à
ce que les légumes soient tendres et rissolés. Brassez
quelques fois.
1
Quantité : 10 portions (environ 120 ml [
⁄2 tasse] par portion).
Par portion : Environ 90 calories, 2 g de protéines,
12 g de glucides, 4 g de lipides, 0,5 g de graisse saturée,
0 mg de cholestérol, 180 mg de sel.
FRANÇAIS
37
Page 40

Scones au citron et aux bleuets
475 ml (2 tasses) de
farine tout usage
45 ml (3 cuillerées à soupe)
de sucre cristallisé
15 ml (1 cuillerée à soupe)
de poudre à pâte
3
4 ml (
⁄4 cuillerée à thé)
de sel
1
60 ml (
⁄4 tasse) de
beurre froid ou de
margarine froide,
coupé(e) en morceaux
FRANÇAIS
de 1,25 cm (
120 ml (
1
⁄2 tasse) de
crème à fouetter
2 oeufs
1
2 ml (
⁄2 cuillerée à thé)
de zeste de citron
235 ml (1 tasse) de
bleuets frais
235 ml (1 tasse) de sucre
en poudre
30 à 45 ml (2 à 3 cuillerées
à soupe) de jus de
citron frais
1
⁄2 po)
Dans un robot culinaire, placez la lame polyvalente dans
un bol de préparation. Ajoutez la farine, le sucre cristallisé,
la poudre à pâte et le sel. Passez au robot pendant 3 à
4 secondes. Ajoutez le beurre. Passez au robot culinaire
pendant 10 à 15 secondes ou jusqu’à l’obtention d’une
texture friable. Transvasez dans un bol de moyen format.
Placez la lame polyvalente dans le bol de préparation.
Ajoutez la crème, les œufs et le zeste de citron. Passez au
robot culinaire pendant 3 à 4 secondes ou jusqu’à ce que le
tout soit mélangé.
En remuant doucement, ajoutez les bleuets dans le mélange
de farine. Ajoutez le mélange de crème; remuez doucement
jusqu’à que le tout soit humide. Formez une boule. Divisez
la pâte en deux parts. Aplatissez doucement la pâte sur une
surface enfarinée et formez des cercles de 12,7 cm (5 po).
À l’aide d’un couteau enfariné, coupez chaque cercle en
quatre coins. Placez-les dans un plateau de rôtissage non
graissé en les distançant de 1,25 cm (
1
⁄2 po).
Placez la grille vers le haut dans les glissières inférieures
du four (position C de la page 29). Faites cuire au four
à 191 °C (375 °F) pendant 12 à 18 minutes, ou jusqu’à
ce les scones soient dorés. Laissez refroidir pendant
10 minutes.
Entre-temps, dans un petit bol, mélangez le sucre
cristallisé avec suffisamment de jus de citron pour obtenir
une consistance liante. Versez sur les scones tièdes.
Quantité : 8 portions (1 scone par portion).
Par portion : Environ 320 calories, 5 g de protéines,
47 g de glucides, 12 g de lipides, 7 g de graisse saturée,
90 mg de cholestérol, 430 mg de sel.
38
38
Page 41

Saumon grillé aux câpres et à la moutarde
680 g (11⁄2 lb) de filets de
saumon frais
30 ml (2 cuillerées à
soupe) de mayonnaise
15 ml (1 cuillerée à
soupe) de câpres
10 ml ( 2 cuillerées à thé)
de moutarde de Dijon
5 ml (1 cuillerée à thé)
d’aneth haché
Aneth frais, si désiré
Déposez le saumon, peau dessous, sur la grille du plateau
de rôtissage.
Dans un petit bol, combinez la mayonnaise, les câpres, la
moutarde et 5 ml (1 cuillerée à thé) d’aneth; mélangez
bien. Étalez 10 ml (2 cuillerées à thé) de mélange sur le
dessus du saumon.
Placez la grille vers le haut dans les glissières inférieures
du four (position C de la page 29). Faites cuire au four
pendant 15 à 20 minutes, ou jusqu’à ce le poisson
s’émiette facilement à la fourchette. Servez avec la sauce
qui reste.Garnissez avec de l’aneth additionnel, au besoin.
Quantité : 4 portions.
Par portion : Environ 330 calories, 39 g de protéines,
0 g de glucides, 18 g de lipides, 2,5 g de graisse saturée,
110 mg de cholestérol, 280 mg de sel.
Poules de Cornouailles à l’ail et aux fines herbes
1 gousse d’ail
30 ml (2 cuillerées à
soupe) de feuilles de
basilic frais
10 ml (2 cuillerées à
thé) de feuilles de
romarin frais
1
2 ml (
5 ml (
15 ml (1 cuillerée à
2 poules de Cornouailles
80 ml (
⁄2 cuillerée à thé)
de sel
1
⁄8 de cuillerée à
thé) de poivre noir
soupe) plus 5 ml
(1 cuillerée à thé)
d’huile d’olive, divisée
(environ 680 g
[24 oz] chacune),
abattis enlevés
1
⁄3 tasse) d’eau
Dans un robot culinaire, placez le bol et la lame de petite
dimension dans un bol de préparation. Ajoutez l’ail, le
basilic et le romarin par l’orifice d’alimentation pendant que
le robot culinaire fonctionne. Faites fonctionner le robot
culinaire pendant 5 à 10 secondes ou jusqu’à ce que les
aliments soient coupés en morceaux. Raclez les parois du
bol. Ajoutez le sel, le poivre et 15 ml (1 cuillerée à soupe)
d’huile. Faites fonctionner le robot culinaire en mode Pulse
(impulsion) pendant 2 impulsions d’environ 2 secondes.
Placez les poules, poitrines vers le haut, dans le plateau
de rôtissage. Dégagez la peau des poitrines; frottez le
mélange d’herbes sous la peau des poitrines. Bridez les
pattes de poulet si désiré. Brossez le dessus de la peau à
l’aide de l’huile restante (5 ml [1 cuillerée à thé]). Versez
l’eau dans le plat, autour des poules.
Placez la grille vers le bas dans les glissières inférieures
du four (position D de la page 29). Faites cuire au four
à 177 °C (350 °F) pendant 55 à 70 minutes ou jusqu’à
ce que la partie la plus charnue de la cuisse atteigne
82 °C (180 °F). Assurez-vous que les poules ne touchent
pas l’élément supérieur.
Quantité : 4 portions.
Par portion : Environ 440 calories, 34 g de protéines,
0 g de glucides, 32 g de lipides, 8 g de graisse saturée,
200 mg de cholestérol, 390 mg de sel.
FRANÇAIS
39
Page 42

Pizza au jambon à l’italienne et au provolone
Croûte
1
⁄2 oz) de fromage
15 g (
parmesan frais,
coupé en morceaux
de 2,5 cm (1 po)
1
355 ml (1
⁄2 tasse) de
farine tout usage
1
2 ml (
⁄2 cuillerée à thé)
de sucre
1
2 ml (
⁄2 cuillerée à thé)
de sel
1
2 ml (
FRANÇAIS
120 ml (
⁄2 cuillerée à thé)
de basilic séché
1
⁄2 tasse) d’eau
15 ml (1 cuillerée à
soupe) d’huile d’olive
5 ml (1 cuillerée à thé)
de levure sèche active
Semoule de maïs
Garniture
8 à 10 grosses feuilles
de basilic frais
30 ml (2 cuillerées à
soupe) de feuilles
d’origan frais
1 gousse d’ail
85 g (3 oz) de provolone
fumé ou de
mozzarella, refroidi
2 grosses tomates
Roma
55 g (2 oz) de jambon
à l’italienne ou de
jambon finement
tranché
Dans un robot culinaire, placez la lame polyvalente dans
un bol de préparation. Ajoutez le fromage parmesan
par l’orifice d’alimentation pendant que le robot culinaire
fonctionne. Faites fonctionner le robot culinaire pendant
25 à 30 secondes ou jusqu’à ce que le fromage soit
finement râpé. Ajoutez la farine, le sucre, le sel et le
basilic séché. Faites fonctionner le robot culinaire pendant
4 à 8 secondes ou jusqu’à ce que le tout soit mélangé.
Dans une petite casserole, combinez l’eau et l’huile.
Chauffez à feu doux jusqu’à ce que le mélange soit
tiède, 41 °C (105 °F) à 46 °C (115 °F). Mélangez la levure
jusqu’à ce qu’elle se dissolve. Ajoutez lentement la levure
par l’orifice d’alimentation pendant que le robot culinaire
fonctionne. Faites fonctionner le robot culinaire pendant
1
⁄4 minute ou jusqu’à ce que la pâte forme une
1 à 1
boule. Retirez la pâte et déposez-la dans un bol graissé.
Tournez-la pour graisser tous les côtés. Couvrez; laissez
lever la pâte dans un endroit chaud jusqu’à ce qu’elle
double de volume, environ 45 à 60 minutes.
Abaissez la pâte. Saupoudrez légèrement le plateau de
rôtissage graissé avec de la semoule de maïs. Foncez le
plateau et ses bords sur une hauteur de 1,25 cm (
1
⁄2 po).
Entre-temps, dans un robot culinaire, placez le
bol et la lame de petite dimension dans un bol de
préparation. Ajoutez le basilic et l’origan frais par l’orifice
d’alimentation pendant que le robot culinaire fonctionne.
Faites fonctionner le robot culinaire pendant 8 à 10
secondes ou jusqu’à ce que les aliments soient coupés
en morceaux. Ajoutez l’ail. Faites fonctionner le robot
culinaire pendant 5 à 10 secondes ou jusqu’à ce qu’il soit
coupé en morceaux. Transvasez et réservez le tout.
Placez le disque déchiqueteur dans le bol de travail. Ajoutez
le provolone. Râpez-le. Transvasez et réservez le tout.
Placez le disque éminceur dans le bol de travail. Ajoutez
les tomates. Tranchez-les. Transvasez et réservez le tout.
Garnissez la croûte de pizza de la moitié de la quantité
de provolone, de tomates et du mélange de basilic.
Placez le disque éminceur dans le bol de travail. Ajoutez
le jambon à l’italienne. Tranchez-le.
Garnissez la pizza de jambon à l’italienne et du reste de
provolone. Placez la grille vers le haut dans les glissières
inférieures du four (position C de la page 29). Faites cuire
au four à 204 °C (400 °F) pendant 10 à 18 minutes, ou
jusqu’à ce la croûte de la pizza soit très dorée et que le
dessus soit coloré. Servez chaude.
Quantité : 6 portions.
Par portion : Environ 220 calories, 11 g de protéines,
25 g de glucides, 8 g de lipides, 3,5 g de graisse saturée,
20 mg de cholestérol, 540 mg de sel.
40
40
Page 43

Carrés sablés aux agrumes
295 ml (11⁄4 tasse) de
farine tout usage
1
120 ml (
⁄2 tasse) de sucre
en poudre
0,5 ml (1⁄8 de cuillerée
à thé) de sel
10 ml (2 cuillerées à
thé) de gingembre
cristallisé finement
haché, si désiré
7 à 10 ml (1
1
⁄2 à 2
tasses) de zeste
d’orange, la partie
orange seulement
5 ml (1 cuillerée à thé)
de zeste de citron, la
partie jaune seulement
3
175 ml (
⁄4 tasse) de
beurre froid ou de
margarine froide,
coupé(e) en morceaux
de 2,5 cm (1 po)
Glaçage
1
80 ml (
⁄3 tasse) de sucre
en poudre
1
1 ml (
⁄4 cuillerée à thé)
de zeste d’orange,
la partie orange
seulement
1
10 à 12 ml (2
⁄2 cuillerées
à soupe) de jus
d’orange frais
Dans un robot culinaire, placez la lame polyvalente
dans un bol de préparation. Ajoutez 120 ml (
1
⁄2 tasse)
de sucre en poudre, le sel, le gingembre, si désiré, et
les zestes d’orange et de citron. Faites fonctionner le
robot culinaire pendant 10 secondes ou jusqu’à le tout
soit mélangé. Ajoutez le beurre. Faites fonctionner le
robot culinaire pendant 25 à 30 secondes ou jusqu’à
l’obtention d’une pâte molle.
Avec les mains légèrement enfarinées, foncez un moule non
graissé de 20,3 cm x 20,3 cm x 5 cm (8 po x 8 po x 2 po).
Placez la grille vers le haut dans les glissières inférieures du four
(position C de la page 29). Faites cuire au four en 149 °C
(300 °F) pendant 15 à 20 minutes, ou jusqu’à ce les carrés
soient légèrement dorés. Laissez refroidir pendant 10 minutes.
Entre-temps, dans une tasse à mesurer en verre, mélangez
les ingrédients du glaçage en ajoutant le jus d’orange
pour obtenir une consistance liante. Étalez sur les barres
partiellement refroidies. Laissez refroidir complètement.
Quantité : 16 portions (1 carré par portion).
Par portion : Environ 130 calories, 1 g de protéines,
13 g de glucides, 9 g de lipides, 5 g de graisse saturée,
25 mg de cholestérol, 20 mg de sel.
FRANÇAIS
41
Page 44

Carrés au chocolat cajous au caramel
20 caramels emballés
individuellement
45 ml (3 cuillerées à
soupe) de crème à
fouetter
3
175 ml (
⁄4 tasse) de
beurre ou de
margarine, ramolli(e)
1
355 ml (1
⁄2 tasse) de sucre
3 oeufs
5 ml (1 cuillerée à thé)
de vanille
FRANÇAIS
235 ml (1 tasse) de farine
tout usage
1
120 ml (
⁄2 tasse) de poudre
de cacao non sucrée
1
0,5 ml (
⁄8 de cuillerée à
thé) de sel
115 g (4 oz) de chocolat
semi-sucré,
grossièrement haché
235 ml (1 tasse) de cajous
rôtis, grossièrement
hachés
30 g (1 oz) de chocolat à
cuire, haché, si désiré
1
2 ml (
⁄2 cuillerée à thé)
d’huile végétale, si
désirée
Dans une petite casserole chauffez les caramels et la crème à
feu doux jusqu’à ce qu’ils soient fondus et lisses. Réservez.
Déposez le beurre, le sucre, les œufs et la vanille dans un
bol à mélanger. Battez à vitesse moyenne à l’aide d’un
malaxeur jusqu’à l’obtention d’une consistance crémeuse.
Ajoutez la farine, le cacao et le sel. Battez à basse vitesse
jusqu’à ce que les ingrédients soient humectés. Mélangez
le chocolat semi-sucré et les cajous. Foncez un moule
graissé de 23 x 23 x 5 cm (9 x 9 x 2 po). Répartissez
uniformément le caramel sur le dessus.
Placez la grille vers le bas dans les glissières inférieures du
four (position D de la page 29). Faites cuire au four à
163 °C (325 °F) pendant 25 à 30 minutes, ou jusqu’à ce
que la pâte soit cuite au centre.
Dans un petit bol allant au lave-vaisselle, ajoutez le
chocolat blanc et l’huile, si désiré. Mélangez à la position
High (élevée) pendant 45 à 60 secondes ou jusqu’à ce
qu’il soit fondu. Mélangez jusqu’à l’obtention d’une
consistance lisse. Étalez sur les carrés au chocolat. Laissez
refroidir pendant 30 minutes. Réfrigérez entre 11⁄2 et 2
heures, le temps que le chocolat durcisse.
Quantité : 16 portions (1 carré au chocolat par portion).
Par portion : Environ 330 calories, 5 g de protéines,
40 g de glucides, 18 g de lipides, 9 g de graisse saturée,
65 mg de cholestérol, 115 mg de sel.
42
42
Page 45

Garantie du four de comptoir KitchenAid®
Durée de la garantie :
50 États des États-Unis,
le district fédéral de
Columbia, le Canada et
Puerto Rico : Garantie
limitée d’un an à compter
de la date d’achat.
DÉSAVEU DE GARANTIE TACITE; LIMITATION DES RECOURS LES GARANTIES
TACITES, Y COMPRIS DANS LA MESURE APPLICABLE LES GARANTIES DE QUALITÉ
MARCHANDE OU D’APTITUDE À UN EMPLOI PARTICULIER, SONT EXCLUES DANS LA
MESURE AUTORISÉE PAR LA LOI. TOUTE GARANTIE TACITE IMP0SÉE PAR LA LOI EST
LIMITÉE À UN AN, OU LA DURÉE MINIMUM PERMISE PAR LA LOI. PUISQUE CERTAINES
JURIDICTIONS NE PERMETTENT PAS L’EXCLUSION OU LA LIMITATION DE DURÉE DES
GARANTIES IMPLICITES DE QUALITÉ MARCHANDE OU D’APTITUDE À UN EMPLOI
PARTICULIER, LES LIMITATIONS CI-DESSUS PEUVENT DONC NE PAS S’APPLIQUER À VOUS.
KitchenAid prendra en
charge :
50 États des ÉtatsUnis, district fédéral de
Columbia et Canada :
Garantie de satisfaction
totale et de remplacement
de votre four de comptoir.
Consultez la page suivante
pour obtenir des détails
sur la façon de remplacer
le four de comptoir.
OU
À Puerto Rico :
Les coûts des pièces de
rechange et de maind’œuvre pour corriger
les défauts de matériaux
et de main-d’œuvre. Le
service après-vente doit
être assuré par un Centre
de réparation autorisé
KitchenAid. Pour obtenir
une réparation, suivez les
directives de la page 44.
KitchenAid ne prendra
pas en charge :
A. Les réparations
découlant de
l’utilisation du four
de comptoir dans
un contexte autre
qu’un foyer unifamilial
normal.
B. Les dommages
attribuables aux causes
suivantes : un accident,
une modification, la
mauvaise utilisation,
un emploi abusif
ou une utilisation
non approuvée par
KitchenAid.
C. Les coûts des pièces
de rechange ou de
main-d’oeuvre pour
le four de comptoir si
ce dernier est utilisé
à l’extérieur du pays
d’achat.
FRANÇAIS
SI CET APPAREIL NE FONCTIONNE PAS COMME GARANTI, LE SEUL ET EXCLUSIF
RECOURS DES CLIENTS EST LA RÉPARATION OU LE REMPLACEMENT SELON LES
DISPOSITIONS DE LA GARANTIE LIMITÉE. KITCHENAID ET KITCHENAID-CANADA
N’ASSUMENT AUCUNE RESPONSABILITÉ EN CAS DE DOMMAGES ACCESSOIRES OU
INDIRECTS. Cette garantie vous confère des droits spécifiques auxquels peuvent s’ajouter
d’autres droits variant d’un État ou d’une province à l’autre.
43
Page 46

Garantie de satisfaction totale et de
remplacement – 50 États des États-Unis,
district fédéral de Columbia
Nous sommes tellement certains que la
qualité de nos produits satisfait aux normes
exigeantes de KitchenAid que, si le four de
comptoir cesse de fonctionner au cours
de la première année, KitchenAid livrera
gratuitement un appareil identique ou
comparable à votre porte et s’occupera
de récupérer le four de comptoir originel.
L’appareil de rechange sera aussi couvert
par notre garantie limitée d’un an. Veuillez
FRANÇAIS
suivre ces instructions pour recevoir ce
service de qualité.
Si le four de comptoir KitchenAid
de fonctionner durant la première année,
Il suffit d’appeler le numéro sans frais
Garantie de satisfaction totale et de
remplacement – Canada
Nous sommes tellement certains que
la qualité de nos produits satisfait aux
normes exigeantes de KitchenAid que, si le
four de comptoir cesse de fonctionner au
cours de la première année, KitchenAid le
remplacera par un appareil identique ou
comparable. L’appareil de rechange sera
aussi couvert par notre garantie limitée
d’un an. Veuillez suivre ces instructions
pour recevoir ce service de qualité.
Si le four de comptoir KitchenAid
de fonctionner au cours de la première
année, apportez-le ou retournez-le port
dû à un Centre de réparation KitchenAid
®
cesse
®
cesse
1-800-541-6390 du Centre de satisfaction
de la clientèle du lundi au vendredi de 8
h à 20 h (heure de l’Est) ou le samedi de
10 h à 17 h. Fournissez votre adresse de
livraison complète au représentant. (Pas de
boîte postale).
Quand vous recevez le four de comptoir
de rechange, veuillez utiliser le carton et
les matériaux d’emballage pour emballer
le four de comptoir originel. Écrivez vos
nom et adresse sur une feuille de papier et
mettez-la dans le carton avec une copie de
la preuve d’achat (reçu de caisse, facture
de règlement par carte de crédit, etc.)
autorisé. Écrivez vos nom et adresse
complète sur une feuille de papier et
mettez-la dans le carton avec une copie de
la preuve d’achat (reçu de caisse, facture
de règlement par carte de crédit, etc.) Le
four de comptoir de rechange sera expédié
port prépayé et assuré. Si le service ne
s’avère pas satisfaisant, appelez le numéro
sans frais du Centre de relations avec la
clientèle : 1-800-807-6777. Ou écrivez à :
Centre de relations avec la clientèle
KitchenAid Canada
1901 Minnesota Court
Mississauga, ON L5N 3A7
Comment obtenir une réparation sous
garantie à Puerto Rico
Le four de comptoir KitchenAid® est
couvert par une garantie limitée d’un an
à partir de la date d’achat. KitchenAid
prendra en charge les coûts des pièces
de rechange et de main-d’œuvre pour
corriger les défauts de matériaux et de
main-d’œuvre. Le service après-vente doit
être assuré par un Centre de réparation
autorisé KitchenAid.
Apportez le four de comptoir ou retournez-le
port payé et assuré à un Centre de réparation
autorisé de KitchenAid. Le four de comptoir
réparé vous sera expédié port prépayé et
assuré. S’il est impossible d’obtenir des
réparations satisfaisantes de cette manière,
appelez le numéro sans frais 1-800-541-6390
pour obtenir l’adresse d’un Centre de
réparation près de chez vous.
44
44
Page 47

Comment obtenir une réparation hors
garantie – tous les territoires
Avant d’appeler pour faire réparer, consultez
la section Dépannage de la page 33.
Pour obtenir de l’information sur
les réparations dans les 50 États
des États-Unis, le district fédéral de
Columbia et Puerto Rico,
appelez le numéro sans frais 1-800-541-6390.
Ou écrivez à :
Centre de satisfaction de la clientèle
KitchenAid Portable Appliances
P.O. Box 218
St. Joseph, MI 49085-0218
Ou contactez un centre de réparation
autorisé près de chez vous.
Comment obtenir une réparation
en dehors de ces territoires
Demandez à votre distributeur local
KitchenAid ou au détaillant où le four de
comptoir a été acheté où le faire réparer.
Pour obtenir de l’information sur les
réparations au Canada,
appelez le numéro sans frais 1-800-807-6777.
Ou écrivez à :
Centre de relations avec la clientèle
KitchenAid Canada
1901 Minnesota Court
Mississauga, ON L5N 3A7
FRANÇAIS
Pour obtenir de l’information sur les
réparations au Mexique,
appelez le numéro sans frais
01-800-024-17-17
(JV Distribuciones)
Ou
01-800-902-31-00
(Industrias Birtman)
Comment commander des accessoires
et des pièces de rechange
Pour commander des accessoires ou
des pièces de rechange pour le four
de comptoir dans les 50 États des
États-Unis, dans le district fédéral de
Columbia et à Puerto Rico,
appelez sans frais le 1-800-541-6390 du
lundi au vendredi, de 8 h à 20 h (heure de
l’Est), le samedi de 10 h à 17 h.
Ou écrivez à :
Centre de satisfaction de la clientèle
KitchenAid Portable Appliances
P.O. Box 218
St. Joseph, MI 49085-0218
Pour commander des accessoires ou
des pièces de rechange pour le four
de comptoir au Canada,
appelez sans frais le 1-800-807-6777.
Ou écrivez à :
Centre de relations avec la clientèle
KitchenAid Canada
1901 Minnesota Court
Mississauga, ON L5N 3A7
Pour commander des accessoires ou
des pièces de rechange pour le four de
comptoir au Mexique,
appelez sans frais le
01-800-024-17-17
(JV Distribuciones)
Ou
01-800-902-31-00
(Industrias Birtman)
45
Page 48

ESPAÑOL
46
Page 49

Índice
INTRODUCCIÓN
Comprobante de compra y registro del producto ..............En el interior de la tapa delantera
Seguridad del horno de la mesada de cocina ................................................................48
Medidas de seguridad importantes ...............................................................................48
Requisitos eléctricos ......................................................................................................49
CARACTERÍSTICAS Y FUNCIONAMIENTO
Características del horno de la mesada de cocina ..........................................................50
Preparación del horno de la mesada de cocina para su uso
Antes de utilizarlo por primera vez ........................................................................52
Antes de cada uso .................................................................................................52
Posiciones de la rejilla Wave-Rack™ del horno ...............................................................53
Cómo hornear (y recalentar) con el horno de la mesada de cocina ...............................54
Cómo asar (y dorar) con el horno de la mesada de cocina ............................................55
Cómo tostar con el horno de la mesada de cocina .......................................................56
Cómo entibiar (y cómo mantener tibio y calentar) con el horno de la mesada de cocina ...56
CUIDADO Y LIMPIEZA
Limpieza del horno de la mesada de cocina ..................................................................57
Solución de problemas .................................................................................................57
CONSEJOS PARA EL HORNO DE LA MESADA DE COCINA
Consejos para utilizar el horno de la mesada de cocina ................................................58
Consejos para cocinar alimentos ...................................................................................58
Consejos prácticos ........................................................................................................59
ESPAÑOL
RECETAS
Contraalas de pollo asiáticas .........................................................................................59
“Crostini” calentitas a la italiana ...................................................................................60
Nachos de carne grandes ..............................................................................................61
Verduras asadas al horno ..............................................................................................61
Escones de limón y arándanos ......................................................................................62
Salmón asado a la mostaza con alcaparras ...................................................................63
Gallinas Cornish asadas con hierbas y ajo .....................................................................63
Pizza de provolone y prosciutto ....................................................................................64
Cuadraditos de “shortbread” (galletas típicas escocesas) dulces con cítricos ..................65
Brownies de chocolate con castañas de cajú y caramelo ...............................................66
INFORMACIÓN SOBRE LA GARANTÍA Y EL SERVICIO TÉCNICO
Garantía del horno de la mesada de cocina KitchenAid
Garantía de reemplazo sin dificultades en los 50 estados de los Estados Unidos
y el Distrito de Columbia ...............................................................................................68
Garantía de reemplazo sin dificultades en Canadá ........................................................68
Cómo obtener el servicio de garantía en Puerto Rico ....................................................68
Cómo obtener el servicio de garantía una vez vencida la garantía – Todos los lugares .... 69
Cómo obtener el servicio técnico en otros lugares .........................................................69
Cómo solicitar accesorios y repuestos ...........................................................................69
47
®
...............................................67
Page 50

Seguridad del horno de la mesada de cocina
Su seguridad y la seguridad de los demás es muy importante.
Hemos incluido muchos mensajes importantes de seguridad en este manual y en
su electrodoméstico. Lea y obedezca siempre todos los mensajes de seguridad.
Este es el símbolo de advertencia de seguridad.
Este símbolo le llama la atención sobre peligros potenciales que
pueden ocasionar la muerte o una lesión a usted y a los demás.
Todos los mensajes de seguridad irán a continuación del símbolo
de advertencia de seguridad y de la palabra “PELIGRO” o
“ADVERTENCIA”. Estas palabras significan:
Si no sigue las instrucciones de
inmediato, usted puede morir o
sufrir una lesión grave.
ADVERTENCIA
Todos los mensajes de seguridad le dirán el peligro potencial, le dirán cómo
reducir las posibilidades de sufrir una lesión y lo que puede suceder si no se
ESPAÑOL
siguen las instrucciones.
Si no sigue las instrucciones, usted
puede morir o sufrir una lesión grave.
MEDIDAS DE SEGURIDAD
IMPORTANTES
Cuando utilice electrodomésticos, siempre se deben seguir las precauciones básicas de
seguridad. Las instrucciones son las siguientes:
1. Lea todas las instrucciones.
2. No toque superficies calientes. Utilice las manijas o perillas.
3. Para protegerse contra descargas eléctricas no sumerja el cable, los enchufes ni
ninguna parte del horno en agua ni en ningún otro líquido.
4. Es necesario que supervise de cerca cuando algún electrodoméstico está siendo
utilizado cerca de los niños o está siendo utilizado por éstos.
5. Desenchúfelo cuando no esté en uso y antes de la limpieza. Deje que se enfríe
antes de colocar o quitar las piezas.
6. No utilice ningún electrodoméstico con un cable o un enchufe dañado ni luego de
un mal funcionamiento ni si se ha dañado de alguna forma. Devuelva el horno al Centro
de servicio técnico autorizado más cercano para su inspección, reparación o ajuste.
7. El uso de acoplamientos accesorios no recomendados por el fabricante del
electrodoméstico puede ocasionar lesiones.
8. No deje que el cable cuelgue del borde de la mesa o mesada de cocina ni que
toque superficies calientes.
9. No lo coloque sobre ni cerca de un quemador eléctrico o a gas caliente ni
dentro de un horno caliente.
10. Tenga mucho cuidado cuando mueva un electrodoméstico que contenga aceite
caliente u otros líquidos calientes.
48
48
Page 51

11. Tenga mucho cuidado cuando retire la asadera o cuando deseche grasa caliente.
12. No se deben introducir alimentos de gran tamaño ni utensilios de metal en un horno
de la mesada de cocina ya que pueden ocasionar incendios o descargas eléctricas.
13. Si el horno de la mesada de cocina está cubierto o si entra en contacto con
materiales inflamables como cortinas, paredes y materiales similares cuando esté
funcionando, se puede producir un incendio. No almacene ningún objeto sobre el
electrodoméstico cuando esté funcionando.
14. No lo limpie con esponjas de metal. Se pueden desprender pedacitos de la
esponja y tocar partes eléctricas creando un riesgo de descarga eléctrica.
15. Se debe tener mucho cuidado cuando se utilizan recipientes que no sean de
metal o de vidrio.
16. Cuando el horno no esté en uso, no almacene ningún material que no sean los
accesorios recomendados por el fabricante.
17. No coloque en el horno ninguno de los siguientes materiales: papel, cartón,
plástico ni ningún material similar.
18. No cubra la bandeja para migas ni ninguna otra parte del horno con papel
metálico. Esto puede hacer que el horno se recaliente.
19. Apague el horno girando la perilla de Control de tiempo hasta la posición 0 (apagado).
20. No lo utilice a la intemperie.
21. No utilice el electrodoméstico con ningún otro fin que no sea el indicado.
22. Este producto está diseñado para ser utilizado sólo para uso doméstico.
GUARDE ESTAS INSTRUCCIONES
Requisitos eléctricos
ADVERTENCIA
Peligro de Choque Eléctrico
Conecte a un contacto de pared
de conexión a tierra de 3
terminales.
No quite la terminal de conexión
a tierra.
No use un adaptador.
No use un cable eléctrico de
extensión.
No seguir estas instrucciones
puede ocasionar la muerte,
incendio o choque eléctrico.
ESPAÑOL
Voltios: 120 V.C.A.
Hertz: 60 Hz
NOTA : Este horno de la mesada de
cocina tiene un enchufe de 3 clavijas con
conexión a tierra. Para reducir el riesgo
de descargas eléctricas, este enchufe
encajará en el tomacorriente sólo de
una manera. Si el enchufe no encaja
en el tomacorriente, contáctese con un
electricista calificado. No modifique el
enchufe de ninguna manera.
No utilice un cable de extensión. Si
el cable del suministro eléctrico es
demasiado corto, solicite a un electricista
o a un técnico calificado que instale un
tomacorriente cerca del electrodoméstico.
49
Page 52

Características del horno de la mesada de cocina
Ranuras para
la colocación
de la rejilla
Elementos
de cocción
ESPAÑOL
Gabinete
del horno
Puerta del horno
Panel
de control
Bandeja para
migas que abarca
todo el ancho
Perilla de
control de
funciones
Perilla de
control de
temperatura
Perilla de
control de
tiempo
(la posición
0 significa
“apagado”)
Luz indicadora de
“encendido”
Rejilla
Wave-Rack™
del horno
50
50
Asadera
con parrilla
Page 53

Características del horno de la mesada de cocina
Elementos de cocción
Cuatro elementos de cocción producen
hasta 1400 vatios para hornear, asar,
tostar y entibiar.
Panel de control
Las tres perillas grandes tienen versátiles
ajustes para Función, Temperatura y
Tiempo. Una luz indicadora de corriente
“encendido” brilla de color rojo cuando
el horno está funcionando.
Asadera con parrilla
Se utiliza una asadera fácil de limpiar con una
parrilla especial para hornear, asar y entibiar.
Esta combinación de asadera con parrilla se
apoya sobre la rejilla Wave-Rack™ del horno.
Rejilla Wave-Rack™ del horno
Rejilla única con diseño de ondas que
permite que el aire circule alrededor del
pan para obtener un tostado parejo. La
rejilla con capacidad para 6 rodajas es
reversible para obtener posiciones óptimas
de cocción.
Cavidad del horno
La cavidad de 0,5 pies cúbicos (0,014 metros
cúbicos) presenta una capa antiadherente de
®
Teflón
para una fácil limpieza.
Ranuras para la colocación de la rejilla
Las ranuras superiores e inferiores a lo largo
de los laterales del horno, combinadas con
la rejilla reversible Wave-Rack™ del horno
pueden mantener los alimentos hasta en
4 posiciones de cocción.
Bandeja para migas que abarca todo
el ancho
La bandeja para migas está diseñada
para que se pueda retirar y limpiar con
facilidad. La bandeja para migas está
ubicada debajo de la puerta del horno y
se la puede retirar sin abrir la puerta.
ESPAÑOL
Puerta del horno
La puerta con marco de metal durable
tiene una manija grande de acero
inoxidable y una ventana de vidrio
templado transparente.
Gabinete del horno
El frente elegante de acero inoxidable
combina con los laterales revestidos con
esmalte horneado.
51
Page 54

Preparación del horno de la mesada
de cocina para su uso
Antes de utilizarlo por primera vez
1. Coloque el horno de la mesada de
cocina sobre una superficie plana, seca
y nivelada como una mesada de cocina
o mesa.
2. Asegúrese de que los laterales, la
parte trasera y la parte superior del
horno estén al menos a 10,16 cm. de
distancia de cualquier pared, gabinete
u objeto que se encuentre sobre la
mesada de cocina o mesa.
3. Retire todos los accesorios y lávelos con
agua caliente jabonosa. Séquelos muy
bien antes de colocarlos en el horno.
NOTA : El horno puede producir un poco
de humo cuando se lo utilice por primera
vez. Esto es normal.
ESPAÑOL
Antes de cada uso
1. Retire todos los objetos que no
sean necesarios para el siguiente
procedimiento de cocción.
ADVERTENCIA
Peligro de Choque Eléctrico
Conecte a un contacto de pared
de conexión a tierra de 3
terminales.
No quite la terminal de conexión
a tierra.
No use un adaptador.
No use un cable eléctrico de
extensión.
No seguir estas instrucciones
puede ocasionar la muerte,
incendio o choque eléctrico.
2. Enchúfelo en un tomacorriente para 3
clavijas con conexión a tierra. El horno
de la mesada de cocina debe ser el
único electrodoméstico funcionando en
el circuito.
3. El horno de la mesada de cocina ahora
está listo para ser utilizado.
52
52
Page 55

Posiciones de la rejilla Wave-Rack™ del horno
Los alimentos se cocinan de manera uniforme a medida que el aire caliente circula
alrededor de la rejilla Wave-Rack™ del horno. Se pueden colocar hasta 6 rodajas de
pan directamente sobre la rejilla para que se tuesten. Esta rejilla única con 4 posiciones
también soporta la asadera con la parrilla, las fuentes o los recipientes para hornear y
los utensilios estándares para hornear. A continuación se incluye una guía para regular la
rejilla Wave-Rack™ del horno para obtener un rendimiento óptimo de cocción.
Posición A
Utilice las ranuras superiores ubicadas a lo
largo de las paredes del horno. Deslice la
rejilla Wave-Rack™ del horno orientándola
hacia arriba.
Posición B
Utilice nuevamente las ranuras superiores
ubicadas a lo largo de las paredes del horno.
Deslice la rejilla Wave-Rack™ del horno
orientándola hacia abajo esta vez.
Posición C
Utilice las ranuras inferiores ubicadas a lo
largo de las paredes del horno. Deslice la
rejilla Wave-Rack™ del horno orientándola
hacia arriba.
Posición D
Utilice nuevamente las ranuras inferiores
ubicadas a lo largo de las paredes del
horno. Deslice la rejilla Wave-Rack™ del
horno orientándola hacia abajo esta vez.
ESPAÑOL
53
Page 56

Cómo hornear (y recalentar) con
el horno de la mesada de cocina
Los elementos superiores e inferiores se
encenderán y apagarán sucesivamente
durante el horneado para mantener la
temperatura deseada del horno.
Posiciones sugeridas: Cuando utilice el
horno por primera vez, coloque la rejilla
Wave-Rack™ del horno como se muestra
en la posición C en “Posiciones de la rejilla
Wave-Rack™ del horno” en la página
53. Luego, regule según sea necesario
de acuerdo con lo que vaya a cocinar.
Recuerde dejar espacio para que los
alimentos se levanten.
1. Coloque la rejilla en una posición baja
de manera que los alimentos que vaya
a hornear o calentar queden en el
centro del horno.
2. Cierre la puerta.
3. Gire la perilla de control de funciones
ESPAÑOL
hasta la posición “Bake” (Hornear).
4. Gire la perilla de control de
temperatura en sentido horario hasta
la temperatura deseada. Hornee de
acuerdo con las instrucciones de la
receta o del paquete (generalmente de
350 °F – 425 °F [177 °C – 218 °C]).
5. Precaliente el horno durante 5
minutos para hornear (y recalentar)
girando la perilla de control de tiempo
en sentido horario hasta más allá de la
posición de 10 minutos, luego, mueva
la perilla hacia atrás hasta la posición
de 5 minutos. Cuando finalicen los 5
minutos, la alarma sonará y el horno
se apagará automáticamente.
6. Coloque los alimentos en el centro de
la rejilla. Cierre la puerta.
7. Gire la perilla de Control de tiempo
en sentido horario hasta la tiempo
deseado. Cuando finalice el tiempo,
la alarma sonará y el horno se
apagará automáticamente. Si retira
los alimentos antes de que finalice el
tiempo, gire la perilla de Control de
tiempo hasta la posición 0 (apagado).
8. Para tiempos de cocción más
prolongados, ajuste dos veces la
perilla de Control de tiempo. Ejemplo:
Para un total de 45 minutos, coloque
la perilla de Control de tiempo
en 30 minutos. Luego, cuando el
tiempo finalice, gire la perilla para
programar 15 minutos más. Cuando
los alimentos estén cocidos, retire la
asadera y la parrilla del horno.
54
54
Page 57

Cómo asar (y dorar) con el
horno de la mesada de cocina
Cuando se seleccione esta función del
horno, sólo calentarán los elementos de
cocción superiores.
Posiciones recomendadas: Utilice las
ranuras superiores ubicadas a lo largo
de las paredes del horno. Deslice hacia
adentro la rejilla Wave-Rack™ del horno
orientándola hacia abajo (vea la Posición
B en la página 53). Coloque la asadera
con la parrilla (con los alimentos) sobre la
rejilla del horno.
NOTA : Los alimentos a hornear deberán
estar al menos a 1 pulgada (2,5 cm.) de
distancia de los elementos de cocción
de la parte superior del horno. Para
alimentos delicados como el pescado o
pollo, o para dorar menos, coloque la
rejilla en las ranuras inferiores.
1. Coloque los alimentos a hornear sobre
la parrilla con la asadera y luego,
cierre la puerta del horno.
2. Coloque la perilla de control de
funciones en “Broil” (Asar).
3. Gire la perilla de Control de
temperatura en sentido horario hasta
“Broil/Toast” (Asar/Tostar).
4. Gire la perilla de Control de tiempo en
sentido horario hasta la tiempo deseado.
5. Controle el progreso de cocción de
los alimentos.
6. Cuando ase alimentos de ambos
lados, coloque la perilla de Control
de tiempo en el tiempo deseado para
un lado. Cuando la alarma suene, el
horno se apagará automáticamente.
Abra la puerta. Utilice una agarradera
para jalar de la mitad de la rejilla y de
la asadera hacia afuera del horno. Dé
vuelta los alimentos, deslice la rejilla
y la asadera dentro del horno y cierre
la puerta. Gire la perilla de Control de
tiempo hasta el tiempo deseado para
el otro lado.
7. Cuando finalice el tiempo, sonará
una alarma y el horno se apagará
automáticamente.
8. Si tiene que retirar los alimentos
antes de que suene la alarma, gire la
perilla de Control de tiempo hasta la
posición 0 (apagado) para apagar el
horno de la mesada de cocina. Luego,
retire los alimentos.
ESPAÑOL
55
Page 58

Cómo tostar con el horno
de la mesada de cocina
Los elementos superiores e inferiores
calentarán cuando se utilice esta función.
Posiciones recomendadas: Utilice las
ranuras inferiores ubicadas a lo largo
de las paredes del horno. Deslice hacia
adentro la rejilla Wave-Rack™ del horno
orientándola hacia arriba (vea la Posición
C en la página 53).
1. Para obtener mejores resultados,
coloque el pan a tostar directamente
sobre la rejilla y en el centro del horno.
NOTA: Para obtener mejores resultados, no
utilice la asadera cuando tueste.
2. Tueste hasta seis rodajas de pan.
Cuando tueste sólo una o dos rodajas
de pan, coloque el pan en el centro
del horno.
3. Cierre la puerta.
4. Gire la perilla de Control de funciones
ESPAÑOL
hasta la posición “Toast” (Tostar).
5. Gire la perilla de Control de
temperatura en sentido horario hasta
la posición “Broil/Toast” (Asar/Tostar).
6. Gire la perilla de Control de tiempo
en sentido horario hasta el color de
tostado deseado. Para un tostado
oscuro, gire la perilla hasta el ícono
oscuro (entre 5 y 10). Para un tostado
claro, primero gire la perilla más allá
de la marca indicadora de 10 minutos
y luego, gire la perilla hacia atrás hasta
el ícono claro (entre 0 y 5).
CONSEJO: Para obtener resultados
más uniformes, precaliente el horno
durante 5 minutos antes de la primera
tanda de tostadas.
7. La alarma sonará y el horno se
apagará automáticamente cuando el
horno de la mesada de cocina haya
finalizado el tostado.
8. Gire la perilla de Control de tiempo
hasta la posición 0 (apagado) si retira las
tostadas antes de que suene la alarma.
9. Regule las posiciones de la perilla de
Control de tiempo según sea necesario
para obtener los resultados deseados.
NOTA: Es normal que se forme
condensación en la puerta del horno
cuando tueste panes frescos o húmedos.
Cómo entibiar (y cómo mantener tibio y
calentar) con el horno de la mesada de cocina
Seleccione las posiciones de las ranuras
para la colocación de la rejilla, de la rejilla
Wave-Rack™ del horno y de la asadera
con la parrilla para que correspondan
con el tamaño de los alimentos que se
están calentando. Cuando se entibian
alimentos, sólo funciona el elemento de
cocción inferior.
Posiciones sugeridas: Utilice la asadera
con parrilla. Cuando utilice el horno por
primera vez, coloque la rejilla Wave-Rack™
del horno como se muestra en la Posición
C en la página 53. Luego, regule según
sea necesario de acuerdo con lo que vaya
a cocinar.
1. Gire la perilla de Control de funciones
hasta la posición “Warm” (Entibiar).
2. Gire la perilla de Control de temperatura
hasta la posición deseada.
3. Gire la perilla de Control de tiempo
hasta la posición deseada.
56
Page 59

Limpieza del horno de la mesada de cocina
• Asegúrese de que la perilla de Control
de tiempo esté en la posición 0
(apagado). Luego, desenchufe el horno
antes de la limpieza.
• Deje que el horno y los accesorios se
enfríen completamente antes de limpiarlos.
• No utilice limpiadores abrasivos ni esponjas
de metal. Esto podría rayar la superficie.
• Limpie la parte exterior del horno con
un paño limpio y húmedo y seque muy
bien. Se puede utilizar un limpiador
líquido no abrasivo para las manchas
difíciles. Enjuague y seque muy bien.
• Se recomienda lavar a mano las rejillas y
la asadera. Saque todos los objetos del
horno de la mesada de cocina. Lave la
rejilla, la asadera y la parrilla con agua
caliente jabonosa. Enjuague y seque muy
bien. Para limpiar la bandeja para migas,
deslícela hacia afuera del horno y retire
las migas con un cepillo. Limpie con un
trapo húmedo y seque muy bien.
Solución de problemas
ADVERTENCIA
Peligro de Choque Eléctrico
Conecte a un contacto de pared
de conexión a tierra de 3
terminales.
No quite la terminal de conexión
a tierra.
No use un adaptador.
No use un cable eléctrico de
extensión.
No seguir estas instrucciones
puede ocasionar la muerte,
incendio o choque eléctrico.
NOTA: La rejilla del horno Wave-Rack™,
la asadera y la parilla son seguras para
lavar en el lavaplatos.
• Para eliminar las manchas adheridas,
refriegue con una pasta hecha con
bicarbonato de sodio y agua. Enjuague
y seque muy bien.
• Las paredes interiores del horno tienen
un revestimiento de Teflón
facilitar la limpieza. Luego del uso,
retire las salpicaduras resistentes con
una almohadilla de poliéster o nylon,
una esponja o un paño humedecido
con agua tibia. Seque con una toalla de
papel o con un paño suave y seco.
IMPORTANTE: No utilice productos
de limpieza, limpiadores o esponjas de
metal en la parte interna del horno ya
que esto puede reducir la efectividad del
revestimiento.
• Si el horno de la mesada de cocina
no funciona, verifique lo siguiente:
1. ¿El horno está enchufado a un
tomacorriente para 3 clavijas con
conexión a tierra?
2. ¿El fusible del circuito del horno de
la mesada de cocina funciona bien?
Si tiene una caja del interruptor de
circuitos, asegúrese de que el circuito
esté cerrado.
3. Desenchufe el horno de la mesada de
cocina, luego, vuélvalo a enchufar.
Si no se puede solucionar el
problema, consulte la sección de
garantía KitchenAid y servicio técnico
en las páginas 67-69. No devuelva
el horno de la mesada de cocina a
la tienda donde lo compró, ellos no
brindan el servicio técnico.
®
para
ESPAÑOL
57
Page 60

Consejos para utilizar el horno
de la mesada de cocina
Cómo programar tiempos muy cortos
Cuando programe el temporizador por
5 minutos o menos, gire la perilla de
Control de tiempo hasta más allá de la
marca de 10 minutos. Luego, gire la
perilla hasta el tiempo deseado.
¿Son correctas las estimaciones?
La experiencia le enseñará cuánto tiempo
debe utilizar para tostar diferentes tipos de
panes. El pan integral, negro o congelado
requiere más tiempo. El pan blanco, tierno
o fresco requiere menos tiempo.
Para alimentos que se derriten
Cuando cocine trozos pequeños de
alimentos o alimentos que se derretirán,
utilice la asadera. Esto evitará que los
alimentos caigan sobre los elementos
de cocción.
ESPAÑOL
Para minimizar la limpieza
Cuando cocine alimentos pegajosos o
húmedos, rocíe la asadera con aceite
antiadherente en aerosol para una
limpieza más fácil. Lave muy bien la
asadera después de cada uso para evitar
la acumulación del aceite en aerosol.
Restricciones en cuanto al tamaño de
los alimentos
Para obtener mejores resultados, los
alimentos y/o los recipientes aptos para
horno (consulte la sección “Cómo elegir
los utensilios para hornear en el horno
de la mesada de cocina” en la página 59)
deben encajar en el horno de la mesada
de cocina sin tocar los elementos de
cocción ni las paredes internas del horno.
La puerta debe cerrar completamente.
Cuando el horno esté apagado
Gire la perilla de Control de temperatura
hasta la posición “Warm” (Entibiar) o hasta
la posición mínima cuando el horno de la
mesada de cocina no esté en uso.
Para uso prolongado
Cuando cocine a altas temperaturas por
un tiempo prolongado, puede detectar
un leve olor causado por los materiales
aislantes del horno. Esto es normal.
Consejos para cocinar alimentos
• Controle el progreso de cocción de los
alimentos a través de la ventana de vidrio
templado transparente de la puerta. Su
horno de la mesada de cocina será más
eficiente en cuanto a la energía si no abre la
puerta con frecuencia.
• Asegúrese de que todos los alimentos
y/o recipientes encajen en el horno de
la mesada de cocina sin que toquen los
elementos de cocción ni que impidan
que la puerta se cierre.
• Retire todos los envoltorios de papel
y/o plástico de los alimentos antes
de cocinarlos.
• Sólo utilice recipientes aptos para horno
con tapa floja; los recipientes herméticos
pueden hacer que los alimentos se
desborden o salpiquen.
• Siga las instrucciones del paquete
cuando prepare alimentos envasados o
congelados. No es necesario precalentar
el horno.
• Las superficies del horno pueden
calentarse durante la cocción. Cuando
el horno esté en funcionamiento, sólo
toque la manija de la puerta y las perillas.
• No coloque objetos sobre ni cerca del
horno de la mesada de cocina cuando
esté en uso.
• Reemplace las tapas de plástico, vidrio o
cartón por papel de aluminio para utilizar
en el horno de la mesada de cocina.
58
58
Page 61

Consejos prácticos
Cómo elegir los utensilios para hornear
para el horno de la mesada de cocina
• La asadera incluida con el horno es
adecuada para cocinar alimentos como
galletas, bollos, bizcochos, nachos y
chuletas de cerdo.
• Es posible utilizar una variedad de
recipientes estándares para hornear como
moldes para tortas cuadrados y redondos
de 9 pulgadas (22,9 cm.), molde para 6
muffins (1,5 litros), placas para hornear
pequeñas y fuentes rectangulares,
cuadradas y redondas de 1 y 2 cuartos de
galón (0,95 ml. y 1,9 litros). La puerta del
horno debe cerrar completamente.
• Elija utensilios para hornear hechos de
metal, vidrio o cerámica aptos para
el horno.
Contraalas de pollo asiáticas
1 trozo (1 pulgada
[2,5 cm.] de largo)
de raíz de jengibre
pelada, cortada
en cuartos
2 dientes de ajo
1
⁄4 de taza (60 ml.)
de mermelada de
naranja
1
⁄4 de taza (60 ml.) de
salsa de soya
2 cucharadas (30 ml.)
de vino blanco
1 cucharadita (5 ml.)
de aceite de sésamo
oscuro
5 cebolletas, cortadas
en pedacitos de
1 pulgada (2,5 cm.)
2 libras (905 g.) de
contraalas de pollo*
En un procesador de alimentos, colocar la cuchilla
multifunción en el bol de trabajo. Con el procesador en
funcionamiento, agregar la raíz de jengibre y el ajo a través
del tubo de alimentación. Procesar hasta que estén picados,
de 8 a 10 segundos. Agregar la mermelada, la salsa de soya,
el vino, el aceite y las cebolletas. Procesar para mezclar y picar
las cebolletas durante 10 segundos aproximadamente.
Colocar en un recipiente poco profundo o en una bolsa
resellable grande de plástico para almacenar alimentos.
Agregar el pollo; cubrir con la marinada. Tapar o sellar.
Refrigerar por 8 horas o durante la noche, dar vuelta
ocasionalmente.
Colocar el pollo y la marinada en una asadera. Hornear con la
rejilla del horno orientada hacia arriba en las ranuras inferiores
del horno (Posición C en la página 53) a 375 °F (191 °C) de
13 a 18 minutos o hasta que la temperatura interna del pollo
alcance los 180 °F (82 °C), dé vuelta una vez.
Asar de 5 a 8 minutos o hasta que se doren. Servir tibio.
Rinde: de 6 a 8 porciones (aproximadamente 3 cotraalas
por porción).
* Si no hay contraalas disponibles, utilice 2
de alitas de pollo enteras. Quitar y desechar las puntas de
las alitas. Separar las 2 secciones restantes de cada alita en la
parte de la coyuntura utilizando un cuchillo filoso.
Cada porción: contiene aproximadamente 260 cal.,
18 g. de proteínas, 10 g. de hidratos de carbono, 15 g. de
grasas totales, 4 g. de grasas saturadas, 65 mg. de colesterol,
690 mg. de cloruro de sodio.
• Utilice la posición más baja de la rejilla
Wave-Rack™ del horno cuando utilice
recipientes hondos de cerámica o de
vidrio aptos para el horno y deje un
espacio de al menos 1 pulgada (2,5 cm.)
entre la parte superior del recipiente y los
elementos de cocción superiores.
• No utilice tapas de vidrio. Si se desea
tapar el recipiente, utilice una lámina
de papel de aluminio que se adapte de
manera floja.
• Muchos alimentos de preparación
rápida vienen envasados en recipientes
no metálicos adecuados para usar
en hornos de microondas. Verifique
las instrucciones del paquete para
determinar si el recipiente es adecuado
para utilizar en un horno común.
1
⁄2 libras (1,1 kg.)
ESPAÑOL
59
Page 62

“Crostini” calentitas a la italiana
14 rebanadas (de 1⁄4 de
pulgada [0,63 cm.]
de espesor) de pan
francés
4 cucharaditas (20 ml.)
de aceite de oliva
extra virgen
6 hojas de albahaca
fresca
1
⁄2-1 diente pequeño
de ajo
1
⁄8 ml. de cucharadita
(0,5 ml.) de sal
55 g. (2 oz.) de provolone
fumé, refroidi
2 onzas (55 g.) de
queso provolone
ahumado, frío
1 tomate Roma grande
ESPAÑOL
Colocar el pan sobre la parrilla en la asadera. Salpicar con
aceite. Hornear con la rejilla del horno orientada hacia
arriba en las ranuras inferiores del horno (Posición C en
la página 53) a 425 °F (218 °C) de 1 a 3 minutos o hasta
que esté ligeramente crujiente (no dorar mucho).
En un procesador de alimentos, colocar la cuchilla
multifunción en el bol de trabajo. Con el procesador en
funcionamiento, agregar la albahaca a través del tubo
de alimentación. Procesar aproximadamente por 10
segundos o hasta que esté picada. Agregar el ajo y la sal.
Procesar de 5 a 10 segundos o hasta que esté picado.
Colocar el disco para desmenuzar en el bol de trabajo
Agregar el queso. Procesar hasta que se raye.
Colocar la cuchilla multifunción en el bol de trabajo
Procesar de 1 a 2 segundos o hasta mezclar. Retirar la
mezcla de queso y dejar a un lado.
Colocar el disco para rebanar en el bol de trabajo Agregar
el tomate. Procesar hasta que quede rebanado.
Cubra cada rebanada de pan con tomate y 1 cucharadita
redonda de la mezcla de queso. Hornear de 2 a 3
minutos adicionales o hasta que el queso se derrita.
Servir tibio.
Rinde: 7 porciones (2 “crostini” por porción).
Consejo: Las “crostini” se pueden armar hasta 1 hora
antes de calentarlas.
Cada porción: contiene aproximadamente 80 cal.,
3 g. de proteínas, 5 g. de hidratos de carbono,
6 g. de grasas totales, 2 g. de grasas saturadas,
5 mg. de colesterol, 150 mg. de cloruro de sodio.
60
60
Page 63

Nachos de carne grandes
1
⁄4 de libra (115 g.) de
sobras de carne vacuna
asada* cortada en
dados de
(1,25 cm.)
2 cucharaditas (10 ml.) de
condimento para tacos
o fajitas o condimento
mexicano en polvo
5 tazas
(aproximadamente
5 onzas [140 g.]) de
trozos de tortilla
1 taza (4 onzas
[115 g.]) de queso
cheddar fuerte
rallado, dividida en
dos partes
4 cebolletas cortadas en
rebanadas finas
1
⁄2 taza (120 ml.) de
aceitunas maduras
cortadas en rodajas
1
⁄4 de taza (60 ml.) de
salsa
1
⁄4 de taza (60 ml.) de
crema agria
1
⁄2 pulgada
En un procesador de alimentos, colocar la cuchilla
multifunción en el bol de trabajo. Agregar la carne vacuna
y los condimentos. Pulsar 4 veces, de 1 a 2 segundos cada
vez o hasta que esté picada muy fina.
Colocar los trozos de tortilla en capas uniformes sobre la
asadera. Espolvorear con
Cubrir uniformemente con la carne vacuna, las cebolletas,
las aceitunas y los
1
⁄3 de taza (80 ml.) de queso.
2
⁄3 de taza (160 ml.) restantes de queso.
Hornear con la rejilla del horno orientada hacia abajo en las
ranuras inferiores del horno (Posición D en la página 53) a
350 °F (177 °C) de 10 a 15 minutos o hasta que el queso
se derrita o comience a burbujear. Cubrir con la salsa y la
crema agria.
Rinde: 6 porciones
*Sustituir las tiritas de carne vacuna cocidas y condimentadas
y omitir el condimento mexicano, si así lo desea.
Cada porción: contiene aproximadamente 260 cal.,
11 g. de proteínas, 19 g. de hidratos de carbono,
16 g. de grasas totales, 7 g. de grasas saturadas,
30 mg. de colesterol, 590 mg. de cloruro de sodio.
ESPAÑOL
Verduras asadas al horno
8 (aproximadamente
1 libra [455 g.])
papas rojas medianas
cortadas en octavos
11
⁄2 taza (355 ml.) de
brócoli fresco
1 taza (235 ml.) de
coliflor fresco
1 cebolla mediana
cortada en trozos finos
1 pimiento rojo pequeño
cortado en octavos
2 dientes de ajo picado
3 cucharadas (45 ml.)
de aceite de oliva
1 cucharada (15 ml.)
de hojas de mejorana
fresca picadas
3
⁄4 de cucharadita
(4 ml.) de sal
1
⁄4 de cucharadita (1 ml.)
de pimienta negra
En un bol grande, combinar todos los ingredientes en
el orden listado. Mezclar para cubrir de manera pareja.
Extender la mezcla de vegetales sobre la asadera.
Hornear con la rejilla del horno orientada hacia arriba
en las ranuras inferiores del horno (Posición C en la
página 53) a 425 °F (218 °C) de 20 a 30 minutos o
hasta que los vegetales estén tiernos y dorados, revolver
ocasionalmente.
1
Rinde: 10 porciones (
⁄2 taza [120 ml.] por porción).
Cada porción: contiene aproximadamente 90 cal.,
2 g. de proteínas, 12 g. de hidratos de carbono,
4 g. de grasas totales, 0,5 g. de grasas saturadas,
0 mg. de colesterol, 180 mg. de cloruro de sodio.
61
Page 64

Escones de limón y arándanos
2 tazas (475 ml.) de
harina común
3 cucharadas (45 ml.) de
azúcar granulada
1 cucharada (15 ml.) de
polvo de hornear
3
⁄4 de cucharadita
(4 ml.) de sal
1
⁄4 de taza (60 ml.)
de mantequilla o
margarina fría cortada
en pedacitos de
pulgada (1,25 cm.)
1
⁄2 taza (120 ml.) de
crema batida
2 huevos
1
⁄2 cucharadita (2 ml.)
de ralladura de
cáscara de limón
1 taza (235 ml.) de
ESPAÑOL
arándanos frescos
1 taza (235 ml.) de
azúcar impalpable
2-3 cucharadas (30-45 ml.)
de jugo de limón fresco
En un procesador de alimentos, colocar la cuchilla
multifunción en el bol de trabajo. Agregar la harina, el
azúcar granulado, el polvo de hornear y la sal. Procesar
de 3 a 4 segundos. Agregar la mantequilla. Procesar de
10 a 15 segundos o hasta formar una mezcla granulada.
Colocar en un bol mediano.
Colocar la cuchilla multifunción en el bol de trabajo Agregar
la crema, los huevos y la ralladura de limón. Procesar de 3 a
4 segundos o hasta que estén mezclados.
Incorporar los arándanos en la mezcla de harina revolviendo
1
suavemente. Agregar la mezcla cremosa; revolver
⁄2
suavemente sólo hasta que se humedezcan. Unir todo hasta
formar un bollo. Dividir la masa en dos partes iguales. Sobre
una superficie enharinada, aplanar cada mitad en círculos
de 5 pulgadas (12,7 cm.) de espesor. Con un cuchillo
enharinado, cortar cada círculo en 4 trozos. Colocarlos en
una asadera sin engrasar separados por
1
⁄2 pulgada
(1,25 cm.) entre sí.
Hornear con la rejilla del horno orientada hacia arriba en
las ranuras inferiores del horno (Posición C en la página
53) a 375 °F (191 °C) entre 12 y 18 minutos o hasta que
estén dorados. Dejar enfriar 10 minutos.
Mientras tanto, en un bol pequeño, mezclar el azúcar
impalpable con la cantidad necesaria de jugo de limón
para lograr una consistencia líquida. Salpicar sobre los
escones tibios.
Rinde: 8 porciones (1 escón por porción).
Cada porción: contiene aproximadamente 320 cal.,
5 g. de proteínas, 47 g. de hidratos de carbono,
12 g. de grasas totales, 7 g. de grasas saturadas,
90 mg. de colesterol, 430 mg. de cloruro de sodio.
62
62
Page 65

Salmón asado a la mostaza con alcaparras
11
⁄2 libras (680 g.) de
filetes de salmón
fresco
2 cucharadas (30 ml.)
de mayonesa
1 cucharada (15 ml.)
de alcaparras
2 cucharaditas (10 ml.)
de mostaza de Dijon
1 cucharadita (5 ml.)
de eneldo fresco
picado
Eneldo fresco, si así
lo desea
Colocar el salmón con la piel hacia abajo sobre la parrilla
en la asadera.
En un bol pequeño, mezclar la mayonesa, las alcaparras,
la mostaza y 1 cucharadita (5 ml.) de eneldo, mezclar
bien. Extender 2 cucharaditas (10 ml.) de la mezcla sobre
el salmón.
Asar con la rejilla para horno orientada hacia arriba en las
ranuras inferiores del horno (Posición C en la página 53)
de 15 a 20 minutos o hasta que el pescado se desmenuce
fácilmente con un tenedor. Servir con la salsa restante.
Adornar con más eneldo fresco, si así lo desea.
Rinde: 4 porciones.
Cada porción: contiene aproximadamente 330 cal.,
39 g. de proteínas, 0 g. de hidratos de carbono,
18 g. de grasas totales, 2,5 g. de grasas saturadas,
110 mg. de colesterol, 250 mg. de cloruro de sodio.
Gallinas Cornish asadas con hierbas y ajo
1 diente de ajo
2 cucharadas (30 ml.)
de hojas de
albahaca fresca
2 cucharaditas (10 ml.)
de hojas de
romero fresco
1
⁄2 cucharadita (2 ml.)
de sal
1
⁄8 de cucharadita
(0,5 ml.) de
pimienta negra
1 cucharada (15 ml.)
más 1 cucharadita
(5 ml.) de aceite de
oliva, dividido en
dos partes
2 gallinas Cornish
(aproximadamente
de 24 onzas
[680 g.] cada una, sin
los menudos
1
⁄3 de taza (80 ml.)
de agua
En un procesador de alimentos, colocar el bol pequeño y
la cuchilla pequeña en el bol de trabajo. Con el procesador
en funcionamiento, agregar el ajo, la albahaca y el
romero a través del tubo de alimentación. Procesar de 5
a 10 segundos o hasta que esté picado. Bajar la mezcla
de los lados del bol con una espátula. Agregar la sal, la
pimienta y una cucharada (15 ml.) de aceite. Pulsar 2 veces,
aproximadamente durante 2 segundos cada vez.
Colocar las gallinas, con las pechugas hacia arriba, en
una asadera. Desprender la piel de las pechugas, frotar la
mezcla de hierbas debajo de la piel sobre las pechugas.
Atar las patas de las gallinas con hilo de cocina, si así
lo desea. Pincelar la parte superior de la piel con 1
cucharadita (5 ml.) del aceite restante. Verter agua en la
asadera alrededor de las gallitas.
Hornear con la rejilla del horno orientada hacia abajo en
las ranuras inferiores del horno (Posición D en la página
53) a 350 °F (177 °C) de 55 a 70 minutos o hasta que la
parte más gruesa de la coyuntura alcance una temperatura
de 180 °F (82 °C). Asegurarse de que las gallinas no
toquen la parte superior de los elementos de cocción.
Rinde: 4 porciones.
Cada porción: contiene aproximadamente 440 cal.,
34 g. de proteínas, 0 g. de hidratos de carbono,
32 g. de grasas totales, 8 g. de grasas saturadas,
200 mg. de colesterol, 390 mg. de cloruro de sodio.
ESPAÑOL
63
Page 66

Pizza de provolone y prosciutto
Masa
1
⁄2 onza (15 g.) de
queso parmesano
fresco cortado en
pedacitos de 1
pulgada (2,5 cm.)
11
⁄2 taza (355 ml.) de
harina común
1
⁄2 cucharadita (2 ml.)
de azúcar
1
⁄2 cucharadita (2 ml.)
de sal
1
⁄2 cucharadita (2 ml.)
de albahaca seca
1
⁄2 taza (120 ml.)
de agua
1 cucharadita (15 ml.)
de aceite de oliva
1 cucharadita (5 ml.) de
levadura activa seca
Harina de maíz
ESPAÑOL
Cubierta
8-10 hojas grandes de
albahaca fresca
2 cucharadas (30 ml.)
de hojas de
orégano fresco
1 diente de ajo
3 onzas (85 g.) de
queso provolone o
mozzarella, frío
2 tomates Roma
grandes
2 onzas (55 g.) de
prosciutto o jamón
cortado en rodajas
finas
En un procesador de alimentos, colocar la cuchilla
multifunción en el bol de trabajo. Con el procesador en
funcionamiento, agregar el queso parmesano a través
del tubo de alimentación. Procesar de 25 a 30 segundos
o hasta que esté rayado muy fino. Agregar la harina,
el azúcar, la sal y la albahaca seca. Procesar de 3 a 8
segundos o hasta que estén mezclados.
En una cacerola pequeña, mezclar el agua y el aceite.
Calentar a fuego suave, entre 105 °F (41 °C) y 115 °F
(46 °C). Revolver la levadura hasta que se disuelva. Con
el procesador en funcionamiento, agregar lentamente
la mezcla de levadura a través del tubo de alimentación.
Procesar de 1 a 1
1
⁄4 minuto o hasta formar una bola con
la masa. Colocar la masa en un bol engrasado, girando
la masa para engrasar todos los lados. Cubrir, dejar
levar en un lugar cálido hasta que duplique su tamaño,
aproximadamente de 45 a 60 minutos.
Presionar la masa hacia abajo. Espolvorear levemente la
asadera engrasada con harina de maíz. Presionar la masa
contra el fondo y
1
⁄2 pulgada (1,25 cm.) hacia arriba de
los laterales de la asadera.
Mientras tanto, en un procesador de alimentos, ubicar el
bol pequeño y la cuchilla pequeña en el bol de trabajo.
Con el procesador en funcionamiento, agregar la albahaca
y el orégano frescos a través del tubo de alimentación.
Procesar de 8 a 10 segundos o hasta que estén picados.
Agregar el ajo. Procesar de 5 a 10 segundos o hasta que
estén picados. Retirar y dejar a un lado.
Colocar el disco para desmenuzar en el bol de trabajo.
Agregar el queso provolone. Procesar hasta que se raye.
Retirar y dejar a un lado.
Colocar el disco para rebanar en el bol de trabajo.
Agregar los tomates. Procesar hasta que queden
rebanados. Retirar y dejar a un lado. Cubrir la masa de
la pizza con la 1⁄2 de queso provolone, los tomates y la
mezcla de albahaca.
Colocar el disco para rebanar en el bol de trabajo. Agregar
el prosciutto. Procesar hasta que quede rebanado.
Extender el prosciutto y el queso provolone restantes
sobre la pizza. Hornear con la rejilla del horno orientada
hacia arriba en las ranuras inferiores del horno (Posición
C en la página 53) a 400 °F (204 °C) de 10 a 18 minutos
o hasta que la masa y la cubierta se doren. Servir caliente.
Rinde: 6 porciones.
Cada porción: contiene aproximadamente 220 cal.,
11 g. de proteínas, 25 g. de hidratos de carbono,
8 g. de grasas totales, 3,5 g. de grasas saturadas,
20 mg. de colesterol, 540 mg. de cloruro de sodio.
64
64
Page 67

Cuadraditos de “shortbread”
(galletas típicas escocesas) dulces con cítricos
11
⁄4 taza (295 ml.) de
harina común
1
⁄2 taza (120 ml.) de
azúcar impalpable
1
⁄8 cucharadita (0,5 ml.)
de sal
2 cucharaditas (10 ml.)
de jengibre confitado
picado fino, si
se desea
11
⁄2 cucharaditas (7-10
ml.) de ralladura de
cáscara de naranja,
sólo de la parte
color naranja
1 cucharadita (5 ml.) de
ralladura de cáscara
de limón, sólo de la
parte color amarilla
3
⁄4 de taza (175 ml.)
de mantequilla
o margarina fría,
cortada en pedacitos
de 1 pulgada
(2,5 cm.)
En un procesador de alimentos, colocar la cuchilla
multifunción en el bol de trabajo. Agregar la harina,
1
⁄2
taza (120 ml.) de azúcar impalpable, la sal, el jengibre,
si así lo desea y las ralladuras de cáscaras de limón y
naranja. Procesar aproximadamente por 10 segundos
o hasta que estén mezclados. Agregar la mantequilla.
Procesar de 25 a 30 segundos o hasta que se forme una
masa blanda.
Con las manos levemente enharinadas, presionar la masa
sobre una fuente para horno de 8 x 8 x 2 pulgadas
(20,3 x 20,3 x 5 cm.) sin engrasar. Hornear con la rejilla del
horno orientada hacia arriba en las ranuras inferiores del
horno (Posición C en la página 53) a 300 °F (149 °C) de 15
a 20 minutos o hasta que esté lista y levemente dorada.
Dejar enfriar 10 minutos.
Mientras tanto, en una taza medidora de vidrio, mezclar
los ingredientes para el glaseado, agregando jugo de
naranja hasta lograr una consistencia líquida. Salpicar las
barritas tibias. Dejar enfriar completamente.
Rinde: 16 porciones (1 cuadradito por persona).
Cada porción: contiene aproximadamente 130 cal.,
1 g. de proteínas, 13 g. de hidratos de carbono,
9 g. de grasas totales, 5 g. de grasas saturadas,
25 mg. de colesterol, 20 mg. de cloruro de sodio.
ESPAÑOL
Glaseado
1
⁄3 de taza (80 ml.) de
azúcar impalpable
1
⁄4 de cucharadita
(1 ml.) de ralladura
de cáscara de
naranja, sólo de la
parte color naranja
1
⁄2 cucharaditas
2-2
(10-12 ml.) de jugo
de naranja)
65
Page 68

Brownies de chocolate
con castañas de cajú y caramelo
20 caramelos envueltos
individualmente
3 cucharadas (45 ml.)
de crema batida
3
⁄4 de taza (175 ml.)
de mantequilla o
margarina, blanda
11
⁄2 taza (355 ml.) de
azúcar
3 huevos
1 cucharadita (5 ml.)
de vainilla
1 taza (235 ml.) de
harina común
1
⁄2 taza (120 ml.) de
cacao en polvo sin
azúcar
1
⁄8 de cucharadita
(0,5 ml.) de sal
ESPAÑOL
4 onzas (115 g.) de
chocolate semidulce
picado en trozos
grandes
1 taza (235 ml.) de
castañas de cajú
tostadas picadas en
trozos grandes
1 onza (30 g.) de
chocolate blanco de
repostería, picado, si
así lo desea
1
⁄2 cucharadita (2 ml.)
de aceite vegetal, si
así lo desea
Calentar los caramelos y la crema en una cacerola pequeña
a fuego suave, mezclando hasta que esté derretido y sin
grumos. Dejar a un lado. En un bol para mezclar, colocar
la mantequilla, el azúcar, los huevos y la vainilla. Con
una batidora, batir a velocidad media hasta lograr una
consistencia cremosa. Agregar la harina, el cacao y la sal.
Mezclar a velocidad baja hasta que se humedezcan. Agregar
el chocolate semidulce y las castañas de cajú sin dejar de
revolver. Extender en una fuente para horno engrasada de
9 x 9 x 2 pulgadas (23 x 23 x 5 cm.). Salpicar el caramelo de
manera pareja sobre la superficie.
Hornear con la rejilla del horno orientada hacia abajo en
las ranuras inferiores del horno (Posición D en la
página 53) a 325 °F (163 °C) de 25 a 30 minutos o hasta
que esté listo en el centro. En un bol pequeño apto para
horno de microondas, agregar el chocolate blanco y el
aceite, si así lo desea. Cocinar en horno de microondas
al máximo de 45 a 60 segundos o hasta que se derrita.
Revolver hasta lograr una consistencia homogénea.
Salpicar sobre los brownies. Dejar enfriar 30 minutos.
Refrigerar de 1
1
⁄2 a 2 horas para endurecer el chocolate.
Rinde: 16 porciones (1 brownie por porción).
Cada porción: contiene aproximadamente 330 cal.,
5 g. de proteínas, 40 g. de hidratos de carbono,
18 g. de grasas totales, 9 g. de grasas saturadas,
65 mg. de colesterol, 115 mg. de cloruro de sodio.
66
66
Page 69

Garantía del horno de la mesada
de cocina KitchenAid®
Duración de la garantía:
50 estados de los
Estados Unidos, el
distrito de Columbia,
Canadá y Puerto Rico:
Un año de garantía
limitada a partir de la
fecha de compra.
LA EXENCIÓN DE RESPONSABILIDAD DE LAS GARANTÍAS IMPLÍCITAS; LAS
GARANTÍAS IMPLÍCITAS DE LIMITACIÓN DE LOS RECURSOS, INCLUYENDO
GARANTÍAS EN LA MEDIDA EN QUE SE APLIQUEN A LA COMERCIABILIDAD O APTITUD
CON UN FIN DETERMINADO, SON EXCLUIDAS EN LA MEDIDA PERMITIDA POR LEY.
CUALQUIER GARANTÍA IMPLÍCITA QUE PUEDA SER IMPUESTA POR LEY ESTÁ LIMITADA
A UN AÑO O AL PERÍODO MÁS CORTO PERMITIDO POR LEY. ALGUNOS ESTADOS Y
PROVINCIAS NO PERMITEN LIMITACIONES NI EXCLUSIONES EN RELACIÓN CON LA
DURACIÓN DE UNA GARANTÍA IMPLÍCITA DE COMERCIABILIDAD O DE APTITUD, DE
MANERA TAL QUE LAS LIMITACIONES O EXCLUSIONES ANTERIORES PUEDEN QUE NO
SE APLIQUEN EN SU CASO.
KitchenAid pagará por:
50 estados de los
Estados Unidos, el
Distrito de Columbia y
Canadá:
El reemplazo de su horno
de la mesada de cocina
sin dificultades. Consulte
la siguiente página para
obtener los detalles sobre
cómo realizar el reemplazo.
O
En Puerto Rico:
Los costos de los repuestos
y del trabajo de reparación
para corregir los defectos
en los materiales y la mano
de obra. El servicio técnico
debe ser provisto por un
Centro de servicio técnico de
KitchenAid autorizado. Para
solicitar un servicio técnico,
siga las instrucciones de la
página 68.
KitchenAid no
pagará por:
A. Las reparaciones
cuando el horno de
la mesada de cocina
sea utilizado con otro
fin que no sea el uso
doméstico normal de
una familia.
B. Los daños como
consecuencia de un
accidente, alteración,
mal uso, abuso o
uso con productos
no aprobados por
KitchenAid.
C. Los costos de los
repuestos o de la
mano de obra de
reparación para el
horno de la mesada
de cocina cuando haya
sido utilizado fuera
del país en donde fue
comprado.
ESPAÑOL
SI ESTE PRODUCTO NO FUNCIONA SEGÚN SE GARANTIZA, EL ÚNICO Y EXCLUSIVO
RECURSO DEL CLIENTE SERÁ LA REPARACIÓN O EL REEMPLAZO SEGÚN LOS TÉRMINOS
Y LAS CONDICIONES DE ESTA GARANTÍA LIMITADA. KITCHENAID Y KITCHENAID
CANADA NO ASUMEN NINGUNA RESPONSABILIDAD POR DAÑOS INCIDENTALES O
CONSIGUIENTES. Esta garantía le otorga derechos legales específicos y es posible que
usted goce de otros derechos que varían de estado en estado o de provincia en provincia.
67
Page 70

Garantía de reemplazo sin dificultades en
los 50 estados de los Estados Unidos
y el Distrito de Columbia
Confiamos tanto en que la calidad de
nuestros productos cumple con las exigentes
normas de KitchenAid, que si el horno de
la mesada de cocina presentara alguna falla
durante el primer año, le enviaremos un
reemplazo sin cargo idéntico o comparable
a su domicilio y arreglaremos la devolución
del horno de la mesada de cocina original.
El reemplazo de su unidad también estará
cubierto por nuestra garantía limitada de un
año. Siga estas instrucciones para recibir este
servicio de calidad.
Si su horno de la mesada de cocina
KitchenAid
durante el primer año, simplemente llame
®
presentara alguna falla
Garantía de reemplazo
ESPAÑOL
Confiamos tanto en que la calidad de
nuestros productos cumple con las exigentes
normas de KitchenAid que, si su horno de
la mesada de cocina presentara alguna falla
durante el primer año, KitchenAid Canada lo
reemplazará por uno idéntico o comparable.
El reemplazo de su unidad también estará
cubierto por nuestra garantía limitada de un
año. Siga estas instrucciones para recibir este
servicio de calidad.
Si su horno de la mesada de cocina
KitchenAid
el primer año, lleve el horno o mándelo
con envío a cobrar a un Centro de servicio
técnico KitchenAid
®
sin dificultades en Canadá
presentara alguna falla durante
®
autorizado. En la caja,
gratis a nuestro Centro de satisfacción al
cliente KitchenAid al 1-800-541-6390,
de lunes a viernes de 8 a.m. a 8 p.m.
(Hora del Este), o los sábados, de 10 a.m.
a 5 p.m. Proporcione al asesor su dirección
completa para el envío. (No se aceptan
números de casillas postales).
Cuando reciba la unidad de reemplazo de
su horno de la mesada de cocina, utilice
la caja y los materiales de embalaje para
embalar el horno de la mesada de cocina
original. En la caja, escriba su nombre y
dirección en un papel junto con la copia del
comprobante de compra (recibo de compra,
ticket de la tarjeta de crédito, etc.).
escriba su nombre y dirección postal en un
papel junto con la copia el comprobante
de compra (recibo de compra, ticket de la
tarjeta de crédito, etc.) El horno de la mesada
de cocina de reemplazo se le entregará de
forma prepaga y asegurada. Si no queda
satisfecho con el servicio, llame de manera
gratuita a nuestro Centro de interacción con
el cliente al 1-800-807-6777.
O escríbanos a:
Customer Interaction Centre
KitchenAid Canada
1901 Minnesota Court
Mississauga, ON L5N 3A7
Cómo obtener el servicio de garantía
en Puerto Rico
Su horno de la mesada de cocina
KitchenAid
partir de la fecha de compra. KitchenAid
pagará los repuestos y la mano de obra
para corregir defectos en los materiales
y en la mano de obra. El servicio técnico
debe ser provisto por un Centro de servicio
técnico de KitchenAid autorizado.
®
tiene garantía de un año a
Lleve el horno de la mesada de cocina o
mándelo con envío asegurado a cobrar a
un Centro de servicio técnico de KitchenAid
autorizado. Su horno de la mesada de cocina
reparado se le entregará de forma prepaga
y asegurada. Si no queda satisfecho con el
servicio, llame de manera gratuita al
1-800-541-6390 para averiguar la ubicación
del Centro de servicio técnico más cercano.
68
68
Page 71

Cómo obtener el servicio de garantía una vez
vencida la garantía – Todos los lugares
Antes de llamar al servicio técnico, revise
la sección de Solución de problemas en la
página 57.
Para obtener información sobre el
servicio técnico en los 50 estados
de los Estados Unidos, Distrito de
Columbia y Puerto Rico,
llame de manera gratuita al 1-800-541-6390.
O escriba a:
Customer Satisfaction Center
KitchenAid Portable Appliances
P.O. Box 218
St. Joseph, MI 49085-0218
Cómo obtener el servicio
técnico en otros lugares
Consulte a su distribuidor de KitchenAid
local o a la tienda donde compró el
horno de mesada de cocina para obtener
información sobre el servicio técnico.
Cómo solicitar accesorios y repuestos
O contáctese con un Centro de servicio
técnico autorizado cercano a su domicilio.
Para obtener información sobre el
servicio técnico en Canadá,
llame de manera gratuita al 1-800-807-6777.
O escriba a:
Customer Interaction Centre
KitchenAid Canada
1901 Minnesota Court
Mississauga, ON L5N 3A7
Para obtener información sobre el
servicio técnico en México,
llame de manera gratuita al
01-800-024-17-17
(JV Distribuciones)
Ou
01-800-902-31-00
(Industrias Birtman)
ESPAÑOL
Para solicitar accesorios o repuestos
para su horno de la mesada de
cocina en los 50 estados de los
Estados Unidos, Distrito de Columbia
y Puerto Rico,
llame de manera gratuita al
1-800-541-6390, de lunes a viernes,
de 8 a.m. a 8 p.m. (Hora del Este) o los
sábados, de 10 a. m. a 5 p. m.
O escriba a:
Customer Satisfaction Center,
KitchenAid Portable Appliances,
P.O. Box 218
St. Joseph, MI 49085-0218
Para solicitar accesorios o repuestos
para su horno de la mesada de cocina
en Canadá,
llame de manera gratuita al
1-800-807-6777.
O escriba a:
Customer Interaction Centre
KitchenAid Canada
1901 Minnesota Court
Mississauga, ON L5N 3A7
Para solicitar accesorios o repuestos
para su horno de la mesada de cocina
en México,
llame de manera gratuita al
01-800-024-17-17
(JV Distribuciones)
O
01-800-902-31-00
(Industrias Birtman)
69
Page 72

®Registered trademark, Marque déposée, Marca registrada KitchenAid, U.S.A.
TM
Trademark, Marque de commerce, Marca de comercio KitchenAid, U.S.A..
©2006. All rights reserved. Tous droits réservés. Todos los derechos reservados.
KitchenAid Canada licensee in Canada. Emploi licencié par KitchenAid Canada au Canada.
Teflon is a registered trademark of E. I. DuPont De Nemours and Company.
Teflon est une marque déposée de E.I. DuPont De Nemours and Company.
Teflon es una marca registrada de E.I. DuPont De Nemours and Company.
P0504132000 (5560dZw706)
 Loading...