

Page 1
KCM1208
Page 2
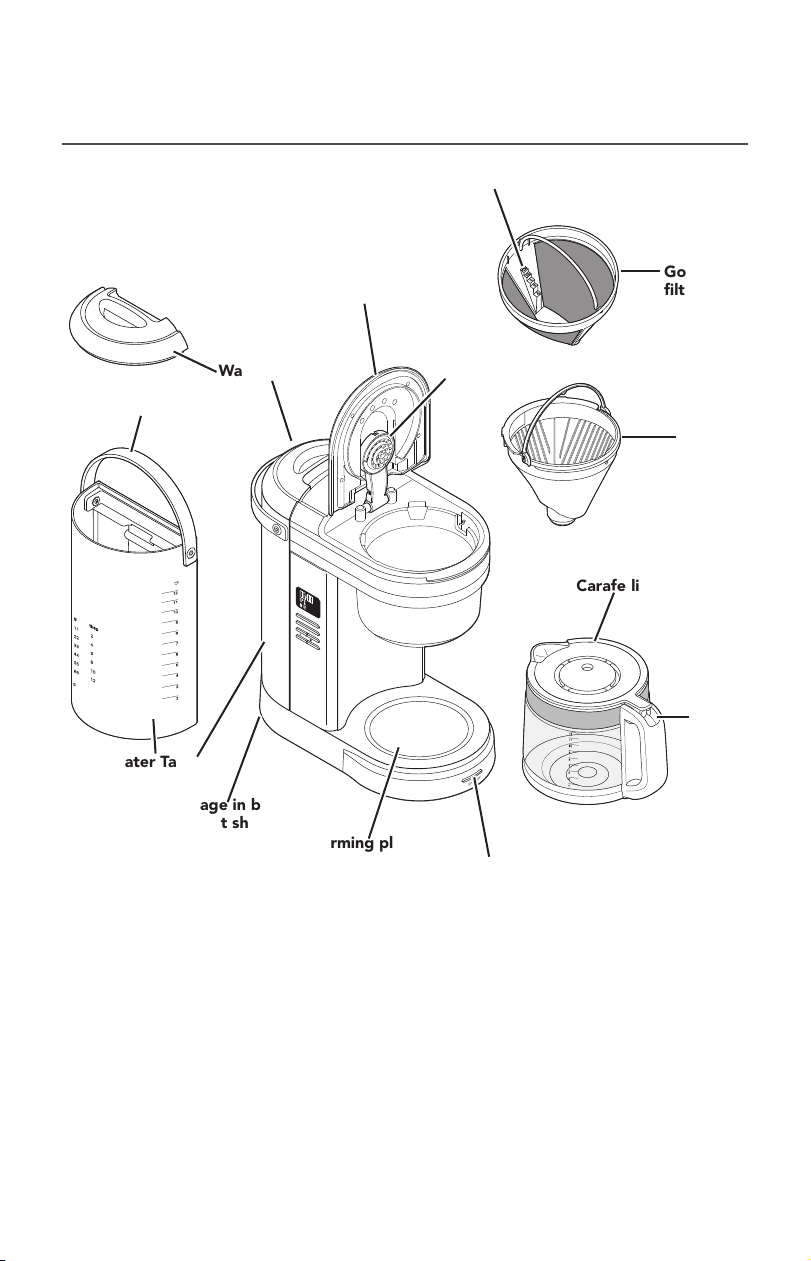
PARTS AND FEATURES
PARTS AND ACCESSORIES
Brew basket lid
Dosage Ladder
Gold tone
filter
Water tank
Water tank lid
Showerhead
handle
AM
Auto 12
PM
x
Brew/Cancel
Auto Set
Hour
Minute
Bold
Clean
Carafe lid
Water Tank
Brew/Cancel
Cord storage in base
(not shown)
Glass Carafe
Warming plate
Brew button
NOTE: Default measurement for 1 cup = approximately 5 oz (147 ml).
Brew
basket
Carafe
handle
2 | PARTS AND FEATURES
Page 3
PARTS AND FEATURES
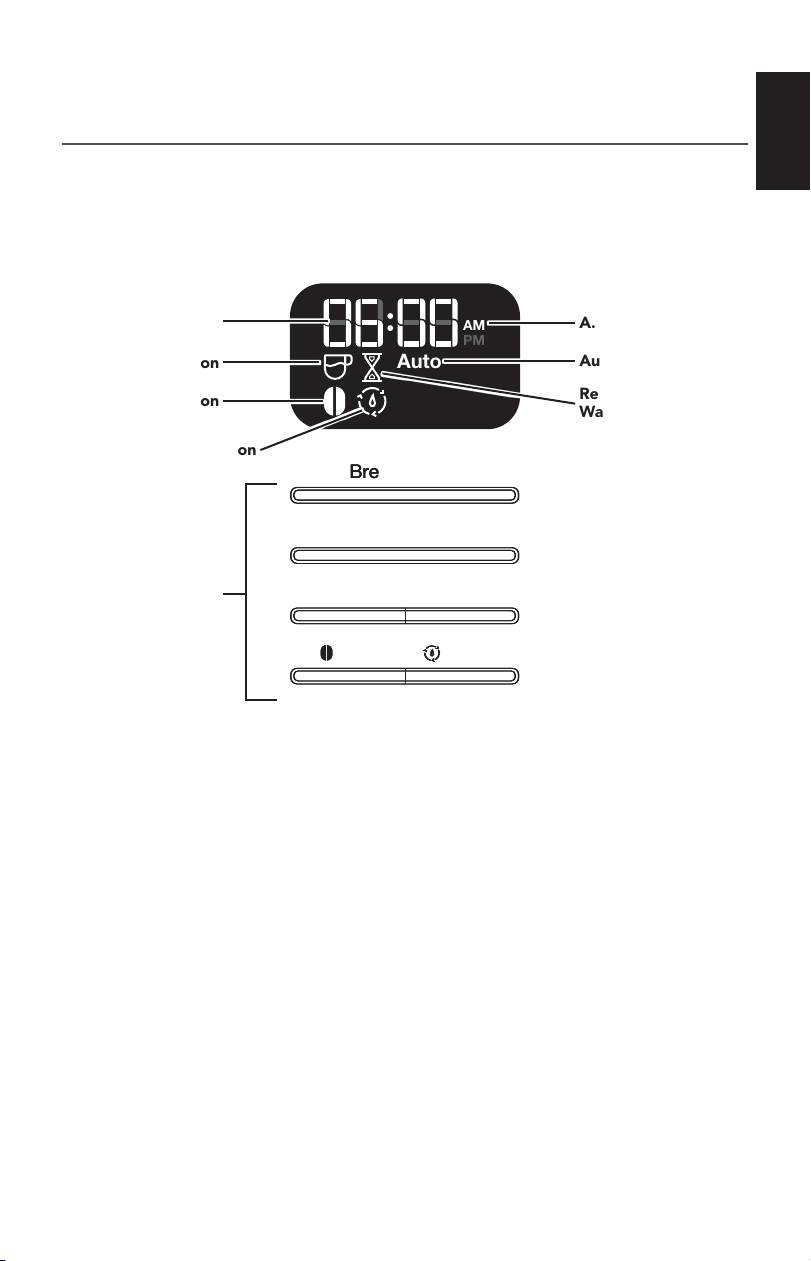
DISPLAY AND CONTROL PANEL FEATURES
Programmable display
ENGLISH
Clock
Brew icon
Bold icon
Clean icon
Control panel
Auto 12
Brew/Cancel
Brew/Cancel
Brew/Cancel
Auto Set
Auto Set
Auto Set
Hour
Hour
Hour
Bold
Bold
Bold
x
Minute
Minute
Minute
AM
PM
Clean
Clean
Clean
A.M./P.M. indicator
Auto icon
Remaining Keep
Warm Time icon
PARTS AND FEATURES | 3
Page 4
COFFEE MAKER SAFETY
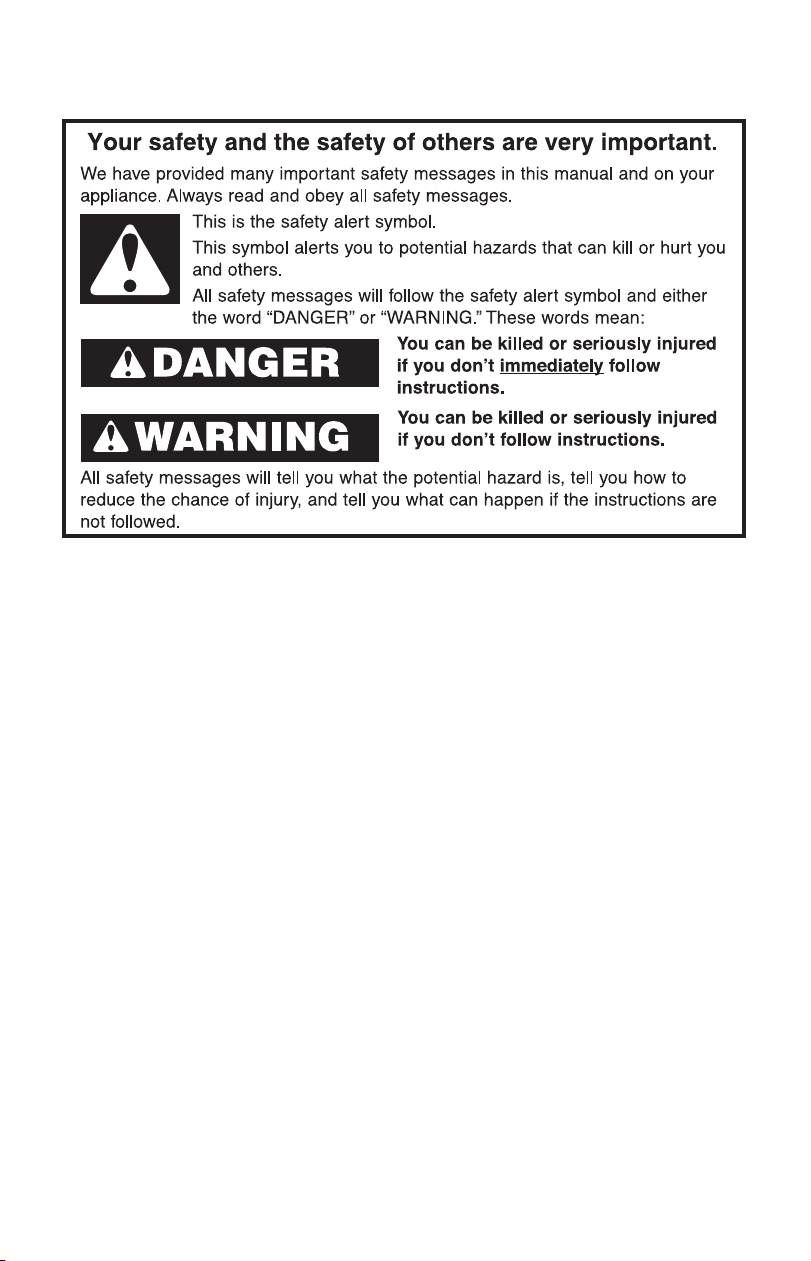
IMPORTANT SAFEGUARDS
When using electrical appliances, basic safety precautions should always
be followed, including the following:
1. Read all instructions.
2. Do not touch hot surfaces. Use handles or knobs.
3. Do not operate any appliance with a damaged cord or plug or after the appliance
malfunctions or is dropped or damaged in any manner. Return appliance to the
nearest Authorized Service Center for examination, repair or adjustment.
4. To protect against re, electric shock and injury to persons do not immerse
appliance in water or other liquid.
5. Unplug from outlet when not in use and before cleaning. Allow to cool before
putting on or taking off parts, and before cleaning the appliance.
6. Close supervision is necessary when any appliance is used by or near children.
7. Do not let cord hang over the edge of table or counter or touch hot surfaces.
8. Do not place on or near a hot gas or electric burner, or in a heated oven.
9. The use of attachments not recommended or sold by KitchenAid may cause re,
electrical shock, or injury.
10. Do not use the appliance outdoors.
11. Do not use appliance for other than intended use.
12. Do not use appliance without lid properly placed on carafe.
13. The carafe is designed for use with this appliance. It must never be used on a
range top or in a microwave oven.
14. Do not set a hot carafe on a wet or cold surface.
15. To disconnect, turn any control to “off,” then remove plug from wall outlet.
16. Scalding may occur if the lid is removed during the brewing cycles.
17. Do not use a cracked carafe or a carafe having a loose or weakened handle.
4 | COFFEE MAKER SAFETY
Page 5
COFFEE MAKER SAFETY
18. Do not clean carafe with abrasive cleaners, steel wool pads, or other abrasive
material.
19. Do not ll the water tank above the marked maximum ll line.
SAVE THESE INSTRUCTIONS
This product is designed for household use only.
ELECTRICAL REQUIREMENTS
Voltage: 120 VAC
Frequency: 60 Hz
Wattage: 1100 Watts
NOTE: If the plug does not fit in the outlet,
contact a qualified electrician. Do not
modify the plug in any way. Do not use an
adapter.
Do not use an extension cord. If the power
supply cord is too short, have a qualified
electrician or service technician to install an
outlet near the appliance.
The cord should be arranged so that it will
not drape over the countertop or tabletop
where it can be pulled on by children or
tripped over unintentionally.
ENGLISH
COFFEE MAKER SAFETY | 5
Page 6
AM
Auto Set
Hour
Bold
Clean
Minute
Brew/Cancel
AM
Auto Set
Hour
Bold
Clean
Minute
Brew/Cancel
USING THE COFFEE MAKER
SETTING THE CLOCK
NOTE: When the Coffee Maker is first plugged in or when power is restored after an
interruption, the display will initially show 12:00 A.M.
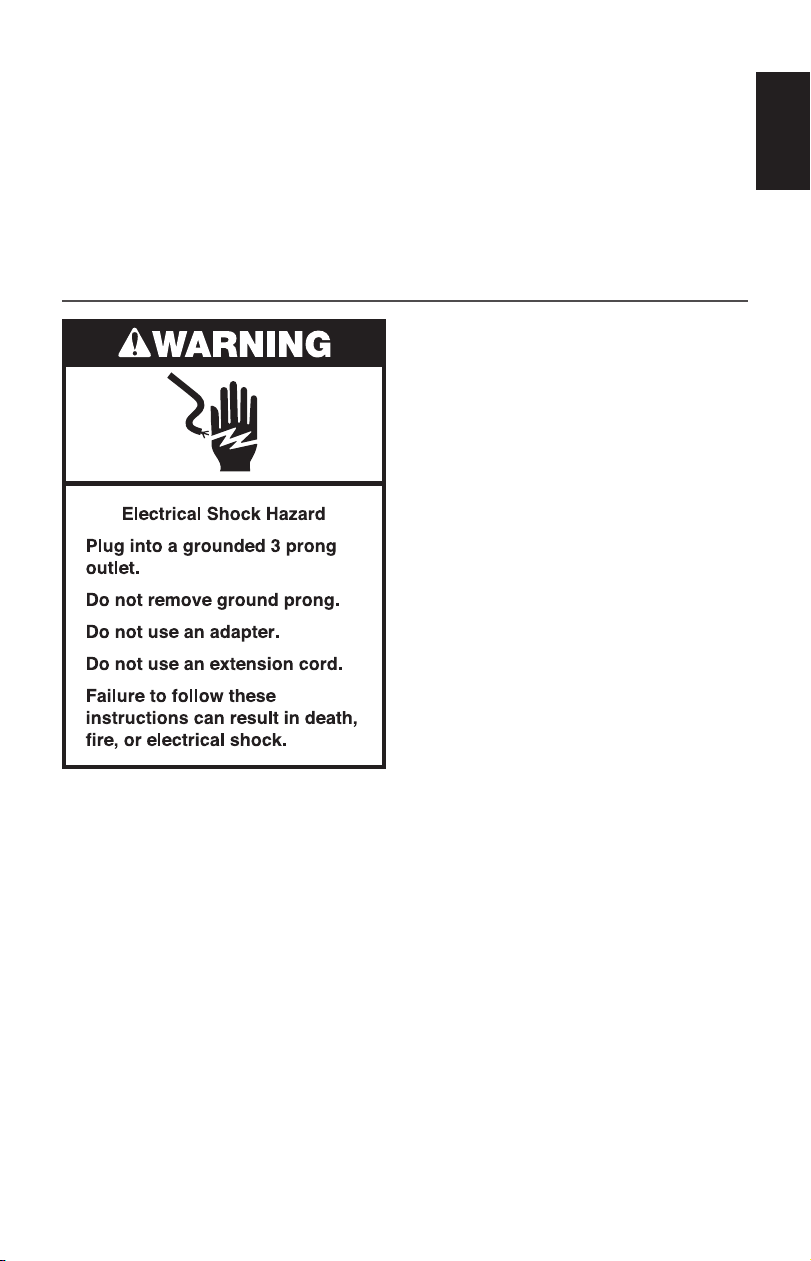
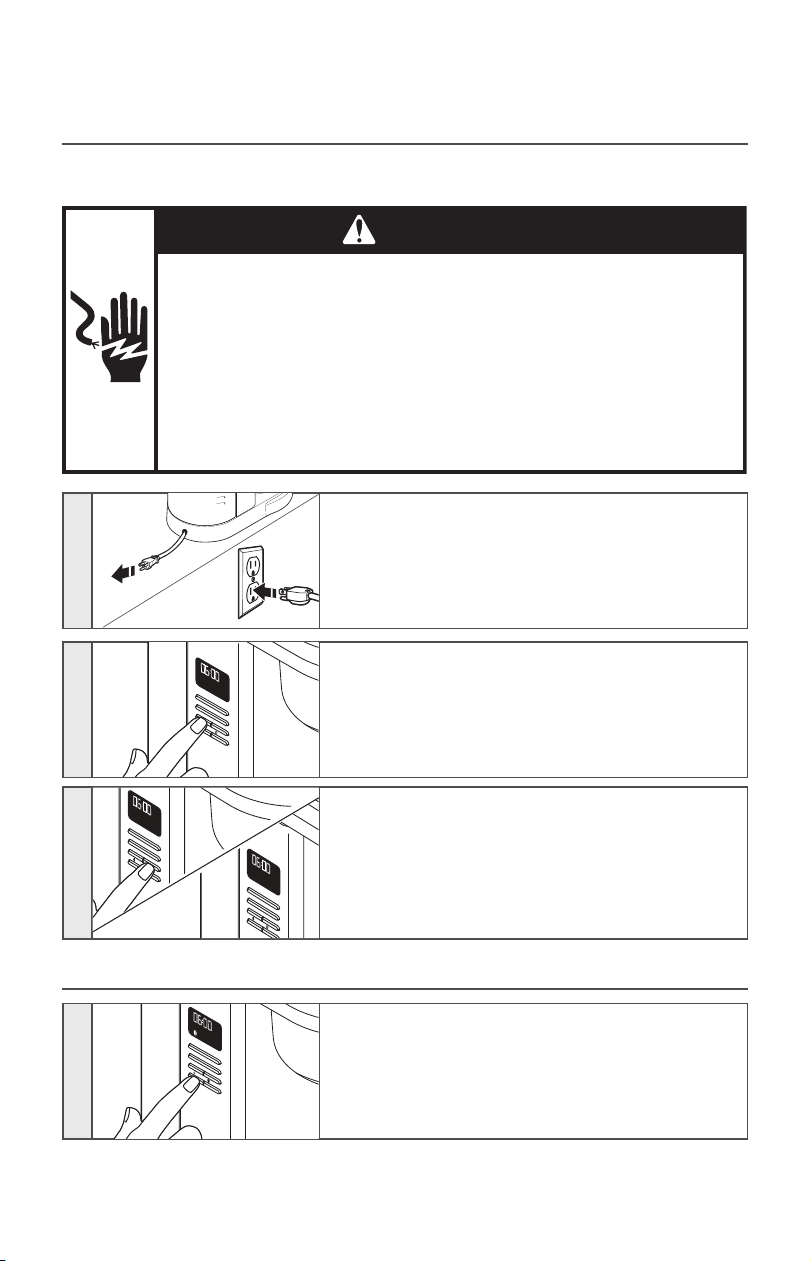
WARNING
Electrical Shock Hazard
Plug into a grounded 3 prong outlet.
Do not remove ground prong.
Do not use an adapter.
Do not use an extension cord.
Failure to follow these instructions can result in death, fire, or
electrical shock.
Cord is stored in base. If needed, gently pull cord
1
outwards until fully extended, or just long enough to
reach the outlet. Plug into a grounded 3 prong outlet.
AM
Brew/Cancel
Auto Set
2
Hour
Minute
Bold
Clean
3
SETTING BREW STRENGTH
AM
Brew/Cancel
Auto Set
Hour
Minute
Bold
Clean
1
NOTE: Regular is the default setting.
6 | USING THE COFFEE MAKER
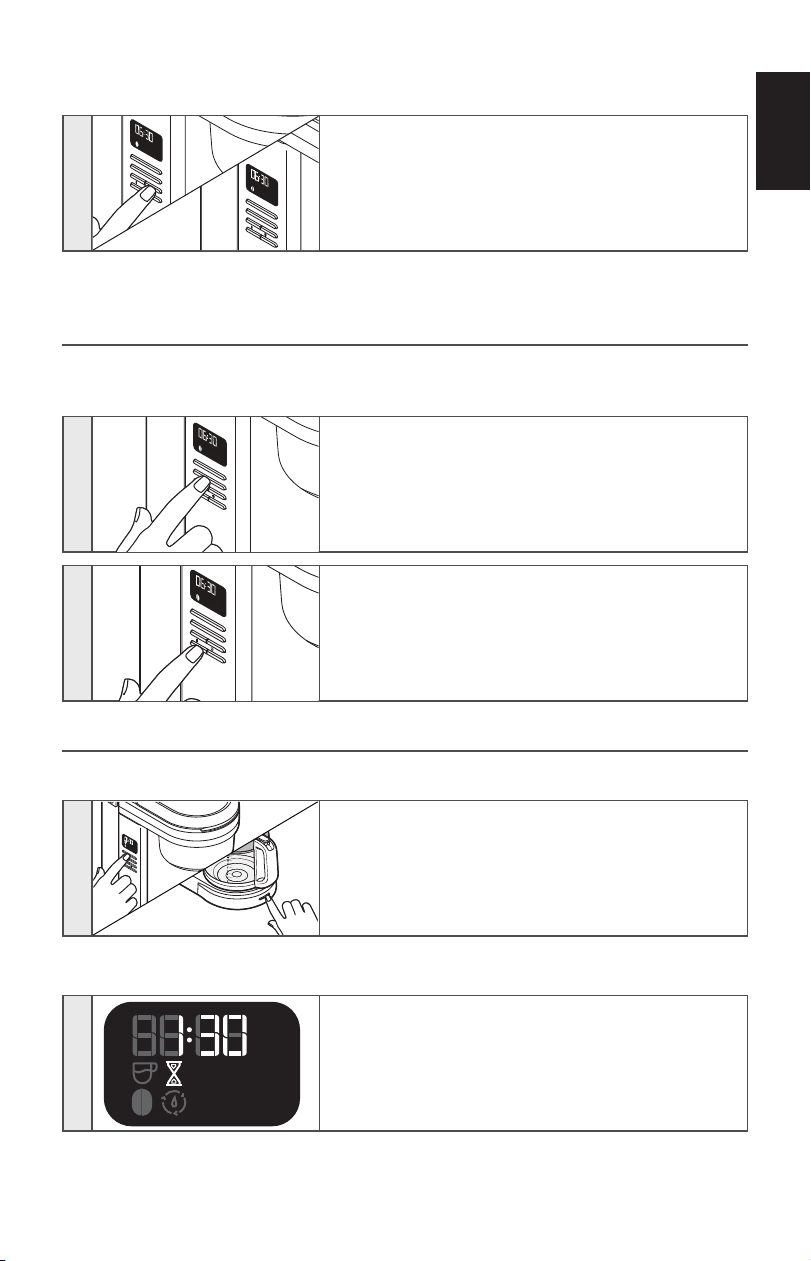
To set the hour: Press HOUR.
The Hour setting will begin to blink. The Hour digits
will change with each press; or press and hold
to scroll rapidly.
To set the minutes: Press MINUTE.
The Hour setting will switch to a solid display and the
Minute setting will begin to blink. The Minute digits
will change with each press; or press and hold to scroll
rapidly.
To save the current displayed time and exit clock
setup: Press any other button (Clean, Auto Set, Bold,
or Brew); or do not press any button for 10 seconds.
To switch between Regular and Bold brew strengths:
Press the BOLD button.
Please note: While brewing small batches (2-4 cups),
using the “Bold Setting” is recommended.
Page 7
USING THE COFFEE MAKER
AM
FILLING THE COFFEE MAKER WITH WATER FOR BREWING
TIP: Brew 2 pots of fresh, cool water and discard before brewing the first pot of coffee.
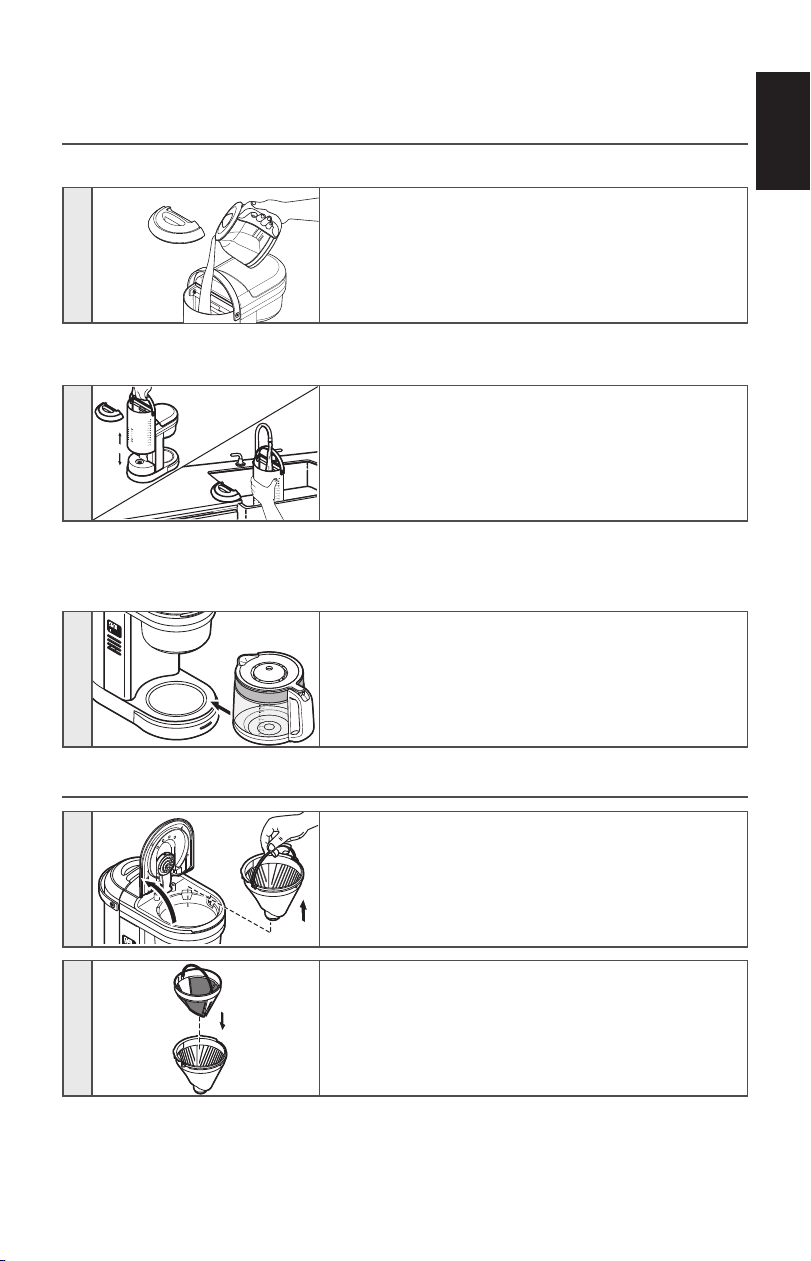
Remove the water tank lid and pour with enough fresh,
1
cool water to make the desired amount of coffee. Use
the level markings on the water tank window. Close
the water tank lid properly.
OR
Remove the water tank lid and then lift the water tank
up gently using handle. Pour enough fresh, cool water
1
to make the desired amount of coffee. Place the water
tank back in position. Use the alignment feature on the
water tank to make sure the water tank is properly in
place.
IMPORTANT: Make sure to fill the water tank with only the amount of water needed to
brew your desired number of cups. If you put in 12 cups of water, the Coffee Maker will
brew all 12 cups.
AM
Brew/Cancel
Auto Set
Hour
Minute
Bold
Clean
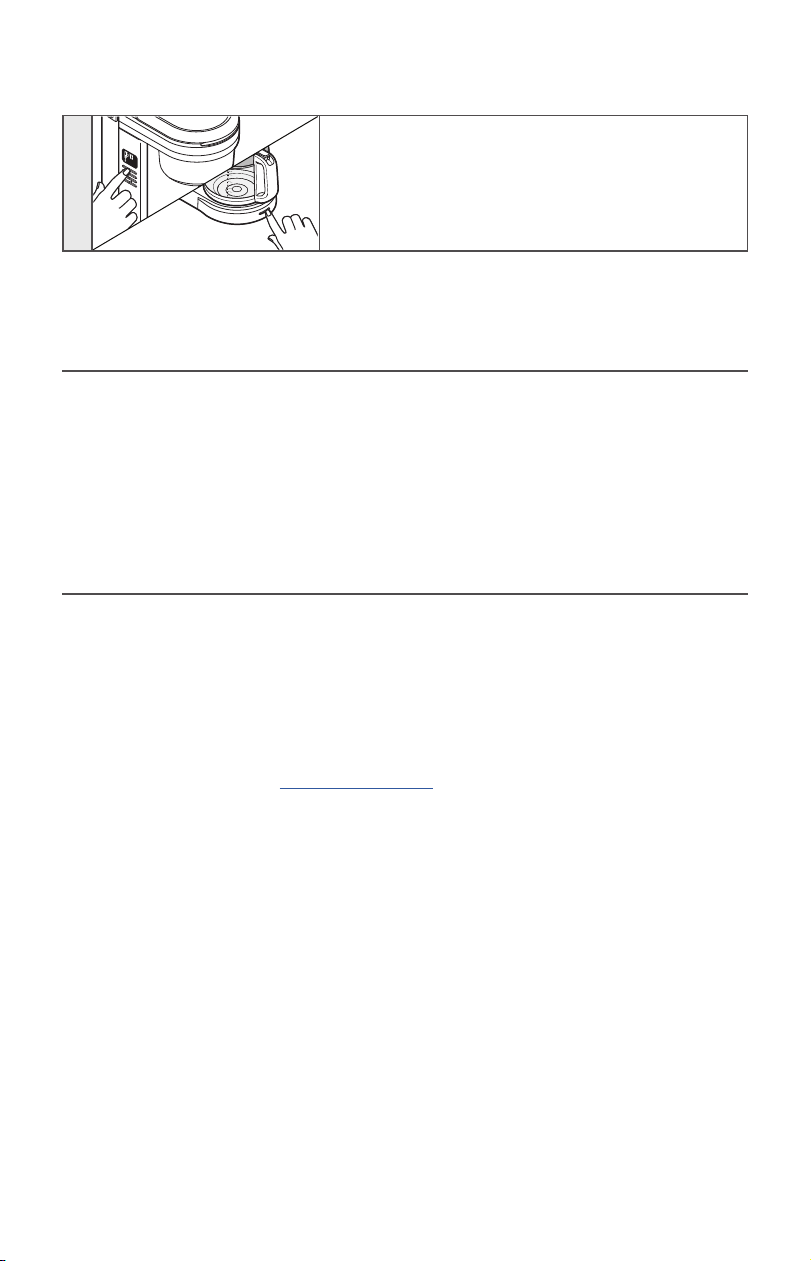
Place the carafe in the Coffee Maker. Make sure the lid
is securely in position and bottom of the carafe is fully
2
Brew/Cancel
seated; otherwise, the Pause and pour feature may
not engage, causing water and coffee to overflow the
brew basket.
ENGLISH
ASSEMBLY AND USAGE OF BREW BASKET
1
2
IMPORTANT: Do not use both types of filters at the same time.
Using both filters might cause water and coffee to overflow the brew basket.
Raise the brew basket lid and remove the brew basket.
Insert the Gold Tone permanent filter or cone paper
filter into the brew basket.
TIP: The coffee filter can also be inserted and coffee
grounds added with or without removing the brew
basket from the Coffee Maker.
USING THE COFFEE MAKER | 7
Page 8
USING THE COFFEE MAKER
Auto 12
AM
PM
x
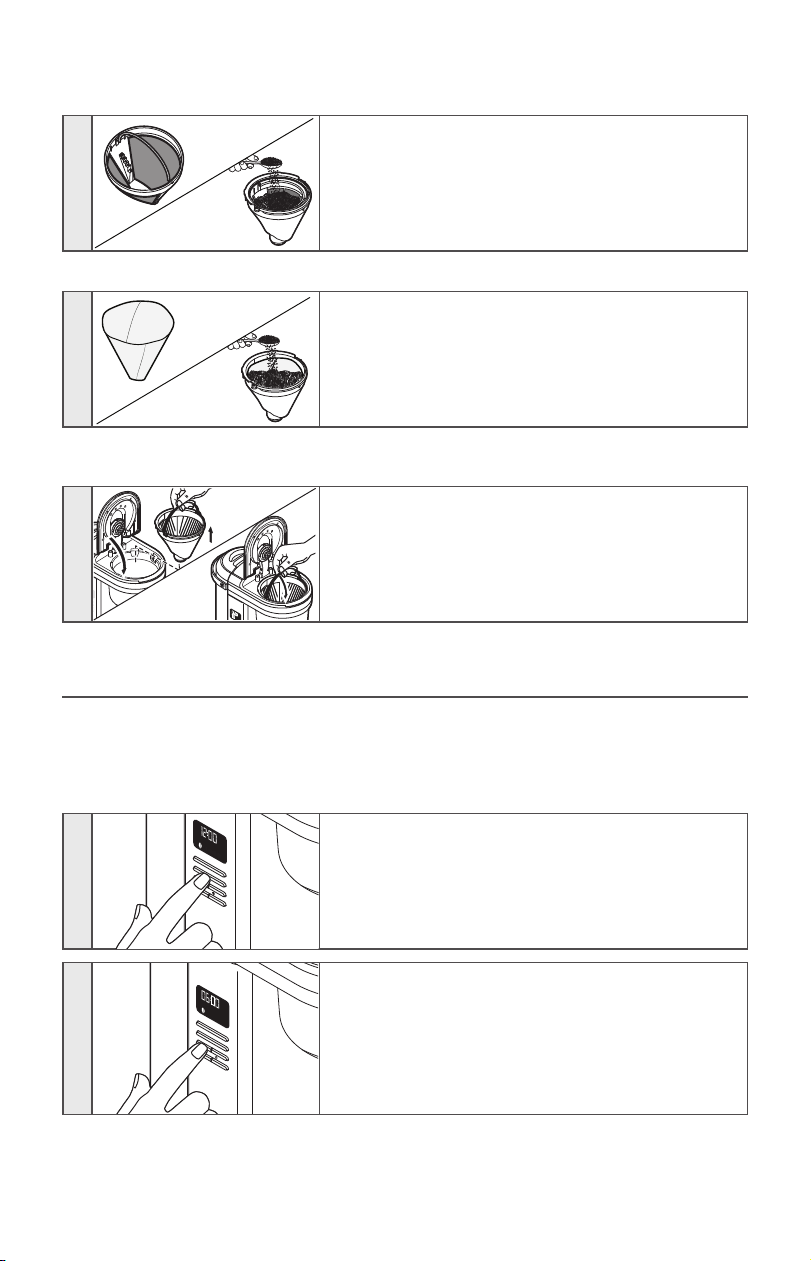
If using the Gold Tone permanent filter, add enough
amount of coffee ground by using Dosage Ladder
3
3
NOTE: Use a medium grind appropriate for automatic drip Coffee Makers. Too fine a grind
will produce bitterness and may clog the coffee filter.
4
NOTE: Do not operate the Coffee Maker without the brew basket in place.
provided inside the Gold Tone permanent filter.
For example: If you need 12 cups of Brew Coffee, then
add coffee grounds till 12 cups scale level.
OR
If using a cone paper coffee filter, place the filter inside
the brew basket, by gently pressing the filter into the
sides of the brew basket. Pre-wetting the paper filter is
not required.
Use the “Coffee Dosage Chart” provided on water
tank to add the enough amount of ground coffee.
Shake the brew basket slightly to even out the bed of
coffee ground. Place the basket into the Coffee Maker
and rotate the handle toward the front of the Coffee
Maker to lock the brew basket in place. Be sure the
brew basket lid is fully closed before brewing.
PROGRAMMING THE AUTO SET FEATURE
NOTE: When the Coffee Maker is first plugged in or when power is restored after an
interruption, the display will initially show 12:00 A.M.
IMPORTANT: Be sure to set the correct time as per the instructions in “Setting the
clock” before using Auto Set feature.
AM
Auto 12
PM
x
Brew/Cancel
Auto Set
Hour
Minute
1
2
Bold
Clean
AM
Auto 12
PM
Brew/Cancel
Auto Set
Hour
Minute
Bold
Clean
8 | USING THE COFFEE MAKER
To Program the Coffee Maker to brew coffee at a
preset time: Press the AUTO SET button one time. The
“Auto” indicator light will flash and the time display
will change to the currently set Auto Set time
(12:00 A.M. is the default time.).
To set the time the Coffee Maker should begin
brewing: Press the HOUR button. The hour digits will
change with each press; or press and hold to scroll
rapidly.
Next, press the MINUTE button. The Hour setting will
stay solid and the Minute setting will begin to blink.
The minute digits will change with each press; or press
and hold to scroll rapidly.
Page 9
USING THE COFFEE MAKER
Auto 12
AM
PM
x
Auto Set
Hour
Bold
Clean
Minute
Brew/Cancel
Auto 12
AM
PM
x
Auto Set
Hour
Bold
Clean
Minute
Brew/Cancel
Au
to 12
AM
PM
x
Auto S
e
t
Ho
ur
B
old
Cle
an
Minute
Br
e
w
/
Cance
l
Brew
Auto 12
AM
P
M
x
Auto Set
Hour
Bold
Clean
Minute
Brew/Cancel
To save the current displayed time and exit Auto Set:
Wait for 10 seconds, or press any button (Clean, Auto
Set, Bold or Brew). The Auto indicator will remain lit
3
NOTE: Please consider the default Brewing cycle time for a full pot (12 cups) is
approximately 10-minutes.
USING THE PREVIOUSLY PROGRAMMED AUTO SET TIME
These steps can be followed to save the Auto Set time after following the steps in the
“Programming the Auto Set feature” section.
AM
Auto 12
PM
x
Brew/Cancel
Auto Set
Hour
Minute
1
2
Bold
Clean
AM
Auto 12
PM
x
Brew/Cancel
Auto Set
Hour
Minute
Bold
Clean
and the time display will go back to the current time.
To cancel the Auto Set time after programming is
complete: Press AUTO SET again; or
press the BREW/CANCEL button.
Press the AUTO SET button. The Auto indicator will
flash and the time display will show the previously set
Auto time.
To save the current displayed time and exit Auto Set:
Wait for 10 seconds, or press any button (Clean, Auto
Set, Bold or Brew). The Auto indicator will remain lit
and the time display will go back to the current time.
ENGLISH
BREWING COFFEE
TIP: Brew 2 pots of fresh, cool water and discard before brewing the first pot of coffee.
Press the BREW button to begin brewing coffee. You
can use any of the BREW buttons provided on side or
1
NOTE: Default Standard Brewing cycle time for a full pot (12 cups) is approximately
10-minutes.
AM
2
NOTE: Allow the Coffee Maker to cool for 5 minutes before starting the next brew cycle.
PM
Auto
x
on front. The Coffee Maker will beep 1 time, and the
“Brew” icon will light up in the display when the Brew
cycle is started. Also, front Brew button will light up.
The Coffee Maker will beep 3 times when the Brew
cycle is complete, then will automatically initiate the
2-hour Warm mode. The Brewing icon will turn off and
the Warming icon will light up. The screen will display
remaining time of Warm mode from 2-hour. After the
Warm mode completes, one long beep will sound.
USING THE COFFEE MAKER | 9
Page 10
USING THE COFFEE MAKER
Au
to 12
AM
PM
x
Auto S
e
t
Ho
ur
B
ol
d
Cl
e
an
Minute
Br
e
w
/
Ca
nce
l
Brew
Auto 12
AM
P
M
x
Auto Set
Hour
Bold
Clean
Minute
Brew/Cancel
After Warm mode countdown is finished, the front
brew button light will go off and the coffee maker will
3
automatically turn off.
To Cancel the Brew cycle or Warm mode : Press the
BREW button once. The Brew cycle or Warm mode will
be cancelled.
NOTE: Opening the brew basket while coffee is brewing will interrupt the brew process
and impair flavor.
PAUSE AND POUR FEATURE
The “Pause and pour” feature enables you to remove the carafe from the Coffee Maker and
pour a cup of coffee before brewing is finished. When the carafe is removed, a special valve
stops the flow of coffee from the brew basket. However, brewing does not stop.
If the carafe is not placed back in the Coffee Maker within 25 seconds, water and coffee
grounds will overflow the brew basket.
TIPS FOR GREAT RESULTS
QUICK TIPS
Fresh Coffee Beans: Truly great coffee can only come from fresh coffee beans. To preserve
the freshness of your beans, keep them in an opaque, airtight container and store in a cool,
dry place. Refrigeration is not recommended since condensation tends to form on the beans
whenever the container is opened. Freezing can help preserve beans stored for an extended
period, but it will also impair flavor.
The Right Grind: The best cup of coffee comes from coffee beans that are properly ground
just before brewing. When grinding, be sure to grind your coffee to a medium grind level, the
appropriate grind for automatic drip Coffee Makers. Look for KitchenAid® Coffee Grinders at
your local retailer or online at www.KitchenAid.com.
The Proper Amount of Ground Coffee: Using the right dosage for coffee and water is critical
for obtaining great results. Use the markings provided in the gold tone filter and the dosage
guide at the back of the water tank as a reference and adjust as per taste. Finer grinds usually
require less coffee but may also produce bitterness and clog the filter. For weaker coffee, brew
using the suggested dosage of coffee grounds and water, then dilute with hot water. This
maximizes flavor and minimizes bitterness.
Brew Water Purity: Great tasting coffee starts with fresh water. The removable water tank
is easy to fill with water to give you great tasting coffee every time. It’s also easy to clean so
you can always make your coffee with the freshest water. Where local water is extremely poor,
you may wish to use bottled water. Do not use distilled water or mineral water since they can
damage your Coffee Maker.
Coffee Maker Cleanliness: Since the coffee oils that build up on the brew basket and carafe
can go stale and impair the flavor of the brewed coffee, it’s important that these two items are
cleaned daily in order to make the best tasting coffee.
Consumption of Fresh Brewed Coffee: It is recommended to consume brewed coffee within
30 minutes from completion of the brewing cycle to get the great rich taste.
10 | TIPS FOR GREAT RESULTS
Page 11
CARE AND CLEANING
CLEANING THE COFFEE MAKER
NOTE: Before cleaning, always disconnect the Coffee Maker from the electrical outlet.
Make sure the Coffee Maker has cooled completely.
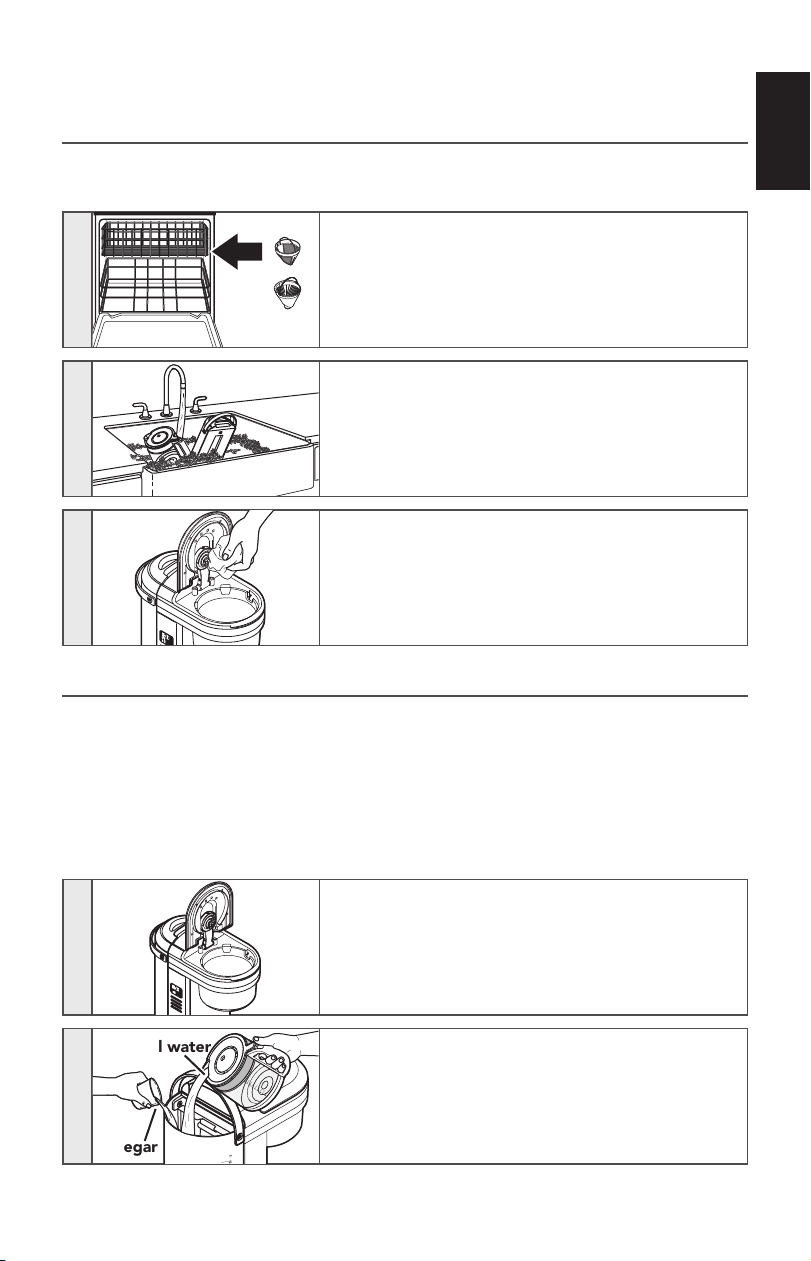
1
Brew basket and Gold Tone permanent filter are
dishwasher-safe, top rack only.
Carafe and Water Tank can be cleaned with warm,
2
soapy water, then rinse with clean water and dry.
Usage of Abrasives and Scouring agents of any kind
are not recommended.
3
AM
Auto 12
PM
x
Wipe the Showerhead with a damp cloth to remove
any coffee splashes.
REMOVING MINERAL DEPOSITS
Calcium deposits (scale) from water will build up in the Coffee Maker over time and impair
brewing efficiency and coffee quality. If you notice that it takes longer than usual to brew
or that the Coffee Maker is making unusual noises, then it is time to descale. The “Clean”
indicator will flash when the Coffee Maker has completed 100 brew cycles. Descaling should
be done as soon as possible to preserve the performance and life of your Coffee Maker.
ENGLISH
NOTE: The Coffee Maker can be descaled using a vinegar and water solution, or by using
a packaged descaling agent, like Affresh®. Always mix the descaling solution using cool
water.
Before descaling, always make sure the brew basket
1
A
M
Aut
o
1
2
B
rew/C
a
nc
e
l
A
u
t
o
S
e
t
H
o
u
r
Minu
te
Bold
C
le
a
n
Cool water
contains no coffee grounds, gold tone filter or any
cone paper filters.
If using vinegar, fill the Water Tank with a solution
consisting of 6 cup vinegar and 6 cup cool water.
2
If using a descaling agent, fill the Water Tank with
descaling agent and cool water. Follow the directions on
the package for the recommended ratios of descaling
Vinegar
agent and cool water to use.
CARE AND CLEANING | 11
Page 12

Au
to 12
AM
PM
x
Auto S
e
t
Ho
ur
B
ol
d
Cle
an
Minute
Br
e
w
/
Cance
l
Brew
Auto 12
AM
P
M
x
Auto Set
Hour
Bold
Clean
Minute
Brew/Cancel
CARE AND CLEANING
When the “Clean” indicator begins to flash on the
display, run a clean cycle: Press the CLEAN button.
The “Clean” indicator will stop flashing. Then press the
BREW button to begin the Clean cycle.
When the Clean cycle is complete (approximately
3
AM
Auto 12
PM
x
Brew/Cancel
Auto Set
Hour
Minute
Bold
Clean
30 minutes), 3 beeps will sound, and the “Clean”
indicator will turn off.
4
Run at least 2 fresh, cool water-only cycles after the
Clean cycle is complete.
NOTE: The Coffee Maker should be run through a complete Clean cycle using a full Water
Tank of the descaling solution.
TROUBLESHOOTING
descaling. Please refer to the “Care and
cleaning” section.
3. If you hear 3 rapid tones:
• There is no water in the water tank. The
Coffee Maker will not brew. Fill the water
tank with fresh, cool water and continue
with the brewing cycle as described in
the “Filling the Coffee Maker with water
for brewing” section.
4. If “Er1” flashes on the display and you hear
1 tone:
• A button may be jammed. Unplug the
Coffee Maker and press each button
several times. Plug the Coffee Maker
into a grounded 3 prong outlet. If “Er1”
appears again on the display, repeat this
procedure.
5. If coffee overflows the brew basket:
• The brew basket is not correctly in place.
Check if the brew basket is locked in
place.
• Too much coffee was placed in to the
brew basket.
• Used both Gold tone filter and paper
filter together.
If your Coffee Maker should fail to operate
as expected, please check the following:
1. If the display is not illuminated:
• Check to see whether the Coffee Maker
is plugged into a grounded 3 prong
outlet. If it is, check the fuse or circuit
breaker on the electrical circuit the
Coffee Maker is connected to and make
sure the circuit is closed.
2. If only a portion of the water added to the
Coffee Maker actually brews:
• The Coffee Maker requires immediate
12 | TROUBLESHOOTING
6. If water exits from the back of the Coffee
Maker:
• Too much water was poured into the
water tank.
If the problem is not due to one of the
above items, see the “Arranging for Service”
chapter in the “Warranty and service” section.
NOTE: Do not return the Coffee Maker to the
retailer as they do not provide service.
Page 13
WARRANTY AND SERVICE
KITCHENAID COFFEE MAKER WARRANTY FOR THE 50 UNITED STATES,
THE DISTRICT OF COLUMBIA, PUERTO RICO, AND CANADA
This warranty extends to the purchaser and any succeeding owner for COFFEE MAKERs
operated in the 50 United States, the District of Columbia, Puerto Rico, and Canada.
Length of Warranty: One Year Full Warranty from date of purchase.
KitchenAid Will Pay
for Your Choice of:
Hassle-Free Replacement of your COFFEE MAKER. See the next
page for details on how to arrange for service, or call the Customer
eXperience Center toll-free at 1-800-541-6390.
OR
The replacement parts and repair labor costs to correct defects
in materials and workmanship. Service must be provided by an
Authorized KitchenAid Service Center.
ENGLISH
KitchenAid Will
Not Pay for:
DISCLAIMER OF IMPLIED WARRANTIES; LIMITATION OF REMEDIES
IMPLIED WARRANTIES, INCLUDING TO THE EXTENT APPLICABLE WARRANTIES OF
MERCHANTABILITY OR FITNESS FOR A PARTICULAR PURPOSE, ARE EXCLUDED TO THE
EXTENT LEGALLY PERMISSIBLE. ANY IMPLIED WARRANTIES THAT MAY BE IMPOSED
BY LAW ARE LIMITED TO ONE YEAR, OR THE SHORTEST PERIOD ALLOWED BY LAW.
SOME STATES AND PROVINCES DO NOT ALLOW LIMITATIONS OR EXCLUSIONS ON
HOW LONG AN IMPLIED WARRANTY OF MERCHANTABILITY OR FITNESS LASTS, SO THE
ABOVE LIMITATIONS OR EXCLUSIONS MAY NOT APPLY TO YOU.
IF THIS PRODUCT FAILS TO WORK AS WARRANTED, CUSTOMER’S SOLE AND EXCLUSIVE
REMEDY SHALL BE REPAIR OR REPLACEMENT ACCORDING TO THE TERMS OF THIS
LIMITED WARRANTY. KITCHENAID AND KITCHENAID CANADA DO NOT ASSUME ANY
RESPONSIBILITY FOR INCIDENTAL OR CONSEQUENTIAL DAMAGES. This warranty gives
you specific legal rights and you may also have other rights which vary from state to state or
province to province.
A. Repairs when your COFFEE MAKER is used in other than
normal single family home use.
B. Damage resulting from accident, alteration, misuse or abuse.
C. Any shipping or handling costs to deliver your
COFFEE MAKER to an Authorized Service Center.
D. Replacement parts or repair labor costs for COFFEE MAKER
attachments operated outside the 50 United States, District of
Columbia, Puerto Rico, and Canada.
WARRANTY AND SERVICE | 13
Page 14

WARRANTY AND SERVICE
HASSLE-FREE REPLACEMENT WARRANTY—50 UNITED STATES, DISTRICT
OF COLUMBIA, AND PUERTO RICO
We’re so confident the quality of our products
meets the exacting standards of KitchenAid
that, if your COFFEE MAKER should fail within
the first year of ownership, KitchenAid will
arrange to deliver an identical or comparable
replacement to your door free of charge and
arrange to have your original COFFEE MAKER
returned to us. Your replacement unit will also
be covered by our one year limited warranty.
If your COFFEE MAKER should fail within the
first year of ownership, simply call our toll-free
Customer eXperience Center at
1-800-541-6390 Monday through Friday.
Please have your original sales receipt
available when you call. Proof of purchase
will be required to initiate the claim. Give the
consultant your complete shipping address
(no P.O. Box numbers, please).
When you receive your replacement COFFEE
MAKER, use the carton, packing materials,
and prepaid shipping label to pack up your
original COFFEE MAKER and send it back to
KitchenAid.
HASSLE-FREE REPLACEMENT WARRANTY—CANADA
We’re so confident the quality of our
products meets the exacting standards of
the KitchenAid brand that, if your COFFEE
MAKER should fail within the first year of
ownership, we will replace your COFFEE
MAKER with an identical or comparable
replacement. Your replacement unit will also
be covered by our one year limited warranty.
If your COFFEE MAKER should fail within the
first year of ownership, simply call our toll-free
Customer eXperience Center at
1-800-807-6777 Monday through Friday.
Please have your original sales receipt
available when you call. Proof of purchase
will be required to initiate the claim. Give the
consultant your complete shipping address.
When you receive your replacement COFFEE
MAKER, use the carton, packing materials,
and prepaid shipping label to pack up your
original COFFEE MAKER and send it back to
KitchenAid.
ARRANGING FOR SERVICE AFTER THE WARRANTY EXPIRES,
OR ORDERING ACCESSORIES AND REPLACEMENT PARTS
In the United States and Puerto Rico:
For service information, or to order
accessories or replacement parts, call
toll-free at 1-800-541-6390 or write to:
Customer eXperience Center,
KitchenAid Small Appliances,
P.O. Box 218, St. Joseph, MI 49085-0218
Outside the United States and Puerto Rico:
Consult your local KitchenAid dealer or the
store where you purchased the COFFEE
MAKER for information on how to obtain
service.
For service information in Canada:
Call toll-free 1-800-807-6777.
For service information in Mexico:
Call toll-free 01-800-0022-767.
®/™ ©2018 KitchenAid. All rights reserved. KITCHENAID and the design of the stand mixer
14 | WARRANTY AND SERVICE
are trademarks in the U.S. and elsewhere. Used under license in Canada.
Page 15

PIÈCES ET CARACTÉRISTIQUES
PIÈCES ET ACCESSOIRES
Dosage en échelle
Couvercle du panier à infusion
Couvercle du
Poignée du
réservoir d’eau
réservoir d’eau
Réservoir d’eau
Rangement pour cordon
dans le socle (non illustré)
AM
Auto 12
PM
x
Brew/Cancel
Auto Set
Hour
Minute
Bold
Clean
Plaque
chauffante
Douchette
Couvercle de la carafe
Brew/Cancel
Carafe en verre
Bouton d’infusion
Filtre doré
Panier à
infusion
Poignée
de la
carafe
FRANÇAIS
REMARQUE: Mesure par défaut pour 1 tasse = environ 5 oz (147 ml).
PIÈCES ET CARACTÉRISTIQUES | 15
Page 16

PIÈCES ET CARACTÉRISTIQUES
CARACTÉRISTIQUES DE L’AFFICHAGE ET DU TABLEAU DE COMMANDE
Écran programmable
Horloge
Icône d’infusion
Icône d’intensité
Icône de nettoyage
Tableau de
commande
Auto 12
Brew/Cancel
Brew/Cancel
Brew/Cancel
Auto Set
Auto Set
Auto Set
Hour
Hour
Hour
Bold
Bold
Bold
x
Minute
Minute
Minute
AM
PM
Clean
Clean
Clean
Témoins A.M./P.M.
Icône automatique
Icône temps restant
du maintien au chaud
16 | PIÈCES ET CARACTÉRISTIQUES
Page 17

SÉCURITÉ DE LA CAFETIÈRE
CONSIGNES DE SÉCURITÉ
IMPORTANTES
Lors de l’utilisation d’appareils électriques, il faut toujours observer certaines
précautions élémentaires de sécurité, y compris les suivantes:
1. Lire toutes les instructions.
2. Ne pas toucher les surfaces chaudes. Utiliser les poignées ou les boutons.
3. Ne pas faire fonctionner un appareil si le cordon ou la prise est endommagé,
si l’appareil ne fonctionne pas correctement, s’il tombe ou s’il est endommagé
d’une quelconque façon. Retourner l’appareil au centre de service agréé le plus
proche pour examen, réparation ou réglage.
4. Pour éviter les décharges électriques, incendies ou blessures, ne pas immerger
l’appareil dans l’eau ou tout autre liquide.
5. Débrancher la prise lorsque l’appareil n’est pas utilisé et avant le nettoyage.
Attendre que l’appareil ait refroidi avant d’installer ou de retirer des pièces,
etavant de nettoyer l’appareil.
6. Une surveillance attentive s’impose lorsqu’un appareil ménager est utilisé par
ouà proximité d’enfants.
7. Ne pas laisser le cordon pendre sur le côté d’une table ou d’un comptoir, ou
toucher une surface chaude.
8. Ne pas placer sur ou près d’un brûleur électrique ou à gaz chaud, ou dans un
four chaud.
9. L’utilisation d’accessoires non recommandés ou non vendus par KitchenAid
peutcauser un incendie, une décharge électrique ou des blessures.
10. Ne pas utiliser l’appareil à l’extérieur.
11. Ne pas utiliser l’appareil pour un autre usage que celui pour lequel il est conçu.
12. Ne pas faire fonctionner l’appareil sans que le couvercle ne soit correctement
placé sur la carafe.
SÉCURITÉ DE LA CAFETIÈRE | 17
FRANÇAIS
Page 18

SÉCURITÉ DE LA CAFETIÈRE
13. La carafe est conçue pour être utilisée avec cet appareil. Elle ne doit jamais être
utilisée sur une cuisinière ou dans un four à micro-ondes.
14. Ne pas placer de carafe chaude sur une surface mouillée ou froide.
15. Pour la mise hors tension, tourner et placer toutes les commandes en position
“off” (arrêt), puis débrancher la che de la prise murale.
16. Ouvrir le couvercle pendant l’infusion peut provoquer un risque d’ébouillantage.
17. Ne pas utiliser de carafe fêlée ou dont la poignée est lâche ou défaillante.
18. Ne pas nettoyer la carafe avec des nettoyants abrasifs, des tampons en laine
d’acier ou tout autre matériau abrasif.
19. Ne pas remplir le réservoir d’eau au-delà de la marque de remplissage maximum.
CONSERVER CES INSTRUCTIONS
Ce produit est conçu uniquement pour un usage domestique.
SPÉCIFICATIONS ÉLECTRIQUES
Tension: 120 V CA
AVERTISSEMENT
Risque de choc électrique
Brancher sur une prise à 3 alvéoles
reliée à la terre.
Ne pas enlever la broche de liaison
à la terre.
Ne pas utiliser un adaptateur.
Ne pas utiliser un câble de
rallonge.
Le non-respect de ces instructions
peut causer un décès, un incendie
ou un choc électrique.
Fréquence: 60Hz
Puissance: 1100 W
REMARQUE: Si cette fiche ne convient
pas à la prise, contacter un électricien
qualifié. Ne pas modifier la prise de
quelque manière que ce soit. Ne pas
utiliser d’adaptateur.
Ne pas utiliser de rallonge. Si le cordon
d’alimentation électrique est trop court,
faire installer une prise près de l’appareil
électroménager par un électricien ou un
technicien de service qualifié.
Le cordon doit être disposé de sorte
qu’ilne pende pas sur le bord du plan
de travail ou de la table de cuisine, où
des enfants pourraient tirer dessus ou
trébucher dessus involontairement.
18 | SÉCURITÉ DE LA CAFETIÈRE
Page 19

AM
Auto Set
Hour
Bold
Clean
Minute
Brew/Cancel
AM
Auto Set
Hour
Bold
Clean
Minute
Brew/Cancel
UTILISATION DE LA CAFETIÈRE
RÉGLAGE DE L’HORLOGE
REMARQUE: Lorsque l’on branche la cafetière pour la première fois ou si l’on
rétablit l’alimentation électrique après une coupure de courant, l’affichage indique
automatiquement 12:00 A.M.
AVERTISSEMENT
Risque de choc électrique
Brancher sur une prise à 3 alvéoles reliée à la terre.
Ne pas enlever la broche de liaison à la terre.
Ne pas utiliser un adaptateur.
Ne pas utiliser un câble de rallonge.
Le non-respect de ces instructions peut causer un décès, un
incendie ou un choc électrique.
Le cordon est rangé dans le socle. Si nécessaire, tirer
doucement sur le cordon vers l’extérieur jusqu’à ce
1
qu’il soit complètement déployé, ou juste assez long
pour atteindre la prise. Brancher l’appareil sur une
prise à 3 alvéoles reliée à la terre.
FRANÇAIS
2
AM
Brew/Cancel
Auto Set
Hour
Minute
Bold
Clean
Réglage de l’heure: Appuyer sur HOUR (heure).
Les chiffres des heures commencent à clignoter.
Chaque pression ajoute une heure; ou maintenir
latouche enfoncée pour un défilement rapide.
Réglage des minutes: Appuyer sur MINUTE.
Les chiffres des heures cessent de clignoter et
les chiffres des minutes commencent à clignoter.
Chaquepression ajoute une minute; ou maintenir
3
latouche enfoncée pour un défilement rapide.
Pour sauvegarder l’affichage actuel de l’heure et
sortir du mode de réglage de l’horloge: Appuyer
sur n’importe quel autre bouton (nettoyage, réglage
automatique, fort ou infusion); ou n’appuyer sur aucun
bouton pendant 10 secondes.
RÉGLAGE DU DEGRÉ D’INFUSION
AM
Brew/Cancel
Auto Set
Hour
Minute
Bold
Clean
1
REMARQUE: Regular (classique) est le réglage par défaut.
Pour basculer entre les degrés d’infusion Regular
(classique) et Bold (fort): Appuyer sur le bouton
BOLD(fort).
À noter: Il est recommandé d’utiliser le réglage
d’intensité maximum pendant l’infusion d’une petite
quantité (2 à 4 tasses).
UTILISATION DE LA CAFETIÈRE | 19
Page 20

UTILISATION DE LA CAFETIÈRE
AM
REMPLISSAGE D’EAU POUR L’INFUSION
CONSEIL: Avant de faire infuser la première carafe de café, faire infuser 2 carafes
d’eau froide et fraîche, puis jeter l’eau.
Retirer le couvercle du réservoir d’eau et remplir
le réservoir d’eau froide et fraîche pour produire la
1
1
IMPORTANT: S’assurer de remplir le réservoir de la quantité d’eau uniquement
nécessaire pour infuser le nombre de tasses souhaité. Si 12 tasses d’eau sont ajoutées,
lacafetière infuse les 12 tasses.
AM
Brew/Cancel
Auto Set
Hour
Minute
Bold
Clean
2
Brew/Cancel
quantité de café souhaitée. Utiliser les marques de
quantité de la fenêtre du réservoir. Bien fermer le
couvercle du réservoir d’eau.
OU
Retirer le couvercle du réservoir d’eau, puis soulever
doucement le réservoir d’eau en utilisant la poignée.
Verser suffisamment d’eau froide et fraîche pour
infuser la quantité de café souhaitée. Remettre
le réservoir d’eau à sa place. Utiliser la fonction
d’alignement du réservoir d’eau pour s’assurer quele
réservoir d’eau est bien mis en place.
Placer la carafe dans la cafetière. S’assurer que le
couvercle est bien en place et que le fond de la carafe
est correctement installé. Sinon, la caractéristique
Pause and Pour (pause et versement) peut ne pas
fonctionner, ce qui pourraitentraîner un débordement
d’eau et decafépar-dessus le panier à infusion.
ASSEMBLAGE ET UTILISATION DU PANIER À INFUSION
1
2
IMPORTANT: Ne pas utiliser les deux types de filtres en même temps.
Le fait d’utiliser les deux filtres en même temps pourrait entraîner le débordement de
l’eau etdu café par-dessus le panier à infusion.
20 | UTILISATION DE LA CAFETIÈRE
Soulever le couvercle du panier à infusion et retirer le
panier à infusion.
Insérer le filtre doré permanent ou le filtre en papier
conique dans le panier à infusion.
CONSEIL: On peut insérer le filtre et ajouter le café
moulu en retirant ou non le panier à infusion de la
cafetière.
Page 21

UTILISATION DE LA CAFETIÈRE
Auto 12
AM
PM
x
Si le filtre doré permanent est utilisé, ajouter
suffisamment de café en utilisant le dosage en
3
échellesitué à l’intérieur du filtre doré permanent.
Par exemple: Si 12 tasses de café sont préparées,
ajouter du café jusqu’à la marque de 12 tasses.
OU
Si un filtre à café en papier est utilisé, il faut insérer le
filtre dans le panier à fusion en appuyant doucement
sur le filtre pour le coller contre les parois du panier à
3
infusion. Il n’est pas nécessaire de mouiller le filtre en
papier au préalable.
Utiliser le “Tableau de dosage du café” situé sur le
réservoir d’eau pour ajouter la bonne quantité d’eau
aux grains de café.
REMARQUE: Utiliser une mouture moyenne pour les cafetières automatiques.
Unemouture trop fine entraînera un goût amer et risque d’obstruer le filtre à café.
Secouer légèrement le panier à infusion pour répartir
les grains de café dans le fond. Placer le panier dans
4
la cafetière et faire pivoter la poignée vers l’avant de
la cafetière pour verrouiller le panier. S’assurer que le
couvercle du panier à infusion est complètement fermé
avant le processus d’infusion.
REMARQUE: Ne pas faire fonctionner la cafetière sans panier à infusion.
PROGRAMMATION DE LA FONCTION AUTO SET (RÉGLAGE AUTOMATIQUE)
REMARQUE: Lorsque l’on branche la cafetière pour la première fois ou si l’on
rétablit l’alimentation électrique après une coupure de courant, l’affichage indique
automatiquement 12:00 A.M.
IMPORTANT: S’assurer de bien placer l’heure en suivant les instructions de la section
“Réglage de l’horloge” avant d’utiliser la fonction de réglage automatique.
FRANÇAIS
1
2
AM
Auto 12
PM
x
Brew/Cancel
Auto Set
Hour
Minute
Bold
Clean
Pour programmer la cafetière pour démarrer l’infusion
du café à un moment précis: Appuyer une fois sur le
bouton AUTO SET (réglage automatique). Le témoin
“Auto” clignote et l’affichage du temps passe à l’heure
courante de la minuterie automatique (12:00 A.M. est
le réglage par défaut).
Pour régler l’heure à laquelle la cafetière doit
commencer l’infusion: Appuyer sur le bouton HOUR
AM
Auto 12
PM
Brew/Cancel
Auto Set
Hour
Minute
Bold
Clean
(heure). Chaque pression ajoute une heure; ou maintenir
la touche enfoncée pour un défilement rapide.
Appuyer ensuite sur le bouton MINUTE. Les chiffres
des heures cessent de clignoter et les chiffres des
minutes commencent à clignoter. Chaque pression
ajoute une minute; ou maintenir la touche enfoncée
pour un défilement rapide.
UTILISATION DE LA CAFETIÈRE | 21
Page 22

UTILISATION DE LA CAFETIÈRE
Auto 12
AM
PM
x
Auto Set
Hour
Bold
Clean
Minute
Brew/Cancel
Auto 12
AM
PM
x
Auto Set
Hour
Bold
Clean
Minute
Brew/Cancel
Au
to 12
AM
PM
x
Auto S
e
t
Ho
ur
B
old
Cle
an
Minute
Br
e
w
/
Cance
l
Brew
Auto 12
AM
P
M
x
Auto Set
Hour
Bold
Clean
Minute
Brew/Cancel
Pour sauvegarder l’affichage actuel de l’heure et sortir du
mode de réglage automatique: Attendre 10 secondes ou
appuyer sur n’importe quel bouton (nettoyage, réglage
automatique, fort ou infusion). Letémoin Auto restera
3
REMARQUE: Ne pas oublier que la durée d’infusion par défaut pour une carafe
complète (12 tasses) est d’environ 10 minutes.
UTILISATION DE L’HEURE DE LA MINUTERIE AUTOMATIQUE RÉGLÉE
AUPRÉALABLE
On peut suivre cette procédure pour enregistrer l’heure réglée automatiquement après avoir
effectué les étapes de la section “Programmation de la caractéristique Auto Set (réglage
automatique)”.
AM
Auto 12
PM
x
Brew/Cancel
Auto Set
Hour
Minute
1
Bold
Clean
allumé et l’affichage du temps reviendra à l’heure actuelle.
Pour annuler le réglage automatique de l’heure à la
fin de la programmation: Appuyer de nouveau sur
AUTO SET ou appuyer sur le bouton BREW/CANCEL
(infusion/annulation).
Appuyer sur le bouton AUTO SET (réglage
automatique). Le témoin Auto clignote et l’affichage
du temps indique désormais l’heure de la minuterie
automatique réglée au préalable.
2
AM
Auto 12
PM
x
Brew/Cancel
Auto Set
Hour
Minute
Bold
Clean
Pour sauvegarder l’affichage actuel de l’heure et
sortir du mode de réglage automatique: Attendre
10 secondes ou appuyer sur n’importe quel bouton
(nettoyage, réglage automatique, fort ou infusion).
Letémoin Auto restera allumé et l’affichage du temps
reviendra à l’heure actuelle.
INFUSION DU CAFÉ
CONSEIL: Avant de faire infuser la première carafe de café, faire infuser 2 carafes d’eau
froide et fraîche, puis jeter l’eau.
Appuyer sur le bouton BREW (infusion) pour démarrer
le processus d’infusion du café. Il est possible d’utiliser
1
REMARQUE: La durée d’infusion par défaut pour une carafe complète (12 tasses) est
d’environ 10 minutes.
AM
2
22 | UTILISATION DE LA CAFETIÈRE
PM
Auto
x
les boutons BREW (infusion) situés sur l’avant et le
côté. Lorsque le programme d’infusion démarre,
lacafetière émet 1 bip et l’icône “Brew” s’illumine
àl’écran. Le bouton d’infusion avant s’illumine aussi.
Une fois l’infusion terminée, la cafetière émet 3 bips,
puis lance automatiquement le mode de maintien
au chaud de 2 heures. L’icône d’infusion s’éteint et
l’icône de maintien au chaud s’allume. L’écran affiche
le temps restant du mode de maintien au chaud
pendant2heures. Une fois le mode de maintien
auchaud terminé, la cafetière émet un bip long.
Page 23

UTILISATION DE LA CAFETIÈRE
Au
to 12
AM
PM
x
Auto S
e
t
Ho
ur
B
ol
d
Cl
e
an
Minute
Br
e
w
/
Ca
nce
l
Brew
Auto 12
AM
P
M
x
Auto Set
Hour
Bold
Clean
Minute
Brew/Cancel
REMARQUE: Laisser refroidir la cafetière pendant 5 minutes avant de commencer le
programme d’infusion suivant.
Une fois la minuterie de maintien au chaud terminée,
le témoin du bouton d’infusion avant s’éteint et la
cafetière s’éteint automatiquement.
3
Pour annuler le programme d’infusion ou le mode de
maintien au chaud: Appuyer une fois sur le bouton
BREW (infusion). Le programme d’infusion ou le mode
de maintien au chaud est annulé.
REMARQUE: Si l’on soulève le panier à infusion pendant que le café est en cours
d’infusion, le processus d’infusion sera interrompu et l’arôme du café altéré.
CARACTÉRISTIQUE PAUSE AND POUR (PAUSE ET VERSEMENT)
La caractéristique Pause and Pour (pause et versement) permet à l’utilisateur de retirer la
carafe de la cafetière et de verser une tasse de café avant la fin de l’infusion. Lorsqu’on retire
lacarafe, une valve spéciale bloque le versement du café qui se fait par le panier à infusion.
Ceci n’interrompt cependant pas le processus d’infusion.
Si l’on ne replace pas la carafe dans la cafetière dans les 25 secondes qui suivent, l’eau et le
café déborderont du panier à infusion.
CONSEILS POUR DE BONS RÉSULTATS
CONSEILS RAPIDES
Grains de café frais: Un grand café, c’est d’abord des grains de café frais. Pour préserver
la fraîcheur des grains de café, les conserver dans un récipient opaque et hermétique et
l’entreposer dans un endroit frais et sec. Il n’est pas conseillé de les réfrigérer, car de la
condensation a tendance à se former sur les grains chaque fois que l’on ouvre le récipient.
Onpeut congeler les grains de café pour les préserver si l’on sait qu’ils ne seront pas
consommés avant longtemps, mais la congélation altérera aussi le goût.
Le calibre idéal de moulure: Une tasse de café parfaite, c’est aussi des grains de café parfaitement
moulus juste avant infusion. Lors de la mouture, veiller à obtenir une mouture moyenne – il s’agit
de la mouture qui convient le mieux aux cafetières à versement automatique. Les moulins à café
KitchenAid® sont offerts chez votre marchand ou en ligne au www.KitchenAid.com.
Quantité idéale de café moulu: Utiliser la bonne quantité de café et d’eau est très important
pour obtenir un bon résultat. Utiliser les marques sur le filtre doré et le guide de dosage situé
au dos du réservoir d’eau comme référence et modifier les quantités au goût. Une mouture
plus fine nécessite généralement moins de café, mais entraîne également un goût plus amer;
de plus cela obstrue le filtre. Pour un café plus léger, faire infuser en utilisant la quantité de
moulure de café et d’eau suggérée, puis diluer le tout dans de l’eau chaude. Ceci optimisera
le goût et réduira l’amertume du goût.
Pureté de l’eau d’infusion: Un café savoureux, c’est d’abord de l’eau fraîche. Le réservoir d’eau
amovible est facile à remplir, ce qui vous permet de savourer un café délicieux chaque fois. Il est aussi
facile à nettoyer; vous pouvez donc préparer votre café avec une eau parfaitement fraîche. Si l’eau du
circuit local est de très mauvaise qualité, il sera peut-être préférable d’utiliser de l’eau en bouteille.
Nepas utiliser d’eau distillée ou d’eau minérale, carelles peuvent endommager la cafetière.
Propreté de la cafetière: Les huiles de café qui s’accumulent dans le panier à infusion et
la carafe peuvent tourner et altérer le goût du café infusé; il est donc important de nettoyer
quotidiennement ces deux éléments pour que l’arôme du café soit idéal.
Consommation d’un café fraîchement infusé: Nous conseillons de consommer le café dans
les 30 minutes suivant son infusion pour conserver un goût riche et agréable.
CONSEILS POUR DE BONS RÉSULTATS | 23
FRANÇAIS
Page 24

ENTRETIEN ET NETTOYAGE
UTILISATION DE LA CAFETIÈRE
REMARQUE: Avant le nettoyage, toujours débrancher la cafetière de la source
d’électricité. S’assurer que la cafetière est froide.
Le panier à infusion et le filtre doré permanent
1
2
peuvent être lavés au lave-vaisselle, dans le panier
supérieur seulement.
La carafe et le réservoir d’eau peuvent être lavés à
l’eau chaude et savonneuse, puis rincés à l’eau claire et
séchés. L’utilisation de produits abrasifs etde produits
à récurer n’est pas recommandée.
3
AM
Auto 12
PM
x
Essuyer la douchette avec un chiffon humide pour
éliminer toute goutte de café.
ÉLIMINER LES DÉPÔTS DE MINÉRAUX
Avec le temps, des dépôts de calcium (tartre) présents dans l’eau s’accumulent dans la cafetière
et réduisent l’efficacité du processus d’infusion ainsi que la qualité du café. Sil’onremarque que
le processus d’infusion dure plus longtemps que d’habitude, ou que la cafetière émet des bruits
inhabituels, cela signifie qu’il est temps de détartrer. Le témoin Clean (nettoyage) clignote lorsque
la cafetière a effectué 100 programmes d’infusion. Lorsque cela seproduit, on doit procéder à un
détartrage dès que possible pour préserver la performance et la longévité de la cafetière.
REMARQUE: La cafetière peut être détartrée à l’aide d’une solution de vinaigre et
d’eau ou d’un agent de détartrage comme un produit affresh®. Toujours diluer la solution
de détartrage avec de l’eau froide.
Avant un détartrage, toujours s’assurer que le panier
1
2
Eau froide
Vinaigre
A
M
Aut
o
1
2
B
rew/C
a
nc
e
l
A
u
t
o
S
e
t
H
o
u
r
Minu
te
Bold
C
le
a
n
à infusion ne contient pas de café, un filtre à café en
papier ou un filtre doré.
Si du vinaigre est utilisé, remplir le réservoir d’eau de
6tasses d’eau froide et de 6 tasses de vinaigre.
Si un agent de détartrage est utilisé, remplir le
réservoir d’eau de l’agent de détartrage et d’eau
froide. Suivre les instructions figurant sur l’emballage
pour connaître les quantités d’agent de détartrage et
d’eau froide recommandées.
24 | ENTRETIEN ET NETTOYAGE
Page 25

Au
to 12
AM
PM
x
Auto S
e
t
Ho
ur
B
ol
d
Cle
an
Minute
Br
e
w
/
Cance
l
Brew
Auto 12
AM
P
M
x
Auto Set
Hour
Bold
Clean
Minute
Brew/Cancel
ENTRETIEN ET NETTOYAGE
Quand le témoin Clean (nettoyage) commence à clignoter
à l’écran, exécuter un programme de nettoyage: Appuyer
sur le bouton CLEAN (nettoyage). Le témoin “Nettoyage”
cesse de clignoter. Appuyer sur le bouton BREW (infusion)
pour démarrer le programme de nettoyage.
3
AM
Auto 12
PM
x
Brew/Cancel
Auto Set
Hour
Minute
Bold
Clean
Lorsque le programme de nettoyage est terminé
(ildure environ 30 minutes), la cafetière émet 3 bips,
etle témoin Clean s’éteint.
Exécuter au moins 2 programmes avec de l’eau froide
4
seulement une fois le programme de nettoyage
terminé.
REMARQUE: Faire fonctionner un programme de nettoyage complet en remplissant le
réservoir d’eau de la solution de détartrage.
DÉPANNAGE
immédiat. Consulter la section
AVERTISSEMENT
Risque de choc électrique
Brancher sur une prise à 3 alvéoles
reliée à la terre.
Ne pas enlever la broche de liaison
à la terre.
Ne pas utiliser un adaptateur.
Ne pas utiliser un câble de
rallonge.
Le non-respect de ces instructions
peut causer un décès, un incendie
ou un choc électrique.
Si la cafetière ne fonctionne pas comme
prévu, vérifier les points suivants:
1. Si l’affichage n’est pas allumé:
•
Vérifier que la cafetière est branchée sur une
prise à 3 alvéoles reliée à la terre. Si tel est le
cas, inspecter le fusible ou coupe-circuit du
circuit électrique auquel la cafetière est raccordée et s’assurer que le circuit est fermé.
2. Si seule une partie de l’eau versée dans la
cafetière infuse:
• La cafetière nécessite un détartrage
«Entretienet nettoyage».
3. Si 3 bips retentissent:
• Le réservoir d’eau est vide. La cafetière
n’infuse pas. Remplir le réservoir
d’eau avec de l’eau froide et fraîche et
poursuivre avec le programme d’infusion
comme décrit dans la section “Remplir
d’eau pour l’infusion”.
4. Si “Er1” clignote à l’écran tandis qu’un
signal sonore retentit:
• Un bouton est peut-être coincé.
Débrancher la cafetière et appuyer plusieurs fois sur chaque bouton. Brancher la
cafetière sur une prise à 3 alvéoles reliée
à la terre. Si “Er1” apparaît de nouveau
sur l’affichage, répéter cette procédure.
5. Si le café déborde du panier à infusion:
• Le panier à infusion n’est pas bien en
place. Vérifier si le panier à infusion
estverrouillé en place.
• Trop de café a été mis dans le panier à
infusion.
• Utilisation à la fois du filtre doré et d’un
filtre en papier.
6. Si de l’eau s’écoule à l’arrière de la cafetière:
• Trop d’eau a été versée dans le réservoir
d’eau.
Si le problème n’est pas attribuable à l’une
des raisons indiquées ci-dessus, voir le point
“Obtenir un service de dépannage” dans la
section “Garantie et dépannage”.
REMARQUE: Ne pas retourner la cafetière
au vendeur, car les vendeurs n’assurent aucun
service après-vente.
DÉPANNAGE | 25
FRANÇAIS
Page 26

GARANTIE ET DÉPANNAGE
GARANTIE DE LA CAFETIÈRE KITCHENAID POUR LES 50 ÉTATS DES ÉTATSUNIS, LE DISTRICT FÉDÉRAL DE COLUMBIA, PORTO RICO ET LE CANADA
La présente garantie couvre l’acheteur et les propriétaires suivants de la CAFETIÈRE lorsqu’elle
est utilisée dans les 50 États des États-Unis, le district fédéral de Columbia, à Porto Rico et au
Canada.
Durée de la garantie: Garantie complète d’un an à compter de la date d’achat.
KitchenAid prendra
encharge les éléments
suivants à votre choix:
Le remplacement satisfaction totale de votre CAFETIÈRE. Voir
la page suivante pour plus de détails concernant la procédure
à suivre pour un dépannage, ou appeler le numéro sans frais
1800541-6390 du Centre eXpérience clientèle.
OU
Les frais de pièces de rechange et de main-d’œuvre pour
corriger les vices de matériaux et de fabrication. L’intervention
de dépannage doit être effectuée par un centre de dépannage
KitchenAid agréé.
KitchenAid ne paiera
pas pour:
CLAUSE D’EXONÉRATION DE RESPONSABILITÉ AU TITRE DES GARANTIES
IMPLICITES; LIMITATION DES RECOURS
LES GARANTIES IMPLICITES, Y COMPRIS DANS LA MESURE APPLICABLE LES GARANTIES
DE QUALITÉ MARCHANDE OU D’APTITUDE À UN USAGE PARTICULIER, SONT EXCLUES
DANS LA MESURE AUTORISÉE PAR LA LOI. TOUTE GARANTIE IMPLICITE POUVANT
ÊTRE IMPOSÉE PAR LA LOI EST LIMITÉE À UN AN OU À LA PLUS COURTE PÉRIODE
AUTORISÉE PAR LA LOI. CERTAINES JURIDICTIONS NE PERMETTENT PAS LA LIMITATION
DE LA DURÉE DE VALIDITÉ DES GARANTIES IMPLICITES DE QUALITÉ MARCHANDE
OU D’APTITUDE À UN USAGE PARTICULIER; PAR CONSÉQUENT, LES LIMITATIONS OU
EXCLUSIONS STIPULÉES DANS LES PRÉSENTES PEUVENT NE PAS ÊTRE APPLICABLES.
SI CE PRODUIT NE FONCTIONNE PAS COMME PRÉVU, LE SEUL ET UNIQUE RECOURS
DU CLIENT CONSISTE À EN OBTENIR LA RÉPARATION OU LE REMPLACEMENT
CONFORMÉMENT AUX TERMES DE LA PRÉSENTE GARANTIE LIMITÉE. KITCHENAID ET
KITCHENAID CANADA DÉCLINENT TOUTE RESPONSABILITÉ AU TITRE DES DOMMAGES
FORTUITS OU INDIRECTS. Cette garantie vous confère des droits juridiques spécifiques et
vous pouvez également jouir d’autres droits qui peuvent varier d’un État à l’autre ou d’une
province à l’autre.
A. Les réparations lorsque la CAFETIÈRE est utilisée à des fins
autres qu’un usage domestique unifamilial normal.
B. Les dommages causés par: accident, altération, mauvaise
utilisation ou abus.
C. Tout frais d’expédition ou de manutention pour livrer la
CAFETIÈRE dans un centre de réparation autorisé.
D. Les frais des pièces de rechange ou de main-d’œuvre pour les
accessoires de la CAFETIÈRE lorsqu’elle est utilisée à l’extérieur
des 50 États des États-Unis, du district fédéral de Columbia,
dePorto Rico et du Canada.
26 | GARANTIE ET DÉPANNAGE
Page 27

GARANTIE ET DÉPANNAGE
GARANTIE DE REMPLACEMENT SANS DIFFICULTÉ POUR LES 50 ÉTATS
DES ÉTATS-UNIS, LE DISTRICT FÉDÉRAL DE COLUMBIA ET PORTO RICO
Nous sommes tellement certains que la qualité
de nos produits satisfait aux normes exigeantes
de KitchenAid que si la CAFETIÈRE cesse de
fonctionner au cours de la première année
suivant son acquisition, KitchenAid livrera
gratuitement à votre porte un appareil de
remplacement identique ou comparable et
prendra les dispositions nécessaires pour que
la CAFETIÈRE d’origine nous soit retournée.
L’appareil de remplacement sera également
couvert par notre garantie limitée d’un an.
Si votre CAFETIÈRE cesse de fonctionner
durant la première année suivant son
acquisition, il vous suffit d’appeler notre
Centre eXpérience clientèle au 1800541-
6390, du lundi au vendredi. Veuillez avoir
l’original de votre reçu de vente à portée de
main au moment de votre appel. Une preuve
d’achat est indispensable pour que votre
réclamation puisse être traitée. Il vous faudra
fournir votre adresse de livraison complète au
représentant (aucune boîte postale).
Après avoir reçu la CAFETIÈRE de rechange,
utiliser le carton, les matériaux d’emballage
et l’étiquette d’expédition prépayée pour
emballer la CAFETIÈRE d’origine et la
renvoyer à KitchenAid.
GARANTIE DE REMPLACEMENT SANS DIFFICULTÉ POUR LE CANADA
Nous sommes tellement certains que la
qualité de nos produits satisfait aux normes
exigeantes de la marque KitchenAid que si la
CAFETIÈRE cesse de fonctionner au cours de
la première année suivant son acquisition, nous
remplacerons la CAFETIÈRE par un appareil
de remplacement identique ou comparable.
L’appareil de remplacement sera également
couvert par notre garantie limitée d’un an.
Si votre CAFETIÈRE cesse de fonctionner
durant la première année suivant son
acquisition, il vous suffit d’appeler notre
CentreeXpérience clientèle au
1800807-6777, du lundi au vendredi.
Veuillez avoir l’original de votre reçu de
vente à portée de main au moment de votre
appel. Une preuve d’achat est indispensable
pour que votre réclamation puisse être
traitée. Ilvous faudra fournir votre adresse
delivraisoncomplète au représentant.
Après avoir reçu la CAFETIÈRE de rechange,
utiliser le carton, les matériaux d’emballage
et l’étiquette d’expédition prépayée pour
emballer la CAFETIÈRE d’origine et la
renvoyer à KitchenAid.
OBTENIR UN DÉPANNAGE UNE FOIS LA GARANTIE EXPIRÉE OU
COMMANDER DES ACCESSOIRES ET DES PIÈCES DE RECHANGE
FRANÇAIS
Aux États-Unis et à Porto Rico:
Pour des informations sur le service de
dépannage ou pour commander des
accessoires ou des pièces de rechange,
composer le numéro sans frais
1800541-6390 ou écrire à:
Customer eXperience Center,
KitchenAid Small Appliances,
P.O. Box218, St. Joseph, MI 49085-0218
®/™ ©2018 KitchenAid. Tous droits réservés. KitchenAid et la forme du batteur sur socle
sont des marques de commerce aux É.-U. et ailleurs. Utilisé sous licence au Canada.
En dehors des États-Unis et de Porto Rico:
Consulter le revendeur KitchenAid le plus
proche de chez vous ou le détaillant auprès
duquel la CAFETIÈRE a été achetée pour
obtenir des informations sur le service de
dépannage.
Pour des informations concernant toute
intervention de dépannage au Canada:
Composer sans frais le 1800807-6777.
Pour des informations concernant toute
intervention de dépannage au Mexique:
Composer sans frais le 018000022-767.
GARANTIE ET DÉPANNAGE | 27
Page 28

PIEZAS Y CARACTERÍSTICAS
PIEZAS Y ACCESORIOS
Escala de dosificación
Manija del
tanque de agua
Tanque de agua
Almacenamiento
del cable en la base
(no se muestra)
Tapa de la canasta
de elaboración
Tapa del tanque
de agua
AM
Auto 12
PM
x
Brew/Cancel
Auto Set
Hour
Minute
Bold
Clean
calentamiento
Filtro
de color
dorado
Cabezal
Canasta
de elaboración
Tapa de la jarra
Manija
de la
jarra
Brew/Cancel
Jarra de vidrio
Placa de
Botón Brew
(Elaboración)
NOTA: Medida predeterminada para 1 taza = aproximadamente 5 oz (147 ml).
28 | PIEZAS Y CARACTERÍSTICAS
Page 29

PIEZAS Y CARACTERÍSTICAS
CARACTERÍSTICAS DE LA PANTALLA Y DEL PANEL DE CONTROL
Pantalla programable
Reloj
Ícono de elaboración
Ícono de fuerte
Ícono de limpieza
Panel de control
Auto 12
Brew/Cancel
Brew/Cancel
Brew/Cancel
Auto Set
Auto Set
Auto Set
Hour
Hour
Hour
Bold
Bold
Bold
x
Minute
Minute
Minute
AM
PM
Clean
Clean
Clean
Indicador A.M./P.M.
Ícono de automático
Ícono de tiempo
restante para
mantener caliente
ESPAÑOL
PIEZAS Y CARACTERÍSTICAS | 29
Page 30

SEGURIDAD DE LA CAFETERA
SALVAGUARDIAS IMPORTANTES
Al utilizar aparatos eléctricos, se deben seguir las precauciones básicas de
seguridad, entre las que se incluyen las siguientes:
1. Lea todas las instrucciones.
2. No toque las supercies calientes. Use las asas o las perillas.
3. No utilice ningún electrodoméstico cuyo cable o enchufe esté dañado, si el
aparato no ha funcionado correctamente, si se ha caído o dañado de alguna
forma. Devuelva el aparato al lugar más cercano de servicio autorizado para
suexamen, reparación o ajuste.
4. Para protegerse contra incendios, choques eléctricos y lesiones, no sumerja la
cafetera en agua ni en ningún otro líquido.
5. Desenchúfela del tomacorriente cuando no esté en uso y antes de limpiarla.
Dejeque se enfríe antes de colocar o quitar piezas y antes de limpiar el aparato.
6. Se debe supervisar atentamente cuando cualquier electrodoméstico sea
utilizado por niños o cerca de ellos.
7. No deje que el cable cuelgue del borde de una mesa o mostrador ni deje que
toque supercies calientes.
8. No la coloque cerca ni encima de un quemador eléctrico o a gas que esté
caliente ni en el interior de un horno caliente.
9. El uso de aditamentos no recomendados o vendidos por KitchenAid puede
provocar un incendio, choque eléctrico o lesión.
10. No utilice el electrodoméstico en exteriores.
11. No dé al aparato un uso diferente de aquél para el cual fue diseñado.
12. No use el aparato sin colocar la tapa debidamente sobre la jarra.
30 | SEGURIDAD DE LA CAFETERA
Page 31

SEGURIDAD DE LA CAFETERA
13. La jarra ha sido diseñada para usarse con este aparato. No se debe colocar
sobre una hornilla de cocina ni en un horno de microondas.
14. No apoye una jarra caliente sobre una supercie mojada o fría.
15. Para desconectar, gire cualquier control hacia “off” (apagado) y quite el enchufe
del contacto de pared.
16. Pueden producirse quemaduras si retira la tapa durante el ciclo de hervor.
17. No use una jarra rajada ni una que tenga la manija oja o débil.
18. No limpie la jarra con limpiadores abrasivos, esponjas de bra metálica u otro
material abrasivo.
19. No coloque agua en el tanque por encima de la línea de llenado máximo.
GUARDE ESTAS INSTRUCCIONES
Este producto ha sido diseñado únicamente para uso doméstico.
REQUISITOS ELÉCTRICOS
Tensión: 120VCA
ADVERTENCIA
Peligro de Choque Eléctrico
Conecte a un contacto de pared de
conexión a tierra de 3 terminales.
No quite la terminal de conexión a
tierra.
No use un adaptador.
No use un cable eléctrico de
extensión.
No seguir estas instrucciones
puede ocasionar la muerte,
incendio o choque eléctrico.
Frecuencia: 60 Hz
Vatiaje: 1100 vatios
NOTA: Si el enchufe no encaja en el
tomacorriente, póngase en contacto con
un electricista calificado. No modifique
elenchufe de ninguna manera. No use
unadaptador.
No use un cable eléctrico de extensión.
Si el cable de suministro eléctrico
es demasiado corto, haga que un
electricista o técnico calificado instale un
tomacorriente cerca del electrodoméstico.
Deberá arreglarse el cable de manera
que no cuelgue sobre el mostrador o la
parte superior de la mesa, donde podría
ser jalado por los niños o causar tropiezos
accidentales.
ESPAÑOL
SEGURIDAD DE LA CAFETERA | 31
Page 32

AM
Auto Set
Hour
Bold
Clean
Minute
Brew/Cancel
AM
Auto Set
Hour
Bold
Clean
Minute
Brew/Cancel
USO DE LA CAFETERA
ADVERTENCIA
Peligro de Choque Eléctrico
Conecte a un contacto de pared de conexión a tierra de
3 terminales.
No quite la terminal de conexión a tierra.
No use un adaptador.
No use un cable eléctrico de extensión.
No seguir estas instrucciones puede ocasionar la muerte,
incendio o choque eléctrico.
AJUSTE DEL RELOJ
NOTA: Cuando se enchufa la cafetera por primera vez o cuando se restablece
laelectricidad después de un corte de corriente, la pantalla mostrará inicialmente
12:00A.M.
El cable se almacena en la base. Si es necesario, tire
con suavidad del cable hacia afuera hasta extenderlo
1
por completo o solo lo necesario para llegar al
tomacorriente. Conecte el producto a un contacto
depared de 3 terminales con conexión a tierra.
2
AM
Brew/Cancel
Auto Set
Hour
Minute
Bold
Clean
Para fijar la hora: Presione HOUR (Hora).
El ajuste de la hora comenzará a parpadear. Los dígitos
de las horas cambiarán cada vez que presione; o bien
mantenga presionado para desplazarse rápidamente.
Para fijar los minutos: Presione MINUTE (Minutos).
El ajuste de la hora cambiará a una pantalla fija y el
ajuste de los minutos comenzará a parpadear. Los dígitos
de los minutos cambiarán cada vez que presione; o bien
3
mantenga presionado para desplazarse rápidamente.
Para guardar la hora que se muestra actualmente
y salir del ajuste del reloj: Presione cualquier otro
botón (Clean [Limpieza], Auto Set [Ajuste automático],
Bold[Fuerte] o Brew [Elaboración]); o no presione
ningún botón durante 10 segundos.
AJUSTE DE LA INTENSIDAD DEL CAFÉ
1
NOTA: Regular (Normal) es el ajuste predeterminado.
32 | USO DE LA CAFETERA
AM
Brew/Cancel
Auto Set
Hour
Minute
Bold
Clean
Para cambiar entre las intensidades Regular (Normal) y
Bold (Fuerte) del café: Presione el botón Bold (Fuerte).
Téngase en cuenta: Se recomienda usar el ajuste Bold
(Fuerte) cuando se elaboren cantidades pequeñas
(2a4 tazas).
Page 33

USO DE LA CAFETERA
AM
CÓMO LLENAR LA CAFETERA CON AGUA PARA ELABORAR CAFÉ
CONSEJO: Prepare 2 jarras de agua limpia y fresca, y deséchelas antes de elaborar la
primera jarra de café.
Retire la tapa del tanque de agua y coloque suficiente
agua limpia y fresca para preparar la cantidad de café
1
1
IMPORTANTE: Asegúrese de llenar el tanque solo con la cantidad de agua necesaria
para preparar el número de tazas que desea. Si introduce 12 tazas de agua, la cafetera
elaborará las 12 tazas.
AM
Brew/Cancel
Auto Set
Hour
Minute
Bold
Clean
2
Brew/Cancel
deseada. Use las marcas de nivel máximo que están en
la ventana del tanque de agua. Cierre correctamente la
tapa del tanque de agua.
O BIEN
Retire la tapa del tanque de agua y luego levante
el tanque suavemente usando la manija. Coloque
suficiente agua limpia y fresca para preparar la
cantidad de café deseada. Vuelva a colocar el
tanque de agua en su posición. Use la característica
de alineado que está en el tanque de agua para
asegurarse de que esté correctamente colocado.
Coloque la jarra en la cafetera. Asegúrese de que la
tapa esté segura en su posición y que la base de la
jarra esté asentada por completo; de lo contrario, la
función de Pause and pour (Pausa para servir) podría
no activarse y hacer que el agua y el café sederramen
de la canasta de elaboración.
ESPAÑOL
ENSAMBLADO Y USO DE LA CANASTA DE ELABORACIÓN
1
2
IMPORTANTE: No use ambos tipos de filtros a la vez.
Si usa ambos filtros, el agua y el café podrían derramarse de la canasta de elaboración.
Levante la tapa de la canasta de elaboración y retire
lacanasta.
Coloque el filtro permanente de color dorado o el filtro
cónico de papel dentro de la canasta de elaboración.
CONSEJO: También puede colocarse el filtro de
café y agregar café molido sin quitar la canasta de
elaboración de la cafetera.
USO DE LA CAFETERA | 33
Page 34

USO DE LA CAFETERA
Auto 12
AM
PM
x
Si usa el filtro permanente de color dorado, use
laescala de dosificación que está adentro del filtro
3
3
NOTA: Use un molido medio adecuado para cafeteras de filtro automáticas. Un molido
demasiado fino hará que el café quede amargo y puede bloquear el filtro de la cafetera.
4
NOTA: no haga funcionar la cafetera sin la canasta de elaboración en su sitio.
paraagregar una cantidad suficiente de café molido.
Por ejemplo: Si necesita preparar 12 tazas de café,
entonces agregue café molido hasta el nivel que
indica12 tazas.
O BIEN
Si usa un filtro de papel cónico, colóquelo dentro
dela canasta de elaboración y presiónelo suavemente
contra los lados de la canasta. No se requiere mojar
previamente el filtro de papel.
Use la “Tabla de dosificación de café” que está en el
tanque de agua para agregar una cantidad suficiente
de café.
Agite ligeramente la canasta de elaboración para que
quede una capa uniforme de café. Coloque la canasta
dentro de la cafetera y gire la manija hacia el frente
de la cafetera para sujetar la canasta de elaboración
en su lugar. Cerciórese de que la tapa de la canasta
de elaboración esté cerrada por completo antes de
preparar café.
CÓMO PROGRAMAR LA CARACTERÍSTICA DE AUTO SET
(AJUSTEAUTOMÁTICO)
NOTA: Cuando se enchufa la cafetera por primera vez o cuando se restablece la
electricidad después de un corte de corriente, la pantalla mostrará inicialmente 12:00 A.M.
IMPORTANTE: Asegúrese de fijar la hora correcta según las instrucciones en “Ajuste del
reloj” antes de usar la función de Ajuste automático.
AM
Auto 12
PM
x
Brew/Cancel
Auto Set
Hour
Minute
1
2
Bold
Clean
AM
Auto 12
PM
Brew/Cancel
Auto Set
Hour
Minute
Bold
Clean
34 | USO DE LA CAFETERA
Para programar la cafetera con el fin de que elabore
café en un horario prefijado: Presione el botón
AUTO SET (Ajuste automático) una vez. La luz del
indicador “Auto” (Automático) destellará y la pantalla
de la hora cambiará a la hora actual establecida
en la característica Auto Set (Ajuste automático) (12:00A.M. es la hora predeterminada).
Para ajustar la hora en que la cafetera debe comenzar
a elaborar: Presione el botón HOUR (Hora). Los dígitos
de las horas cambiarán cada vez que presione; o bien
mantenga presionado para desplazarse rápidamente.
Después, presione el botón MINUTE (Minuto). Elajuste
de la hora quedará fijo y el ajuste de los minutos
comenzará a parpadear. Los dígitos de los minutos
cambiarán cada vez que presione; o bien mantenga
presionado para desplazarse rápidamente.
Page 35

USO DE LA CAFETERA
Auto 12
AM
PM
x
Auto Set
Hour
Bold
Clean
Minute
Brew/Cancel
Auto 12
AM
PM
x
Auto Set
Hour
Bold
Clean
Minute
Brew/Cancel
Au
to 12
AM
PM
x
Auto S
e
t
Ho
ur
B
old
Cle
an
Minute
Br
e
w
/
Cance
l
Brew
Auto 12
AM
P
M
x
Auto Set
Hour
Bold
Clean
Minute
Brew/Cancel
Para guardar la hora que se muestra actualmente y salir
de Auto Set (Ajuste automático): Espere 10 segundos
o presione cualquier botón (Clean [Limpiar], Auto Set
[Ajuste automático], Bold [Fuerte], o Brew [Elaboración]).
3
NOTA: Tenga en cuenta que el tiempo predeterminado del ciclo de elaboración para una
jarra completa (12 tazas) es de aproximadamente 10 minutos.
CÓMO USAR LA HORA DEL AJUSTE AUTOMÁTICO PROGRAMADO
PREVIAMENTE
Estos pasos se pueden seguir para guardar la hora de Auto Set (Ajuste automático) después
de seguir los pasos de la sección “Cómo programar la característica de ajuste automático”.
AM
Auto 12
PM
x
Brew/Cancel
Auto Set
Hour
Minute
1
Bold
Clean
El indicador Auto (Automático) permanecerá iluminado
y la pantalla de la hora volverá a la hora actual.
Para cancelar la hora de Auto Set (Ajuste automático)
después de que la programación está completa: Presione
AUTO SET (Ajuste automático) nuevamente opresione el
botón BREW/CANCEL (Elaborar/Cancelar).
Presione el botón de AUTO SET (Fijado automático).
El indicador Auto (Automático) destellará y la pantalla
de la hora mostrará la hora previamente ajustada en la
característica Auto (Automático).
ESPAÑOL
2
AM
Auto 12
PM
x
Brew/Cancel
Auto Set
Hour
Minute
Bold
Clean
Para guardar la hora que se muestra actualmente y salir
de Auto Set (Ajuste automático): Espere 10 segundos
o presione cualquier botón (Clean [Limpiar], Auto Set
[Ajuste automático], Bold [Fuerte], o Brew [Elaboración]).
El indicador Auto (Automático) permanecerá iluminado
y la pantalla de la hora volverá a la hora actual.
ELABORACIÓN DE CAFÉ
CONSEJO: Prepare 2 jarras de agua limpia y fresca, y deséchelas antes de elaborar la
primera jarra de café.
Presione el botón de BREW (Elaboración) para comenzar
a preparar el café. Puede usar cualquiera de los botones
BREW (Elaboración) que se encuentran a los costados
1
NOTA: El tiempo predeterminado del ciclo de elaboración para una jarra completa
(12tazas) es de aproximadamente 10 minutos.
AM
PM
Auto
x
2
o al frente. La cafetera emitirá un pitido y el icono
de “Brew” (Elaboración) se encenderá en la pantalla
cuando el ciclo de elaboración comience. También se
encenderá el botón Brew (Elaboración) del frente.
La cafetera emitirá 3 pitidos cuando el ciclo de
elaboración se complete y, después, iniciará
automáticamente el modo Warm (Calentamiento)
de 2 horas. El icono de elaboración se apagará y se
iluminará el de calentamiento. La pantalla mostrará
el tiempo restante de las 2 horas del modo Warm
(Calentamiento). Una vez que se complete el modo
Warm (Calentamiento), sonará un pitido largo.
USO DE LA CAFETERA | 35
Page 36

USO DE LA CAFETERA
Au
to 12
AM
PM
x
Auto S
e
t
Ho
ur
B
ol
d
Cl
e
an
Minute
Br
e
w
/
Ca
nce
l
Brew
Auto 12
AM
P
M
x
Auto Set
Hour
Bold
Clean
Minute
Brew/Cancel
NOTA: Deje que la cafetera se enfríe durante 5 minutos antes de comenzar el próximo
ciclo de elaboración.
Luego de que se acabe el tiempo del modo Warm
(Calentamiento), la luz del botón Brew (Elaboración)
del frente y la cafetera se apagarán automáticamente.
3
Para cancelar el ciclo de elaboración o el modo Warm
(Calentamiento): Presione el botón BREW (Elaborar)
una vez. El ciclo Brew (Elaborar) o el modo Warm
(Calentamiento) se cancelará.
NOTA: si se levanta la tapa de la canasta de elaboración mientras se está preparando
café, se interrumpirá el proceso de elaboración y se deteriorará el sabor del café.
CARACTERÍSTICA DE PAUSA PARA SERVIR
La característica Pause and pour (Pausa para servir) permite retirar la jarra de la cafetera y servir
una taza de café antes de que se termine la elaboración. Al sacar la jarra, una válvula especial
detiene el flujo de café de la canasta de elaboración. Sin embargo, la elaboración no se detiene.
Si no se coloca la jarra nuevamente en la cafetera en menos de 25 segundos, se derramará el
agua y el café molido de la canasta de elaboración.
CONSEJOS PARA OBTENER RESULTADOS IDEALES
CONSEJOS RÁPIDOS
Granos frescos de café: Un café realmente sabroso se puede preparar solamente con
granos frescos de café. Para conservar la frescura de los granos de café, manténgalos en
un recipiente hermético opaco y guárdelos en un lugar fresco y seco. No se recomienda
refrigerarlos, debido a que el agua tiende a condensarse sobre los granos cada vez que
se abre el recipiente. El congelamiento puede ayudar a mantener los granos almacenados
durante un período prolongado, pero también afectará su sabor negativamente.
El molido justo: La mejor taza de café se prepara con granos de café que han sido molidos
adecuadamente, justo antes de prepararlo. Cuando muela los granos de café, cerciórese de que
sea a un nivel de molido medio, el apropiado para las cafeteras de filtro automáticas. Encuentre
los molinillos de café KitchenAid en su tienda local o en Internet en www.KitchenAid.com.
La cantidad adecuada de café molido: Para obtener buenos resultados es crucial que use la
dosificación correcta de café y de agua. Use como referencia las marcas provistas en el filtro
de color dorado y la guía de dosificación que está en la parte posterior del tanque de agua,
y ajuste las cantidades a su gusto. Si el molido es más fino, por lo general se necesita menos
café, pero esto puede producir un café amargo y bloquear el filtro. Para obtener un café
menos fuerte, prepárelo siguiendo la dosificación sugerida de granos de café y agua; luego
dilúyalo con agua caliente. Esto aumenta el sabor y hace que quede menos amargo.
La pureza del agua para la elaboración de café: Un sabroso café comienza con agua fresca.
Eltanque de agua removible es fácil de llenar, para proveerle siempre un café con un gusto
ideal. También es fácil de limpiar, para que usted siempre pueda preparar su café con el agua
más fresca. En lugares en donde las condiciones del agua local sean muy malas, tal vez desee
usar agua embotellada. No use agua destilada ni agua mineral, ya que pueden dañar su cafetera.
Para mantener la cafetera limpia: Debido a que los aceites del café que se acumulan en la
canasta de elaboración y en la jarra pueden ponerse en malas condiciones y afectar el sabor
del café preparado, es importante que estas dos piezas se limpien diariamente para poder
preparar un café con el mejor sabor.
Consumo del café recién preparado: Para obtener el mejor sabor, se recomienda consumir
elcafé dentro de los 30 minutos luego de haberse completado el ciclo de elaboración.
36 | CONSEJOS PARA OBTENER RESULTADOS IDEALES
Page 37

CUIDADO Y LIMPIEZA
CÓMO LIMPIAR LA CAFETERA
NOTA: Antes de limpiarla, siempre desconecte la cafetera del tomacorriente.
Asegúresede que la cafetera se haya enfriado completamente.
La canasta de elaboración y el filtro permanente
1
de color dorado son aptos para lavavajillas.
Colóquelosúnicamente en la bandeja superior.
La jarra y el tanque de agua se pueden limpiar con
2
agua tibia y jabonosa, luego enjuáguelos con agua
limpia y déjelos secar. No se recomienda usar ningún
tipo de agentes abrasivos ni productos de limpieza.
3
AM
Auto 12
PM
x
Limpie el cabezal con un paño húmedo para quitar las
salpicaduras de café.
CÓMO QUITAR LOS DEPÓSITOS DE MINERALES
Con el paso del tiempo, se acumularán depósitos de calcio (sarro) del agua en la cafetera y
perjudicarán la eficiencia de la elaboración y la calidad del café. Si nota que la elaboración lleva
más tiempo que el normal, o si la cafetera hace ruidos raros, entonces es tiempo de quitar el
sarro. El indicador “Clean” (Limpiar) destellará cuando la cafetera haya completado 100 ciclos
de elaboración. Deberá quitarse el sarro lo antes posible para conservar el rendimiento y la
vida útil de la cafetera.
NOTA: Para quitar el sarro de la cafetera se puede usar una solución de agua y vinagre o
un agente envasado para quitar el sarro, como Affresh®. Mezcle siempre la solución para
quitar el sarro con agua fresca.
Antes de quitar el sarro, cerciórese de que la canasta
1
A
M
Aut
o
1
2
B
rew/C
a
nc
e
l
A
u
t
o
S
e
t
H
o
u
r
Minu
te
Bold
C
le
a
n
de elaboración no contenga café ni el filtro de color
dorado ni filtros de papel.
ESPAÑOL
2
Agua fresca
Vinagre
Si usa vinagre, llene el tanque de agua con una
solución compuesta por 6 tazas de vinagre y 6 tazas
deagua fresca.
Si usa un agente para quitar el sarro, llene el
tanque de agua con este y con agua fresca. Siga las
instrucciones del envase para ver las proporciones
recomendadas de agente para quitar el sarro y de
agua fresca que se deben usar.
CUIDADO Y LIMPIEZA | 37
Page 38

Au
to 12
AM
PM
x
Auto S
e
t
Ho
ur
B
ol
d
Cle
an
Minute
Br
e
w
/
Cance
l
Brew
Auto 12
AM
P
M
x
Auto Set
Hour
Bold
Clean
Minute
Brew/Cancel
CUIDADO Y LIMPIEZA
Cuando el indicador “Clean” (Limpiar) comience
adestellar en la pantalla, haga funcionar un ciclo
delimpieza: Presione el botón CLEAN (limpiar). El
indicador “Clean” (Limpiar) dejará de destellar. Luego
presione el botón de BREW (Elaboración) paracomenzar
el ciclo de limpieza.
3
AM
Auto 12
PM
x
Brew/Cancel
Auto Set
Hour
Minute
Bold
Clean
Cuando del ciclo de limpieza esté completo
(aproximadamente 30 minutos), sonarán 3 pitidos
yelindicador “Clean” (Limpiar) se apagará.
4
Haga funcionar al menos dos ciclos solo con agua
fresca y limpia luego de completar el ciclo de limpieza.
NOTA: La cafetera deberá completar un ciclo de limpieza usando un tanque de agua
entero lleno de solución para quitar el sarro.
38 | CUIDADO Y LIMPIEZA
Page 39

SOLUCIÓN DE PROBLEMAS
3. Si oye tres tonos rápidos:
ADVERTENCIA
Peligro de Choque Eléctrico
Conecte a un contacto de pared de
conexión a tierra de 3 terminales.
No quite la terminal de conexión a
tierra.
No use un adaptador.
No use un cable eléctrico de
extensión.
No seguir estas instrucciones
puede ocasionar la muerte,
incendio o choque eléctrico.
Si la cafetera no funciona según lo previsto,
verifique lo siguiente:
1. Si no se ilumina la pantalla:
• Revise si la cafetera está enchufada en
un tomacorriente de 3 terminales con
conexión a tierra. Si lo está, revise el fusible
o el cortacircuitos del circuito eléctrico al
que está conectada la cafetera y asegúrese
de que el circuito esté cerrado.
2. Si solo se prepara una parte del agua
agregada a la cafetera:
• Deberá quitar el sarro de la cafetera de
inmediato. Consulte la sección “Cuidado
y limpieza”.
• No hay agua en el tanque de agua.
Lacafetera no elaborará café. Llene
eltanque con agua limpia y fresca y
continúecon el ciclo de elaboración como
se describe en la sección “Cómo llenar la
cafetera con agua para elaborar café”.
4. Si destella “Er1” en la pantalla y se oye
untono:
•
Es posible que haya un botón atascado.
Desenchufe la cafetera y presione varias
veces cada botón. Enchufe la cafetera en
un tomacorriente de 3 terminales con
conexión a tierra. Si aparece nuevamente
“Er1” en la pantalla, repita este
procedimiento.
5. Si se derrama café de la canasta de
elaboración:
• La canasta de elaboración no está
correctamente en su lugar.
Verifiquesilacanasta de elaboración está
correctamente en su lugar.
• Se colocó demasiado café en la canasta
de elaboración.
• Se usó el filtro de color dorado y el filtro
de papel al mismo tiempo.
6. Si sale agua por la parte posterior de la
cafetera:
• Se colocó demasiada agua en el tanque
de agua.
Si el problema no se debe a lo mencionado
anteriormente, consulte la sección “Cómo
obtener servicio técnico” en la sección
“Garantía y servicio”.
NOTA: No devuelva la cafetera a la tienda
minorista ya que ellos no brindan servicio
técnico.
ESPAÑOL
SOLUCIÓN DE PROBLEMAS | 39
Page 40

GARANTÍA Y SERVICIO TÉCNICO
GARANTÍA DE KITCHENAID PARA LA CAFETERA EN LOS 50 ESTADOS
DE LOS ESTADOS UNIDOS, EL DISTRITO DE COLUMBIA, PUERTO RICO
YCANADÁ
Esta garantía se extiende al comprador y a cualquier propietario subsiguiente para las CAFETERAS
usadas en los 50 estados de Estados Unidos, el Distrito de Columbia, Puerto Rico y Canadá.
Duración de la garantía: Un año de garantía completa a partir de la fecha de compra.
KitchenAid pagará
por lo siguiente,
asuelección:
Reemplazo sin dificultades de su CAFETERA. Consulte la siguiente
página para obtener detalles acerca de cómo obtener el servicio
ollame sin cargo al Centro para la eXperiencia del cliente al
1-800-541-6390.
O BIEN
El costo de las piezas de repuesto y de la mano de obra de
reparación para corregir los defectos de los materiales y la mano
de obra. El servicio deberá ser provisto por un centro de servicio
autorizado por KitchenAid.
KitchenAid no
pagarápor:
EXCLUSIÓN DE GARANTÍAS IMPLÍCITAS; LIMITACIÓN DE RECURSOS
LAS GARANTÍAS IMPLÍCITAS, INCLUIDAS EN LA MEDIDA QUE CORRESPONDA LAS
GARANTÍAS DE COMERCIABILIDAD O DE IDONEIDAD PARA UN PROPÓSITO PARTICULAR,
QUEDAN EXCLUIDAS EN LA MEDIDA EN QUE ESTÉ PERMITIDO POR LEY. TODA GARANTÍA
IMPLÍCITA QUE SEA IMPUESTA POR LEY SERÁ LIMITADA A UN AÑO O AL PERÍODO MÁS
CORTO PERMITIDO POR LEY. ALGUNOS ESTADOS Y PROVINCIAS NO PERMITEN LAS
LIMITACIONES O EXCLUSIONES ACERCA DE CUÁNTO DEBE DURAR UNA GARANTÍA
IMPLÍCITA DE COMERCIABILIDAD O DE IDONEIDAD, DE MODO QUE LAS LIMITACIONES
OEXCLUSIONES ARRIBA MENCIONADAS PUEDEN NO APLICARSE EN SU CASO.
SI ESTE PRODUCTO NO FUNCIONA COMO SE HA GARANTIZADO, EL ÚNICO Y
EXCLUSIVO RECURSO DEL CLIENTE SERÁ EL DE REPARARLO O REEMPLAZARLO
SEGÚNLOS TÉRMINOS DE ESTA GARANTÍA LIMITADA. KITCHENAID Y KITCHENAID
CANADA NO SE RESPONSABILIZARÁN POR DAÑOS INCIDENTALES O CONSECUENTES.
Esta garantía le otorga derechos legales específicos y es posible que usted tenga también
otros derechos, los cuales varían de un estado a otro o de una provincia a otra.
A. Reparaciones cuando su CAFETERA haya sido empleada para
fines ajenos al uso doméstico normal de una sola familia.
B. Daños causados por accidente, alteración, uso indebido o
abuso.
C. Cualquier gasto de envío o manipulación para llevar la
CAFETERA a un centro de servicio autorizado.
D. Piezas de repuesto o costos de mano de obra para accesorios
de las cafeteras operadas fuera de los 50 estados de Estados
Unidos, el Distrito de Columbia, Puerto Rico y Canadá.
40 | GARANTÍA Y SERVICIO TÉCNICO
Page 41

GARANTÍA Y SERVICIO TÉCNICO
GARANTÍA DE REEMPLAZO SIN DIFICULTADES — EN LOS CINCUENTA
ESTADOS DE ESTADOS UNIDOS, EL DISTRITO DE COLUMBIA Y
PUERTORICO
Confiamos tanto en que la calidad de
nuestros productos cumple con las exigentes
normas de KitchenAid que, si su CAFETERA
presentara alguna falla durante el primer
año de compra, KitchenAid se encargará de
entregar un reemplazo idéntico o similar a su
domicilio sin cargo y de devolver su cafetera
original a nosotros. La unidad de reemplazo
estará también cubierta por nuestra garantía
limitada de un año.
Si su CAFETERA fallara durante el primer
año de compra, simplemente llame a nuestro
Centro para la eXperiencia del cliente
al 1-800-541-6390, de lunes a viernes.
Tengaamano el recibo de compra original
cuando llame. Se requerirá el comprobante
decompra para iniciar un proceso de reclamo.
Proporcione al consultor su dirección de envío
completa (no números de casillas de correo).
Cuando reciba la CAFETERA de reemplazo,
use la caja, el material de embalaje y la
etiqueta de envío prepago para embalar la
CAFETERA original y devolverla a KitchenAid.
GARANTÍA DE REEMPLAZO SIN DIFICULTADES — EN CANADÁ
Confiamos tanto en que la calidad de
nuestros productos cumple con las exigentes
normas de KitchenAid que, si la CAFETERA
presentara alguna falla durante el primer año
de compra, reemplazaremos su CAFETERA
por una idéntica o similar. La unidad de
reemplazo estará también cubierta por
nuestra garantía limitada de un año.
Si su CAFETERA fallara durante el primer
año de compra, simplemente llame a nuestro
Centro para la eXperiencia del cliente al 1-800-
807-6777, de lunes a viernes. Tengaamano
el recibo de compra original cuando llame.
Se requerirá el comprobante decompra para
iniciar un proceso de reclamo. Proporcione
alasesor su dirección de envío completa.
Cuando reciba la CAFETERA de reemplazo,
use la caja, el material de embalaje y la
etiqueta de envío prepago para embalar la
CAFETERA original y devolverla a KitchenAid.
CÓMO OBTENER SERVICIO TÉCNICO DESPUÉS DE QUE EXPIRE LA
GARANTÍA O CÓMO PEDIR ACCESORIOS Y PIEZAS DE REPUESTO
En los Estados Unidos y Puerto Rico:
Para obtener información acerca del servicio
técnico o para pedir accesorios o piezas de
repuesto, llame sin costo al 1-800-541-6390
o escriba a:
Customer eXperience Center,
KitchenAid Small Appliances,
P.O. Box 218, St. Joseph, MI 49085-0218.
Fuera de los Estados Unidos y Puerto Rico:
Consulte a su distribuidor local de KitchenAid
o a la tienda donde compró la cafetera para
obtener información sobre cómo acceder al
servicio técnico.
Para obtener información acerca del servicio
en Canadá:
Llame sin cargo al 1-800-807-6777.
Para obtener información acerca del servicio
en México:
Llame sin cargo al 01-800-0022-767.
ESPAÑOL
®/™ ©2018 KitchenAid. Todos los derechos reservados. KITCHENAID y el diseño de la batidora
conbase son marcas registradas en EE.UU. y en otros países. Usado en Canadá bajo licencia.
GARANTÍA Y SERVICIO TÉCNICO | 41
Page 42

Page 43

Page 44

DISCOVER MORE. DÉCOUVREZ PLUS. DESCUBRA MÁS.
KITCHENAID.COM/QUICKSTART
PRODUCT QUESTIONS OR RETURNS
QUESTIONS SUR LE PRODUIT OU LES RETOURS
PREGUNTAS SOBRE EL PRODUCTO O DEVOLUCIÓNES
USA: 1.800.541.6390 | KitchenAid.com
CANADA: 1.800.807.6777 | KitchenAid.ca
MEXICO: KitchenAid.com.mx
LATIN AMERICA: KitchenAid-Latam.com
®/™ ©2018 KitchenAid. All rights reserved. KITCHENAID and the design of the stand mixer
®/™ ©2018 KitchenAid. Tous droits réservés. KITCHENAID et la forme du batteur sur socle sont des
®/™ ©2018 KitchenAid. Todos los derechos reservados. KITCHENAID y el diseño de la batidora con
W11288105A 10/18
are trademarks in the U.S. and elsewhere. Used under license in Canada.
marques de commerce aux É.-U. et dans d’autres pays. Utilisé sous licence au Canada.
base son marcas registradas en EE.UU. y en otras partes. Usada en Canadá bajo licencia.
 Loading...