

Page 1
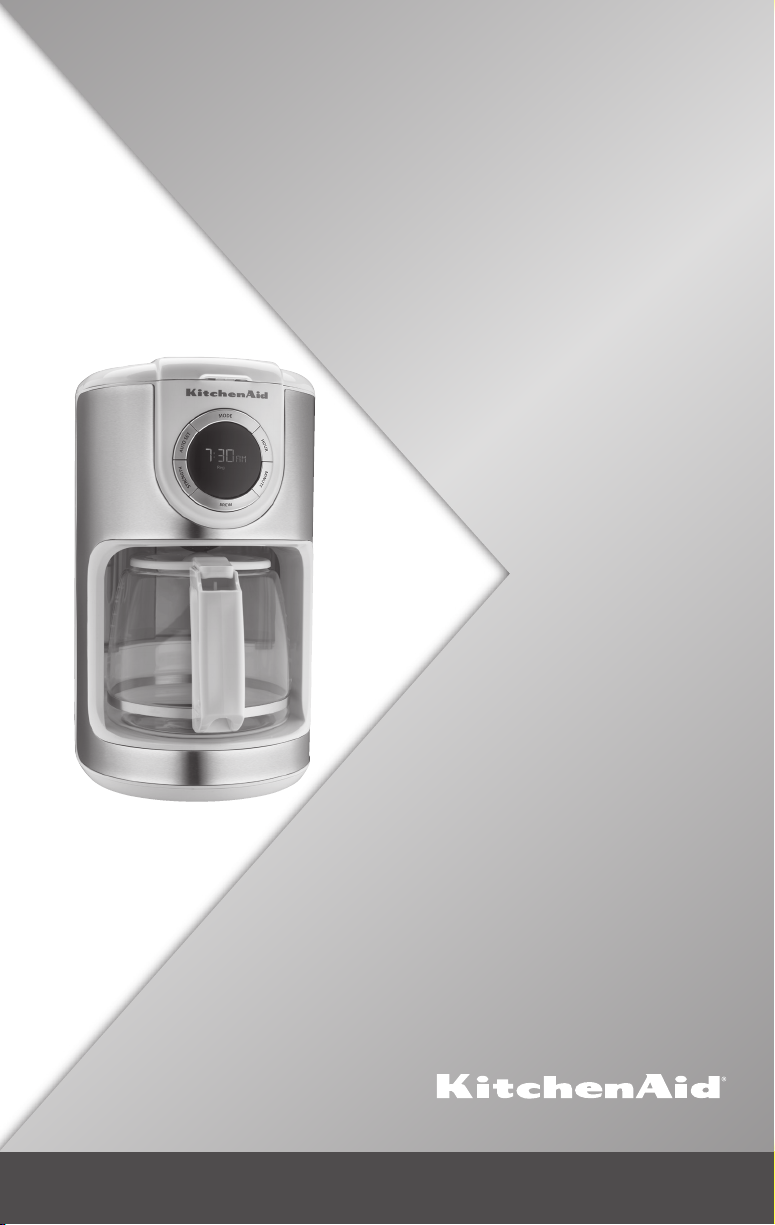
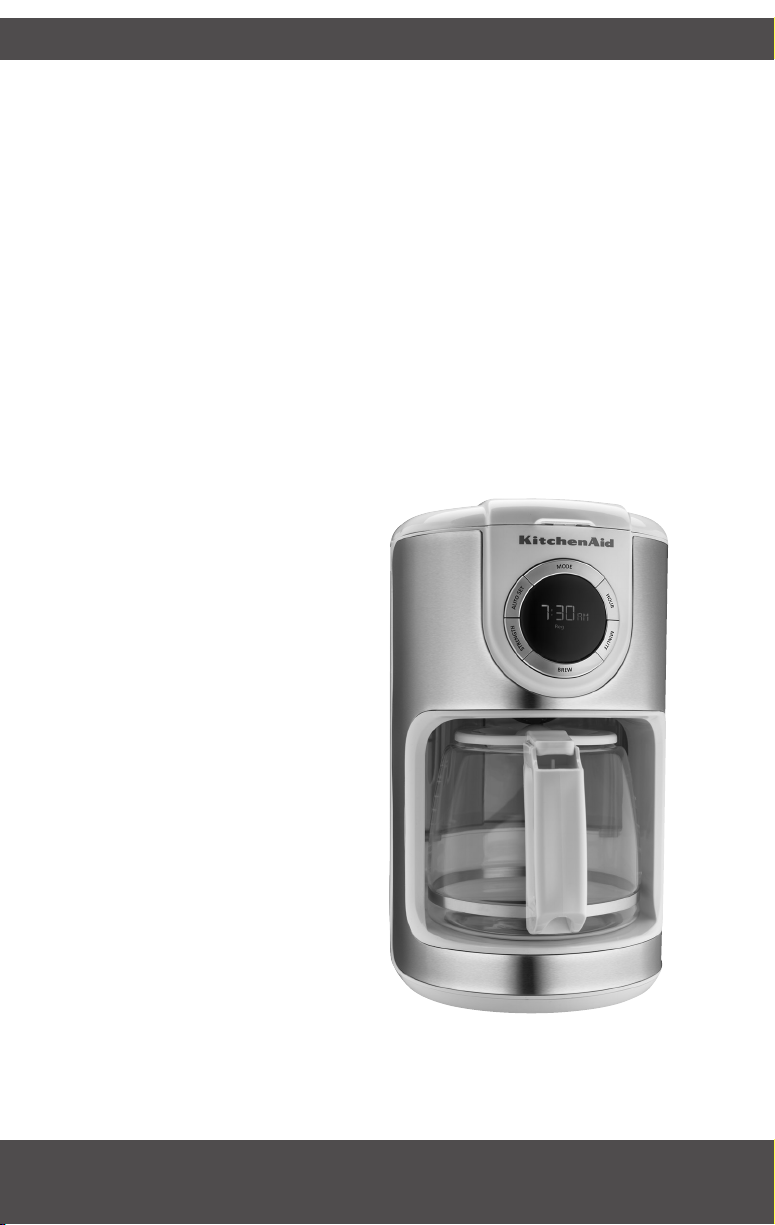
KCM1202
INSTRUCTIONS
INSTRUCTIONS
INSTRUCCIONES
Page 2
WELCOME TO THE WORLD OF KITCHENAID.
We’re committed to helping you
create a lifetime of delicious meals for
family and friends. To help ensure the
longevity and performance of your
appliance, keep this guide handy. It will
empower you with the best way to
use and care for your product. Your
satisfaction is our #1 goal. Remember
to register your product online at
www.kitchenaid.com or by
mail using the attached
Product Registration Card.
USA: 1.800.541.6390
Canada: 1.800.807.6777
2
Join us in the kitchen at www.kitchenaid.com.
KitchenAid.com
KitchenAid.ca
Page 3

COFFEE MAKER INSTRUCTIONS
TABLE OF CONTENTS
COFFEE MAKER SAFETY
Important safeguards .......................................................................................... 4
Electrical requirements ...................................................................................... 5
PARTS AND FEATURES
Parts and accessories .......................................................................................... 6
ASSEMBLING THE COFFEE MAKER
Preparing the Coffee Maker for use ................................................................... 7
Installing the water lter ..................................................................................... 7
OPERATING THE COFFEE MAKER
Setting up the clock ............................................................................................ 8
Setting brew strength ......................................................................................... 9
Pause and pour feature ....................................................................................... 9
Filling the Coffee Maker with water for brewing ............................................. 10
Filling the brew basket with coffee ................................................................... 11
Brewing coffee ................................................................................................. 12
1–4 cup brewing .............................................................................................. 13
Setting up the Automatic brew feature ............................................................ 14
Using previously programmed Automatic brew settings ................................. 15
TIPS FOR GREAT RESULTS
Quick tips ......................................................................................................... 16
CARE AND CLEANING
Cleaning the Coffee Maker .............................................................................. 17
TROUBLESHOOTING ......................................................................................... 19
WARRANTY .......................................................................................................... 20
English
PROOF OF PURCHASE & PRODUCT REGISTRATION
Always keep a copy of the itemized sales receipt showing the date of purchase of your
Coffee Maker. Proof of purchase will assure you of in-warranty service. Before you use your
Coffee Maker, please ll out and mail your product registration card packed with the unit,
or register on-line at www.kitchenaid.com. This card will enable us to contact you in the
unlikely event of a product safety notication and assist us in complying with the provisions
of the Consumer Product Safety Act. This card does not verify your warranty. Please
complete the following for your personal records:
Model Number ______________________________________________________________________
Serial Number ______________________________________________________________________
Date Purchased _____________________________________________________________________
Store Name ________________________________________________________________________
3
Page 4
COFFEE MAKER SAFETY
IMPORTANT SAFEGUARDS
When using electrical appliances, basic safety precautions should always be
followed to reduce the risk of re, electric shock, and/or injury to persons,
including the following:
1. Read all instructions.
2. Do not touch hot surfaces. Use handles or knobs.
3. To protect against electrical shock, do not immerse cord, plugs, or Coffee
Maker in water or other liquid.
4. Close supervision is necessary when any appliance is used by or near children.
5. Unplug Coffee Maker from outlet when not in use and before cleaning. Allow to
cool before putting on or taking off parts, and before cleaning the appliance.
6. Do not operate any appliance with a damaged cord or plug or after the
appliance malfunctions or has been damaged in any manner. Return appliance
to the nearest Authorized Service Facility for examination, repair or adjustment.
7. The use of accessory attachments not recommended by the appliance
manufacturer may cause injuries.
8. Do not use outdoors.
9. Do not let cord hang over edge of table or counter, or touch hot surfaces.
10. Do not place on or near a hot gas or electric burner, or in a heated oven.
11. Do not use appliance for other than intended use.
4
Page 5

COFFEE MAKER SAFETYCOFFEE MAKER SAFETY
12. Do not use appliance without lid properly placed on carafe.
13. The carafe is designed for use with this appliance. It must never be
used on a range top or in a microwave oven.
14. Do not set a hot carafe on a wet or cold surface.
15. Do not use a cracked carafe or a carafe having a loose or
weakened handle.
16. Do not clean carafe with abrasive cleaners, steel wool pads, or other
abrasive material.
17. This product is designed for household use only.
18. Scalding may occur if the brew basket lid is opened during the brew cycles.
SAVE THESE INSTRUCTIONS
Electrical requirements
Voltage: 120 Volts A.C. only
Frequency: 60 Hz
NOTE: If the plug does not fit in the outlet,
contact a qualified electrician. Do not modify
the plug in any way. Do not use an adapter.
Do not use an extension cord. If the power
supply cord is too short, have a qualified
electrician or serviceman install an outlet
near the appliance.
English
5
Page 6
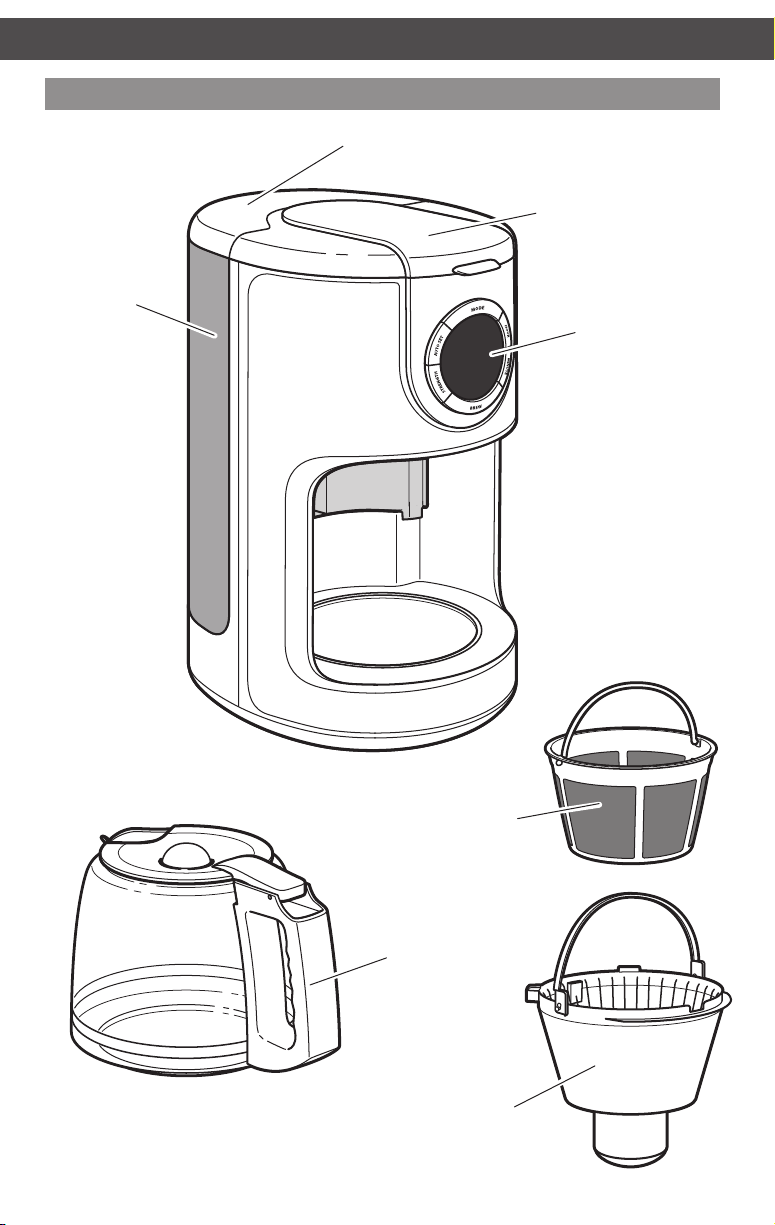
PARTS AND FEATURES
Parts and accessories
Removable
water tank
Water tank lid
Brew basket
lid
Programmable
display
Gold Tone
permanent lter
Glass carafe
Brew basket
6
Page 7
ASSEMBLING THE COFFEE MAKER
Preparing the Coffee Maker for use
Before First Use
Wash the brew basket, Gold Tone permanent filter, and carafe in hot, soapy water,
then rinse with clean water and dry. Do not use abrasive cleansers or scouring pads.
NOTE: These parts can also be washed in the top rack of the dishwasher.
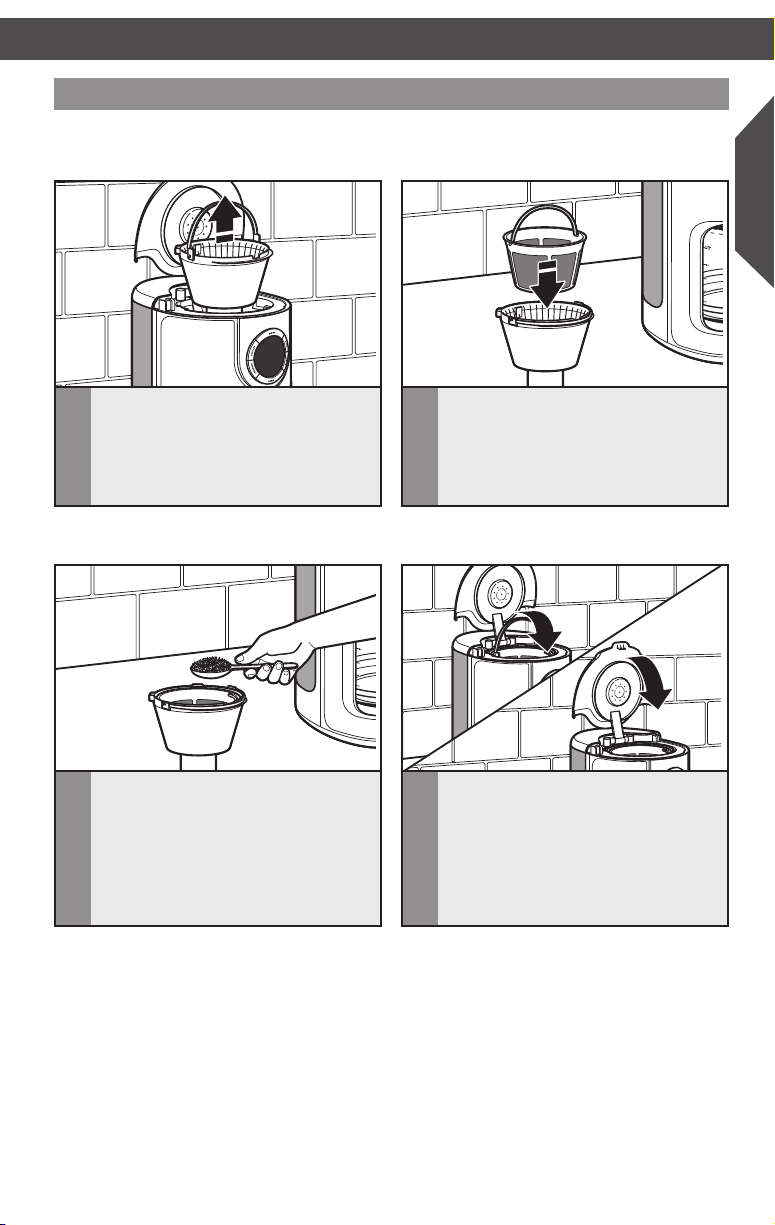
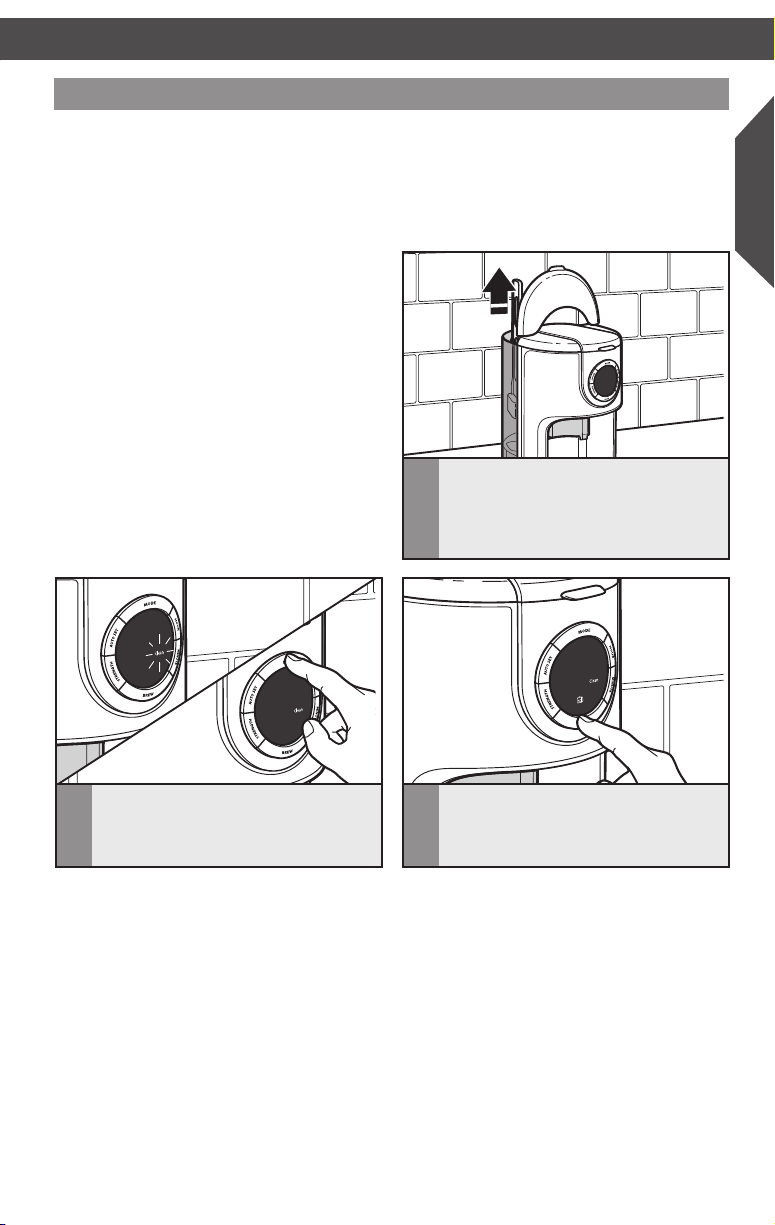
Installing the water lter
Use of the water filter is optional, but strongly recommended. The filter reduces
contaminants which impair the coffee flavor. The Coffee Maker will operate normally
without it.
The water filter is for use only with municipally treated tap water or well water that
is regularly tested for contaminants; the filter is not intended to remove contaminants
in water that is not suitable for drinking.
English
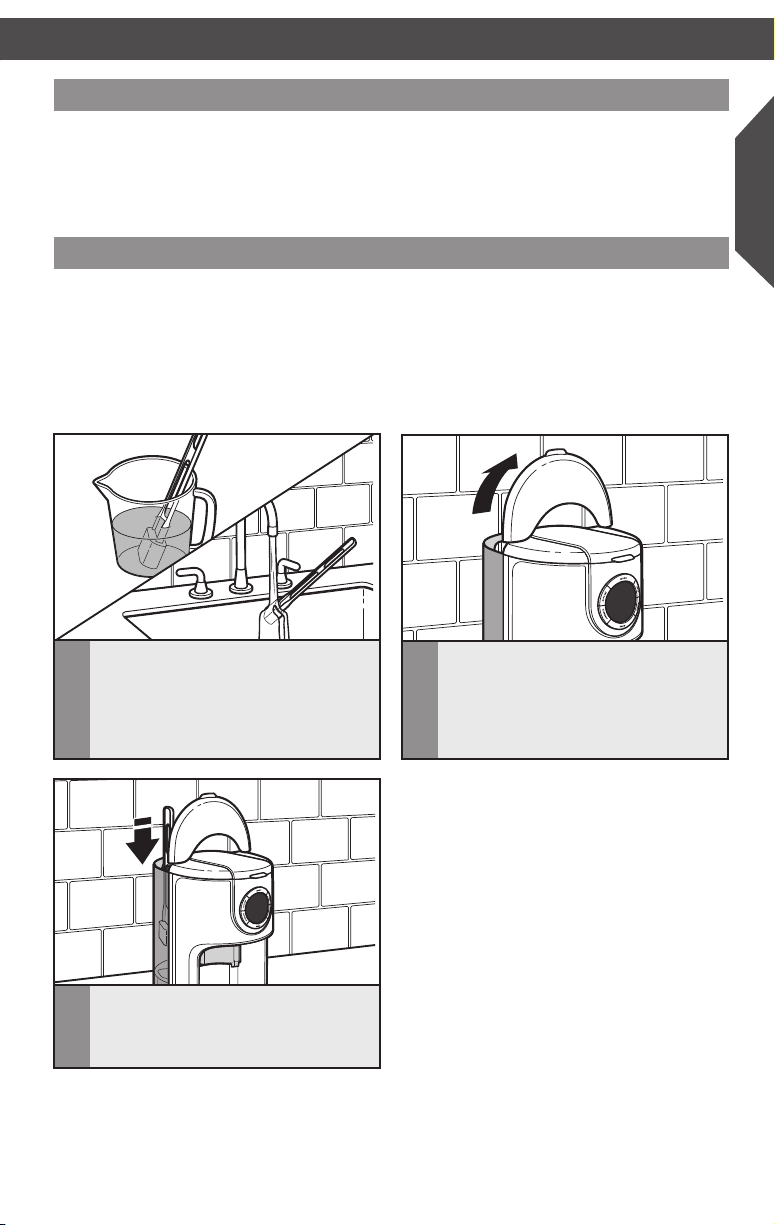
Place the filter cartridge in a separate
1
container filled with fresh, cool water.
The cartridge should remain submerged
in the water for 10 minutes. Rinse the
filter cartridge under running water for
5 seconds after soaking.
Place the filter cartridge in the well
3
at the bottom of the water reservoir.
Push the cartridge slightly to make sure
it fits snugly.
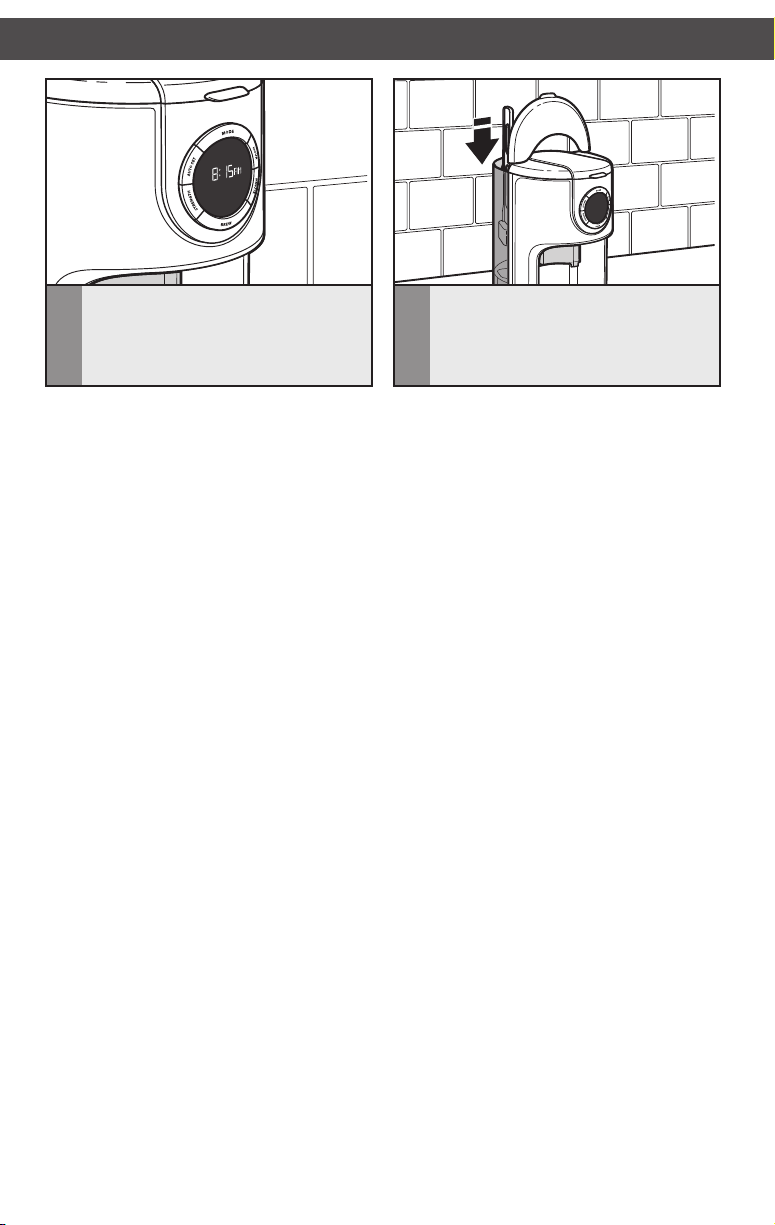
Lift the water tank lid using the tab on
2
the rear of the lid.
IMPORTANT: Every time you install
a new water filter, run the Coffee
Maker through a complete brew cycle
without coffee. Use a full carafe of
clean, cool water.
7
Page 8
OPERATING THE COFFEE MAKER
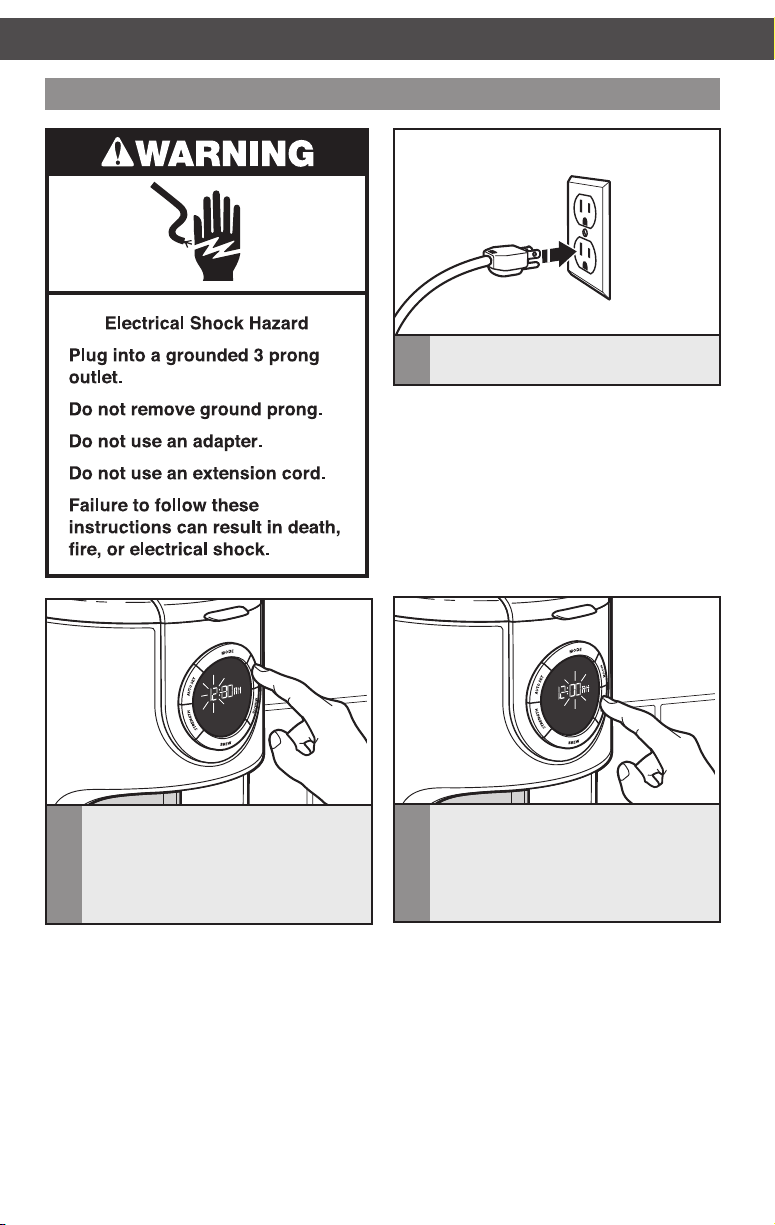
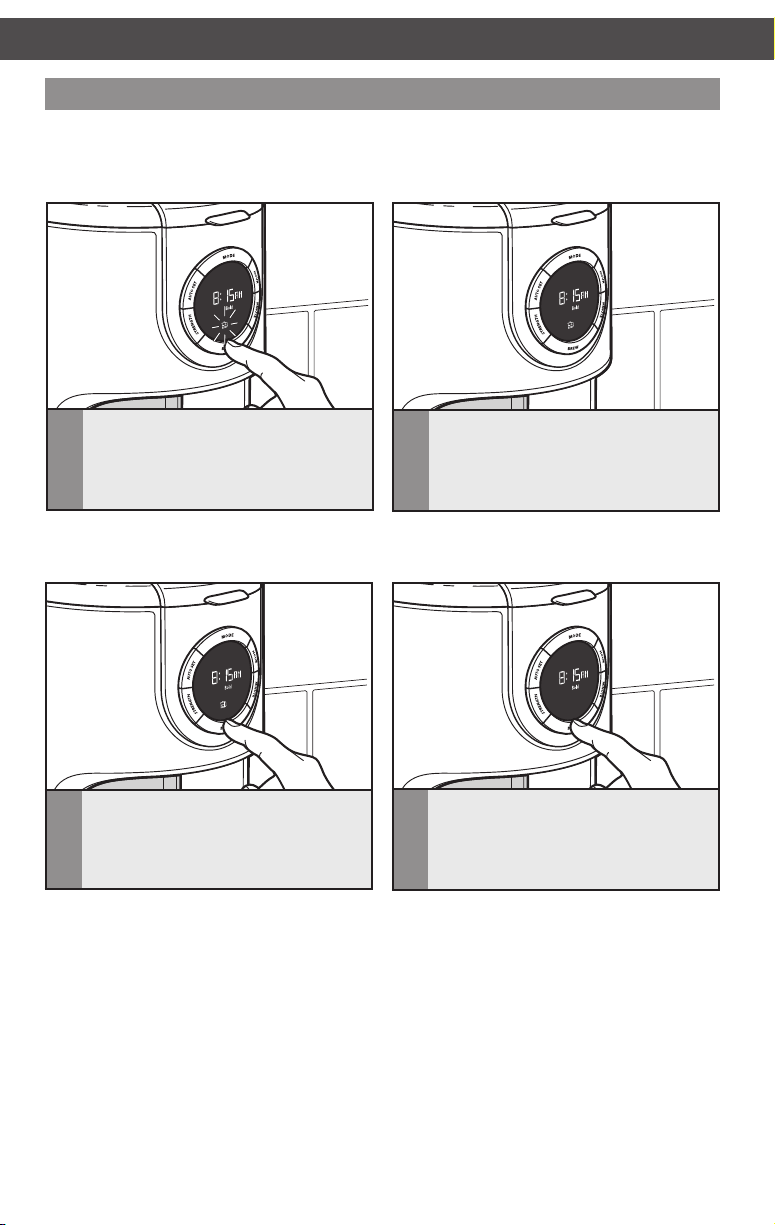
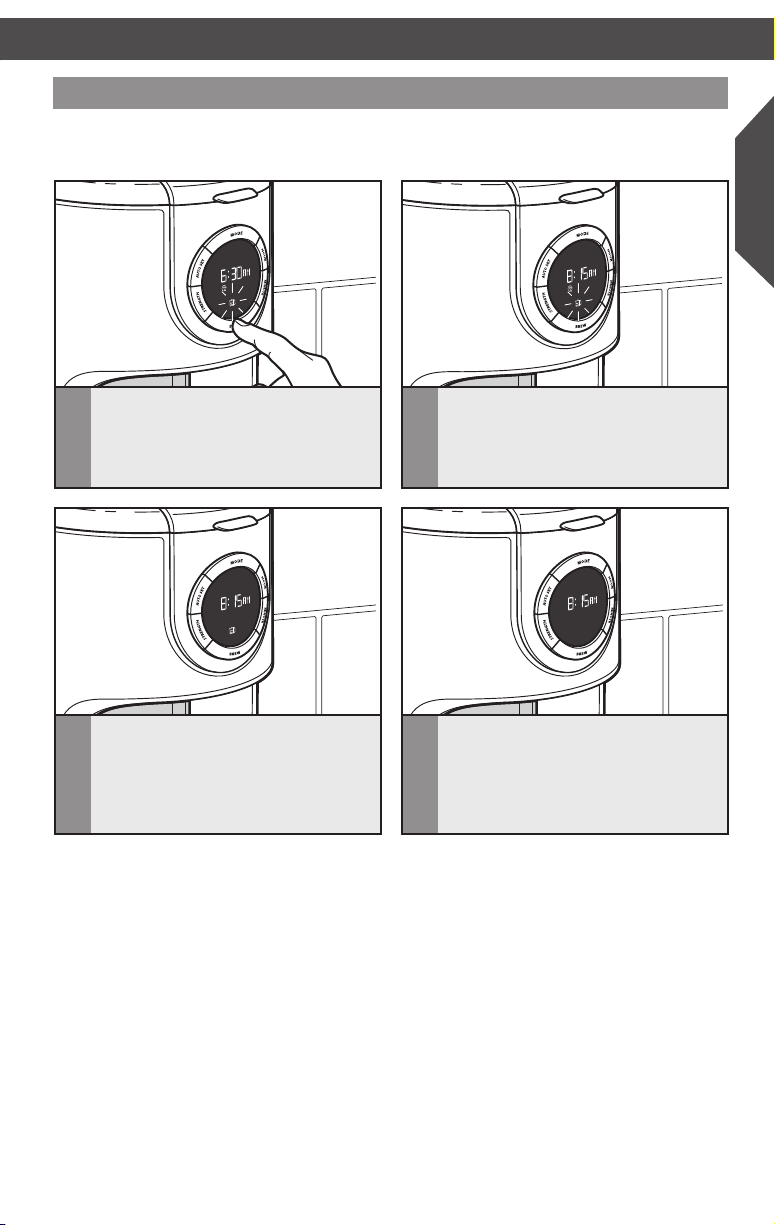
Setting up the clock
Plug into a grounded 3-prong outlet.
1
NOTE: When the Coffee Maker is first
plugged in or when power is restored after
an interruption, the brew timer display will
initially show 12:00 AM.
To set the Hour: Press HOUR. The
2
Hour setting will begin to blink. The
Hour digits will change with each press;
or PRESS AND HOLD and the Hour
digits will scroll rapidly.
8
To set the Minutes: Press MINUTE.
3
The Hour setting will switch to a solid
display and the Minute setting will begin
to blink. The Minute digits will change
with each press; or PRESS AND HOLD
and the Minute digits will scroll rapidly.
Page 9
To save the current displayed time and
4
exit clock set up: Press ANY other
button (Mode, Auto Set, Strength or
Brew); or do not press any button for
10 seconds.
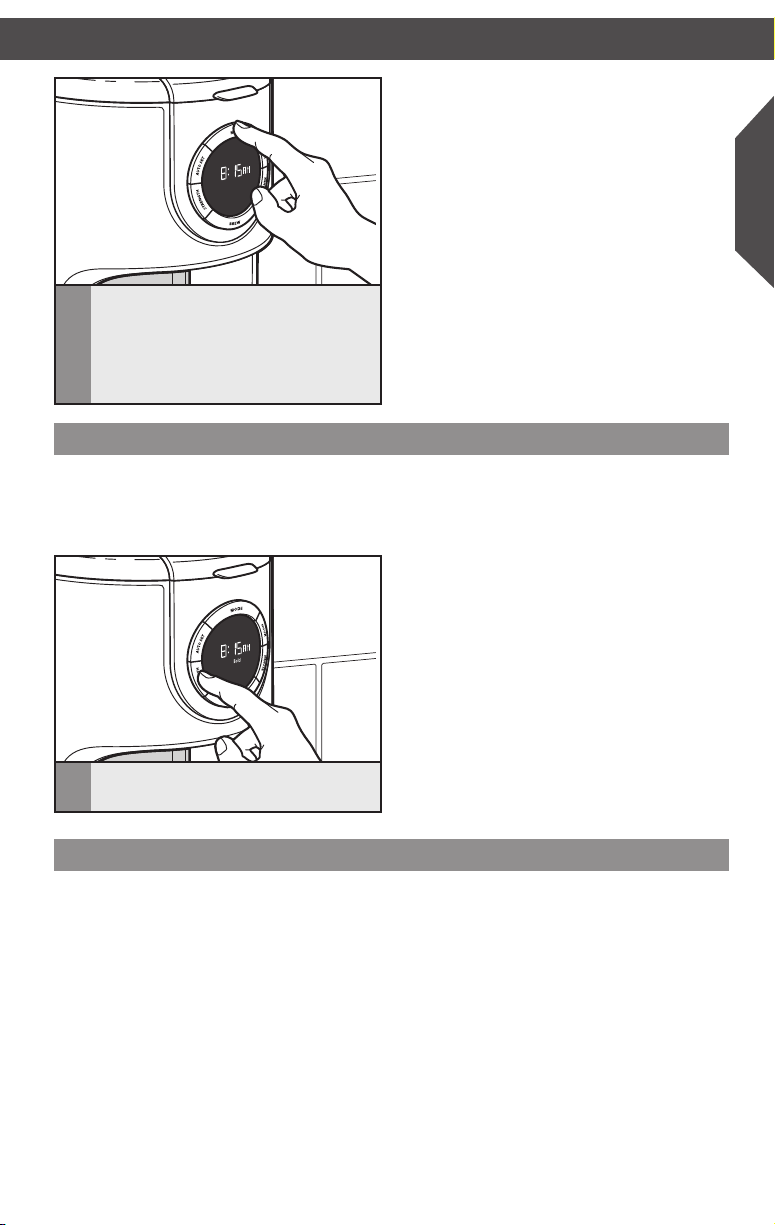
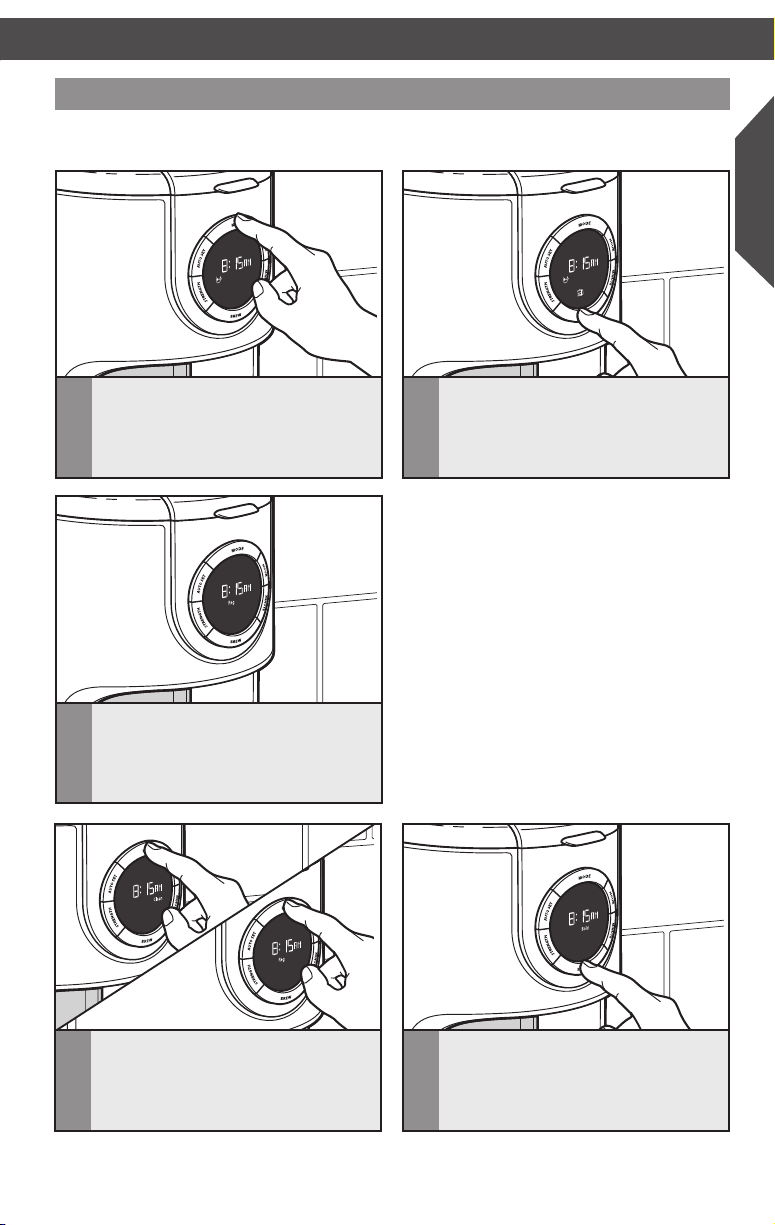
Setting brew strength
The Coffee Maker can be programmed to brew coffee at a Regular (REG) or Bold (BOLD)
strength (the default brew strength is Regular).
To program and activate the “Bold” mode setting:
Press the STRENGTH button to select
1
the “Bold” indicator.
English
Pause and pour feature
The “Pause and pour” feature enables you to remove the carafe from the Coffee Maker and
pour a cup of coffee before brewing is finished. When the carafe is removed, a special valve
stops the flow of coffee from the brew basket. However, brewing does not stop. If the
carafe is not placed back in the Coffee Maker within 30 seconds, water and coffee grounds
will overflow the brew basket.
9
Page 10
OPERATING THE COFFEE MAKER
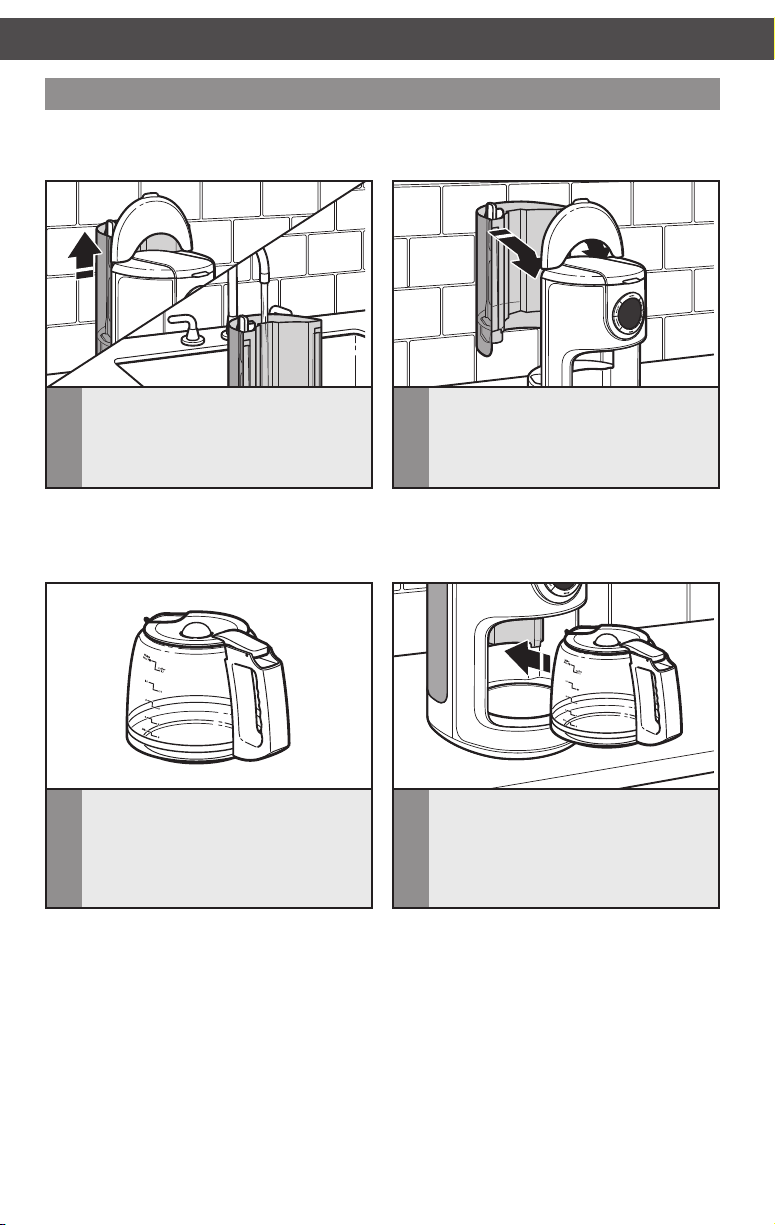
Filling the Coffee Maker with water for brewing
TIP: Brew one pot of fresh, cool water and discard before brewing the first pot of coffee
(see the “Preparing the Coffee Maker for Use” section).
Remove the water tank and fill with
1
enough fresh, cool water to make the
desired amount of coffee. A graduated
scale on the water tank indicates the
amount of water needed.
NOTE: The water tank does not need to be removed in order to be refilled; simply lift the
tank lid and pour fresh, cool water into the tank. Water can also be poured directly into the
reservoir at the back of the Coffee Maker.
On the carafe: The right side of the scale
3
(Coffee) is a measurement of coffee
volume. The left side of the scale (Water)
indicates the amount of water needed to
produce a given number of cups.
When replacing the tank, make sure to
2
align the holes on the top of the tank
with the tabs on the back of the Coffee
Maker housing.
Place the carafe in the Coffee Maker.
4
Make sure the lid is securely in position
and the bottom of the carafe is fully
seated, or the Pause and pour feature
may not engage, causing water and
coffee to overflow the brew basket.
10
Page 11
Filling the brew basket with coffee
TIP: The coffee filter can also be inserted and coffee grounds added without removing the
brew basket from the Coffee Maker.
English
Remove the brew basket from the top
1
of the Coffee Maker by grasping the
locking handle on the basket.
NOTE: Do not operate the Coffee Maker without the brew basket in place.
Fill the filter with one rounded
3
tablespoon of ground coffee for each
cup desired. Use a medium grind
appropriate for automatic drip Coffee
Makers. Too fine a grind will produce
bitterness and may clog the coffee filter.
Shake the brew basket slightly to even
out the bed of coffee.
Insert a 10–12 cup flat bottom paper
2
filter or the Gold Tone permanent filter
into the brew basket. Do not use both
types of filters at the same time. Using
both filters might cause water and
coffee to overflow the brew basket.
Place the basket into the Coffee Maker
4
and rotate the handle toward the front
of the Coffee Maker to lock the brew
basket in place. Be sure the brew basket
lid is fully closed before brewing.
11
Page 12
OPERATING THE COFFEE MAKER
Brewing coffee
To brew
1–4
Cups only, see the “
NOTE: Brew one pot of fresh, cool water and discard before brewing the first pot
of coffee (see the “Preparing the Coffee Maker for Use” section).
Press the BREW button to begin
1
brewing coffee. The Coffee Maker will
beep 1 time, and the “Brew” icon will
light up when the Brew cycle is started.
NOTE: Opening the brew basket lid while coffee is brewing will interrupt the brew
process and impair flavor.
1–4
cup brewing” section.
2
The Coffee Maker will beep 3 times
when the Brew cycle is complete, then
will automatically initiate the 2 hour
Warm cycle. After the Warm cycle
completes, one long beep will sound.
To cancel the Brew cycle or to turn off
3
the Coffee Maker manually during the
Warm cycle, press the Brew button
once. The Brew cycle will be cancelled.
IMPORTANT: The outside of the carafe may be warm to the touch after brewing. Use
discretion when placing the carafe on uncovered surfaces immediately after brewing.
12
Repeat steps 1–2 to brew additional
4
carafes of coffee. Always turn off the
Coffee Maker and allow it to cool for
5 minutes before starting the next
brew cycle.
Page 13
OPERATING THE COFFEE MAKEROPERATING THE COFFEE MAKER
1–4 cup brewing
NOTE: Brew one pot of fresh, cool water and discard before brewing the first pot
of coffee (see the “Preparing the Coffee Maker for Use” section).
English
Press MODE once. The indicator will
1
change from “Reg” to “1–4 Cup”.
The Coffee Maker will beep 3 times
3
when the Brew cycle is complete, then
will automatically initiate the 2 hour
Warm cycle. After the Warm cycle
completes, one long beep will sound.
Press the BREW button. One beep will
2
sound, and the “Brew” icon will light
up. The light will stay on throughout
the duration of the brew cycle, and will
stay lit throughout the Warm cycle.
NOTE: When the Brew cycle is complete
the “1–4 Cup” icon will turn off and the
Coffee Maker will change back to the
“Reg” setting
To cancel
4
MODE twice. The display will first
show “Clean”, then “REG”. The
Cup brewing cycle will be cancelled.
NOTE: If no button is pressed after “
cycle will be cancelled after 10 seconds.
1–4
Cup brewing: Press
1–4
Repeat steps 1–3 to brew additional
5
1–4
Cup” mode is selected, the
carafes of coffee. Always turn off the
Coffee Maker and allow it to cool for
5 minutes before starting the next
brew cycle.
1–4
Cup brewing
13
Page 14
OPERATING THE COFFEE MAKER
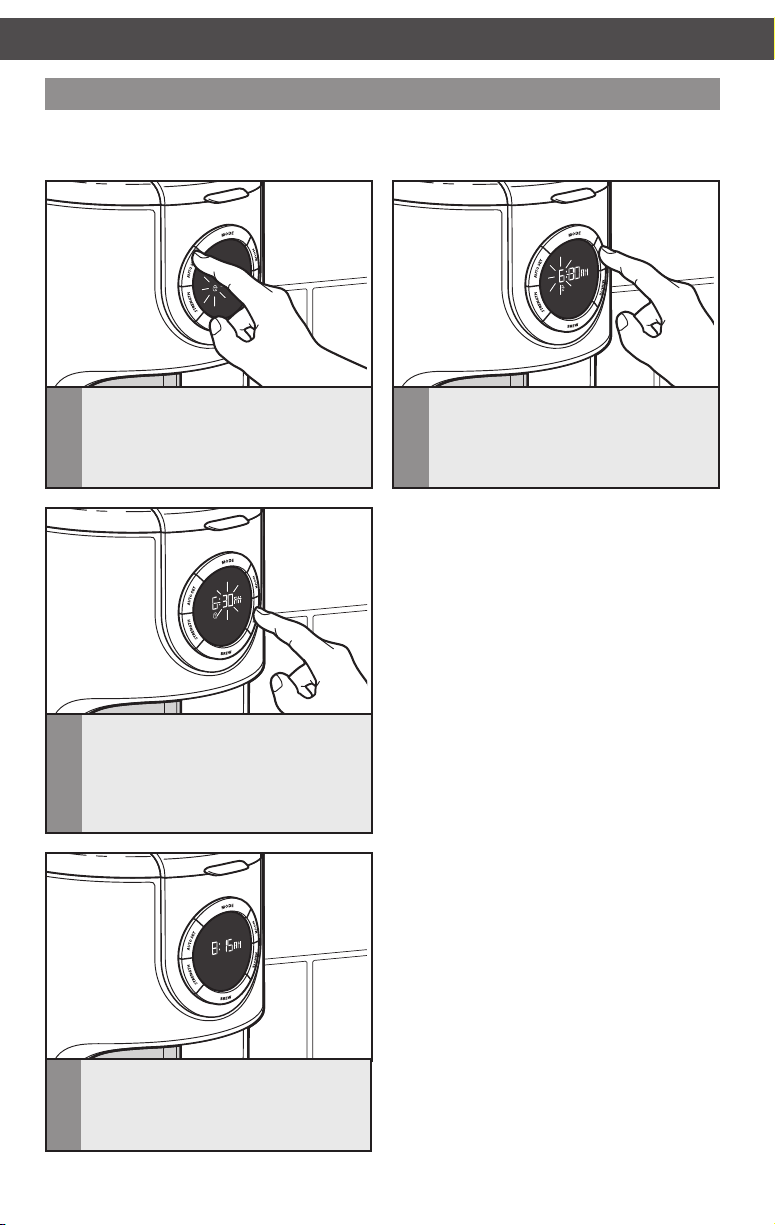
Setting up the Automatic brew feature
The Coffee Maker can be programmed to brew coffee at a preset time, making it easy to
wake up to fresh coffee every morning. To program and activate the Automatic Brew Timer:
Press the AUTO SET button one
1
time. The “Auto” indicator will flash
and the time display will change to the
currently set Auto Brew time.
(12:00 p.m. is the default time.)
Press the MINUTE button. The Hour
3
setting will switch to a solid display and
the Minute setting will begin to blink.
The Minute digits will change with each
press; or PRESS AND HOLD and the
Minute digits will scroll rapidly.
Press the HOUR button to select the
2
hour you want the Coffee Maker to
begin brewing. Hour digits will change
with each press; or PRESS AND HOLD
and the Hour digits will scroll rapidly.
NOTE: Auto Brew time may be saved in
2 different ways. After completing steps
1–3, either complete step 4 below to save
the Auto Brew time and exit out of the
feature, or go directly to step 1 of “Using
previously programmed Automatic brew
settings” to save the Auto Brew time and
automatically start the Auto Brew cycle.
NOTE: During auto brew time setting,
if there are no buttons pressed for
10 seconds after selecting the minute
setting, the “Auto” indicator will turn
off and the main screen will reappear.
Press the AUTO SET button. The
4
“Auto” indicator will turn off and the
main screen will reappear. The Auto
Brew time is saved.
14
Page 15
OPERATING THE COFFEE MAKEROPERATING THE COFFEE MAKER
Using previously programmed Automatic brew settings
These steps can also be followed to save the Auto Brew time after following steps 1–3
in the “Setting up the Automatic Brew feature” section.
English
Press and hold the BREW button for
1
three seconds. Time display turns into
current Auto Brew time. The “Auto”
indicator will come on, and the “Brew”
indicator will begin to flash.
The Coffee Maker will begin the brew
3
cycle at the auto brew time, beeping
once when the cycle begins. The
“BREW” indicator will stop flashing
and remain lit up, and the “Auto”
indicator will turn off.
After 5 seconds, the display will switch
2
back to the main screen. The “Auto”
indicator will stay on, and the “Brew”
icon will continue to flash.
The Coffee Maker will beep 3 times
4
when the Brew cycle is complete, then
will automatically initiate the 2 hour
Warm cycle. After the Warm cycle
finishes, one long beep will sound.
15
Page 16

TIPS FOR GREAT RESULTS
Quick tips
Fresh Coffee Beans: Truly great coffee
can only come from fresh coffee beans. To
preserve the freshness of your beans, keep
them in an opaque, airtight container and
store in a cool, dry place. Refrigeration is not
recommended since condensation tends to
form on the beans whenever the container
is opened. Freezing can help preserve beans
stored for an extended period, but it will also
impair flavor.
The Right Grind: The best cup of coffee
comes from coffee beans that are properly
ground just before brewing. When grinding,
be sure to grind your coffee to a medium
grind level, the appropriate grind for
automatic drip Coffee Makers. Look for
KitchenAid® Coffee Grinders at your local
retailer or online at www.kitchenaid.com.
The Proper Amount of Ground Coffee:
A good starting point is 1 tablespoon of
coffee for every cup of brew water marked
on the glass carafe or the water tank. Finer
grinds usually require less coffee but may
also produce bitterness and clog the filter.
For weaker coffee, brew using the suggested
ratio of coffee grounds and water, then dilute
with hot water. This maximizes flavor and
minimizes bitterness.
Brew Water Purity: Great tasting coffee
starts with fresh water. The removable
water tank is easy to fill with water to give
you great tasting coffee every time. It’s also
easy to clean so you can always make your
coffee with the freshest water. Where local
water is extremely poor, you may wish to
use bottled water. Do not use distilled water
or mineral water since they can damage your
Coffee Maker.
Coffee Maker Cleanliness: Since the coffee
oils that build up on the brew basket and
carafe can go stale and impair the flavor of
the brewed coffee, it’s important that these
two items are cleaned daily in order to make
the best tasting coffee.
16
Page 17
Cleaning the Coffee Maker
Calcium deposits (scale) from water will build up in the Coffee Maker heat pump over time and
impair brewing efficiency and coffee quality. If you notice that it takes longer than usual to brew, or
that the Coffee Maker is making unusual noises, then it is time to descale. The “Clean” indicator will
flash when the Coffee Maker has brewed 100 cups of coffee, or detects scale buildup. Descaling
should be done as soon as possible to preserve the performance and life of your Coffee Maker.
English
NOTE:
using a vinegar and water solution, or by using
a packaged descaling agent. Always mix the
descaling solution using cool water.
When using vinegar, fill the carafe with a solution
consisting of ½ vinegar and ½ water.
When using a descaling agent, follow the
directions on the package for the recommended
ratios of descaling agent and water to use.
The Coffee Maker should be run through a
complete Clean cycle using a full tank of the
descaling solution.
The Coffee Maker can be descaled
When the “Clean” indicator begins to
2
flash: Press the MODE button 2 times.
The “Reg” indicator will go off, and the
“Clean” indicator will turn on.
Before descaling, always remove the
1
water filter (see the “Installing the
Water Filter” section) and make sure
the brew basket contains no coffee or
coffee filters.
Press the BREW button. One beep will
3
sound and the “Brew” indicator will
light up. The “Clean” indicator will stay
on and the Clean cycle will begin.
17
Page 18
When the Clean cycle is complete
4
(approximately 9 minutes), 3 beeps will
sound, and the “Clean” and “Brew”
indicators will turn off. The main screen
will reappear.
NOTE: The Clean cycle can be completed at regular intervals, if desired, without the
“Clean” indicator needing to light up. Follow these directions to clean the Coffee Maker
whenever desired.
Reinstall or replace the water filter.
5
Replace the filter every 3 months under
normal use. Replace it more often
under heavy use.
18
Page 19

TROUBLESHOOTINGCARE AND CLEANING
1. If the brew timer display is not
illuminated:
• Check to see whether the Coffee Maker
is plugged into a grounded 3-prong outlet.
If it is, check the fuse or circuit breaker
on the electrical circuit the Coffee Maker
is connected to and make sure the circuit
is closed.
2. If only a portion of the water added
to the Coffee Maker actually brews:
• The Coffee Maker requires immediate
descaling. Please refer to “Descaling
the Coffee Maker” in the “Care and
Cleaning” section.
3. If “Er1” appears on the brew button
timer display:
• A button may be jammed. Unplug the
Coffee Maker and press each button
several times.
• Plug the Coffee Maker into a grounded
3-prong outlet.
• If “Er1” appears again on the display,
repeat this procedure.
4. If the problem cannot be corrected:
• See the “Warranty” section. Do not
return the Coffee Maker to the retailer;
retailers do not provide service.
English
19
Page 20

WARRANTY
KitchenAid® Coffee Maker Warranty for the 50 United States,
the District of Columbia, Puerto Rico, and Canada
This warranty extends to the purchaser and any succeeding owner for Coffee Makers
operated in the 50 United States, the District of Columbia, Puerto Rico, and Canada.
Length of Warranty: One Year Full Warranty from date of purchase.
KitchenAid Will Pay Hassle-Free Replacement of your Coffee Maker.
for Your Choice of: See the next page for details on how to arrange for service,
or call the Customer eXperience Center toll-free at
1-800-541-6390.
OR
The replacement parts and repair labor costs to correct
defects in materials and workmanship. Service must be
provided by an Authorized KitchenAid Service Center.
KitchenAid Will A. Repairs when Coffee Maker is used in other than
Not Pay for: normal single family home use.
B. Damage resulting from accident, alteration, misuse
or abuse.
C. Any shipping or handling costs to deliver your Coffee
Maker to an Authorized Service Center.
D. Replacement parts or repair labor costs for Coffee
Maker operated outside the 50 United States,
District of Columbia, Puerto Rico, and Canada.
DISCLAIMER OF IMPLIED WARRANTIES; LIMITATION OF REMEDIES
IMPLIED WARRANTIES, INCLUDING TO THE EXTENT APPLICABLE WARRANTIES
OF MERCHANTABILITY OR FITNESS FOR A PARTICULAR PURPOSE, ARE
EXCLUDED TO THE EXTENT LEGALLY PERMISSIBLE. ANY IMPLIED WARRANTIES
THAT MAY BE IMPOSED BY LAW ARE LIMITED TO ONE YEAR, OR THE SHORTEST
PERIOD ALLOWED BY LAW. SOME STATES AND PROVINCES DO NOT ALLOW
LIMITATIONS OR EXCLUSIONS ON HOW LONG AN IMPLIED WARRANTY
OF MERCHANTABILITY OR FITNESS LASTS, SO THE ABOVE LIMITATIONS OR
EXCLUSIONS MAY NOT APPLY TO YOU.
IF THIS PRODUCT FAILS TO WORK AS WARRANTED, CUSTOMER’S SOLE AND
EXCLUSIVE REMEDY SHALL BE REPAIR OR REPLACEMENT ACCORDING TO THE
TERMS OF THIS LIMITED WARRANTY. KITCHENAID AND KITCHENAID CANADA
DO NOT ASSUME ANY RESPONSIBILITY FOR INCIDENTAL OR CONSEQUENTIAL
DAMAGES. This warranty gives you specic legal rights and you may also have other
rights which vary from state to state or province to province.
20
Page 21

WARRANTYWARRANTY
Hassle-Free Replacement Warranty –
50 United States, District of Columbia, and Puerto Rico
We’re so condent the quality of our
products meets the exacting standards
of KitchenAid that, if your Coffee Maker
should fail within the rst year of ownership,
KitchenAid will arrange to deliver an identical
or comparable replacement to your door
free of charge and arrange to have your
original Coffee Maker returned to us. Your
replacement unit will also be covered by
our one year limited warranty. Please follow
these instructions to receive this quality
service.
Hassle-Free Replacement Warranty – Canada
We’re so condent the quality of our
products meets the exacting standards of the
KitchenAid brand that, if your Coffee Maker
should fail within the rst year of ownership,
KitchenAid Canada will replace your Coffee
Maker with an identical or comparable
replacement. Your replacement unit will also
be covered by our one year limited warranty.
Please follow these instructions to receive
this quality service.
If your Coffee Maker should fail within the
rst year of ownership, take the Coffee
Maker or ship collect to an Authorized
KitchenAid Service Centre. In the carton
If your Coffee Maker should fail within the
rst year of ownership, simply call our
toll-free Customer eXperience Center at
1-800-541-6390 Monday through Friday.
Please have your original sales receipt
available when you call. Proof of purchase
will be required to initiate the claim. Give
the consultant your complete shipping
address. (No P.O. Box numbers, please.)
When you receive your replacement Coffee
Maker, use the carton and packing materials
to pack up your original Coffee Maker.
include your name and complete shipping
address along with a copy of the proof of
purchase (register receipt, credit card slip,
etc.). Your replacement Coffee Maker will
be returned prepaid and insured. If you
are unable to obtain satisfactory service
in this manner call our toll-free Customer
eXperience Centre at 1-800-807-6777.
Or write to us at:
Customer eXperience Centre
KitchenAid Canada
200 - 6750 Century Ave.
Mississauga, ON L5N 0B7
English
Arranging for Service after the Warranty Expires,
or Ordering Accessories and Replacement Parts
In the United States and Puerto Rico:
For service information, or to order
accessories or replacement parts, call tollfree at 1-800-541-6390 or write to:
Customer eXperience Center,
KitchenAid Small Appliances,
P.O. Box 218, St. Joseph, MI 49085-0218
Outside the United States
and Puerto Rico:
Consult your local KitchenAid dealer or
the store where you purchased the Coffee
Maker for information on how to obtain
service.
®/™ © 2014. All rights reserved. Used under license in Canada.
For service information in Canada:
Call toll-free 1-800-807-6777.
Or write to:
Customer eXperience Centre
KitchenAid Canada
200 - 6750 Century Ave.
Mississauga, ON L5N 0B7
21
Page 22

BIENVENUE DANS LE MONDE DE KITCHENAID.
Nous nous engageons à vous
aider à créer de délicieux repas
pour votre famille et vos amis,
et ce durant tout le cycle de vie
de l’appareil. Pour contribuer
à la durabilité et à une bonne
performance de votre appareil,
conservez ce guide à portée de
main. Il vous permettra d’utiliser
et d’entretenir votre produit
de la meilleure manière qui
soit. Votre satisfaction est notre
objectif numéro 1. N’oubliez pas
d’enregistrer votre produit en
ligne sur www.kitchenaid.ca
ou par courrier à l’aide de la
carte d’enregistrement du
produit ci-jointe.
USA: 1.800.541.6390
Canada: 1.800.807.6777
22
Rejoignez-nous au coin cuisine sur www.kitchenaid.ca.
KitchenAid.com
KitchenAid.ca
Page 23

INSTRUCTIONS DE LA CAFETIÈRE
TABLE DES MATIÈRES
SÉCURITÉ DE LA CAFETIÈRE
Consignes de sécurité importantes .................................................................. 24
Spécications électriques .................................................................................. 25
PIÈCES ET CARACTÉRISTIQUES
Pièces et accessoires ........................................................................................ 26
ASSEMBLAGE DE LA CAFETIÈRE
Préparation de la cafetière pour utilisation ....................................................... 27
Installation du ltre à eau .................................................................................. 27
FONCTIONNEMENT DE LA CAFETIÈRE
Réglage de l’horloge ......................................................................................... 28
Réglage du degré d’infusion .............................................................................. 29
Caractéristique Pause et versement ................................................................. 29
Remplissage d’eau pour infusion ....................................................................... 30
Remplissage du panier à infusion avec du café.................................................. 31
Infusion du café ................................................................................................. 32
Infusion pour 1 à 4 tasse(s) ............................................................................... 33
Réglage de la fonction d’infusion automatique ................................................. 34
Utilisation des réglages d’infusion automatique programmés au préalables ..... 35
CONSEILS D’UTILISATION POUR DES RÉSULTATS IMPECCABLES
Conseils rapides ................................................................................................ 36
ENTRETIEN ET NETTOYAGE
Nettoyage de la cafetière ................................................................................. 37
DÉPANNAGE ......................................................................................................... 38
GARANTIE ............................................................................................................. 39
Français
PREUVE D’ACHAT ET ENREGISTREMENT DU PRODUIT
Veuillez toujours conserver une copie détaillée du ticket de caisse indiquant la date d’achat
de votre cafetière. La preuve d’achat vous garantit le bénéce du service après-vente. Avant
d’utiliser votre cafetière, remplir et poster la carte d’enregistrement du produit fournie avec
celui-ci, ou enregistrer le produit en ligne sur www.kitchenaid.ca. Grâce à cette carte, nous
pourrons vous contacter dans l’éventualité improbable d’un avis de sécurité concernant le
produit; ceci nous aidera aussi à nous conformer aux dispositions du Consumer Product
Safety Act. Cette carte ne conrme pas votre garantie. Veuillez remplir ce qui suit pour vos
dossiers personnels:
Numéro de modèle __________________________________________________________________
Numéro de série ____________________________________________________________________
Date d’achat ________________________________________________________________________
Nom du magasin ____________________________________________________________________
23
Page 24

SÉCURITÉ DE LA CAFETIÈRE
CONSIGNES DE SÉCURITÉ
IMPORTANTES
An de réduire le risque d’incendie, de choc électrique et/ou de blessures
corporelles lors de l’utilisation d’appareils électriques, certaines précautions
élémentaires de sécurité doivent être systématiquement respectées –
notamment :
1. Lire toutes les instructions.
2. Ne pas toucher les surfaces chaudes. Utiliser les poignées ou les boutons.
3. Pour se protéger contre tout choc électrique, ne pas immerger le cordon, les
prises ou la cafetière dans de l’eau ou dans tout autre liquide.
4. Une surveillance attentive s’impose lorsqu’un appareil ménager est utilisé par
ou à proximité d’enfants.
5. Débrancher la cafetière lorsqu’elle n’est pas utilisée et avant le nettoyage.
Attendre que l’appareil ait refroidi avant d’installer ou de retirer des pièces, et
avant de nettoyer l’appareil.
6. Ne pas faire fonctionner un appareil dont le cordon ou la prise est
endommagé(e), lorsque l’appareil ne fonctionne pas correctement ou lorsqu’il
a été endommagé d’une quelconque façon. Retourner l’appareil au centre de
service agréé le plus proche pour examen, réparation ou réglage.
24
Page 25

7. L’utilisation d’accessoires non recommandés par le fabricant de l’appareil
peut causer des blessures.
8. Ne pas utiliser à l’extérieur.
9. Ne pas laisser le cordon pendre sur le côté d’une table ou d’un comptoir,
ou toucher une surface chaude.
10. Ne pas placer sur ou près d’un brûleur électrique ou à gaz chaud, ou dans
un four chaud.
11. Ne pas utiliser l’appareil pour un autre usage que celui pour lequel il est conçu.
12. Ne pas faire fonctionner d’appareil sans que le couvercle ne soit correctement
placé sur la carafe.
13. La carafe est conçue pour être utilisée avec cet appareil. Elle ne doit jamais
être utilisée sur une cuisinière ou dans un four à micro-ondes.
14. Ne pas placer une carafe chaude sur une surface mouillée ou froide.
15. Ne pas utiliser une carafe fêlée ou une carafe dont la poignée n’est pas
correctement xée.
16. Ne pas nettoyer la carafe avec des nettoyants abrasifs, des tampons
en laine d’acier ou tout autre matériau abrasif.
17. Ce produit est conçu uniquement pour un usage domestique.
18. L’ouverture du panier à infusion pendant les programmes d’infusion
peut provoquer un risque d’ébouillantage.
CONSERVER CES INSTRUCTIONS
Spécications électriques
Tension: 120 volts C.A. uniquement
Fréquence: 60 Hz
REMARQUE : Si cette fiche ne convient pas
à la prise, contacter un électricien qualifié.
Ne pas modifier la prise de quelque manière
que ce soit. Ne pas utiliser d’adaptateur.
Ne pas utiliser de rallonge. Si le cordon
d’alimentation électrique est trop court,
faire installer une prise près de l’appareil
électroménager par un électricien ou un
technicien de service qualifié.
Français
25
Page 26

PIÈCES ET CARACTÉRISTIQUES
Pièces et accessoires
Couvercle du réservoir d’eau
Réservoir
d’eau
amovible
Couvercle du
panier à infusion
Écran
programmable
Filtre doré
permanent
Carafe en verre
Panier à
infusion
26
Page 27

Préparation de la cafetière pour utilisation
Avant la première utilisation
Laver le panier à infusion, le filtre doré permanent et la carafe à l’eau chaude et savonneuse, puis
rincer à l’eau propre et sécher. Ne pas utiliser de nettoyants abrasifs ou de tampons à récurer.
REMARQUE : Ces parties peuvent également être lavées dans le panier supérieur du
lave-vaisselle.
Installation du ltre à eau
L’utilisation du filtre à eau est facultative mais fortement recommandée. Le filtre réduit
la proportion de contaminants qui altèrent l’arôme du café. La cafetière fonctionne
normalement sans ce filtre.
Le filtre à eau doit être utilisé avec une eau traitée par la municipalité ou une eau de
puisage régulièrement testée sur sa teneur en contaminants; le filtre n’a pas été conçu pour
éliminer les contaminants présents dans de l’eau impropre à la consommation humaine.
Français
Placer la cartouche du filtre dans un
1
récipient séparé rempli d’eau froide
et fraîche. La cartouche doit rester
immergée pendant 10 minutes. Rincer
le filtre sous l’eau courante pendant 5
secondes après l’avoir fait tremper.
Placer la cartouche du filtre dans le
3
creux situé au fond du réservoir d’eau.
Enfoncer légèrement la cartouche
pour s’assurer qu’elle est solidement
installée.
Soulever le couvercle du réservoir d’eau
2
à l’aide de l’onglet situé à l’arrière du
couvercle.
IMPORTANT : À chaque installation d’un
nouveau filtre à eau, faire fonctionner un
programme d’infusion complet sans café.
Utiliser une carafe pleine d’eau propre
et fraîche.
27
Page 28

FONCTIONNEMENT DE LA CAFETIÈRE
Réglage de l’horloge
Brancher l’appareil dans une prise à
1
3 alvéoles reliée à la terre.
REMARQUE : Lorsqu’on branche la
cafetière pour la première fois ou si l’on
rétablit l’alimentation électrique après
une coupure de courant, l’affichage
de la minuterie d’infusion indique
automatiquement 12:00 AM.
Réglage des heures : Appuyer sur
2
HOUR (heure). Les chiffres des
heures commencent à clignoter.
Chaque pression ajoute une heure; ou
MAINTENIR LA TOUCHE APPUYÉE
pour faire défiler les chiffres rapidement.
28
Réglage des minutes : Appuyer sur
3
MINUTE. Les chiffres des heures
cessent de clignoter et les chiffres
des minutes commencent à clignoter.
Chaque pression ajoute une minute;
ou MAINTENIR LA TOUCHE
APPUYÉE pour faire défiler les
chiffres des minutes rapidement.
Page 29

Pour sauvegarder l’affichage actuel de
4
l’heure et sortir du mode de réglage de
l’horloge : Appuyer sur N’IMPORTE
QUEL autre bouton (Mode, Auto Set,
Strength ou Brew); ou n’appuyer sur
aucun bouton pendant 10 secondes.
Réglage du degré d’infusion
La cafetière peut être programmée pour faire infuser le café au niveau classique (REG)
ou fort (BOLD) (la force d’infusion par défaut est classique).
Pour programmer et activer le réglage du mode “Bold” :
Appuyer sur le bouton STRENGTH
1
(force) pour sélectionner le témoin
“Bold”.
Caractéristique Pause et versement
Français
La caractéristique “Pause and pour” (pause et versement) permet à l’utilisateur de retirer
la carafe de la cafetière et de verser une tasse de café avant que l’infusion soit terminée.
Lorsqu’on retire la carafe, une valve spéciale bloque le versement du café qui se fait par le
panier à infusion. Ceci n’interrompt cependant pas le processus d’infusion. Si l’on ne replace
pas la carafe dans la cafetière dans les 30 secondes qui suivent, l’eau et le café déborderont
du panier à infusion.
29
Page 30

FONCTIONNEMENT DE LA CAFETIÈRE
Remplissage d’eau pour infusion
ASTUCE : Avant de faire infuser la première carafe de café, faire infuser une carafe d’eau
fraîche et froide puis la jeter (voir la section “Préparation de la cafetière pour utilisation”).
Retirer le réservoir d’eau et le remplir
1
d’eau froide et fraîche pour produire la
quantité de café souhaitée. Une échelle
graduée sur le réservoir permet de
mesurer la quantité d’eau nécessaire.
REMARQUE : Il n’est pas nécessaire de retirer le réservoir d’eau pour le remplir;
il suffit de soulever le couvercle du réservoir et de verser de l’eau fraîche et froide
dans le réservoir. On peut aussi verser l’eau directement dans le réservoir à l’arrière
de la cafetière.
Sur la carafe : Le côté droit de l’échelle
3
graduée (Coffee [café]) correspond à
la mesure du volume de café. Le côté
gauche de l’échelle graduée (Water [eau])
indique la quantité d’eau nécessaire pour
produire un nombre de tasses donné.
Lorsqu’on remet en place le réservoir,
2
s’assurer que les trous situés au sommet
du réservoir sont alignés avec les onglets
à l’arrière du boîtier de la cafetière.
Placer la carafe dans la cafetière.
4
S’assurer que le couvercle est bien
en place et que le fond de la carafe
est correctement installé. Dans le cas
contraire, la caractéristique Pause and
Pour (pause et versement) peut ne pas
fonctionner, ce qui pourrait entraîner
un débordement d’eau et de café
par-dessus le panier à infusion.
30
Page 31

Remplissage du panier à infusion avec du café Infusion du café
ASTUCE : On peut insérer le filtre et ajouter le café moulu sans avoir à retirer le panier
à infusion de la cafetière.
Retirer le panier à infusion du dessus
1
de la cafetière en saisissant la poignée
de verrouillage située sur le panier.
REMARQUE : Ne pas faire fonctionner la cafetière si le panier à infusion n’est pas à sa place.
Remplir le filtre en utilisant une cuillère
3
à soupe bombée de café moulu par
tasse de café désirée. Utiliser une
mouture moyenne pour les cafetières
automatiques. Une mouture trop fine
entraînera un goût amer et risque
d’obstruer le filtre à café. Secouer
légèrement le panier à infusion pour
répartir le café dans le fond.
Insérer un filtre en papier à fond
2
plat de 10 à 12 tasses ou placer le
filtre doré permanent dans le panier
à infusion. Ne pas utiliser les deux
types de filtres en même temps.
Le fait d’utiliser les deux filtres en
même temps pourrait entraîner le
débordement de l’eau et du café pardessus le panier à infusion.
Placer le panier dans la cafetière et
4
faire pivoter la poignée vers l’avant de
la cafetière pour verrouiller le panier.
S’assurer que le couvercle du panier à
infusion est complètement fermé avant
le processus d’infusion.
Français
31
Page 32

FONCTIONNEMENT DE LA CAFETIÈRE
Infusion du café
Pour préparer 1 à 4 tasse(s) seulement, voir la section “Infusion pour 1 à 4 tasse(s)”.
REMARQUE : Avant de faire infuser la première carafe de café, faire infuser une
carafe d’eau fraîche et froide puis la jeter (voir la section “Préparation de la cafetière
pour utilisation”).
Appuyer sur le bouton BREW (infusion)
1
pour démarrer le processus d’infusion
du café. Lorsque le programme
d’infusion démarre, la cafetière émet
1 bip et l’icône “Brew” s’illumine.
REMARQUE : Si l’on soulève le couvercle du panier à infusion pendant que le café est en
cours d’infusion, le processus d’infusion sera interrompu et l’arôme du café sera affecté.
Pour annuler le programme d’infusion
3
ou pour éteindre manuellement la
cafetière durant le programme de
maintien au chaud, appuyer une fois
sur le bouton Brew. Le programme
d’infusion est annulé.
IMPORTANT : Il est possible que l’extérieur de la carafe soit chaud au toucher après
l’infusion. Il appartient à l’utilisateur de déterminer s’il est prudent ou non de placer la
carafe sur des surfaces nues immédiatement après l’infusion.
Une fois l’infusion terminée, la
2
cafetière émet 3 bips, puis lance
automatiquement le programme
de maintien au chaud de 2 heures.
Une fois le programme de maintien
au chaud terminé, la cafetière émet
un bip long.
Répéter les étapes 1 et 2 pour
4
faire infuser des carafes de café
supplémentaires. Toujours éteindre la
cafetière et la laisser refroidir pendant
5 minutes avant de commencer le
programme d’infusion suivant.
32
Page 33

Infusion pour 1 à 4 tasse(s)
REMARQUE : Avant de faire infuser la première carafe de café, faire infuser une
carafe d’eau fraîche et froide puis la jeter (voir la section “Préparation de la cafetière
pour utilisation”).
Appuyer une fois sur MODE. Le témoin
1
passe de “Reg” (classique) à “1–4 Cup”
(1 à 4 tasse[s]).
Une fois l’infusion terminée, la
3
cafetière émet 3 bips, puis lance
automatiquement le programme de
maintien au chaud de 2 heures. Une
fois le programme de maintien au
chaud terminé, la cafetière émet un
bip long.
Appuyer sur le bouton BREW
2
(infusion). La cafetière émet un bip,
et l’icône “Brew” s’illumine. L’icône
reste allumée pendant toute la
durée du programme d’infusion, et
restera également allumée durant le
programme de maintien au chaud.
REMARQUE : Lorsque le programme
d’infusion est terminé, l’icône “1–4
Cup” s’éteint et la cafetière retourne
au réglage “Reg”.
Français
Annulation de l’infusion pour 1 à 4
4
tasse(s) : Appuyer deux fois sur MODE.
L’affichage indique d’abord “Clean”
(nettoyage), puis “REG” (classique).
Le programme d’infusion pour 1 à 4
tasse(s) est annulé.
REMARQUE : Si l’on n’appuie sur aucun bouton après avoir sélectionné le mode
“1 à 4 tasse(s)”, le mode “1 à 4 tasse(s)” est annulé au bout de 10 secondes.
Répéter les étapes 1 à 3 pour
5
faire infuser des carafes de café
supplémentaires. Toujours éteindre la
cafetière et la laisser refroidir pendant
5 minutes avant de commencer le
programme d’infusion suivant.
33
Page 34

FONCTIONNEMENT DE LA CAFETIÈRE
Réglage de la fonction d’infusion automatique
La cafetière peut être programmée pour démarrer l’infusion du café à un moment précis,
vous simplifiant ainsi la vie en mettant à votre disposition du café frais dès le réveil. Pour
programmer et activer la minuterie d’infusion automatique :
Appuyer une fois sur le bouton
1
AUTO SET (réglage automatique).
Le témoin “Auto” clignote et
l’horloge indique désormais
l’heure de la minuterie d’infusion
automatique réglée actuellement.
(l’heure par défaut est 12 H 00)
Appuyer sur le bouton MINUTE. Les
3
chiffres des heures cessent de clignoter
et les chiffres des minutes commencent
à clignoter. Chaque pression ajoute une
minute; ou MAINTENIR LA TOUCHE
APPUYÉE pour faire défiler les chiffres
des minutes rapidement.
Appuyer sur le bouton HOUR
2
(heure) pour sélectionner l’heure
à laquelle vous souhaitez lancer
l’infusion. Chaque pression ajoute
une heure; ou MAINTENIR LA
TOUCHE APPUYÉE pour faire
défiler les chiffres rapidement.
REMARQUE : On peut enregistrer
l’heure d’infusion automatique de deux
façons différentes. Après avoir effectué les
étapes 1 à 3, on peut soit effectuer l’étape
4 ci-dessous pour enregistrer l’heure
d’infusion automatique et sortir du mode,
soit passer directement à l’étape 1 de la
section “Utilisation des réglages d’infusion
automatique programmés au préalable”
pour enregistrer l’heure d’infusion
automatique et lancer automatiquement
le programme d’infusion automatique.
REMARQUE : Durant le réglage de
l’heure d’infusion automatique, si l’on
n’appuie sur aucun bouton pendant les
10 secondes qui suivent le réglage des
minutes, le témoin “Auto” s’éteint et
l’affichage retourne à l’écran principal.
Appuyer sur le bouton AUTO SET
4
(réglage automatique). Le témoin
“Auto” s’éteint et l’affichage retourne
à l’écran principal. L’heure d’infusion
automatique est enregistrée.
34
Page 35

Utilisation des réglages d’infusion automatique programmés au préalable
On peut également suivre cette procédure pour enregistrer l’heure d’infusion
automatique après avoir effectué les étapes 1 à 3 de la section “Réglage de la
fonction d’infusion automatique”.
Maintenir le bouton BREW (infusion)
1
appuyé pendant 3 secondes. L’horloge
affiche désormais l’heure d’infusion
automatique réglée actuellement. Le
témoin “Auto” s’allume, et l’indicateur
“Brew” commence à clignoter.
La cafetière lance le programme
3
d’infusion à l’heure d’infusion
automatique réglée, et émet un bip au
démarrage du programme. Le témoin
“BREW” s’arrête de clignoter et reste
allumé, et le témoin “Auto” s’éteint.
Après 5 secondes, l’affichage retourne
2
à l’écran principal. Le témoin “Auto”
reste allumé, et l’icône “Brew”
continue à clignoter.
Une fois l’infusion terminée, la
4
cafetière émet 3 bips, puis lance
automatiquement le programme de
maintien au chaud de 2 heures. Une
fois le programme de maintien au
chaud terminé, la cafetière émet un
bip long.
Français
35
Page 36

CONSEILS D’UTILISATION POUR DES RÉSULTATS IMPECCABLES
Conseils rapides
Grains de café frais : Un bon café,
c’est d’abord des grains de café frais. Pour
préserver la fraîcheur des grains de café,
les conserver dans un récipient opaque et
hermétique et l’entreposer dans un endroit
frais et sec. Il n’est pas conseillé de les
réfrigérer car de la condensation a tendance
à se former sur les grains chaque fois que
l’on ouvre le récipient. On peut congeler
les grains de café pour les préserver si l’on
sait qu’ils ne seront pas consommés avant
longtemps, mais la congélation altérera
aussi le goût.
La mouture idéale : Une tasse de café
parfaite, c’est aussi des grains de café
parfaitement moulus juste avant infusion.
Lors de la mouture, veiller à obtenir une
mouture moyenne - il s’agit de la mouture
qui convient le mieux aux cafetières à
versement automatique. Les moulins à
café KitchenAid® sont disponibles chez
votre marchand ou en ligne à l’adresse
www.kitchenaid.ca.
Quantité idéale de café moulu : Comme
point de repère, on peut utiliser une cuillère
à soupe de café pour chaque tasse d’eau
d’infusion indiquée sur la carafe en verre ou
le réservoir d’eau. Une mouture plus fine
nécessite généralement moins de café mais
entraîne également un goût plus amer; de
plus cela obstrue le filtre. Pour un café plus
léger, faire infuser en utilisant les proportions
de café et d’eau suggérées puis diluer le tout
dans de l’eau chaude. Ceci optimisera le goût
et minimisera l’amertume du goût.
Pureté de l’eau d’infusion : Un café
savoureux, c’est d’abord de l’eau fraîche.
Le réservoir d’eau amovible est facile à
remplir, ce qui vous permet de savourer
un café délicieux à chaque fois. Il est
aussi facile à nettoyer; vous pouvez
donc préparer votre café avec une eau
parfaitement fraîche. Si l’eau du robinet
est de très mauvaise qualité, il sera
peut-être préférable d’utiliser de l’eau
en bouteille. Ne pas utiliser d’eau distillée
ou d’eau minérale car elles peuvent
endommager la cafetière.
Propreté de la cafetière : Les huiles
de café qui s’accumulent dans le panier
à infusion et la carafe peuvent tourner et
altérer le goût du café infusé; il est donc
important de nettoyer quotidiennement
ces deux éléments pour que l’arôme du
café soit idéal.
36
Page 37

ENTRETIEN ET NETTOYAGE
Nettoyage de la cafetière
Avec le temps, des dépôts de calcium (tartre) présents dans l’eau s’accumulent dans la pompe de
chauffage de la cafetière et réduisent l’efficacité du processus d’infusion ainsi que la qualité du café.
Si l’on remarque que le processus d’infusion dure plus longtemps que d’habitude, ou que la cafetière
émet des bruits inhabituels, cela signifie qu’il est temps de détartrer. Le témoin “Clean” (nettoyage)
clignote lorsque la cafetière a infusé 100 tasses de café, ou lorsqu’elle détecte une accumulation de
tartre. Lorsque cela se produit, on doit procéder à un détartrage dès que possible pour préserver la
performance et la longévité de la cafetière.
REMARQUE : La cafetière peut être détartrée
à l’aide d’une solution de vinaigre et d’eau, ou
d’un agent de détartrage. Toujours diluer la
solution de détartrage avec de l’eau froide.
Lorsqu’on utilise du vinaigre, remplir la carafe d’un
mélange d’eau et de vinaigre en quantité égale.
Lorsqu’on utilise un agent de détartrage, suivre
les instructions de l’emballage pour connaître
les quantités d’agent de détartrage et d’eau
recommandées.
Faire fonctionner un programme de nettoyage
complet en remplissant le réservoir rempli de
solution de détartrage.
Avant un détartrage, toujours retirer le
1
filtre à eau (voir la section “Installation
du filtre à eau”) et s’assurer que le
panier à infusion ne contient pas de
café ou de filtre à café.
Français
Lorsque le témoin “Clean” (nettoyage)
2
commence à clignoter : Appuyer 2
fois sur le bouton MODE. Le témoin
“Reg” (classique) s’éteint, et le témoin
“Clean” s’allume.
Appuyer sur le bouton BREW
3
(infusion). La cafetière émet un bip, et
le témoin “Brew” s’illumine. Le témoin
“Clean” (nettoyage) reste allumé et le
programme de nettoyage démarre.
37
Page 38

ENTRETIEN ET NETTOYAGE
Lorsque le programme de nettoyage
4
est terminé (il dure environ 9 minutes),
la cafetière émet 3 bips, et les témoins
“Clean” et “Brew” s’éteignent. L’écran
d’accueil réapparaît.
REMARQUE : On peut effectuer le programme de nettoyage à intervalles réguliers
si désiré, sans attendre que le témoin “Clean” s’illumine. Suivre ces instructions pour
nettoyer la cafetière dès que souhaité.
Réinstaller ou remplacer le filtre
5
à eau. Dans le cadre d’une utilisation
normale, remplacer le filtre tous les
3 mois. Le remplacer plus souvent
en cas d’utilisation intensive ou si
l’eau utilisée est dure.
DÉPANNAGE
1. Si l’afchage de la minuterie
d’infusion n’est pas allumé :
• Vérier que la cafetière est branchée
dans une prise à 3 alvéoles reliée à la
terre. Si tel est le cas, inspecter le fusible
ou coupe-circuit du circuit électrique
auquel la cafetière est raccordée et
s’assurer que le circuit est fermé.
2. Si seule une partie de l’eau versée
dans la cafetière infuse :
• La cafetière nécessite un détartrage
immédiat. Consulter “Nettoyage
de la cafetière” dans la section
“Entretien de la cafetière”.
3. Si “Er1” apparaît sur l’afchage de
la minuterie du bouton d’infusion :
• Un bouton est peut-être coincé.
Débrancher la cafetière et appuyer
plusieurs fois sur chaque bouton.
• Brancher la cafetière dans une prise
à 3 alvéoles reliée à la terre.
• Si “Er1” s’afche de nouveau, répéter
cette procédure.
4. Si le problème ne peut être résolu :
• Voir la section “Garantie”. Ne pas
retourner la cafetière au vendeur -
les vendeurs n’assurent pas de
service après-vente.
38
Page 39

Garantie de la cafetière KitchenAid® pour les 50 États des
États-Unis, le district fédéral de Columbia, Porto Rico et le Canada
La présente garantie couvre l’acheteur et les propriétaires suivants de la cafetière lorsqu’elle
est utilisée dans les 50 États des États-Unis, le district fédéral de Columbia, à Porto Rico et
au Canada.
Durée de la garantie : Garantie complète d’un an à compter de la date d’achat.
KitchenAid prendra
Remplacement sans difculté de votre cafetière. Voir la page
en charge les éléments
suivants à votre choix :
A. Les réparations lorsque la cafetière est utilisée à des
KitchenAid ne
paiera pas pour :
B. Les dommages causés par : accident, altération,
C. Tout frais d’expédition ou de manutention pour livrer
D. Les frais des pièces de rechange ou de main-d’œuvre
CLAUSE D’EXONÉRATION DE RESPONSABILITÉ AU TITRE DES GARANTIES
IMPLICITES; LIMITATION DES RECOURS
LES GARANTIES IMPLICITES, Y COMPRIS DANS LA MESURE APPLICABLE
LES GARANTIES DE QUALITÉ MARCHANDE OU D’APTITUDE À UN USAGE
PARTICULIER, SONT EXLUES DANS LA MESURE AUTORISÉE PAR LA LOI. TOUTE
GARANTIE IMPLICITE POUVANT ÊTRE IMPOSÉE PAR LA LOI EST LIMITÉE À
UN AN, OU À LA PLUS COURTE PÉRIODE AUTORISÉE PAR LA LOI. CERTAINES
JURIDICTIONS NE PERMETTENT PAS LA LIMITATION DE LA DURÉE DE VALIDITÉ
DES GARANTIES IMPLICITES DE QUALITÉ MARCHANDE OU D’APTITUDE À UN
USAGE PARTICULIER; PAR CONSÉQUENT, LES LIMITATIONS OU EXCLUSIONS
STIPULÉES DANS LES PRÉSENTES PEUVENT NE PAS VOUS ÊTRE APPLICABLES.
SI CE PRODUIT NE FONCTIONNE PAS TEL QUE GARANTI, LE SEUL ET
UNIQUE RECOURS DU CLIENT CONSISTE À EN OBTENIR LA RÉPARATION
OU LE REMPLACEMENT CONFORMÉMENT AUX TERMES DE LA PRÉSENTE
GARANTIE LIMITÉE. KITCHENAID ET KITCHENAID CANADA DÉCLINENT TOUTE
RESPONSABILITÉ AU TITRE DES DOMMAGES FORTUITS OU INDIRECTS. Cette
garantie vous confère des droits juridiques spéciques et vous pouvez également jouir
d’autres droits qui peuvent varier d’un État à l’autre ou d’une province à l’autre.
suivante pour plus de détails concernant la procédure à
suivre pour un dépannage, ou appeler le numéro sans frais
1-800-541-6390 du Centre d’eXpérience de la clientèle.
OU
Les frais de pièces de rechange et de main-d’œuvre
pour corriger les vices de matériaux et de fabrication.
L’intervention de dépannage doit être effectuée par
un centre de dépannage KitchenAid agréé.
ns autres qu’un usage domestique unifamilial normal.
mésusage ou abus.
la cafetière dans un centre de réparation autorisé.
pour la cafetière lorsqu’elle est utilisée à l’extérieur
des 50 États des États-Unis, du district fédéral de
Columbia, de Porto Rico et du Canada.
Français
39
Page 40

GARANTIE
Garantie de remplacement sans difculté – 50 États
des États-Unis, district fédéral de Columbia et Porto Rico
Nous sommes tellement certains que la
qualité de nos produits satisfait aux normes
exigeantes de KitchenAid que si la cafetière
cesse de fonctionner au cours de la première
année suivant son acquisition, KitchenAid
livrera gratuitement à votre porte un appareil
de remplacement identique ou comparable
et prendra les dispositions nécessaires
pour que la cafetière d’origine nous soit
retournée. L’appareil de remplacement sera
également couvert par notre garantie limitée
d’un an. Veuillez suivre ces instructions pour
bénécier de ce service de qualité.
Si votre cafetière cesse de fonctionner
durant la première année suivant son
Garantie de remplacement sans difculté – Canada
Nous sommes tellement certains que la
qualité de nos produits satisfait aux normes
exigeantes de la marque KitchenAid
que si la cafetière cesse de fonctionner
au cours de la première année suivant
son acquisition, KitchenAid Canada
remplacera la cafetière par un appareil de
remplacement identique ou comparable.
L’appareil de remplacement sera également
couvert par notre garantie limitée d’un
an. Veuillez suivre ces instructions pour
bénécier de ce service de qualité.
Si votre cafetière cesse de fonctionner
durant la première année suivant son
acquisition, il vous suft d’appeler notre
Centre d’eXpérience de la clientèle au
1-800-541-6390, du lundi au vendredi.
Veuillez avoir votre reçu de vente à portée
de main au moment de votre appel. Une
preuve d’achat est indispensable pour
que votre réclamation puisse être traitée.
Fournissez votre adresse de livraison
complète au représentant. (Pas de
boîte postale)
Après avoir reçu la cafetière de
remplacement, utiliser le carton
et les matériaux d’emballage pour
emballer la cafetière d’origine.
acquisition, apporter ou réexpédier
la cafetière port dû vers un centre de
réparation KitchenAid autorisé. Veuillez
indiquer vos nom et adresse d’expédition
complets dans le carton et joignez une
copie de votre preuve d’achat (reçu
de caisse, facture de règlement par
carte de crédit etc.). Votre cafetière de
remplacement sera retournée port payé et
assurée. Si le service que vous obtenez de
cette manière n’est pas satisfaisant, appelez
sans frais notre centre d’eXpérience de la
clientèle au 1-800-807-6777.
Obtenir un dépannage une fois la garantie expirée ou
commander des accessoires et pièces de rechange
Aux États-Unis et à Porto Rico :
Pour des informations sur le service de
dépannage ou pour commander des
accessoires ou des pièces de rechange,
composer le numéro sans frais
1-800-541-6390 ou écrire à :
Customer Satisfaction Center,
KitchenAid Small Appliances,
P.O. Box 218, St. Joseph, MI 49085-0218
40
®/™ © 2014. Tous droits réservés. Utilisé sous licence au Canada.
En dehors des États-Unis et de Porto Rico :
Consulter le revendeur KitchenAid le plus
proche de chez vous ou le détaillant auprès
duquel la cafetière a été achetée pour
obtenir des informations sur le service de
dépannage.
Pour des informations concernant toute
intervention de dépannage au Canada :
1-800-807-6777
Ou écrire à l’adresse suivante :
Centre eXpérience clientèle
KitchenAid Canada
200 - 6750 Century Ave.
Mississauga, ON L5N 0B7
Page 41

BIENVENIDO AL MUNDO DE KITCHENAID.
Bienvenido al mundo de KitchenAid.
Estamos comprometidos a ayudarle
a crear deliciosas comidas para
su familia y amistades por toda la
vida. Para ayudar a asegurar la larga
duración y el desempeño de su
aparato, mantenga esta guía a mano.
Ésta le proveerá información sobre
la mejor manera de usar y cuidar su
producto. Su satisfacción es nuestra
meta número 1. Recuerde registrar
su producto en línea en
www.kitchenaid.com, o bien por
correo usando la Tarjeta de registro
del producto que se adjunta.
Español
Únase a nosotros en la cocina, visite www.kitchenaid.com.
USA: 1.800.541.6390
Canada: 1.800.807.6777
KitchenAid.com
KitchenAid.ca
41
Page 42

INSTRUCCIONES DE LA CAFETERA
ÍNDICE
SEGURIDAD DE LA CAFETERA
Salvaguardias importantes ................................................................................ 43
Requisitos eléctricos ......................................................................................... 44
PIEZAS Y CARACTERÍSTICAS
Piezas y accesorios ........................................................................................... 45
ENSAMBLAJE DE LA CAFETERA
Cómo preparar la cafetera para su uso ............................................................ 46
Instalación del ltro de agua ............................................................................. 46
FUNCIONAMIENTO DE LA CAFETERA
Ajuste del reloj .................................................................................................. 47
Ajuste de la intensidad del café ......................................................................... 48
Característica de pausa y servir ........................................................................ 48
Cómo llenar la cafetera con agua para elaborar café ....................................... 49
Cómo llenar la canasta de elaboración con café ............................................... 50
Elaboración de café .......................................................................................... 51
1–4 tazas ........................................................................................................... 52
Ajuste de la característica de elaboración automática ...................................... 53
Uso de ajustes de elaboración automáticos previamente programados .......... 54
CONSEJOS PARA OBTENER RESULTADOS IDEALES
Consejos rápidos .............................................................................................. 55
CUIDADO Y LIMPIEZA
Limpieza de la cafetera ..................................................................................... 56
SOLUCIÓN DE PROBLEMAS ............................................................................. 57
GARANTÍA ............................................................................................................ 58
COMPROBANTE DE COMPRA Y REGISTRO DEL PRODUCTO
Guarde siempre una copia del recibo de compra, en el que se muestra la fecha de compra
de su cafetera. El comprobante de compra le asegurará el servicio bajo la garantía. Antes de
usar la cafetera, llene la tarjeta de registro de su producto, que fue empacada con la unidad,
o regístrelo en línea, en www.kitchenaid.com. Esta tarjeta nos permitirá contactarle en el
caso improbable de que haya una noticación de seguridad relacionada con el producto, y
nos ayudará a cumplir con lo dispuesto en Consumer Product Safety Act (Ley de seguridad
de productos al consumidor). Esta tarjeta no conrma su garantía. Complete lo siguiente
para su información personal:
Número de modelo __________________________________________________________________
Número de serie ____________________________________________________________________
Fecha de compra ____________________________________________________________________
Nombre de la tienda _________________________________________________________________
42
Page 43

SALVAGUARDIAS IMPORTANTES
Cuando use aparatos eléctricos, siempre deberá tomar precauciones básicas
de seguridad para reducir el riesgo de incendio, choque eléctrico y/o lesiones
a personas, incluyendo las siguientes:
1. Lea todas las instrucciones.
2. No toque las supercies calientes. Use las asas o perillas.
3. Para protegerse contra choque eléctrico, no sumerja el cable, los enchufes
ni la cafetera en agua ni en ningún otro líquido.
4. Es necesario supervisar cuidadosamente a los niños cuando usen cualquier
aparato o cuando éste se use cerca de ellos.
5. Desenchufe la cafetera del contacto cuando no esté en uso y antes de la
limpieza. Deje que se enfríe antes de colocar o quitar piezas, y antes de
limpiar el aparato.
6. No opere ningún aparato que tenga un cable o enchufe dañado, que
haya funcionado mal o que se haya dañado de alguna manera. Devuelva
el aparato al lugar más cercano de servicio autorizado para su examen,
reparación o ajuste.
Español
43
Page 44

7. El uso de accesorios de acoplamiento no recomendados por parte del
fabricante del aparato puede ocasionar heridas.
8. No lo use al aire libre.
9. No deje que el cable cuelgue del borde de una mesa o mostrador ni que
toque supercies calientes.
10. No lo coloque cerca de un quemador a gas o eléctrico caliente ni sobre
el mismo, ni tampoco dentro de un horno caliente.
11. No dé al aparato un uso diferente de aquél para el cual fue diseñado.
12. No use el aparato sin colocar la tapa debidamente sobre la jarra.
13. La jarra ha sido diseñada para usarse con este aparato. Nunca deberá
usarse sobre la estufa ni dentro de un horno de microondas.
14. No deje una jarra caliente sobre una supercie mojada o fría.
15. No use una jarra rajada ni una que tenga la manija oja o débil.
16. No limpie la jarra con limpiadores abrasivos, esponjas de bra metálica
u otro material abrasivo.
17. Este producto ha sido diseñado únicamente para uso doméstico.
18. Se pueden producir quemaduras si se abre la tapa de la canasta de
elaboración durante los ciclos de elaboración de café.
GUARDE ESTAS INSTRUCCIONES
Requisitos eléctricos
Voltaje: 120 Voltios, CA solamente
Frecuencia: 60 Hz
NOTA: Si el enchufe no encaja en el
contacto, póngase en contacto con un
electricista calificado. No modifique el
enchufe de ninguna manera. No use
un adaptador.
No use un cable eléctrico de extensión. Si el
cable de suministro eléctrico es demasiado
corto, haga que un electricista o técnico de
servicio capacitado instale un contacto cerca
del electrodoméstico.
44
Page 45

PIEZAS Y CARACTERÍSTICASSEGURIDAD DE LA CAFETERA
Piezas y accesorios
Tanque
de agua
removible
Tapa del tanque de agua
Tapa de la
canasta de
elaboración
Pantalla
programable
Español
Filtro permanente
de color dorado
Jarra de vidrio
Canasta de
elaboración
45
Page 46

ENSAMBLAJE DE LA CAFETERA
Cómo preparar la cafetera para su uso
Antes del primer uso
Lave la canasta de elaboración, el filtro permanente de color dorado y la jarra en
agua caliente jabonosa; enjuáguelos con agua limpia y séquelos. No use limpiadores
ni estropajos abrasivos.
NOTA: Estas piezas pueden lavarse también en la canasta superior de la lavavajillas.
Instalación del ltro de agua
El uso del filtro de agua es opcional, pero se recomienda enérgicamente. El filtro reduce
los contaminantes que afectan negativamente el sabor del café. La cafetera funcionará
normalmente sin el mismo.
El filtro de agua es para usarse solamente con agua de grifo tratada por los servicios
públicos o agua de pozo en la que se efectúen pruebas para detectar contaminantes
con regularidad; el filtro no ha sido diseñado para quitar los contaminantes del agua
que no es adecuada para el consumo.
Coloque el cartucho del filtro en un
1
recipiente separado lleno con agua fresca.
Deberá mantenerse el cartucho sumergido
en agua durante 10 minutos. Enjuague
el cartucho del filtro bajo agua del grifo
durante 5 segundos después de remojarlo.
Coloque el cartucho del filtro en la
3
cavidad que está en la base del depósito
de agua. Empuje ligeramente el cartucho
para asegurarse de que encaja justo.
46
Levante la tapa del tanque de agua usando
2
la lengüeta que está en la parte posterior
de la tapa.
IMPORTANTE: Cada vez que instale un
nuevo filtro de agua, ponga a funcionar
la cafetera por un ciclo completo de
elaboración sin café. Use una jarra llena
de agua limpia y fresca.
Page 47

FUNCIONAMIENTO DE LA CAFETERAENSAMBLAJE DE LA CAFETERA
Ajuste del reloj
Conecte a un contacto de pared de
1
conexión a tierra de 3 terminales.
NOTA: Cuando se enchufa la cafetera por
primera vez o cuando vuelva a restablecerse
la electricidad después de un corte de
corriente, la pantalla del temporizador de
elaboración mostrará inicialmente 12:00 AM.
Español
Para fijar la Hora: Presione HOUR
2
(Hora). El ajuste de la Hora comenzará
a parpadear. Los dígitos de las Horas
cambiarán cada vez que presione; o bien
PRESIONE Y SOSTENGA y los dígitos
de las Horas avanzarán rápidamente.
Para fijar los Minutos: Presione MINUTE
3
(Minutos). El ajuste de la Hora cambiará
a una pantalla fija y el ajuste de los
Minutos comenzará a parpadear. Los
dígitos de los Minutos cambiarán cada
vez que presione; o bien PRESIONE Y
SOSTENGA y los dígitos de los Minutos
avanzarán rápidamente.
47
Page 48

FUNCIONAMIENTO DE LA CAFETERA
Para guardar el tiempo que se muestra
4
en pantalla y salir de la configuración
del reloj: Presione CUALQUIER otro
botón (Mode [Modo], Auto Set [Fijado
automático], Strength [Intensidad] o
Brew [Elaboración]); o no presione
ningún botón durante 10 segundos.
Ajuste de la intensidad del café
La cafetera puede programarse para elaborar café a una intensidad Regular (REG)
o Fuerte (BOLD) (la intensidad de elaboración predeterminada es Regular).
Para programar y activar el ajuste del modo de “Bold” (Fuerte):
Presione el botón de STRENGTH
1
(Intensidad) para seleccionar el
indicador de “Bold” (Fuerte).
Característica de pausa y servir
La característica de “Pausa y servir” le permite retirar la jarra de la cafetera y servirse
una taza de café antes de que se termine la elaboración. Al sacar la jarra, una válvula
especial detiene el flujo de café de la canasta de elaboración. Sin embargo, la elaboración
no se detiene. Si no se coloca la jarra nuevamente en la cafetera en menos de 30 segundos,
se derramará el agua y el café molido de la canasta de elaboración.
48
Page 49

FUNCIONAMIENTO DE LA CAFETERA
Cómo llenar la cafetera con agua para elaborar café
CONSEJO: Ponga a elaborar una jarra de agua fresca en la cafetera y deséchela antes de
elaborar la primera jarra de café (consulte la sección “Cómo preparar la cafetera para su uso”).
Saque el tanque de agua y llénelo con
1
agua fresca suficiente como para hacer
la cantidad de café deseada. Una escala
graduada en el tanque de agua indica la
cantidad de agua necesaria.
NOTA: No se necesita quitar el tanque de agua para volverlo a llenar; simplemente levante
la tapa del tanque y vierta agua fresca en el mismo. Puede verter el agua directamente dentro
del depósito, en la parte posterior de la cafetera.
En la jarra: El lado derecho de la
3
escala (Coffee [Café]) es una medida
del volumen de café. El lado izquierdo
de la escala (Water [Agua]) indica
la cantidad de agua necesaria para
preparar cierto número de tazas
de café.
Cuando vuelva a colocar el tanque,
2
cerciórese de alinear los orificios
que están encima del tanque con
las lengüetas que están en la parte
posterior de la cubierta de la cafetera.
Coloque la jarra en la cafetera.
4
Asegúrese de que la tapa esté segura
en su posición y que la base de la
jarra esté asentada por completo, o la
característica de Pausa y servir puede
no activarse y hacer que se derramen
el agua y el café de la canasta de
elaboración.
Español
49
Page 50

FUNCIONAMIENTO DE LA CAFETERA
Cómo llenar la canasta de elaboración con café
CONSEJO: Puede insertarse el filtro de café y agregarse el café molido sin quitar
la canasta de elaboración de la cafetera.
Saque la canasta de elaboración de la
1
parte superior de la cafetera, agarrando
la manija de sujeción que se encuentra
en la canasta.
NOTA: No haga funcionar la cafetera sin la canasta de elaboración en su sitio.
Llene el filtro con una cucharada
3
colmada de café molido por cada
taza deseada. Use un molido medio
adecuado para cafeteras automáticas.
Un molido demasiado fino hará que el
café quede amargo y puede bloquear
el filtro de la cafetera. Agite ligeramente
la canasta de elaboración para que
quede una capa de café uniforme.
Inserte un filtro de papel de base para
2
10 a 12 tazas o el filtro permanente
de color dorado dentro de la canasta
de elaboración. No use ambos tipos
de filtros a la vez. Si usa ambos filtros,
podría derramarse el agua y el café de
la canasta de elaboración.
Coloque la canasta dentro de la cafetera
4
y gire la manija hacia el frente de la
cafetera para sujetar la canasta de
elaboración en su lugar. Cerciórese de
que la tapa de la canasta de elaboración
esté cerrada por completo antes de
preparar café.
50
Page 51

Elaboración de café
Para elaborar 1 a 4 tazas solamente, consulte la sección “Elaboración de 1 a 4 tazas”.
NOTA: Ponga a elaborar una jarra de agua fresca en la cafetera y deséchela antes de elaborar
la primera jarra de café (consulte la sección “Cómo preparar la cafetera para su uso”).
Presione el botón de BREW (Elaboración)
1
para comenzar a preparar el café. La
cafetera hará un pitido una vez y el ícono
de “Brew” (Elaboración) se encenderá
cuando el ciclo de elaboración comience.
La cafetera hará un pitido 3 veces cuando
2
el ciclo de Brew (Elaboración) se complete
y luego iniciará automáticamente un ciclo
de Warm (Calentamiento) durante 2 horas.
Una vez que se complete el ciclo de
Warm (Calentamiento), se escuchará
un pitido largo.
NOTA: Al levantar la tapa de la canasta de elaboración mientras se está preparando
el café se interrumpirá el proceso de elaboración y afectará el sabor del café.
Para cancelar el ciclo de Brew (Elaboración)
3
o apagar la cafetera de forma manual
durante el ciclo Warm (Calentamiento),
presione el botón Brew (Elaboración)
una vez. El ciclo de Brew (Elaboración)
se cancelará.
Repita los pasos 1 y 2 para preparar jarras
4
adicionales de café. Apague siempre la
cafetera y deje que se enfríe durante 5
minutos antes de comenzar el próximo
ciclo de elaboración.
IMPORTANT: Es posible que el exterior de la jarra esté caliente al tacto después
de la elaboración. Tenga cuidado al colocar la jarra sobre superficies sin protección
inmediatamente después de la elaboración de café.
Español
51
Page 52

FUNCIONAMIENTO DE LA CAFETERA
1– 4 tazas
NOTA: Ponga a elaborar una jarra de agua fresca en la cafetera y deséchela antes de elaborar
la primera jarra de café (consulte la sección “Cómo preparar la cafetera para su uso”).
Presione MODE (Modo) una vez. El
1
indicador cambiará de “Reg” (Regular)
a “1–4 Cup” (1 a 4 tazas).
La cafetera hará un pitido 3 veces cuando
3
el ciclo de Brew (Elaboración) se complete
y luego iniciará automáticamente un ciclo
de Warm (Calentamiento) durante 2 horas.
Una vez que se complete el ciclo de Warm
(Calentamiento), se escuchará un pitido largo.
Presione el botón de BREW (Elaboración).
2
Hará un pitido y se encenderá el ícono de
“Brew” (Elaboración). La luz permanecerá
encendida durante todo el ciclo de Brew
(Elaboración) y permanecerá prendida
durante el ciclo de Warm (Calentamiento).
NOTA: Cuando el ciclo de Brew
(Elaboración) se complete, el ícono de
“1–4 Cup” (1 a 4 tazas) se apagará y la
cafetera volverá al ajuste “Reg” (Regular).
Para cancelar la elaboración de 1–4
4
Cup (1 a 4 tazas): Presione MODE
(Modo) dos veces. La pantalla mostrará
primero “Clean” (Limpiar) y luego,
“REG” (Regular). Se cancelará el ciclo de
elaboración de 1–4 Cup (1 a 4 tazas).
Repita los pasos 1 a 3 para preparar
5
jarras adicionales de café. Apague
siempre la cafetera y deje que se enfríe
durante 5 minutos antes de comenzar
el próximo ciclo de elaboración.
NOTA: Si no se presiona ningún botón después de seleccionar el modo “1–4 Cup” (1 a 4
tazas), el ciclo de elaboración de 1–4 Cup (1 a 4 tazas) se cancelará después de 10 segundos.
52
Page 53

FUNCIONAMIENTO DE LA CAFETERAFUNCIONAMIENTO DE LA CAFETERA
Ajuste de la característica de elaboración automática
La cafetera puede programarse para preparar café en una hora fijada previamente, haciendo
más fácil levantarse cada mañana y tomarse un café recién hecho. Para programar y activar el
temporizador de elaboración automática:
Presione el botón de AUTO SET (Fijado
1
automático) una vez. El indicador “Auto”
(Automático) destellará y el indicador de
tiempo cambiará al tiempo actual de Auto
Brew (Elaboración automática).
(12:00 p.m. es el tiempo
predeterminado).
Presione el botón de MINUTE (Minutos).
3
El ajuste de la Hora cambiará a una pantalla
fija y el ajuste de los Minutos comenzará
a parpadear. Los dígitos de los Minutos
cambiarán cada vez que presione; o bien
PRESIONE Y SOSTENGA y los dígitos de
los Minutos avanzarán rápidamente.
Presione el botón HOUR (Hora) para
2
seleccionar la hora que desea que la
cafetera comience a elaborar café. Los
dígitos de las Horas cambiarán cada
vez que presione; o bien PRESIONE Y
SOSTENGA y los dígitos de las horas
avanzarán rápidamente.
NOTE: El tiempo de Auto Brew
(Elaboración automática) se puede guardar
de 2 formas diferentes. Después de
completar los pasos 1 a 3, complete el paso
4 a continuación para guardar el tiempo
Auto Brew (Elaboración automática) y salga
de la característica, o bien directamente
vaya al paso 1 de “Uso de ajustes de
elaboración automáticos previamente
programados” para guardar el tiempo de
Auto Brew (Elaboración automática) y
comenzará automáticamente este ciclo.
NOTE: Durante el ajuste del tiempo
de elaboración automática, si no se
presiona ningún botón durante 10
segundos después de seleccionar el ajuste
de los minutos, el indicador de “Auto”
(Automático) se apagará y la pantalla
principal volverá a aparecer.
Español
Presione el botón de AUTO SET
4
(Fijado automático). El indicador “Auto”
(Automático) se apagará y la pantalla
principal volverá a aparecer. Se guardará
el tiempo de Auto Brew (Elaboración
automática).
53
Page 54

FUNCIONAMIENTO DE LA CAFETERA
Uso de ajustes de elaboración automáticos previamente programados
Estos pasos también pueden seguirse para guardar el tiempo de Auto Brew
(Elaboración automática) después de seguir los pasos 1 a 3 en la sección
“Ajuste de la característica de elaboración automática”.
Presione y sostenga el botón de
1
BREW (Elaboración) durante tres
segundos. El indicador de tiempo
pasará al tiempo actual de Auto
Brew (Elaboración automática).
Se encenderá el indicador “Auto”
(Automático), y el indicador de
“Brew” (Elaboración) comenzará
a destellar.
La cafetera comenzará el ciclo de
3
elaboración a la hora de elaboración
automática y cuando el ciclo comience,
emitirá un pitido una vez. El indicador
de “BREW” (Elaboración) dejará de
destellar y permanecerá encendido
y el indicador “Auto” (Automático)
se apagará.
Después de 5 segundos, la pantalla
2
volverá a la pantalla principal. El
indicador de “Auto” (Automático)
permanecerá encendido, y el ícono
de “Brew” (Elaboración) continuará
destellando.
La cafetera hará un pitido 3 veces
4
cuando el ciclo de Brew (Elaboración)
se complete y luego iniciará
automáticamente un ciclo de Warm
(Calentamiento) durante 2 horas.
Una vez que finalice el ciclo de Warm
(Calentamiento), se escuchará un
pitido largo.
54
Page 55

CONSEJOS PARA OBTENER RESULTADOS IDEALESFUNCIONAMIENTO DE LA CAFETERA
Consejos rápidos
Granos frescos de café: Un café realmente
sabroso se puede preparar solamente con
granos frescos de café. Para conservar la
frescura de los granos de café, manténgalos
en un recipiente hermético opaco y
guárdelos en un lugar fresco y seco. No
se recomienda refrigerarlos, debido a que
el agua tiende a condensarse sobre los
granos cada vez que se abre el recipiente.
El congelamiento puede ayudar a mantener
los granos almacenados durante un período
prolongado, pero también afectará su sabor
negativamente.
El molido justo: La mejor taza de café se
prepara con granos de café que han sido
molidos adecuadamente, justo antes de
prepararlo. Cuando muela los granos de café,
cerciórese de que sea a un nivel de molido
mediano, el apropiado para las cafeteras
automáticas. Encuentre los molinillos de café
KitchenAid en su tienda local o por Internet
en www.kitchenaid.com.
La cantidad adecuada de café molido:
Será una buena idea comenzar con 1 cuchara
de café por cada taza de café marcada en la
jarra de vidrio o en el tanque de agua. Si el
molido es más fino, por lo general se necesita
menos café, pero esto puede producir un
café amargo y bloquear el filtro. Para obtener
un café menos fuerte, prepárelo siguiendo
la proporción sugerida de granos de café
y agua; después dilúyalo en agua caliente.
Esto aumenta el sabor y hace que quede
menos amargo.
La pureza del agua para la elaboración
de café: Un sabroso café comienza con
agua fresca. El tanque de agua removible
es fácil de llenar, para proveerle siempre
un café con un gusto ideal. También es fácil
de limpiar, para que usted siempre pueda
preparar su café con el agua más fresca. En
lugares en donde las condiciones del agua
local sean muy malas, tal vez desee usar agua
embotellada. No use agua destilada ni agua
mineral, ya que pueden dañar su cafetera.
Para mantener la cafetera limpia: Debido
a que los aceites del café que se acumulan en
la canasta de elaboración y en la jarra pueden
ponerse en malas condiciones y afectar el
sabor del café preparado, es importante que
estas dos piezas se limpien diariamente para
poder preparar un café con el mejor sabor.
Español
55
Page 56

CUIDADO Y LIMPIEZA
Limpieza de la cafetera
Los depósitos de calcio (sarro) del agua se acumularán en la bomba de calor de la cafetera con
el correr del tiempo y afectarán la eficacia de la elaboración y la calidad del café. Si nota que la
elaboración lleva más tiempo que el normal, o si la cafetera hace ruidos raros, entonces es tiempo
de quitar el sarro. El indicador de “Clean” (Limpiar) destellará cuando la cafetera haya preparado
100 tazas de café o detecta la acumulación de sarro. Deberá quitarse el sarro lo antes posible para
conservar el desempeño y la vida útil de su cafetera.
NOTA:
con una solución de agua y vinagre o con un
agente comercial para quitar el sarro. Mezcle
siempre la solución para quitar el sarro con
agua fresca.
Cuando use vinagre, llene la jarra con una
solución compuesta por ½ de vinagre y ½
de agua.
Cuando use un agente para quitar el sarro,
siga las instrucciones del paquete para ver las
proporciones recomendadas de agente para
quitar el sarro y el agua a usar.
La cafetera deberá ponerse en marcha en un
ciclo completo de Clean (Limpiar) usando un
tanque entero de solución para quitar el sarro.
Puede quitarse el sarro de la cafetera
Saque siempre el filtro de agua antes
1
de quitar el sarro (consulte la sección
“Instalación del filtro de agua”) y
cerciórese de que la canasta de
elaboración no contenga café ni filtros
de café.
Cuando el indicador de “Clean”
2
(Limpiar) comience a destellar:
Presione el botón MODE (Modo) 2
veces. El indicador de “Reg” (Regular)
se apagará y el indicador de “Clean”
(Limpiar) se encenderá.
56
Presione el botón de BREW
3
(Elaboración). Hará un pitido y se
encenderá el indicador de “Brew”
(Elaboración). El indicador de “Clean”
(Limpiar) permanecerá encendido y el
ciclo de Clean (Limpiar) comenzará.
Page 57

Cuando del ciclo de Clean (Limpiar)
4
esté completo (aproximadamente 9
minutos), se escucharán 3 pitidos y
los indicadores de “Clean” (Limpiar) y
“Brew” (Elaboración) se apagarán. La
pantalla principal volverá a aparecer.
NOTA: El ciclo de Clean (Limpiar) puede completarse en intervalos regulares, si lo desea,
sin necesidad de que se encienda el indicador de “Clean” (Limpiar). Siga estas instrucciones
para limpiar la cafetera siempre que lo desee.
Vuelva a colocar el filtro de agua o
5
reemplácelo. Reemplace el filtro cada
3 meses cuando el uso sea normal.
Reemplácelo más a menudo si lo usa
con frecuencia.
SOLUCIÓN DE PROBLEMAS
1. Si no se ha iluminado la pantalla del
temporizador de elaboración:
• Revise que la cafetera se haya enchufado
en un contacto de conexión a tierra de 3
terminales. Si lo está, revise el fusible o el
cortacircuitos del circuito eléctrico al que
está conectada la cafetera y asegúrese de
que el circuito esté cerrado.
2. Si sólo se prepara un poco del agua
agregada a la cafetera:
• Deberá quitarse el sarro a la cafetera
de inmediato. Consulte “Limpieza de
la cafetera” en la sección “Cuidado y
limpieza”.
3. Si aparece “Er1” en la pantalla
del temporizador del botón de
elaboración:
• A Es posible que haya un botón atascado.
Desenchufe la cafetera y presione varias
veces cada botón.
• Enchufe la cafetera en un contacto
de pared de conexión a tierra de
3 terminales.
• Si aparece nuevamente en la pantalla
“Er1”, repita este procedimiento.
4. Si no se puede corregir el problema:
• Consulte la sección “Garantía”. No
devuelva la cafetera a la tienda; los
vendedores minoristas no proveen
servicio técnico.
Español
57
Page 58

GARANTÍA
Garantía de KitchenAid® para la cafetera en los 50 estados de
los Estados Unidos, el Distrito de Columbia, Puerto Rico y Canadá
Esta garantía se extiende al comprador y a cualquier propietario subsiguiente para las cafeteras
usadas en los 50 estados de Estados Unidos, el Distrito de Columbia, Puerto Rico y Canadá.
Duración de la garantía: Un año de garantía completa a partir de la fecha de compra.
Reemplazo sin dicultades para su cafetera. Consulte la
KitchenAid pagará
por lo siguiente, a
su elección:
KitchenAid no
A. Reparaciones cuando su cafetera haya sido empleada
pagará por:
B. Daños causados por accidente, alteración,
C. Cualquier gasto de envío o manipulación para llevar
D. Piezas de repuesto o costos de mano de obra para
EXCLUSIÓN DE GARANTÍAS IMPLÍCITAS; LIMITACIÓN DE RECURSOS
LAS GARANTÍAS IMPLÍCITAS, INCLUYENDO EN LA MEDIDA QUE CORRESPONDA
LAS GARANTÍAS DE COMERCIABILIDAD O DE CAPACIDAD PARA UN PROPÓSITO
PARTICULAR, SON EXCLUIDAS EN LA MEDIDA EN QUE SEA LEGALMENTE
PERMISIBLE. TODA GARANTÍA QUE SEA IMPUESTA POR LEY SERÁ LIMITADA A
UN AÑO O AL PERÍODO MÁS CORTO PERMITIDO POR LEY. ALGUNOS ESTADOS
Y PROVINCIAS NO PERMITEN LAS LIMITACIONES O EXCLUSIONES ACERCA
DE CUÁNTO DEBE DURAR UNA GARANTÍA IMPLÍCITA DE COMERCIABILIDAD
O CAPACIDAD, DE MODO QUE LAS LIMITACIONES O EXCLUSIONES ARRIBA
MENCIONADAS PUEDEN NO APLICARSE EN SU CASO.
SI ESTE PRODUCTO NO FUNCIONA COMO SE HA GARANTIZADO, EL ÚNICO Y
EXCLUSIVO RECURSO DEL CLIENTE SERÁ EL DE REPARARLO O REEMPLAZARLO
SEGÚN LOS TÉRMINOS DE ESTA GARANTÍA LIMITADA. KITCHENAID Y
KITCHENAID CANADA NO SE RESPONSABILIZARÁN POR DAÑOS INCIDENTALES
O CONSECUENTES. Esta garantía le otorga derechos legales especícos, y es posible
que usted tenga también otros derechos, los cuales varían de un estado a otro o de una
provincia a otra.rights which vary from state to state or province to province.
siguiente página para obtener detalles acerca de cómo
obtener servicio o llame a nuestro número gratuito del
Centro para la eXperiencia del cliente al 1-800-541-6390.
O BIEN
Las piezas de repuesto o costos de trabajo de reparación
para corregir defectos en los materiales y en la mano de
obra. El servicio deberá ser provisto por un Centro de
servicio autorizado por KitchenAid.
para nes ajenos al uso doméstico normal de una
sola familia.
uso indebido o abuso.
la cafetera a un centro de servicio autorizado.
cafeteras operadas fuera de los 50 estados de Estados
Unidos, el Distrito de Columbia, Puerto Rico y Canadá.
58
Page 59

GARANTÍA
Hassle-Free Replacement Warranty –
50 United States, District of Columbia, and Puerto Rico
Conamos tanto en que la calidad de
nuestros productos cumple con las
exigentes normas de KitchenAid que, si
la cafetera presentara alguna falla durante
el primer año de compra, KitchenAid
se encargará de entregar un reemplazo
idéntico o similar a su domicilio sin cargo y
de devolver su cafetera original a nosotros.
La unidad de reemplazo estará también
cubierta por nuestra garantía limitada
de un año. Siga estas instrucciones para
recibir este servicio de calidad.
Garantía de reemplazo sin dicultades - en Canadá
We’re so condent the quality of our
products meets the exacting standards of the
KitchenAid brand that, if your Coffee Maker
should fail within the rst year of ownership,
KitchenAid Canada will replace your Coffee
Maker with an identical or comparable
replacement. Your replacement unit will also
be covered by our one year limited warranty.
Please follow these instructions to receive
this quality service.
If your Coffee Maker should fail within the
rst year of ownership, take the Coffee
Maker or ship collect to an Authorized
KitchenAid Service Centre. In the carton
Si su cafetera fallara durante el primer
año de compra, simplemente llame a
nuestro número gratuito del Centro
para la eXperiencia del cliente al
1-800-541-6390, de lunes a viernes.
Tenga a mano el recibo de compra
original cuando llame. Se requerirá el
comprobante de compra para iniciar
un proceso de reclamo. Proporcione al
asesor su dirección de envío completa.
(No proporcionar números de
apartados postales.)
Cuando usted reciba la cafetera
de reemplazo, use la caja y los
materiales de empaque para
empacar la cafetera original.
include your name and complete shipping
address along with a copy of the proof of
purchase (register receipt, credit card slip,
etc.). Your replacement Coffee Maker will
be returned prepaid and insured. If you
are unable to obtain satisfactory service
in this manner call our toll-free Customer
eXperience Centre at 1-800-807-6777.
Or write to us at:
Customer eXperience Centre
KitchenAid Canada
200 - 6750 Century Ave.
Mississauga, ON L5N 0B7
Español
Cómo obtener servicio técnico después de que expire la
garantía o cómo pedir accesorios y piezas de repuesto
En los Estados Unidos y Puerto Rico:
Para obtener información acerca del
servicio técnico o para pedir accesorios o
piezas de repuesto, llame sin costo
al 1-800-541-6390 o escriba a:
Centro para la eXperiencia del cliente,
KitchenAid Small Appliances,
P.O. Box 218, St. Joseph, MI 49085-0218
®/™ © 2014. Todos los derechos reservados. Usada en Canadá bajo licencia.
Fuera de los Estados Unidos y Puerto
Rico:
Consulte a su distribuidor local de KitchenAid
o a la tienda donde compró la cafetera para
conocer cómo obtener el servicio técnico.
Para obtener información acerca del
servicio en Canadá:
Llame sin costo al 1-800-807-6777.
O bien escriba a:
Centro para la eXperiencia del cliente
KitchenAid Canada
200 - 6750 Century Ave.
Mississauga, ON L5N 0B7
59
Page 60

®/™ © 2014 KitchenAid. All rights reserved. Used under license in Canada.
®/™ © 2014 KitchenAid. Tous droits réservés. Utilisé sous licence au Canada.
®/™ © 2014 KitchenAid. Todos los derechos reservados. Usada en Canadá bajo licencia.
W10638729A 03/14
 Loading...