

KitchenAid KCGC500JSS Use & Care Guide
KITCHENAID® COMMERCIAL-STYLE
GAS COOKTOP
Use & Care Guide
For questions about features, operation/performance, parts, accessories or service, call: 1-800-422-1230,
In Canada, for assistance, installation and service, call: 1-800-807-6777
or visit our website at www.kitchenaid.com
or visit our website at www.kitchenaid.ca.
TABLE DE CUISSON À GAZ DE STYLE
COMMERCIAL DE KITCHENAID
Guide d’utilisation et d’entretien
Pour des questions concernant les caractéristiques, le fonctionnement, la performance, les pièces, accessoires ou pour une
intervention de dépannage, composer le 1-800-422-1230 ou consulter www.kitchenaid.com
Au Canada, pour assistance, installation ou service composez le 1-800-807-6777
ou visitez notre site web à www.kitchenaid.ca.
Table of Contents/Table des matières ..................................... 2
®
W11179810A
Table of Contents Table de matières
SAFETY INFORMATION ................................................................3
PARTS AND FEATURES ................................................................5
Cooktop ...............................................................................5
Control Knobs .....................................................................6
COOKTOP FEATURES ...................................................................8
Burners.................................................................................8
Wok Ring Grates ..................................................................9
Chrome Electric Griddle ......................................................9
USING YOUR COOKTOP ............................................................10
Light Indicators, Behaviors and Controls .........................10
CARE AND CLEANING ................................................................11
Cooktop Surface ...............................................................11
Sealed Surface Burners ....................................................11
Porcelain-Coated Grates and Caps ..................................12
Griddle ...............................................................................12
Cooktop Controls ..............................................................13
Stainless Steel Exterior ......................................................13
TROUBLESHOOTING ..................................................................14
ASSISTANCE OR SERVICE .........................................................15
INFORMATIONS DE SÉCURITÉ..................................................16
PIÈCES ET CARACTÉRISTIQUES ..............................................18
Table de cuisson ...............................................................18
Boutons de commande ....................................................19
CARACTÉRISTIQUES DE LA TABLE DE CUISSON ..................21
Brûleurs .............................................................................21
Grilles à anneaux Wok .......................................................22
Plaque à frire chromée ......................................................22
UTILISATION DU TABLE DE CUISSON ......................................23
Témoins, comportements et commandes .......................23
ENTRETIEN ET NETTOYAGE ......................................................24
Surface de la table de cuisson ..........................................24
Brûleurs de surface scellés ...............................................24
Grilles et chapeaux émaillés ..............................................25
Plaque à frire ......................................................................25
Commandes de la table de cuisson .................................26
Extérieur en acier inoxydable ............................................26
DÉPANNAGE .................................................................................27
ASSISTANCE OU SERVICE .........................................................28
ACCESSORIES .............................................................................15
ACCESSOIRES .............................................................................28
2
SAFETY INFORMATION
Your safety and the safety of others are very important.
We have provided many important safety messages in this manual and on your appliance. Always read and obey all safety
messages.
This is the safety alert symbol.
This symbol alerts you to potential hazards that can kill or hurt you and others.
All safety messages will follow the safety alert symbol and either the word “DANGER” or “WARNING.”
These words mean:
You can be killed or seriously injured if you don't immediately
DANGER
WARNING
All safety messages will tell you what the potential hazard is, tell you how to reduce the chance of injury, and tell you what can
happen if the instructions are not followed.
WARNING: If the information in these instructions is not followed exactly, a fire or
explosion may result causing property damage, personal injury or death.
follow instructions.
You
can be killed or seriously injured if you don't
instructions.
follow
– Do not store or use gasoline or other flammable vapors and liquids in the vicinity of this
or any other appliance.
– WHAT TO DO IF YOU SMELL GAS:
Do not try to light any appliance.
•
Do not touch any electrical switch.
•
Do not use any phone in your building.
•
Immediately call your gas supplier from a neighbor's phone. Follow the gas supplier's
•
instructions.
If you cannot reach your gas supplier, call the fire department.
•
Installation and service must be performed by a qualified installer, service agency or
–
the gas supplier.
WARNING: Gas leaks cannot always be detected by smell.
Gas suppliers recommend that you use a gas detector approved by UL or CSA.
For more information, contact your gas supplier.
If a gas leak is detected, follow the “What to do if you smell gas” instructions.
3
SAFETY INFORMATION
IMPORTANT SAFETY INSTRUCTIONS
WARNING: To reduce the risk of fire, electrical shock,
injury to persons, or damage when using the cooktop, follow
basic precautions, including the following:
■ WARNING:
heater to heat or warm the room. Doing so may result in
carbon monoxide poisoning and overheating of the cooktop.
■ CAUTION: Do not store items of interest to children in
cabinets above the cooktop – children climbing on the
cooktop to reach items could be seriously injured.
■ Proper Installation – The cooktop, when installed, must be
electrically grounded in accordance with local codes or, in
the absence of local codes, with the
Code, ANSI/NFPA70 or the Canadian Electrical Code,
. Be sure the cooktop is properly installed and
Part 1
grounded by a qualified technician.
NEVER use this appliance as a space
National Electrical
SAVE THESE INSTRUCTIONS
This cooktop is equipped with a three-prong grounding
■
plug for your protection against shock hazard and should
be plugged directly into a properly grounded receptacle. Do
not cut or remove the grounding prong from this plug.
Disconnect the electrical supply before servicing the
■
cooktop.
■ Injuries may result from the misuse of the cooktop such as
stepping, leaning, or sitting on the top surface.
Maintenance – Keep cooktop area clear and free from
■
combustible materials, gasoline, and other flammable
vapors and liquids.
Storage on the cooktop – Flammable materials should not
■
be stored on or near surface units.
■ Top burner flame size should be adjusted so it does not
extend beyond the edge of the cooking utensil.
4
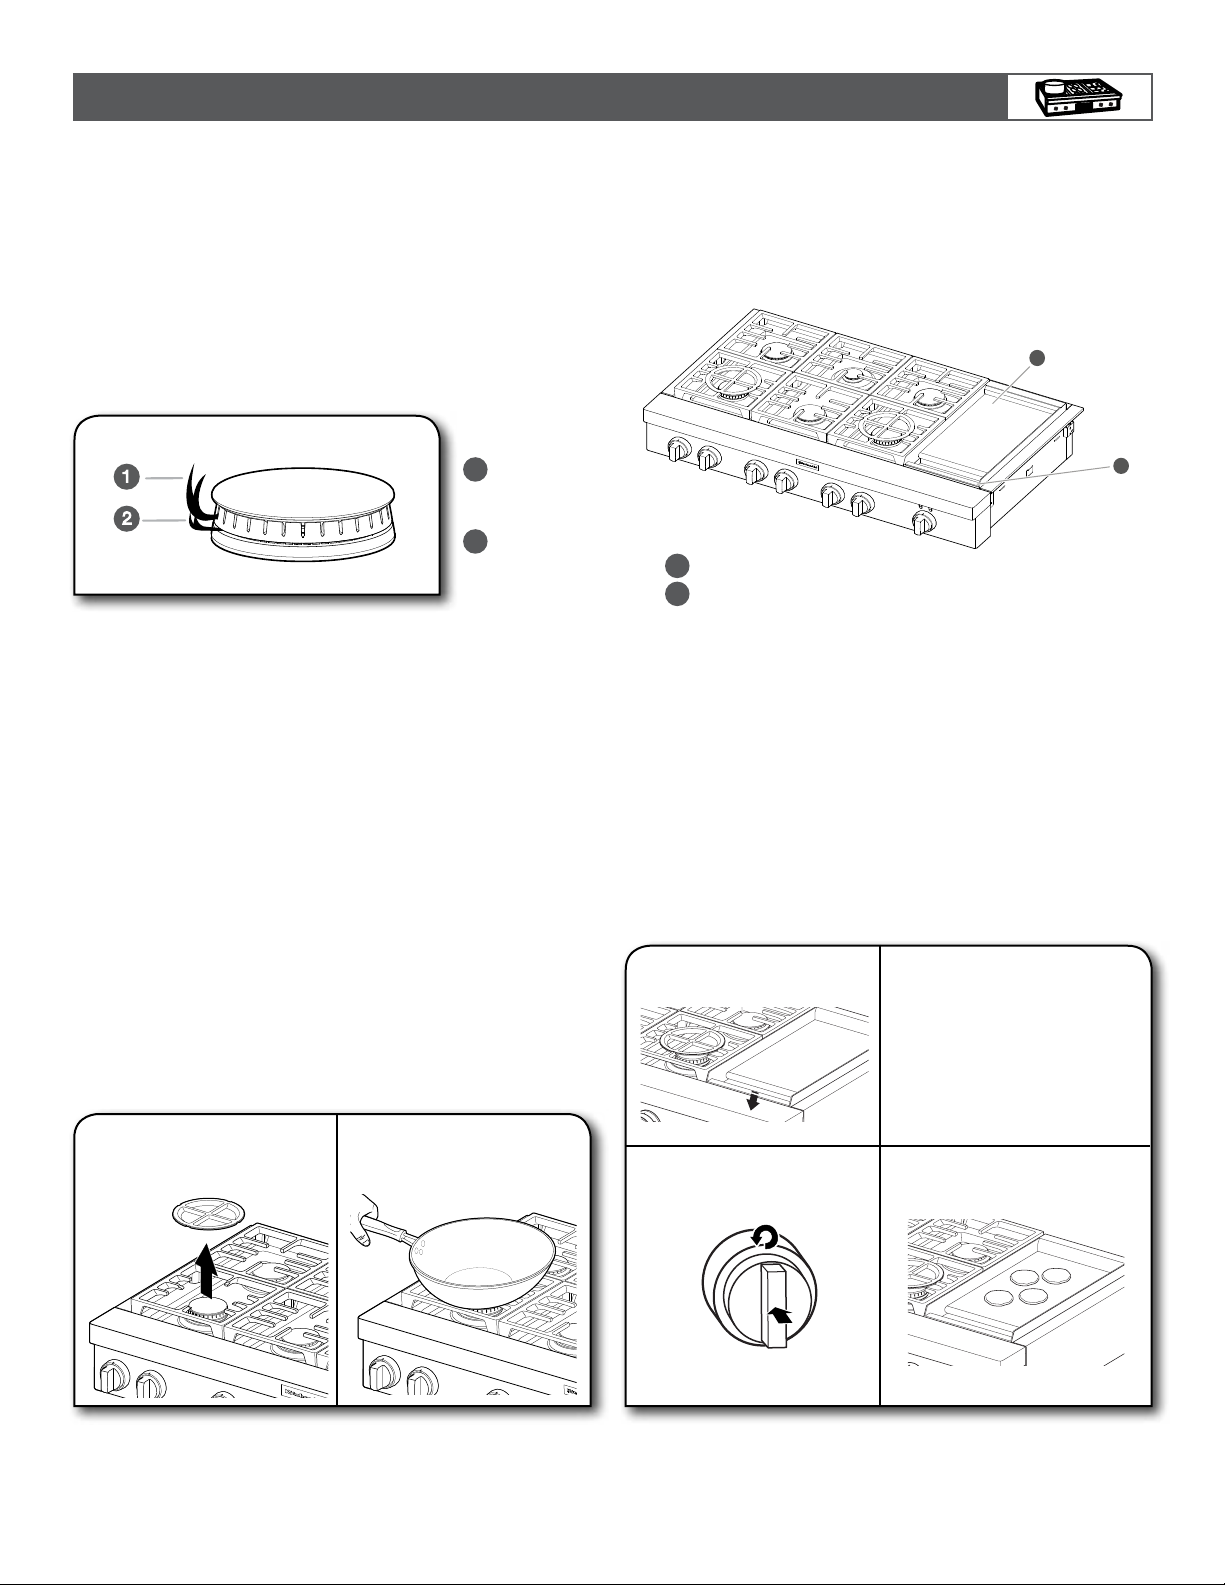
PARTS AND FEATURES
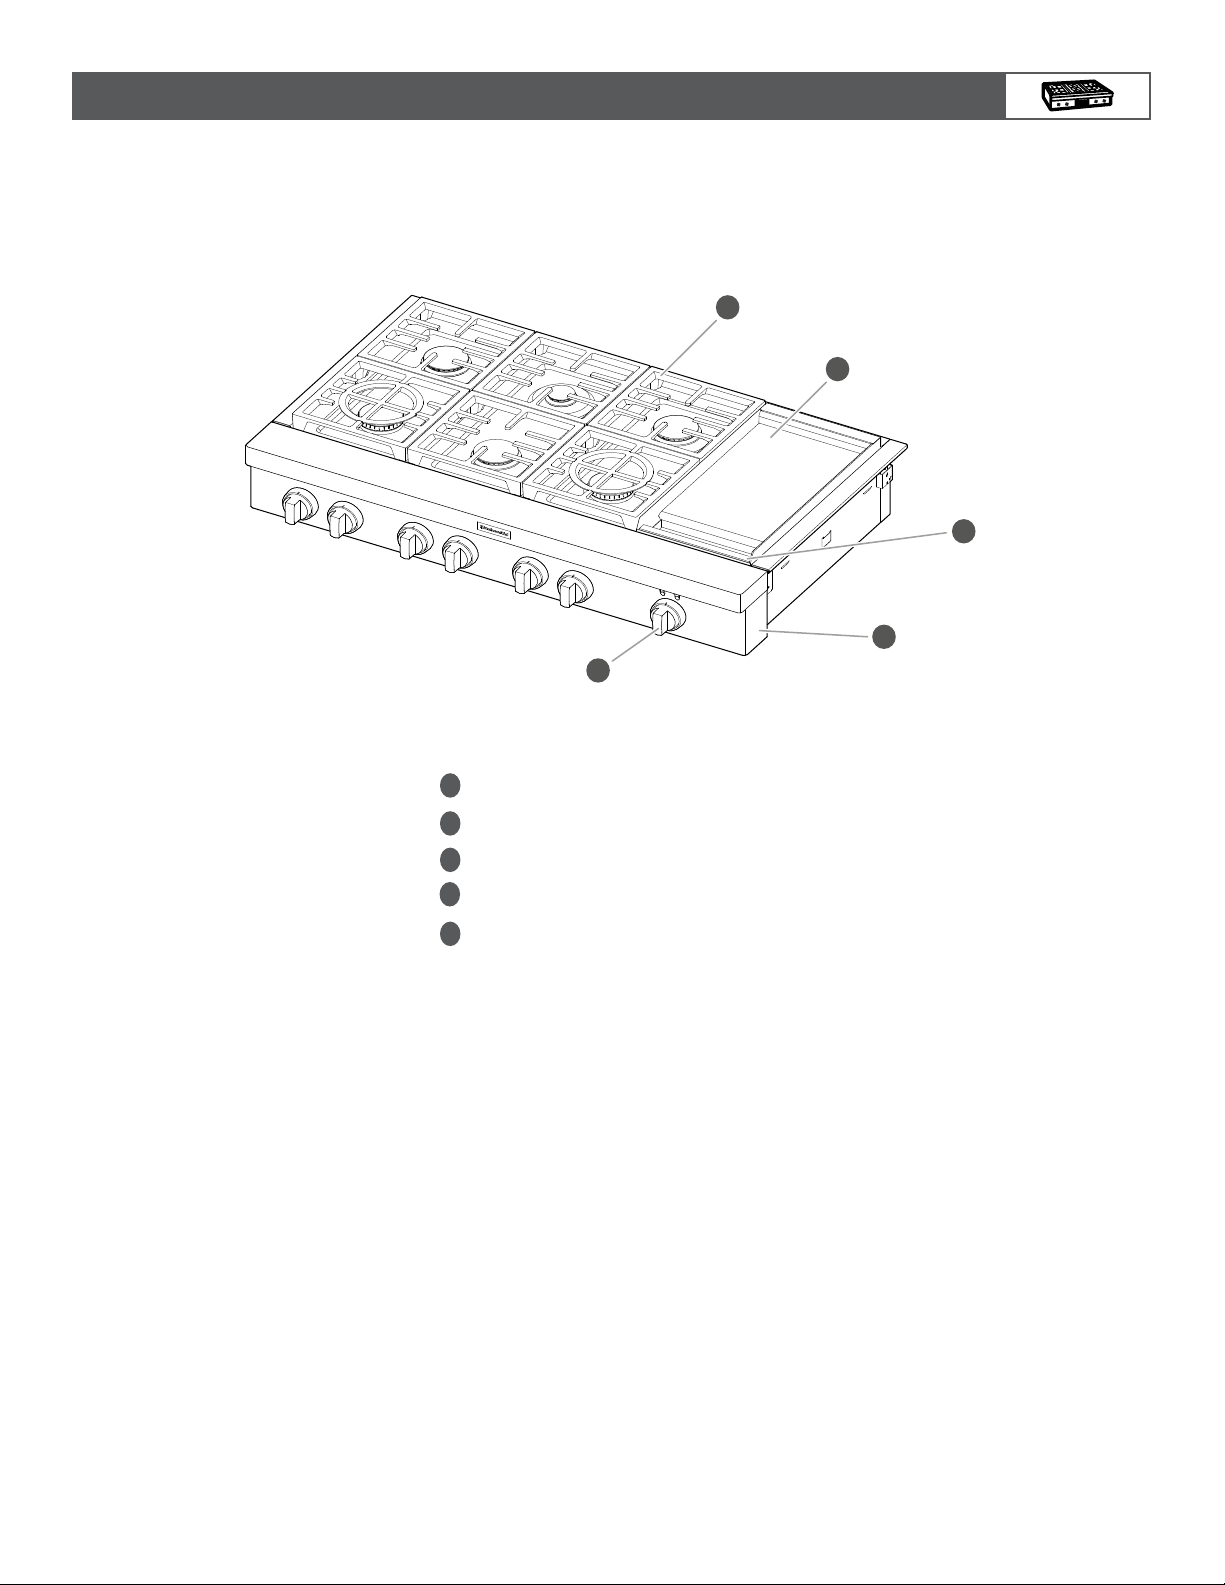
These instructions cover several different models. The cooktop you have purchased may have some or all of the items listed.
Thelocations and appearances of the features shown here may not match those of your model.
COOKTOP
1
2
3
4
5
48" (121.9 cm) cooktop shown*
Cooktop grate
1
Electric griddle (on some models)
2
Drip tray (on griddle models)
3
4
Console panel
5
Cooktop knobs
*Cooktop conguration may differ.
5
PARTS AND FEATURES
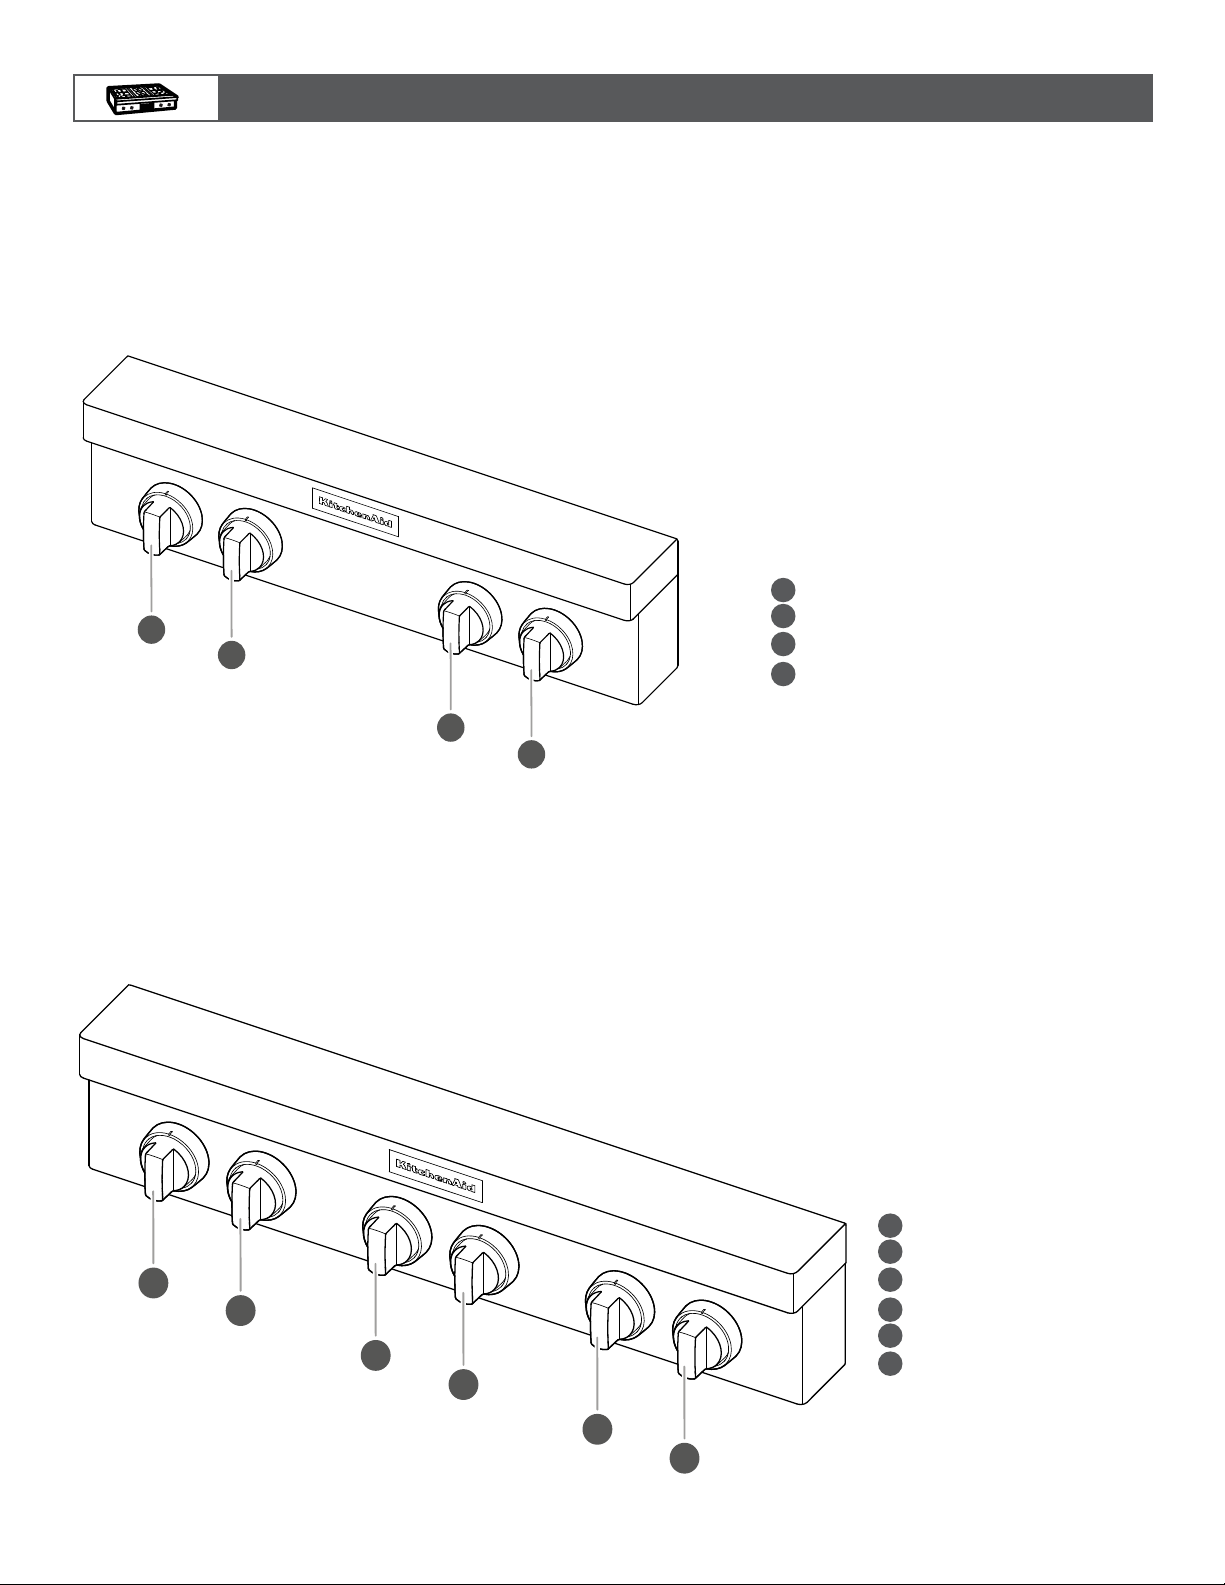
CONTROL KNOBS
The cooktop features are accessed through the cooktop knobs.
30" (76.2 CM)
Cooktop Knobs
A
B
Left Rear Knob
A
B
Left Front Knob
C
Right Rear Knob
Right Front Knob
D
Cooktop Knobs
A
C
NOTE: Cooktop conguration, features,
and controls may differ.
D
36" (91.4 CM)
Left Rear Knob
A
B
Left Front Knob
C
Center Rear Knob
Center Front Knob
B
C
D
E
Right Rear Knob
F
Right Front Knob
D
E
NOTE: Cooktop conguration,
features, and controls may differ.
F
6
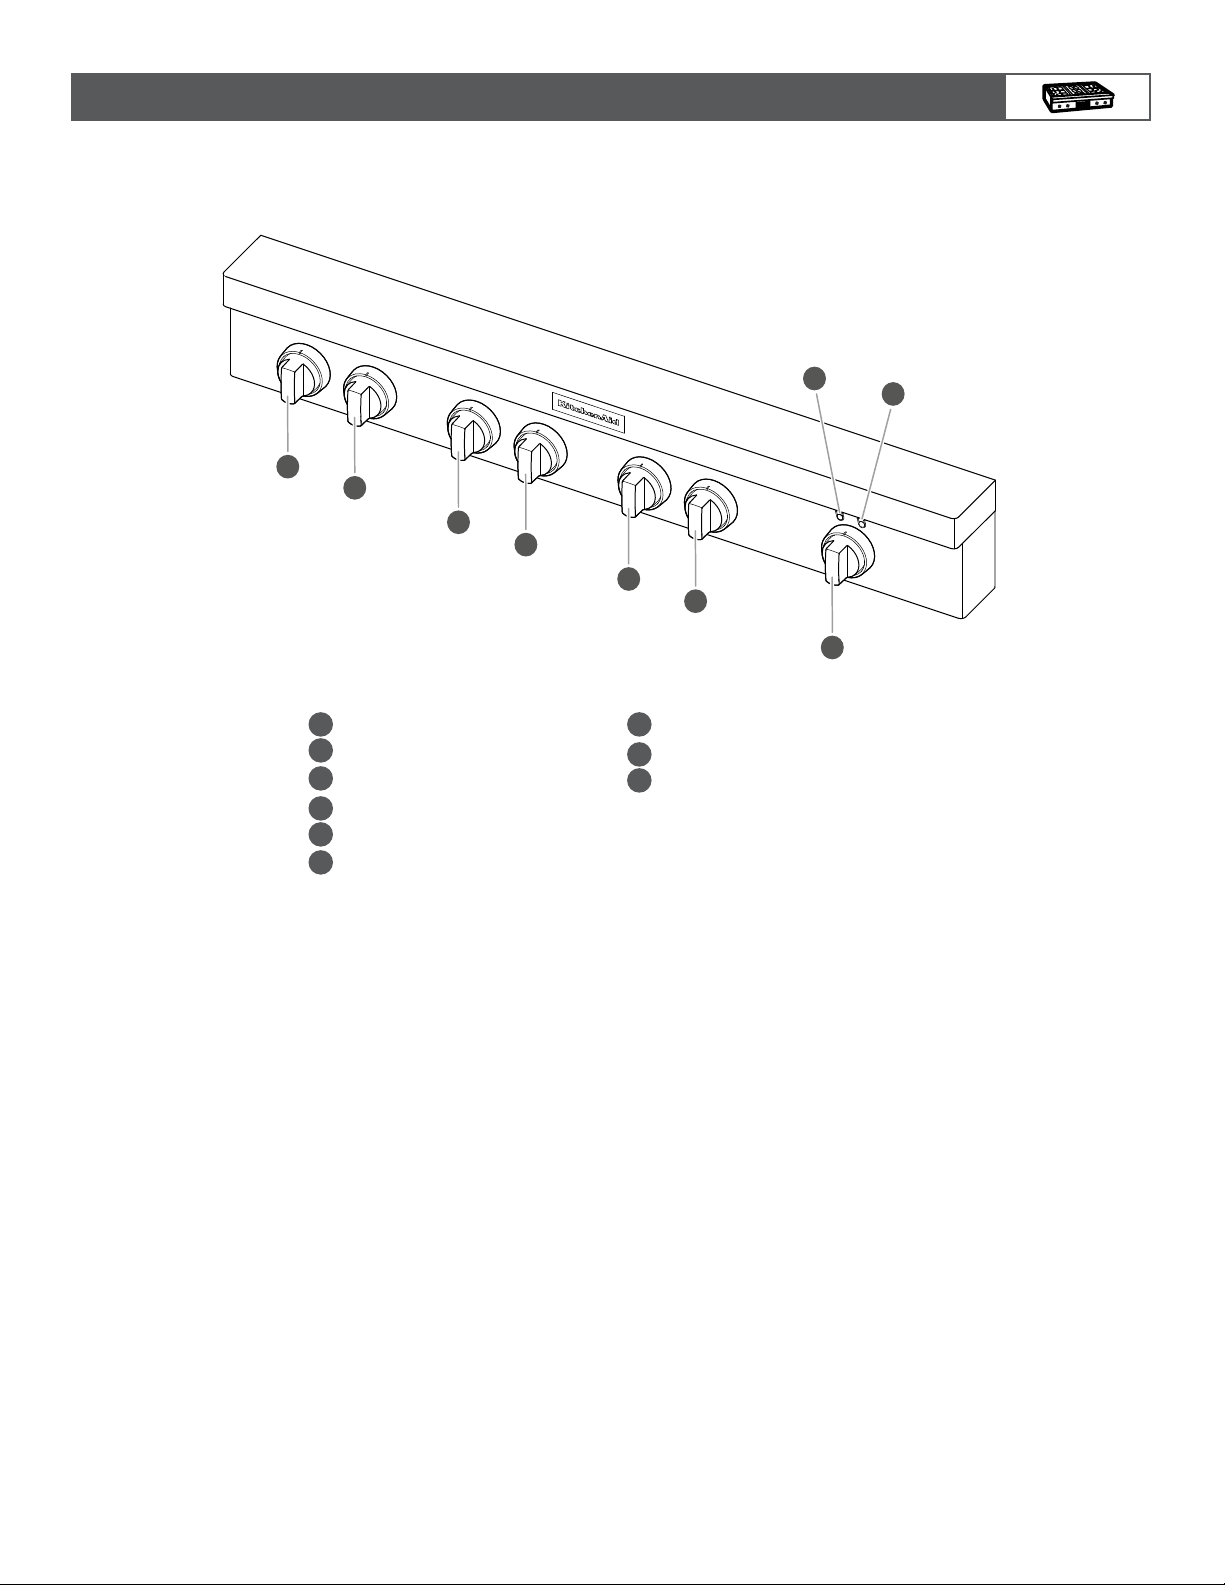
Cooktop Knobs and Indicator Lights
PARTS AND FEATURES
48" (121.9 CM)
A
B
C
D
E
F
Left Rear Knob
A
B
Left Front Knob
C
Center Rear Knob
Center Front Knob
D
E
Right Rear Knob
F
Right Front Knob
NOTE: Cooktop conguration, features, and controls may differ.
G
Griddle Knob
Griddle Preheat Light
H
I
Griddle Cooktop ON Light
H
G
I
7
COOKTOP FEATURES
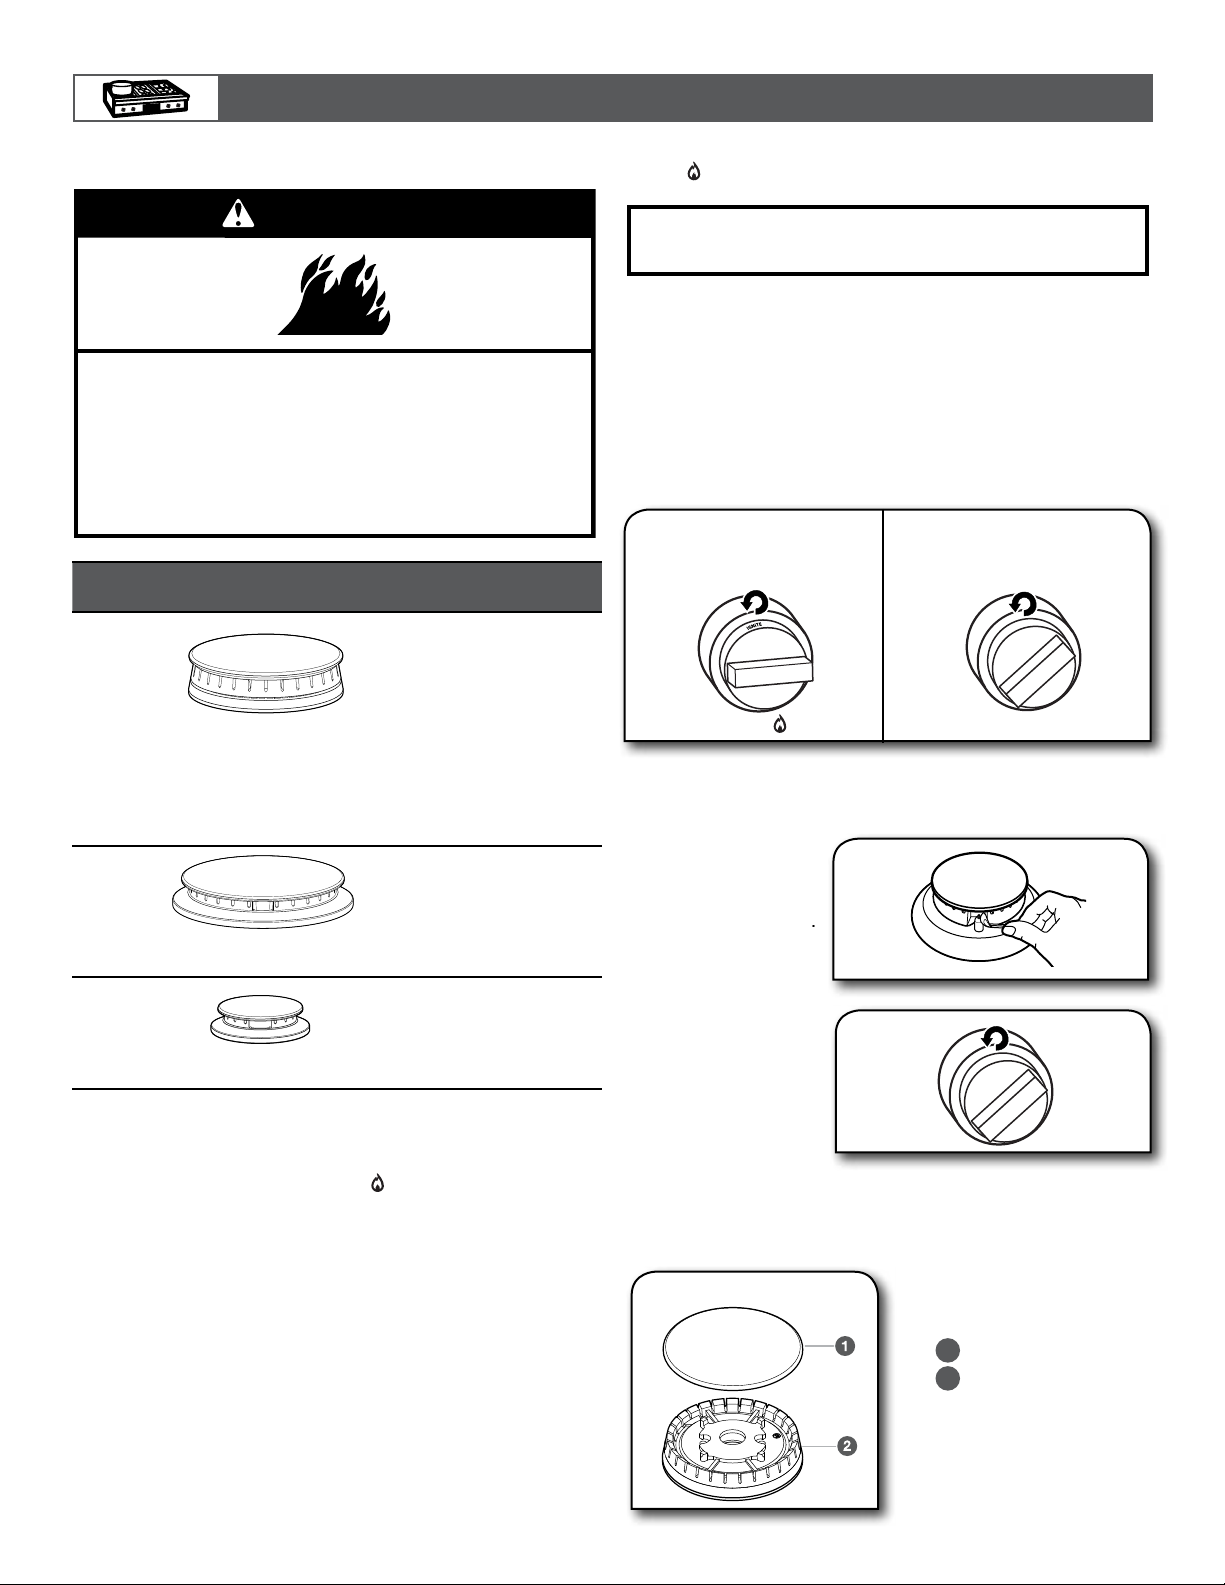
BURNERS
WARNING
Fire Hazard
Do not let the burner flame extend beyond the edge of
the pan.
Turn off all controls when not cooking.
Failure to follow these instructions can result in death
or fire.
BTU/hr
Large
stacked
burner
Large
burner
BURNER
APPEARANCE
FEATURES
This burner has an upper
and lower level of ame.
The H setting uses both
ame levels at full power to
provide the highest heat.
It is ideal for cooking large
quantities of food or liquid
and using large pots and
pans. The Simmer H and
L settings use the lower
ame only.
This burner is ideal for
cooking large quantities of
food.
■ When the burner knob for the desired burner is turned to
the position, the burner will click independent of the other
burners.
REMEMBER: When cooktop is in use, the entire cooktop
area may become hot.
Reignition Feature
During cooktop use, if one or more burners are extinguished
due to external causes (such as a water spill, wind, or
ventilation draft), the ignition system will turn on to reignite
the flame. When the flame comes back on, the system will
stop sparking. If the draft in the room is not removed, occasional
sparking may continue. Sparking may also occasionally occur
when using the low setting on a burner.
To Set a Burner:
1.
Push in and turn
counterclockwise
to .
Turn knob counterclockwise further for Simmer H and Simmer L.
2. Turn knob
counterclockwise
between H and L.
In Case of Power Failure
Hold a lit match near a
burner and turn knob
counterclockwise to H.
After burner lights, turn
knob to desired setting.
Small
burner
This burner is ideal for
cooking smaller quantities
of food and melting
chocolate or butter.
Igniting Burners:
■ Electric igniters automatically light the surface burners
when burner knobs are turned to
■ Before setting a burner knob, place lled cookware on the
grate. Do not operate a burner using empty cookware or
without any cookware on the grate.
■ Visually check that the burner has lit. If the burner does not
ignite, listen for the clicking sound. If you do not hear the
igniter click, turn off the burner. Check for a tripped circuit
breaker or blown fuse. Check that the burner knob is pressed
completely down on the valve shaft. If the spark igniter still
does not operate, call a trained repair specialist.
8
.
SEALED SURFACE BURNERS
Sealed surface burners are designed to minimize gaps and
seams that can allow liquids and spills to get under the
cooktop. This design makes cleanup quick and easy.
Burner
Burner cap
1
Burner base
2
COOKTOP FEATURES
IMPORTANT: Do not obstruct the ow of combustion and
ventilation air around the burner grate edges.
Burner cap: Always keep the burner cap in place when
using a surface burner. A clean burner cap will help avoid poor
ignition and uneven ames. Always clean the burner cap after a
spillover, and routinely remove and clean the caps according to
the “Care and Cleaning” section.
Gas opening: Gas must ow freely throughout the gas
opening for the burner to light properly. Keep this area free of
soil and do not allow spills, food, cleaning agents, or any other
material to enter the gas opening. Keep spillovers out of the gas
opening by always using a burner cap.
Large Burner
Upper
1
2
1
(main)
ame
Lower
2
(simmer)
ame
Burner Ports:
Check burner ames occasionally for proper size and shape as
shown above. A good ame is blue in color, not yellow. Keep
this area free of soil and do not allow spills, food, cleaning
agents, or any other material to enter the burner ports.
WOK RING GRATES
Some grates on the unit are designed for use with a wok. These
grates can be used over the high power burners (LF or RF) or
can be used for improved melting performance when used with
the small, low power burners (RR or CR).
To use for wok cooking, place the grates with the removable
ring over the LF or RF burner, remove the center ring and set it
aside. A 14" (35.5 cm) or larger wok pan will rest in the opening
of the grate for optimum cooking with your wok.
To use for improved melting performance, place the grates with
the removable ring over the small, low power burner. Turn the
center ring upside down and reposition it in the center of the
grate so the pan will be farther away from the heat source.
To Use:
CHROME ELECTRIC GRIDDLE (on some models)
The chrome electric griddle provides the perfect cooking
surface for grilled sandwiches, pancakes, eggs, burgers,
sautéed vegetables, and many more family favorites. The
attractive low-stick surface is designed to make cleanup easy.
1
Griddle
1
Drip tray
2
The chrome electric griddle system provides a convenient
cooking surface.
■ Be sure plastic lm has been removed and wash with hot
water before rst use.
■ To avoid scratching the griddle, do not place any pots or
pans on the griddle. Use only heat-resistant plastic or
wooden utensils.
■ The griddle surface is ready to use and does not need to be
seasoned.
■ Pouring cold water on a hot griddle may warp the griddle,
resulting in an uneven cooking surface.
To Use:
1. Position drip tray.
3. Wait for preheat
light to solid
indicating the griddle
has reached preheat.
2
1. Remove inner
ring.
2. Place wok on
the grate.
2. Push in and turn
knob
to desired temperature.
4. Place food on the
griddle
and cook to desired doneness.
9
 Loading...