

Page 1
ACCOLADE™400
TILT-HEAD
STAND MIXER
INSTRUCTIONS AND RECIPES
FOR THE WAY IT’S MADE.
®
®
1-800-807-6777
Call our Consumer Interaction Centre
with questions or comments
Web Site: KitchenAid.ca
Page 2

Product Registration Card
Before you use your Stand Mixer,
please fill out and mail your product
registration card packed with the
Instructions and Recipes manual. This
card will enable us to contact you in
the unlikely event of a product safety
notification. This card does not verify
your warranty.
Keep a copy of the sales receipt
showing the date of purchase of your
Stand Mixer. Proof of purchase will
assure you of in-warranty service.
Please complete the following for
your personal records:
Model Number* ______________________________________________________
Date Purchased _______________________________________________________
Dealer’s Name ________________________________________________________
Address______________________________________________________________
Phone _______________________________________________________________
*Located on the product registration card or under base.
®
Registered Trademark/™ Trademark of KitchenAid, U.S.A.,
KitchenAid Canada Licensee in Canada
© 2005. All rights reserved.
1901 Minnesota Court, Mississauga ON L5N 3A7
(4604dZw405)
Page 3

1
Table of Contents
Product Registration Card ........................................................Inside Front Cover
Electrical Requirements......................................................................................2
Important Safeguards........................................................................................3
About Your Mixer
Tilt-Head Stand Mixer Features ..........................................................................4
Assembling Your Tilt-Head Mixer.......................................................................5
Using Your KitchenAid®Attachments ................................................................7
Mixing Time ......................................................................................................7
Mixer Use ..........................................................................................................7
Care and Cleaning .............................................................................................8
Beater to Bowl Clearance...................................................................................8
Speed Control Guide .........................................................................................9
Mixing Tips......................................................................................................10
Egg Whites ...............................................................................................11
Whipped Cream........................................................................................11
Attachments and Accessories - General Instructions ........................................12
Warranty .........................................................................................................13
How to Arrange for Warranty Service........................................................13
How to Arrange for Out-Of-Warranty Service............................................14
Troubleshooting ..............................................................................................14
Appetizers, Entrees, and Vegetables ................................................................15
Cakes and Frostings.........................................................................................25
Cookies, Bars, and Candies ..............................................................................38
Pies and Desserts .............................................................................................45
Yeast Breads and Quick Breads........................................................................50
General Instructions for Making and Kneading Yeast Dough.....................50
Bread Making Tips ....................................................................................51
KitchenAid
®
Attachments and Accessories .......................................................75
9709234
Page 4
2
Your safety and the safety of others are very important.
We have provided many important safety messages in this manual and on your
appliance. Always read and obey all safety messages.
This is the safety alert symbol.
This symbol alerts you to potential hazards that can kill or hurt
you and others.
All safety messages will follow the safety alert symbol and either
the word “DANGER” or “WARNING.” These words mean:
You can be killed or seriously
injured if you don’t immediately
follow instructions.
You can be killed or seriously
injured if you don’t follow
instructions.
All safety messages will tell you what the potential hazard is, tell you how to
reduce the chance of injury, and tell you what can happen if the instructions are
not followed.
Electrical Requirements
Volts: 120 A.C. only. Hertz: 60
The wattage rating for your Stand
Mixer is printed on the serial plate.
Do not use an extension cord. If the
power supply cord is too short, have a
qualified electrician or serviceman
install an outlet near the appliance.
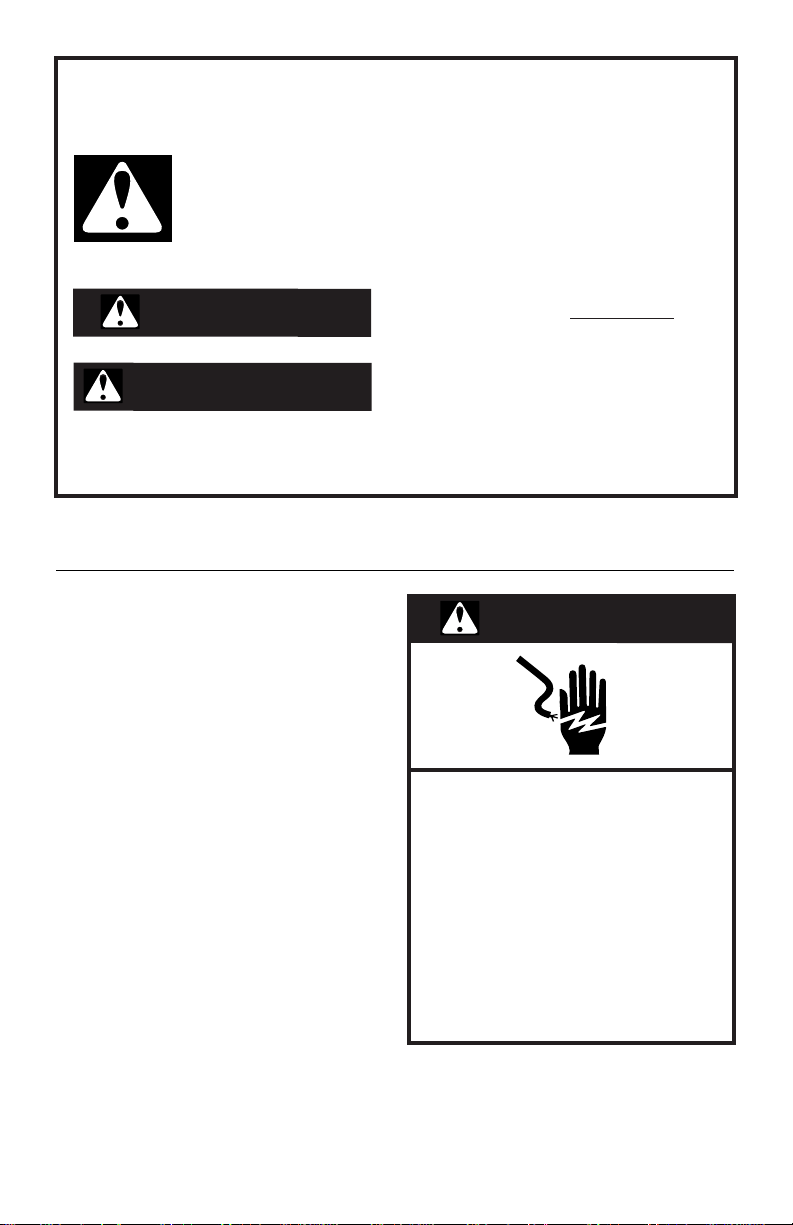
Electrical Requirements
DANGER
WARNING
WARNING
Electrical Shock Hazard
Plug into a grounded 3 prong
outlet.
Do not remove ground prong.
Do not use an adapter.
Do not use an extension cord.
Failure to follow these
instructions can result in
death, fire, or electrical shock.
Page 5

3
IMPORTANT SAFEGUARDS
When using electrical appliances, basic safety precautions should always be
followed including the following:
1. Read all instructions.
2. To protect against risk of electrical shock, do not put Stand Mixer in water
or other liquid.
3. Close supervision is necessary when any appliance is used by or near
children.
4. Unplug Stand Mixer from outlet when not in use, before putting on or
taking off parts and before cleaning.
5. Avoid contacting moving parts. Keep hands, hair, clothing, as well as
spatulas and other utensils away from beater during operation to reduce
the risk of injury to persons and/or damage to the Stand Mixer.
6. Do not operate Stand Mixer with a damaged cord or plug or after the
Stand Mixer malfunctions, or is dropped or damaged in any manner.
Return appliance to the nearest Authorized Service Centre for examination,
repair or electrical or mechanical adjustment. Call KitchenAid Service at
1-800-807-6777 for more information.
7. The use of attachments not recommended or sold by KitchenAid may cause
fire, electrical shock or injury.
8. Do not use the Stand Mixer outdoors.
9. Do not let the cord hang over edge of table or counter.
10. Remove flat beater, wire whip or dough hook from Stand Mixer before washing.
11. This product is designed for household use only.
SAVE THESE INSTRUCTIONS
Page 6
4
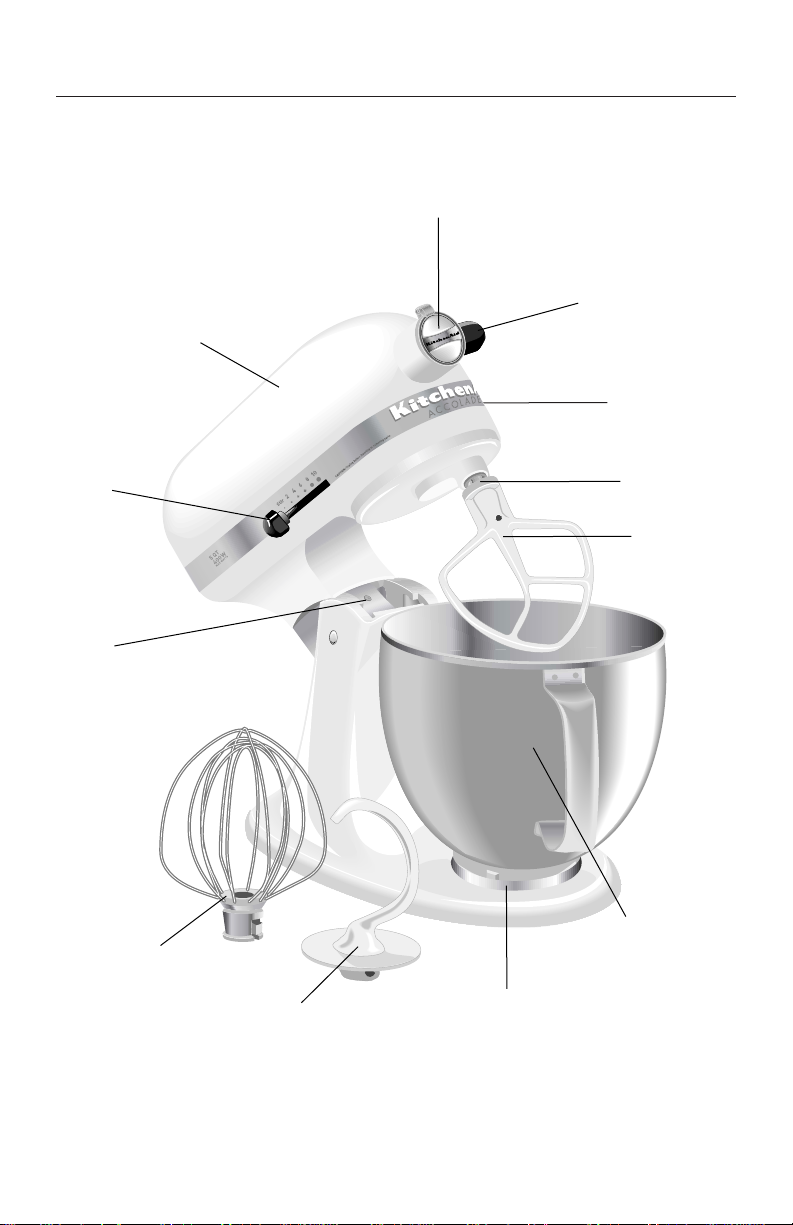
Tilt-Head Stand Mixer Features
Motor Head
Speed
Control
Lever
Beater Height
Adjustment
Screw
Stainless Steel
Wire Whip
Dough Hook
Bowl Lock Plate
5 Quart (4.73 l)
Stainless Steel
Bowl
Flat Beater
Beater Shaft
Motor Head
Locking Lever
(not shown)
Attachment Knob
Attachment Hub
(see page 12)
Page 7
5
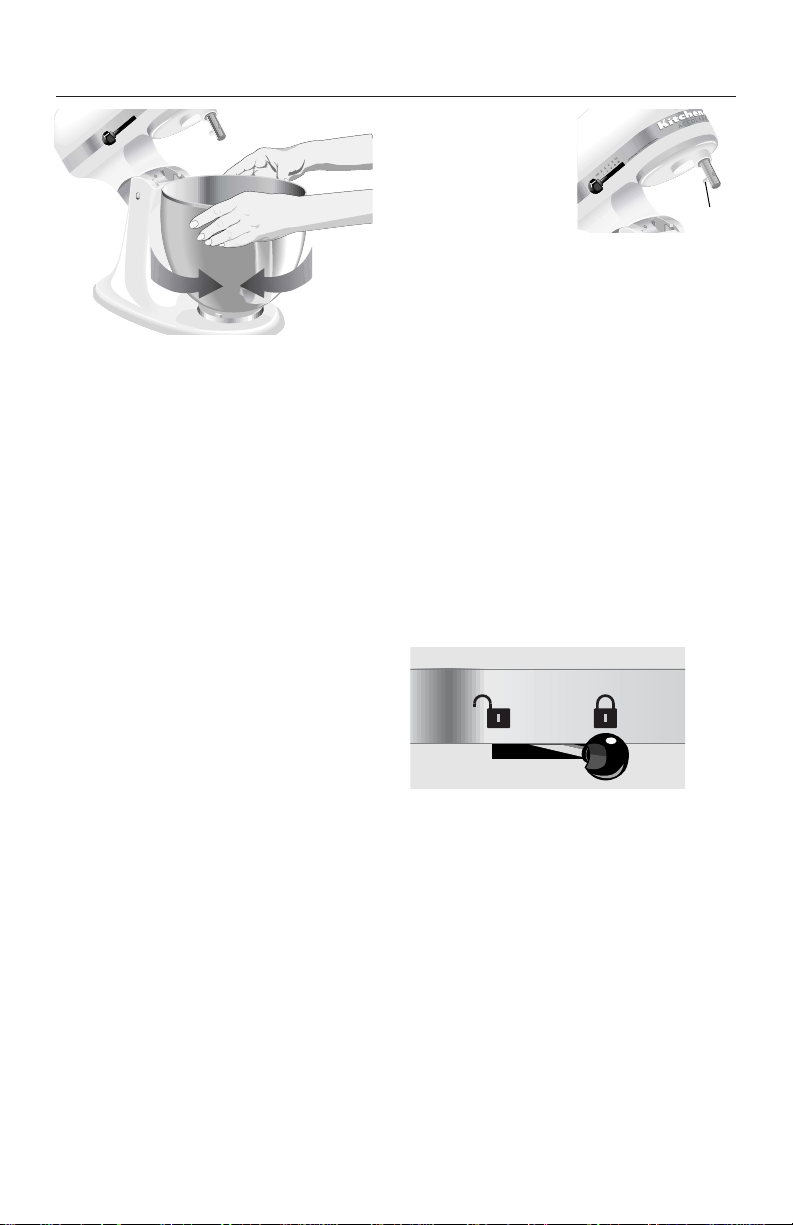
Assembling Your Tilt-Head Mixer
To Attach Bowl
1. Turn speed control to OFF.
2. Unplug Stand Mixer or disconnect
power.
3. Unlock motor head.
4. Tilt motor head back and lock.
5. Place bowl on bowl lock plate.
6. Turn bowl gently in clockwise
direction.
7. Lower motor head and lock.
8. Plug into a grounded 3 prong
outlet.
To Remove Bowl
1. Turn speed control to OFF.
2. Unplug Stand Mixer or disconnect
power.
3. Unlock motor head.
4. Tilt motor head back and lock.
5. Turn bowl in counterclockwise
direction and remove.
6. Lower motor head and lock.
To Attach Flat Beater, Wire Whip,
or Dough Hook
1. Turn speed control to OFF.
2. Unplug Stand Mixer or disconnect
power.
3. Unlock motor head.
4. Tilt motor head back and lock.
5. Slip beater
onto beater
shaft and
press upward
as far as
possible.
6. Hook beater over pin on shaft by
turning clockwise (right).
7. Unlock motor head and lower.
8. Lock motor head and plug into a
grounded 3 prong outlet.
To Remove Flat Beater, Wire
Whip or Dough Hook
1. Turn speed control to OFF.
2. Unplug Stand Mixer or disconnect
power.
3. Unlock motor head.
4. Tilt motor head back and lock.
5. Press beater upward as far as
possible and turn counterclockwise
(left) to unhook.
6. Pull beater from beater shaft.
7. Unlock motor head and lower.
To Lock Motor Head
1. Push locking lever back as far as
possible.
2. Test lock by attempting to raise or
lower head.
NOTE: Motor head should always be
locked when using mixer, and when
attaching or removing the bowl, flat
beater, wire whip, or dough hook.
When in locked position, lever may not
extend all the way back. This is normal.
To Unlock Motor Head
1. Pull locking lever forward as far as
possible. Motor head can now be
raised or lowered.
On
Off
Pin
t
e
s
e
R
ff/O
O
s
t
r
a
p
g
n
i
v
o
m
e
r
f
o
g
n
i
t
r
e
s
n
i
e
r
o
f
e
b
g
u
l
p
n
0
U
:
N
1
O
I
T
U
A
8
C
6
4
Stir
2
Page 8
6
Assembling Your Tilt-Head Mixer
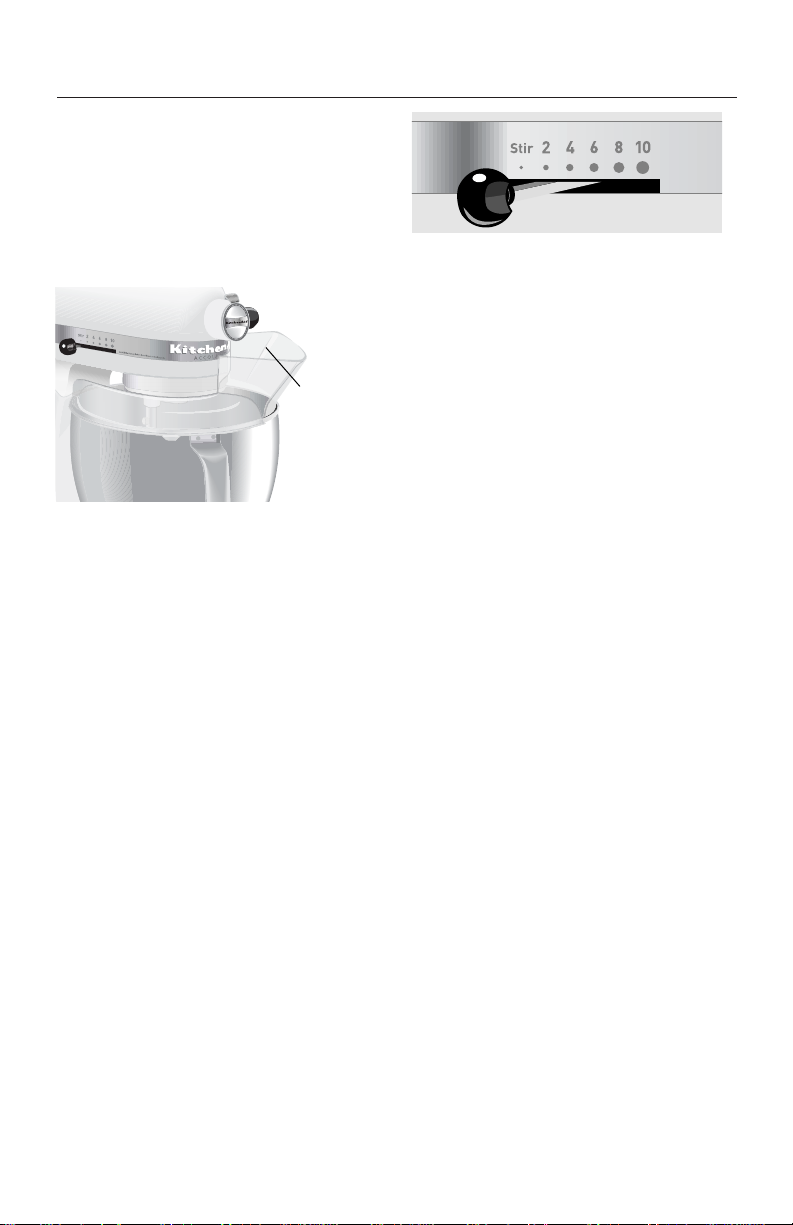
To Attach Pouring Shield
1. Turn speed control to OFF.
2. Unplug Stand Mixer or disconnect
power.
3. Attach bowl along with flat
beater, dough hook, or wire whip.
Lower and lock motor head.
4. From the front of the mixer, slide
the pouring shield over the bowl
until the shield is centered. The
bottom rim of the shield should fit
within the bowl.
To Remove Pouring Shield
1. Turn speed control to OFF.
2. Unplug stand mixer or disconnect
power.
3. Lift the front of the pour shield
clear of the bowl rim and pull
forward.
4. Remove attachment and bowl.
To Use Pouring Shield
1. For best results, rotate the shield
so the motor head covers the “u”
shaped gap in the shield. The
pouring chute will be just to the
right of the attachment hub as
you face the mixer.
2. Pour the ingredients into the bowl
through the pouring chute.
To Operate Speed Control
Plug into a grounded 3 prong outlet.
Speed control lever should always be
set on lowest speed for starting, then
gradually moved to desired higher
speed to avoid splashing ingredients
out of bowl. See page 9 for Speed
Control Guide.
Overload Reset
If the mixer stops due to overload,
slide the speed control lever to
OFF. This automatically resets the
mixer. Wait a few minutes. Slide the
Speed Control Lever to the desired
speed and continue mixing. If unit
does not restart see the KitchenAid
Stand Mixer warranty on page 13.
Pouring
Chute
Page 9

7
Using Your KitchenAid®Attachments
Flat Beater for normal to heavy mixtures:
cakes biscuits
creamed frostings quick breads
candies meat loaf
cookies mashed potatoes
pie pastry
Wire Whip for mixtures that need air incorporated:
eggs sponge cakes
egg whites angel food cakes
heavy cream mayonnaise
boiled frostings some candies
Dough Hook for mixing and kneading
yeast doughs:
breads coffee cakes
rolls buns
pizza dough
Mixing Time
Your KitchenAid®Stand Mixer will mix
faster and more thoroughly than
most other electric Stand Mixers.
Therefore, the mixing time in most
recipes must be adjusted to avoid
overbeating. With cakes, for example,
beating time may be half as long as
with other Stand Mixers.
Mixer Use
NOTE: Do not scrape bowl while
Stand Mixer is operating.
The bowl and beater are designed to
provide thorough mixing without
frequent scraping. Scraping the bowl
once or twice during mixing is
usually sufficient. Turn unit off
before scraping.
The Stand Mixer may warm up during
use. Under heavy loads with extended
mixing time, you may not be able to
comfortably touch the top of the
unit. This is normal.
WARNING
Injury Hazard
Unplug mixer before touching
beaters.
Failure to do so can result in
broken bones, cuts or bruises.
Page 10
8
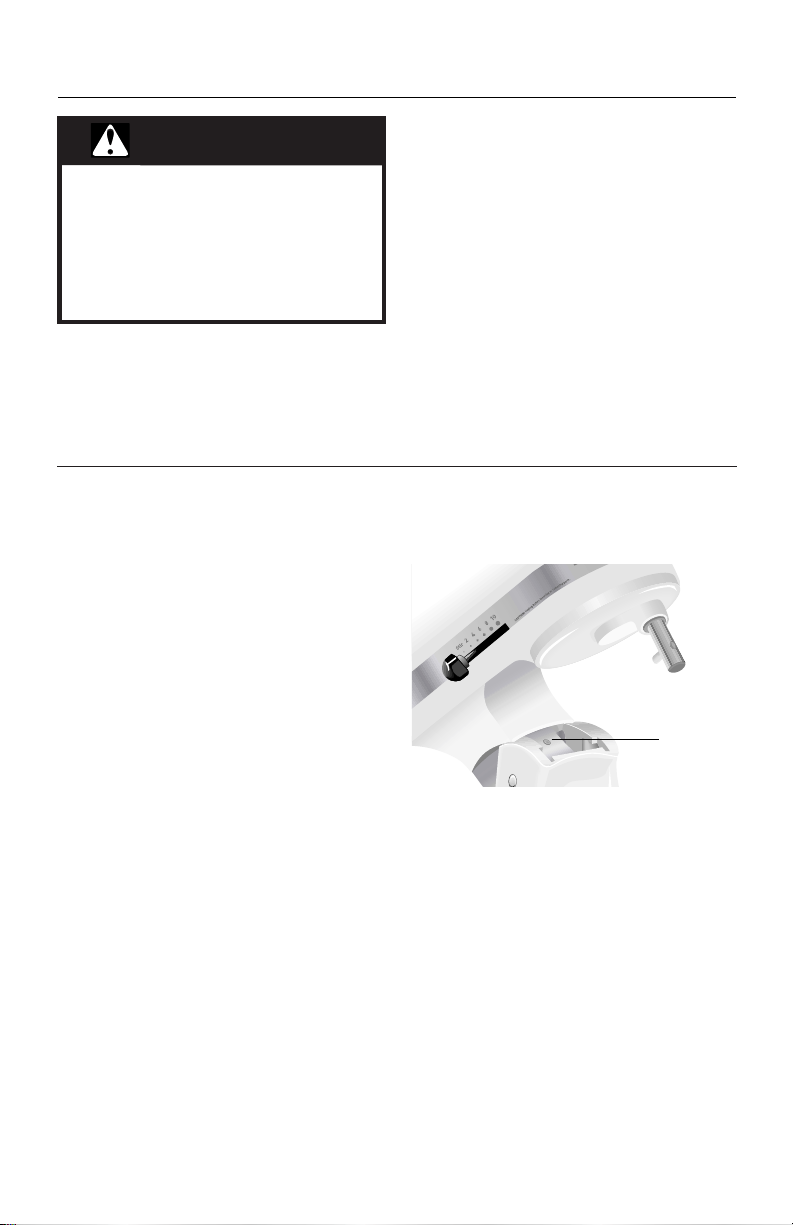
Beater To Bowl Clearance
Your mixer is adjusted at the factory so that the flat beater just clears the
bottom of the bowl. If for any reason, the flat beater hits the bottom of the
bowl or is too far away from the bowl, clearance can be corrected as follows:
A
Bowl, flat beater and dough hook
may be washed in an automatic
dishwasher. Or, clean them
Care and Cleaning
thoroughly in hot sudsy water and
rinse completely before drying. Wire
whip should be hand washed and
dried immediately. Do not wash wire
whip in a dishwasher.
NOTE: Always be sure to unplug
Stand Mixer before cleaning. Wipe
Stand Mixer with a soft, damp cloth.
Do not use household/commercial
cleaners. Do not immerse in water.
Wipe off beater shaft frequently,
removing any residue that may
accumulate.
1. Turn speed control to OFF.
2. Unplug Stand Mixer or disconnect
power.
3. Unlock motor head.
4. Tilt motor head back and lock.
5. Remove bowl, beater, dough
hook, or wire whip if attached.
6. Turn screw (A) slightly
counterclockwise (left) to raise the
flat beater, or clockwise (right) to
lower flat beater.
7. Attach flat beater and bowl.
8. Unlock motor head and lower.
9. Beater should just clear surface of
bowl. If it does not, repeat steps
4-7.
NOTE: If you over adjust the screw,
the bowl lock lever may not lock into
place.
NOTE: When properly adjusted, the
flat beater will not strike on bottom
or side of bowl. If beater or wire whip
is adjusted too close so that it strikes
bottom of bowl, coating may wear
off beater or wires may wear through
on wire whip.
WARNING
Injury Hazard
Unplug mixer before touching
beaters.
Failure to do so can result in
broken bones, cuts or bruises.
Page 11

9
Speed Control Guide
All speeds have the Soft Start®feature which automatically starts the mixer at a
lower speed to help prevent ingredient splash out and “flour puff” at startup
then quickly increases to the selected speed for optimal performance.
Number of Speed
Stir STIRRING For slow stirring, combining, mashing,
starting all mixing procedures. Use to add
flour and dry ingredients to batter, add liquids
to dry ingredients, and combine heavy
mixtures. Use with Ice Cream Maker
attachment.
2 SLOW MIXING For slow mixing, mashing, faster stirring. Use
to mix heavy batters and candies, start
mashing potatoes or other vegetables, cut
shortening into flour, mix thin or splashy
batters, and mix and knead yeast dough.
Use with Can Opener attachment.
4 MIXING, For mixing semi-heavy batters, such as
BEATING cookies. Use to combine sugar and
shortening and to add sugar to egg whites
for meringues. Medium speed for cake mixes.
Use with: Food Grinder, Slicer/Shredder, and
Fruit/Vegetable Strainer.
6 BEATING, For medium fast beating (creaming) or
CREAMING whipping. Use to finish mixing cake,
doughnut, and other batters. High speed for
cake mixes. Use with Citrus Juicer attachment.
8 FAST BEATING, For whipping cream, egg whites, and
WHIPPING boiled frostings.
10 FAST WHIPPING For whipping small amounts of cream or egg
whites. Use with Pasta Maker and Grain Mill
attachments.
NOTE: Will not maintain fast speeds
under heavy loads, such as when using Pasta
Maker or Grain Mill attachments.
NOTE: The Speed Control Lever can be set between the speeds listed in the
above chart to obtain speeds 3, 5, 7 and 9 if a finer adjustment is required.
Do not exceed Speed 2 when preparing yeast doughs as this may cause
damage to the mixer.
Page 12

10
Converting Your Recipe
for the Mixer
The mixing instructions for recipes in
this book can guide you in converting
your own favorite recipes for
preparation with your KitchenAid
®
mixer. Look for recipes similar to
yours and then adapt your recipes to
use the procedures in the similar
KitchenAid recipes.
For example, the “quick mix”
method (sometimes referred to as the
“dump” method) is ideal for simple
cakes, such as the Quick Yellow Cake
and Easy White Cake included in this
book. This method calls for
combining dry ingredients with most
or all liquid ingredients in one step.
More elaborate cakes, such as
Caramel Walnut Banana Torte, should
be prepared using the traditional cake
mixing method. With this method,
sugar and the shortening, butter or
margarine are thoroughly mixed
(creamed) before other ingredients
are added.
For all cakes, mixing times may
change because your KitchenAid
®
mixer works more quickly than other
mixers. In general, mixing a cake
with the KitchenAid®mixer will take
about half the time called for in
most cake recipes.
To help determine the ideal mixing
time, observe the batter or dough
and mix only until it has the desired
appearance described in your recipe,
such as “smooth and creamy.”
To select the best mixing speeds, use
the Speed Control Guide on page 9.
Mixing Tips
Adding Ingredients
Always add ingredients as close to
side of bowl as possible, not directly
into moving beater. The Pouring
Shield can be used to simplify adding
ingredients.
NOTE: If ingredients in very bottom
of bowl are not thoroughly mixed,
then the beater is not far enough into
the bowl. See “Beater to Bowl
Clearance,” page 8.
Cake Mixes
When preparing packaged cake
mixes, use Speed 2 for low speed,
Speed 4 for medium speed, and
Speed 6 for high speed. For best
results, mix for the time stated on the
package directions.
Adding Nuts, Raisins or
Candied Fruits
Follow individual recipes for
guidelines on including these
ingredients. In general, solid materials
should be folded in the last few
seconds of mixing on STIR Speed. The
batter should be thick enough to
prevent the fruit or nuts from sinking
to the bottom of the pan during
baking. Sticky fruits should be dusted
with flour for better distribution in
the batter.
Liquid Mixtures
Mixtures containing large amounts of
liquid ingredients should be mixed at
lower speeds to avoid splashing.
Increase speed only after mixture has
thickened.
Page 13

11
Egg Whites
Place room temperature egg whites in
clean, dry bowl. Attach bowl and wire
whip. To avoid splashing, gradually
turn to designated speed and whip to
desired stage. See chart below.
AMOUNT SPEED
1 egg white .......GRADUALLY to 10
2-4 egg whites ........GRADUALLY to 8
6 or more
egg whites ........GRADUALLY to 8
Whipping Stages
With your KitchenAid®Stand Mixer,
egg whites whip quickly. So, watch
carefully to avoid overwhipping. This
list tells you what to expect.
Frothy
Large, uneven air bubbles.
Begins to Hold Shape
Air bubbles are fine and compact;
product is white.
Soft Peak
Tips of peaks fall over when wire
whip is removed.
Almost Stiff
Sharp peaks form when wire whip is
removed, but whites are actually soft.
Stiff but not Dry
Sharp, stiff peaks form when wire
whip is removed. Whites are uniform
in colour and glisten.
Stiff and Dry
Sharp, stiff peaks form when wire
whip is removed. Whites are speckled
and dull in appearance.
Whipped Cream
Pour cold whipping cream into chilled
bowl. Attach bowl and wire whip. To
avoid splashing, gradually turn to
designated speed and whip to desired
stage. See chart below.
AMOUNT SPEED
1
⁄4 cup (60 mL)........GRADUALLY to 10
1
⁄2 cup (120 mL) .....GRADUALLY to 10
1 cup (235 mL)........GRADUALLY to 8
1 pint (470 mL) .......GRADUALLY to 8
Whipping Stages
Watch cream closely during
whipping. Because your KitchenAid
®
Stand Mixer whips so quickly, there
are just a few seconds between
whipping stages. Look for these
characteristics:
Begins to Thicken
Cream is thick and custard-like.
Holds its Shape
Cream forms soft peaks when wire
whip is removed. Can be folded into
other ingredients when making
desserts and sauces.
Stiff
Cream stands in stiff, sharp peaks
when wire whip is removed. Use for
topping on cakes or desserts, or filling
for cream puffs.
Page 14
12
®
Attachments and Accessories
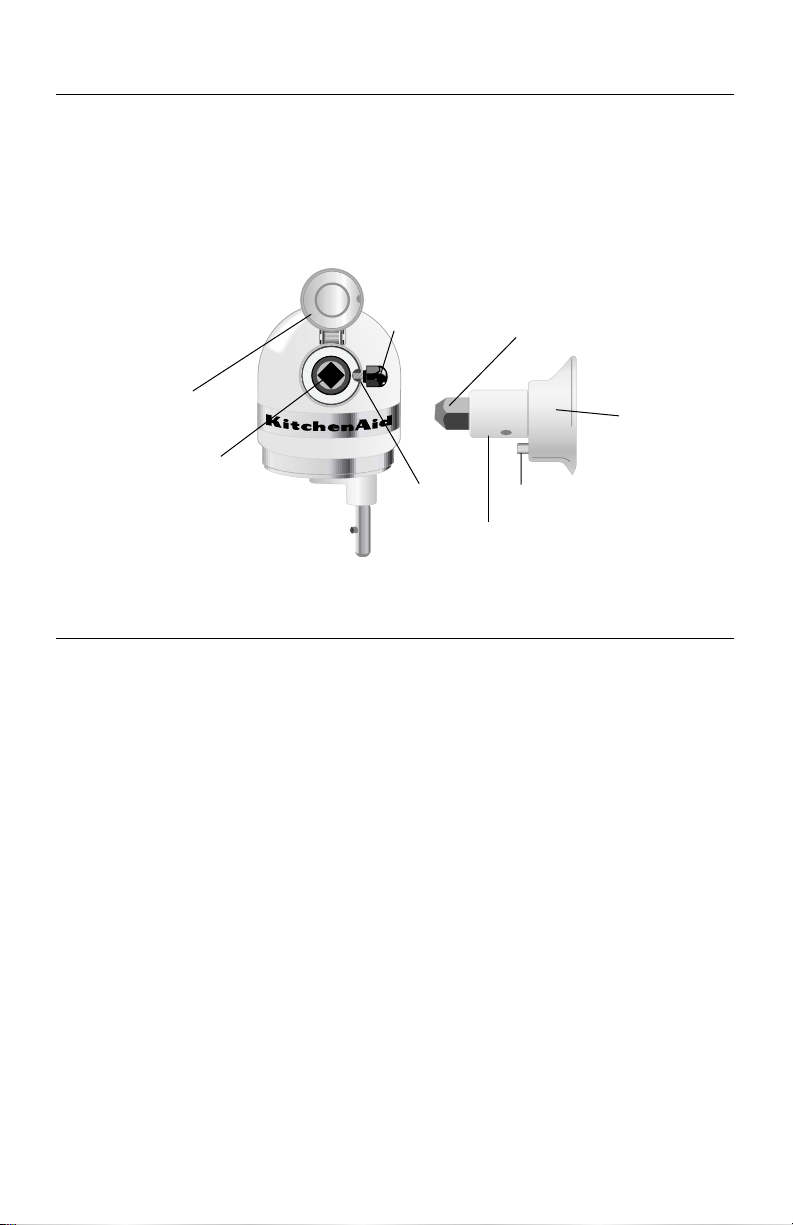
To Attach
1. Turn speed control to OFF.
2. Unplug Stand Mixer or disconnect
power.
3. Loosen attachment knob by
turning it counterclockwise.
4. Flip up hinged hub cover.
5. Insert attachment shaft housing
into attachment hub, making
certain that attachment power
shaft fits into square attachment
hub socket. It may be necessary to
rotate attachment back and forth.
When attachment is in proper
position, the pin on the
attachment will fit into the notch
on the hub rim.
6. Tighten attachment knob by turning
clockwise until attachment is
completely secured to Stand Mixer.
7. Plug into a grounded 3 prong
outlet.
To Remove
1. Turn speed control to OFF.
2. Unplug Stand Mixer or disconnect
power.
3. Loosen attachment knob by
turning it counterclockwise. Rotate
attachment slightly back and forth
while pulling out.
4. Replace attachment hub cover.
Tighten attachment knob by
turning it clockwise.
General Information
KitchenAid
®
Attachments are designed to assure long life. The attachment
power shaft and hub socket are of a square design, to eliminate any possibility
of slipping during the transmission of power to the attachment. The hub and
shaft housing are tapered to assure a snug fit, even after prolonged use and
wear. KitchenAid®Attachments require no extra power unit to operate them;
the power unit is built-in.
‡Not part of mixer.
General Instructions
Attachment
Hub Socket
Attachment
Knob
Notch
Pin
Attachment Shaft
Housing
Attachment
Power Shaft‡
Hinged
Hub Cover
Attachment
Housing
Page 15

13
KitchenAid®Stand Mixer Warranty
Length of
Warranty:
One Year Full warranty
from date of purchase.
KitchenAid Canada
Will Pay For:
Replacement parts and
repair labour costs to
correct defects in materials
and workmanship. Service
must be provided by a
designated KitchenAid
Service Centre.
KitchenAid Canada
Will Not Pay For:
A. Repairs when Stand
Mixer is used in other
than normal singlefamily household use.
B. Damage resulting from
accident, alteration,
misuse or abuse, fire,
floods, acts of God, or
use of products not
approved by
KitchenAid Canada.
C. Any incidental shipping
or handling costs to
deliver your Stand
Mixer to a designated
KitchenAid Service
Centre.
D. Replacement parts or
repair labour costs for
Stand Mixers operated
outside Canada.
KITCHENAID CANADA DOES NOT ASSUME ANY RESPONSIBILITY FOR
INCIDENTAL OR CONSEQUENTIAL DAMAGES. Some provinces do not allow
the exclusion or limitation of incidental or consequential damages, so this
exclusion may not apply to you. This warranty gives you specific legal rights and
you may also have other rights which vary from province to province.
How to Arrange for Warranty Service
First review the Troubleshooting
section, to possibly avoid the need for
service.
One Year Full warranty from date of
purchase KitchenAid Canada will pay
for replacement parts and repair
labour costs to correct defects in
materials and workmanship. Service
must be provided by a designated
KitchenAid Service Centre.
Take the Stand Mixer or ship prepaid
and insured to a designated
KitchenAid Service Centre. Your
repaired Stand Mixer will be returned
prepaid and insured.
If you are unable to obtain satisfactory
service in this manner, contact
KitchenAid Canada, 1901 Minnesota
Court, Mississauga, Ontario L5N 3A7.
Telephone 1-800-807-6777.
Page 16

14
How to Arrange for Out-of-Warranty Service
• First review the Troubleshooting
section below.
• Then, consult your telephone
directory for a designated
KitchenAid Service Centre near you.
If one is not listed contact
KitchenAid Service from anywhere in
Canada at 1-800-807-6777.
• Take the Stand Mixer or ship
prepaid and insured to a designated
KitchenAid Service Centre. Your
repaired Stand Mixer will be
returned prepaid and insured.
• All out-of-warranty service should be
handled by a designated KitchenAid
Service Centre.
Troubleshooting
Please read the following before
calling your service centre.
1. The Stand Mixer may warm up
during use. Under heavy loads with
extended mixing time periods, you
may not be able to comfortably
touch the top of the unit. This is
normal.
2. The Stand Mixer may emit a
pungent odor, especially when
new. This is common with electric
motors.
3. If the flat beater hits the bowl, stop
the Stand Mixer. See “Beater to
Bowl Clearance,” page 8.
Keep a copy of the sales receipt
showing the date of purchase. Proof
of purchase will assure you of
in-warranty service.
If your Stand Mixer should
malfunction or fail to operate,
please check the following:
- Is the Stand Mixer plugged in?
- Is the fuse in the circuit to the Stand
Mixer in working order? If you have
a circuit breaker box, be sure the
circuit is closed.
- Turn the Stand Mixer off for 10-15
seconds, then turn it back on. If the
mixer still does not start, allow it to
cool for 30 minutes before turning it
back on.
- If the problem is not due to one of
the above items, see “How to
Arrange For Service” sections.
- Do not return the Stand Mixer to
the retailer as they do not provide
service.
- For assistance throughout Canada
call KitchenAid Consumer Interaction
Centre toll-free 8:30 a.m. - 5:30 p.m.
(EST): 1-800-807-6777.
or write to:
Consumer Relations Centre
KitchenAid Canada
1901 Minnesota Court
Mississauga, ON L5N 3A7
Page 17

15
APPETIZERS, ENTREES, AND VEGETABLES
Crabmeat Dip
1 package (8 oz.
[225 g]) light cream
cheese
1 cup (235 ml)
reduced-fat cottage
cheese
1
⁄4 cup (60 ml) reduced-
calorie mayonnaise
1 can (6
1
⁄2
oz. [185 g])
crabmeat, flaked
1tablespoon (15 ml)
lemon juice
3 tablespoons (45 ml)
chopped green
onions
1
⁄2 teaspoon (2 ml)
garlic salt
3 drops hot pepper
sauce
Place cream cheese, cottage cheese, and
mayonnaise in mixer bowl. Attach bowl and flat
beater to mixer. Turn to Speed 6 and beat about
1 minute, or until well blended. Stop and scrape
bowl. Add all remaining ingredients. Turn to Speed
6 and beat about 1 minute, or until all ingredients
are combined.
Refrigerate until well chilled. Serve with assorted
crackers or raw vegetables.
Yield: 24 servings (2 tablespoons [30 ml] per serving)
Per serving: About 42 cal, 4 g pro, 1 g carb, 3 g fat,
12 mg chol, 180 mg sod.
4 ounces (115 g) light
cream cheese
1
⁄
2 cup (120 ml)
marshmallow cream
1 can (8 oz. [225 g])
crushed pineapple,
well drained
2 teaspoons (10 ml)
grated orange peel
Place cream cheese in mixer bowl. Attach bowl and
flat beater to mixer. Turn to Speed 2 and mix about
30 seconds. Stop and scrape bowl. Add
marshmallow cream, pineapple, and orange peel.
Turn to Speed 4 and beat about 30 seconds. Stop
and scrape bowl. Turn to Speed 4 and beat about
30 seconds. Refrigerate at least 2 hours. Serve with
sliced fresh fruit, if desired.
Yield: 12 servings (2 tablespoons [30 ml] per serving).
Per serving: About 61 cal, 1 g pro, 11 g carb,
2 g fat, 3 mg chol, 58 mg sod.
Creamy Pineapple Fruit Dip
Page 18

16
1 package (8 oz.
[225 g]) light cream
cheese
1
⁄2 cup (120 ml)
shredded hot pepper
Monterey Jack
cheese
1
⁄4
cup (60 ml) bean or
black bean dip
1
⁄2 cup (120 ml) thick
and chunky salsa
1
⁄2 cup (120 ml)
chopped green
onions
1
⁄4 cup (60 ml) sliced
pitted ripe olives
Place cream cheese in mixer bowl. Attach bowl and
flat beater to mixer. Turn to Speed 2 and mix about
30 seconds. Stop and scrape bowl. Add Monterey
Jack cheese. Turn to Speed 2 and mix about
30 seconds.
Spread cheese mixture on 10-inch (25-cm) serving
plate to within 1 or 2 inches (2.5 or 5 cm) of
edge. Spread bean dip over cheese. Spread salsa
over bean dip. Top with onions and olives.
Refrigerate until ready to serve. Serve with tortilla
chips, if desired.
Yield: 12 servings (1⁄4 cup [60 ml] per serving).
Per serving: About 70 cal, 4 g pro, 3 g carb,
5 g fat, 12 mg chol, 265 mg sod.
Layered Mexican Dip
2 packages (8 oz.
[225 g] each) light
cream cheese,
softened
1 package (1.25 oz.
[37 g]) taco
seasoning mix
3 eggs
2 cups (475 ml)
shredded Marble-
Jack cheese
1 can (4 oz. [115 g])
green chilies
1 cup (235 ml) light
sour cream
1 cup (235 ml) salsa
Place cream cheese and taco seasoning mix in mixer
bowl. Attach bowl and flat beater to mixer. Turn to
Speed 6 and beat about 11⁄2 minutes, or until fluffy.
Stop and scrape bowl. Turn to Speed 4 and add
eggs, one at a time, beating about 15 seconds after
each addition. Stop and scrape bowl. Add cheese
and green chilies. Turn to STIR Speed and mix
15 seconds.
Pour mixture into greased 9-inch (23-cm) springform
pan. Bake at 350ºF (177°C) for 40 minutes, or until
knife inserted near centre comes out clean. Remove
from oven and spread with sour cream. Return to
oven and bake 5 minutes longer. Cool 15 minutes.
Refrigerate 3 to 8 hours. Before serving, remove
outer ring and spread top of cheesecake with salsa.
Serve with taco chips, if desired.
Yield: 20 servings (1 wedge per serving).
Per serving: About 136 cal, 7 g pro, 5 g carb,
9 g fat, 59 mg chol, 421 mg sod.
Fiesta Cheesecake Appetizer
Page 19

17
1 cup (235 ml)
shredded sharp
Cheddar cheese
1 cup (235 ml)
shredded Swiss
cheese
1 package (8 oz.
[225 g]) light cream
cheese
2 tablespoons (30 ml)
chopped fresh chives
2 teaspoons (10 ml)
Worcestershire sauce
1
⁄4 teaspoon (1 ml)
paprika
1
⁄2 teaspoon (2 ml)
garlic powder
1
⁄4 cup (60 ml) finely
chopped pecans
Nutty Cheese Ball
Place all ingredients, except pecans, in mixer bowl.
Attach bowl and flat beater to mixer. Turn to Speed
4 and beat about 1 minute, or until well blended.
On waxed paper, shape mixture into a ball. Roll ball
in chopped pecans. Wrap in waxed paper.
Refrigerate until serving time. Serve with assorted
crackers or raw vegetables.
Yield: 24 servings (2 tablespoons [30 ml] per serving).
Per serving: About 65 cal, 4 g pro, 1 g carb, 5 g fat,
13 mg chol, 109 mg sod.
1 baguette loaf,
cut into
1
⁄2-inch
(1.25-cm) slices
2 teaspoons (10 ml)
butter or margarine
1
⁄2 cup (120 ml) finely
chopped onion
1 clove garlic, minced
1 package (9 oz.
[255 g]) frozen
chopped spinach,
thawed and
squeezed dry
1 package (8 oz.
[225 g]) light cream
cheese
1
⁄4
cup (60 ml) roasted
red peppers
1
⁄2 cup (120 ml)
shredded Cheddar
cheese
Place baguette slices on baking sheet. Bake at 375°F
(190°C) for 4 to 6 minutes, or until toasted.
Set aside.
Melt butter in 10-inch (25-cm) skillet over medium
heat. Add onion and garlic. Cook and stir 2 to 3
minutes, or until softened. Add spinach. Cook and
stir 30 to 60 seconds, or until warm. Cool slightly.
Place cream cheese in mixer bowl. Attach bowl and
flat beater to mixer. Turn to Speed 2, mix about
30 seconds. Add spinach mixture. Continuing on
Speed 2, mix about 30 seconds. Add red peppers.
Continuing on Speed 2, mix about 30 seconds.
Spread spinach mixture on toasted baguette slices.
Top each slice with about 1 teaspoon (5 ml)
Cheddar cheese. Bake at 375°F (190°C) for 5 to 8
minutes, or until thoroughly heated and cheese is
melted. Serve warm.
Yield: 12 servings (2 crostini per serving).
Per serving: About 141 cal, 6 g pro, 16 g carb,
6 g fat, 12 mg chol, 324 mg sod.
Spinach and Cheese Crostini
Page 20

18
Mushroom-Onion Tartlets
Pastry Crusts
4 oz. (115 g) light
cream cheese
3 tablespoons (45 ml)
butter or margarine,
divided
3
⁄4 cup plus 1 teaspoon
(180 ml) all-purpose
flour
8 oz. (225 g) fresh
mushrooms, coarsely
chopped
1
⁄2 cup (120 ml)
chopped green
onions
Filling
1 egg
1
⁄4 teaspoon (1 ml) dried
thyme leaves
1
⁄2 cup (120 ml)
shredded Swiss
cheese
To make Pastry Crusts, place cream cheese and
2 tablespoons (30 ml) butter in mixer bowl. Attach
bowl and flat beater to mixer. Turn to Speed 4 and
beat about 1 minute. Stop and scrape bowl. Add
3
⁄4 cup (175 ml) flour. Turn to Speed 2 and mix
about 1 minute, or until well blended. Form mixture
into a ball. Wrap in waxed paper and chill 1 hour.
Clean mixer bowl and beater.
To make Filling, melt remaining 1 tablespoon
(15 ml) butter in 10-inch (25-cm) skillet over medium
heat. Add mushrooms and onions. Cook and stir
until tender. Remove from heat. Cool slightly.
Divide chilled dough into 24 pieces. Press each piece
into miniature muffin cup (greased, if desired).
For Filling, place egg, remaining 1 teaspoon (5 ml)
flour, and thyme in mixer bowl. Attach bowl and
flat beater to mixer. Turn to Speed 6 and beat
about 30 seconds. Stir in cheese and cooled
mushroom mixture. Spoon into pastry-lined muffin
cups. Bake at 375°F (191°C) for 15 to 20 minutes,
or until egg mixture is puffed and golden brown.
Serve warm.
Yield: 12 servings (2 tartlets per serving).
Per serving: About 98 cal, 4 g pro, 8 g carb,
6 g fat, 33 mg chol, 83 mg sod.
Page 21

19
Herbed Whipped Squash
1 large butternut
squash, baked
(about 3 cups
[710 ml] cooked)
1
⁄4 cup (60 ml) butter or
margarine, melted
1
⁄2 teaspoon (2 ml) dried
tarragon leaves
1
⁄8 teaspoon (.5 ml) salt
1
⁄8 teaspoon (.5 ml)
black pepper
Scoop cooked squash out of shell and place in
mixer bowl. Attach bowl and wire whip to mixer.
Turn to Speed 4 and beat about 30 seconds. Add
all remaining ingredients. Turn to Speed 2 and mix
about 30 seconds. Turn to Speed 4 and beat about
2 minutes.
Yield: 6 servings (1⁄2 cup (120 ml) per serving).
Per serving: About 107 cal, 1 g pro, 11 g carb,
7 g fat, 0 mg chol, 137 mg sod.
2 medium sweet
potatoes, cooked
and peeled
1
⁄2 cup (120 ml) low-fat
milk
1
⁄3 cup (80 ml) sugar
2 eggs
2 tablespoons (30 ml)
butter or margarine
1
⁄2 teaspoon (2 ml)
nutmeg
1
⁄2 teaspoon (2 ml)
cinnamon
Crunchy Praline Topping
2 tablespoons (30 ml)
butter or margarine,
melted
3
⁄4 cup (175 ml) corn
flakes
1
⁄4 cup (60 ml) chopped
walnuts or pecans
1
⁄4 cup (60 ml) firmly
packed brown sugar
Place potatoes in mixer bowl. Attach bowl and flat
beater to mixer. Turn to Speed 2 and mix about
30 seconds. Add milk, sugar, eggs, 2 tablespoons
(30 ml) butter, nutmeg, and cinnamon. Turn to
Speed 4 and beat about 1 minute. Spread mixture
in greased 9-inch (23-cm) pie plate. Bake at 400°F
(204°C) for 20 minutes, or until set. Clean bowl
and beater.
Place all Topping ingredients in mixer bowl. Attach
bowl and flat beater to mixer. Turn to STIR Speed
and mix about 15 seconds. Spread on hot puff.
Bake 10 minutes longer.
Yield: 6 servings (1⁄2 cup [120 ml] per serving).
Per serving: About 268 cal, 6 g pro, 35 g carb,
12 g fat, 2 mg chol, 176 mg sod.
Sweet Potato Puff
Page 22

20
Appetizer Cream Puffs
with Creamy Feta Olive Filling
Cream Puffs
1 cup (235 ml) water
1
⁄2 cup (120 ml) butter
or margarine
1
⁄4 teaspoon (1 ml) salt
1 cup (235 ml)
all-purpose flour
4 eggs
Filling
1 package (8 oz.
[225 g]) light cream
cheese
4 oz. (115 g) crumbled
tomato-basil feta
cheese
1
⁄2 cup (120 ml) light
sour cream
1
⁄
3 cup (80 ml) finely
chopped kalamata or
ripe olives
1
⁄2 teaspoon (2 ml)
lemon pepper
seasoning
To make Cream Puffs, heat water, butter, and salt
in a medium saucepan over high heat to a full
rolling boil. Reduce heat and quickly stir in flour,
mixing vigorously until mixture leaves sides of pan
in a ball.
Place flour mixture in mixer bowl. Attach bowl and
flat beater. Turn to Speed 2 and add eggs, one at a
time, beating about 30 seconds after each addition.
Stop and scrape bowl. Turn to Speed 4 and beat
about 15 seconds.
Drop dough onto greased baking sheets forming
36 mounds, 2 inches (5 cm) apart. Bake at 400ºF
(204°C) for 10 minutes. Reduce heat to 350ºF
(177°C) and bake 25 minutes longer. Turn off oven.
Remove pans from oven. Cut a small slit in side of
each puff. Return pans to oven (turned off) for
10 minutes, leaving oven door ajar. Cool completely
on rack.
To make Filling, combine all ingredients in mixer
bowl. Attach bowl and flat beater. Turn to Speed 2
and mix about 30 seconds, or until blended. Pipe or
spoon about 1 tablespoon (15 ml) filling into each
cream puff.
Yield: 36 servings (1 filled cream puff per serving).
Per serving: About 72 cal, 2 g pro, 4 g carb, 5 g fat,
37 mg chol, 132 mg sod.
Page 23

21
Mashed Potatoes
5 large potatoes (about
2
1
⁄2 lbs. [1130 g]),
peeled, quartered,
and boiled
1
⁄2 cup (120 ml) low-fat
milk, heated
2 tablespoons (30 ml)
butter or margarine
1 teaspoon (5 ml) salt
1
⁄8 teaspoon (.5 ml)
black pepper
Warm mixer bowl and flat beater with hot water;
dry. Place hot potatoes in bowl. Attach bowl and
flat beater to mixer. Gradually turn to Speed 2 and
mix about 1 minute, or until smooth.
Add all remaining ingredients. Turn to Speed 4 and
beat about 30 seconds, or until milk is absorbed.
Gradually turn to Speed 6 and beat about 1 minute,
or until fluffy. Stop and scrape bowl. Exchange flat
beater for wire whip. Turn to Speed 10 and whip
2 to 3 minutes.
Yield: 9 servings (3⁄4 cup [175 ml] per serving).
Per serving: About 111 cal, 2 g pro, 19 g carb,
3 g fat, 8 mg chol, 296 mg sod.
VARIATIONS
Garlic Mashed Potatoes
Substitute 1 teaspoon (5 ml) garlic salt for salt.
Per serving: About 111 cal, 2 g pro, 19 g carb,
3 g fat, 8 mg chol, 239 mg sod.
Page 24

22
Baked Pastry Shell
(see page 45)
1 tablespoon (15 ml)
oil
1 small onion,
chopped
1medium green bell
pepper, chopped
8 oz. (225 g) sliced
fresh mushrooms
6 eggs
1
⁄3 cup (80 ml) low-fat
milk
1 tablespoon (15 ml)
chopped fresh
parsley
1 teaspoon (5 ml) salt
5 drops hot pepper
sauce
1 cup (4 oz. [115 g])
reduced-fat shredded
Swiss cheese
Follow procedure for Baked Pastry Shell. Cool
10 minutes.
Meanwhile, heat oil in large non-stick skillet over
medium-high heat. Add onion and bell pepper.
Cook about 1 minute, stirring frequently. Add
mushrooms. Cook and stir about 2 minutes, or until
vegetables are tender. Set aside.
Place eggs, milk, parsley, salt, and hot pepper sauce
in mixer bowl. Attach bowl and wire whip to mixer.
Turn to Speed 2 and mix 1 to 2 minutes.
Sprinkle half of cheese in pastry shell. Top with
vegetables. Pour egg mixture over vegetables. Top
with remaining cheese. Bake at 350°F (177°C) for
30 to 35 minutes, or until knife inserted in centre
comes out clean. Let stand about 5 minutes
before serving.
Yield: 8 servings.
Per serving (filling and crust): About 264 cal,
12 g pro, 17 g carb, 16 g fat, 172 mg chol,
561 mg sod.
Garden Quiche
Page 25

23
1 cup (235 ml) salsa,
divided
2 cups (475 ml) soft
bread crumbs
1 small onion,
chopped
1 egg
1tablespoon (15 ml)
Worcestershire sauce
1 teaspoon (5 ml) dried
thyme
1
⁄2 teaspoon (2 ml)
garlic salt
1
⁄4 teaspoon (1 ml)
pepper
1 pound (455 g) lean
ground beef
1
⁄2 pound (225 g)
ground turkey
Place 3⁄4 cup (175 ml) salsa, bread crumbs, onion,
egg, Worcestershire sauce, thyme, garlic salt, and
pepper in mixer bowl. Attach bowl and flat beater
to mixer. Turn to STIR Speed, mix about 30 seconds.
Add beef and turkey. Continuing on STIR Speed,
mix about 45 seconds, or until blended.
Divide mixture into 3 equal parts. Shape each part
into a loaf about 6x3x12-inches (15x7.5x30-cm).
Place loaves on rack in shallow baking pan. Spoon
remaining salsa on tops of loaves. Bake at 350°F
(177°C) for 40 to 45 minutes, or until no longer
pink in centre.
Yield: 6 servings (2 servings per loaf).
Per serving: About 167 cal, 11 g pro, 16 g carb,
6 g fat, 47 mg chol, 426 mg sod.
VARIATION
Mexican Appetizer Meatballs
Form meat mixture into 1-inch (2.5-cm) balls.
Place in 13x9x2-inch (33x23x5-cm) rectangular
baking pan. Bake at 400°F (204°C) for 20 to 25
minutes, or until no longer pink inside. Serve with
salsa, if desired.
Yield: 18 servings (2 meatballs per serving).
Per serving: About 124 cal, 9 g pro, 11 g carb,
5 g fat, 36 mg chol, 287 mg sod.
Mexican Meatloaf
Page 26

24
Filling
2 tablespoons (30 ml)
butter or margarine
3 boneless, skinless
chicken breast
halves, cut into
1
⁄2-inch (1.25-cm)
pieces
1 medium onion or 3
shallots, sliced
8 ounces (225 g)
button or crimini
mushrooms, halved
or quartered
1 can (14
1
⁄2 oz. [410 g])
diced tomatoes,
undrained
2 tablespoons (30 ml)
flour
1
⁄
2 teaspoon (2 ml) dried
thyme leaves
Pastry Topping
1
⁄2 cup (120 ml) water
1
⁄4 cup (60 ml) butter or
margarine, cut up
1
⁄4
teaspoon (1 ml) salt
1
⁄2 cup (120 ml)
all-purpose flour
2 eggs
2 oz. (55 g) sharp
Cheddar cheese,
diced
To make Filling, melt butter in large skillet over
medium heat. Add chicken and onion. Cook and
stir 3 minutes. Add mushrooms. Cook and stir
5 minutes. Add tomatoes, flour, and thyme. Cook
and stir until thickened and bubbly. Cover and keep
warm on low heat.
To make Pastry Topping, heat water, butter, and
salt in small saucepan over high heat to a full
rolling boil. Reduce heat and quickly stir in flour,
mixing vigorously until mixture leaves sides of pan
in a ball.
Place flour mixture in mixer bowl. Attach bowl and
flat beater to mixer. Turn to Speed 2 and add eggs,
one at a time, mixing about 30 seconds after each
addition. Stop and scrape bowl. Turn to Speed 4
and beat about 15 seconds. Add cheese. Turn to
STIR Speed and mix about 10 seconds.
Pour hot filling into 2-quart (1.89 l) casserole dish
sprayed with no-stick cooking spray. Spoon pastry
into 4 mounds on top of chicken mixture. Bake at
400°F (204°C) for 35 to 45 minutes, or until pastry
is puffed and browned and filling is bubbly.
Yield: 4 servings.
Per serving: About 507 cal, 39 g pro, 24 g carb,
28 g fat, 240 mg chol, 706 mg sod.
Chicken and Mushroom Casserole
with Cheese Puff Topping
Page 27

25
21⁄4 cups (535 ml)
all-purpose flour
1
1
⁄3 cups (315 ml) sugar
3 teaspoons (15 ml)
baking powder
1
⁄2 teaspoon (2 ml) salt
1
⁄2 cup (120 ml)
shortening
1 cup (235 ml) low-fat
milk
1 teaspoon (5 ml)
vanilla
2 eggs
Combine dry ingredients in mixer bowl. Add
shortening, milk, and vanilla. Attach bowl and flat
beater to mixer. Turn to Speed 2 and mix about
1 minute. Stop and scrape bowl. Add eggs.
Continuing on Speed 2, mix about 30 seconds.
Stop and scrape bowl. Turn to Speed 6 and beat
about 1 minute.
Pour batter into two greased and floured 8- or
9-inch (20- or 23-cm) round baking pans. Bake at
350°F (177°C) for 30 to 35 minutes, or until
toothpick inserted in centre comes out clean. Cool
10 minutes. Remove from pans. Cool completely on
wire rack. Frost if desired.
Yield: 12 to 16 servings.
Per serving: About 272 cal, 4 g pro, 42 g carb,
10 g fat, 37 mg chol, 175 mg sod.
Quick Yellow Cake
2 cups (475 ml)
all-purpose flour
1
1
⁄2 cups (355 ml) sugar
3 teaspoons (15 ml)
baking powder
1
⁄2 teaspoon (2 ml) salt
1
⁄2 cup (120 ml)
shortening
1 cup (235 ml) low-fat
milk
1 teaspoon (5 ml)
vanilla
4 egg whites
Combine dry ingredients in mixer bowl. Add
shortening, milk, and vanilla. Attach bowl and flat
beater to mixer. Turn to Speed 2 and mix about
1 minute. Stop and scrape bowl. Add egg whites.
Turn to Speed 6 and beat about 1 minute, or until
smooth and fluffy.
Pour batter into two greased and floured 8- or
9-inch (20- or 23-cm) round baking pans. Bake at
350°F (177°C) for 30 to 35 minutes, or until
toothpick inserted in centre comes out clean. Cool
10 minutes. Remove from pans. Cool completely on
wire rack. Frost if desired.
Yield: 12 to 16 servings.
Per serving: About 267 cal, 4 g pro, 42 g carb,
9 g fat, 2 mg chol, 183 mg sod.
Easy White Cake
CAKES AND FROSTINGS
Page 28

26
Topping
1 cup (235 ml) firmly
packed brown sugar
1
⁄2 cup (120 ml) butter
or margarine
1
⁄4 cup (60 ml)
whipping cream
1 cup (235 ml)
chopped walnuts
Cake
1
1
⁄2 cups (355 ml) sugar
1
⁄2 cup (120 ml) butter
or margarine,
softened
1 cup (235 ml)
(2 medium) mashed
ripe banana
1 teaspoon (5 ml)
vanilla
3 eggs
2
1
⁄2 cups (590 ml)
all-purpose flour
1
1
⁄4 teaspoons (6 ml)
baking powder
1 teaspoon (5 ml)
baking soda
1
⁄
2 teaspoon (2 ml) salt
3
⁄4 cup (175 ml)
buttermilk
Filling
1
⁄2 cup (120 ml) sugar
3 tablespoons (45 ml)
all-purpose flour
1
⁄4 teaspoon (1 ml) salt
1 cup (235 ml) low-fat
milk
1 egg, beaten
1 teaspoon (5 ml)
vanilla
1tablespoon (15 ml)
butter or margarine
2 medium bananas,
thinly sliced
1
⁄2 cup (120 ml)
whipping cream,
whipped
To make Topping, place brown sugar, butter, and
cream in small saucepan. Heat over low heat just
until butter melts, stirring constantly. Pour over
bottoms of three 8- or 9-inch (20- or 23-cm) round
baking pans. Sprinkle with walnuts.
To make Cake, place sugar and butter in mixer
bowl. Attach bowl and flat beater to mixer. Turn to
Speed 2 and mix about 30 seconds. Stop and scrape
bowl. Add banana and vanilla. Continuing on Speed
2, mix about 30 seconds. Continuing on Speed 2,
add eggs, one at a time, mixing about 15 seconds
after each addition. Stop and scrape bowl.
Combine flour, baking powder, baking soda, and
salt in small bowl. Add half of flour mixture to
sugar mixture in mixer bowl. Turn to Speed 2 and
mix about 30 seconds. Add buttermilk and
remaining flour mixture. Gradually turn to Speed 6
and beat about 30 seconds. Spread batter evenly
over nut mixture in pans. Bake at 350°F (177°C) for
25 to 30 minutes, or until toothpick inserted in
centre comes out clean. Cool in pans about 3
minutes. Remove from pans and cool completely on
wire racks.
Meanwhile, to make Filling, combine sugar, flour,
and salt in medium saucepan. Gradually stir in milk.
Heat to boiling over medium heat, stirring constantly.
Stir about 1⁄4 cup (60 ml) hot mixture into beaten egg
in separate bowl. Pour egg mixture into saucepan.
Cook until mixture is bubbly, stirring constantly.
Remove from heat. Stir in vanilla and butter. Cool
slightly. Refrigerate 1 hour while cake is cooling.
To assemble torte, place one cake layer, nut side
up, on large plate. Spread with half of Filling.
Arrange half of banana slices over Filling. Top with
second layer, nut side up. Spread with remaining
Filling and banana slices. Top with remaining cake
layer, nut side up. Top torte with whipped cream.
Store in refrigerator.
Yield: 16 to 20 servings.
Per serving: About 451 cal, 7 g pro, 65 g carb,
19 g fat, 58 mg chol, 384 mg sod.
Caramel Walnut Banana Torte
Page 29

27
11⁄4 cups (295 ml)
all-purpose flour
1
1
⁄2 cups (355 ml) sugar,
divided
1
1
⁄2 cups (355 ml) egg
whites (about 12 to
15 egg whites)
1
1
⁄2
teaspoons (7 ml)
cream of tartar
1
⁄4 teaspoon (1 ml) salt
1
1
⁄2 teaspoons (7 ml)
vanilla or
1
⁄2 teaspoon
(2 ml) almond extract
Mix flour and 1⁄2 cup (120 ml) sugar in small bowl.
Set aside.
Place egg whites in mixer bowl. Attach bowl and
wire whip to mixer. Gradually turn to Speed 6
and whip 30 to 60 seconds, or until egg whites
are frothy.
Add cream of tartar, salt, and vanilla. Turn to Speed
8 and whip 2 to 21⁄2 minutes, or until whites are
almost stiff but not dry. Turn to Speed 2. Gradually
add remaining 1 cup (235 ml) sugar and mix about
1 minute. Stop and scrape bowl.
Remove bowl from mixer. Spoon flour-sugar
mixture, one-fourth at a time, over egg whites. Fold
in gently with spatula, just until blended.
Pour batter into ungreased 10-inch (25-cm) tube
pan. With knife, gently cut through batter to
remove large air bubbles. Bake at 375°F (191°) for
35 minutes, or until crust is golden brown and
cracks are very dry. Immediately invert cake onto
funnel or soft drink bottle. Cool completely. Remove
from pan.
Yield: 16 servings.
Per serving: About 124 cal, 4 g pro, 27 g carb,
0 g fat, 0 mg chol, 79 mg sod.
Angel Food Cake
Page 30

28
3 cups (710 ml)
all-purpose flour
2cups (475 ml) sugar
3 teaspoons (15 ml)
baking powder
1
⁄2 teaspoon (2 ml) salt
2 cups (475 ml) butter,
softened
1
⁄2 cup (120 ml) low-fat
milk
1 teaspoon (5 ml)
vanilla
1 teaspoon (5 ml)
almond extract
6 eggs
Combine dry ingredients in mixer bowl. Add butter,
milk, vanilla, and almond extract. Attach bowl and
flat beater to mixer. Turn to STIR Speed and mix
about 1 minute. Stop and scrape bowl. Turn to
Speed 6 and beat about 2 minutes. Stop and
scrape bowl.
Turn to Speed 2 and add eggs, one at a time,
mixing about 15 seconds after each addition. Turn
to Speed 4 and beat about 30 seconds.
Pour batter into greased and floured 10-inch
(25-cm) tube pan. Bake at 350°F (177°C) for 1 hour
15 minutes, or until toothpick inserted in centre
comes out clean. Cool completely on wire rack.
Remove cake from pan.
Yield: 16 servings.
Per serving: About 419 cal, 5 g pro, 44 g carb,
25 g fat, 143 mg chol, 378 mg sod.
VARIATION
Double Chocolate Pound Cake
Add 1⁄2 cup (120 ml) unsweetened Dutch-processed
cocoa powder to dry ingredients. Reduce butter to
1 cup (235 ml). Increase milk to 1 cup (235 ml).
Omit almond extract. Prepare as directed above.
Bake at 325°F (163°C) for 1 hour 20 minutes.
Chocolate Glaze
Melt 1 square (1 oz. [30g]) semi-sweet chocolate
and 1 teaspoon (5 ml) shortening in small saucepan
over low heat, stirring to blend. Drizzle over cake.
Yield: 16 servings.
Per serving (cake and glaze): About 390 cal,
6 g pro, 55 g carb, 18 g fat, 99 mg chol,
289 mg sod.
Old-Fashioned Pound Cake
Page 31

29
Italian Cream Cake
5 eggs, separated
1
⁄2 cup (120 ml) butter
or margarine
1
⁄2 cup (120 ml)
shortening
1
3
⁄4 cups (410 ml) sugar
2 cups (475 ml)
all-purpose flour
1 teaspoon (5 ml)
baking soda
1 cup (235 ml)
buttermilk
1 teaspoon (5 ml)
vanilla
2 cups (475 ml)
coconut
1 cup (235 ml)
chopped pecans
Place egg whites in mixer bowl. Attach bowl and
wire whip to mixer. Turn to Speed 8 and whip 21⁄2
to 3 minutes, or until egg whites are stiff but not
dry. Place egg whites in another bowl.
Place butter, shortening, and sugar in mixer bowl.
Attach bowl and flat beater to mixer. Turn to Speed
4 and mix about 21⁄2 minutes, or until light and
fluffy. Continuing on Speed 4, add egg yolks, one at
a time, mixing about 15 seconds after each
addition. Stop and scrape bowl.
Mix flour and baking soda. Add half to sugar
mixture in mixer bowl. Turn to Speed 2 and mix
about 30 seconds. Add buttermilk, vanilla, and
remaining flour mixture. Gradually turn to Speed 4
and beat about 1 minute.
Add coconut and pecans. Turn to STIR Speed and
mix just until blended. Remove bowl from mixer.
Gently fold in beaten egg whites with spatula just
until blended. Pour batter into greased and floured
13x9x2-inch (33x23x5-cm) baking pan. Bake at
350°F (177°C) for 40 to 50 minutes, or until
toothpick inserted in centre comes out clean. Cool
completely on wire rack. Spread with Cream Cheese
Frosting.
Yield: 15 servings.
NOTE: For best flavour, chill cake in refrigerator
several hours or overnight.
Place all ingredients in mixer bowl. Attach bowl and
flat beater to mixer. Turn to Speed 2 and mix about
30 seconds, or until blended. Stop and scrape bowl.
Turn to Speed 4 and beat about 2 minutes, or until
smooth and creamy. Spread on cooled cake.
Per serving: About 626 cal, 7 g pro, 77 g carb,
33 g fat, 112 mg chol, 351 mg sod.
Cream Cheese Frosting
4 cups (945 ml)
powdered sugar
1 package (8 oz.
[225 g]) light cream
cheese, softened
1
⁄2 cup (120 ml) butter
or margarine,
softened
1 teaspoon (5 ml)
vanilla
Page 32

30
Chocolate Cake
2 cups (475 ml)
all-purpose flour
1
1
⁄3 cups (315 ml) sugar
1 teaspoon (5 ml)
baking powder
1
⁄2 teaspoon (2 ml)
baking soda
1
⁄2 teaspoon (2 ml) salt
1
⁄2 cup (120 ml)
shortening
1 cup (235 ml) low-fat
milk
1 teaspoon (5 ml)
vanilla
2 eggs
2 squares (1 oz. [30 g]
each) unsweetened
chocolate, melted
Combine dry ingredients in mixer bowl. Add
shortening, milk, and vanilla. Attach bowl and flat
beater to mixer. Turn to Speed 2 and mix about
1 minute. Stop and scrape bowl. Add eggs and
chocolate. Continuing on Speed 2, mix about
30 seconds. Stop and scrape bowl. Turn to Speed
6 and beat about 1 minute.
Pour batter into two greased and floured 8- or
9-inch (20- or 23-cm) round baking pans. Bake at
350°F (177°C) for 30 to 35 minutes, or until
toothpick inserted in centre comes out clean. Cool
10 minutes. Remove from pans. Cool completely on
wire rack. Frost if desired.
Yield: 12 to 16 servings.
Per serving: About 285 cal, 4 g pro, 41 g carb,
12 g fat, 37 mg chol, 185 mg sod.
Apple Cake
11⁄2 cups (355 ml)
all-purpose flour
1 cup (235 ml) whole
wheat flour
1
1
⁄2 cups (355 ml) sugar
1 teaspoon (5 ml)
baking powder
1 teaspoon (5 ml)
baking soda
1
⁄2 teaspoon (2 ml) salt
1
1
⁄2 teaspoons (7 ml)
cinnamon
1
⁄2 teaspoon (2 ml)
nutmeg
1
1
⁄2 cups (355 ml)
applesauce
1
⁄
2 cup (120 ml) butter
or margarine, melted
2 eggs
1 cup (235 ml)
chopped, peeled
apple
1
⁄
2 cup (120 ml)
chopped walnuts
Caramel Creme
Frosting, if desired
(see page 36)
Combine dry ingredients in mixer bowl. Add
applesauce, butter, and eggs. Attach bowl and flat
beater to mixer. Turn to Speed 2 and mix about
1 minute. Stop and scrape bowl. Turn to Speed 4
and beat about 30 seconds. Add apple and walnuts.
Turn to STIR Speed and mix just until blended.
Pour batter into greased and floured 13x9x2-inch
(33x23x5-cm) baking pan. Bake at 350°F (177°C) for
35 to 40 minutes, or until toothpick inserted in
centre comes out clean. Cool completely on wire
rack. Frost with Caramel Creme Frosting,
if desired.
Yield: 12 to 16 servings.
Per serving: About 318 cal, 5 g pro, 51 g carb,
11 g fat, 36 mg chol, 315 mg sod.
Page 33

31
Sunshine Chiffon Cake
2 cups (475 ml)
all-purpose flour
1
1
⁄2 cups (355 ml) sugar
1 tablespoon (15 ml)
baking powder
1
⁄2 teaspoon (2 ml) salt
3
⁄4 cup (175 ml) cold
water
1
⁄2 cup (120 ml) oil
7 egg yolks, beaten
1 teaspoon (5 ml)
vanilla
2 teaspoons (10 ml)
grated lemon rind
7 egg whites
1
⁄2 teaspoon (2 ml)
cream of tartar
Combine flour, sugar, baking powder, and salt in
mixer bowl. Add water, oil, egg yolks, vanilla, and
lemon rind. Attach bowl and wire whip to mixer.
Turn to Speed 4 and beat about 1 minute. Stop and
scrape bowl. Continuing on Speed 4, beat about
15 seconds. Pour mixture into another bowl. Clean
mixer bowl and wire whip.
Place egg whites and cream of tartar in mixer bowl.
Attach bowl and wire whip to mixer. Turn to Speed
8 and whip 2 to 21⁄2 minutes, or until whites are stiff
but not dry.
Remove bowl from mixer. Gradually add flour
mixture to egg whites. Fold in gently with spatula,
just until blended.
Pour batter into ungreased 10-inch (25-cm) tube
pan. Bake at 325°F (163°C) for 60 to 75 minutes, or
until top springs back when lightly touched.
Immediately invert cake onto funnel or soft drink
bottle. Cool completely. Remove from pan. Drizzle
with Lemon Glaze.
Lemon Glaze
1 cup (235 ml)
powdered sugar
1tablespoon (15 ml)
butter or margarine,
softened
2-3 tablespoons (30-
45 ml) lemon juice
Combine powdered sugar and butter in small bowl.
Stir in lemon juice, 1 tablespoon (15 ml) at a time,
until glaze is of desired consistency.
Yield: 16 servings.
Per serving: About 256 cal, 4 g pro, 38 g carb,
10 g fat, 93 mg chol, 152 mg sod.
Page 34

32
Chocolate Almond Brownie Cake
Cake
7 squares (1 oz. [30 g]
each) semi-sweet
chocolate
1
⁄2 cup (120 ml) butter
or margarine
3 eggs, separated
1
⁄2
cup (120 ml) sugar
1
⁄2 teaspoon (2 ml)
almond extract
2 tablespoons (30 ml)
all-purpose flour
Glaze
1 square (1 oz. [30 g] )
semi-sweet
chocolate
1 teaspoon (5 ml)
shortening
Topping
1
⁄2 cup (120 ml)
whipping cream
1tablespoon (15 ml)
powdered sugar
1
⁄4 teaspoon (1 ml)
almond extract
2 tablespoons (30 ml)
sliced almonds
To make Cake, melt chocolate and butter in
medium saucepan over low heat, stirring constantly.
Remove from heat; cool slightly.
Place egg whites in mixer bowl. Attach bowl and
wire whip to mixer. Turn to Speed 8 and whip 1 to
2 minutes, or until stiff peaks form. Place egg whites
in another bowl. Clean mixer bowl and wire whip.
Place chocolate mixture, sugar, and almond extract
in mixer bowl. Attach bowl and flat beater to mixer.
Turn to Speed 4 and beat about 1 minute. Stop
and scrape bowl. Continuing on Speed 4, add egg
yolks, one at a time, beating about 30 seconds after
each addition. Continuing on Speed 4, add flour
and beat about 15 seconds. Gently fold in egg
whites with spatula.
Spoon batter into 8-inch (20.3-cm) springform pan
that has been greased and floured on the bottom
only. Bake at 375°F (191°C) for 20 to 25 minutes,
or until set in centre. Cool completely on wire rack
before glazing. Clean mixer bowl.
To make Glaze, melt chocolate and shortening in
small saucepan over low heat, stirring to blend.
Drizzle over cake.
To make Topping, place cream, powdered sugar,
and almond extract in mixer bowl. Attach wire whip
and bowl to mixer. Turn to Speed 10 and whip
30 to 60 seconds, or until stiff peaks form. Pipe or
spoon whipped cream in ring over top of cake.
Sprinkle with almonds. Store in refrigerator.
Yield: 16 servings.
Per serving: About 180 cal, 3 g pro, 17 g carb,
13 g fat, 58 mg chol, 74 mg sod.
Page 35

33
Double Lemon Cake Roll
To make Cake, place eggs in mixer bowl. Attach
bowl and wire whip to mixer. Turn to Speed 8 and
whip eggs about 3 minutes, or until very thick and
lemon coloured. Continuing on Speed 8, gradually
add sugar, beating about 1 minute. Stop and
scrape bowl.
Add water, vanilla, and lemon extract. Turn to Speed
4 and beat about 30 seconds. Continuing on Speed
4, gradually add flour, baking powder, and salt. Beat
about 30 seconds, or until batter is smooth.
Line a 151⁄2x101⁄2x1-inch (39.4x26.7x2.5-cm) baking
pan with waxed paper, aluminum foil, or
parchment paper. Grease well. Pour batter into pan,
spreading to corners. Bake at 375°F (191°C) for
11 to 13 minutes, or until toothpick inserted in
centre comes out clean. Remove from oven and
immediately turn onto a towel sprinkled with
powdered sugar. Remove paper or foil. Roll cake
and towel together. Cool completely on wire rack.
Meanwhile, to make Lemon Filling, place
ingredients in mixer bowl. Attach bowl and flat
beater to mixer. Turn to Speed 4 and beat about
11⁄2 minutes, or until well mixed. Spread on cooled
cake roll.
When cool, unroll cake and spread with Lemon
Filling. Reroll and sprinkle with powdered sugar.
Yield: 10 servings (1-inch [2.5-cm] slice per serving).
Per serving: About 217 cal, 6 g pro, 35 g carb,
6 g fat, 96 mg chol, 213 mg sod.
Cake
4 eggs
3
⁄4 cup (175ml)
granulated sugar
1
⁄4 cup (60 ml) water
1
⁄2 teaspoon (2 ml)
vanilla
1
⁄2 teaspoon (2 ml)
lemon extract
2
⁄3 cup (160 ml)
all-purpose flour
1 teaspoon (5 ml)
baking powder
1
⁄4 teaspoon (1 ml) salt
Lemon Filling
1 package (8 oz.
[225 g] ) light cream
cheese, softened
1 cup (235 ml)
powdered sugar
1 tablespoon (15 ml)
lemon juice
2 teaspoons (10 ml)
grated lemon peel
Page 36

34
Gingered Pear Upside-Down Cake
Topping
1
⁄2 cup (120 ml) packed
brown sugar
1
⁄4 cup (60 ml) butter or
margarine
1 tablespoon (15 ml)
light corn syrup
1 tablespoon(15 ml)
finely chopped
crystallized ginger
1 large ripe pear
Cake
1 cup (235 ml)
granulated sugar
1
⁄2 cup (120 ml)
shortening
1 teaspoon (5 ml)
vanilla
2 eggs
1
1
⁄2 cups (355 ml)
all-purpose flour
1
⁄2 cup (120 ml) low-fat
milk
1 tablespoon (15 ml)
finely chopped
crystallized ginger
1
1
⁄2 teaspoons (7 ml)
baking powder
1
⁄2 teaspoon (2 ml)
nutmeg
1
⁄4 teaspoon (1 ml) salt
To make Topping, combine brown sugar, butter,
and corn syrup in small saucepan. Cook and stir
over medium-low heat for 3 to 5 minutes, or until
smooth. Pour evenly into 9-inch (23-cm) round or
square cake pan that has been sprayed with nostick cooking spray. Sprinkle evenly with chopped
ginger. Set aside.
To make Cake, place granulated sugar, shortening,
and vanilla in mixer bowl. Attach bowl and flat
beater to mixer. Turn to Speed 2 and mix about
45 seconds. Continuing on Speed 2, add eggs and
mix about 45 seconds longer. Continuing on Speed
2, add remaining cake ingredients and mix about
30 seconds. Stop and scrape bowl. Turn to Speed 6
and beat about 1 minute.
Peel, core, and slice pear. Arrange pear slices evenly
over sugar mixture in pan. Spread batter evenly over
pear slices.
Bake at 350ºF (177°C) for 45 to 55 minutes, or until
centre springs back when touched lightly. Let stand
in pan about 3 minutes. Invert onto serving plate.
Serve warm or at room temperature.
Yield: 8 servings.
Per serving: About 462 cal, 5 g pro, 66 g carb,
21 g fat, 70 mg chol, 210 mg sod.
Page 37

35
Cappuccino Fudge Cupcakes
Cupcakes
1
⁄2 cup (120 ml) butter
or margarine,
softened
1
1
⁄2 cups (355 ml) sugar
3 eggs
3
⁄4
cup (175 ml) milk
1 tablespoon plus 2
teaspoons (25 ml)
instant espresso or
coffee granules
1
3
⁄4 cups (410 ml)
all-purpose flour
1
1
⁄2 teaspoons (7 ml)
baking powder
1
⁄4 teaspoon (1 ml) salt
Coffee Cream
1
1
⁄2 cups (355 ml) heavy
cream
1
⁄4 cup (60 ml) sugar
1
1
⁄2 teaspoons (7 ml)
instant espresso or
coffee granules
(optional)
Fudge Sauce
4 squares (1 oz. [30 g]
each) semi-sweet
chocolate
1
⁄2 cup (120 ml)
whipping cream
1
⁄4 teaspoon (1 ml)
cinnamon
To make Cupcakes, place butter in bowl. Attach
bowl and flat beater to mixer. Turn to Speed 6 and
gradually add sugar, beating about 3 minutes, or
until light and fluffy. Turn to Speed 4 and add eggs,
one at a time, beating for 30 seconds after each
addition. Stop and scrape bowl. Dissolve instant
espresso in milk. Set aside.
Combine flour, baking powder, and salt. Turn to
STIR Speed and add 1⁄3 of the flour mixture
alternately with 1⁄2 of the milk mixture, mixing
15 seconds after each addition.
Spoon batter into 8 greased and floured custard
cups. Place cups on baking sheet. Bake at 350°F
(177°C) for 30 to 35 minutes, or until toothpick
inserted into cupcake comes out clean. Remove
from custard cups and cool on wire rack. Top with
Coffee Cream and serve with Fudge Sauce.
To make Coffee Cream, combine cream, sugar,
and espresso in bowl. Attach bowl and wire whip to
mixer. Turn to Speed 8 and whip cream until stiff.
To make Fudge Sauce, place chocolate, cream,
and cinnamon in small saucepan. Cook and stir
over low heat until chocolate is melted and mixture
is combined.
Yield: 8 servings (8 cupcakes).
Per serving: About 690 cal, 8 g pro, 76 g carb,
40 g fat, 187 mg chol, 291 mg sod.
Page 38

36
Caramel Creme Frosting
1
⁄2 cup (120 ml) butter
or margarine
1 cup (235 ml) firmly
packed brown sugar
1
⁄4 cup (60 ml) low-fat
milk
1 cup (235 ml)
miniature
marshmallows
2 cups (475 ml)
powdered sugar
1
⁄2 teaspoon (2 ml)
vanilla
Melt butter in medium saucepan. Add brown sugar
and milk, stirring to blend. Heat to boiling. Cook
about 1 minute, stirring constantly. Remove from
heat. Add marshmallows. Stir until marshmallows
melt and mixture is smooth.
Place powdered sugar in mixer bowl. Add brown
sugar mixture and vanilla. Attach bowl and flat
beater to mixer. Turn to STIR Speed and mix
about 30 seconds. Turn to Speed 4 and beat
about 1 minute, or until smooth and creamy.
Spread on cake while warm.
Yield: 12 to 16 servings (frosting for 2-layer or
13x9x2-inch (33x23x5-cm) cake).
Per serving: About 228 cal, 0 g pro, 41 g carb,
7 g fat, 0 mg chol, 98 mg sod.
Fluffy Frosting
11⁄2 cups (355 ml) sugar
1
⁄2 teaspoon (2 ml)
cream of tartar
1
⁄2 teaspoon (2 ml) salt
1
⁄2 cup (120 ml) water
1
1
⁄2 tablespoons (20 ml)
light corn syrup
2 egg whites
1
1
⁄2 teaspoons (7 ml)
vanilla
Place sugar, cream of tartar, salt, water, and corn
syrup in saucepan. Cook and stir over medium heat
until sugar is completely dissolved, forming a syrup.
Place egg whites in mixer bowl. Attach bowl and
wire whip to mixer. Turn to Speed 10 and whip
about 45 seconds, or until whites begin to hold
shape. Continuing on Speed 10, slowly pour hot
syrup into egg whites in a fine stream and whip
1 to 11⁄2 minutes. Add vanilla and whip about
5 minutes longer, or until frosting loses its gloss
and stands in stiff peaks. Frost cake immediately.
Yield: 12 to 16 servings (frosting for 2-layer or
13x9x2-inch (33x23x5-cm) cake).
Per serving: About 109 cal, 1 g pro, 27 g carb,
0 g fat, 0 mg chol, 101 mg sod.
Page 39

37
Buttercream Frosting
1
⁄3 cup (80 ml) butter or
margarine, softened
1
⁄4 cup (60 ml)
whipping cream or
evaporated milk
1 teaspoon (5 ml)
vanilla
1
⁄4
teaspoon (1 ml) salt
4 cups (945 ml)
powdered sugar,
divided
low-fat milk, if
necessary
Place butter in mixer bowl. Attach bowl and flat
beater to mixer. Turn to Speed 4 and beat about
1 minute, or until creamy. Stop and scrape bowl.
Add cream, vanilla, salt, and 1 cup (235 ml)
powdered sugar. Turn to STIR Speed and mix about
30 seconds. Stop and scrape bowl. Turn to Speed 2
and mix about 11⁄2
minutes, or until well blended.
Stop and scrape bowl.
Turn to STIR Speed. Gradually add remaining 3 cups
(710 ml) powdered sugar and mix until blended.
Stop and scrape bowl, if necessary. Add milk,
1 teaspoon (5 ml) at a time, if necessary. Turn to
Speed 4 and beat about 1 minute, or until smooth.
Yield: 12 to 16 servings (frosting for 2-layer or
13x9x2-inch (33x23x 5-cm) cake).
Per serving: About 219 cal, 0 g pro, 40 g carb,
7 g fat, 21 mg chol, 103 mg sod.
VARIATION
Chocolate Buttercream Frosting
Mix
1
⁄3 cup (80 ml) cocoa with powdered sugar in
small bowl. Add to softened butter, cream, vanilla,
and salt. Continue as directed above.
Yield 12 to 16 servings (frosting for 2-layer or
13x9x2-inch cake [33x23x 5-cm])
Per serving: About 224 cal, 1 g pro, 41 g carb,
7 g fat, 21 mg chol, 103 mg sod.
Orange Cream Cheese Frosting
4 cups (945 ml)
powdered sugar
1 package (8 oz.
[225 g]) light cream
cheese
1 teaspoon (5 ml)
orange juice
1
⁄2 teaspoon (2 ml)
grated orange peel
Place all ingredients in mixer bowl. Attach bowl
and flat beater to mixer. Turn to STIR Speed and
mix about 30 seconds, or until blended. Turn to
Speed 4 and beat about 2 minutes, or until smooth
and creamy.
Yield: 12 to 16 servings (frosting for 2-layer or
13x9x2-inch cake [33x23x 5-cm]).
Per serving: About 196 cal, 2 g pro, 41 g carb,
3 g fat, 7 mg chol, 107 mg sod.
Page 40

38
COOKIES, BARS, AND CANDIES
Chocolate Fudge
Butter
2cups (475 ml) sugar
1
⁄
8 teaspoon (.5 ml) salt
3
⁄
4 cup (175 ml)
evaporated milk
1 teaspoon (5 ml) light
corn syrup
2 squares (1 oz. [30 g]
each) unsweetened
chocolate
2 tablespoons (30 ml)
butter or margarine
1 teaspoon (5 ml)
vanilla
2 cup (475 ml)
chopped walnuts or
pecans
Butter sides of heavy 2-quart (1.9 l) saucepan.
Combine sugar, salt, evaporated milk, corn syrup,
and chocolate in pan. Cook and stir over medium
heat until chocolate melts and sugar dissolves.
Cook to soft ball stage (236°F [113°C]) without
stirring. Remove immediately from heat. Add butter
without stirring. Cool to lukewarm (110°F [43°C]).
Stir in vanilla.
Pour mixture into mixer bowl. Attach bowl and flat
beater to mixer. Turn to Speed 2 and mix about
8 minutes, or until fudge stiffens and loses its
gloss. Quickly turn to STIR Speed and add walnuts,
mixing just until blended. Spread in buttered
9x9x2-inch (23x23x 5-cm) baking pan. Cool at
room temperature. Cut into 1-inch (2.5-cm) squares
when firm.
Yield: 64 servings (1 square per serving).
Per serving: About 59 cal, 1 g pro, 7 g carb, 3 g fat,
1 mg chol, 12 mg sod.
Creamy No-Cook Mints
3 ounces (85 g) light
cream cheese
1
⁄4 teaspoon (1 ml) mint
flavouring
2 drops green food
colour or colour of
choice
4
1
⁄4-41⁄2 cups (1.05-1 l)
powdered sugar
superfine sugar
Place cream cheese, flavouring, and food colour in
mixer bowl. Attach bowl and flat beater to mixer.
Turn to Speed 2 and mix about 30 seconds, or until
smooth. Continuing on Speed 2, gradually add
powdered sugar and mix about 11⁄2 minutes, or until
mixture becomes very stiff.
To make mints, dip individual flexible candy molds
in superfine sugar. Press in mint mixture. Turn out
onto waxed paper covered with superfine sugar.
Repeat until all mixture is used. OR: Shape mixture
into 3⁄4-inch (2-cm) balls, using about 1 teaspoon
(5 ml) for each ball. Roll in superfine sugar. Place on
waxed paper covered with superfine sugar. Flatten
slightly with thumb to form 1⁄4-inch (.625 cm) thick
patties. If desired, press back of fork lightly on
patties to form ridges.
Store mints, tightly covered, in refrigerator. Mints
also freeze well.
Yield: 42 servings (2 candies per serving).
Per serving: About 54 cal, 0 g pro, 13 g carb,
0 g fat, 1 mg chol, 12 mg sod.
Page 41

39
Divinity
3cups (710 ml) sugar
3
⁄4 cup (175 ml) light
corn syrup
1
⁄2 cup (120 ml) water
2 egg whites
1 teaspoon (5 ml)
almond extract
1 cup (235 ml)
chopped walnuts or
pecans
Place sugar, corn syrup, and water in heavy
saucepan. Cook and stir over medium heat to hard
ball stage (248°F [120°C]). Remove from heat and
let stand until temperature drops to 220°F (104°C),
without stirring.
Place egg whites in mixer bowl. Attach bowl and
wire whip to mixer. Turn to Speed 8 and whip
about 1 minute, or until soft peaks form.
Gradually add syrup in a fine stream and whip
about 21⁄2 minutes longer.
Turn to Speed 4. Add almond extract and whip
20 to 25 minutes, or until mixture starts to
become dry. Turn to STIR Speed and add walnuts,
mixing just until blended.
Drop mixture from measuring tablespoon onto
waxed paper or greased baking sheet to form patties.
Yield: 20 servings (2 pieces per serving).
Per serving: About 192 cal, 2 g pro, 40 g carb,
4 g fat, 0 mg chol, 15 mg sod.
Page 42

40
Chocolate Chip Cookies
1 cup (235 ml)
granulated sugar
1 cup (235 ml) brown
sugar
1 cup (235 ml) butter
or margarine,
softened
2 eggs
1
1
⁄2 teaspoons (7 ml)
vanilla
1 teaspoon (5 ml)
baking soda
1 teaspoon (5 ml) salt
3 cups (710 ml)
all-purpose flour
12 ounces (340 g)
semi-sweet
chocolate chips
Place sugars, butter, eggs, and vanilla in mixer bowl.
Attach bowl and flat beater to mixer. Turn to Speed
2 and mix about 30 seconds. Stop and scrape bowl.
Turn to Speed 4 and beat about 30 seconds. Stop
and scrape bowl.
Turn to STIR Speed. Gradually add baking soda, salt,
and flour to sugar mixture and mix about 2 minutes.
Turn to Speed 2 and mix about 30 seconds. Stop
mixer and scrape bowl. Add chocolate chips. Turn to
STIR Speed and mix about 15 seconds.
Drop by rounded teaspoonfuls onto greased baking
sheets, about 2 inches (5-cm) apart. Bake at 375°F
(191°C) for 10 to 12 minutes. Remove from baking
sheets immediately and cool on wire racks.
Yield: 54 servings (1 cookie per serving).
Per serving: About 117 cal, 1 g pro, 17 g carb,
5 g fat, 8 mg chol, 106 mg sod.
VARIATIONS
Macadamia Chocolate Chunk Cookies
Decrease granulated sugar to 3⁄4 cup (175 ml).
Decrease flour to 21⁄4 cups (535 ml). Add 1⁄2 cup
(120 ml) unsweetened cocoa powder with the flour.
Follow mixing directions above. Omit chocolate
chips. Turn to STIR Speed. Add 1 package (8 oz.
[225 g]) semi-sweet baking chocolate, cut into small
chunks, and 1 jar (31⁄2 oz. [100 g]) macadamia nuts,
coarsely chopped. Mix just until blended. Bake at
325°F (163°C) for 12 to 13 minutes, or until edges
are set. Do not overbake. Cool on baking sheet
about 1 minute. Cool completely on wire racks.
Yield: 48 servings (1 cookie per serving.)
Per serving: About 125 cal, 2 g pro, 16 g carb,
7 g fat, 9 mg chol, 107 mg sod.
Page 43

41
Peanut Butter Cookies
1
⁄2 cup (120 ml) peanut
butter
1
⁄2 cup (120 ml) butter
or margarine,
softened
1
⁄2 cup (120 ml)
granulated sugar
1
⁄2
cup (120 ml) brown
sugar
1 egg
1
⁄2 teaspoon (2 ml)
vanilla
1
⁄2 teaspoon (2 ml)
baking soda
1
⁄4 teaspoon (1 ml) salt
1
1
⁄4 cups (295 ml)
all-purpose flour
Place peanut butter and butter in mixer bowl. Attach
bowl and flat beater to mixer. Turn to Speed 6 and
beat about 1 minute, or until mixture is smooth.
Stop and scrape bowl. Add sugars, egg, and vanilla.
Turn to Speed 4 and beat about 1 minute. Stop and
scrape bowl.
Turn to STIR Speed. Gradually add all remaining
ingredients to sugar mixture and mix about 30
seconds. Turn to Speed 2 and mix about 30 seconds.
Roll dough into 1-inch (2.5-cm) balls. Place about
2 inches (5-cm) apart on ungreased baking sheets.
Press flat with fork in a criss-cross pattern to 1⁄4-inch
(625 cm) thickness.
Bake at 375°F (191°C) for 10 to 12 minutes, or until
golden brown. Remove from baking sheets
immediately and cool on wire racks.
Yield: 36 servings (1 cookie per serving).
Per serving: About 83 cal, 2 g pro, 10 g carb,
4 g fat, 6 mg chol, 81 mg sod.
Nutty Shortbread Bars
1 cup (235 ml) butter
or margarine,
softened
1 cup (235 ml) firmly
packed brown sugar
2 cups (475 ml)
all-purpose flour
1 teaspoon (5 ml)
baking powder
1
⁄2 teaspoon (2 ml) salt
2 egg whites
1 cup (235 ml)
chopped walnuts or
pecans
Place butter and brown sugar in mixer bowl. Attach
bowl and flat beater to mixer. Turn to Speed 2 and
mix about 1 minute. Stop and scrape bowl. Add
flour, baking powder, and salt. Turn to Speed 2 and
mix about 11⁄2 minutes, or until soft dough forms.
Press dough into greased 151⁄2x101⁄2x1-inch
(40x25x2-cm) baking pan. Beat egg whites with
fork until slightly foamy. Brush dough with egg
whites, using only as much as needed to cover
lightly. Sprinkle with chopped walnuts.
Bake at 375°F (191°C) for 20 to 25 minutes. Cut into
bars while warm. Cool on wire rack.
Yield: 30 servings (1 bar per serving).
Per serving: About 139 cal, 2 g pro, 14 g carb,
8 g fat, 17 mg chol, 114 mg sod.
Page 44

42
Lemon Cream Cheese Bars
Crust
2 cups (475 ml)
all-purpose flour
1
⁄2 cup (120 ml)
powdered sugar
1 cup (235 ml) (2
sticks) chilled butter,
cut into chunks
Cream Cheese Filling
1 package (8 oz.
[225 g]) light cream
cheese
1
⁄2 cup (120 ml)
powdered sugar
2 tablespoons (30 ml)
flour
2 eggs
1 teaspoon (5 ml)
vanilla
Lemon Filling
4 eggs
2 cups (475 ml)
granulated sugar
1
⁄4 cup (60 ml) all-
purpose flour
1 teaspoon (5 ml)
grated lemon peel
1
⁄4 cup (60 ml) lemon
juice
Powdered sugar, if
desired
Place Crust ingredients in mixer bowl. Attach bowl
and flat beater to mixer. Turn to STIR Speed and mix
about 1 minute, or until well blended and mixture
starts to stick together. Press into ungreased
151⁄2x101⁄2x1-inch (40x25x2-cm) baking pan. Bake at
350°F (177°C) for 14 to 16 minutes, or until set.
(NOTE: Check Crust after 10 minutes and prick with
fork if it puffs up during baking.) Remove from oven.
Meanwhile, clean mixer bowl and beater. Place
Cream Cheese Filling ingredients in mixer bowl.
Attach bowl and flat beater to mixer. Turn to STIR
Speed and mix about 30 seconds. Turn to Speed 4
and beat about 2 minutes, or until smooth and
creamy. Pour over partially baked Crust. Bake at
350°F (177°C) for 6 to 7 minutes, or until filling is
slightly set. Remove from oven.
Meanwhile, clean mixer bowl and beater. Place all
Lemon Filling ingredients, except lemon juice, in
mixer bowl. Attach bowl and flat beater to mixer.
Turn to Stir Speed and mix about 30 seconds. Turn
to Speed 2. Gradually add lemon juice and mix
about 30 seconds, or until well blended. Pour over
Cream Cheese Filling. Bake at 350°F (177°C) for
14 to 16 minutes, or until filling is set. (NOTE:
Filling may puff up during baking but will fall when
removed from oven.) Sprinkle with powdered sugar,
if desired. Cool completely in pan.
Yield: 48 servings (1 bar per serving).
Per serving: About 115 cal, 2 g pro, 16 g carb,
5 g fat, 39 mg chol, 65 mg sod.
Page 45

43
Sugar Cookies
1
⁄
2 cup (120 ml) butter
or margarine,
softened
3
⁄4
cup (175 ml) sugar
1 egg
1 teaspoon (5 ml)
vanilla
2 cups (475 ml)
all-purpose flour
1
⁄2 teaspoon (2 ml)
baking soda
1
⁄4
teaspoon (1 ml) salt
Place butter and sugar in mixer bowl. Attach bowl
and flat beater to mixer. Turn to Speed 2 and mix
30 seconds. Turn to speed 4 and beat about
11⁄2 minutes. Stop and scrape bowl. Add egg and
vanilla. Turn to Speed 6 and beat about 1 minute.
Combine flour, soda and salt. Add to mixer bowl.
Turn to STIR Speed and beat about 30 seconds.
Stop and scrape bowl. Turn to Speed 2 and mix
about 45 seconds. Shape dough into a flat ball.
Wrap in plastic wrap. Chill in refrigerator 2 to 3 hours.
Divide dough into thirds. Roll each portion 1⁄8-inch
(5-mm) thick on lightly floured waxed paper. Cut
with cookie cutters and place on lightly greased
baking sheets. Bake at 375°F (191°C) for 7 to 10
minutes, or until edges are light brown. Remove from
baking sheets immediately and cool on wire racks.
Yield: 48 servings (1 cookie per serving).
Per serving: About 50 cal, 1 g pro, 7 g carb, 2 g fat,
10 mg chol, 46 mg sod.
Raisin-Apricot Oatmeal Cookies
1
⁄2 cup (120 ml) butter
or margarine
1
⁄2 cup (120 ml)
shortening
3
⁄4 cup (175 ml)
granulated sugar
1
⁄
4 cup (60 ml) packed
brown sugar
2 teaspoons (10 ml)
vanilla
2 eggs
2 cups (475 ml) quick
cooking oats
1
1
⁄2 cups (355 ml)
all-purpose flour
1 teaspoon (5 ml)
baking soda
1
⁄
2 teaspoon (2 ml) salt
3
⁄4 cup (175 ml) raisins
1
⁄2 cup (120 ml)
chopped dried
apricots
Place butter, shortening, vanilla, sugars, and eggs in
mixer bowl. Attach bowl and flat beater to mixer.
Turn to Speed 2 and mix about 30 seconds. Stop
mixer and scrape bowl. Turn to Speed 4 and beat
about 30 seconds. Stop and scrape bowl. Add oats,
flour, baking soda, salt, raisins, and apricots. Turn
to Speed 2 and mix about 30 seconds.
Drop by rounded teaspoonfuls onto greased baking
sheets. Bake at 375°F (191°C) for 8 to 10 minutes,
or until light golden brown.
Yield: 48 servings (1 cookie per serving)
Per serving: About 91 cal, 1 g pro, 12 g carb,
5 g fat, 14 mg chol, 74 mg sod.
Page 46

44
Crispy Cheese Wafers
3 cups (710 ml)
(12 oz. [340 g])
shredded extra sharp
Cheddar cheese
3
⁄4 cup (175 ml) butter
or margarine,
softened and cut up
1
1
⁄2 cups (355 ml)
all-purpose flour
1
⁄2 teaspoon (2 ml)
cayenne pepper
Place cheese and butter in mixer bowl. Attach bowl
and flat beater to mixer. Turn to Speed 2 and mix
about 45 seconds. Turn to Speed 4 and beat about
30 seconds, or until well blended. Add flour and
cayenne pepper. Turn to STIR Speed and mix about
45 seconds, or until mixture forms a ball.
Divide dough in half. Wrap half of dough in plastic
wrap and refrigerate. On floured surface with
floured rolling pin, roll remaining half of dough to
1
⁄
4 inch (5 mm) thick (about 12x9-inch [30x23-cm]
rectangle). Cut into 1x3-inch (2x7-cm) strips. With
floured spatula, place on large lightly greased baking
sheets. Bake at 375°F (191°C) for 10 to 12 minutes,
or until set. Let stand 1 minute. Remove from pans
and cool on wire rack. Repeat with remaining
dough. Serve warm or at room temperature.
Yield: 30 servings (2 wafers per serving).
Per serving: About 108 cal, 4 g pro, 5 g carb,
8 g fat, 12 mg chol, 126 mg sod.
Almond Kisses
3 egg whites
1
1
⁄2 cups (355 ml) sugar
1 teaspoon (5 ml)
almond extract
2 cups (475 ml) sliced
almonds
Place egg whites in mixer bowl. Attach bowl and
wire whip to mixer. Gradually turn to Speed 10 and
whip about 2 minutes, or until soft peaks form.
Reduce to Speed 4 and gradually add sugar,
beating about 1 minute. Stop and scrape bowl. Add
almond extract. Turn to Speed 10 and whip
11⁄2 minutes, or until very stiff. Fold in almonds with
rubber spatula.
Drop by tablespoonfuls onto greased and floured or
parchment paper-covered baking sheets. Bake at
325°F (163° C) for 15 minutes. Cool on wire racks.
Yield: 36 servings (1 cookie per serving).
Per serving: About 66 cal, 1 g pro, 9 g carb, 3 g fat,
0 mg chol, 5 mg sod.
Page 47

45
Pie Pastry
21⁄4 cups (535 ml)
all-purpose flour
3
⁄4 teaspoon (4 ml) salt
1
⁄2 cup (120 ml)
shortening, well
chilled
2 tablespoons (30 ml)
butter or margarine,
well chilled
5-6 tablespoons (75-
90 ml) cold water
Place flour and salt in mixer bowl. Attach bowl and
flat beater to mixer. Turn to STIR Speed and mix
about 15 seconds. Cut shortening and butter into
pieces and add to flour mixture. Turn to STIR Speed
and mix 30 to 45 seconds, or until shortening
particles are size of small peas.
Continuing on STIR Speed, add water, 1 tablespoon
(15 ml) at a time, mixing until all particles are
moistened and dough begins to hold together.
Divide dough in half. Pat each half into a smooth
ball and flatten slightly. Wrap in plastic wrap. Chill in
refrigerator 15 minutes.
Roll one half of dough to 1⁄8-inch (3 mm) thickness
between waxed paper. Fold pastry into quarters.
Ease into 8- or 9-inch (20- or 23-cm) pie plate and
unfold, pressing firmly against bottom and sides.
Continue with one of the procedures that follow.
For One-Crust Pie: Fold edge under. Crimp, as
desired. Add desired pie filling. Bake as directed.
For Two-Crust Pie: Trim pastry even with edge of pie
plate. Using second half of dough, roll out another
pastry crust. Add desired pie filling. Top with second
pastry crust. Seal edge. Crimp, as desired. Cut slits
for steam to escape. Bake as directed.
For Baked Pastry Shell: Fold edge under. Crimp, as
desired. Prick sides and bottom with fork. Bake at
450°F (232°C) for 8 to 10 minutes, or until lightly
browned. Cool completely on wire rack and fill.
Alternate Method for Baked Pastry Shell: Fold edge
under. Crimp, as desired. Line shell with foil. Fill with pie
weights or dried beans. Bake at 450°F (232°C) for 10 to
12 minutes, or until edges are lightly browned. Remove
pie weights and foil. Cool completely on wire rack and fill.
Yield: 8 servings (two 8- or 9-inch [20- or 23-cm] crusts).
Per serving (one crust): About 134 cal, 2 g pro,
13 g carb, 8 g fat, 0 mg chol, 118 mg sod.
Per serving (two crusts): About 267 cal, 4 g pro,
27 g carb, 16 g fat, 0 mg chol, 236 mg sod.
PIES AND DESSERTS
Page 48

46
Lemony Light Cheesecake
Crust
15 reduced-fat creme-
filled chocolate
sandwich cookies,
finely crushed (about
1
1
⁄2 cups [355 ml]
crumbs)
2 tablespoons (30 ml)
butter or margarine,
melted
Filling
3 packages (8 oz. [225
g] each) light cream
cheese
1 cup (235 ml) sugar
1tablespoon (15 ml)
all-purpose flour
4 eggs
1
⁄
4 cup (60 ml) lemon
juice
1 teaspoon (5 ml)
grated lemon peel
Spray bottom and sides of 9-inch (23-cm)
springform pan with no-stick cooking spray.
To make Crust, combine cookie crumbs and butter
in medium bowl; mix well. Press mixture firmly into
bottom of springform pan. Chill while making Filling.
To make Filling, place cream cheese, sugar, and
flour in mixer bowl. Attach bowl and flat beater to
mixer. Turn to Speed 2 and mix about 30 seconds.
Stop and scrape bowl. Turn to Speed 2 and mix
about 30 seconds longer. Stop and scrape bowl.
Add eggs, lemon juice, and lemon peel. Turn to
STIR Speed and mix about 30 seconds. Stop and
scrape bowl. Turn to Speed 2 and mix 15 to 30
seconds longer, just until blended. Do not overbeat.
Pour Filling into Crust.
Place top oven rack in centre of oven. Place pan of
hot water on bottom rack of oven. Place cheesecake
on rack in centre of oven. Bake at 325°F (163°C) for
50 to 60 minutes, or until cheesecake is set when
pan is jiggled slightly. Do not overbake.
Turn off oven; open oven door. Let cheesecake
stand in oven 30 minutes. Remove from oven. Cool
completely on wire rack away from drafts. Cover
and refrigerate 6 to 8 hours before serving.
Yield: 16 servings.
Per serving: About 169 cal, 6 g pro, 20 g carb,
7 g fat, 68 mg chol, 214 mg sod.
Page 49

47
Tawny Pumpkin Pie
1 can (16 oz. [455 g])
pumpkin
3
⁄4 cup (175 ml) firmly
packed brown sugar
3 eggs
1 teaspoon (5 ml)
cinnamon
1
⁄2
teaspoon (2 ml)
ginger
1
⁄2 teaspoon (2 ml) salt
1
⁄4 teaspoon (1 ml)
cloves
1
1
⁄4 cups (295 ml)
low-fat milk
Pie Pastry for
One-Crust Pie (see
page 45)
Place pumpkin, brown sugar, eggs, cinnamon,
ginger, salt, and cloves in mixer bowl. Attach bowl
and flat beater to mixer. Turn to Speed 2 and mix
about 30 seconds. Stop and scrape bowl.
Continuing on Speed 2, slowly add milk and mix
about 11⁄2 minutes.
Follow procedure for One-crust Pie. Fill with
pumpkin mixture. Bake at 400°F (204°C) for 40 to
50 minutes, or until knife inserted near centre
comes out clean.
Yield: 8 servings.
Per serving (filling and crust): About 280 cal,
6 g pro, 41 g carb, 11 g fat, 87 mg chol,
325 mg sod.
Cookies and Cream Sundae Pie
1 pie crust (9-inch
[23-cm]) baked and
cooled completely
(see page 45)
3 cups (710 ml)
(1
1
⁄2 pints) light
cherry nut ice cream
1 cup (235 ml) (10)
reduced-fat cream
filled chocolate
wafer cookies, cut
up
1 cup (235 ml)
prepared hot fudge
topping, warmed
slightly
4 cups (945 ml) (1
quart) light French
silk chocolate or
chocolate ice cream
Place cherry nut ice cream and half the cookies
(1⁄2 cup [120 ml]) in mixer bowl. Attach bowl and
flat beater to mixer. Turn to Speed 2 and mix about
20 seconds. Spoon quickly into pie crust. Top evenly
with 3⁄4 cup (175 ml) hot fudge topping. Freeze at
least 1 hour.
Place French silk chocolate ice cream in mixer bowl
with remaining 1⁄2 cup (120 ml) cookies. Turn to
Speed 2 and mix about 20 seconds. Spoon into pie
crust. Drizzle with remaining 1⁄4 cup (60 ml) hot
fudge topping. Freeze at least 4 hours.
Yield: 8 servings.
Per serving: About 553 cal, 10 g pro, 91 g carb,
16 g fat, 10 mg chol, 445 mg sod.
Page 50

48
Double Chocolate Mousse
with Raspberry Sauce
Mousse
6 oz. (170 ml)
bittersweet
chocolate, chopped
in
3
⁄4-inch (1.9-cm)
chunks
6 oz. (170 ml) white
chocolate, chopped
in
3
⁄4-inch (2-cm)
chunks
2 cups (475 ml)
whipping cream,
divided
Raspberry Sauce
1 package (14-16 oz.
[395-455 g]) frozen
unsweetened
raspberries, thawed
1
⁄4 cup (60 ml) water
1
⁄4
cup (60 ml) sugar
1tablespoon (15 ml)
cornstarch
To make Mousse, place bittersweet chocolate in
one 3- to 4-cup (710 to 945 ml) microwave-safe
bowl. Place white chocolate in a second microwavesafe bowl. Cover each with waxed paper. Place one
bowl at a time into microwave oven and heat on
HIGH for 11⁄2 minutes. Stop and stir. If chocolate is
not melted, repeat process for 30 seconds at a time,
or until melted. Stop and stir.
Heat cream in a heavy saucepan over medium heat
until very hot, but do not boil. Remove from heat.
Pour 1 cup (235 ml) of cream into each of the
chocolate bowls. Stir each until completely mixed.
Cover bowls and refrigerate about 2 hours.
Pour white chocolate mixture into mixer bowl.
Attach bowl and wire whip to mixer. Gradually turn
to Speed 6 and beat 4 to 41⁄
2 minutes, or until soft
peaks form. Spoon about
1
⁄3 cup (80 ml) mixture
into each of 6 stemmed dessert dishes. Set aside.
Pour bittersweet chocolate mixture into mixer bowl.
Gradually turn to Speed 6, and beat about 3 minutes,
or until soft peaks form. Spoon about 1⁄3 cup (80 ml)
mixture over white chocolate layer. Cover dishes with
plastic wrap or foil. Refrigerate 8 hours, or overnight.
To make Raspberry Sauce, place raspberries in
blender container. Cover and blend until smooth.
Pour mixture into a wire mesh strainer over a small
saucepan; press with back of spoon to squeeze out
liquid. Discard seeds and pulp in strainer.
Place remaining ingredients in saucepan. Cook over
medium heat, stirring constantly, until thickened
and bubbly. Remove from heat and cool. Store
sauce in covered container in refrigerator. Stir
before using.
Spoon Raspberry Sauce over chocolate in dessert
dishes before serving.
Yield: 6 servings (2⁄3 cup [160 ml]) mousse and
1
⁄4 cup [60 ml] raspberry sauce per serving).
Per serving: About 664 cal, 6 g pro, 53 g carb,
48 g fat, 115 mg chol, 57 mg sod.
Page 51

49
Raspberry Filled
Almond Meringue Dessert
Meringue
2 cups (475 ml)
toasted slivered
almonds, finely
chopped
8 egg whites, room
temperature
1 tablespoon (15ml)
vanilla
1 teaspoon (5 ml)
white vinegar
2 cups (475 ml)
powdered sugar
Filling
2 cups (475 ml) frozen
raspberries
(from 16 oz.
[455 g] bag)
1
⁄2 cup (120 ml)
granulated sugar
2 tablespoons
(30 ml) cornstarch
1
⁄
4 cup (60 ml) water or
orange juice
1 cup (235 ml)
whipping cream
3 tablespoons
(45 ml) powdered
sugar
To make Meringue, place egg whites in mixer
bowl. Attach bowl and wire whip to mixer. Turn to
Speed 8 and whip about 11⁄2 minutes, or until
foamy. Continuing on Speed 8, add vanilla and
vinegar. Whip about 5 seconds. Add powdered
sugar. Turn to Speed 4 and beat about 5 seconds.
Stop and scrape bowl. Turn to Speed 8 and whip
about 21⁄2 minutes, or until stiff but not dry. Stop
and scrape bowl. Add nuts. Turn to STIR and mix
about 10 seconds, or until well blended.
Divide egg white mixture equally between two
9-inch (23-cm) round baking pans lined with
waxed paper cut to fit the pan bottoms, greased,
and floured. Bake at 350°F (177°C) for 25 to 35
minutes, or until golden brown. Cool in pans about
15 minutes. Remove from pans and cool
completely on wire racks.
To make Filling, place raspberries, granulated
sugar, cornstarch, and water in medium saucepan.
Cook and stir over medium heat until bubbly. Cook
about 1 minute longer, or until thick and
translucent, stirring constantly. Remove from heat.
Strain seeds if desired. Cool completely.
Place whipping cream and powdered sugar in mixer
bowl. Attach bowl and wire whip to mixer. Gradually
turn to Speed 8 and whip about 11⁄2 minutes, or until
cream holds soft peaks. Stop mixer. Add cooled
raspberry mixture. Turn to Speed 8 and whip about
15 seconds, or until thick and blended.
Place 1 meringue layer on serving plate. Top with
half the filling. Top with remaining meringue layer
and remaining filling. Freeze or refrigerate until
serving. Garnish with fresh raspberries or almonds,
if desired.
Yield: 8 servings.
Tip: To toast almonds, place in baking pan and
bake at 375°F (191°C) for 6 to 8 minutes.
Per serving: About 528 cal, 11 g pro, 58 g carb,
28 g fat, 41 mg chol, 71 mg sod.
Page 52

50
YEAST BREADS AND QUICK BREADS
“Rapid Mix” describes a bread baking
method that calls for dry yeast to be
mixed with other dry ingredients
before liquid is added. In contrast,
the traditional method is to dissolve
yeast in warm water.
1. Place all dry ingredients including
yeast into bowl, except last 1 to
2 cups (235 ml to 475 ml) flour.
2. Attach bowl and dough hook.
Turn to Speed 2 and mix about
15 seconds, or until ingredients
are combined.
3. Continuing on Speed 2, gradually
add liquid ingredients to flour
mixture and mix 1 to 2 minutes
longer. See Illustration A.
NOTE: If liquid ingredients are added
too quickly, they will form a pool
around the dough hook and slow
down mixing process.
4. Continuing on Speed 2, gently add
remaining flour, 1⁄2 cup (120 ml) at
a time. See Illustration B. Mix until
dough clings to hook and cleans
sides of bowl, about 2 minutes.
5. When dough clings to hook,
knead on Speed 2 for 2 minutes,
or until dough is smooth and
elastic. See Illustration C.
6. Tilt mixer head back and remove
dough from hook. Follow
directions in recipe for rising,
shaping and baking.
When using the traditional method to
prepare a favorite recipe, dissolve
yeast in warm water in warmed bowl.
Add remaining liquids and dry
ingredients, except last 1 to 2 cups
(235 ml to 475 ml) flour. Turn to
Speed 2 and mix about 1 minute, or
until ingredients are thoroughly mixed.
Proceed with Steps 4 through 6.
Both methods work equally well for
bread preparation. However, the
“Rapid Mix” method may be a bit
faster and easier for new bread
bakers. It is slightly more temperature
tolerant because the yeast is mixed
with dry ingredients rather than with
warm liquid.
General Instructions
For Making And Kneading Yeast Dough
with the Rapid Mix Method
ILLUSTRATION A
ILLUSTRATION B
ILLUSTRATION C
1
0
4
6
8
1
0
6
8
1
0
4
6
8
Page 53

51
Making bread with a mixer is quite
different from making bread by hand.
Therefore, it will take some practice
before you are completely
comfortable with the new process.
For your convenience, we offer these
tips to help you become accustomed
to bread making the KitchenAid
®
brand way.
• Start out with an easy recipe, like
Basic White Bread, page 53, until
you are familiar with using the
dough hook.
• ALWAYS use the dough hook to
mix and knead yeast doughs.
• Use Speed 2 to mix or knead
yeast doughs. Use of any other
speed creates high potential for
unit failure.
• NEVER use recipes calling for more
than 10 cups (2.4 l) all-purpose
flour or 6 cups (1.5 l) whole wheat
flour when making dough with a
5 quart (4.73 l) mixer.
• Use a candy or other kitchen
thermometer to assure that liquids
are at temperature specified in the
recipe. Liquids at higher
temperature can kill yeast, while
liquids at lower temperatures will
retard yeast growth.
• Warm all ingredients to room
temperature to insure proper rising
of dough. If yeast is to be dissolved
in bowl, always warm bowl first by
rinsing with warm water to prevent
cooling of liquids.
• Allow bread to rise in a warm place,
80°F to 85°F (27°C to 30°C), free
from draft, unless otherwise
specified in recipe.
• Here are some alternative rising
methods to use: (1) The bowl
containing the dough can be placed
on a wire rack over a pan of hot
water. (2) The bowl can be placed
on the top rack of an unheated
oven; put a pan of hot water on the
rack below. (3) Pre-warm the oven
by setting at 400°F (204°C) for 1
minute; then turn it off; place the
bowl on the centre rack of the oven
and close the door.
Cover bowl with waxed paper, if
desired. Always cover with towel to
retain warmth in the bowl and
protect the dough from drafts.
• Recipe rising times may vary due to
temperature and humidity in your
kitchen. Dough has doubled in bulk
when indentation remains after tips
of fingers are pressed lightly and
quickly into dough.
• Most bread recipes give a range for
the amount of flour to be used.
Enough flour has been added when
the dough clings to the hook and
cleans sides of bowl. If dough is
sticky or humidity is high, slowly
add more flour, about 1⁄2 cup
(120 ml) at a time but NEVER
exceed recommended flour
capacity. Knead after each addition
until flour is completely worked into
dough. If too much flour is added,
a dry loaf will result.
• Some types of dough, especially
those made with whole grain
flours, may not form a ball on the
hook. However, as long as the hook
comes in contact with the dough,
kneading will be accomplished.
Continued on next page.
Bread Making Tips
Page 54

52
Bread Making Tips
• Some large recipes and soft doughs
may occasionally climb over the
collar of the hook. This usually
indicates that the dough is sticky
and more flour should be added.
The sooner all the flour is added,
the less likely the dough will climb
the hook. For such recipes, try
starting with all but the last cup
(235 ml) of flour in the initial mixing
process. Then add the remaining
flour as quickly as possible.
• When done, yeast breads and rolls
should be deep golden brown in
colour. Other tests for doneness of
breads are: Bread pulls away from
the sides of pan, and tapping on
the top of the loaf produces a
hollow sound. Turn loaves and rolls
onto racks immediately after baking
to prevent sogginess.
Shaping A Loaf
Divide dough in half. On lightly
floured surface, roll each half into a
rectangle, approximately 9x14 inches
(23x36 cm). A rolling pin will smooth
dough and remove gas bubbles.
Starting at a short end, roll dough
tightly. Pinch dough to seal seam.
Pinch ends and turn under. Place,
seam side down, in loaf pan.
Follow directions in recipe for rising
and baking.
Page 55

53
Basic White Bread
1
⁄2 cup (120 ml) low-fat
milk
3 tablespoons (45 ml)
sugar
2 teaspoons (10 ml)
salt
3 tablespoons (45 ml)
butter or margarine
2 packages active dry
yeast
1
1
⁄2 cups (355 ml) warm
water (105°F to
115°F [40°C to
46°C])
5-6 cups (1.25-1.5 l)
all-purpose flour
Place milk, sugar, salt, and butter in small saucepan.
Heat over low heat until butter melts and sugar
dissolves. Cool to lukewarm.
Dissolve yeast in warm water in warmed mixer bowl.
Add lukewarm milk mixture and 41⁄2 cups (1 l) flour.
Attach bowl and dough hook to mixer. Turn to
Speed 2 and mix about 1 minute.
Continuing on Speed 2, add remaining flour, 1⁄2
cup
(120 ml) at a time, and mix about 1
1
⁄2 minutes, or
until dough starts to clean sides of bowl. Knead on
Speed 2 about 2 minutes longer, or until dough is
smooth and elastic. Dough will be slightly sticky to
the touch.
Place dough in greased bowl, turning to grease top.
Cover. Let rise in warm place, free from draft, about
1 hour, or until doubled in bulk.
Punch dough down and divide in half. Shape each
half into a loaf, as directed on page 52, and place
in greased 81⁄2x41⁄2x21⁄2-inch (21x12x6-cm) baking
pans. Cover. Let rise in warm place, free from draft,
about 1 hour, or until doubled in bulk.
Bake at 400°F (204°C) for 30 minutes, or until
golden brown. Remove from pans immediately and
cool on wire racks.
Yield: 32 servings (16 slices per loaf).
Per serving: About 95 cal, 3 g pro, 18 g carb,
1 g fat, 0 mg chol, 148 mg sod.
Variations continued on next page.
Page 56

54
Basic White Bread CONTINUED
VARIATIONS
Cinnamon Bread
Prepare dough, divide, and roll out each half to a
rectangle, as directed on page 52. Mix together
1
⁄2 cup (120 ml) sugar and 2 teaspoons (10 ml)
cinnamon in small bowl. Spread each rectangle with
1 tablespoon (15 ml) softened butter or margarine.
Sprinkle with half of sugar mixture. Finish rolling and
shaping loaves. Place in well-greased 81⁄2x41⁄2x21⁄2-inch
(21x12x6-cm) baking pans. Cover. Let rise in warm
place, free from draft, about 1 hour, or until
doubled in bulk. If desired, brush tops with beaten
egg white. Bake at 375°F (191°C) for 40 to 45
minutes, or until golden brown. Remove from pans
immediately and cool on wire racks.
Yield: 32 servings (16 slices per loaf).
Per serving: About 111 cal, 3 g pro, 21 g carb,
2 g fat, 0 mg chol, 152 mg sod.
Sixty-Minute Rolls
Increase yeast to 3 packages and sugar to 1⁄4 cup
(60 ml). Mix and knead dough as directed for Basic
White Bread on page 53. Place in greased bowl,
turning to grease top. Cover. Let rise in warm place,
free from draft, about 15 minutes. Turn dough
onto lightly floured surface. Shape as desired (see
following suggestions). Cover. Let rise in slightly
warm oven (90°F [32°C]) about 15 minutes. Bake at
425°F (218°C) for 12 minutes, or until golden
brown. Remove from pans immediately and cool on
wire racks.
Curlicues: Divide dough in half and roll each half
to 12x9-inch (30x22-cm) rectangle. Cut 12 equal
strips about 1 inch (2.5 cm) wide. Roll each strip
tightly to form a coil, tucking ends underneath.
Place on greased baking sheets about 2 inches
(5 cm) apart.
Cloverleafs: Divide dough into 24 equal pieces.
Form each piece into a ball and place in greased
muffin pan. With scissors, cut each ball in half,
then quarters.
Yield: 24 servings (1 roll per serving).
Per serving: About 130 cal, 4 g pro, 25 g carb,
2 g fat, 0 mg chol, 198 mg sod.
Page 57

55
Whole Grain Wheat Bread
1
⁄3 cup (80 ml) plus
1 tablespoon
(15 ml) brown sugar
2 cups (475 ml) warm
water (105°F to
115°F [40°C to
46°C])
2 packages active dry
yeast
5-6 cups (1.2 to 1.5 l)
whole wheat flour
3
⁄4 cup (175 ml)
powdered milk
2 teaspoons (10 ml)
salt
1
⁄3 cup (80 ml) oil
Dissolve 1 tablespoon (15 ml) brown sugar in warm
water in small bowl. Add yeast and let mixture stand.
Place 4 cups (1 l) flour, powdered milk, 1⁄3 cup
(80 ml) brown sugar, and salt in mixer bowl. Attach
bowl and dough hook to mixer. Turn to Speed 2
and mix about 15 seconds. Continuing on Speed 2,
gradually add yeast mixture and oil to flour mixture
and mix about 11⁄2 minutes longer. Stop and scrape
bowl, if necessary.
Continuing on Speed 2, add remaining flour, 1⁄2 cup
(120 ml) at a time, and mix about 2 minutes, or
until dough starts to clean sides of bowl. Knead on
Speed 2 about 2 minutes longer.
NOTE: Dough may not form a ball on hook.
However, as long as hook comes in contact with
dough, kneading will be accomplished. Do not add
more than the maximum amount of flour specified
or a dry loaf will result.
Place dough in greased bowl, turning to grease top.
Cover. Let rise in warm place, free from draft, about
1 hour, or until doubled in bulk.
Punch dough down and divide in half. Shape each
half into a loaf as directed on page 52. Place in
greased 81⁄
2x4
1
⁄
2x2
1
⁄
2-inch (21x12x6-cm) baking pan.
Cover. Let rise in warm place, free from draft, about
1 hour, or until doubled in bulk.
Bake at 400°F (204°C) for 15 minutes. Reduce oven
temperature to 350°F (177°C) and bake 20 to 30
minutes longer. Remove from pans immediately and
cool on wire racks.
Yield: 32 servings (16 slices per loaf).
Per serving: About 112 cal, 4 g pro, 19 g carb,
3 g fat, 2 mg chol, 146 mg sod.
Page 58

56
French Bread
2 packages active dry
yeast
2
1
⁄2
cups (590 ml) warm
water (105°F to
115°F [40°C to
46°C])
1tablespoon (15 ml)
salt
1tablespoon (15 ml)
butter or margarine,
melted
7 cups (1.66 l)
all-purpose flour
2 tablespoons (10 ml)
cornmeal
1 egg white
1tablespoon (15 ml)
cold water
Dissolve yeast in warm water in warmed mixer
bowl. Add salt, butter, and flour. Attach bowl and
dough hook to mixer. Turn to Speed 2 and mix
about 1 minute, or until well blended. Knead on
Speed 2 about 2 minutes longer. Dough will
be sticky.
Place dough in greased bowl, turning to grease top.
Cover. Let rise in warm place, free from draft, about
1 hour, or until doubled in bulk.
Punch dough down and divide in half. Roll each
half into 12x15-inch (30x37-cm) rectangle. Roll
dough tightly, from longest side, tapering ends if
desired. Place loaves on greased baking sheets that
have been dusted with cornmeal. Cover. Let rise in
warm place, free from draft, about 1 hour, or until
doubled in bulk.
With sharp knife, make 4 diagonal cuts on top of
each loaf. Bake at 450°F (232°C) for 25 minutes.
Remove from oven. Beat egg white and water
together with a fork. Brush each loaf with egg
mixture. Return to oven and bake 5 to 10 minutes
longer. Remove from baking sheets immediately
and cool on wire racks.
Yield: 30 servings (15 slices per loaf).
Per serving: About 114 cal, 3 g pro, 23 g carb,
1 g fat, 0 mg chol, 221 mg sod.
Page 59

57
Honey Oatmeal Bread
11⁄2 cups (355 ml) water
1
⁄2 cup (120 ml) honey
1
⁄3 cup (80 ml) butter or
margarine
5
1
⁄2-61⁄2 cups (1.3-1.54 l) all-
purpose flour
1 cup (235 ml) quick
cooking oats
2 teaspoons (10 ml)
salt
2 packages active dry
yeast
2 eggs
1 egg white
1tablespoon (15 ml)
water
Oatmeal
Place water, honey, and butter in small saucepan.
Heat over low heat until mixture is very warm
(120°F to 130°F [48°C to 54°C]).
First place oats, then 5 cups (1.20 l) flour, salt, and
yeast in mixer bowl. Attach bowl and dough hook to
mixer. Turn to Speed 2 and mix about 15 seconds.
Continuing on Speed 2, gradually add warm mixture
to flour mixture and mix about 1 minute. Add eggs
and mix about 1 minute longer.
Continuing on Speed 2, add remaining flour, 1⁄2 cup
(120 ml) at a time, and mix about 2 minutes, or
until dough starts to clean sides of bowl. Knead on
Speed 2 about 2 minutes longer.
Place dough in greased bowl, turning to grease top.
Cover. Let rise in warm place, free from draft, about
1 hour, or until doubled in bulk.
Punch dough down and divide in half. Shape each
half into a loaf as directed on page 52. Place in
greased 81⁄2x41⁄2x21⁄2-inch (21x12x6-cm) baking pans.
Cover. Let rise in warm place, free from draft, about
1 hour, or until doubled in bulk.
Beat egg white and water together with a fork.
Brush tops of loaves with mixture. Sprinkle with
oatmeal. Bake at 375°F (191°C) for 30 to 40
minutes. Remove from pans immediately and cool
on wire racks.
Yield: 32 servings (16 slices per loaf).
Per serving: About 134 cal, 4 g pro, 24 g carb,
3 g fat, 13 mg chol, 162 mg sod.
Page 60

58
Light Rye Bread
1
⁄4 cup (60 ml) honey
1
⁄4 cup (60 ml) light
molasses
2 teaspoons (10 ml)
salt
2 tablespoons (30 ml)
butter or margarine
2 tablespoons (30 ml)
caraway seed
1 cup (235 ml) boiling
water
2 packages active dry
yeast
3
⁄4 cup (175 ml) warm
water (105°F to
115°F [40°C to
46°C])
2 cups (475 ml) rye
flour
3
1
⁄2-4 cups (830 ml-
945 ml)
all-purpose flour
Place honey, molasses, salt, butter, caraway seed,
and boiling water in small bowl. Stir until honey
dissolves. Cool to lukewarm.
Dissolve yeast in warm water in warmed mixer
bowl. Add lukewarm honey mixture, rye flour, and
1 cup (235 ml) all-purpose flour. Attach bowl and
dough hook to mixer. Turn to Speed 2 and mix
about 1 minute, or until well mixed. Stop and
scrape bowl if necessary.
Continuing on Speed 2, add remaining all-purpose
flour, 1⁄2 cup (120 ml) at a time, and mix about
2 minutes, or until dough starts to clean sides of
bowl. Knead on Speed 2 about 2 minutes longer.
Place dough in greased bowl, turning to grease top.
Cover. Let rise in warm place, free from draft, about
1 hour, or until doubled in bulk.
Punch dough down and divide in half. Shape each
half into a round loaf. Place on two greased baking
sheets. Cover. Let rise in warm place, free from
draft, 45 to 60 minutes, or until doubled in bulk.
Bake at 350°F (177°C) for 30 to 45 minutes. Cover
loaves with aluminum foil for last 15 minutes if tops
brown too quickly. Remove from baking sheets
immediately and cool on wire racks.
Yield: 32 servings (16 slices per loaf).
Per serving: About 96 cal, 2 g pro, 20 g carb,
1 g fat, 0 mg chol, 143 mg sod.
Page 61

59
Dill Batter Bread
2 packages active dry
yeast
1
⁄2
cup (120 ml) warm
water (105°F to
115°F [40°C to
46°C])
4 tablespoons (60 ml)
honey, divided
2 cups (475 ml) large
curd cottage cheese
2 tablespoons (30 ml)
grated fresh onion
4 tablespoons (60 ml)
butter or margarine,
softened
3 tablespoons (45 ml)
dill seed
3 teaspoons (15 ml)
salt
1
⁄2 teaspoon (2 ml)
baking soda
2 eggs
1 cup (235 ml) whole
wheat flour
3-3
1
⁄
2 cups (710-830 ml)
all-purpose flour
Dissolve yeast in warm water in warmed mixer
bowl. Add 1 tablespoon (15 ml) honey and let
stand 5 minutes.
Add cottage cheese, remaining 3 tablespoons
(45 ml) honey, onion, butter, dill seed, salt, and
soda. Attach bowl and flat beater to mixer. Turn to
Stir Speed and mix about 30 seconds. Add eggs.
Continuing on STIR Speed, mix about 15 seconds.
Add whole wheat flour and 2 cups (475 ml)
all-purpose flour. Turn to Speed 2 and mix about
2 minutes, or until combined. Continuing on
Speed 2, add remaining flour, a little at a time, and
mix until dough forms a stiff batter. Stop and
scrape bowl, if necessary. Continuing on Speed 2,
mix about 2 minutes longer.
Cover. Let rise in warm place, free from draft, about
1 hour, or until doubled in bulk.
Stir dough down. Place in two well-greased
81⁄2x41⁄2x21⁄2-inch (21x12x6-cm) baking pans or two
well-greased 11⁄
2- to 2-quart (1.4 to 1.8 l) casseroles.
Cover. Let rise in warm place, free from draft, about
45 minutes, or until doubled in bulk.
Bake at 350°F (177°C) for 40 to 50 minutes. Remove
from pans immediately and cool on wire racks.
Yield: 32 servings (16 slices per loaf).
Per serving: About 98 cal, 4 g pro, 15 g carb,
3 g fat, 15 mg chol, 298 mg sod.
Page 62

60
Vegetable Cheese Bread
2 packages active dry
yeast
1 cup (235 ml) warm
water (105°F to
115°F [40°C to
46°C])
2 cups (475 ml) whole
wheat flour
3-3
1
⁄2 cups (710-830 ml)
all-purpose flour
2 tablespoons (30 ml)
sugar
2 teaspoons (10 ml)
salt
2 tablespoons (25 ml)
softened butter or
margarine
1 cup (235 ml) warm
low-fat milk (105°F
to 115°F [40°C to
46°C])
1
⁄4 cup (60 ml) chopped
sun-dried tomatoes
2 teaspoons (10 ml)
instant minced onion
2 teaspoons (10 ml)
dried parsley leaves
1
⁄
2 cup (120 ml)
shredded sharp
Cheddar cheese
Dissolve yeast in warm water in small bowl.
Set aside.
Combine whole wheat flour, 2 cups (475 ml)
all-purpose flour, sugar, and salt in mixer bowl.
Attach bowl and dough hook to mixer. Turn to
Speed 2 and mix about 30 seconds.
Continuing on Speed 2, gradually add yeast
mixture, softened butter, and warm milk to flour
mixture and mix about 11⁄2 minutes. Stop and scrape
bowl. Add tomatoes, onion, parsley, and cheese.
Turn to Speed 2 and mix about 30 seconds.
Continuing on Speed 2, add remaining flour, 1⁄2 cup
(120 ml) at a time and mix about 2 minutes, or
until dough starts to clean sides of bowl. Knead on
Speed 2 about 2 minutes longer.
Place dough in greased bowl, turning to grease top.
Cover. Let rise in warm place, free from draft, about
1 hour, or until doubled in bulk.
Punch dough down and divide in half. Shape each
half into a loaf as directed on page 52. Place in
well-greased 81⁄
2x4
1
⁄
2x2
1
⁄
2-inch (21x12x6-cm) baking
pans. Cover. Let rise in warm place, free from draft,
45 to 60 minutes, or until doubled in bulk.
Bake at 375°F (191°C) for 40 minutes. Remove from
pans immediately and cool on wire rack. (NOTE:
Loaves may need to be released by running a knife
around edges of pans.)
Yield: 32 servings (16 slices per loaf).
Per serving: About 99 cal, 3 g pro, 18 g carb,
2 g fat, 2 mg chol, 160 mg sod.
Page 63

61
Blueberry Oat Bread
2 cups (475 ml)
all-purpose flour
1 cup (235 ml) rolled
oats
1 cup (235 ml) sugar
1
1
⁄
2 teaspoons (7 ml)
baking powder
1
⁄2 teaspoon (2 ml)
baking soda
1
⁄4 teaspoon (1 ml) salt
1
⁄4 teaspoon (1 ml)
all spice
3
⁄4 cup (175 ml) low-fat
milk
1
⁄2 cup (120 ml) butter
or margarine, melted
1tablespoon (15 ml)
grated orange peel
2 eggs
1
1
⁄4 cups (295 ml) fresh
or frozen blueberries
(not thawed)
Combine dry ingredients in mixer bowl. Add milk,
butter, orange peel, and eggs. Attach bowl and flat
beater to mixer. Turn to STIR Speed and mix about
30 seconds. With spoon, gently stir in blueberries.
Spoon batter into 9x5x3-inch (23x13x7.5-cm)
baking pan that has been greased on the bottom
only. Bake at 350°F (177°C) for 55 to 65 minutes, or
until toothpick inserted in centre comes out clean.
Cool in pan 10 minutes. Remove from pan and cool
completely on wire rack.
Yield: 16 servings (16 slices per loaf).
Per serving: About 196 cal, 3 g pro, 31 g carb,
7 g fat, 27 mg chol, 177 mg sod.
Baking Powder Biscuits
2 cups (475 ml)
all-purpose flour
4 teaspoons (20 ml)
baking powder
1
⁄
2 teaspoon (2 ml) salt
1
⁄3 cup (80 ml)
shortening
2
⁄
3 cup (160 ml) low-fat
milk
Melted butter or
margarine, if desired
Place flour, baking powder, salt, and shortening in
mixer bowl. Attach bowl and flat beater to mixer.
Turn to STIR Speed and mix about 1 minute. Stop
and scrape bowl. Add milk. Continuing on STIR
Speed, mix until dough starts to cling to beater.
Avoid overbeating.
Turn dough onto lightly floured surface and knead
about 20 seconds, or until smooth. Pat or roll to
1
⁄2-inch (1.25 cm) thickness. Cut with floured 2-inch
(5 cm) biscuit cutter.
Place on greased baking sheets and brush with
melted butter, if desired. Bake at 450°F (232°C) for
12 to 15 minutes. Serve immediately.
Yield: 12 servings (1 biscuit per serving).
Per serving: About 135 cal, 3 g pro, 17 g carb,
6 g fat, 1 mg chol, 183 mg sod.
Page 64

62
Basic Sweet Dough
3
⁄4 cup (175 ml) low-fat
milk
1
⁄2
cup (120 ml) sugar
1
1
⁄4 teaspoons (6 ml) salt
1
⁄2 cup (120 ml) butter
or margarine
2 packages active dry
yeast
1
⁄3 cup (80 ml) warm
water (105°F to
115°F [40°C to
46°C])
3 eggs, room
temperature
5
1
⁄2-61⁄2 cups (1.3-1.54 l) all-
purpose flour
Place milk, sugar, salt, and butter in small saucepan.
Heat over low heat until butter melts and sugar
dissolves. Cool to lukewarm.
Dissolve yeast in warm water in warmed mixer
bowl. Add lukewarm milk mixture, eggs, and
5 cups (1.3 l) flour. Attach bowl and dough hook to
mixer. Turn to Speed 2 and mix about 2 minutes.
Continuing on Speed 2, add remaining flour, 1⁄2 cup
(120 ml) at a time, and mix about 11⁄2 minutes, or
until dough starts to clean sides of bowl. Knead on
Speed 2 about 2 minutes longer.
Place dough in greased bowl, turning to grease top.
Cover. Let rise in warm place, free from draft, about
1 hour, or until doubled in bulk.
Punch dough down and shape as desired for rolls or
coffee cakes.
Page 65

63
Cinnamon Swirl Rounds
1 cup (235 ml) firmly
packed brown sugar
1 cup (235 ml) sugar
1
⁄2 cup (120 ml) butter
or margarine,
softened
1
⁄4
cup (60 ml)
all-purpose flour
1
1
⁄2 tablespoons
(20 ml) cinnamon
1
⁄2 cup (120 ml)
chopped walnuts or
pecans
1 recipe Basic Sweet
Dough (see page 62)
Place brown sugar, sugar, butter, flour, cinnamon,
and walnuts in mixer bowl. Attach bowl and flat
beater to mixer. Turn to Speed 2 and mix about
1 minute.
Turn dough onto lightly floured surface. Roll dough
to 10x24-inch (25x60-cm) rectangle. Spread sugarcinnamon mixture evenly on dough. Roll dough
tightly from long side to form 24-inch (60-cm) roll,
pinching seam together. Cut into 24 slices, 1-inch
(2.5-cm) each.
Place 12 rolls each in two greased 13x9x2-inch
(33x23x5-cm) baking pans. Cover. Let rise in warm
place, free from draft, 45 to 60 minutes, or until
doubled in bulk.
Bake at 350°F (177°C) for 20 to 25 minutes.
Remove from pans immediately. Spoon Caramel
Glaze over warm rolls.
Caramel Glaze
1
⁄
3 cup (80 ml)
evaporated milk
2 tablespoons (30 ml)
brown sugar
1
1
⁄2 cups (355 ml)
powdered sugar
1 teaspoon (5 ml)
vanilla
Place evaporated milk and brown sugar in small
saucepan. Cook over medium heat until mixture
begins to boil, stirring constantly.
Place milk mixture, powdered sugar, and vanilla in
mixer bowl. Attach bowl and flat beater to mixer.
Turn to Speed 4 and beat about 2 minutes, or
until creamy.
Yield: 24 servings (1 roll per serving)
Per serving: About 338 cal, 6 g pro, 57 g carb,
10 g fat, 28 mg chol, 219 mg sod.
Page 66

64
Rapid Mix Cool Rise White Bread
6-7 cups (1.5-1.66 l)
all-purpose flour
2 tablespoons (30 ml)
sugar
3
1
⁄2 teaspoons (17 ml)
salt
3 packages active dry
yeast
1
⁄4 cup (60 ml) butter or
margarine, softened
2 cups (475 ml) very
warm water (120°F
to 130°F [48°C to
54°C])
vegetable oil
Place 51⁄2 cups (1.3 l) flour, sugar, salt, yeast, and
butter in mixer bowl. Attach bowl and dough hook
to mixer. Turn to Speed 2 and mix about 20
seconds. Gradually add warm water and mix about
11⁄2 minutes longer.
Continuing on Speed 2, add remaining flour, 1⁄2 cup
(120 ml) at a time, and mix about 2 minutes, or
until dough starts to clean sides of bowl. Knead on
Speed 2 about 2 minutes longer.
Cover dough with plastic wrap and a towel. Let rest
20 minutes.
Divide dough in half. Shape each half into a loaf as
directed on page 52. Place in greased 81⁄2x41⁄2x21⁄2-inch
(21x12x6-cm) baking pans. Brush each loaf with
vegetable oil and cover loosely with plastic wrap.
Refrigerate 2 to 12 hours.
When ready to bake, uncover dough carefully. Let
stand at room temperature 10 minutes. Puncture
any gas bubbles which may have formed.
Bake at 400°F (204°C) for 35 to 40 minutes. Remove
from pans immediately and cool on wire racks.
Yield: 32 servings (16 slices per loaf).
Per serving: About 110 cal, 3 g pro, 21 g carb,
2 g fat, 0 mg chol, 251 mg sod.
Page 67

65
Crusty Pizza Dough
1 package active dry
yeast
1 cup (235 ml) warm
water (105°F to
115°F [40°C to
46°C])
1
⁄2 teaspoon (2 ml) salt
2 teaspoons (10 ml)
olive oil
2
1
⁄2-31⁄2 cups (590-830 ml)
all-purpose flour
1tablespoon (15 ml)
cornmeal
Dissolve yeast in warm water in warmed mixer
bowl. Add salt, olive oil, and 21⁄2 cups (590 ml)
flour. Attach bowl and dough hook to mixer. Turn
to Speed 2 and mix about 1 minute.
Continuing on Speed 2, add remaining flour, 1⁄2
cup
(120 ml) at a time, and mix about 1
1
⁄2 minutes, or
until dough starts to clean sides of bowl. Knead on
Speed 2 about 2 minutes longer.
Place dough in greased bowl, turning to grease top.
Cover. Let rise in warm place, free from draft, about
1 hour, or until doubled in bulk. Punch dough down.
Brush 14-inch (35 cm) pizza pan with oil. Sprinkle
with cornmeal. Press dough across bottom of pan,
forming a collar around edge to hold toppings.
Add toppings, as desired. Bake at 450°F (232°C) for
15 to 20 minutes.
Yield: 4 servings (1⁄4 pizza per serving).
Per serving: About 373 cal, 11 g pro, 74 g carb,
3 g fat, 0 mg chol, 271 mg sod.
Page 68

66
Herb Garlic Baguettes
1 package active dry
yeast
1 teaspoon (5 ml)
sugar
1
⁄4 cup (60 ml) warm
water (105°F to
115°F [40°C to
46°C])
3
1
⁄4
-3
1
⁄2
cups (780-830 ml)
all-purpose flour
1tablespoon (15 ml)
chopped fresh basil
or 1 teaspoon (5 ml)
dried basil
2 teaspoons (10 ml)
chopped fresh
oregano or
1
⁄2
teaspoon (2 ml)
dried leaf oregano
2 teaspoons (10 ml)
chopped fresh
thyme or
1
⁄2 teaspoon
(2 ml) dried leaf
thyme
1 teaspoon (5 ml)
fresh minced garlic
1 teaspoon (5 ml) salt
3
⁄4 cup (175 ml) cold
water
1 egg
1 teaspoon (5 ml)
water
Dissolve yeast and sugar in warm water.
Place 31⁄4
cups (780 ml) flour, basil, oregano, thyme,
garlic, and salt in bowl. Attach bowl and dough
hook to mixer. Turn to Speed 2 and mix 30 seconds.
Stop and scrape bowl.
Continuing on Speed 2, slowly add yeast mixture
and cold water, mixing about 30 seconds. If dough
is sticky, add remaining
1
⁄4 cup (60 ml) flour. Knead
on Speed 2 about 3 minutes, or until dough is
smooth and elastic.
Place dough in greased bowl, turning to grease top.
Cover. Let rise in warm place, free from draft, 11⁄2 to
2 hours, or until doubled in size.
On lightly floured surface, punch dough down
several times to remove all air bubbles. Divide
dough in half. Shape each half into a 12-inch
(30 cm) long loaf. Place each loaf on greased
baking sheet or in greased baguette pans. With
sharp knife, make 3 to 4 shallow diagonal slices in
top of dough. Beat egg and 1 teaspoon (5 ml)
water together with a fork. Brush each baguette
with egg mixture. Cover with greased plastic wrap.
Let rise in warm place, free from draft, about 1 to
11⁄
2 hours, or until doubled in bulk.
Brush top of each baguette again with egg mixture.
Bake at 450°F (232°C) for 15 to 18 minutes, or until
deep golden brown. Remove from pans and cool on
wire racks.
Yield: 36 servings (18 slices per loaf).
Tip: Freeze up to 2 weeks. Thaw at room
temperature. Wrap loosely with foil. Heat at 375°F
(191°C) for 10 to 15 minutes.
Per serving: About 45 cal, 1 g pro, 9 g carb, 0 g fat,
6 mg chol, 62 mg sod.
Page 69

67
Herb Pull-Apart Rolls
1 package active dry
yeast
1 cup (235 ml) warm
water (105°F to
115°F [40°C to
46°C])
1
⁄2 cup (120 ml) butter
or margarine, melted
3-3
1
⁄2
cups (710-830 ml)
all-purpose flour
2 tablespoons (30 ml)
sugar
1
1
⁄2 teaspoons (7 ml) salt
1
⁄4 teaspoon (1 ml)
thyme
1
⁄4 teaspoon (1 ml)
oregano
1
⁄4 teaspoon (1 ml) dill
Dissolve yeast in warm water in warmed mixer
bowl. Add 1⁄4 cup (60 ml) butter, 2 cups (475 ml)
flour, sugar, salt, thyme, oregano, and dill. Attach
bowl and dough hook to mixer. Turn to Speed 2
and mix for 1 minute, or until well blended.
Continuing on Speed 2, add remaining flour, 1⁄2 cup
(120 ml) at a time, and mix about 2 minutes, or
until dough starts to clean sides of bowl. Knead on
Speed 2 about 2 minutes longer, or until dough is
smooth and elastic.
Place dough in greased bowl, turning to grease top.
Cover. Let rise in warm place, free from draft, about
1 hour, or until doubled in bulk.
Punch dough down. Roll dough into a 12x9x1⁄4-inch
(30x23x.625-cm) rectangle. Brush with remaining
butter. Slice dough into six 11⁄2x12-inch (3.5x30-cm)
strips. Stack strips; then cut into twelve 1-inch
(2.5 cm) pieces. Place pieces, cut side up, in greased
muffin pans. Cover. Let rise in warm place, free from
draft, about 45 minutes, or until doubled in bulk.
Bake at 400°F (204°C) for 15 to 20 minutes. Remove
from pans immediately and cool on wire racks.
Yield: 12 servings (12 rolls).
Per serving: About 149 cal, 3 g pro, 17 g carb,
8 g fat, 20 mg chol, 292 mg sod.
Page 70

68
Banana Nut Bread
1
⁄3 cup (80 ml)
shortening
1
⁄2 cup (120 ml) sugar
2 eggs
1
3
⁄4
cups (410 ml)
all-purpose flour
1 teaspoon (5 ml)
baking powder
1
⁄2 teaspoon (2 ml)
baking soda
1
⁄2 teaspoon (2 ml) salt
1 cup (235 ml)
(2 medium) mashed
ripe banana
1
⁄2 cup (120 ml)
chopped walnuts or
pecans
Place shortening and sugar in mixer bowl. Attach
bowl and flat beater to mixer. Turn to Speed 6 and
beat about 1 minute. Stop and scrape bowl.
Continuing on Speed 6, beat about 1 minute
longer. Add eggs. Turn to Speed 4 and beat about
30 seconds. Stop and scrape bowl. Turn to Speed 6
and beat about 11⁄2 minutes.
Combine flour, baking powder, baking soda, and
salt in separate bowl. Add half of flour mixture
and half of mashed banana to mixer bowl. Turn to
STIR Speed and mix about 30 seconds. Add
remaining flour and banana. Continuing on STIR
Speed, mix about 30 seconds. Stop and scrape
bowl. Add walnuts. Continuing on STIR Speed, mix
about 15 seconds.
Pour mixture into greased and floured 9x5x3-inch
(23x13x7.5-cm) baking pan. Bake at 350°F (177°C)
for 40 to 45 minutes. Cool 5 minutes in pan.
Remove from pan and cool completely on wire rack.
Yield: 16 servings (16 slices).
Per serving: About 157 cal, 3 g pro, 21 g carb,
7 g fat, 27 mg chol, 131 mg sod.
Page 71

69
Lemony Raisin Bread
1 package active dry
yeast
1 cup (235 ml) warm
milk (105°F to 115°F
[40°C to 46°C])
4-4
1
⁄2 cups (945 ml to 1 l)
all-purpose flour
1 cup (235 ml) raisins
1
⁄4
cup (60 ml) sugar
1 teaspoon (5 ml) salt
1 teaspoon (5 ml)
grated lemon peel
1
⁄2 cup (120 ml)
vegetable oil
1
⁄2 cup (120 ml) butter
or margarine, melted
4 egg yolks, beaten
1 egg white
1tablespoon (15 ml)
water
Dissolve yeast in warm milk. Set aside.
Place 3 cups (710 ml) flour, raisins, sugar, salt, and
lemon peel in mixing bowl. Attach bowl and
dough hook to mixer. Turn to Speed 2 and mix
about 15 seconds.
Continuing on Speed 2, gradually add milk mixture,
oil, butter, and egg yolks to flour mixture and mix
about 1 minute.
Continuing on Speed 2, add remaining flour, 1⁄2 cup
(120 ml) at a time, until dough starts to clean sides
of bowl. Knead on Speed 2 about 2 minutes longer.
(NOTE: Dough may not form a ball on the hook.
However, as long as there is contact between
dough and hook, kneading will be accomplished.
Do not add more than the maximum amount of
flour specified or loaf will be dry.)
Place dough in a greased bowl, turning to grease
top. Cover. Let rise in warm place, free from draft,
about 1 hour, or until doubled in bulk.
Punch dough down and shape into a ball. Place in a
greased and floured 11⁄2-quart (1.4 l) baking dish.
Let rise in warm place, free from draft, about
1 hour, or until doubled in bulk.
Cut 2 slashes with a sharp knife in a cross pattern
on top of loaf. Beat egg white and water in small
bowl and brush lightly on top of loaf. Bake at 350°F
(177°C) for 55 to 60 minutes. Remove from baking
dish immediately and cool on wire rack.
Yield: 12 servings (12 slices per loaf).
Per serving: About 351 cal, 7 g pro, 47 g carb,
15 g fat, 83 mg chol, 253 mg sod.
VARIATION
Lemony Raisin Focaccia
Prepare dough as directed above. After shaping into
a ball, place dough on lightly greased baking sheet
and flatten to 2 inches (5 cm) thick. Let rise and
bake as directed above.
Page 72

70
Raisin Bran Muffins
1 cup (235 ml) boiling
water
1 cup (235 ml) wheat
bran
1 cup (235 ml) raisins
1 cup (235 ml) brown
sugar
1
⁄2
cup (120 ml) sugar
1
⁄2 cup (120 ml)
shortening
2 eggs
2 cups (475 ml)
buttermilk
1
1
⁄2 teaspoons (7 ml)
vanilla
2
1
⁄2 cups (590 ml)
all-purpose flour
2
1
⁄2 teaspoons (12 ml)
baking soda
1 teaspoon (5 ml)
baking powder
1
⁄2 teaspoon (2 ml) salt
2 cups (475 ml) bran
cereal flakes
Pour boiling water over bran in medium bowl. Add
raisins. Set aside.
Place brown sugar, sugar, and shortening in mixer
bowl. Attach bowl and flat beater to mixer. Turn to
Speed 4 and beat about 1 minute. Add eggs. Turn
to Speed 4 and beat about 30 seconds. Add
buttermilk and vanilla. Turn to STIR Speed and mix
about 30 seconds. Stop and scrape bowl.
Add flour, baking soda, baking powder, and salt.
Continuing on STIR Speed, mix about 30 seconds.
Stop and scrape bowl. Continuing on STIR Speed,
mix about 30 seconds longer. Gradually turn to
Speed 4 and beat about 1 minute. Add bran-raisin
mixture and bran cereal flakes. Turn to STIR Speed
and mix about 30 seconds, or until ingredients
are combined.
Spoon batter into greased or paper-lined muffin
pans. Bake at 400°F (204°C) for 20 minutes, or until
toothpick inserted in centre comes out clean.
Remove from pans immediately. Serve warm.
Yield: 24 servings (1 muffin per serving).
Per servings: About 185 cal, 3 g pro, 33 g carb,
5 g fat, 18 mg chol, 261 mg sod.
Tip: Batter can be refrigerated in tightly covered
container up to 1 week.
Page 73

71
Pepper Cheese Muffins
1 cup (235 ml)
buttermilk
1
⁄3 cup (80 ml) butter or
margarine, melted
2 eggs
2 cups (475 ml)
all-purpose flour
4 oz. (115 g) (1 cup
[235 ml]) shredded
pepper cheese
1tablespoon (15 ml)
sugar
2 teaspoons (10 ml)
baking powder
1 teaspoon (5 ml)
chopped parsley
1
⁄2 teaspoon (2 ml)
baking soda
1
⁄4 teaspoon (1 ml) salt
1
⁄4 teaspoon (1 ml)
coarsely ground
black pepper
Place buttermilk, butter, and eggs in bowl. Attach
bowl and flat beater to mixer. Turn to Speed 4 and
beat 1 minute. Stop and scrape bowl. Combine
flour, cheese, sugar, baking powder, parsley,
baking soda, salt, and pepper. Turn to STIR Speed
and add flour mixture, mixing just until moistened,
about 30 seconds. DO NOT OVERBEAT.
Fill greased regular muffin pans two-thirds full. Bake
at 400°F (204°C) for 15 to 20 minutes. Serve warm.
Yield: 12 servings (12 muffins).
Tip: Recipe will make 24 miniature muffins to serve
as an appetizer.
Per serving: About 90 cal, 3 g pro, 9 g carb, 5 g fat,
29 mg chol, 145 mg sod.
Page 74

72
Sour Cream Coffee Cake
1
⁄2 cup (120 ml) firmly
packed brown sugar
1
1
⁄2 teaspoons (7 ml)
cinnamon
1 cup (235 ml)
chopped walnuts or
pecans
3 cups (710 ml)
all-purpose flour
1
1
⁄2 cups (355 ml)
granulated sugar
3 teaspoons (15 ml)
baking powder
1 teaspoon (5 ml)
baking soda
1
⁄2 teaspoon (2 ml) salt
1 cup (235 ml) butter
or margarine,
softened
1 cup (235 ml)
reduced-fat sour
cream
1 teaspoon (5 ml)
vanilla
3 eggs
Combine brown sugar, cinnamon, and walnuts in
small bowl. Set aside.
Combine flour, granulated sugar, baking powder,
baking soda, and salt in mixer bowl. Add butter,
sour cream, and vanilla. Attach bowl and flat
beater to mixer. Turn to Speed 2 and mix about
45 seconds, or until ingredients are combined. Stop
and scrape bowl. Turn to Speed 4 and beat about
11⁄2 minutes. Stop and scrape bowl.
Turn to STIR Speed and add eggs, one at a time,
mixing about 15 seconds after each addition. Turn
to Speed 2 and mix about 30 seconds.
Spread half of batter in greased and floured
13x9x2-inch (33x23x5-cm) baking pan or 10-inch
(25-cm) tube pan. Sprinkle with half of cinnamonsugar mixture. Spread remaining batter in pan and
top with remaining cinnamon-sugar mixture. Bake
at 350°F (177°C) for 40 to 50 minutes (13x9x2-inch
[33x23x5-cm] pan) or 50 to 60 minutes (10-inch
[25-cm] tube pan). Serve warm.
Yield: 16 servings.
Per serving: About 362 cal, 6 g pro, 47 g carb,
17 g fat, 44 mg chol, 349 mg sod.
Page 75

73
Caramel Apple Kuchen
1 recipe Basic Sweet
Dough (see page 62)
2 cups (475 ml) firmly
packed brown sugar
6 tablespoons (90 ml)
all-purpose flour
2 teaspoons (10 ml)
cinnamon
6 tablespoons (90 ml)
butter or margarine,
softened
6-8 apples (8 cups [2 l]),
peeled and thinly
sliced
Divide dough in half. Press each half into greased
13x9x2-inch (33x23x5-cm) baking pan. Gently press
edges 1⁄2 inch (1 cm) up sides.
Cover. Let rise in warm place, free from draft, 45 to
60 minutes, or until doubled in bulk.
Meanwhile, place brown sugar, flour, cinnamon,
and butter in mixer bowl. Attach bowl and flat
beater to mixer. Turn to Speed 2 and mix about
1 minute.
Arrange apple slices over dough in each of two
pans. Sprinkle evenly with brown sugar mixture.
Bake at 350°F (177°C) for 35 to 45 minutes, or until
golden brown and apples are tender. Serve warm.
Yield: 24 servings (12 pieces per kuchen).
Per serving: About 301 cal, 5 g pro, 54 g carb,
8 g fat, 27 mg chol, 207 mg sod.
Crispy Waffles
2 cups (475 ml)
all-purpose flour
3 teaspoons (15 ml)
baking powder
2 tablespoons (30 ml)
sugar
1
⁄2 teaspoon (2 ml) salt
2 eggs, separated
1
1
⁄4 cups (295 ml)
low-fat milk
1
⁄4 cup (60 ml) butter or
margarine, melted
Combine flour, baking powder, sugar, and salt in
mixer bowl. Add egg yolks, milk, and butter. Attach
bowl and flat beater to mixer. Turn to Speed 4 and
mix about 30 seconds, or until ingredients are
combined. Stop and scrape bowl. Continuing on
Speed 4, mix about 15 seconds, or until smooth.
Pour mixture into another bowl. Clean mixer bowl.
Place egg whites in mixer bowl. Attach bowl and
wire whip to mixer. Turn to Speed 8 and whip until
whites are stiff but not dry. Gently fold egg whites
into flour mixture.
Spray waffle iron with no-stick cooking spray. Heat
waffle iron. Pour about 1⁄3 cup (80 ml) batter for
each waffle onto iron. Bake 3 to 5 minutes, or until
golden brown.
Yield: 6 servings (1 waffle per serving).
Per serving: About 287 cal, 8 g pro, 39 g carb,
10 g fat, 75 mg chol, 441 mg sod.
Page 76

74
Light and Fluffy Pancakes
4 eggs, separated
1 cup (235 ml) cottage
cheese
1
⁄3 cup (80 ml)
all-purpose flour
1
⁄4 teaspoon (1 ml) salt
Place egg whites in mixer bowl. Attach bowl and
wire whip to mixer. Turn to Speed 8 and beat 2 to
21⁄2 minutes, or until egg whites are stiff but not dry.
Place egg whites in another bowl.
Place yolks in mixer bowl. Turn to Speed 2 and mix
about 1 minute. Continuing on Speed 2, add
cottage cheese, flour, and salt. Mix about 1 minute.
Stop and scrape bowl. Remove bowl from mixer and
fold in beaten egg whites with a rubber spatula.
For each pancake, drop a heaping tablespoonful of
batter on hot, greased griddle. Cook pancakes 1 to
2 minutes, or until puffed and dry around edges.
Turn and cook 1 to 2 minutes longer, or until
golden brown on underside.
Yield: 6 servings (3, 3-inch [7.5 cm] pancakes
per serving).
Per serving: About 108 cal, 10 g pro, 7 g carb,
4 g fat, 147 mg chol, 272 mg sod.
Page 77

75
The keys to a lifetime of convenience
and flavour are available in three handy
collections.
Model 4FPPA
Includes a Slicer/Shredder (4RVSA),
Food Grinder (4FGA), and
Fruit/Vegetable Strainer Parts (4FVSP).
Stand Mixer Attachment Packs
Attachments – For More Information call 1-800-807-6777
Model 4KGSA
Includes the Food Grinder (4FGA),
Slicer/Shredder (4RVSA), and Pasta
Maker Plates (4SNPS).
Page 78

76
Sausage Stuffer
Custom
Model 4SSA
3
⁄
8" (9 mm) and
5
⁄
8" (15 mm) stuffing
tubes make Bratwurst, Kielbasa, Italian
or Polish Sausage and breakfast links.
For use with 4FGA.
Food Grinder
Model 4FGA
Grinds meat, firm fruits and vegetables,
and dry bread.
C
u
s
to
m
Attachments –
For More Information call 1-800-807-6777
Pasta Maker
Custom
Model 4SNFGA
5 plates make thin and thick spaghetti,
flat noodles, macaroni, and lasagna.
Comes with Food Grinder.
Page 79

77
Fruit/Vegetable Strainer
Model 4FVSFGA
Makes preparing jams, purées, sauces
and baby foods quick and easy. Comes
with Food Grinder.
C
u
s
to
m
Attachments – For More Information call 1-800-807-6777
Food Tray
®
Model 4FT
Holds large quantities of food for
quicker and easier juicing, puréeing
and grinding. For use with 4FGA.
Slicer/Shredder
C
u
s
to
m
Model 4RVSA
Includes 4 cones: thin and thick slicer,
fine and coarse shredder.
Page 80

78
Attachments – For More Information call 1-800-807-6777
Custom
Pasta Sheet Roller and Cutter Set
Model 4KPRA
Makes lasagna noodles, fettuccini and
linguine fini. 3 piece set includes Roller,
Fettuccine Cutter and Spaghetti Cutter.
Pasta Cutter Companion Set
Custom
Model 4KPCA
This all-metal, two cutter set will make
spectacular angel hair pasta or
lusciously thick egg noodles from your
fresh pasta sheets. Includes recipes and
cooking tips.
Ravioli Maker
Model 4KRAV
Create exquisite ravioli from your fresh
pasta sheets and filling. A special
hopper guides the filling while
precision rollers seal it into large
pockets. Includes filling scoop and
cleaning brush.
Custom
Page 81

79
Citrus Juicer
Custom
Model 4JE
Juices citrus fruits quickly and
thoroughly, strains out pulp.
Attachments – For More Information call 1-800-807-6777
Grain Mill
C
u
s
to
m
Model 4KGMA
Grinds low-moisture grains from very
fine to extra coarse textures.
Ice Cream Maker
Model 4KICA0WH
Enjoy up to 2 quarts (1.89 l) of
homemade ice cream, sorbet, and
other frozen desserts - without ice, salt,
or hand cranking! Includes freeze bowl,
drive assembly, dasher, and bowl
adapter ring.
Page 82

80
Pouring Shield
Model 4KN1PS
Minimizes splash-out when adding
ingredients.
Attachments – For More Information call 1-800-807-6777
Can Opener
Model 4CO
Opens cans quickly, leaves edges
smooth and snag-free.
Custom
Page 83

81
Page 84

BATTEUR SUR SOCLE
À TÊTE INCLINABLE
ACCOLADE
™
400
DIRECTIVES ET RECETTES
BIEN PENSÉ. BIEN FABRIQUÉ.
®
®
1 800 807-6777
Des questions ? Des commentaires ?
Appelez notre Centre d’interaction
aux consommateurs.
Site Web : KitchenAid.ca
Page 85

Carte d’enregistrement du produit
Avant d’utiliser votre batteur sur
socle, veuillez remplir la carte
d’enregistrement du produit jointe au
manuel « Directives et recettes » et
nous retourner celle-ci par la poste.
Cette carte nous permettrait de vous
contacter dans le cas peu probable
d’un avis de sécurité. Cette carte ne
confirme pas votre garantie.
Gardez une copie du reçu de caisse
indiquant la date d’achat de votre
batteur sur socle. Une preuve d’achat
est requise pour bénéficier du service
après-vente couvert par la garantie.
Veuillez inscrire les renseignements
suivants que vous pourrez conserver
dans vos dossiers personnels :
Numéro de modèle*___________________________________________________
Date d’achat _________________________________________________________
Nom du détaillant_____________________________________________________
Adresse______________________________________________________________
Téléphone ___________________________________________________________
* Se trouve sur la carte d’enregistrement du produit ou sous le socle.
®
Marque déposée / ™ Marque de commerce de KitchenAid, U.S.A.,
emploi licencié au Canada par KitchenAid Canada.
© 2005. Tous droits réservés.
1901 Minnesota Court, Mississauga ON L5N 3A7
(4604dZw405)
Page 86

1
Table des matières
Carte d’enregistrement du produit.............................Couverture avant intérieure
Alimentation électrique......................................................................................2
Consignes de sécurité importantes.....................................................................3
À propos de votre batteur
Caractéristiques du batteur sur socle à tête inclinable ........................................4
Assemblage du batteur à tête inclinable ............................................................5
Utilisation des accessoires KitchenAid®...............................................................7
Durée de mélange .............................................................................................7
Utilisation du batteur.........................................................................................7
Entretien et nettoyage .......................................................................................8
Dégagement entre le batteur et le bol...............................................................8
Guide de réglage de la vitesse ...........................................................................9
Conseils pour l’utilisation du batteur ...............................................................11
Blancs d’oeufs...........................................................................................12
Crème fouettée.........................................................................................12
Accessoires - Directives générales.....................................................................13
Garantie ..........................................................................................................14
Comment vous prévaloir du service après-vente couvert
par la garantie ..........................................................................................15
Comment vous prévaloir du service après-vente non couvert
par la garantie ..........................................................................................15
Dépannage......................................................................................................16
Hors-d’oeuvre, entrées et légumes...................................................................17
Gâteaux et glaçages ........................................................................................28
Biscuits, barres et friandises .............................................................................43
Tartes et desserts.............................................................................................55
Pains à la levure et pains éclairs .......................................................................62
Directives générales pour préparer et pétrir la pâte levée...........................62
Conseils pour la fabrication du pain..........................................................63
Accessoires KitchenAid
®
...................................................................................89
9709234
Page 87

2
Alimentation électrique
Volts : 120 c.a. uniquement. Hertz : 60
La puissance nominale de votre
batteur sur socle est imprimée sur la
plaque de numéro de série.
N’utilisez pas de rallonge. Si le cordon
d’alimentation est trop court,
demandez à un électricien qualifié ou
un technicien de service après-vente
d’installer une prise à proximité de
l’appareil.
Votre sécurité et celle des autres est très importante.
Nous donnons de nombreux messages de sécurité importants dans ce manuel
et sur votre appareil ménager. Assurez-vous de toujours lire tous les messages
de sécurité et de vous y conformer.
Voici le symbole d’alerte de sécurité.
Ce symbole d’alerte de sécurité vous signale les dangers
potentiels de décès et de blessures graves à vous et à d’autres.
Tous les messages de sécurité suivront le symbole d’alerte de
sécurité et le mot “DANGER” ou “AVERTISSEMENT”. Ces mots
signifient :
Risque possible de décès ou de
blessure grave si vous ne suivez
pas immédiatement
les instructions.
Risque possible de décès ou de
blessure grave si vous ne suivez
pas les instructions.
Tous les messages de sécurité vous diront quel est le danger potentiel et vous
disent comment réduire le risque de blessure et ce qui peut se produire en cas
de non-respect des instructions.
DANGER
AVERTISSEMENT
AVERTISSEMENT
Risque de choc électrique
Brancher sur une prise à 3
alvéoles reliée à la terre.
Ne pas enlever la broche de
liaison à la terre.
Ne pas utiliser un adaptateur.
Ne pas utiliser un câble de
rallonge.
Le non-respect de ces
instructions peut causer un
décès, un incendie ou un choc
électrique.
Page 88

3
CONSIGNES DE SÉCURITÉ
IMPORTANTES
Lors de l’utilisation d’appareils électriques, il est important d’observer en tout
temps certaines précautions élémentaires, notamment :
1. Veuillez lire toutes les directives.
2. N’immergez pas le batteur sur socle dans l’eau ni tout autre liquide pour
éviter les risques de choc électrique.
3. Une surveillance étroite s’impose lorsque cet appareil ou tout autre appareil
est utilisé par des enfants ou à proximité de ceux-ci.
4. Débranchez le batteur sur socle après l’usage, avant de mettre ou de retirer
des pièces et avant de le nettoyer.
5. Évitez de toucher les pièces en mouvement. Évitez que les mains, les
cheveux, les vêtements ainsi que les spatules et les autres ustensiles entrent
en contact avec le fouet pendant le fonctionnement de l’appareil pour
réduire le risque de blessures et(ou) de dommages au batteur sur socle.
6. Ne branchez aucun batteur sur socle qui présente un défaut de
fonctionnement, qui est tombé par terre ou qui a été endommagé de
quelque façon que ce soit ou dont le cordon d’alimentation est
endommagé. Retournez l’appareil au Centre de service après-vente autorisé
le plus proche pour le faire inspecter ou réparer, ou pour y faire effectuer
des réglages électriques ou mécaniques. Pour plus de précisions, appelez le
service après-vente KitchenAid au 1 800 807-6777.
7. L’utilisation d’accessoires non recommandés ou vendus par KitchenAid pose
des risques d’incendie, de choc électrique ou de blessures.
8. N’utilisez pas le batteur sur socle à l’extérieur.
9. Ne laissez pas le cordon d’alimentation pendre d’une table ou d’un
comptoir.
10. Enlevez le batteur plat, le fouet en métal et le crochet pétrisseur du batteur
sur socle avant de le nettoyer.
11. Ce produit est destiné uniquement à un usage domestique.
CONSERVEZ CES DIRECTIVES
Page 89

4
Caractéristiques du batteur
sur socle à tête inclinable
Tête du moteur
Sélecteur
de vitesse
Vis de réglage
de la hauteur
du batteur
Fouet en métal en
acier inoxydable
Crochet pétrisseur
Plaque de
verrouillage
du bol
Bol en acier
inoxydable de
4,73 L (5 pintes)
Batteur plat
Axe du batteur
Levier de
verrouillage de la
tête du moteur
(non illustré)
Bouton pour
accessoires
Moyeu pour
accessoires
(page 13)
Page 90

5
Assemblage du batteur à tête inclinable
Assemblage du bol
1. Tournez la commande de vitesse
en position « OFF » (arrêt).
2. Débranchez le batteur sur socle ou
coupez le courant.
3. Déverrouillez la tête du moteur.
4. Inclinez la tête du moteur vers
l’arrière et verrouillez-la.
5. Placez le bol sur la plaque de
verrouillage du bol.
6. Tournez le bol doucement vers
la droite.
7. Abaissez la tête du moteur et
verrouillez-la.
8. Branchez l’appareil sur une prise à
la terre à trois broches.
Retrait du bol
1. Tournez la commande de vitesse
en position « OFF » (arrêt).
2. Débranchez le batteur sur socle ou
coupez le courant.
3. Déverrouillez la tête du moteur.
4. Inclinez la tête du moteur vers
l’arrière et verrouillez-la.
5. Tournez le bol vers la gauche et
retirez-le.
6. Abaissez la tête du moteur et
verrouillez-la.
Assemblage du batteur plat, du
fouet en métal ou du crochet
pétrisseur
1. Tournez la commande de vitesse
en position « OFF » (arrêt).
2. Débranchez le batteur sur socle ou
coupez le courant.
3. Déverrouillez la tête du moteur.
4. Inclinez la tête du moteur vers
l’arrière et verrouillez-la.
5. Glissez le
batteur plat
sur l’axe du
batteur et
appuyez
vers le haut
le plus loin possible.
6. Fixez le batteur plat sur la goupille
de l’axe en le tournant vers la droite.
7. Déverrouillez la tête du moteur et
abaissez-la.
8. Verrouillez la tête du moteur et
branchez l’appareil sur une prise à
la terre à trois broches.
Retrait du batteur plat, du fouet
en métal ou du crochet pétrisseur
1. Tournez la commande de vitesse
en position « OFF » (arrêt).
2. Débranchez le batteur sur socle ou
coupez le courant.
3. Déverrouillez la tête du moteur.
4. Inclinez la tête du moteur vers
l’arrière et verrouillez-la.
5. Appuyez sur le batteur plat vers le
haut le plus loin possible et
tournez-le vers la gauche pour le
déverrouiller.
6. Retirez le batteur plat de l’axe
du batteur.
7. Déverrouillez la tête du moteur et
abaissez-la.
Verrouillage de la tête du moteur
1. Poussez le levier de verrouillage
vers l’arrière le plus loin possible.
2. Testez la solidité du verrouillage en
tentant d’élever ou d’abaisser la
tête du moteur.
Marche
Arrêt
Goupille de
blocage
0
1
8
6
4
2
Stir
t
e
s
e
R
O
ff/
O
s
t
r
a
p
g
n
i
v
o
m
e
r
f
o
g
n
i
t
r
e
s
n
i
e
r
o
f
e
b
g
u
l
p
n
U
:
N
O
I
T
U
A
C
Page 91

2. Débranchez le batteur sur socle ou
coupez le courant.
3. Soulevez l’avant de l’écran verseur
en l’éloignant du bord du bol et
tirez vers l’avant.
4. Retirez l’accessoire et le bol.
Utilisation de l’écran verseur
1. Pour des résultats optimaux, faites
tourner l’écran verseur de façon à
ce que la tête du moteur recouvre
l’intervalle en forme de « U » de
l’écran verseur. La goulotte
verseuse se trouvera à la droite du
moyeu pour accessoires alors que
vous ferez face au batteur sur socle.
2. Versez les ingrédients dans le bol
par la goulotte verseuse.
Utilisation de la commande
de vitesse
Branchez l’appareil sur une prise à la
terre à trois broches.
Pour éviter les éclaboussures, réglez le
sélecteur de vitesse au plus bas pour
faire démarrer l’appareil, puis
accélérez graduellement jusqu’à la
vitesse souhaitée. Voir le Guide de
réglage de la vitesse à la page 9.
Réenclenchement contre les
surcharges
Si le batteur sur socle s’arrête en
raison d’une surcharge, faites glisser
le sélecteur de vitesse en position
« OFF » (arrêt). Attendez quelques
minutes. Le batteur sur socle se
réenclenchera automatiquement.
Faites glisser le sélecteur de vitesse sur
la vitesse souhaitée et continuez à
mélanger. Si l’appareil ne redémarre
pas, voir la garantie du batteur sur
socle KitchenAid à la page 14.
REMARQUE : La tête du moteur
doit toujours être verrouillée lors de
l’utilisation du batteur sur socle et
lors de l’assemblage ou du retrait du
bol, du batteur plat, du fouet en
métal ou du crochet pétrisseur.
Lorsqu’il est en position de
verrouillage, il est possible que le
levier ne puisse être entièrement
redéployé. Ceci est normal.
Déverrouillage de la tête du
moteur
1. Tirez le levier de verrouillage vers
l’avant le plus loin possible. La tête
du moteur peut maintenant être
élevée ou abaissée.
Assemblage de l’écran verseur
1. Tournez la commande de vitesse
en position « OFF » (arrêt).
2. Débranchez le batteur sur socle ou
coupez le courant.
3. Fixez le bol ainsi que le batteur
plat, le crochet pétrisseur ou le
fouet en métal. Abaissez la tête du
moteur et verrouillez-la.
4. À l’avant du batteur sur socle,
faites glisser l’écran verseur sur le
bol jusqu’à ce que l’écran verseur
soit centré. Le rebord inférieur de
l’écran verseur doit s’emboîter à
l’intérieur du bol.
Retrait de l’écran verseur
1. Tournez la commande de vitesse
en position « OFF » (arrêt).
6
Assemblage du batteur à tête inclinable
Goulotte
verseuse
Page 92

7
Utilisation des accessoires KitchenAid
®
Batteur plat pour les mélanges ordinaires ou épais :
gâteaux biscuits anglais
glaçages crémeux pains éclairs
friandises pains de viande
biscuits purée de pommes de terre
pâte à tarte
Fouet en métal pour les mélanges exigeant l’incorporation d’air :
oeufs gâteaux éponge
blancs d’oeufs gâteaux des anges
crème épaisse mayonnaise
glaçages cuits certaines friandises
Crochet pétrisseur pour mélanger et pétrir la pâte levée :
pain brioches
pain mollet petits pains
pâte à pizza
Durée de mélange
Votre batteur sur socle KitchenAid
®
mélange plus rapidement et plus
efficacement que la plupart des autres
batteurs sur socle électriques.
Cependant, il faut rajuster la durée de
mélange pour la plupart des recettes
afin d’éviter le battage excessif. Pour
les gâteaux, par exemple, la durée du
fouettage peut être la moitié de celle
requise par d’autres batteurs sur socle.
Utilisation du batteur
REMARQUE : Ne raclez pas les parois
du bol pendant que le batteur sur
socle fonctionne.
Le bol et le batteur sont conçus pour
assurer un mélange efficace sans
racler fréquemment les parois du bol.
Il suffit généralement de les racler une
ou deux fois au cours du mélange, en
arrêtant d’abord l’appareil.
Le batteur sur socle peut devenir
chaud durant l’utilisation. Lors de la
préparation de mélanges épais
pendant une période prolongée, il se
peut que le dessus de l’appareil soit
inconfortable au toucher. Il s’agit d’un
phénomène normal.
AVERTISSEMENT
Risque de blessure
Débrancher le batteur avant de
toucher aux fouets.
Le non-respect de cette
instruction peut entraîner des
fractures d’os, des coupures
ou des bleus.
Page 93

8
Le bol, le batteur plat et le crochet
pétrisseur sont lavables au lavevaisselle automatique. Vous pouvez
aussi les laver soigneusement dans
l’eau chaude savonneuse en prenant
soin de bien les rincer avant de les
essuyer. Le fouet en métal doit être
lavé à la main et séché
immédiatement. Ne pas laver le fouet
en métal au lave-vaisselle.
REMARQUE : Assurez-vous de
toujours débrancher le batteur sur
socle avant de le nettoyer. Essuyez le
batteur sur socle avec un chiffon doux
humide. N’utilisez pas de nettoyants
domestiques ou commerciaux.
N’immergez pas le batteur dans l’eau.
Essuyez fréquemment l’axe du batteur
en éliminant les résidus qui risquent
de s’accumuler.
Entretien et nettoyage
Dégagement entre le batteur et le bol
Votre batteur sur socle est réglé à l’usine de façon à ce que le batteur plat soit
à ras du fond du bol sans le toucher. Si, pour l’une ou l’autre raison, le batteur
plat touche le fond du bol ou est trop éloigné du bol, vous pouvez facilement
rajuster le dégagement en procédant comme suit :
A
1. Tournez la commande de vitesse
en position « OFF » (arrêt).
2. Débranchez le batteur sur socle ou
coupez le courant.
3. Déverrouillez la tête du moteur.
4. Inclinez la tête du moteur vers
l’arrière et verrouillez-la.
5. Retirez le bol, le batteur plat, le
crochet pétrisseur ou le fouet en
métal s’ils sont fixés.
6. Tournez légèrement la vis (A) vers
la gauche pour élever le batteur
plat ou vers la droite pour abaisser
le batteur plat.
7. Fixez le batteur plat et le bol.
8. Déverrouillez la tête du moteur et
abaissez-la.
9. Le batteur plat doit être juste à
ras du fond du bol sans le
toucher. Si tel n’est pas le cas,
répétez les étapes 4 à 8.
REMARQUE : Si la vis est trop ajustée,
il est possible que le levier de
verrouillage du bol ne s’enclenche pas.
REMARQUE : Correctement réglé, le
batteur plat ne doit pas toucher le
fond ni les côtés du bol. Si le batteur
plat ou le fouet en métal est si près
du bol qu’il en touche le fond, le
revêtement du batteur plat ou du
fouet en métal risque de s’user.
AVERTISSEMENT
Risque de blessure
Débrancher le batteur avant de
toucher aux fouets.
Le non-respect de cette
instruction peut entraîner des
fractures d’os, des coupures
ou des bleus.
Page 94

9
Guide de réglage de la vitesse
Chaque vitesse est munie de la fonction Soft Start®grâce à laquelle le batteur
sur socle démarre automatiquement à une faible vitesse afin d’éviter les nuages
de farine et les éclaboussures, puis accélère rapidement jusqu’à la vitesse
souhaitée pour un rendement optimal.
Nombre de vitesses
Vitesse
Stir REMUER Pour remuer lentement, combiner, réduire en
purée et commencer toute préparation. Utilisez
cette vitesse pour ajouter de la farine et des
ingrédients secs à la pâte, des liquides aux
ingrédients secs et combiner des mélanges
épais. Utilisez cette vitesse avec l’accessoire
sorbetière.
2 MÉLANGER Pour mélanger lentement, réduire en purée,
LENTEMENT remuer plus rapidement. Utilisez cette vitesse
pour mélanger et pétrir la pâte levée, les pâtes
épaisses et les friandises, pour commencer à
réduire en purée les pommes de terre ou autres
légumes, incorporer le shortening à la farine,
mélanger les pâtes légères et éviter les
éclaboussures. Utilisez cette vitesse avec
l’accessoire ouvre-boîtes.
4 MÉLANGER, BATTRE Pour mélanger les pâtes semi-épaisses telles
que la pâte à biscuits. Utilisez cette vitesse pour
combiner le sucre et le shortening et pour
ajouter du sucre aux blancs d’oeufs pour les
meringues. Vitesse moyenne pour les mélanges
à gâteau. Utilisez cette vitesse avec le hachoir,
le disque éminceur / déchiqueteur et le tamis à
fruits et légumes.
6 BATTRE, CRÉMER Pour battre à vitesse moyenne (crémer) ou pour
fouetter. Utilisez cette vitesse pour finir de
mélanger les pâtes à gâteaux, à beignes et
autres. Vitesse rapide pour les mélanges à
gâteau. Utilisez cette vitesse avec l’accessoire
presse-agrumes.
Page 95

10
Guide de réglage de la vitesse
Nombre de vitesses
Vitesse
8 BATTRE RAPIDEMENT, Pour fouetter la crème, les blancs d’oeufs
FOUETTER et les glaçages cuits.
10 FOUETTER Pour fouetter les petites quantités de crème ou
RAPIDEMENT de blancs d’oeufs. Utilisez cette vitesse avec la
machine à pâtes et le moulin à grains.
REMARQUE : Ne maintient pas les vitesses
rapides en cas de mélanges épais, comme lors
de l’utilisation de la machine à pâtes ou du
moulin à grains.
REMARQUE : Le sélecteur de vitesse peut être réglé entre les vitesses indiquées
ci-dessus. Vous obtenez ainsi des vitesses 3, 5, 7 et 9 si un ajustement plus fin
est nécessaire. Veillez à ne pas dépasser la vitesse 2 lors de la préparation de la
pâte levée, afin d’éviter d’endommager le batteur sur socle.
Page 96

11
Conseils pour l’utilisation du batteur
Adaptation d’une recette
au batteur
Les directives de mélange des recettes
offertes dans ce manuel peuvent vous
aider à préparer vos recettes
préférées à l’aide de votre batteur sur
socle KitchenAid®. Recherchez les
recettes KitchenAid®semblables aux
vôtres et adaptez vos recettes en
fonction de leurs directives.
Par exemple, la méthode de
mélange rapide est idéale pour les
gâteaux simples tels que le Gâteau
doré vite fait et le Gâteau blanc facile
dont la recette se trouve dans ce
manuel. Cette méthode permet de
combiner en une étape les
ingrédients secs avec les ingrédients
liquides, en tout ou en partie.
Les gâteaux plus élaborés, tels que
la Tourte caramélisée aux noix et aux
bananes, doivent être préparés selon
la méthode traditionnelle de mélange
des gâteaux. Le sucre et le shortening,
le beurre ou la margarine, doivent être
soigneusement travaillés avant l’ajout
des autres ingrédients.
Pour tous les gâteaux, la durée du
mélange peut varier étant donné que
le batteur sur socle KitchenAid
®
fonctionne plus rapidement que
d’autres batteurs. En général, le
mélange d’un gâteau à l’aide du
batteur sur socle KitchenAid®ne
prend qu’environ la moitié du temps
indiqué dans la plupart des recettes
de gâteaux.
Pour établir le temps de mélange
idéal, surveillez la pâte et mélangez-la
seulement jusqu’à l’obtention de
l’apparence souhaitée, telle que
décrite dans la recette, par exemple
« lisse et crémeuse ».
Afin de choisir les meilleures
vitesses de mélange, consultez le
Guide de réglage de la vitesse aux
pages 9 et 10.
Ajout d’ingrédients
Ajoutez toujours les ingrédients le
plus près possible des côtés du bol et
non directement sous le batteur en
mouvement. L’écran verseur peut être
utilisé pour faciliter la tâche.
REMARQUE : Si les ingrédients au
fond du bol ne sont pas bien
mélangés, le batteur n’est pas assez
bas dans le bol. Voir « Dégagement
entre le batteur et le bol » à la
page 8.
Mélanges à gâteau
Pour préparer des mélanges à gâteau
instantanés, utilisez la 2evitesse
comme vitesse faible, la 4evitesse
comme vitesse moyenne et la 6
e
vitesse comme vitesse rapide. Pour de
meilleurs résultats, mélangez la
préparation pendant la durée
indiquée sur l’emballage.
Ajout de noix, de raisins ou
de fruits confits
Suivez les directives de chaque recette
pour ajouter ces ingrédients. En
général, les ingrédients solides
doivent être incorporés à la fin du
mélange à la vitesse STIR (remuer). La
pâte doit être assez épaisse pour
empêcher les fruits ou les noix de se
déposer au fond du moule au cours
de la cuisson. Les fruits collants
doivent être saupoudrés de farine
pour une meilleure distribution dans
la pâte.
Mélanges liquides
Les préparations contenant de
grandes quantités d’ingrédients
liquides doivent être mélangées à une
faible vitesse pour éviter les
éclaboussures. Augmentez la vitesse
seulement lorsque le mélange épaissit.
Page 97

12
Blancs d’oeufs
Déposez les blancs d’oeufs à
température ambiante dans le bol
propre et sec. Fixez le bol et le fouet
en métal sur le batteur. Pour éviter les
éclaboussures, réglez graduellement
l’appareil sur la vitesse indiquée et
fouettez jusqu’au stade désiré. Voir le
tableau ci-dessous.
QUANTITÉ VITESSE
1 blanc d’oeuf.....GRADUELLEMENT
jusqu’à 10
2-4 blancs d’oeufs...GRADUELLEMENT
jusqu’à 8
6blancs d’oeufs
ou plus ............GRADUELLEMENT
jusqu’à 8
Stades du fouettage
À l’aide de votre batteur sur socle
KitchenAid®, les blancs d’oeufs se
fouettent rapidement. Il faut donc
faire attention de ne pas fouetter à
l’excès. Voici la liste des différents
stades qu’il faut prévoir.
Consistance mousseuse
Grandes bulles d’air inégales.
Consistance un peu plus ferme
Les bulles d’air sont fines et
compactes ; le produit est blanc.
Pics mous
Le sommet des pics tombe lorsque
vous retirez le fouet en métal.
Consistance presque ferme
Des pics fermes se forment lorsque
vous retirez le fouet en métal, mais
les blancs d’oeufs sont mous.
Consistance ferme et non sèche
Des pics fermes se forment lorsque
vous retirez le fouet en métal. Les
blancs d’oeufs sont d’une couleur
uniforme et brillante.
Consistance ferme et sèche
Des pics fermes se forment lorsque
vous retirez le fouet en métal. Les
blancs d’oeufs sont tachetés et
d’apparence matte.
Crème fouettée
Versez la crème à fouetter froide dans
le bol réfrigéré. Fixez le bol et le fouet
en métal sur le batteur. Pour éviter les
éclaboussures, réglez graduellement
l’appareil sur la vitesse indiquée et
fouettez jusqu’au stade désiré. Voir le
tableau ci-dessous.
QUANTITÉ VITESSE
60 mL (1⁄4 tasse).......GRADUELLEMENT
jusqu’à 10
120 mL (1⁄2 tasse).....GRADUELLEMENT
jusqu’à 10
235 mL (1 tasse).....GRADUELLEMENT
jusqu’à 8
470 mL (1 chopine)..GRADUELLEMENT
jusqu’à 8
Stades du fouettage
Surveillez la crème de près quand
vous la fouettez. Votre batteur sur
socle KitchenAid®fouettant très
rapidement, il s’écoule à peine
quelques secondes entre les stades
du fouettage. Surveillez les
caractéristiques suivantes :
Épaississement graduel
La crème est épaisse et ressemble à
de la crème pâtissière.
Consistance plus ferme
La crème forme des pics mous
lorsque vous retirez le fouet en métal.
Elle peut être incorporée à d’autres
ingrédients dans la préparation de
desserts et de sauces.
Consistance ferme
La crème forme des pics fermes
lorsque vous retirez le fouet en métal.
Utilisez-la pour garnir les gâteaux ou
les desserts, ou pour remplir les choux
à la crème.
Page 98

13
®
Accessoires
Assemblage
1. Tournez la commande de vitesse
en position « OFF » (arrêt).
2. Débranchez le batteur sur socle ou
coupez le courant.
3. Desserrez le bouton pour
accessoires en le tournant vers
la gauche.
4. Soulevez le couvercle du moyeu à
charnières.
5. Insérez le boîtier d’axe de
commande dans le moyeu pour
accessoires, en vous assurant que
l’axe de commande s’adapte bien
au raccord carré du moyeu. Il peut
être nécessaire d’exécuter un
mouvement de rotation vers l’avant
et vers l’arrière. Lorsque l’accessoire
est en bonne position, la goupille
s’adapte à l’encoche située sur le
bord du moyeu.
6. Serrez le bouton en le tournant
vers la droite jusqu’à ce que
l’accessoire soit bien fixé au batteur
sur socle.
7. Branchez l’appareil sur une prise à
la terre à trois broches.
Retrait
1. Tournez la commande de vitesse
en position « OFF » (arrêt).
2. Débranchez le batteur sur socle ou
coupez le courant.
3. Desserrez le bouton en le tournant
vers la gauche. Retirez l’accessoire
en le tournant légèrement vers
l’avant et vers l’arrière.
4. Replacez le couvercle du moyeu.
Serrez le bouton en le tournant
vers la droite.
Renseignements généraux
Les accessoires KitchenAid
®
sont conçus pour un fonctionnement de longue
durée. L’axe de commande et le raccord du moyeu pour accessoires sont carrés
pour éliminer toute possibilité de glissement au cours de l’alimentation de
l’accessoire. Le moyeu et le boîtier de l’axe sont effilés pour permettre une
fixation optimale, même après un usage intensif. Les accessoires KitchenAid
®
comportent un bloc moteur intégré et n’ont besoin de rien d’autre pour
fonctionner.
‡Ne fait pas partie du batteur.
Directives générales
Raccord du moyeu
pour accessoires
Bouton pour
accessoires
Encoche
Goupille de blocage
Boîtier d’axe de
commande
Axe de commande‡
Couvercle du
moyeu à charnières
Boîtier
d’accessoires
Page 99

14
Garantie du batteur sur socle KitchenAid
®
Durée de
la garantie :
Garantie totale d’un an à
compter de la date
d’achat.
KitchenAid Canada
assumera les frais
suivants :
Les pièces de rechange et
les frais de main-d’oeuvre
nécessaires pour corriger
les vices de matériaux et
de fabrication. Le service
doit être assuré par un
Centre de service aprèsvente KitchenAid autorisé.
KitchenAid Canada
n’assumera pas les
frais suivants :
A. Les réparations si le
batteur sur socle est
utilisé à des fins autres
qu’un usage unifamilial
normal.
B. Les dommages
résultant d’un accident,
d’une modification,
d’une mauvaise
utilisation, d’un emploi
abusif, d’un incendie,
d’une inondation, d’un
cas de force majeure ou
de l’utilisation de
produits non approuvés
par KitchenAid Canada.
C. Les frais indirects
d’expédition ou de
manutention pour livrer
le batteur sur socle à un
Centre de service aprèsvente KitchenAid
autorisé.
D. Les pièces de rechange
ou les frais de maind’oeuvre nécessaires
pour réparer les
batteurs sur socle
utilisés à l’extérieur du
Canada.
KITCHENAID CANADA N’ASSUME AUCUNE RESPONSABILITÉ POUR LES
DOMMAGES ACCESSOIRES OU INDIRECTS. Certaines provinces n’autorisent
ni l’exclusion, ni la limitation des dommages accessoires ou indirects de sorte
que cette exclusion peut ne pas s’appliquer dans votre cas. La présente garantie
vous confère des droits légaux spécifiques, en plus d’autres droits dont vous
pouvez bénéficier et qui varient d’une province à l’autre.
Page 100

15
Comment vous prévaloir du service
après-vente non couvert par la garantie
• Consultez d’abord la section
« Dépannage » ci-après.
• Repérez dans l’annuaire
téléphonique un Centre de service
après-vente KitchenAid autorisé situé
près de chez vous. Si vous n’en
trouvez aucun, composez le
1 800 807-6777 pour communiquer,
d’où que vous soyez au Canada,
avec la ligne de service après-vente
KitchenAid.
• Apportez le batteur sur socle ou
envoyez-le en port payé et assuré à
un Centre de service après-vente
KitchenAid autorisé. Votre batteur
sur socle réparé vous sera retourné
en port payé et assuré.
• Tout service non couvert par la
garantie devrait être effectué par un
Centre de service après-vente
KitchenAid autorisé.
Comment vous prévaloir du service
après-vente couvert par la garantie
Consultez d’abord la section
« Dépannage » ; il est possible qu’une
réparation ne soit pas nécessaire.
Garantie totale d’un an à compter de
la date d’achat – KitchenAid Canada
assumera les frais des pièces de
rechange et de main-d’oeuvre
nécessaires pour corriger les vices de
matériaux et de fabrication. Le service
doit être assuré par un Centre de
service après-vente KitchenAid
autorisé.
Apportez le batteur sur socle ou
envoyez-le en port payé et assuré à un
Centre de service après-vente
KitchenAid autorisé. Votre batteur sur
socle réparé vous sera retourné en
port payé et assuré.
Si vous ne pouvez obtenir un service
satisfaisant de cette façon,
communiquez avec KitchenAid
Canada, 1901 Minnesota Court,
Mississauga ON L5N 3A7.
Téléphone : 1 800 807-6777.
 Loading...