

Page 1
I itChenAid ®
HOME APPLIANCES
APPAREILSI_LECTROM_:NAGERS
www.kitchenaid.com
_---------._
\
Quick Reference
Section
Page
Introduction
Product dlmenslons 3
Bullt-ln opening dlmenslons 3
Electrical requlremonts 4
Water requlrements 4
Draln requlrements 4
Installation steps 5 -
Need assistance? Back cover
2
PartNo. 9743822 Rev,C
Piece n° 9743822 R_. C
The KitchenAidConsumerAssistance Centeris open 24 hoursa
day,7daysa week. Call1-(800) 422-1230.Thecallis free withinthe
continentalUnitedStates.In Canada,call 1-(800)461-5681for
English,and 1-(800) 461-5703for French.
Call t_ KitchenAtdConsumerAssistance Centerwhen you:
Havequestionsaboutdishwasherinstallationoroperation.
1_ Needtoobtainthenameand numberofa KitchenAid-authorized
servicecompany,
Important:
• Installer:. LeaveInstalLationInstructionswiththe homeowner.
• Homeowner: KeepInstallationInstructionsfor future
reference.
• SaveInstallationInstructionsforlocalelectricalinspector's use,
Page 2

In_on s_s cont fmm _ s
If connecting dishwasher with power supply cord,
check that power supply is dlsconne_ed.
ElectricalShockHazard
PlugIntoa grounded3prongoutlet.
Donotremovegroundprong.
Do notuseanadapter.
Donotuseanextansloncord.
FailuretofollowtheseInstructionscanresultIn death,fire,
orelectricalshock.
• Usepowersupply cord kit (Part No. 4317824) availablefromyour
dealer orpartssupplier.Followinstructionswithkit forinstalling
powersupplycord.
Ifthe cord kitis notacailable,a U.L.-listed/CSA-cerlifled,16-gauge,
three-conductor,power supplycord and m.ainreliefmustbe
used.Sixfeet(1.8m) must bethe maximumlengthofpower
supplycord.
• Routepowersupplycord so itdoesnot touchdishwashermotoror
lowerpartofdishwasherrob.
_ *Removethedishwasherterminalboxcover(O).
• Installa U.L.÷listed/CSA-certiliedstrain relief(P) to theterminal
box. Runpower supplycord throughstrain relief.
Page 3
®
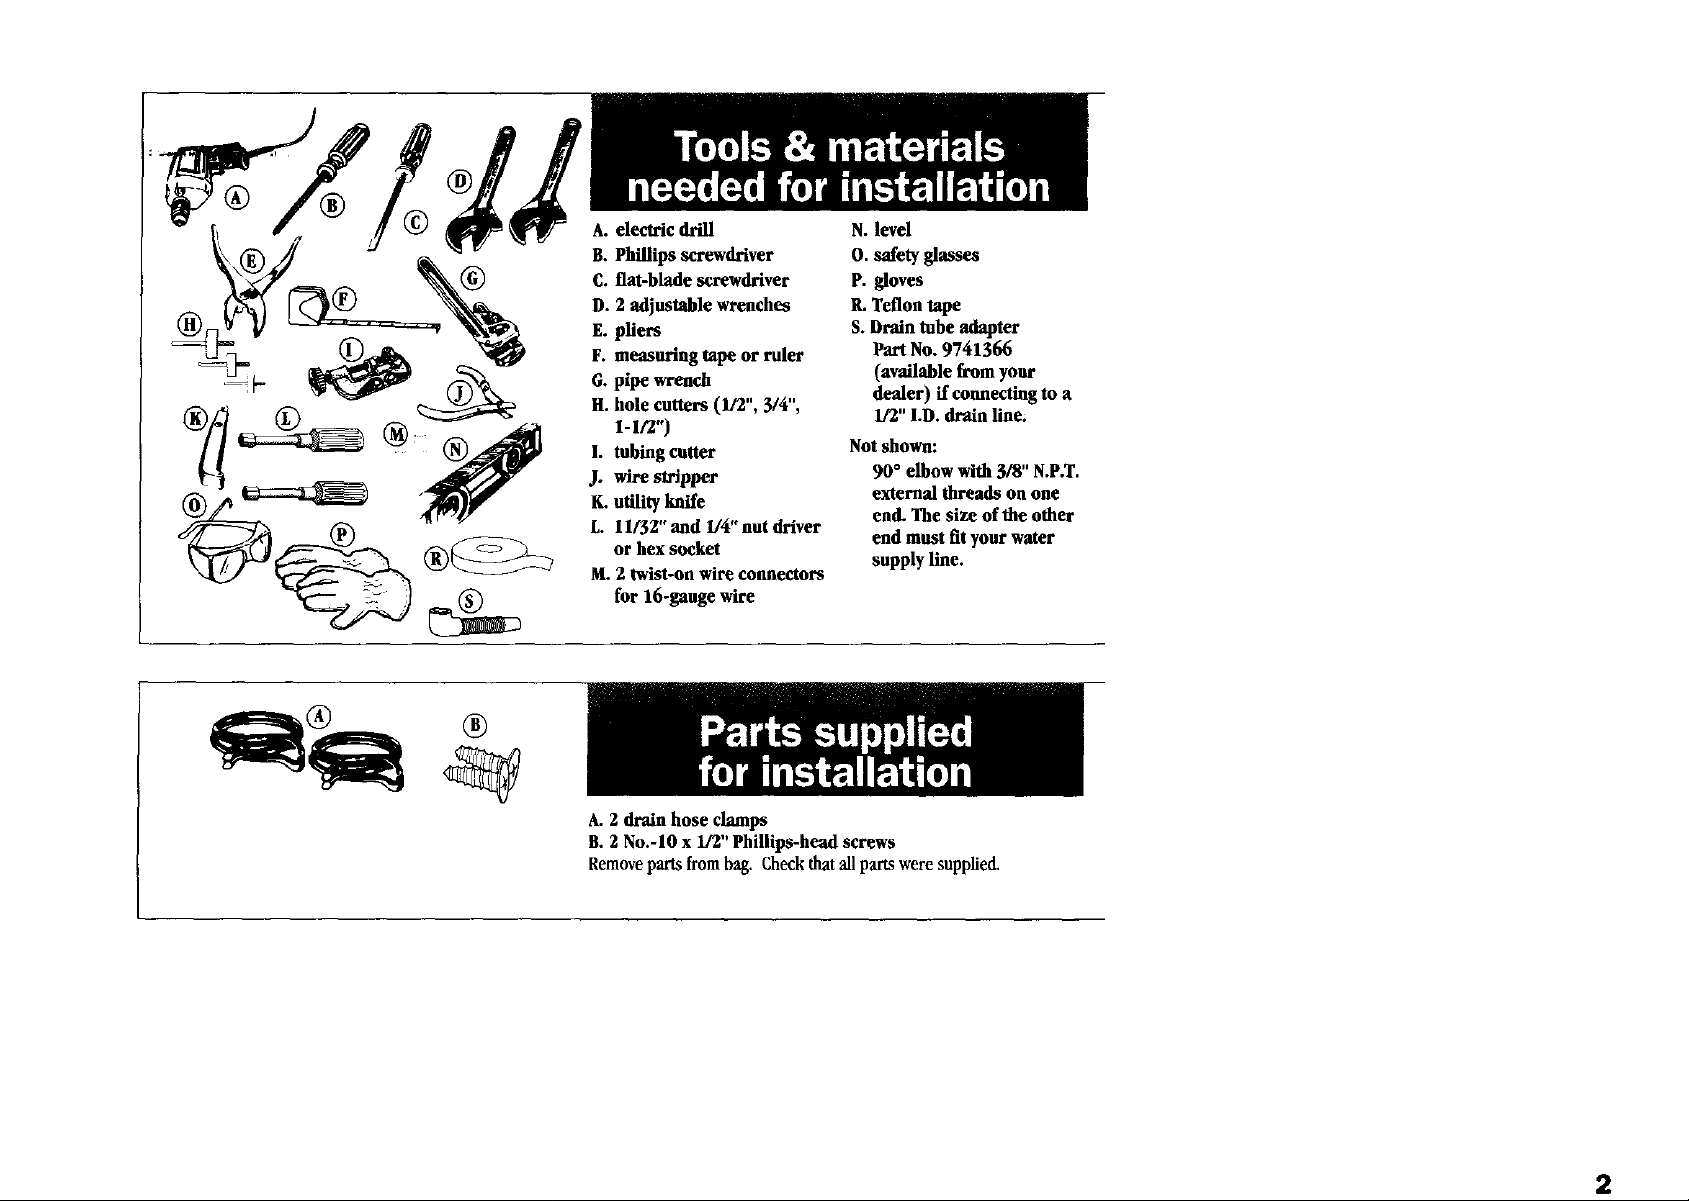
A. electric drill
B. Phillips screwdriver
C. flat-blade screwdriver
D. 2 adjustable wrenches
E. pliers
F. measuring tape or ruler
G. pipe wrench
H. hole cutters (1/2", 3/4",
t-ln")
1. tubing cutter
J. wire stripper
K. utility knife
L. 11/32" and 1/4" nut driver
or hex socket
M. 2 twist-on wire connectors
for 16-gange wire
N. level
O. safety glasses
P. gloves
R. Teflon tape
S. Drain tube adapter
Part No. 9741366
(available from your
dealer) if connecting to a
1/2" I.D. drain line.
Not shown:
90 ° elbow with 3/8" N.P.T.
external threads on one
end. The size of the other
end must fit your water
supply line.
A. 2 drain hose clamps
B. 2 No.-lO x 1/2" Phillips-head screws
Remove parts from bag. Check that all parts were supplied.
2
Page 4
/
(6xem)
34"(S6._)
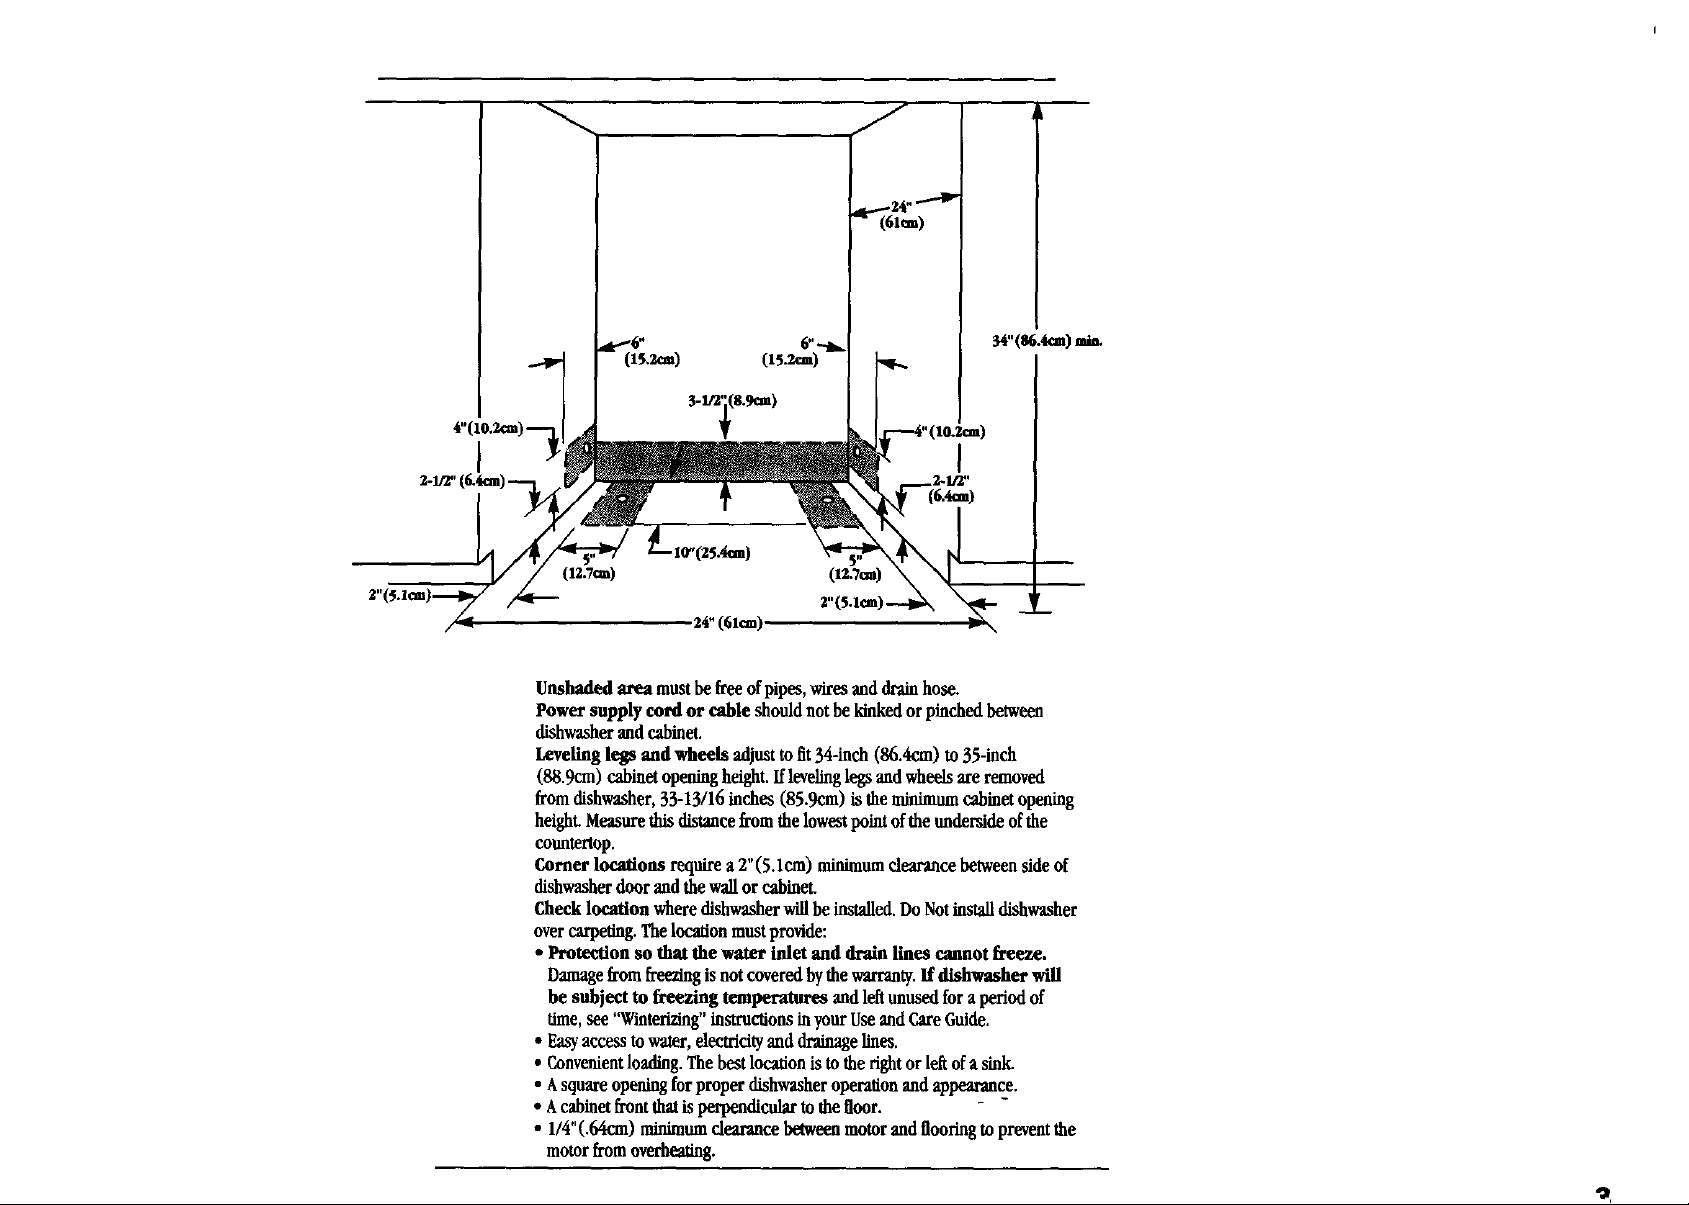
Unshaded area must befreeofpipes, wiresanddrain hose.
Power supply cord or cable shouldnot bekinkedorpinchedbetwom
dishwasherandcab'met.
Leveling legs and wheels adjusttofit34-inch(86.4cm) to35-inch
(88.9cm) cabinetopeningheight.Iflevelinglegsand wheelsare removed
fromdishwasher,33-13/16inches (85.9cm) istheminimumcabinetopening
height.Measurethisdistance fromthelowestpointofthe underside ofthe
countertop.
Cornerlocations requirea 2"(5.1cm) minimumclearancebetweensideof
dishwasherdoor and the wallor cabineL
Checklocation where dishwasherwillbe installed.Do Notinstalldishwasher
over carpeting.Thelocationmust provide:
• Protection so thatthe water inlet and drain lines cannot freeze.
Damagefromfreezingis notcoveredbythe warranty.Ifdishwasher will
be subject to freezing temperatures and leftunused fora periodof
time, see"Winterizing"instructionsinyourUseand Care Guide.
• Easyaccess to water,dectvidtyand drainage lines.
• Convenientloading.Thebest locationis totherightor leftof a sink
• Asquareopeningfor proper dishwasheroperation and appearance.
* Acalfmetfruntthatisperpendicular tothe floor.
• 1/4"(.64cm) minimumclearancebetweenmotor and flooringto preventthe
motorfromoverheating.
Page 5
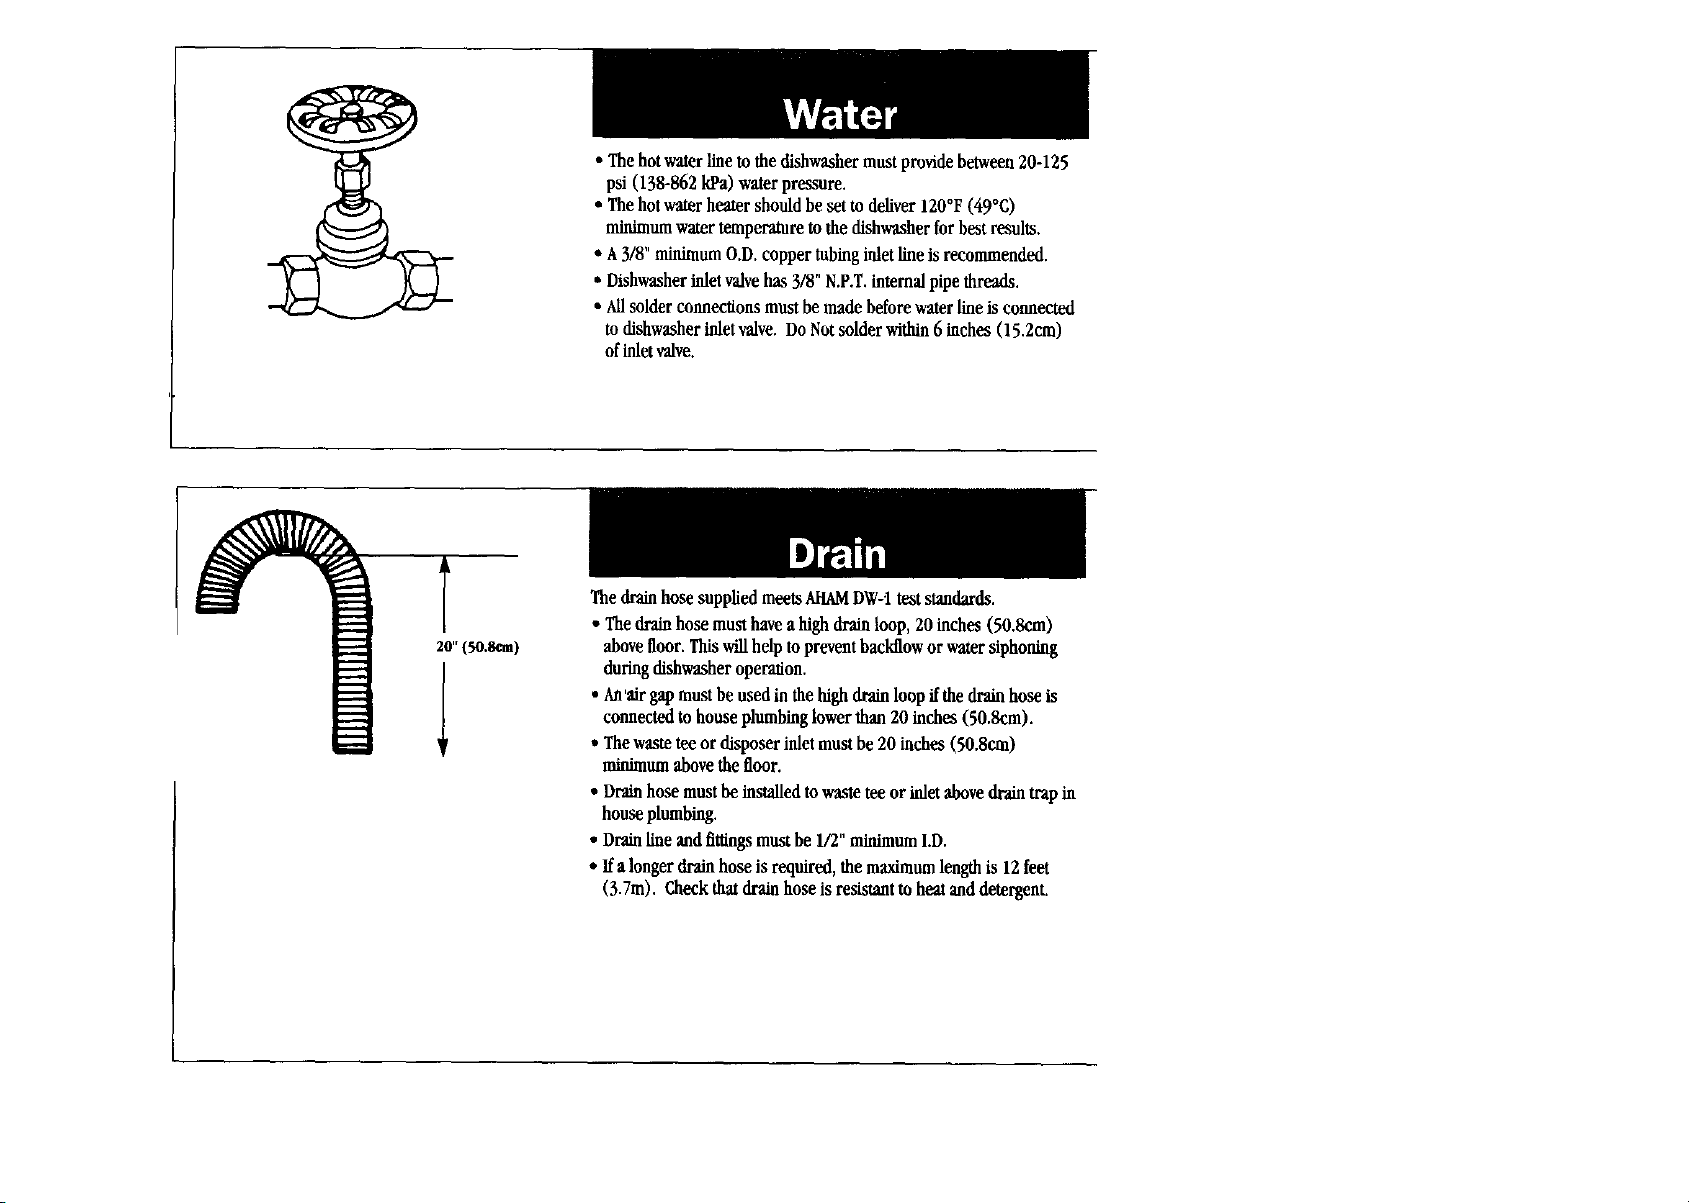
20-(so.san)
• The hot water line to the dishwasher must provide between 20-125
psi (138-862 kPa) water pressure.
• The hot water heater should be set to deliver 120°F (49°C)
minimum water temperature to the dishwasher for best results.
• A3/8" minimum O.D. copper tubing inlet line is recommended.
• Dishwasher inlet valve has 3/8" N.P.T. internal pipe threads.
• Allsolder connections must be made before water line is connected
to dishwasher inlet valve. Do Not solder within 6 inches (15.2cm)
of inlet valve.
The drainhosesuppliedmeetsAHAMDW-iteststandards.
• Thedrain hose musthavea highdrain loop,20 inches (50.8cm)
abovefloor.Thiswillhelp topreventbackflowor watersiphoning
duringdishwasheroperation.
• An'airgap mustbeused in thehigh drainloopffthedrain hoseis
connectedto house plumbinglower than20 inches(50.8cm).
• Thewastetee or disposerinletmust be20 inches(50.8cm)
minimumabovethe floor.
• Drain hose must be installed to wasto tee or inlet above drain trap in
house plumbing.
• Drain line and fittings must be 1/2" minimum I.D.
• ff a longer drain hose is required, the _um length is 12 feet
(3.7m). Check thatdrain hose is resistant to heat and detergent.
Page 6
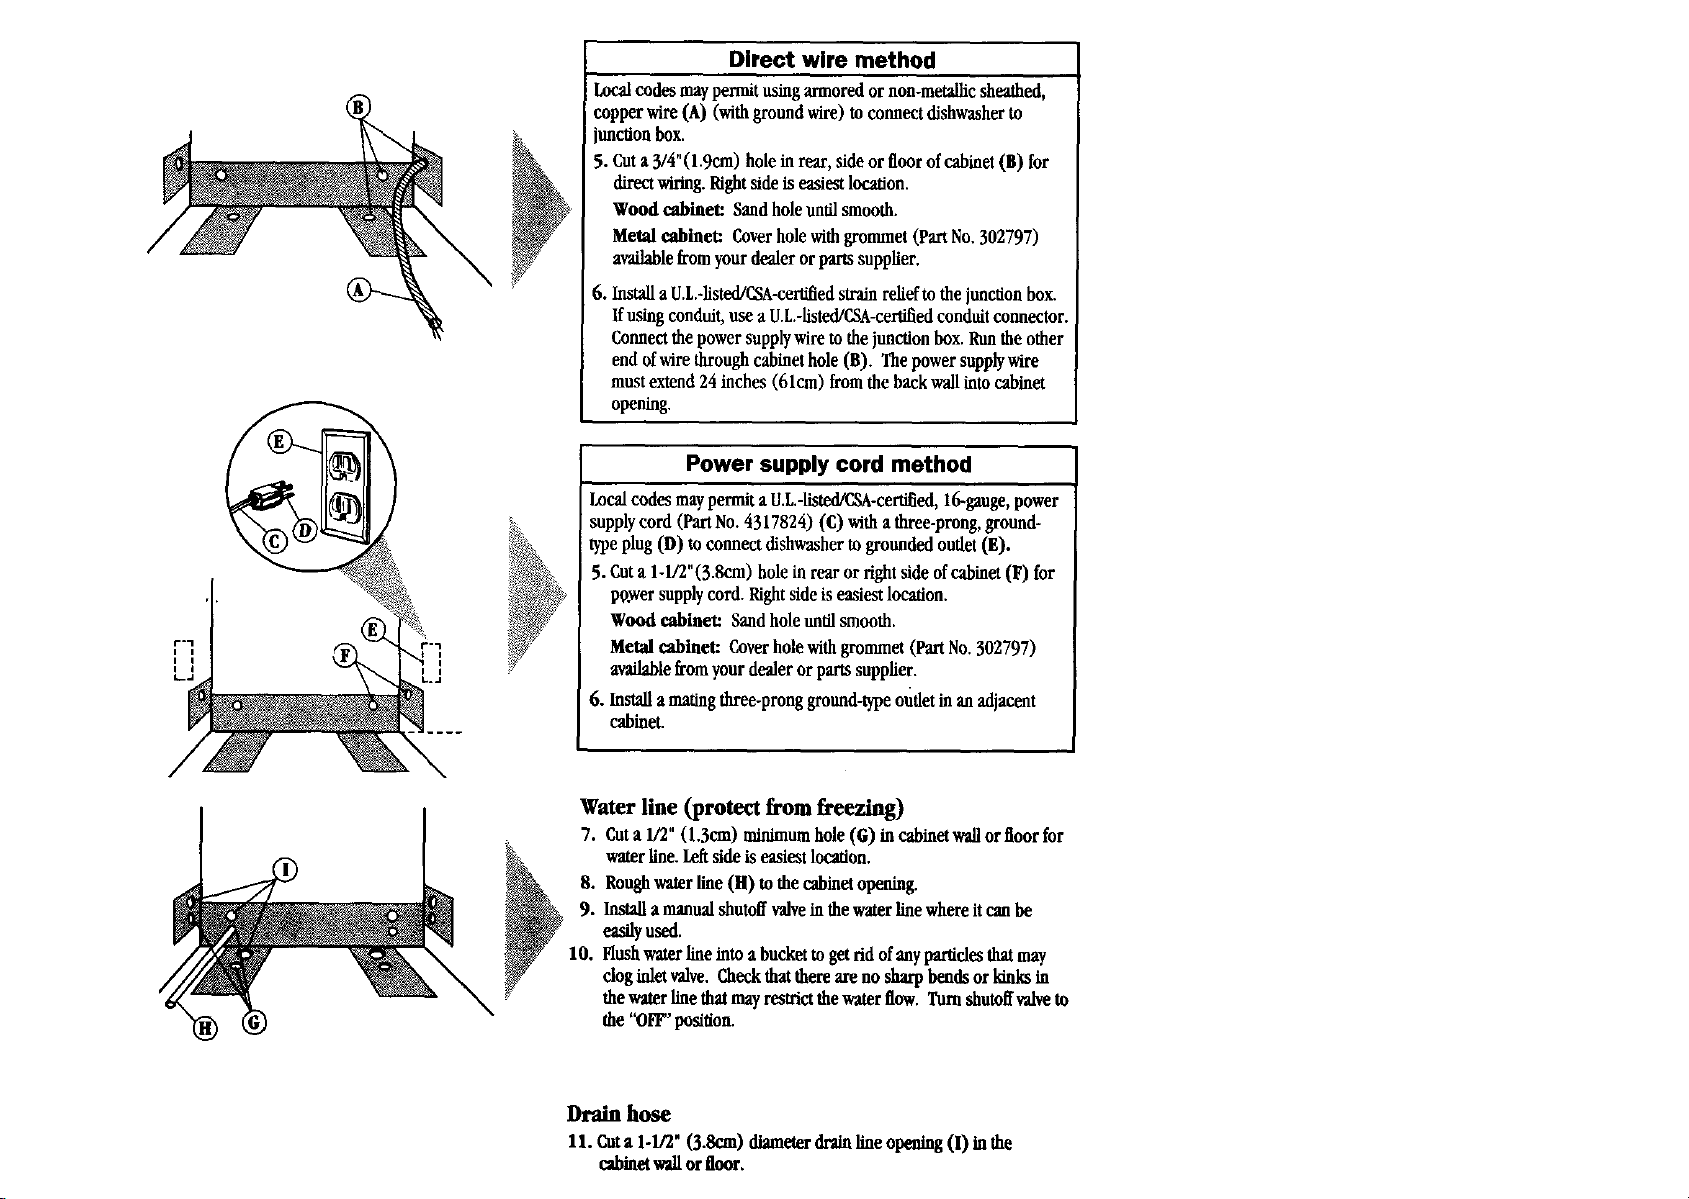
Direct wire method
Localcodes maypermitusingarmored ornon-metallicsheathed,
copper wire(A) (withgroundwire) toconnectdishwasherto
unctionbox.
5. Cuta 3/4"(l.gcm) holeinla_, sideorfloorofcabinet(B) for
directwiring.Rightsideis easiestlocation.
Wood cabinet: Sandholeuntilsmooth.
Metalcabinet: Coverholewithgrommet (PartNo.302797)
availablefromyour dealerorparts supplier.
6. Install a U.L-listed/C_A-certffied strain relinfto the junction box.
If using conduit, use a Ui.-listed/CSA-cer tiffed conduit connector.
Connect the power supply wire to thejunction box. Run the other
end of wire through cabinet hole (B). The power supply wire
must extend 24 inches (61cm) from the back wall into cabinet
opening.
Power supply cord method
Localcodes maypermit a U.L.-listed/_A-certiffed,16-gauge,power
supplycord (PartNo.4317824) (C) with a three-prong,ground-
typeplug(D) toconnectdishwasherto grounded outlet(E).
5. Cuta 1-1/2"(3.8cm) hole in rear or rightside ofcabinet(F) for
powersupplycord. Rightsideis easiestlocation.
Wood cabinet: Sandholeuntil smooth.
Metal obinet: Coverhole withgrommet(PartNo.302797)
availablefromyour dealer or parts supplier.
6. Install a matingthree-pronggronnd-typeoudetinanadjacent
cabinet.
Waterline (protect from freezing)
7. CUta 1/2"(1.3cm) minimumhole (G) in cabinetwall orfloor for
water line.Loftsideis easiestlocation.
8. Roughwaterline(H) to the cabinetopening.
9. Installamanualshutoffvalveinthewaterline whereit can be
easilyused.
10. Flushwaterlineinto a bucket to getrid ofanyparticles thatmay
cloginlet valve. Checkthatthereareno sharpbendsorldnks in
thewaterlinethatmayrestrictthewaterflow. Turnshutoffvalveto
the "OFF"position.
Drain hose
11. CUta 1-1/2' (3.8on) diameterdrainline op_ (I) in the
cabinetwallorfloor.
Page 7
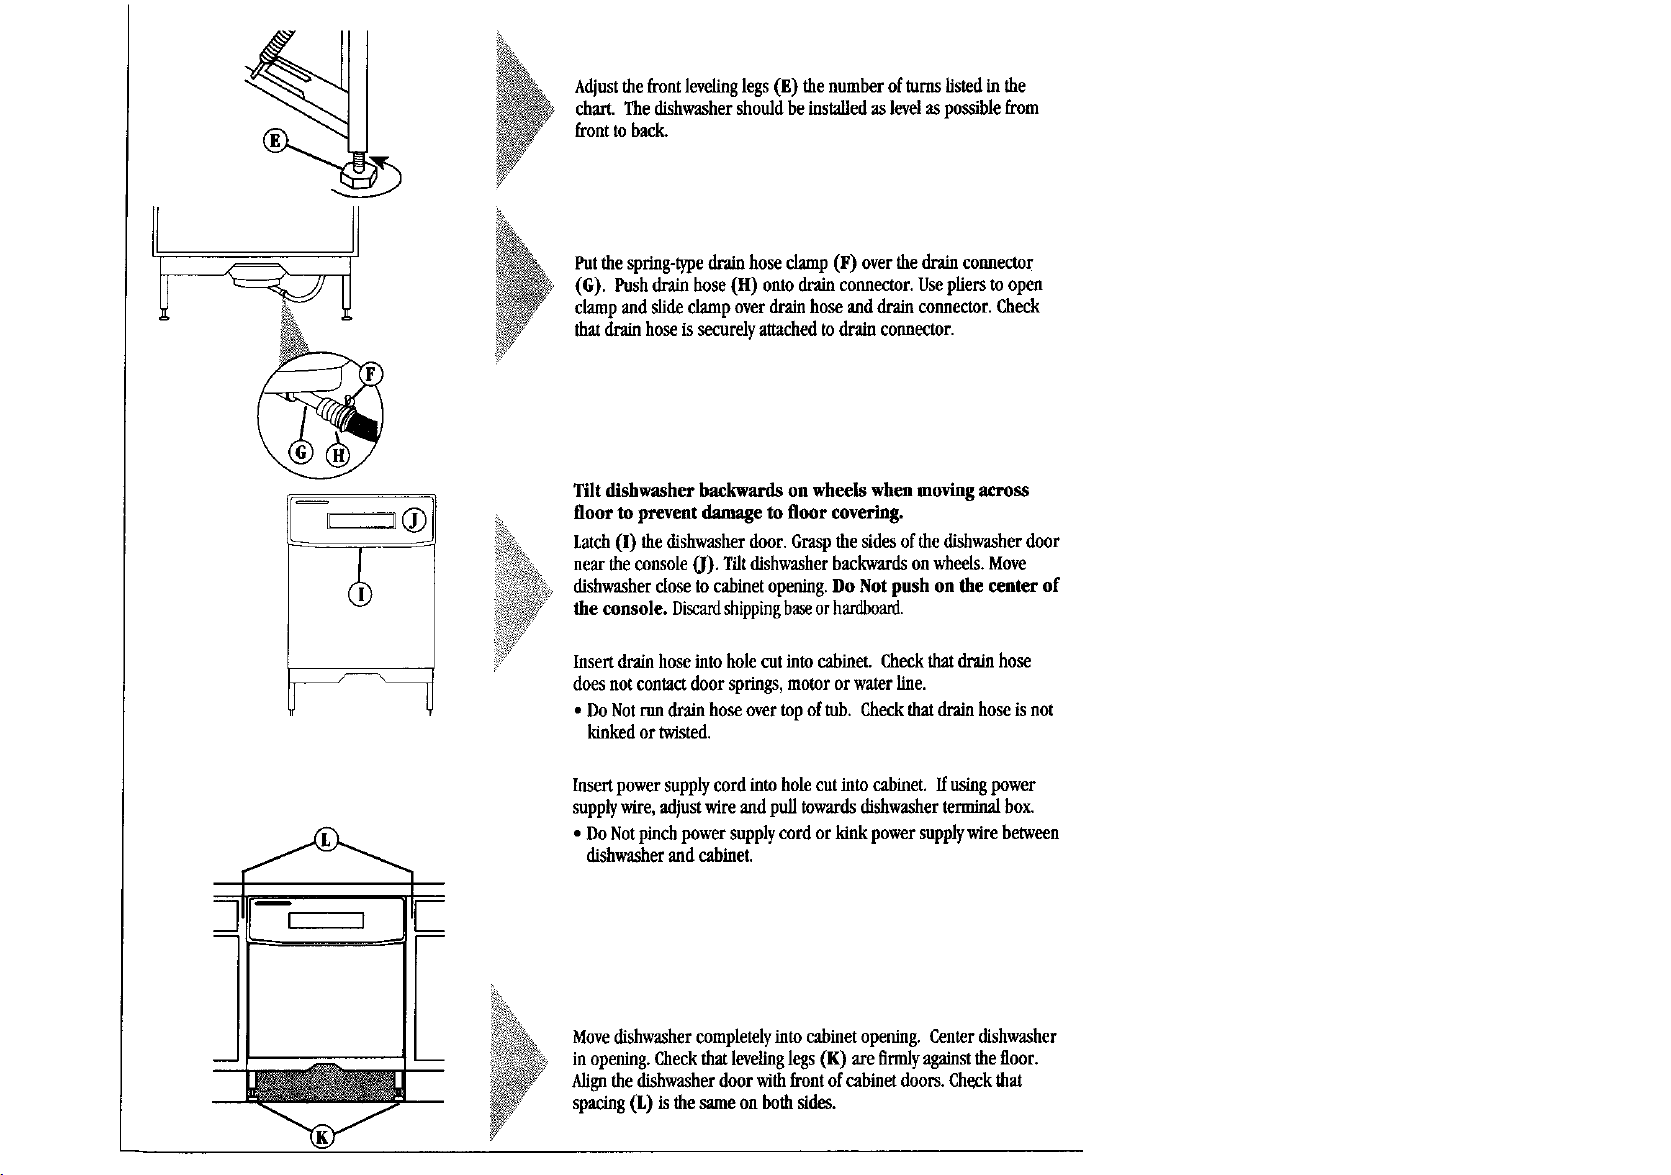
chart. Thedishwashershouldbe installedas levelas possiblefrom
fronttoback.
Adjustthefroutlevelinglegs (E) the numberof turnslistedinthe
(G). Pushdrainhose (H) onto drain connector. Usepliers to open
Putthe spring-typedrain hose clamp(F) over thedrain connector
clampand slideclamp overdrain hoseanddrain connector.Check
thatdrainhose is securelyattachedto drain connector.
Tilt dishwasher backwards on wheels when moving across
floor to prevent damage to floor covering.
Latch (I) the dishwasher door. Grasp the sides of the dishwasher door
near the console (J). Tilt dishwasher backwards on wheels. Move
dishwasher close to cabinet opening. Do Not push on the center of
the console. Discardshipping baseor hardboard.
Insertdrain hoseintoholecut intocaFmet. Checkthatdrain hose
doesnot contactdoor springs,motor orwater line.
• Do Notrundrain hoseover topof tub. Checkthatdrain hoseis not
kinkedortwisted.
m I m
__ m
Insert power supply cord into hole cut into cabinet. Ifusing power
supply wire, adjust wire and pull towards dishwasher terminal box.
• Do Not pinch power supply cord or ldnk power supply wire between
dishwasher and cab'met.
Movedishwashercompletelyintocabinetopening. Centerdishwasher
in opening.Checkthat levelinglegs (K) are firmlyagainstthe floor.
Alignthedishwasherdoor withfront ofcab'metdoors.Checkthat
spacing(L) isthe same on bothsides.
Page 8

Altemate Connection Methods
NoAirGap
Iflocal codespermit,thedishwasherdrainhosemaybe connected
direcOytoawasteteeorwastedispo .
Drain hose (A) to waste tee (B)
Cutdrain endofdrainhose asshown(C). DoNotcotfibbed
sectionto shortendrainhose(D).
Securedrainhose towaste teewithspring-or screw-type
clamp (E). Ifspring-typeclampdoesnot fitsmallersectionof
drain hoseconnector,use a smallerclamp. Smallerdamps are
availableatplumbingsupplystores.
The waste tee connection MUSTbe ahead of the drain
trap (F) and 20 inches (50.8cm) minimum above the
floor(6).
Drain hose (H) to disposer (I)
Knock out disposer inlet plug from inlet 0)- Ifinletplug
fallsinsidedisposer,youmustremoveinletplugbefore
connec_ngdrainhose. If disposeris alreadyinstalledinsink,
youmay needto removedisposer fromsinkto removeplug.
DONOTcutend of drain hose.
Securedrain hoseto disposerwithspring-or screw-type
damp (X).
Mostdisposershave7/8"connectors,or specialconnectorsare
availableatplumbingsupplystores.
The disposer connection MUSTbe ahead of the drain
trap (L) and 20 inches (50.8cm) minimum above the
floor (M).
7
Page 9

• InstallaU.L-listed/t_-certiliedstrainrelief(F) to theterminal
box. Runpowersupplywire throughstrainrelief,ffusingconduit,
use a U.L.-listed/CA_-certiffedconduitconnncmr.Runconduit
throughconnector.
• Connectthewhitewire (G) fromthepowersupplywireto the
whitewire intheterminalboxwithtwist-onwire connector.
• Connectthe blackwire (H) fi'omthepower supplywireto the
blackwirein the terminalbox withtwist-onwireconnector.
Ifthe ground connector (I) looks like this:
• LoosenfrontnutO) on groundconnectorlocatedon the backof
terminalbox. DoNotloosenthe rearnut(K) on the ground
connector.
• Formthebaregroundwire (L) into a U-shapedhook. Wrap
groundwirehookclockwisearound ground connectorand
betweenthe rearandfront nuts. Securelytightenthefront nut (J)
overthe groundwire.
• Tightenstrainrelieforconduitconnector screws(M).
OR
If the ground connector (i) looks like this:
• LoosenscrewO) onground connectorlocatedonthe backof
terminalbox.
• Formthebaregroundwire(K) intoa U-shapedhook. Wrapground
wire hook clockwisearound groundconnectorand under the
washer(L).Securelytightenthescrew0).
• Tightenswainrelieforconduitconnectorscrews(M).
II
• Replaceterminalcover(E).
®
Installation steps cont. on page 9 o
Page 10

• Connectthewhitewire(Q)fromthepowersupplycordto the
whitewireinthe terminalbox withtwist-onwireconnector.
• Connectthe black_ (R) fromthepower supplycordto the
blackwirein the terminalboxwithtwist-onwireconnector.
Iftheground connector (S) looks like this:
• Loosenfrontnut(T) on ground connectorlocatedonthebackof
terminalbox. DoNotloosenthe rearnut(U) on theground
connector.
• Formthebaregroundwire(V)intoaU-shapedhook. Wrap
groundwirehook clockwisearoundgroundconnectorand
betweenthe rearand fi'ontouts. Securelytightenthe frontnot (T)
i
overtheground wire.
• Tightenstrainreliefscrews (W).
OR
ffthe ground connector (S) looks like this:
• Loosenscrew(1")onground connectorlocatedontheback of
terminalbox.
• Formthebaregronndwire (U) into a U-shapedhook Wrap
groundwirehookclockwisearound ground connectorand under
thewasher(V). Securelytightenthe screw(T).
• Tightenstrainreliefscrews(W).
J
m I
Illl
(o_1
• Replaceterminalcover(0).
• Plug power supply cord (X) into mating grounded outlet (Y).
Q
Page 11

O
Opendoor about 3inches(7.6cm) and checkfor equalspacing (C)
betweeninner door and tubsides. If spacingis notequal, loosen
bracket screwsand shifttub. Tightenbracket screws.Remove
newstraperor towelfromdishwasher.
easily.Ifdoor doses too quicklyorfallsopen,adjustdoor
Openand close door severaltimes.Thedoorshouldopen and close
springs(D) bymovingspringendstodifferentholes (£) in base.
tN
Page 12

accessandlowerpanelto dishw_herso thatthebottomedge
ofthelower panelcontactsthe floor.
Your installation is now complete.
Keep Installation Instructions and Use and Care Guide
close to dishwasher for easy reference.
Page 13

n
is very Important.
We have provided many important safety
messages inthis manual and on your appliance.
Always read and obey all safety messages.
This is the safety alert symbol. This symbol
alerts you to hazards that can kill or hurt
you and others. All safety messages will be
preceded by the safety alert symbol and the word
"DANGER" or "WARNING". These words mean:
You will be killed or seriously Injured if you
don't follow instructions.
You can be killed or seriously injured if you
don't follow instructions.
All safety messages will identify the hazard,
tell you how to reduce the chance of injury, and tell
you what can happen if the instructions are
not followed.
Your safety and the safety of others
• Observe all governing codes and ordinances.
• complywiththeinstallationspecificationsand dimensions.
• properlyinstalldishwasher.
• makesure youhaveeverythingnecessaryfor proper installation.
• contacta qualifiedinstallerto insure thattheelectricalandplumbing
installationsmeetallnationalandlocalcodes andordinances.
Keep cardboard shipping base or hardboard under
dishwasher until it is installed. The shipping base or -
hardboard will help Io protect floor covering when
dishwasher is moved across the floor during installation.
Page 14

MODELS A
MODI_LIES
KUDC Series
Stifle KUDC 24-1/4" (61.6 ore)
10UDI25 Series 61,6 cta (24-1/4 po)
Sl_de KIJDI25
All Others 25-1/4" (64.1 an)
TOllS lea anwes 64,1 can (25-1/4 po)
* does not include insulation bhmket
* ne comprend pas l'isolant
Introduction cont.from page2
A*
91- 24"(61cm)* --
35-7.'8"
(_) a_.
19-3/4" (50.2{_)*
Opening for electrical, drain and water supply lines:
• Mustbeinstalledwithinthe shaded areaasspecified.
• Shouldbe located as close to the rear wallas possible.
Electrical outlet must be installedin anadj_cut cabinet.
Wiring should not contact the motor or dishwasherlegs.
Water line: CutI/2"(1.3cm) diameter opening.
W_ter line Must Not contact the motor or dishwasher legs.
Drain line and power supply cord: Cut I-I/2"(3.8cm) diameter opening.
Direct wire electrical suppl],: Cut 3/4"(1.9cm) diameter opening.
Install a grommet (Part No. 302797) in opening cut in a metal cabinet for
power supply cord orpower supplycable.
Dishwashermust be completely enclosed, sides, top and rear. Side panel ldts
are available fromyour dealer for installing yourdiswasher at the end of a
cabinet.
Bl_k, Part No. 4378868
White,PartNo. 4378867
Almnnfl P_rt MO _TP_ql_Q
Page 15

Ill
O}
It is the customer's responsibility:.
To contact a qualified electrician.
Toassure thatthe electrical installation is adequate and in
conformancewith all national and local codes and
ordinances.
Dishwashermust be connectedtotheproperelectricalvoltageand
flequencyasspecifiedonthemodel/serialratingplate.Themodel/serial
ratingplateis locatedbehindthedoor on thefrontframeofthe
dishwasheropening.
• CONNECTWITHCOPPERWIREONLY.
• 120-volt, 60-Hz, AC-unly,15-ampere, fused electrical supply is
required.
• Atime-delay fuse or circuit breaker is recommended.
• It is recommended that a separate circuit servingonly this appliance
be provided.
• Some models are already equipped with a power supplycord. If a
power supply cord is not supplied, Power Supply Cord Kit (Part No.
4317824) is available from your local dealer or parts supplier. Follow
the kit instructions for installing power supply cord.
If the kitis not available locally, use a U.L-listed/CA*_-certified,three-
conductor, 16-gauge, six foot, power supply cord that meets all local
codes and ordinances. It must be routed so it does not touch the
dishwashermotor or lower portion ofthe dishwasher tub. A swain
reliefmust be used to secure the power supply cord to the dishwasher
terminal box. The power supply cord must be plugged into a mating
3-prong, ground-type oudet, grounded in accordance with all national
and local codes and ordinances.
• Ifapowersupplycordisattachedto dishwasherbutyouneedto direct
wiredishwasher,youwillneedDirectWireConnectionKit(Part No.
4317979). Removepowersupplycordandmakealldirectwire
connectionsinsideterminalbox. Allelectricalconnectionsmustbe
madein accordancewithallnationalandlocalcodesandordinances.
• Dishwashermustbeconnectedto agroundedmetal,permanent
wiringsystemor a groundconductorcan beusedwiththedt_-'uit
conductorsto connecttothegroundterminalor leadonthe
dishwasher.
• Do notgroundto a gaspipe.
• Do notconnectdishwashertoelectricalsupplyuntildishwasheris
permanentlygrounded.
• Donothaveafusein theneutralor groundcircuit.
Page 16

/
24,,'''_
(61_m)
ElectricalShock Hazard
Disconnectelectricalpowerat thefuse box
or circuit breakerbox before installing
dishwasher.
Failuretodo so can result in death or
electricalshock.
1.Disconnectthepower supply.
2. Putonglovesandsafetyglasses.
Electrical
3. Pickone methodto follow("Directwire" or "Powersupplycord"),
dependinguponyourdishwasherand local codes.
4. Completewiringto cabinetopeningaccordingtowiring_nethodyou
need. Followalllocalcodes and ordinances.
Page 17

Tip Over Hazard
Do not usedishwasheruntilcompletely
installed.
Do notpush downon open door.
Doing so can result in seriousinjuryorcuts.
Excessive Weight Hazard
Usetwo or morepeopleto move and Install
dishwasher.
Failureto do socan resultinbackor other injury.
Keep cardboard shipping base or hardboard under
dishwasher until it is installed. The shipping base or
hardboard will help to protect floor covering during
installation.
Removethefour screwsattachingaccesspanel(A) andlower panel
(B) todishwasherusinga 1/4"hexsocket, nut driveror PhiLlips
screwdriver. Removepanelsand set panelsaside on aprotective
surface.
Mill,
Cutout
"" Height
34"(s6.4cm)
34-1/8" (86.7c_m)
34-5/16"(87.2cm)
34-1/2"(87.6_n)
Wheel Number Of Turns
Position To Adjust
(See Illustration) Levelers
1 9
2 6
3 3
4 0
For additional height:
1. Add shims under the wheels.
2. Turn front levelers (each turn is approximately 1/16"
(1.6ram) in height).
Measureheightofcabinetopening(C) fi'omundersideofcountertop
tofloor. Checkchartforthatheightopening. Putwheels(D) inthe
requiredposition,
Page 18

(I r ! I'1
Connectdrainhosetoanair gaporwasteteeusing oneof the
recommendedor alternatemethods.
Recommended Connection Methods
Install Air Gap Kit (Part No. 300096) (A) according to kit
instructions. If a different air gap is used, it should be checked to
make sure it allows for the same air flow.
Drain hose (B) to air gap (A) to waste tee (C)
Cutdrain cod of drainhose asshown(D). Do Notcut ribbed
sectionto shortendrainhose (E).
,t,
Securedrainhose toairgapwithspring-typeclamp(F). If
spring-typeclampdoesnotfit smallersection ofdrainhose
connector,use a smallerclamp. Smallerclampsareavailableat
plumbingsupplystores.
Connectthe air gap towastetee usinga rubberconnector(G)*
andspring-orscrew-typodamps (H).
The waste tee connection MUSTbe ahead of the drain
trap (I) and 20 inches (50.8om) minimum above the
floor O).
Drain hose (K) to air gap (L) to disposer (M)
Knock out disposer inlet plug (N) from inlet. Ifinletplug
fallsinsidedisposer,youmust removeinletplugbefore
connectingdrainhose. Ifdisposeris alreadyinstalledin sink,
youmayneedto removedisposerfromsinkto removeplug.
DONOTcutendofdrainhose.
Securedrainhoseto air gapwithspring-typeclamp(0).
Connectthe airgapto disposer using a rubberconnector (P)*
andspring- orserew-typoclamps(Q).
Mostdisposershave7/8"connectors,orspecia]connectorsare
availableatplumbingsupplystores.
The disposer connection MUSTbe ahead of thedrain
trap (It) and 20 inches (50.8cm) minimum above the
floor (S).
* All parts are available from your dealer.
Page 19

towaterinletvalve(B). Attachwatersupplyline(C) to fitting.
Do Not allow the waterpipe or tubing to contact the motor or
ApplyTeflontapeto90° elbowfitting(A)and connectfittingdirectly
dishwasher legs (D). Turnonwatersupplyand check forleaks.
o
Check electrical requirements. Be sure you have correct
electrical supply and recommended grounding method. See
Page 4.
If connecting dishwasher using direct wire method,
check that power supply is disconnected.
ElectricalShockHazard
Electricallygrounddishwasher.
Connectgroundwiretogreengroundconnectorinterminal
box.
Donot useanextensioncord.
Failuretodoso canresultindeath,fire,orelectricalshock.
• Removethedishwasherterminalbox cover (E).
Page 20

TipOver Hazard
Do not usedishwasheruntilcompletely
installed.
Do not pushdown on opendoor.
Doingso canresultin serious injury or cuts.
bottomrzck Placenewspaper (A)or toweloverbottom of
Opendishwasherdoor and removeall shippingmaterials. Remove
dishwashertopreventscrewsfrom fallingintopump area when
securingdishwasherto countertop.
ThedishwasherMUSTbe secured to countertoporfloorto keepit
fromtippingwhen dooris opened.
Countertopattachment: Securedishwashertocounter_p withtwo,
No. 10x 1/2"Phillips-headscrews(it).
DoNotdropscrewsintothe bottom ofthedishwasher.Screws,if
droppedin pumparen,maycausedamagetopumpormotur.
Floor attachment: Usefloor attachmentkit (Part No.4378968)
availablefromyour dealer.
Page 21

Checkthatallparts havebeen installed(exceptaccessand lower
panels) and no stepswereskipped.
_ Checkthatyouhaveallthetoolsyouused.
Readthe Useand CareGuidethatcamewithyourdishwasher.
,,Reconnec,t, powersupplyto dishwasher.Setthe dishwasherto runthe
'Normal' cycle.Startdishwasherand allowitto runfor 2minutes.
Opendishwasherdoor. Thewaterlevelshouldbe deep enoughto
causedieflent(A)mfloatonthewater,ffthewaterleveliscorrect,
closethedoor andallowthe dishwasherto completethe cycle.
_ff the dishwasherdoes not fallto theproper level,checkthe following:
• Is theshutoffvalveinthewatersupplylinecompletelyopen?
• Isthe watersupplylineblocked or kinked?
Checkthatthere ure nowaterleaks. Ifthereare waterleaks,
aghtenllmngs.
Page 22

The KltchenAidConsumer Assistance Centeris open 24 hoursa
day,7 daysaweek.Call1o(800)422-1230.Thecallis freewithinthe
continentalUnitedSta_. InCanada,call1-(800)461-5681 for
Englishand 1-(800) 461-5703 forFrench.
Callthe KitchenAid Consumer Assistance Center when you:
• Havequestionsabout dishwasherinstallationor operation.
1_Needto obtainthenameand number ofa KitebenAid-
authorizedservicecompany.
If dishwasher does not operate, check these points:
"]ff FI_ the cir_it breaker trippedor the house fuse blown?
• Isthedoordosed tightlyand latched?
• Hasthecyclebeen set correctlyto startthedishwasher?
Haselectricalpower beenInterrupted?
• Hasdiemotoroverloaded?It willresetitselfwithina few
minutes.
Ifyou need service:
Maintainthequalitybuiltintoyour appliancebycallinga KitcbenAid-
authorizedservicecompany.Toobtainthenameand number ofan
authorizedservicecompany:.
• Contactthe dealerfrom whomyoupurchased the app_ance;
• LookInthe YellowPages ofyour telephone directoryunder
"Appliances-- Household-- Major-- Serviceand Repair;"
• or Calldie KitcbenAidConsumerAssistanceCenter.
When you call, you will need:
II_Thedishwashermodelnumber.
Thedishwasher serialnumber.
Bothambers are listedon the model/serialratingplatelocated
behindthedooron the_out frameofthe dishwasheropening.
PartNo.9743822 Rev.C
© 1998 rdtchen_d
*RegisteredTrademark/TrademarkofKitchenAidU.S.A.,
KitchenAidCanadalicenseein Canada
PrintedInU.S.A.
 Loading...