

KitchenAid 9741183 User Manual
Installation Instructions
Undercounter
Dishwasher
Important:
Read and save
these instructions.
-_.^-I. -
Important:
l
Installer: Leave Installation
Instructions with the
Homeowner.
l
Homeowner: Keep Installation
Instructions for future reference.
l
Save Installation Instructions for
local electrical inspector’s use.
Part No. Y/4 I 183 Rev. A
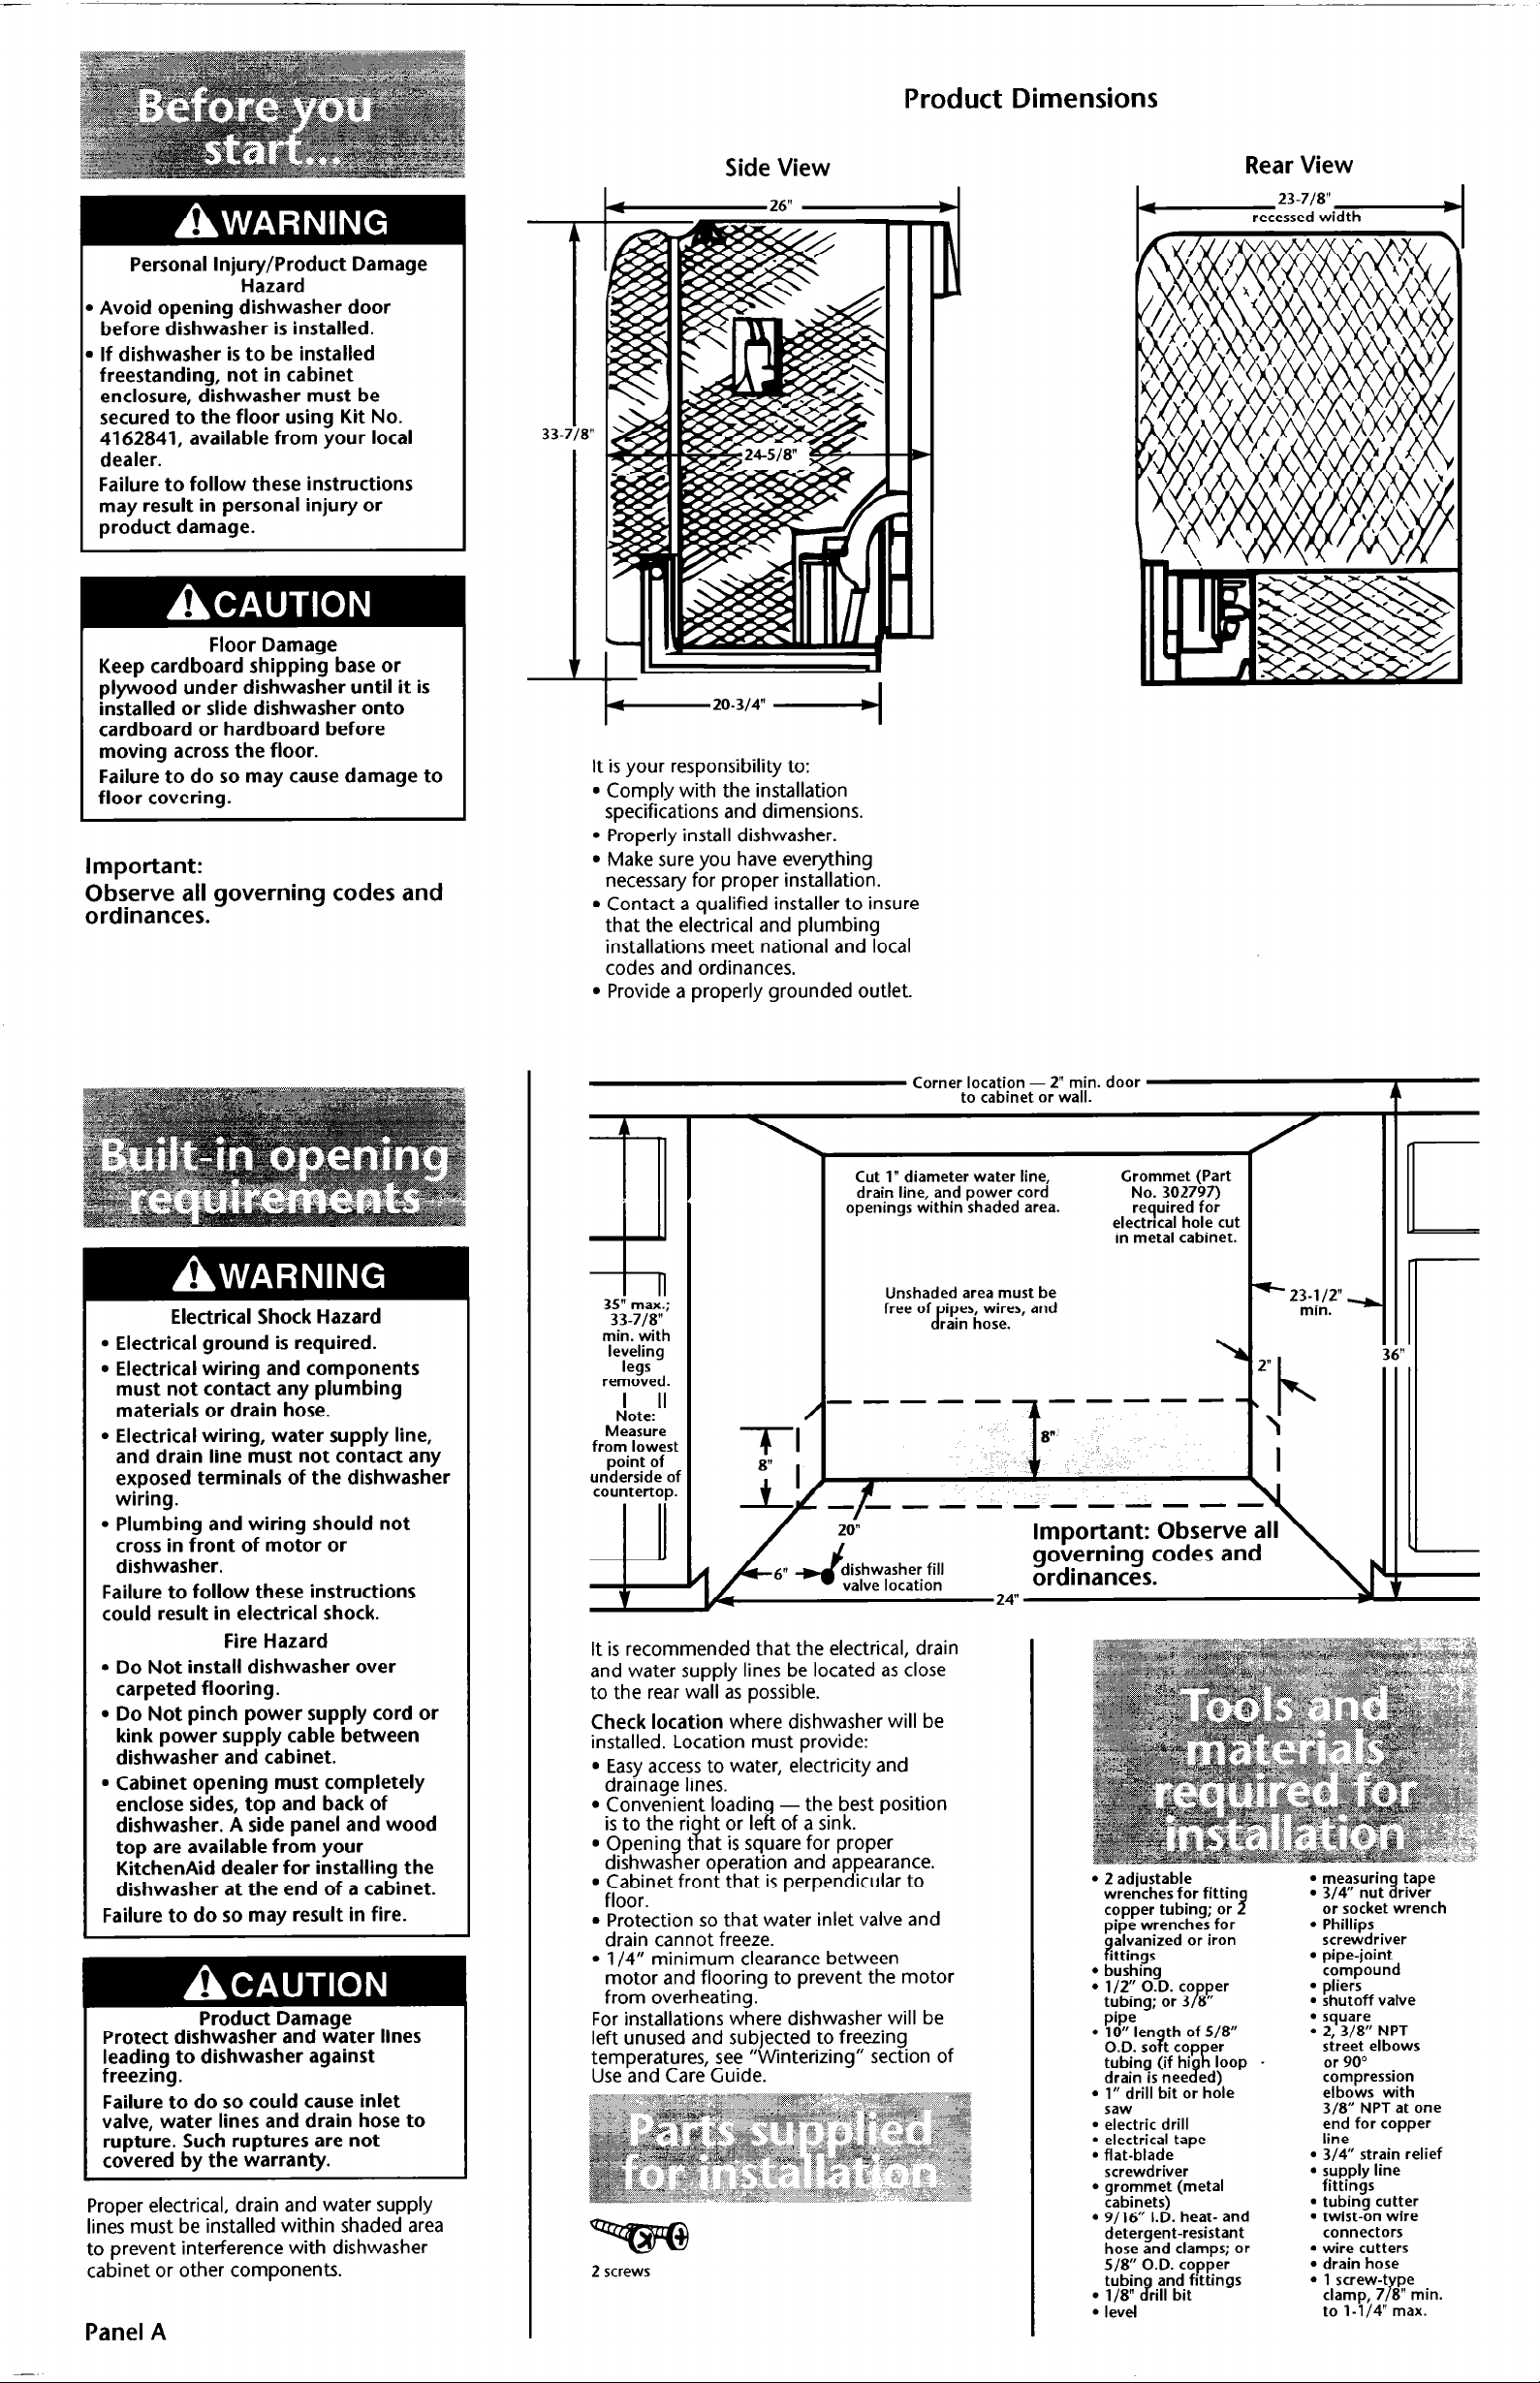
Product Dimensions
Personal Injury/Product Damage
Hazard
Avoid opening dishwasher door
before dishwasher is installed.
If dishwasher is to be installed
freestanding, not in cabinet
enclosure, dishwasher must be
secured to the floor using Kit No.
4162841, available from your local
dealer.
Failure to follow these instructions
may result in personal injury or
product damage.
Floor Damage
Keep cardboard shipping base or
plywood under dishwasher until it is
installed or slide dishwasher onto
cardboard or hardboard before
moving across the floor.
Failure to do so may cause damage to
floor covering.
Important:
Observe all governing codes and
ordinances.
Side View
L-2611 -_I
20-314”
It is your responsibility to:
. Comply with the installation
specifications and dimensions.
l Properly install dishwasher.
l Make sure you have everything
necessary for proper installation.
l Contact a qualified installer to insure
that the electrical and plumbing
installations meet national and local
codes and ordinances.
l Provide a properly grounded outlet.
Rear View
Electrical Shock Hazard
l Electrical ground is required.
l Electrical wiring and components
must not contact any plumbing
materials or drain hose.
l Electrical wiring, water supply line,
and drain line must not contact any
exposed terminals of the dishwasher
wiring.
l Plumbing and wiring should not
cross in front of motor or
dishwasher.
Failure to follow these instructions
could result in electrical shock.
Fire Hazard
l Do Not install dishwasher over
carpeted flooring.
l Do Not pinch power supply cord or
kink power supply cable between
dishwasher and cabinet.
. Cabinet opening must completely
enclose sides, top and back of
dishwasher. A side panel and wood
top are available from your
KitchenAid dealer for installing the
dishwasher at the end of a cabinet.
Failure to do so may result in fire.
Product Damage
Protect dishwasher and water lines
leading to dishwasher against
freezing.
Failure to do so could cause inlet
valve, water lines and drain hose to
rupture. Such ruptures are not
covered by the warranty.
Proper electrical, drain and water supply
lines must be installed within shaded area
to prevent interference with dishwasher
cabinet or other components.
Corner location - 2” min. door
Cut 1” diameter water line
drain line, and power cord
openings within shaded area.
35” max..
33-718” ’
min. with
leveling
legs
removed.
F!ote:ll
Measure
from lowest
point of
underside of
countertop.
4-J
I
-n
8” 1
Unshaded area must be
free ofg;ip;Lz;zs, and
dishwasher fill
valve location
v
It is recommended that the electrical, drain
and water supply lines be located as close
to the rear wall as possible.
Check location where dishwasher will be
installed. Location must provide:
l Easy access to water, electricity and
drainage lines.
l Convenient loadin -the best position
is to the ri ht or le % ;: of a sink.
l Openin
dishwas er operation and appearance.
l Cabinet front that is perpendicular to
floor.
l Protection so that water inlet valve and
drain cannot freeze.
l l/4” minimum clearance between
motor and flooring to prevent the motor
from overheating.
For installations where dishwasher will be
left unused and subjected to freezing
temperatures, see “Winterizing” section of
Use and Care Guide.
2 screws
t at is square for proper
?I
to cabinet or wall.
Important: Observe all
governing codes and
ordinances.
24”
Grommet (Part
No. 302797)
required for
electrical hole cut
in metal cabinet.
----
l
2 adjustable
wrenches for fittin
copper tubing; or
pipe wrenches. for
$gagn:‘zed or Iron
l
bushing
l
l/2” O.D. co per
tubing; or 3 8
l
1” drill bit or hole
saw
l
electric drill
l
electrical tape
l
flat-blade
screwdriver
l
grommet (metal
cabinets)
l
9/16” I.D. heat- and
detergent-resistant
hose and clamps; or
PI1
-23-112”
b
2”
.
‘\
s
min. -
b
I
l
measurin
l
3/4” nut %
or socket wrench
l
Phillips
screwdriver
l
pipe-joint
compound
l
pliers
l
shutoff valve
: ‘p;T;I’ NPT
sireet elbows
or 90”
compression
elbows with
3/8” NPT at one
end for copper
line
l
3/4” strain relief
l
supply line
fittings
l
tubing cutter
l
twist-on wire
connectors
l
wire cutters
l
drain hose
36”
tape
river
Panel A
l
level
*il.
2
--3 After dishwasher is installed in
opening, remove terminal box cover.
t: i Install conduit connector to box.
Em
.,&
T-2 + Insert power cable through conduit
connector.
Product Damage
l Heavy duty door springs must be
used with custom panels that weigh
more than 4 pounds. Heavy duty
door springs are attached to the
right mounting bracket located
behind the toe panel or can be
ordered from your dealer or
authorized parts distributor. Order
Door Spring Kit, Part Number
9741247.
l Maximum door panel weight is 10
pounds.
Failure to follow these instructions
could cause product damage.
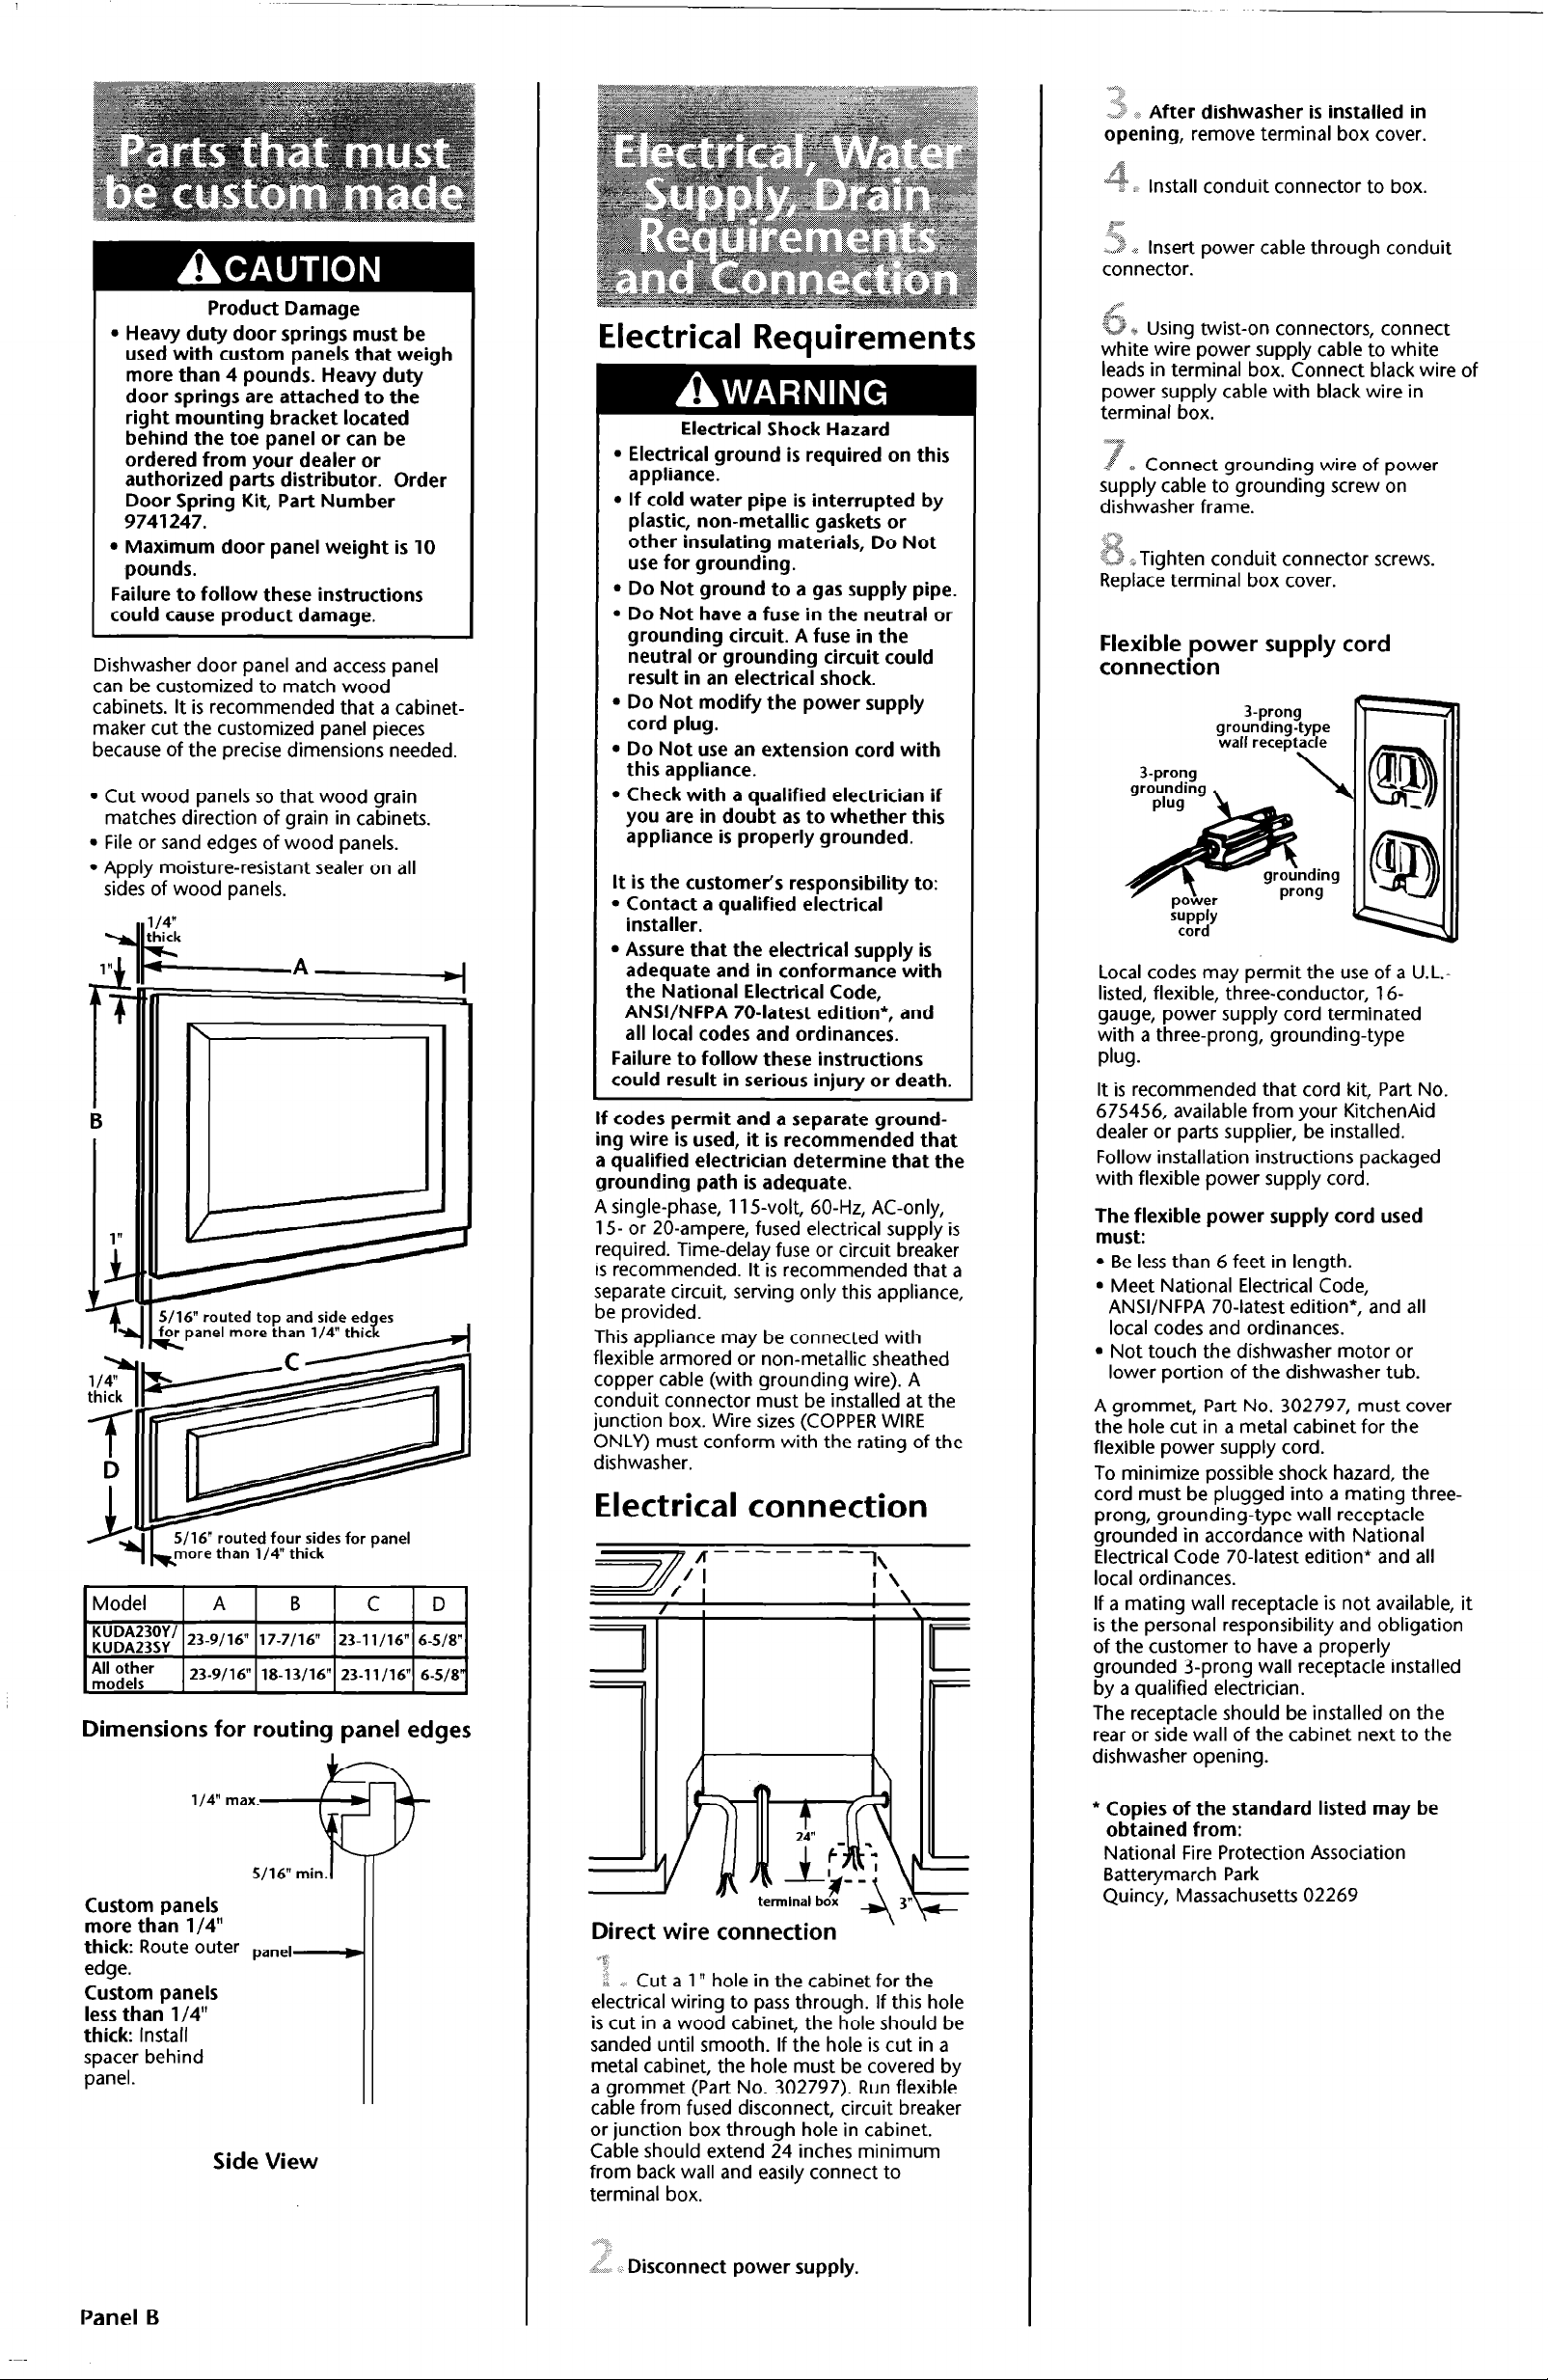
Dishwasher door panel and access panel
can be customized to match wood
cabinets. It is recommended that a cabinetmaker cut the customized panel pieces
because of the precise dimensions needed.
l Cut wood panels so that wood grain
matches direction of grain in cabinets.
. File or sand edges of wood panels.
9 Apply moisture-resistant sealer on all
sides of wood panels.
l/4”
thick
b
1 ”
T
f
B
iI 5/16”
7 Lmore than l/4” thick
routed too and side edoes
S/16” routed four sides for panel
1 Model 1 A 1 B 1 C
KUDA230Y’ 23-9116” 17-7/l&’ 23-11116”
1
6-S/8]
Dimensions for routing panel edges
Electrical Requirements
‘- + Using twist-on connectors, connect
ite wire power supply cable to white
leads in terminal box. Connect black wire of
power supply cable with black wire in
terminal box.
Electrical Shock Hazard
l Electrical ground is required on this
appliance.
l If cold water pipe is interrupted by
plastic, non-metallic gaskets or
R Connect grounding wire of power
supply cable to grounding screw on
dishwasher frame.
other insulating materials, Do Not
use for grounding.
l Do Not ground to a gas supply pipe.
l Do Not have a fuse in the neutral or
grounding circuit. A fuse in the
neutral or grounding circuit could
result in an electrical shock.
l Do Not modify the power supply
cord plug.
l Do Not use an extension cord with
‘2 -Tighten conduit connector screws.
Replace terminal box cover.
Flexible power supply cord
connection
3-prong
grounding-type
wall receptacle
this appliance.
l Check with a qualified electrician if
you are in doubt as to whether this
appliance is properly grounded.
It is the customer’s responsibility to:
l Contact a qualified electrical
installer.
l Assure that the electrical supply is
adequate and in conformance with
the National Electrical Code,
ANWNFPA 70-latest edition*, and
all local codes and ordinances.
Failure to follow these instructions
could result in serious injury or death.
If codes permit and a separate grounding wire is used, it is recommended that
a qualified electrician determine that the
grounding path is adequate.
A single-phase, 11 S-volt, 60-Hz, AC-only,
15- or 20-ampere, fused electrical supply is
required. Time-delay fuse or circuit breaker
is recommended. It is recommended that a
separate circuit, serving only this appliance,
be provided.
This appliance may be connected with
flexible armored or non-metallic sheathed
copper cable (with grounding wire). A
conduit connector must be installed at the
junction box. Wire sizes (COPPER WIRE
ONLY) must conform with the rating of the
dishwasher.
Local codes may permit the use of a U.L.-
listed, flexible, three-conductor, 16gauge, power supply cord terminated
with a three-prong, grounding-type
plug.
It is recommended that cord kit, Part No.
675456, available from your KitchenAid
dealer or parts supplier, be installed.
Follow installation instructions packaged
with flexible power supply cord.
The flexible power supply cord used
must:
l Be less than 6 feet in length.
. Meet National Electrical Code,
ANSVNFPA 70-latest edition*, and all
local codes and ordinances.
. Not touch the dishwasher motor or
lower portion of the dishwasher tub.
A grommet, Part No. 302797, must cover
the hole cut in a metal cabinet for the
flexible power supply cord.
To minimize possible shock hazard, the
cord must be plugged into a mating three-
Electrical connection
- A
-------
l\
I ‘\
I \
prong, grounding-type wall receptacle
grounded in accordance with National
Electrical Code 70-latest edition* and all
local ordinances.
If a mating wall receptacle is not available, it
is the personal responsibility and obligation
of the customer to have a properly
grounded 3-prong wall receptacle installed
1
by a qualified electrician.
The receptacle should be installed on the
rear or side wall of the cabinet next to the
dishwasher opening.
l/4” max.
S/16” min.1
Custom panels
more than l/4”
thick: Route outer panej-D
edge.
Custom panels
less than l/4”
thick: Install
spacer behind
panel.
Side View
Panel B
Direct wire connection
’
* P
i T Cut a 1” hole in the cabinet for the
electrical wiring to pass through. If this hole
is cut in a wood cabinet, the hole should be
sanded until smooth. If the hole is cut in a
metal cabinet, the hole must be covered by
a grommet (Part No. 302797). Run flexible
cable from fused disconnect, circuit breaker
or junction box through hole in cabinet.
Cable should extend 24 inches minimum
from back wall and easily connect to
terminal box.
Disconnect power supply.
D :.
* Copies of the standard listed may be
obtained from:
National Fire Protection Association
Batterymarch Park
Quincy, Massachusetts 02269
 Loading...