

Page 1
BOWL-LIFT
STAND MIXER
INSTRUCTIONS AND RECIPES
BATTEUR À
BOL AMOVIBLE
INSTRUCTIONS ET RECETTES
BATIDORA
CON TAZÓN
QUE SE LEVANTA
INSTRUCCIONES Y RECETAS
U.S.A./En EE.UU.:
1-800-541-6390
Canada/En Canadá:
1-800-807-6777
9709962C
KitchenAid.com
KitchenAid.ca
Page 2

Proof of Purchase
Always keep a copy of the sales receipt
showing the date of purchase of your
stand mixer. Proof of purchase will
assure you of in-warranty service.
Before you use your stand mixer,
please fill out and mail your product
registration card packed with the unit.
Model Number __________________________________________________________
Date Purchased __________________________________________________________
Store Name and Location __________________________________________________
This card will enable us to contact you
in the unlikely event of a product safety
notification and assist us in complying
with the provisions of the Consumer
Product Safety Act. This card does not
verify your warranty.
Please complete the following for your
personal records:
Preuve d’achat
Conservez toujours une copie de la
facture indiquant la date d’achat de
votre batteur sur socle. La preuve
d’achat vous assurera un service sous
garantie.
Avant d’utiliser votre batteur sur socle,
veuillez remplir et postez votre carte
d’enregistrement de produit fournie
avec l’unité.
Numéro de modèle __________________________________________________
Date d’achat ________________________________________________________
Cette carte nous permet de vous
contacter dans le cas fort peu probable
d’une notification de sécurité du produit
et nous aidera à nous conformer aux
provisions de la loi américaine sur la
sécurité du produit au consommateur.
Cette carte ne vérifie pas votre garantie.
Veuillez remplir ce qui suit pour vos
dossiers :
Nom du magasin et emplacement ______________________________________
Comprobante de compra
Guarde siempre una copia del recibo
de compra que muestre la fecha en
que adquirió su batidora con base. El
comprobante de compra le asegura su
derecho al servicio de garantía.
Antes de utilizar su batidora con base,
por favor complete y envíe por correo
la tarjeta de registro del producto que
viene junto con la unidad.
Número del modelo __________________________________________________
Fecha de compra ____________________________________________________
Nombre de la tienda y dirección ________________________________________
Esta tarjeta nos permitirá comunicarnos
con usted en el remoto caso que se
dé un aviso de seguridad del producto
y nos ayudará a cumplir con las
disposiciones de la Ley de Seguridad de
Productos de Consumo. Esta tarjeta no
confirma su garantía.
Por favor, complete los siguientes datos
para su registro personal:
Page 3

TABLE OF CONTENTS
INTRODUCTION
Proof of Purchase ................................................................Inside Front Cover
Stand Mixer Safety ........................................................................................ 5
Important Safeguards ................................................................................... 5
Electrical Requirements ................................................................................. 6
WARRANTY AND SERVICE INFORMATION
Kitchenaid
Hassle-Free Replacement Warranty –
50 United States and District Of Columbia .................................................... 8
Hassle-Free Replacement Warranty – Canada ................................................ 8
How to Arrange for Warranty Service in Puerto Rico ..................................... 9
How to Arrange for Service after the Warranty Expires – All Locations .......... 9
How to Arrange for Service Outside these Locations ..................................... 9
How to Order Accessories and Replacement Parts ....................................... 10
FEATURES AND OPERATION
Troubleshooting Problems ........................................................................... 11
Bowl-Lift Stand Mixer Features .................................................................... 12
Assembling Your Bowl-Lift Stand Mixer ....................................................... 15
Pre-Use Cleaning ................................................................................. 15
Attaching Mixing Bowl ........................................................................ 15
Raising and Lowering Mixing Bowl ...................................................... 15
Removing Mixing Bowl ........................................................................ 15
Attaching the Flat Beater, Wire Whip and
PowerKnead™ Spiral Dough Hook ....................................................... 16
Removing the Flat Beater, Wire Whip and
PowerKnead™ Spiral Dough Hook ....................................................... 16
Using The Pouring Shield (not included with all models) ............................. 17
Attaching the Pouring Shield ............................................................... 17
Using the Pouring Shield ..................................................................... 17
Removing the Pouring Shield ............................................................... 17
Cleaning the Pouring Shield ................................................................. 17
Using the KitchenAid
Bowl-Lift Stand Mixer Use ........................................................................... 19
Operating the Mixer ............................................................................ 19
Commercial Style Motor Protection ..................................................... 19
Speed Control Guide ................................................................................... 20
Care and Cleaning ...................................................................................... 21
Cleaning the Stand Mixer and Accessories ........................................... 21
Beater to Bowl Clearance ............................................................................ 22
®
Stand Mixer Warranty ................................................................ 7
®
Stand Mixer Accessories ........................................... 18
ENGLISH
3
333
Continued on next page
Page 4

ENGLISH
TABLE OF CONTENTS
Mixing Tips ................................................................................................. 23
Egg Whites ................................................................................................. 24
Whipping Cream ........................................................................................ 24
Stand Mixer Attachments ........................................................................... 25
Mounting Attachments ....................................................................... 25
Removing Attachments ....................................................................... 25
Stand Mixer Accessories .............................................................................. 27
General Instructions for Mixing and Kneading Yeast Dough
with the Rapid Mix Method ........................................................................ 28
Bread Making Tips ...................................................................................... 29
Shaping a Loaf............................................................................................ 30
RECIPES
Basic White Bread ....................................................................................... 31
Whole Grain Wheat Bread .......................................................................... 32
French Bread ............................................................................................... 33
Honey Oatmeal Bread ................................................................................. 34
Crusty Pizza Dough ..................................................................................... 35
Basic Sweet Dough ..................................................................................... 36
Cinnamon Swirl Rounds .............................................................................. 37
4
4
444
Page 5

STAND MIXER SAFETY
Your safety and the safety of others are very important.
We have provided many important safety messages in this manual and on
your appliance. Always read and obey all safety messages.
This is the safety alert symbol.
This symbol alerts you to potential hazards that can
kill or hurt you and others.
All safety messages will follow the safety alert symbol and
either the word “DANGER” or “WARNING.”
These words mean:
You can be killed or seriously
DANGER
WARNING
All safety messages will tell you what the potential hazard is, tell you how to
reduce the chance of injury, and tell you what can happen if the instructions
are not followed.
injured if you don’t immediately
follow instructions.
You can be killed or seriously
injured if you don’t follow
instructions.
IMPORTANT SAFEGUARDS
ENGLISH
When using electrical appliances, basic safety precautions should always be
followed including the following:
1. Read all instructions.
2. To avoid risk of electrical shock, do not put stand mixer in water or
other liquid.
3. Close supervision is necessary when any appliance is used by or
near children.
4. Unplug stand mixer from outlet when not in use, before putting on or
taking off parts and before cleaning.
5. Avoid contacting moving parts. Keep hands, hair, clothing, as well
as spatulas and other utensils away from beater during operation to
reduce the risk of injury to persons and/or damage to the stand mixer.
6. Do not operate stand mixer with a damaged cord or plug or after
the stand mixer malfunctions, or is dropped or damaged in any
manner. Return appliance to the nearest Authorized Service Center for
examination, repair or electrical or mechanical adjustment. Call the
KitchenAid Customer Satisfaction Center at 1-800-541-6390 for
more information.
5
555
Continued on next page
Page 6
7. The use of attachments not recommended or sold by KitchenAid may
cause fire, electrical shock or injury.
8. Do not use the stand mixer outdoors.
9. Do not let the cord hang over edge of table or counter.
10. Remove flat beater, wire whip or dough hook from stand mixer
before washing.
ENGLISH
SAVE THESE INSTRUCTIONS
THIS PRODUCT IS DESIGNED FOR
HOUSEHOLD USE ONLY.
ELECTRICAL REQUIREMENTS
Volts: 120 A.C. only.
Hertz: 60
The wattage rating for your stand
mixer is printed on the serial plate.
Do not use an extension cord. If
the power cord is too short, have a
qualified electrician or serviceman
install an outlet near the appliance.
The maximum rating is based on the
attachment that draws the greatest
load (power). Other recommended
attachments may draw significantly
less power.
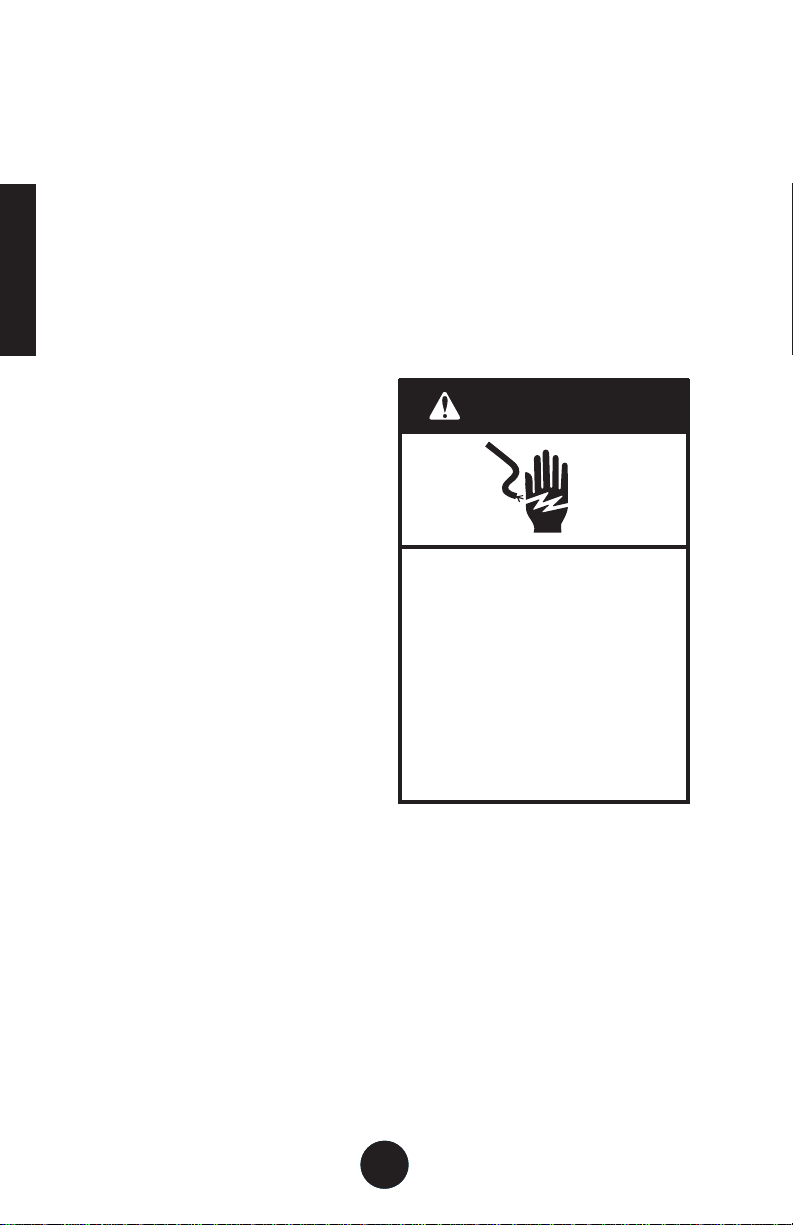
WARNING
Electrical Shock Hazard
Plug into a grounded 3 prong
outlet.
Do not remove ground prong.
Do not use an adapter.
Do not use an extension cord.
Failure to follow these
instructions can result in
death, fire, or electrical shock.
6
6
666
Page 7

KITCHENAID® STAND MIXER WARRANTY
Length of
Warranty:
50 United States,
the District of
Columbia, Canada,
and Puerto Rico:
One-year limited
warranty from date of
purchase.
DISCLAIMER OF IMPLIED WARRANTIES; LIMITATION OF REMEDIES
IMPLIED WARRANTIES, INCLUDING TO THE EXTENT APPLICABLE
WARRANTIES OF MERCHANTABILITY OR FITNESS FOR A PARTICULAR
PURPOSE, ARE EXCLUDED TO THE EXTENT LEGALLY PERMISSIBLE. ANY
IMPLIED WARRANTIES THAT MAY BE IMPOSED BY LAW ARE LIMITED TO
ONE YEAR, OR THE SHORTEST PERIOD ALLOWED BY LAW. SOME STATES
AND PROVINCES DO NOT ALLOW LIMITATIONS OR EXCLUSIONS ON HOW
LONG AN IMPLIED WARRANTY OF MERCHANTABILITY OR FITNESS LASTS, SO
THE ABOVE LIMITATIONS OR EXCLUSIONS MAY NOT APPLY TO YOU.
KitchenAid
Will Pay For:
50 United States, the
District of Columbia
and Canada: Hassle-
free replacement of
your stand mixer.
See the following
page for details on
how to arrange for
replacement.
OR
In Puerto Rico:
The replacement parts
and repair labor costs
to correct defects
in materials and
workmanship. Service
must be provided by an
Authorized KitchenAid
Service Center. To
arrange for service,
follow the instructions.
KitchenAid
Will Not Pay For:
A. Repairs when
stand mixer is
used in other than
normal single family
home use.
B. Damage resulting
from accident,
alteration, misuse
or abuse or use
with products
not approved by
KitchenAid.
C. Replacement parts
or repair labor costs
for stand mixer
when operated
outside the country
of purchase.
ENGLISH
IF THIS PRODUCT FAILS TO WORK AS WARRANTED, CUSTOMER’S SOLE AND
EXCLUSIVE REMEDY SHALL BE REPAIR OR REPLACEMENT ACCORDING TO
THE TERMS OF THIS LIMITED WARRANTY. KITCHENAID AND KITCHENAID
CANADA DO NOT ASSUME ANY RESPONSIBILITY FOR INCIDENTAL OR
CONSEQUENTIAL DAMAGES. This warranty gives you specific legal rights
and you may also have other rights which vary from state to state or
province to province.
7
777
Page 8

ENGLISH
HASSLE-FREE REPLACEMENT
WARRANTY – 50 UNITED STATES AND
DISTRICT OF COLUMBIA
We’re so confident the quality of
our products meets the exacting
standards of KitchenAid that, if your
stand mixer should fail within the
first year of ownership, KitchenAid
will arrange to deliver an identical
or comparable replacement to your
door free of charge and arrange
to have your original stand mixer
returned to us. Your replacement
unit will also be covered by our one
year limited warranty. Please follow
these instructions to receive this
high-quality service.
If your KitchenAid
should fail within the first year of
ownership, simply call our toll-free
Customer Satisfaction Center at
1-800-541-6390 Monday through
Friday, 8 a.m. to 8 p.m. (Eastern
Time), or Saturday, 10 a.m. to 5 p.m.
Give the consultant your complete
shipping address. (No P.O. Box
numbers, please.)
When you receive your replacement
stand mixer, use the carton and
packing materials to pack up your
original stand mixer. In the carton,
include your name and address on
a sheet of paper along with a copy
of the proof of purchase (register
receipt, credit card slip, etc.).
®
stand mixer
HASSLE-FREE REPLACEMENT
WARRANTY – CANADA
We’re so confident the quality of
our products meets the exacting
standards of the KitchenAid
that, if your stand mixer should fail
within the first year of ownership,
KitchenAid Canada will replace
your stand mixer with an identical
or comparable replacement. Your
replacement unit will also be covered
by our one year limited warranty.
Please follow these instructions to
receive this high-quality service.
brand
If your KitchenAid
should fail within the first year of
ownership, take the stand mixer
or ship collect to an Authorized
KitchenAid Canada Service Centre.
In the carton include your name
and complete shipping address
along with a copy of the proof of
purchase (register receipt, credit card
slip, etc.). Your replacement stand
mixer will be returned prepaid and
insured. If you are unable to obtain
satisfactory service in this manner call
our toll-free Customer eXperience
Centre at 1-800-807-6777.
Or write to us at:
Customer eXperience Centre
KitchenAid Canada
200-6750 Century Ave.
Mississauga, ON L5N 0B7
®
stand mixer
8
8
888
Page 9

HOW TO ARRANGE FOR WARRANTY
SERVICE IN PUERTO RICO
Your KitchenAid® stand mixer is
covered by a one-year limited
warranty from the date of
purchase. KitchenAid will pay for
replacement parts and labor costs
to correct defects in materials
and workmanship. Service must
be provided by an Authorized
KitchenAid Service Center.
Take the stand mixer or ship prepaid
and insured to an Authorized
KitchenAid Service Center. Your
repaired stand mixer will be returned
prepaid and insured. If you are
unable to obtain satisfactory service
in this manner, call toll-free
1-800-541-6390 to learn the location
of a Service Center near you.
HOW TO ARRANGE FOR SERVICE
AFTER THE WARRANTY EXPIRES –
ALL LOCATIONS
Before calling for service, please
review the Troubleshooting section.
For service information in the
50 United States, District of
Columbia, and Puerto Rico,
call toll-free 1-800-541-6390.
Or write to:
Customer Satisfaction Center
KitchenAid Portable Appliances
P.O. Box 218
St. Joseph, MI 49085-0218
Or contact an Authorized Service
Center near you.
For service information in
Canada,
call toll-free 1-800-807-6777.
Or write to:
Customer eXperience Centre
KitchenAid Canada
200-6750 Century Ave.
Mississauga, ON L5N 0B7
ENGLISH
HOW TO ARRANGE FOR SERVICE
OUTSIDE THESE LOCATIONS
Consult your local KitchenAid dealer
or the store where you purchased
the stand mixer for information on
how to obtain service.
For service information in
Mexico,
call toll-free
01-800-024-17-17
(JV Distribuciones)
Or
01-800-902-31-00
(Industrias Birtman)
9
999
Page 10

HOW TO ORDER ACCESSORIES
AND REPLACEMENT PARTS
ENGLISH
To order accessories or
replacement parts for your
stand mixer in the 50 United
States, District of Columbia, and
Puerto Rico,
call toll-free 1-800-541-6390
Monday through Friday, 8 a.m. to
8 p.m. (Eastern Time), or Saturday,
10 a.m. to 5 p.m.
Or write to:
Customer Satisfaction Center
KitchenAid Portable Appliances
P.O. Box 218
St. Joseph, MI 49085-0218
To order accessories or
replacement parts for your stand
mixer in Canada,
call toll-free 1-800-807-6777.
Or write to:
Customer eXperience Centre
KitchenAid Canada
200-6750 Century Ave.
Mississauga, ON L5N 0B7
To order accessories or
replacement parts for your stand
mixer in Mexico,
call toll-free
01-800-024-17-17
(JV Distribuciones)
Or
01-800-902-31-00
(Industrias Birtman)
10
101010
10
Page 11

TROUBLESHOOTING PROBLEMS
Please read the following before
calling the service center.
1. The stand mixer may become
warm during use. Under heavy
loads with extended mixing time
periods, you may not be able to
comfortably touch the top of the
stand mixer. This is normal.
2. The stand mixer may emit a
pungent odor, especially when
new. This is common with
electric motors.
3. If the flat beater hits the bowl,
stop the stand mixer. See “Beater
to Bowl Clearance” section.
If your stand mixer should
malfunction or fail to operate,
please check the following:
– Is the stand mixer plugged in?
WARNING
– Turn the stand mixer off for
10-15 seconds, then turn it back
on. If the mixer still does not start,
allow it to cool for 30 minutes
before turning it back on.
If the problem is not due to
one of the above items, see
the KitchenAid
Warranty. Do not return the
stand mixer to the retailer – they
do not provide service.
USA/Puerto Rico: 1-800-541-6390
Canada: 1-800-807-6777
Mexico: 01-800-024-17-17
(JV Distribuciones)
or
01-800-902-31-00
(Industrias Birtman)
®
stand mixer
ENGLISH
Electrical Shock Hazard
Plug into a grounded 3 prong
outlet.
Do not remove ground prong.
Do not use an adapter.
Do not use an extension cord.
Failure to follow these
instructions can result in
death, fire, or electrical shock.
– Is the fuse in the circuit to the
stand mixer in working order? If
you have a circuit breaker box, be
sure the circuit is closed.
11
111111
Page 12
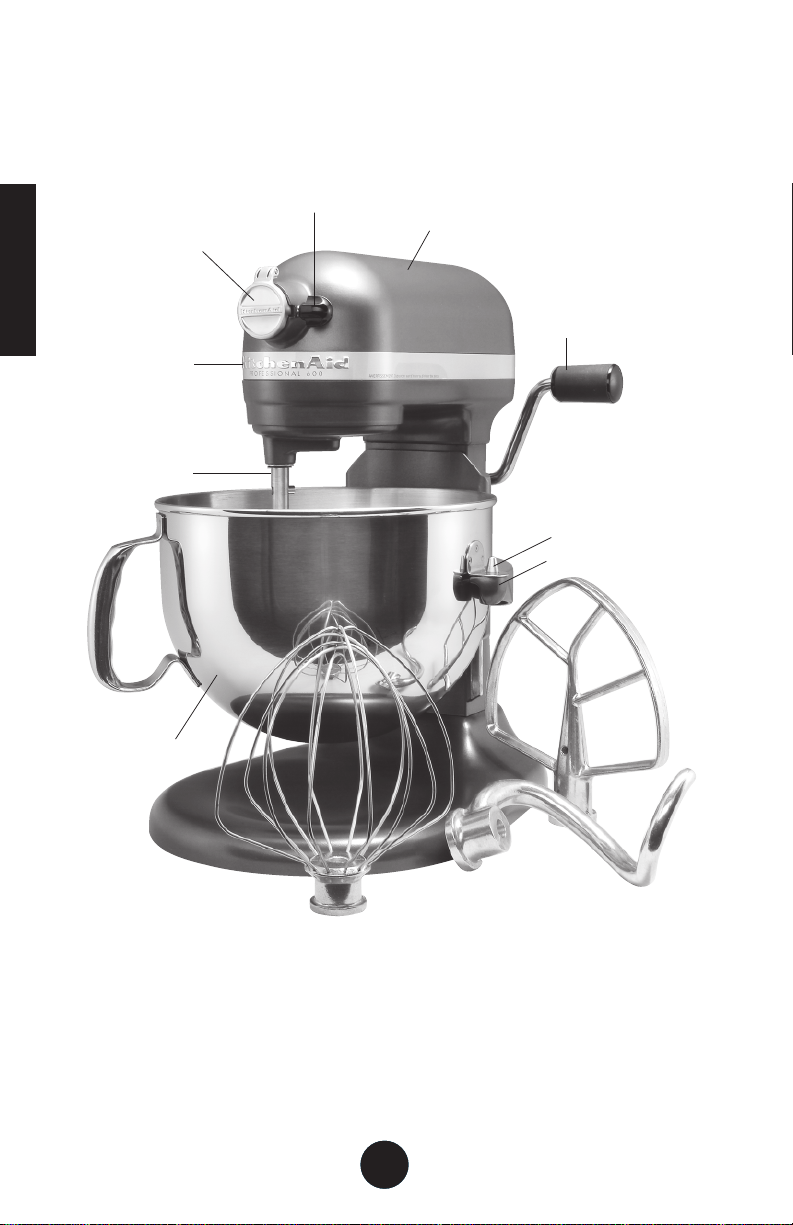
BOWL-LIFT STAND MIXER FEATURES
ENGLISH
Features“ section)
Multipurpose
Attachment Hub
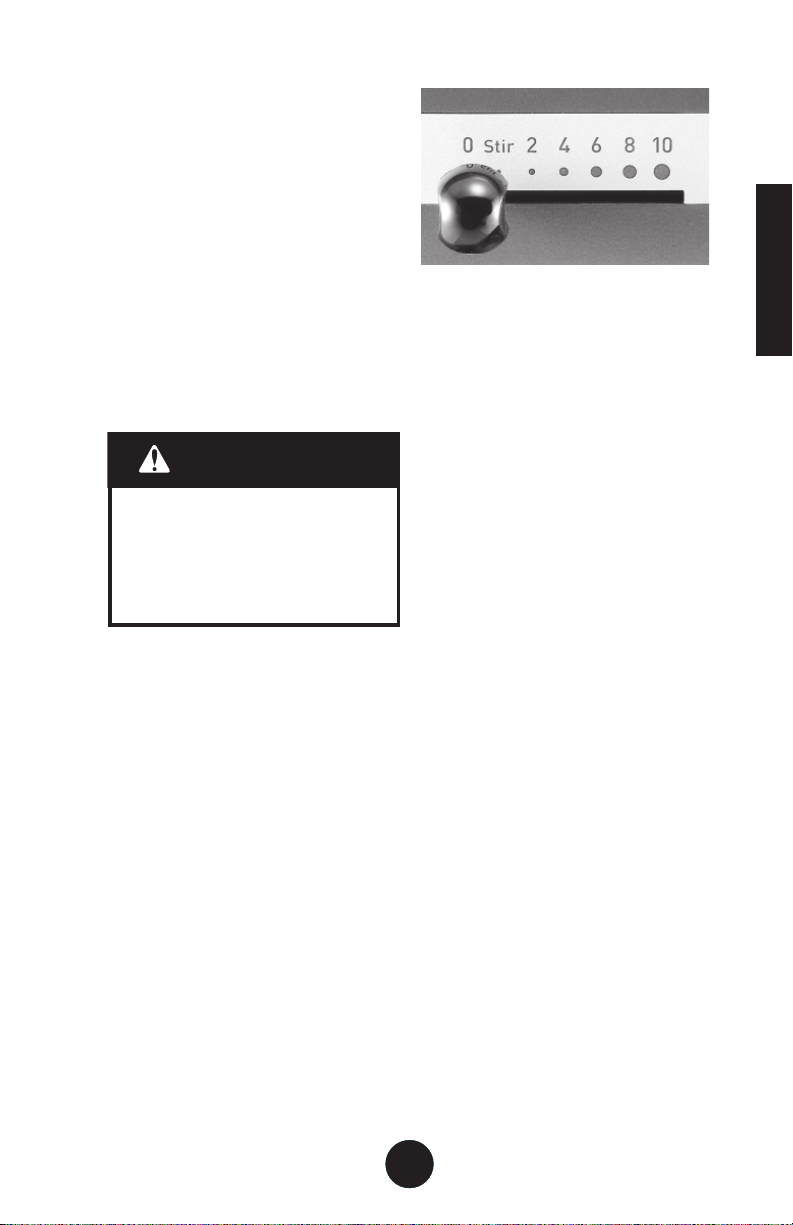
Speed Control
Lever
(not shown –
see the “Bowl-
Lift Stand Mixer
Beater Shaft
Stainless
Steel Bowl
Attachment
Knob
Motor Head
(contains direct-drive,
all-steel gear transmission)
Bowl-Lift Lever
Locating Pins
Bowl Support
Flat
Beater
Wire Whip*
12
121212
PowerKnead™
Spiral Dough Hook
12
*Some models include the
11-Wire Whip instead of the
Wire Whip. See “Using the KitchenAid
Stand Mixer Accessories“ section.
®
Page 13

BOWL-LIFT STAND MIXER FEATURES
Direct-Drive,
All-Steel Gear Transmission
The motor head houses the
powerful, high-performance motor
and the direct-drive, all-steel gear
transmission.
Multipurpose Attachment Hub
with Hinged Hub Cover
Hinged hub cover flips open to
reveal the multipurpose attachment
hub. The hub powers a variety of
attachments that simplify food
preparation and add culinary
versatility. See the “Stand Mixer
Attachments“ section.
Commercial-Style Motor Protection
This reset feature keeps the motor
from overheating by automatically
shutting down the mixer when
thermal overload is detected.
Attachment Knob
Knob secures stand mixer
attachments to the hub.
Bowl-Lift Lever
Sturdy bowl-lift lever raises and
lowers the mixing bowl.
Beater Shaft
Flat beater, dough hook, and wire
whip accessories mount to the
beater shaft.
Stainless Steel Bowl
Polished stainless steel bowl is
dishwasher safe.
Speed Control Lever
10 mixing speeds provide versatility
for any recipe. Speeds range from a
very slow stir to a very fast mix.
Bowl-Height Adjustment Screw
Screw adjusts the beater-to-bowl
clearance. Factory preset.
Bowl Support
Durable metal arms support the
bowl for stable mixing.
Locating Pins
Pins fit through the bowl brackets to
position the bowl on the bowl support.
67-Point Planetary Mixing Action
The beater spirals to 67 different
touch-points within the bowl for
quick, complete mixing.
Soft Start™ Mixing Feature
Helps minimize ingredient splatter
with gentle acceleration to the
selected speed.
PowerKnead™ Spiral Dough
Hook
Quickly and thoroughly kneads any type
of raised dough – even large quantities.
Flat Beater
Use the flat beater to mix cakes,
quick breads, cookie dough and
to mash potatoes. Special design
works with unique mixing action to
thoroughly mix ingredients.
Wire Whip
The design of the wire whip rapidly
increases airflow into egg mixtures
for stiff soufflés and rigid peaks
of meringue. With the planetary
mixing action, the wire whip covers
134 points within the bowl to create
silky decorator icings and lighter,
fluffier whipped cream.
NOTE: Some models include the
11-Wire Whip instead.
ENGLISH
13
131313
Continued on next page
Page 14

BOWL-LIFT STAND MIXER FEATURES
ENGLISH
11-Wire Whip
The 11-wire whip is ideal for
achieving superior results when
whipping smaller quantities of egg
whites and cream. The design of the
11-wire whip produces larger
volumes of egg whites in significantly
less time than it would take the
standard wire whip. The 11-wire
whip also can whip cream faster.
NOTE: The 11-Wire Whip is standard
equipment with select models but
can be purchased as an optional
accessory. [Model KN211WW]
Wide-Chute Pouring Shield
(not shown)
The dual-purpose pouring shield
helps avoid ingredient splatter and
minimizes flour puff. Wide pouring
chute makes adding ingredients easy.
(Standard with select models.)
Electronic Speed Sensor
The electronic speed sensor
maintains the selected speed even
when ingredients are added and the
density and weight change.
14
141414
14
Page 15
ASSEMBLING YOUR BOWL-LIFT
STAND MIXER
Pre-Use Cleaning
Before using your stand mixer for
the first time, wash the mixing bowl
and accessories. See the “Care and
Cleaning“ section.
Attaching Mixing Bowl
WARNING
Electrical Shock Hazard
Plug into a grounded 3 prong
outlet.
Do not remove ground prong.
Do not use an adapter.
Do not use an extension cord.
Failure to follow these
instructions can result in
death, fire, or electrical shock.
4. Place bowl brackets over the
locating pins on the bowl support.
5. Press down on the back of the
bowl until bowl pin snaps into
the spring latch.
6. Raise the bowl before mixing.
7. Plug into a grounded
3-prong outlet.
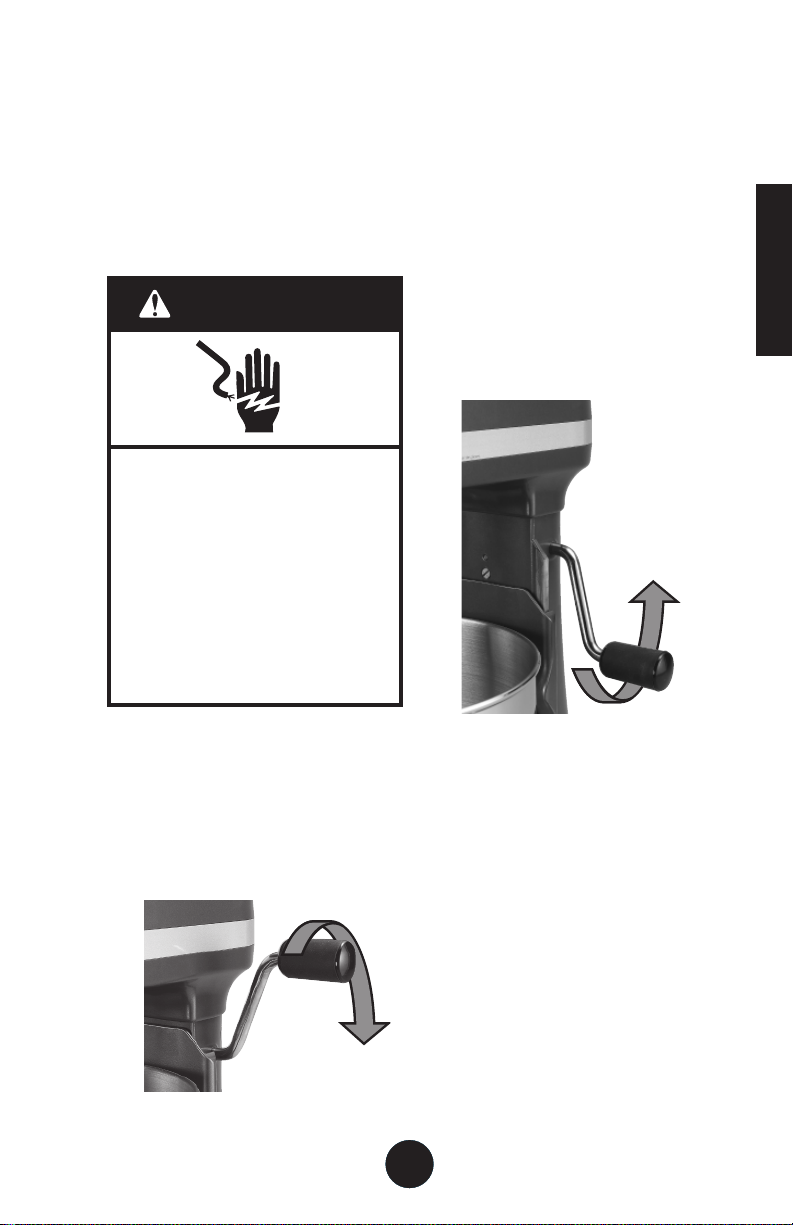
Raising and Lowering Mixing Bowl
1. To raise the bowl, turn the
bowl-lift lever counterclockwise
as far as possible.
Raise
ENGLISH
1. Make sure the speed control lever
is set to the OFF/0 position.
2. Unplug the stand mixer or
disconnect power.
3. Lower the bowl support by
turning the bowl-lift lever
clockwise.
Lower
2. The bowl-lift lever will snap
into place when the bowl is
completely raised.
3. To lower the bowl, turn the bowl-
lift lever clockwise.
Removing Mixing Bowl
1. Make sure the speed control
lever is set to the OFF/0
position.
2. Unplug the stand mixer or
disconnect power.
3. Lower the bowl support by
turning the bowl-lift lever
clockwise.
4. Grasp the bowl handle
and lift the bowl off of the
locating pins.
15
151515
Continued on next page
Page 16

ASSEMBLING YOUR BOWL-LIFT
STAND MIXER
ENGLISH
Attaching the Flat Beater,
Wire Whip, and PowerKnead™
Spiral Dough Hook
1. Make sure the speed control
lever is set to the OFF/0 position.
2. Unplug the stand mixer or
disconnect power.
3. Slide selected accessory onto
the beater shaft.
Beater
Shaft
Removing the Flat Beater,
Wire Whip, and PowerKnead™
Spiral Dough Hook
1. Make sure the speed control
lever is set to the OFF/0 position.
2. Unplug the stand mixer or
disconnect power.
3. Press accessory upward and turn
to the left.
4. To remove, gently slide the
accessory down from the
beater shaft.
..4. Turn the accessory to the right,
hooking it over the pin on the
shaft.
5. Plug into a grounded
3-prong outlet.
16
161616
16
Page 17

USING THE POURING SHIELD*
Attaching the Pouring Shield*
1. Make sure the speed control
lever is set to the OFF/0 position.
2. Unplug the stand mixer or
disconnect power.
3. Attach desired accessory and
raise the mixing bowl.
4. Slide pouring shield collar
around beater shaft, centering
collar over rim of bowl.
Using the Pouring Shield
Pour ingredients into the mixing
bowl through the chute portion of
shield.
IMPORTANT: Make sure the guides
on the bottom of the chute rest
on the rim of the bowl to keep
ingredients from falling outside the
bowl as they are added.
Pouring
Chute
ENGLISH
Removing the Pouring Shield
1. Make sure the speed control
lever is set to the OFF/0 position.
2. Unplug the stand mixer or
disconnect power.
3. Remove pouring chute
from collar.
4. Slide pouring shield collar
off bowl.
5. Lower the bowl support by
turning the bowl-lift lever
clockwise.
6. Remove accessory and the
mixing bowl.
Cleaning the Pouring Shield
Wash in warm sudsy water. If you
wish, you may place on the top rack
of your dishwasher.
17
171717
*If Pouring Shield is included.
Page 18

ENGLISH
USING THE KITCHENAID®
STAND MIXER ACCESSORIES
Flat Beater for normal to
heavy mixtures:
cakes biscuits
creamed frostings quick breads
candies meat loaf
cookies mashed potatoes
pie pastry
Wire Whip or 11-Wire Whip
for mixtures that
need air incorporated:
eggs
egg whites
heavy cream
boiled frostings
sponge cakes
Wire Whip
angel food cakes
mayonnaise
some candies
11-Wire Whip
Powerknead™ Spiral Dough Hook for
mixing and kneading
yeast doughs:
breads rolls
pizza crusts coffee cakes
buns
18
18
181818
Page 19
BOWL-LIFT STAND MIXER USE
Operating the Mixer
1. Before use, make sure the
flat beater, wire whip, or the
PowerKnead™ Spiral Dough
Hook is properly attached
and the bowl is raised into
mixing position.
2. Plug the stand mixer into a
grounded 3-prong outlet.
3. Slowly slide the speed control
lever forward to begin mixing.
Gradually increase the speed to
avoid splashing ingredients.
4. To stop mixing, slide the
speed control lever to the
OFF/0 position.
WARNING
Injury Hazard
Unplug mixer before touching
beaters.
Failure to do so can result in
broken bones, cuts or bruises.
NOTE: The bowl and beater are
designed to provide thorough mixing
without frequent scraping. Scraping
the bowl once or twice during mixing
is usually sufficient. Turn off the
stand mixer before scraping. Do not
scrape the bowl while the stand
mixer is operating.
Commercial Style Motor
Protection
If the stand mixer becomes
overheated due to heavy use, the
motor will automatically shut off to
avoid damage. If this occurs:
1. Slide the speed control lever to
the OFF/0 position. This resets
the mixer.
2. Allow the mixer to cool for
several minutes.
3. Resume mixing by sliding the
speed control lever to the
desired speed.
4. If the mixer does not start, slide
the speed control lever to the
OFF/0 position. Let the mixer
cool for 30 more minutes
before resuming.
ENGLISH
19
191919
Page 20

ENGLISH
SPEED CONTROL GUIDE
The speed control lever can be set between the speeds listed below if a finer
adjustment is required.
IMPORTANT: Use Speed 2 when preparing yeast dough – using any other
speed may damage the mixer.
Speed Use For Description
STIR STIRRING For slow stirring, combining, mashing,
starting all mixing procedures. Use to add
flour and dry ingredients to batter, add
liquids to dry ingredients, and combine
heavy mixtures.
• Also for use with Ice Cream
Maker Attachment.
NOTE: Do not use STIR speed to mix or
knead yeast dough.
2 SLOW MIXING For slow mixing, mashing, and faster
stirring. Use to mix heavy batters and
candies, begin mashing potatoes or other
vegetables, cut shortening into flour,
mix thin or splashy batters, and mix
and knead yeast dough.
• Also for use with Can Opener Attachment.
4 MIXING & For mixing semi-heavy batters, such as cookies.
BEATING Use to combine sugar and shortening and to
add sugar to egg whites for meringues. This is
a medium speed for cake mixes.
• Also for use with the Food Grinder
Attachment, the Slicer/Shredder
Attachment, and the Fruit/Vegetable
Strainer Attachment.
6 BEATING & For medium-fast beating, creaming, or
CREAMING whipping. Use to finish mixing cake,
doughnut, and other batters. This is a high
speed for cake mixes.
• Also for use with the Citrus Juicer
8 FAST BEATING For whipping cream, egg whites, and
& WHIPPING boiled frostings.
10 FAST WHIPPING For whipping small amounts of cream
or egg whites.
• Also for use with the Pasta Maker and
NOTE: The mixer will slow down under the
Attachment.
20
Grain Mill Attachments.
heavy loads imposed by these attachments.
This is normal.
20
202020
Page 21

CARE AND CLEANING
Cleaning the stand mixer and
Accessories
• Make sure the speed control
lever is set to the OFF/0 position.
• Unplug the stand mixer or
disconnect power.
• Burnished (bare metal) flat
beaters, PowerKnead™ Spiral
Dough Hook, and wire whips
should be hand washed in
hot soapy water and dried
immediately after washing. Do
not wash burnished accessories
in the dishwasher.
• All mixing bowls, coated (white)
flat beaters, and coated (white)
dough hooks are dishwasher safe.
• Wipe mixer with a soft, damp
cloth. Do not use abrasive
cleansers or scouring pads. Do
not immerse mixer in water.
• Wipe off beater shaft frequently
to remove any residue that
may accumulate. Do not store
accessories on the beater shaft.
ENGLISH
21
212121
Page 22

BEATER TO BOWL CLEARANCE
ENGLISH
Your stand mixer is adjusted at the
factory so the flat beater just clears
the bottom of the bowl. If, for
any reason, the flat beater hits the
bottom of the bowl, or is too far
away from the bowl, you can correct
the clearance easily.
NOTE: Adjustments should be made
only with the flat beater in place.
1. Make sure the speed control
lever is set to the OFF/0 position.
2. Unplug the stand mixer or
disconnect power.
3. Place the bowl-lift lever in the
down position.
4. Attach the mixing bowl and
flat beater.
5. Gently turn screw (A) slightly
counterclockwise to raise the
bowl (reduced beater clearance),
or clockwise to lower the bowl
(increased beater clearance). A
slight turn is all that is required;
the full range of adjustment is
achieved in just
screw. Do not rotate the screw
more than
direction.
1
/2 turn of the
1
/2 turn in either
6. Raise the bowl into mixing position.
7. Examine the clearance between
the beater and the bowl. The
beater should just clear the
surface of the bowl. If it does
not, lower the bowl and readjust.
NOTE: When properly adjusted,
the flat beater will not strike the
bottom or sides of the bowl while
the mixer is running. If the beater
or professional wire whip strikes the
bowl, damage may result.
A
22
22
222222
Page 23

MIXING TIPS
Converting Your Recipe
for the Mixer
The following mixing instructions
can help guide you in converting
your own favorite recipes and
mixing methods for use with your
KitchenAid
®
stand mixer.
The “quick mix” method (sometimes
referred to as the “dump” method)
is ideal for simple cake recipes. This
method calls for combining dry
ingredients with most or all-liquid
ingredients in one step.
More elaborate cake recipes should
be prepared using the traditional
cake mixing method commonly
referred to as the “creaming”
method. With this method, sugar
and shortening, butter, or margarine
are thoroughly mixed (creamed)
before other ingredients are added.
For all cakes, mixing times may vary
because your KitchenAid
®
stand mixer
mixes faster than most other mixers.
In general, mixing a cake with a
KitchenAid
®
stand mixer will take
about half the time recommended in
most cake recipes.
To help determine the ideal mixing
time, observe the batter or dough
and mix only until it has the desired
appearance described in your recipe,
such as “smooth and creamy.” To
select the best mixing speed for the
job, use the Speed Control Guide.
Adding Ingredients
Always add ingredients as close to
the side of the bowl as possible, not
directly into the moving beater. The
Pouring Shield* can simplify adding
ingredients. If the ingredients in the
bottom of bowl are not thoroughly
mixed, then the beater-to-bowl
clearance must be adjusted. See
“Beater to Bowl Clearance“ section.
Cake Mixes
When preparing packaged cake
mixes, use Speed 2 for low speed,
Speed 4 for medium speed, and
Speed 6 for high speed. For the best
results, mix for the time stated on
the package directions.
Adding Nuts, Raisins, or
Candied Fruits
Follow individual recipes for
guidelines on including these
ingredients. In general, solid materials
should be folded into the mix during
the last few seconds of mixing on
the STIR Speed. The batter should
be thick enough to keep the fruit or
nuts from sinking to the bottom of
the pan during baking. Sticky fruits
should be dusted with flour for
better distribution in the batter.
Liquid Mixtures
Mixtures containing large amounts
of liquid ingredients should be mixed
at lower speeds to avoid splashing.
Increase the speed only after the
mixture has thickened.
ENGLISH
23
232323
*If Pouring Shield is included.
Page 24

EGG WHITES
Place room temperature egg whites in a clean, dry bowl. Attach the bowl and
wire whip. To avoid splashing, gradually turn to designated speed and whip to
the desired stage. See chart below.
ENGLISH
AMOUNT SPEED
1 egg white ... GRADUALLY to 10
2-4 egg whites ... GRADUALLY to 8
6+ egg whites ... GRADUALLY to 8
Whipping Stages
With your KitchenAid
egg whites will whip quickly.
Watch closely to avoid
overwhipping. Refer to the list of
whipping stages below:
Frothy
Large, uneven air bubbles.
Begins to Hold Shape
Air bubbles are fine and compact.
Product is white.
®
stand mixer,
Soft Peak
Tips of peaks fall over when wire
whip is removed.
Almost Stiff
Sharp peaks form when wire
whip is removed, but whites are
actually soft.
Stiff But Not Dry
Sharp, stiff peaks form when
wire whip is removed. Whites are
uniform in color and glisten.
Stiff and Dry
Sharp, stiff peaks form when
wire whip is removed. Whites are
speckled and dull in appearance.
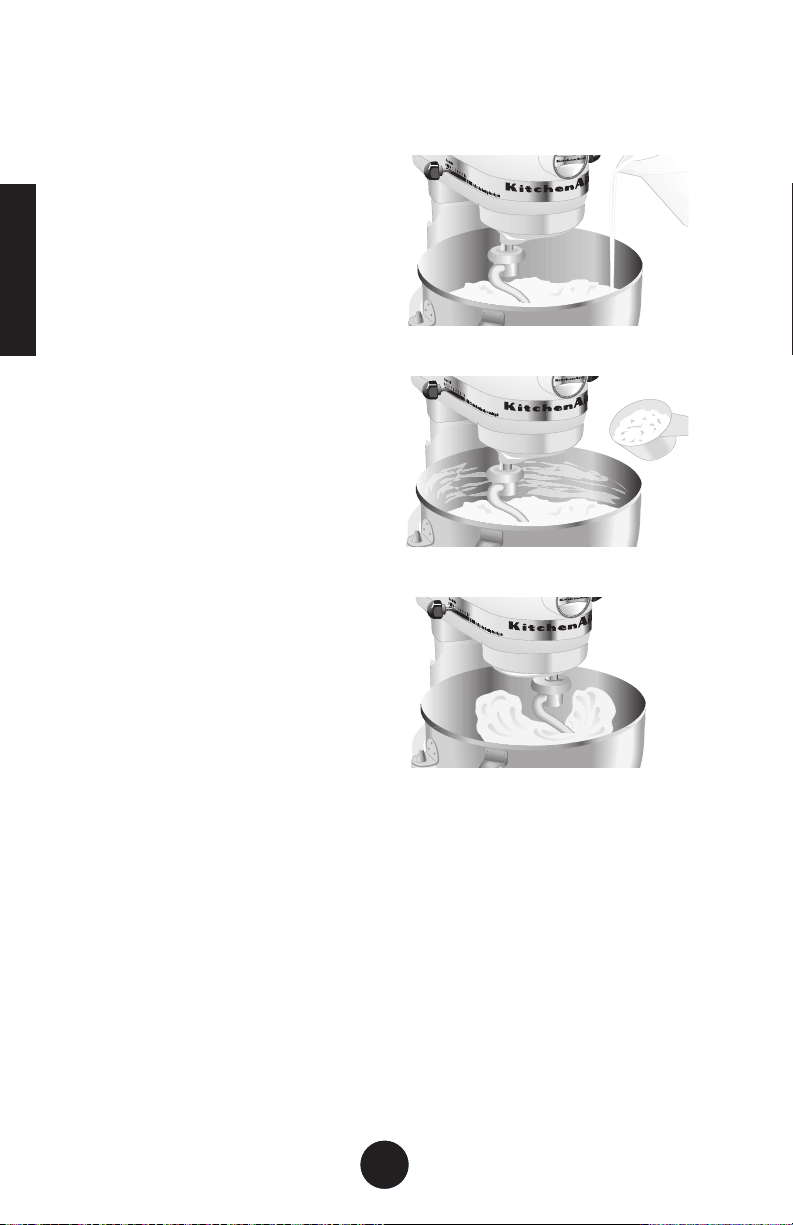
WHIPPING CREAM
Pour cold whipping cream into a chilled bowl. Attach the bowl and wire
whip. To avoid splashing, gradually turn to designated speed and whip to
desired stage. See chart below:
AMOUNT SPEED
1
/4 - 3/4 cup.......... GRADUALLY to 10
(60 mL - 175 mL)
1+ cup ...............GRADUALLY to 8
(235 mL +)
Whipping Stages
Watch the cream closely during
whipping. Because your KitchenAid
stand mixer whips so quickly, there
are just a few seconds between
whipping stages. Look for these
characteristics:
Begins to Thicken
Cream is thick and custard-like.
Holds Its Shape
Cream forms soft peaks when wire
whip is removed. Can be folded
into other ingredients when making
desserts and sauces.
Stiff
®
Cream stands in stiff, sharp peaks
when wire whip is removed. Use
for topping on cakes or desserts, or
filling for cream puffs.
24
24
242424
Page 25

STAND MIXER ATTACHMENTS
KitchenAid® Attachments are designed to assure long life. The attachment
power shaft and hub socket are of a square design, to eliminate any possibility
of slipping during the transfer of power to the attachment. The hub and
shaft housing are tapered to assure a snug fit, even after prolonged use. All
KitchenAid
power unit is built-in.
See the Stand Mixer Attachments Use and Care Guide for speed settings and
operating time.
®
Attachments require no extra power unit to operate them; the
Hinged Hub Cover
Attachment Knob
Attachment Hub Socket
Attachment Power Shaft
Attachment
ENGLISH
Mounting Attachments
1. Make sure the speed control
lever is set to the OFF/0 position.
2. Unplug the stand mixer or
disconnect power.
3. Loosen the attachment knob by
turning it counterclockwise, then
flip up the hinged hub cover.
4. Insert the attachment shaft
housing into attachment hub.
Make sure attachment power
shaft fits into square attachment
hub socket. It may be necessary
to rotate attachment back and
forth. When the attachment is in
proper position, the pin on the
attachment will fit into the notch
on the hub rim.
5. Tighten the attachment knob
by turning it clockwise until the
attachment is completely secured
to the stand mixer.
Removing Attachments
1. Make sure the speed control
lever is set to the OFF/0 position.
2. Unplug the stand mixer or
disconnect power.
3. Loosen the attachment knob
by turning it counterclockwise.
Rotate the attachment back and
forth slightly while pulling it out.
4. Replace attachment hub cover.
Tighten attachment knob by
turning it clockwise.
25
252525
Continued on next page
Page 26

STAND MIXER ATTACHMENTS
ENGLISH
RAVIOLI MAKER
Rolls pasta sheets
and filling into
3 rows of fresh,
large-pocket
ravioli. Includes
specially designed
filling scoop and cleaning brush.
Accommodates 6-inch wide pasta
sheets produced with the Pasta
Sheet Roller Attachment [KPSA]
(sold separately). [KRAV]
PASTA CUTTER COMPANION SET
Accommodates
pasta sheets
produced by the
Pasta Sheet Roller
[KPSA] or the
Pasta Roller Set
[KPRA] (both sold
separately) to cut thin angel hair pasta
and thick noodles. [KPCA]
PASTA SHEET ROLLER AND
CUTTER SET
The 3-piece, all
metal set contains
a Pasta Sheet
Roller, Fettuccine
Cutter, and
Spaghetti Cutter.
Includes cleaning
brush. [KPSA]
Pasta Sheet Roller
only. [KPRA]
GRAIN MILL
The all-metal
oil grains. Choose from “cracked”
to extra-fine consistency. Includes
cleaning brush. [KGMA]
SLICER AND SHREDDER
cheese. Includes 2 slicer and 2
shredder cones. [RVSA]
FOOD GRINDER
food pusher/wrench. [FGA]
SAUSAGE STUFFER
for large links. The Sausage Stuffer
requires the Food Grinder Attachment
[FGA sold separately.] [SSA]
Grain Mill
Attachment will
grind wheat,
oats, corn, rice,
and other lowmoisture, low-
Cuts thick or thin
slices of firm fruits
and vegetables,
as well as fine or
coarse shreds of
crisp vegetables,
nuts, and firm
Quickly grind
meats, firm fruits
and vegetables,
dry bread, and
cheese. Includes
coarse and fine
grinder plates,
and combination
Prepare sausages
that burst with
delectable flavor
and nutrition.
Includes a
(1 cm) tube for
small links, and a
5
/8" (1.6 cm) tube
26
3
/8"
26
262626
Page 27

STAND MIXER ATTACHMENTS
ICE CREAM MAKER
Makes up to
2 qt (1.9 L) of
homemade
ice cream,
sorbet, and other
frozen dessert
favorites within
20-30 minutes. After a minimum
15 hours in the freezer, the Freeze
Bowl is ready to work with the
Dasher to provide thorough,
even freezing of ice cream batter
throughout the mixing process.
[KICA0WH]
CAN OPENER
This handy
attachment is
perfect for very
large cans —
and small ones,
too. The Can
Opener Attachment will leave edges
smooth and snag-free. [CO]
STAND MIXER ACCESSORIES
CITRUS JUICER
Extract fresh
juice from the
smallest lime
to the largest
grapefruit,
quickly and
easily. A special strainer helps avoid
accumulation of pulp and seeds. [JE]
FOOD TRAY
Attach the Food
Tray to expand
your workspace
and provide
a convenient
surface for additional food. Use
with the Food Grinder, Pasta Maker,
Sausage Stuffer, and Fruit and
Vegetable Strainer. [FT]
ENGLISH
POURING SHIELD
Designed with a pouring chute, this
shield minimizes splash-out and flour
puff when ingredients are added to
the mixing bowl. [KN2PS]
WATER JACKET
Fill with ice to keep whipping cream
cool, or fill with hot water to keep
mashed potatoes warm. [Model
KN2WJ for 6 qt (5.7 L) bowl-lift
mixers.]
MIXER COVERS
Guard against scratches and dust
with these cloth covers. All feature
black trim. [KMCC1KB is Khaki Bone,
KMCC1OB is Onyx Black, KMCC1WH
is White, KMCC1ER is Empire Red.]
27
272727
Page 28
ENGLISH
GENERAL INSTRUCTIONS
FOR MIXING AND KNEADING YEAST
DOUGH WITH THE RAPID MIX METHOD
“Rapid Mix” describes a bread baking
method that calls for dry yeast to
be mixed with other dry ingredients
before liquid is added. In contrast,
the traditional method is to dissolve
yeast in warm water.
1. Place all dry ingredients including
yeast into bowl, except last 1 to
2 cups (235 to 475 mL) flour.
2. Attach bowl and dough hook.
Raise mixer bowl. Turn to Speed
2 and mix about 15 seconds, or
until ingredients are combined.
3. Continuing on Speed 2, gradually
add liquid ingredients to flour
mixture and mix 1 to 2 minutes
longer. See Illustration A.
NOTE: If liquid ingredients are added
too quickly, they will form a pool
around the dough hook and slow
down mixing process.
4. Continuing on Speed 2, gently
add remaining flour,
(120 mL) at a time. See
Illustration B. Mix until dough
starts to clean sides of bowl,
about 2 minutes.
5. Knead on Speed 2 for 2 more
minutes, or until dough is
smooth and elastic.
See Illustration C.
6. Lower bowl on mixer and
remove dough from the bowl
and dough hook. Follow
directions in recipe for rising,
shaping and baking.
When using the traditional method
to prepare a favorite recipe, dissolve
yeast in warm water in warmed
bowl. Add remaining liquids and dry
ingredients, except last 1 to 2 cups
(235 to 475 mL) flour. Turn to
Speed 2 and mix about 1 minute,
or until ingredients are thoroughly
mixed. Proceed with steps 4 through 6.
1
/2 cup
ILLUSTRATION A
ILLUSTRATION B
ILLUSTRATION C
Both methods work equally well
for bread preparation. However,
the “Rapid Mix” method may be a
bit faster and easier for new bread
bakers. It is slightly more temperature
tolerant because the yeast is mixed
with dry ingredients rather than with
warm liquid.
28
28
282828
Page 29

BREAD MAKING TIPS
Making bread with a mixer is quite different from making bread by hand.
Therefore, it will take some practice before you are completely comfortable
with the new process. For your convenience, we offer these tips to help you
become accustomed to bread making the KitchenAid
• Start out with an easy recipe, like
Basic White Bread until you are
familiar with using the dough
hook.
• ALWAYS use the dough hook to
mix and knead yeast doughs.
• Use Speed 2
doughs. Use of any other speed
creates high potential for stand
mixer failure.
• Do not use recipes calling for more
than 14 cups (3.4 L) all-purpose
flour or 8 cups (1.9 L) whole-wheat
flour when making dough with a
6 qt (5.7 L) mixer.
• Do not use recipes calling for more
than 12 cups (3 L) all-purpose flour
or 6 cups (1.5 L) whole-wheat flour
when making dough with a 5 qt
(4.73 L) mixer.
• Use a candy or other kitchen
thermometer to assure that liquids
are at temperature specified
in the recipe. Liquids at higher
temperature can kill yeast, while
liquids at lower temperatures will
retard yeast growth.
• Warm all ingredients to room
temperature to insure proper rising
of dough. If yeast is to be dissolved
in bowl, always warm bowl first by
rinsing with warm water to avoid
cooling of liquids.
• Allow bread to rise in a warm
place, 80°F to 85°F (26°C to 29°C),
free from draft, unless otherwise
specified in recipe.
• Here are some alternative rising
methods to use: (1) The bowl
to mix or knead yeast
containing the dough can be
placed on a wire rack over a pan
of hot water. (2) The bowl can
be placed on the top rack of an
unheated oven; put a pan of hot
water on the rack below. (3) Turn
the oven to 400°F (200°C) for
1 minute; then turn it off; place
the bowl on the center rack of the
oven and close the door.
• Cover bowl with waxed paper, if
desired. Always cover with towel to
retain warmth in the bowl and to
keep drafts away from the dough.
• Recipe rising times may vary due
to temperature and humidity in
your kitchen. Dough has doubled
in bulk when indentation remains
after tips of fingers are pressed
lightly and quickly into dough.
• Most bread recipes give a range
for the amount of flour to be used.
Enough flour has been added
when the dough starts to clean
sides of bowl. If dough is sticky or
humidity is high, slowly add more
flour, about
at a time but do not exceed
recommended flour capacity.
Knead after each addition until
flour is completely worked into
dough. If too much flour is added,
a dry loaf will result.
• When done, yeast breads and rolls
should be deep golden brown in
color. Other tests for doneness of
breads are: Bread pulls away from
the sides of pan, and tapping
on the top of the loaf produces
a hollow sound. Turn loaves and
rolls onto racks immediately after
baking to avoid sogginess.
®
brand way.
1
/2 cup (120 mL)
ENGLISH
29
292929
Page 30

ENGLISH
SHAPING A LOAF
Divide dough in half. On lightly
floured surface, roll each half
into a rectangle, approximately
9 x 14" (22.5 x 35 cm). A rolling pin
will smooth dough and remove gas
bubbles.
Starting at a short end, roll dough
tightly. Pinch dough to seal seam.
Pinch ends and turn under. Place,
seam side down, in loaf pan.
Follow directions in recipe for rising
and baking.
30
303030
30
Page 31

BASIC WHITE BREAD
1/2 cup (120 mL)
low-fat milk
3 tbs (45 mL) sugar
2 tsp (10 mL) salt
3 tbs (45 mL) butter or
margarine
2 packages active dry
yeast
1
/2 cups (355 mL)
1
warm water
(105°F to 115°F)
[40°C to 46° C]
5-6 cups (1.2 to 1.5 L)
all-purpose flour
Place milk, sugar, salt, and butter in small
saucepan. Heat over low heat until butter melts
and sugar dissolves. Cool to lukewarm.
Dissolve yeast in warm water in warmed mixer
bowl. Add lukewarm milk mixture and
1
/2 cups (1 L) flour. Attach bowl and dough
4
hook to mixer. Turn to Speed 2 and mix about
1 minute.
Continuing on Speed 2, add remaining flour,
1
/2 cup (120 mL) at a time, and mix about
1
1
/2 minutes, or until dough starts to clean
sides of bowl. Knead on Speed 2 about
2 minutes longer, or until dough is smooth
and elastic. Dough will be slightly sticky to the
touch.
Place dough in greased bowl, turning to grease
top. Cover. Let rise in warm place, free from
draft, about 1 hour, or until doubled in bulk.
Punch dough down and divide in half.
Shape each half into a loaf, as directed in the
“Shaping a Loaf“ section, and place in greased
1
8
/2 x 41/2 x 21/2" (21.25 x 11.25 x 6.25 cm)
baking pans. Cover.
Let rise in warm place, free from draft, about
1 hour, or until doubled in bulk.
Bake at 400°F (200°C) for 30 minutes, or until
golden brown. Remove from pans immediately
and cool on wire racks.
Yield: 32 servings (16 slices per loaf).
Per serving: About 95 cal, 3 g protein, 18 g
carb, 1 g fat, 0 mg chol, 148 mg sodium.
ENGLISH
VARIATION
Extra Bread for the Freezer
Increase ingredient quantities by 50 percent
and prepare in 6 qt (5.7 L) mixer bowl. In
second paragraph, change 4
1
/2 cups (1 L) flour
to 7 cups (1.735 L). Divide dough into 3 pieces.
Yield: 48 servings (16 slices per loaf).
31
313131
Page 32

WHOLE GRAIN WHEAT BREAD
ENGLISH
1/3 cup plus 1 tbs
(95 mL)
brown sugar
2 cups (475 mL)
warm water
(105°F to 115°F
[40°C to 46°C])
2 packages active
dry yeast
5-6 cups (1.2 to 1.5 L)
whole-wheat flour
3
/4 cup (175 mL)
powdered milk
2 tsp (10 mL) salt
1
/3 cup (80 mL) oil
Dissolve 1 tbs (15 mL) brown sugar in warm water
in small bowl. Add yeast and let mixture stand.
Place 4 cups (945 mL) flour, powdered milk,
1
/3 cup (80 mL) brown sugar, and salt in mixer
bowl. Attach bowl and dough hook to mixer. Turn
to Speed 2 and mix about 15 seconds. Continuing
on Speed 2, gradually add yeast mixture and oil to
flour mixture and mix about 1
1
/2 minutes longer.
Stop and scrape bowl, if necessary.
Continuing on Speed 2, add remaining flour,
1
/2 cup (120 mL) at a time, and mix about
2 minutes, or until dough starts to clean sides of
bowl. Knead on Speed 2 about 2 minutes longer.
Dough may not form a ball on hook.
NOTE:
However, as long as hook comes in contact
with dough, kneading will be accomplished.
Do not add more than the maximum amount
of flour specified or a dry loaf will result.
Place dough in greased bowl, turning to grease
top. Cover. Let rise in warm place, free from
draft, about 1 hour, or until doubled in bulk.
Punch dough down and divide in half. Shape
each half into a loaf as directed in the “Shaping
a Loaf“ section. Place in greased 81/2 x 41/2 x 21/2"
(21.25 x 11.25 x 6.25 cm) baking pan. Cover.
Let rise in warm place, free from draft, about
1 hour, or until doubled in bulk.
Bake at 400°F (200°C) for 15 minutes. Reduce
oven temperature to 350°F (180°C) and bake
20 to 30 minutes longer. Remove from pans
immediately and cool on wire racks.
Yield: 32 servings (16 slices per loaf).
Per serving: About 112 cal, 4 g protein, 19 g
carb, 3 g fat, 2 mg chol, 146 mg sodium.
32
323232
32
Page 33

FRENCH BREAD
2 packages active
dry yeast
1
/2 cups (590 mL)
2
warm water
(105°F to 115°F
[40°C to 46°C])
1 tbs (15 mL) salt
1 tbs (15 mL)
butter or margarine,
melted
7 cups (1.75 L)
all-purpose flour
2 tsp (30 mL) cornmeal
1 egg white
1 tbs (15 mL)
cold water
Dissolve yeast in warm water in warmed mixer
bowl. Add salt, butter, and flour. Attach bowl
and dough hook to mixer. Turn to Speed 2
and mix about 1 minute, or until well blended.
Knead on Speed 2 about 2 minutes longer.
Dough will be sticky.
Place dough in greased bowl, turning to grease
top. Cover. Let rise in warm place, free from
draft, about 1 hour, or until doubled in bulk.
Punch dough down and divide in half. Roll each
half into 12 x 15" (30 x 37.5 cm) rectangle. Roll
dough tightly, from longest side, tapering ends
if desired. Place loaves on greased baking sheets
that have been dusted with cornmeal. Cover. Let
rise in warm place, free from draft, about 1 hour,
or until doubled in bulk.
With sharp knife, make 4 diagonal cuts on top
of each loaf. Bake at 450°F (230°C) for
25 minutes. Remove from oven. Beat egg white
and water together with a fork. Brush each loaf
with egg mixture. Return to oven and bake 5 to
10 minutes longer. Remove from baking sheets
immediately and cool on wire racks.
Yield: 30 servings (15 slices per loaf).
Per serving: About 114 cal, 3 g protein, 23 g
carb, 1 g fat, 0 mg chol, 221 mg sodium.
ENGLISH
33
333333
Page 34

HONEY OATMEAL BREAD
ENGLISH
11/2 cups (355 mL) water
1
/2 cup (120 mL) honey
1
/3 cup (80 mL)
butter or margarine
1
/2-61/2 cups (1.32 to 1.62 L)
5
all-purpose flour
1 cup (235 mL) quick
cooking oats
2 tsp (10 mL) salt
2 packages active
dry yeast
2 eggs
1 egg white
1 tbs (15 mL) water
Oatmeal
Place water, honey, and butter in small
saucepan. Heat over low heat until mixture is
very warm (120°F to 130°F [49°C to 54°C]).
First place oats, then 5 cups (1.2 L) flour, salt,
and yeast in mixer bowl. Attach bowl and
dough hook to mixer. Turn to Speed 2 and mix
about 15 seconds. Continuing on Speed 2,
gradually add warm mixture to flour mixture
and mix about 1 minute. Add eggs and mix
about 1 minute longer.
Continuing on Speed 2, add remaining flour,
1
/2 cup (120 mL) at a time, and mix about
2 minutes, or until dough starts to clean sides of
bowl. Knead on Speed 2 about 2 minutes longer.
Place dough in greased bowl, turning to grease
top. Cover. Let rise in warm place, free from
draft, about 1 hour, or until doubled in bulk.
Punch dough down and divide in half.
Shape each half into a loaf as directed in the
“Shaping a Loaf“ section. Place in greased
1
/2 x 41/2 x 21/2" (21.25 x 11.25 x 6.25 cm)
8
baking pans. Cover.
Let rise in warm place, free from draft, about
1 hour, or until doubled in bulk.
Beat egg white and water together with a fork.
Brush tops of loaves with mixture. Sprinkle with
oatmeal. Bake at 375°F (190°C) for 30 to
40 minutes. Remove from pans immediately
and cool on wire racks.
Yield: 32 servings (16 slices per loaf).
Per serving: About 134 cal, 4 g protein, 24 g
carb, 3 g fat, 13 mg chol, 162 mg sodium.
34
343434
34
Page 35

CRUSTY PIZZA DOUGH
1 package active
dry yeast
1 cup (235 mL)
warm water
(105°F to 115°F
[40°C to 46°C])
1
/2 tsp (2 mL) salt
2 tsp (10 mL) olive oil
1
/2-31/2 cups (590-830 mL)
2
all-purpose flour
1 tbs (15 mL) cornmeal
Dissolve yeast in warm water in warmed mixer
bowl. Add salt, olive oil, and 2
1
/2 cups (590 mL)
flour. Attach bowl and dough hook to mixer.
Turn to Speed 2 and mix about 1 minute.
Continuing on Speed 2, add remaining flour,
1
/2 cup (120 mL) at a time, and mix about
1
1
/2 minutes, or until dough starts to clean sides of
bowl. Knead on Speed 2 about 2 minutes longer.
Place dough in greased bowl, turning to grease
top. Cover. Let rise in warm place, free from
draft, about 1 hour, or until doubled in bulk.
Punch dough down.
Brush 14" (35 cm) pizza pan with oil. Sprinkle
with cornmeal. Press dough across bottom
of pan, forming a collar around edge to hold
toppings. Add toppings, as desired. Bake at
450°F (230°C) for 15 to 20 minutes.
1
Yield: 4 servings (
/4 pizza per serving).
Per serving: About 373 cal, 11 g protein,
74 g carb, 3 g fat, 0 mg chol, 271 mg sodium.
VARIATION
Pizza for a Crowd
Double the ingredients and prepare in the
6 qt (5.7 L) mixer bowl.
1
Yield: 8 servings (
/4 pizza per serving).
ENGLISH
35
353535
Page 36

BASIC SWEET DOUGH
ENGLISH
3/4 cup (175 mL)
low-fat milk
1
/2 cup (120 mL) sugar
1
/4 tsp (6 ml) salt
1
1
/2 cup (120 mL) butter
or margarine
2 packages active dry
yeast
1
/3 cup (80 mL)
warm water
(105°F to 115°F
[40° C to 46°C])
3 eggs, room
temperature
1
/2-61/2 cups (1.32-1.62 mL)
5
all-purpose flour
Place milk, sugar, salt, and butter in small
saucepan. Heat over low heat until butter melts
and sugar dissolves. Cool to lukewarm.
Dissolve yeast in warm water in warmed mixer
bowl. Add lukewarm milk mixture, eggs,
and 5 cups (1.2 L) flour. Attach bowl and
PowerKnead™ Spiral Dough Hook to mixer.
Turn to Speed 2 and mix about 2 minutes.
Continuing on Speed 2, add remaining flour,
1
/2 cup (120 mL) at a time, and mix about
1
1
/2 minutes, or until dough starts to clean
sides of bowl. Knead on Speed 2 about
2 minutes longer.
Place dough in greased bowl, turning to grease
top. Cover. Let rise in warm place, free from
draft, about 1 hour, or until doubled in bulk.
Punch dough down and shape as desired for
rolls or coffee cakes.
VARIATION
Basic Sweet Dough for a Crowd
Double all ingredients and prepare in 6 qt
(5.7 L) mixer bowl. In first paragraph, change
small sauce pan to medium sauce pan. In
second paragraph, change 5 cups (1.2 L) flour
to 10 cups (2.4 L) flour.
36
363636
36
Page 37

CINNAMON SWIRL ROUNDS
1 cup (235 mL) firmly
packed brown sugar
1 cup (235 mL) sugar
1
/2 cup (120 mL) butter
or margarine,
softened
1
/4 cup (60 mL)
all-purpose flour
1
/2 tbs (355 mL)
1
cinnamon
1
/2 cup (120 mL)
chopped walnuts or
pecans
1 recipe Basic Sweet
dough (see the
“Basic Sweet Dough“
recipe)
Caramel Glaze
1
/3 cup (80 mL)
evaporated milk
2 tbs (30 mL) brown
sugar
1
/2 cups (355 mL)
1
powdered sugar
1 tsp (5 mL) vanilla
Place brown sugar, sugar, butter, flour,
cinnamon, and walnuts in mixer bowl. Attach
bowl and flat beater to mixer. Turn to Speed 2
and mix about 1 minute.
Turn dough onto lightly floured surface. Roll
dough to 10 x 24" (25 x 60 cm) rectangle. Spread
sugar-cinnamon mixture evenly on dough. Roll
dough tightly from long side to form 24" (60 cm)
roll, pinching seam together. Cut into
24 slices, 1" (2.5 cm) each.
Place 12 rolls each in two greased 13 x 9 x 2"
(32.5 x 22.5 x 5 cm) baking pans. Cover. Let
rise in warm place, free from draft, 45 to
60 minutes, or until doubled in bulk.
Bake at 350°F (180°F) for 20 to 25 minutes.
Remove from pans immediately. Spoon
Caramel Glaze over warm rolls.
Place evaporated milk and brown sugar in
small saucepan. Cook over medium heat until
mixture begins to boil, stirring constantly.
Place milk mixture, powdered sugar, and vanilla
in mixer bowl. Attach bowl and flat beater to
mixer. Turn to Speed 4 and beat about
2 minutes, or until creamy.
Yield: 24 servings (1 roll per serving)
Per serving: About 338 cal, 6 g protein, 57 g
carb, 10 g fat, 28 mg chol, 219 mg sodium.
ENGLISH
37
373737
Page 38

FRANÇAIS
TABLE DES MATIÈRES
INTRODUCTION
Preuve d’achat .......................................................... Deuxième de couverture
Sécurité du batteur sur socle ....................................................................... 40
Consignes de sécurité importantes .............................................................. 40
Alimentation ............................................................................................... 41
INFORMATION SUR LA GARANTIE ET LE SERVICE
Garantie du batteur sur socle Kitchenaid
Garantie de satisfaction totale et de remplacement –
50 États des États-Unis, district fédéral de Columbia .................................. 43
Garantie de satisfaction totale et de remplacement – Canada ..................... 43
Comment obtenir une réparation sous garantie à Puerto Rico .................... 44
Comment obtenir une réparation hors garantie – tous les territoires ........... 44
Comment obtenir une réparation en dehors de ces territoires ..................... 44
Comment commander des accessoires et des pièces de rechange ............... 45
CARACTÉRISTIQUES ET OPÉRATION
Dépannage ................................................................................................ 46
Caractéristiques du batteur à bol amovible ................................................ 47
Assembler le batteur à bol amovible ........................................................... 50
Nettoyage avant l’utilisation ................................................................ 50
Installer le bol à mélanger ...................................................................50
Soulever et abaisser le bol à mélanger ................................................ 50
Retirer le bol à mélanger .................................................................... 51
Installer le batteur plat, le fouet à fil et le crochet pétrisseur
en spirale PowerKnead™ .................................................................... 51
Retirer le batteur plat, le fouet à fil et le crochet pétrisseur
en spirale PowerKnead™ .....................................................................51
Utiliser l’écran verseur (non inclus avec tous les modèles) ...........................50
Installer l’écran verseur ........................................................................ 52
Utiliser l’écran verseur ......................................................................... 52
Retirer l’écran verseur .......................................................................... 52
Nettoyer l’écran verseur ....................................................................... 52
Utiliser les accessoires du batteur sur socle KitchenAid
Utilisation du batteur à bol amovible .......................................................... 54
Mode d’emploi du batteur .................................................................. 54
Protection du moteur de style commercial .......................................... 54
Guide de contrôle de vitesse ...................................................................... 55
Entretien et nettoyage ................................................................................ 56
Nettoyage du batteur sur socle et des accessoires .............................. 56
Jeu entre le batteur et le bol ....................................................................... 57
®
................................................... 42
®
.............................. 53
38383838
Page 39

TABLE DES MATIÈRES
Conseils de mélange ................................................................................... 58
Blancs d’œufs ............................................................................................. 59
Crème fouettée ........................................................................................... 59
Accessoires ajoutés du batteur sur socle ...................................................... 60
Installer les accessoires ajoutés ............................................................. 60
Retirer les accessoires ajoutés ............................................................... 61
Accessoires du batteur sur socle.................................................................. 63
Instructions générales pour mélanger et pétrir la pâte à levure avec la
méthode de mélange rapide ...................................................................... 64
Conseils de préparation du pain ................................................................ 65
Former un pain .......................................................................................... 66
RECETTES
Pain blanc de base ..................................................................................... 67
Pain de blé entier ....................................................................................... 68
Pain français .............................................................................................. 69
Pain de farine d’avoine et miel ................................................................... 70
Pâte à pizza croûtée ..................................................................................71
Pâte sucrée de base ................................................................................... 72
Tourbillons de cannelle .............................................................................. 73
FRANÇAIS
39
39393939
Page 40

FRANÇAIS
SÉCURITÉ DU BATTEUR SUR SOCLE
Votre sécurité et celle des autres est
très importante.
Nous donnons de nombreux messages de sécurité importants dans
ce manuel et sur votre appareil ménager. Assurez-vous de toujours lire
tous les messages de sécurité et de vous y conformer.
Voici le symbole d’alerte de sécurité.
Ce symbole d’alerte de sécurité vous signale les dangers
potentiels de décès et de blessures graves à vous et à
d’autres.
Tous les messages de sécurité suivront le symbole
d’alerte de sécurité et le mot “DANGER” ou
“AVERTISSEMENT”. Ces mots signifient :
Risque possible de décès ou
de blessure grave si vous
ne suivez pas immédiatement
les instructions.
Risque possible de décès ou
de blessure grave si vous ne
suivez pas les instructions.
Tous les messages de sécurité vous diront quel est le danger potentiel
et vous disent comment réduire le risque de blessure et ce qui peut se
produire en cas de non-respect des instructions.
CONSIGNES DE SÉCURITÉ
IMPORTANTES
Lors de l’utilisation d’appareils électriques, il faut observer des mesures de
sécurité élémentaires, et en particulier :
1. Lire toutes les instructions.
2. Pour se protéger contre les chocs électriques, ne pas plonger le batteur
à bol amovible dans l’eau ou dans tout autre liquide.
3. Il faut une supervision étroite lorsque l’appareil est utilisé par ou près
d’enfants.
4. Débrancher le batteur à bol amovible de la prise lorsqu’il n’est pas
utilisé, avant de mettre ou de retirer toutes pièces et avant tout
nettoyage.
5. Éviter tout contact avec les pièces mobiles. Garder les mains, les
cheveux, les vêtements, en plus des spatules et autres ustensiles loin
du batteur pendant qu’il fonctionne pour réduire le risque de graves
blessures pour les personnes et/ou de dommages au batteur à bol
amovible.
40404040
Suite à la page suivante
Page 41

6. Ne pas faire fonctionner le batteur à bol amovible avec un cordon ou
une fiche endommagé(e), ou si le batteur à bol amovible fonctionne
mal ou s’il est échappé ou endommagé de quelque façon que ce soit.
Retourner l’appareil au centre de service autorisé le plus proche pour
qu’il soit vérifié, réparé ou que les éléments électriques ou mécaniques
soient ajustés. Pour plus d’information, appelez le centre de satisfaction
de la clientèle KitchenAid au 1-800-541-6390.
7. L’utilisation de tout accessoire non recommandé ou non vendu par
KitchenAid peut provoquer des incendies, des chocs électriques ou des
blessures.
8. Ne pas utiliser le batteur à bol amovible à l’extérieur.
9. Ne pas laisser le cordon pendre au bord de la table ou du comptoir.
10. Retirer le batteur plat, le fouet à fil ou le crochet pétrisseur du batteur à
bol amovible avant le nettoyage.
CONSERVEZ CES
INSTRUCTIONS
CE PRODUIT EST RÉSERVÉ À
LʼUTILISATION RÉSIDENTIELLE
UNIQUEMENT.
ALIMENTATION
Volts : 120 volts de c.a. seulement.
Hertz : 60 Hz
La puissance nominale de votre
batteur à bol amovible est
imprimée sur la plaque signalétique.
N’utilisez pas de rallonges. Si le
cordon est trop court, demandez
à un électricien qualifié ou à un
réparateur d’installer une prise plus
près de l’appareil.
La puissance maximale est basée
sur l’accessoire qui consomme la
plus grande charge (puissance). Il
se peut que d'autres accessoires
recommandés utilisent moins de
puissance.
FRANÇAIS
41
41414141
Page 42

GARANTIE DU
BATTEUR SUR SOCLE KITCHENAID
®
Durée de la
garantie :
50 États des
États-Unis, le district
fédéral de Columbia,
le Canada et Puerto
Rico : Garantie limitée
d’un an à compter de
la date d’achat.
FRANÇAIS
KitchenAid prendra
en charge :
50 États des
États-Unis, le district
fédéral de Columbia
et Canada :
Remplacementsatisfaction totale de
votre batteur à bol
amovible. Consultez
la page suivante pour
obtenir des détails sur
la façon de remplacer
le batteur à bol
amovible.
OU
À Puerto Rico :
Les coûts des pièces
de rechange et de
main-d’œuvre pour
corriger les défauts de
matériaux et de maind’œuvre. Le service
après-vente doit être
assuré par un centre
de réparation autorisé
KitchenAid. Pour
obtenir une réparation,
suivez les directives.
KitchenAid ne prendra
pas en charge :
A. Les réparations
découlant de
l’utilisation du
batteur à bol
amovible dans
un contexte
autre qu’un foyer
unifamilial normal.
B. Les dommages
attribuables aux
causes suivantes :
un accident, une
modification, la
mauvaise utilisation,
un emploi abusif
ou une utilisation
non approuvée par
KitchenAid.
C. Les coûts des pièces
de rechange ou
de main-d’oeuvre
pour le batteur à
bol amovible si ce
dernier est utilisé à
l’extérieur du pays
d’achat.
DÉSAVEU DE GARANTIE TACITE, LIMITATION DES RECOURS LES
GARANTIES TACITES, Y COMPRIS DANS LA MESURE APPLICABLE LES
GARANTIES DE QUALITÉ MARCHANDE OU D’APTITUDE À UN EMPLOI
PARTICULIER, SONT EXCLUES DANS LA MESURE AUTORISÉE PAR LA LOI.
TOUTE GARANTIE TACITE IMP0SÉE PAR LA LOI EST LIMITÉE À UN AN, OU LA
DURÉE MINIMUM PERMISE PAR LA LOI. PUISQUE CERTAINES JURIDICTIONS
NE PERMETTENT PAS L’EXCLUSION OU LA LIMITATION DE DURÉE DES
GARANTIES IMPLICITES DE QUALITÉ MARCHANDE OU D’APTITUDE À UN
EMPLOI PARTICULIER, LES LIMITATIONS CI-DESSUS PEUVENT DONC NE PAS
S’APPLIQUER À VOUS.
SI CET APPAREIL NE FONCTIONNE PAS COMME GARANTI, LE SEUL ET
EXCLUSIF RECOURS DES CLIENTS EST LA RÉPARATION OU LE REMPLACEMENT
SELON LES DISPOSITIONS DE LA GARANTIE LIMITÉE. KITCHENAID ET
KITCHENAID-CANADA N’ASSUMENT AUCUNE RESPONSABILITÉ EN CAS DE
DOMMAGES ACCESSOIRES OU INDIRECTS. Cette garantie vous confère des
droits spécifiques auxquels peuvent s’ajouter d’autres droits variant d’un État
ou d’une province à l’autre.
42424242
Page 43

GARANTIE DE SATISFACTION TOTALE
ET DE REMPLACEMENT – 50 ÉTATS DES
ÉTATS - UNIS, DISTRICT FÉDÉRAL DE
COLUMBIA
Nous sommes tellement certains que
la qualité de nos produits satisfait
aux normes exigeantes de KitchenAid
que, si le batteur à bol amovible
cesse de fonctionner au cours de la
première année, KitchenAid livrera
gratuitement un appareil identique
ou comparable à votre porte et
s’occupera de récupérer le batteur à
bol amovible d'origine.
L’appareil de rechange sera aussi
couvert par notre garantie limitée
d’un an. Veuillez suivre ces
instructions pour recevoir ce service
de qualité.
Si le batteur à bol amovible
KitchenAid
cours de la première année, il suffit
®
cesse de fonctionner au
d’appeler le numéro sans frais
1-800-541-6390 du Centre de
satisfaction de la clientèle du lundi
au vendredi de 8 h à 20 h (heure de
l’Est) ou le samedi de 10 h à 17 h.
Fournissez votre adresse de livraison
complète au représentant. (Pas de
boîte postale).
Quand vous recevez le batteur à
bol amovible de rechange, veuillez
utiliser le carton et les matériaux
d’emballage pour emballer le batteur
à bol amovible d'origine.
Écrivez vos nom et adresse sur une
feuille de papier et mettez-la dans le
carton avec une copie de la preuve
d’achat (reçu de caisse, facture de
règlement par carte de crédit, etc.).
GARANTIE DE SATISFACTION TOTALE ET
DE REMPLACEMENT – CANADA
Nous sommes tellement certains
que la qualité de nos produits
satisfait aux normes exigeantes
de KitchenAid que, si le batteur à
bol amovible cesse de fonctionner
au cours de la première année,
KitchenAid le remplacera par un
batteur à bol amovible identique ou
comparable. L’appareil de rechange
sera aussi couvert par notre garantie
limitée d’un an. Veuillez suivre ces
instructions pour recevoir ce service
de qualité.
Si le batteur à bol amovible
KitchenAid
au cours de la première année,
apportez-le ou retournez-le port dû
à un centre de service de KitchenAid
Canada autorisé. Écrivez votre nom
®
cesse de fonctionner
et adresse complète sur une feuille
de papier et mettez-la dans le carton
avec une copie de la preuve d’achat
(reçu de caisse, facture de règlement
par carte de crédit, etc.) Le batteur
à bol amovible de rechange sera
expédié port prépayé et assuré. Si
le service ne s’avère pas satisfaisant,
appelez le numéro sans frais du
Centre de relations avec la clientèle :
1-800-807-6777.
Ou écrivez à :
Centre de relations avec la clientèle
KitchenAid Canada
200-6750 Century Ave.
Mississauga, ON L5N 0B7
FRANÇAIS
4343434343
Page 44

COMMENT OBTENIR UNE RÉPARATION
SOUS GARANTIE À PUERTO RICO
Le batteur à bol amovible
KitchenAid
garantie limitée d’un an à partir de
la date d’achat. KitchenAid prendra
en charge les coûts des pièces de
rechange et de main-d’œuvre pour
corriger les défauts de matériaux et
de main-d’œuvre. Le service aprèsvente doit être assuré par un centre
de réparation autorisé KitchenAid.
FRANÇAIS
HORS GARANTIE – TOUS LES TERRITOIRES
Avant d’appeler pour faire réparer,
consultez la section Dépannage.
Pour obtenir de l’information sur
les réparations dans les 50 États
des États-Unis, le district fédéral
de Columbia et Puerto Rico,
appelez le numéro sans frais
1-800-541-6390.
Ou écrivez à :
Centre de satisfaction de la clientèle
KitchenAid Portable Appliances
P.O. Box 218
St. Joseph, MI 49085-0218
®
est couvert par une
Apportez le batteur à bol amovible
ou retournez-le port payé et
assuré à un centre de réparation
autorisé de KitchenAid. Le batteur
à bol amovible réparé sera expédié
port prépayé et assuré. S’il est
impossible d’obtenir des réparations
satisfaisantes de cette manière,
appelez le numéro sans frais
1-800-541-6390 pour obtenir
l’adresse d’un centre de réparation
près de chez vous.
COMMENT OBTENIR UNE RÉPARATION
Ou contactez un centre de réparation
autorisé près de chez vous.
Pour obtenir de l’information sur
les réparations au Canada,
appelez le numéro sans frais
1-800-807-6777.
Ou écrivez à :
Centre de relations avec la clientèle
KitchenAid Canada
200-6750 Century Ave.
Mississauga, ON L5N 0B7
COMMENT OBTENIR UNE RÉPARATION
EN DEHORS DE CES TERRITOIRES
Demandez à votre distributeur local
KitchenAid ou au détaillant où le
batteur à bol amovible a été acheté
où le faire réparer.
Pour obtenir de l’information sur
les réparations au Mexique,
appelez le numéro sans frais
01-800-024-17-17
(JV Distribuciones)
ou
01-800-902-31-00
(Industrias Birtman)
44444444
Page 45

COMMENT COMMANDER
DES ACCESSOIRES ET DES PIÈCES
DE RECHANGE
Pour commander des accessoires
ou des pièces de rechange pour
le batteur à bol amovible dans
les 50 États des États-Unis, dans
le district fédéral de Columbia et
à Puerto-Rico, appelez sans frais le
1-800-541-6390 du lundi au
vendredi, de 8 h à 20 h (heure de
l’Est), le samedi de 10 h à 17 h.
Ou écrivez à :
Centre de satisfaction de la clientèle
KitchenAid Portable Appliances
P.O. Box 218
St. Joseph, MI 49085-0218
Pour commander des accessoires
ou des pièces de rechange pour
le batteur à bol amovible
au Canada, appelez sans frais le
1-800-807-6777.
Ou écrivez à :
Centre de relations avec la clientèle
KitchenAid Canada
200-6750 Century Ave.
Mississauga, ON L5N 0B7
Pour commander des accessoires
ou des pièces de rechange pour
le batteur à bol amovible au
Mexique,
appelez sans frais le
01-800-024-17-17
(JV Distribuciones)
ou
01-800-902-31-00
(Industrias Birtman)
FRANÇAIS
4545454545
Page 46

DÉPANNAGE
Veuillez lire les directives
suivantes avant de téléphoner
au centre de réparation.
1. Le batteur à bol amovible
2. Le batteur à bol amovible peut
FRANÇAIS
3. Si le fouet plat frappe le bol,
Si le batteur à bol amovible
fonctionne mal ou pas du tout,
vérifiez les points suivants :
– Le batteur est-il branché?
peut se réchauffer durant
l’utilisation. Dans le cas de
charges importantes et d’une
durée de mélange prolongée, il
est possible que vous ne puissiez
pas toucher facilement le dessus
de l’appareil. Ceci est normal.
dégager une odeur désagréable,
particulièrement s’il est neuf.
Cela se produit couramment
avec les moteurs électriques.
éteignez le batteur à bol amovible.
Consultez la section “Jeu entre le
fouet et le bol“.
état de marche? Si vous avez un
disjoncteur, assurez-vous que
le circuit est fermé.
– Débranchez le batteur à bol
amovible et attendez 10 à
15 secondes, puis remettez-le
en fonction. Si le batteur ne
fonctionne pas, laissez-le refroidir
pendant 30 minutes avant de
le rebrancher.
Si le problème ne peut pas être
résolu en suivant les étapes
fournies dans cette section,
consultez la section “Garantie du
batteur sur socle KitchenAid
retournez pas le batteur chez le
détaillant, car celui-ci n’offre pas
de service de réparation.
®
“. Ne
États-Unis/Puerto Rico :
1-800-541-6390
Canada : 1-800-807-6777
Mexique : 01-800-024-17-17
(JV Distribuciones)
ou
01-800-902-31-00
(Industrias Birtman)
– Le fusible du circuit relié au
batteur à bol amovible est-il en
46464646
Page 47

DU BATTEUR À BOL AMOVIBLE
Emboîtement
pour accessoire ajouté
multi-usage
CARACTÉRISTIQUES
Bouton
pour accessoire
ajouté
Tête du moteur
(contient une transmission à
engrenage entièrement en acier, à
entraînement direct)
Levier de contrôle
de vitesse
(non illustré - voir la
section “Utilisation
du batteur à bol
amovible“)
Arbre du
batteur
Bol en acier
inoxydable
Fouet à fil *
Levier lève-bol
Goupilles de
position
Support de bol
Crochet pétrisseur
en spirale PowerKnead™
Batteur
plat
FRANÇAIS
*Certains modèles incluent le fouet
à 11 fils au lieu du fouet à fil.
Voir la section “Utiliser les accessoires
du batteur sur socle KitchenAid®“
4747474747
Page 48

CARACTÉRISTIQUES
DU BATTEUR À BOL AMOVIBLE
Transmission à engrenage
entièrement en acier, à
entraînement direct
La tête du moteur renferme le puissant
moteur haute performance et la
transmission à engrenage entièrement
d’acier, à entraînement direct.
Emboîtement pour accessoire
ajouté multi-usage à couvercle à
emboîtement à charnière
Le couvercle à emboîtement à charnière
FRANÇAIS
s’ouvre pour révéler l’emboîtement
pour accessoire ajouté multi-usage.
L’emboîtement alimente une variété
d’accessoires ajoutés qui simplifient
la préparation alimentaire et ajoutent
une polyvalence dans la cuisine. Voir
la section “Accessoires du batteur sur
socle“.
Protection du moteur
de style commercial
Cette fonction de réinitialisation
protège le moteur de toute surchauffe
en éteignant automatiquement le
batteur après avoir détecté toute
surchauffe thermique.
Bouton pour accessoire ajouté
Le bouton fixe les accessoires
ajoutés du batteur à bol amovible
à l’emboîtement.
Levier lève-bol
Le solide levier lève-bol relève et
abaisse le bol à mélanger.
Arbre du batteur
Les accessoires de batteur plat,
crochet pétrisseur et fouet à fil se
montent sur l’arbre du batteur.
Bol en acier inoxydable
Le bol d’acier inoxydable poli passe
au lave-vaisselle.
Levier de contrôle de vitesse
Les dix vitesses de mélange offrent
la polyvalence voulue pour toutes les
recettes. Les vitesses vont de brassage
très lent à mélange très rapide.
Vis d’ajustement de
hauteur du bol
La vis ajuste le dégagement entre le
batteur et le bol. Préréglé en usine.
Support de bol
Les bras en métal résistant
maintiennent le bol pour un mélange
stable.
Goupilles de position
Les goupilles traversent les fixations
du bol pour positionner le bol sur
son support.
Action de mélange planétaire
à 67 points
Le batteur tourne en spirale à
67 points de contact différents dans
le bol pour un mélange rapide
et complet.
Fonction de mélange Soft Start™
Aide à réduire l’éclaboussure des
ingrédients avec une accélération en
douceur à la vitesse choisie.
Crochet pétrisseur en spirale
PowerKnead™
Pétrit rapidement et entièrement
tout type de pâte levée même en
grandes quantités.
Batteur plat
Utilisez le batteur plat pour mélanger
les gâteaux, les préparations rapides
pour pain, la pâte à biscuits et pour
préparer les purées de pommes de
terre. Le concept spécial utilise une
action unique de mélange pour bien
mélanger les ingrédients.
48484848
Suite à la page suivante
Page 49

CARACTÉRISTIQUES
DU BATTEUR À BOL AMOVIBLE
Fouet à fil
Le conception du fouet à fil augmente
rapidement la circulation d’air dans
les mélanges d’œufs pour des soufflés
bien montés et des pointes rigides de
meringue. Avec l’action de mélange
planétaire, le fouet à fil couvre
134 points dans le bol pour créer
des glaçages de décoration veloutés
et une crème fouettée plus légère et
plus duveteuse.
REMARQUE : Certains modèles
incluent plutôt un fouet à 11 fils.
Fouet à 11 fils
Ce fouet est idéal pour donner des
résultats supérieurs en fouettant de
petites quantités de crème ou de
blancs d’œufs. La conception du
fouet à 11 fils donne plus de volume
aux blancs d’œufs en beaucoup
moins de temps que le modèle
standard. Le fouet à 11 fils peut aussi
fouetter plus rapidement la crème.
REMARQUE : Le fouet à 11 fils est
un équipement standard avec certains
modèles, mais vous pouvez l’acheter
comme accessoire optionnel.
[Modèle KN211WW]
Écran verseur à large goulotte
(Non illustré)
L’écran verseur à double usage
aide à prévenir l’éclaboussure des
ingrédients et à réduire les bouffées
de farine. La large goulotte de
versement permet d’ajouter les
ingrédients facilement. (Standard
avec certains modèles.)
Capteur électronique de vitesse
Le capteur électronique de vitesse
maintient la vitesse choisie même
lorsque vous ajoutez les ingrédients
et lorsque la densité et le poids
changent.
FRANÇAIS
4949494949
Page 50

ASSEMBLER LE BATTEUR À BOL AMOVIBLE
Nettoyage avant l’utilisation
Avant d’utiliser le batteur à bol
amovible pour la première fois,
nettoyez le bol à mélanger et les
accessoires (consultez la section
“Entretien et nettoyage“.)
Installer le bol à mélanger
FRANÇAIS
3. Abaissez le support du bol en
tournant le levier lève-bol dans
le sens horaire.
Abaissez
4. Placez les fixations du bol sur les
goupilles de position sur le support
du bol.
5. Appuyez vers le bas à l’arrière du
bol jusqu’à ce que la goupille
du bol s’enclenche dans le
loquet à ressort.
6. Soulevez le bol avant le mélange.
7. Branchez l’appareil dans une prise
mise à la terre à 3 broches.
Soulever et abaisser le bol
à mélanger
1. Pour soulever le bol, tournez
le levier lève-bol dans le sens
antihoraire aussi loin
que possible.
1. Assurez-vous que le levier de
contrôle de vitesse est réglé à la
position OFF/0.
2. Débranchez le batteur à bol
amovible ou mettez-le hors
tension.
2. Le levier lève-bol s’enclenche
en place lorsque le bol est
entièrement relevé.
3. Pour abaisser le bol, tournez
le levier lève-bol dans le
sens horaire.
50505050
Suite à la page suivante
Soulevez
Page 51

ASSEMBLER LE BATTEUR À BOL AMOVIBLE
Retirer le bol à mélanger
1. Assurez-vous que le levier de
contrôle de vitesse est réglé à la
position OFF/0.
2. Débranchez le batteur à bol
amovible ou mettez-le hors
tension.
3. Abaissez le support du bol en
tournant le levier lève-bol dans
le sens horaire.
4. Agrippez la poignée du bol et
soulevez le bol pour le retirer
des goupilles de position.
Installer le batteur plat, le fouet
à fil et le crochet pétrisseur en
spirale PowerKnead™
1. Assurez-vous que le levier de
contrôle de vitesse est réglé à la
position OFF/0.
2. Débranchez le batteur à bol
amovible ou mettez-le hors
tension.
3. Glissez l'accessoire choisi sur
l’arbre du batteur et sur le
goupille de l’arbre.
..4. Tournez l'accessoire vers la droite
en l'accrochant par-dessus la
goupille sur le batteur.
5. Branchez l’appareil dans une
prise mise à la terre à
3 broches.
Retirer le batteur plat, le fouet
à fil et le crochet pétrisseur en
spirale PowerKnead™
1. Assurez-vous que le levier de
contrôle de vitesse est réglé à la
position OFF/0.
2. Débranchez le batteur à bol
amovible ou mettez-le hors
tension.
3. Appuyez sur l’accessoire vers le
haut et tournez vers la gauche.
4. Pour retirer, glissez délicatement
l’accessoire vers le bas de l’arbre
du batteur.
FRANÇAIS
Arbre du
batteur
51
51515151
Page 52

Installer l’écran verseur*
1. Assurez-vous que le levier de
2. Débranchez le batteur à bol
3. Insérez l’accessoire voulu et
4. Glissez le col de l’écran verseur
Utiliser l’écran verseur
FRANÇAIS
Versez les ingrédients dans le bol de
mélange à travers la partie goulotte
de l’écran.
IMPORTANT : Assurez-vous que les
guides au bas de la goulotte reposent
sur le bord du bol pour empêcher
les ingrédients de tomber du bol en
les ajoutant.
UTILISER LʼÉCRAN VERSEUR*
contrôle de vitesse est réglé à la
position OFF/0.
amovible ou mettez-le hors
tension.
relevez le bol de mélange.
autour de l’arbre du batteur,
centrant le col sur le bord du bol.
Retirer l’écran verseur
1. Assurez-vous que le levier de
contrôle de vitesse est réglé à la
position OFF/0.
2. Débranchez le batteur à bol
amovible ou mettez-le hors
tension.
3. Retirez la goulotte de versement
du col.
4. Glissez le col de l’écran verseur
pour le sortir du bol.
5. Abaissez le support du bol en
tournant le levier lève-bol dans le
sens horaire.
6. Retirez l’accessoire et le bol
de mélange.
Nettoyer l’écran verseur
Lavez dans de l’eau tiède savonneuse.
Si vous le désirez, vous pouvez le
placer sur le plateau supérieur de
votre lave-vaisselle.
Goulotte de
versement
* Si l’écran verseur est inclus.
52525252
Page 53

UTILISER LES ACCESSOIRES DU
BATTEUR SUR SOCLE KITCHENAID®
Batteur plat pour les mélanges
normaux à épais :
gâteaux biscotins
glaçages crémeux préparations
bonbons rapides pour pain
biscuits pain de viande
pâte à tarte pommes de terre
en purée
Fouet à fil ou fouet à 11 fils pour les
mélanges qui ont besoin d’incorporer
de l’air :
oeufs
blancs d’œufs
crème riche en matière grasse
glaçages bouillis
gâteaux éponges
Fouet à fil
mayonnaise
certains bonbons
FRANÇAIS
Fouet à 11 fils
Crochet pétrisseur en spirale
Powerknead™ pour mélanger et pétrir
les pâtes à levure :
pains petits pains
croûtes de pizza gâteaux danois
brioches
5353535353
Page 54

BATTEUR À BOL AMOVIBLE
Mode d’emploi du batteur
1. Avant utilisation, assurez-vous
que le batteur plat, le fouet à
fil ou le crochet pétrisseur en
spirale PowerKnead™ est bien
installé et que le bol est soulevé
en position de mélange.
2. Branchez le batteur à bol
amovible dans une prise de
courant mise à la terre à
3 broches.
3. Glissez lentement le levier de
FRANÇAIS
contrôle de vitesse vers l’avant
pour commencer à mélanger.
Augmentez graduellement
la vitesse pour éviter toute
éclaboussure des ingrédients.
4. Pour arrêter le mélange, glissez
le levier de contrôle de vitesse à
la position OFF/0.
UTILISATION DU
Protection du moteur de
style commercial
Si le batteur à bol amovible
surchauffe à cause d’une forte
utilisation, le moteur s’éteindra
automatiquement pour éviter tout
dommage. Si ceci se produit :
1. Glissez le levier de contrôle de
vitesse à la position OFF/0. Ceci
réinitialise le batteur.
2. Laissez le batteur refroidir
pendant quelques minutes.
3. Reprenez le mélange en glissant
le levier de contrôle de vitesse à
la vitesse voulue.
4. Si le batteur ne démarre pas,
glissez le levier de contrôle
de vitesse à la position OFF/0.
Laissez le batteur refroidir
pendant 30 autres minutes avant
de recommencer.
REMARQUE : Le bol et le batteur
sont conçus pour fournir un
mélange complet sans avoir à racler
fréquemment. Racler le bol une fois
ou deux durant le mélange suffit
normalement. Éteindre le batteur
à bol amobivle avant de racler. Ne
raclez pas le bol lorsque le batteur à
bol amovible fonctionne.
54545454
Page 55

GUIDE DE CONTRÔLE DE VITESSE
Le levier de contrôle de vitesse se règle entre les vitesses indiquées ci-dessous
s’il faut un ajustement plus fin.
IMPORTANT : Utilisez la vitesse 2 pour préparer la pâte à levure - utiliser
toute autre vitesse pourrait endommager le batteur.
Vitesse Utilisez pour Description
STIR BRASSAGE Pour brasser lentement, combiner, écraser,
lancer toutes les procédures de mélange.
Utilisez pour ajouter la farine et les
ingrédients secs au mélange, ajouter les
liquides aux ingrédients secs et combiner les
mélanges lourds.
• Utiliser aussi avec la sorbetière (accessoire
ajouté).
REMARQUE : N’utilisez pas la vitesse STIR
pour mélanger ou pétrir la pâte à levure.
2 MÉLANGE Pour mélanger lentement, écraser et brasser
LENT rapidement. Utilisez-le pour mélanger les pâtes
épaisses et les bonbons, commencer à écraser
les pommes de terre ou autres légumes, couper
le shortening dans la farine, mélanger les pâtes
minces ou éclaboussantes et mélanger et pétrir
la pâte à levure.
• Utiliser aussi avec l'ouvre-boîte (accessoire
ajouté).
4 MÉLANGER Pour mélanger les pâtes semi-épaisses, comme
ET BATTRE les biscuits. Utilisez pour combiner sucre et
shortening et pour ajouter le sucre aux blancs
d’œuf pour les meringues. Ceci est une vitesse
moyenne pour les mélanges à gâteau.
• À utiliser aussi avec les accessoires ajoutés
suivants: hachoir, trancheuse/râpeuse et
presse fruits/légumes.
FRANÇAIS
6 BATTRE Pour battre, crémer ou fouetter à vitesse
ET CRÉMER moyenne-rapide. Utilisez pour terminer le
mélange à gâteau, à beignets et autres pâtes.
Ceci est une vitesse rapide pour les mélanges
à gâteau.
• Utiliser aussi avec le presse-agrumes
(accessoire ajouté).
55
55555555
Suite à la page suivante
Page 56

GUIDE DE CONTRÔLE DE VITESSE
Vitesse Utilisez pour Description
8 BATTRE ET Pour fouetter la crème, les blancs d’œufs et
FOUETTER les glaçages bouillis.
RAPIDEMENT
10 FOUETTER Pour fouetter de petites quantités de crème
RAPIDEMENT ou de blancs d’œufs.
• Utiliser aussi avec la machine à pâtes
alimentaires et le moulin à grains
(accessoires ajoutés).
REMARQUE : Le batteur ralentira sous l'effet
des lourdes charges imposées par ces
accessoires ajoutés. Ceci est normal.
FRANÇAIS
Nettoyage du batteur sur socle
et des accessoires
• Assurez-vous que le levier de
contrôle de vitesse est réglé à la
position OFF/0.
• Débranchez le batteur à bol
amovible ou mettez-le hors
tension.
• Les batteurs plats (métal
nu) polis, crochet pétrisseur
en spirale PowerKnead™
et fouets à fil doivent être
lavés à la main dans de l’eau
savonneuse chaude et séchés
immédiatement après le lavage.
Ne lavez pas les accessoires polis
dans le lave-vaisselle.
• Tous les bols à mélanger, les
batteurs plats revêtus (blancs) et
les crochets pétrisseurs (blancs)
revêtus passent tous au
lave-vaisselle.
• Essuyez le batteur avec un
chiffon doux et humide.
N’utilisez pas de nettoyants
abrasifs ou de tampons à
récurer. Ne plongez pas le
batteur dans l’eau.
• Essuyez fréquemment l’arbre
du batteur pour retirer tous les
résidus qui s’accumulent. Ne
rangez pas les accessoires sur
l’arbre du batteur.
56565656
Page 57

JEU ENTRE LE BATTEUR ET LE BOL
Votre batteur à bol amovible est
ajusté à l’usine pour que le batteur
plat dégage le bas du bol. Si, pour
quelque raison que ce soit, le batteur
plat frappe le bas du bol, ou est trop
loin du bol, vous pouvez corriger
facilement le dégagement.
REMARQUE : Les ajustements
doivent se faire seulement lorsque
le batteur plat est en place.
1. Assurez-vous que le levier de
contrôle de vitesse est réglé à la
position OFF/0.
2. Débranchez le batteur à bol
amovible ou mettez-le hors
tension.
3. Placez le levier lève-bol en
position vers le bas.
4. Installez le bol à mélanger et le
batteur plat.
5. Tournez délicatement et
légèrement la vis (A) dans le
sens antihoraire pour relever
le batteur (pour réduire le
jeu) ou dans le sens horaire
pour abaisser le batteur (pour
augmenter le jeu). Il ne faut
qu’un tour léger et la plage
complète de l’ajustement
s’atteint en à peine
vis. Ne tournez pas la vis de plus
1
de
/2 tour dans l’une ou l’autre
direction.
1
/2 tour de la
6. Soulevez le bol à la position
de mélange.
7. Examinez le jeu entre le batteur
et le bol. Le batteur doit dégager
tout juste la surface du bol.
Sinon, abaissez le bol
et réajustez.
REMARQUE : Lorsque le batteur
plat est ajusté correctement, il
ne frappera pas le bas ou les
côtés du bol lorsque le batteur
fonctionne. Si le batteur ou le fouet
à fil professionnel frappe le bol, il
pourrait y avoir des dommages.
FRANÇAIS
A
57
57575757
Page 58

CONSEILS DE MÉLANGE
Adapter votre recette pour
le batteur
Les instructions de mélange
suivantes peuvent vous guider dans
l'adaptation de vos recettes préférées
et vos propres méthodes de mélange
pour utilisation avec votre batteur
sur socle KitchenAid
La méthode de “mélange rapide“
(parfois indiquée sous le nom
de méthode de “versement“) est
idéale pour les recettes à gâteaux
simples. Cette méthode demande de
combiner les ingrédients secs avec
FRANÇAIS
la plupart ou tous les ingrédients
liquides en une seule étape.
Les recettes de gâteaux plus élaborés
doivent être préparées utilisant la
méthode de mélange à gâteau
traditionnelle indiquée couramment
sous le nom de méthode “crémeuse“.
Avec cette méthode, le sucre et le
shortening, le beurre ou la margarine
sont bien mélangés (crémeux) avant
l'ajout des autres ingrédients.
Les durées de mélange pour tous les
gâteaux peuvent varier car le batteur
à bol amovible KitchenAid
plus rapidement que la plupart des
autres batteurs. En général, mélanger
une préparation de gâteau avec un
batteur à bol amovible KitchenAid
prendra environ la moitié du temps
recommandé dans la plupart des
recettes à gâteau.
Pour aider à déterminer le temps de
mélange idéal, observez la pâte et
mélangez seulement jusqu’à ce que
vous obteniez l’apparence voulue
décrite dans votre recette, comme
“lisse et crémeux“. Pour choisir la
meilleure vitesse de mélange pour
l’emploi, utilisez le guide de contrôle
de vitesse.
®
.
®
mélange
Ajouter des ingrédients
Ajoutez toujours les ingrédients aussi
près que possible du côté du bol,
non pas directement dans le batteur
qui se déplace. L’écran verseur* peut
simplifier l’ajout des ingrédients.
Si les ingrédients au bas du bol ne
sont pas bien mélangés, il faut alors
ajuster le jeu entre le batteur et le
bol. Voir la section “Jeu entre le
batteur et le bol“.
Mélanges à gâteau
En préparant les mélanges à gâteau
emballés, utilisez la vitesse 2 pour
la basse vitesse, la vitesse 4 pour la
vitesse moyenne et la vitesse 6 pour
la vitesse élevée. Pour les meilleurs
résultats, mélangez pendant la durée
indiquée sur le mode d’emploi de
l’emballage.
Ajouter noix, raisins ou fruits
confits
Suivez les recettes individuelles
pour les directives pour inclure
ces ingrédients. En général, les
ingrédients solides devraient être
ajoutés au mélange durant les
dernières secondes du mélange à la
vitesse STIR. La pâte devrait être assez
épaisse pour éviter que les fruits ou
les noix ne tombent au fond du plat
®
durant la cuisson. Les fruits collants
doivent être saupoudrés de farine
pour une meilleure distribution dans
la pâte.
Mélanges liquides
Les mélanges contenant de grandes
quantités d’ingrédients liquides
doivent être mélangés à des
vitesses plus basses pour éviter les
éclaboussures. Augmentez la vitesse
seulement après que le mélange
ait épaissi.
58585858
*Si l’écran verseur est inclus.
Page 59

BLANCS DʼŒUFS
Placez les blancs d’œuf à température ambiante dans un bol propre et
sec. Installez le bol et le fouet à fil. Pour éviter les éclaboussures, tournez
graduellement à la vitesse désignée et fouettez jusqu’à la consistance voulue.
Consultez le tableau plus bas.
QUANTITÉ VITESSE
1 blanc d’œuf ........GRADUELLEMENT
jusqu’à 10
2 blancs d’œufs .....GRADUELLEMENT
2 à 4 jusqu’à 8
Étapes de fouettage
Avec votre batteur à bol amovible
KitchenAid
fouettent rapidement. Attention de
ne pas trop fouetter. Reportez-vous
à la liste des étapes de fouettage
plus bas :
Mousseux
Larges bulles d’air inégales.
Commence à garder sa forme
Les bulles d’air sont fines et
compactes ; le produit est blanc.
®
, les blancs d’œufs se
Pointes molles
Les bouts des pointes tombent
lorsqu’on retire le fouet à fil.
Presque rigide
Les pointes se forment lorsqu’on
retire le fouet à fils, mais les blancs
sont en fait mous.
Rigide, mais non pas sec
Des pointes acérées et rigides se
forment lorsqu’on retire le fouet
à fil. Les blancs ont une couleur
uniforme et brillent.
Rigide et sec
Des pointes acérées et rigides se
forment lorsqu’on retire le fouet
à fil. Les blancs sont tachetés et
d’apparence terne.
CRÈME FOUETTÉE
Versez la crème fouettée froide dans un bol refroidi. Installez le bol et le
fouet à fil. Pour éviter les éclaboussures, tournez graduellement à la vitesse
désignée et fouettez jusqu’à la consistance voulue. Consultez le tableau
plus bas :
QUANTITÉ VITESSE
60 mL à 175 mL ....GRADUELLEMENT
1
(
/4 - 3/4 tasses) jusqu’à 10
235 mL et plus .......GRADUELLEMENT
(1 tasse et plus) jusqu’à 8
Étapes de fouettage
Surveillez attentivement la crème
durant le fouettage. Parce que votre
batteur à bol amovible KitchenAid
fouette si rapidement, il n’y a que
quelques secondes entre les étapes
de fouettage. Recherchez ces
caractéristiques :
Commence à épaissir
La crème est épaisse et ressemble à
une crème anglaise.
Garde sa forme
La crème forme des pointes molles
lorsqu’on retire le fouet à fil. Peut
être intégrée à d’autres ingrédients
dans la préparation de desserts et
de sauces.
®
Rigide
La crème forme des pointes rigides,
pointues lorsqu’on retire le fouet à
fil. Utilisez pour garnir les gâteaux
ou les desserts ou pour remplir les
choux à la crème.
FRANÇAIS
59
59595959
Page 60

ACCESSOIRES AJOUTÉS
DU BATTEUR SUR SOCLE
Les accessoires ajoutés KitchenAid® sont conçus pour assurer une longue
vie. L’arbre d’alimentation et la douille d’emboîtement (accessoires ajoutés)
sont d’un modèle carré pour éliminer toute possibilité de glisser durant le
transfert de courant à l’accessoire ajouté. Le boîtier de l’arbre et l’emboîtement
sont effilés pour assurer un ajustement serré, même après une utilisation
prolongée. Tous les accessoires ajoutés KitchenAid
unité d’alimentation pour fonctionner; l’unité d’alimentation est intégrée.
®
n’exigent aucune autre
Couvercle d’emboîtement
Bouton pour accessoire ajouté
Douille d’emboîtement pour accessoire
FRANÇAIS
Arbre d’alimentation pour accessoire ajouté
Accessoire ajouté
Installer les accessoires ajoutés
1. Assurez-vous que le levier de
contrôle de vitesse est réglé à la
position OFF/0.
2. Débranchez le batteur à bol
amovible ou mettez-le
hors tension.
3. Desserrez le bouton pour
accessoire ajouté en tournant
dans le sens antihoraire, puis
relevez le couvercle
d'emboîtement à charnière.
4. Insérez le boîtier de l’arbre
(accessoire ajouté) dans
l’emboîtement pour accessoire
ajouté. Assurez-vous que l’arbre
d’alimentation pour accessoire
ajouté s’ajuste dans la douille
à charnière
ajouté
d’emboîtement pour accessoire
carrée. Il sera peut-être
nécessaire de faire avancer
et reculer l’accessoire ajouté.
Lorsque l’accessoire ajouté sera
bien en position, la goupille de
ce dernier s’enclenchera dans
l’encoche du rebord du moyeu.
5. Resserrez le bouton de l’accessoire
ajouté en tournant dans le sens
horaire jusqu’à ce que l’accessoire
ajouté soit bien en place sur le
batteur sur socle.
60606060
Page 61

ACCESSOIRES AJOUTÉS
DU BATTEUR SUR SOCLE
Retirer les accessoires ajoutés
1. Assurez-vous que le levier de
contrôle de vitesse est réglé à la
position OFF/0.
2. Débranchez le batteur à bol
amovible ou mettez-le hors
tension.
3. Desserrez le bouton pour
accessoire ajouté en tournant
dans le sens antihoraire. Tournez
l’accessoire dans un mouvement
de va-et-vient tout en le sortant.
4. Replacez le couvercle
d’emboîtement pour accessoire
ajouté. Resserrez le bouton pour
accessoire ajouté en tournant
dans le sens horaire.
MACHINE À RAVIOLIS
Roule les
feuilles de pâtes
alimentaires et la
garniture en
3 rangées de
raviolis frais à
larges poches. Inclut une pelle de
garniture spéciale et une brosse de
nettoyage. Convient pour des feuilles
de pâte alimentaire de 15,2 cm (6 po)
de largeur avec le rouleau à feuilles de
pâtes alimentaires (accessoire ajouté)
[KPSA] (vendu séparément). [KRAV]
ENSEMBLE COMPLÉMENTAIRE
DE MACHINES À PÂTES
Convient pour des feuilles de pâte
alimentaire
fabriquées avec
le rouleau à
feuilles de pâtes
alimentaires
[KPSA] ou
l’ensemble de
rouleaux à pâtes alimentaires [KPRA]
(les deux vendus séparément) pour
couper les nouilles épaisses et les
pâtes à cheveux d’ange. [KPCA]
ENSEMBLE ROULEAU
ET MACHINES À PÂTES
ALIMENTAIRES
Cet ensemble
de trois pièces,
entièrement
en métal,
contient un
rouleau à pâtes
alimentaires,
une machine
à fettuccine et
une machine
à spaghetti. Inclut une brosse de
nettoyage. [KPSA] Rouleau à
feuilles de pâtes alimentaires
seulement. [KPRA]
MOULIN À GRAINS
Le moulin à
grains (accessoire
ajouté)
entièrement en
métal broiera le
blé, l’avoine, le
maïs, le riz et
autres grains à
faible teneur en huile et en humidité.
Choisissez une consistance de
“concassé“ à extra-fine. Inclut une
brosse de nettoyage. [KGMA]
TRANCHEUSE/RÂPEUSE
Coupe des
tranches minces
ou épaisses de
fruits et légumes
fermes en plus de
râper fin ou épais
les légumes croustillants, les noix et
le fromage ferme. Inclut 2 cônes à
trancher et 2 cônes à râper. [RVSA]
FRANÇAIS
6161616161
Suite à la page suivante
Page 62

ACCESSOIRES AJOUTÉS
DU BATTEUR SUR SOCLE
HACHOIR
de hachoir épaisses et fines et une
combinaison poussoir/clé. [FGA]
POUSSOIR À SAUCISSES
FRANÇAIS
pour les petits chaînons et un tube
de 1,6 cm (⁵⁄₈ po) pour les larges
chaînons. Le poussoir à saucisses
nécessite l'emploi du hachoir
(accessoire ajouté) [FGA vendu
séparément.] [SSA]
OUVRE-BOÎTE
les petites. L'ouvre-boîte (accessoire
ajouté) laisse les bords lisses et sans
accroc. [CO]
Hachez
rapidement
les viandes, les
fruits fermes et
les légumes, le
pain sec, et le
fromage. Inclut
des plaques
Préparez des
saucisses pleines
de saveurs
délicieuses et
nutritives. Inclut
un tube de
1 cm (³⁄₈ po)
Cet accessoire
pratique et
parfait pour
les boîtes très
larges et même
SORBETIÈRE
Prépare jusqu’à
1,9 litres
(2 pintes) de
crème glacée,
sorbets et
autres desserts
surgelés
préférés en 20 à 30 minutes.
Après au moins 15 heures dans un
congélateur, le bol de congélation
est prêt à fonctionner avec la
palette pour fournir une congélation
complète et uniforme du mélange de
crème glacée pendant l’ensemble du
processus de mélange. [KICA0WH]
PRESSE-AGRUMES
Extrayez du
jus frais de la
plus petite lime
au plus gros
pamplemousse,
rapidement et
facilement.
Une passoire spéciale aide à
prévenir l’accumulation de pulpe et
de pépins. [JE]
PLATEAU D’ALIMENTS
Installez
le plateau
d’aliments pour
prolonger votre
poste de travail et fournir une surface
pratique pour d’autres aliments.
Utilisez-le avec le hachoir, la
machine à pâtes alimentaires, le
poussoir à saucisses et le presse
fruits/légumes. [FT]
62626262
Page 63

ACCESSOIRES DU BATTEUR SUR SOCLE
ÉCRAN VERSEUR
Cet écran est conçu avec une
goulotte de versement et il réduit
les éclaboussures et les bouffées
de farine lorsqu’on ajoute des
ingrédients au bol à mélanger.
[KN2PS]
CHEMISE D’EAU
Remplissez de glace pour garder la
crème fouettée fraîche ou remplissez
d’eau chaude pour garder les
pommes de terre en purée chaudes.
[Modèle KN2WJ pour les batteurs à
bol amovibles de 5,7 L (6 pintes).]
COUVERCLES DE BATTEUR
Protégez votre batteur contre les
égratignures et la poussière avec
des couvercles en tissu. Ils ont tous
ont une bordure noire. [KMCC1KB
est kaki os, KMCC1OB est onyx noir,
KMCC1WH est blanc, KMCC1ER est
rouge empire.]
FRANÇAIS
63
63636363
Page 64

INSTRUCTIONS GÉNÉRALES POUR
MÉLANGER ET PÉTRIR LA PÂTE À LEVURE
AVEC LA MÉTHODE DE MÉLANGE RAPIDE
Le “mélange rapide“ décrit une
méthode de préparation de pain
avec une levure sèche à mélanger
avec les autres ingrédients secs avant
d’ajouter le liquide. En revanche, la
méthode traditionnelle est de faire
dissoudre la levure dans l’eau tiède.
1. Placez tous les ingrédients secs
2. Installez le bol et le crochet
FRANÇAIS
3. Continuez à la vitesse 2 et
REMARQUE : Si les ingrédients
liquides sont ajoutés trop
rapidement, ils s’accumuleront
autour du crochet pétrisseur et
ralentiront le processus de mélange.
4. Continuez à la vitesse 2 en
5. Pétrissez à la vitesse 2 pendant
6. Abaissez le bol sur le batteur
Lorsque vous utilisez la méthode
traditionnelle pour préparer votre
recette préférée, faites dissoudre
y compris la levure dans le bol,
sauf les derniers 235 à 475 mL
(1 à 2 tasses) de farine.
pétrisseur. Relevez le bol du
batteur. Mettez le batteur à la
vitesse 2 et mélangez pendant
environ 15 secondes ou jusqu’à
ce que les ingrédients soient
combinés.
très graduellement ajoutez les
ingrédients liquides au mélange
de farine, puis mélangez pendant
1 à 2 minutes de plus.
Reportez-vous à l’illustration A.
ajoutant délicatement le reste de
la farine, 120 mL (
fois. Reportez-vous à l’illustration
B. Mélangez jusqu’à ce que la
pâte commence à se dégager
des côtés du bol, soit environ
2 minutes.
2 autres minutes de plus ou
jusqu’à ce que le la pâte soit
lisse et élastique. Reportez-vous
à l’illustration C.
et retirez la pâte du bol et le
crochet pétrisseur. Suivez les
directives de la recette pour lever,
former et faire cuire.
1
/2 tasse) à la
ILLUSTRATION A
ILLUSTRATION B
ILLUSTRATION C
la levure dans l’eau tiède dans un
bol réchauffé. Ajoutez les autres
ingrédients secs et liquides, sauf
les derniers 235 à 475 mL (1 à
2 tasses) de farine. Mettez le batteur
à la vitesse 2 et mélangez pendant
environ 1 minute ou jusqu’à ce que
les ingrédients soient bien mélangés.
Passez aux étapes 4 à 6.
Les deux méthodes fonctionnent
tout aussi bien pour la préparation
du pain. Par contre, la méthode de
“mélange rapide“ pourrait être un
peu plus rapide et facile pour les
débutants. Elle tolère un peu plus
de température car la levure est
mélangée aux ingrédients secs plutôt
qu’au liquide chaud.
64646464
Page 65

CONSEILS DE PRÉPARATION DU PAIN
Préparer le pain avec un batteur est un peu différent de la préparation à la
main. Il faudra donc un peu de pratique avant que vous ne soyez entièrement
confortable avec le nouveau processus. Nous vous offrons donc ces conseils
pour vous aider à vous habituer à la préparation du pain à la manière
de KitchenAid
®
.
• Commencez avec une recette
facile, comme le pain blanc de
base, jusqu’à ce que vous vous
soyez familiarisé avec le crochet
pétrisseur.
• Utilisez TOUJOURS le crochet
pétrisseur pour mélanger et pétrir
les pâtes à levure.
• Utilisez la vitesse 2 pour mélanger
ou pétrir les pâtes à levure. Utiliser
toute autre vitesse crée la possibilité
de défaillance de l’appareil.
• N’utilisez pas le batteur pour des
recettes qui exigent plus de 3,4 L
(14 tasses) de farine tout usage
ou 1,9 L (8 tasses) de farine de blé
entier lorsque vous préparez de la
pâte avec un batteur de 5,7 L
(6 pintes).
• N’utilisez pas le batteur pour des
recettes qui exigent plus de 3 L
(12 tasses) de farine tout usage ou
1,5 L (6 tasses) de farine de blé entier
lorsque vous préparez de la pâte avec
un batteur de 4,73 L (5 pintes).
• Utilisez un thermomètre à bonbon
ou autre thermomètre de cuisine
pour faire en sorte que les liquides
soient à la température spécifiée
dans la recette. Les liquides à des
températures plus élevées peuvent
tuer la levure tandis que ceux à
plus basses températures peuvent
retarder la croissance de la levure.
• Réchauffez tous les ingrédients à
température ambiante pour assurer
que la pâte lève bien. Si la levure
doit être dissoute dans le bol,
réchauffez toujours le bol d’abord
en le rinçant à l’eau tiède pour éviter
le refroidissement des liquides.
• Laissez le pain lever dans un endroit
tiède, à une température de 26 °C à
29 °C (80 °F à 85 °F), loin des
courants d’air à moins d’indication
contraire dans la recette.
• Voici certaines autres méthodes
pour faire lever : (1) le bol
contenant la pâte peut être placé
sur une clayette au-dessus d’une
casserole d’eau chaude. (2) Le
bol peut être placé sur la clayette
supérieure d’un four non chauffé,
mettez une casserole d’eau chaude
sur la clayette en dessous.
(3) Allumez le four à 200 °C
(400 °F) pendant 1 minute; puis
éteignez-le, placez le bol sur la
clayette centrale du four et fermez
la porte.
• Couvrez le bol de papier ciré, si
désiré. Couvrez toujours d’une
serviette pour conserver la chaleur
du bol et protégez la pâte des
courants d’air.
• Les temps de levée des recettes
peuvent varier à cause de la
température et de l’humidité de
votre cuisine. La pâte a doublé
lorsque la marque de doigt
reste en place après avoir pressé
légèrement et rapidement la pâte.
FRANÇAIS
65
65656565
Suite à la page suivante
Page 66

CONSEILS DE PRÉPARATION DU PAIN
• La plupart des recettes de pain
FRANÇAIS
offrent une plage de quantité de
farine à utiliser. Vous avez ajouté
suffisamment de farine lorsque la
pâte commence à se dégager des
côtés du bol. Si la pâte est collante
ou s’il y a une forte humidité,
ajoutez lentement plus de farine,
environ 120 mL (
mais ne pas dépassez la quantité
de farine recommandée. Pétrissez
après chaque ajout jusqu’à ce que
la farine ait pénétré
1
/2 tasse) à la fois,
FORMER UN PAIN
complètement dans la pâte. Si vous
avez ajouté trop de farine, le pain
sera sec.
• À la fin, les pains et les petits
pains à levure devrait être d’un
brun doré. Voici d’autres tests
pour savoir si les pains sont cuits :
le pain se dégage des côtés du
moule et taper sur le dessus du
pain produit un son creux.
Tournez les pains et les petits pains
sur les clayettes immédiatement
après la cuisson pour éviter qu’ils
ne s'humidifient.
Divisez la pâte en deux parties.
Sur une surface légèrement farinée,
roulez chaque moitié de pâte en
forme de rectangle d’environ
22,5 x 35 cm (9 x 14"). Un rouleau
à pâte lissera la pâte et retirera les
bulles de gaz.
Commencez à une extrémité courte
et roulez bien serré. Pincez la pâte
pour sceller la couture.
Pincez les extrémités et retournez.
Placez, couture vers le bas dans un
moule à pain. Suivez les directives de
la recette pour lever et faire cuire.
66666666
Page 67

PAIN BLANC DE BASE
120 mL (1/2 tasse) de lait
faible en matière
grasse
45 mL (3 cuillérées à
soupe) de sucre
10 mL (2 cuillérées à
thé) de sel
45 mL (3 cuillérées à
soupe) de beurre ou
de margarine
2 sachets de levure
active sèche
1
355 mL (1
/2 tasse) d’eau
tiède (40 °C à 46 °C
[105 °F à 115 °F])
1,2 à 1,5 L (5 à 6 tasses)
de farine tout usage
Placez le lait, le sucre, le sel et le beurre dans
une petite casserole. Réchauffez à feu bas
jusqu’à ce que le beurre fonde et que le sucre
soit dissout. Laissez refroidir à tiède.
Faites dissoudre la levure dans de l’eau tiède
dans le bol du batteur réchauffé. Ajoutez le
mélange de lait tiède et 1 L (4¹⁄₂ tasses) de
farine. Installez le bol et le crochet pétrisseur
au batteur. Mettez le batteur à la vitesse 2 et
mélangez pendant 1 minute.
Continuez à la vitesse 2 en ajoutant le reste
de la farine, 120 mL (
1
/2 tasse) à la fois et
mélangez pendant environ 11/2 minutes ou
jusqu’à ce que la pâte commence à se dégager
des côtés du bol. Pétrissez à la vitesse 2
pendant 2 minutes de plus ou jusqu’à ce que
le la pâte soit lisse et élastique. La pâte sera un
peu collante au toucher.
Placez la pâte dans un bol graissé, tournez la
pâte pour graisser le dessus. Couvrez. Laissez la
pâte lever dans un endroit tiède, sans courant
d’air, pendant environ 1 heure ou jusqu’à ce
qu’elle ait doublé de taille.
Frappez pour faire baisser la pâte et divisez
en deux. Formez chaque moitié en pain
(tel qu’indiqué à la section “Former un pain“)
et placez dans des moules à pain graissés de
21,25 x 11,25 x 6,25 cm (8
1
/2 x 41/2 x 21/2").
Couvrez. Laissez la pâte lever dans un endroit
tiède, sans courant d’air, pendant environ
1 heure ou jusqu’à ce qu’elle ait doublé de
taille.
Faites cuire à 200 °C (400 °F) pendant
30 minutes ou jusqu’à ce qu’ils soient bruns
dorés. Retirez immédiatement des moules et
laissez refroidir sur les clayettes.
Donne : 32 portions (16 portions par pain).
Par portion : environ 95 calories, 3 g pro,
18 g glucides, 1 g gras, 0 mg chol, 148 mg sod.
VARIATION
Quantité de pain supplémentaire pour le
congélateur
Augmentez les quantités d’ingrédients de 50
pour cent et préparez dans le bol du batteur de
5,7 L (6 pintes). Dans le deuxième paragraphe,
changez 1 L (4
1
/2 tasses) de farine pour 1,735 L
(7 tasses). Divisez la pâte en trois morceaux.
Donne : 48 portions (16 portions par pain).
FRANÇAIS
67
67676767
Page 68

PAIN DE BLÉ ENTIER
95 mL (1/3 tasse plus
475 mL (2 tasses) d’eau
2 sachets de levure
1,2 à 1,5 L (5 à 6 tasses)
175 mL (
10 mL (2 cuillérées à
FRANÇAIS
80 mL (
1 cuillerée à soupe)
de cassonade
tiède (40 °C à 46 °C
[105 °F à 115 °F])
active sèche
de farine de blé
entier
3
/4 tasse) de lait
en poudre
thé) de sel
1
/3 tasse) d’huile
Faites dissoudre 15 mL (1 cuillerée à soupe) de
cassonade dans l’eau tiède dans un petit bol.
Ajoutez la levure et laissez reposer le mélange.
Mettez 945 mL (4 tasses) de farine, le lait en
poudre, 80 mL (
1
/3 tasse) de cassonade et le sel
dans le bol du batteur. Installez le bol et le crochet
pétrisseur au batteur. Mettez le batteur à la vitesse
2 et mélangez pendant environ 15 secondes.
Continuez à la vitesse 2 et graduellement ajoutez
le mélange à levure et l’huile au mélange de
farine, puis mélangez pendant 1
1
/2 minute de plus.
Arrêtez et grattez le bol, si nécessaire.
Continuez à la vitesse 2 en ajoutant le reste de
la farine, 120 mL (
1
/2 tasse) à la fois et mélangez
pendant environ 2 minutes ou jusqu’à ce que la
pâte commence à se dégager des côtés du bol.
Continuez à la vitesse 2 pendant environ 2 minutes
de plus.
REMARQUE : La pâte ne formera peut-être
pas de boule sur le crochet. Pourtant, aussi
longtemps que le crochet entre en contact
avec la pâte, le pétrissage se fera. N’en ajoutez
pas plus que la quantité maximum de farine
spécifiée sinon le pain sera sec.
Placez la pâte dans un bol graissé, tournez la
pâte pour graisser le dessus. Couvrez. Laissez la
pâte lever dans un endroit tiède, sans courant
d’air, pendant environ 1 heure ou jusqu’à ce
qu’elle ait doublé de taille.
Frappez pour faire baisser la pâte et divisez
en deux. Formez chaque moitié en pain tel
qu’indiqué à la section “Former un pain“.
Placez dans un moule graissé de 21,25 x 11,25
x 6,25 cm (8
1
/2 x 41/2 x 21/2"). Couvrez. Laissez la
pâte lever dans un endroit tiède, sans courant
d’air, pendant environ 1 heure ou jusqu’à ce
qu’elle ait doublé de taille.
Faites cuire à 200 °C (400 °F) pendant
15 minutes. Réduisez la température du four à
180 °C (350 °F) et faites cuire pendant 20 à
30 minutes de plus. Retirez immédiatement des
moules et laissez refroidir sur les clayettes.
Donne : 32 portions (16 portions par pain).
Par portion : environ 112 calories, 4 g pro,
19 g glucides, 3 g gras, 2 mg chol, 146 mg sod.
68686868
Page 69

PAIN FRANÇAIS
2 sachets de levure
active sèche
1
590 mL (2
15 mL (1 cuillerée à
15 mL (1 cuillérée à
1,75 mL (7 tasses) de
30 mL (2 cuillérées à
1 blanc d’œuf
15 mL (1 cuillerée à
/2 tasses) d’eau
tiède (40 °C à 46 °C
[105 °F à 115 °F])
soupe) de sel
soupe) de beurre
ou de margarine,
fondu(e)
farine tout usage
soupe) de semoule
de maïs
soupe) d’eau froide
Faites dissoudre la levure dans de l’eau tiède
dans le bol du batteur réchauffé. Ajoutez le
sel, le beurre et la farine. Installez le bol et le
crochet pétrisseur au batteur. Mettez le batteur
à la vitesse 2 et mélangez pendant 1 minute
ou jusqu’à ce que le tout soit bien mélangé.
Continuez à la vitesse 2 pendant environ
2 minutes de plus. La pâte sera un peu collante.
Placez la pâte dans un bol graissé, tournez la
pâte pour graisser le dessus. Couvrez. Laissez la
pâte lever dans un endroit tiède, sans courant
d’air, pendant environ 1 heure ou jusqu’à ce
qu’elle ait doublé de taille.
Frappez pour faire baisser la pâte et divisez
en deux. Roulez chaque moitié en rectangle
de 30 x 37,5 cm (12 x 15"). Roulez la pâte
bien serrée, du côté le plus long en effilant
les extrémités si désiré. Placez les pains sur
les plaques à biscuits graissés saupoudrées
de semoule de maïs. Couvrez. Laissez la pâte
lever dans un endroit tiède, sans courant d’air,
pendant environ 1 heure ou jusqu’à ce qu’elle
ait doublé de taille.
Avec un couteau tranchant, faites 4 coupes en
diagonale sur le dessus de chaque pain. Faites
cuire à 230 °C (450 °F) pendant 25 minutes.
Retirez du four. Mélangez le blanc d’œuf
et l’eau ensemble avec une fourchette.
Badigeonnez chaque pain du mélange d’œuf.
Remettez au four et faites cuire pendant 5 à
10 minutes de plus. Retirez immédiatement des
plaques à biscuit et laissez refroidir sur
les clayettes.
Donne : 30 portions (15 portions par pain).
Par portion : environ 114 calories, 3 g pro,
23 g glucides, 1 g gras, 0 mg chol, 221 mg sod.
FRANÇAIS
69
69696969
Page 70

PAIN DE FARINE DʼAVOINE ET MIEL
355 mL (11/2 tasse) d’eau
120 mL (
80 mL (
beurre ou margarine
1,32 à 1,62 L (5
tasses) de farine
tout usage
235 mL (1 tasse) d’avoine
à cuisson rapide
10 mL (2 cuillérées à
thé) de sel
2 sachets de levure
active sèche
2 oeufs
FRANÇAIS
1 blanc d’œuf
15 mL (1 cuillerée à
soupe) d’eau
Farine d’avoine
1
/2 tasse) de miel
1
/3 tasse) de
1
/2 à 61/2
Placez l’eau, le miel et le beurre dans une
petite casserole. Chauffez à feu bas jusqu’à ce
que le mélange soit très chaud, 49 à 54 °C
(120 à 130 °F).
Placez d’abord l’avoine, puis 1,2 L (5 tasses)
de farine, le sel, et la levure dans le bol du
batteur. Installez le bol et le crochet pétrisseur
au batteur. Mettez le batteur à la vitesse 2
et mélangez pendant environ 15 secondes.
Continuez à la vitesse 2 et graduellement
ajoutez le mélange chaud au mélange de
farine, puis mélangez pendant environ
1 minute. Ajoutez les oeufs et mélangez
pendant environ 1 minute de plus.
Continuez à la vitesse 2 en ajoutant le reste
de la farine, 120 mL (1/2 tasse) à la fois et
mélangez pendant environ 2 minutes ou
jusqu’à ce que la pâte commence à se dégager
des côtés du bol. Pétrissez à la vitesse 2
pendant environ 2 minutes de plus.
Placez la pâte dans un bol graissé, tournez la
pâte pour graisser le dessus. Couvrez. Laissez la
pâte lever dans un endroit tiède, sans courant
d’air, pendant environ 1 heure ou jusqu’à ce
qu’elle ait doublé de taille.
Frappez pour faire baisser la pâte et divisez
en deux. Formez chaque moitié en pain tel
qu’indiqué à la section “Former un pain“.
Placez dans des moules graissés de 21,25 x
11,25 x 6,25 cm (8
1
/2 x 41/2 x 21/2"). Couvrez.
Laissez la pâte lever dans un endroit tiède,
sans courant d’air, pendant environ 1 heure ou
jusqu’à ce qu’elle ait doublé de taille.
Battez le blanc d’œuf et l’eau ensemble avec
une fourchette. Badigeonnez les dessus des
pains du mélange. Saupoudrez de farine
d’avoine. Faites cuire à 190 °C (375 °F) pendant
30 à 40 minutes. Retirez immédiatement des
moules et laissez refroidir sur les clayettes.
Donne : 32 portions (16 portions par pain).
Par portion : environ 134 calories, 4 g pro,
24 g glucides, 3 g gras, 13 mg chol, 162 mg sod.
70707070
Page 71

PÂTE À PIZZA CROÛTÉE
1 sachet de levure
active sèche
235 mL (1 tasse) d’eau
tiède (40 °C à 46 °C
[105 °F à 115 °F])
1
2 mL (
/2 cuillérée à thé)
de sel
10 mL (2 cuillérées à
thé) d’huile d’olive
1
590 à 830 mL (2
/2 à 31/2
tasses) de farine tout
usage
15 mL (1 cuillerée à
soupe) de semoule
de maïs
Faites dissoudre la levure dans de l’eau tiède
dans le bol du batteur réchauffé. Ajoutez le
sel, l’huile d’olive et 590 mL (2
1
/2 tasses) de
farine. Installez le bol et le crochet pétrisseur
au batteur. Mettez le batteur à la vitesse 2 et
mélangez pendant 1 minute.
Continuez à la vitesse 2 en ajoutant le reste
de la farine, 120 mL (
mélangez pendant environ 1
1
/2 tasse) à la fois et
1
/2 minute ou
jusqu’à ce que la pâte commence à se dégager
des côtés du bol. Continuez à la vitesse
2 pendant environ 2 minutes de plus.
Placez la pâte dans un bol graissé, tournez la
pâte pour graisser le dessus. Couvrez. Laissez la
pâte lever dans un endroit tiède, sans courant
d’air, pendant environ 1 heure ou jusqu’à ce
qu’elle ait doublé de taille. Frappez pour faire
redescendre la pâte.
Badigeonnez une plaque à pizza de 35 cm
(14 po) d’huile. Saupoudrez de semoule de
maïs. Pressez la pâte au fond de la plaque et
formez un col autour du bord pour retenir les
garnitures. Ajoutez les garnitures, si désiré.
Faites cuire à 230 °C (450 °F) pendant 15 à
20 minutes.
Donne : 4 portions (
1
/4 pizza par portion).
Par portion : environ 373 calories, 11 g pro,
74 g glucides, 3 g gras, 0 mg chol, 271 mg sod.
FRANÇAIS
VARIATION
Pizza pour un grand nombre de
personnes
Doublez les ingrédients et préparez dans le bol
du batteur de 5,7 L (6 pintes).
1
Donne : 8 portions (
71
71717171
/4 pizza par portion).
Page 72

PÂTE SUCRÉE DE BASE
175 mL (3/4 tasse) de lait
120 mL (
6 mL (1
120 mL (
2 sachets de levure
80 mL (
3 oeufs à température
FRANÇAIS
1,32 à 1,62 mL (5
faible en matière
grasse
1
/2 tasse) de sucre
1
/4 cuillérée à
thé) de sel
1
/2 tasse) de
beurre ou margarine
active sèche
1
/3 tasses) d’eau
tiède (40 °C à 46 °C
[105 °F à 115 °F])
ambiante
1
/2-61/2
tasses) de farine tout
usage
Placez le lait, le sucre, le sel et le beurre dans
une petite casserole. Réchauffez à feu bas
jusqu’à ce que le beurre fonde et le sucre soit
dissout. Laissez refroidir à tiède.
Faites dissoudre la levure dans de l’eau tiède
dans le bol du batteur réchauffé. Ajoutez le
mélange de lait tiède, les oeufs et 1,2 L
(5 tasses) de farine. Installez le bol et le crochet
pétrisseur en spirale PowerKnead™ au batteur.
Mettez le batteur à la vitesse 2 et mélangez
pendant environ 2 minutes.
Continuez à la vitesse 2 en ajoutant le reste
de la farine, 120 mL (
mélangez pendant environ 1
1
/2 tasse) à la fois et
1
/2 minute ou
jusqu’à ce que la pâte commence à se dégager
des côtés du bol. Continuez à la vitesse 2
pendant environ 2 minutes de plus.
Placez la pâte dans un bol graissé, tournez la
pâte pour graisser le dessus. Couvrez. Laissez la
pâte lever dans un endroit tiède, sans courant
d’air, pendant environ 1 heure ou jusqu’à ce
qu’elle ait doublé de taille.
Frappez pour faire baisser la pâte et formez
au goût pour les petits pains ou les
gâteaux danois.
VARIATION
Pâte sucrée de base pour un grand
nombre de personnes
Doublez les ingrédients et préparez dans le
bol du batteur de 5,7 L (6 pintes). Dans le
premier paragraphe, changez petite casserole
pour moyenne casserole. Dans le deuxième
paragraphe, changez 1,2 L (5 tasses) de farine
pour 2,4 L (10 tasses).
72727272
Page 73

TOURBILLONS DE CANNELLE
235 mL (1 tasse) de
cassonade bien
tassée
235 mL (1 tasse) de sucre
1
120 mL (
/2 tasse) de
beurre ou margarine,
amolli(e)
1
60 mL (
/4 tasse) de
farine tout usage
1
355 mL (1
/2 tasse)
de cannelle
1
120 mL (
/2 tasse) de
pacanes ou noix de
Grenoble hachées
1 recette de pâte
sucrée de base
Fondant au caramel
80 mL (
1
/3 tasse) de lait
évaporé
30 mL (2 cuillérées à
soupe) de cassonade
1
355 mL (1
/2 tasse) de
sucre en poudre
5 mL (1 cuillérée à thé)
de vanille
Placez la cassonade, le sucre, le beurre, la
farine, la cannelle et les noix de Grenoble dans
le bol du batteur. Installez le bol et le batteur
plat au batteur. Mettez le batteur à la vitesse 2
et mélangez pendant 1 minute.
Placez la pâte sur une surface légèrement
farinée. Roulez la pâte en rectangle de
25 x 60 cm (10 x 24"). Versez le mélange sucrecannelle uniformément sur la pâte. Roulez
la pâte bien serrée du côté le plus long pour
former un rouleau de 60 cm (24"), pinçant
ensemble les coutures. Coupez en
24 tranches de 2,5 cm (1") chacune.
Placez 12 rouleaux dans deux moules graissés
de 32,5 x 22,5 x 5 cm (13 x 9 x 2"). Couvrez.
Laissez lever dans un endroit tiède, sans
courant d’air, pendant 45 à 60 minutes ou
jusqu’à ce que leur taille ait doublé.
Faites cuire à 180 °C (350 °F) pendant 20 à
25 minutes. Retirez immédiatement des
moules. Versez le fondant au caramel sur les
rouleaux chauds.
Placez le lait évaporé et la cassonade dans
une petite casserole. Faites cuire à feu moyen
jusqu’à ce que le mélange commence à bouillir,
en brassant constamment.
Placez le mélange de lait, le sucre en poudre et
la vanille dans le bol du batteur. Installez le bol
et le batteur plat au batteur. Mettez le batteur
à la vitesse 4 et mélangez pendant 2 minutes
ou jusqu’à ce que le tout soit crémeux.
Donne : 24 portions (1 rouleau par portion).
Par portion : environ 338 calories, 6 g pro,
57 g glucides, 10 g gras, 28 mg chol,
219 mg sod.
FRANÇAIS
73
73737373
Page 74

ESPAÑOL
ÍNDICE
INTRODUCCIÓN
Comprobante de compra ................................................Interior de la portada
Seguridad de la batidora con base .............................................................. 76
Medidas de seguridad importantes ............................................................. 76
Requisitos eléctricos .................................................................................... 77
INFORMACIÓN DE GARANTÍA Y SERVICIO
Garantía de la batidora con base KitchenAid
Garantía de reemplazo sin dificultades en los 50 estados de
los Estados Unidos y en el Distrito de Columbia .......................................... 79
Garantía de reemplazo sin dificultades en Canadá ...................................... 79
Cómo obtener el servicio de garantía en Puerto Rico .................................. 80
Cómo obtener el servicio de garantía una vez que ésta haya expirado –
Todos los lugares ........................................................................................ 80
Cómo obtener el servicio técnico en otros lugares ...................................... 80
Cómo realizar un pedido de accesorios y repuestos .................................... 81
CARACTERÍSTICAS Y FUNCIONAMIENTO
Solución de problemas ............................................................................... 82
Características de la batidora con tazón que se levanta ............................... 83
Ensamblaje de la batidora con tazón que se levanta ................................... 86
Limpieza antes de usar ........................................................................ 86
Colocación del tazón para batir ........................................................... 86
Cómo levantar y bajar el tazón para batir ............................................ 86
Cómo retirar el tazón para batir .......................................................... 87
Colocación del batidor plano, el batidor de alambre y el gancho
para masa en espiral PowerKnead™ .................................................... 87
Cómo retirar el batidor plano, el batidor de alambre y el gancho
para masa en espiral PowerKnead™ .................................................... 87
Uso del vertedor antisalpicaduras (no se incluye en todos los modelos) ...... 88
Colocación del vertedor antisalpicaduras .............................................88
Uso del vertedor antisalpicaduras ........................................................ 88
Extracción del vertedor antisalpicaduras ............................................... 88
Limpieza del vertedor antisalpicaduras ................................................. 88
Uso de los accesorios de batidora con base KitchenAid
Uso de la batidora con tazón que se levanta .............................................. 90
Funcionamiento de la batidora ............................................................ 90
Protección del motor de estilo comercial ............................................. 90
Guía para control de velocidades ................................................................ 91
Cuidado y limpieza ..................................................................................... 92
Limpieza de la batidora con base y los accesorios ................................ 92
Distancia entre el batidor y el tazón ............................................................ 93
®
............................................ 78
®
............................. 89
74747474
Continúa en la página siguiente
Page 75

ÍNDICE
Consejos para batir ..................................................................................... 94
Claras de huevo .......................................................................................... 95
Crema para batir ......................................................................................... 95
Aditamentos de la batidora con base .......................................................... 96
Montaje de los aditamentos ................................................................ 96
Cómo retirar los aditamentos .............................................................. 96
Accesorios de la batidora con base ............................................................. 99
Instrucciones generales para batir y amasar masa de levadura
con el método de batido rápido ............................................................... 100
Consejos para hacer pan ........................................................................... 101
Cómo dar forma al pan ............................................................................ 102
RECETAS
Pan blanco básico ..................................................................................... 103
Pan de trigo integral ................................................................................. 104
Pan francés ............................................................................................... 105
Pan de avena y miel .................................................................................. 106
Masa crocante para pizza ......................................................................... 107
Masa dulce básica .................................................................................... 108
Roscas de canela ....................................................................................... 109
7575757575
ESPAÑOL
Page 76

SEGURIDAD DE LA BATIDORA CON BASE
Su seguridad y la seguridad
de los demás es muy importante.
Hemos incluido muchos mensajes importantes de seguridad en este
manual y en su electrodoméstico. Lea y obedezca siempre todos los
mensajes de seguridad.
Este es el símbolo de advertencia de seguridad.
Este símbolo le llama la atención sobre peligros
potenciales que pueden ocasionar la muerte o una
lesión a usted y a los demás.
Todos los mensajes de seguridad irán a continuación
del símbolo de advertencia de seguridad y de la palabra
“PELIGRO” o “ADVERTENCIA”.
Estas palabras significan:
Si no sigue las instrucciones
de inmediato, usted puede
morir o sufrir una lesión grave.
Si no sigue las instrucciones,
usted puede morir o sufrir una
ESPAÑOL
Todos los mensajes de seguridad le dirán el peligro potencial, le dirán
cómo reducir las posibilidades de sufrir una lesión y lo que puede
suceder si no se siguen las instrucciones.
lesión grave.
MEDIDAS DE SEGURIDAD
IMPORTANTES
Al utilizar aparatos eléctricos, debe seguir las precauciones básicas de
seguridad, entre las que se incluyen las siguientes:
1. Lea todas las instrucciones.
2. Para protegerse del riesgo de una descarga eléctrica, no introduzca la
batidora al agua u otros líquidos.
3. Es necesaria una supervisión estricta cuando un niño utiliza cualquier
electrodoméstico o si hay niños alrededor.
4. Desconecte la batidora de la corriente eléctrica cuando no esté en uso,
antes de colocarle o retirarle componentes y antes de limpiarla.
5. Evite tocar las partes que estén en movimiento. Mantenga las manos,
el cabello, la ropa, como también las espátulas y otros utensilios fuera
del batidor mientras esté en funcionamiento para reducir el riesgo de
que alguien pueda sufrir una lesión o que la batidora se dañe.
76767676
Page 77

6. No utilice la batidora con algún cable o enchufe dañado o si la
batidora no ha funcionado correctamente, o se haya caído al suelo o
está dañada de alguna forma. Devuelva el aparato al centro de servicio
técnico autorizado más cercano para su inspección, reparación o ajuste
eléctrico o mecánico. Llame al Centro de satisfacción al cliente de
KitchenAid al 1-800-541-6390 para obtener más información.
7. El uso de aditamentos no recomendados o que no sean vendidos por
KitchenAid puede provocar un incendio, descarga eléctrica o lesión.
8. No utilice la batidora en exteriores.
9. No deje que el cable cuelgue del filo de la mesa o de la encimera.
10. Quite el batidor plano, batidor de alambre o gancho para masa de la
batidora antes de proceder al lavado.
CONSERVE ESTAS
INSTRUCCIONES
ESTE PRODUCTO ESTÁ DISEÑADO
EXCLUSIVAMENTE PARA USO
DOMÉSTICO.
REQUISITOS ELÉCTRICOS
Voltios: 120 V.C.A. únicamente.
Hertz: 60
El vataje al que funciona su
batidora con base se encuentra
impreso en la placa con el
número de serie. No utilice un
cable de extensión. Si el cable de
corriente es muy corto, pida a
un electricista calificado o a un
técnico que instale una toma de
corriente cerca del aparato.
La clasificación máxima está
basada en el accesorio que
requiera la mayor carga
(potencia). Otros accesorios
recomendados pueden requerir
una potencia significativamente
menor.
ESPAÑOL
7777777777
Page 78

ESPAÑOL
GARANTÍA DE LA
BATIDORA CON BASE KITCHENAID
Duración de la
garantía:
50 estados de los
Estados Unidos,
el Distrito de
Columbia, Canadá y
Puerto Rico: Un año
de garantía limitada a
partir de la fecha de
compra.
KitchenAid
pagará por:
50 estados de los
Estados Unidos,
el Distrito de
Columbia y Canadá:
el reemplazo de su
batidora con base sin
dificultades. Consulte la
siguiente página para
obtener los detalles
sobre cómo realizar el
reemplazo.
O
En Puerto Rico:
Los costos de los
repuestos y del trabajo
de reparación para
corregir los defectos
en los materiales y
la mano de obra. El
servicio técnico debe
ser provisto por un
Centro de servicio
técnico de KitchenAid
autorizado. Para solicitar
un servicio técnico, siga
las instrucciones.
KitchenAid
no pagará por:
A. Las reparaciones
cuando la batidora
con base sea
utilizada con otro
fin que no sea el
uso doméstico
normal de una
familia.
B. Los daños como
consecuencia de
un accidente,
alteración, mal
uso, abuso o uso
con productos no
aprobados por
KitchenAid.
C. Los costos de
repuestos o de
mano de obra de
reparación de la
batidora con base
cuando haya sido
utilizada fuera del
país en donde fue
comprada.
®
LA EXENCIÓN DE RESPONSABILIDAD DE LAS GARANTÍAS IMPLÍCITAS;
LIMITACIÓN DE LOS RECURSOS, INCLUYENDO GARANTÍAS EN LA
MEDIDA EN QUE SE APLIQUEN A LA COMERCIABILIDAD O APTITUD CON
UN FIN DETERMINADO, SON EXCLUIDAS EN LA MEDIDA PERMITIDA POR
LEY. CUALQUIER GARANTÍA IMPLÍCITA QUE PUEDA SER IMPUESTA POR
LEY ESTÁ LIMITADA A UN AÑO O AL PERÍODO MÁS CORTO PERMITIDO
POR LEY. ALGUNOS ESTADOS Y PROVINCIAS NO PERMITEN LIMITACIONES
NI EXCLUSIONES EN RELACIÓN CON LA DURACIÓN DE UNA GARANTÍA
IMPLÍCITA DE COMERCIABILIDAD O DE APTITUD, DE MANERA TAL QUE LAS
LIMITACIONES O EXCLUSIONES ANTERIORES PUEDE QUE NO SE APLIQUEN
EN SU CASO.
SI ESTE PRODUCTO NO FUNCIONA SEGÚN SE GARANTIZA, EL ÚNICO Y
EXCLUSIVO RECURSO DEL CLIENTE SERÁ LA REPARACIÓN O EL REEMPLAZO
SEGÚN LOS TÉRMINOS Y LAS CONDICIONES DE ESTA GARANTÍA LIMITADA.
KITCHENAID Y KITCHENAID CANADA NO ASUMEN NINGUNA RESPONSABILIDAD
POR DAÑOS INCIDENTALES O CONSIGUIENTES. Esta garantía le otorga
derechos legales específicos y es posible que usted goce de otros derechos
que varían de estado en estado o de provincia en provincia.
78787878
Page 79

GARANTÍA DE REEMPLAZO SIN
DIFICULTADES EN LOS 50 ESTADOS
DE LOS ESTADOS UNIDOS Y EN EL
DISTRITO DE COLUMBIA
Confiamos tanto en que la calidad de
nuestros productos cumple con las
exigentes normas de KitchenAid, que
si la batidora con base presentara
alguna falla durante el primer año, le
enviaremos un reemplazo sin cargo
idéntico o comparable a su domicilio
y arreglaremos la devolución de
la batidora con base original. El
reemplazo de su unidad también
estará cubierto por nuestra garantía
limitada de un año. Siga estas
instrucciones para recibir este servicio
de alta calidad.
Si su batidora con base KitchenAid
presentara alguna falla durante
el primer año de propiedad,
simplemente llame gratis a nuestro
Centro de satisfacción al cliente
al 1-800-541-6390, de lunes a
viernes de 8 a.m. a 8 p.m. (Hora
del Este), o los sábados, de 10 a.m.
a 5 p.m. Proporcione al asesor su
dirección completa para el envío.
(No se aceptan números de casillas
postales).
Cuando reciba la unidad de
reemplazo de su batidora con base,
utilice la caja y los materiales de
embalaje para embalar la batidora
con base original. En la caja, escriba
su nombre y dirección en un papel
®
junto con la copia del comprobante
de compra (recibo de compra, ticket
de la tarjeta de crédito, etc.).
GARANTÍA DE REEMPLAZO SIN
DIFICULTADES EN CANADÁ
Confiamos tanto en que la calidad
de nuestros productos cumple con
las exigentes normas de KitchenAid
que, si su batidora con base
presentara alguna falla durante el
primer año, KitchenAid Canada la
reemplazará por una idéntica o
comparable. El reemplazo de su
unidad también estará cubierto por
nuestra garantía limitada de un año.
Siga estas instrucciones para recibir
este servicio de alta calidad.
Si su batidora con base KitchenAid
presentara alguna falla durante
el primer año de propiedad, lleve
la batidora con base o mándela
con envío pagado a un Centro de
servicio técnico KitchenAid Canada
autorizado. En la caja, escriba
su nombre y dirección postal en
un papel junto con la copia del
comprobante de compra (recibo
de compra, ticket de la tarjeta de
crédito, etc.). La batidora con base
de reemplazo se le entregará de
forma prepaga y asegurada. Si no
queda satisfecho con el servicio,
llame de manera gratuita a nuestro
Centro para la eXperiencia del cliente
al 1-800-807-6777.
O escríbanos a:
®
Customer eXperience Centre
KitchenAid Canada
200-6750 Century Ave.
Mississauga, ON L5N 0B7
ESPAÑOL
7979797979
Page 80

CÓMO OBTENER EL SERVICIO DE
GARANTÍA EN PUERTO RICO
ESPAÑOL
Su batidora con base KitchenAid®
tiene garantía limitada de un año
a partir de la fecha de compra.
KitchenAid pagará los repuestos y la
mano de obra para corregir defectos
en los materiales y en la mano de
obra. El servicio técnico debe ser
provisto por un Centro de servicio
técnico de KitchenAid autorizado.
Lleve la batidora con base o mándela
con envío asegurado prepago a
un Centro de servicio técnico de
KitchenAid autorizado. La batidora
con base reparada se le entregará
de forma prepaga y asegurada. Si
no queda satisfecho con el servicio,
llame de manera gratuita al
1-800-541-6390 para averiguar
la ubicación del Centro de servicio
técnico más cercano.
CÓMO OBTENER EL SERVICIO DE
GARANTÍA UNA VEZ QUE ÉSTA HAYA
EXPIRADO – TODOS LOS LUGARES
Antes de llamar al servicio técnico,
revise la sección de Solución de
problemas.
Para obtener información sobre el
servicio técnico en los 50 estados
de los Estados Unidos, el Distrito
de Columbia y Puerto Rico,
llame de manera gratuita al
1-800-541-6390.
O escriba a:
Customer Satisfaction Center
KitchenAid Portable Appliances
P.O. Box 218
St. Joseph, MI 49085-0218
O comuníquese con un Centro de
servicio técnico autorizado cercano a
su domicilio.
Para obtener información sobre
el servicio técnico en Canadá,
llame de manera gratuita al
1-800-807-6777.
O escriba a:
Customer eXperience Centre
KitchenAid Canada
200-6750 Century Ave.
Mississauga, ON L5N 0B7
CÓMO OBTENER EL SERVICIO
TÉCNICO EN OTROS LUGARES
Consulte a su distribuidor de
KitchenAid local o a la tienda donde
compró la batidora con base para
obtener información sobre el
servicio técnico.
Para obtener información sobre
el servicio técnico en México,
llame de manera gratuita al
01-800-024-17-17
(JV Distribuciones)
O
01-800-902-31-00
(Industrias Birtman)
80808080
Page 81

CÓMO REALIZAR UN PEDIDO
DE ACCESORIOS Y REPUESTOS
Para solicitar accesorios o
repuestos para su batidora con
base en los 50 estados de los
Estados Unidos, el Distrito de
Columbia y Puerto Rico,
llame de manera gratuita al
1-800-541-6390, de lunes a viernes,
de 8 a.m. a 8 p.m. (Hora del Este) o
los sábados, de 10 a.m. a 5 p.m.
O escriba a:
Customer Satisfaction Center
KitchenAid Portable Appliances
P.O. Box 218
St. Joseph, MI 49085-0218
Para solicitar accesorios o
repuestos para su batidora con
base en Canadá,
llame de manera gratuita al
1-800-807-6777.
O escriba a:
Customer eXperience Centre
KitchenAid Canada
200-6750 Century Ave.
Mississauga, ON L5N 0B7
Para solicitar accesorios o
repuestos para su batidora
con base en México,
llame de manera gratuita al
01-800-024-17-17
(JV Distribuciones)
O
01-800-902-31-00
(Industrias Birtman)
ESPAÑOL
8181818181
Page 82

ESPAÑOL
SOLUCIÓN DE PROBLEMAS
Lea lo siguiente antes de llamar al
centro de servicio técnico.
1. Es posible que la batidora con
base se caliente durante su uso.
Cuando la batidora funciona
con cargas pesadas durante
tiempos de mezclado
prolongados, es posible que
no pueda tocar de manera
confortable la parte superior de la
unidad. Esto es normal.
2. Es posible que la batidora
con base emita un fuerte olor
acre, especialmente cuando es
nueva. Esto es común en los
motores eléctricos.
3. Si el batidor plano choca con
el tazón, detenga la batidora
con base. Consulte la sección
“Distancia entre el batidor y el
tazón”.
Si su batidora con base falla o no
funciona, verifique lo siguiente:
– ¿La batidora con base está
enchufada?
– Apague la batidora con base
durante 10 a 15 minutos y vuelva
a encenderla. Si la batidora todavía
no se enciende, deje que se enfríe
durante 30 minutos antes de volver
a encenderla.
Si el problema no se debe a uno
de los conceptos mencionados
anteriormente, vea la garantía de
la batidora con base KitchenAid®.
No devuelva la batidora con base
a la tienda - ellos no brindan
servicio técnico.
EE.UU./Puerto Rico:
1-800-541-6390
Canadá: 1-800-807-6777
México: 01-800-024-17-17
(JV Distribuciones)
O
01-800-902-31-00
(Industrias Birtman)
– ¿El fusible del circuito a la batidora
con base funciona bien? Si tiene
una caja del interruptor de circuitos,
asegúrese de que el circuito esté
cerrado.
82828282
Page 83

CARACTERÍSTICAS DE LA BATIDORA
CON TAZÓN QUE SE LEVANTA
Receptáculo para
aditamentos
con diferentes
funciones
Palanca de control de
vea la sección “Uso de
la batidora con tazón
velocidades
(no se muestra –
que se levanta”)
Eje del
batidor
Tazón de acero
inoxidable
Perilla para
accesorios
Cabeza del motor
(contiene transmisión directa
con engranaje de acero)
Palanca para
levantar el tazón
Pernos
localizadores
Soporte del tazón
Batidor
plano
ESPAÑOL
Batidor de alambre*
Gancho para masa
en espiral PowerKnead™
* Algunos modelos incluyen el batidor
de 11 alambres en lugar del batidor
de alambre. Vea la sección “Uso de
los accesorios de la batidora con base
KitchenAid®”.
8383838383
Page 84

CARACTERÍSTICAS DE LA BATIDORA
CON TAZÓN QUE SE LEVANTA
ESPAÑOL
Transmisión directa
de velocidades hecha
completamente de acero
La cabeza del motor alberga el
poderoso motor de alto rendimiento
y la transmisión directa de velocidades
hecha completamente de acero.
Receptáculo para aditamentos con
diferentes funciones con cubierta
abisagrada.
La cubierta abisagrada del receptáculo
se levanta para mostrar el receptáculo
para aditamentos con multifunciones.
El receptáculo acciona diferentes
aditamentos que hacen que sea más
fácil cocinar y aumentan la versatilidad
de las recetas que se pueden preparar.
Vea la sección “Aditamentos de la
batidora con base”.
Protección del motor de
estilo comercial
Esta característica de reposición
protege al motor contra el
sobrecalentamiento porque
desconecta automáticamente la
batidora si se detecta una
sobrecarga térmica.
Perilla para aditamentos
La perilla asegura los aditamentos
de la batidora al receptáculo.
Palanca para levantar el tazón
La resistente palanca sube y baja
el tazón de la batidora.
Eje del batidor
El batidor plano, el gancho para
masa y el batidor de alambre se
montan al eje del batidor.
Tazón de acero inoxidable
El tazón de acero inoxidable pulido
es apto para el lavavajillas.
Palanca para control de
velocidades
Las 10 velocidades de batido
proporcionan versatilidad para
preparar cualquier receta. Las
velocidades van desde una agitación
muy lenta hasta un batido muy rápido.
Tornillo para ajuste de la altura
del tazón
El tornillo ajusta la distancia entre
el batidor y el tazón. Previamente
ajustado de fábrica.
Soporte del tazón
Los durables brazos de metal soportan
el tazón para un batido estable.
Pernos localizadores
Los pernos encajan en las horquillas
del tazón para colocarlo en la
posición correcta en el soporte.
Acción de batido planetario con
67 puntos
El batidor se mueve en espiral en
67 puntos de toque diferentes dentro
del tazón, para un batido rápido y
completo.
Característica de batido Soft
Start™
Ayuda a que las salpicaduras de
ingredientes sean mínimas con
una aceleración moderada hasta la
velocidad seleccionada.
Gancho para masa en espiral
PowerKnead™
Amasa rápida y uniformemente
cualquier tipo de masa con levadura,
incluso en grandes cantidades.
Batidor plano
Use el batidor plano para batir
masa para pasteles, panes rápidos,
galletas y para hacer puré de papas.
El diseño especial funciona con una
acción de batido única que mezcla
perfectamente los ingredientes.
Batidor de alambre
El diseño del batidor de alambre
aumenta rápidamente el flujo de aire
en mezclas de huevos para suflés y
picos de merengues. Con la acción de
batido planetario, el batidor de
alambre cubre 134 puntos dentro del
tazón para crear coberturas de
decoración sedosas y una crema
batida más ligera y esponjosa.
NOTA: Algunos modelos incluyen el
batidor de 11 alambres.
84848484
Page 85

CARACTERÍSTICAS DE LA BATIDORA
CON TAZÓN QUE SE LEVANTA
Batidor de 11 alambres
El batidor de 11 alambres es ideal
para obtener resultados superiores al
batir cantidades más pequeñas de
claras de huevo y crema. El diseño del
batidor de 11 alambres produce un
volumen mayor de claras de huevo en
mucho menor tiempo del que tardaría
el batidor estándar de alambre. El
batidor de 11 alambres también puede
batir crema de forma más rápida.
NOTA: El batidor de 11 alambres es
un utensilio estándar con algunos
modelos selectos, pero puede
comprarse como accesorio opcional.
[Modelo KN211WW]
Vertedor antisalpicaduras ancho
(No se muestra)
El vertedor tiene el doble propósito
de ayudar a evitar la salpicadura de
los ingredientes y reducir al mínimo
el soplo de harina. El ancho vertedor
ayuda a que sea más fácil agregar
los ingredientes. (Estándar en
modelos selectos.)
Sensor electrónico de velocidad
El sensor electrónico de velocidad
mantiene la velocidad seleccionada,
incluso si se añaden ingredientes y la
densidad y el peso cambian.
ESPAÑOL
8585858585
Page 86

ENSAMBLAJE DE LA BATIDORA CON
TAZÓN QUE SE LEVANTA
ESPAÑOL
Limpieza antes de usar
Antes de usar su batidora con base
por primera vez, lave el tazón y
los accesorios. Consulte la sección
“Cuidado y limpieza”.
Colocación del tazón para batir
4. Coloque las horquillas del tazón
sobre los pernos localizadores en
el soporte del tazón.
5. Presione hacia abajo la parte
trasera del tazón hasta que el
perno se introduzca en el pestillo
y escuche un clic.
6. Eleve el tazón antes de batir.
7. Conecte a una toma de corriente
trifásica con conexión a tierra.
Cómo levantar y bajar el tazón
para batir
1. Para levantar el tazón, gire la
palanca todo lo que pueda en el
sentido contrario a las manecillas
del reloj.
Levantar
1. Asegúrese que la palanca
para control de velocidades esté
en la posición de apagado (OFF/0).
2. Desconecte la batidora o
la corriente.
3. Baje el soporte del tazón girando
la palanca en el sentido de las
manecillas del reloj.
Bajar
2. La palanca encajará en su
lugar cuando el tazón esté
completamente levantado.
3. Para bajar el tazón, gire la
palanca en el sentido de las
agujas del reloj.
86868686
Continúa en la página siguiente
Page 87

ENSAMBLAJE DE LA BATIDORA CON
TAZÓN QUE SE LEVANTA
Cómo retirar el tazón para batir
1. Asegúrese que la palanca para
control de velocidades esté en
la posición de apagado (OFF/0).
2. Desconecte la batidora o
la corriente.
3. Baje el soporte del tazón girando
la palanca en el sentido de las
manecillas del reloj.
4. Tome el mango del tazón y
levante el tazón separándolo
de los pernos localizadores.
Colocación del batidor plano,
el batidor de alambre y el
gancho para masa en espiral
PowerKnead™
1. Asegúrese que la palanca para
control de velocidades esté en
la posición de apagado (OFF/0).
2. Desconecte la batidora o
la corriente.
3. Deslice el accesorio seleccionado
hacia el eje del batidor.
4. Gire el accesorio hacia la
derecha, enganchándolo en el
perno del eje.
5. Conecte a una toma de corriente
trifásica con conexión a tierra.
Cómo retirar el batidor plano,
el batidor de alambre y el
gancho para masa en espiral
PowerKnead™
1. Asegúrese que la palanca para
control de velocidades esté en la
posición de apagado (OFF/0).
2. Desconecte la batidora o
la corriente.
3. Presione el accesorio hacia arriba
y gírelo hacia la izquierda.
4. Para sacarlo, deslice suavemente
el accesorio hacia abajo del eje
del batidor.
ESPAÑOL
Eje del
batidor
..
8787878787
Page 88

USO DEL VERTEDOR ANTISALPICADURAS*
Colocación del vertedor
antisalpicaduras*
1. Asegúrese que la palanca para
control de velocidades esté en
la posición de apagado (OFF/0).
2. Desconecte la batidora o
la corriente.
3. Coloque el accesorio deseado y
eleve el tazón para batir.
4. Deslice el cuello del vertedor
antisalpicaduras en el eje del
batidor centrándolo sobre el
borde del tazón.
Uso del vertedor antisalpicaduras
Agregue los ingredientes al tazón
para batir a través del vertedor.
IMPORTANTE: Asegúrese de que las
guías en la parte inferior del vertedor
se apoyen en el borde del tazón para
evitar que los ingredientes escapen
del tazón a medida que se añaden.
ESPAÑOL
Extracción del vertedor
antisalpicaduras
1. Asegúrese que la palanca para
control de velocidades esté en la
posición de apagado (OFF/0).
2. Desconecte la batidora o
la corriente.
3. Quite el vertedor del cuello.
4. Deslice el cuello del vertedor hacia
afuera del tazón.
5. Baje el soporte del tazón girando
la palanca en el sentido de las
agujas del reloj.
6. Quite el accesorio y el tazón
para batir.
Limpieza del vertedor
antisalpicaduras
Lave en agua caliente con jabón. Si
lo desea, puede lavar en la canasta
superior del lavavajillas.
Vertedor
*Si se incluye vertedor antisalpicaduras.
88888888
Page 89

USO DE LOS ACCESORIOS DE LA
BATIDORA CON BASE KITCHENAID®
Batidor plano para mezclas
normales a espesas:
pasteles panecillos
coberturas cremosas panes rápidos
caramelos pastel de carne
galletas puré de papas
masa para pay
Batidor de alambre o batidor de 11
alambres para mezclas que requieren
de aire incorporado:
huevos
claras de huevo
crema espesa
glaseados hervidos
pasteles esponjosos
Batidor de alambre
pasteles de ángel
mayonesa
algunos caramelos
Batidor de 11
alambres
ESPAÑOL
Gancho para masa en espiral
Powerknead™ para batir y amasar
masas con levadura:
panes rollos
masa para pizza pasteles de café
bollos
8989898989
Page 90

USO DE LA BATIDORA CON
TAZÓN QUE SE LEVANTA
Funcionamiento de la batidora
1. Antes de usar, asegúrese que
el batidor plano, el batidor de
alambre o el gancho para masa
en espiral PowerKnead™ esté
correctamente colocado y que
el tazón esté levantado a la
posición de batido.
2. Enchufe la batidora en una
toma de corriente trifásica con
conexión
a tierra.
3. Deslice lentamente la palanca
para el control de velocidades
hacia adelante para comenzar
a batir. Aumente gradualmente
la velocidad para evitar que se
salpiquen los ingredientes.
4. Para interrumpir el batido,
deslice la palanca para el control
de velocidades hacia la posición
ESPAÑOL
de apagado (OFF/0).
Protección del motor de
estilo comercial
Si la batidora se sobrecalienta debido
al uso pesado, el motor se apagará
automáticamente para prevenir
daños. Si esto ocurre:
1. Deslice la palanca para el control
de velocidades hacia la posición
de apagado (OFF/0). Esto apaga
la batidora.
2. Deje enfriar la batidora durante
varios minutos.
3. Continúe el batido deslizando
la palanca para control de
velocidades hacia la velocidad
deseada.
4. Si la batidora no arranca, deslice
la palanca para control de
velocidades hacia la posición de
apagado (OFF/0). Deje enfriar
la batidora durante 30 minutos
más antes de reanudar.
NOTA: El tazón y el batidor están
diseñados para proporcionar un
batido completo sin necesidad
de raspar las orillas del tazón
con frecuencia. Por lo general es
suficiente raspar las orillas del
tazón una o dos veces durante el
batido. Apague la batidora con base
antes de raspar. No raspe el tazón
mientras la batidora se encuentra
funcionando.
90909090
Page 91

GUÍA PARA CONTROL DE VELOCIDADES
La palanca para control de velocidades se puede regular entre las velocidades
que se mencionan a continuación si se requiere un ajuste más fino.
IMPORTANTE: Use la Velocidad 2 cuando prepare masa con levadura - el uso
de cualquier otra velocidad puede dañar la batidora.
Velocidad Uso Descripción
STIR REVOLVER Para revolver lentamente, combinar, hacer
(Revolver) puré y comenzar todos los procedimientos de
batido. Use para añadir harina e ingredientes
secos a mezclas, añadir líquidos a ingredientes
secos y combinar mezclas espesas.
• También para uso con el aditamento para
hacer helados.
NOTA: No use la velocidad STIR para
mezclar o amasar masa con levadura.
2 BATIDO Para batir lentamente, hacer puré y revolver
LENTO más rápidamente. Use para batir masas
espesas y caramelos, comenzar a hacer puré
de papas u otras verduras, incorporar
mantequilla en la harina, batir masas
delgadas o que salpican, y batir y amasar masa
con levadura.
• También para uso con el aditamento
abrelatas.
4 MEZCLADO Para batir mezclas semi-espesas, como galletas.
Y BATIDO Use para combinar azúcar y mantequilla y para
añadir azúcar a las claras de huevo para hacer
merengue. Ésta es una velocidad media para
mezclas de pastel.
• También se usa con el aditamento molino de
alimentos, el aditamento rebanador/rallador y
el aditamento colador de frutas y vegetales.
ESPAÑOL
6 BATIR, Para batir a velocidad media a rápida y montar
HACER cremas o para hacer crema batida. Use para
CREMAS acabar el batido de pasteles, donas y otras
mezclas. Ésta es una velocidad alta para
mezclas de pastel.
• También se usa con la exprimidora
de cítricos.
9191919191
Continúa en la página siguiente
Page 92

GUÍA PARA CONTROL DE VELOCIDADES
Velocidad Uso Descripción
8 BATIR O Para montar crema, claras y
MEZCLAR glaseados hervidos.
RÁPIDAMENTE
10 BATIR Para montar pequeñas cantidades de crema o
RÁPIDAMENTE claras de huevo.
• También se usa con el aditamento
fabricador de pastas y con el molino
de granos.
NOTA: La batidora trabajará más lentamente
con las cargas pesadas producidas por estos
aditamentos. Esto es normal.
CUIDADO Y LIMPIEZA
ESPAÑOL
Limpieza de la batidora con base
y los accesorios
• Asegúrese que la palanca para
control de velocidades esté en
la posición de apagado (OFF/0).
• Desconecte la batidora o
la corriente.
• Los batidores planos pulidos
(metal sin pintar), el gancho
para masa en espiral
PowerKnead™ y los batidores de
alambre se deben lavar a mano
con agua y jabón y secarse
inmediatamente
después de lavarlos. No lavar
los accesorios pulidos en
el lavavajillas.
• Todos los tazones para batir,
batidores planos revestidos
(blancos) y ganchos para masa
revestidos (blancos) son aptos
para el lavavajillas.
• Limpie la batidora con un
paño húmedo y suave. No
use limpiadores abrasivos
o estropajos. No sumerja la
batidora en agua.
• Limpie el eje del batidor
frecuentemente para eliminar
cualquier residuo que se
pueda acumular. No almacene
accesorios en el eje del batidor.
92929292
Page 93

DISTANCIA ENTRE
EL BATIDOR Y EL TAZÓN
La batidora con base se ajusta en
fábrica de modo que el batidor plano
apenas se acerque al fondo del tazón.
Si, por alguna razón, el batidor plano
golpea el fondo del tazón o está
demasiado lejos del tazón, puede
corregir la distancia fácilmente.
NOTA: Los ajustes se deben realizar
únicamente cuando el batidor plano
esté en su lugar.
1. Asegúrese que la palanca para
control de velocidades esté en la
posición de apagado (OFF/0).
2. Desconecte la batidora o
la corriente.
3. Coloque la palanca hacia abajo.
4. Coloque el tazón para batir y el
batidor plano.
5. Gire suavemente el tornillo (A)
en el sentido contrario a las
manecillas del reloj para elevar
el batidor (se reduce la distancia
del batidor) o en el sentido de
las manecillas del reloj para
bajarlo (se aumenta la distancia
del batidor).. Un leve giro es
todo lo que se necesita; todo el
rango de ajuste se logra con tan
1
solo
/2 vuelta de tornillo. No
gire el tornillo más de
en ninguna dirección.
1
/2 vuelta
6. Levante el tazón hacia la
posición de batido.
7. Examine la distancia entre el
batidor y el tazón. El batidor
debe apenas acercarse a la
superficie del tazón. Si no lo
hace, baje el tazón y vuelva
a ajustar.
NOTA: Cuando se ajusta
correctamente, el batidor plano
no golpea contra el fondo o los
laterales del tazón mientras la
batidora está en funcionamiento.
Si el batidor o el batidor de alambre
profesional golpean el tazón, se
pueden producir daños.
ESPAÑOL
A
9393939393
Page 94

CONSEJOS PARA BATIR
ESPAÑOL
Adapte su receta a la batidora
Las siguientes son instrucciones
de batido que le pueden ayudar a
convertir sus propias recetas favoritas
y sus métodos de batido para
utilizarlos con su batidora con base
KitchenAid
®
.
El método de “batido rápido“
(a veces llamado método “vertedor”)
es ideal para recetas de pasteles
sencillos. Este método consiste en
combinar los ingredientes secos con
la mayoría o la totalidad de los
ingredientes líquidos en un solo paso.
Las recetas para pasteles más
elaborados deben prepararse usando
el método tradicional de batido,
que comúnmente se conoce como
método de “acremado“. Con este
método, se mezclan completamente
azúcar y grasas, mantequilla o
margarina (haciéndose crema) antes
de que se añadan otros ingredientes.
Para todos los pasteles, los tiempos
de batido pueden variar, ya que la
batidora con base KitchenAid
®
bate
más rápidamente que la mayoría de
las batidoras. En general, batir un
pastel con una batidora KitchenAid
®
tomará aproximadamente la mitad
del tiempo recomendado en la
mayoría de las recetas de pasteles.
Para ayudar a determinar el tiempo
de batido ideal, observe la mezcla
o masa y bata únicamente hasta
que tenga el aspecto deseado que
se describe en su receta, como por
ejemplo “uniforme y cremoso”. Para
seleccionar la velocidad óptima de
batido para esa tarea, use la Guía
para control de velocidades.
Cómo agregar ingredientes
Añada siempre los ingredientes
lo más cerca posible al lateral
del tazón, no directamente en el
batidor en movimiento. El vertedor
antisalpicaduras* puede ayudar
a que sea más fácil agregar los
ingredientes. Si los ingredientes en el
fondo del tazón no se mezclan por
completo, deberá ajustar la distancia
entre el batidor y el tazón. Vea la
sección “Distancia entre el batidor y
el tazón”.
Mezclas para pastel
Cuando prepare mezclas para pastel,
use la velocidad 2 para velocidad
lenta, la velocidad 4 para velocidad
media y la velocidad 6 para velocidad
alta. Para obtener los mejores
resultados, bata durante el tiempo
que se indica en las instrucciones
del envase.
Cómo agregar nueces,
pasas o frutas confitadas
Siga las pautas de cada receta
para incluir estos ingredientes. En
general, los materiales sólidos deben
añadirse a la mezcla durante los
últimos segundos del batido en la
velocidad STIR (Revolver). La pasta
debe ser lo suficientemente espesa
para evitar que las frutas o nueces
se hundan en el fondo de la fuente
durante la cocción en el horno. Las
frutas pegajosas deben recubrirse con
harina para que se distribuyan mejor
en la mezcla.
Mezclas líquidas
Las mezclas que contienen gran
cantidad de ingredientes líquidos se
deben batir a velocidades inferiores
para evitar salpicaduras. Aumente la
velocidad una vez que la mezcla se
haya espesado.
94949494
*Si se incluye vertedor antisalpicaduras.
Page 95

CLARAS DE HUEVO
Coloque las claras a temperatura ambiente en un tazón limpio y seco.
Coloque el tazón y el batidor de alambre. Para evitar salpicaduras, gire
gradualmente hasta la velocidad designada y bata hasta obtener el punto
deseado. Vea el siguiente cuadro.
CANTIDAD VELOCIDAD
1 clara de huevo .....GRADUALMENTE
hasta 10
2 a 4 claras de huevo....GRADUALMENTE
hasta 8
6+ claras de huevo ....GRADUALMENTE
hasta 8
Puntos de batido
®
Con su batidora KitchenAid
claras de huevo se baten rápidamente.
Por lo tanto, tenga cuidado para no
batir más de lo necesario. Consulte
la lista de puntos de batido a
continuación:
Espumoso
Burbujas de aire grandes y disparejas.
Comienza a tomar forma
Las burbujas de aire son sutiles y
compactas. El producto es blanco.
, las
Pico suave
Las puntas de los picos caen cuando
se quita el batidor de alambre.
Casi rígido
Cuando se quita el batidor de alambre,
se forman picos puntiagudos, pero
las claras están suaves.
Rígido pero no seco
Cuando se quita el batidor
de alambre, se forman picos
puntiagudos y rígidos. Las claras
tienen color y brillo uniformes.
Rígido y seco
Cuando se quita el batidor de alambre,
se forman picos puntiagudos y rígidos.
Aparentemente, las claras tienen
pequeñas manchitas y son opacas.
CREMA BATIDA
Vierta crema para batir fría en un tazón frío. Coloque el tazón y el batidor
de alambre. Para evitar salpicaduras, gire gradualmente hasta la velocidad
designada y bata hasta obtener el punto deseado. Vea el siguiente cuadro:
CANTIDAD VELOCIDAD
1
/4 - 3/4 de taza ........GRADUALMENTE
(60 mL - 175 mL) hasta 10
1+ tazas ...............GRADUALMENTE
(235 mL +) hasta 8
Puntos de batido
Observe la crema con atención
mientras bate. Debido a que su
batidora KitchenAid
rápido, sólo hay unos pocos
segundos entre los puntos de
batido. Busque estas características:
®
bate tan
Comienza a espesarse
La crema es espesa y tiene la
consistencia de la natilla.
Conserva su forma
Cuando se quita el batidor, la
crema forma picos suaves. Puede
incorporarse a otros ingredientes
cuando se hacen postres y salsas.
Rígido
Cuando se quita el batidor de
alambre, la crema forma picos
rígidos y puntiagudos. Utilice como
cobertura para tortas y postres, o
como relleno para bombas de crema.
ESPAÑOL
9595959595
Page 96

ESPAÑOL
ADITAMENTOS DE
LA BATIDORA CON BASE
Los aditamentos KitchenAid® están diseñados para garantizar una vida
extensa. El eje de potencia y la cavidad del receptáculo del aditamento tienen
un diseño cuadrado para eliminar cualquier posibilidad de deslizamiento
durante la transferencia de potencia hacia el aditamento. El receptáculo y el
gabinete del eje son cónicos para garantizar un ajuste exacto, incluso después
de usarlo durante mucho tiempo. Ningún aditamento KitchenAid
potencia adicional para funcionar; la unidad de potencia está incorporada.
Cubierta abisagrada del receptáculo
Perilla para aditamentos
Cavidad del receptáculo para aditamentos
Eje de potencia para aditamentos
Aditamento
®
requiere
Montaje de los aditamentos
1. Asegúrese que la palanca para
control de velocidades esté en la
posición de apagado (OFF/0).
2. Desconecte la batidora o
la corriente.
3. Afloje la perilla para
aditamentos girándola en
sentido contrario a las agujas
del reloj; luego levante la
cubierta abisagrada del
receptáculo.
4. Inserte el gabinete del eje del
aditamento en el receptáculo
para aditamentos. Asegúrese
que el eje de potencia del
aditamento encaje en la cavidad
cuadrada del receptáculo para
aditamentos. Quizá sea necesario
girar el aditamento de un lado
a otro. Cuando el aditamento
está en la posición adecuada, la
punta se ajusta en la muesca
del borde del receptáculo.
5. Apriete la perilla del aditamento
haciéndola girar
en el sentido de las manecillas
del reloj hasta que el aditamento
esté completamente fijo a
la batidora con base.
Cómo retirar los aditamentos
1. Asegúrese que la palanca para
control de velocidades esté en la
posición de apagado (OFF/0).
2. Desconecte la batidora o
la corriente.
3. Afloje la perilla del aditamento
haciéndola girar en sentido
contrario a las manecillas del
reloj. Gire el aditamento hacia
un lado y el otro levemente
mientras lo extrae jalándolo.
4. Vuelva a colocar la cubierta del
receptáculo para aditamentos.
Apriete la perilla del aditamento
girando en el sentido de las
manecillas del reloj.
96969696
Continúa en la página siguiente
Page 97

ADITAMENTOS DE
LA BATIDORA CON BASE
FABRICADOR DE RAVIOLES
Enrolla láminas de
pasta y su relleno
en 3 hileras de
grandes y frescos
ravioles. Incluye
cuchara
para rellenar y cepillo de limpieza de
diseño especial. Sirve para las láminas
de pasta de 6" (15,2 cm) de ancho que
se obtienen con el aditamento rodillo
laminador de pastas [KPSA] (se vende
por separado). [KRAV]
JUEGO DE ACOMPAÑAMIENTO
PARA EL CORTADOR DE PASTAS
Sirve para las
láminas de pasta
que se obtienen
con el rodillo
laminador de
pasta [KPSA] o el
juego de rodillos
para pasta [KPRA]
(ambos se venden por separado) para
cortar pasta cabello de ángel delgada
y fideos gruesos. [KPCA]
JUEGO DE RODILLO Y CORTADOR
DE PASTAS
El juego de
3 piezas metálicas
contiene un
rodillo laminador
de pastas,
cortador de
fetuccini y
cortador de
espaguetis.
Incluye cepillo de
limpieza. [KPSA] Únicamente rodillo
laminador de pastas. [KPRA]
MOLINO DE GRANOS
El aditamento
molino de granos
metálico muele
trigo, avena,
maíz, arroz y
otros granos
con poco aceite
y poca humedad.
Elija desde una consistencia “partida”
hasta una extra fina. Incluye cepillo
de limpieza. [KGMA]
REBANADOR Y RALLADOR
Corta rodajas
finas y gruesas
de frutas y
verduras firmes
y ralla pedazos
bastos y finos
de vegetales
crocantes, nueces y quesos firmes.
Incluye 2 conos rebanadores y
2 conos ralladores. [RVSA]
MOLINO DE ALIMENTOS
Muele
rápidamente
carnes, frutas
y verduras
firmes, pan
seco y quesos.
Incluye placas
moledoras finas
y gruesas y una combinación de
empujador de alimentos/llave. [FGA]
ESPAÑOL
9797979797
Continúa en la página siguiente
Page 98

ADITAMENTOS DE
LA BATIDORA CON BASE
ESPAÑOL
EMBUTIDOR
Prepare
embutidos
increíblemente
deliciosos y
nutritivos.
Incluye un tubo
3
de
(1 cm) para embutidos pequeños
y un tubo de
embutidos grandes. El embutidor
requiere el molino de alimentos [FGA
se vende por separado]. [SSA]
FABRICADORA DE HELADOS
en 20-30 minutos. Después de un
mínimo de 15 horas en el congelador, el tazón para congelar estará
listo para trabajar con el mezclador
y para que la mezcla de helado se
mantenga uniformemente congelada
durante todo el proceso de batido.
[KICA0WH]
5
/8" (1,6 cm) para
/8"
Elabora hasta
2 cuartos
(1,9 L) de
helado casero,
sorbete y otros
postres hela-
dos favoritos
ABRELATAS
Este aditamento
práctico es
perfecto para
latas muy
grandes y
también para
latas pequeñas. El aditamento
Abrelatas dejará los bordes suaves y
sin protuberancias. [CO]
EXPRIMIDORA DE CÍTRICOS
Obtenga rápida
y fácilmente
el jugo fresco
de los limones
más pequeños
hasta la toronja
más grande. Un
colador especial ayuda a prevenir la
acumulación de pulpa y semillas. [JE]
BANDEJA PARA ALIMENTOS
Coloque la
bandeja para
alimentos para
expandir su
espacio de trabajo y proporcionar
una superficie conveniente para
alimento adicional. Use con el molino
de alimentos, el fabricador de pastas,
el embutidor y el colador de frutas y
vegetales. [FT]
98989898
Page 99

ACCESORIOS DE
LA BATIDORA CON BASE
VERTEDOR ANTISALPICADURAS
Diseñado con un vertedor que
minimiza las salpicaduras y evita que
la harina vuele cuando se añaden
los ingredientes al tazón para batir.
[KN2PS]
CAMISA DE AGUA
Rellene con hielo para mantener fría
la crema batida o con agua caliente
para mantener caliente el puré de
papas. [Modelo KN2WJ para batidora
con tazón que se levanta de
6 cuartos (5,7 L)].
FUNDAS PARA BATIDORA
Proteja contra raspaduras y polvo con
estas fundas de tela. Todas vienen
con ribete negro. [KMCC1KB es
hueso Kaki, KMCC1OB es negro Ónix,
KMCC1WH es blanco, KMCC1ER es
rojo imperio].
ESPAÑOL
9999999999
Page 100

ESPAÑOL
INSTRUCCIONES GENERALES PARA BATIR
Y AMASAR MASA DE LEVADURA CON
EL MÉTODO DE BATIDO RÁPIDO
El “batido rápido” describe un
método para hornear pan que
requiere mezclar levadura seca con
otros ingredientes secos antes de
añadir líquido. En cambio, el método
tradicional consiste en disolver la
levadura en agua tibia.
1. Coloque todos los ingredientes
secos, incluso la levadura, en el
tazón, excepto las últimas 1 a
2 tazas (235 a 475 mL) de
harina.
2. Coloque el tazón y el gancho
para masa en la batidora.
Levante el tazón de la batidora.
Ponga en velocidad 2 y bata
aproximadamente 15 segundos
o hasta que se hayan combinado
todos los ingredientes.
3. Continúe en velocidad 2,
añadiendo gradualmente los
ingredientes líquidos a la mezcla
de harina y bata de 1 a
2 minutos más. Vea la
Ilustración A.
NOTA: Si los ingredientes líquidos
se añaden demasiado rápido, se
agruparán alrededor del gancho
y reducirán la velocidad del
procedimiento de batido.
4. Siempre en velocidad 2, añada
moderadamente el resto de la
1
harina,
vez. Vea la Ilustración B. Bata
hasta que la masa comience a
limpiar los laterales del tazón,
aproximadamente 2 minutos.
5. Amase en velocidad 2 durante
2 minutos más o hasta que la
masa esté uniforme y elástica.
Vea la Ilustración C.
6. Baje el tazón en la batidora y
retire la masa del tazón y el
gancho. Siga las instrucciones
de la receta para levar, dar forma
y hornear.
Cuando use el método tradicional
para preparar una de sus recetas
favoritas, disuelva la levadura con
/2 taza (120 mL) a la
ILUSTRACIÓN A
ILUSTRACIÓN B
ILUSTRACIÓN C
agua tibia en un recipiente
previamente calentado. Añada
el resto de los líquidos y los
ingredientes secos, excepto las
últimas 1 a 2 tazas (235 a 475 mL)
de harina. Ponga en velocidad 2 y
bata aproximadamente 1 minuto o
hasta que se hayan combinado
todos los ingredientes. Proceda a
los pasos 4 a 6.
Ambos métodos tienen la misma
eficacia para preparar pan. No
obstante, el “batido rápido” puede
ser un poco más rápido y sencillo
para panaderos principiantes. Tolera
levemente mejor la temperatura,
ya que la levadura se mezcla con
los ingredientes secos en lugar de
líquido tibio.
100100100100
 Loading...