

Page 1

Optional tools and materials
needed for some installations:
worm
;;;,,;e;” &=w
gear clamp
Installation
Instructions
Proper mstallatlon IS your responslblllty Read instructions carefully before b~:~lnnln~
installation. Make sure you have everything necessary for correct mstallat~orl
Tools and materials needed
for installation:
IPLEX straight
waste connector
(Code No. 373-15)
plastic tube
dishwasher drain
connector
on-off
electrical
switch
(‘/? hp,
15-20 amperes)
Ask about the KitchenAid” Instant Hot”
water dispenser - the faucet that cooks as
it pours
l
Delivers 19O’F (87.8-C) hot water - perfect
for soups, cereals, sauces, gravies, desserts
and more!
0
copper wire
6
K====-h
strain relief
KltchenAld,z St Joseph,
Michigan 49085
KitchenAid
For the way it’s made.
Form ~&part No
10023/421152>
Page 2
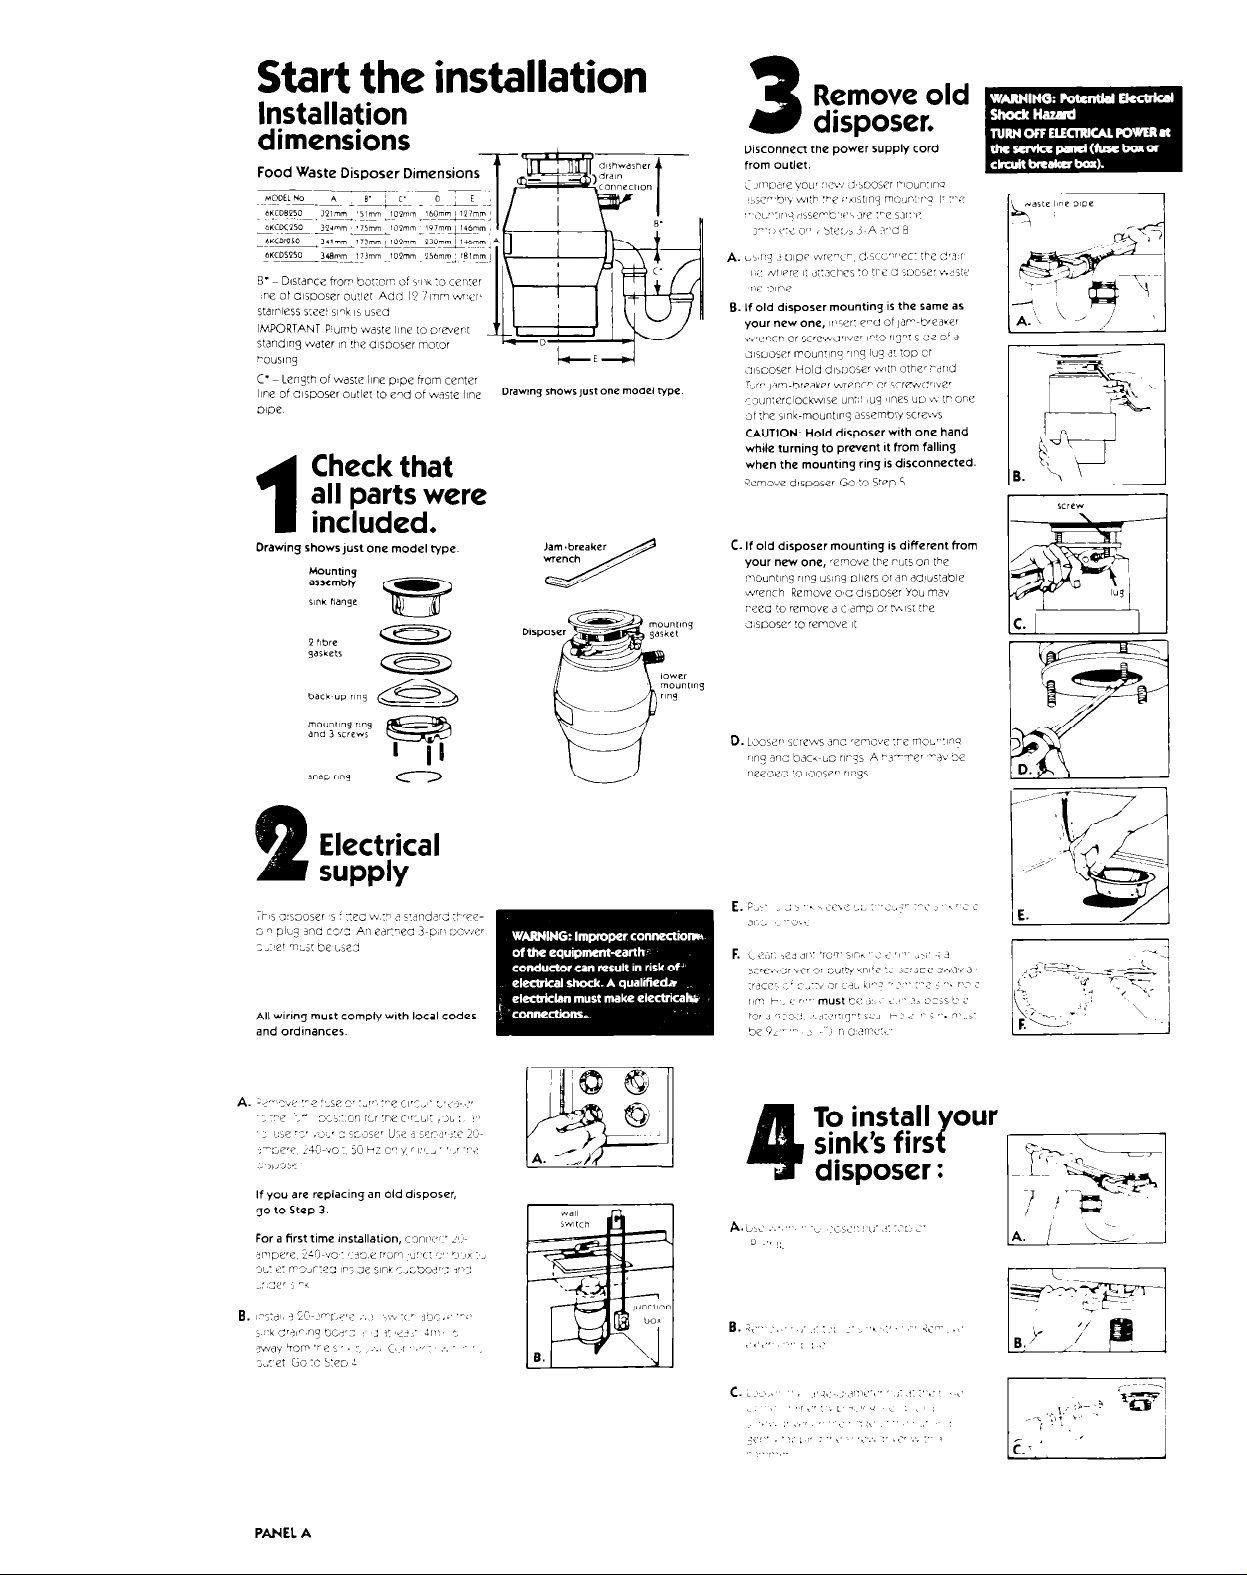
Start the installation
-v-m w w-m- -s------------
Installation
dimensions
Food
Waste Disposer Dimensions
Check that
all parts were
included.
1
Drawing showslust one model type
Remove old
3
Disconnect the power supply cord
from outlet.
disposer.
Electrical
SUPPlY
All wrmg must comply wth local codes
and ordinances.
PANEL A
Page 3

Clean sink’s
5
drain line.
Separate the
mounting
assembly.
%
Attach the
upper
mounting
assembly.
D:.,. i-r ,_
Apply f ibre
s
J : _ ;;
asket or putty
o sink flange. r,
0.ptional
z;F;asher
9
connection
Connect
disposer
to mounting
assembly.
PANEL B
1
Page 4

Attach the
disposer
11
Dram connemons must be made by a
qualified plumber.
waste line
pipe to
drain trap.
Optional:
Connect to
12
If you do not plan to connect a
dIshwasher drain to the dtsposer, go
to step 13
Make sure connectlons comply with
local plumbmy codes.
13
dishwasher drain.
lock
disposer
in place.
I
Make sure all conrectlons comply with
local plumbing codes.
7
4
- C.
kke&!ia%
D
roper-
operation.
PANEL c
Page 5

Instructions pertaining to risk of
fire, electric shock, or injury to persons.
Important safety
instructions:
WARNING When using electric appliances,
basic precautions should always be
followed, including the folIowIng
1. Read all the Instructions before using the
appliance
2. To reduce the risk of Injury, close
supervision IS necessary wherl appliance
IS used near children
3. Do not put ftngers or hands Into waste
dtsposer
4. Turn the power switch to the OFF
posItion before attempting to clear a Jam
or remove an object from the disposer
5. When attempting to looseli a jam In a
waste disposer, use a jam- breaker
wrench as descrtbed In Use and
Care Guide
6. When attempting to remove objects from
a w&e disposer, use long-handled tongs
or Diiers
7. To reduce the risk of injury by materials
that may be expelled by a food waste
disposer, place the stopper In the
drain!grlnd posItIon when yrindlny Do
Not put the folIowIny Into a disposer,
a. Clam and oyster shells
b. Drain cleaper
c. Glass, china or piastlc
d. Large, whole bones
e. Metal, such as bottle caps, tin cans,
or alulninum foil
8. When not operating a disposer, leave the
dralrl cover in place to reduce the risk of
objects falling
9. a. EARTH INSTRUCTIONS FOR CORD
CONNECTED UNITS: This appliance
must be earthed In the event of a
malfunction or breakdown, earth
provides a path of least resistance for
electnc current to reduce the risk of
electric shock. If this appltance IS
equipped with a cord having an
equipment-earth conductor and an
earth plug, the plug must be plugged
Into an appropriate outlet that
properly Installed and earthed In
accordance with all local codes and
ordinances.
~rlto
the disposer
IS
DANGER - Improper connection of
the equipment-earth conductor can
result
IV
risk of electric shock Check
with a quaIlfled electricIan If you are In
doubt as to whether the appliance
properly earthed Do not modify the
plug provided with the appliance ~
If
it
wtl! not fit the outiet, have a
proper outlet Installed by a qualifted
electrIcian
b. EARTH INSTRUCTIONS FOR
PERMANENTLY CONNECTED UNITS:
This appliance must be connected
to an earthed, metal permanent wlnng
system, or an euulpment-earth
conductor must be run with the clrcult
conductors and connected to the
equipment-earth terminal or lead on
the appliance
I
Save these
instructions.
INSTALLER - Please leave Installation
Instructions with the homeowner or
occupant
IS
I
FormNo/PartNo
~0023/4211522-
For service information, ring your local KitchenAid Distributor
Prcoared by KltckerAld,” 5: Joseph, Mlchqan 49085
PrInted in U S A
 Loading...