

KitchenAid 5KSB5070, 5KSB5080 User Manual
5KSB5070
5KSB5080

BLENDER INSTRUCTIONS

English
3
BLENDER INSTRUCTIONS
BLENDER SAFETY
Important safeguards .......................................................................................... 4
Electrical requirements
...................................................................................... 6
Motor horsepower
............................................................................................. 6
PARTS AND FEATURES
Parts and accessories .......................................................................................... 7
ASSEMBLING THE BLENDER
Preparing the Blender for use ............................................................................ 8
OPERATING THE BLENDER
Using the Blender ............................................................................................... 8
Blender function guide...................................................................................... 11
TIPS FOR GREAT RESULTS
Quick tips ......................................................................................................... 12
How to...
........................................................................................................ 13
CARE AND CLEANING
....................................................................................... 14
TROUBLESHOOTING
UnderstandingtheBlenderashcodes ............................................................ 15
Blender does not operate when a setting is selected
....................................... 16
Blender stops while blending
............................................................................ 16
TABLE OF CONTENTS

4
BLENDER SAFETY
IMPORTANT SAFEGUARDS
When using electrical appliances, basic safety
precautions should always be followed, including
the following:
1. Read all instructions. Misuse of appliance may
result in personal injury.
2. To protect against risk of electrical shock, do not
put Blender in water or other liquid.
3. This appliance can be used by children aged
from 8 years and above and persons with reduced
physical, sensory or mental capabilities or lack of
experience and knowledge if they have been given
supervision or instruction concerning use of the
appliance in a safe way and understand hazards
involved. Children shall not play with the appliance.
Cleaning and user maintenance shall not be made
by children without supervision.
4. Unplug from outlet when not in use, before putting
on or taking off parts, and before cleaning.
5. Avoid contact with moving parts.
BLENDER SAFETY

English
5
BLENDER SAFETY
6. Do not operate the Blender with a damaged cord
or plug or after appliance malfunctions, or is dropped
or damaged in any manner. Return appliance to the
nearest Authorised Service Centre for examination,
repair or electrical or mechanical adjustment.
7. Do not use outdoors.
8. Do not let cord hang over edge of table or counter.
9. Keep hands and utensils out of container while
blending to reduce the risk of severe injury to persons
or damage to the Blender. A scraper may
be used but must be used only when the Blender
is not running.
10. Blades are sharp. Care should be taken when handling
the sharp cutting blades, emptying the pitcher and
during cleaning.
11. The use of attachments not recommended by
KitchenAid may cause a risk of injury to persons.
12. Flashing light indicates ready to operate — avoid
any contact with blades or movable parts.
13. Be careful if hot liquid is poured into the Blender
as it can be ejected out of the appliance due
to sudden steaming.
14. This appliance is intended to be used in household
and similar applications such as:
- staff kitchen areas in shops, ofces or other
working environments;
- farmhouses.
- by clients in hotels, motels and other residential
type environments.
- bed and breakfast type environments.
SAVE THESE INSTRUCTIONS
6
BLENDER SAFETY
Electrical requirements
Voltage: 220-240 volts
Frequency: 50-60 Hz
Wattage : 1300 watts
NOTE: If the plug does not fit in the
outlet, contact a qualified electrician.
Do not modify the plug in any way.
Do not use an adapter.
Do not use an extension cord. If the power
supply cord is too short, have a qualified
electrician or serviceman install an outlet
near the appliance.
This appliance incorporates an earth
connection for functional purposes only.
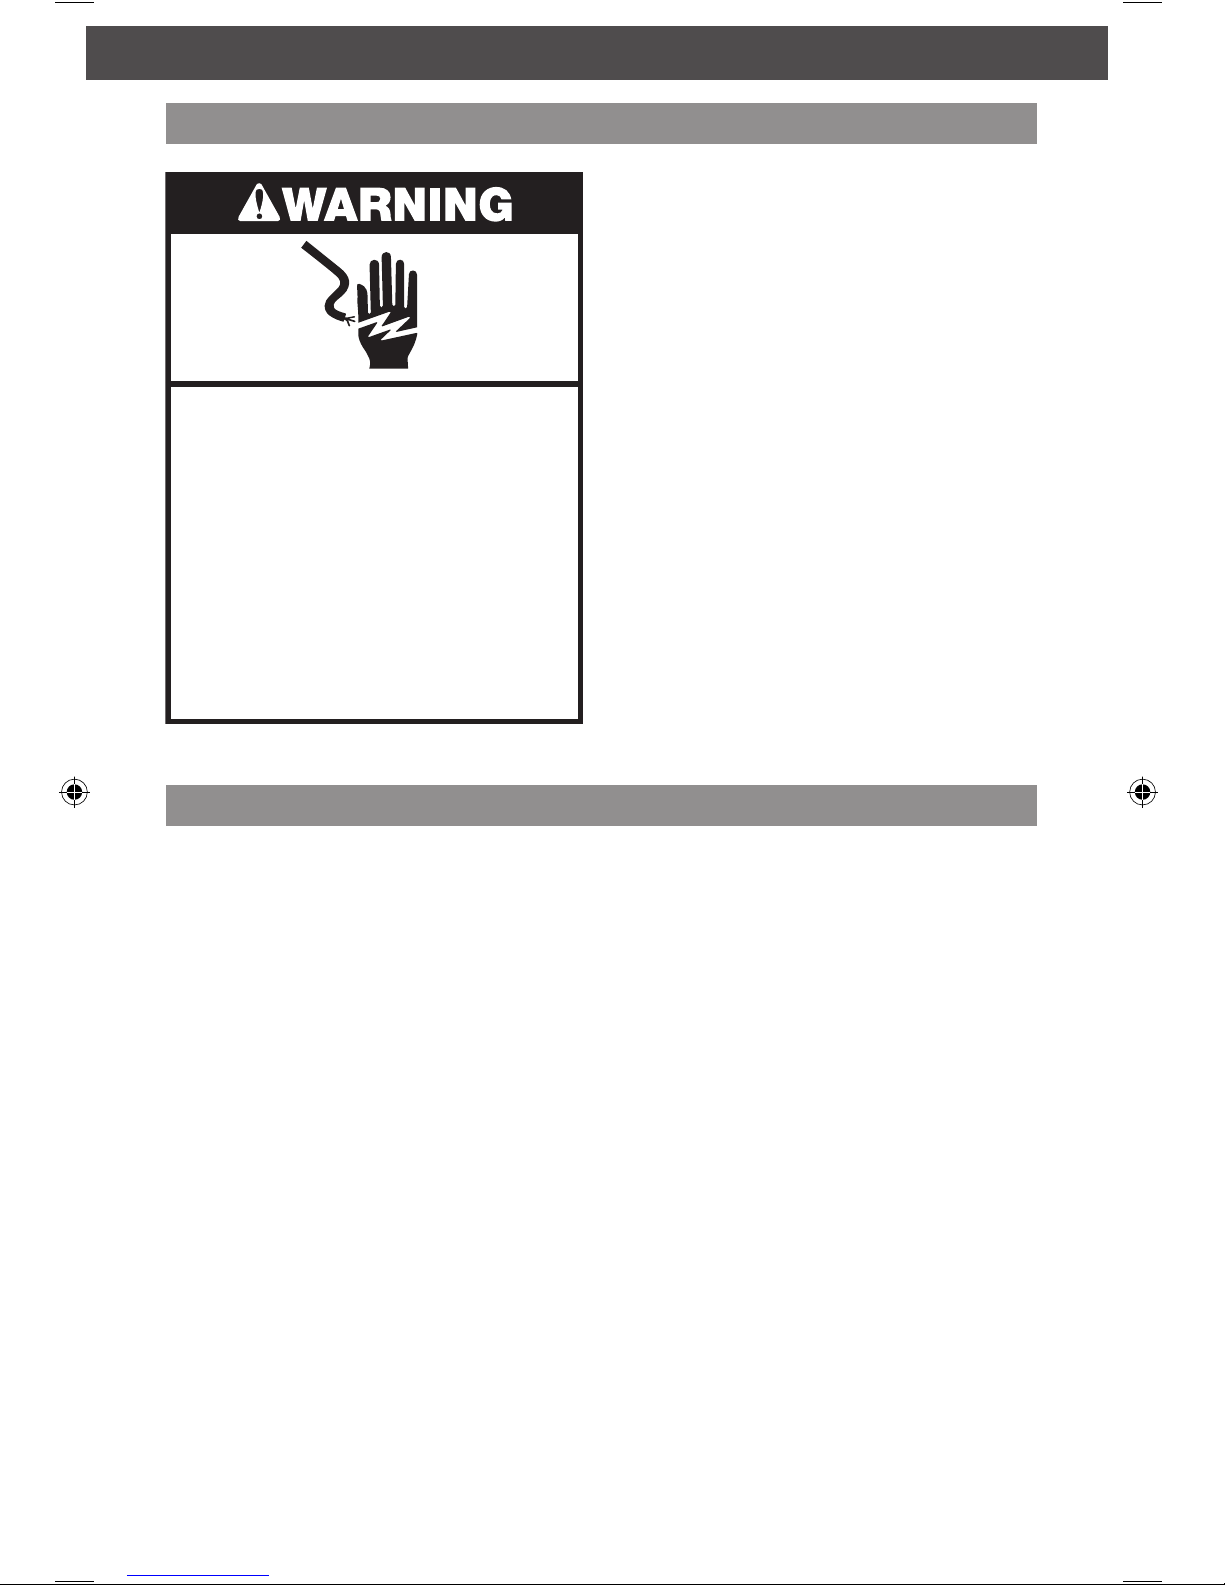
Electrical Shock Hazard
Plug into an earthed outlet.
Do not remove earth prong.
Do not use an adapter.
Do not use an extension cord.
Failure to follow these
instructions can result in
death, fire, or electrical shock.
Motor horsepower for the Blender motor was measured using a dynamometer, a machine
that laboratories routinely use to measure the mechanical power of motors. Our 2.0 peak
horsepower(HP)motorreferencereectsthehorsepoweroutputofthemotoritselfand
not the Blender’s horsepower output in the blender pitcher. As with any Blender, the power
output in the pitcher is not the same as the horsepower of the motor itself. This motor
delivers 1.8 peak HP in the pitcher, enabling your Blender to deliver robust power for
all your recipes.
NOTE: In accordance with guidelines from medical device manufacturers, as with many
products containing magnets, it is recommended that those with implantable pacemakers/
debrillatorsshouldusecarewiththeBlenderandkeeptheirdevice30cm(12inches)away
from the Blender.
Motor horsepower
PARTS AND FEATURES
English
7
PARTS AND FEATURES
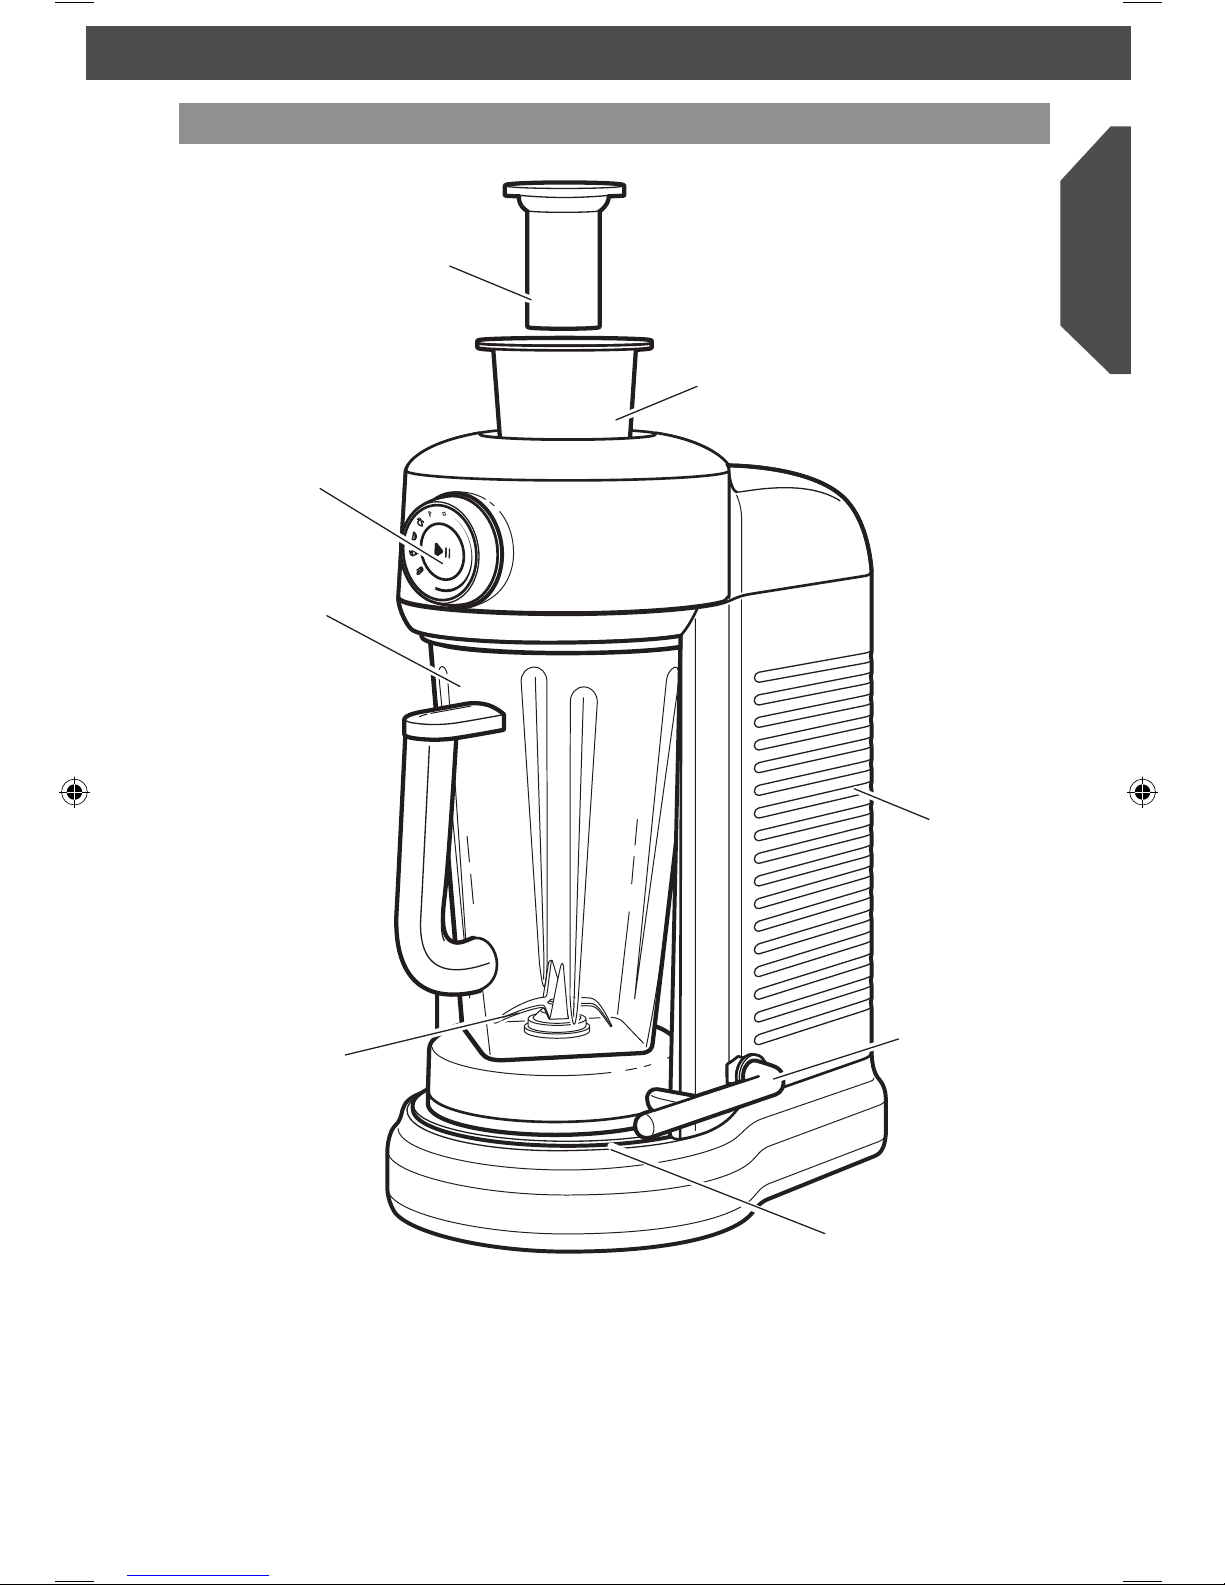
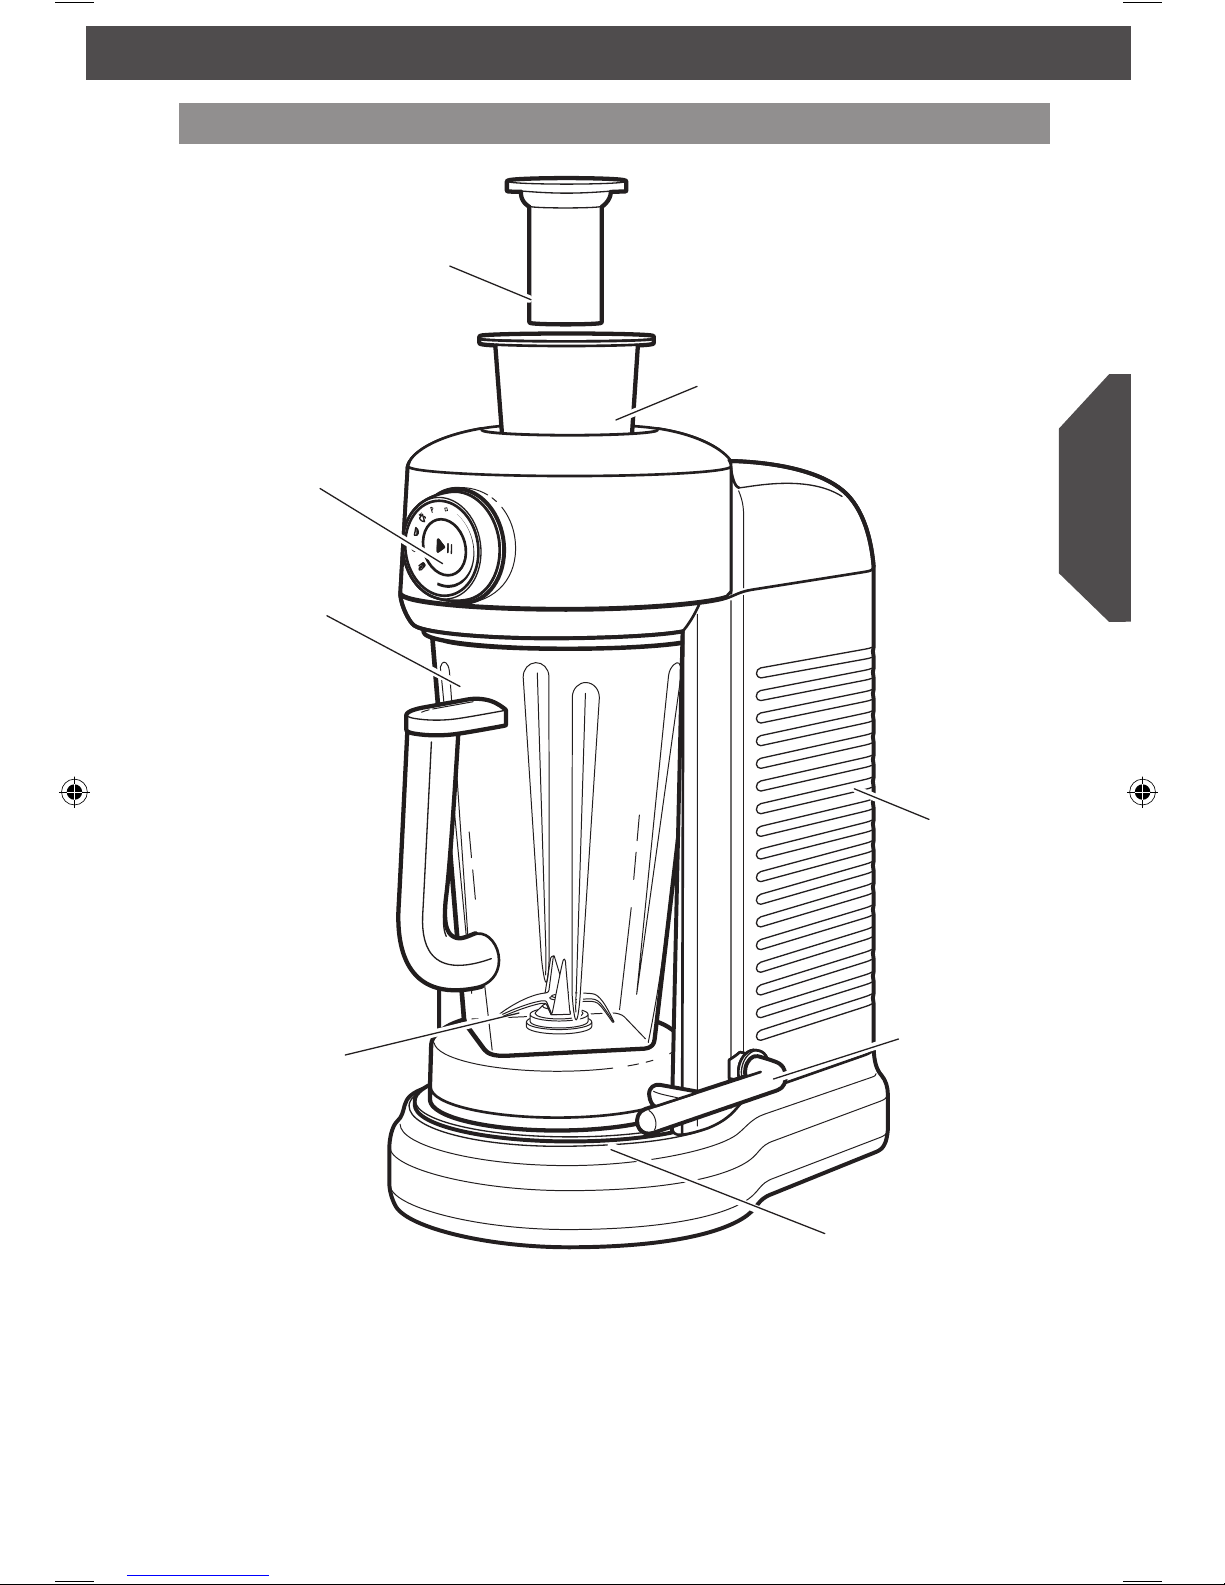
Parts and accessories
BPA-free
pitcher with lid
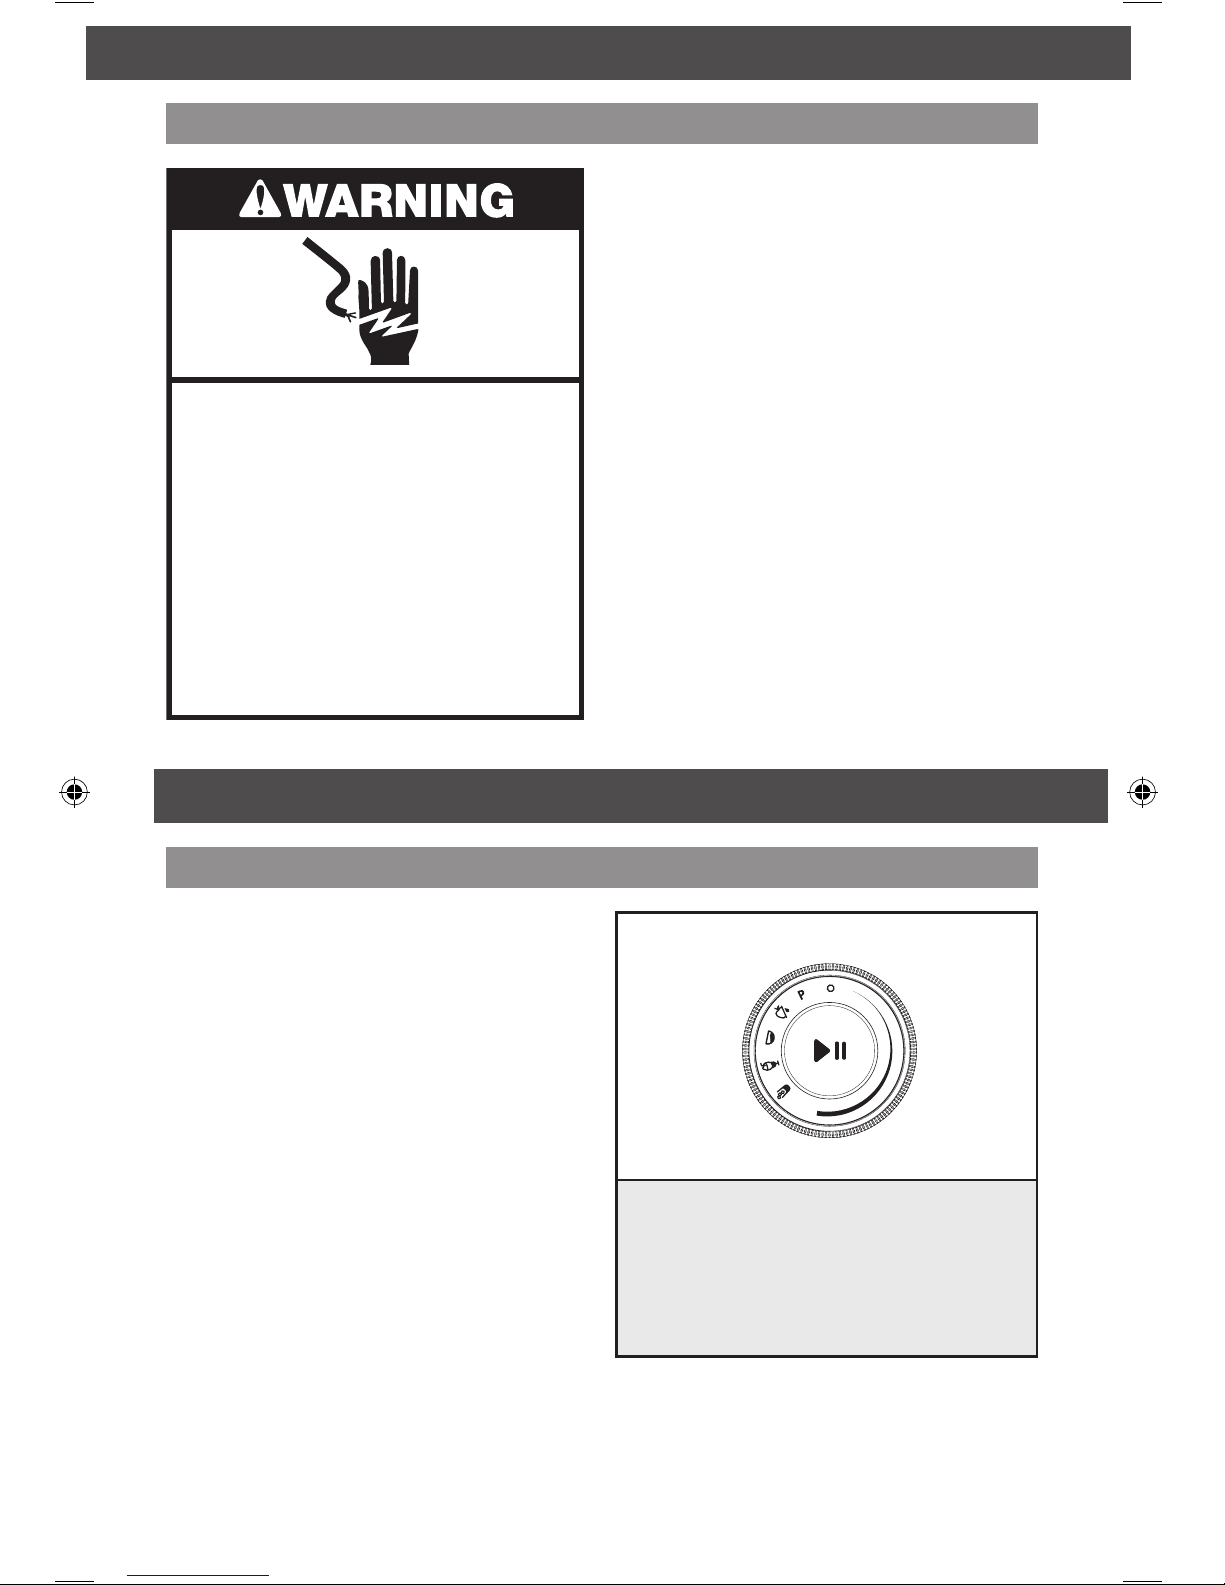
Function
selection dial*
Die-cast
metal base
Pitcher release
lever
Stainless
steel blades
Removable
ingredient cap
with measuring markings
Removable funnel
* See the “Blender function guide” section.
Magnetic drive
(not visible)
8
ASSEMBLING THE BLENDER
Before rst use
Before using your Blender for the first
time, wipe Blender base with a warm
damp cloth, then wipe clean with a damp
cloth. Dry with a soft cloth. Wash pitcher,
lid, and ingredient cup in warm, sudsy
water (see “Care and cleaning” section).
Rinse parts and wipe dry.
Before using the Blender, plug into
an earthed outlet.
Using the Blender
Before use
Before operating the Blender, make sure
the pitcher is properly locked into the
blender base.
The Blender will not run if the pitcher and
lid are not fully in place. If you pull the
Blender out of the base before the Blender
stops running, the blade brake will kick in to
stop the blades, and the Blender will stop
after a few seconds.
The Blender has four preset recipe programs:
Icy Drinks/Smoothies, Milkshakes, Soups/
Sauces, and Juice. It also features Variable
Speed and Pulse selections that allow you to
customise your blending for any recipe you
make. See “Blender function guide” for more
detailed information.
Preparing the Blender for use
OPERATING THE BLENDER
OPERATING THE BLENDER
Electrical Shock Hazard
Plug into an earthed outlet.
Do not remove earth prong.
Do not use an adapter.
Do not use an extension cord.
Failure to follow these
instructions can result in
death, fire, or electrical shock.
English
9
OPERATING THE BLENDER
3
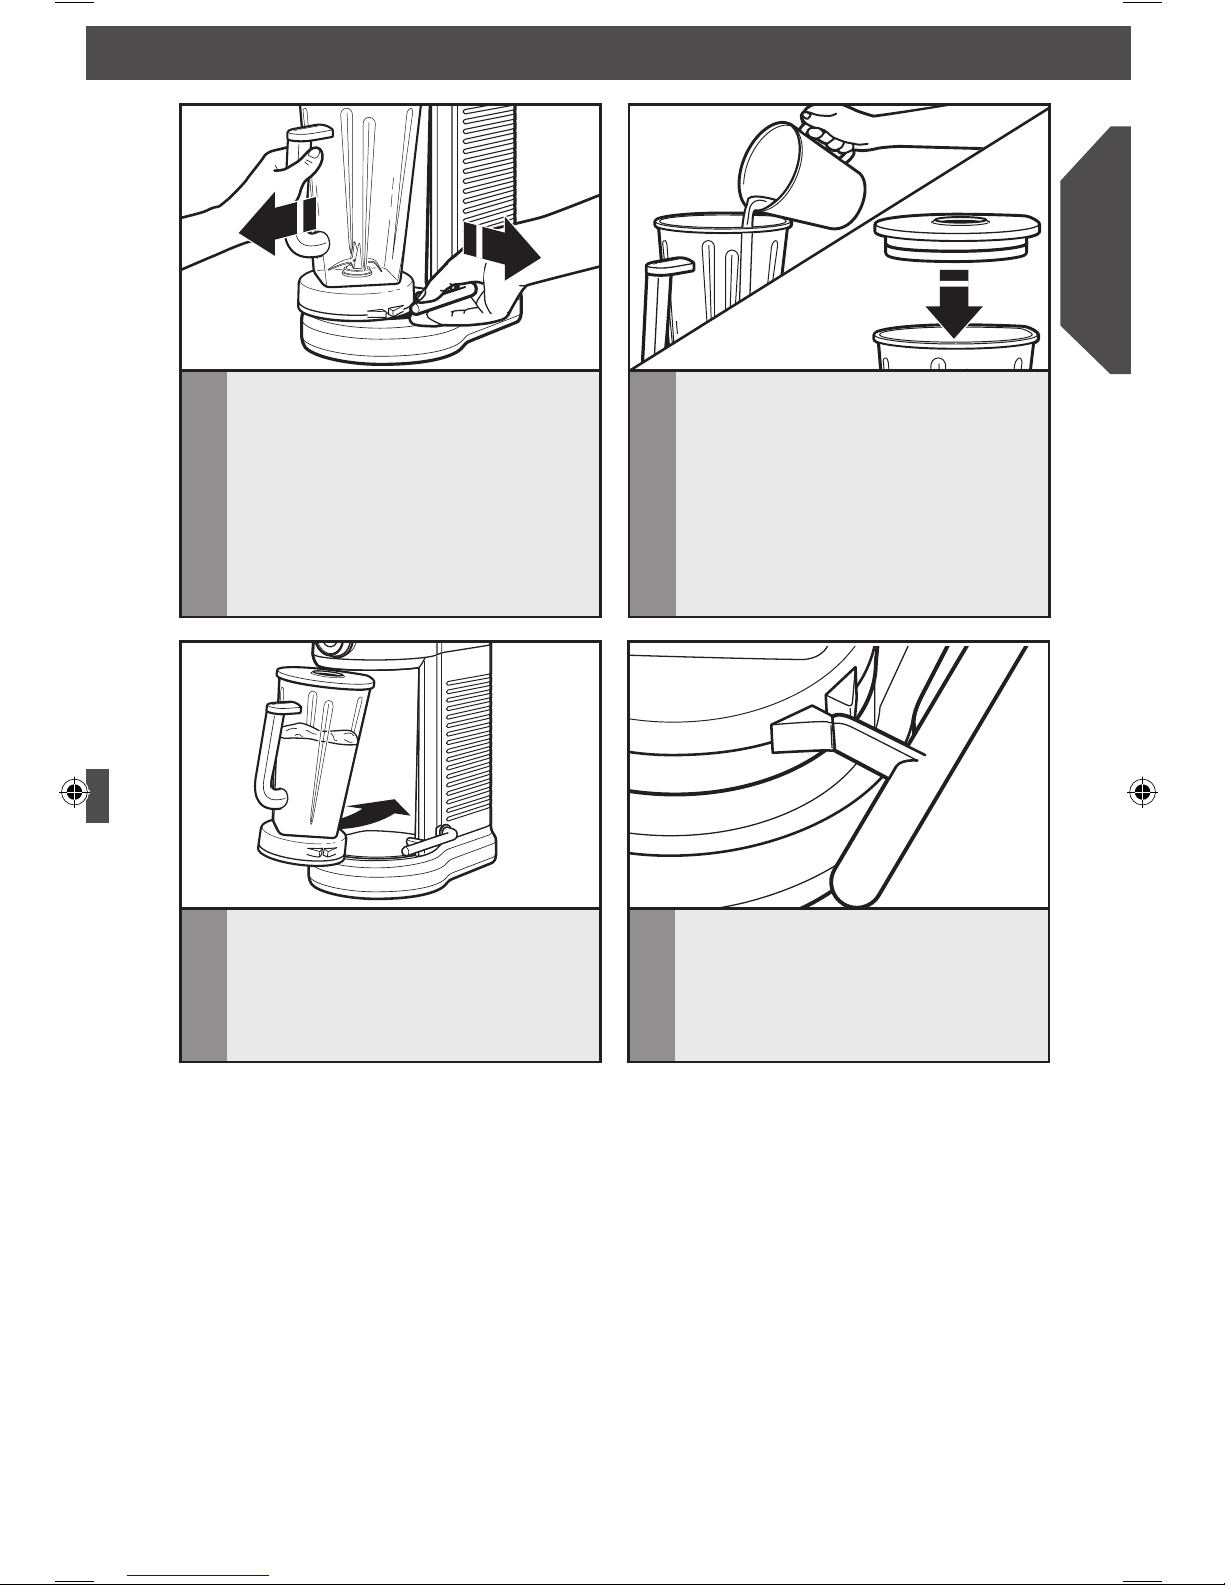
Align the top of the pitcher to slide
under the top of the base, and slide
pitcher forward into the housing. Ensure
that the pitcher goes in straight and is
secured in place.
1
Remove the pitcher from the Blender
base in order to fill it with ingredients.
Pull the pitcher release lever to help
remove the pitcher. Grab the handle
firmly, and pull the pitcher straight
towards you to remove.
4
Ensure that the pitcher is fully in place
by making sure that the tab on the
pitcher release handle sits between the
two triangular notches on the base of
the pitcher. You will hear a click when
the pitcher is fully in place.
2
Put ingredients in the pitcher. Add
liquids first, then soft foods, then ice or
frozen fruit last. Do not fill the pitcher
beyond the max fill line - especially
when using primarily liquids. Put the
lid on the pitcher spout first, then
push down on the side of the lid near
the handle, ensuring that the lid is on
straight. The Blender will not work
without the lid in place.
NOTE: There should be 1 cm of platform
evenly visible around the pitcher when it’s
fully locked in place.
10
6
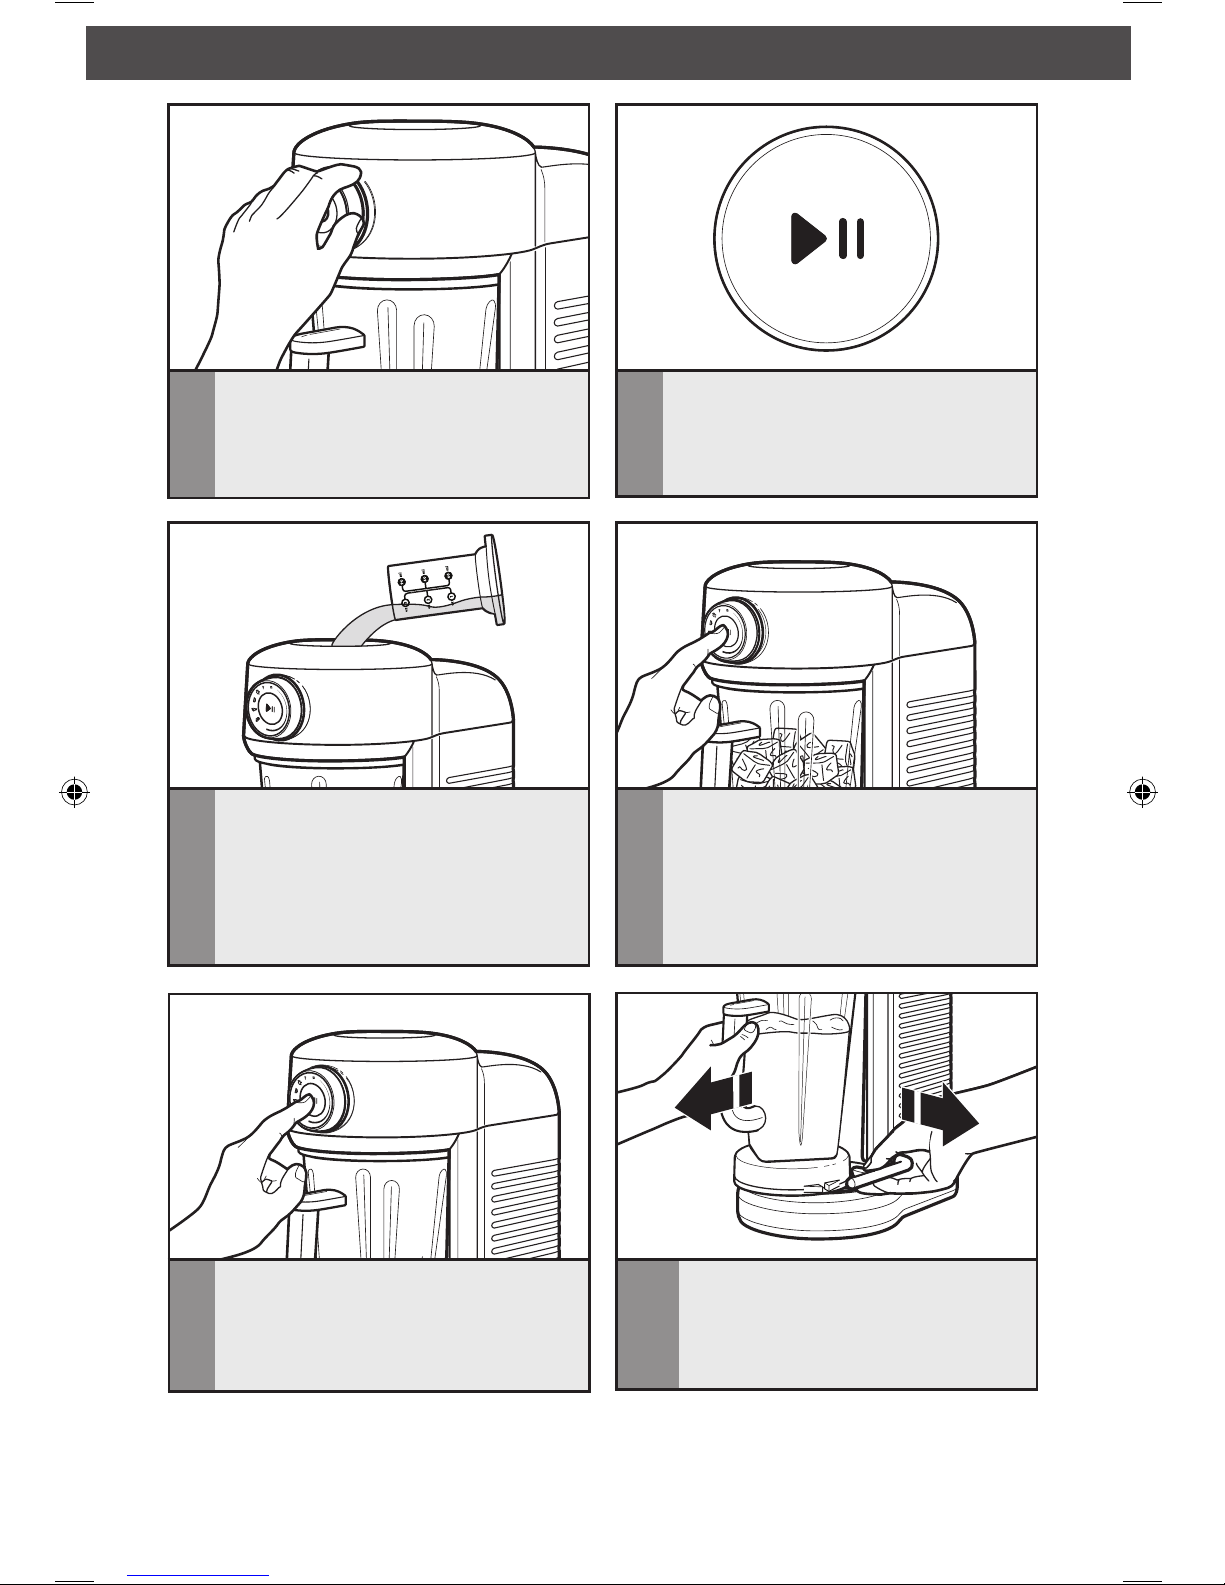
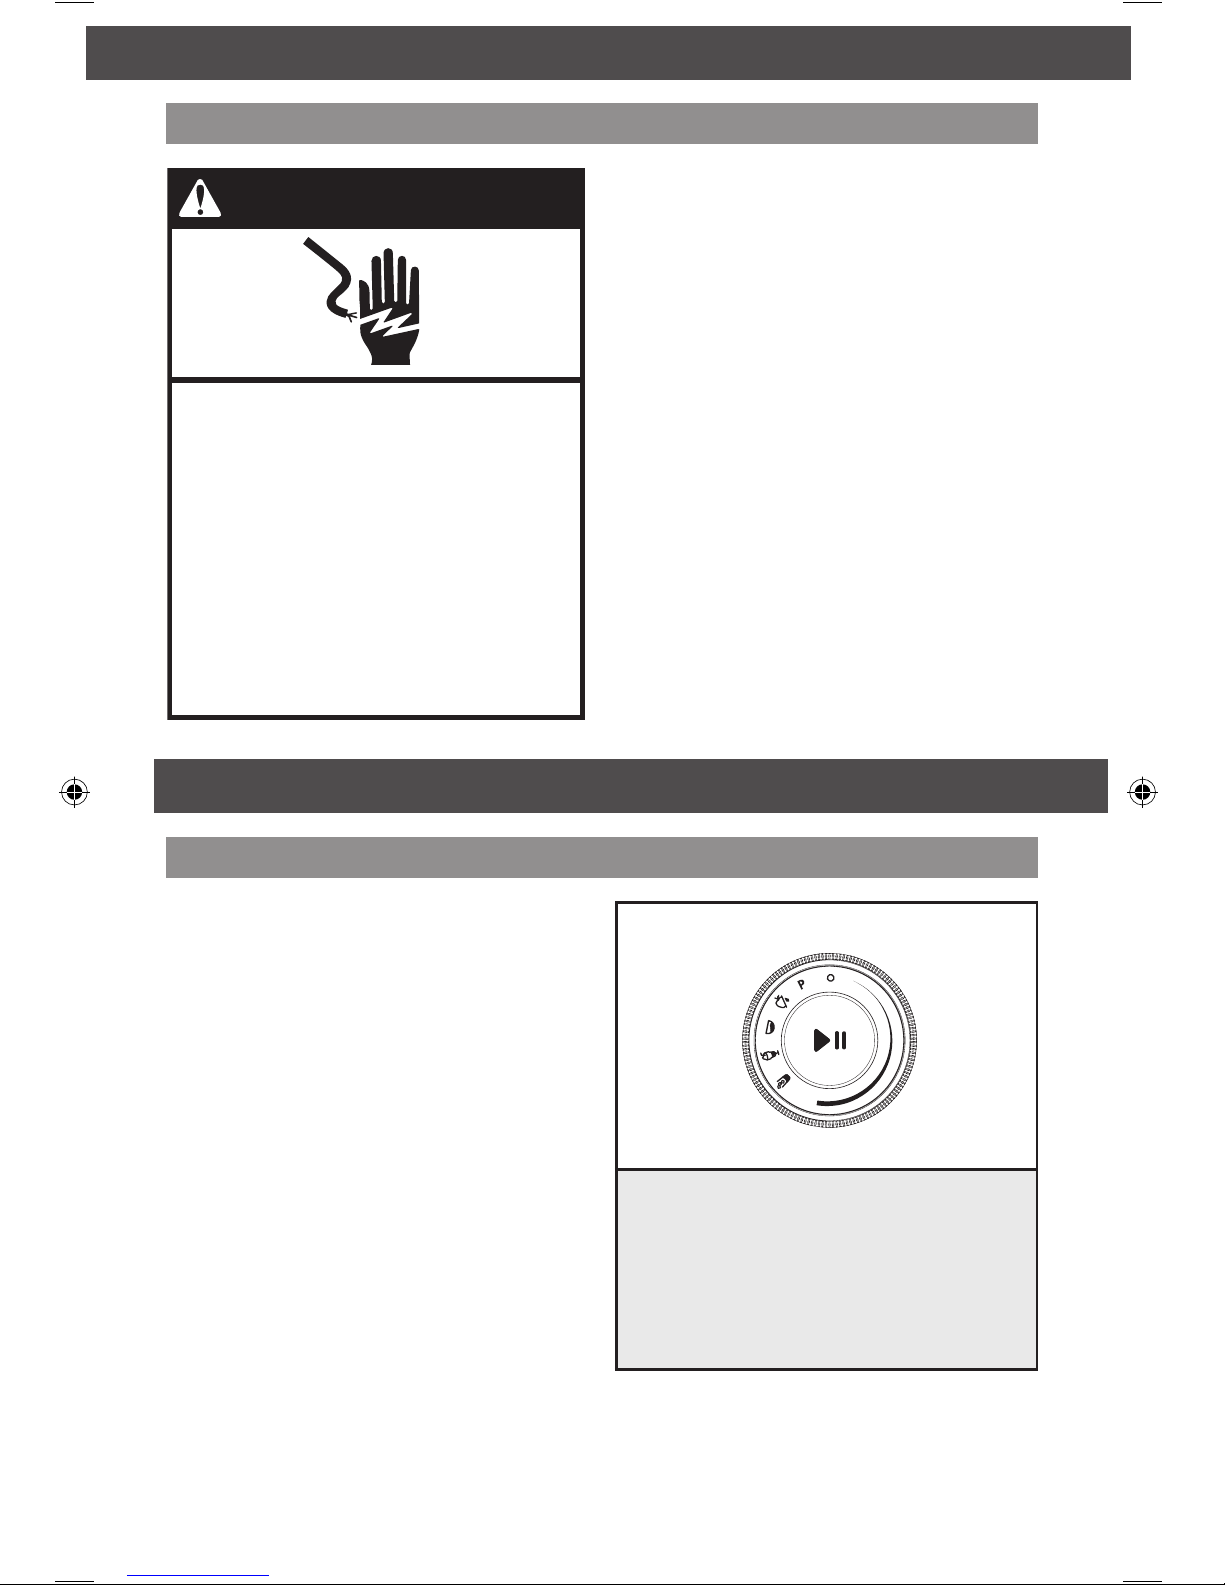
Press the START/PAUSE button.
5
Turn the selection knob to your desired
preset program or variable speed
selection (see the “Blender function
guide” for more information).
OPERATING THE BLENDER
7
You may use the removable ingredient
cap and removable funnel to add
more ingredients to the pitcher while
blending, if needed. The cap includes
convenient measuring indicators
for precise measurement of added
ingredients.
10
Pull the release lever to help remove
the pitcher after you have finished
blending. Grab the handle firmly, and
pull the pitcher straight towards you
to remove.
8
To use the Pulse feature, turn the dial
to PULSE, then PRESS AND HOLD
the START/PAUSE button for the
desired length of time.
9
The Blender will automatically stop
when programs are complete. The
Blender will chime to signal the cycle is
complete, or press the START/PAUSE
button to stop the Blender manually.
OPERATING THE BLENDER
English
11
OPERATING THE BLENDER
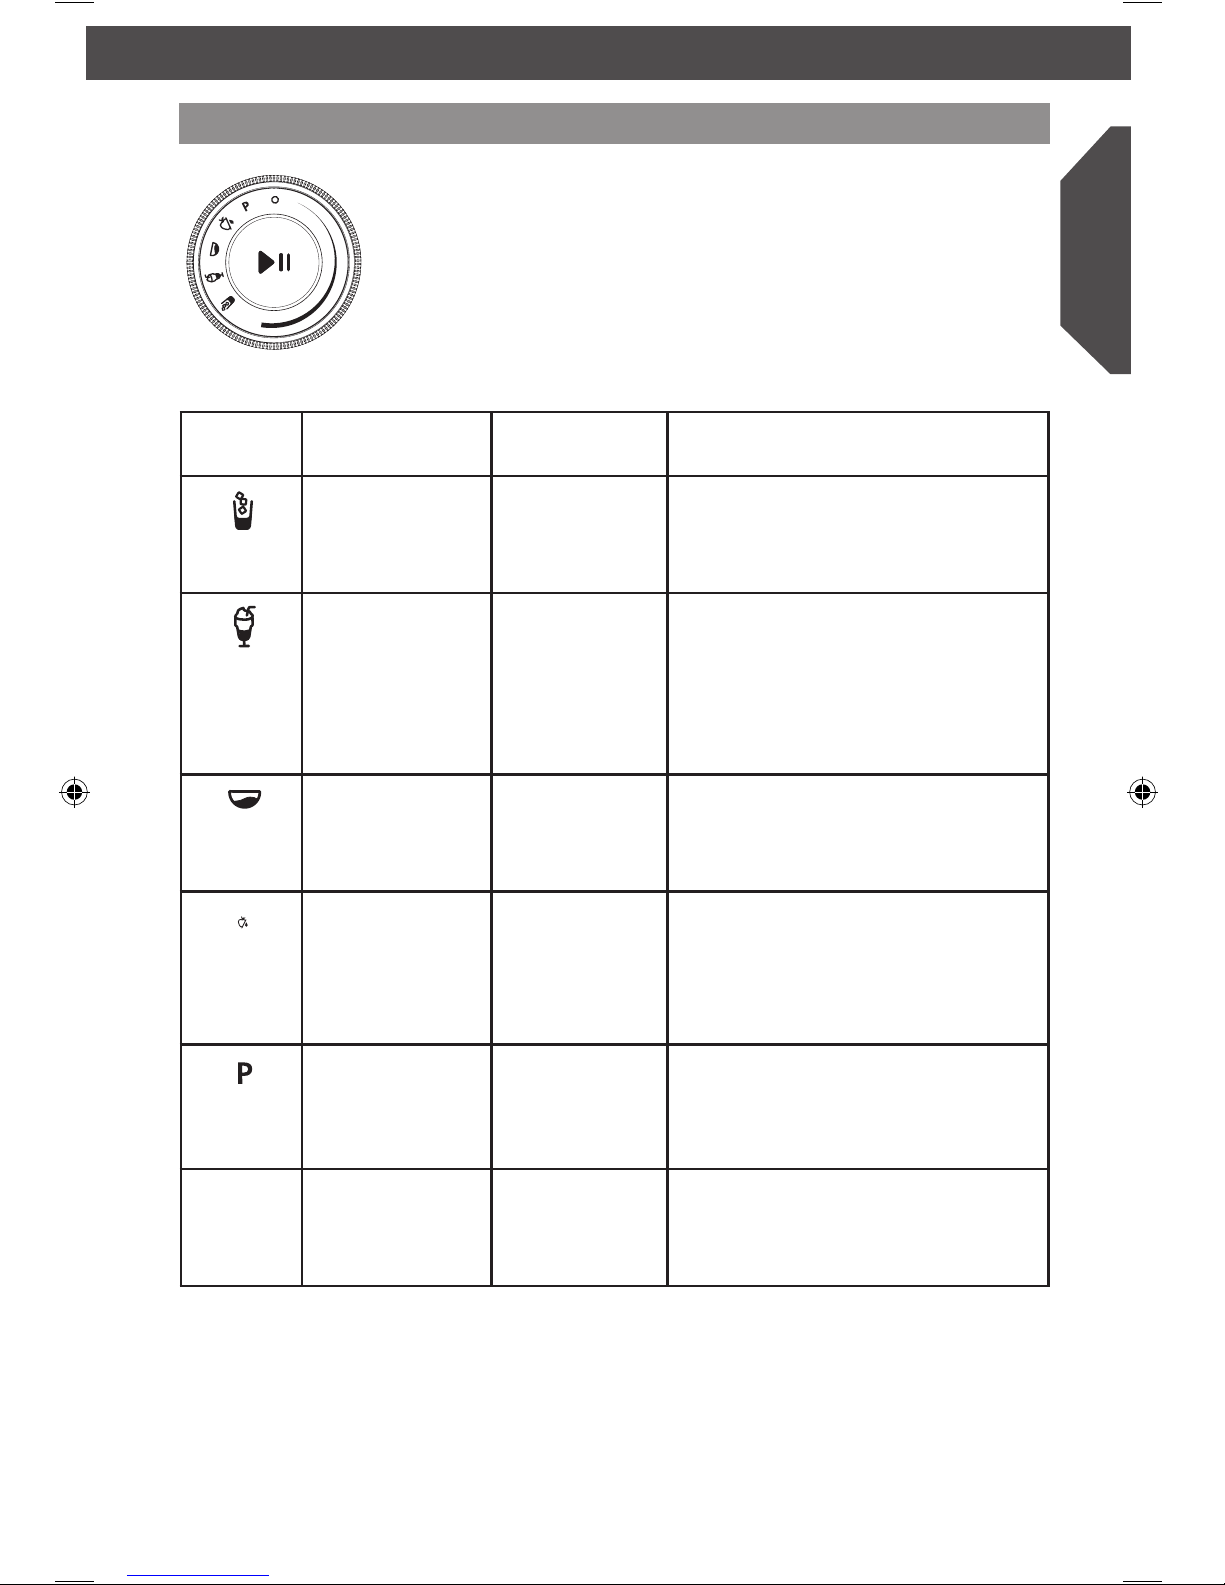
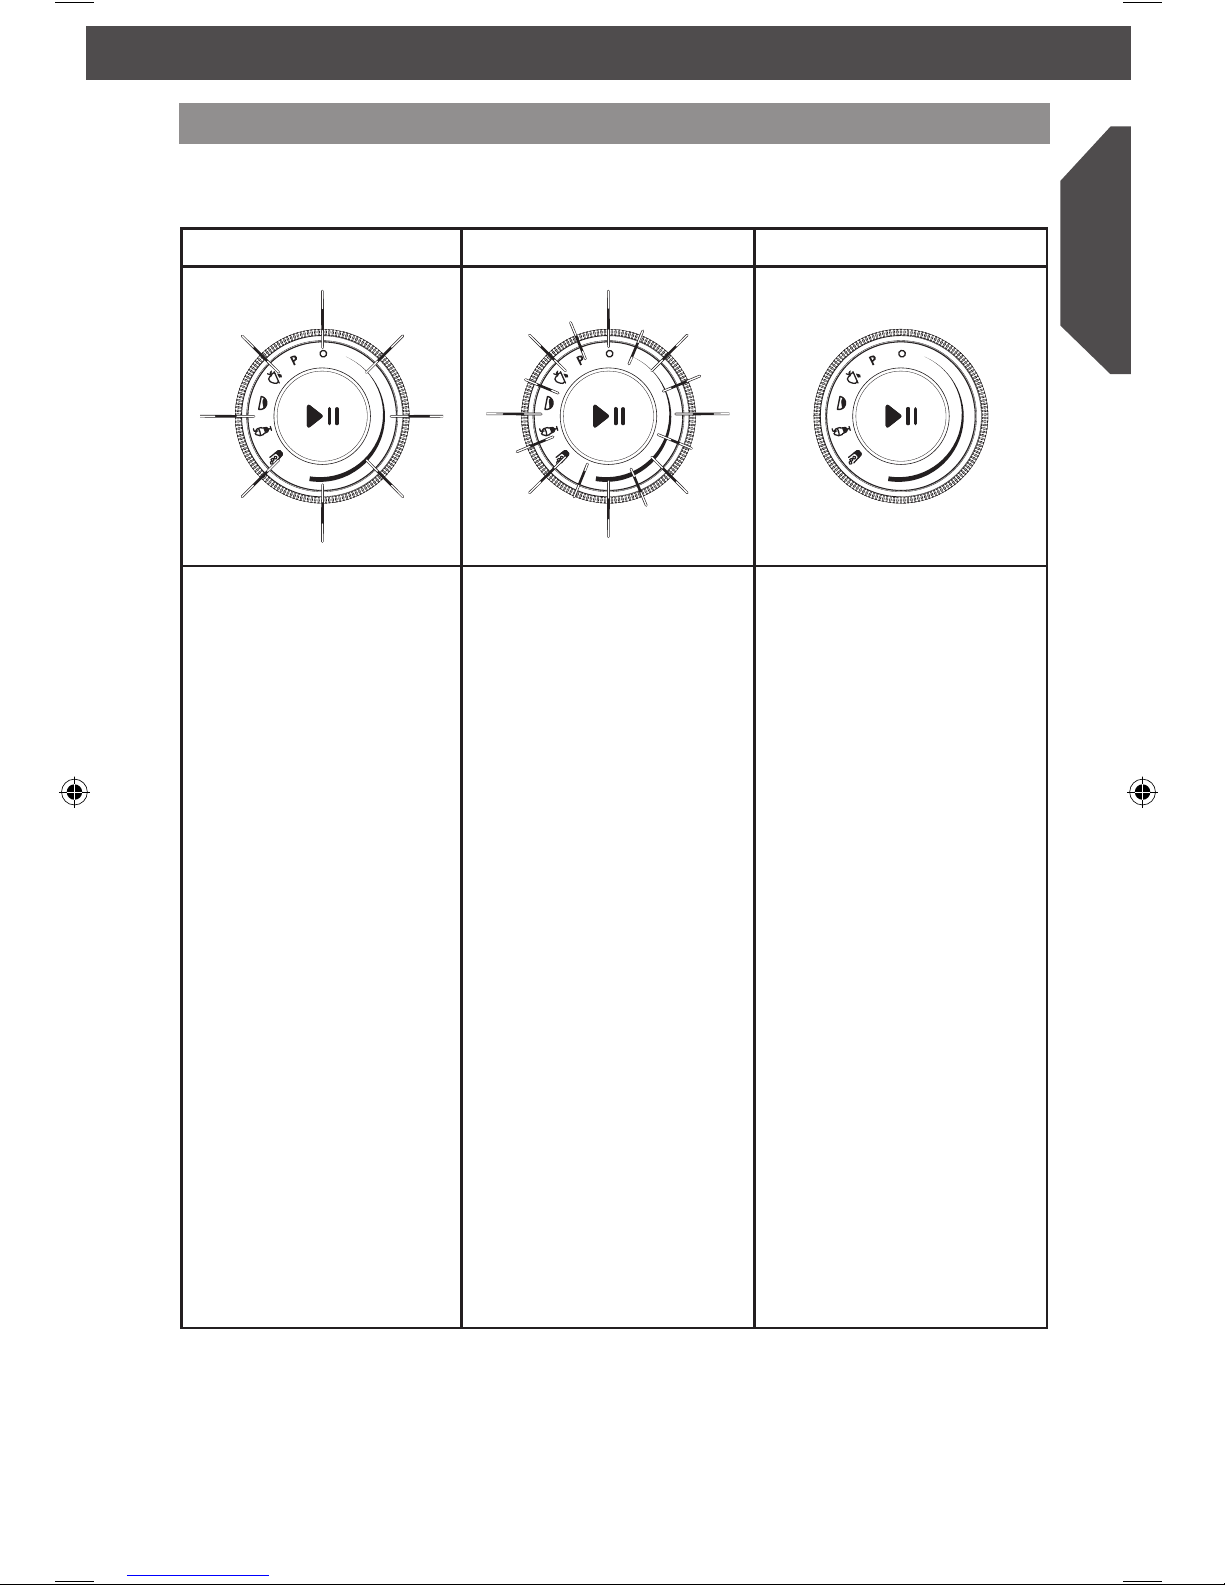
Blender function guide
Setting Description Blending time
(in min:sec)
Items to blend
Quick pulses of power
to crush large amounts
of hard foods, such as
ice, frozen vegetables,
or frozen fruits.
1:05
Blended ice drinks
Crushed ice
Frozen chopped fruit
(defrost slightly until it
can be probed with a
knife tip)
Long, slow speed
blending to create
smooth, uniform
consistency when
blending thick,
sticky foods.
1:39
Ice cream-based drinks
Sherbet/Ice
milk-based drinks
Frozen yogurtbased drinks
Potato puree
Smooth ricotta or
cottage cheese
Pureed fruit or
vegetables/Baby food
Pureed meat/Baby
food meat
Pancake/Wafebatter
Gradual ramp-up of
speed and power.
Ideal for blending
hot ingredients
in particular.
1:25
Hot drinks
Soup
Salad dressing
Hot sauces
High blade speed to
blendtoanetexture
for recipes with foods
highinber,orwith
skins, or seeds.
1:29
Fruit juice from
frozen concentrate
Fruit-based drinks
(thin)
Cold fruit or
vegetable sauce
Finely chopped
fresh fruits
Finely chopped
fresh vegetables
Allows precise control
of the duration and
frequency of blending.
Great for recipes that
require a light touch.
Short pulses of 2-3
seconds as needed
Savory crumb topping
Sweet crumb topping
Meat salad for
sandwichlling
Chopped fruits
Chopped vegetables
Adjustable speeds for
netunedchopping
and blending needs to
prepare any recipe.
Up to 2:00,
as needed for
desired recipe
Pesto
Dips
Grated hard cheese
Fluffy gelatin for
pie/desserts
Cheesecake
Mousse
SOUPS/
SAUCES
VARIABLE
SPEEDS
MILKSHAKES
JUICE
ICY DRINKS/
SMOOTHIES
PULSE
The four preset recipe programs were each developed based
ontypicalrecipesinthatcategory.However,you’llndthatnot
all recipes are exactly the same, and sometimes a particular recipe
might blend more to your preference on a program that is not
obvious. For example, some milkshakes with frozen fruit blend
better on the Icy Drinks/Smoothies program. Also, when making
smoothies,youmightpreferthenertexturethattheJuiceprogram
creates.Weencourageyoutoexperimenttondthebestprogram
for your favourite recipes.

12
TIPS FOR GREAT RESULTS
Quick tips
Using the Blender
• Stop the Blender before using utensils in
the pitcher. Use a rubber spatula to mix
ingredients only when the Blender is off.
Never use any utensil, including spatulas,
in the pitcher while the motor is running.
• The Blender is capable of handling hot
ingredients. Cool hot foods, if possible,
before blending.
• For best results, when blending hot
food or liquids, do not fill the blender
pitcher to the top. Secure the lid,
remove the centre ingredient cap
and place a towel over the top.
• The Blender is not intended to be
used as a heating device.
Magnetic Blending
• Be aware that the blender jar and blender
base contain magnets that may attract
other items. For example, the jar may
attract adjacent metal utensils when
placed on a countertop.
• Metal items may also be attracted to
the blender base if jar is not in place.
However, the Blender will not run
without the jar and lid in place.
• Check that jar bottom is free of small
magnetic debris before each use.
Blending on Variable Speed
• For mixtures blended on the Variable
Speeds setting, start the blending process
at a lower speed to thoroughly combine
the ingredients. Then increase to a
higher speed, as desired. You’ll find that
the preset recipe programs will make
blending easier by varying the speed level
automatically.
• Because the Blender can work without
user intervention, the Variable Speed
function will automatically turn off after
approximately 2 minutes to ensure it
does not run longer than intended and
the recipe does not get overblended.
If you want to blend longer, reset the
Blender to the “OFF/O” position and run
it again as needed.
Using the ingredient feed
• If desired, you can remove centre
ingredient cap to add ingredients while
the Blender is operating.
• The ingredient cap and funnel will need
to be washed even if ingredients are not
added through the ingredient feed.
• For thorough processing of ingredients,
add them early in the cycle so that the
Blender can process them fully.
• If chunks of fruit and vegetables are
desired, add the ingredients towards
the end of the blending cycle.
• If the ingredient cap does not fully
seat, make sure the funnel is fully in
the down position. If you are having
trouble, rotate either the funnel or the
cap until you find the correct position.
• Wipe out inner funnel liner after each use.
Crushing ice
• Ice directly from the freezer will crush
better than partially melted ice for snow.
• Smaller ice cubes can be chopped or
crushed faster than large ones.
• For best results, crush ice by adding
it through the ingredient feed as the
Blender is running.
TIPS FOR GREAT RESULTS

English
13
TIPS FOR GREAT RESULTS
Take lumps out of sauce: If sauce becomes
lumpy, place in the pitcher. Cover and blend
on MILKSHAKES setting until smooth.
Combine flour and liquid for thickening:
Pour liquid ingredients in pitcher first, then
add flour on top. Cover, and blend on
MILKSHAKES setting.
Prepare white sauce: Pour milk in
pitcher first, then add flour on top and,
if desired, salt. Cover, and blend on
MILKSHAKES setting.
Prepare pancake or waffle batter from
mix: Pour liquid ingredients in pitcher first,
then add mix and other ingredients on top.
Cover, and blend on MILKSHAKES setting.
Stop the Blender and scrape sides of the
pitcher as needed.
Make smoothies: Place liquids and frozen
ingredients in pitcher first, then add other
ingredients on top. Cover and blend on
ICY DRINKS/SMOOTHIES setting.
How to...
Dissolve flavoured gelatin: Pour boiling
water into the pitcher; add gelatin. Remove
centre ingredient cup, and place a towel
over the lid. Use the Variable Speed setting
and blend at a slow speed until gelatin is
dissolved, about 10 to 30 seconds. Add
other ingredients.
Chop fruits and vegetables: Put 475 mL
(2 cups) of fruit or vegetable chunks in
pitcher. In PULSE mode, cover and blend,
pulsing a few times, about 2 to 3 seconds
each time, until reaching desired consistency.
Puree fruits: Place 475 mL (2 cups)
canned or cooked fruit in pitcher. Add 30
to 60 mL (2 to 4 tablespoons) fruit juice
or water per 240 mL (1 cup) of fruit.
Cover and blend on MILKSHAKES setting.
Puree vegetables: Place 475 mL (2 cups)
canned or cooked vegetables in pitcher.
Add 30 to 60 mL (2 to 4 tablespoons)
broth, water, or milk per 240 mL
(1 cup) of vegetables. Cover and blend
on MILKSHAKES setting.
14
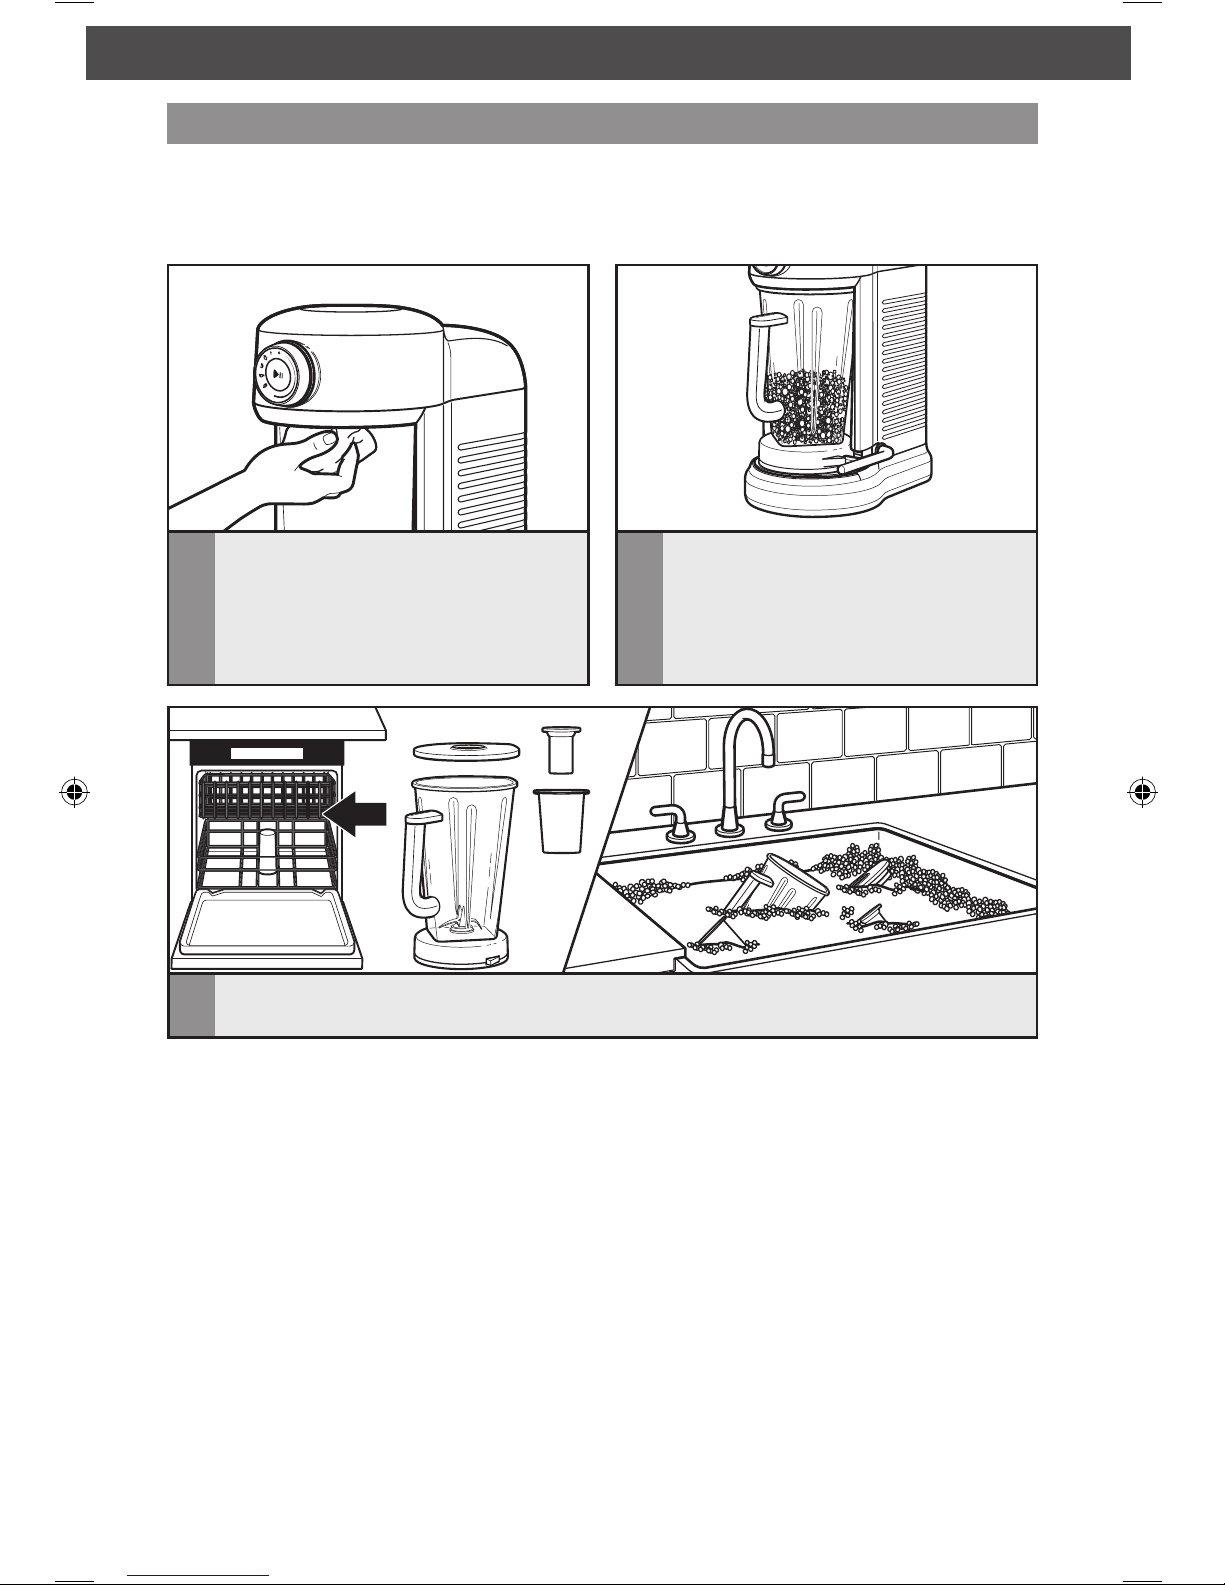
Cleaning the Blender
• Clean the Blender thoroughly after every use. Be sure to unplug before cleaning.
• To avoid damaging the Blender, do not immerse the blender base or cord in water.
• To avoid scratching the Blender, do not use abrasive cleansers or scouring pads.
1
To clean the blender base and cord:
Unplug the Blender before cleaning.
Wipe with a warm, damp cloth; wipe
clean with a damp cloth, and dry with
a soft cloth. Make sure to clean inside
the ingredient feed each time.
2
To quickly clean the Blender while
in the base: Add 1 drop of dish soap
to half a pitcher of water, and run on
the ICY DRINKS/SMOOTHIES cycle.
Discard water when cycle is finished,
and rinse completely.
3
To clean pitcher, lid, ingredient cap, and funnel: Wash all items in the dishwasher
on the top or bottom rack. Or hand wash with soapy water, rinse, and wipe dry.
CARE AND CLEANING
NOTE: For best results when cleaning the Blender, completely disassemble the lid,
ingredient cap and funnel and thoroughly wash all parts after each use.
TROUBLESHOOTING
English
15
TROUBLESHOOTING
IMPORTANT: The Blender will not operate at any speed unless the START/PAUSE button
is pressed first.
Understanding the Blender ash codes
LED is ashing slowly LED is ashing rapidly LED is not ashing
Ready mode
If the LED slowly glows with
increasing intensity and then
is off, the Blender is ready
for blending. Press START/
PAUSE button to start
blending.
Error mode
IftheLEDasheson/offin
rapid bursts, the Blender is not
ready for blending.
The most common reasons
include :
-
Pitcher is not properly in place
- Pitcher was removed before
blending was completed
- Blender is jammed
First, rotate the knob to
“OFF/O”. Next, make sure
the pitcher is properly in
place. Then, choose your
selection and press the
START/PAUSE button.
If Blender is jammed, it will
stop running to avoid damage
to the motor. Press START/
PAUSE, then unplug the power
cord. Remove the pitcher from
the base, and with a scraper,
free the blades by breaking
up or removing the contents
at the bottom of the pitcher.
To restart, rotate the knob to
“OFF/O” position and then
rotate to knob selection and
press START/PAUSE.
IftheLEDdoesnotashaftera
setting is selected, the Blender
is not ready for blending.
The most common reasons
include:
- Blender is in “sleep mode”
-
Blender has been unplugged or
a power outage has occurred
The Blender may have gone
into an inactive mode or “sleep
mode.” This feature saves
power if the Blender is left
unattended for a few minutes.
Resetting the dial to “OFF/O”
brings the Blender back into
“active mode”. First, rotate the
knob to “OFF/O”. Next, make
sure the pitcher is properly
in place. Then, choose your
selection and press the START/
PAUSE button.
If the Blender still does not
work, see below for further
information on ways to correct
the operation error.
16
TROUBLESHOOTING
If the problem cannot be fixed with the steps provided in this section, contact an authorised
service centre.
Blender stops while blending
• Power Loss – Rotate selection dial to
the “OFF/O” position and then rotate
to desired selection setting and press
START/PAUSE.
• The Blender automatically shuts off after
approximately 2 minutes of blending
on Variable Speed. To reset it, turn the
selection dial to the “OFF/O” position,
and then back to your desired setting, and
press START/PAUSE.
• The Blender may be jammed. If it is
jammed, the Blender will stop running
to avoid damage to the motor. Rotate the
knob to “OFF/O”, then unplug the power
cord. Remove the pitcher from the base,
and with a scraper, free the blades by
breaking up or removing the contents
at the bottom of the pitcher. To restart,
rotate the knob to “OFF/O” position and
then rotate to knob selection and press
START/PAUSE.
Blender does not operate when a setting is selected
• IftheLEDisashingon/offinrapidbursts,
the pitcher might not be fully in place or
the Blender might have gone into “sleep
mode” and need to be reset to “OFF/O”.
Follow the “Error mode” instructions.
• Check to see if the Blender is plugged
into an earthed outlet. If it is, press
START/PAUSE; then unplug the Blender.
Plug it back in to the same outlet, and
press START/PAUSE. If the Blender still
does not work, check the fuse or circuit
breaker on the electrical circuit the
Blender is connected to and make sure
the circuit is closed.
• The pitcher might not be fully in place.
Ensure it is all the way in and the lid
is aligned.
• The Blender may need to be reset.
Turn it to the “OFF/O” position and back
to your desired setting.
Electrical Shock Hazard
Plug into an earthed outlet.
Do not remove earth prong.
Do not use an adapter.
Do not use an extension cord.
Failure to follow these
instructions can result in
death, fire, or electrical shock.

Español
17
INSTRUCCIONES DE LA LICUADORA
MEDIDAS DE SEGURIDAD PARA EL USO DE LA LICUADORA
Medidas de seguridad importantes ................................................................... 18
Requisitos eléctricos ......................................................................................... 20
Potencia del motor ........................................................................................... 20
COMPONENTES Y FUNCIONES
Componentes y accesorios .............................................................................. 21
MONTAJE DE LA LICUADORA
Preparación para usar la licuadora .................................................................... 22
FUNCIONAMIENTO DE LA LICUADORA
Uso de la licuadora ........................................................................................... 22
Guía de funciones de la licuadora ..................................................................... 25
CONSEJOS PARA OBTENER EXCELENTES RESULTADOS
Consejos rápidos .............................................................................................. 26
Procedimiento para .......................................................................................... 27
CUIDADO Y LIMPIEZA ....................................................................................... 28
SOLUCIÓN DE PROBLEMAS
Explicación de los parpadeos de la licuadora .................................................... 29
Hay una opción seleccionada y la licuadora no funciona .................................. 30
La licuadora se detiene mientras licúa .............................................................. 30
ÍNDICE
18
MEDIDAS DE SEGURIDAD PARA EL USO DE LA LICUADORA
Su seguridad y la seguridad de los demás es muy importante.
En este manual y en el mismo aparato encontrará muchos mensajes de seguridad
importantes. Lea y obedezca siempre todos los mensajes de seguridad.
Este es el símbolo de alerta de seguridad.
Este símbolo le avisa de los peligros potenciales que pueden matarle
o herirle a usted y a los demás.
Todos los mensajes de seguridad irán acompañados del símbolo de alerta
y la palabra “PELIGRO” o “ADVERTENCIA”. Estas palabras signican:
Puede fallecer o herirse de gravedad si
no sigue las instrucciones de inmediato.
Puede fallecer o herirse de gravedad si
no sigue las instrucciones.
Todos los mensajes de seguridad le indicarán cuáles son los peligros potenciales, cómo
reducir la probabilidad de lesiones y qué puede pasar si no sigue las instrucciones.
PELIGRO
ADVERTENCIA
MEDIDAS DE SEGURIDAD IMPORTANTES
Cuando se utilizan aparatos eléctricos, se deben
tomar entodo momento una serie de precauciones
de seguridad básicas, entre las que se incluyen las
siguientes:
1. Lea todas las instrucciones. El uso indebido del
aparato puede provocar lesiones personales.
2. Para evitar el riesgo de descargas eléctricas,
noponga la licuadora en contacto con el agua
niconningún otro líquido.
3. Este aparato puede ser utilizado por niños a partir
de8años ypor personas con limitaciones físicas,
sensoriales o mentales, oque carezcan de la
experiencia y el conocimiento sucientes, siempre
que lo hagan bajo la supervisión de las personas
responsables de su seguridad o que hayan recibido
de las mismas las instrucciones adecuadas para
su uso de forma segura y hayan comprendido los
peligros que este conlleva. No permita que los niños
jueguen con el aparato. Las tareas delimpieza y
mantenimiento nodeben ser realizadas por niñossin
supervisión.
MEDIDAS DE SEGURIDAD PARA EL USO DE LA LICUADORA

Español
19
MEDIDAS DE SEGURIDAD PARA EL USO DE LA LICUADORA
4. Desenchufe el aparato de la toma de corriente
cuando no se utilice, antes de poner o retirar piezas
y antes delimpiarlo.
5. Evite el contacto con las piezas móviles.
6. No ponga en funcionamiento un aparato que tenga
el cable o el enchufe dañado, ni después de un
funcionamiento defectuoso, de caerse o de sufrir
cualquier tipo de daño. Lleve el aparato al servicio
técnico autorizado más cercano para su examen,
reparación o ajuste eléctrico o mecánico.
7. No utilice el aparato al aire libre.
8. No deje que el cable cuelgue de una mesa o encimera.
9. Mantenga las manos y los utensilios que utilice
apartados del contenedor mientras esté licuando a n
de reducir el riesgo de lesiones personales o daños a la
licuadora. Puede utilizarse un raspador, pero únicamente
cuando lalicuadora no esté en funcionamiento.
10. Las cuchillas son aladas. Extreme el cuidado
cuando manipule cuchillas muy aladas, cuando
vacíe la jarra y durante las tareas de limpieza.
11. El empleo de accesorios que no estén recomendados
por KitchenAid puede aumentar el riesgo de
dañospersonales.
12. La luz intermitente indica que el aparato está listo
parafuncionar; evite el contacto con las cuchillas
ocon las piezas móviles.
13. Tenga cuidado si se vierte líquido caliente en la
licuadora ya que podría salir despedido del aparato
debido a un sobrecalentamiento repentino.
14. Este aparato está pensado para uso doméstico
yenaplicaciones similares como:
- áreas de cocina para el personal en tiendas,
ocinasy entornos laborales.
- granjas.
- clientes en hoteles, moteles y otros entornos
residenciales.
- entornos de tipo “bed and breakfast”.
CONSERVE ESTAS INSTRUCCIONES
20
MEDIDAS DE SEGURIDAD PARA EL USO DE LA LICUADORA
Requisitos eléctricos
Voltaje: 220-240 voltios
Frecuencia: 50/60 hercios
Potencia: 1300 vatios
NOTA: Si el enchufe no encaja en la toma
de corriente, póngase en contacto con
un electricista cualificado. No modifique
el enchufe de ninguna manera. No utilice
un adaptador.
No utilice un cable alargador. Si el cable
de alimentación es demasiado corto, llame
a un electricista o a un técnico cualificado
para que instale una toma de corriente
cerca del aparato.
La toma de tierra de este aparato solo
tiene una finalidad funcional.
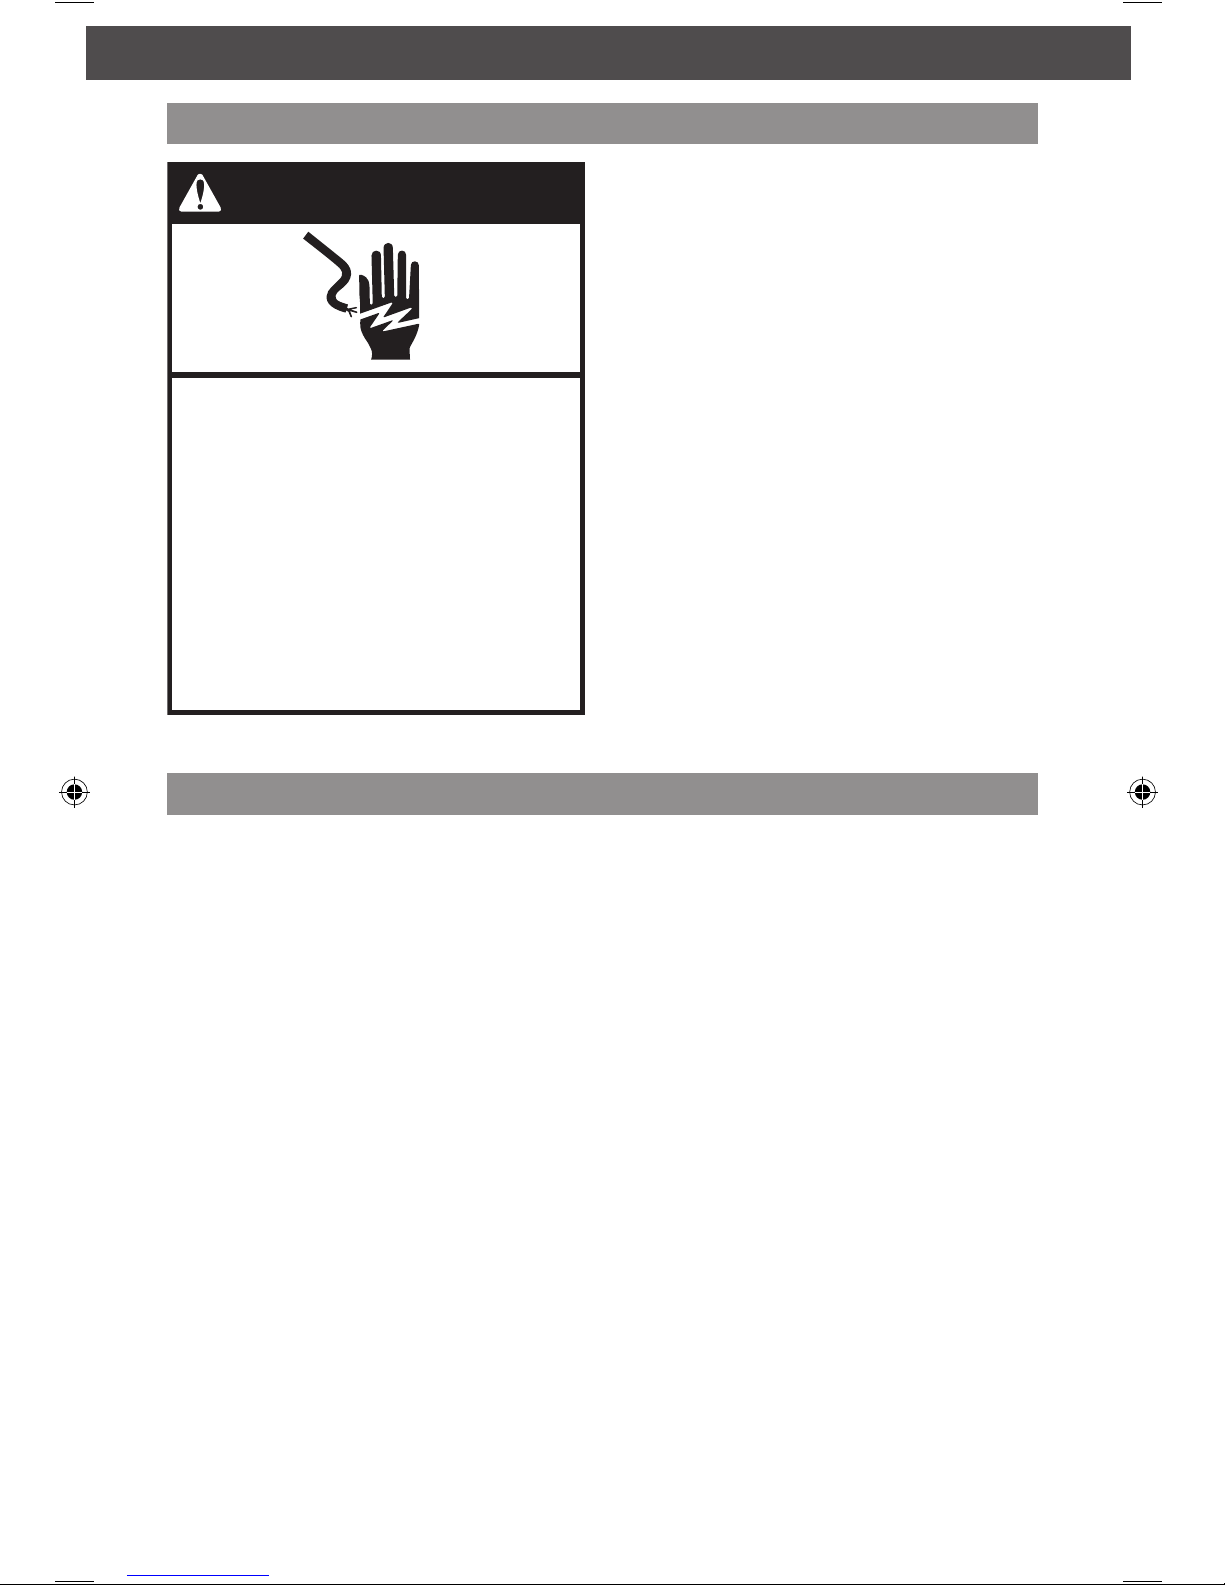
Peligro de descarga eléctrica
Enchúfela en una salida con toma
de tierra.
No extraiga la clavija de conexión
a tierra.
No utilice un adaptador.
No utilice un cable alargador.
El incumplimiento de estas instrucciones
podría provocar la muerte, un incendio
o una descarga eléctrica.
ADVERTENCIA
La potencia del motor (caballos) de la licuadora se ha medido con un dinamómetro,
un dispositivo que los laboratorios usan para medir la potencia mecánica de los motores.
La potencia máxima del motor de 2 de caballos refleja la potencia de salida del motor
y no la de la licuadora en la jarra. Como ocurre con todas las licuadoras, la potencia
de salida en la jarra no es la misma que la potencia del motor en sí. La potencia de salida
de este motor es de 1,8 CV en la jarra y permite a la licuadora generar una potencia
robusta para todo tipo de recetas.
NOTA: Según las directrices de los fabricantes de dispositivos médicos, e igual que
ocurre con muchos productos que contienen imanes, se recomienda que las personas
con marcapasos y/o desfibriladores tengan cuidado al utilizar la licuadora y la mantengan
a una distancia de 30 cm.
Potencia del motor
COMPONENTES Y FUNCIONES
Español
21
COMPONENTES Y FUNCIONES
Componentes y accesorios
Jarra sin Bisfenol A
con tapa
Dial de selección
de función*
Base de metal
troquelado
Palanca de
desbloqueo
de la jarra
Cuchillas de acero
inoxidable
Tapón para ingredientes
extraíble con marcas
de medición
Embudo extraíble
* Consulte la sección “Guía de funciones de la licuadora”.
Accionamiento
magnético (no visible)
22
MONTAJE DE LA LICUADORA
Peligro de descarga eléctrica
Enchúfela en una salida con toma
de tierra.
No extraiga la clavija de conexión
a tierra.
No utilice un adaptador.
No utilice un cable alargador.
El incumplimiento de estas instrucciones
podría provocar la muerte, un incendio
o una descarga eléctrica.
ADVERTENCIA
Antes de utilizarla por
primeravez
Antes de utilizar la licuadora por primera vez,
limpie la base con un paño tibio enjabonado
y aclárela con un paño húmedo. Séquelo con
un paño suave. Lave la jarra, la tapa y el tapón
para ingredientes en agua tibia con jabón
(consulte “Cuidado y limpieza”). Enjuague
y seque los componentes.
Antes de utilizar la licuadora enchúfela a una
toma con conexión a tierra.
Uso de la licuadora
Antes del uso
Antes de utilizar la licuadora compruebe
que la jarra está colocada correctamente
en la base.
La licuadora no funcionará si la jarra y la tapa
no están bien colocadas. Si retira la jarra de
la base sin pararla se activa el freno de las
cuchillas para detenerlas y la licuadora se
apagará tras unos pocos segundos.
La licuadora tiene cuatro programas de
recetas predefinidos: Bebidas heladas/Licuados
congelados, batidos de leche, sopas/salsas
y Jugo/Licuados verdes. También permite
seleccionar las opciones Velocidades variables e
Intermitente para adaptar el licuado a cualquier
tipo de receta. Para obtener más información
consulte la “Guía de funciones de licuadora”.
Preparación para usar la licuadora
FUNCIONAMIENTO DE LA LICUADORA
FUNCIONAMIENTO DE LA LICUADORA

Español
23
FUNCIONAMIENTO DE LA LICUADORA
3
Alinee la parte superior de la jarra para
que se deslice por debajo de la parte
superior de la base y deslícela hacia su
alojamiento. Asegúrese de que la jarra
entra recta y que queda bien colocada.
1
Retire la jarra de la base de la licuadora
para llenarla con los ingredientes. Para
ello, tire de la palanca de desbloqueo
de la jarra. Agarre la empuñadura con
firmeza y tire de la jarra hacia usted.
4
Compruebe que la jarra está en su sitio
observando que la palanca de desbloqueo
queda encajada entre las dos muescas
triangulares de la base de la jarra. Oirá
un “clic” cuando la jarra quede fijada.
2
Introduzca los ingredientes en la jarra.
Añada los líquidos primero, después
los ingredientes blandos y por último
el hielo o la fruta helada. No rebase
la línea de llenado máximo de la jarra
(1,75 l [60 oz]) -sobre todo cuando
utilice principalmente líquidos. En primer
lugar coloque la tapa de la jarra, a
continuación presione el lateral de la tapa
próximo a la empuñadura para asegurar
que la tapa está recta. La licuadora no
funcionará si la tapa no está en su sitio.
NOTA: Una vez fijada debería verse 1 cm
de plataforma alrededor de la jarra.
 Loading...