

Page 1
RAVIOLIMAKER
GIDS VOOR HET BESTE RESULTAAT
RAVIOLI MAKER
GUIDE TO EXPERT RESULTS
MACHINE POUR LA PRÉPARATION
ET LE REMPLISSAGE DES RAVIOLIS
GUIDE DU CONNAISSEUR
RAVIOLI MAKER
ANLEITUNG FÜR PROFI-ERGEBNISSE
ACCESSORIO PER RAVIOLI
GUIDA AI RISULTATI EXPERT
MÁQUINA DE RAVIOLIS
GUÍA PARA CONSEGUIR RESULTADOS PROFESIONALES
RAVIOLI MAKER
GUIDE FÖR BÄSTA RESULTAT
RAVIOLIMASKIN
OPPNÅ BEST MULIG RESULTATER
RAVIOLIKONE
OPAS PARHAISIIN TULOKSIIN
RAVIOLIMASKINE
VEJLEDNING FOR EKSPERT-RESULTATER
RAVIOLI MAKER
GUIA PARA RESULTADOS PROFISSIONAIS
English
RAVÍÓLÍVÉL
LEIÐBEININGAR UM RÉTTA NOTKUN
ΜΗΧΑΝΗ ΠΑΡΑΣΚΕΥΗΣ ΡΑΒΙΟΛΙ
Ο∆ΗΓΙΕΣ ΧΡΗΣΗΣ ΓΙΑ ΤΕΛΕΙΑ ΑΠΟΤΕΛΕΣΜΑΤΑ
Model 5KRAV
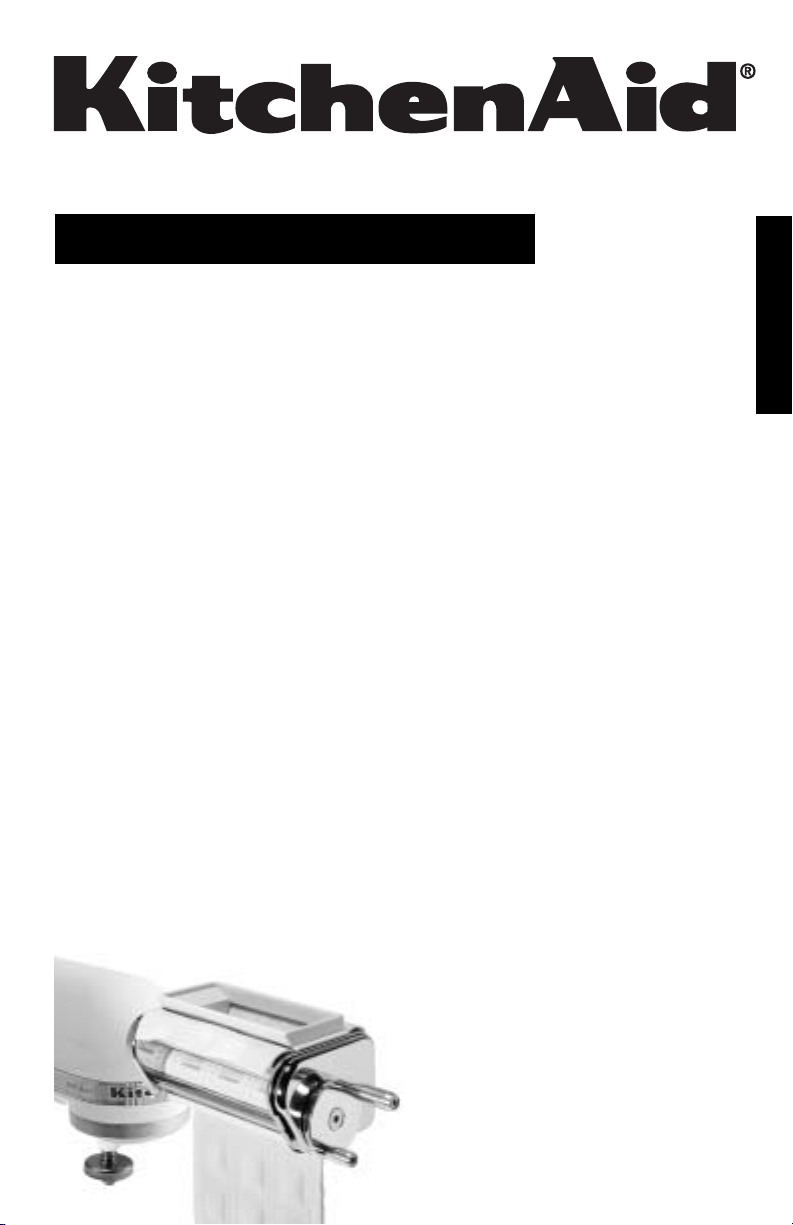
Ravioli Maker
This attachment has been approved
for use with all KitchenAid
®
stand mixers.
Page 2

Table of Contents
Important Safeguards ....................................................................................... 3
Ravioli Maker Attachment ................................................................................. 4
Assembling Your Pasta Sheet Roller ................................................................... 5
Tips for Perfect Pasta ......................................................................................... 5
Preparing Pasta Sheets ...................................................................................... 6
Assembling Your Ravioli Maker ......................................................................... 7
English
Using Your Ravioli Maker ..................................................................................7
Care and Cleaning ............................................................................................ 9
Recipes ........................................................................................................... 10
Household KitchenAid
Service Centers ................................................................................................ 19
Customer Service ............................................................................................ 19
®
Stand Mixer Attachment Warranty ............................. 19
2
Page 3

IMPORTANT SAFEGUARDS
When using electrical appliances, basic safety precautions should always be
followed including the following:
1. Read all instructions.
2. To protect against risk of electrical shock, do not put mixer in water or
other liquid.
3. The appliance is not intended for use by young children or infirm persons
without supervision.
4. Unplug mixer from outlet when not in use, before putting on or taking off
parts and before cleaning.
5. Avoid contacting moving parts. Keep fingers out of hopper inlet and
discharge opening.
6. Do not operate the mixer with a damaged cord or plug or after the mixer
malfunctions, or is dropped or damaged in any manner. Return the mixer
to the nearest designated KitchenAid Service Center for examination, repair
or electrical or mechanical adjustment.
7. The use of attachments not recommended or sold by KitchenAid may
cause fire, electric shock or injury.
8. Do not use the mixer outdoors.
9. Do not let the cord hang over the edge of table or counter.
10. Do not let cord contact hot surface, including the stove.
11. This product is designed for household use only.
English
SAVE THESE INSTRUCTIONS
3
Page 4
English
O
1
2
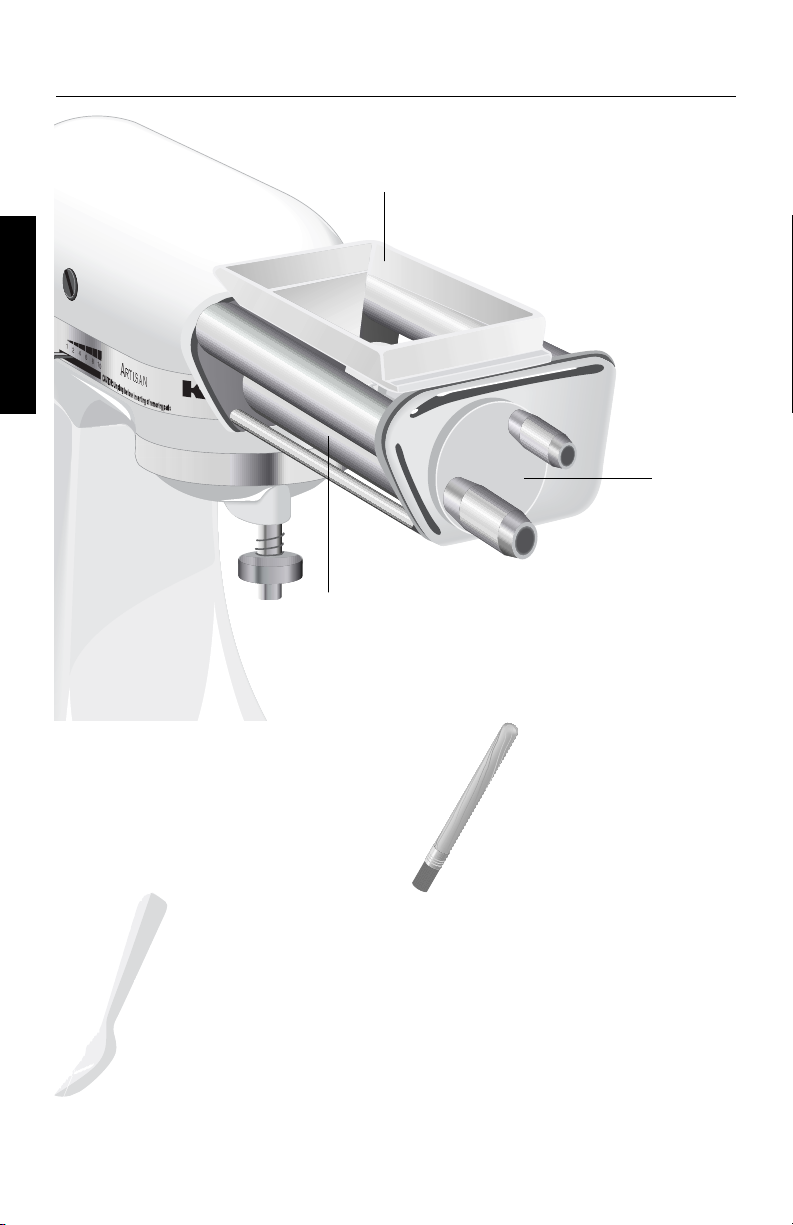
Ravioli Maker Attachment
Hopper
4
6
8
10
A
RTI SAN
Handle
Ravioli Maker
Ravioli Maker — Fills sheets of pasta
with filling, then crimps the edges for
strips of stuffed pasta that after drying
can be separated for cooking. Unit
attaches to the stand mixer for
stability, but is operated manually for
precise control.
Filling Scoop — Use
the scoop to spoon filling
into the hopper. The special
pointed shape helps spread
filling into the corners of the
hopper for even distribution.
Cleaning Brush —
Use to brush away dried
dough after use.
NOTE: This attachment is designed
to be used with pasta dough only. Do
not cut or roll any other material or
food with this unit.
NOTE: When using the machine,
do not wear ties, scarves or long
necklaces; gather long hair with a clasp.
4
Page 5
o
o
Assembling Your Pasta Sheet Roller
If you do not own a KitchenAid®
Pasta Sheet Roller, pasta sheets can be
prepared by hand. Pasta sheets should
be rolled out to a thickness of 16 mm
and a width of 15 cm in order to pass
through the Ravioli Maker.
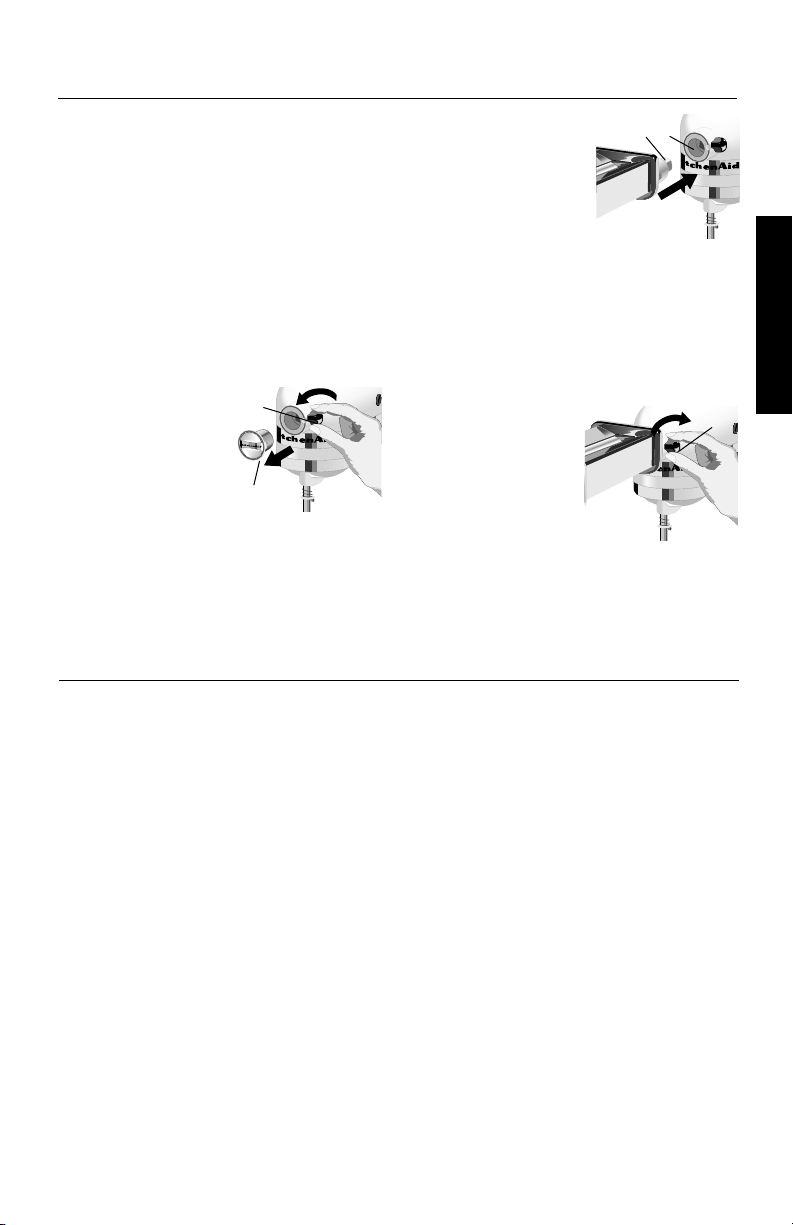
To Attach Pasta Sheet Roller:
Remove “Do not immerse in water”
label, prior to use.
Before Attaching Accessory,
Tu rn “O” and Unplug Unit.
1. Depending on
which type of
hub you have,
A
o
L
either flip up
hinged cover
or loosen
B
attachment knob (A) by turning
it counterclockwise and remove
attachment hub cover (B).
Tips for Perfect Pasta
2. Select Pasta Sheet
Roller attachment.
Insert attachment
shaft housing (C)
into attachment
hub (D), making
certain that the power shaft fits
into square hub socket. Rotate
attachment back and forth if
necessary. When attachment is in
proper position, the pin on the
attachment housing will fit into
the notch on the hub rim.
3. Tighten
l
n
U
k
c
attachment
knob (A)
until unit is
completely
secured to
mixer.
C
D
English
A
l
n
U
k
c
o
L
• Good pasta dough is firm and
leathery to touch, but also pliable.
It should never stick to your fingers
or crumble and fall apart. Many
factors, such as humidity, brand of
flour used, and size of eggs, may
affect dough consistency.
• To test for correct dough
consistency, pinch a small amount
of dough together after mixing
with the flat beater. If the dough
stays together without sticking to
your fingers, it should work well.
It may be necessary to add a small
amount of flour or water to reach
correct dough consistency.
• If using ravioli maker for the first
time, practice feeding pasta without
filling through the attachment to
perfect your technique.
• Separated ravioli can be cooked
right away or stored in the
refrigerator overnight. For longer
storage individually freeze ravioli
on baking sheet. Then store in
freezer in sealed container.
• Cook ravioli in 5.8 liters salted,
boiling water until al dente
or slightly firm to the bite,
approximately 5 to 7 minutes.
5
Page 6
Preparing Pasta Sheets
2
1. Prepare pasta dough and let rest
at least 10 minutes. Cut dough
into sections approximately the
size of a tennis ball and work
with one section at a time. Wrap
remaining dough in plastic wrap
English
to keep from drying out.
2. Adjust Pasta Sheet Roller to setting
1 (Pasta Sheet Roller settings are
adjusted by pulling out and turning
the knob on
the front of the
attachment).
Tu rn the stand
S
p
e
e
d
C
o
4
n
t
6
r
o
8
l
1
0
mixer to Speed
2 or 4 and feed
dough into the Pasta Sheet Roller.
3. Fold dough in half and roll again.
Repeat folding
and kneading
process several
times or until
dough is smooth
and elastic. Lightly dust pasta with
flour while rolling to aid in drying
and separation.
4. Move the Pasta
Sheet Roller
adjustment
C
o
n
t
r
o
l
1
0
knob to setting
2. Feed the
dough through
rollers to further flatten. Change to
setting 3 and feed dough through
rollers again. Dough should be
flexible, not sticky, and exactly the
same width as the flat rollers.
5. Lightly flour the dough sheet on
both sides. Using a knife, trim each
end of the dough sheet.
6. To clean Pasta Sheet Roller, let
parts air dry for one hour and
then remove any dried dough
using the Cleaning Brush. If dried
dough cannot be removed, try
hand-tapping the attachment. A
toothpick can be used if necessary.
Never use a knife or other sharp
object to remove excess dough.
Polish with a soft, dry cloth and
store attachment pieces in a dry
place at room temperature.
NOTE: Never wash or immerse
Pasta Sheet Roller attachment in
water or other liquid. Never wash in
dishwasher.
NOTE: Do not run a dishtowel or
any other cloth through the rollers to
clean them. Do not insert objects such
as knives, screwdrivers, etc., to clean
the unit.
6
Page 7

k
o
Assembling Your Ravioli Maker
To Attach Ravioli Maker:
Before Attaching Accessory,
Turn “O” and Unplug Unit.
1. Loosen
attachment knob
A
(A) by turning it
counterclockwise.
Remove
B
attachment hub
cover (B).
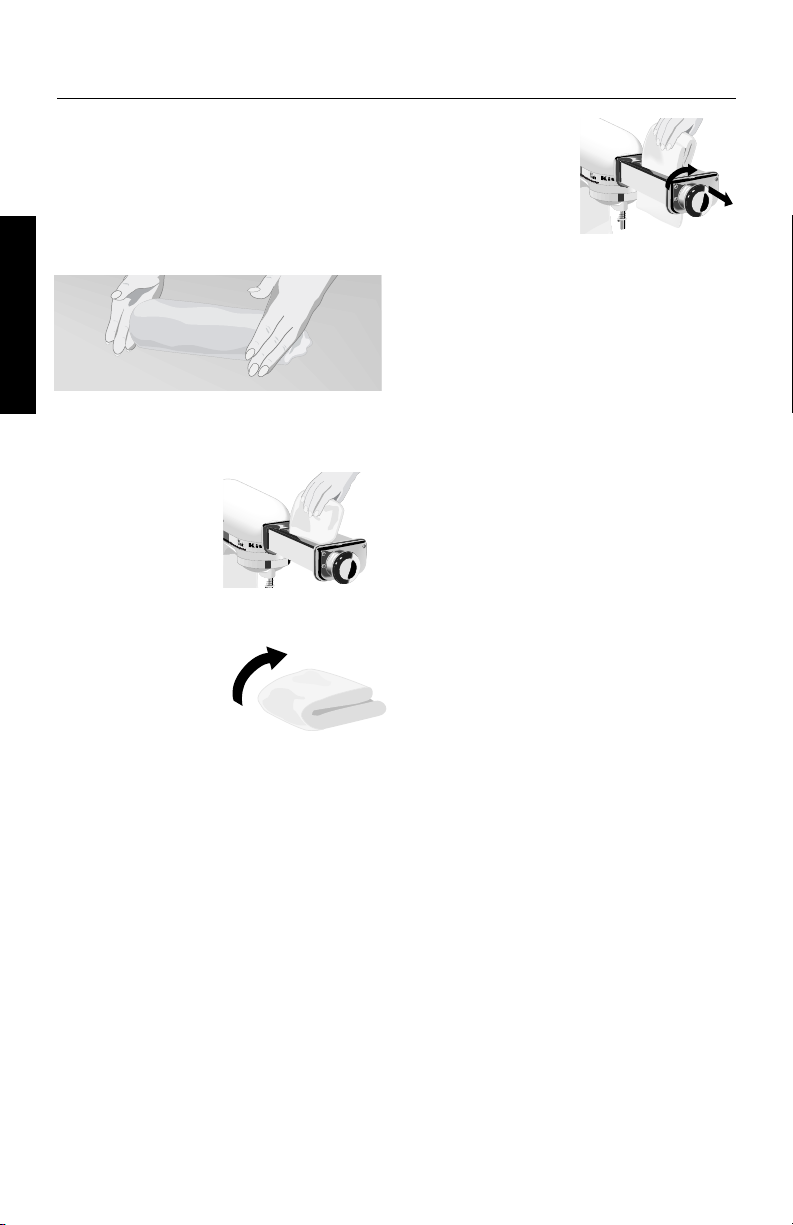
2. Remove Filling Hopper from Ravioli
Maker Attachment.
Using Your Ravioli Maker
To Use:
1. Remove hopper from the Ravioli
Attachment by pulling upward
firmly.
2. Fold pasta sheet in half.
Folded End
KitchenAid
S
t
.
J
o
s
Solid Stat
e
p
h
,
M
i
c
h
i
g
a
n
U
S
A
e Speed Control
O
f
f
S
t
i
r
2
4
6
8
1
0
3. Insert attachment
shaft housing (C)
into attachment
hub (D). The
attachment
should be flush to
c
o
L
the hub.
4. Tighten
attachment knob
(A) by turning
clockwise until
unit is completely
secured in mixer.
K
S
i
t
t
c
.
J
h
o
e
s
S
n
e
p
A
h
o
i
,
d
M
l
ic
i
h
d
i
g
a
n
S
U
S
t
A
a
t
e
O
S
f
f
p
e
S
e
t
i
d
r
C
2
o
4
n
t
6
r
o
8
l
1
0
D
C
A
L
English
3. To insert the pasta sheet, insert the
folded end between the forming
rollers. Rotate the handle one
quarter of a turn to feed the
pasta sheet.
4. Separate the two loose ends of the
pasta sheet and drape each end
over the smooth metal rollers.
7
Page 8

Using Your Ravioli Maker
e
M
Indentation
English
5. Locate the slight indentation
on one side of the hopper rim.
Position the indented side so it
faces the attachment-knob-side of
the stand mixer. Place the hopper
on top of the dough sheet,
between the separated ends, and
push down until you hear a click
and the side edges of the hopper
rest against the Ravioli Maker.
Attachment
Knob
(not shown)
K
S
i
t
t
c
.
J
h
o
e
s
S
n
e
p
A
h
o
i
,
d
M
l
i
c
i
h
d
i
g
a
n
S
U
S
t
A
a
t
e
O
S
f
f
p
e
S
e
t
i
d
r
C
2
o
4
n
t
6
r
o
8
l
1
0
7. Slowly turn the handle.*
8. Add more filling to the hopper as
needed. Spread the filling evenly
into the corners of the hopper
and gently press down on the
filling with the scoop. Make sure
all filling in the hopper is used
before the end of the pasta sheet
is reached, or the filling will collect
on the rollers. Use the scoop to
remove extra filling if necessary.
Solid State Speed Control
n
A
i
d
ic
h
ig
a
n
U
S
A
Off Stir 2 4 6 8 10
6. Using the provided scoop, spoon
1-2 scoops of filling into the
hopper. Spread the filling evenly
into the corners of the hopper and
gently, evenly press down on the
filling with the scoop.
9. Place the strips of ravioli on a
lightly floured surface and let
them dry for at least 10 minutes.
Separate the ravioli one by one.
10 . Before rolling the next sheet of
ravioli strips, clean the attachment
by using the brush to lightly dust
the rollers with flour.
* Check that ravioli are feeding freely through
bottom of attachment.
8
Page 9

Care and Cleaning
To clean the Ravioli Maker
Attachment
1. Dust the attachment with flour
and use the brush to clean it.
2. Remove the hopper and snap open
the thin white plastic guides/levers
at the bottom of the attachment
for easy access to the rollers. Wash
in warm, soapy water.
NOTE: Never wash in dishwasher.
Do not run a dishtowel or any other
cloth through the rollers to clean
them. Do not insert objects such as
knives, screwdrivers, etc., to clean
the attachment.
English
9
Page 10

RECIPES
Ravioli al Limone
(Ravioli with Ricotta-Lemon filling)
Pasta
300 g white flour type 00
2 eggs
1 tablespoon olive oil
1 level teaspoon salt
English
Filling
1
⁄2 untreated lemons
1
300 g fresh ricotta
1 egg
50 g freshly grated
Pecorino or
Parmesan cheese
2 tablespoons
Limoncello (liqueur)
(if desired)
salt, black pepper
Serve with:
1 bunch of fresh mint
80 g butter
freshly grated
Pecorino or Parmesan
cheese for sprinkling
Add eggs, oil, 2 to 3 teaspoons water and a level
teaspoon of salt to flour in the mixer bowl. Use the
dough hook and knead into dough. Add water if
necessary. Wrap the dough in a tea towel and stand
for 30 minutes.
For the filling wash the lemons with hot water, dry
them and finely grind the rind. Replace the dough
hook with flat beater and blend the ricotta with
the grated lemon rind, egg, cheese and possibly
limoncello. Add salt and pepper to taste.
Using the dough hook, knead the dough again.
Separate into pieces (about the size of a tennis ball).
Reserve the remaining pieces in plastic wrap. Place
the pasta roller on the mixer on setting 1 and feed
the dough through the roller (see page 6) to form thin
sheets. Replace the pasta roller with the ravioli maker.
Fold your pasta sheet in half and place the hopper
on top of the dough sheet. Then start adding the
filling using the provided spoon. Place the ravioli on
tea towels and leave to dry if necessary.
Bring a large quantity of water to a boil. Wash the
mint and tear the leaves into smaller pieces. Add
salt to the water, then the ravioli, and boil ravioli
depending on their freshness for 3 to 4 min.
Before serving melt butter. Add some of the mint.
Drain ravioli. Serve and sprinkle ravioli with fresh
mint and spread mint butter over pieces. Serve
cheese separately.
10
Page 11

Ravioli alla Milanese
(Milanese Ravioli)
Filling
250 g cooked chicken
1 lamb brain
150 g beef marrow
25 g butter
1 tablespoon grated
Parmesan
25 g fresh breadcrumbs
2 egg yolks
nutmeg, pepper
and salt
Pasta
325 g white flour type 00
4 eggs
salt
Serve with:
Meat juices
1 tablespoon butter
40 g Parmesan cheese
or
100 g butter and 60 g
Parmesan cheese
First prepare filling. Finely chop the chicken with the
food grinder in the mixer bowl. Blanch the brains in
boiling water, drain and grind. Mix the brains and
chicken in the mixer bowl.
Soften the marrow in hot water, remove and add
to chicken and brain in the mixer bowl. Blend brain,
chicken and marrow in the mixer bowl using beater.
Add butter, grated cheese, breadcrumbs, egg yolks
and pinch of grated nutmeg to this mixture. Knead
mixture for a few minutes with dough hook. Make
pasta with flour, eggs and salt using the dough hook.
Prepare the pasta sheets (see page 6) with the pasta
roller and fill the sheets using the ravioli maker. Let
the ravioli rest for 15 minutes.
Cook the ravioli in plenty of boiling water with a
pinch of salt. Drain water and place half the cooked
ravioli in a preheated casserole dish. Pour half the
juices (or melted butter) over ravioli. Add the other
half of the ravioli with the remaining dressing. Stir
carefully, add grated cheese, stir again and serve.
RECIPES
English
11
Page 12

RECIPES
Ravioli alla Parmigiana
(Ravioli Parmesan Style)
Sauce
1 onion
2 cloves of garlic
1 carrot
1 stalk blanched celery
60 g butter
English
3 tablespoons olive oil
300 g ground beef (steak)
4 tablespoons dry
red wine
400 g tomatoes (canned)
pepper and salt
Parmesan cheese
Filling
6 tablespoons grated
toast (use rotor
vegetable slicer
and shredder)
1 egg
cinnamon powder
nutmeg, pepper
and salt
Pasta
240 g white flour type 00
3 eggs
salt
Peel and chop onion and garlic. Scrape the carrot
and chop it. Chop the blanched celery. For the sauce,
sauté onion, carrot, blanched celery and garlic in
saucepan with butter and oil. Add ground meat
(ground in food grinder) and brown on all sides.
Add wine, turn up heat and evaporate alcohol. Add
the drained and pureed tomatoes and add pepper
and salt to taste. Cover the sauce and leave it to
simmer, stirring occasionally, for at least 2 hours.
Add some water if the mixture becomes too dry.
Place the grated toast in the mixer bowl and wet
with 4 tablespoons of sauce. Thicken with egg.
Use the beater. Add some nutmeg and cinnamon
powder and salt and pepper to taste. The filling
should be thick.
Prepare the pasta in the mixer bowl, using the dough
hook. Then use the pasta roller to roll out the dough
(see page 6). Exchange pasta roller with ravioli
maker and add the filling with filling spoon between
the sheets. Let the ravioli rest for 15-20 min.
Boil ravioli in a large amount of boiling salted water.
Discard the water and place the ravioli into warm
bowl. Pour the sauce over ravioli and stir. Sprinkle
plenty of grated Parmesan cheese and serve.
12
Page 13

Ravioli alla Ghiotta
(Flavourful Ravioli)
Filling
1 onion
150 g prosciutto crudo
(e.g., Parma, San
Daniele)
2 tablespoons olive oil
2 tablespoons butter
250 g ground veal
5 tablespoons dry
white wine
4 tablespoons veal stock
nutmeg
pepper and salt
1 egg
Pasta
320 g white flour type 00
4 eggs
salt
Serve with:
2 tablespoons butter
tomato sauce (see
“The Ultimate Mixer
Cookbook”, p37
“Tomato Passata”)
40 g Parmesan cheese
First prepare the sauce so it can simmer while the
rest is being prepared.
Next make the filling. Peel and chop the onion and
sauté gently with the ham, oil and butter. Add the
ground meat and continue to stir until brown. Pour
in the wine and let the alcohol evaporate. Add
some veal stock and let simmer until ground meat is
cooked. Remove the pan from the heat, add a pinch
of nutmeg and pepper and salt to taste. Leave to
cool. Place mixture in mixer bowl and blend in egg
using the beater.
Prepare the pasta with flour, eggs and salt. Attach the
pasta roller to the stand mixer and make fine sheets
(see page 6). Then exchange for the ravioli maker
and make ravioli. Let the ravioli stand for 15 min.
Cook the ravioli in boiling salted water. Drain the
water and place the cooked ravioli in a warm
covered dish. Add the butter, sauce and grated
cheese and stir carefully. Serve hot.
RECIPES
English
13
Page 14

RECIPES
Ravioli con Spinaci e Pecorino
(Ravioli with Spinach and Pecorino)
Filling
225 g cooked spinach
2 tablespoons butter
2 eggs
275 g soft Pecorino
nutmeg
English
pepper and salt
1-2 tablespoons white
flour type 00
Pasta
200 g very fine semolina
3 eggs
salt
Flavour:
tomato sauce (see
“The Ultimate Mixer
Cookbook”, p37
“Tomato Passata”)
30 g old Pecorino
Finely chop the spinach and stir in pan with butter.
Next blend the fried spinach in the mixing bowl
with the eggs, Pecorino, and a pinch of grated
nutmeg. Add pepper and salt to taste. Blend
mixture with beater. Add the flour and mix again.
Reserve mixture.
Prepare pasta with semolina instead of regular flour,
eggs and salt, using the dough hook. Attach the
pasta maker on the mixer and make pasta sheets
(see page 6). Next exchange the pasta maker for the
ravioli maker. Use the filling for making the ravioli.
Let stand for 15 minutes before cooking in plenty
of boiling salted water. In the meantime heat the
tomato sauce.
Drain the pasta, place into a warm dish and pour
sauce over it. Sprinkle with grated old Pecorino and
serve hot.
14
Page 15

Ravioli ala Bolognese
(Ravioli with Bolognaise Sauce)
Filling
2 tablespoons butter
100 g pork
75 g turkey filet
75 g veal
50 g veal brain
100 g Mortadella
2 egg yolks
60 g Parmesan cheese
nutmeg
pepper and salt
Pasta
450 g white flour type 00
3 eggs
salt
1 teaspoon olive oil
(optional)
Serve with:
100 g butter or tomato
sauce (see “The
Ultimate Mixer
Cookbook”, p37
“Tomato Passata”)
60 g Parmesan cheese
First make the filling. Melt butter in a pan and
add pork, turkey and veal. Simmer on moderate
heat for 10 minutes and then add the brain and
Mortadella. Mix everything on heat for 5 to 10
minutes. Grind mixture using the food grinder. Place
the finely ground meat mixture in the mixer bowl
and add egg yolks, grated Parmesan cheese (using
rotor vegetable slicer and shredder), and a pinch
of grated nutmeg. Flavour with pepper and salt to
taste. Use the dough hook and knead the mixture
into a homogenous blend. Set aside.
Make ravioli with flour, eggs, 2 eggshells of water,
salt and oil if necessary. Do this using the dough
hook. Make sheets with pasta roller (see page 6).
Next attach the ravioli maker on the mixer and make
the ravioli with the filling. Let rest for 20 minutes.
Cook the ravioli in plenty of boiling salted water.
Drain and place in a preheated dish. Pour the
melted butter over ravioli and sprinkle with grated
cheese, or pour the sauce as desired with grated
cheese. Serve hot.
RECIPES
English
15
Page 16

RECIPES
Ravioli alla Panna
(Ravioli in Cream Sauce)
Filling
3 tablespoons butter
100 g ground pork
100 g ground veal
30 g Parmesan cheese
1 tablespoon fresh
English
bread crumbs
100 g Prosciutto
nutmeg
pepper and salt
2 tablespoons hot
bouillon
1 tablespoon chopped
parsley
Pasta
320 g white flour type 00
4 eggs
salt
Sauce
50 g butter
3 leaves fresh sage
2 dl cream
Heat the butter in a pan and fry the meat. Mix until
the meat is ready and then place in mixer bowl.
Add the grated cheese, grated using the rotor
vegetable slicer and shredder, breadcrumbs, finely
chopped Prosciutto and a pinch of grated nutmeg
to the fried meat mixture. Blend evenly with beater.
Add pepper and salt to taste. Add the bouillon and
parsley. Mix again and set aside.
Make the ravioli with flour, eggs and salt in the
mixer bowl using the dough hook. Then use the
pasta maker and roll out the dough in two even
sheets (see page 6). Make the ravioli with the filling
using the ravioli maker. Let stand.
In the meantime heat the butter and sage leaves
in a small pan for 5 minutes. Remove the sage and
add the cream. Heat thoroughly. Add pepper and
salt to taste. Keep in a warm place.
Cook the ravioli in plenty of boiling water. Drain the
water when the ravioli is cooked and transfer to
a bowl. Pour the cream sauce over ravioli and stir
well. Sprinkle with white pepper and grated cheese.
Serve hot.
Serve with:
40 g Parmesan cheese
white pepper
16
Page 17

Ravioli alla Vegetariana
(Vegetarian Ravioli)
Filling
2 medium aubergines
Deep-frying oil
20 walnuts
2 dl thick béchamel
sauce
1 tablespoon chopped
parsley
2 egg yolks
nutmeg
pepper and salt
Pasta
325 g white flour type 00
4 eggs
salt
Serve with:
tomato sauce (see
“The Ultimate Mixer
Cookbook”, p37
“Tomato Passata”)
40 g Parmesan cheese
Peel the aubergines and chop, fry until golden brown,
drain on paper towels and set aside. When cooled,
mix the aubergines with the shelled and chopped
walnuts, béchamel sauce, chopped parsley and
egg yolks in the mixer bowl using beater. Add some
grated nutmeg and flavour with salt and pepper.
Make pasta with flour, eggs and a pinch of salt in
the mixer bowl using dough hook. Next make the
sheets with the pasta roller and the ravioli with the
ravioli maker (see page 6). Let stand for 10 minutes.
Deep-fry the ravioli 4 pieces at a time and drain on
paper towels. Arrange fried ravioli on a warm dish.
Pour the tomato sauce over the ravioli and sprinkle
with cheese. Serve as hot as possible.
RECIPES
English
17
Page 18

RECIPES
Ravioli con la Zucca
(Ravioli with Pumpkin)
Filling
1750 g yellow pumpkin
60 g Parmesan cheese
5 Amaretti (dry round
Amaretto biscuits)
200 g mostarda di frutta
English
(candied fruit)
nutmeg
ginger powder
pepper and salt
Pasta
325 g white flour type 00
4 eggs
salt
Serve with:
100 g butter
5 leaves fresh sage
60 g Parmesan cheese
Oven bake the pumpkin for the filling as you would
a potato in its skin. Remove seeds from pumpkin and
place soft pulp in the mixer bowl, then add grated
Parmesan cheese (grated in advance with rotor
vegetable slicer and shredder) and mix using the
beater. Then add the crumbled Amaretti and finely
chopped mostarda. Carefully flavour with a pinch
of grated nutmeg, ginger powder, pepper and salt,
and set aside.
Prepare the pasta with flour, eggs and salt in the
mixer bowl using dough hook. Make the sheets
with the pasta roller and the ravioli (see page 6)
with the ravioli maker. Let stand for 15 minutes.
Cook the ravioli in plenty of boiling salted water. In
the meantime heat the butter in a small saucepan until
golden brown and then add the sage. Keep warm.
Carefully drain the ravioli and arrange half on a
heated dish. Pour half the butter over ravioli (without
sage) and sprinkle half of grated cheese over dish.
Add the rest of the ravioli, as well as the rest of the
melted butter and grated cheese. Serve hot.
18
Page 19

Household KitchenAid®
Stand Mixer Attachment Warranty
Length of
Warranty:
Europe & Australia:
Tw o Years Full Warranty
from date of purchase.
Other:
One Year Full Warranty
from date of purchase.
KITCHENAID DOES NOT ASSUME ANY RESPONSIBILITY FOR
INDIRECT DAMAGES.
KitchenAid
Will Pay For:
Replacement parts
and repair labor costs
to correct defects
in materials or
workmanship. Service
must be provided by an
Authorized KitchenAid
Service Center
KitchenAid
Will Not Pay For:
A. Repairs when
Ravioli Maker is
used for operations
other than normal
household food
preparation.
B. Damage resulting
from accident,
alterations, misuse,
abuse, or installation/
operation not in
accordance with
local electrical codes.
Service Centers
All service should be handled locally
by an Authorized KitchenAid Service
Center. Contact the dealer from whom
the unit was purchased to obtain
the name of the nearest Authorized
KitchenAid Service Center.
In the U.K.:
Call: 0845 6011 287
In Ireland:
M.X. ELECTRIC
Service Department
25 Alymer Crescent
Kilcock, CO.KILDARE
Call: 1 679 2398/87 2581574
Fax: 1 628 4368
In Australia:
Call: 1800 990 990
In New Zealand:
Call: 0800 881 200
English
Customer Service
In U.K. & Ireland: Tollfree number 00800 38104026
Address: KitchenAid Europa, Inc.
PO BOX 19
B-2018 ANTWERP 11
BELGIUM
www.KitchenAid.com
19
Page 20

English
9709535
®
FOR THE WAY IT’S MADE.
® Registered Trademark of KitchenAid, U.S.A.
™ Trademark of KitchenAid, U.S.A.
The shape of the stand mixer is a trademark of KitchenAid, U.S.A.
© 2005. All rights reserved.
Specifications subject to change without notice.
20
™
3943dZw605
 Loading...