

Page 1
1
English
BEREIDINGSSET VOOR HOLLE,
BUISVORMIGE DEEGWAREN
INSTRUCTIES EN RECEPTEN
PASTA SHAPE PRESS
INSTRUCTIONS AND RECIPES
KIT EMPORTE-PIÈCES
POUR PÂTES FRAÎCHES
MODE D'EMPLOI ET RECETTES
RÖHRENNUDELNVORSATZ
BEDIENUNGSANLEITUNG UND REZEPTE
ACCESSORIO PER LA PASTA CORTA
ISTRUZIONI PER L'USO E RICETTE
PRENSA PARA PASTA FRESCA
INSTRUCCIONES Y RECETAS
PASTAPRESS
INSTRUKTIONER OCH RECEPT
PASTAPRESSE
INSTRUKTIONER OG OPPSKRIFTER
PASTAPURISTIN
KÄYTTÖ-JA VALMISTUSOHJEET
PASTAPRESSE
INSTRUKTIONER OG OPSKRIFTER
PASTA SHAPE PRESS
INSTRUÇÕES E RECEITAS
PASTAPRESSA
LEIÐBEININGAR OG UPPSKRIFTIR
ΣΥΣΚΕΥΗ ΠΑΡΑΣΚΕΥΗΣ
ΖΥΜΑΡΙΚΩΝ
ΟδΗγΙΕΣ ΚΑΙ ΣΥΝτΑγΕΣ
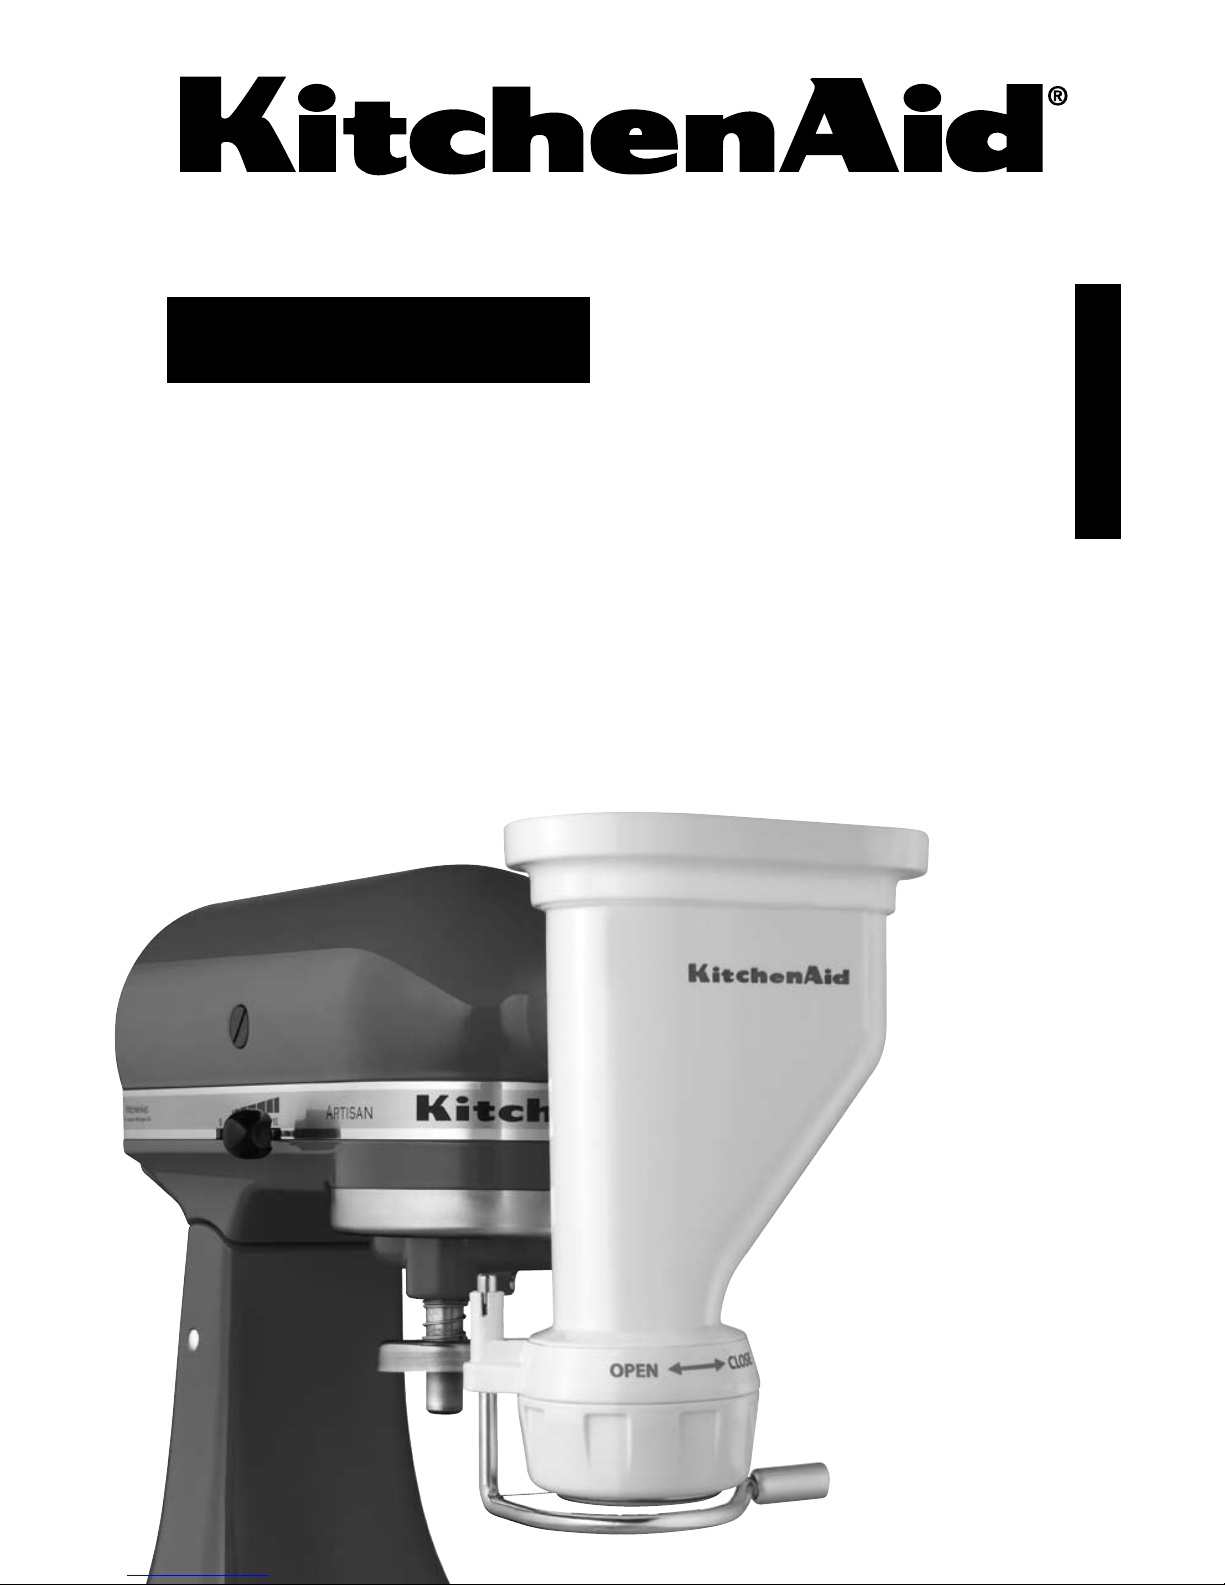
Model 5KPEXTA
Pasta Shape Press
Designed exclusively
for use with KitchenAid
®
Stand Mixers.
Photograph for demonstration purposes.
Page 2

2
English
Table of Contents
INTRODUCTION
Stand Mixer Accessory Safety ..........................................................................................3
Important Safeguards .....................................................................................................3
FEATURES AND OPERATION
To Assemble Pasta Shape Press Accessory ........................................................................4
Pasta Plates .....................................................................................................................6
To Attach Pasta Shape Press Accessory ............................................................................7
To Use Pasta Shape Press Accessory ................................................................................7
To Change the Pasta Plates ......................................................................................8
To Loosen the Pasta Ring .........................................................................................8
Care and Cleaning ..........................................................................................................9
Pasta Making Tips .........................................................................................................10
Cooking Pasta ...............................................................................................................11
RECIPES
Basic Egg Noodle Pasta .................................................................................................11
Small Macaroni With Courgettes and Scampi ...............................................................12
Extra Spicy Penne (Large Macaroni) ...............................................................................12
Bucatini with Garlic, Oil and Peperoncino .....................................................................13
Rigatoni with Tuna ........................................................................................................13
WARRANTY AND SERVICE INFORMATION
KitchenAid
®
Household Stand Mixer Accessory Warranty ..............................................14
Service Centers ..............................................................................................................14
Customer Service ..........................................................................................................15
Page 3

3
English
IMPORTANT SAFEGUARDS
Stand Mixer Accessory Safety
When using electrical appliances, basic safety precautions should always be followed
including the following:
1. Read all instructions.
2. To protect against risk of electrical shock, do not put mixer in water or other liquid.
3. This appliance is not intended for use by persons (including children) with reduced
physical, sensory or mental capabilities, or lack of experience and knowledge, unless
they have been given supervision or instruction concerning use of the appliance by a
person responsible for their safety.
4. Children should be supervised to ensure that they do not play with the appliance.
5. Unplug from outlet when not in use, before putting on or taking off parts, and
before cleaning.
6. Avoid contacting moving parts.
7. Never feed dough by hand. Always use the combo tool to push food.
8. Do not operate the mixer with a damaged cord or plug or after the mixer malfunctions,
or is dropped or damaged in any manner. Return the mixer to the nearest Authorized
Service Center for examination, repair or electrical or mechanical adjustment.
9. The use of accessories not recommended or sold by KitchenAid may cause fire,
electric shock or injury.
10. Do not use the mixer outdoors.
11. Do not let the cord hang over the edge of table or counter.
12. Do not let cord contact hot surface, including the stove.
13. This product is designed for household use only.
SAVE THESE INSTRUCTIONS
Your safety and the safety of others are very important.
We have provided many important safety messages in this manual and on your
appliance. Always read and obey all safety messages.
This is the safety alert symbol.
This symbol alerts you to potential hazards that can kill or hurt you
and others.
All safety messages will follow the safety alert symbol and either
the word “DANGER” or “WARNING.” These words mean:
You can be killed or seriously injured
if you don’t immediately follow
instructions.
You can be killed or seriously injured
if you don’t follow instructions.
All safety messages will tell you what the potential hazard is, tell you how to
reduce the chance of injury, and tell you what can happen if the instructions are
not followed.
Danger
Warning
Page 4
4
English
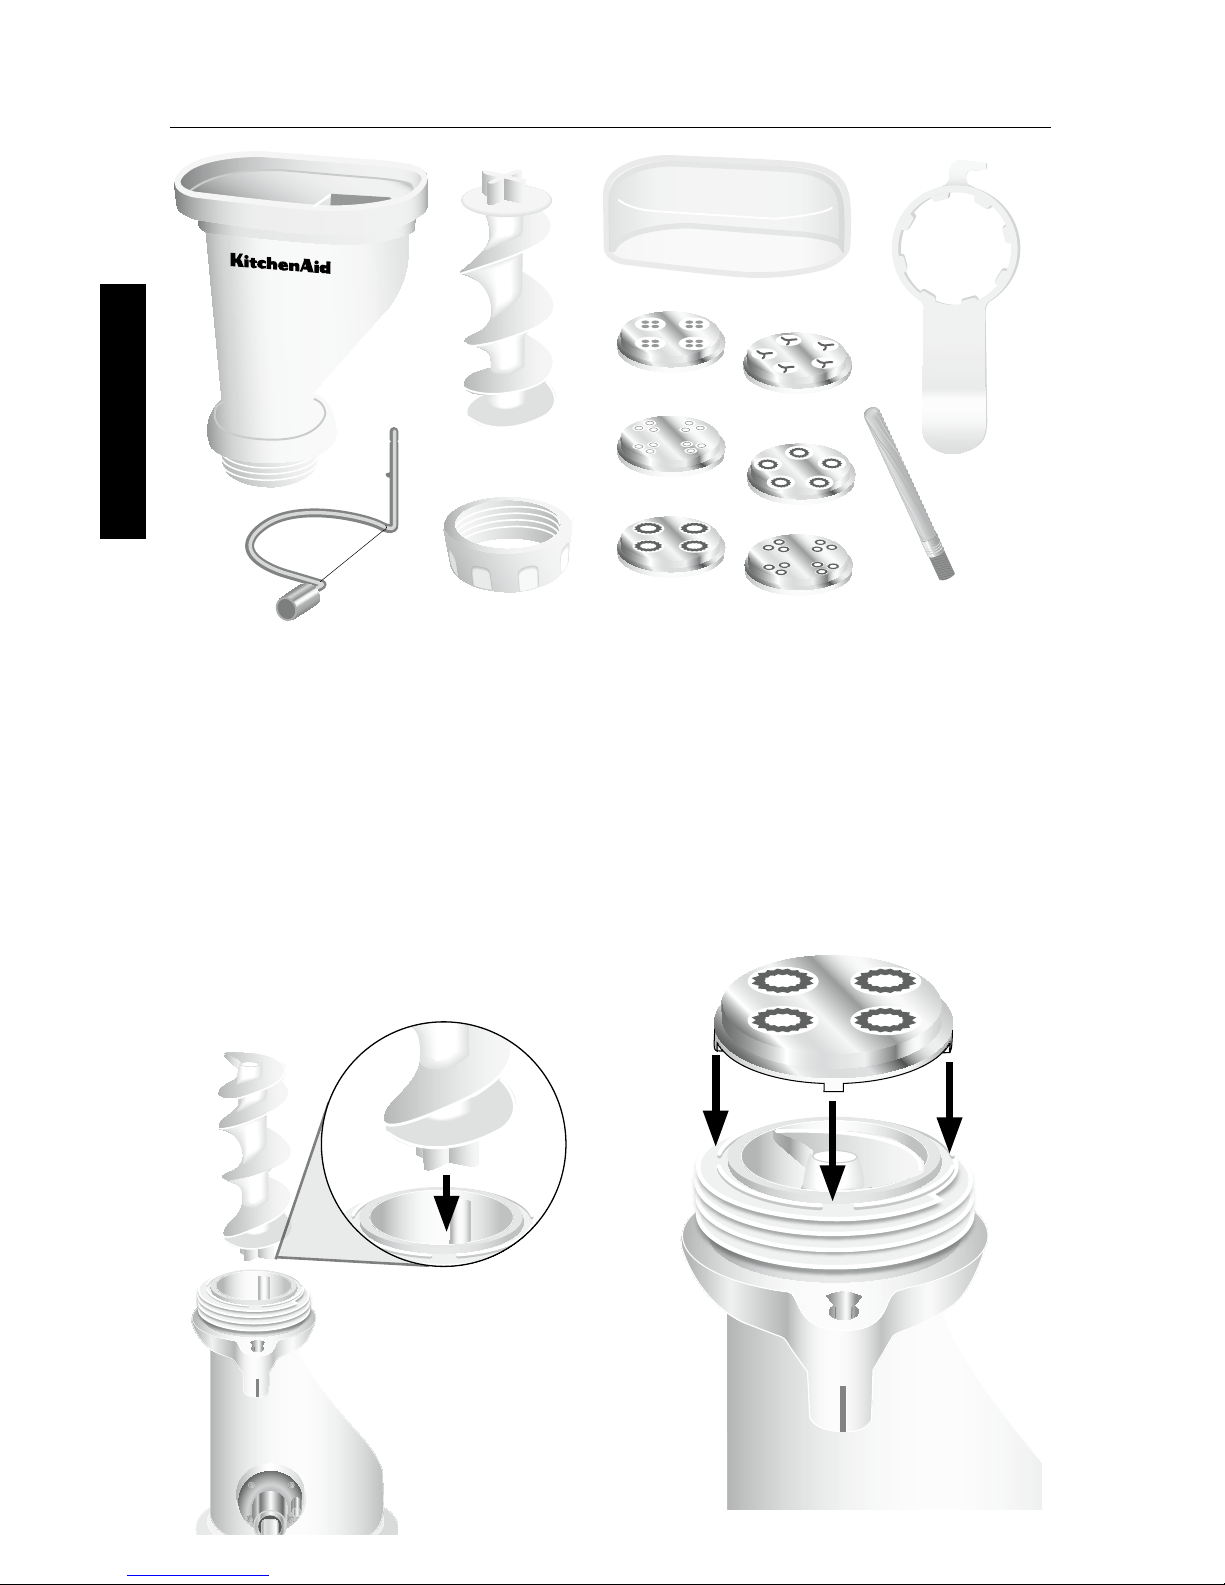
1. Place the press upside down on a
counter or table, and insert the end
of the auger with the cross-shaped
protrusion (C) into the press housing
(A), aligning the cross-shaped protrusion
with the matching indentation inside.
When correctly positioned, the top
of the auger will be flush with the
opening.
To Assemble Pasta Shape Press Accessory
2. Place one of the pasta plates (F, G, H,
I, J or K) over the opening, aligning its
center with the auger, matching the
tabs of the plate with the notches in
the press housing.
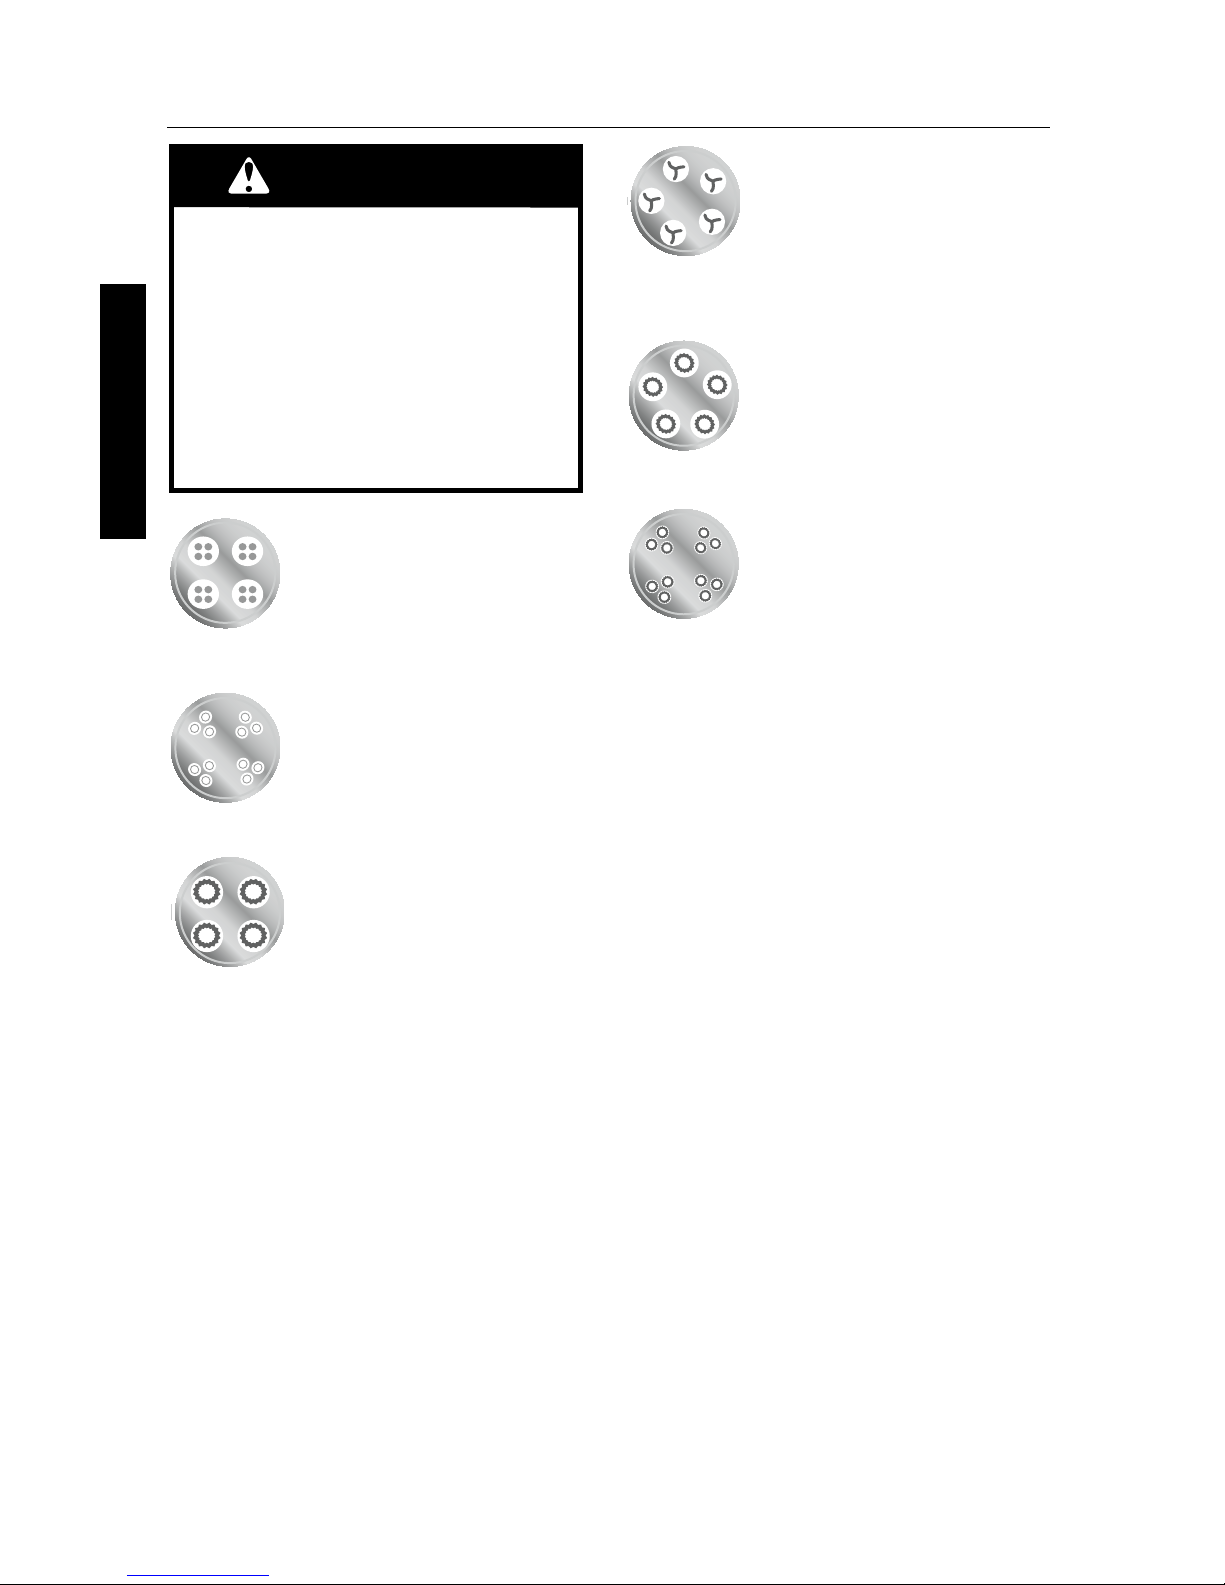
SMALL MACARONI
LARGE
MACARONI
FUSILLI
SPAGHETTI
BUCATINI
RIGATONI
A - Housing
B - Swing-Arm Wire
Dough Cutter
C - Auger
D - Pasta Ring
E - Storage Case
F - Spaghetti Plate
G - Bucatini Plate
H - Rigatoni Plate
I - Fusilli Plate
J - Large Macaroni Plate
K - Small Macaroni Plate
L - Combo Tool
M
- Cleaning Brush
N
- Small Hopper
C
D
E
F
G
H
I
L
J
K
A
N
B
RIGATONI
RIGATONI
RIGATONI
RIGATONI
RIGATONI
Continued on next page.
M
A A
A
F, G, H, I, J
or K
C
C
Page 5

5
English
3. Place the pasta ring (D) over the plate
and gently turn by hand until finger
tight but not over tightened.
4. Insert the cutter (B) into the socket,
aligning the flange (O) with the left
side of the slot (P) as shown. Push in
until locked into place and turn cutter
to the right. The pasta shape press
is now ready to attach to the Stand
Mixer.
To Assemble Pasta Shape Press Accessory
A multipurpose combo tool (L) with a
hook and wrench is provided. The flat end
may be used to help push dough into the
press. The wrench may be used to loosen
the pasta ring from the press body. The
hook may be used to pry the auger out of
the casing.
A storage case (E) is provided to store
pasta plates (F, G, H, I, J and K).
NOTE: Do not use combo tool (L) to
tighten pasta ring.
RIGATONI
A
D
RIGATONI
RIGATONI
RIGATONI
O
P
TURN AFTER
INSERTING
INTO SOCKET
B
L
C
A
A
Page 6
6
English
SPAGHETTI (PLATE F)
Recommended Stand
Mixer Speed: 10
Extrusion Length -
Approximately 24 cm (9½ in.).
BUCATINI (PLATE G)
Recommended Stand
Mixer Speed: 10
Extrusion Length -
Approximately 24 cm (9½ in.).
RIGATONI (PLATE H)
Recommended Stand
Mixer Speed: 6
Extrusion Length -
Approximately 4 cm (1½ in.).
FUSILLI (PLATE I)
Recommended Stand
Mixer Speed: 2-4
Extrusion Length -
Traditional (Long): 24 cm
(9½ in.); Short: 4 cm (1½ in.).
LARGE MACARONI (PLATE J)
Recommended Stand
Mixer Speed: 6
Extrusion Length - Up to
5 cm (2 in.).
SMALL MACARONI (PLATE K)
Recommended Stand
Mixer Speed: 6
Extrusion Length - Up to
4 cm (1½ in.).
Separating Fresh Pasta
Separate pasta after extrusion. Pasta
may be cooked immediately. If drying
instead of cooking, place long noodles on
KitchenAid
®
Drying Rack (KPDR), or dry in
a single layer on a towel placed on a flat
surface. Short pasta should be dried on a
flat surface.
Storing Fresh Pasta
To store fresh pasta, air dry for 1 hour,
then wrap in an airtight plastic bag and
refrigerate for up to 5 days. Long
noodles (except fusilli) may be formed into
a “nest” before drying.
Pasta Plates
RIGATONI
SPAGHETTI
BUCATINI
RIGATONI
BUCATINI
RIGATONI
SMALL MACARONI
FUSILLI
RIGATONI
SPAGHETTI
LARGE
MACARONI
BUCATINI
FUSILLI
RIGATONI
WARNING
Food Poisoning Hazard
Do not let foods that contain
perishable ingredients such as
eggs, dairy products, and
meats remain unrefrigerated for
more than one hour.
Doing so can result in food
poisoning or sickness.
FUSILLI
RIGATONI
LARGE
MACARONI
BUCATINI
Page 7

7
English
Before Attaching Pasta Shape Press
Accessory
Remove “Do not immerse in water” label,
and detach the storage case from the
accessory housing top.
To Attach:
1. Turn Stand Mixer speed control to "0"
(OFF).
2. Unplug Stand Mixer or disconnect
power.
3. Loosen the accessory knob (P) by
turning it counterclockwise.
4. Remove the accessory hub cover.
5. Insert the accessory shaft housing (N)
into the accessory hub (O) making
certain that accessory power shaft fits
into square hub socket.
6. It may be necessary to rotate the
accessory back and forth. When the
accessory is in proper position, the pin
on the accessory housing will fit into
the notch on the hub rim.
7. Tighten the accessory knob by turning
it clockwise until the accessory is
completely secured to Stand Mixer.
P
O
N
To Attach Pasta Shape Press Accessory
To Use Pasta Shape Press Accessory
2. Slowly feed walnut-size pieces of
dough into the hopper; dough should
self-feed. The auger should be visible
before adding the next piece of dough.
3. Use combo tool to push dough only if
dough becomes caught in hopper and
no longer self feeds.
1. Set the Stand Mixer speed between
6 and 10, according to pasta type
and personal preference. For best
results, Fusilli should be extruded at a
maximum speed of 6. Slower speeds
are also recommended for very short
pasta. Longer pasta, such as Spaghetti
may be extruded at higher speeds.
Rotating Blade Hazard
Always use combo tool.
Keep fingers out of openings.
Keep away from children.
Failure to do so can result in
amputations or cuts
WARNING
Page 8

8
English
To Loosen the Pasta Ring:
1. If pasta ring is too tight to remove
by hand, slip the wrench over the
grooves.
2. Turn pasta ring in direction indicated
by the arrow to OPEN.
NOTE: Do not use wrench of combo tool
to attach ring to press housing. Damage
to the accessory may result.
NOTE: When using the Pasta Shape Press
Accessory, do not wear ties, scarves or
long necklaces; gather long hair with a
clasp.
To Use Pasta Shape Press Accessory
4. Use the swing-arm wire dough
cutter to cut pasta at desired length
as it exits the press. See page 6 for
recommended lengths.
5. Separate pasta as described on page 6.
To Change the Pasta Plates:
1. Turn Stand Mixer speed control to "0"
(OFF).
2. Unplug Stand Mixer or disconnect
power.
3. Remove the Pasta Shape Press
Accessory from the Stand Mixer.
4. Remove the cutter, pasta ring, auger
and clean the dough out of the press
housing.
5. Then reassemble the accessory as
stated on page 5.
O
P
E
N
C
L
O
S
E
O
P
E
N
C
L
O
S
E
Page 9

9
English
Care and Cleaning
To Clean:
1. Turn Stand Mixer speed control to "0"
(OFF).
2. Unplug Stand Mixer or disconnect
power.
3. Completely disassemble Pasta Shape
Press.
4. Use the wrench end of combo tool to
loosen pasta ring. Use the hook to pry
out the auger from press housing.
5. Allow remaining dough on pasta plates
to dry overnight before separating.
Remove completely dried dough with
the Cleaning Brush. Use a wooden
skewer or toothpick to pick out any
remaining dough. Do not use metal
objects or put pasta plates in the
dishwasher to clean.
6. Auger, pasta ring, combo tool and
storage case are dishwasher safe.
NOTE: Do not wash press housing or
pasta plates in dishwasher or immerse in
water or other liquids.
NOTE: These accessories are designed to
be used with pasta dough only. To avoid
damaging your Pasta Shape Press, do not
insert anything other than pasta dough.
Page 10

10
English
NOTE: Mixer must rest at least 1 hour after
extruding 900 g (2 pounds) of dough.
Dough
•Learningtomakehomemadepasta
is simply a matter of practice. If you
have not made pasta, you may have to
prepare several batches of dough before
you feel comfortable. We recommend
experimenting with the Basic Egg
Noodle Pasta Recipe, page 11.
•Theratioofliquidtoflourissmall,
making the pasta dough firm and
leathery, but still pliable. It is extremely
important to have the correct proportion
of ingredients for proper dough
consistency, as dough that is too moist
or too dry will be difficult to work
with. To help you achieve consistent
results, the pasta recipes in this booklet
specify sifted flour. To sift flour, follow
this procedure: Place dry ingredient
measuring cup on a large piece of waxed
paper and hold sifter directly above and
close to cup. Scoop flour into sifter and
sift until flour exceeds top of cup. Using
the flat edge of a spatula, remove excess
flour from measuring cup.
•Occasionally,theremaybeunmixed
pieces of dough in the bowl after initial
mixing with the flat beater. These pieces
will be sufficiently incorporated by
Stand Mixer kneading followed by hand
kneading which firms and smoothes the
texture of the dough.
•Manyfactors,suchashumidity,brand
of flour used, and size of eggs, can
affect dough consistency. To compensate
for humid conditions, start the initial
mixing process with only the sifted
flour and eggs. Check the dough for
proper consistency by pinching a small
amount of dough together after mixing
with the flat beater. The dough should
stay together without sticking to your
fingers. It may be necessary to add a
small amount of water or flour to reach
correct dough consistency.
•Iftheprepareddoughistoomoistor
sticky to extrude, simply dust with flour
or pat some flour into the dough before
placing in the extruder.
Using Your Pasta Shape Press and
KitchenAid
®
Stand Mixer
•Longnoodlesandmacaronitendtocurl
in different directions as they extrude
through the plate. The first 25 cm
(10 inches) of curled noodles may be
pulled off and returned to the hopper
to be extruded again. Pasta will extrude
slowly at first, then faster as more
dough is extruded.
•Separatepastaimmediatelyafterextrusion.
Lay a group of noodles on a towel placed
on a flat surface and pull apart from drier
ends of strands. Dry in a single layer. Long
strands of pasta may be placed on a
KitchenAid
®
Drying Rack (KPDR).
•Homemadepastabehavesdifferently
than store-purchased pasta. Because
long noodles bend as they dry and
are more fragile, they require gentle
handling before cooking.
Storing Your Pasta
•Storedriedpastainanairtightglassor
plastic container almost indefinitely in a
cool, dark place. However, do not store
dried whole-wheat pasta for more than
1 month, as it may turn rancid.
•Tostorefreshpasta,airdryfor1hour,
then wrap in an airtight plastic bag and
refrigerate for up to 5 days. To freeze,
double wrap the pasta and keep frozen
for up to 4 months. To use frozen
fresh pasta, do not thaw – it should go
directly from freezer into boiling water.
Pasta Making Tips
WARNING
Food Poisoning Hazard
Do not let foods that contain
perishable ingredients such as
eggs, dairy products, and
meats remain unrefrigerated for
more than one hour.
Doing so can result in food
poisoning or sickness.
Page 11

11
English
Add 10 ml (2 teaspoons) salt and
15 ml (1 tablespoon) oil (optional) to
5,7 L (6 quarts) boiling water. Gradually
add pasta and continue to cook at a boil
until pasta is “al dente” or slightly firm to
the bite. Pasta floats to the top of the
water while cooking, so stir occasionally to
keep it cooking evenly. Drain in a colander.
•Drypasta–7minutes
•Freshpasta–2–5minutesdependingon
thickness of noodles
Cooking Pasta
1 egg per 100 g white
flour type 00
1 pinch of salt
olive oil (optional for
when dough is too
dry)
Place white flour in Stand Mixer bowl. Attach bowl and flat
beater. Turn to speed 2 and gradually add eggs and a pinch
of salt. Mix for 30 seconds. Stop Stand Mixer and exchange
flat beater for dough hook. Turn to speed 2 and knead until
dough is elastic.
If dough is too dry, add a little olive oil during the
kneading.
Remove mixture from bowl and hand knead for 30
seconds to 1 minute.
Form walnut-sized pieces of dough and extrude pasta into
desired shape. Separate and dry as desired, then follow
cooking instructions above.
Basic Egg Noodle Pasta
WARNING
Food Poisoning Hazard
Do not let foods that contain perishable
ingredients such as eggs, dairy products, and
meats remain unrefrigerated for more than
one hour.
Doing so can result in food poisoning
or sickness.
Page 12

12
English
For 4 portions:
1 clove of garlic
1 shallot
1 large courgette
300 g scampi
2 to 3 tablespoons
olive oil
salt and pepper
500 g small macaroni
parsley, finely
chopped
For 4 portions:
2 cloves of fresh garlic
3 whole dried
peperoncini
(red dried hot
chilli peppers)
1 tin (+/-200 g) of
chopped tomatoes
several small
black olives (4 to 5)
(for the garnish)
2 to 3 tablespoons
olive oil
salt and pepper
500 g penne rigate
A handful of grated
pecorino (hard Italian
cheese made from
sheep’s milk)
Preparation:
Heat a little olive oil in a non-stick pan over a gentle heat.
Chop the garlic and shallot very finely and leave to
simmer in the hot olive oil.
Finely dice the courgette and simmer together with the
shallot and garlic. Leave to simmer until the courgette is
reduced to a pulp.
Season with salt and pepper.
Boil the macaroni in water with a little salt until al dente.
Add the scampi to the courgette mixture. Stir well and
leave to simmer.
Drain the pasta and add to the scampi and courgette.
Mix thoroughly.
Serve with finely chopped parsley.
Preparation:
Gently heat up a little olive oil in a non-stick pan.
Add the cloves of garlic and fry in the hot olive oil.
Add the chopped tomatoes. Season with salt and pepper.
Stir 3 whole dried chillies into the sauce, then add
the olives.
Leave to simmer for about 20 minutes on a gentle heat.
In the meantime, boil the pasta in salted water until
al dente.
Drain the pasta and add it immediately to the hot sauce.
Serve with grated pecorino.
Small Macaroni With Courgettes and Scampi
Extra Spicy Penne (Large Macaroni)
Page 13

13
English
For 4 portions:
5 to 6 tablespoons
olive oil
5 cloves of garlic,
peeled
2 ground dried
peperoncini
(red dried hot
Chilli pepper)
or
Hot Chilli Powder
spice (to the taste)
a handful of grated
pecorino (hard Italian
cheese made from
sheep’s milk)
500 g bucatini
For 4 portions:
1 large tin (+/- 100 g)
of tuna in olive oil
1 bunch of fresh spring
onions
1 pack of cherry
tomatoes
700 g passata (sieved
pureed tomatoes –
buy ready made)
1 large sprig of finely
chopped parsley
finely chopped chives
2 to 3 tablespoons
olive oil
500 g rigatoni
Preparation:
Heat some oil in a non-stick pan.
Finely chop the cloves of garlic and add to the oil.
Heat the garlic thoroughly. It is important that you can
actually smell the garlic cooking, but it is also important
not to let it burn.
Add the dried peperoncini or hot Chilli powder (the
amount used determines how hot this dish is).
Leave everything to fry gently and in the meantime bring
some water to a boil.
Boil the bucatini until al dente and drain immediately.
Mix the bucatini with the garlic and the dried peperoncini
or Hot Chilli Powder mixture.
Serve immediately and sprinkle with a handful of
grated pecorino.
TIP: Give the hot pasta dish a crunchier texture by
adding fried breadcrumbs. It is best to use white bread
that is several days old. You can make the breadcrumbs
crunchy by frying them in the hot oil after you have
added the garlic.
Preparation:
Heat some olive oil in a saucepan. Finely chop the spring
onions. Cut the tomatoes in half and add them to the hot
oil together with the spring onions. Leave to simmer gently.
Then add the passata and allow to thicken. Season with
salt and pepper.
Leave the sauce to cook through for around 15 minutes
on a gentle heat so that the tomatoes soften.
Drain and reserve the oil from the tuna. Add the fish
to the tomato sauce. Add some of the reserved oil to
strengthen the tuna flavour to taste.
In the meantime, boil the rigatoni until al dente. Drain
the pasta.
Mix the pasta with the tuna sauce.
Decorate the plate with the finely chopped parsley
and chives.
TIP: Make sure you use tuna in olive oil and not in brine
or spring water.
Bucatini with Garlic, Oil and Peperoncino
Rigatoni with Tuna
Page 14

14
English
Length of
Warranty:
Europe, Australia and
New Zealand:
Two years Full Warranty
from date of purchase.
Other:
One Year Full Warranty
from date of purchase.
KitchenAid
Will Pay For:
Replacement parts and
repair labor costs to
correct defects in materials
or workmanship. Service
must be provided by an
Authorized KitchenAid
Service Center.
KitchenAid
Will Not Pay For:
A. Repairs when Pasta
Shape Press is used for
operations other than
normal household food
preparation.
B. Damage resulting from
accident, alterations,
misuse, abuse, or
installation/operation
not in accordance with
local electrical codes.
KITCHENAID DOES NOT ASSUME ANY RESPONSIBILITY FOR INDIRECT DAMAGES.
KitchenAid® Household Stand Mixer
Accessory Warranty
Service Centers
All service should be handled locally by an
Authorized KitchenAid Service Center.
Contact the dealer from whom the
accessories were purchased to obtain the
name of the nearest Authorized KitchenAid
Service Center.
In the U.K.:
Call: 0845 6011 287
In Ireland:
M.X. ELECTRIC
Service Department
25 Alymer Crescent
Kilcock, CO.KILDARE
Call: 1 679 2398/87 2581574
Fax: 1 628 4368
In Australia:
Call: 1 800 990 990
In New Zealand:
Call: 0800 881 200
Page 15

15
English
® Registered Trademark of KitchenAid, U.S.A.
™ Trademark of KitchenAid, U.S.A.
The shape of the stand mixer is a trademark of KitchenAid, U.S.A.
© 2008. All rights reserved.
Specifications subject to change without notice.
(5809AdZw1108)
Customer Service
For U.K. & Northern Ireland:
Freephone helpline number on:
0800 988 1266
(calls from mobiles are charged
at your standard network rate)
For Southern Ireland:
Helpline number on:
+44 (0) 20 8616 5148
Address:
KitchenAid Europa, Inc.
PO BOX 19
B-2018 ANTWERP 11
BELGIUM
www.KitchenAid.co.uk
www.KitchenAid.com
 Loading...