

KitchenAid 5KMC4241EER, 5KMC4241EOB Use & Care Guide
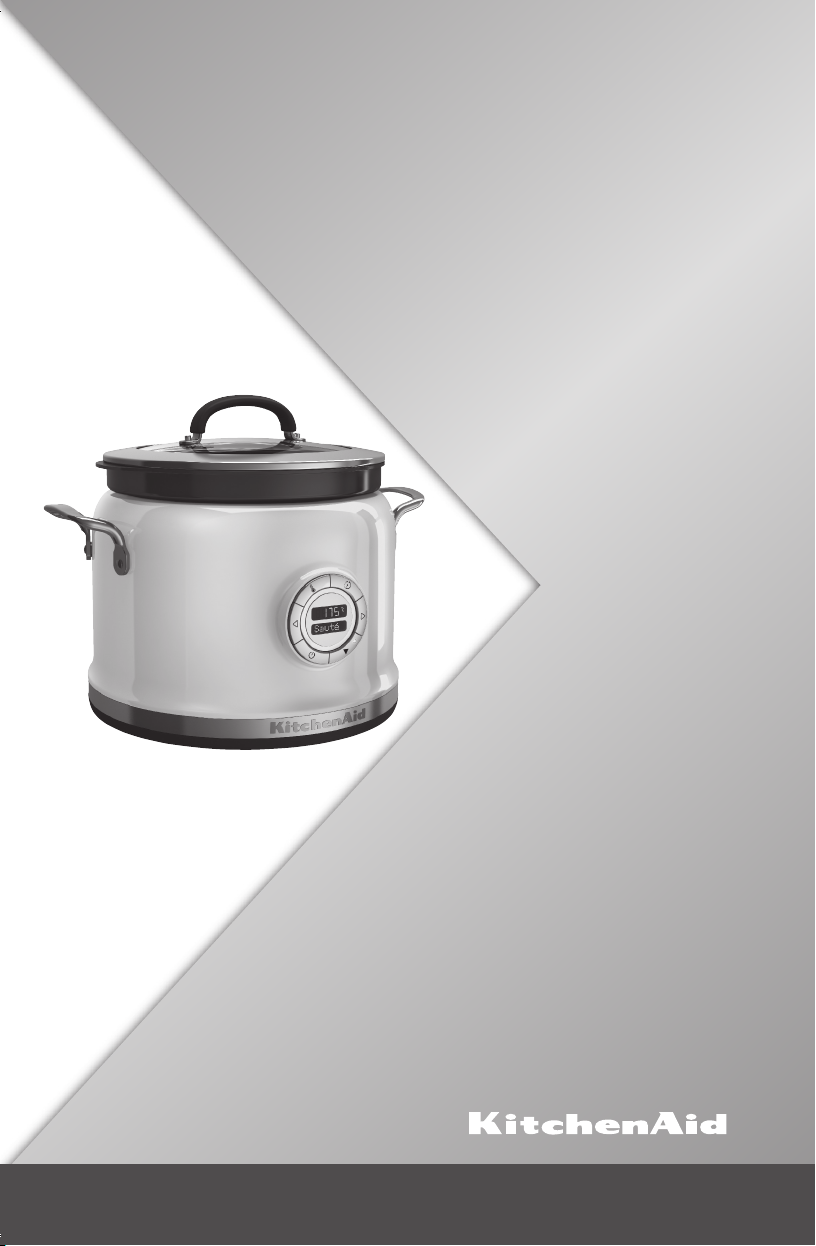
5KMC4241
5KMC4244


English ................................................................................5
Deutsch ............................................................................ 29
Français ............................................................................53
Italiano ..............................................................................77
Nederlands ....................................................................101
Русский .......................................................................... 125


MULTI-COOKER INSTRUCTIONS
TABLE OF CONTENTS
MULTI-COOKER SAFETY
Important safeguards ........................................................................................... 6
Electrical requirements .......................................................................................9
Electrical equipment waste disposal .................................................................... 9
PARTS AND FEATURES
Parts and accessories ......................................................................................... 10
Controls.............................................................................................................11
Available accessories .........................................................................................11
COOKING MODES GUIDE .................................................................................. 12
COOKING METHODS .......................................................................................... 13
STEP-BY-STEP COOKING MODES .................................................................... 14
MANUAL COOKING ............................................................................................18
ADDITIONAL FEATURES AND SETTINGS
Changing between Fahrenheit and Celsius .......................................................19
Display language ................................................................................................ 19
Last selections used ........................................................................................... 20
Using the timer as a kitchen timer ....................................................................20
GETTING STARTED
Before rst use .................................................................................................. 21
Setting up the Multi-Cooker ..............................................................................21
OPERATING THE MULTI-COOKER
Setting a cooking mode ..................................................................................... 22
When cooking is complete ................................................................................ 23
Roasting with the roasting rack .........................................................................24
Steaming with the steam basket ........................................................................ 24
TIPS FOR GREAT RESULTS
Cooking tips ......................................................................................................25
CARE AND CLEANING
Cleaning your Multi-Cooker.............................................................................. 27
TROUBLESHOOTING .......................................................................................... 27
WARRANTY AND SERVICE ................................................................................28
English
5
IMPORTANT SAFEGUARDS
When using electrical appliances, basic safety
precautions should always be followed to reduce the
risk of fire, electric shock, and/or injury to persons
including the following:
1. Read all instructions.
2. Do not touch hot surfaces. Use potholders or oven mitts
when handling the cooking bowl or lid.
3. To avoid electrical shock do not immerse cord, plugs, or
the Multi-Cooker base in water or other liquid.
4. Close supervision is necessary when any appliance is
used by or near children.
5. Unplug from outlet when not in use and before cleaning.
Allow to cool before putting on or taking off parts.
6

MULTI-COOKER SAFETYMULTI-COOKER SAFETY
6. Do not operate any appliance with a damaged cord
or plug or after the appliance malfunctions or has
been damaged in any manner. Return appliance to
the nearest Authorized Service Facility for examination,
repair, or adjustment.
7. Appliances can be used by persons with reduced
physical, sensory or mental capabilities or lack of
experience and knowledge if they have been given
supervision or instruction concerning use of the
appliance in a safe way and if they understand the
hazards involved.
8. The use of accessory attachments not recommended
by KitchenAid may cause injuries.
9. Do not use outdoors.
10. Do not let cord hang over edge of table or
counter, or touch hot surfaces, including the
top of the Multi-Cooker.
11. Do not place on or near a hot gas or electric burner,
or in a heated oven.
12. Extreme caution must be used when moving an
appliance containing hot oil or other hot liquids.
13. Do not use appliance for other than intended use.
14. This product is designed for household use only.
15. To disconnect, set all controls to O (off), then remove
plug from wall outlet.
16. Cook only in removable container.
17. Do not ll cooking pot above the Max Fill line.
18. Do not exceed 16 ounces (475 ml) of oil when cooking
with the Multi-Cooker.
English
7

CMD + SHIFT CLICK TO CHANGE COPY CMD + SHIFT CLICK TO CHANGE COPYMULTI-COOKER SAFETY MULTI-COOKER SAFETY
19. If control panel is blank during or after a cooking cycle,
the Multi-Cooker may have lost power during the
cooking cycle. Check food to be sure it is cooked to an
internal temperature of at least 74° C (165°F).
20. Switch off the appliance and disconnect from supply
before changing accessories or approaching parts that
move in use.
21. This appliance is intended to be used in household
and similar applications such as: Staff kitchen areas
in shops, ofces and other working environments;
farm houses; by clients in hotels, motels, and other
residential type environments; and bed-and-breakfast
type environments.
22. If the bowl is overlled, boiling water may be ejected.
23. The appliance is only to be used with the base provided.
24. CAUTION: Ensure that the appliance is switched off
before removing it from its base.
SAVE THESE INSTRUCTIONS
8

Electrical requirements
Voltage: 220–240 VAC
Frequency: 50/60 Hz
Wattage: 700 Watts
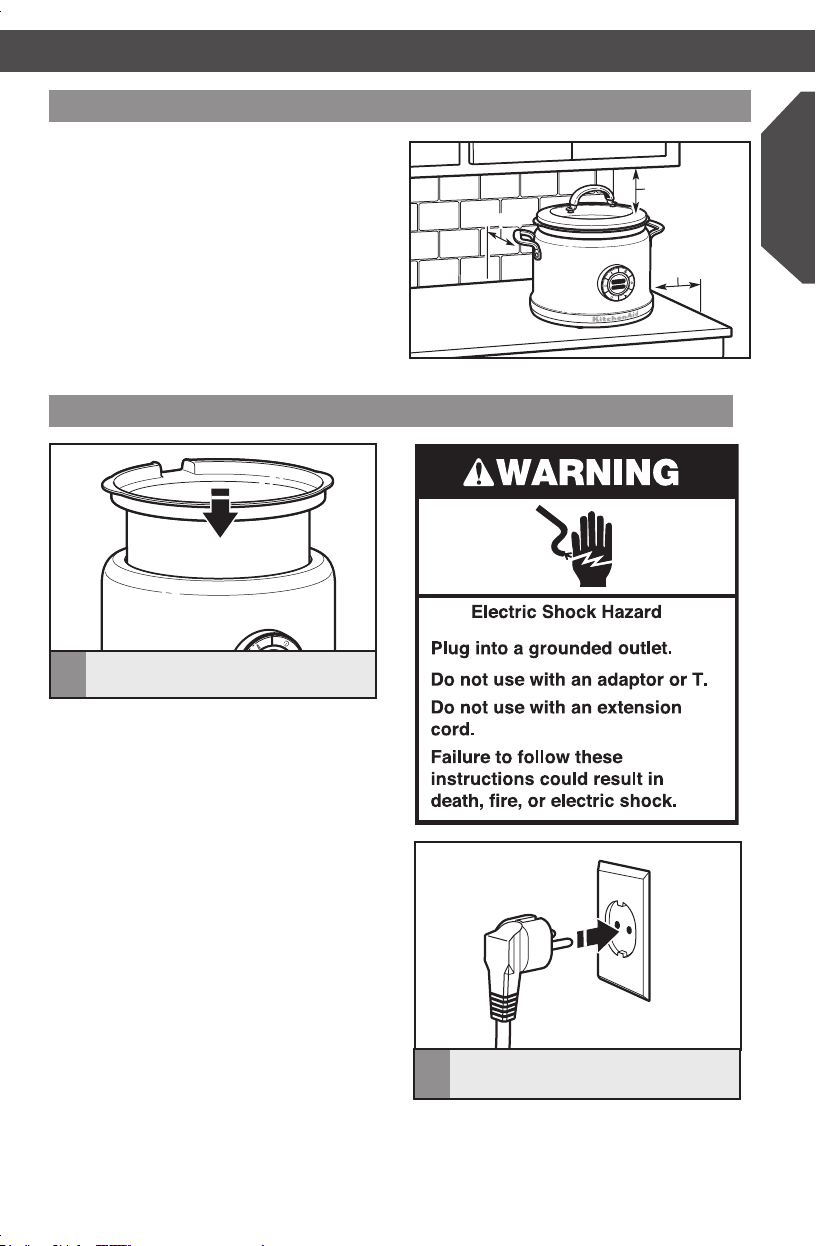
NOTE: This Multi-Cooker has a grounded
(earthed) plug. To reduce the risk of
electrical shock, this plug will fit in an outlet
only one way. If the plug does not fit in the
outlet, contact a qualified electrician. Do not
modify the plug in any way.
Electrical equipment waste disposal
Disposal of packing material
The packing material is 100% recyclable
and is marked with the recycle symbol .
The various parts of the packing must
therefore be disposed of responsibly
and in full compliance with local authority
regulations governing waste disposal.
Scrapping the product
- This appliance is marked in compliance with
European Directive 2012/19/EU, Waste
Electrical and Electronic Equipment (WEEE).
- By ensuring this product is disposed of
correctly, you will help prevent potential
negative consequences for the environment
and human health, which could otherwise
be caused by inappropriate waste handling
of this product.
Do not use an extension cord. If the power
supply cord is too short, have a qualified
electrician or technician install an outlet
near the appliance.
A short power supply cord should be used
to reduce the risk resulting from becoming
entangled in or tripping over a longer cord.
- The symbol on the product or on the
accompanying documentation indicates
that it should not be treated as domestic
waste but must be taken to an appropriate
collection centre for the recycling of
electrical and electronic equipment.
For more detailed information about
treatment, recovery and recycling of this
product, please contact your local city ofce,
your household waste disposal service or the
shop where you purchased the product.
English
9
F
Sear
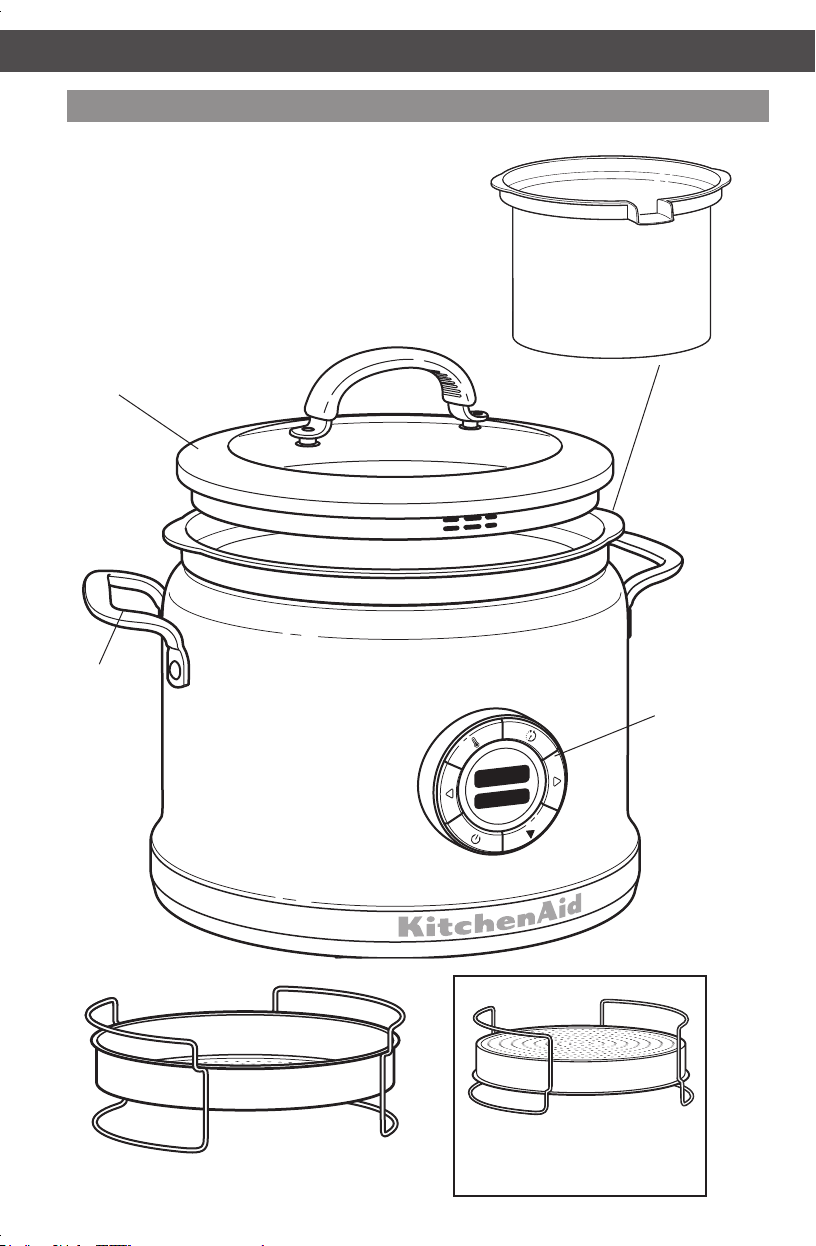
Parts and accessories
Tempered glass lid with
integrated strainer/pour
openings
Built-in
lifting
handles
CERAMASHIELD
nonstick cooking pot
with pouring spout
Control panel
Flip for convenient
2-in-1 Reversible steam basket/
10
roasting rack
roasting rack
PARTS AND FEATURESPARTS AND FEATURES
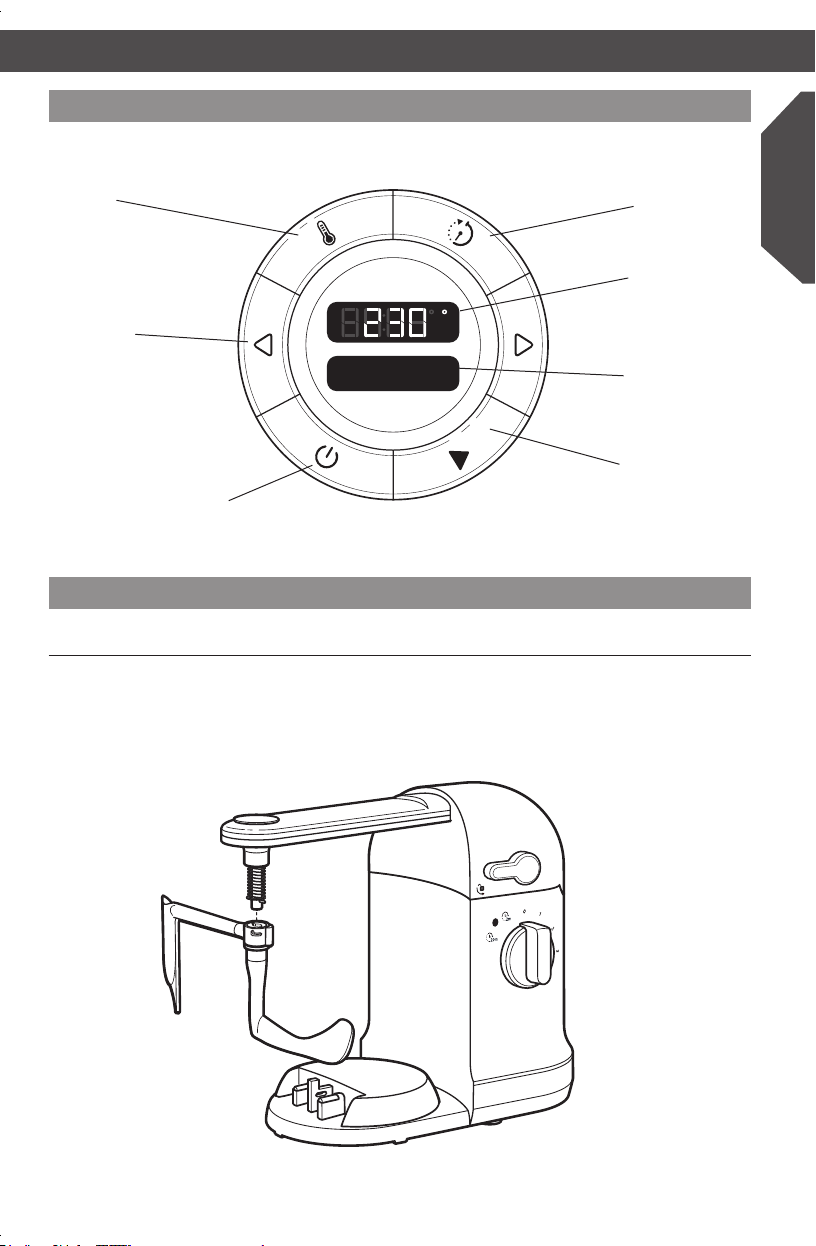
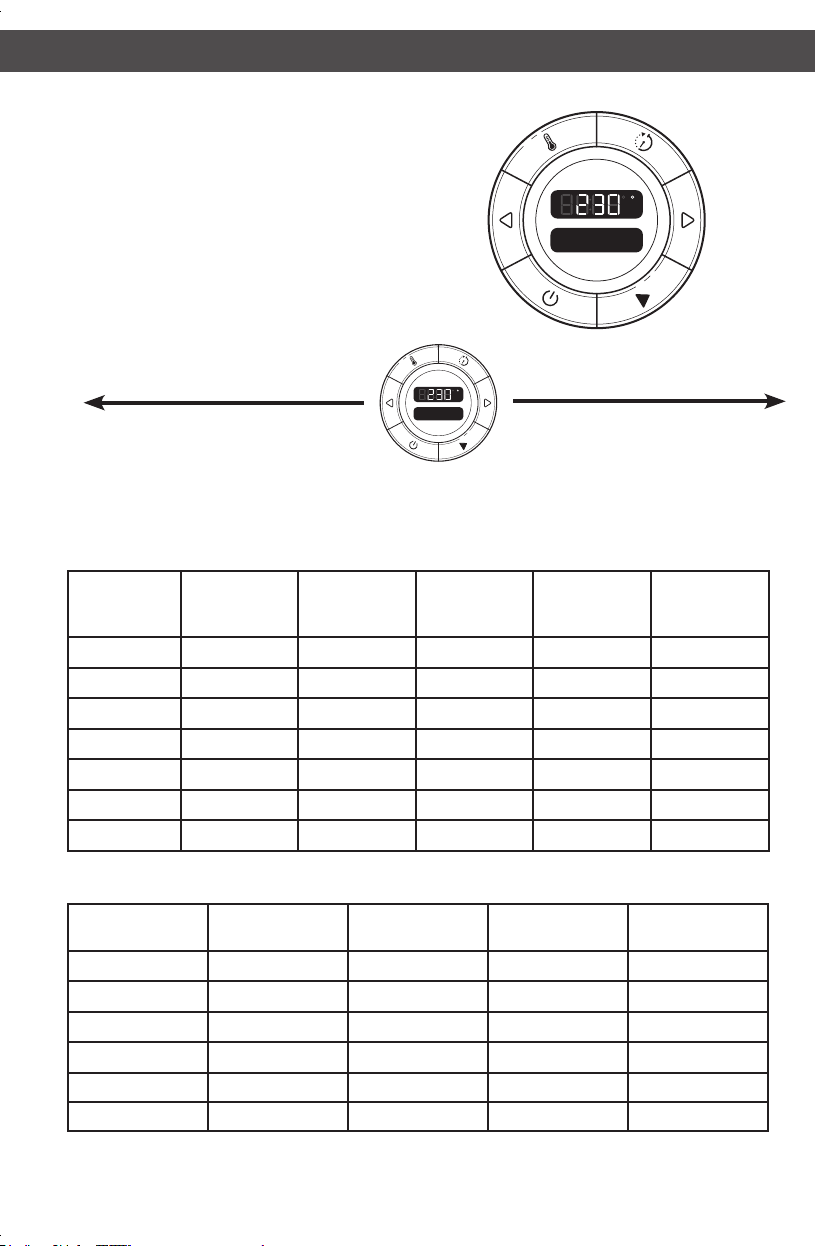
Controls
Temperature
Adjust Select
Cooking Mode/
Option Select
< and >
Power/Cancel
Button
Sear
F C
h
Timer adjust
Temperature/
Time Display
Cook Mode
Display
Power on/
status light
Available Accessories
Stir Tower 5KST4054 (sold separately)
The Stir Tower works like your own personal sous chef to help keep things moving, no matter
what you are cooking. Specially designed flipping wand and scraping blade keep food circulating,
allowing for even heating and consistent mixing, all at the touch of a switch.
English
11
Your Multi-Cooker features over 10
Cooking Methods, including a Manual Mode,
and 4 Step-by-Step Cooking Modes, specially
designed for a variety of cooking tasks.
Refer to the quick guide below for Cooking
Methods and Step Cooking Mode options,
or see detailed explanations and tips for
each cooking mode on the following pages.
Keep
Slow
Warm
Cook
Simmer Boil/
Steam
Bake
Sauté Sear Manual
COOKING METHODS
F C
h
Sear
F C
h
Sear
Soup Risotto Pilaf Porridge Yogurt Rice
Cooking
Method
Preset
Temp* in ° C
Min. Temp
Setting
in ° C
Max. Temp
Setting
in ° C Keep Warm
Cook time
Sear 230° C 220° C 230° C Manual 2
Sauté 175° C 160° C 190° C Manual 2
Bake 175° C 165° C 190° C Manual 2
Boil/Steam 100° C 90° C 110° C Manual 5
Simmer 95° C 85° C 100° C Manual 5
Slow Cook 90° C N/A N/A Auto 12
Keep Warm 75° C N/A N/A N/A 24
STEP-BY-STEP COOKING MODES
Cooking Mode
Method
Rice N/A N/A N/A Auto
Soup Sauté Boil Simmer Manual
Risotto Sauté Simmer N/A Manual
Pilaf Sauté Boil Simmer Manual
Porridge Boil Simmer N/A Manual
Yogurt Simmer Culture N/A N/A
* Preheating will appear in the display until the selected temperature is reached.
Step 1
Step 2
Method
Step 3
Method Keep Warm
Max.
(hrs.)
12

COOKING METHODSCOOKING MODES GUIDE
For cooking and food preparation tips, see “See Tips for Great Results” on how to get the
most of each cooking method.
Sear (220–230° C)
Searing allows you to prepare meats for
stews, soups, and other dishes. It uses high
temperatures to cook the outside surfaces
quickly, trapping flavour and juices inside.
Sauté (160–190° C)
Sautéing is ideal for giving meats and
vegetables a fresh, crisp flavour and texture.
Use sauté for creating oriental dishes, stirfries, and breakfast foods such as sausage
and scrambled eggs.
Bake (165–190° C)
Select bake to make cakes, casseroles,
and other dishes.
Boil/Steam (90–110° C)
Use Boil/Steam to prepare a variety of foods
such as hot cereals, steam shrimp, or to heat
delicate foods such as fish with indirect heat.
Simmer (85–100° C)
Simmer is great for soups and stews where
a gentle cooking helps yield rich, hearty
flavours.
Slow Cook (90° C)
Slow Cook allows the Multi-Cooker to be
used like a slow cooker, making it ideal for
slow cooking BBQ, chili, and meatballs, to
name just a few.
Keep Warm (75° C)
Keep Warm mode is designed to keep foods
at serving temperature after cooking has
finished for up to 24 hours. Certain cooking
methods and modes feature an automatic
Keep Warm mode. For other cooking
methods and modes, Keep Warm can be
selected manually.
IMPORTANT: Use Keep Warm only with
fully cooked food. Keep Warm is intended
to keep fully cooked food at serving
temperature.
English
13
STEP-BY-STEP COOKING MODES STEP-BY-STEP COOKING MODES
Step-by-step cooking modes use multiple cooking methods to cook different kinds of
foods. Use the key to advance from step to step. If it is necessary to back up a step,
press the key.
Rice (White/Brown)
Rice allows you to cook a variety of rice
types, from white rice, brown rice, wild rice
to sushi rice. Rice modes offers white and
brown rice programs for optimal results
(see table).
1. Add the measured rice and water to
the cooking pot.
NOTE: To reduce the possibility of
boilovers, rinse dry rice before adding
to pot.
2. Press to scroll to Rice mode. Press
to select.
3. The Multi-Cooker will display For
white, press < and For brown,
press >. Use or to select the
desired type of rice, then press .
4. Once cooking is complete, Rice
mode done, keeping warm will be
displayed and the Multi-Cooker will go
into Keep Warm mode. When in keep
warm mode without setting timer, the
Multi-Cooker will automatically turn off
after 24 hours.
NOTE: Default cook time is for 1 cup
(190 g) of dry rice. You can adjust the
time based on the quantity of rice.
Rice Type
White (long grain) 1 (190g) 13/4–21/4 (415–475 ml) 35*
White (medium grain) 1 (190g) 13/4–2 (415–475 ml) 35*
Brown 1 (190g) 13/4–21/4 (415–475 ml) 55*
Sushi/White (short/grain) 1 (190g) 11/4–13/4 (415–475 ml) 35*
* Default time
Dry Rice
cups (g)
Water
cups (ml)
(min.)
Time
14

Soup
Sauté > Boil > Simmer > Keep
Soup mode uses multiple preprogrammed
steps for creating soups and stews from
scratch, without the guesswork.
1. Press to scroll to Soup mode. Press
to select.
2. The Multi-Cooker will preheat to Sauté. If
setting a cooking time, set the timer, then
press to start timer countdown.
3. Add the starting ingredients.
4. Once sautéing is complete, press to
continue to Boil.
5. The Multi-Cooker will cool down to
Boil mode. If setting a boiling time, set
the timer, then press to start timer
countdown.
Risotto
Sauté > Simmer > Keep Warm
Risotto mode uses multiple preprogrammed
steps to make preparing risotto a snap, from
sautéing the meat or vegetables to simmering
the rice to perfection.
1. Press to scroll to Risotto mode.
Press to select.
2. The Multi-Cooker will preheat to Sauté. If
setting a cooking time, set the timer, then
press to start timer countdown.
3. Add the starting ingredients.
Warm
6. Add remaining ingredients.
7. Once boiling is complete, press to
continue to Simmer.
8. If setting a simmer time, set the timer,
then press to start timer countdown
9. Once simmering is complete, press the
button for Keep Warm mode. When in
keep warm mode without setting timer,
the Multi-Cooker will automatically turn
off after 24 hours.
4. Once sautéing is done, press the
button to continue to Simmer.
5. The Multi-Cooker will cool down to
Simmer mode. If setting a simmer time,
set the timer, then press to start timer
countdown.
6. Add remaining ingredients.
7. Once simmering is complete, press the
button for Keep Warm mode. When in
keep warm mode without setting timer,
the Multi-Cooker will automatically turn
off after 24 hours.
English
15
Pilaf
Sauté > Boil > Simmer > Keep Warm
Pilaf mode uses multiple preprogrammed
steps for creating succulent pilafs without
all the mess of traditional cooking methods.
From initial preparation of meats and
vegetables to the final baking steps, the
Multi-Cooker keeps it simple.
1. Press to scroll to Pilaf mode.
Press to select.
2. The Multi-Cooker will preheat to Sauté.
If setting a cooking time, set the timer,
then press to start timer countdown.
3. Add the starting ingredients.
4. Once sautéing is complete, press to
continue to Boil.
Porridge
Boil > Simmer > Keep Warm
Use this mode to create delicious porridges
quickly and easily, any time of day.
1. Press to scroll to Porridge mode.
Press to select.
2. The Multi-Cooker will preheat to Boil. If
setting a cooking time, set the timer, then
press to start timer countdown.
3. Add the starting ingredients.
4. Once boiling is done, press to continue
to Simmer.
5. The Multi-Cooker will cool down to
Boil mode. If setting a boiling time, set
the timer, then press to start timer
countdown.
6. Add remaining ingredients.
7. Once boiling is complete, press to
continue to Simmer.
8. If setting a simmer time, set the timer,
then press to start timer countdown.
9. Once simmering is complete, press for
Keep Warm mode. When in Keep
Warm mode without setting timer, the
Multi-Cooker will automatically turn off
after 24 hours.
5. The Multi-Cooker will cool down to
Simmer mode. If setting a simmer time,
set the timer, then press to start timer
countdown.
6. Add remaining ingredients.
7. Once simmering is complete, press the
button for Keep Warm mode. When in
keep warm mode without setting timer,
the Multi-Cooker will automatically turn
off after 24 hours.
16

STEP-BY-STEP COOKING MODESSTEP-BY-STEP COOKING MODES
WARNING
Yogurt
Simmer > Culture
Food Poisoning Hazard
Do not cook any foods, other than
yogurt, using the yogurt mode.
Doing so can result in food
poisoning or sickness.
Yogurt mode works at lower temperatures
than other cooking modes and is designed for
making yogurt only. Do not use for cooking
other food types; food poisoning or sickness
can occur.
Use yogurt mode to create your own
delicious yogurts at home.
1. Add the ingredients.
2. Press to scroll to Yogurt mode.
Press to select.
3. The Multi-Cooker will preheat to Simmer.
If setting a cooking time, set the timer,
then press to start timer countdown.
4. Once simmering is complete, press to
continue to Culture.
5. The Multi-Cooker will cool down to
Culture mode. If setting a culture time,
set the timer, then press to start timer
countdown.
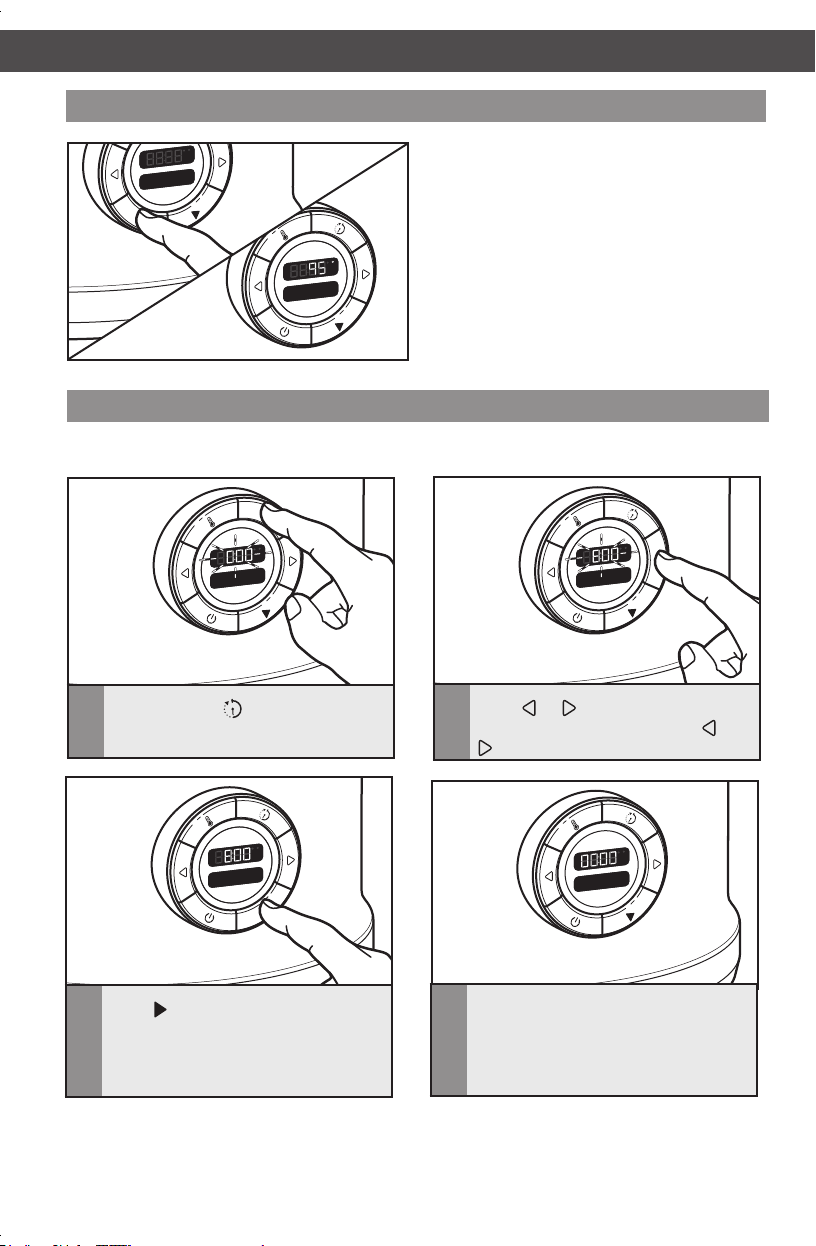
NOTE: The default simmer temperature of
Yogurt mode (step 1) is designed for 0.95L
of milk. Allow about 10 to 12 minutes
of heating time before adding yogurt or
commercial yogurt starter to make yogurt.
For larger or smaller quantities, please
adjust time accordingly and use a kitchen
thermometer to ensure the milk reaches
85° C before moving on to culture (step 2).
English
17
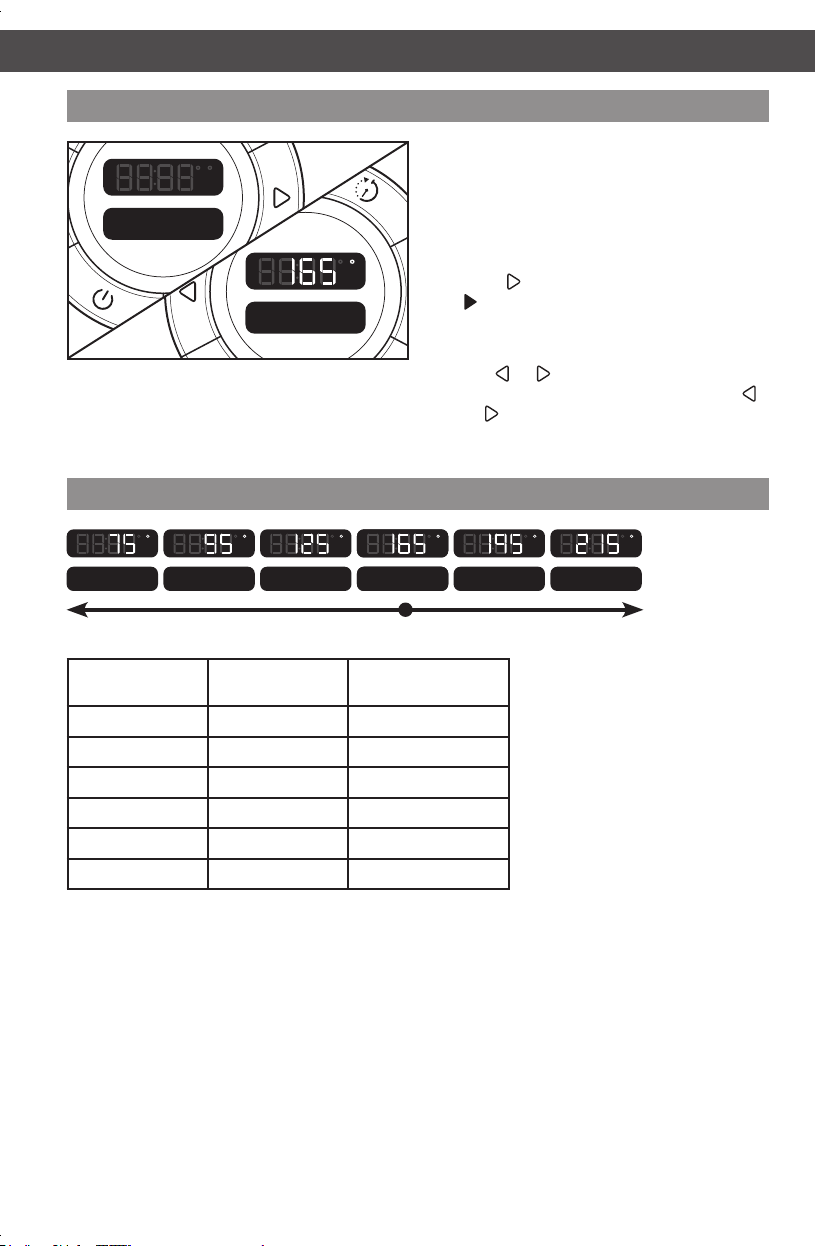
Manual Cooking Modes
Medium
F C
h
Manual
F C
h
Manual Cooking Modes
Manual cooking mode has 6 preset ranges to
allow you to cook like on a regular stove top:
Warm, Low, Med-Lo, Medium, Med-Hi, and
High. Each range is adjustable based on the
chart below.
To select and adjust a manual mode:
1. Press to scroll to Manual mode. Press
to select.
2. Medium will appear in the display, with a
temperature of 165° C.
3. Tap or to adjust the temperature
in 5° C increments, or press and hold
or to jump between Manual cooking
modes.
F C
h
Warm
Manual
Cooking Mode
Low
F C
h
Med-Lo
Preset
Temp* in ° C
F C
h
Manual
Medium
F C
F C
h
h
Max. Temp
in ° C
Med-Hi
High 215° C 230° C
Medium High 195° C 210° C
Medium 165° C 190° C
Medium Low 125° C 160° C
Low 95° C 120° C
Warm 75° C 90° C
* Preheating will appear in the display until the selected temperature is reached.
F C
h
F C
h
High
18
ADDITIONAL FEATURES AND SETTINGSMANUAL COOKING
F
Sear
F
h
C
Saute
F
Sear
F
h
C
Saute
Langua
F C
h
Settin
F C
h
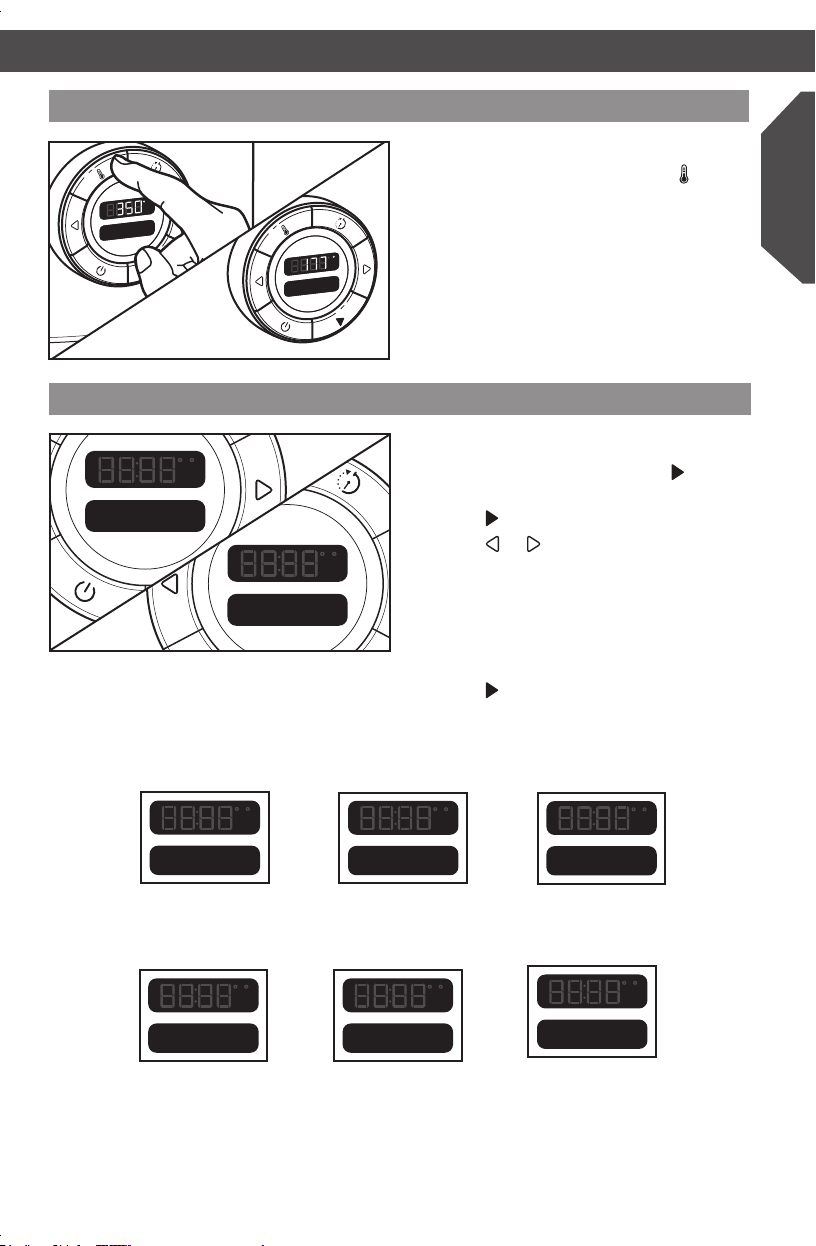
Changing between Fahrenheit and Celsius
To change between degrees Fahrenheit and
degrees Celsius, press and hold the button
for 3 seconds.
Display Language
To adjust the displayed language:
1. Scroll to Settings, and press .
2. Display shows Language Selection.
3. Press or to switch between:
4. Press to select and save setting.
English
Press .
English (default)
Russian
French
German
Italian
Dutch
Englis
English
Deutsc
German
F C
h
F C
h
F C
h
Russian
Italian
K
N
Franca
French
F C
h
Nederl
Dutch
Pycc
Italia
F C
h
F C
h
19
Last selections used
F
Sear
Simmer
F
h
C
F
Sear
Set Tim
F
h
C
If the Multi-Cooker remains plugged in, it will
remember the last cooking method or mode
and temperature settings used the next time
it is turned on.
Using the timer as a kitchen timer
The Multi-Cooker timer can be used as a kitchen timer when not in a cooking mode.
C
Sear
Set Tim
C
F
F
h
Sear
Set Tim
F
F
h
Press and hold .
1
C
F
F
h
Sear
Set Tim
Press to start the timer
3
countdown. A single tone will sound
when the time reaches 1 minute,
then the time will continue counting
down in seconds.
20
Press or to adjust the time up
2
or down. Pressing and holding or
will change the time more rapidly.
C
F
F
h
Sear
When the timer reaches 00:00, three
4
tones will sound.
GETTING STARTEDADDITIONAL FEATURES AND SETTINGS
Before rst use
1. Place the Multi-Cooker on a dry, flat, level
surface such as a countertop or table.
2. Be sure the sides and back of the
Multi-Cooker are at least 10 cm away
from any walls, cabinets, or objects on the
counter or table. Allow room above the
Multi-Cooker to remove the lid and avoid
steam buildup on cabinets.
3. Remove all packaging materials, if present.
4. Wash lid and cooking pot in hot, sudsy
water. Dry thoroughly.
Setting up the Multi-Cooker
10
cm10 cm
10 cm
English
10 cm
F
F
Sear
Sear
Insert the cooking pot into the
1
Multi-Cooker.
Plug into a grounded (earthed) outlet.
2
The Multi-Cooker is now ready to use.
21

Setting a cooking mode
F
Sear
Sear
F
h
C
F
Sear
Set Tim
F
h
C
F
Sear
Sauté
F
h
C
F
Sear
Sauté
F
h
C
Sauté
Sear
C
F
F
h
Press .
1
Press to select the cooking method
3
or mode. The displayed temperature
will change as the Multi-Cooker
preheats.
C
F
F
h
Sauté
Sear
Use or to scroll to the desired
2
cooking mode or method. The default
cooking temperature will be displayed.
C
F
F
h
Sauté
Sear
To adjust the temperature, if desired,
4
press the TEMP button, then press
or to decrease or increase the
temperature. Press to confirm. See
“Cooking Modes” chart for options.
To set the cook timer, if desired, press
5
TIMER, then use or to increase
or decrease the cook time. Press to
start the timer countdown.
22
Place ingredients in the cooking pot.
6

OPERATING THE MULTI-COOKEROPERATING THE MULTI-COOKER
C
F
F
h
Keep W
Sear
English
Cover with lid. Rotate lid so pouring
7
opening is covered to help keep foods
moist.
When cooking is complete
F
F
Use pot holders or oven mitts when
1
removing the cooking pot from the base
and when pouring contents.
If using a Step Cooking mode, a tone
8
will sound when the timer (if set)
reaches 00:00. Press and the timer
will begin counting down for the next
Step.
The Multi-Cooker will shut off automatically
after the set time period. For Slow Cook
High, Slow Cook Low, and Rice, if Auto Keep
Warm is set to ON, the Multi-Cooker will
automatically change to Keep Warm mode for
up to 24 hours.
C
F
F
h
Sear
Set Tim
To turn the Multi-Cooker off, press and
2
hold the button for three seconds.
23
F
Sear
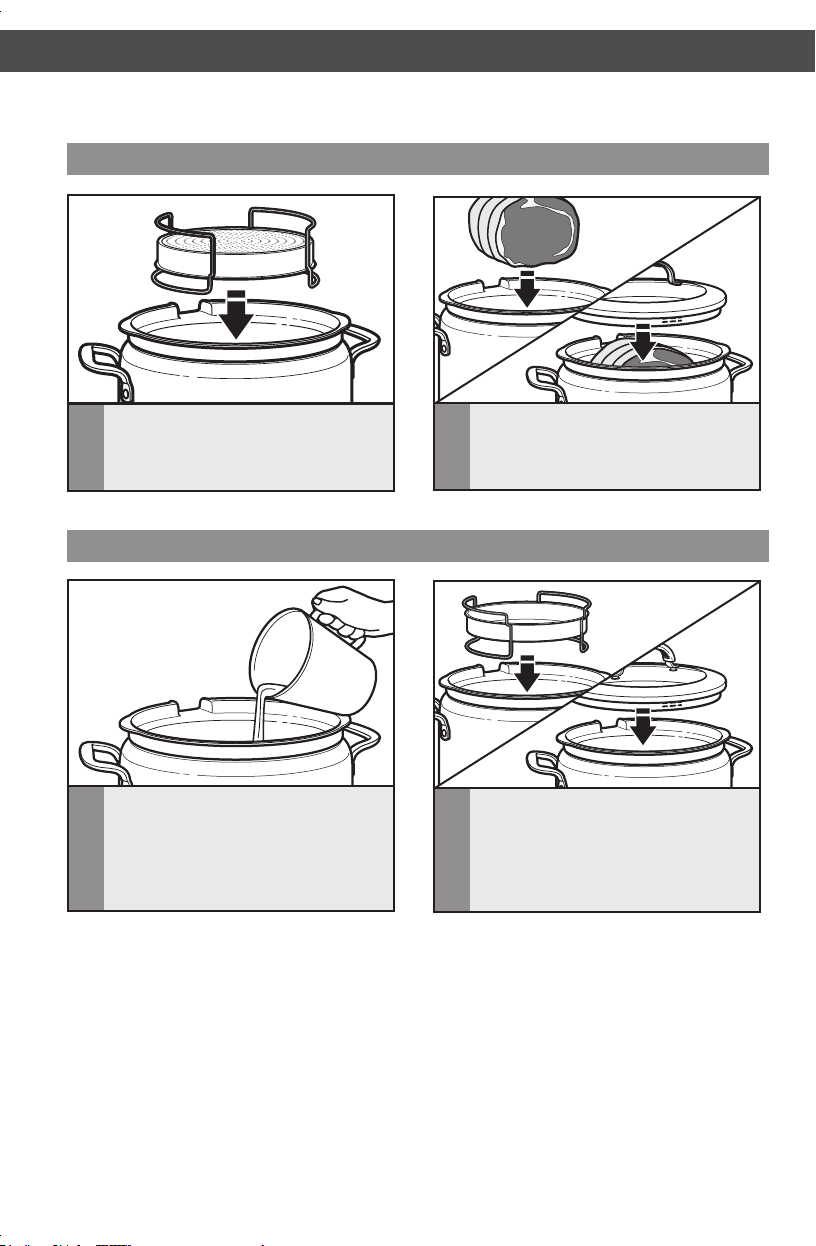
The Multi-Cooker includes a combination steam basket and roasting rack for multilevel cooking.
F
Sear
NOTE: Steam basket and roasting rack can not be used with the optional Stir Tower accessory.
Roasting with the roasting rack
If cooking with the roasting rack,
1
add any ingredients for regular
cooking to cooking pot.
Steaming with the steam basket
Add water to the bottom of the
1
cooking pot. For best results, do not
exceed approx. 18 oz./0.5 L.
Lower roasting/steaming rack into
2
cooking pot as shown and place
ingredients to be roasted on rack.
Cover with lid.
Lower roasting/steaming rack into
2
cooking pot as shown and place
ingredients to be steamed in basket.
Cover with lid. When cooking has
nished, remove food with a spoon
or tongs.
24

TIPS FOR GREAT RESULTSOPERATING THE MULTI-COOKER
Cooking tips
Refer to the following tips for getting the most
out of the different cooking modes.
Searing and Sautéing:
• For best browning results, pat exterior
surfaces of meat dry with paper towels
before sautéing or searing.
• It’s important not to over-crowd the cooking
pot when browning meat for a recipe.
Brown approx. 0.25 kg or less at a time
for the best results and to avoid steaming
the meat.
• If using oil or butter for sautéing, add it after
the preheating the multi-cooker.
• To easily drain grease after searing or
sautéing food, place the lid on the cooking
pot in the drain position and hold it securely
with hot pads while pouring grease into a
heat safe container.
• When sautéing vegetables such as carrots,
celery, onions, and garlic, add larger cut
ingredients rst and cook for several
minutes before adding smaller cut foods
such as minced garlic. This ensures all of the
vegetables are evenly cooked and the garlic
does not burn.
Steaming:
• It is not necessary to allow the unit to
preheat when steaming foods, simply add
water, place food on the steaming rack and
set the multi-cooker to STEAM. At the end
of the preheat time, press the START button.
• Foods will steam faster if cooked in a single
layer. Larger amounts of food may need to
be repositioned midway through the cooking
time for even results.
• Foods that have been cut or trimmed into
pieces approximately the same size will cook
more evenly.
• Make sure the lid covers the cooking pot
spout to trap steam for optimal cooking
performance.
• Removing the lid slowly during steaming.
Rice:
• It is important to measure rice and water
accurately before cooking for best results.
• Some varieties of rice are washed/rinsed
prior to cooking. U.S. varieties generally
are not, as they have been enriched with
vitamins and minerals. Rinsing these types of
rice removes the added nutrients. If washing
rice before cooking, be sure to measure it
before washing, not after, and try to drain as
much water away as possible before adding
the amount needed for cooking.
• After adding rice and water to the
multi-cooker pot, spread the rice into
an even layer on the bottom for the best
cooking results. Do not remove the lid
during cooking.
• Most types of rice will be slightly
undercooked at the end of the Rice cooking
cycle. Allowing the cooked rice to rest in
the cooking pot with the lid on for 5 to 10
minutes will allow the last bit of moisture to
be absorbed.
• Oil, butter and salt and other seasonings
can all be added if desired. Stir in prior to
starting the Rice cooking cycle. Liquids other
than water can also be used to add avour.
Try substituting sh, poultry, vegetable or
meat stocks or broths.
• Chopped fresh herbs can be stirring into
cooked rice at the end of the cooking cycle
before allowing the rice to rest.
• Make sure the lid covers the cooking pot
spout to trap steam for optimal rice cooking
performance.
Soup:
• Follow the cooking tips for Sauté/Sear when
using this part of the Soup cooking cycle.
• The bits of cooked on foods on the bottom
of the cooking pot after browning contain
lots of avour. Add some of the liquid
from your recipe and scrape them up with
a wooden spoon to add depth and more
intense avour to your soup.
• Cutting foods into pieces approximately the
same size will ensure the most even cooking
results.
• It is not necessary to thaw frozen vegetables
prior to adding to a soup for cooking, but the
cooking time may need to be lengthened.
Frozen meats should be thawed before
cooking with the Soup cycle to be sure they
are properly cooked through.
• It’s best to add dairy ingredients such as
cream, milk or cheeses near the end of
cooking to prevent separation.
English
25

Risotto:
• In general, the rice for risotto should be
sautéed in some type of fat prior to adding
any of the liquids in the recipe. Allow the
multi-cooker to preheat in the Sauté stage,
and then add butter or oil as outlined in your
recipe. Add the amount of rice specied in
the recipe and stir it occasionally for several
minutes or until the outer edges of the rice
grains are semi-transparent but the interior
is still white. Other ingredients that need to
be sautéed such as onions, garlic or other
vegetables can also be added and cooked
during this step.
• If your recipe calls for wine, add it before
adding the other liquids. This allows the
avour of the wine to be absorbed into
the rice.
• Heat the liquids for your risotto recipe on
the stove or in the microwave until very hot,
generally just below the boiling point.
• Add hot liquids to the rice in one-cup
(190 g) increments and stir constantly until
almost all of the liquid has been absorbed
before adding more.
• It is best to add cheese, herbs or other
delicate ingredients during the last few
minutes of cooking.
• To prevent overcooking and keep the
texture of the risotto creamy, remove the
cooking pot from the multi-cooker base
after your recipe is nished if not serving
immediately.
Slow-Cooking:
• As a general rule for using your favourite
recipes in the Multi-Cooker, increase the
amounts of herbs and seasonings to offset
the effect of longer cooking times.
• Do not use frozen, uncooked meat in the
Multi-Cooker. Always thaw meats prior to
slow cooking. The size you cut food into
can affect its taste and texture. To assure
uniformity of cooking, cut vegetables of
similar density, such as potatoes, carrots,
and parsnips into similar-sized pieces. In
general, dense vegetables should be slightly
smaller than more tender vegetables.
• Cutting meats into large pieces allows longer
cooking times and avoids overcooking.
• Some foods are not suited for extended
cooking. Pasta, seafood, milk, cream or
sour cream should be added 2 hours
before serving.
• Add garnishes, fresh herbs, and quickcooking vegetables toward the end of the
cooking cycle. For example, you can add
peas, corn and freshly sliced squash in the
last 10 to 20 minutes.
Yogurt:
• Yogurt can be made from whole, reduced fat
or fat free milk. Whole or 2% milk will result
in yogurt with a thicker texture.
• For best result, refrigerate yogurt before
straining whey through cheese cloth for a
thicker texture.
• Once you start making your own yogurt, you
can use some of the previous batch to make
the next one. Only do this 2-3 times before
starting with fresh.
Manual:
• When heating a large amount of water for
cooking pasta or other foods, use MANUAL
mode at the highest temperature setting
230° C (450°F). Note that the display will
likely continue to scroll “preheating” even
after the water has reached a full rolling boil,
as the unit is sensing the water temperature.
26

CARE AND CLEANINGTIPS FOR GREAT RESULTS
Cleaning your Multi-Cooker
Unplug your Multi-Cooker from the wall
socket before cleaning.
• Allow Multi-Cooker and accessories
to cool completely before cleaning.
• Do not use abrasive cleaners or metal
scouring pads. They could scratch
the surface.
• Wipe the outside of the Multi-Cooker with
a clean, damp cloth and dry thoroughly. A
nonabrasive liquid cleaner may be used for
stubborn stains.
• The ceramic nonstick coating of the
Multi-Cooker pot is scratch-resistant.
However, dropping or hard impacts can
chip or crack the ceramic coating.
• The pot of the Multi-Cooker has a nonstick
coating for easy cleaning. Repeated
washing in the dishwasher can reduce the
effectiveness of the nonstick coating.
NOTE: The lid and pot are dishwasher
durable, but handwashing in hot, soapy
water is recommended to maximize the life
of the nonstick coating.
TROUBLESHOOTING
If your Multi-Cooker malfunctions or fails to operate
• Is the Multi-Cooker plugged into
a grounded (earthed) outlet?
Plug the Multi-Cooker into a grounded
(earthed) outlet.
English
• Is the fuse in the circuit to the
Multi-Cooker in working order?
If you have a circuit breaker box, make
sure the circuit is closed. Try unplugging the
Multi-Cooker, then plug it back in.
• Multi-Cooker turned off on its own.
The Multi-Cooker has an auto shutoff
feature. Depending on the cooking method,
the Multi-Cooker will automatically shut
off after up to 12 hours (24 hours when in
Keep Warm mode).
• If the problem cannot be corrected:
See the “KitchenAid Warranty and Service”
sections. Do not return the Multi-Cooker
to the retailer – retailers do not provide
service.
27

WARRANTY AND SERVICE
KitchenAid Multi-Cooker warranty
Length of
Warranty:
Europe, Middle East
and Africa:
For models
and 5KMC4244:
Two years full warranty from
date of purchase.
KITCHENAID DOES NOT ASSUME ANY RESPONSIBILITY FOR INDIRECT
DAMAGES.
5KMC4241
KitchenAid Will Pay For: KitchenAid Will Not Pay
For:
The replacement parts and
repair labor costs to correct
defects in materials or
workmanship. Service must
be provided by an Authorized
KitchenAid Service Center.
A. Repairs when Multi-
Cooker is used for
operations other
than normal household
food preparation.
B. Damage resulting from
accident, alterations,
misuse, abuse, or
installation/operation not
in accordance with local
electrical codes.
Customer service
In U.K. and Ireland:
For any questions, or to nd the nearest KitchenAid Authorized Service Center, please nd our
contact details below.
NOTE: All service should be handled locally by an Authorized KitchenAid Service Center.
Contact number for U.K. and Northern Ireland:
Tollfree number 0800 988 1266 (calls from mobile phones are charged standard
network rate), or 0194 260 5504
Contact number for Ireland:
Tollfree number +44 (0) 20 8616 5148
E-mail contact for U.K. and Ireland:
Go to www.kitchenaid.co.uk, and click on the link “Contact Us” at the bottom of the page.
Address for U.K. and Ireland:
KitchenAid Europa, Inc.
PO BOX 19
B-2018 ANTWERP 11
BELGIUM
In other countries:
For all product related questions and after sales matters, please contact your dealer to obtain the
name of the nearest Authorized KitchenAid Service/Customer Center.
For more information, visit our website at:
28
www.KitchenAid.co.uk
www.KitchenAid.eu

CMD + SHIFT CLICK TO CHANGE COPYBEDIENUNGSANLEITUNG FÜR DEN MULTI-COOKER
INHALTSVERZEICHNIS
SICHERHEITSHINWEISE ZUM MULTI-COOKER
Wichtige Sicherheitshinweise ���������������������������������������������������������������������������� 30
Elektrische Anforderungen ��������������������������������������������������������������������������������33
Entsorgung von Elektrogeräten ������������������������������������������������������������������������� 33
TEILE UND MERKMALE
Teile und Zubehör ��������������������������������������������������������������������������������������������� 34
Bedienelemente �������������������������������������������������������������������������������������������������35
Erhältliches Zubehör ����������������������������������������������������������������������������������������� 35
KOCHMODI ������������������������������������������������������������������������������������������������������������ 36
GARMETHODEN ��������������������������������������������������������������������������������������������������� 37
SCHRITT-FÜR-SCHRITT-KOCHMODI �������������������������������������������������������������� 38
MANUELLES KOCHEN ����������������������������������������������������������������������������������������42
WEITERE FUNKTIONEN UND EINSTELLUNGEN
Einstellen der Temperatureinheit: Fahrenheit oder Celsius ������������������������������ 42
Anzeigesprache �������������������������������������������������������������������������������������������������42
Zuletzt verwendete Funktion ���������������������������������������������������������������������������� 44
Verwenden des Timers als Kurzzeitmesser ������������������������������������������������������44
GRUNDLAGEN
Vor dem ersten Verwenden ������������������������������������������������������������������������������ 45
Vorbereiten des Multi-Cookers�������������������������������������������������������������������������45
BEDIENEN DES MULTI-COOKERS
Auswählen eines Kochmodus ���������������������������������������������������������������������������� 46
Nach der Zubereitung ��������������������������������������������������������������������������������������� 47
Braten mit dem Brateinsatz �������������������������������������������������������������������������������48
Dämpfen mit dem Dampfgarkorb ��������������������������������������������������������������������� 48
TIPPS FÜR TOLLE ERGEBNISSE
Zubereitungstipps ����������������������������������������������������������������������������������������������49
PFLEGE UND REINIGUNG
Reinigen des Multi-Cookers ������������������������������������������������������������������������������ 51
PROBLEMBEHEBUNG �����������������������������������������������������������������������������������������51
GARANTIE UND KUNDENDIENST ������������������������������������������������������������������ 52
Deutsch
29
CMD + SHIFT CLICK TO CHANGE COPY CMD + SHIFT CLICK TO CHANGE COPY
Ihre Sicherheit und die Sicherheit anderer sind von großer Wichtigkeit.
Im vorliegenden Handbuch und an Ihrem Gerät sind zahlreiche Sicherheitshinweise zu nden.
Lesen und beachten Sie bitte immer alle diese Sicherheitshinweise.
Dies ist das Warnzeichen.
Dieses Zeichen weist Sie auf mögliche Gefahren hin, die zum Tode oder
zu Verletzungen führen können.
Alle Sicherheitshinweise stehen nach diesem Zeichen oder dem Wort „GEFAHR“
oder „WARNUNG“. Diese Worte bedeuten:
Sie können schwer oder tödlich verletzt
GEFAHR
werden, wenn Sie diese Hinweise nicht
unmittelbar beachten.
WARNUNG
Alle Sicherheitshinweise erklären Ihnen die Art der Gefahr und geben Hinweise, wie Sie die
Verletzungsgefahr verringern können, aber sie informieren Sie auch über die Folgen, wenn Sie
diese Hinweise nicht beachten.
Sie können schwer oder tödlich verletzt werden,
wenn Sie diese Hinweise nicht beachten.
WICHTIGE SICHERHEITSHINWEISE
Beim Benutzen elektrischer Geräte sollten Sie stets
grundlegende Sicherheits vorkehrungen treffen
und diese beachten, um die Gefahr eines Brandes,
Stromschlags und/oder von Körperverletzungen zu
verringern.
1. Lesen Sie alle Instruktionen.
2. Berühren Sie keine heißen Oberflächen. Verwenden
Sie Topflappen oder Ofenhandschuhe, wenn Sie die
Kochschüssel oder den Deckel anfassen.
3. Zur Vermeidung eines Stromschlags halten Sie
Zuleitung, Stecker und Basis des Multi-Cookers niemals
in Wasser oder andere Flüssigkeiten.
4. Kinder sollten das Gerät nur unter Aufsicht verwenden,
damit sie nicht damit spielen.
5. Ziehen Sie den Netzstecker aus der Steckdose,
wenn Sie das Gerät nicht benutzen oder es reinigen.
LassenSie das Gerät abkühlen, bevor Sie irgendwelche
Teileanbringen oder abnehmen.
30
 Loading...