

Page 1
ROOMIJSMAKER
INSTRUCTIES EN RECEPTEN
ICE CREAM MAKER
INSTRUCTIONS AND RECIPES
SORBETIÈRE
MODE D'EMPLOI ET RECETTES
SPEISEEISMASCHINE
BEDIENUNGSANLEITUNG UND REZEPTE
GELATIERA
ISTRUZIONI PER L’USO E RICETTE
HELADERA
INSTRUCCIONES Y RECETAS
GLASSMASKIN
INSTRUKTIONER OCH RECEPT
ISKREM-MASKIN
BRUKSANVISNING OG OPPSKRIFTER
JÄÄTELÖKONE
KÄYTTÖOHJEET JA RESEPTIT
ISMASKINE
INSTRUKTIONER OG OPSKRIFTER
SORVETEIRA
INSTRUÇÕES E RECEITAS
ÍSGERÐARTÆKI
LEIÐBEININGAR OG UPPSKRIFTIR
ΠΑΓΩΤΟΜΗΧΑΝΗ
OΔHΓIEΣ KAI ΣYNTAΓEΣ
English
Model 5KICA0WH
Ice Cream Maker
Designed exclusively for use with all
KitchenAid
®
Household Stand Mixers.
Page 2

Table of Contents
Ice Cream Maker Safety ..................................................................................................1
Important Safeguards .....................................................................................................1
Ice Cream Maker Features ...............................................................................................2
Assembling the Ice Cream Maker Attachment for Tilt-Head Mixer ...................................3
Assembling the Ice Cream Maker Attachment for Bowl-Lift Mixer ...................................5
Using the Ice Cream Maker Attachment .........................................................................7
English
Tips for Making Perfect Ice Cream ...................................................................................7
Care and Cleaning .......................................................................................................... 8
Recipes ...........................................................................................................................8
KitchenAid
Service Centers ..............................................................................................................13
Customer Service ..........................................................................................................14
®
Household Stand Mixer Attachment Warranty ...........................................13
Page 3
Ice Cream Maker Safety
Your safety and the safety of others are very important.
We have provided many important safety messages in this manual and on your
appliance. Always read and obey all safety messages.
This is the safety alert symbol.
This symbol alerts you to potential hazards that can kill or hurt you
and others.
All safety messages will follow the safety alert symbol and either
the word “DANGER” or “WARNING.” These words mean:
You can be killed or seriously
DANGER
WARNING
All safety messages will tell you what the potential hazard is, tell you how to
reduce the chance of injury, and tell you what can happen if the instructions are
not followed.
injured if you don’t immediately
follow instructions.
You can be killed or seriously injured
if you don’t follow instructions.
IMPORTANT SAFEGUARDS
When using electrical appliances, basic safety precautions should always be followed
including the following:
1. Read all instructions.
2. To protect against risk of electrical shock, do not put mixer in water or other liquid.
3. The appliance is not intended for use by young children or infirm persons without
supervision.
4. Unplug from outlet when not in use, before putting on or taking off parts, and
before cleaning.
5. Avoid contacting moving parts. Keep fingers out of discharge opening.
6. Do not operate the mixer with a damaged cord or plug or after the mixer
malfunctions, or is dropped or damaged in any manner. Return the mixer to the
nearest Authorized Service Center for examination, repair or electrical or mechanical
adjustment.
7. The use of attachments not recommended or sold by KitchenAid may cause fire,
electric shock or injury.
8. Do not use the mixer outdoors.
9. Do not let the cord hang over the edge of table or counter.
10. This product is designed for household use only.
English
SAVE THESE INSTRUCTIONS
1
Page 4
English
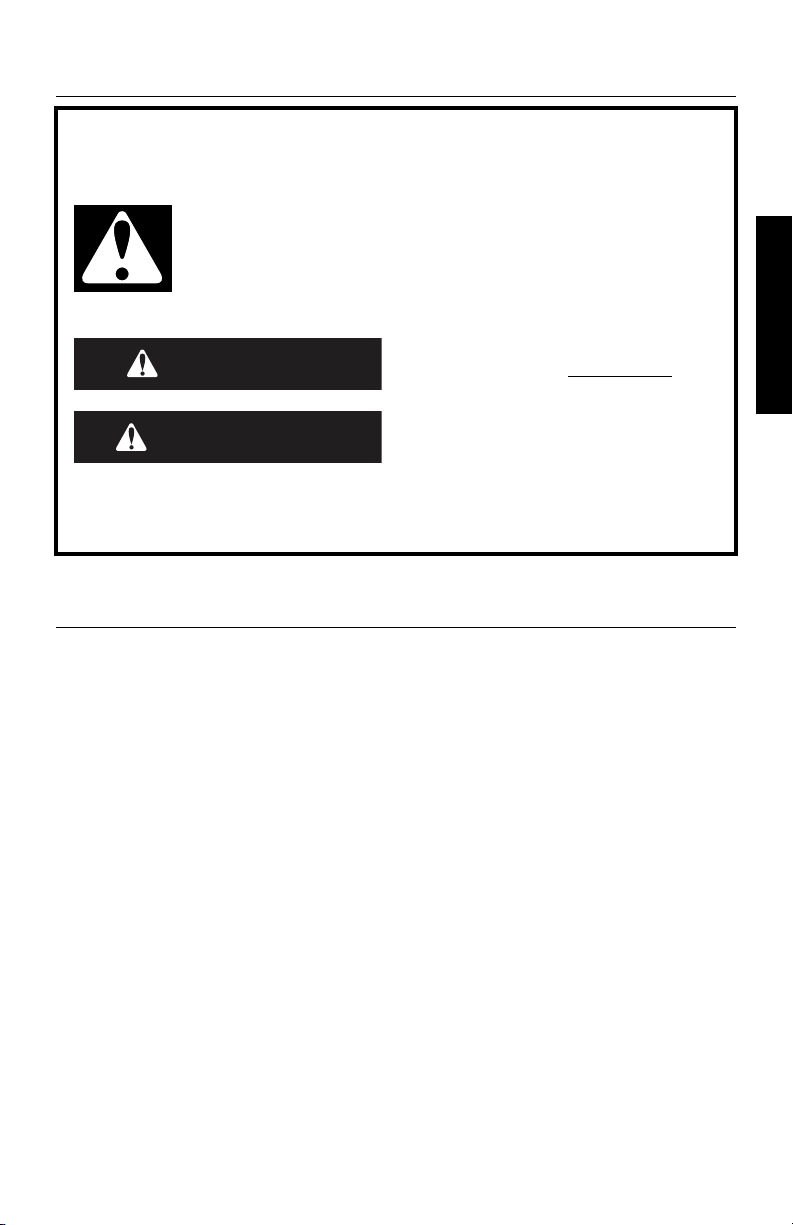
Ice Cream Maker Features
Freeze Bowl — Once completely frozen,
liquid within the double walls of the bowl
provides thorough, even freezing of ice
cream batter throughout the mixing process.
Drive Assembly — Attaches to the
motor head, above the ring on the beater
shaft, and drives dasher on all European
KitchenAid
®
Stand Mixers.
Dasher — Engages with the drive assembly
to spread, scrape and mix ice cream batter
within the freeze bowl.
NOTE: The freeze bowl must be
completely frozen to make ice cream.
IMPORTANT: Never wash the freeze bowl
in dishwasher.
2
Page 5
Assembling the Ice Cream Maker
Attachment for Tilt-Head Mixer
S
T
R
A
P
G
N
I
V
O
M
E
R
F
O
G
N
I
T
R
E
S
N
I
E
R
O
F
E
B
G
U
L
P
N
5
.
/
)
4
5
!
#
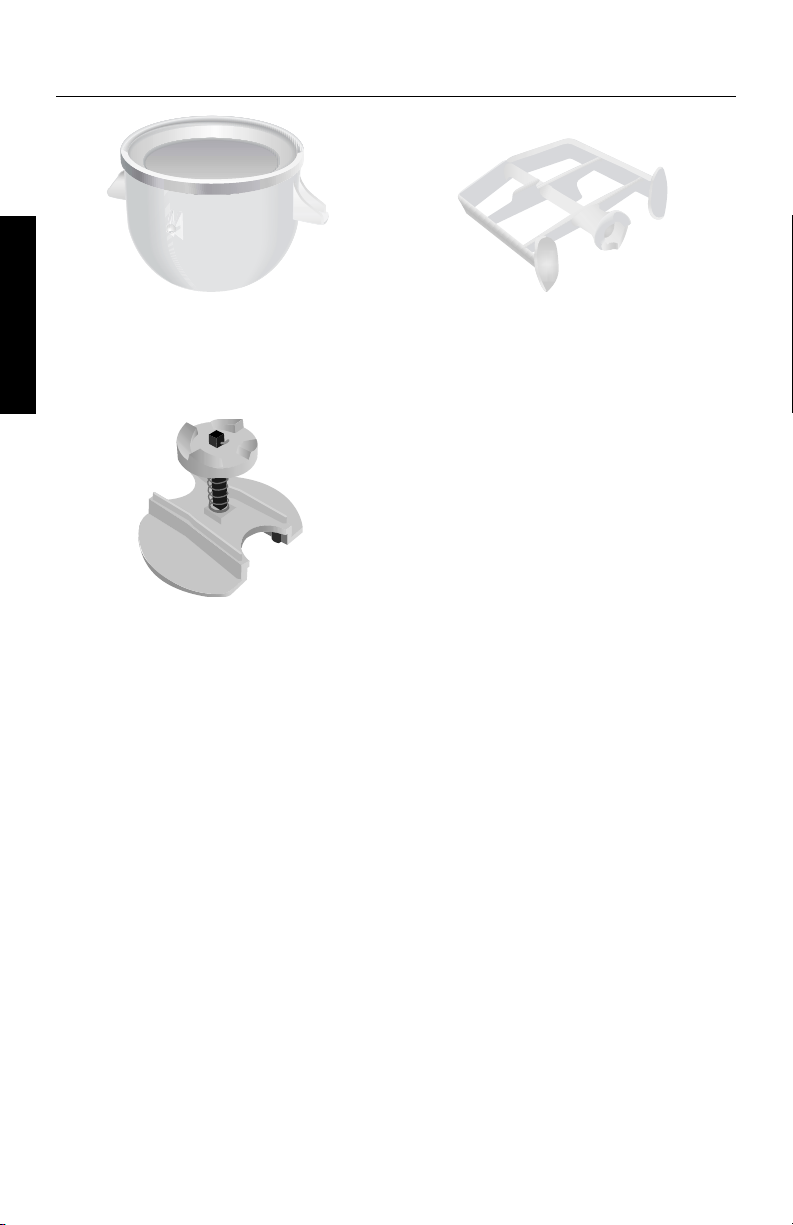
To Assemble Freeze Bowl and Dasher:
NOTE: Use the freeze bowl immediately
upon removal from freezer, as it begins to
thaw once removed.
IMPORTANT: Do not pour ice cream
batter into the freeze bowl until all parts
are assembled and the mixer is running.
1. Turn stand mixer speed-control to “O”
(off) and unplug mixer.
2. Tilt motor head back and remove
mixing bowl.
3. Place dasher inside the freeze bowl.
*
4. Place the freeze bowl on bowl-clamping
plate.
5. Gently turn the freeze bowl in
counterclockwise direction (in direction of
) to secure. The freeze bowl should fit
the bowl-clamping plate tightly.
s
t
r
a
p
g
n
i
v
o
m
e
r
f
o
g
n
i
t
r
e
s
n
i
e
r
o
f
e
b
g
u
l
p
n
U
:
N
O
I
T
U
A
C
BOWL-
CLAMPING
PLATE
English
* For bowl-lift mixer, see page 5 and 6.
3
Page 6

Assembling the Ice Cream Maker
Attachment for Tilt-Head Mixer
*
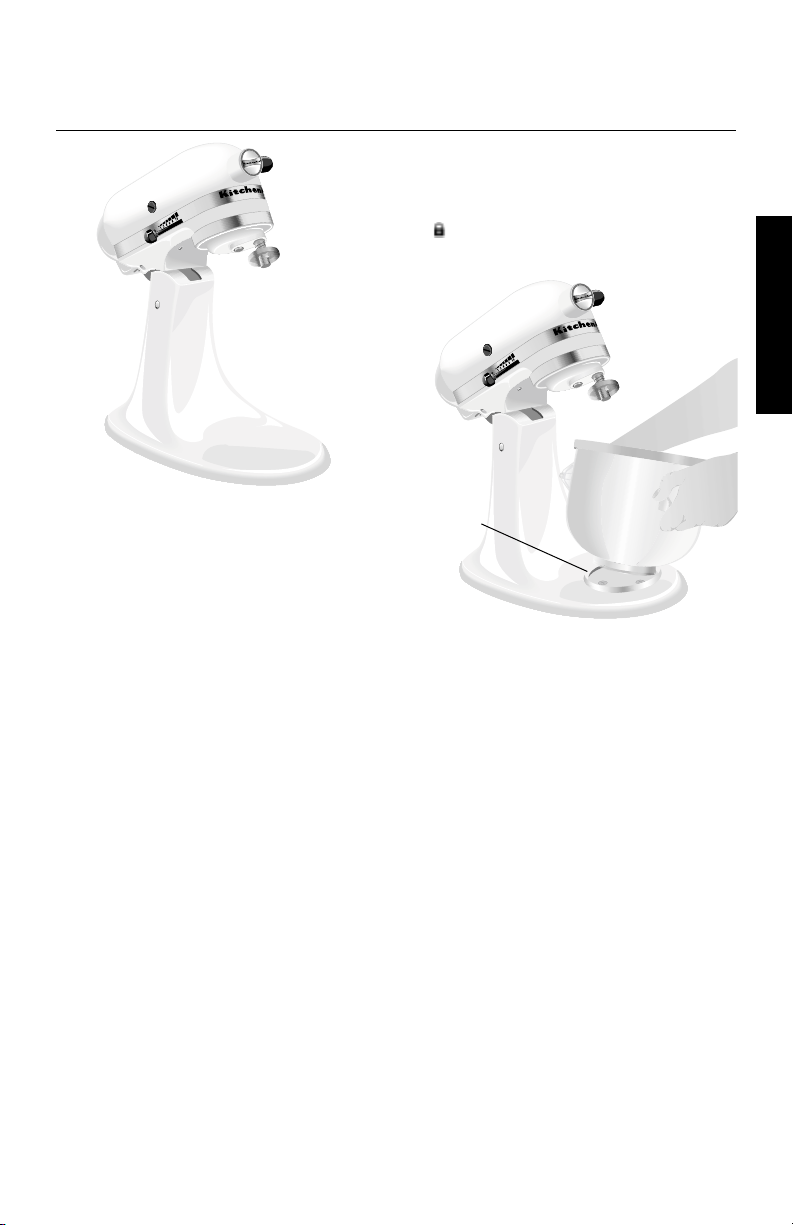
To Attach Drive-Assembly:
1. Be sure speed-control is still on “O”
(off) and mixer is unplugged.
2. Motor head should still be tilted, and
the freeze bowl and dasher should be
English
in place.
3. Determine your mixer model by checking
for a spring on the beater shaft, and
then position the drive assembly as
illustrated for proper placement.
Wider End
(marked “A”)
No Step
Spring
Narrower
End
(marked “B”)
Step
No Spring
4. Slide drive assembly onto the motor
head until it will not slide any further.
When properly assembled, the outer
curved edges of the drive assembly
should center on the motor head. If
they are not centered, slide the drive
assembly either back or forward until it
is centered on the motor head. Make
sure the drive assembly is securely in
place by pressing upward.
MOTOR HEAD
5. Lower the motor head to engage the
drive assembly with the dasher. If the
drive assembly doesn’t engage the
dasher, slide the drive assembly either
back or forward until it does engage
the dasher properly.
6. Make sure the motor head is down
completely.
BEATER
SHAFT
NOTE: If drive assembly will not fit onto
the motor head, try using the other side of
the drive assembly.
7. Place locking lever in the LOCK position.
8. Before mixing, test the lock by
attempting to raise the motor head.
9. Plug the mixer into a grounded
3-prong outlet.
* For bowl-lift mixer, see page 5 and 6.
4
Page 7

Assembling the Ice Cream Maker Attachment
for Bowl-Lift Mixer*
NOTE: The freeze bowl is designed to fit all
bowl-lift mixers. If the bowl pin at the back
of the bowl is too short or too long to snap
into the spring latch, remove and rotate the
bowl so the opposite bowl pin faces the
spring latch. Repeat steps 3 and 4.
Pin too
short
To Assemble Freeze Bowl and Dasher:
NOTE: Use the freeze bowl immediately
upon removal from the freezer, as it
begins to thaw once removed.
IMPORTANT: Do not pour ice cream
batter into the freeze bowl until all parts
are assembled and the mixer is running.
1. Turn stand mixer speed-control to “O”
(off) and unplug mixer.
2. Place bowl-lift handle in down position
and remove mixing bowl.
3. Fit the freeze bowl into place over the
locating pins.
4. Press down on the back of the freeze
bowl until the bowl pin snaps into the
spring latch.
Correct
pin fit
5. Place the dasher inside the freeze
bowl.
English
LOCATING
PIN
* For tilt-head mixer, see page 3 and 4.
5
Page 8

Assembling the Ice Cream Maker Attachment
for Bowl-Lift Mixer*
To Attach Drive Assembly:
1. Be sure the speed-control is still on “O”
(off) and the mixer is unplugged.
2. Make sure the bowl-lift handle is still in
the down position, and the freeze bowl
English
and dasher are in place.
3. Determine your mixer model by
checking for a spring on the beater
shaft, then position the drive assembly
as illustrated for proper placement.
Wider End
(marked “A”)
No Step
Spring
Narrower
End
(marked “B”)
Step
No Spring
4. Slide drive assembly onto the motor
head until it will not slide any further.
When properly assembled, the outer
curved edges of the drive assembly
should center on the motor head. If
they are not centered, slide the drive
assembly either back or forward until it
is centered on the motor head. Make
sure the drive assembly is securely in
place by pressing upward.
5. Raise the bowl to engage the dasher
with the drive assembly before mixing.
If the drive assembly doesn’t engage
the dasher, slide the drive assembly
either back or forward until it does
engage the dasher properly.
6. Plug the mixer into a grounded
3-prong outlet.
MOTOR
BEATER
SHAFT
HEAD
NOTE: If drive assembly will not fit onto
the motor head, try using the other side of
the drive assembly.
* For tilt-head mixer, see page 3 and 4.
6
Page 9

Using the Ice Cream Maker Attachment
To Use:
IMPORTANT: Pouring batter into the
freeze bowl before starting the mixer may
cause the batter to freeze prematurely and
lock the dasher.
1. Store the freeze bowl in the freezer for
a minimum of 15 hours.
2. Prepare ice cream batter in advance
(see “Tips for Perfect Ice Cream”).
3. Assemble and engage the freeze bowl,
dasher, and drive assembly.
4. Set the mixer to speed 1 (STIR) and
pour the ice cream batter into the
freeze bowl; mix 20-30 minutes, or
to desired consistency. Add any solid
ingredients such as fruits, nuts, candies,
or chocolate chips, after 12-15 minutes
of the mixing process.
NOTE: If the dasher begins to slip and
make a clicking noise, this is an audible
indicator that the ice cream is done.
Tips for Making Perfect Ice Cream
• The freeze bowl must be completely
frozen to make ice cream or other
frozen desserts.
• For best results, store the freeze bowl
in the back of your freezer where the
temperature is coldest for at least 15
hours. Adjusting your freezer to its
coldest setting will help the freeze bowl
make firmer ice cream faster.
• Storing the freeze bowl in the freezer
at all times allows you the flexibility
to make your favorite frozen desserts
on a whim.
• For recipes that need to be pre-cooked,
allow the mixture to cool completely in
the refrigerator.
• All batter recipes need to be completely
chilled in the refrigerator before
making ice cream.
• Most ice cream recipes call for a
combination of cream, milk, eggs, and
sugar. The type of cream you choose
will determine how rich in flavor and
how creamy the texture of the
finished result. The higher percentage
of fat in the cream, the richer and
creamier your ice cream will be.
5. Remove the dasher and the freeze bowl
and, using a rubber spatula or a plastic
or wooden spoon, transfer ice cream
to dessert dishes or to an airtight
container for storage.
NOTE: The Ice Cream Maker Attachment
will create a soft-consistency ice cream.
For firmer consistency, store ice cream
in an airtight container in the freezer for
2-4 hours.
IMPORTANT: Do not store ice cream in
the freeze bowl in the freezer. Prying hard
ice cream out of the freeze bowl with
metal scoops or utensils may damage the
freeze bowl.
Any combination can be used, as
long as the liquid measurement stays
the same. Lighter ice creams can be
made by using more milk than cream,
or by eliminating cream. Skim milk will
work, but there will be a noticeable
difference in texture.
TYPE OF CREAM FAT %
Heavy Cream .................................... 36%
Whipping Cream .............................. 30%
Light Cream ...................................... 18%
Half and Half .................................... 10%
• When mixing an ice cream recipe that
calls for solid ingredients such as fruits,
nuts, candies, or chocolate chips, it is
best to wait until the final two minutes
of the mixing process to add them.
• Ice cream making is a two-part process:
conversion and ripening. Mixing batter
into ice cream is the conversion process
in which the ice cream consistency will
be similar to soft serve. The ripening
process takes place in the freezer,
where the ice cream will harden over a
period of 2-4 hours.
(continued on page 8)
English
7
Page 10

(continued)Tips for Making Perfect Ice Cream (continued)
• Follow recommended mixer speeds. Faster
speeds will slow the conversion process.
• Batter volume grows significantly
during the conversion process.
Care and Cleaning
English
Allow the freeze bowl to reach room
temperature before attempting to clean it.
The drive assembly and dasher are
dishwasher safe.
French Vanilla Ice Cream
600 mL (21⁄2 cups )
half-and-half
8 egg yolks
230 g (1 cup) sugar
600 mL (2
4 teaspoons vanilla
A pinch of salt
1
⁄2 cups)
whipping cream
• Initial batter volume should not exceed
1.365 L to produce 1,9 L of ice cream.
• Keep in mind that freezing subdues
sweetness, so recipes won’t taste quite
as sweet once they are frozen.
Wash the freeze bowl in warm water with
mild detergent. Thoroughly dry the freeze
bowl before storing in freezer.
IMPORTANT: Never wash the freeze bowl
in the dishwasher. Hand-wash with warm
water and mild detergent only.
In medium saucepan over medium heat, heat half-andhalf until very hot but not boiling, stirring often. Remove
from heat; set aside.
Place egg yolks and sugar in mixer bowl. Attach bowl
and wire whip to mixer. Turn to Speed 2 and mix about
30 seconds, or until well blended and slightly thickened.
Continuing on Speed 2, very gradually add half-andhalf; mix until blended. Return half-and-half mixture to
medium saucepan; cook over medium heat until small
bubbles form around edge and mixture is steamy, stirring
constantly. Do not boil. Transfer half-and-half mixture into
large bowl; stir in whipping cream, vanilla, and salt. Cover
and chill thoroughly, at least 8 hours.
Assemble and engage freeze bowl, dasher, and drive
assembly as directed in attachment instructions. Turn to
STIR Speed (Speed 1). Using a container with a spout,
pour mixture into freeze bowl. Continue on STIR (Speed
1) for 15 to 20 minutes or until desired consistency.
Immediately transfer ice cream into serving dishes, or
freeze in an airtight container.
1
Yield: 16 servings (120 mL [
⁄2 cup] per serving).
VARIATIONS
Fresh Strawberry Ice Cream
In medium bowl, combine 2 cups (500 g) chopped, fresh
strawberries (or other fresh fruit) and 2 to 3 teaspoons
sugar, if desired. Let stand while ice cream is processing.
Add during last 3 to 5 minutes of freeze time.
1
Yield: 20 servings (120 mL [
8
⁄2 cup] per serving).
Page 11

(continued) French Vanilla Ice Cream (continued)
VARIATIONS
Cookies ’n Cream Ice Cream
Add 100 g (1⁄2 cup) chopped, cream-filled chocolate
sandwich cookies (or other cookies, nuts, or candy) during
last 1 to 2 minutes of freeze time.
1
Yield: 19 servings (120 mL [
⁄2 cup] per serving).
Triple Chocolate Ice Cream
450 mL (2 cups)
whipping cream,
divided
1 square (30 g [1 oz.])
extra-dark chocolate,
cut into chunks
1 square (30 g [1 oz.])
dark chocolate, cut
into chunks
450 mL (2 cups)
half-and-half
230 g (1 cup) sugar
40 g unsweetened
cocoa powder
8 egg yolks
4 teaspoons
vanilla
A pinch of salt
1 bar (50 g [1.55 oz.])
milk chocolate,
chopped
In small saucepan, place
120 mL whipping cream, extra-dark
chocolate, and dark chocolate. Heat over medium-low heat
until chocolate melts, stirring frequently. Remove from heat;
set aside. In medium saucepan over medium heat, heat
half-and-half until very hot but not boiling, stirring often.
Remove from heat; set aside.
In small bowl, combine sugar and cocoa powder. Set aside.
Place egg yolks in mixer bowl. Attach bowl and wire whip
to mixer. Turn to Speed 2 and gradually add sugar mixture;
mix about 30 seconds, or until well blended and slightly
thickened. Continuing on Speed 2, very gradually add
chocolate mixture and half-and-half; mix until well blended.
Return half-and-half mixture to medium saucepan; stirring
constantly, cook over medium heat until small bubbles form
around edge and mixture is steamy. Do not boil. Transfer
half-and-half mixture into large bowl; stir in remaining
330 mL (1
1
⁄2 cups) whipping cream, vanilla, and salt.
Cover and chill thoroughly, at least 8 hours.
Assemble and engage freeze bowl, dasher, and drive
assembly as directed in attachment instructions. Turn to
STIR Speed (Speed 1). Using a container with a spout,
pour mixture into freeze bowl. Continue on STIR (Speed 1)
for 10 to 15 minutes or until desired consistency, adding
milk chocolate during last 1 to 2 minutes of freeze time.
Immediately transfer ice cream into serving dishes, or freeze
in an airtight container.
Yield: 16 servings (120 mL [1⁄2 cup] per serving).
English
9
Page 12

Caramel Pecan Ice Cream
850 mL (31⁄2 cups)
whole milk
1 can (415 mL [14 oz.])
unsweetened
condensed milk
230 mL (1 cup) prepared
hot caramel or
English
butterscotch caramel
topping (about
340 g [12 oz.])
1 package (100 g
[3.4 oz.]) instant
vanilla pudding
1 teaspoon vanilla
A pinch of salt
50- 100 g coarsely
chopped pecans
150 g gingerbread, broken
in small pieces
600 mL (21⁄2 cups)
whole milk
100 g sugar
1 tablespoon honey
6 egg yolks
In medium bowl, place all ingredients except pecans. Whisk
until well blended and pudding is dissolved. Cover and chill
thoroughly, at least 6 hours.
Assemble and engage freeze bowl, dasher, and drive
assembly as directed in attachment instructions. Turn to STIR
Speed (Speed 1). Using container with spout, pour mixture
into freeze bowl. Continue on STIR (Speed 1) for 15-20
minutes or until desired consistency, adding pecans during
last 1 minute of freeze time. Immediately transfer ice cream
into serving dishes, or freeze in an airtight container.
1
Yield: 16 servings (120 mL [
⁄2 cup] per serving).
Gingerbread Ice Cream
In medium saucepan, heat over whole milk until very hot
but not boiling, stirring often. Remove from heat and add
small pieces of gingerbread.
Place egg yolks, honey and sugar in mixer bowl. Attach bowl
and wire whip to mixer. Turn to speed 4 and mix about
30 seconds, or until well blended and slightly whitened.
Stirring constantly, cook the whole milk and gingerbread
mixture until gingerbread melts.Gradually add the egg
yolks, honey and sugar mixture. Do not boil. Remove from
heat; set aside. Cover and chill thoroughly, at least 8 hours.
Assemble and engage freeze bowl, dasher, and drive
assembly as directed in attachment instructions. Turn to
STIR Speed (Speed 1). Using a container with a spout,
pour mixture into freeze bowl. Continue on STIR (Speed 1)
for 10 to 15 minutes or until desired consistency.
Immediately transfer ice cream into serving dishes, or
freeze in an airtight container.
Yield: 8 servings (120 mL per serving).
10
Page 13

Creamy Lemon-Orange Gelato
500 mL (2 cups) reduced-
fat (2%) milk
3
4 (5 x 2 cm [2 x
⁄4 -inch])
strips orange peel
4 (5 x 2 cm [2 x 3⁄4 -inch])
strips lemon peel
6 coffee beans
5 egg yolks
3
170 g (
⁄4 cup) sugar
Fresh Raspberry Sorbet
750 g raspberries
90 mL (
300 mL (1
Simple Syrup
1
⁄4 cup plus 2
tablespoons) water
1
⁄4 cups) Simple
Syrup (recipe follows)
Scald milk with orange peel, lemon peel and coffee beans
in heavy medium saucepan.
Whisk yolks and sugar in medium bowl to blend.
Gradually whisk half of milk mixture into yolks. Return
yolks to saucepan with remaining milk. Stir over low heat
until mixture thickens slightly and leaves path on back of
spoon when finger is drawn across, about 8 minutes;
do not boil. Strain into medium bowl. Refrigerate until
well chilled.
Assemble and engage freeze bowl, dasher, and drive
assembly as directed in attachment instructions. Turn to
Stir Speed. Using a container with a spout, pour mixture
into freeze bowl. Continue on Stir Speed for 15 to 20
minutes or until desired consistency. Transfer ice cream to
airtight container and freeze several hours to allow flavors
to ripen. Can be prepared up to 4 days ahead. If frozen
solid, soften slightly in refrigerator about 20 minutes
before serving.
Yield: 8 servings (120 mL [
1
⁄2 cup] per serving).
Combine raspberries and water in bowl of food
processor fitted with metal blade. Process until very
smooth; pour through fine mesh strainer, pressing down
lightly on solids trapped in strainer to extract as much
liquid as possible without forcing solids through strainer.
Discard solid. Pour liquid into airtight container and
refrigerate until thoroughly chilled, at least 8 hours.
Assemble and engage freeze bowl, dasher, and drive assembly
as directed in attachment instructions. Turn to STIR (Speed 1).
Combine chilled raspberry juice and chilled simple syrup.
Using a container with a spout, pour mixture into freeze
bowl. Continue on STIR (Speed 1) for 7 to 12 minutes or
until desired consistency. Immediately transfer sorbet into
airtight container and freeze at least 2 hours before serving.
Yield: 8 servings (
230 mL [1 cup] per serving).
English
500 g (2 cups) sugar
500 mL (2 cups) water
Combine sugar and water in saucepan. Bring to a boil
over medium-high heat; cook and stir until sugar dissolves
completely, about 10 minutes. Transfer to ice bath,
stirring until well chilled. Refrigerate until ready to use.
Yield: 710 mL (3 cups) syrup
11
Page 14

Other Sorbets
Substitute the following
quantities of ingredients for
the ingredients listed on the
previous page to make these
sorbets:
English
Flavor Fruit Plus Water
475 mL
Lemon
(2 cups)
lemon
none
juice
Mango
Kiwi
Pineapple
Blueberry
475 mL
(2 cups)
chopped
475 mL
(2 cups)
chopped
475 mL
(2 cups)
chopped
1.2 L
(5 cups)
60 to 120 mL
(1⁄4 to 1⁄2 cup)
135 mL (
plus 1 tablespoon)
(15 mL) lime juice
75 mL (1⁄4 cup
plus 1 tablespoon)
lime juice
90 mL (1⁄4 cup plus
2 tablespoons)
lime juice
Minted Mango Sherbet
1
⁄2 cup
Plus
Simple
Syrup
300 mL
1
(1
⁄4 cups)
300 mL
(11⁄4 cups)
300 mL
1
(1
⁄4 cups)
300 mL
1⁄4
(1
cups)
300 mL
1⁄4
(1
cups)
230 g (1 cup) sugar
700 mL (3 cups)
whole milk
1
60 mL (
⁄4 cup) cane
sugar syrup
3 ripe mangoes, peeled,
seeded, and chopped
(about 700 mL
[3 cups])
2 tablespoons fresh
lime or lemon juice
2 teaspoons finely
chopped fresh mint,
if desired
In medium saucepan, combine sugar, milk, and corn syrup.
Heat over medium heat, stirring often, until very hot but
not boiling. Remove from heat; set aside.
Place mangoes and lime juice in food processor work
bowl; use the multipurpose blade to process until
smooth. Add mango mixture and mint to milk mixture.
Cover and chill thoroughly, at least 8 hours.
Assemble and engage freeze bowl, dasher, and drive
assembly as directed in attachment instructions. Turn to
STIR Speed (Speed 1). Using a container with a spout,
pour mixture into freeze bowl. Continue on STIR
(Speed 1) for 7 to 12 minutes or until desired consistency.
Immediately transfer sherbet into serving dishes, or freeze
in an airtight container.
1
Yield: 14 servings (120 mL [
⁄2 cup] per serving).
12
Page 15

KitchenAid® Household
Stand Mixer Attachment Warranty
Length of
Warranty:
Europe, Australia &
New Zealand:
Full Warranty from date of
purchase.
Other:
One Year Full Warranty
from date of purchase.
Two Year
KitchenAid
Will Pay For:
Replacement parts and
repair labor costs to
correct defects in materials
or workmanship. Service
must be provided by an
Authorized KitchenAid
Service Center.
KitchenAid
Will Not Pay For:
A. Repairs when Ice
Cream Maker is used
for operations
other than normal
household food
preparation.
B. Damage resulting from
accident, alterations,
misuse, abuse, or
installation/operation
not in accordance with
local electrical codes.
KITCHENAID DOES NOT ASSUME ANY RESPONSIBILITY FOR
INDIRECT DAMAGES.
Service Centers
All service should be handled locally by
an Authorized KitchenAid Service Center.
Contact the dealer from whom the unit
was purchased to obtain the name of the
nearest Authorized KitchenAid Service
Center.
In the U.K.:
Call: 0845 6011 287
In Ireland:
M.X. ELECTRIC
Service Department
25 Alymer Crescent
Kilcock, CO.KILDARE
Call: 1 679 2398/87 2581574
Fax: 1 628 4368
In Australia:
Call: 1800 990 990
In New Zealand:
Call: 0800 881 200
English
13
Page 16

Customer Service
In U.K. & Ireland: Tollfree number 00800 38104026
Address: KitchenAid Europa, Inc.
PO BOX 19
B-2018 ANTWERP 11
BELGIUM
www.KitchenAid.com
English
® Registered Trademark of KitchenAid, U.S.A.
The shape of the stand mixer is a trademark of KitchenAid, U.S.A.
9709864 (4042dZw806)
™ Trademark of KitchenAid, U.S.A.
© 2006. All rights reserved.
Specifications subject to change without notice.
14
 Loading...