

Page 1
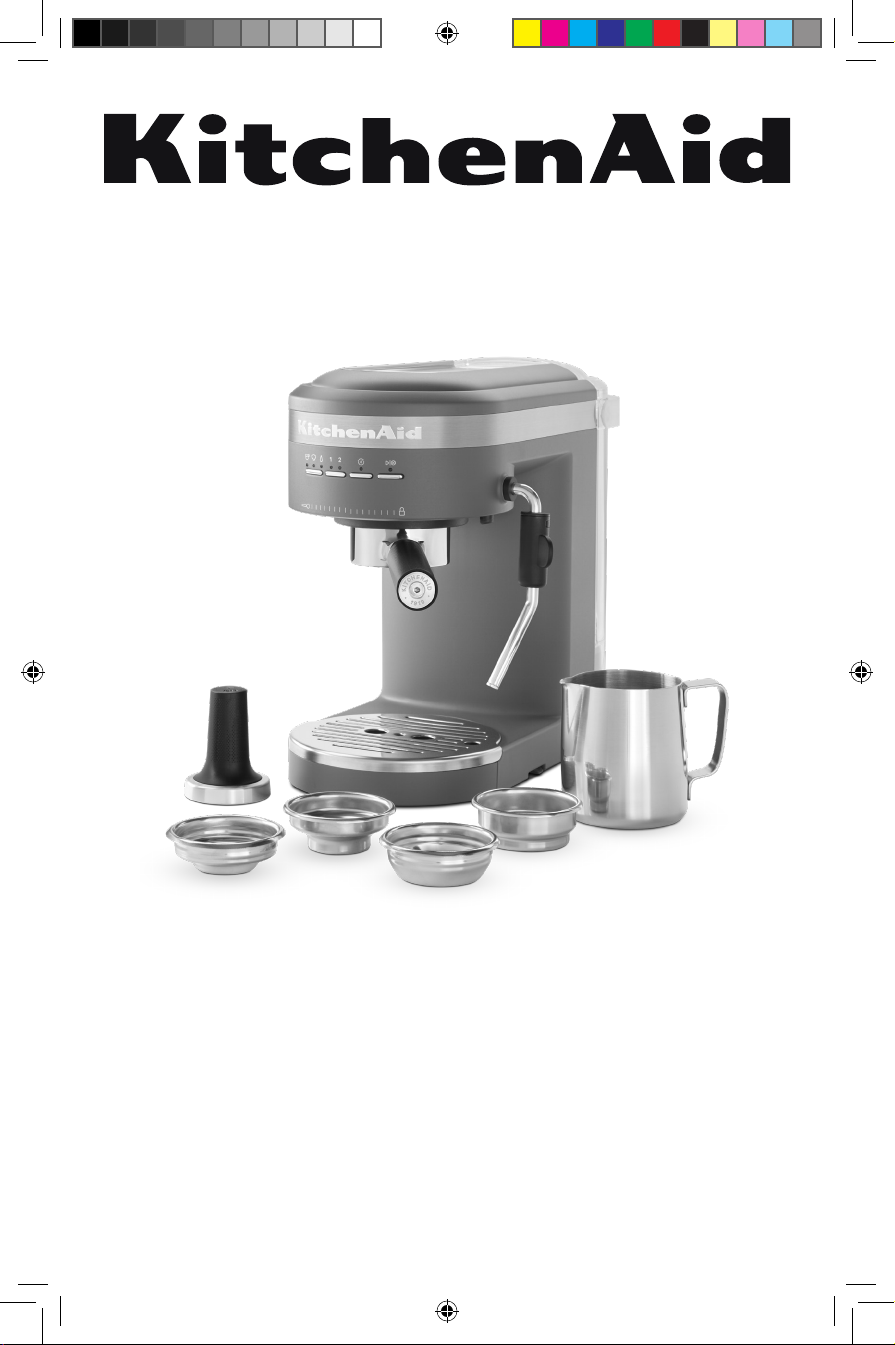
Espresso Machine
5KES6403
5KES6503
EN Use and Care manual 2
DE Gebrauchs- und Pegeanleitung 21
FR Manuel d’utilisation et d’entretien 41
IT Manuale d’uso e manutenzione 63
NL Gebruiks- en
onderhoudshandleiding
ES Manual de uso y cuidado
PT Manual de utilização e
manutenção
EL Εγχειρίδιο Χρήσης και Φροντίδας 139
SV Handbok för skötsel och
användning
NO Håndbok for bruk og vedlikehold 175
W11331487C_01_EN.indd 1W11331487C_01_EN.indd 1 26-04-2021 13:42:0126-04-2021 13:42:01
81
99
119
157
FI Käyttö- ja huolto-opas 193
DA Vejledning til anvendelse og
vedligehold
IS Notenda & Meðhöndlunar
handbók
RU Руководство по эксплуатации и
уходу
PL Instrukcja obsługi i konserwacji 267
CS Návod k použití a údržbě 285
TR Kullanım ve Bakım kılavuzu 303
UK Посібник із використання й
догляду
AR
211
229
247
321
1
Page 2
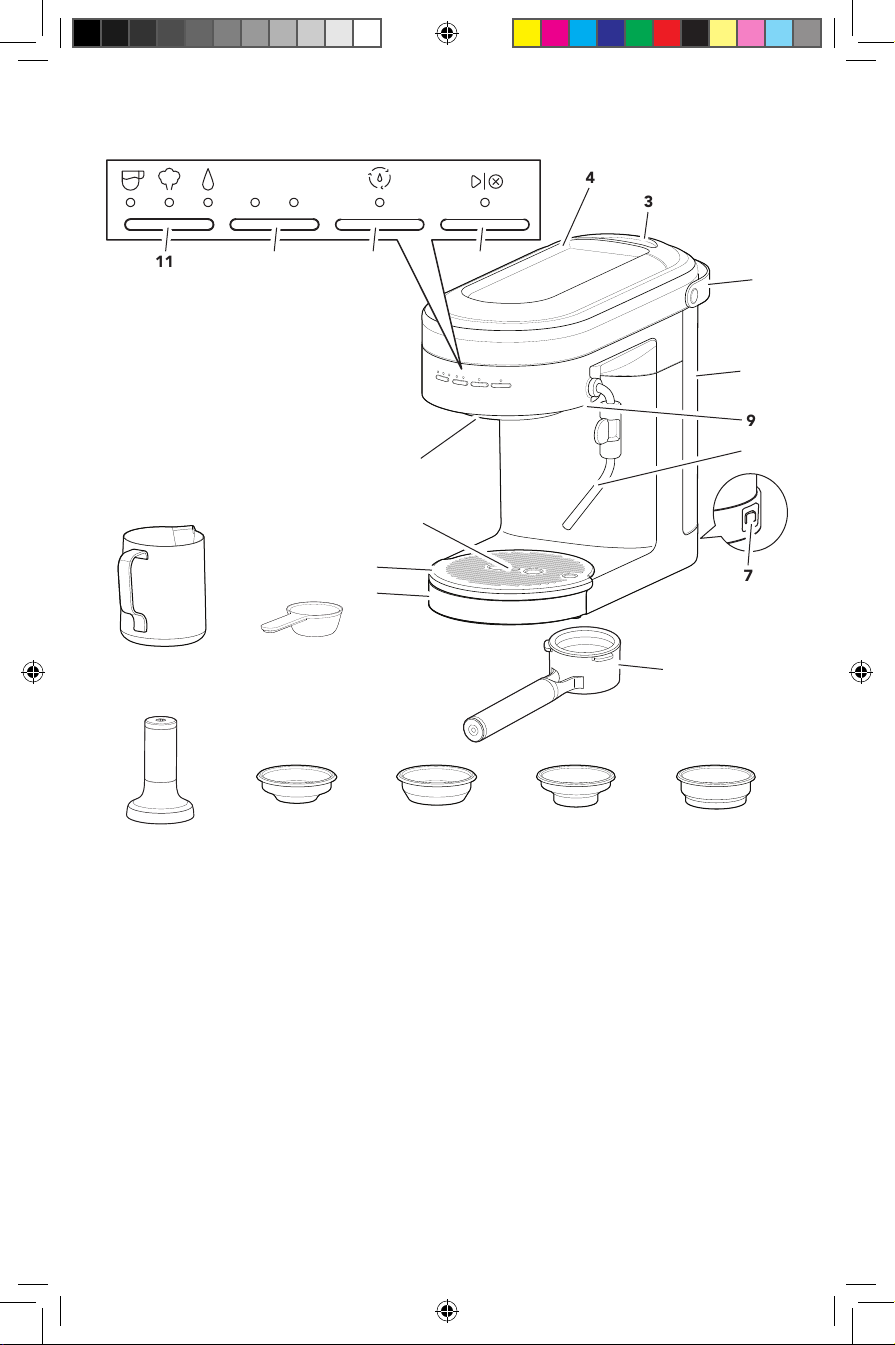
PARTS AND FEATURES
11 12 13 14
16
15
5
6
Milk
Pitcher
Coffee
Scoop
4
3
2
1
9
8
7
10
Tamper
1 Water Tank (Capacity: 1.4 Liters)
2 Water Tank Handle
3 Water Tank Lid
4 Cup Warmer
5 Drip Tray Plate
6 Drip Tray
7 Main Power On/Off Switch
8 Steam Wand
9 Steam Wand Release Button
2
W11331487C_01_EN.indd 2W11331487C_01_EN.indd 2 26-04-2021 13:42:0226-04-2021 13:42:02
Single Wall
1 shot
Single Wall
2 shot
10 Portafilter (58 mm)
11 Mode Button : Espresso
12 Dose Button : 1 (1 shot)
13 Clean Cycle Button
14 Start/Cancel Button
15 Empty Drip Tray Indicator
16 Group Head
Double Wall
1 shot
: Steam
: Hot Water
: 2 (2 shot)
Double Wall
2 shot
Page 3
ENGLISH
PRODUCT SAFETY
IMPORTANT SAFEGUARDS
When using electrical appliances, basic safety
precautions should always be followed, including the
following:
1. Read all instructions. Misuse of appliance may result in
personal injury.
2. European Union Only: This appliance shall not be used
by children. Keep the appliance and its cord out of
reach of children.
3. European Union Only: Appliances can be used by
persons with reduced physical, sensory or mental
capabilities or lack of experience and knowledge
if they have been given supervision or instruction
concerning use of the appliance in a safe way and
understand the hazards involved. Children shall not
play with the appliance.
4. Do not touch hot surfaces. Use handles or knobs.
5. This appliance is not intended for use by persons
(including children) with reduced physical, sensory
or mental capabilities, or lack of experience and
knowledge, unless they have been given supervision
or instruction concerning use of the appliance by a
person responsible for their safety.
3
W11331487C_01_EN.indd 3W11331487C_01_EN.indd 3 26-04-2021 13:42:0226-04-2021 13:42:02
Page 4
PRODUCT SAFETY
6. To protect against re, electric shock, and personal
injury do not immerse cord, plugs, or appliance in
water or other liquids. Avoid spillage on the connector.
7. Close supervision is necessary when any appliance is
used by or near children.
8. Unplug from outlet when not in use and before
cleaning. Allow to cool before putting on or taking off
parts, and before cleaning.
9. Do not operate any appliance with a damaged cord or
plug, or after the appliance malfunctions, or is dropped
or damaged in any manner. Return appliance to the
nearest Authorised Service Facility for examination,
repair, or electrical or mechanical adjustment.
10. Never leave the appliance unattended while it is in
operation.
11. The use of accessory attachments not recommended
by the appliance manufacturer may result in re,
electric shock, or personal injury.
12. Do not use the appliance outdoors.
13. Do not let cord hang over edge of table or counter, or
touch hot surfaces.
14. Do not place on or near a hot gas or electric burner, or
in a heated oven.
15. Turn the appliance OFF, then unplug from the outlet
when not in use, before assembling or disassembling
parts and before cleaning. To unplug, grasp the plug
and pull from the outlet. Never pull from the power
cord.
16. Do not clean the Espresso Machine with abrasive
cleaners, steel wool, or other abrasive materials.
17. Use extreme caution when using hot steam.
18. Do not use appliance for other than intended use.
19. Irritation to skin or eyes can occur if they come into
contact with the descaling solution. Avoid skin and eye
contact. Rinse off descaling solution with clean water.
Obtain medical advice after eye contact.
20. Damage to delicate surfaces can occur after contact
with the descaling solution. Remove any splashes
immediately.
4
W11331487C_01_EN.indd 4W11331487C_01_EN.indd 4 26-04-2021 13:42:0226-04-2021 13:42:02
Page 5
ENGLISH
PRODUCT SAFETY
21. Refer to the “Care and Cleaning” section for
instructions on cleaning the surfaces in contact with
food.
22. The heating element surface is subject to residual heat
after use. Do not touch hot surface. Use handles.
23. Children should be supervised to ensure that they do
not play with the appliance.
24. If the supply cord is damaged, it must be replaced by
the manufacturer, its service agent or similarly qualied
persons in order to avoid a hazard.
25. Cleaning and user maintenance shall not be made by
children without supervision.
26. The Coffee-Maker shall not be placed in a cabinet
when in use.
27. This appliance is intended to be used in household and
similar applications such as:
- staff kitchen areas in shops, ofces and other
working environments;
- farm houses;
- by clients in hotels, motels and other residential type
environments;
- bed and breakfast type environments.
SAVE THESE INSTRUCTIONS
Instructions are also available online, visit our website at:
www.KitchenAid.co.uk or www.KitchenAid.eu
5
W11331487C_01_EN.indd 5W11331487C_01_EN.indd 5 26-04-2021 13:42:0226-04-2021 13:42:02
Page 6
PRODUCT SAFETY
ELECTRICAL REQUIREMENTS
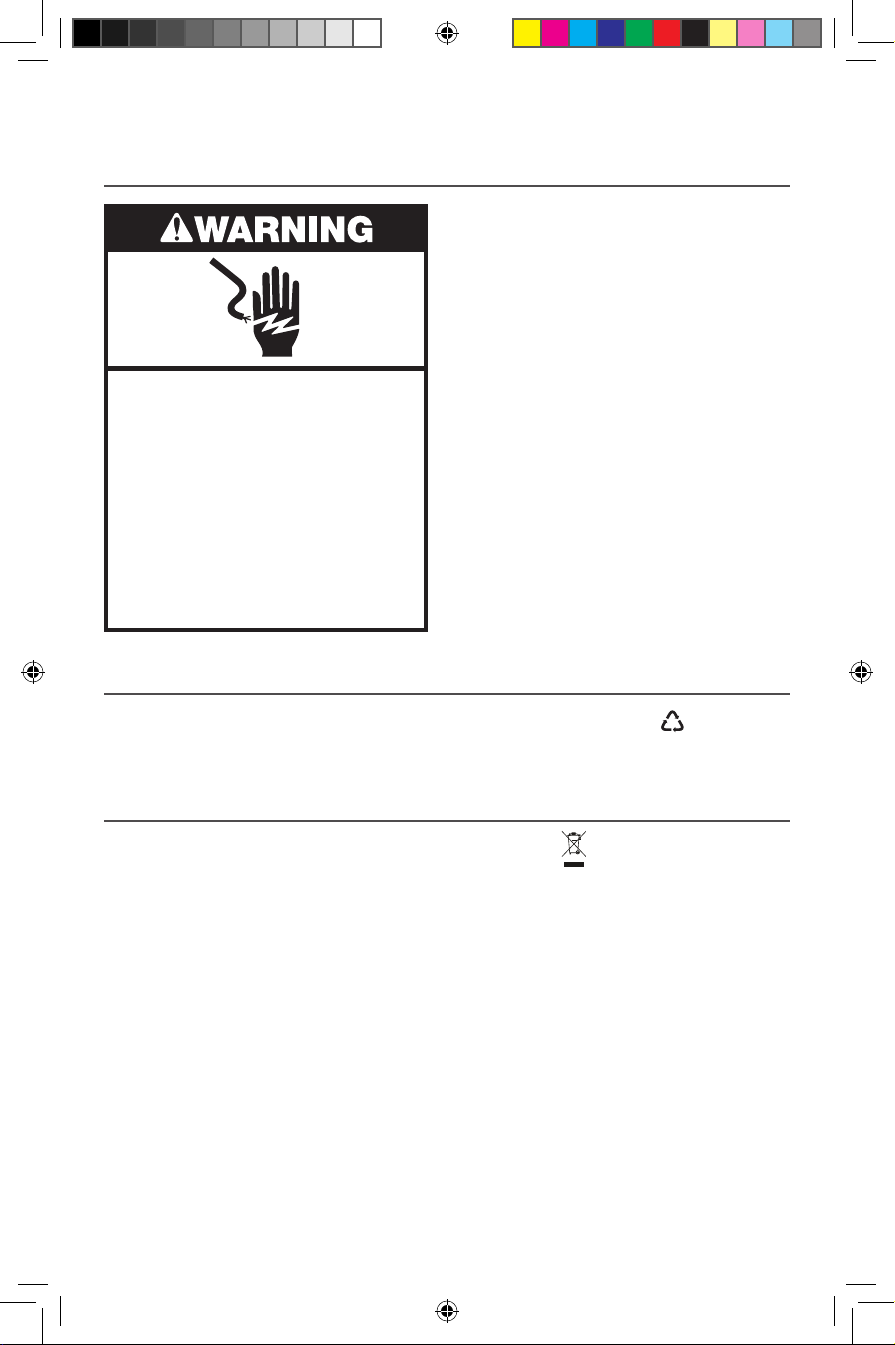
Electrical Shock Hazard
Plug into an earthed outlet.
Do not remove earth prong.
Do not use an adapter.
Do not use an extension cord.
Failure to follow these
instructions can result in
death, fire, or electrical shock.
DISPOSAL OF PACKING MATERIAL
Voltage: 220-240 Volts AC
Frequency: 50-60 Hz
Wattage: 1470 Watts
NOTE: If the plug does not fit in the
outlet, contact a qualified electrician or
service person. Do not modify the plug in
any way. Do not use an adapter.
Do not use an extension cord. If the
power supply cord is too short, have a
qualified electrician or service person to
install an outlet near the appliance.
The cord should be arranged so that it
will not drape over the countertop or
tabletop where it can be pulled on by
children or tripped over unintentionally.
The packing material is recyclable and is marked with the recycle symbol . The various
parts of the packing must therefore be disposed of responsibly and in full compliance
with local authority regulations governing waste disposal.
ELECTRICAL EQUIPMENT WASTE DISPOSAL
Recycling the product
- This appliance is marked in compliance
with law in the EU and UK covering,
Waste Electrical and Electronic Equipment
(WEEE).
- By ensuring this product is disposed
of correctly, you will help prevent
potential negative consequences for
the environment and human health,
which could otherwise be caused by
inappropriate waste handling of this
product.
6
- The symbol on the product or on the
accompanying documentation indicates
that it should not be treated as domestic
waste but must be taken to an appropriate
collection centre for the recycling of
electrical and electronic equipment.
For more detailed information about
treatment, recovery and recycling of this
product, please contact your local city
office, your household waste disposal
service, or the shop where you purchased
the product.
W11331487C_01_EN.indd 6W11331487C_01_EN.indd 6 26-04-2021 13:42:0326-04-2021 13:42:03
Page 7
ENGLISH
PRODUCT SAFETY
DECLARATION OF CONFORMITY (UK)
This appliance has been designed, constructed and distributed in compliance with
the safety requirements of UK Legislation: Electrical Equipment (Safety) Regulations
2016, Electromagnetic Compatibility Regulations 2016. The Ecodesign for EnergyRelated Products and Energy Information (Amendment) (EU Exit) Regulations 2019.
The Restriction of the Use of Certain Hazardous Stubstances in Electrical and Electronic
Equipment Regulations 2012.
DECLARATION OF CONFORMITY (EU)
This appliance has been designed, constructed and distributed in compliance with the
safety requirements of EC Directives: Low Voltage Directive 2014/35 Electromagnetic
Compatibility - Directive 2014/30/EU Directive 92/42/EEC hot water boilers and
Ecodesign Directive 2009/125/EC Restriction of the use of certain Hazardous Substances
in Electrical and Electronic Equipment (RoHS) - Directive 2002/95/EC.
7
W11331487C_01_EN.indd 7W11331487C_01_EN.indd 7 26-04-2021 13:42:0326-04-2021 13:42:03
Page 8
GETTING STARTED
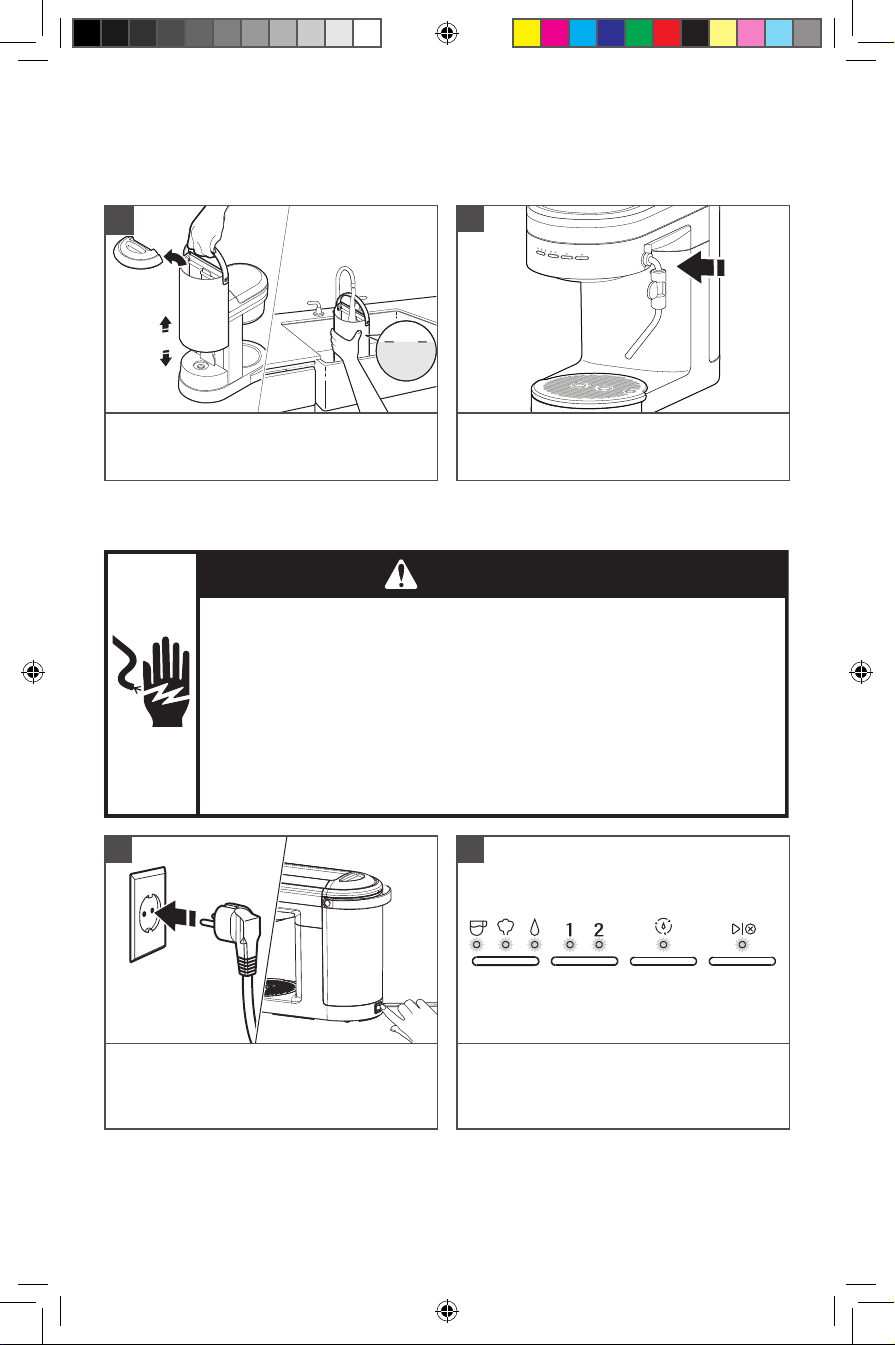
First, clean all parts and accessories (See “Care and Cleaning” section).
Place the Espresso Machine on a dry, flat, level surface such as a countertop or table.
1
MAX
Fill the Water Tank with fresh water
(max. 1.4 liter). Replace the Water Tank
Lid.
IMPORTANT: Distilled water or mineral water can damage the Espresso Machine.
Do not use either to brew espresso.
2
Insert the Steam Wand until you hear a
click.
WARNING
Electrical Shock Hazard
Plug into an earthed outlet.
Do not remove an earth prong.
Do not use an adapter.
Do not use an extension cord.
Failure to follow these instructions can result in death, re,
or electrical shock.
3
Plug into an earthed outlet.
Press the main power switch to “ON (-)”.
8
W11331487C_01_EN.indd 8W11331487C_01_EN.indd 8 26-04-2021 13:42:0426-04-2021 13:42:04
4
The machine automatically pumps water
into the heater and starts heating. When
lights stop blinking, the Espresso Machine
is ready for use.
Page 9
ENGLISH
GETTING STARTED
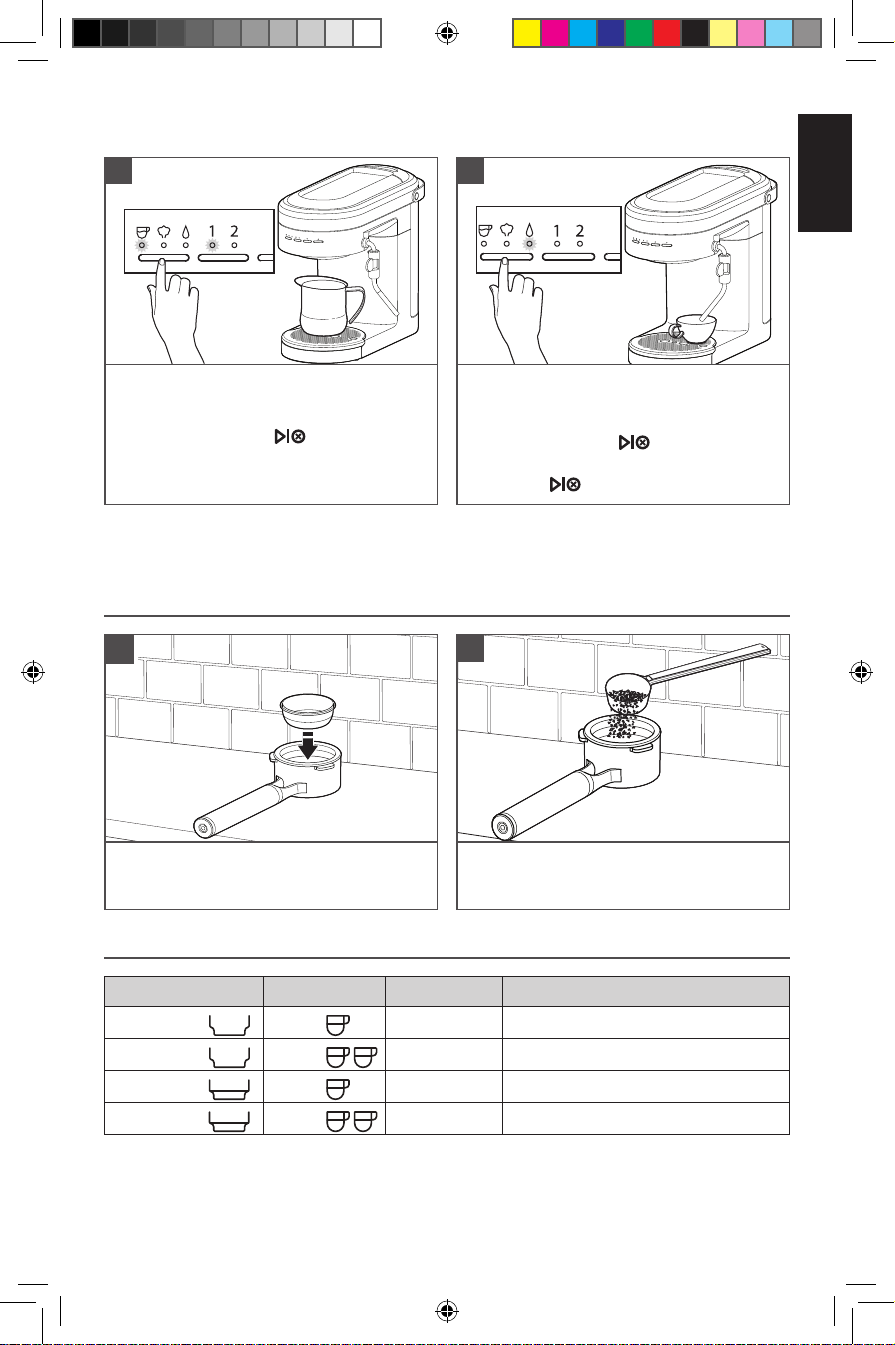
5
To rinse the Group Head, place a container
under the Group Head. Toggle the Mode
Button to select Espresso. Toggle Dose
Button to 1 and press button.
The machine will flush water through the
Group Head and automatically stop when
the cycle is complete.
PRODUCT USAGE
BREWING ESPRESSO
1
6
To rinse the Steam Wand, direct the Steam
Wand towards the Drip Tray or into a cup.
Then, toggle the Mode Button to select
Hot Water and press button to start.
Allow water to flow for 3 to 5 seconds
then, press button to stop.
2
Select desired Filter basket (see Basket
selection chart). Press the Filter basket into
the Portafilter until it clicks into place.
Fill the Filter basket with fine Espresso
coffee grounds (see Basket selection chart
for dosing recommendations).
BASKET SELECTION CHART
Basket type Shot Dose (gram) Use for
Single wall
Single wall
Double wall
Double wall
W11331487C_01_EN.indd 9W11331487C_01_EN.indd 9 26-04-2021 13:42:0426-04-2021 13:42:04
1 shot
2 shot
1 shot
2 shot
10 - 12 Freshly ground whole bean coffee
18 - 20 Freshly ground whole bean coffee
10 - 12 Pre-ground coffee
18 - 20 Pre-ground coffee
9
Page 10
PRODUCT USAGE
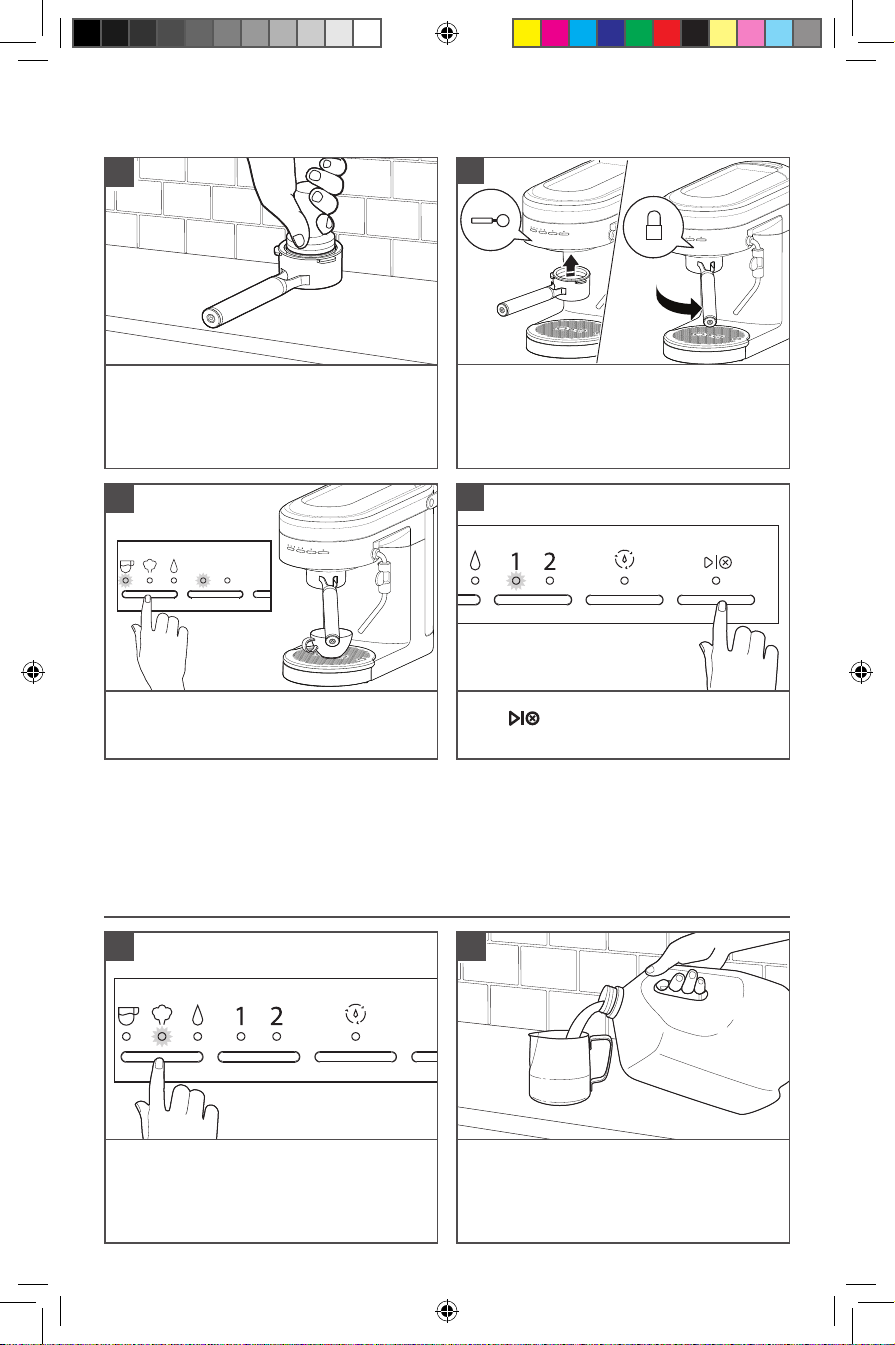
3
Tap the Portafilter to level the ground
coffee bed and rest on a flat surface. Use
the Tamper to tamp down the ground
coffee. Sweep excess coffee grinds from
the rim.
5
1 2
Toggle Mode Button to select Espresso.
Toggle Dose Button to select desired
number of shots 1 (~ 30 ml) or 2 (~ 60 ml).
4
Position the Portafilter under the Group
Head with the handle align to unlock.
Raise the Portafilter into the Group Head
and twist to the right side to lock.
6
Press button to run selected Espresso
cycle.
NOTE: Do not remove the Portafilter when brewing.
TIP: Shot duration should be between 20-30 seconds for 1 and 2 shot selections.
- If less than 20 seconds: decrease grind size and/or increase tamp pressure.
- If more than 30 seconds: increase grind size and/or reduce tamp pressure.
USING THE STEAM MODE FOR MILK
1
Toggle the Mode Button to select Steam.
The machine will automatically start
heating, indicated by the flashing Steam
light. The Steam light will go solid when
machine is ready for steaming.
10
W11331487C_01_EN.indd 10W11331487C_01_EN.indd 10 26-04-2021 13:42:0526-04-2021 13:42:05
2
Fill the Milk Pitcher with desired amount of
cold milk.
TIP: Fill to bottom of the pour spout.
Page 11
ENGLISH
PRODUCT USAGE
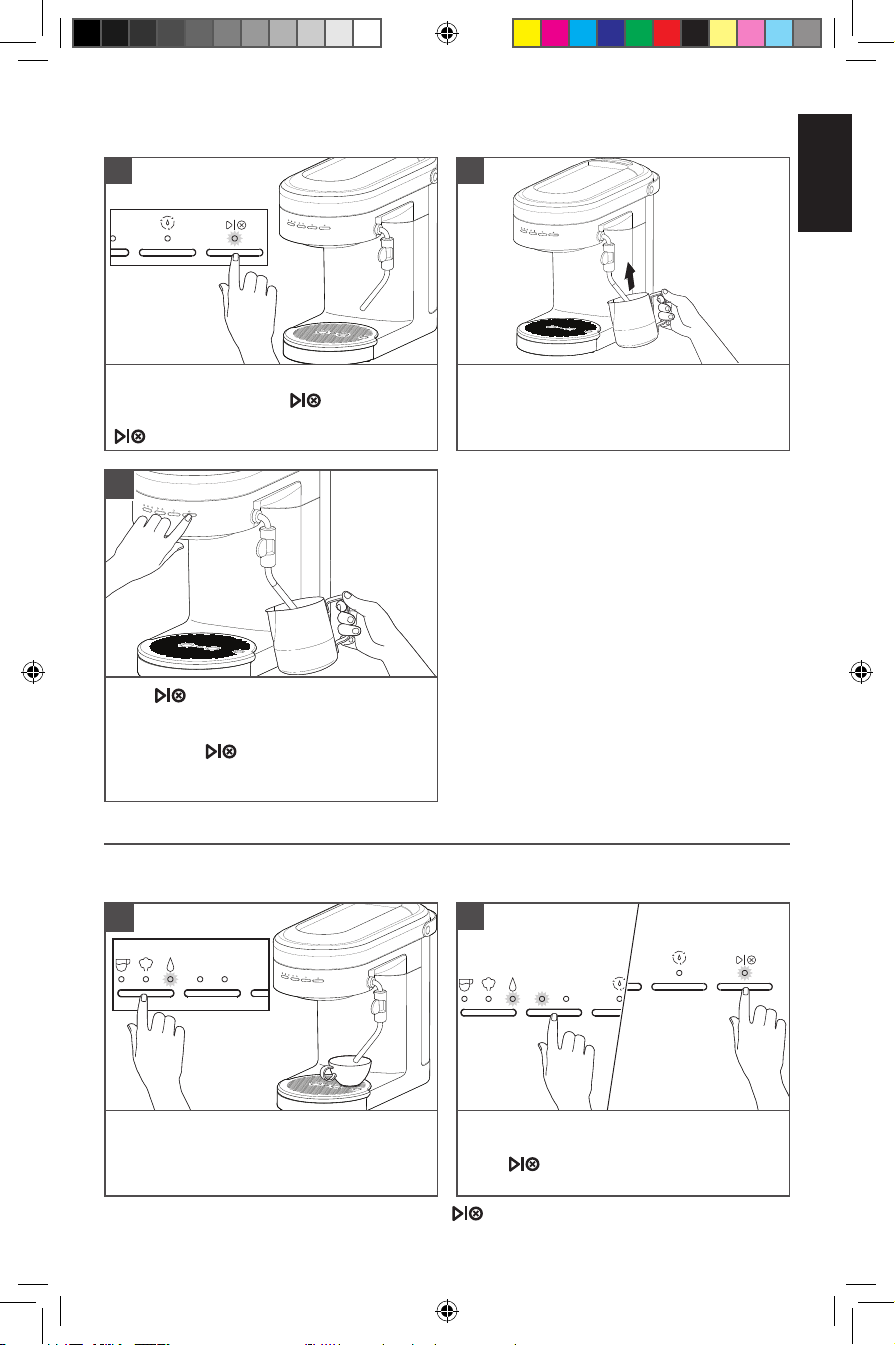
1 2
3
Angle the Steam Wand towards the Drip
Tray or into a cup. Press button to
start. Once water turns to steam, press
button to stop.
5
Press button to initiate the steam.
Froth until desired level of foam and
temperature is reached. To stop the
steam, press button again. To avoid
splattering, wait until the steam stops before
removing the Steam Wand from the milk.
4
Adjust the Steam Wand to desirable
position. Submerge the tip of the Steam
Wand just below the surface of milk in the
Milk Pitcher.
USING HOT WATER FEATURE
The Steam Wand can also dispense hot water which is great for an americano, tea, hot
chocolate, etc. You can also use hot water to pre-heat cups.
1
2
1 2
Toggle the Mode Button to select Water.
Place a cup under the Steam Wand.
NOTE: You can pause the cycle by pressing button to stop the flow of water
before the cycle complete.
W11331487C_01_EN.indd 11W11331487C_01_EN.indd 11 26-04-2021 13:42:0726-04-2021 13:42:07
Press Dose Button to select the volume of
water 1 (~ 118 ml) or 2 (~ 177 ml).
Press button to start water cycle.
Water flows out from the Steam Wand.
11
Page 12
PROGRAMMING FUNCTION
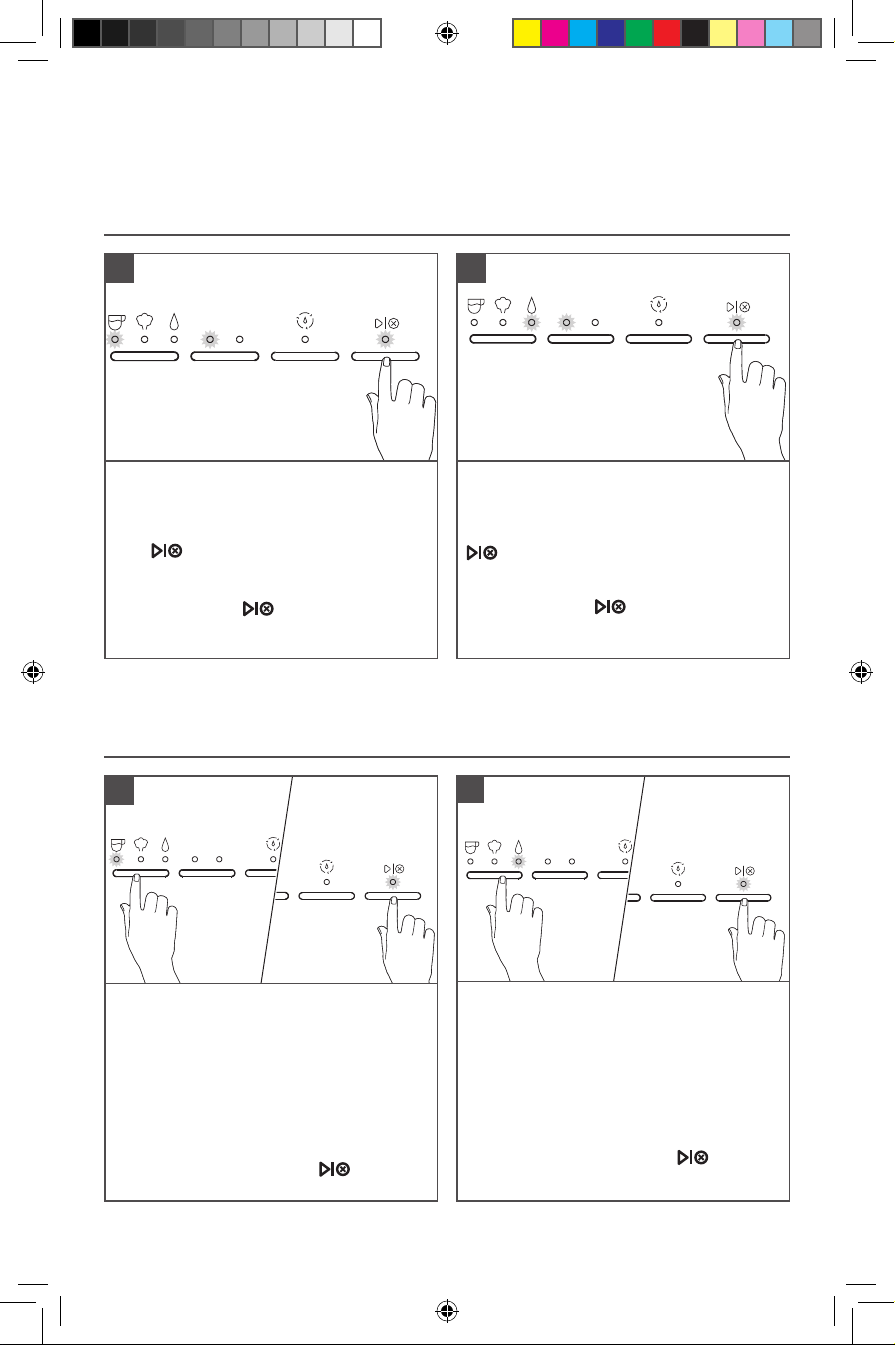
1 2
1 2
The Espresso Machine is equipped with programming functionality. Any customised settings
will be saved even in the event power is lost to the machine.
PROGRAMMING THE ESPRESSO AND HOT WATER AMOUNT
1
2
1 2
1 2
To change pre-programmed Espresso
Volume for 1 / 2: Toggle the Mode Button
to select Espresso. Select the dose you
desire to programme (1 or 2). Press and
hold button until desired espresso
amount is reached in your cup.
While programming your selected dose,
the dose and the button lights will
blink. Lights will stop blinking when
programming is complete.
TIP: To restore all factory settings, Press and Hold “Dose Button” for 3 seconds. Changing the
factory default Espresso or Water Volumes may impact the intended performance of the machine.
PROGRAMMING THE WATER TEMPERATURE AND WATER HARDNESS
1
To change pre-programmed Water
Volume for 1 / 2: Toggle the Mode Button
to select Water. Select the dose you desire
to programme (1 or 2). Press and hold
button until desired water amount is
reached in your cup.
While programming your selected dose,
the dose and the button light will
blink. Lights will stop blinking when
programming is complete.
2
To change pre-programmed Water
Temperature: Toggle the Mode Button
to select Espresso, press and hold for
3seconds.
The indicator lights will show the default
factory setting or previous saved setting
(see Indicator light chart for reference).
Toggle the Mode Button between Low-MidHigh to select desired temperature.
To save your selection, press button or
wait for 10 seconds.
12
W11331487C_01_EN.indd 12W11331487C_01_EN.indd 12 26-04-2021 13:42:0826-04-2021 13:42:08
To change pre-programmed Water
Hardness: Toggle the Mode Button to
Water, Press and hold for 3 seconds.
The indicator lights will show the default
factory setting or previous saved setting
(see Indicator light chart for reference).
Toggle the Mode Button between LowMid-High to select desired water hardness.
To save your selection, press button
or wait for 10 seconds.
Page 13
ENGLISH
PROGRAMMING FUNCTION
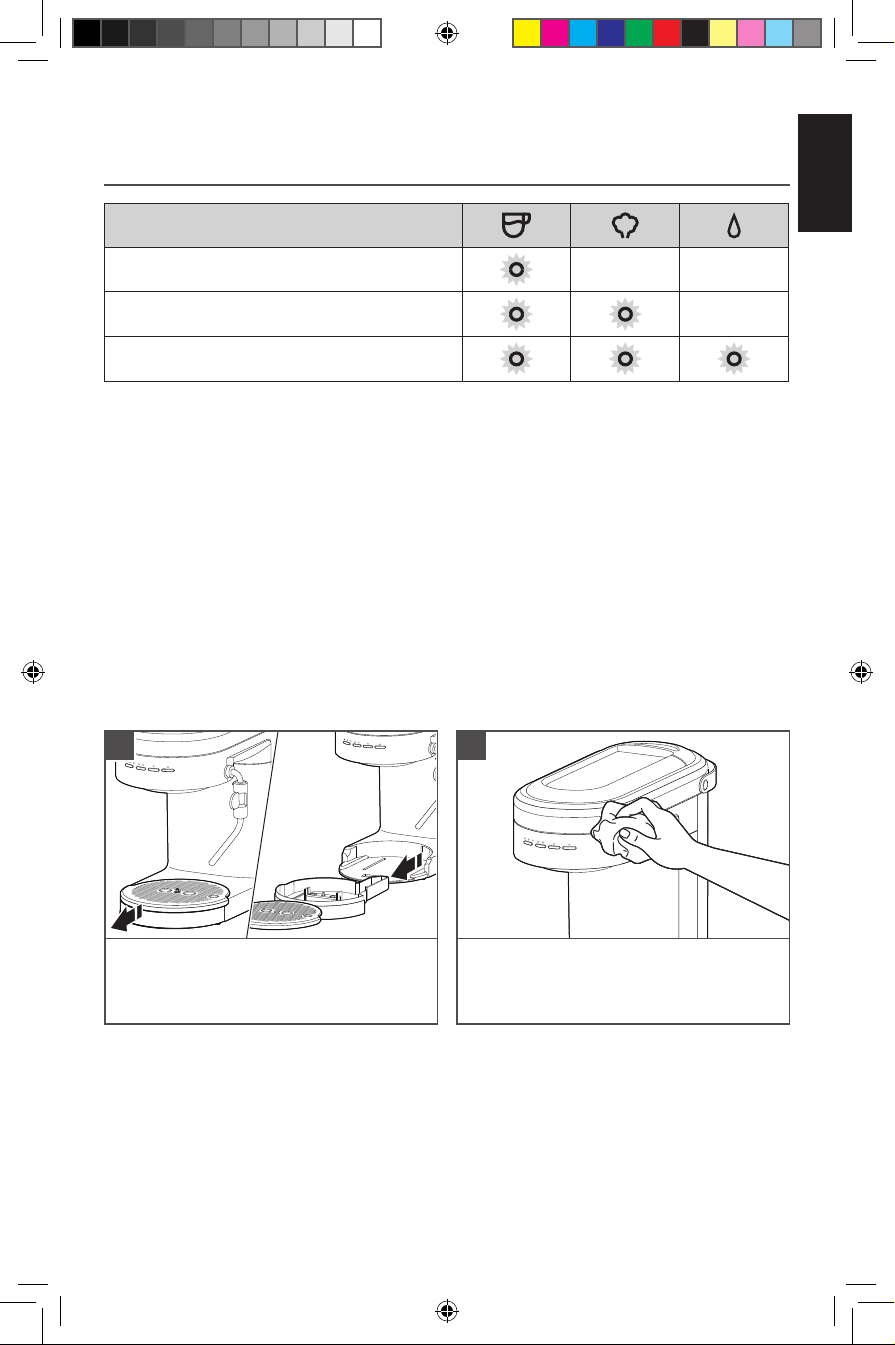
INDICATOR LIGHT CHART
Water Temperature or Water Hardness
Low
Medium
High
NOTE: Water Hardness - Low: 0 to 60 ppm
Medium: 60 to 120 ppm
High: more than 120 ppm
TIP: To restore all factory settings, Press and Hold “Dose Button” for 3 seconds.
All indicator lights will blink indicating that all settings are restored.
CARE AND CLEANING
For best results, regularly clean the Espresso Machine and accessories.
IMPORTANT: Unplug the Espresso Machine before cleaning. Allow the Espresso
Machine and accessories to cool down.
NOTE: Do not use abrasive cleansers or scouring pads when cleaning the Espresso
Machine, parts, or accessories. Do not immerse the Espresso Machine or cord in water
or other liquids.
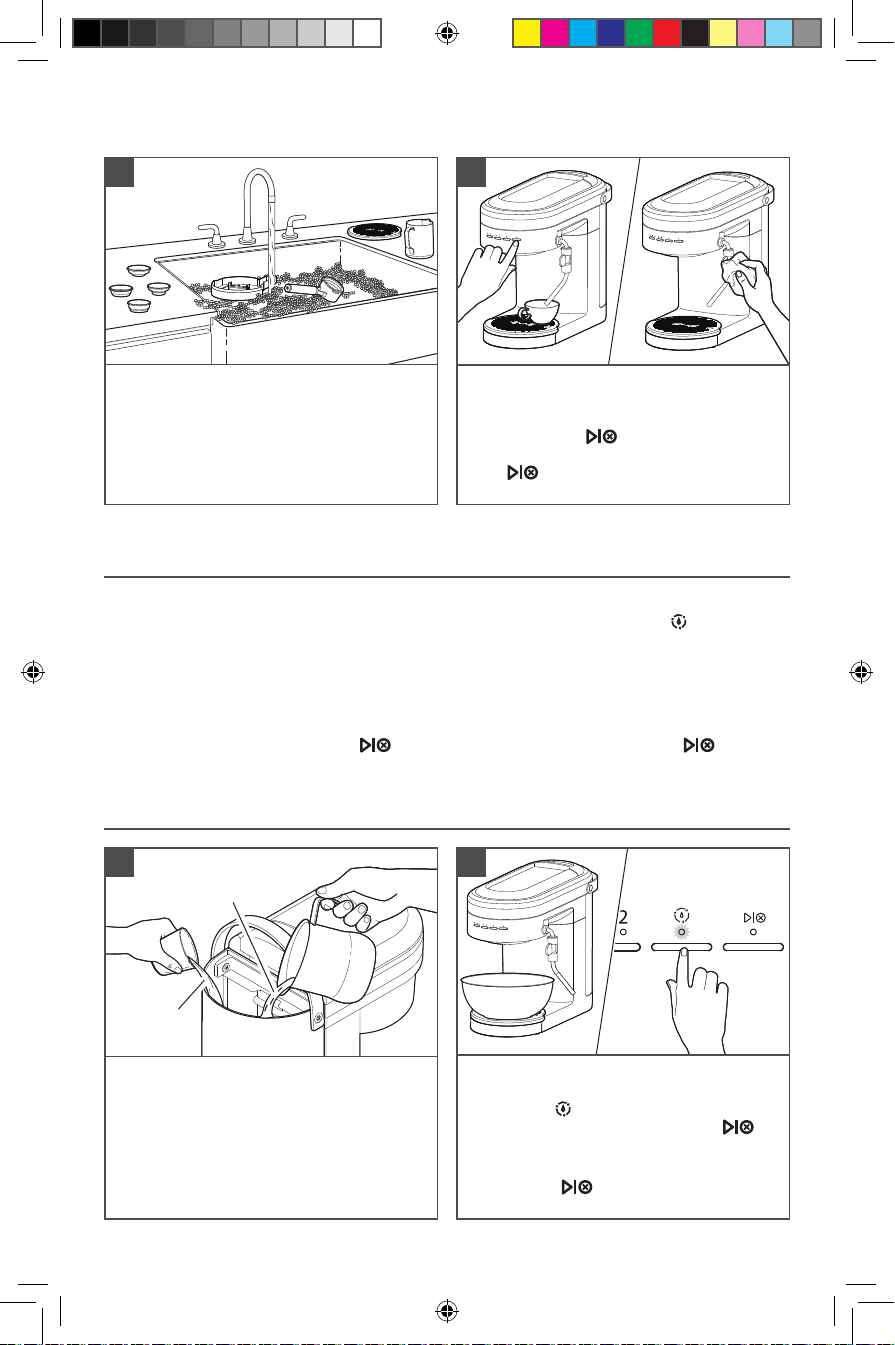
1
2
When the Drip Tray Indicator rises and
becomes visible above the surface of the
Drip Tray Plate, empty the Drip Tray and
rinse with warm water.
W11331487C_01_EN.indd 13W11331487C_01_EN.indd 13 26-04-2021 13:42:0926-04-2021 13:42:09
Wipe the Espresso Machine housing and
Group Head with a clean soft damp cloth.
13
Page 14
CARE AND CLEANING
3
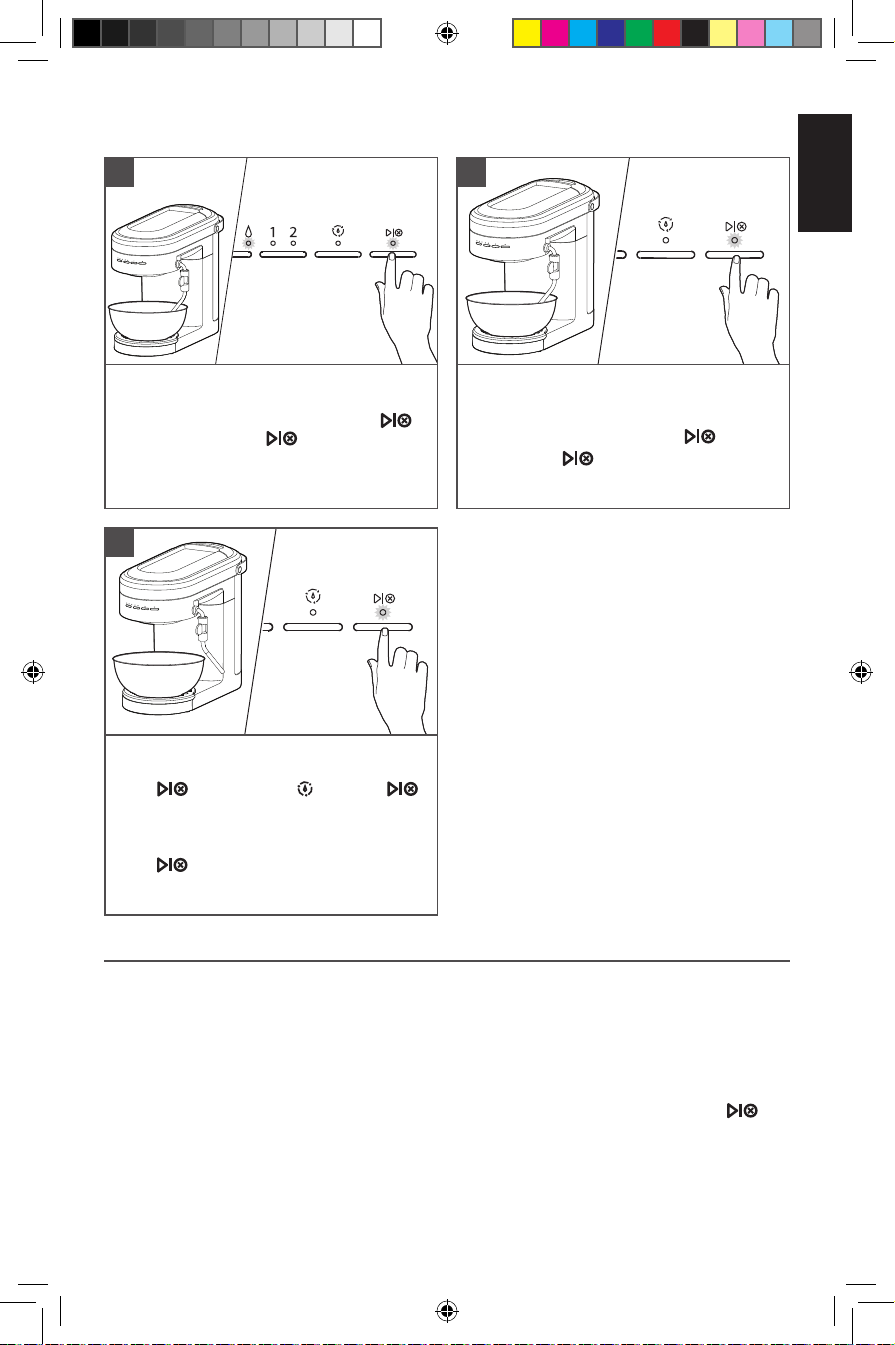
Wash the Drip Tray, Portafilter, Filter
baskets, Milk Pitcher, and Drip Tray Plate
in warm, soapy water and rinse with clean
water. Dry with a soft cloth.
NOTE: To remove the Steam Wand press the Steam Wand Release Button.
4
Clean the Steam Wand after every use.
Toggle the Mode Button to select Water.
Position the Steam Wand over Drip Tray or
into a cup. Press button, wait 3 to 5
seconds.
Press button to stop. Wipe down wand
exterior with a soft damp cloth.
DESCALING THE ESPRESSO MACHINE
The descaling programme enables simple and effective descaling of your Espresso Machine.
Descale the Espresso Machine regularly, but a minimum whenever the “Clean ( )” indicator
is blinking. The frequency of descaling depends on the hardness of the water in your region.
Therefore, it is important to programme the Espresso Machine according to the water hardness
level of your location.
NOTE: The descaling process runs in 4 phases, takes approximately 10 minutes and
must be completed before next use. At any time during the descaling programme you
can pause the cycle by pressing button. And, resume too by pressing button.
IMPORTANT: Only use descaling solution intended for Espresso Machines.
SET UP OF GROUP HEAD DESCALING
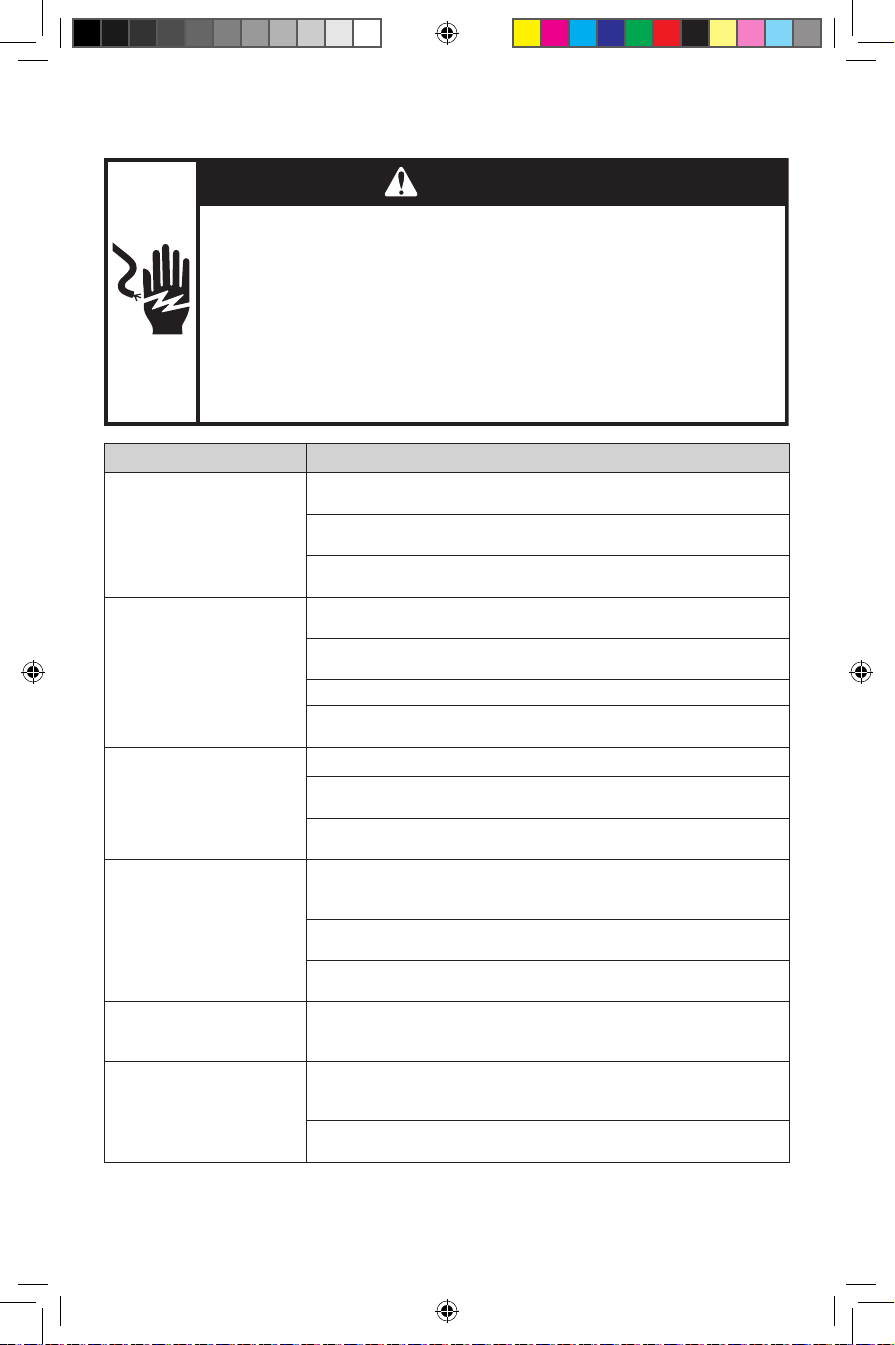
1
Water
Descaling
solution
Fill 250 ml water and 125 ml descaling
solution inside the Water Tank.
NOTE: The clean cycle is designed to
run as per the above mentioned water
and descaling solution volumes.
The cycle cannot be completed with
any less volume than mentioned above.
14
W11331487C_01_EN.indd 14W11331487C_01_EN.indd 14 26-04-2021 13:42:1126-04-2021 13:42:11
2
Phase 1: Place a container (~0.5 L) on the
Drip Tray below the Group Head. Press the
Clean cycle ( ) button for 3 seconds or
until Clean light is solid. Then, press
button to start first phase of decalcification
cycle.
Start/Cancel ( ) will blink fast after the
first phase is complete. Empty the container.
Page 15
ENGLISH
CARE AND CLEANING
3
Phase 2: Place the container (~0.5 L)
below the Steam Wand. Then, press
button.
Start/Cancel ( )
Mode lights will blink fast after the second
phase is complete. Empty the container.
and Water
5
Phase 4: Place the container (~0.5 L) on
the Drip Tray below Group Head. Then,
press button. Clean light and
button light will blink fast after the fourth
and final phase is complete. Empty the
container.
Press button to complete the Clean
cycle. Machine will go back into heating
mode.
4
Phase 3: Place the container (~0.5 L) below
the Steam Wand. Empty, rinse and refill the
Water Tank with fresh water to Max fill line.
Replace the Water Tank. Press button.
Start/Cancel ( ) will blink fast after
the third phase is complete. Empty the
container.
WINTER STORAGE CARE
IMPORTANT: To avoid damage, use and store your Espresso Machine where it will not
freeze. Because some water remains inside the unit, freezing can damage the product.
If storing or moving during freezing weather, purge your Espresso Machine.
To purge the Espresso Machine, ensure Steam Wand is attached and Water Tank is at least half
full.
1. Place a cup under the Steam Wand nozzle.
2. Turn the Espresso Machine On, toggle Mode Button to Steam. Press Start/Cancel ( ).
Once steam exits the Steam Wand for approximately 10 seconds, remove Water Tank and
allow remaining water in the machine to exit through the Steam Wand.
3. Purging cycle will be complete once Espresso Machine stops and the Water mode will
blink.
4. Turn On/Off (icon) button to off. Empty and re-install Water Tank. Then, unplug the
Espresso Machine.
15
W11331487C_01_EN.indd 15W11331487C_01_EN.indd 15 26-04-2021 13:42:1226-04-2021 13:42:12
Page 16
TROUBLESHOOTING GUIDE
WARNING
Electrical Shock Hazard
Plug into an earthed outlet.
Do not remove an earth prong.
Do not use an adapter.
Do not use an extension cord.
Failure to follow these instructions can result in death, re,
or electrical shock.
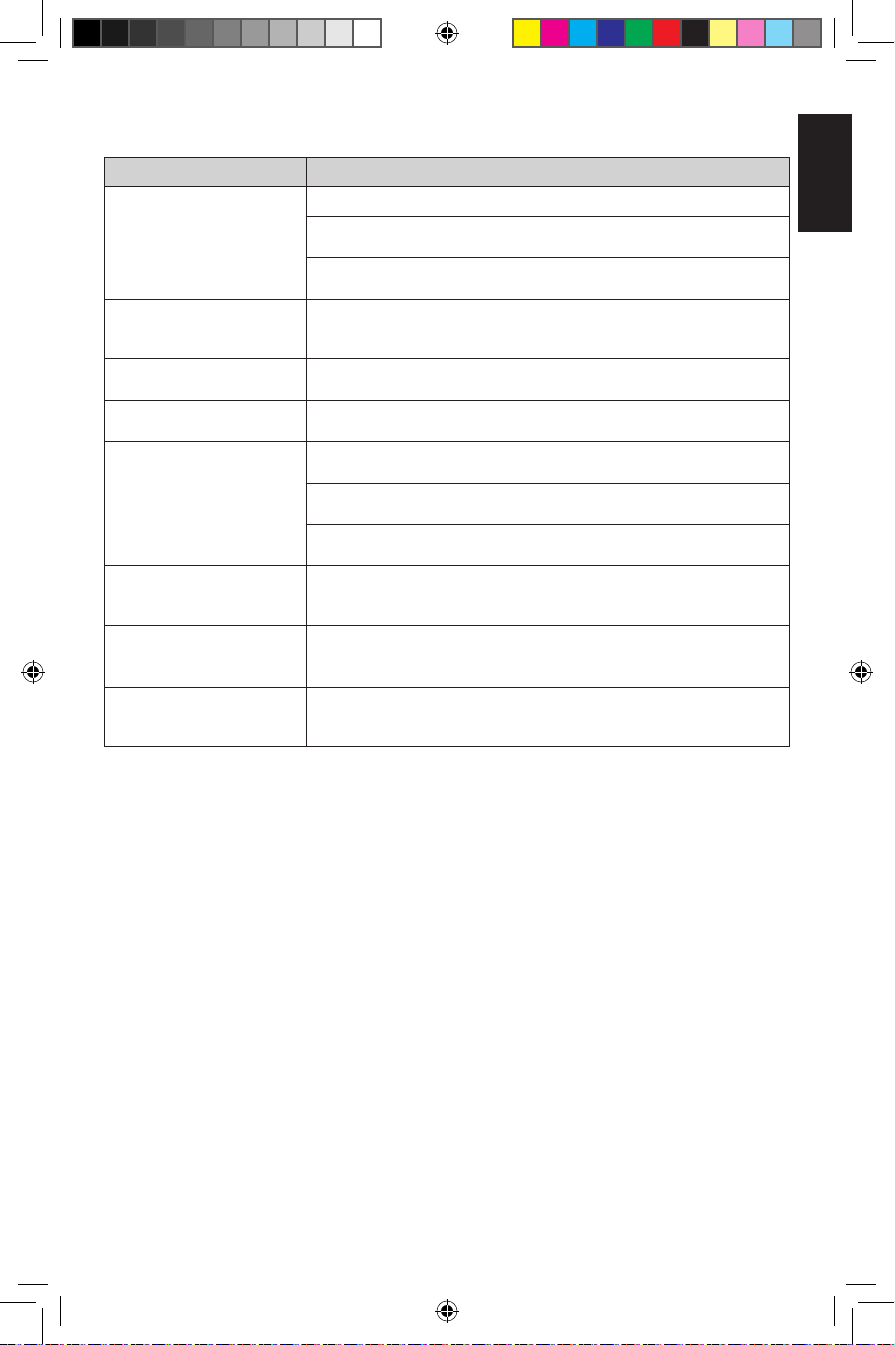
Problem Solution
Check if the Espresso Machine is securely plugged into an
earthed prong outlet.
Espresso Machine will not
start
Espresso flows slowly or
only drips
Espresso flows too quickly
Espresso flows over the
edge of the Portafilter
Steam Wand is not
producing hot water/
steam
Steam/hot water flows
slowly from Steam Wand
Check to see if the Main Power On/Off Switch is turned on.
If you have a circuit breaker box, then make sure the circuit is
closed.
Coffee is ground too finely. Use slightly coarser grind.
Coffee tamped too hard. Use slightly lighter tamp between
15-20 kg or 30-40 lb of force.
Filter basket can be blocked. Use a pin to unblock the hole(s).
Machine might need to be descaled. Refer to the “Descaling the
Espresso Machine” section.
Coffee is ground too coarsely. Use slightly finer grind.
Not sufficient coffee in the filter basket. Increase dose of coffee.
Refer to the “Basket selection chart” section.
Coffee tamped too softly. Use slightly firmer tamp between
15-20 kg or 30-40 lb of force.
Portafilter is not inserted in the Group Head properly. Ensure the
Portafilter is completely inserted and rotated until the handle is
aligned to the lock icon.
There are coffee grounds around the rim of the filter basket.
Swipe excess coffee to ensure proper seal in the Group Head.
Too much coffee in the filter basket. Use lower dose of coffee.
Refer to the “Basket selection chart” section.
Operating temperature has not been reached. Allow the machine
to reach to the operating temperature.
Steam Wand is partially blocked. Remove Steam Wand from
Espresso Machine. Soak in cleaning solution and use a pin to
clear out the hole and rinse with clear water.
Machine might need to be descaled. Refer to the “Descaling the
Espresso Machine” section.
16
W11331487C_01_EN.indd 16W11331487C_01_EN.indd 16 26-04-2021 13:42:1226-04-2021 13:42:12
Page 17
ENGLISH
TROUBLESHOOTING GUIDE
Problem Solution
Coffee is ground too coarsely. Use slightly finer grind.
No Crema is being
produced
Knocking/pumping sound
occurs during espresso,
steam, or hot water cycle
All Mode/Dose lights are
blinking
The Steam light and all
Dose lights are blinking
Water light continuously
blinks
All lights are blinking at
the same time
All lights are continuously
on
If the problem is not due
to one of the above items
Coffee tamped too softly. Use slightly firmer tamp between
15-20 kg or 30-40 lb of force.
Single wall filter basket might have been used with pre-ground
coffee. Please see the “Basket selection chart” section.
The Espresso Machine is going through a normal operation,
therefore no action is required.
Machine is in protection mode to avoid the pump from over
heating. Turn Off the machine for 7.5 minutes.
Machine is in the protection mode to avoid from overheating.
Turn Off the machine for 10 minutes.
Ensure water is in the Water Tank and ensure Water Tank is
properly assembled.
Steam Wand is blocked. Remove it from Espresso Machine and
thoroughly clean it.
Coffee puck is too dense, adjust to larger grind size.
If using a Double wall basket, then clean exit hole with a pin.
Turn off the Espresso Machine and unplug for approximately
10 minutes. Then, plug back in and restart the machine.
If problem persist call service.
If the problem occurs again, unplug the machine for approx.
5 minutes, plug back in and restart the machine and then run
1 complete clean cycle.
See the “Arranging for Service” chapter in the “Terms of
KitchenAid Guarantee (“Guarantee”)” section. Do not return the
Espresso Machine to the retailer as they do not provide service.
17
W11331487C_01_EN.indd 17W11331487C_01_EN.indd 17 26-04-2021 13:42:1226-04-2021 13:42:12
Page 18
TERMS OF KITCHENAID GUARANTEE
("GUARANTEE")
Covering U.K. - Ireland - South Africa - UAE
KitchenAid Europa, Inc., Nijverheidslaan 3, Box 5, 1853 Strombeek-Bever, Belgium
("Guarantor") grants the end-customer, who is a consumer, a Guarantee pursuant to the
following terms.
FOR U.K.:
The Guarantee applies in addition to and does not limit or affect the statutory warranty
rights of the end-customer against the seller of the product. In summary, the Consumer
Rights Act 2015 says products must be as described, fit for purpose and of satisfactory
quality. During the expected lifespan of your product your legal rights entitle you to the
following:
- Up to 30 days: if your product is faulty, then you can get an immediate refund.
- Up to six months: if your product can't be repaired or replaced, then you're
entitled to a full refund, in most cases.
- Up to six years: if your product does not last a reasonable length of time you
may be entitled to some money back.
These rights are subject to certain exceptions. For detailed information please visit the
Citizens Advice website www.adviceguide.org.uk or call 03454 04 05 06.
FOR IRELAND:
The Guarantee applies in addition to and does not limit or affect the statutory warranty
rights of the end-customer against the seller of the product under the European
Communities (Certain Aspects of the Sale of Consumer Goods and Associated Guarantees
Regulations 2003 (S.I. No. 11/2003)) and other enactments governing the sale of consumer
goods.
FOR SOUTH AFRICA:
The Guarantee applies in addition to and does not limit or affect the statutory warranty
rights of the end-customer against the seller of the product. In summary, the Consumer
Protection Act, 2008 says that products must be: (i) reasonably suitable for the purpose
for which they are intended; (ii) in good working order, of good quality and free of any
defects; (iii) useable and durable for a reasonable period of time, having regard to the use
to which they would normally be put and to all the surrounding circumstances; and (iv) in
compliance with any applicable standards or any other public regulations.
During the expected lifespan of your product and where the products are not purchased
online, your legal rights will entitle you to the following:
- You will be entitled to a full refund, if you did not have the opportunity to examine the
product before delivery and if you rejected delivery of the product on the basis that the
type and quality of the product was not as reasonably expected or did not reasonably
conform to the material specifications.
- Within 5 business days after delivery: you may rescind your purchase and request a
refund, if your purchase resulted from direct marketing.
- Within 10 business days after delivery: you will be entitled to a full refund, if it is found
that the product was unsuitable for a particular purpose specifically communicated to you
by the Guarantor.
- Within 15 business days after delivery: you will be entitled to a refund if: (i) the product
was not delivered to you; or (ii) if you returned the product to the Guarantor.
- Within 6 months after delivery: you will be entitled to a refund or a replacement product,
if the product is defective or fails to operate in terms of its specifications.
18
W11331487C_01_EN.indd 18W11331487C_01_EN.indd 18 26-04-2021 13:42:1226-04-2021 13:42:12
Page 19
ENGLISH
TERMS OF KITCHENAID GUARANTEE
("GUARANTEE")
Where you have purchased a product online your legal rights will be governed by the
Electronic Communications and Transactions Act, 2002 and you will be entitled to the
following:
- Within 7 days after conclusion of the transaction or after delivery: you may cancel your
purchase without reason and without penalty.
- Within 30 days of the date of cancellation of the transaction: you will be entitled to
receive a refund, if you have already made payment.
- You will only be liable for the direct costs of returning the product to the Guarantor.
FOR UAE:
The Guarantee applies in addition to and does not limit or affect the statutory warranty
rights of the end-customer against the seller of the product.
1) SCOPE AND TERMS OF THE GUARANTEE
a) The Guarantor grants the Guarantee for the products mentioned under Section
1.b) which a consumer has purchased from a seller or a company of the KitchenAid-
Group within the following countries: U.K., Ireland, or South Africa, or the United Arab
Emirates(UAE).
b) The Guarantee period depends on the purchased product and is as follows:
5KES6403 Two years full guarantee from date of purchase.
5KES6503 Five years full guarantee from date of purchase.
c) The Guarantee period commences on the date of purchase, i.e. the date on which a
consumer purchased the product from a dealer or a company of the KitchenAid-Group.
d) The Guarantee covers the defect-free nature of the product.
e) The Guarantor shall provide the consumer with the following services under this
Guarantee, at the choice of the Guarantor, if a defect occurs during the Guarantee
period:
- Repair of the defective product or product part, or
- Replacement of the defective product or product part. If a product is no longer
available, the Guarantor is entitled to exchange the product for a product of equal or
higher value.
f) If the consumer wishes to make a claim under the Guarantee, the consumer has to
contact the country specific KitchenAid service centres or the Guarantor directly at
KitchenAid Europa, Inc. Nijverheidslaan 3, Box 5, 1853 Strombeek-Bever, Belgium;
Email-Address U.K.: [email protected]
Email-Address IRELAND: [email protected]
Toll Free Number U.K. & IRELAND: 00 800 381 040 26
FOR SOUTH-AFRICA:
Our local KitchenAid Distributor:
KitchenAid Africa
PO Box 52102
V&A Waterfront
Cape Town
8002
19
W11331487C_01_EN.indd 19W11331487C_01_EN.indd 19 26-04-2021 13:42:1326-04-2021 13:42:13
Page 20
TERMS OF KITCHENAID GUARANTEE
("GUARANTEE")
Contact our distributor:
Telephone: +27 21 555 0700
You can contact our Customer Service Centre for Small Domestic Appliances
from 8.30 am to 1.00pm and from 1.30 pm to 5.00 pm or write to us at the following
address: [email protected]
FOR UAE:
AL GHANDI ELECTRONICS.
POST BOX NO. 9098,
DUBAI, UNITED ARAB EMIRATES
Toll free number: +971 4 2570007
g) The costs of repair, including spare parts, and the postage costs (if applicable) for
the delivery of a defect-free product or product part shall be borne by the Guarantor.
The Guarantor shall also bear the postage costs for returning the defective product or
product part if the Guarantor or the country specific KitchenAid customer service centre
requested the return of the defective product or product part. However, the consumer
shall bear the costs of appropriate packaging for the return of the defective product or
product part.
h) To be able to make a claim under the Guarantee, the consumer must present the
receipt or invoice of the purchase of the product.
2) LIMITATIONS OF THE GUARANTEE
a) The Guarantee applies only to products used for private purposes and not for
professional or commercial purposes.
b) The Guarantee does not apply in the case of normal wear and tear, improper or
abusive use, failure to follow the instructions for use, use of the product at the wrong
electrical voltage, installation and operation in violation of the applicable electrical
regulations, and use of force (e.g. blows).
c) The Guarantee does not apply if the product has been modified or converted, e.g.
conversions from 120 V products to 220-240 V products.
d) The provision of Guarantee services does not extend the Guarantee period, nor
does it initiate the commencement of a new Guarantee period. The Guarantee period
for installed spare parts ends with the Guarantee period for the entire product.
e) FOR SOUTH-AFRICA & UAE ONLY:
Further or other claims, in particular claims for damages, are excluded unless liability
is mandatory by law.
After expiry of the Guarantee period or for products for which the Guarantee does not
apply, the KitchenAid customer service centres are still available to the end-customer for
questions and information.
Further information is also available on our website:
- For U.K. & Ireland www.kitchenaid.eu
- For South-Africa: www.kitchenaidafrica.com
- For UAE: www.KitchenAid-MEA.com
PRODUCT REGISTRATION
Register your new KitchenAid appliance now: http://www.kitchenaid.eu/register
©2021 All rights reserved.
20
W11331487C_01_EN.indd 20W11331487C_01_EN.indd 20 26-04-2021 13:42:1326-04-2021 13:42:13
 Loading...